
Chapter 1. Developer Portal
By the end of this section you should be familiar with the Developer Portal, including its structure, use, and functionality.
You can customize the look and feel of the entire Developer Portal to match your own branding. You have complete control over every element of the portal, so you can make it as easy as possible for developers to learn how to use your API. A successful API Developer Portal will help your developers turn concepts into working apps in no time at all.
1.1. Overview of the Developer Portal
The Developer Portal consists of a few elements:
- Left menu with access to Content, Drafts, Redirects, Groups, Feature Visibility, ActiveDocs, Legal Terms, Settings and Liquid documentation.
- The main area containing details of the sections above.
1.2. Content
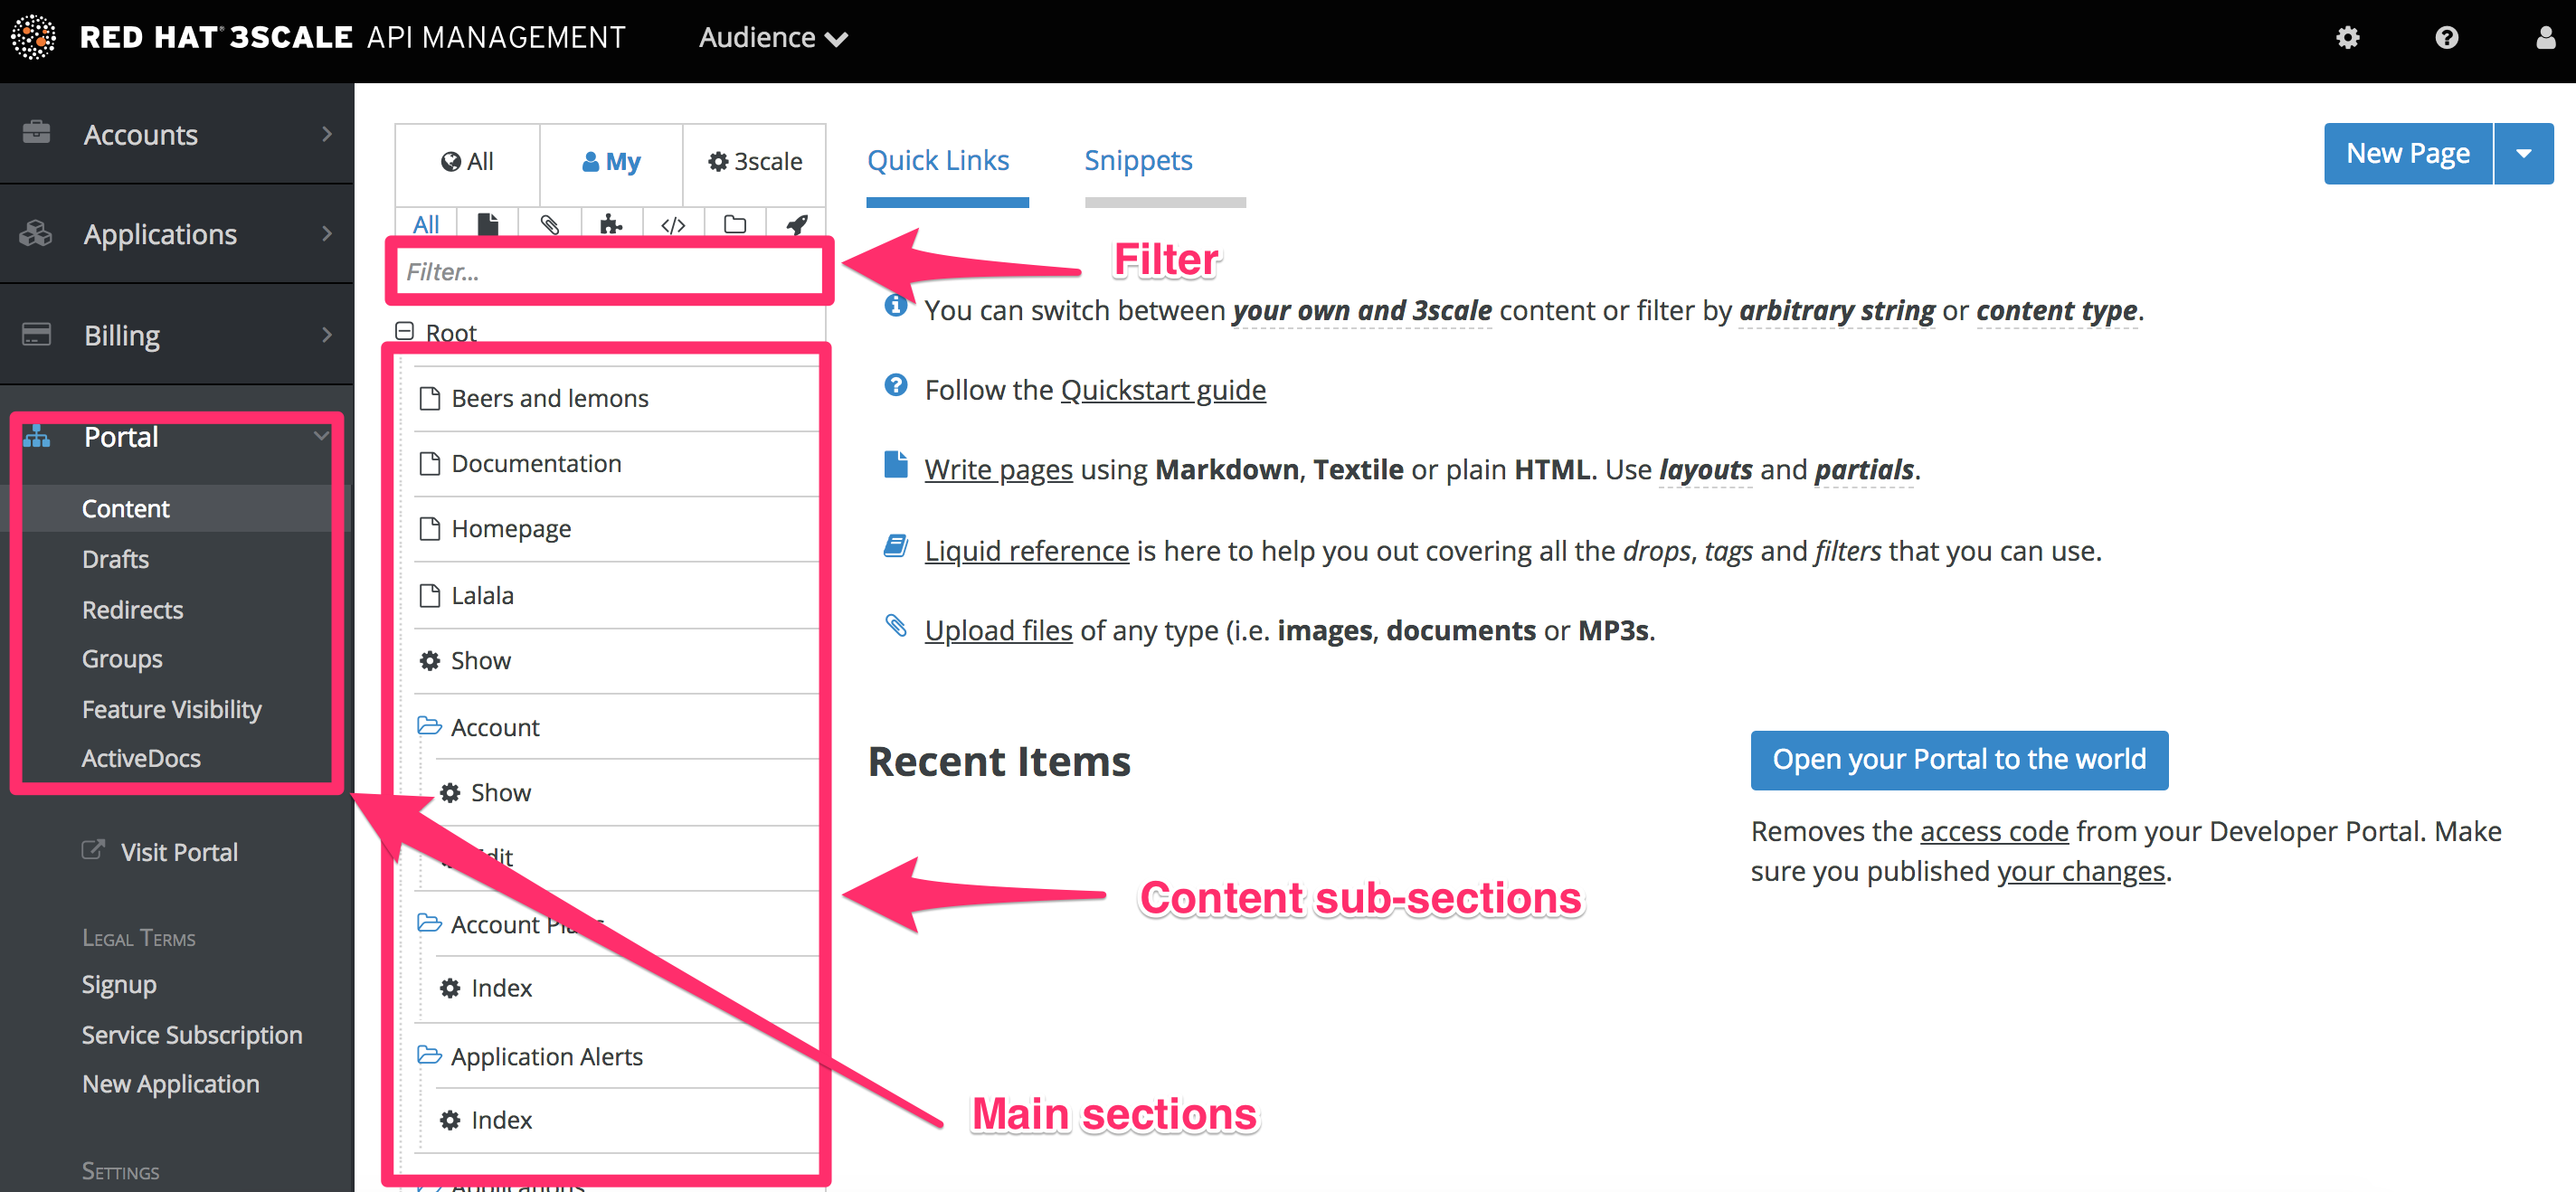
This is the most important part of your view of the Developer Portal system. The content section shows the site structure and hierarchy and provides editing functionality within the same page. This means you can manage the site structure, the pages, and other assets stored in it. The portal’s hierarchy is displayed in the form of a directory tree.
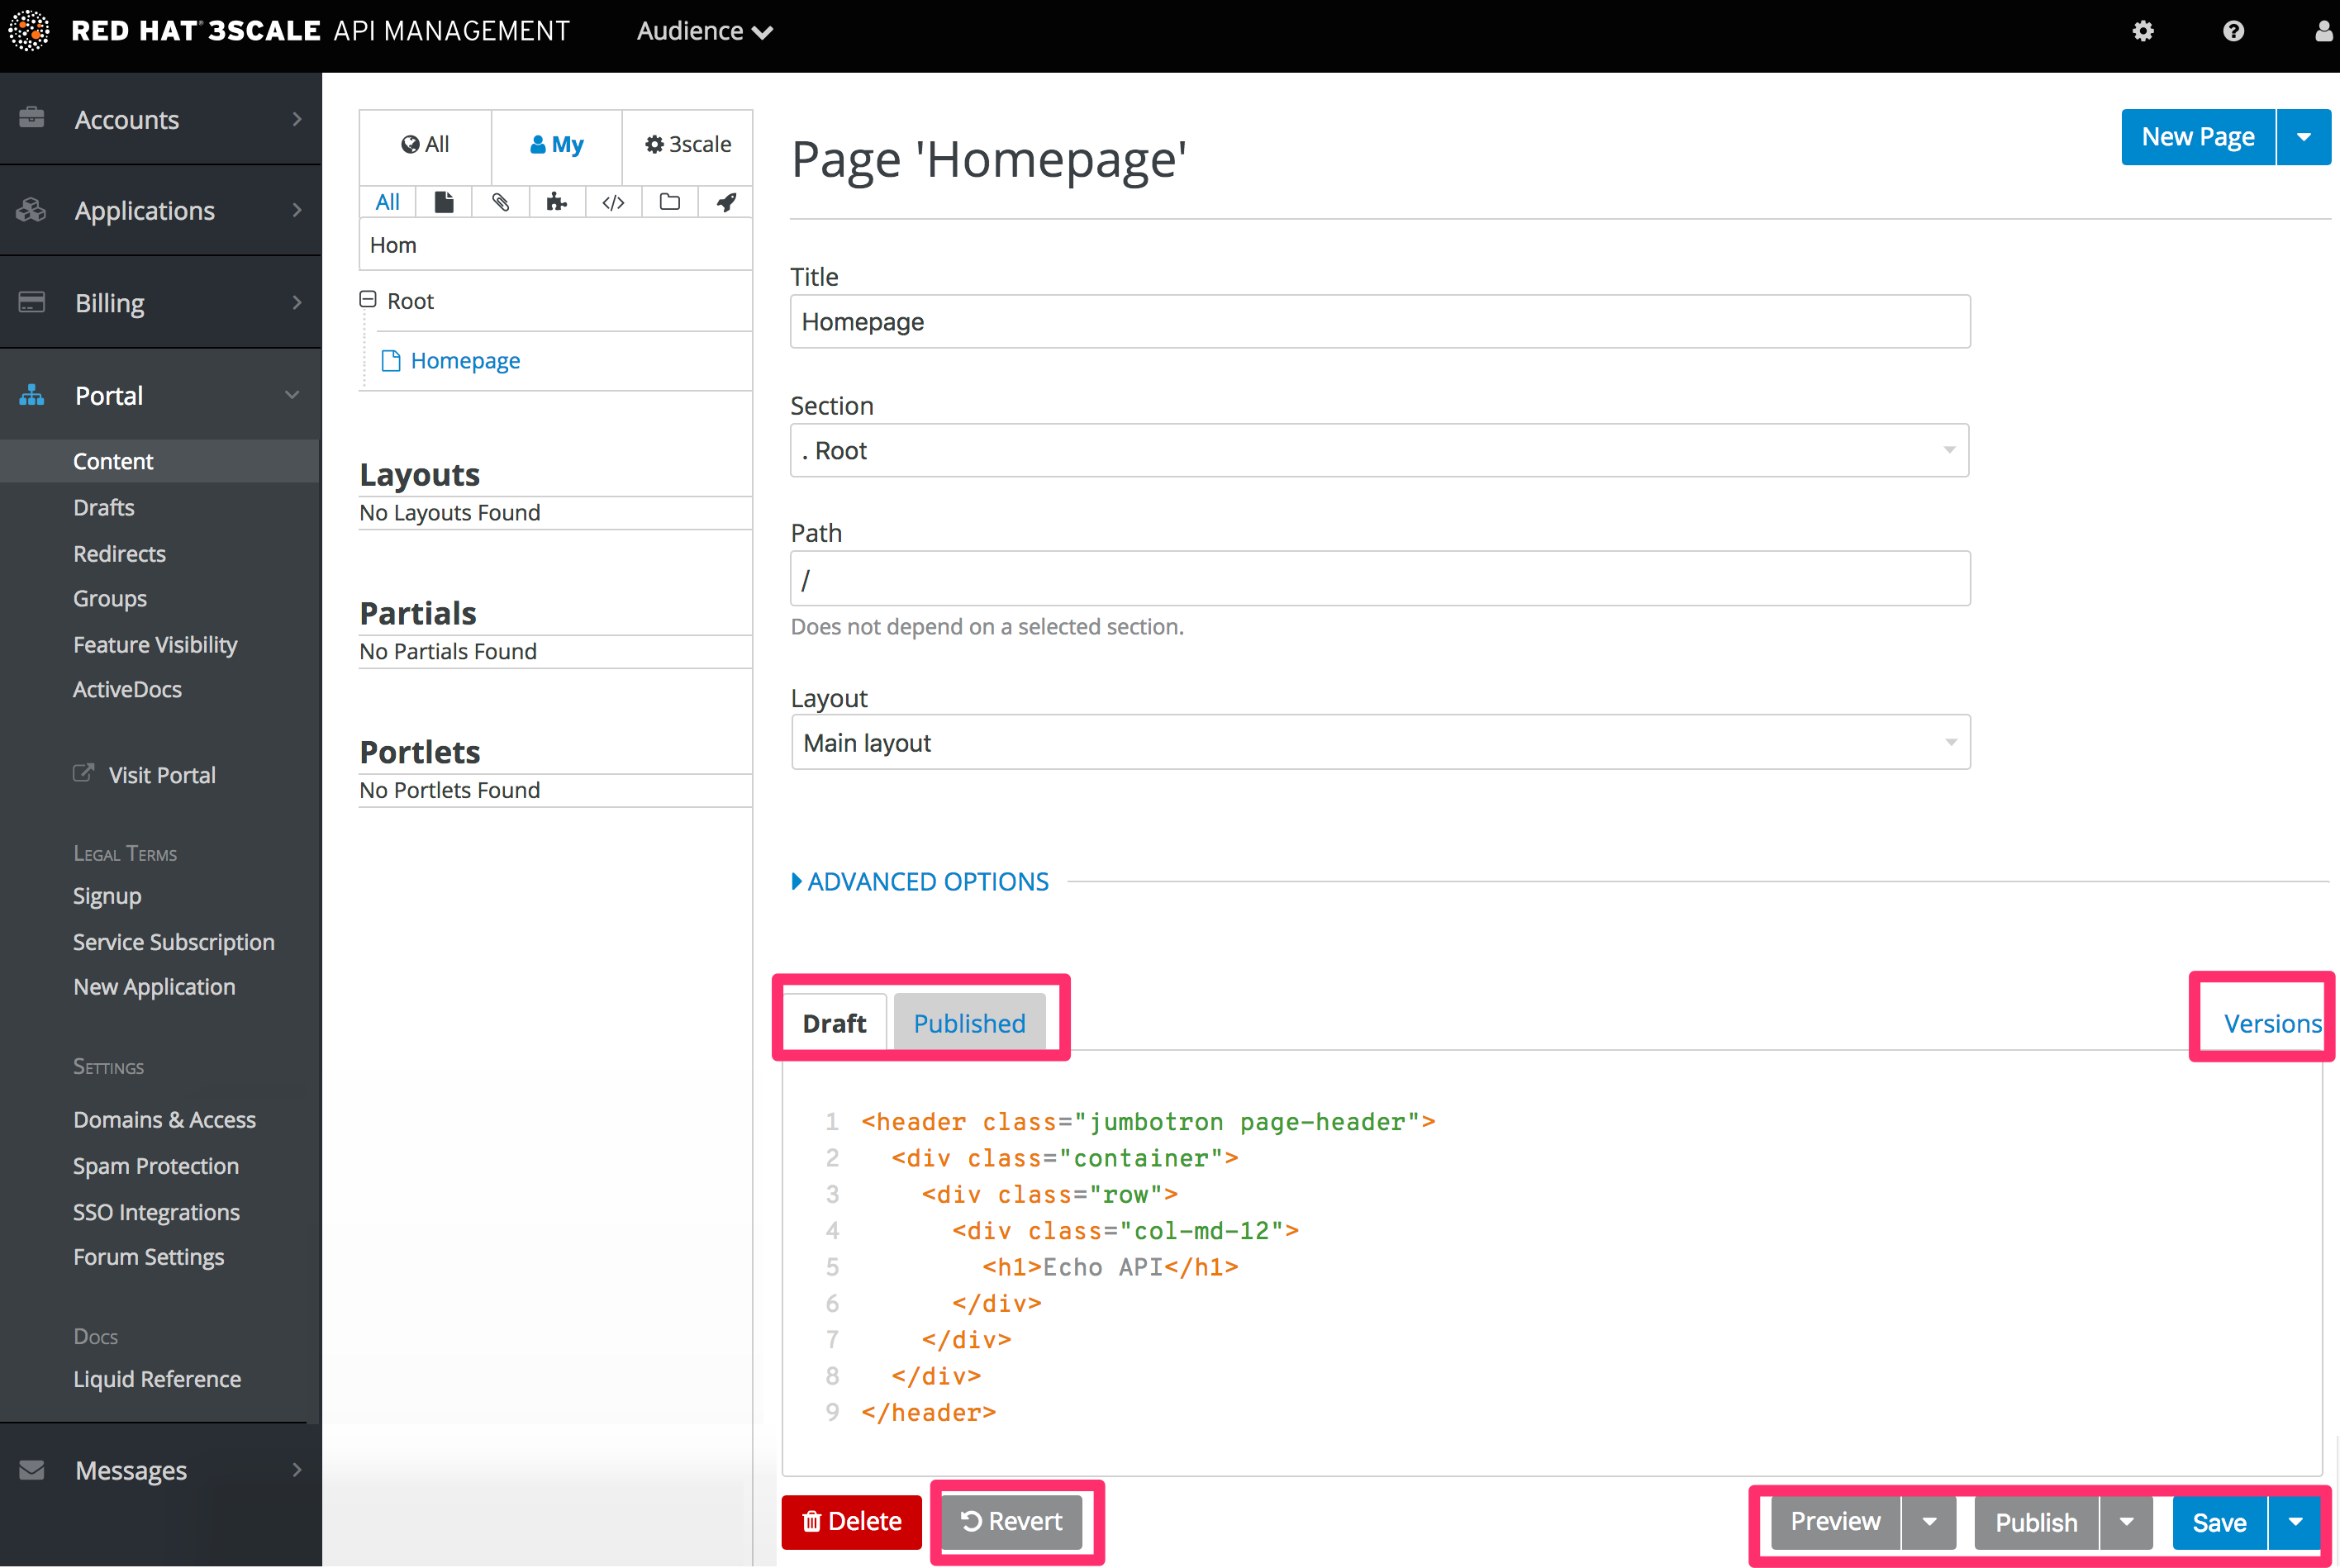
The image above shows a sample view of one of the pages inside the contents section. As you can see, it displays all the files (pages, images, stylesheets, JavaScript, etc.) preserving the site’s path hierarchy. As before, sections are functionally equal to directories.
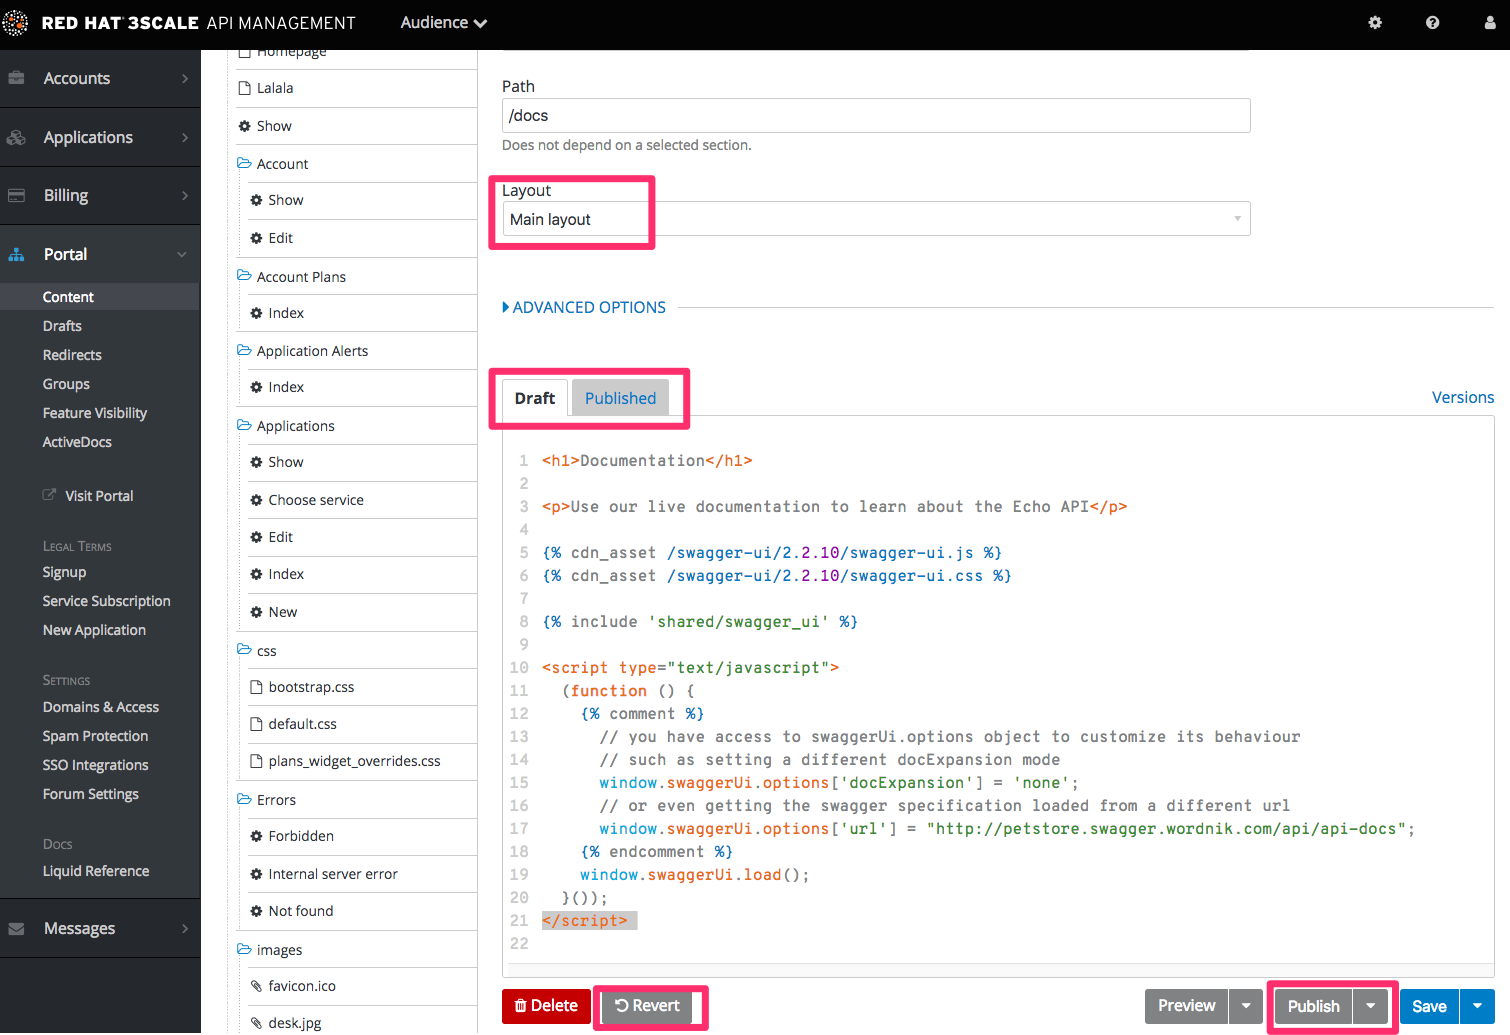
On the right-hand side, you can see the edit page view. Here you can see the page name (which also indicates whether it’s a standard or built-in page) and a button to add a new element to the content (page, layout, partial, section, file, or portlet). Below, you can choose which layout the page will use and toggle the liquid tags functionality. The following part is the text editor, which supports code highlighting, tabulations, line numeration, and much more. The tab buttons Draft and Published switch between the draft and published versions of the edited document. The following two icons list the document’s versions and open a pop-up edit window, respectively.
To edit page content, simply choose the desired layout, set a few additional options such as content type and URL path, and then input the code in HTML, Markdown, or Textile.
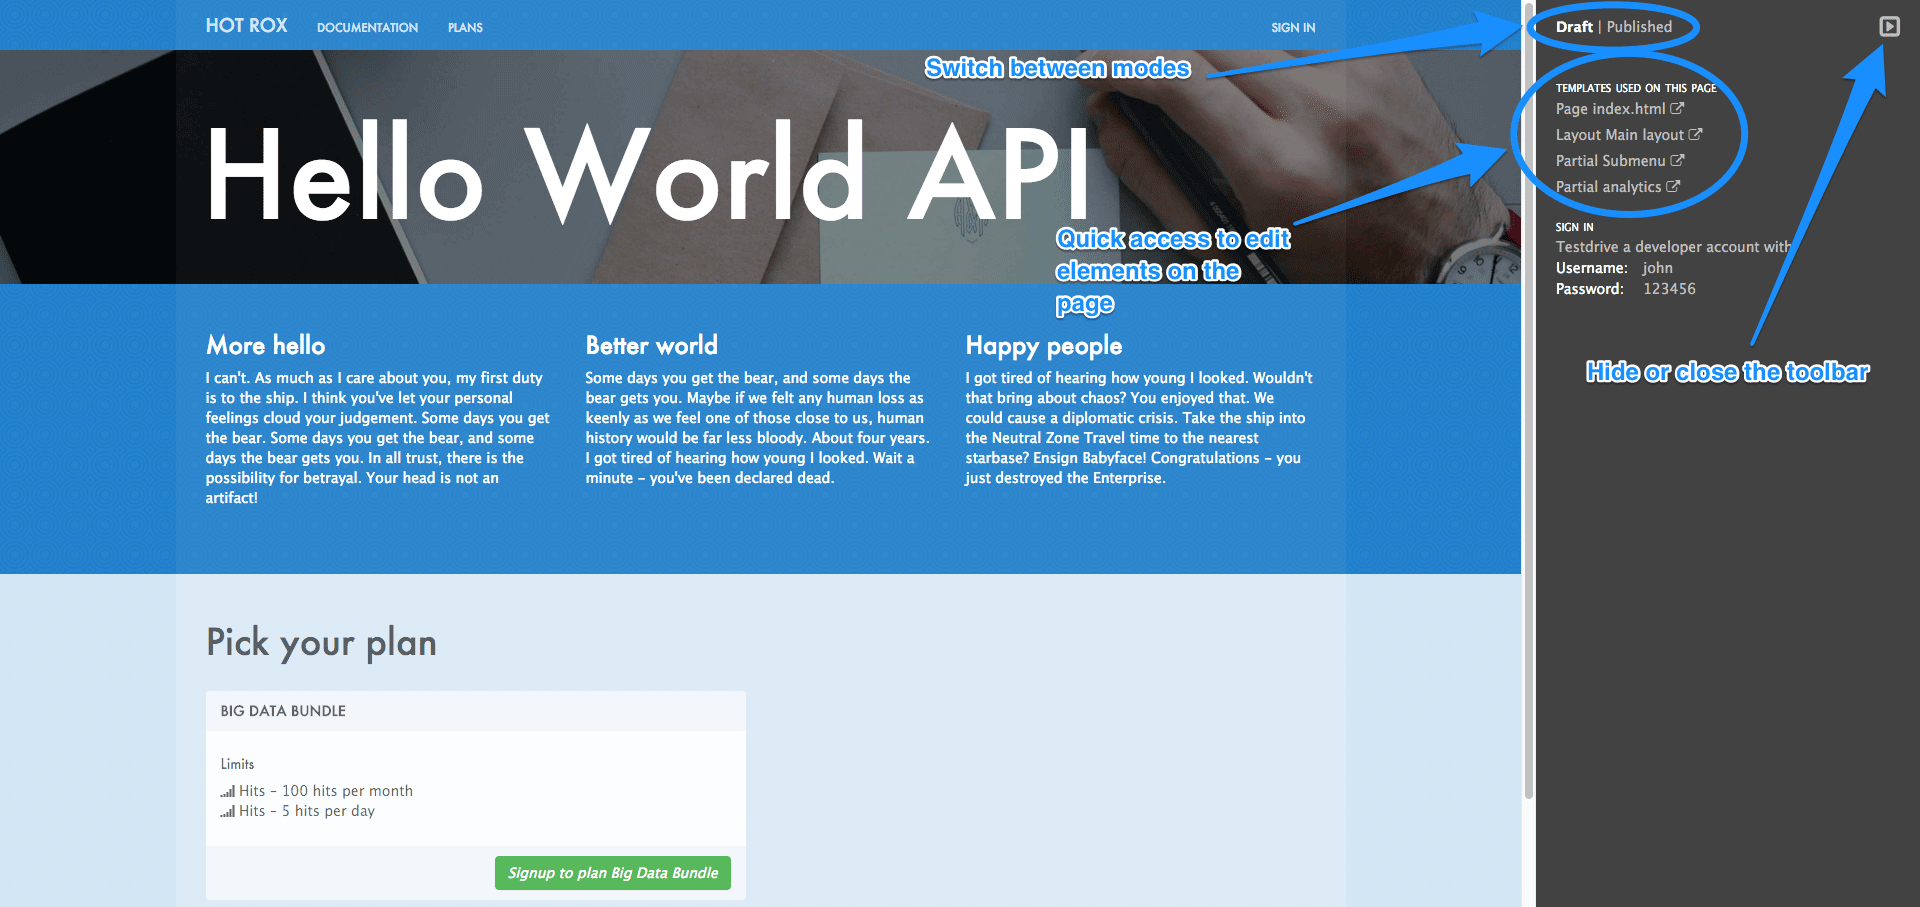
Another important feature in this view is the Preview button. You can choose whether you want to preview the published or draft version of the page. Clicking the button redirects you to Developer Portal mode, where you can see the live (or draft) rendered version of the page with a dark grey vertical bar on the right-hand side. This bar contains links to the page, layout, and partials edit views of the Developer Portal. It allows you to swtich between draft and published views.
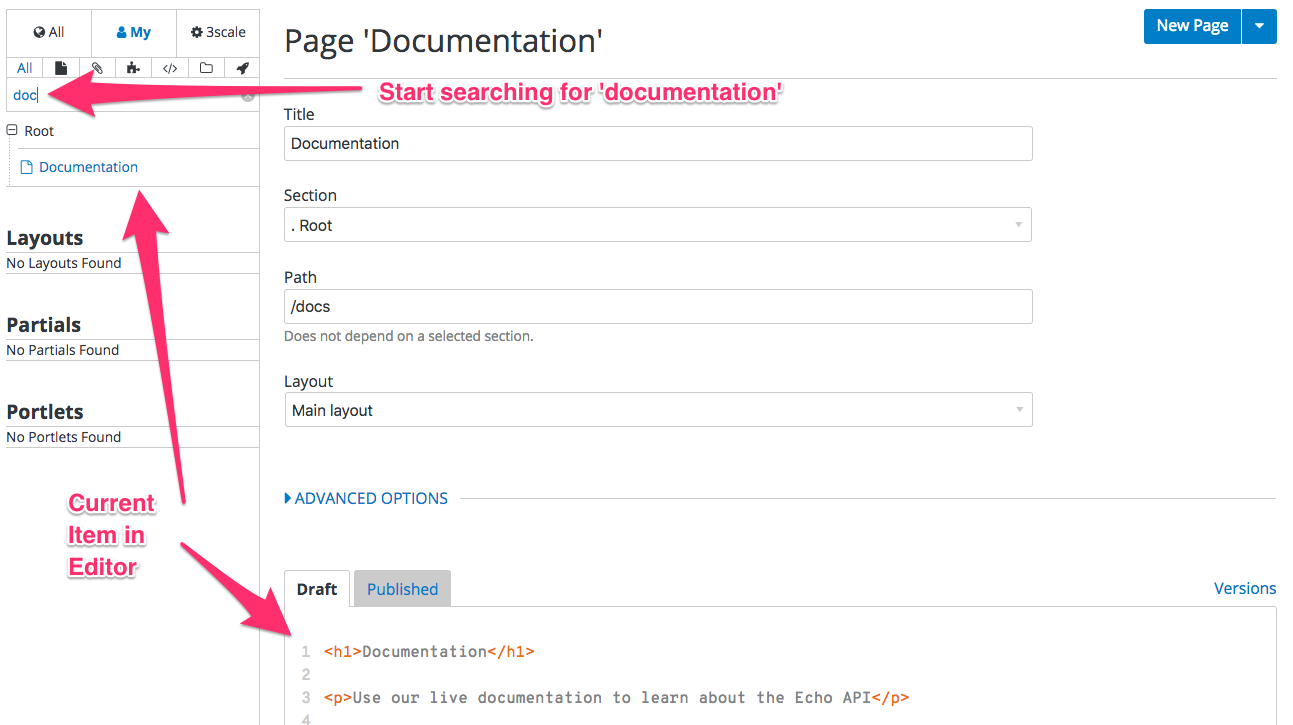
There’s also a filter feature, which serves not only as a search field but allows you to limit the elements shown to only stylesheets, JavaScript, or any other types specified.
1.3. Layouts and partials
The layouts and partials sections manage the templates and the reusable parts of the page. Their functionality is similar to that of the content section.
The layouts section consists of definitions of the templates used by pages. Layout is the main structure of the page, and the contents of this template will be rendered on every page that uses it. The partials, portlets, and the actual content of the pages reside inside the templates.
Partials are the reusable parts of code, which can be applied to many places on different pages. For example, the footer is the same on every layout, and the sidebar is the same on a few pages with different layouts.
To include a partial in a layout, partial, email template or portlet, use the following command:
{% include "partial_name" %}As with the other parts of the portal, layouts and partials also have draft and published states and offer a full version history, with the following features:
- Text editor for the layout template.
- Save draft, publish current version, and revert to the last published state.
- Switch the text editor between the draft and published versions, list the version history, and launch the pop-up editor.
For a complete guide of liquid tags, check the Liquid Reference guide.
1.4. Portlets
The last subsection of the content are the portlets. They give you some more advanced functionality without needing any advanced coding. Our Developer Portal provides three different portlets:
- External RSS feed - fetches the RSS feed from a given source
- Table of contents - generates the links list for the pages in a given section
- Latest forum posts - generates the list of the n latest forum posts
While creating your desired portlet, you have to input the requested data in the setup page such as title, system name, and the URL feed for the external RSS feed portlet.
1.4.1. Note
The editor will come pre-filled with standard portlet code using some custom liquid tags. You can try editing the generated structure, but be careful. When in doubt, you can refer to the Liquid reference chapter.
1.5. Redirects and changes
The last elements of the Developer Portal are the redirects and changes sections. They are much less complicated than the content section but are still important and provide some custom functionality.
Redirects help you set up redirects from one portal URL to another. This is useful, for example, when you deprecate an old page and don’t want to change all the links. Redirects cannot be used for built-in Developer Portal pages – they are only for pages created by you.
Last but not least is the changes section. It contains a list of all the newly edited and unpublished pages and gives you the choice to publish them individually or all at once.
1.6. Updating local assets
This section provides details on updating local assets for the Developer Portal, based on these points:
-
From 3scale 2.8, all new Developer Portals are created using the
cdn_assettag. -
For existing instances of the Developer Portal, you need to update your assets by using the
cdn_assettag. With this feature, there is not dependence on assets that require downloading from other websites, because all external assets were moved from Content Delivery Networks (CDNs) to our codebase.
Hence, to update an existing Developer Portal instance and use the new local assets, follow these instructions:
- Go to Audience > Developer Portal > Content
From the menu list located on the left side of the window, select Main layout.

Replace
{{ '//netdna.bootstrapcdn.com/font-awesome/4.3.0/css/font-awesome.css' | stylesheet_link_tag }}with
{% cdn_asset /font-awesome/4.3.0/css/font-awesome.css %}Replace
{{ '//ajax.googleapis.com/ajax/libs/jquery/1.7.1/jquery.min.js' | javascript_include_tag }}with
{% cdn_asset /jquery/1.7.1/jquery.min.js %}- Click Publish, and then Save.
- From the menu list located on the left side of the window, select Partials.
Choose stats/chart.
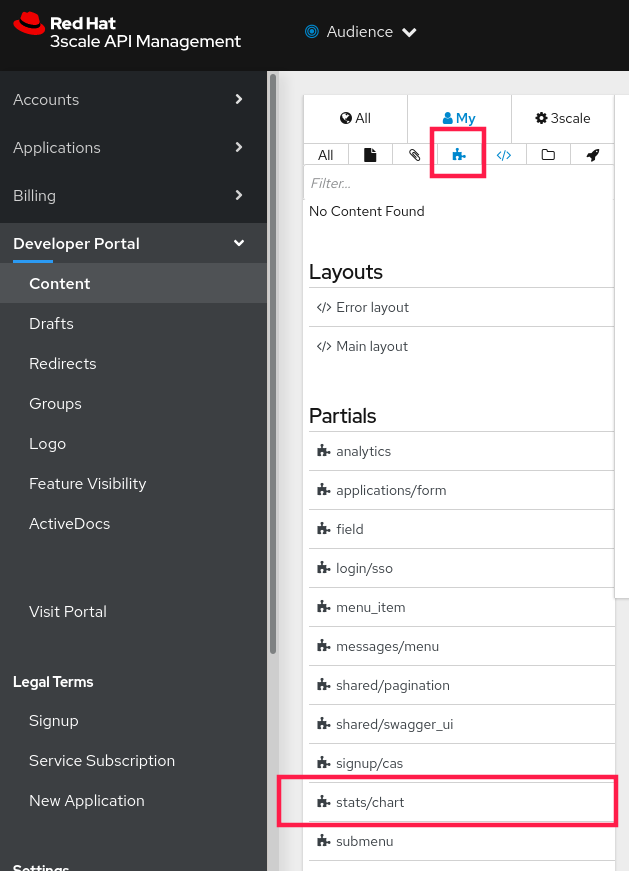
Replace
{{ '//ajax.googleapis.com/ajax/libs/jqueryui/1.11.4/themes/ui-lightness/jquery-ui.css' | stylesheet_link_tag }}with
{% cdn_asset /jquery-ui/1.11.4/jquery-ui.css %}- Click Publish, and then Save.
If you have created other instance files based on the previous ones, such as Main Layout and stats/chart, you will need to update them too. For more information, see the documentation for Liquid tags in porta.