
Chapter 7. Multitenancy
Red Hat 3scale API Management allows multiple independent instances of 3scale accounts to exist on a single on-premises deployment. Accounts operate independently from one another, and cannot share information among themselves.
7.1. Master Admin Portal
A master administrator monitors and manages the Red Hat 3scale API Management accounts through the Master Admin Portal and API endpoints. Similar to the standard Admin Portal, the Master Admin Portal contains information about all accounts in a deployment and allows for administration of accounts and users through a unique account page.
For details on account administrator operations, refer to the Account settings guide.
7.1.1. Accessing the Master Admin Portal
To access the Master Admin Portal, you need to use the credentials and URL specifically defined for the Master Admin Portal during the on-premises installation process.
The Master Admin Portal URL consists of the MASTER_NAME (master by default in the template) and the WILDCARD_DOMAIN:
<MASTER_NAME>.<WILDCARD_DOMAIN>You can identify the Master Admin Portal by the Master flag.

7.1.2. Adding an account through the Master Admin Portal
To add an account through the Master Admin Portal, follow these steps:
- Log in to the Master Admin Portal.
- Navigate to Accounts.
- Click Create.
Indicate the required information for the user:
- Username
- Password
- Password confirmation
Indicate the required information for the organization:
- Organization/Group Name
- Click Create.
After these steps, Red Hat 3scale creates an account subdomain for your account based on the Organization/Group Name field. Additionally, you can see a page containing the details of the account you created.
7.1.3. Creating a single gateway with the Master Admin Portal
With the Master Admin Portal, you can create a single gateway for all tenants by configuring the THREESCALE_PORTAL_ENDPOINT environment variable. This is similar to the Hosted APIcast in the Hosted 3scale (SaaS), where the default apicast-staging and apicast-production gateways deployed with the OpenShift template are configured in this way.
To create a single gateway with the Master Admin Portal, follow these steps:
-
Fetch the value of ACCESS_TOKEN out of the
system-master-apicastsecret in your 3scale project. Alternatively, you can create new access tokens in the Master Admin Portal. Use the following command when you deploy APIcast:
THREESCALE_PORTAL_ENDPOINT="https://<ACCESS_TOKEN>@<public url to master admin portal>/master/api/proxy/configs"
-
The end of the url looks like
/master/api/proxy/configs, this is because master holds theconfigsin a different endpoint compared to the default/admin/api/services.json.
-
The end of the url looks like
7.2. Managing accounts
You can manage accounts through the Master Admin Portal or through API calls.
7.2.1. Managing accounts through the Master Admin Portal
To manage the accounts through the Master Admin Portal, you need to do the following:
- Log in to the Master Admin Portal.
- Navigate to the Accounts page.
- Select the group or organization you want to manage.
On the Accounts page from a Master Admin Portal, you can perform administrative actions, such as impersonating an admin tenant account or suspend a tenant account. You can also manage the following account attributes:
- Applications
- Users
- Invitations
- Group Memberships
- Organization/Group Name
7.2.1.1. Additional information
- For more information about tenant accounts, see the 3scale Glossary.
7.2.2. Managing accounts through API calls
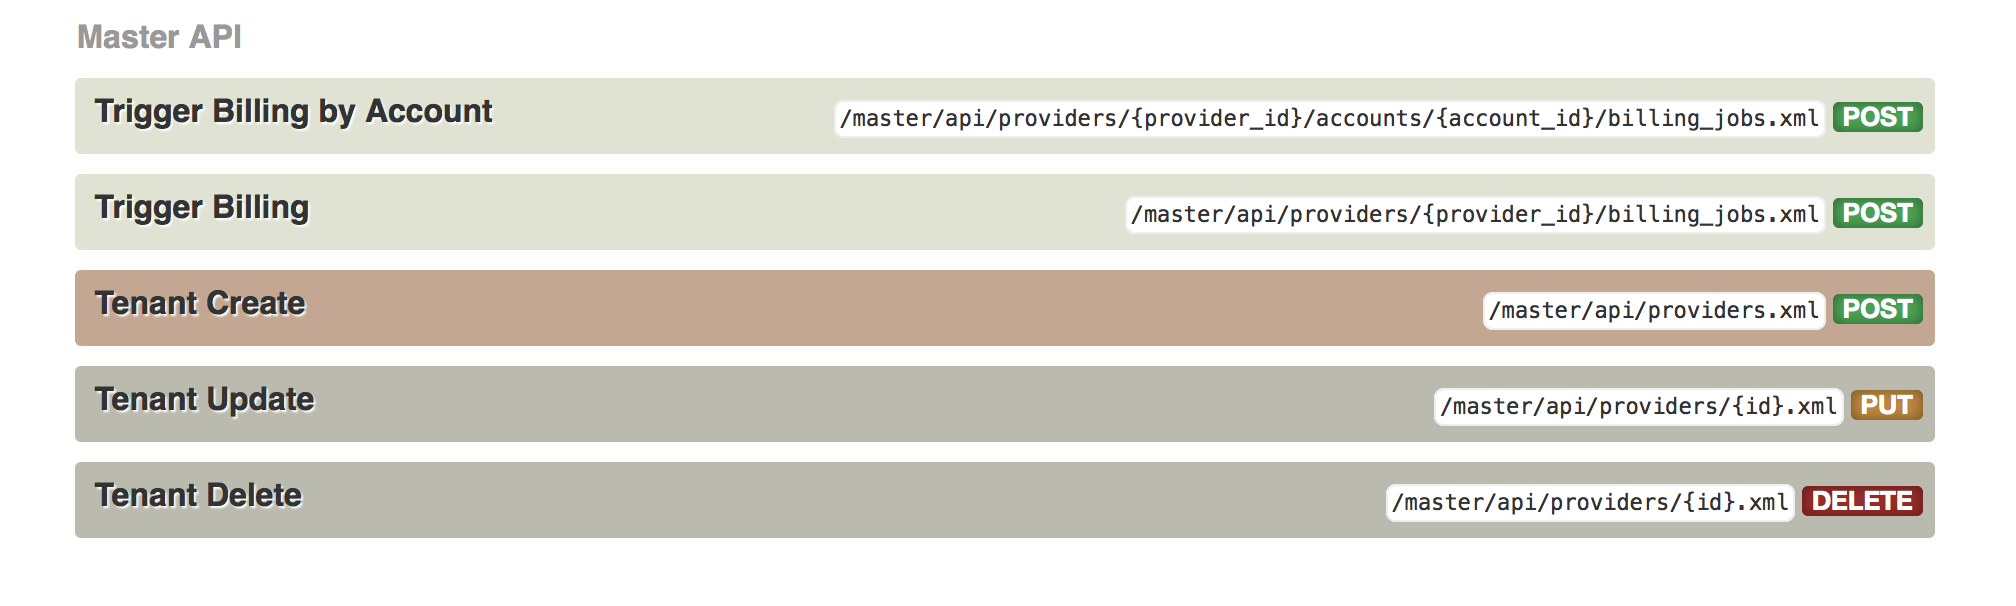
You can manage accounts through the Master Admin API calls. For information on these calls, refer to the Master API section, by clicking the question mark (?) icon located in the upper-right corner of the Master Admin Portal, and then choosing 3scale API Docs.
7.3. Understanding multitenancy subdomains
As a result of multiple accounts existing under the same OpenShift cluster domain, individual account names prepend the OpenShift cluster domain name as subdomains. For example, the route for an account named user on a cluster with a domain of example.com appears as:
user.example.com
A standard multitenant deployment will include:
- A master admin user
A master admin portal route, defined by the
MASTER_NAMEparameter:<MASTER_NAME>.<WILDCARD_DOMAIN>
- An account admin user
An account admin portal route, defined by the
TENANT_NAMEparameter:<TENANT_NAME>-admin.<WILDCARD_DOMAIN>
A developer portal route for the account:
<TENANT_NAME>.<WILDCARD_DOMAIN>
Routes for the production and staging built-in APIcast gateway:
<API_NAME>-<TENANT_NAME>-apicast-staging.<WILDCARD_DOMAIN>
<API_NAME>-<TENANT_NAME>-apicast-production.<WILDCARD_DOMAIN>
This example illustrates the output users and routes of a standard multitenant deployment of 3scale:
----
--> Deploying template "3scale-project/3scale-api-management" for "amp.yml" to project project
3scale API Management
---------
3scale API Management main system
     Login on https://user-admin.3scale-project.example.com as admin/xXxXyz123
     ...
     * With parameters:
      * ADMIN_PASSWORD=xXxXyz123 # generated
      * ADMIN_USERNAME=admin
      * TENANT_NAME=user
      ...
      * MASTER_NAME=master
      * MASTER_USER=master
      * MASTER_PASSWORD=xXxXyz123 # generated
      ...
--> Success
    Access your application via route 'user-admin.3scale-project.example.com'
    Access your application via route 'master-admin.3scale-project.example.com'
    Access your application via route 'backend-user.3scale-project.example.com'
    Access your application via route 'user.3scale-project.example.com'
    Access your application via route 'api-user-apicast-staging.3scale-project.example.com'
    Access your application via route 'api-user-apicast-production.3scale-project.example.com'
    Access your application via route 'apicast-wildcard.3scale-project.example.com'
    ...
----
Additional accounts added by the master admin will be be assigned a subdomain based on their names.
7.4. Deleting tenant accounts
7.4.1. Deleting an account via the Admin Portal
With this procedure, accounts are scheduled for deletion and will be deleted after 15 days. During the time it is scheduled for deletion:
- Users cannot log in to the account.
- The account can not be edited; but the master can resume the account to the approved status.
Additionally, the domains of the tenant (admin domain and developer portal) are not available, similar to a real deletion.
Prerequisites:
- Log in to your master admin account.
Procedure
- To see the list of accounts, navigate to Accounts.
- Click the account you want to delete.
- Click Edit, next to the account’s name.
- In the accounts details page, click the Delete icon.
- Confirm the deletion.
7.4.2. Deleting a tenant via the console
If you want to delete the account with an immediate effect, you can do so via the console:
Open the console with these commands:
oc rsh -c system-master "$(oc get pods --selector deploymentconfig=system-app -o name)"
bundle exec rails console
Delete immediately with these lines:
tenant = Account.find(PROVIDER_ID)
tenant.schedule_for_deletion!
DeleteAccountHierarchyWorker.perform_later(tenant)
This is how each line works:
-
Line 1: finds the account and saves it in the variable
tenant. - Line 2: schedules the account for deletion. This is only necessary if you have not scheduled the deletion through the Admin Portal.
- Line 3: deletes the tenant in a background process only if you have scheduled the account for deletion or it is suspended. Deletion will not proceed if the account is in approved status.
-
Line 1: finds the account and saves it in the variable
7.5. Resuming tenant accounts
Resuming a tenant account implies restoring an account scheduled for deletion. You can resume a tenant account up to 15 days after you have scheduled it for deletion.
After resuming an account:
- All previous apps exist.
- All historical stats remain.
- All tokens that should be valid are valid again.
- Apps start authorizing again.
Prerequisites:
- Log in to your master admin account.
Procedure
- To see the list of accounts, navigate to Accounts.
- Click the account you want to resume.
- Under the account details, click Resume.
- Click Ok to confirm you want to resume the account.