
Installing 3scale
Install and configure 3scale API Management.
Abstract
Preface
This guide will help you to install and configure 3scale
Chapter 1. Setting up your 3scale system image with an Oracle Database
This section explains how a Red Hat 3scale API Management administrator sets up the 3scale system image with an Oracle Database. By default, 3scale has a component called system that stores configuration data in a MySQL database. You can override the default database and store your information in an external Oracle Database. Follow the steps in this chapter to build a custom system container image with your own Oracle Database client binaries and deploy 3scale to OpenShift.
Prerequisites
A supported version of the following Oracle software components:
- Oracle Instant Client Package: Basic or Basic Light
- Oracle Instant Client Package: SDK
- Oracle Instant Client Package: ODBC
Example packages
- instantclient-basiclite-linux.x64-12.2.0.1.0.zip or instantclient-basic-linux.x64-12.2.0.1.0.zip
- instantclient-sdk-linux.x64-12.2.0.1.0.zip
- instantclient-odbc-linux.x64-12.2.0.1.0-2.zip
To set up your 3scale system image with and Oracle Database, perform the steps outlined in the following sections:
1.1. Preparing the Oracle Database
This section provides steps for preparing your Oracle Database.
Prerequisites
- A supported version of Oracle Database accessible from your OpenShift cluster
- Access to the Oracle Database system user for installation procedures
-
The 3scale 2.5
amp.ymltemplate
Procedure
Create a new database.
The following settings are required for the Oracle Database to work with 3scale:
ALTER SYSTEM SET max_string_size=extended SCOPE=SPFILE;
ALTER SYSTEM SET compatible='12.2.0.1' SCOPE=SPFILE;
Collect the database details.
Get the following information that will be needed for 3scale configuration:
- Oracle Database URL
- Oracle Database service name
Oracle Database system password
The
DATABASE_URLparameter must follow this format:oracle-enhanced://${user}:${password}@${host}:${port}/${database}`
Example
DATABASE_URL="oracle-enhanced://user:password@my-oracle-database.com:1521/threescalepdb"
Additional resources
For information on creating a new database in Oracle Database, see the Oracle documentation.
1.2. Building the system image
After you download the system Oracle build.yml file, you will have to manually change the AMP_RELEASE value from 2.4.0 to 2.5.0.
This section provides steps to build the system image.
Prerequisites
- The Oracle Database must be configured. For more details, follow the steps in Section 1.1, “Preparing the Oracle Database”.
Procedure
Clone the 3scale OpenShift Templates GitHub repository. Use the following command:
$ git clone --branch 2.5.0.GA https://github.com/3scale/3scale-amp-openshift-templates.git
-
Place your Oracle Database Instant Client Package files into the
3scale-amp-openshift-templates/amp/system-oracle/oracle-client-filesdirectory. - Download the 3scale 2.5 amp.yml template.
Run the
oc new-appcommand with the-foption and specify thebuild.ymlOpenShift template:$ oc new-app -f build.yml
Run the
oc new-appcommand with the-foption to indicate theamp.ymlOpenShift template, and the-poption to specify theWILDCARD_DOMAINparameter with the domain of your OpenShift cluster:$ oc new-app -f amp.yml -p WILDCARD_DOMAIN=mydomain.com
Enter the following
oc patchcommands, replacingSYSTEM_PASSWORDwith the Oracle Databasesystempassword you set up in Section 1.1, “Preparing the Oracle Database”:$ oc patch dc/system-app -p '[{"op": "add", "path": "/spec/strategy/rollingParams/pre/execNewPod/env/-", "value": {"name": "ORACLE_SYSTEM_PASSWORD", "value": "SYSTEM_PASSWORD"}}]' --type=json $ oc patch dc/system-app -p '{"spec": {"strategy": {"rollingParams": {"post":{"execNewPod": {"env": [{"name": "ORACLE_SYSTEM_PASSWORD", "value": "SYSTEM_PASSWORD"}]}}}}}}'Enter the following command, replacing
DATABASE_URLto point to your Oracle Database, specified in Section 1.1, “Preparing the Oracle Database”:$ oc patch secret/system-database -p '{"stringData": {"URL": "DATABASE_URL"}}'Link the pull secret to the builder with the following command:
$ oc secrets link builder threescale-registry-auth
Enter the
oc start-buildcommand to build the new system image:$ oc start-build 3scale-amp-system-oracle --from-dir=.
Additional resources
- For more information about 3scale and Oracle Database support, see Red Hat 3scale API Management Supported Configurations.
Chapter 2. 3scale on OpenShift installation guide
2.1. Introduction
This guide walks you through steps to deploy Red Hat 3scale API Management - On-premises 2.5 on OpenShift.
The 3scale solution for on-premises deployment is composed of:
- Two API gateways: embedded APIcast
- One 3scale Admin Portal and Developer Portal with persistent storage
There are two ways to deploy a 3scale solution:
The 3scale operator is a Technology Preview feature only. Technology Preview features are not supported with Red Hat production service level agreements (SLAs) and might not be functionally complete. Red Hat does not recommend using them in production. These features provide early access to upcoming product features, enabling customers to test functionality and provide feedback during the development process. For more information about the support scope of Red Hat Technology Preview features, see Technology Preview Features Support Scope.
2.1.1. Prerequisites
- You must configure 3scale servers for UTC (Coordinated Universal Time).
2.2. System requirements
This section lists the requirements for the 3scale API Management OpenShift template.
2.2.1. Environment requirements
3scale API Management requires an environment specified in supported configurations.
Persistent volumes:
- 3 RWO (ReadWriteOnce) persistent volumes for Redis and MySQL persistence
- 1 RWX (ReadWriteMany) persistent volume for CMS and System-app Assets
The RWX persistent volume must be configured to be group writable. For a list of persistent volume types that support the required access modes, see the OpenShift documentation .
2.2.2. Hardware requirements
Hardware requirements depend on your usage needs. Red Hat recommends that you test and configure your environment to meet your specific requirements. Following are the recommendations when configuring your environment for 3scale on OpenShift:
- Compute optimized nodes for deployments on cloud environments (AWS c4.2xlarge or Azure Standard_F8).
- Very large installations may require a separate node (AWS M4 series or Azure Av2 series) for Redis if memory requirements exceed your current node’s available RAM.
- Separate nodes between routing and compute tasks.
- Dedicated compute nodes to 3scale specific tasks.
-
Set the
PUMA_WORKERSvariable of the backend listener to the number of cores in your compute node.
2.3. Configuring nodes and entitlements
Before you can deploy 3scale on OpenShift, you must configure your nodes and the entitlements required for your environment to fetch images from Red Hat.
Perform the following steps to configure the entitlements:
- Install Red Hat Enterprise Linux (RHEL) on each of your nodes.
- Register your nodes with Red Hat using the Red Hat Subscription Manager (RHSM), via the interface or the command line.
- Attach your nodes to your 3scale subscription using RHSM.
Install OpenShift on your nodes, complying with the following requirements:
- Use a supported OpenShift version.
- Configure persistent storage on a file system that supports multiple writes.
- Install the OpenShift command line interface.
Enable access to the
rhel-7-server-3scale-amp-2.5-rpmsrepository using the subscription manager:sudo subscription-manager repos --enable=rhel-7-server-3scale-amp-2.5-rpms
Install the
3scale-amp-template. The template will be saved at/opt/amp/templates.sudo yum install 3scale-amp-template
2.4. Deploying 3scale on OpenShift using a template
2.4.1. Prerequisites
- An OpenShift cluster configured as specified in Section 2.3, “Configuring nodes and entitlements”.
- A domain, preferably wildcard, that resolves to your OpenShift cluster.
- Access to the Red Hat container catalog.
- (Optional) A working SMTP server for email functionality.
Follow these procedures to install 3scale on OpenShift using a .yml template:
2.4.2. Importing the 3scale template
Perform the following steps to import the 3scale template into your OpenShift cluster:
From a terminal session log in to OpenShift as the cluster administrator:
oc login
Select your project, or create a new project:
oc project <project_name>
oc new-project <project_name>
Enter the
oc new-appcommand:-
Specify the
--fileoption with the path to the amp.yml file you downloaded as part of the configure nodes and entitlements section. -
Specify the
--paramoption with theWILDCARD_DOMAINparameter set to the domain of your OpenShift cluster. Optionally, specify the
--paramoption with theWILDCARD_POLICYparameter set tosubdomainto enable wildcard domain routing:Without Wildcard Routing:
oc new-app --file /opt/amp/templates/amp.yml --param WILDCARD_DOMAIN=<WILDCARD_DOMAIN>
With Wildcard Routing:
oc new-app --file /opt/amp/templates/amp.yml --param WILDCARD_DOMAIN=<WILDCARD_DOMAIN> --param WILDCARD_POLICY=Subdomain
The terminal shows the master and tenant URLs and credentials for your newly created 3scale Admin Portal. This output should include the following information:
- master admin username
- master password
- master token information
- tenant username
- tenant password
- tenant token information
-
Specify the
Log in to https://user-admin.3scale-project.example.com as admin/xXxXyz123.
* With parameters:

 * ADMIN_PASSWORD=xXxXyz123 # generated
 * ADMIN_USERNAME=admin
 * TENANT_NAME=user

 * MASTER_NAME=master
 * MASTER_USER=master
 * MASTER_PASSWORD=xXxXyz123 # generated

--> Success
Access your application via route 'user-admin.3scale-project.example.com'
Access your application via route 'master-admin.3scale-project.example.com'
Access your application via route 'backend-user.3scale-project.example.com'
Access your application via route 'user.3scale-project.example.com'
Access your application via route 'api-user-apicast-staging.3scale-project.example.com'
Access your application via route 'api-user-apicast-production.3scale-project.example.com'
Access your application via route 'apicast-wildcard.3scale-project.example.com'
Make a note of these details for future reference.
NoteYou may need to wait a few minutes for 3scale to fully deploy on OpenShift for your login and credentials to work.
More Information
For information about wildcard domains on OpenShift, visit Using Wildcard Routes (for a Subdomain).
2.4.3. Configuring SMTP variables (optional)
OpenShift uses email to send notifications and invite new users. If you intend to use these features, you must provide your own SMTP server and configure SMTP variables in the SMTP config map.
Perform the following steps to configure the SMTP variables in the SMTP config map:
If you are not already logged in, log in to OpenShift:
oc login
Configure variables for the SMTP config map. Use the
oc patchcommand, specify theconfigmapandsmtpobjects, followed by the-poption and write the following new values in JSON for the following variables:Variable Description address
Allows you to specify a remote mail server as a relay
username
Specify your mail server username
password
Specify your mail server password
domain
Specify a HELO domain
port
Specify the port on which the mail server is listening for new connections
authentication
Specify the authentication type of your mail server. Allowed values:
plain( sends the password in the clear),login(send password Base64 encoded), orcram_md5(exchange information and a cryptographic Message Digest 5 algorithm to hash important information)openssl.verify.mode
Specify how OpenSSL checks certificates when using TLS. Allowed values:
none,peer,client_once, orfail_if_no_peer_cert.Example
oc patch configmap smtp -p '{"data":{"address":"<your_address>"}}'
oc patch configmap smtp -p '{"data":{"username":"<your_username>"}}'
oc patch configmap smtp -p '{"data":{"password":"<your_password>"}}'
After you have set the configmap variables, redeploy the
system-appandsystem-sidekiqpods:oc rollout latest dc/system-app oc rollout latest dc/system-sidekiq
2.5. 3scale template parameters
Template parameters configure environment variables of the 3scale (amp.yml) template during and after deployment.
In 3scale 2.5, the PostgreSQL version has been updated from 9 to 10. We highly recommend for PostgreSQL configuration you make this update. Refer to Upgrade Zync Database PostgreSQL 9.5 to 10 in the Migrating 3scale documentation.
| Name | Description | Default Value | Required? |
|---|---|---|---|
| APP_LABEL | Used for object app labels |
| yes |
| ZYNC_DATABASE_PASSWORD | Password for the PostgreSQL connection user. Generated randomly if not provided. | N/A | yes |
| ZYNC_SECRET_KEY_BASE | Secret key base for Zync. Generated randomly if not provided. | N/A | yes |
| ZYNC_AUTHENTICATION_TOKEN | Authentication token for Zync. Generated randomly if not provided. | N/A | yes |
| AMP_RELEASE | 3scale release tag. |
| yes |
| ADMIN_PASSWORD | A randomly generated 3scale administrator account password. | N/A | yes |
| ADMIN_USERNAME | 3scale administrator account username. |
| yes |
| APICAST_ACCESS_TOKEN | Read Only Access Token that APIcast will use to download its configuration. | N/A | yes |
| ADMIN_ACCESS_TOKEN | Admin Access Token with all scopes and write permissions for API access. | N/A | no |
| WILDCARD_DOMAIN |
Root domain for the wildcard routes. For example, a root domain | N/A | yes |
| WILDCARD_POLICY | Enable wildcard routes to embedded APIcast gateways by setting the value as "Subdomain" |
| yes |
| TENANT_NAME | Tenant name under the root that Admin Portal will be available with -admin suffix. |
| yes |
| MYSQL_USER | Username for MySQL user that will be used for accessing the database. |
| yes |
| MYSQL_PASSWORD | Password for the MySQL user. | N/A | yes |
| MYSQL_DATABASE | Name of the MySQL database accessed. |
| yes |
| MYSQL_ROOT_PASSWORD | Password for Root user. | N/A | yes |
| SYSTEM_BACKEND_USERNAME | Internal 3scale API username for internal 3scale api auth. |
| yes |
| SYSTEM_BACKEND_PASSWORD | Internal 3scale API password for internal 3scale api auth. | N/A | yes |
| REDIS_IMAGE | Redis image to use |
| yes |
| MYSQL_IMAGE | Mysql image to use |
| yes |
| MEMCACHED_IMAGE | Memcached image to use |
| yes |
| POSTGRESQL_IMAGE | Postgresql image to use |
| yes |
| AMP_SYSTEM_IMAGE | 3scale System image to use |
| yes |
| AMP_BACKEND_IMAGE | 3scale Backend image to use |
| yes |
| AMP_APICAST_IMAGE | 3scale APIcast image to use |
| yes |
| AMP_ROUTER_IMAGE | 3scale Wildcard Router image to use |
| yes |
| AMP_ZYNC_IMAGE | 3scale Zync image to use |
| yes |
| SYSTEM_BACKEND_SHARED_SECRET | Shared secret to import events from backend to system. | N/A | yes |
| SYSTEM_APP_SECRET_KEY_BASE | System application secret key base | N/A | yes |
| APICAST_MANAGEMENT_API | Scope of the APIcast Management API. Can be disabled, status or debug. At least status required for health checks. |
| no |
| APICAST_OPENSSL_VERIFY | Turn on/off the OpenSSL peer verification when downloading the configuration. Can be set to true/false. |
| no |
| APICAST_RESPONSE_CODES | Enable logging response codes in APIcast. | true | no |
| APICAST_REGISTRY_URL | A URL which resolves to the location of APIcast policies | yes | |
| MASTER_USER | Master administrator account username |
| yes |
| MASTER_NAME |
The subdomain value for the master Admin Portal, will be appended with the |
| yes |
| MASTER_PASSWORD | A randomly generated master administrator password | N/A | yes |
| MASTER_ACCESS_TOKEN | A token with master level permissions for API calls | N/A | yes |
| IMAGESTREAM_TAG_IMPORT_INSECURE | Set to true if the server may bypass certificate verification or connect directly over HTTP during image import. |
| yes |
2.6. Using APIcast with 3scale on OpenShift
APIcast is available with API Manager for 3scale Hosted, and in on-premises installations in OpenShift Container Platform. The configuration procedures are different for both. This section explains how to deploy APIcast with API Manager on OpenShift.
2.6.1. Deploying APIcast templates on an existing OpenShift cluster containing 3scale
3scale OpenShift templates contain two embedded APIcast API gateways by default. If you require more API gateways, or require separate APIcast deployments, you can deploy additional APIcast templates on your OpenShift cluster.
Perform the following steps to deploy additional API gateways on your OpenShift cluster:
Create an access token with the following configurations:
- Scoped to Account Management API
- Having read-only access
Log in to your APIcast cluster:
oc login
Create a secret that allows APIcast to communicate with 3scale. Specify
new-basicauth,apicast-configuration-url-secret, and the--passwordparameter with the access token, tenant name, and wildcard domain of your 3scale deployment:oc secret new-basicauth apicast-configuration-url-secret --password=https://<APICAST_ACCESS_TOKEN>@<TENANT_NAME>-admin.<WILDCARD_DOMAIN>
NoteTENANT_NAMEis the name under the root that the Admin Portal will be available with. The default value forTENANT_NAMEis 3scale. If you used a custom value in your 3scale deployment, you must use that value.Import the APIcast template using the
oc new-appcommand, specifying the--fileoption with theapicast.ymlfile:oc new-app --file /opt/amp/templates/apicast.yml
NoteFirst install the APIcast template as described in Section 2.3, “Configuring nodes and entitlements”.
2.6.2. Connecting APIcast from a different OpenShift cluster
If you deploy APIcast on a different OpenShift cluster, outside your 3scale cluster, you must connect through the public route:
Create an access token with the following configurations:
- Scoped to Account Management API
- Having read-only access
Log in to your APIcast cluster:
oc login
Create a secret that allows APIcast to communicate with 3scale. Specify
new-basicauth,apicast-configuration-url-secret, and the--passwordparameter with the access token, tenant name, and wildcard domain of your 3scale deployment:oc secret new-basicauth apicast-configuration-url-secret --password=https://<APICAST_ACCESS_TOKEN>@<TENANT_NAME>-admin.<WILDCARD_DOMAIN>
NoteTENANT_NAMEis the name under the root that the Admin Portal will be available with. The default value forTENANT_NAMEis 3scale. If you used a custom value in your 3scale deployment, you must use that value.Deploy APIcast on an OpenShift cluster outside of the OpenShift Cluster with the
oc new-appcommand. Specify the--fileoption and the path to yourapicast.ymlfile:oc new-app --file /path/to/file/apicast.yml
2.6.3. Changing the default behavior for embedded APIcast
In external APIcast deployments, you can modify default behavior by changing the template parameters in the APIcast OpenShift template.
In embedded APIcast deployments, 3scale and APIcast are deployed from a single template. You must modify environment variables after deployment if you wish to change the default behavior for the embedded APIcast deployments.
2.6.4. Connecting multiple APIcast deployments on a single OpenShift cluster over internal service routes
If you deploy multiple APIcast gateways into the same OpenShift cluster, you can configure them to connect using internal routes through the backend listener service instead of the default external route configuration.
You must have an OpenShift SDN plugin installed to connect over internal service routes. How you connect depends on which SDN you have installed:
ovs-subnet
If you are using the ovs-subnet OpenShift Software-Defined Networking (SDN) plugin, perform the following steps to connect over internal routes:
If not already logged in, log in to your OpenShift cluster:
oc login
Enter the following command to display the
backend-listenerroute URL:oc route backend-listener
Enter the
oc new-appcommand with the path toapicast.yml:oc new-app -f apicast.yml
ovs-multitenant
If you are using the ovs-multitenant OpenShift SDN plugin, perform the following steps to connect over internal routes:
If not already logged in, log in to your OpenShift cluster:
oc login
As admin, specify the
oadmcommand with thepod-networkandjoin-projectsoptions to set up communication between both projects:oadm pod-network join-projects --to=<3SCALE_PROJECT> <APICAST_PROJECT>
Enter the following command to display the
backend-listenerroute URL:oc route backend-listener
Enter the
oc new-appcommand with the path toapicast.yml:oc new-app -f apicast.yml
More information
For information on OpenShift SDN and project network isolation, see Openshift SDN.
2.6.5. Connecting APIcast on other deployments
If you deploy APIcast on Docker, you can connect APIcast to 3scale deployed on OpenShift by setting the THREESCALE_PORTAL_ENDPOINT parameter to the URL and access token of your 3scale administration portal deployed on OpenShift. You do not need to set the BACKEND_ENDPOINT_OVERRIDE parameter in this case.
For more details, see Chapter 5, APIcast on the Docker containerized environment.
2.7. Deploying 3scale using the operator
This section will take you through installing and deploying the 3scale solution via the 3scale operator using the APIManager custom resource.
The 3scale operator is a Technology Preview feature only. Technology Preview features are not supported with Red Hat production service level agreements (SLAs) and might not be functionally complete. Red Hat does not recommend using them in production. These features provide early access to upcoming product features, enabling customers to test functionality and provide feedback during the development process. For more information about the support scope of Red Hat Technology Preview features, see Technology Preview Features Support Scope.
2.7.1. Prerequisites
- Deploying 3scale using the operator first requires that the 3scale operator is installed
OpenShift Container Platform 3.11
- A user account with administrator privileges in the OpenShift cluster
2.7.2. Deploying the APIManager custom resource
Deploying the APIManager custom resource will make the operator begin the processing of it and will deploy a 3scale solution from it.
Deploy an APIManager by creating a new YAML file with the following content:
NoteThe wildcardDomain parameter can be any desired name you wish to give that resolves to an IP address, which is a valid DNS domain. The wildcardPolicy parameter can only be
NoneorSubdomain. Be sure to remove the placeholder marks for your parameters: < >.apiVersion: apps.3scale.net/v1alpha1 kind: APIManager metadata: name: example-apimanager spec: productVersion: "2.5" wildcardDomain: <wildcardDomain> wildcardPolicy: <None|Subdomain> resourceRequirementsEnabled: true
Enable wildcard routes at the OpenShift router level if
wildcardPolicyisSubdomain.You can do so by running the following command:
oc set env dc/router ROUTER_ALLOW_WILDCARD_ROUTES=true -n default
NoteFor more information about the APIManager fields, refer to the Reference documentation.
export NAMESPACE="operator-test" oc project ${NAMESPACE} oc create -f <yaml-name>- This should trigger the deployment of a 3scale solution in the operator-test project.
2.8. Troubleshooting
This section contains a list of common installation issues and provides guidance for their resolution.
- Section 2.8.1, “Previous deployment leaving dirty persistent volume claims”
- Section 2.8.2, “Incorrectly pulling from the Docker registry”
- Section 2.8.3, “Permission issues for MySQL when persistent volumes are mounted locally”
- Section 2.8.4, “Unable to upload logo or images”
- Section 2.8.5, “Test calls do not work on OpenShift”
- Section 2.8.6, “APIcast on a different project from 3scale”
2.8.1. Previous deployment leaving dirty persistent volume claims
Problem
A previous deployment attempt leaves a dirty Persistent Volume Claim (PVC) causing the MySQL container to fail to start.
Cause
Deleting a project in OpenShift does not clean the PVCs associated with it.
Solution
Find the PVC containing the erroneous MySQL data with the
oc get pvccommand:# oc get pvc NAME STATUS VOLUME CAPACITY ACCESSMODES AGE backend-redis-storage Bound vol003 100Gi RWO,RWX 4d mysql-storage Bound vol006 100Gi RWO,RWX 4d system-redis-storage Bound vol008 100Gi RWO,RWX 4d system-storage Bound vol004 100Gi RWO,RWX 4d
-
Stop the deployment of the system-mysql pod by clicking
cancel deploymentin the OpenShift UI. - Delete everything under the MySQL path to clean the volume.
-
Start a new
system-mysqldeployment.
2.8.2. Incorrectly pulling from the Docker registry
Problem
The following error occurs during installation:
svc/system-redis - 1EX.AMP.LE.IP:6379
  dc/system-redis deploys docker.io/rhscl/redis-32-rhel7:3.2-5.3
    deployment #1 failed 13 minutes ago: config change
Cause
OpenShift searches for and pulls container images by issuing the docker command. This command refers to the docker.io Docker registry instead of the registry.access.redhat.com Red Hat container registry.
This occurs when the system contains an unexpected version of the Docker containerized environment.
Solution
Use the appropriate version of the Docker containerized environment.
2.8.3. Permission issues for MySQL when persistent volumes are mounted locally
Problem
The system-msql pod crashes and does not deploy causing other systems dependant on it to fail deployment. The pod log displays the following error:
[ERROR] Cannot start server : on unix socket: Permission denied
[ERROR] Do you already have another mysqld server running on socket: /var/lib/mysql/mysql.sock ?
[ERROR] Aborting
Cause
The MySQL process is started with inappropriate user permissions.
Solution
The directories used for the persistent volumes MUST have the write permissions for the root group. Having rw permissions for the root user is not enough as the MySQL service runs as a different user in the root group. Execute the following command as the root user:
chmod -R g+w /path/for/pvs
Execute the following command to prevent SElinux from blocking access:
chcon -Rt svirt_sandbox_file_t /path/for/pvs
2.8.4. Unable to upload logo or images
Problem
Unable to upload a logo - system-app logs display the following error:
Errno::EACCES (Permission denied @ dir_s_mkdir - /opt/system/public//system/provider-name/2
Cause
Persistent volumes are not writable by OpenShift.
Solution
Ensure your persistent volume is writable by OpenShift. It should be owned by root group and be group writable.
2.8.5. Test calls do not work on OpenShift
Problem
Test calls do not work after creation of a new service and routes on OpenShift. Direct calls via curl also fail, stating: service not available.
Cause
3scale requires HTTPS routes by default, and OpenShift routes are not secured.
Solution
Ensure the secure route checkbox is clicked in your OpenShift router settings.
2.8.6. APIcast on a different project from 3scale
Problem
APIcast deploy fails (pod does not turn blue). The following error appears in the logs:
update acceptor rejected apicast-3: pods for deployment "apicast-3" took longer than 600 seconds to become ready
The following error appears in the pod:
Error synching pod, skipping: failed to "StartContainer" for "apicast" with RunContainerError: "GenerateRunContainerOptions: secrets \"apicast-configuration-url-secret\" not found"
Cause
The secret was not properly set up.
Solution
When creating a secret with APIcast v3, specify apicast-configuration-url-secret:
oc secret new-basicauth apicast-configuration-url-secret --password=https://<ACCESS_TOKEN>@<TENANT_NAME>-admin.<WILDCARD_DOMAIN>
Chapter 3. Installing APIcast
APIcast is an NGINX based API gateway used to integrate your internal and external API services with the 3scale Platform. APIcast does load balancing by using round-robin.
In this guide you will learn about deployment options, environments provided, and how to get started.
To get information about the latest released and supported version of APIcast, see the articles Red Hat 3scale API Management Supported Configurations and Red Hat 3scale API Management - Component Details.
3.1. Prerequisites
APIcast is not a standalone API gateway. It needs connection to 3scale API Manager.
- You will need a working 3scale On-Premises instance.
3.2. Deployment options
You can use hosted or self-managed APIcast. In both cases, APIcast must be connected to the rest of the 3scale API management platform:
- Embedded APIcast: Two APIcast gateways (staging and production) come by default with the 3scale API Management installation. They come pre-configured and ready to use out-of-the-box.
Self-managed APIcast: You can deploy APIcast wherever you want. Here are a few recommended options to deploy APIcast:
- the Docker containerized environment: Download a ready to use Docker-formatted container image, which includes all of the dependencies to run APIcast in a Docker-formatted container.
- OpenShift: Run APIcast on a supported version of OpenShift. You can connect self-managed APIcasts both to a 3scale installation or to a 3scale online account.
3.3. Environments
By default, when you create a 3scale account, you get embedded APIcast in two different environments:
-
Staging: Intended to be used only while configuring and testing your API integration. When you have confirmed that your setup is working as expected, then you can choose to deploy it to the production environment. The OpenShift template sets the parameters of the Staging APIcast in a way that the configuration is reloaded on each API call (
APICAST_CONFIGURATION_LOADER: lazy,APICAST_CONFIGURATION_CACHE: 0). It is useful to test the changes in APIcast configuration quickly. -
Production: This environment is intended for production use. The following parameters are set for the Production APIcast in the OpenShift template:
APICAST_CONFIGURATION_LOADER: boot,APICAST_CONFIGURATION_CACHE: 300. This means that the configuration will be fully loaded when APIcast is started, and will be cached for 300 seconds (5 minutes). After 5 minutes the configuration will be reloaded. This means that when you promote the configuration to production, it may take up to 5 minutes to be applied, unless you trigger a new deployment of APIcast.
3.4. Configuring the integration settings
Go to [your_API_name] > Integration > Configuration.
At the top of the Integration page you will see the integration options. By default, the deployment option is hosted APIcast, and the authentication mode is API key. You can change these settings by clicking on edit integration settings in the upper right corner.
At the top of the Integration page you will see the integration options. By default, you find these values:
- Deployment option: embedded APIcast.
- Authentication mode: API key.
You can change these settings by clicking on edit integration settings in the upper right corner.
3.5. Configuring your service
3.5.1. Declare the API backend
You need to declare your API backend in the Private Base URL field, which is the endpoint host of your API backend. APIcast will redirect all traffic to your API backend after all authentication, authorization, rate limits and statistics have been processed.
Typically, the Private Base URL of your API will be something like https://api-backend.yourdomain.com:443, on the domain that you manage (yourdomain.com). For instance, if you were integrating with the Twitter API the Private Base URL would be https://api.twitter.com/. In this example will use the Echo API hosted by 3scale – a simple API that accepts any path and returns information about the request (path, request parameters, headers, etc.). Its Private Base URL is https://echo-api.3scale.net:443

Test your private (unmanaged) API is working. For example, for the Echo API you can make the following call with curl command:
curl "https://echo-api.3scale.net:443"
You will get the following response:
{
    "method": "GET",
    "path": "/",
    "args": "",
    "body": "",
    "headers": {
      "HTTP_VERSION": "HTTP/1.1",
      "HTTP_HOST": "echo-api.3scale.net",
      "HTTP_ACCEPT": "*/*",
      "HTTP_USER_AGENT": "curl/7.51.0",
      "HTTP_X_FORWARDED_FOR": "2.139.235.79, 10.0.103.58",
      "HTTP_X_FORWARDED_HOST": "echo-api.3scale.net",
      "HTTP_X_FORWARDED_PORT": "443",
      "HTTP_X_FORWARDED_PROTO": "https",
      "HTTP_FORWARDED": "for=10.0.103.58;host=echo-api.3scale.net;proto=https"
    },
    "uuid": "ee626b70-e928-4cb1-a1a4-348b8e361733"
  }
3.5.2. Configure the authentication settings
You can configure authentication settings for your API in the AUTHENTICATION SETTINGS section. The following fields are all optional:
| Field | Description |
|---|---|
| Host Header | Define a custom Host request header. This is required if your API backend only accepts traffic from a specific host. |
| Secret Token | Used to block direct developer requests to your API backend. Set the value of the header here, and ensure your backend only allows calls with this secret header. |
| Credentials location | Define whether credentials are passed as HTTP headers, query parameters or as HTTP basic authentication. |
| Auth user key | Set the user key associated with the credentials location |
| Errors | Define the response code, content type, and response body, for the following errors: authentication failed, authentication missing, no match. |
3.5.3. Configure the API test call
You need to configure the test call for the hosted staging environment. Enter a path existing in your API in the API test GET request field (for example, /v1/word/good.json).
3.5.4. Save the configuration settings
Save the settings by clicking on the Update & Test Staging Configuration button in the bottom right part of the page. This will deploy the APIcast configuration to the 3scale hosted staging environment. If everything is configured correctly, the vertical line on the left should turn green.
If you are using one of the Self-managed deployment options, save the configuration from the GUI and make sure it is pointing to your deployed API gateway by adding the correct host in the staging or production Public base URL field. Before making any calls to your production gateway, do not forget to click on the Promote v.x to Production button.
Find the sample curl at the bottom of the staging section and run it from the console:
curl "https://XXX.staging.apicast.io:443/v1/word/good.json?user_key=YOUR_USER_KEY"
You should get the same response as above, however, this time the request will go through the 3scale hosted APIcast instance. Note: You should make sure you have an application with valid credentials for the service. If you are using the default API service created on sign up to 3scale, you should already have an application. Otherwise, if you see USER_KEY or APP_ID and APP_KEY values in the test curl, you need to create an application for this service first.
Now you have your API integrated with 3scale.
3scale-hosted APIcast gateway does the validation of the credentials and applies the rate limits that you defined for the application plan of the application. If you try to make a call without credentials, or with invalid credentials, you will see an error message.
Chapter 4. Running APIcast on Red Hat OpenShift
This tutorial describes how to deploy the APIcast API Gateway on Red Hat OpenShift.
4.1. Prerequisites
To follow the tutorial steps below, you will first need to configure APIcast in your 3scale Admin Portal as per the Installing APIcast guide. Make sure Self-managed Gateway is selected as the deployment option in the integration settings. You should have both Staging and Production environment configured to proceed.
4.2. Setting up Red Hat OpenShift
If you already have a running OpenShift cluster, you can skip this step. Otherwise, continue reading.
For production deployments you can follow the instructions for OpenShift installation.
In this tutorial the OpenShift cluster will be installed using:
- Red Hat Enterprise Linux (RHEL) 7
- Docker containerized environment v1.10.3
- OpenShift Origin command line interface (CLI) - v1.3.1
4.2.1. Install the Docker containerized environment
Docker-formatted container images provided by Red Hat are released as part of the Extras channel in RHEL. To enable additional repositories, you can use either the Subscription Manager, or yum config manager. See the RHEL product documentation for details.
For a RHEL 7 deployed on a AWS EC2 instance you will use the following the instructions:
List all repositories:
sudo yum repolist all
Find and enable the
*-extrasrepository.sudo yum-config-manager --enable rhui-REGION-rhel-server-extras
Install Docker-formatted container images:
sudo yum install docker docker-registry
Add an insecure registry of
172.30.0.0/16by adding or uncommenting the following line in/etc/sysconfig/dockerfile:INSECURE_REGISTRY='--insecure-registry 172.30.0.0/16'
Start the Docker service:
sudo systemctl start docker
With the following command, you can verify that the container service is running:
sudo systemctl status docker
4.2.2. Start the OpenShift cluster
Download the latest stable release of the client tools (openshift-origin-client-tools-VERSION-linux-64bit.tar.gz) from OpenShift releases page, and place the Linux oc binary extracted from the archive in your PATH.
-
Please be aware that the
oc clusterset of commands are only available in the 1.3+ or newer releases. -
the docker command runs as the
rootuser, so you will need to run anyocor docker commands with root privileges.
Open a terminal with a user that has permission to run docker commands and run:
oc cluster up
At the bottom of the output you will find information about the deployed cluster:
    -- Server Information ...
      OpenShift server started.
      The server is accessible via web console at:
      https://172.30.0.112:8443

      You are logged in as:
        User:     developer
        Password: developer

      To login as administrator:
        oc login -u system:admin
Note the IP address that is assigned to your OpenShift server. You will refer to it in the tutorial as OPENSHIFT-SERVER-IP.
4.2.3. Set up the OpenShift cluster on a remote server (Optional)
If you are deploying the OpenShift cluster on a remote server, you will need to explicitly specify a public hostname and a routing suffix on starting the cluster, so that you will be able to access the OpenShift web console remotely.
For example, if you are deploying on an AWS EC2 instance, you should specify the following options:
oc cluster up --public-hostname=ec2-54-321-67-89.compute-1.amazonaws.com --routing-suffix=54.321.67.89.xip.io
where ec2-54-321-67-89.compute-1.amazonaws.com is the Public Domain, and 54.321.67.89 is the IP of the instance. You will then be able to access the OpenShift web console at https://ec2-54-321-67-89.compute-1.amazonaws.com:8443.
4.3. Deploying APIcast using the OpenShift template
By default you are logged in as developer and can proceed to the next step.
Otherwise login into OpenShift using the
oc logincommand from the OpenShift Client tools you downloaded and installed in the previous step. The default login credentials are username = "developer" and password = "developer":oc login https://OPENSHIFT-SERVER-IP:8443
You should see
Login successful.in the output.Create your project. This example sets the display name as gateway
oc new-project "3scalegateway" --display-name="gateway" --description="3scale gateway demo"
The response should look like this:
Now using project "3scalegateway" on server "https://172.30.0.112:8443".
Ignore the suggested next steps in the text output at the command prompt and proceed to the next step below.
Create a new secret to reference your project by replacing
<access_token>and<domain>with your own credentials. See below for more information about the<access_token>and<domain>.oc create secret generic apicast-configuration-url-secret --from-literal=password=https://<access_token>@<admin_portal_domain> --type=kubernetes.io/basic-auth
Here
<access_token>is an Access Token (not a Service Token) for the 3scale Account Management API, and<domain>-admin.3scale.netis the URL of your 3scale Admin Portal.The response should look like this:
secret/apicast-configuration-url-secret
Create an application for your APIcast gateway from the template, and start the deployment:
oc new-app -f https://raw.githubusercontent.com/3scale/3scale-amp-openshift-templates/2.5.0.GA/apicast-gateway/apicast.yml
You should see the following messages at the bottom of the output:
--> Creating resources with label app=3scale-gateway ...
    deploymentconfig "apicast" created
    service "apicast" created
--> Success
    Run 'oc status' to view your app.
4.4. Creating routes via the OpenShift console
Open the web console for your OpenShift cluster in your browser: https://OPENSHIFT-SERVER-IP:8443/console/
Use the value specified in
--public-hostnameinstead ofOPENSHIFT-SERVER-IPif you started OpenShift cluster on a remote server.You should see the login screen:
 Note
NoteYou may receive a warning about an untrusted web-site. This is expected, as you are trying to access the web console through secure protocol, without having configured a valid certificate. While you should avoid this in production environment, for this test setup you can go ahead and create an exception for this address.
Log in using the developer credentials created or obtained in the Setup OpenShift section above.
You will see a list of projects, including the gateway project you created from the command line above.
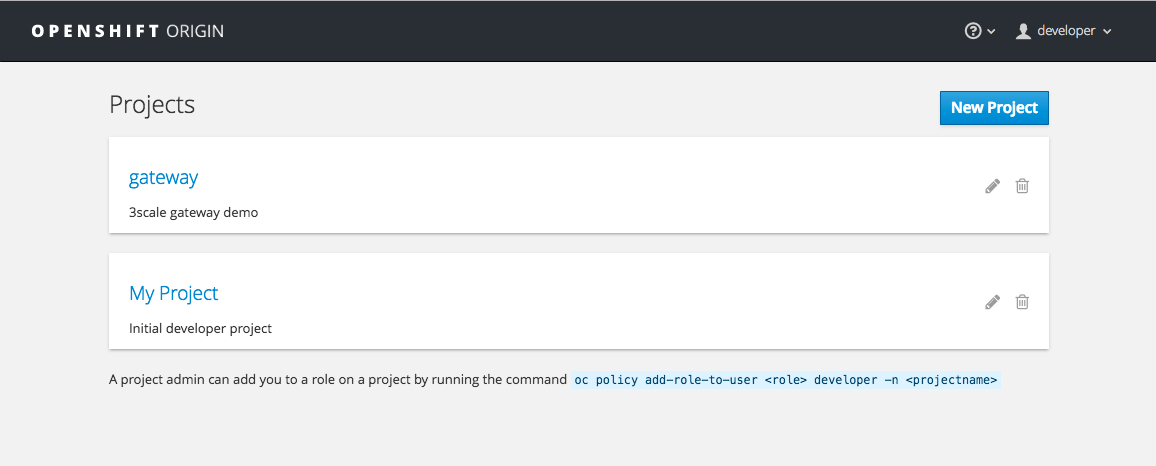
If you do not see your gateway project, you probably created it with a different user and will need to assign the policy role to to this user.
Click on the gateway link and you will see the Overview tab.
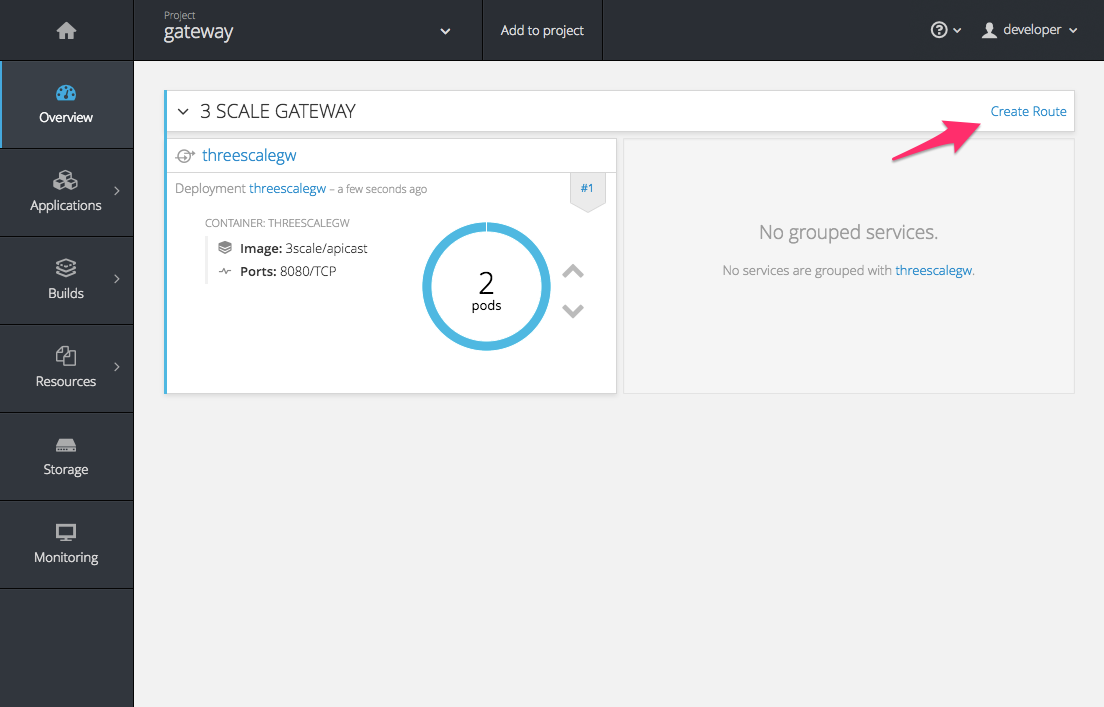
OpenShift downloaded the code for APIcast and started the deployment. You may see the message Deployment #1 running when the deployment is in progress.
When the build completes, the UI will refresh and show two instances of APIcast ( 2 pods ) that have been started by OpenShift, as defined in the template.

Each APIcast instance, upon starting, downloads the required configuration from 3scale using the settings you provided on the Integration page of your 3scale Admin Portal.
OpenShift will maintain two APIcast instances and monitor the health of both; any unhealthy APIcast instance will automatically be replaced with a new one.
To allow your APIcast instances to receive traffic, you need to create a route. Start by clicking on Create Route.
Enter the same host you set in 3scale above in the section Public Base URL (without the http:// and without the port) , e.g.
gateway.openshift.demo, then click the Create button.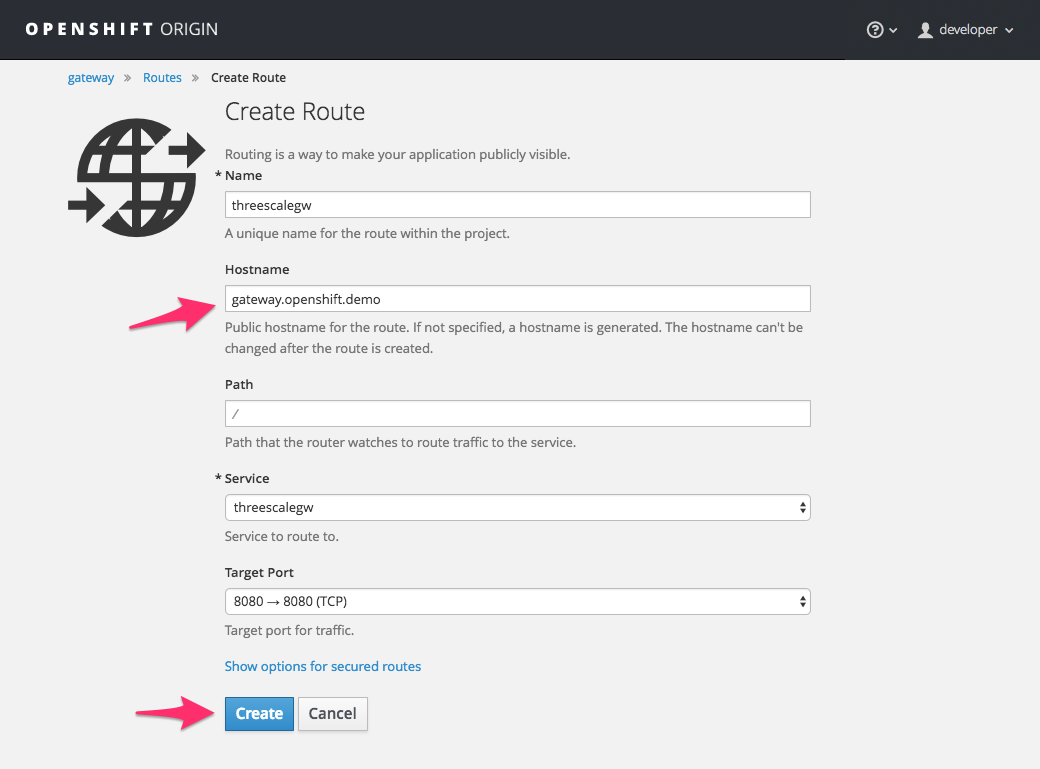
For every 3scale service you define, you must create a new route. Alternatively, you can configure the Embedded APIcast Wildcard Routing to avoid creating a new route for every 3scale service you define.
Chapter 5. APIcast on the Docker containerized environment
This is a step-by-step guide to deploy APIcast inside a Docker-formatted container that is ready to be used as a 3scale API gateway.
5.1. Prerequisites
You must configure APIcast in your 3scale Admin Portal as per the the Installing APIcast guide.
5.2. Installing the Docker containerized environment
This guide covers the steps to set up the Docker containerized environment on Red Hat Enterprise Linux (RHEL) 7.
Docker-formatted containers provided by Red Hat are released as part of the Extras channel in RHEL. To enable additional repositories, you can use either the Subscription Manager or the yum config manager. For details, see the RHEL product documentation.
To deploy RHEL 7 on an AWS EC2 instance, take the following steps:
-
List all repositories:
sudo yum repolist all. -
Find the
*-extrasrepository. -
Enable the
extrasrepository:sudo yum-config-manager --enable rhui-REGION-rhel-server-extras. -
Install the Docker containerized environment package:
sudo yum install docker.
For other operating systems, refer to the following Docker documentation:
5.3. Running the Docker containerized environment gateway
Start the Docker daemon:
sudo systemctl start docker.service.Check if the Docker daemon is running:
sudo systemctl status docker.service.You can download a ready to use Docker-formatted container image from the Red Hat registry:
sudo docker pull registry.access.redhat.com/3scale-amp25/apicast-gateway.Run APIcast in a Docker-formatted container:
sudo docker run --name apicast --rm -p 8080:8080 -e THREESCALE_PORTAL_ENDPOINT=https://<access_token>@<domain>-admin.3scale.net registry.access.redhat.com/3scale-amp25/apicast-gateway.Here,
<access_token>is the Access Token for the 3scale Account Management API. You can use the Provider Key instead of the access token.<domain>-admin.3scale.netis the URL of your 3scale admin portal.
This command runs a Docker-formatted container called "apicast" on port 8080 and fetches the JSON configuration file from your 3scale portal. For other configuration options, see the Installing APIcast guide.
5.3.1. The Docker command options
You can use the following options with the docker run command:
-
--rm: Automatically removes the container when it exits. -
-dor--detach: Runs the container in the background and prints the container ID. When it is not specified, the container runs in the foreground mode and you can stop it usingCTRL + c. When started in the detached mode, you can reattach to the container with thedocker attachcommand, for example,docker attach apicast. -
-por--publish: Publishes a container’s port to the host. The value should have the format<host port="">:<container port="">, so-p 80:8080will bind port8080of the container to port80of the host machine. For example, the Management API uses port8090, so you may want to publish this port by adding-p 8090:8090to thedocker runcommand. -
-eor--env: Sets environment variables. -
-vor--volume: Mounts a volume. The value is typically represented as<host path="">:<container path="">[:<options>].<options>is an optional attribute; you can set it to:roto specify that the volume will be read only (by default, it is mounted in read-write mode). Example:-v /host/path:/container/path:ro.
For more information on available options, see Docker run reference.
5.4. Testing APIcast
The preceding steps ensure that your Docker-formatted container is running with your own configuration file and the Docker-formatted image from the 3scale registry. You can test calls through APIcast on port 8080 and provide the correct authentication credentials, which you can get from your 3scale account.
Test calls will not only verify that APIcast is running correctly but also that authentication and reporting is being handled successfully.
Ensure that the host you use for the calls is the same as the one configured in the Public Base URL field on the Integration page.
Chapter 6. Installing the 3scale Operator
6.1. Introduction
In this documentation you will find details about deploying custom resource definitions (CRDs), deploying role-based access control (RBAC), and deploying the 3scale operator image for managing deployments of the same configuration in multiple environments.
The 3scale operator is a Technology Preview feature only. Technology Preview features are not supported with Red Hat production service level agreements (SLAs) and might not be functionally complete. Red Hat does not recommend using them in production. These features provide early access to upcoming product features, enabling customers to test functionality and provide feedback during the development process. For more information about the support scope of Red Hat Technology Preview features, see Technology Preview Features Support Scope.
6.1.1. Prerequisites
- A 3scale 2.5 On-Premises instance
OpenShift Container Platform 3.11
- A user account with administrator privileges in the OpenShift cluster
Deploy the 3scale operator and custom CRDs in a separate project. If you deploy them in an existing project containing infrastructure, it could alter or delete existing elements.
6.2. Creating a new OpenShift project
You must run a command like the one shown below to create a new OpenShift project. This command shows you an example of a project name:
oc new-project operator-test
This will create a new OpenShift project where the operator, the APIManager custom resource (CR) and the Capabilities custom resources will be installed.
6.2.1. Registering the 3scale operator CRDs in the OpenShift API server
- Download and uncompress the the tar file: deploy.tar.gz.
Log in as an administrator in the cluster and deploy all the 3scale operator CRDs by running the following command:
for i in `ls deploy/crds/*_crd.yaml`; do oc create -f $i ; done
- This will register the APIManager CRD and the CRDs related to the Capabilities functionality of the operator in the OpenShift API server.
If the command runs successfully, you should be able to query the resource types defined by this CRDs via
oc get.For example, to verify that the APIManager CRD has been correctly registered, execute the following command:
oc get apimanagers
You should see the following output:
No resources found.
6.2.2. Deploying roles and ServiceAccounts for the 3scale operator
Go to the
operator-testOpenShift project and make sure that no other elements exist:export NAMESPACE="operator-test" oc project ${NAMESPACE} oc get all // This shouldn't return any resultDeploy the ServiceAccount that will be used by the 3scale operator:
oc create -f deploy/service_account.yaml
Log in as an administrator to the cluster and deploy the 3scale operator Role and the RoleBinding that will attach that role to the created ServiceAccount:
// As a cluster admin
export NAMESPACE="operator-test"
oc project ${NAMESPACE}
oc create -f deploy/role.yaml
oc create -f deploy/role_binding.yaml
6.2.3. Deploying the 3scale operator
Deploy the 3scale operator by executing the following commands:
export NAMESPACE="operator-test" oc project ${NAMESPACE} oc create -f deploy/operator.yaml- This will create a Deployment that will contain a Pod with the Operator code and will start listening to incoming APIManager and Capabilities resources.
To verify the 3scale operator is deployed and ready, run the following command:
oc get deployment 3scale-operator
Chapter 7. 3scale High Availability and Evaluation templates
7.1. Introduction
This document describes the templates for High Availability and Evaluation used by Red Hat 3scale API Management 2.5 On-Premises installation.
The 3scale High Availability and Evaluation templates are a Technology Preview feature only. Technology Preview features are not supported with Red Hat production service level agreements (SLAs) and might not be functionally complete. Red Hat does not recommend using them in production. These features provide early access to upcoming product features, enabling customers to test functionality and provide feedback during the development process. For more information about the support scope of Red Hat Technology Preview features, see Technology Preview Features Support Scope.
7.2. Prerequisites
- You need to have an available OpenShift cluster to deploy elements of the High Availability and Evaluation templates.
7.3. High Availability template
The High Availability (HA) template allows you to have a HA setting for critical databases.
7.3.1. Prerequisites
- Before deploying the HA template, you must deploy and configure the external databases, and configure them in a HA configuration with a load-balanced endpoint.
7.3.2. Using the HA template
For HA, the template named amp-ha-tech-preview.yml allows you to deploy critical databases externally to OpenShift. This excludes:
- Memcached
- Sphinx
- Zync
Differences between the standard amp.yml template and amp-ha-tech-preview.yml include:
Removal of the following elements:
- backend-redis and its related components
- system-redis and its related components
- system-mysql and its related components
- Redis and MySQL related ConfigMaps
- MYSQL_IMAGE, REDIS_IMAGE, MYSQL_USER, MYSQL_ROOT_PASSWORD parameters
-
By default, increased from 1 to 2 the number of replicas for non-database
DeploymentConfigobject types. Addition of the following mandatory parameters, allowing you the control of the location of external databases:
- BACKEND_REDIS_STORAGE_ENDPOINT
- BACKEND_REDIS_QUEUES_ENDPOINT
- SYSTEM_REDIS_URL
- APICAST_STAGING_REDIS_URL
- APICAST_PRODUCTION_REDIS_URL
- SYSTEM_DATABASE_URL
With amp-ha-tech-preview.yml, you need to configure database connections (excluding system-memcache, zync-database and system-sphinx that do not contain permanent data) out of the cluster via the newly added mandatory parameters. The endpoints require database load-balanced connection strings, including authentication information. Also, for the non-database deployments, the number of pod replicas is increased to 2 by default to have redundancy at application-level.
7.4. Evaluation template
For evaluation purposes, there is a template named amp-eval-tech-preview.yml that deploys a 3scale environment without resource requests nor limits.
The only functional difference compared to the standard amp.yml template is that the resource limits and requests have been removed. This means that in this version the minimum hardware requirements have been removed on the pods at CPU and Memory level. This template is intended only for evaluation, testing, and development purposes as it tries to deploy the components in a best-effort way with the given hardware resources.
Chapter 8. Redis high availability (HA) support for 3scale
There are known issues with Redis high availability (HA) support for 3scale. For more information, see the Red Hat 3scale API Management 2.5 release notes, Chapter 8. Known issues in the release notes.
8.1. Introduction
High availability (HA) is provided for most components by the OpenShift Container Platform (OCP). For more information see OpenShift Container Platform 3.11 Chapter 30. High Availability.
The database components for HA in 3scale include:
-
system-redis: provides temporary storage for background jobs for 3scale and it is also used as a message bus for Ruby processes ofsystem-apppods. -
backend-redis: used for statistics storage and temporary job storage.
Both system-redis and backend-redis can be replaced by the Redis Cluster (open-source or Redis Labs).
The following env vars can be set into system-(app,sidekiq,sphinx) deployment configurations, though it is only a requirement for Redis Enterprise:
-
MESSAGE_BUS_REDIS_URL(a redis URL) -
REDIS_NAMESPACE(a short string to namespace Sidekiq’s Redis keys) -
MESSAGE_BUS_REDIS_NAMESPACE(a short string to namespace System message bus’s Redis keys)
A new pod is created automatically when the Redis pod dies or is killed by OCP and the data is restored from the persistent storage, so the pod continues to work. In the scenario described, there would be a small amount of downtime while the new pod is being started. This is due to the limitation that Redis does not support a multi-master setup. Downtime can be reduced by preloading the Redis images onto all nodes that have Redis deployed to them, which will speed up the pod restart.
8.2. Setting up Redis for zero downtime
If zero downtime is required, Redis would need to be set up outside of OCP. There are several ways to set it up using the configuration options of 3scale pods:
- Set up your own self-managed Redis
- Use Redis Sentinel: Reference Redis Sentinel Documentation
Redis provided as a service:
For example by:
- Amazon ElastiCache
- Redis Labs
Red Hat does not provide support for the above mentioned services. The mention of any such services does not imply endorsement by Red Hat of the products or services. You agree that Red Hat is not responsible or liable for any loss or expenses that may result due to your use of (or reliance on) any external content.
8.3. Configurating backend components for 3scale
There are configuration settings in 3scale 2.5 to configure Redis HA (failover) for the backend component. They can be set as environment variables in the following deployment configurations: backend-cron, backend-listener, and backend-worker:
CONFIG_REDIS_SENTINEL_HOSTSandCONFIG_QUEUES_SENTINEL_HOSTS:A comma-separated list of Sentinel hosts for the main statistics database and the Resque background job database.
NoteValues should be in the format: name:value
<host>:<port>For example:host1:26379,host2:26379, orhost3:26379CONFIG_REDIS_SENTINEL_ROLEandCONFIG_QUEUES_SENTINEL_ROLE:The role of each Sentinels group, either master or slave. Currently only master (default) is supported.
This makes the value of CONFIG_REDIS_PROXY and CONFIG_QUEUES_MASTER_NAME take the meaning of Sentinel group name instead of a specific server.
When no Sentinel hosts are configured, the environment variables
CONFIG_REDIS_PROXYandCONFIG_QUEUES_MASTER_NAMEcan use URLs and support password-protected databases, for example:CONFIG_REDIS_PROXY=redis://user:password@server:port/database- The connection is then established with the password-protected Redis instance.
-
When Sentinel hosts are configured, the password must be set in the Sentinel configuration and use the Sentinel group name instead:
CONFIG_REDIS_PROXY=master_group