
Getting Started
Getting started with your 3scale API Management installation.
Abstract
Preface
This guide will help you to begin working with Red Hat 3scale API Management.
Chapter 1. Launching an API
This guide helps you to get started with boosting the API with 3scale.
It will cover the following key steps to launch the API:
- Secure the API.
- Configure the API access policies with application plans.
- Engage your developers with a Developer Portal.
- Go Live.
You can choose from the following three paths to launch the API:
Completion time: Less than an hour.
Goal*: Complete an end-to-end integration of 3scale with a simple public API.
Recommended for: The prototype path is recommended to get the fastest possible overview of how to integrate 3scale and to get an appreciation of 3scale’s end-to-end capabilities. You must do this before going through the basic path. If you have successfully completed the onboarding wizard in the Admin Portal, you can skip this path and go to the next one.
Completion time: Less than one week.
Goal: Complete all implementation steps to launch your API in production.
Recommended for: If you want to go live with your API in production and you have limited time, the basic path will cover most of your needs.
Completion time: Several weeks.
Goal: Optional extras after you have completed the basic path. Advanced control of your API. Deeper customization of the Developer Portal.
Recommended for: If you have a more complex requirement or if you have covered the basic path already, you may be ready to consider advanced options. If you want to use a custom domain and email (in SaaS), they have a long lead time, so you should follow the steps in the go live section to get them set up quickly.
The timing guidelines depend on the complexity of your API and the resources you plan to dedicate to the effort. You will spend most of your time on refining your API and preparing content for your developer portal. If you already have a stable API and content for documentation, you can go live within a week.
1.1. Securing, controlling, and promoting your APIs
You can follow through the prototype, basic, and advanced paths individually from end to end, or you can also choose to perform some steps from the three different paths according to your needs. Each path is independent, but they build on top of each other.
1.1.1. Prototype
1.1.1.1. Securing your API
Assuming your API is publicly accessible (for Saas) or reachable from your 3scale AMP installation (for on-premises), you can prototype the 3scale access control layer within a few minutes.
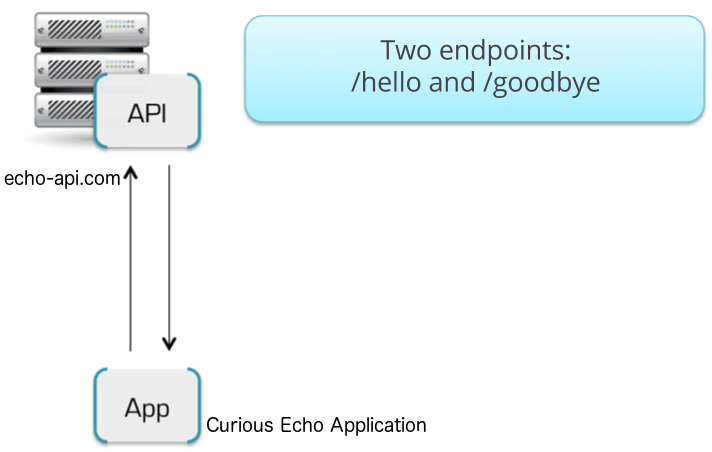
The Echo API will serve as en example of a public API. It is a simple API that accepts any path and returns information about the request (path, request parameters, headers, etc.) in the response body. It is accessible at the following URL: https://echo-api.3scale.net
- Verify that your API is reachable (after the security layer is in place, you can hide or restrict access to the backend host). Example: https://echo-api.3scale.net/v1/fast/track.
- Navigate to [Your_API_name] > Integration > Configuration.
- Before you set up your own API, verify that you can make a test call using the default parameters.
-
After verification, enter the private base URL; example:
https://echo-api.3scale.net:443. -
To make a test call, enter the URL path for a valid GET request; example:
/v1/fast/track, and then click Update & Test Staging Environment. Copy the cURL statement, which includes the
user_keyas the default credential, to make calls from the command line:curl "https://api-2445581407825.staging.apicast.io:443/v1/fast/track?user_key=287d64924e6120d215b1000ac07c063b"
You can make different calls. For example try another endpoint, adding the same
user_key.NoteYou can get the API keys from the application details page of one of the developer accounts.
Your 3scale access control layer will now only allow authenticated calls through to your backend API.
1.1.1.2. Configuring your API access policies with application plans
In the preceding steps, you ensured that only authenticated calls are allowed through to your API. In this section you will apply policies to differentiate the rate limits.
In 3scale, applications define the credentials to access your API. An application is always associated with one application plan that determines the access policies. Applications are stored within developer accounts. In the basic 3scale plans only a single application is allowed; but, in the higher plans, multiple applications per account are allowed.
In this example, you add a policy to the Echo API used in the preceding section.
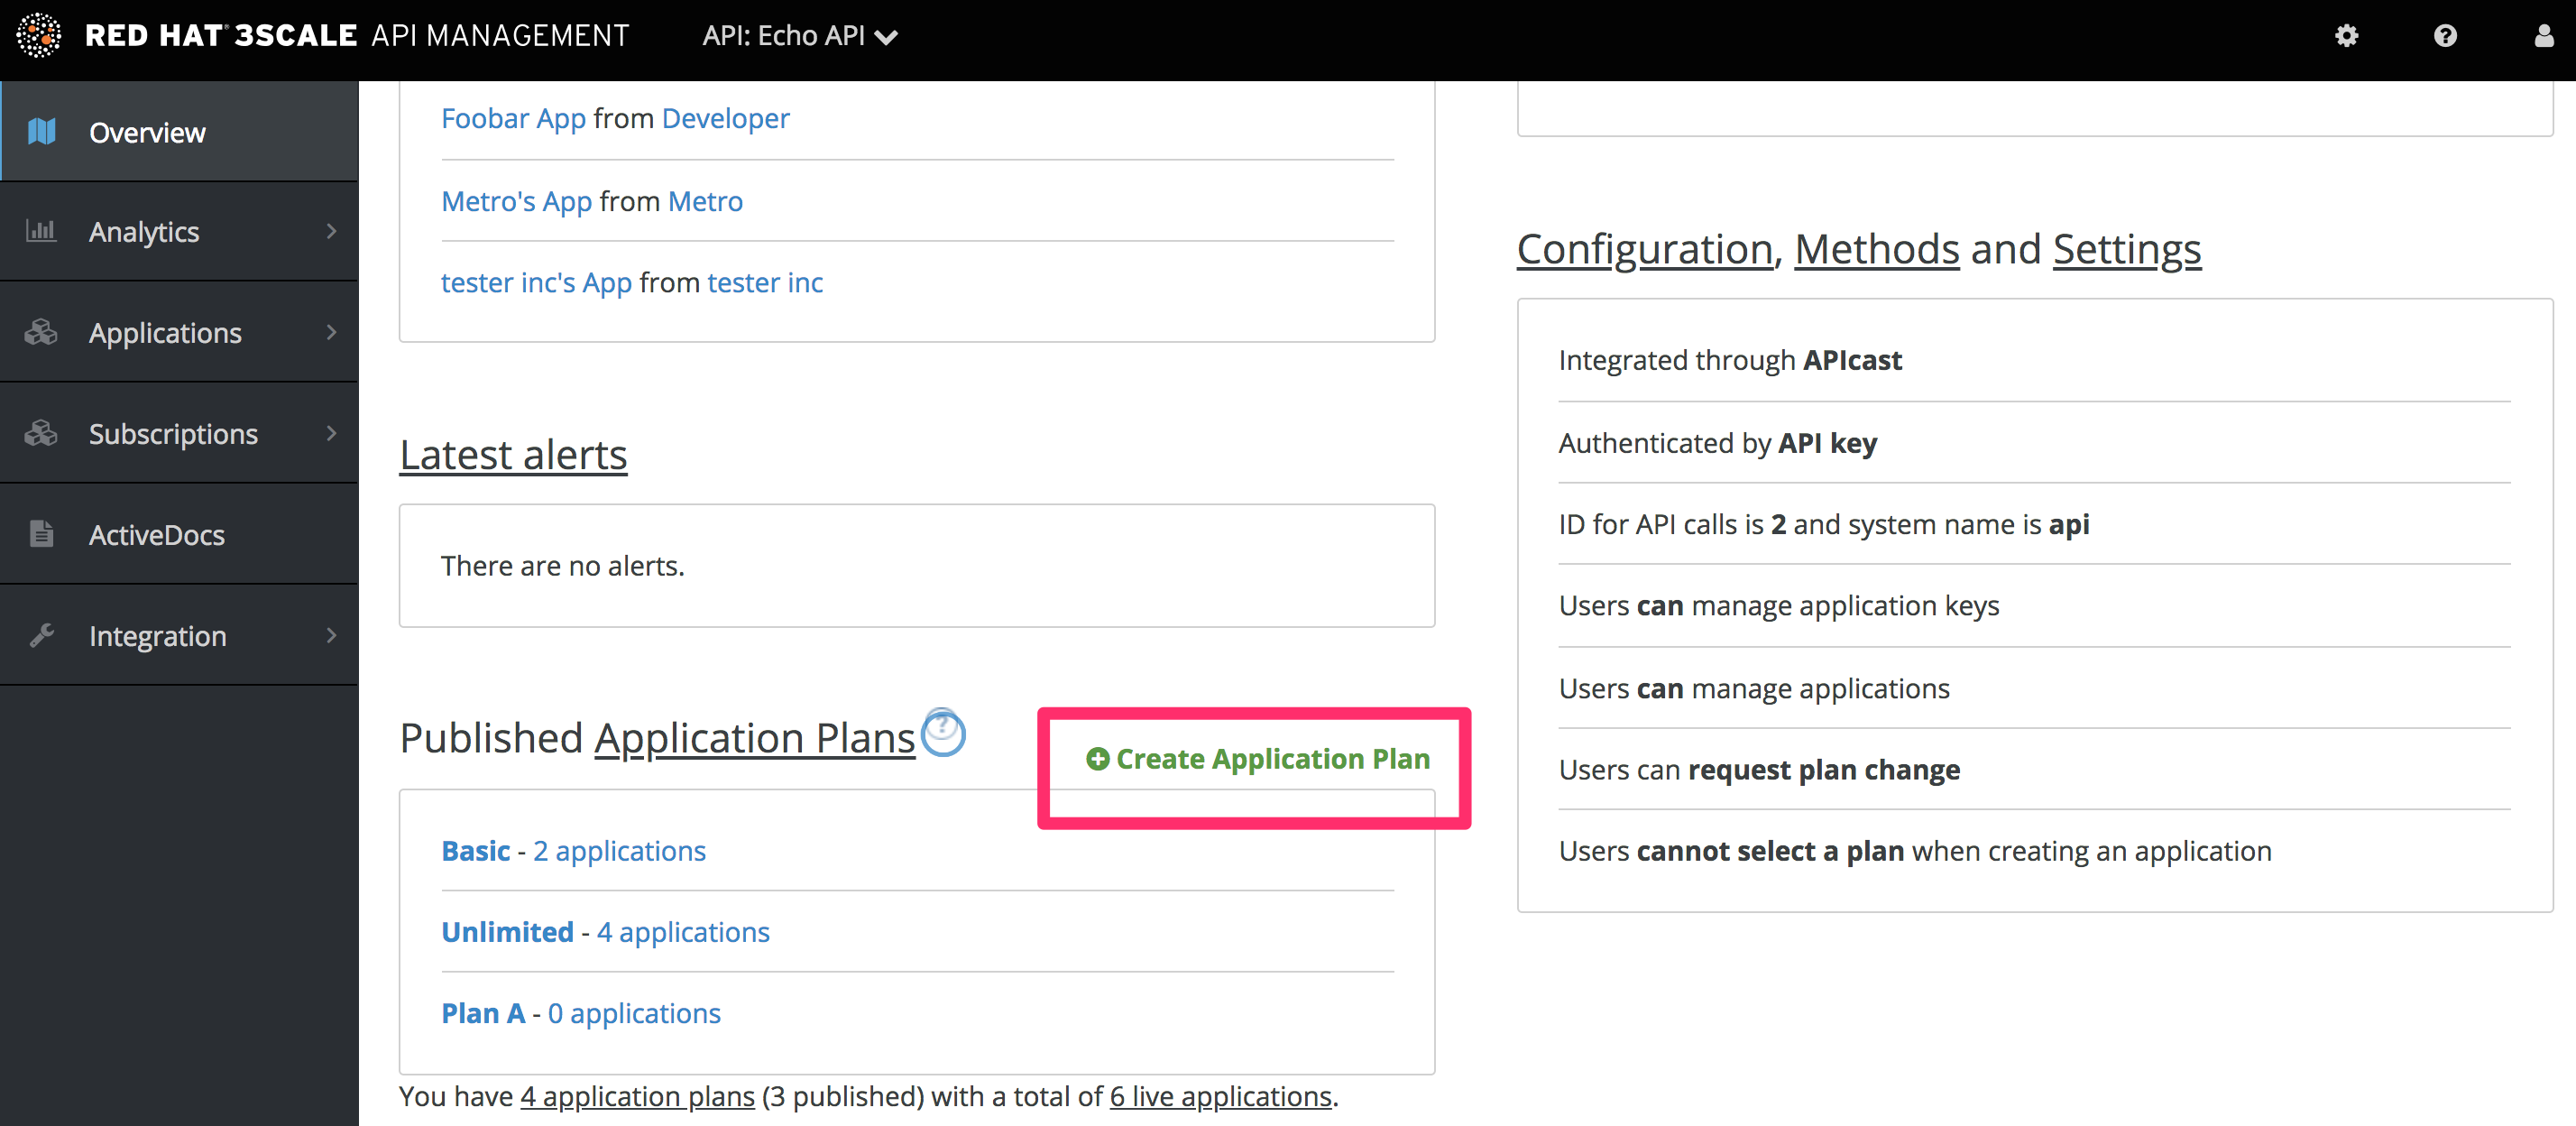
- Navigate to [Your_API_name] > Applications > Application Plans.
- In the ‘Application plans’ section, go to the basic application plan to edit one of the plans that was generated by the sample data after installing or signing up for 3scale.
- Select limits in the hits row, and create a new usage limit of 3 per hour.
- Find one of your sample applications, by navigating to [Your_API_name] > Applications > Listing. Ensure that the application is set to the basic plan. If not, change plan on the application details page.
- Use the credentials for this application and repeat the previous sample call at least 3 times.
You have now successfully defined more restrictive access polices for all the applications on the basic plan.
1.1.1.3. Engaging your developers with a developer portal
For the prototype, you do not need to create any documentation content. It is usually enough to check that the workflows will meet your requirements. For example, while the API is in development and testing, you may want to disable the full self-service workflow:
- From your Admin Portal, navigate to Audience space and click Visit Portal link in the Developer Portal menu.
- Create a test signup and walk through all the steps.
- Usually self-service is enabled by default. To change it, go to Audience > Accounts > Usage Rules and click the account approval required checkbox.
- Repeat the test signup walkthrough and verify that you need to approve the account in the Admin Portal before the user can log in.
You can now successfully customize workflows for your developer portal.
1.1.2. Basic
1.1.2.1. Securing your API
For a full production implementation, you need to make some fundamental decisions about how to structure your API and implement integration with 3scale.
You have the choice of several authentication modes for API traffic. Consult the guide on the available options and configure the settings.
After you set it, you should not switch auth modes again because it can easily invalidate existing credentials.
You also have several deployment options for the API traffic manager layer. APIcast, the NGINX based API gateway, is the favorite amongst 3scale customers due to its combination of ease of configuration and performance. You can use hosted APIcast which is great to get started quickly, but comes with volume limits and additional latency. Alternatively, you can deploy it on your own servers for the best performance and completely unrestricted traffic volume.
Hosted APIcast
- Follow the onboarding wizard after you log in to your Admin Portal for the first time.
- Continue iterating on your API configuration (such as refining access policies) until you have reached a version you are happy with for production.
- Promote your APIcast configuration to the production gateway.
Self-managed APIcast
- Set up a test installation of your API gateway on your OpenShift servers.
- Continue iterating on your API configuration (such as refining access policies) until you have reached a version that you are happy with for production.
- Promote your APIcast configuration to the production gateway.
- For further details about self-managed APIcast, see Installing APIcast. Additionally, APIcast policies covers some concepts to configure the API access policies
1.1.2.1.1. Configuring your API access policies with application plans
In the preceding section, you ensured that only authenticated calls are allowed through to your API. In this section you will apply policies to differentiate rate limits.
In 3scale, applications define the credentials to access your API. An application is always associated with one application plan that determines the access policies. Applications are stored within developer accounts. In the basic 3scale plans, only a single application is allowed. In the higher plans, multiple applications per account are allowed.
In prototype, you can only control access based on overall hits on your API. The flexibility of 3scale is realized after you start using custom methods and metrics to create more sophisticated tiers for your application plans and for deeper analytic insight to your API. For more details, see the analytics guide.
- The mapping between your API structure and methods or metrics in 3scale is logical. You can get reports of the API usage from 3scale if you define a consistent rule. You must determine the level of detail. Generally, it is good to aim for 5-20 methods/metrics.
- The values reported to 3scale can only be incremented. You cannot set absolute values or decrement the counters.
- After adding any new methods or metrics to 3scale, it is important to add the new system names to your integration point (API gateway or code plugin).
- You can make changes, such as rate limits, at runtime without redeploying.
In this example, to add polices to the application plan of the Echo API, take the following steps:
- Find the API you want to work on.
- In the 'Application Plans' section, select basic to edit one of the plans that was generated automatically after signing up to 3scale/deploying your instance.
- If you have a rate limit for hits, remove it.
- Add a new method to the plan under the hits metric with the system name "test".
- Set a rate limit for the test method to 5 per hour.
- Add two new metrics with system names "v1" and "v2".
- Under the v2 metric, disable access by clicking on the enabled column. This has the same effect as setting a rate limit of zero.
APIcast deployment
- Go to [Your_API_name] > Integration > Configuration.
Expand the mapping rules section and add the following mappings:
 Note
Notethe default mapping for "/" has been removed. If still used, it will lead to double-counting of hits.
Code plugin deployment
- Follow the instructions and examples in your plugin library to add usage for custom methods and metrics to your 3scale authorization and reporting calls.
- Ensure a mapping from the URL structure to the custom method, "test".
- Ensure a mapping from the URL to the custom metrics "v1" and "v2".
Test the calls using application credentials associated with the basic plan.
Calls will be allowed:
curl "https://api-2445581407825.staging.apicast.io:443/v1/test?user_key=287d64924e6120d215b1000ac07c063b"
After 5 calls, the calls will start to get rejected. This is because of the limit set for the test method.
Calls will be rejected because v2 is not allowed in the basic plan:
curl "https://api-2445581407825.staging.apicast.io:443/v2/test?user_key=287d64924e6120d215b1000ac07c063b"
Calls will be rejected because there is no mapping rule set for missing:
curl "https://api-2445581407825.staging.apicast.io:443/missing?user_key=287d64924e6120d215b1000ac07c063b"
These calls will be allowed for NGINX (depending on how you have implemented the mapping for your plugin). For the following call, it will be up to your application to return a 404 not found response. To avoid this, refine the mapping:
curl "https://api-2445581407825.staging.apicast.io:443/noversion/test?user_key=287d64924e6120d215b1000ac07c063b"
This basic concept gives you all the flexibility you need to define your API tiers. It is important to decide early on what you want to use for your custom methods and metrics. Whenever you make changes to the system names, you must redeploy the changes as described in the secure your API section.
1.1.2.2. Engaging your developers with the Developer Portal
The Developer Portal Guide contains information to create and use a Developer Portal. Consider writing your content in Textile or Markdown. Following are optional steps that you may want to consider:
- Configure ActiveDocs to bring interactive capabilities to your documentation and make it easier for developers to explore.
- Add a favicon.
- Add your Google Analytics tracker code by editing partial in your CMS called analytics.
- Configure your signup workflows.
- Customize your email addresses (doc for SaaS) and the email template content.
1.1.3. Advanced
1.1.3.1. Securing your API
Advanced authentication mode: OpenID Connect
Secure your APIs using the APIcast integration with OpenID Connect for Red Hat Single Sign-On (RH-SSO). Applications in the Red Hat 3scale API Management Platform are synchronized with the Identity Provider (IdP), in this case RH-SSO. Currently, this is an end-to-end supported solution. It covers the main OAuth 2.0 flows: Authorization code, Resource password owner, Client credentials, and Implicit grant.
Code plugin deployment
Almost all 3scale customers find performance to be fine. But, if you want to turbo-charge your API, you can cache authorization calls to 3scale using any caching library that you are comfortable with.
1.1.3.2. Configuring your API access policies with application plans
In the preceding section, you ensured that only authenticated calls are allowed through to your API. In this section, you apply policies to differentiate rate limits.
In 3scale, applications define the credentials to access your API. An application is always associated with one application plan that determines the access policies. Applications are stored within developer accounts. In the basic 3scale plans, only a single application is allowed. In the higher plans, multiple applications per account are allowed.
Alerts may be configured to send notifications by email or to the web consoles: . Go to your API Settings page: [Your_API_name] > Integration > Settings. . Go to the Alerts section on the page. Here, you can configure the alerts that you want as a percentage of your rate limit levels.
3scale gives you the flexibility to decide whether to make rate limits soft (even calls above the limits are allowed through) or hard (calls are rejected before hitting your application). With the code plugin, you consciously need to decide which type to implement. On the other hand, APIcast defines hard limits by default. These can be customized in the Lua file to avoid rejecting over-limit calls.
1.1.3.3. Engaging your developers with the Developer Portal
After you have completed the basic path, following are the two advanced areas to explore for the developer portal:
- Liquid markup provides tags and drops that provide direct access to system objects and allow you to introduce dynamic rendering of developer portal pages.
- All 3scale system pages can be customized. This is for advanced users because the HTML is complex. Ultimately, you can customize virtually any page of your developer portal. Usually the default pages will be perfectly fine with some CSS changes.
1.2. Going live
Following is the final checklist before the public launch of your API.
Raise request for the custom domain and email as soon as possible because they have a long lead time.
- Set up a custom domain. For further details, refer to Custom Domain in SaaS.
- Optionally, set up a custom outbound email address. To see how to perform this step, see Configure Email Domain.
- Remove the Developer Portal access code from Audience > Developer Portal > Domains & Access.
Following are some extra points for consideration:
- Add pricing to generate revenue directly from your API (only available for SaaS accounts).
- Use insight from your API analytics (under analytics in your Admin Portal) to refine your application plans.
Chapter 2. API traffic with 3scale
By the end of this guide, your API traffic will be protected by API keys, tracked, and monitored by 3scale with basic rate limits and controls in place. A fictional Echo API serves as an example, which you can substitute with your own API.
Getting your API up and running with 3scale is straightforward and easy to accomplish by following the steps here. You will get traffic flowing and monitored as well as be able to issue rate-limited developer keys.
Remember that if you have a production API, you should do this in a staging/non-production environment initially to avoid disruption for existing API users.
2.1. Prerequisites
This tutorial assumes that you are using a 3scale SaaS account and have access to the Admin Portal.
To run this example you can use a simple test API called Echo API hosted at https://echo-api.3scale.net.
You need to have a simple application, for example Curious echo, which will call the API. This may be as simple as a command line call, a mobile app, or any code that can call a remote server.
2.2. Connecting Echo API to 3scale
In order to connect Echo API to 3scale, you need to follow three simple steps:
- Access your 3scale Admin Portal and set up your first plans and metrics and your first API keys.
- Integrate your API with 3scale using the API gateway in the staging environment (for development only).
- Map your API endpoints to 3scale methods and metrics.
2.2.1. Defining your API and creating your first API key
Your 3scale Admin Portal (http://YOURDOMAIN-admin.3scale.net) provides access to a number of configuration features. For now, focus on getting the minimum setup required to deploy your API:
- Define your API: Add the metrics and methods.
- Configure any limits you may wish to impose on API usage.
- Head to Audience > Accounts > Listing to create a new developer account and API credentials.
2.2.1.1. Defining your API: Add metrics and methods
Here you can add as many methods and metrics as you need. By default, they will be available in all plans of your service.
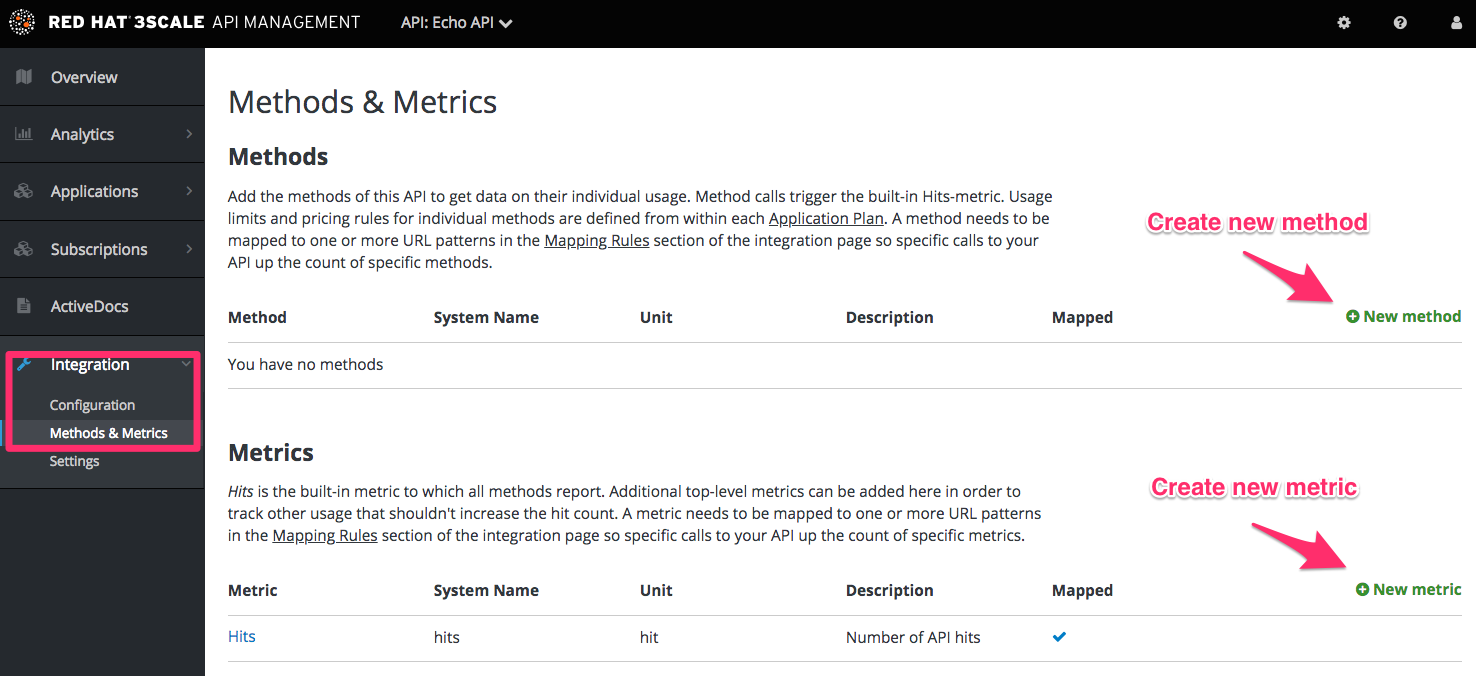
For more details about how to add methods and metrics, you can check out our documentation page about defining your API on 3scale.
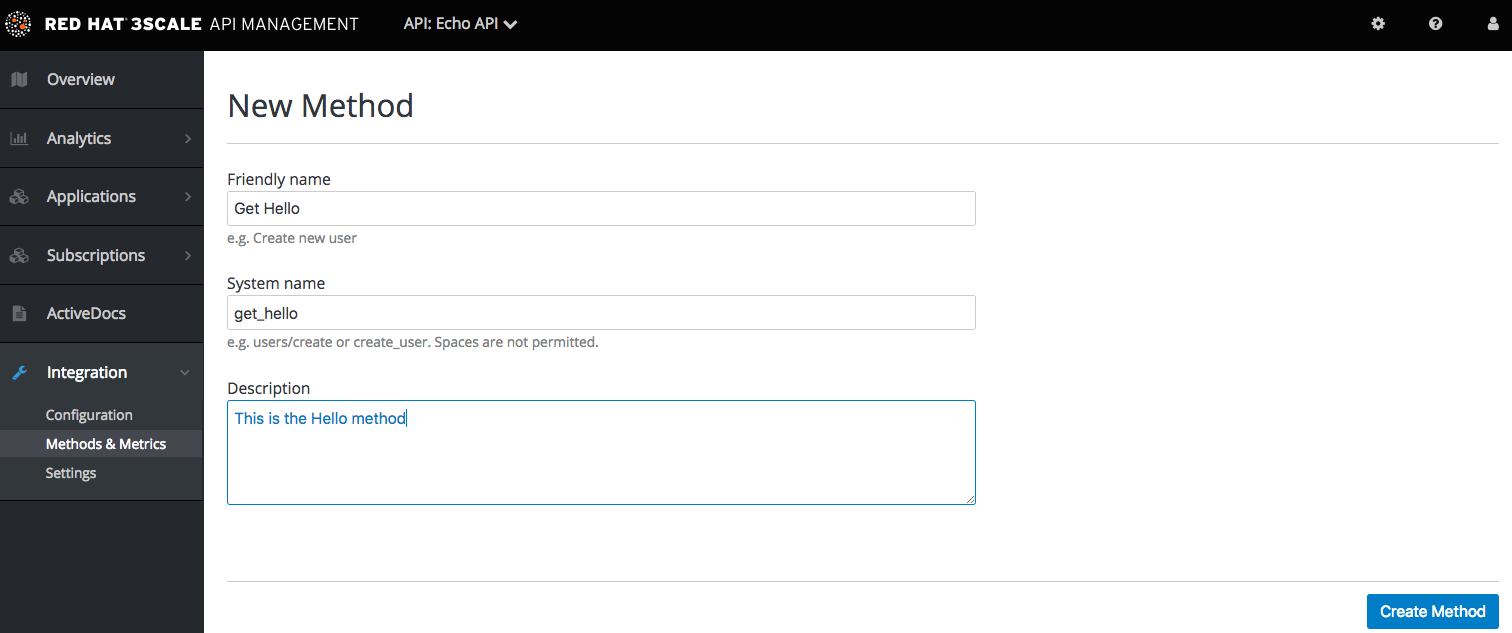
For this simple test, add just two methods under hits with system names:
- gethello
- getgoodbye
2.2.1.2. Configuring limits on API usage
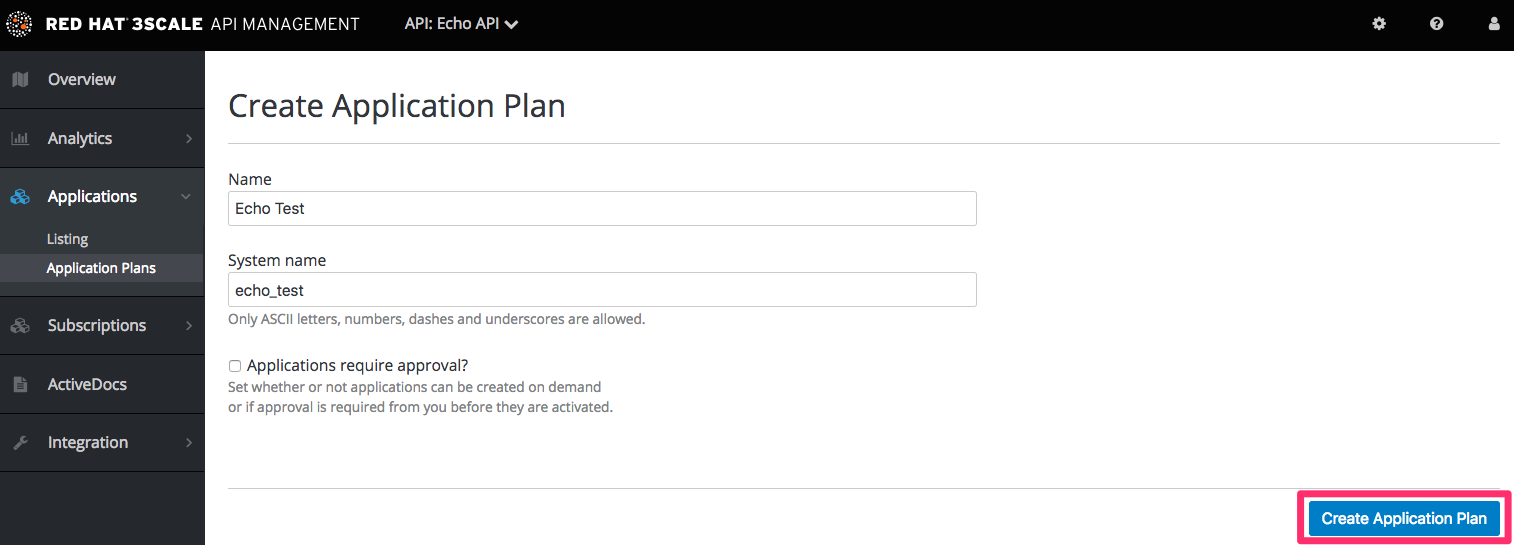
In addition to creating the metrics/methods, you can also add limits to any of the API usage metrics under each plan. Create a new application plan for this example. Navigate to [your_API_name] > Overview > Create Application Plan.
In the form that opens, specify the desired name – for example HelloEchoTest – and the system name. Then click on Create Application Plan button.
After the previous step, you should see the list of application plans. Click on the HelloEchoTest plan to create limits for the metrics and methods. You should be able to see all the metrics and methods that you defined in the previous step. Click on the Limits icon under any metric or method. Adding a limit to the Hits metric applies the rule across all the methods under Hits; adding limits to a method only applies to that method. You can create different plans with different limits later on.
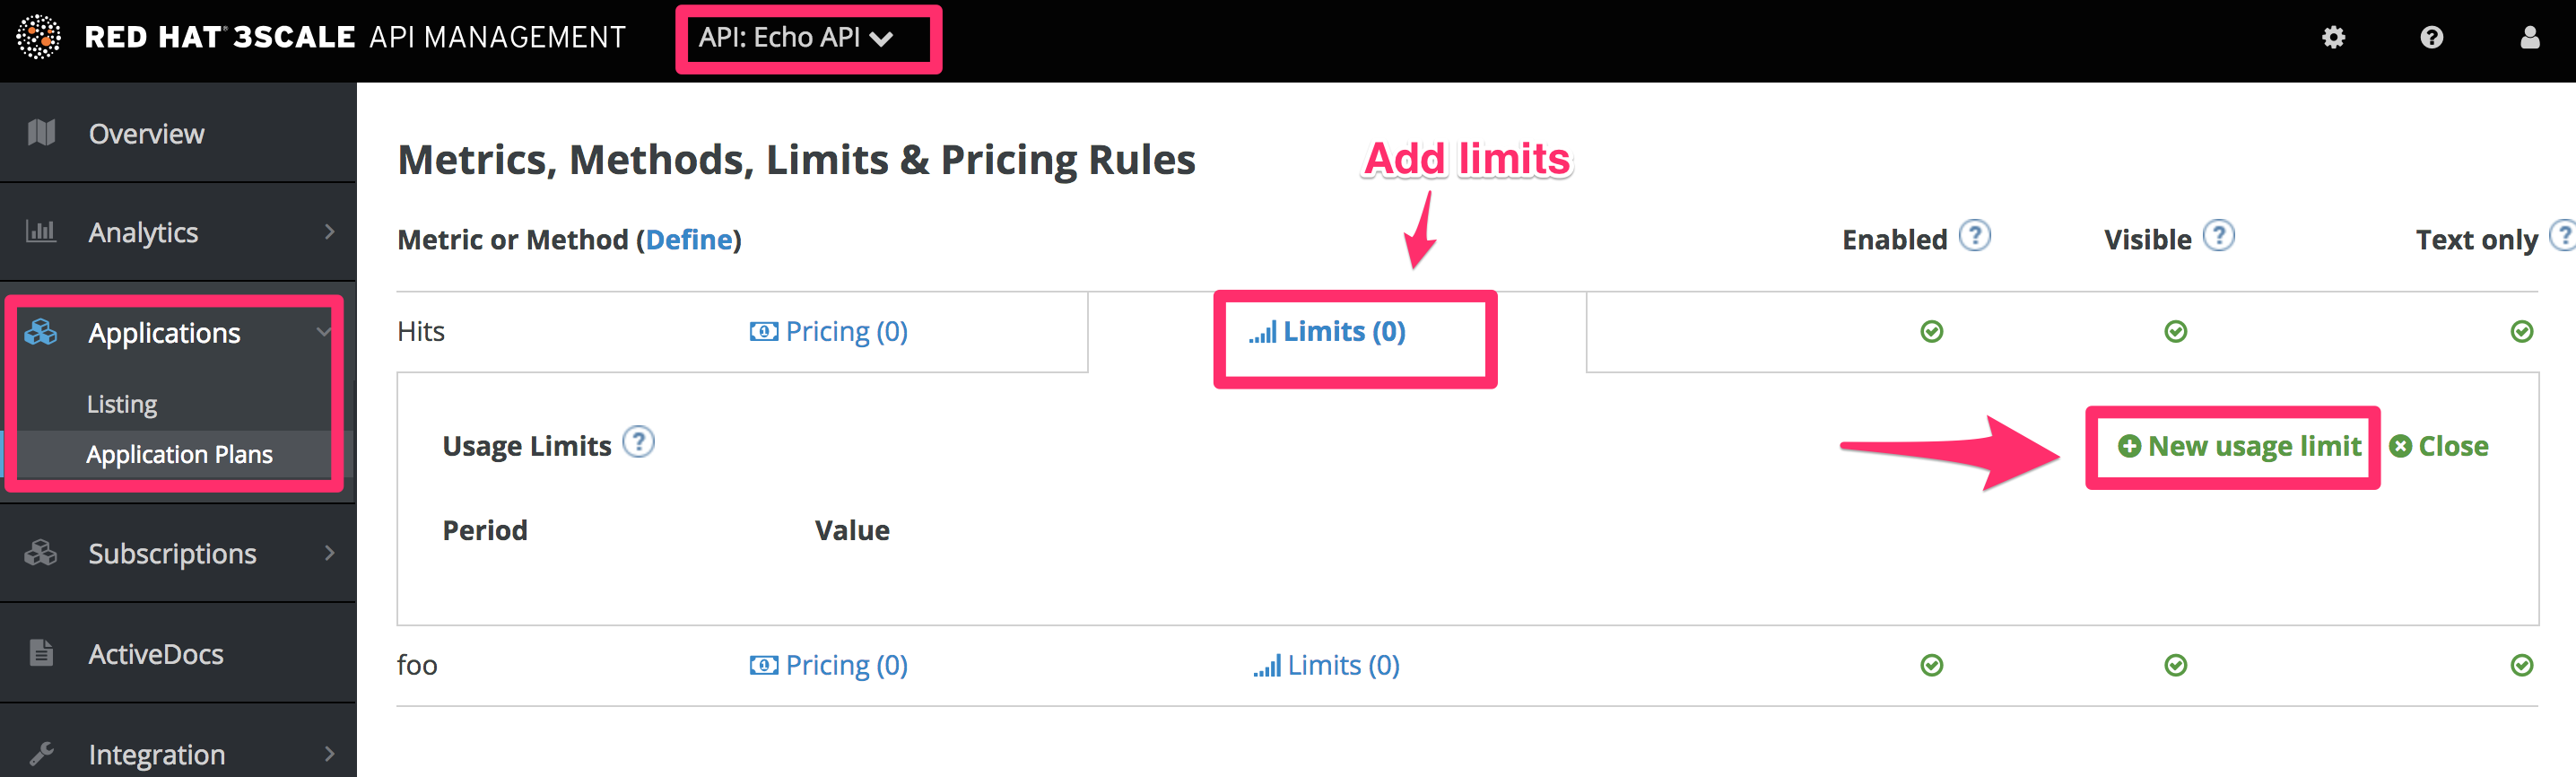
Limits restrict the number of API calls an application on this plan can do per minute/hour/day/etc.
2.2.1.3. Creating a new developer account and API credentials
Go to Audience > Accounts > Listing and click on the Create button.
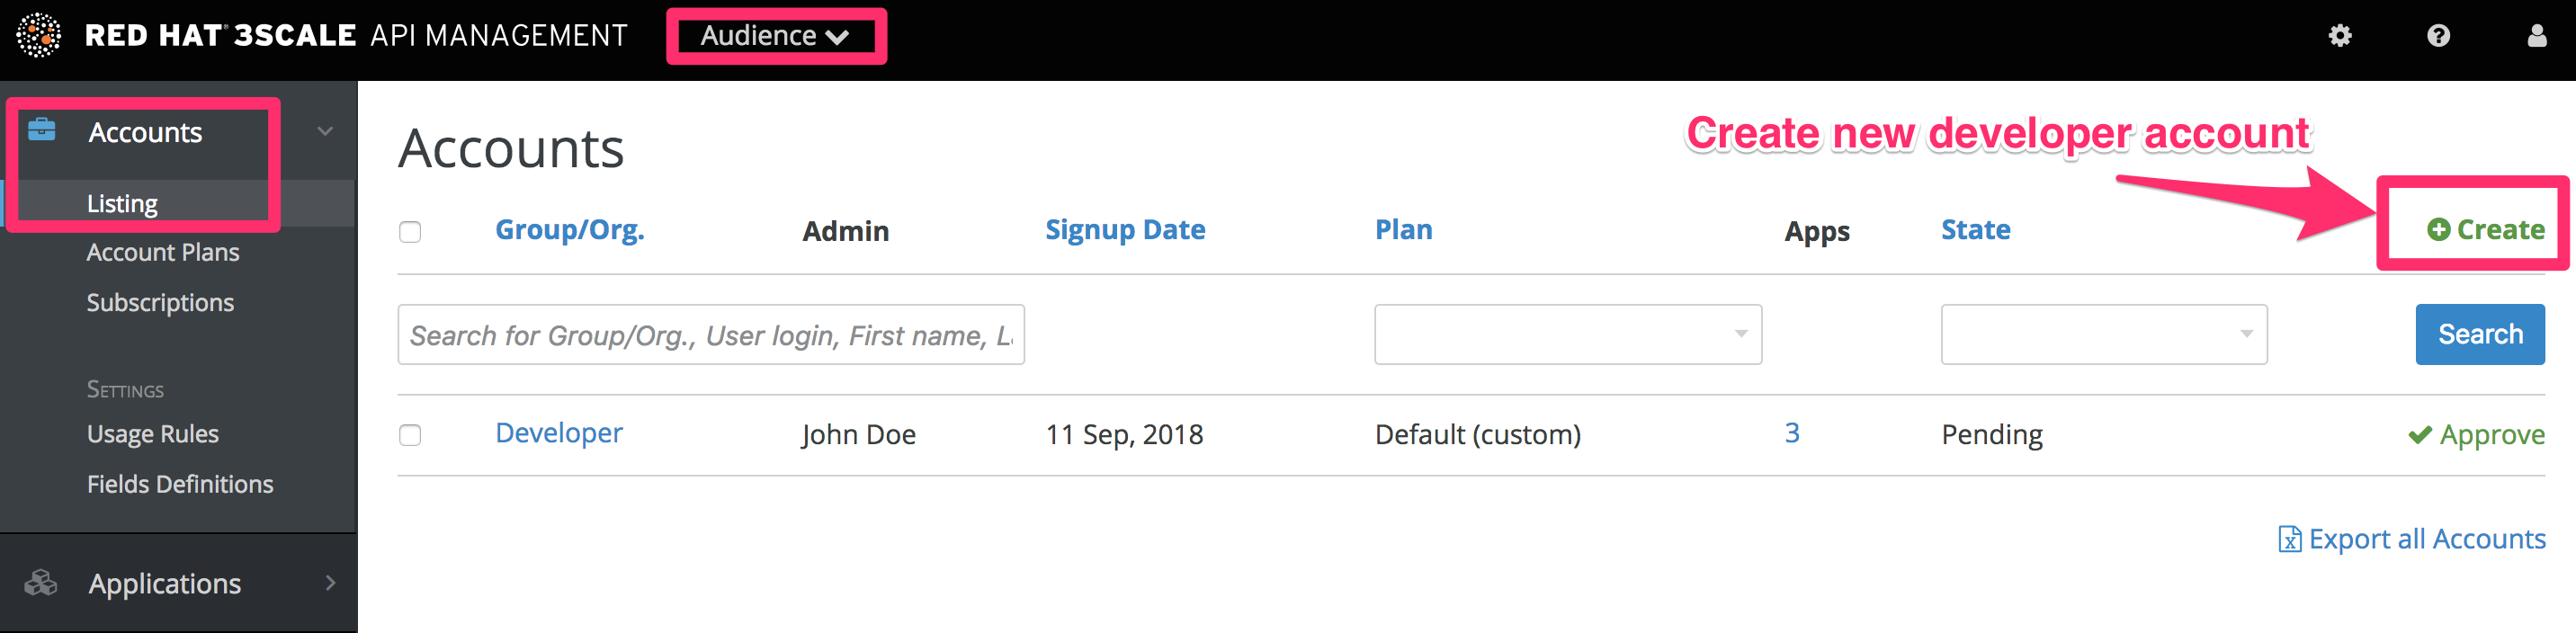
Fill in some information for the new developer who will access the API.
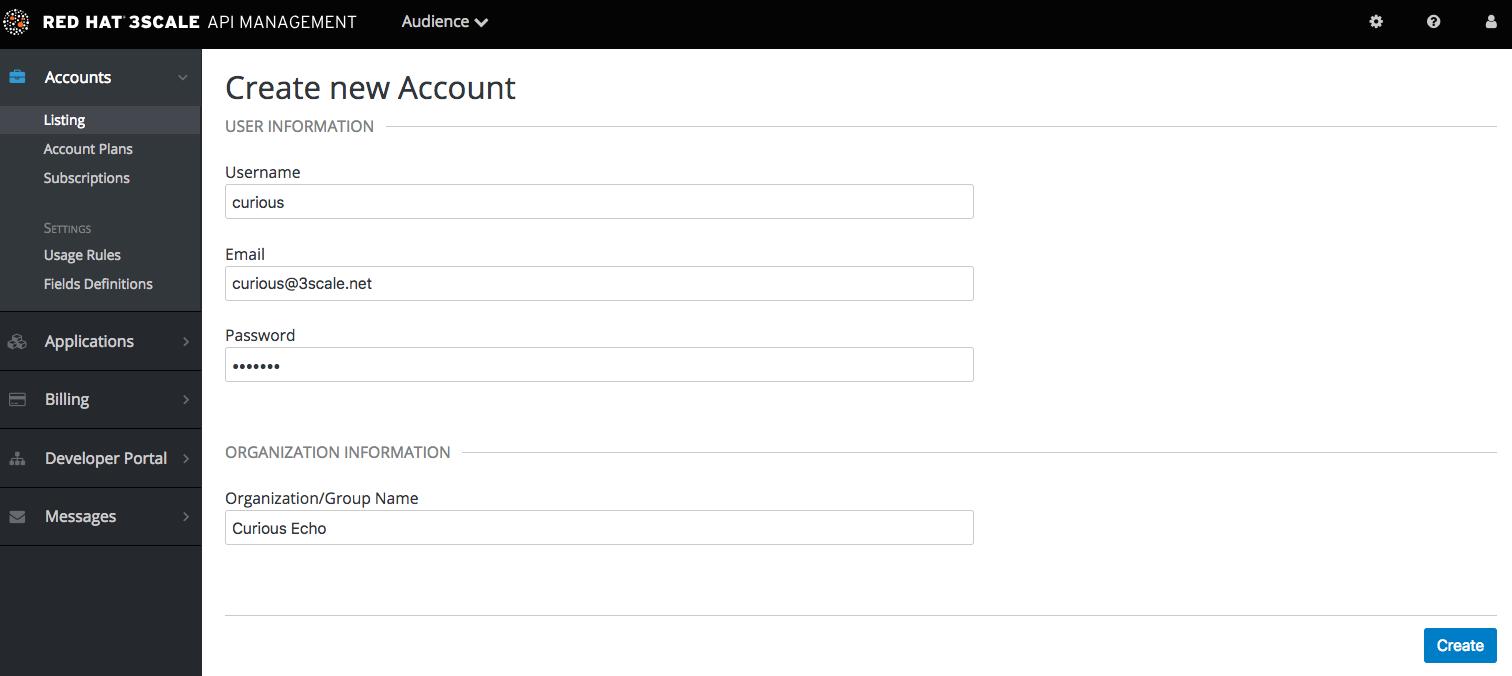
Once you click Create, select the new account from the list to go to the home page.
The account area lists all the companies and developers signed up to use the API. New companies can be added from the Admin Portal, from the API, or by self-service signup on the developer portal.
When you create a new developer account, you will also be creating a new application for that account.
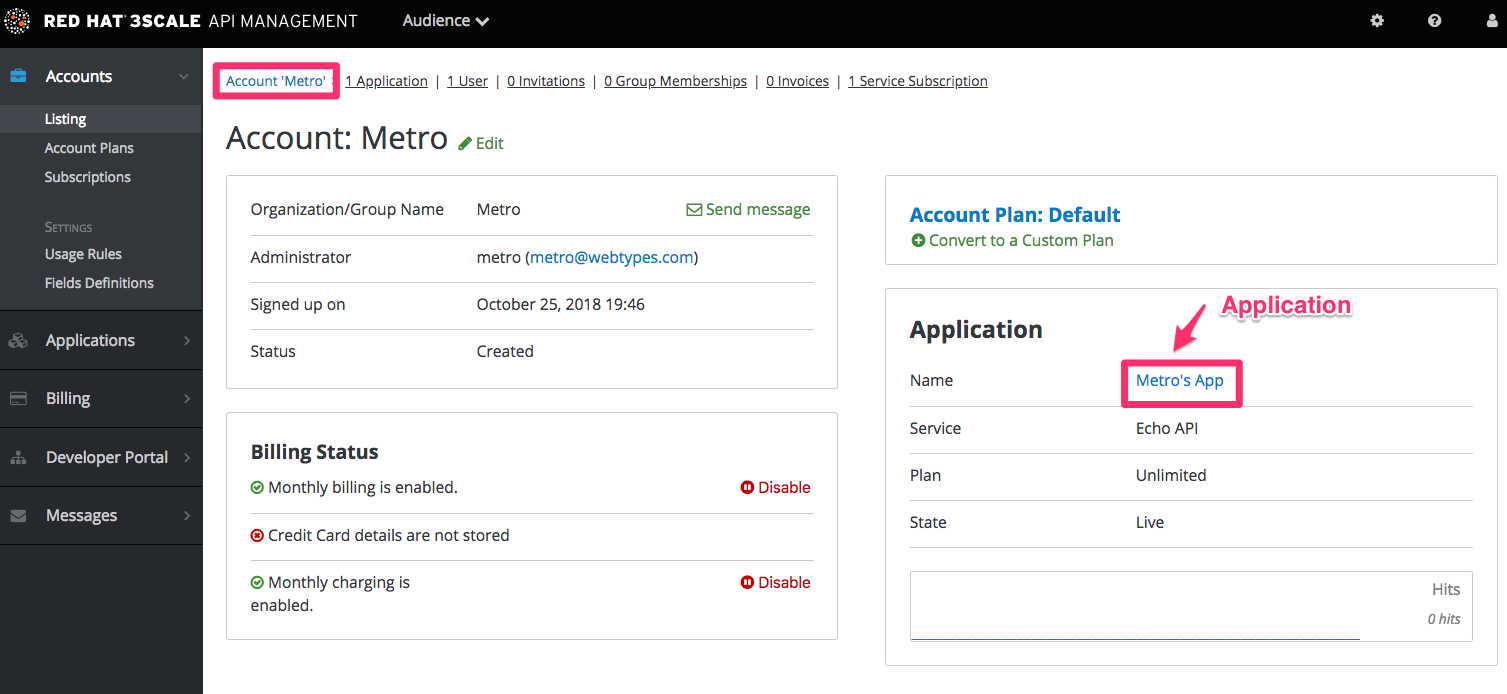
Applications will each have a unique key to access the API. To find that key, click on the application name and check the API credentials section.
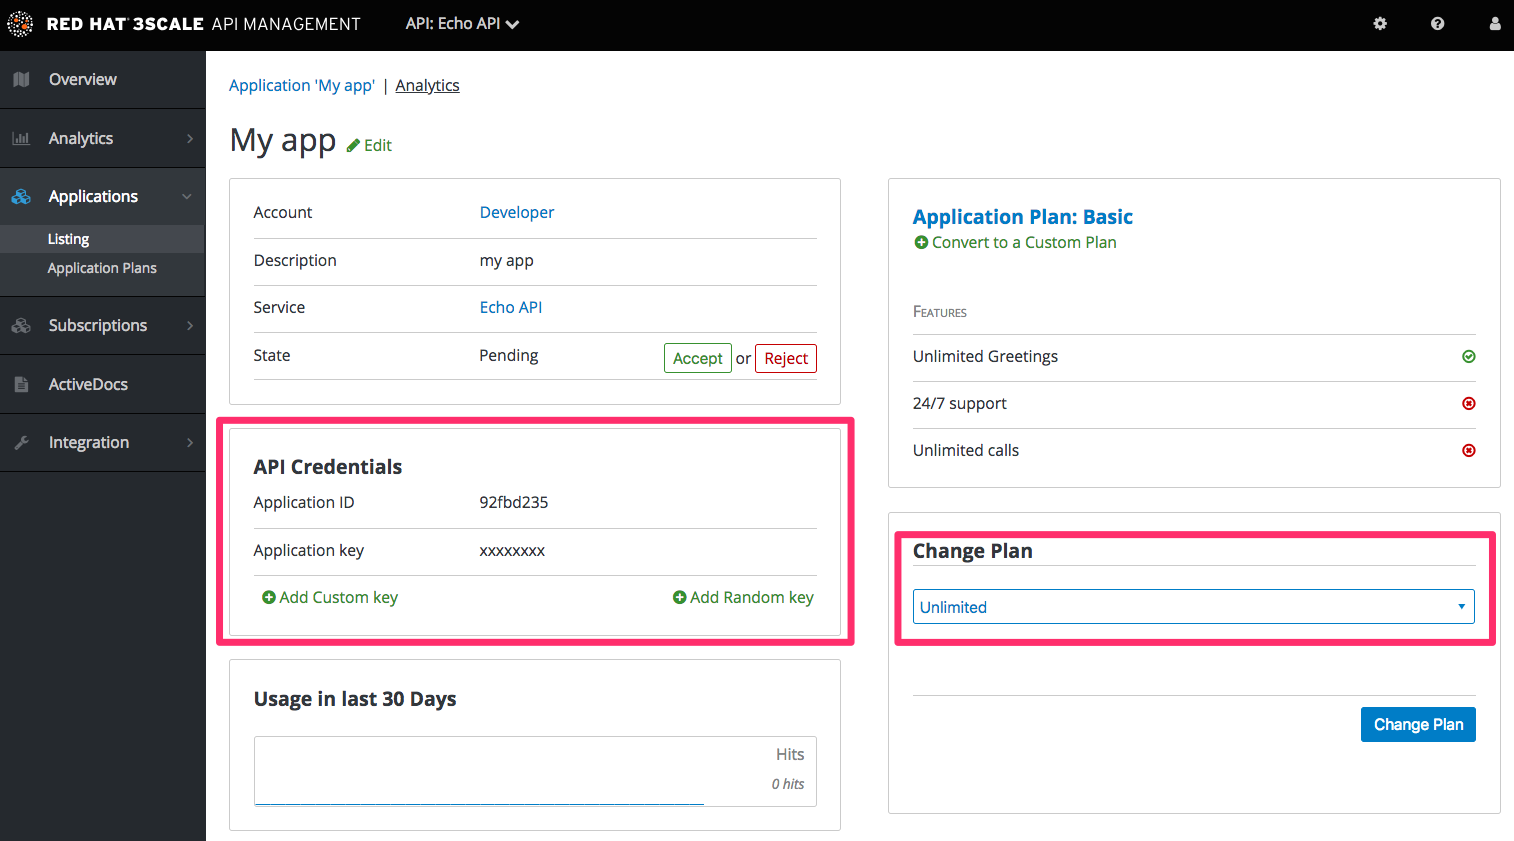
These are the keys the Curious Echo app will use to call the Echo API. Lastly, on the right-hand side of the application details page (see screenshot above), select the Change Plan dropdown and select the plan you created and named earlier, Echo Test, and confirm the change. This applies the new plan to this application.
You have now configured the management system for your first application.
2.2.2. Integrating via API gateway in the staging environment
Once you sign into your 3scale account, go to [your_API_name] > Integration > Configuration.
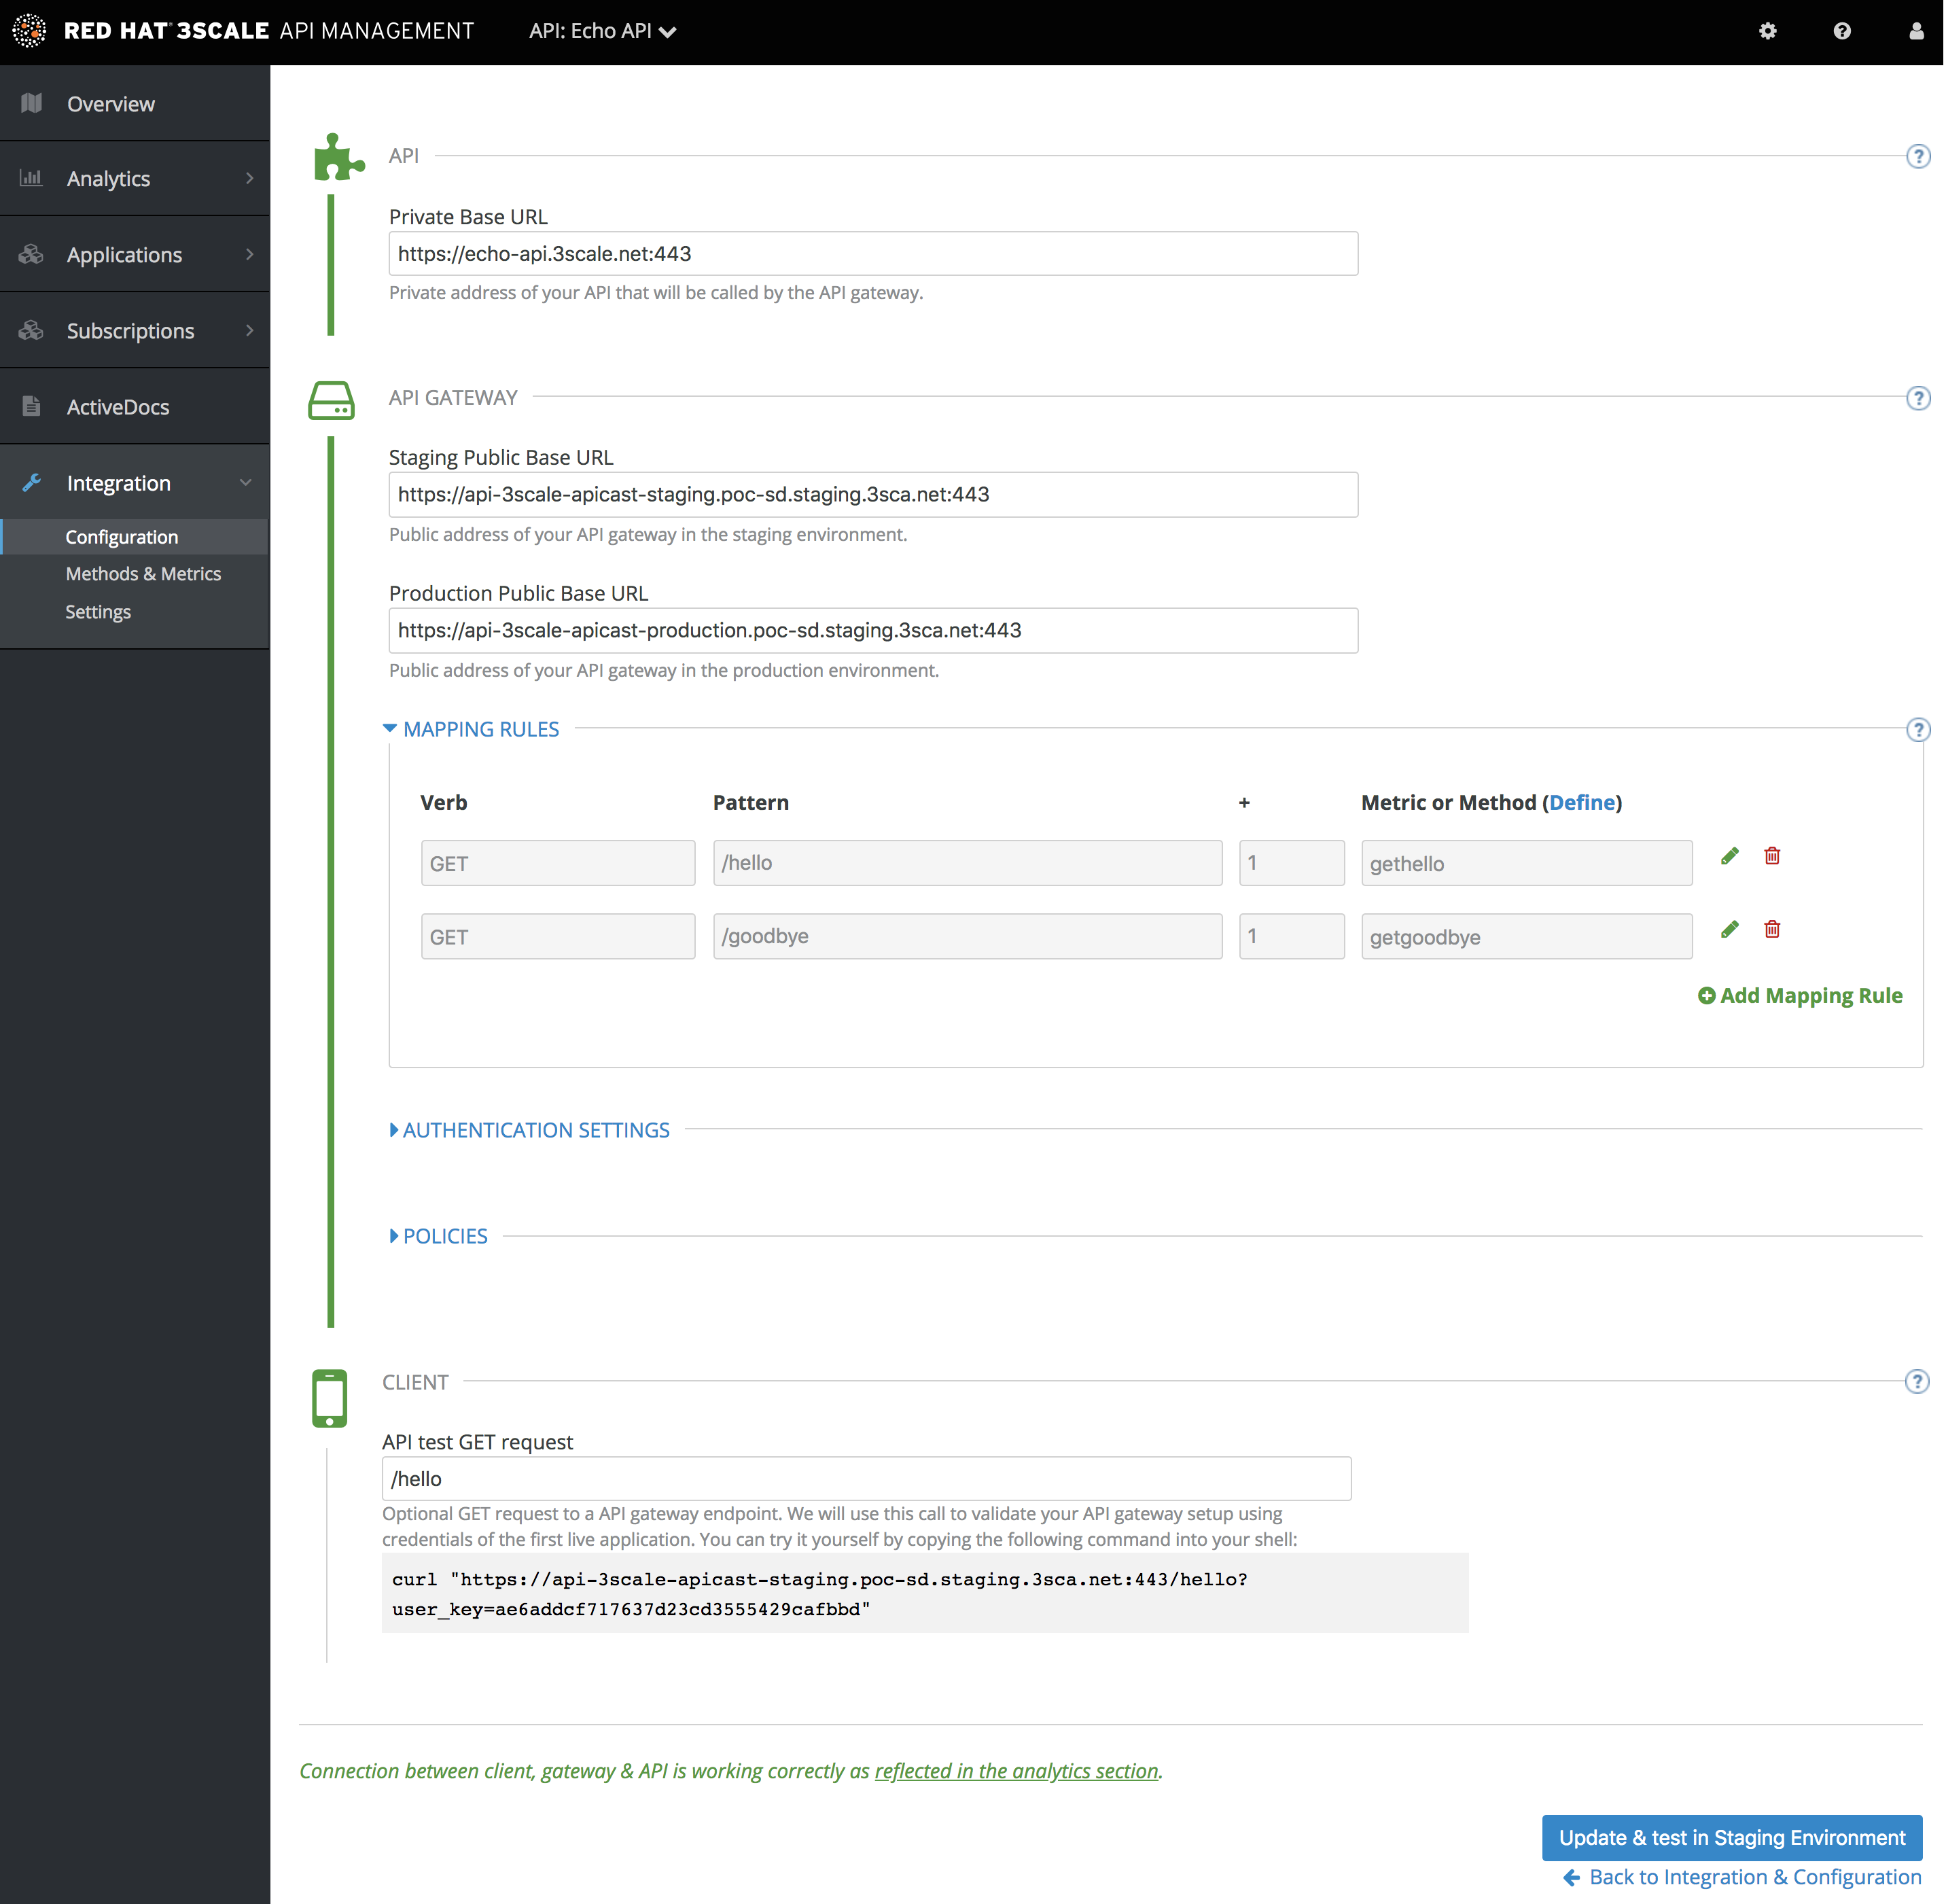
Set the address of your API backend in the staging environment. This is the address of the server where your API is running. Now you can input a valid resource path for your API, which will be used to validate the API gateway in the staging environment. After that, click Update & test in Staging Environment. If everything goes well, you will see a green vertical line in the staging area and the full test call made to verify connection. It will look like this:
curl "https://api-xxx.staging.apicast.io/hello?user_key=USER_KEY"
USER_KEY is the key of one of the sample applications that were created when you first logged into your 3scale account. If you missed that step, create a developer account and an application within that account.
Try the integrated API without app credentials, then with incorrect credentials. Then once authenticated, try to send API calls within and over any rate limits that you have defined.
2.2.3. Capturing traffic for specific methods
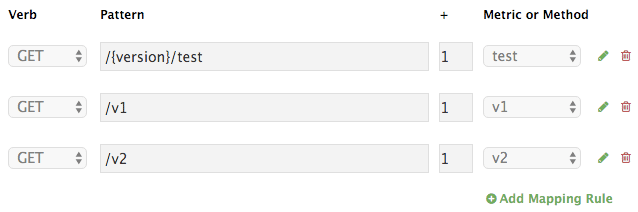
By default you start with a very simple mapping rule.
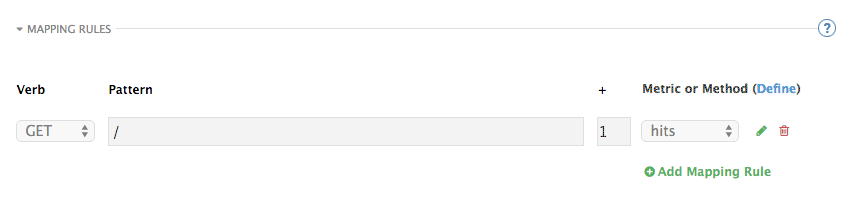
This rule says that any GET request that starts with forward slash (/) will increment the metric hits by 1. You will most likely remove this rule since it is too generic. You can learn more about how to manage Mapping rules on this documentation page .
The mapping rules define which metrics (and methods) you want to report depending on the requests to your API. For instance, below you can see the rules for the Echo API.

You are matching the API endpoints with the methods, which you defined earlier in application plans.
- /hello
- /goodbye
Now you can repeat traffic testing for the mapped methods and check their traffic in the Analytics section of your Admin Portal.
2.3. Results
Your API is now connected to 3scale. You can now apply API management features to manage and track your API traffic.
2.4. Closing the loop
In the example, new API credentials were generated from the Admin Portal to keep things simple. Once you have set up a developer portal, new developers can use the it to automatically create accounts and receive their credentials.
2.5. Help
If you have trouble setting up your API, head over to the troubleshooting tutorial.
Additional resources
Now that you have tested your integration with 3scale in a staging environment, you can select a production deployment option. Find more information about the APIcast gateway in the following documentation: