
Chapter 1. APIcast Overview
APIcast is an NGINX based API gateway used to integrate your internal and external API services with the 3scale API Management Platform. APIcast does load balancing by using round-robin. In this guide you’ll learn more about deployment options, environments provided, and how to get started.
See the articles Red Hat 3scale API Management Supported Configurations and Red Hat 3scale API Management - Component Details to get information about the latest released and supported version of APIcast.
1.1. Prerequisites
APIcast is not a standalone API gateway, it needs connection to 3scale API Manager.
- You will need a working 3scale On-Premises instance.
1.2. Deployment options
You can use APIcast hosted or self-managed, in both cases, it needs connection to the rest of the 3scale API management platform:
- APIcast built-in: Two APIcast gateways (staging and production) come by default with the 3scale API Management installation. They come pre-configured and ready to use out-of-the-box.
APIcast self-managed: You can deploy APIcast wherever you want. Here are a few recommended options to deploy APIcast:
- the Docker containerized environment: Download a ready to use Docker-formatted container image, which includes all of the dependencies to run APIcast in a Docker-formatted container.
- OpenShift: Run APIcast on a supported version of OpenShift. You can connect self-managed APIcasts both to a 3scale API Management on-premise installation or to a 3scale hosted account.
1.3. Environments
By default, when you create a 3scale account, you get built-in APIcast in two different environments:
-
Staging: Intended to be used only while configuring and testing your API integration. When you have confirmed that your setup is working as expected, then you can choose to deploy it to the production environment. The OpenShift template sets the parameters of the Staging APIcast in a way that the configuration is reloaded on each API call (
APICAST_CONFIGURATION_LOADER: lazy,APICAST_CONFIGURATION_CACHE: 0). It is useful to test the changes in APIcast configuration quickly. -
Production: This environment is intended for production use. The following parameters are set for the Production APIcast in the OpenShift template:
APICAST_CONFIGURATION_LOADER: boot,APICAST_CONFIGURATION_CACHE: 300. This means that the configuration will be fully loaded when APIcast is started, and will be cached for 300 seconds (5 minutes). After 5 minutes the configuration will be reloaded. This means that when you promote the configuration to production, it may take up to 5 minutes to be applied, unless you trigger a new deployment of APIcast.
1.4. Configuring the integration settings
Go to [your_API_name] > Integration > Configuration.
The integration options are displayed on the Integration page, in the upper right-hand side. By default, the deployment option is APIcast hosted, and the authentication mode is API key. You can change these settings by clicking on edit integration settings in the top right corner. Note that OAuth 2.0 authentication is only available for the self-managed deployment.
1.5. Configuring your service
You will need to declare your API backend in the Private Base URL field, which is the endpoint host of your API backend. APIcast will redirect all traffic to your API backend after all authentication, authorization, rate limits and statistics have been processed.
Typically, the Private Base URL of your API will be something like https://api-backend.yourdomain.com:443, on the domain that you manage (yourdomain.com). For instance, if you were integrating with the Twitter API the Private Base URL would be https://api.twitter.com/. In this example will use the Echo API hosted by 3scale – a simple API that accepts any path and returns information about the request (path, request parameters, headers, etc.). Its Private Base URL is https://echo-api.3scale.net:443.

Test your private (unmanaged) API is working. For example, for the Echo API you can make the following call with curl command:
curl "https://echo-api.3scale.net:443"
You will get the following response:
{
    "method": "GET",
    "path": "/",
    "args": "",
    "body": "",
    "headers": {
      "HTTP_VERSION": "HTTP/1.1",
      "HTTP_HOST": "echo-api.3scale.net",
      "HTTP_ACCEPT": "*/*",
      "HTTP_USER_AGENT": "curl/7.51.0",
      "HTTP_X_FORWARDED_FOR": "2.139.235.79, 10.0.103.58",
      "HTTP_X_FORWARDED_HOST": "echo-api.3scale.net",
      "HTTP_X_FORWARDED_PORT": "443",
      "HTTP_X_FORWARDED_PROTO": "https",
      "HTTP_FORWARDED": "for=10.0.103.58;host=echo-api.3scale.net;proto=https"
    },
    "uuid": "ee626b70-e928-4cb1-a1a4-348b8e361733"
  }
Once you have confirmed that your API is working, you will need to configure the test call for the hosted staging environment. Enter a path existing in your API in the API test GET request field (for example, /v1/word/good.json).
Save the settings by clicking on the Update & Test Staging Configuration button in the bottom right part of the page. This will deploy the APIcast configuration to the 3scale hosted staging environment. If everything is configured correctly, the vertical line on the left should turn green.
1.5.1. Configuring the authentication settings
If you are using one of the self-managed deployment options, save the configuration from the GUI and make sure it is pointing to your deployed API gateway by adding the correct host in the staging or production Public base URL field. Before making any calls to your production gateway, click on the Promote v.x to Production button.
Find the sample curl at the bottom of the staging section and run it from the console:
curl "https://XXX.staging.apicast.io:443/v1/word/good.json?user_key=YOUR_USER_KEY"
You should get the same response as above, however, this time the request will go through the 3scale hosted APIcast instance. Note: You must have an application with valid credentials for the service. If you are using the default API service created on sign up to 3scale, you should already have an application. Otherwise, if you see USER_KEY or APP_ID and APP_KEY values in the test curl, you need to create an application for this service first.
Now you have your API integrated with 3scale.
3scale hosted APIcast gateway does the validation of the credentials and applies the rate limits that you defined for the application plan of the application. If you try to make a call without credentials, or with invalid credentials, you will see an error message. The code and the text of the message can be configured, check out the Advanced APIcast configuration article for more information.
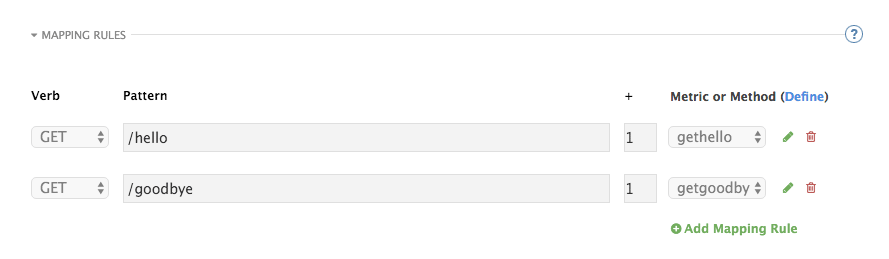
1.6. Mapping rules
The mapping rules define which metrics (and methods) you want to report depending on the requests to your API.
By default we start with a very simple mapping rule,

This rule means that any GET request that starts with / will increment the metric hits by 1. This mapping rule will match any request to your API. Most likely you will change this rule since it is too generic.
APIcast fetches the parameters in the following ways:
- For a GET method: APIcast fetches the parameters from the query string.
- For any of these methods (POST, DELETE, PUT): APIcast fetches the parameters from the body.
Parameters can also have named wildcards. Wildcards can appear between slashes or between slash and dot.
For instance, below you can see the rules for the Echo API:
Mapping rules can also include parameters on the query string or in the body: /{word}?value={value}.
The matching of the rules is done by prefix and can be arbitrarily complex (the notation follows Swagger and ActiveDocs specification)
-
You can do a match on the path over a literal string:
/hello -
Mapping rules can contain named wildcards:
/{word}
This rule will match anything in the placeholder {word}, making requests like /morning match the rule.
Wildcards can appear between slashes or between slash and dot.
-
Mapping rules can also include parameters on the query string or in the body:
/{word}?value={value}
APIcast will try to fetch the parameters from the query string when it is a GET and from the body when it is a POST, DELETE, PUT.
Parameters can also have named wildcards.
By default, all mapping rules are evaluated from first to last, according to the sort you specified. If you add a rule /v1 to the example on the figure above, it would be matched for the requests whose path starts with /v1, considering if it is either /v1/word or /v1/sentence.
1.7. Mapping rules workflow
The intended workflow to define mapping rules is as follows:
- You can add new rules by clicking the Add Mapping Rule button. Then you select an HTTP method, a pattern, a metric (or method) and finally its increment. When you are done, click Update & Test Staging Configuration to apply the changes.
- Mapping rules will be grayed out on the next reload to prevent accidental modifications.
- To edit an existing mapping rule you must enable it first by clicking the pencil icon on the right.
- To delete a rule click on the trash icon.
- Modifications and deletions will be saved when you hit the Update & Test Staging Configuration button.
In addition to this workflow, you have two features:
- To sort mapping rules, you can drag and drop them using the green arrows next to the checkbox of each mapping rule in the Last? column. The specified sort is saved in the database and it is kept in the content of the proxy configuration specifications after you click the Update & test in Staging Environment button.
- You can select the Last? checkbox to stop processing other mapping rules. For example, if you have the following mapping rules defined in API Integration Settings and you have different metrics associated to each rule:
(get) /path/to/example/search
(get) /path/to/example/{id}
When calling with: (get) /path/to/example/search, it will stop processing the remaining mapping rules and incrementing their metrics after the rule is matched.
For more advanced configuration options, you can check the APIcast advanced configuration tutorial.
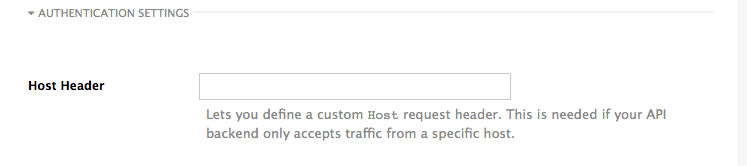
1.8. Host Header
This option is only needed for those API backends that reject traffic unless the Host header matches the expected one. In these cases, having a gateway in front of your API backend will cause problems since the Host will be the one of the gateway, e.g. xxx-yyy.staging.apicast.io
To avoid this issue you can define the host your API backend expects in the Host Header field in the Authentication Settings, and the hosted APIcast instance will rewrite the host.
1.9. Production deployment
Once you have configured your API integration and verified it is working in the Staging environment, you can go ahead with one of the APIcast production deployments. See the Deployment options in the beginning of this article.
At the bottom of the Integration page you will find the Production section. You will find two fields here: the Private Base URL, which will be the same as you configured in the Staging section, and the Public Base URL.
1.10. Public Base URL
The Public Base URL is the URL, which your developers will use to make requests to your API, protected by 3scale. This will be the URL of your APIcast instance.
If you are using one of the self-managed deployment options, you can choose your own Public Base URL for each one of the environments provided (staging and production), on a domain name you are managing. Note that this URL should be different from the one of your API backend, and could be something like https://api.yourdomain.com:443, where yourdomain.com is the domain that belongs to you. After setting the Public Base URL make sure you save the changes and, if necessary, promote the changes in staging to production.
Please note that APIcast will only accept calls to the hostname which is specified in the Public Base URL. For example, for the Echo API example used above, if you specify https://echo-api.3scale.net:443 as the Public Base URL, the correct call would be be:
curl "https://echo-api.3scale.net:443/hello?user_key=YOUR_USER_KEY"
In case you don’t yet have a public domain for your API, you can also use the APIcast IP in the requests, but you still need to specify a value in the Public Base URL field (even if the domain is not real), and in this case make sure you provide the host in the Host header, for example:
curl "http://192.0.2.12:80/hello?user_key=YOUR_USER_KEY" -H "Host: echo-api.3scale.net"
If you are deploying on local machine, you can also just use "localhost" as the domain, so the Public Base URL will look like http://localhost:80, and then you can make requests like this:
curl "http://localhost:80/hello?user_key=YOUR_USER_KEY"
In case you have multiple API services, you will need to set this Public Base URL appropriately for each service. APIcast will route the requests based on the hostname.
1.11. Protecting your API backend
Once you have APIcast working in production, you might want to restrict direct access to your API backend without credentials. The easiest way to do this is by using the Secret Token set by APIcast. Please refer to the Advanced APIcast configuration for information on how to set it up.
1.12. Using APIcast with private APIs
With APIcast, you can protect the APIs that are not publicly accessible from the Internet. The requirements are as follows:
- APIcast self-managed must be used as the deployment option.
- APIcast needs to be accessible from the public Internet and be able to make outbound calls to the 3scale Service Management API.
- The API backend should be accessible by APIcast.
In this case you can set your internal domain name or the IP address of your API in the Private Base URL field and follow the rest of the steps as usual. Note, however, that you will not be able to take advantage of the Staging environment, and the test calls will not be successful, as the Staging APIcast instance is hosted by 3scale and will not have access to your private API backend). But once you deploy APIcast in your production environment, if the configuration is correct, APIcast will work as expected.
1.13. Configuring APIcast with OpenTracing
OpenTracing is an API specification and method used to profile and monitor microservices. From version 3.3 onwards, APIcast includes OpenTracing Libraries and the Jaeger Tracer library.
1.13.1. Prerequisites
To add distributed tracing to your APIcast deployment, you need to ensure the following prerequisites:
- Each external request should have a unique request ID attached, usually via a HTTP header.
- Each service should forward the request ID to other services.
- Each service should output the request ID in the logs.
- Each service should record additional information, like start and end time of the request.
- Logs need to be aggregated, and provide a way to parse via HTTP request ID.
1.13.2. Procedure
To configure OpenTracing, use the following environment variables:
- OPENTRACING_TRACER: To define which tracer implementation to use. Currently, only Jaeger is available.
- OPENTRACING_CONFIG: To specify the default configuration file of your tracer. You can see an example here.
- OPENTRACING_HEADER_FORWARD: Optional. You can set this environment variable according to your OpenTracing configuration.
For more information about these variables, refer to APIcast environment variables.
To test if the integration is properly working, you need to check if traces are reported in the Jaeger tracing interface.
1.13.3. Additional information
The OpenTracing and Jaeger integration are available in the upstream project: https://github.com/3scale/apicast
1.13.4. Installing Jaeger on your OpenShift instance
This section provides information about the installation of Jaeger on the OpenShift instance you are running.
Jaeger is a third-party component, which 3scale does not provide support for, with the exception of uses with APIcast. The following instructions are provided as a reference example only, and are not suitable for production use.
Install the Jaeger all-in-one in the current namespace:
oc process -f https://raw.githubusercontent.com/jaegertracing/jaeger-openshift/master/all-in-one/jaeger-all-in-one-template.yml | oc create -f -
Create a Jaeger configuration file
jaeger_config.jsonand add the following:{ "service_name": "apicast", "disabled": false, "sampler": { "type": "const", "param": 1 }, "reporter": { "queueSize": 100, "bufferFlushInterval": 10, "logSpans": false, "localAgentHostPort": "jaeger-agent:6831" }, "headers": { "jaegerDebugHeader": "debug-id", "jaegerBaggageHeader": "baggage", "TraceContextHeaderName": "uber-trace-id", "traceBaggageHeaderPrefix": "testctx-" }, "baggage_restrictions": { "denyBaggageOnInitializationFailure": false, "hostPort": "127.0.0.1:5778", "refreshInterval": 60 } }-
set a
samplerconstant of 1 to sample all requests -
set the location and queue size of the
reporter -
set
headers, includingTraceContextHeaderNamewhich we will use to track requests
-
set a
Create a ConfigMap from our Jaeger configuration file and mount it into APIcast:
oc create configmap jaeger-config --from-file=jaeger_config.json
oc volume dc/apicast --add -m /tmp/jaeger/ --configmap-name jaeger-config
Enable OpenTracing and Jaeger with the configuration we have just added:
oc env deploymentConfig/apicast OPENTRACING_TRACER=jaeger OPENTRACING_CONFIG=/tmp/jaeger/jaeger_config.json
Find the URL the Jaeger interface is running on:
oc get route
(…) jaeger-query-myproject.127.0.0.1.nip.io
- Open the Jaeger interface from the previous step, which shows data being populated from Openshift Health checks.
- The final step is to add OpenTracing and Jaeger support to your backend APIs so that you can see the complete request trace. This varies in each back end, depending on the frameworks and languages used. As a reference example, you can see Using OpenTracing with Jaeger to collect Application Metrics in Kubernetes.
For more information on configuring Jaeger, see: * Jaeger on OpenShift development setup * Jaeger on OpenShift production setup * Distributed tracing on OpenShift Service Mesh