
API Bizops
How to add / invite developers, account and application approvals, contacting developers, etc.
Abstract
Chapter 1. Adding Developers
These are the steps to add a new developer account for access to your API.
If you have configured the workflow to invite developers manually, this covers how to add new developers.
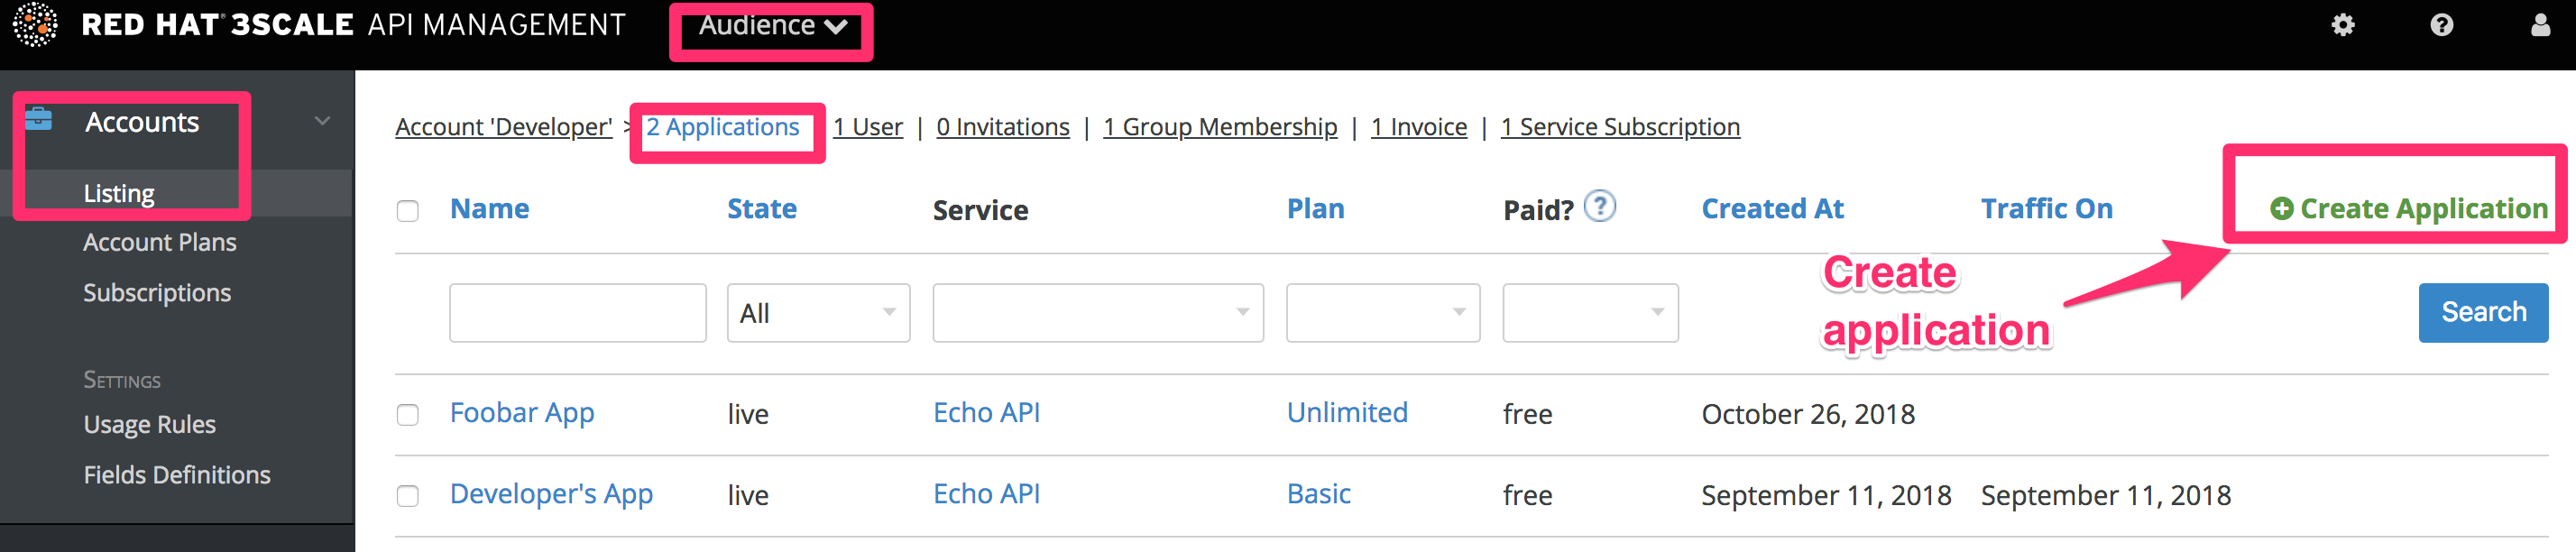
1.1. Step 1: Create a new developer account
- Follow Accounts link from the Audience section on the Dashboard.
- Click Create.
As an admin, you can skip even some of the required fields. If you want to invite users to the account securely, you can also skip the password fields. However the email on this main admin account must be unique among all users.

1.2. Step 2: Set up applications
If you want to pre-configure app keys for the account, you can also add an application on behalf of the developer. Otherwise, leave this as one of the initial steps for the developer to take.
1.3. Step 3: Notify the developer
You can either send an email invitation to the developer manually or follow the steps to use the invite developer feature.
Chapter 2. Approving Developers
This section shows how to make approvals for any step in the signup workflow.
Once you’ve implemented the signup workflow with manual approval steps, you have a few options. The approval process is slightly different depending on the trigger and what is being approved. If you receive an email notification, follow the instructions in the following section. Otherwise, it depends on whether you want to approve an account, a service, or an application.
2.1. Approve from email notification
If you (as admin) receive an email notification that one of your developers has an item pending approval, you can copy/paste the URL for the item into your browser, and it will take you directly to the page to make the approval.
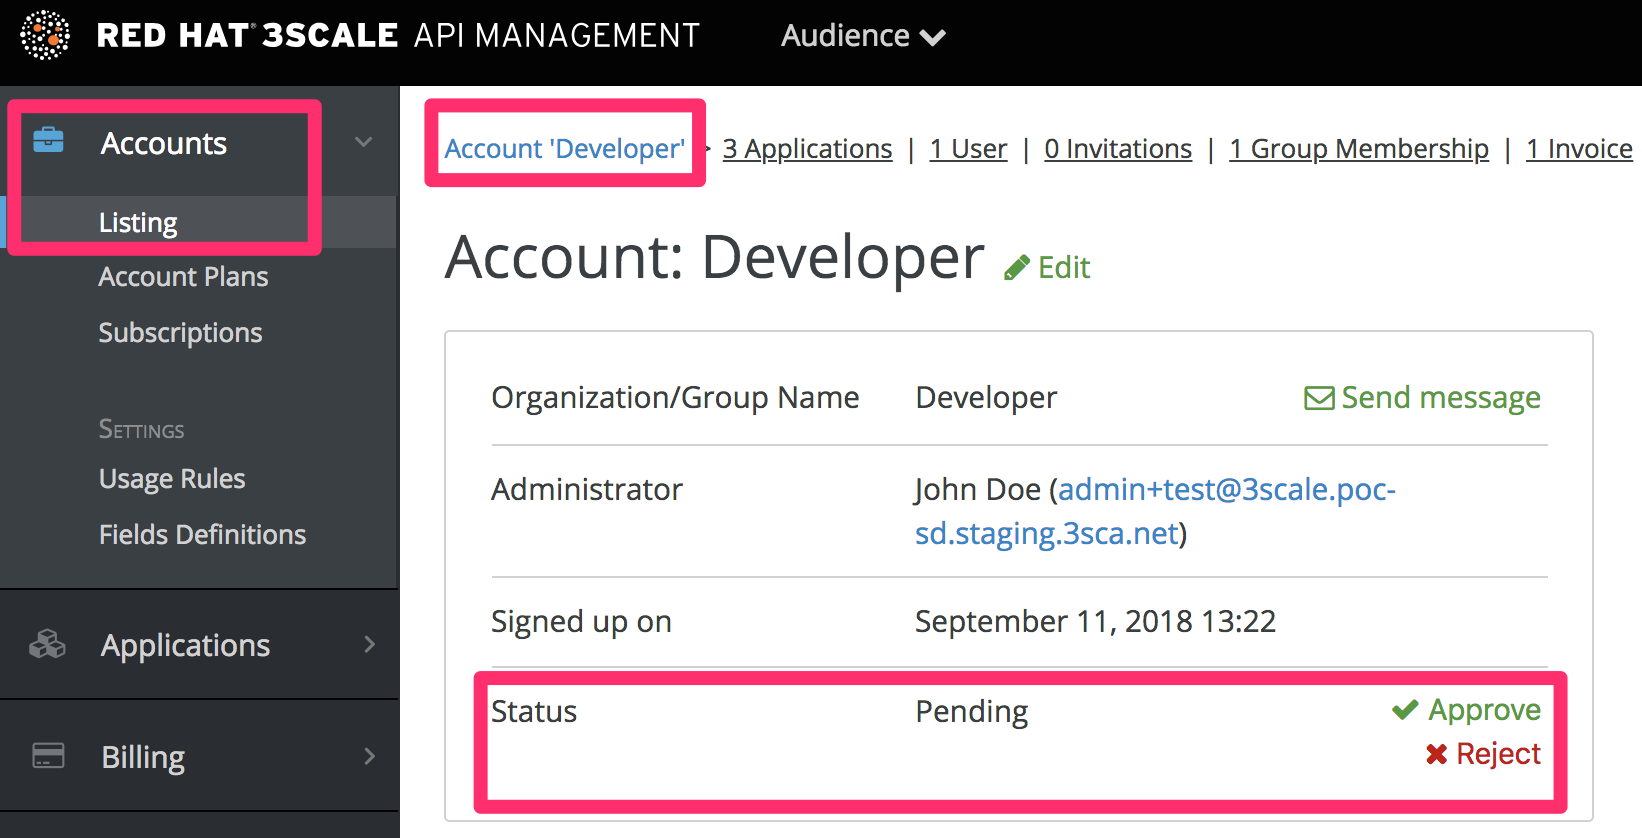
2.2. Account approval
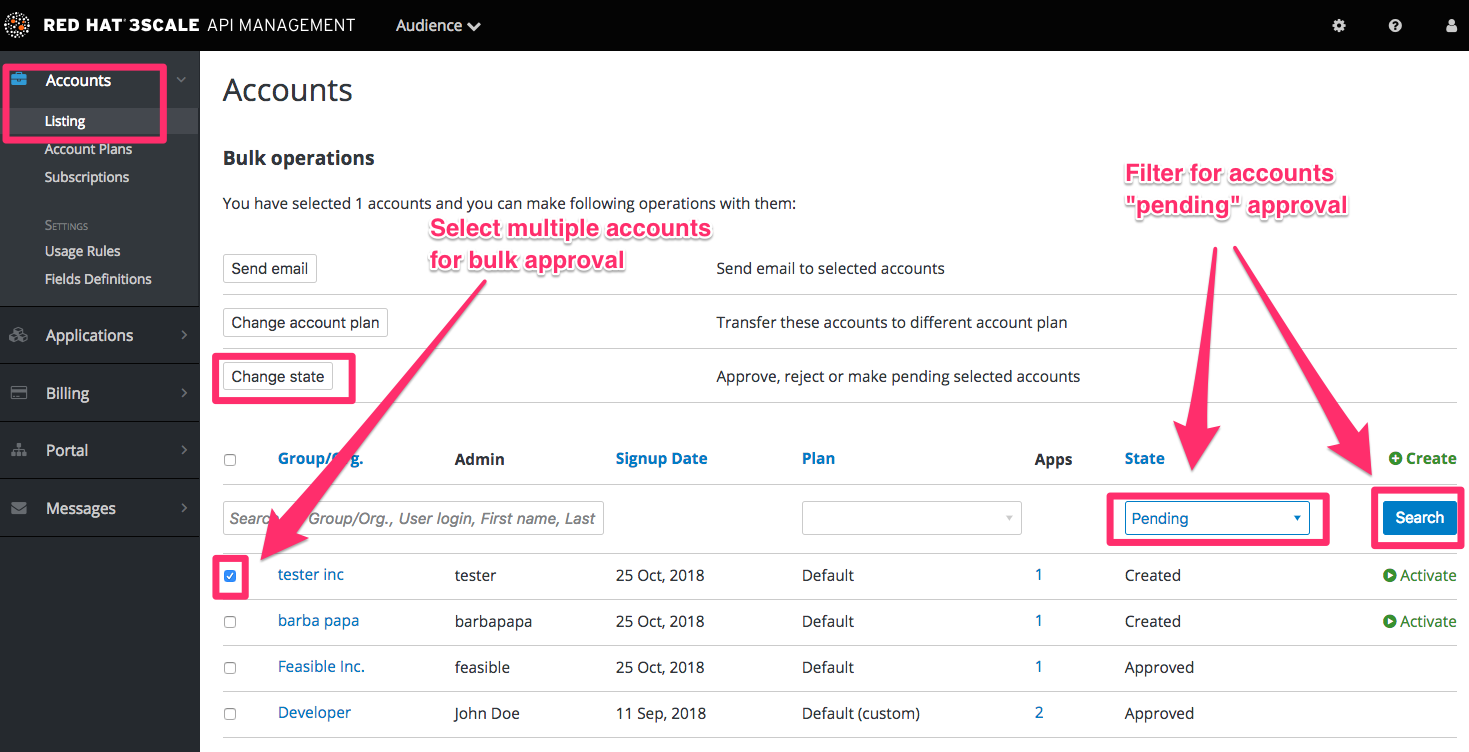
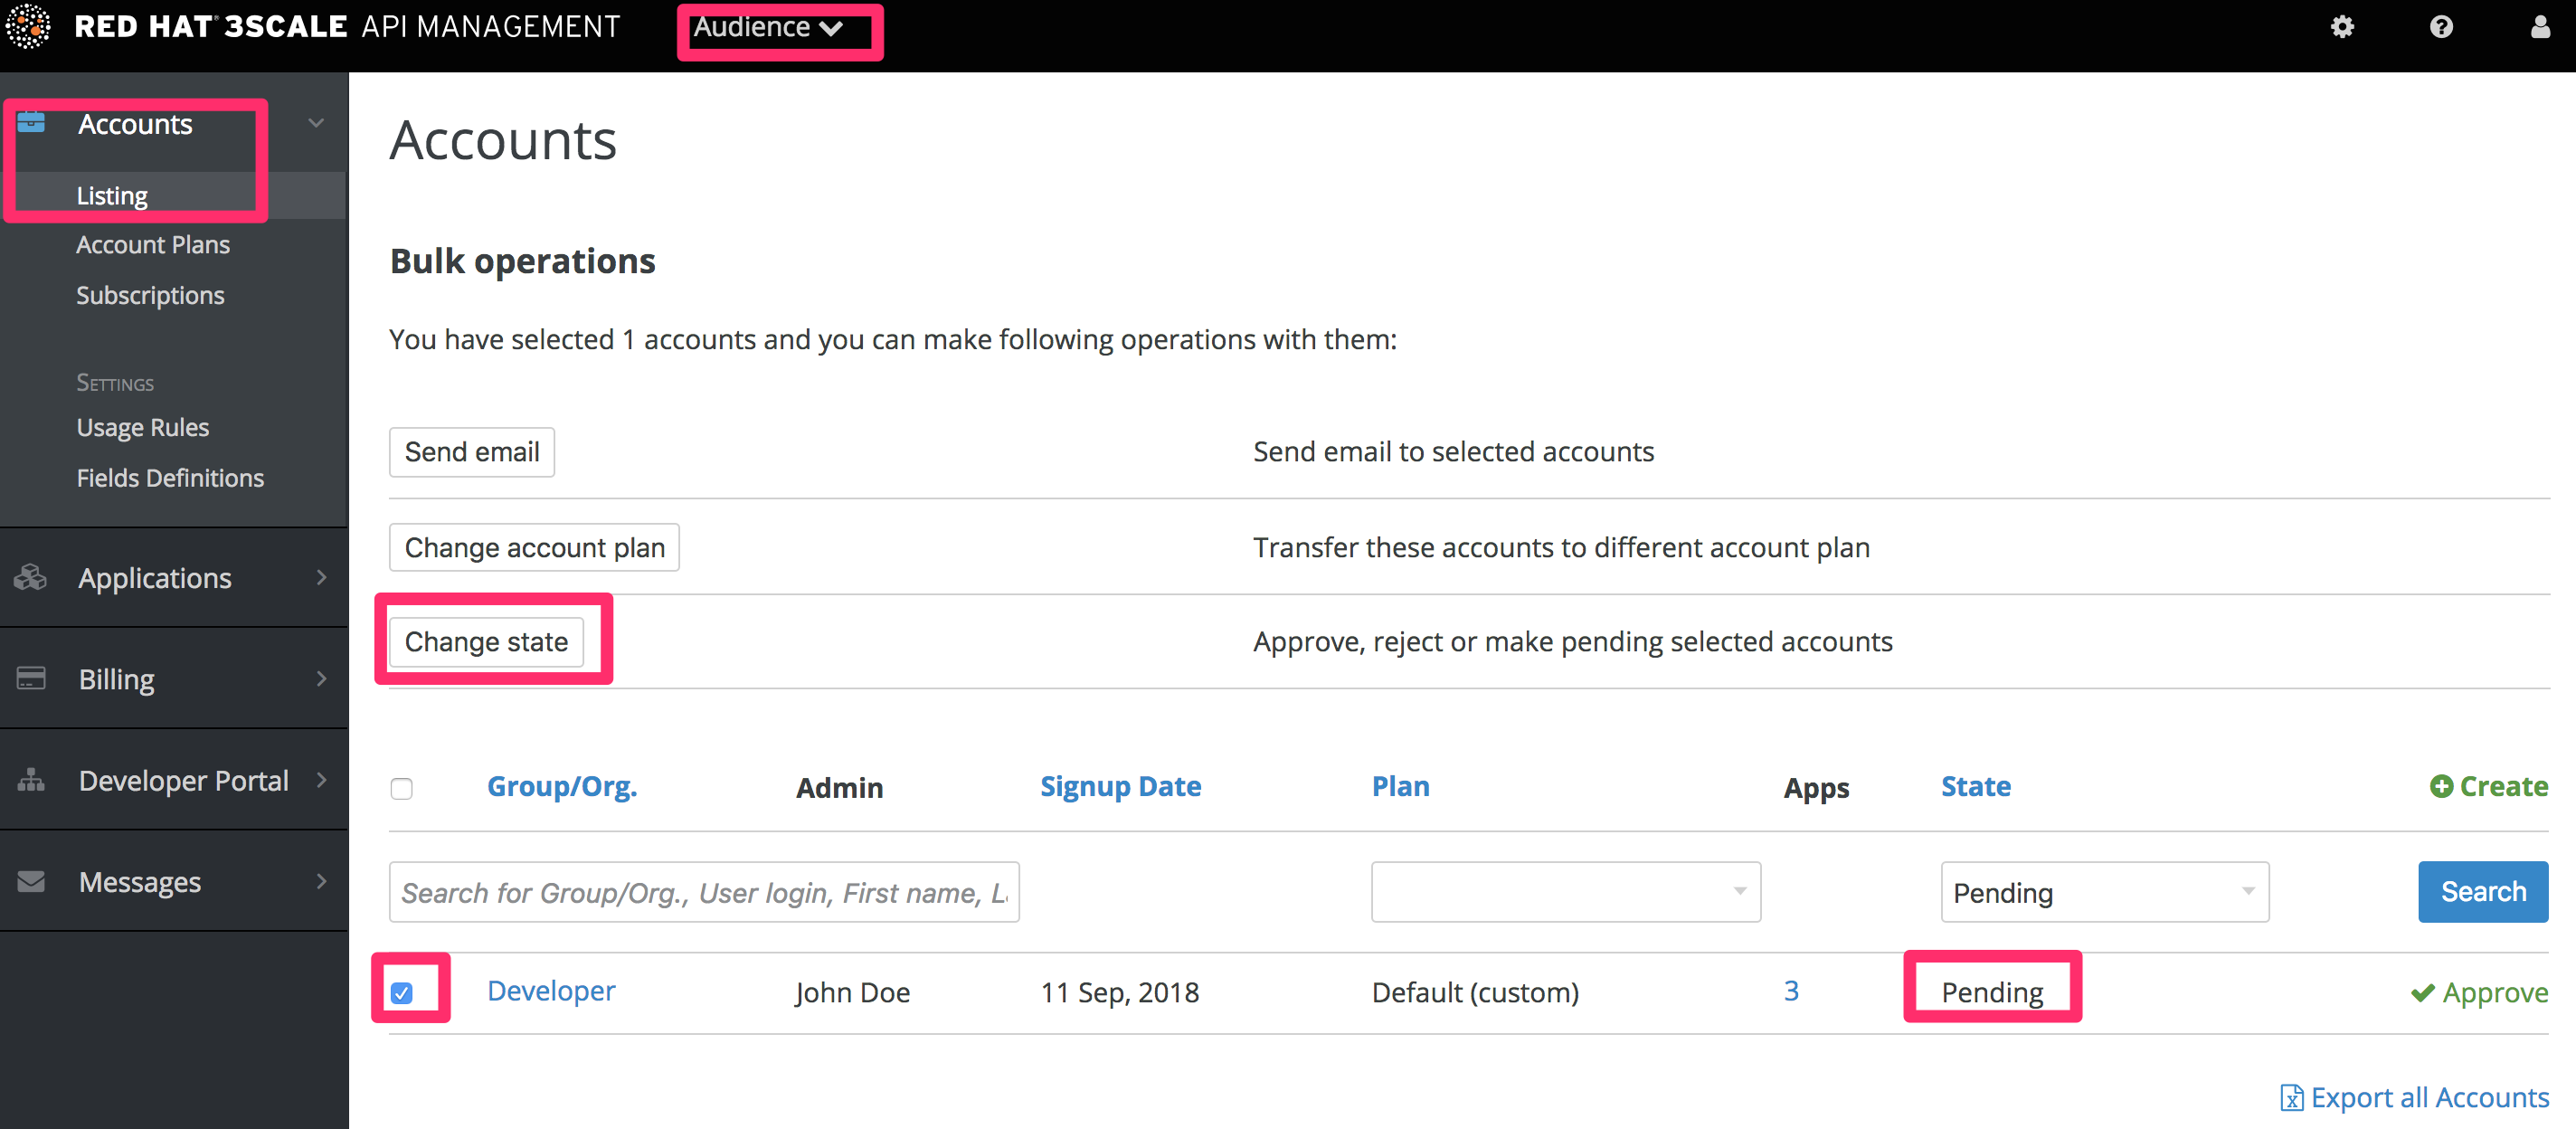
To search for specific accounts or filter all accounts that are in a “pending” (for approval) state, navigate to Audience > Accounts > Listing. To show only the pending accounts, select "Pending" in the dropdown list State and click Search.
You can make individual approvals directly on each row, or select several rows at a time and perform a bulk approval.
2.3. Service approval
To search for specific subscriptions to a service or filter all subscriptions that are in a “pending” (for approval) state, navigate to Audience > Accounts > Subscriptions.
To view Subscriptions, enable Service Plans in Audience > Accounts > Usage Rules.
You can select one subscription or several at a time and perform a bulk approval.
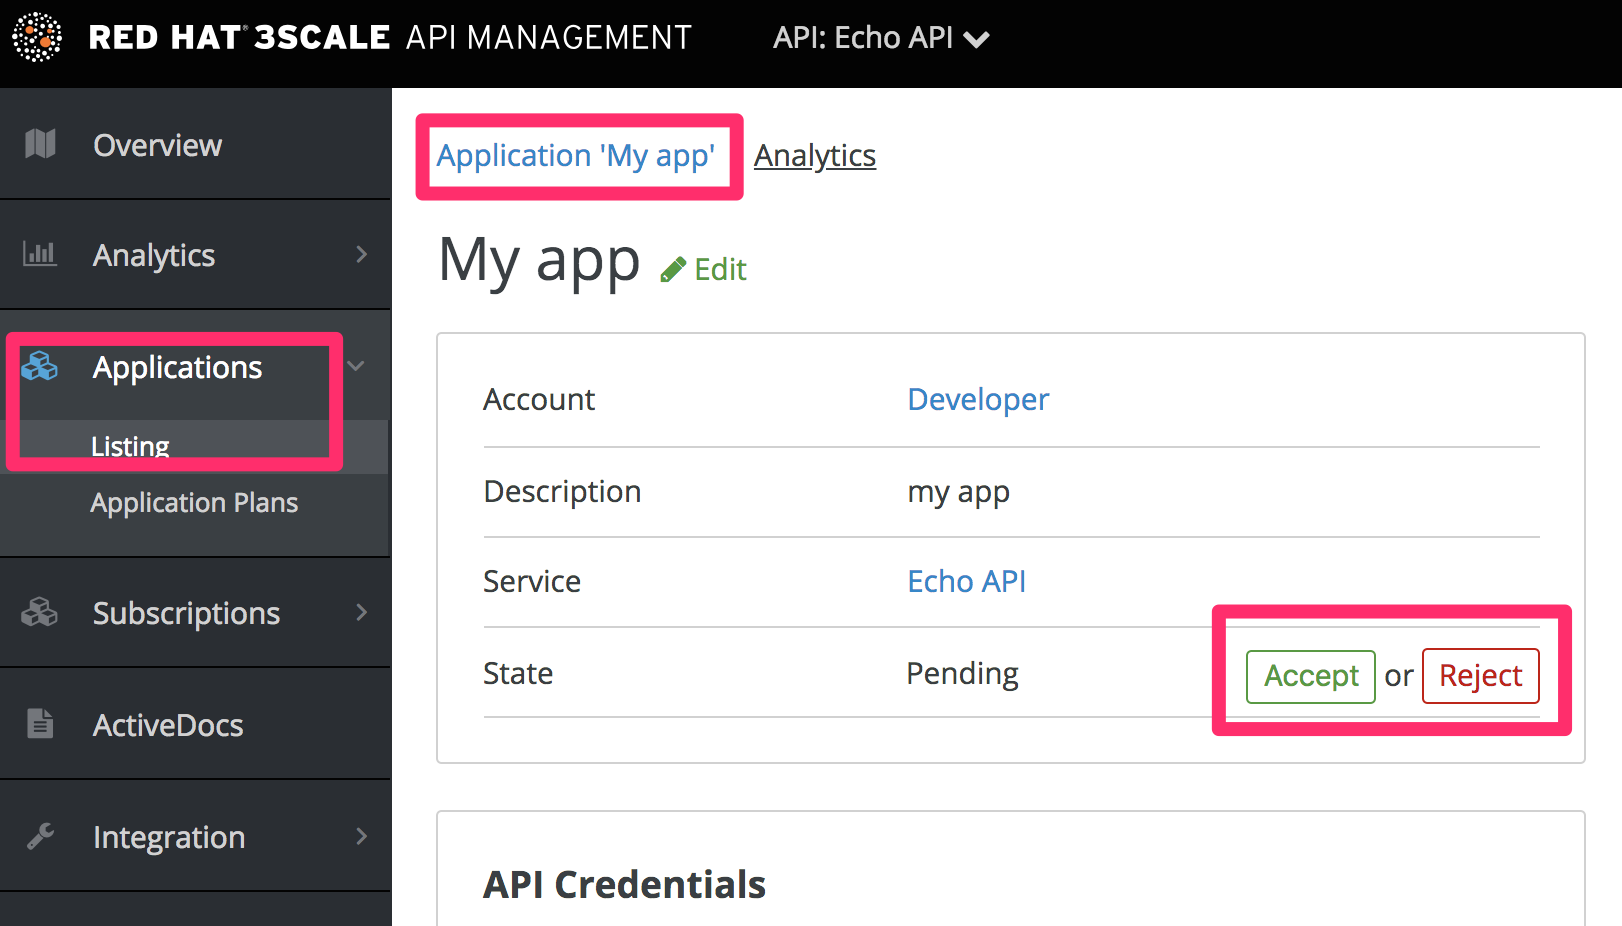
2.4. Application approval
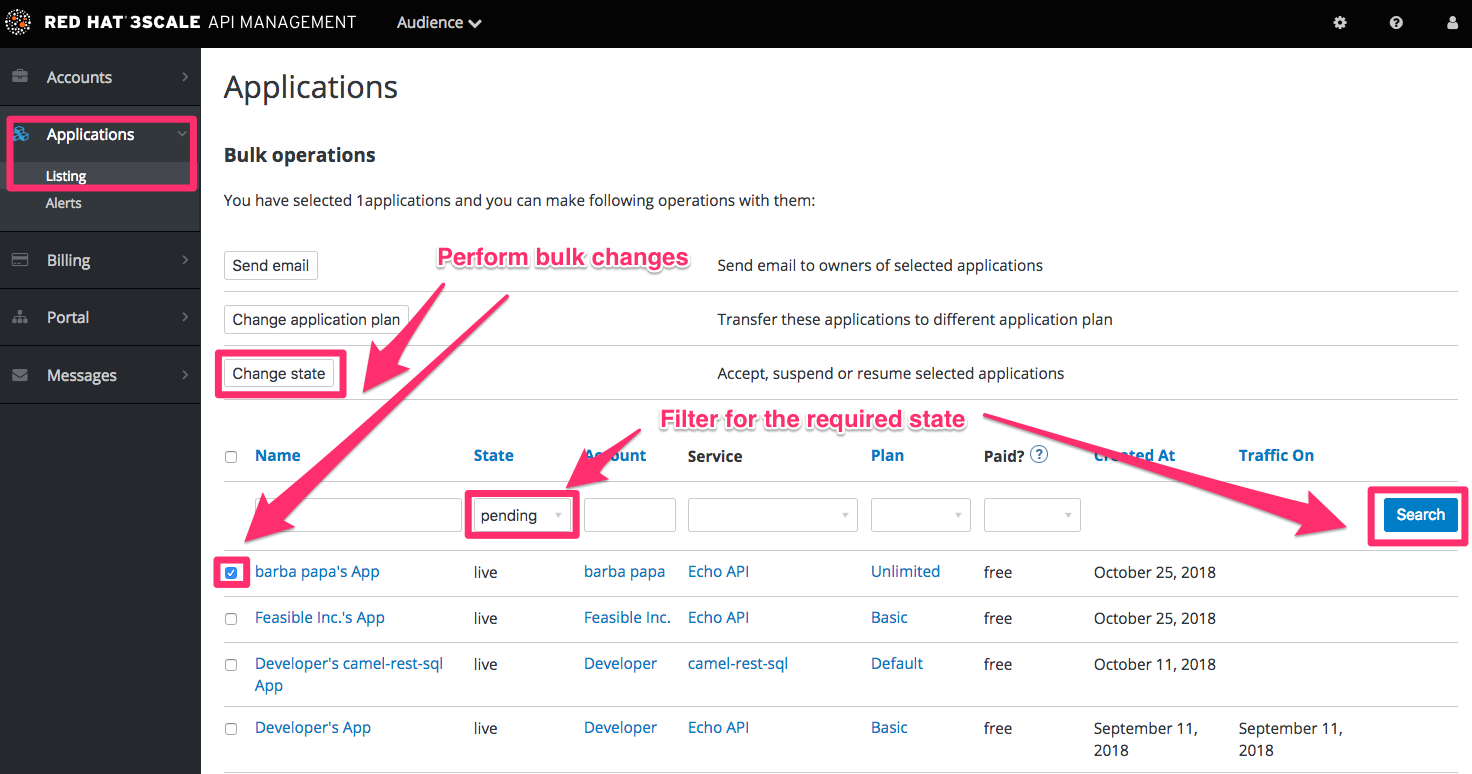
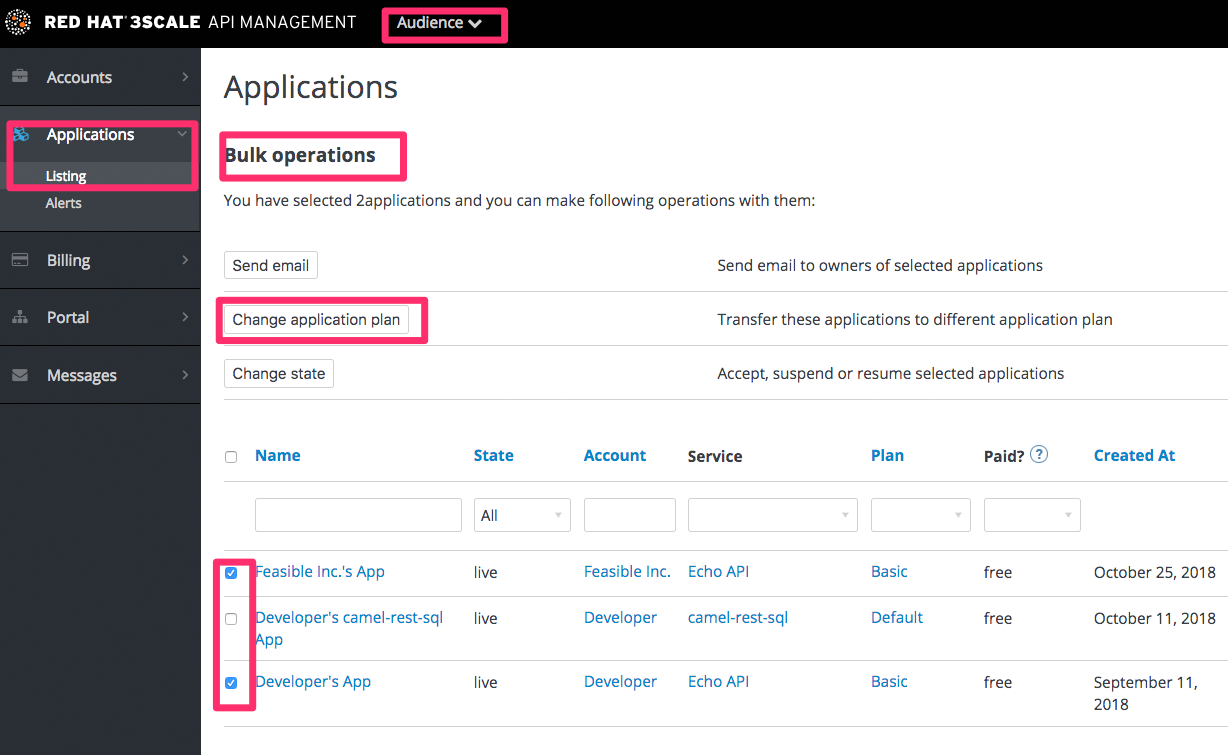
To search for applications or filter all applications that are in a “pending” (for approval) state:
- Navigate to Audience > Applications > Listing.
- Select "pending" in the dropdown list State and click Search.
You can select one application or several at a time and perform a bulk approval.
You can also start from the details page for a developer account, select which application you wish to approve from there, and make the approval on the application details page.
Chapter 3. Changing Plans For An App
After this section you will be able to change plans for accounts, services or applications
As admin you may change plans for a developer at any time, or in response to a plan change request that the developer initiates.
The change plans step is slightly different depending on what type of plans are being changed.
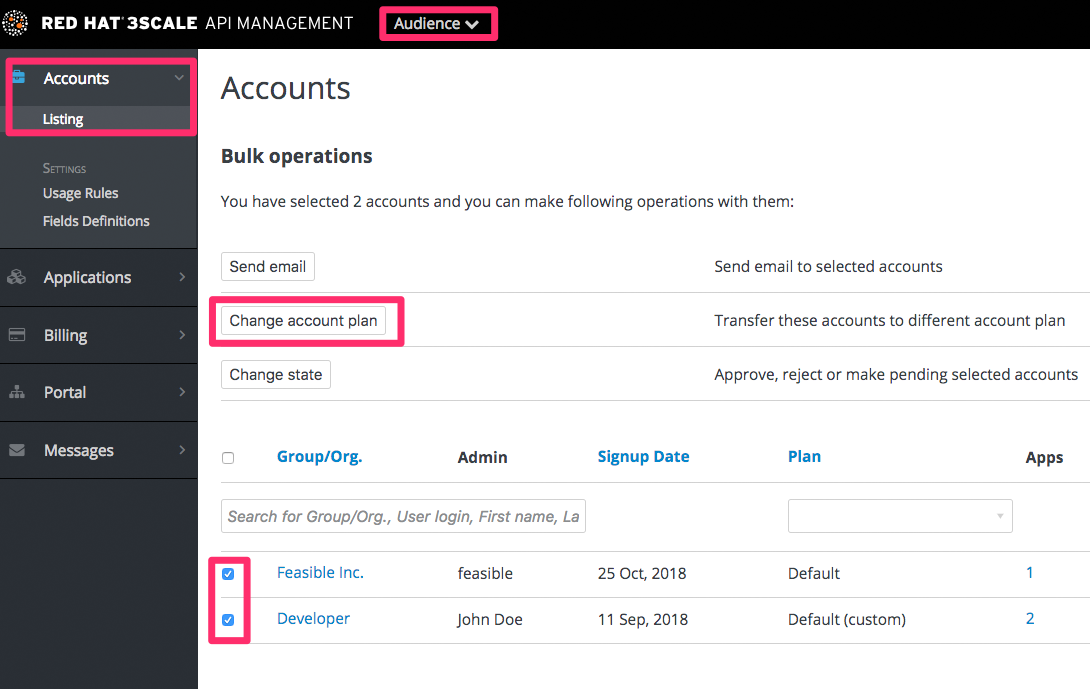
3.1. Change Account Plans
To search or filter specific accounts, navigate to Audience > Accounts > Listing.
You can select one or more rows at a time, and change the plans.
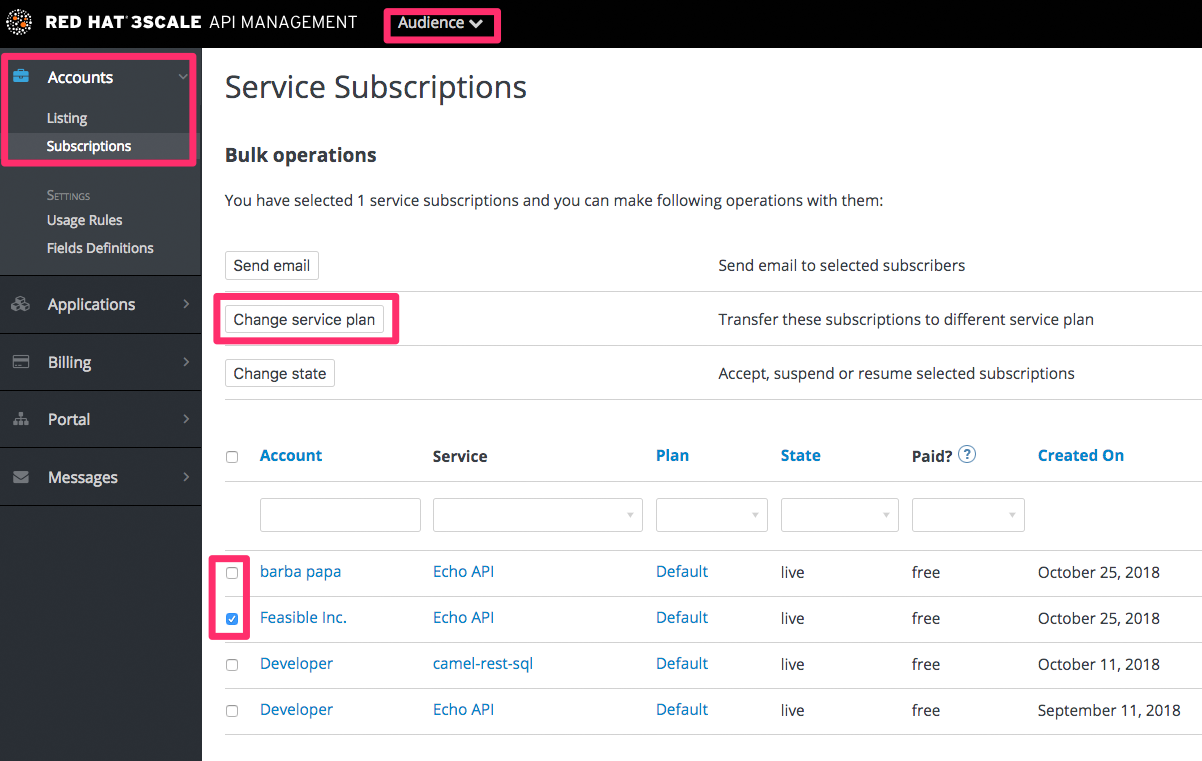
3.2. Change Service Plans
To search or filter specific subscriptions to a service, navigate to Audience > Accounts > Subscriptions.
You can only view subscriptions if you have enabled Service Plans in the Settings page.
You can select one or several subscriptions at a time, and change the plans.
3.3. Change Application Plans
To search or filter specific applications, navigate to Audience > Applications > Listing.
You can select one or several applications at a time, and change plans.
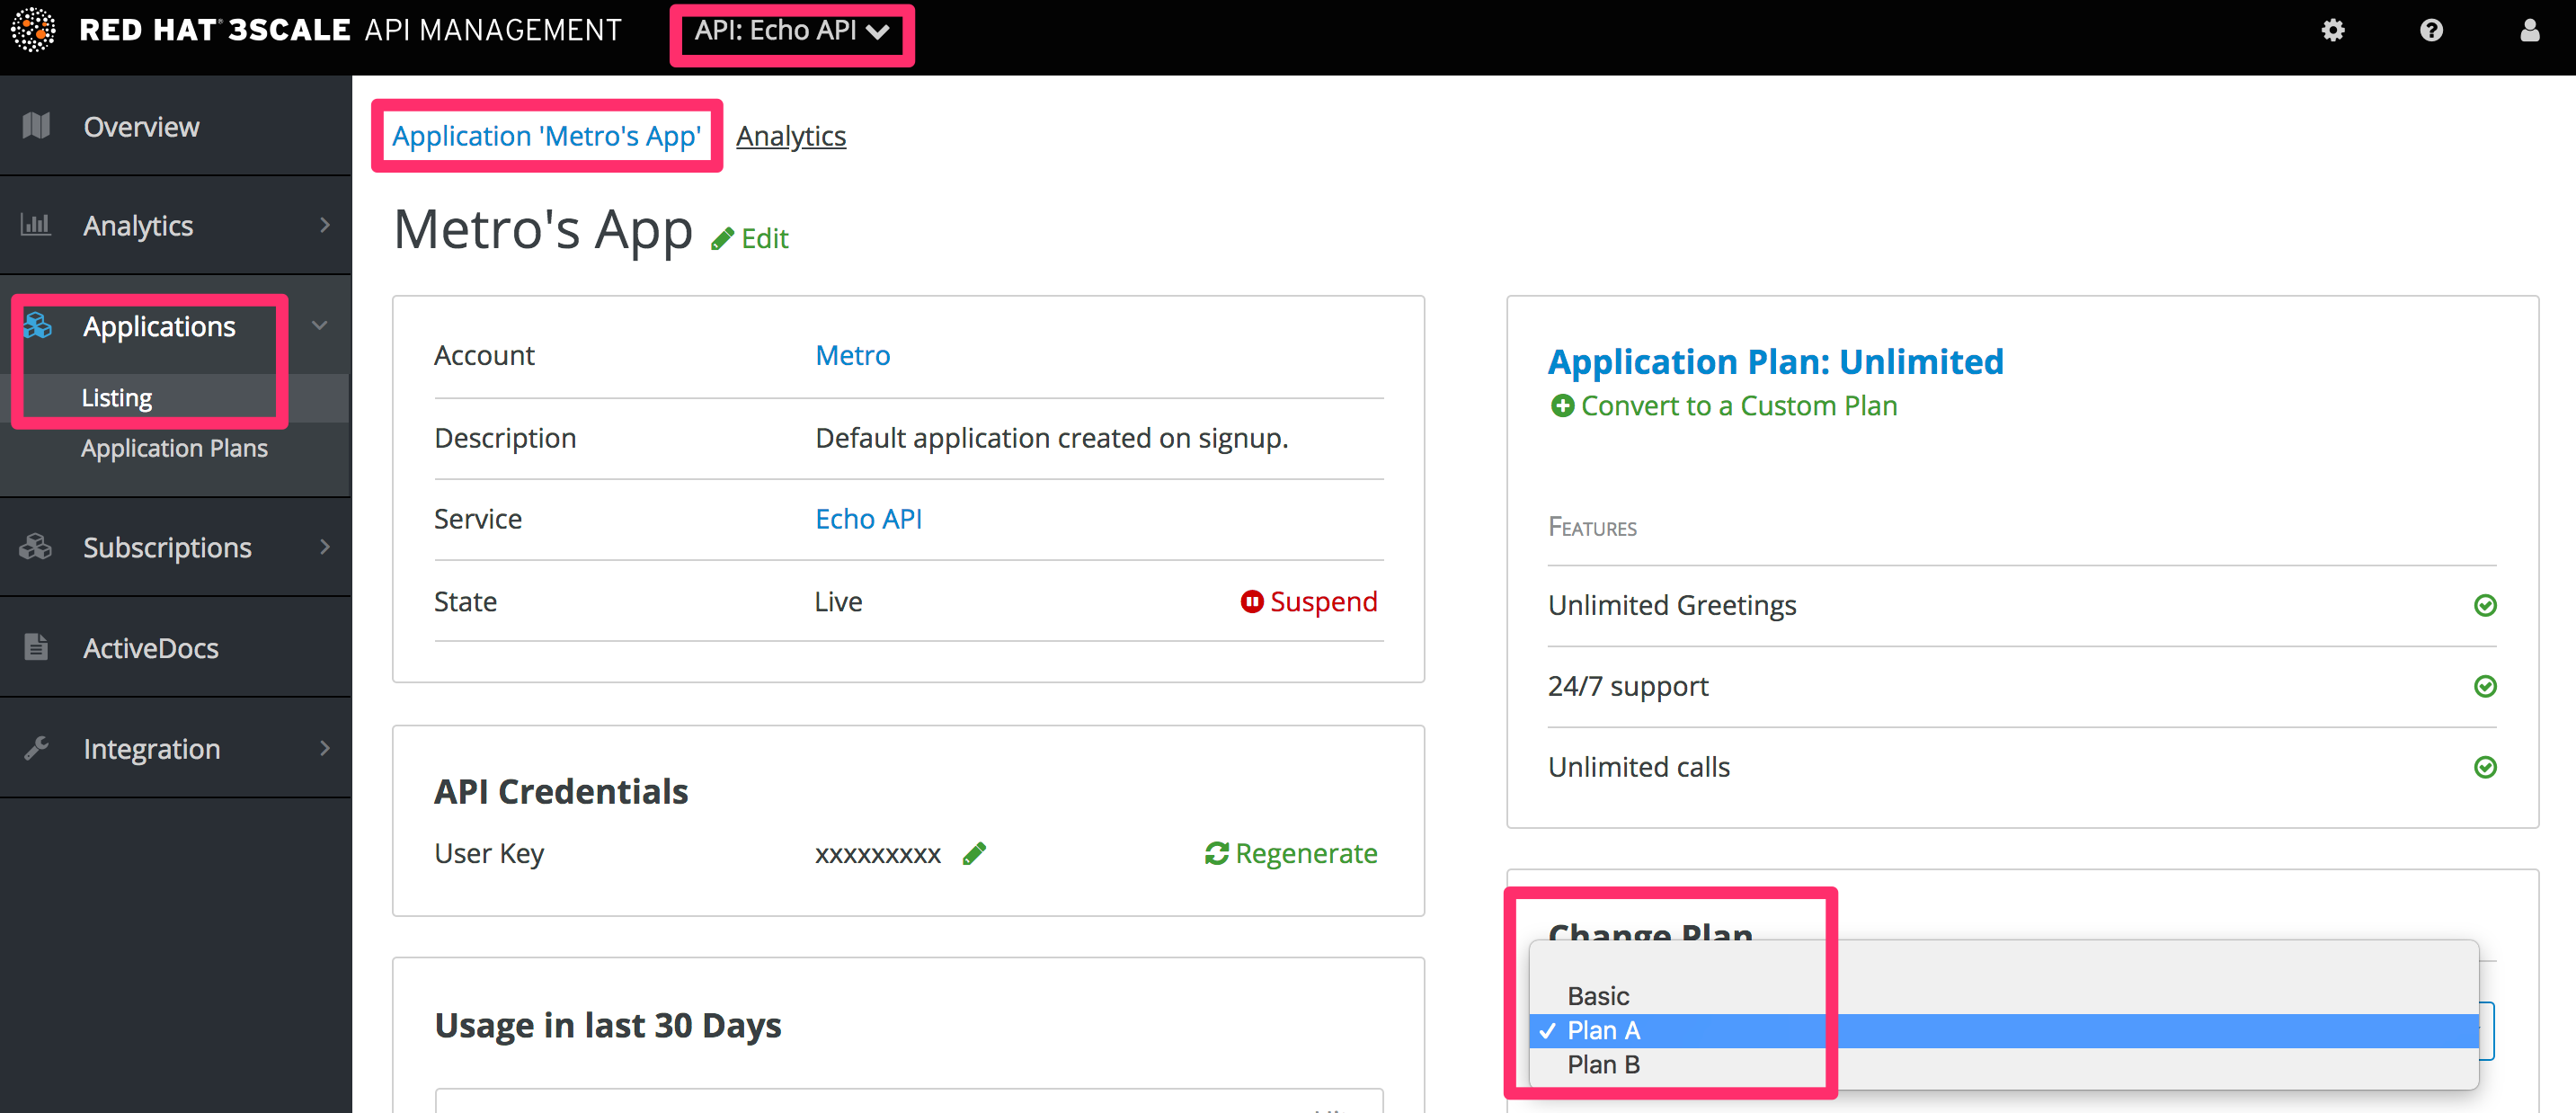
Another scenario is to start from the details page for a developer Account. From there you select the application for which you wish to change plan. On the application details page, you can change the plan.
3.3.1. More Information
If rather than change to another standard plan, you only want to make a change for one specific app, you can use the customize plans feature.
Chapter 4. Contacting Developers
This guide explains how to find out which developer account manages a particular application and then communicate with them – both through 3scale and externally.
During API operations, you may urgently need to contact developers who are using your API.
4.1. Step 1: Locate the relevant application and account in the system
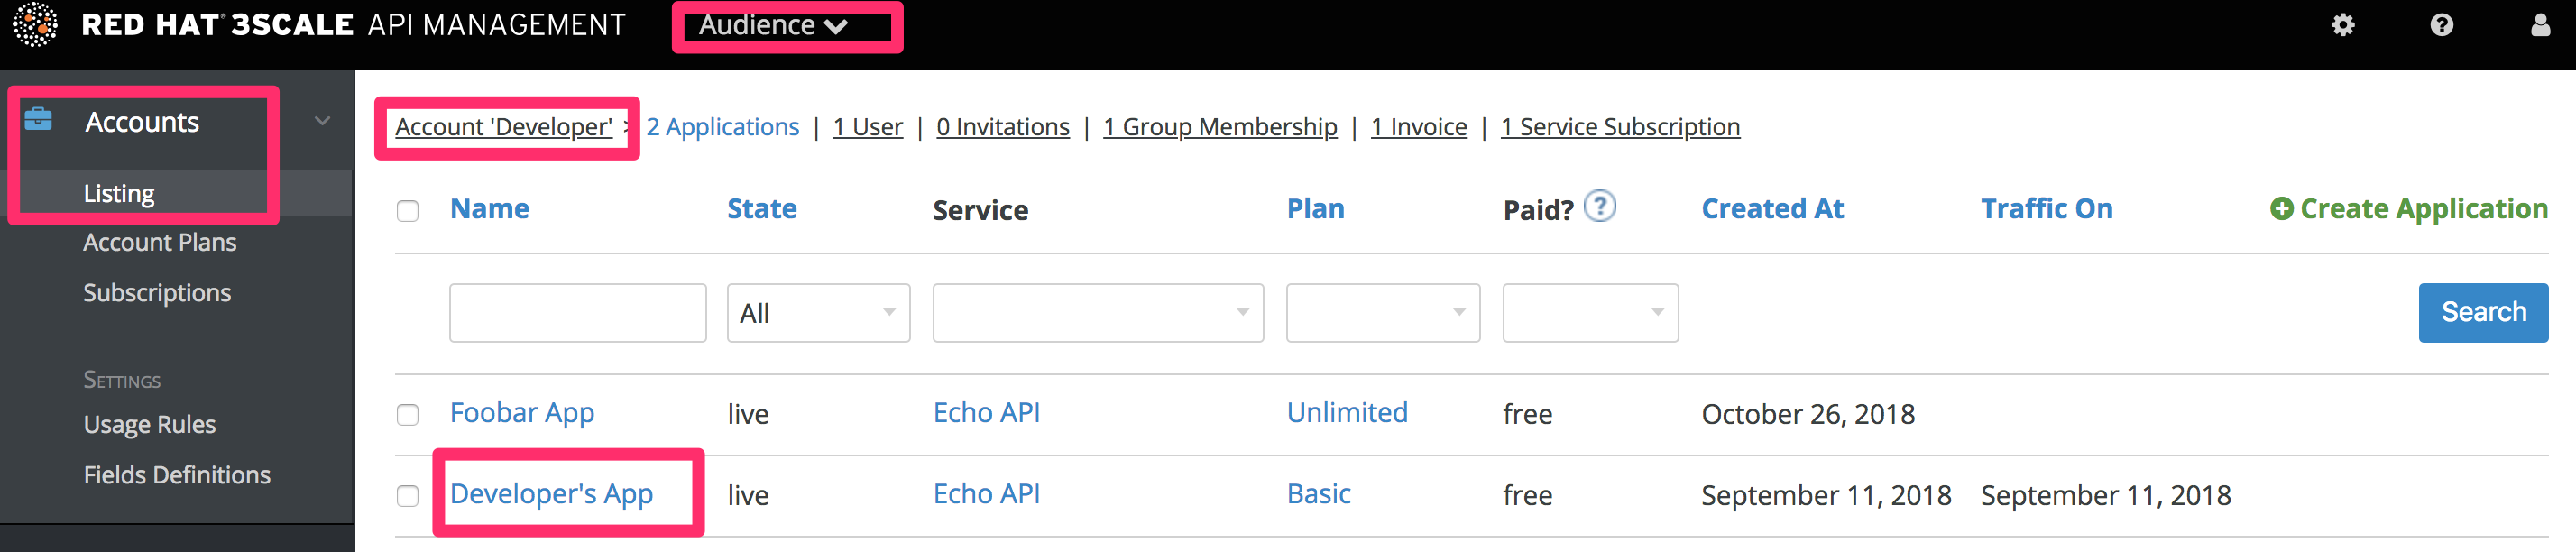
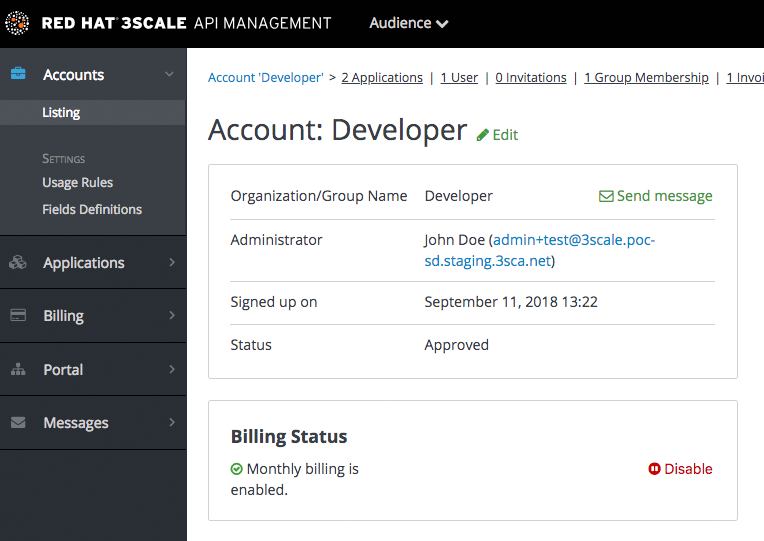
If you already know the account and developer who manages the application in question, navigate to their account from the Accounts page in Audience > Accounts > Listing, as shown below.
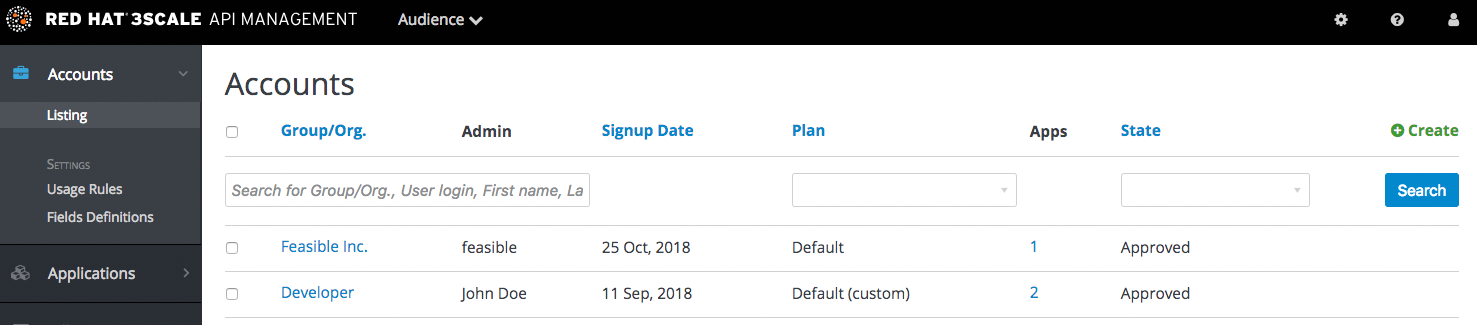
If you only have the application ID or API key, you can use the search box on the Accounts page in Audience > Accounts > Listing to find the relevant account. More information on locating applications is available here.
4.2. Step 2: Send internal messages to developers
Once you are in the account profile page as shown below, click the message icon.

The message created here will be sent both to the account system dashboard, where all developers on the account will see it, and by email to the people on the developer account who have admin status within the account.
4.3. Step 3: Contact by other means
If it’s an emergency and email is unlikely to be fast enough for your purposes, you can also use the contact information submitted by the developer at time of signup, which is available:
- On the company account page (general contact information but may include a phone number)
- Developer/user specific information on the users’ own file
Note that you can make contact phone numbers a required field upon signup.
Chapter 5. Customize Plans
When you have completed this section you will have customized an application plan for a specific developer.
Application plans are a good way to apply standard policies for different segments of your developer community. However, you always have the flexibility to customize the standard plans for any individual developer with unique requirements.
Once a plan is customized, you lose the link to the original plan. If you make changes to the original plan, the custom plan does not inherit any of those changes. So you should use this customization feature sparingly, before you become overwhelmed with too many custom plans which you cannot manage effectively.
A developer wants to increase their current limits without upgrading to the next pricing tier as the current billing period is already under way. A customization could be a good way to handle this situation by enabling the increase in limits and charging only the variable costs incurred. This would also help encourage an upgrade for the following billing month.
5.1. Step 1: Choose the account
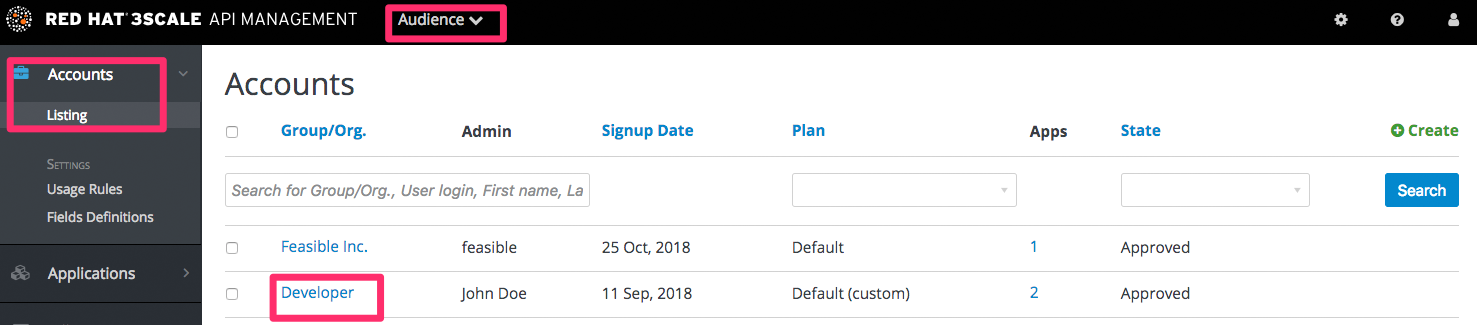
To view the details page for the developer Account you are interested in:
- Navigate to Audience > Accounts > Listing
- Choose the Developer account
5.2. Step 2: Select the application
Select the application whose plan you wish to customize.
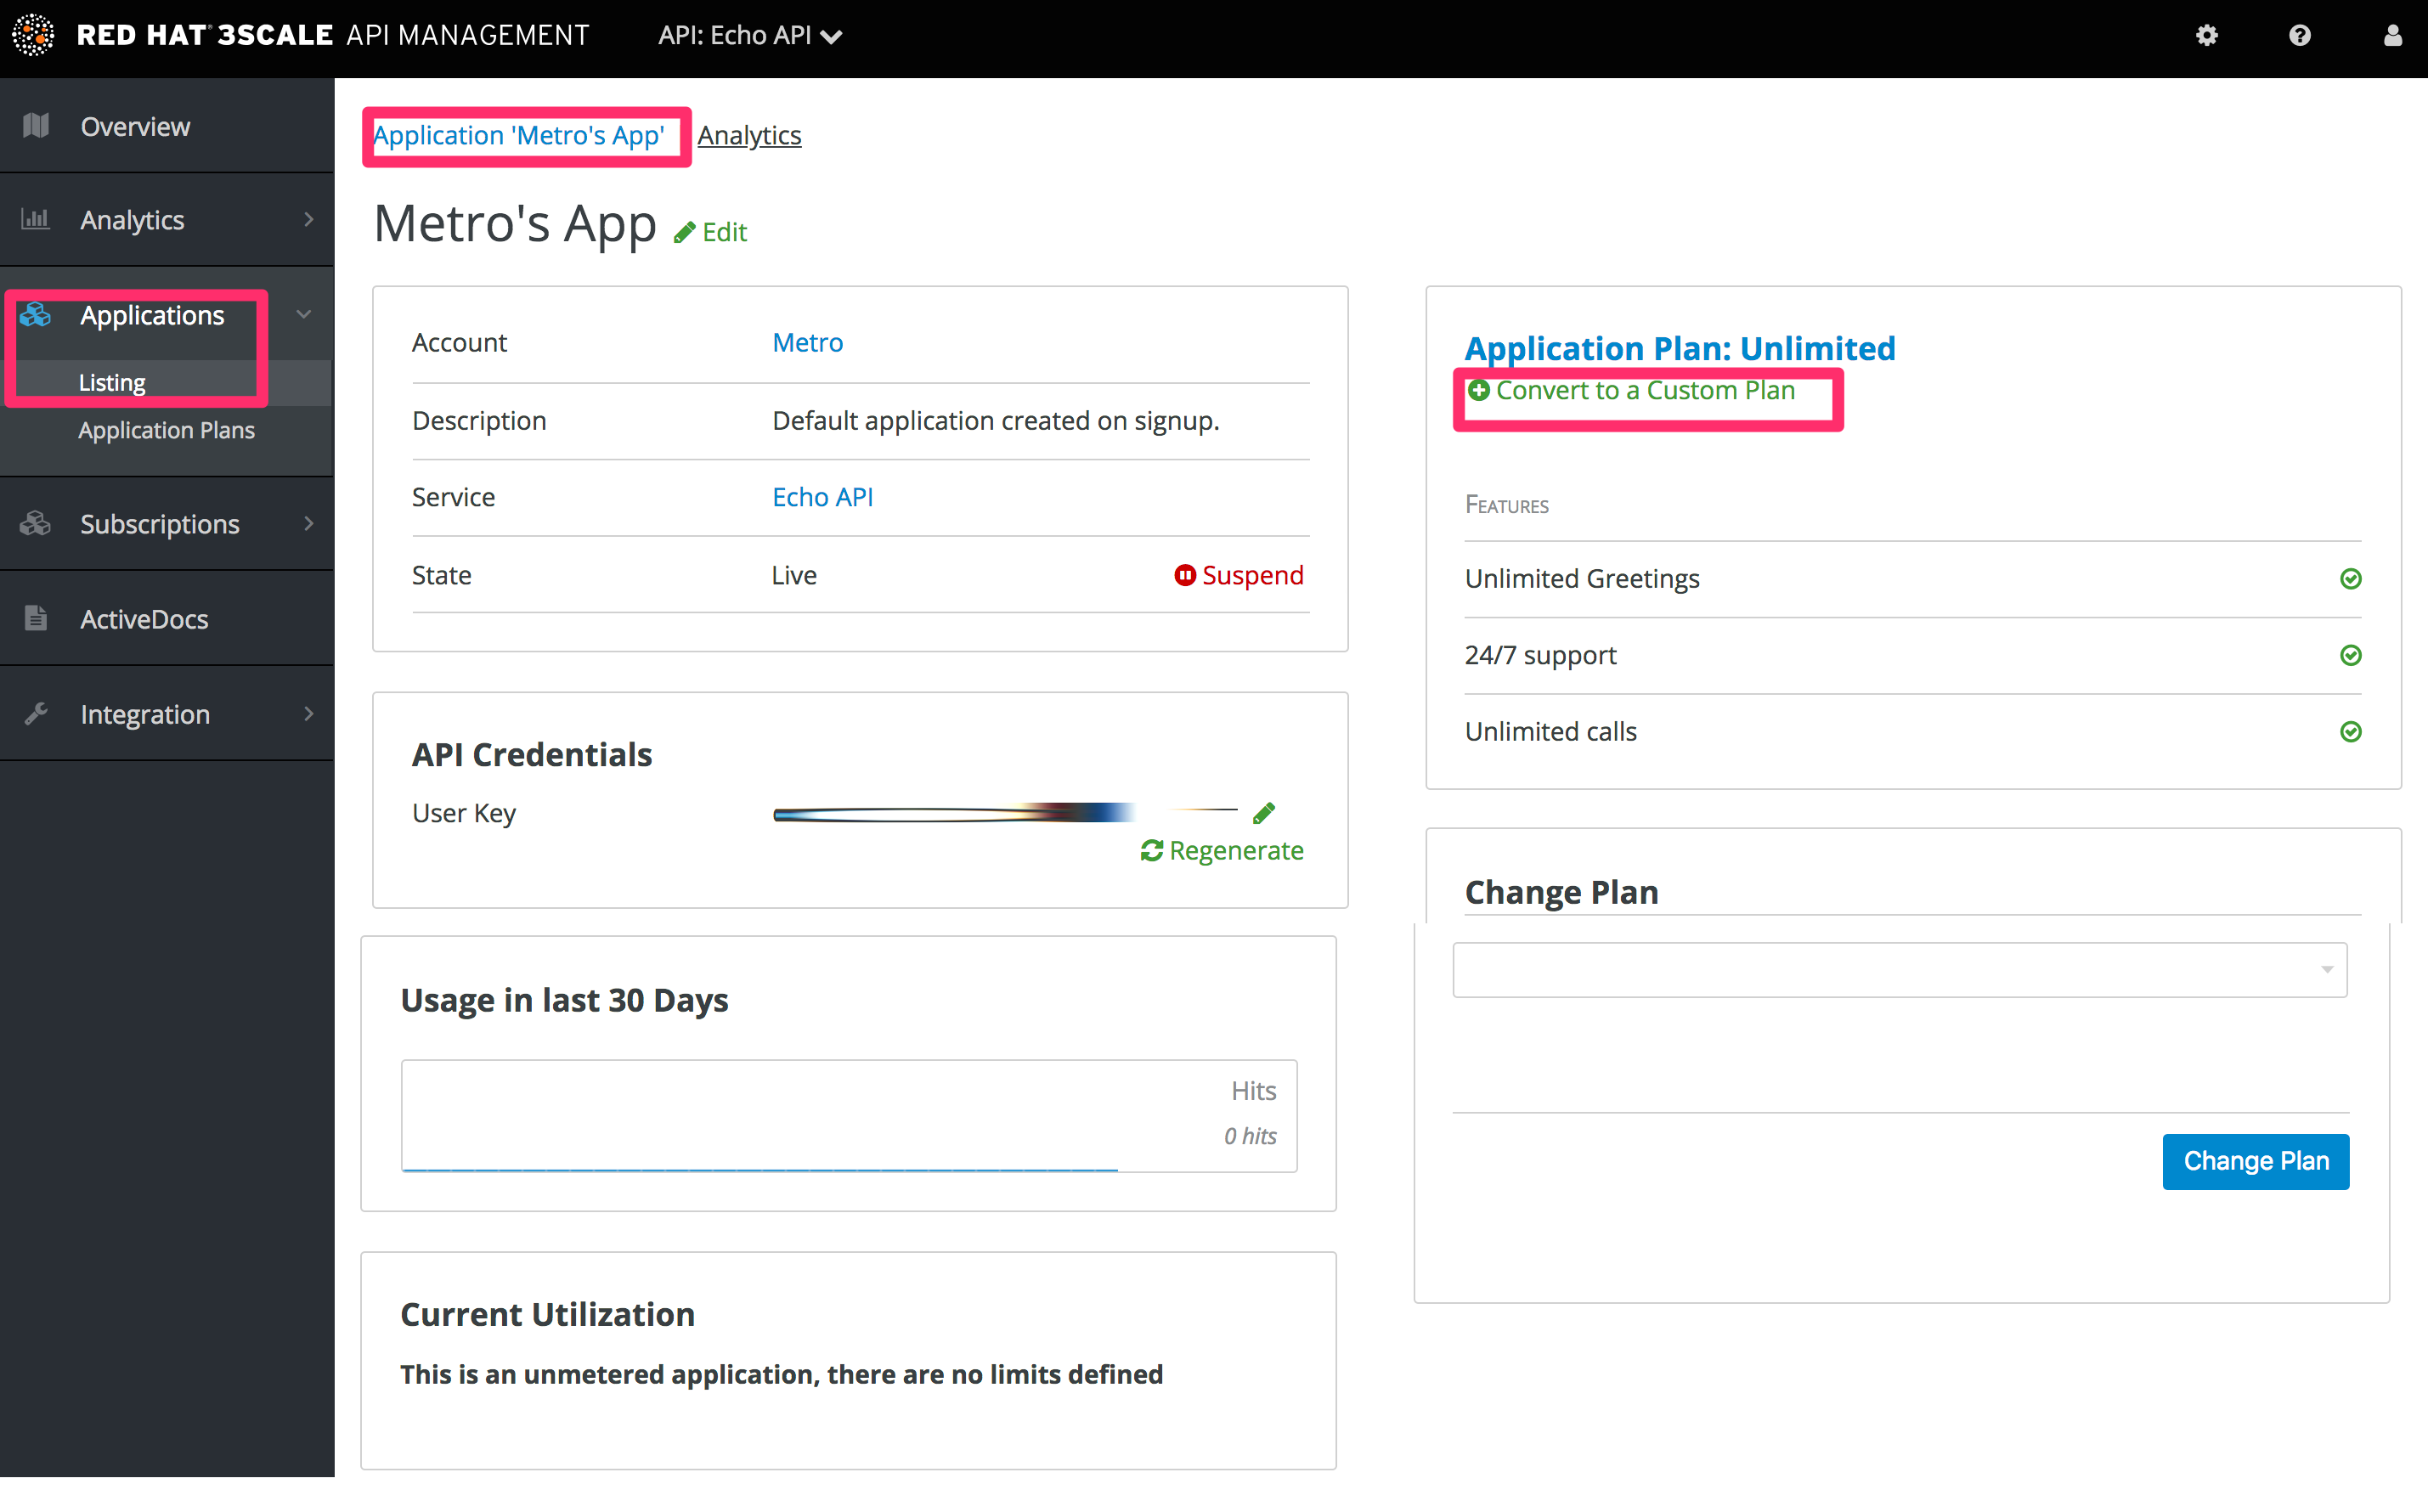
5.3. Customize the application plan
Select the option to “customize”. This provides the page where all the plan elements can be customized for the application owned by this account.
5.3.1. More Information
Before you take the step to customize plans, always consider first if you are not better off with a new standard plan (which can be hidden from display in the Developer Portal). Then you would just change to the standard plan and so gain the benefit of reuse if this applies to more than one of your developer partners.
Chapter 6. Enable Signup
Configure developer signup by implementing self-service or manual mode.
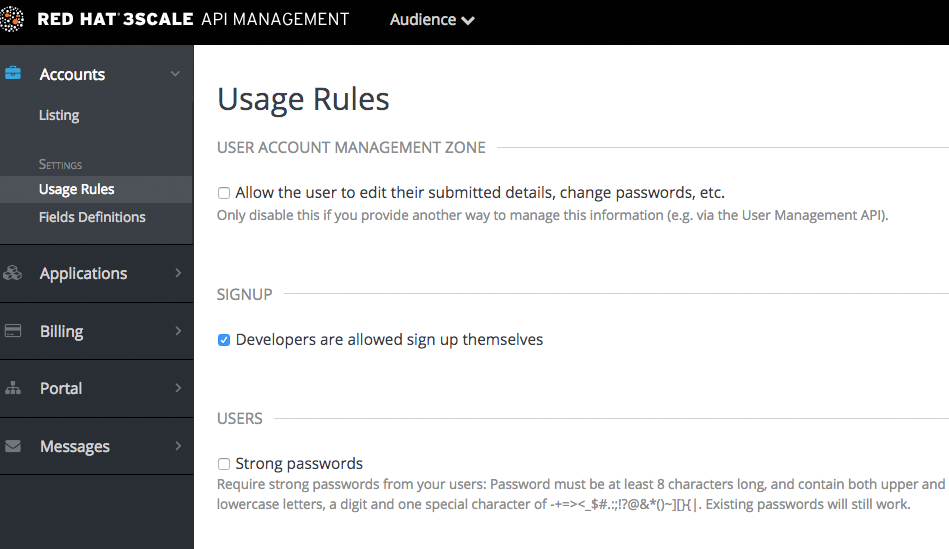
You can configure the workflow for developers to be self-service or by manual invite only. Self-service signups are done by developers through the Developer Portal, while manual invites are handled by your admins through the Admin Portal.
By default, the checkbox toggle is set to enabled. To do so, navigate to Audience > Accounts > Settings > Usage Rules.
Chapter 7. Finding Applications
By the end of this guide, you’ll be able to quickly locate an application in the Dashboard based on either its name, an API key, or an application identifier.
During API operations, you may need to be able to find information on an application that is accessing your API quickly – either for support purposes, to change configuration, or potentially because the application is misbehaving and needs to be disabled.
7.1. Step 1: Get the information you need
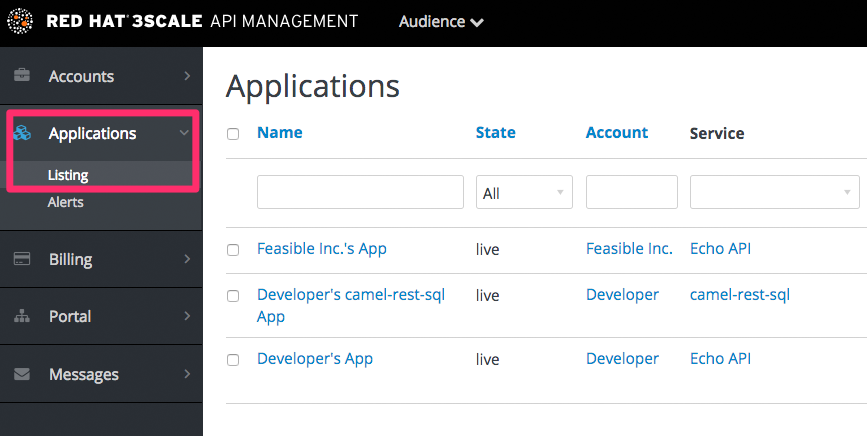
To find an application, you need the name of the account it belongs to or the application’s name. If you do not have this information, you can verify the access logs. To perform the search, navigate to Applications (Audience > Applications > Listing).
If you search by identifier for an authentication type, you need the following information:
- For API key-only authentication patterns: the API key
- For app ID and app key authentication patterns: the app identifier (search by app key is not supported)
- For OpenID Connect authentication patterns: the client_id (search on the secret is not supported)
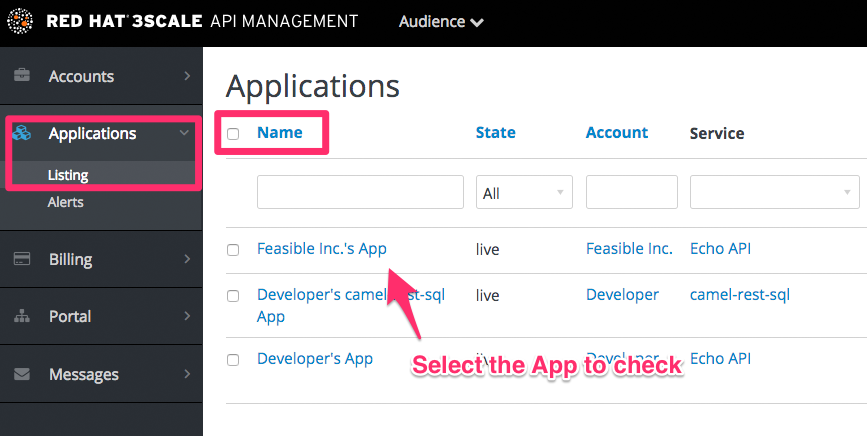
7.2. Step 2: Search for the application
To search a given application, navigate to Applications page (Audience > Applications > Listing), and use the search box as shown in the image below.
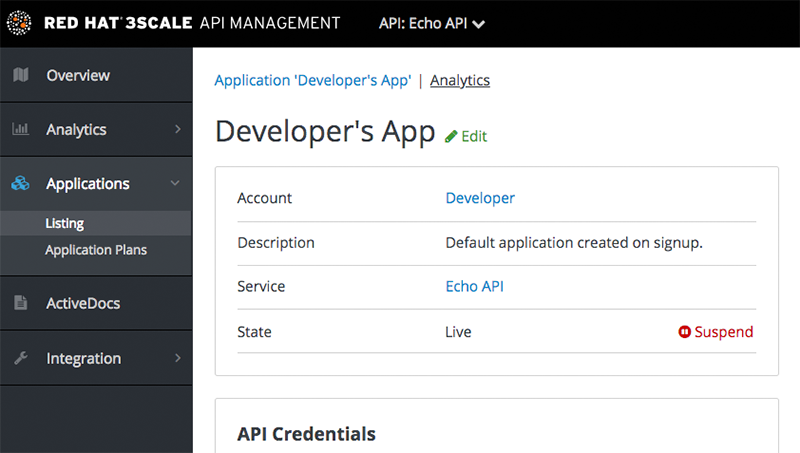
7.3. Step 3: Access application information
Once the results are returned, click on the application you’d like to access and you’ll be taken to that application’s homepage, which includes information such as that shown in the image below.
Chapter 8. Inviting Developers
After completing these steps, you will have added a new developer user to a developer account.
When you create a developer account manually, you can invite developer users to that account through the Admin Portal:
- Navigate to Audience > Accounts > Listing.
- Choose the account in question.
- Select "Invitations" and then click Invite user.

Chapter 9. Unsubscribing developers from a service
As an admin, you can unsubscribe developers from a service. You may need to do this for one specific developer, or for multiple developers, in the event of a service deprecation.
9.1. Unsubscribing a single developer from services
Unsubscribe a single developer from a service they are subscribed to through the admin portal:
- In the Admin Portal, navigate to Audience > Accounts > Listing > [select an account] > Service Subscriptions.
- Select Unsubscribe for the service that you want to remove the developer from.
9.2. Unsubscribing multiple developers from services
Perform a bulk action to unsubscribe multiple developers from a deprecated or deleted service:
This method only applies to services that have been deleted or suspended. You cannot perform a bulk unsubscription action on active services.
- In the Admin Portal, navigate to: Audience > Accounts > Subscriptions.
- Do bulk state change.
- Using the service dropdown menu, identify the service from which you want to unsubscribe developers.
- Using the checkboxes on the left, select the developers you want to unsubscribe.
- Select Change State > Suspend to suspend the selected developer subscriptions.
Remember that service plans need to be enabled.
Chapter 10. Suspending Applications
This guide explains how to disable all keys and access tokens for an application.
If an application is misusing your API and affecting other traffic, you may need to quickly suspend its operations before contacting the developer involved to ask them to amend their code or configuration.
10.1. Step 1: Find the application
You can find the application from the Accounts or Applications tabs or by searching as described here.
10.2. Step 2: Disable the application
Once you have located the application and see the application summary page, click on the suspend icon next to the ‘State’ value. This action will immediately disable the application from the API and suspend all keys from working. Calls with these application keys will be rejected by the control system.
The application can be unsuspended using the same button once the problematic behavior has been rectified.
If you use caching in your agents, suspension may not be immediate but require a short timeout.
10.3. Step 3: Contact the developer
How you contact the developer of the application will depend on your workflow and policy. On the same page, you can click on the account name, which will take you to the account view where you can identify the key administrator of the account that owns the application. You can contact them either by email or by clicking on the send message button as shown, which will generate a dashboard message for the user.
Chapter 11. Deleting applications
To delete an application via the Admin Portal, you need to follow these steps:
Option 1: Delete an application from the list of all applications for [Your_API_name].
- In the Dashboard, click [Your_API_name].
- Click the Overview tab.
- From the left panel on the Overview page, click Applications.
- Choose Listing.
- Click on an application.
- You will see a page containing details of the application. Click Edit.
- To delete the application, click Delete.
- You will see a confirmation message. Click Ok to confirm the deletion.
Option 2: Delete an application based on a specific application plan.
- In the Admin Portal, click Dashboard.
- Choose API.
- Under Published Application Plans, choose an application.
- Click on an application.
- You will see a page containing details of the application. Click Edit.
- To delete the application, click Delete.
- You will see a confirmation message. Click Ok to confirm the deletion.
Alternatively, you can also delete an application via 3scale API Docs, with the operation called Application Delete.
Chapter 12. Multitenancy
Red Hat 3scale API Management allows multiple independent instances of 3scale accounts to exist on a single on-premises deployment. Accounts operate independently from one another, and cannot share information among themselves.
12.1. Master Admin Portal
A master administrator monitors and manages the 3scale accounts through the Master Admin Portal and API endpoints. Similar to the standard Admin Portal, the Master Admin Portal contains information about all accounts in a deployment and allows for administration of accounts and users through a unique account page.
For details on account administrator operations, refer to the Accounts guide.
12.1.1. Accessing the Master Admin Portal
To access the Master Admin Portal, you need to use the credentials and URL specifically defined for the Master Admin Portal during the on-premises installation process.
The Master Admin Portal URL consists of the MASTER_NAME (master by default in the template) and the WILDCARD_DOMAIN:
<MASTER_NAME>.<WILDCARD_DOMAIN>You can identify the Master Admin Portal by the Master flag.

12.1.2. Adding an account through the Master Admin Portal
To add an account through the Master Admin Portal, follow these steps:
- Log in to the Master Admin Portal.
- Navigate to Accounts.
- Click Create.
Indicate the required information for the user:
- Username
- Password
- Password confirmation
Indicate the required information for the organization:
- Organization/Group Name
- Click Create.
After these steps, Red Hat 3scale creates an account subdomain for your account based on the Organization/Group Name field. Additionally, you can see a page containing the details of the account you created.
12.2. Managing accounts
You can manage accounts through the Master Admin Portal or through API calls.
12.2.1. Managing accounts through the Master Admin Portal
To manage the accounts through the Master Admin Portal, you need to do the following:
- Log in to the Master Admin Portal.
- Navigate to the Accounts page.
- Select the group or organization you want to manage.
From the Accounts page, you can perform administrative actions, such as impersonating an admin account or suspending an account. You can also manage the following account attributes:
- Applications
- Users
- Invitations
- Group Memberships
- Organization/Group Name
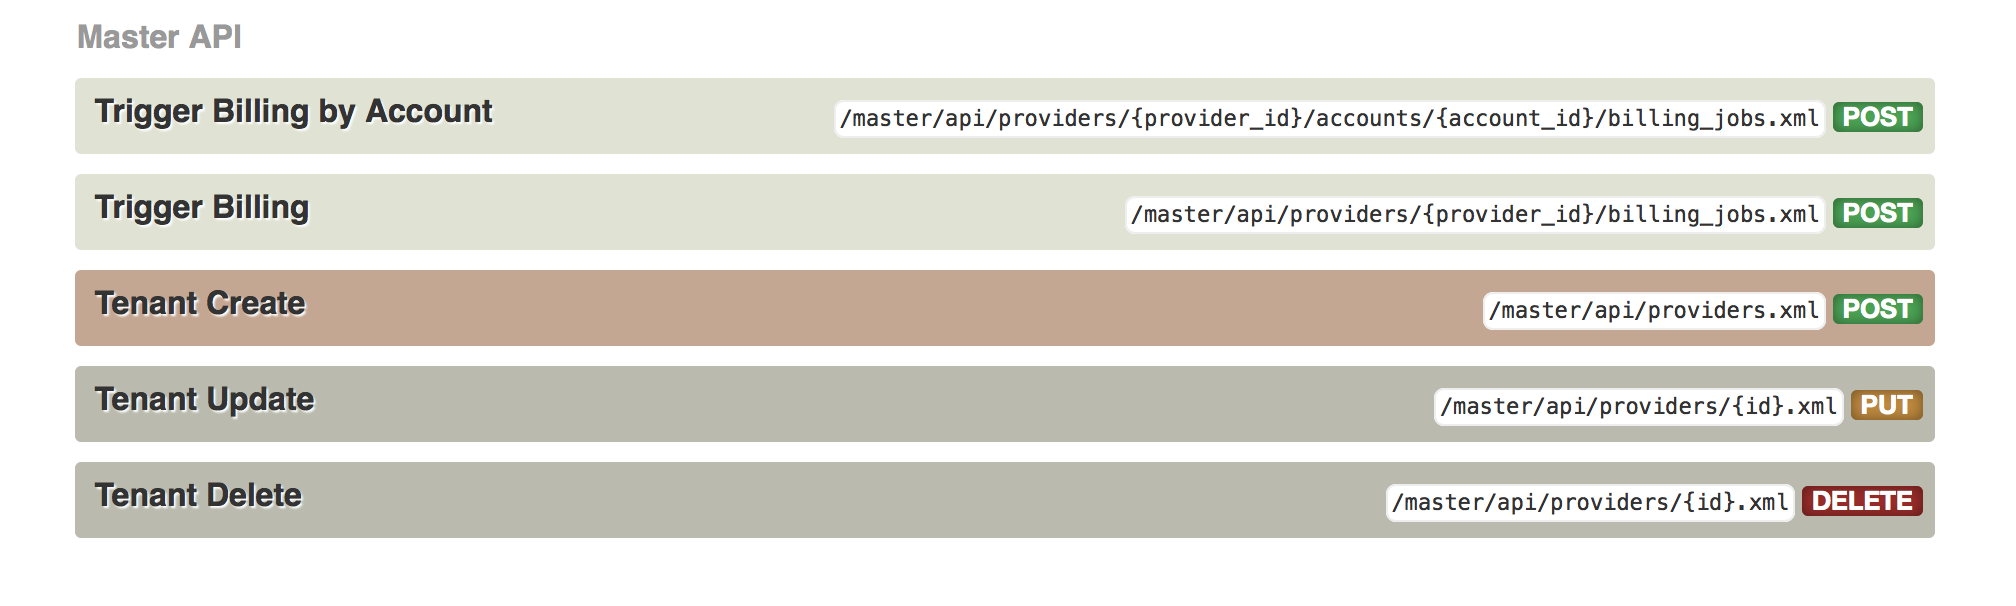
12.2.2. Managing accounts through API calls
You can manage accounts through the Master Admin API calls. For information on these calls, refer to the Master API section, by clicking the question mark (?) icon located in the upper-right corner of the Master Admin Portal, and then choosing 3scale API Docs.
12.3. Understanding multitenancy subdomains
As a result of multiple accounts existing under the same OpenShift cluster domain, individual account names prepend the OpenShift cluster domain name as subdomains. For example, the route for an account named user on a cluster with a domain of example.com appears as:
user.example.com
A standard multitenant deployment will include:
- A master admin user
A master admin portal route, defined by the
MASTER_NAMEparameter:<MASTER_NAME>.<WILDCARD_DOMAIN>
- An account admin user
An account admin portal route, defined by the
TENANT_NAMEparameter:<TENANT_NAME>-admin.<WILDCARD_DOMAIN>
A developer portal route for the account:
<TENANT_NAME>.<WILDCARD_DOMAIN>
Routes for the production and staging built-in APIcast gateway:
<API_NAME>-<TENANT_NAME>-apicast-staging.<WILDCARD_DOMAIN>
<API_NAME>-<TENANT_NAME>-apicast-production.<WILDCARD_DOMAIN>
This example illustrates the output users and routes of a standard multitenant deployment of 3scale:
----
--> Deploying template "3scale-project/3scale-api-management" for "amp.yml" to project project
3scale API Management
---------
3scale API Management main system
     Login on https://user-admin.3scale-project.example.com as admin/xXxXyz123
     ...
     * With parameters:
      * ADMIN_PASSWORD=xXxXyz123 # generated
      * ADMIN_USERNAME=admin
      * TENANT_NAME=user
      ...
      * MASTER_NAME=master
      * MASTER_USER=master
      * MASTER_PASSWORD=xXxXyz123 # generated
      ...
--> Success
    Access your application via route 'user-admin.3scale-project.example.com'
    Access your application via route 'master-admin.3scale-project.example.com'
    Access your application via route 'backend-user.3scale-project.example.com'
    Access your application via route 'user.3scale-project.example.com'
    Access your application via route 'api-user-apicast-staging.3scale-project.example.com'
    Access your application via route 'api-user-apicast-production.3scale-project.example.com'
    Access your application via route 'apicast-wildcard.3scale-project.example.com'
    ...
----
Additional accounts added by the master admin will be be assigned a subdomain based on their names.
12.4. Deleting tenant accounts
12.4.1. Deleting an account via the Admin Portal
With this procedure, accounts are scheduled for deletion and will be deleted after 15 days. During the time it is scheduled for deletion:
- Users cannot log in to the account.
- The account can not be edited; but the master can resume the account to the approved status.
Additionally, the domains of the tenant (admin domain and developer portal) are not available, similar to a real deletion.
Prerequisites:
- Log in to your master admin account.
Procedure
- To see the list of accounts, navigate to Accounts.
- Click the account you want to delete.
- Click Edit, next to the account’s name.
- In the accounts details page, click the Delete icon.
- Confirm the deletion.
12.4.2. Deleting a tenant via the console
If you want to delete the account with an immediate effect, you can do so via the console:
Open the console with these commands:
oc rsh -c system-master "$(oc get pods --selector deploymentconfig=system-app -o name)"
bundle exec rails console
Delete immediately with these lines:
tenant = Account.find(PROVIDER_ID)
tenant.schedule_for_deletion!
DeleteAccountHierarchyWorker.perform_later(tenant)
This is how each line works:
-
Line 1: finds the account and saves it in the variable
tenant. - Line 2: schedules the account for deletion. This is only necessary if you have not scheduled the deletion through the Admin Portal.
- Line 3: deletes the tenant in a background process only if you have scheduled the account for deletion or it is suspended. Deletion will not proceed if the account is in approved status.
-
Line 1: finds the account and saves it in the variable
12.5. Resuming tenant accounts
Resuming a tenant account implies restoring an account scheduled for deletion. You can resume a tenant account up to 15 days after you have scheduled it for deletion.
After resuming an account:
- All previous apps exist.
- All historical stats remain.
- All tokens that should be valid are valid again.
- Apps start authorizing again.
Prerequisites:
- Log in to your master admin account.
Procedure
- To see the list of accounts, navigate to Accounts.
- Click the account you want to delete.
- Under the account details, click Resume.
- Click Ok to confirm you want to resume the account.
Chapter 13. Webhooks
By the end of this section, you’ll be able to configure and take action on the webhooks in Developer Portal.
The use of webhooks allows you to tightly integrate 3scale with your back-office workflow. When specified events happen within the 3scale system, your applications will be notified with a webhook message, and you can use the data such as from a new account signup to populate your CRM system.
13.1. Introducing webhooks
A webhook is a custom HTTP callback triggered by an event. In the 3scale system, all the possible events are displayed in Account Settings (gear icon in the top right corner) > Integrate > Webhooks.
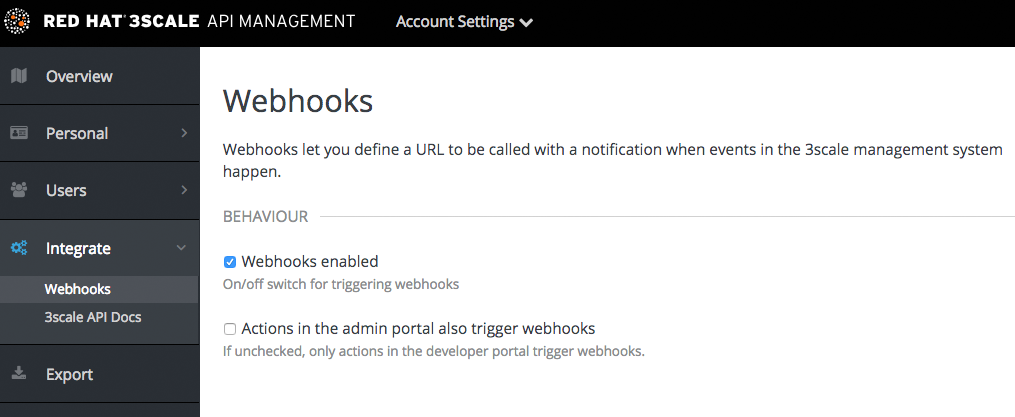
When one of these events occurs, the 3scale system makes an HTTP (or HTTPS) request to the URI configured in the webhooks section. On your end, you can configure the listener to invoke some desired behavior such as event tracking.
The remaining two checkboxes on the screenshot turn on webhooks ("Webhooks are" switch) and allow webhooks to be fired by actions in the Admin Portal. The default behavior is to trigger webhooks only by actions triggered from within the Developer Portal. Bear in mind that this means not all events can be triggered.
13.2. Webhooks format
The format of the webhook is always the same. It makes a post to the endpoint with an XML document of the following structure:
<?xml version="1.0" encoding="UTF-8"?>
<event>
  <type>application</type>
  <action>updated</action>
  <object>
    THE APPLICATION OBJECT AS WOULD BE RETURNED BY A GET ON THE ACCOUNT MANAGEMENT
    API
  </object>
</event>
The <type> gives you the subject of the event such as "application", "account", etc. The <action> – what has been done such as "updated", "created", "deleted". Finally the <object> is the XML object itself in the same format that is returned by the Account Management API. To check this, you can use our interactive ActiveDocs, available in your Admin Portal, under the question mark (?) icon located in top right corner, and 3scale API Docs.
If you need to provide assurance that the webhook was fired by 3scale, expose an HTTPS webhook URL and add a custom parameter to your webhook declaration in 3scale. For example: https://your-webhook-endpoint?someSecretParameterName=someSecretParameterValue. Decide on the parameter name and value. Then, inside your webhook endpoint, check for the presence of this parameter value.
13.3. Troubleshooting
If you want to experiment with the webhooks or troubleshoot issues, you may find RequestBin a great (and free) service to view the results of the webhooks: http://requestb.in/
If you experience an outage for your listening endpoint, you can recover failed deliveries. 3scale will consider a webhook delivered if your endpoint responds with a 200 code. Otherwise, it will retry 5 times with a 60 seconds gap. After any recovery from an outage, or periodically, you should run a check and if applicable clean up the queue. You can find more in the ActiveDocs for the two methods:
- Webhooks list failed deliveries
- Webhooks delete failed deliveries