
Chapter 1. Customer Integration
The "customer ecosystem" use case involves using APIs to allow existing customers to automate the processes they run on your system, to use bulk operations or just integrate more tightly with your system. You may also choose to expose your API to partners, in which case you might find the partner integrations section useful too.
Some examples of successful companies that use APIs to enable customers to tightly integrate with their platform through APIs include Zendesk, a customer support platform that exposes an API to allow their customers to automate and enhance their customer support, and Dropbox, which has both a Core API and Dropbox for Business API that allows business customers to easily administer team accounts and monitor usage and activity.
Although APIs to enable customer integrations are generally publicly documented and free to use, they’re often restricted for use by existing customers only. As such, you may want to provide API access automatically for all user accounts, or only to customers on certain contracts. You probably have a pre-existing relationship with your API consumers before they start using your API.
1.1. API requirements
Before diving in to the setup for a customer API, review your requirements for the API:
1.1.1. Purpose
The main driver behind exposing an API to your customers would be to allow them to customize their experience, for your core product to closely suit their needs by allowing them to automate processes and integrate with other systems. This level of integration encourages customers to use your product more as well as increasing loyalty due to the time and effort spent integrating.
A final reason could be as an upsell driver such as how Salesforce only allows API access for Enterprise level contracts.
1.1.2. Audience
The audience here is clear – you’re targeting existing (as well as potential) customers. If your existing product currently provides distinct contracts or plans, you might choose to differentiate between levels of API access based on these plans. This is especially important if these contracts allow for access to different sets of functionality in your core product.
Additionally, if you’re planning to use your API as an upsell driver, you’ll want to provide trial access to all customers either with a reduced usage allowance and/or functionality.
1.1.3. Functionality
Since you’re offering an API to your existing customers, you’ll want to ensure your API offering covers most (if not all) of your core product’s functionality as well as ways to import/export data via API and automate configuration changes. You may decide to split these different sets of functionality into multiple APIs or services to be bundled and exposed separately, or you could just offer them within a single API offering.
1.1.4. Access Control and Security
Now that you have a clear idea of the sort of functionality you want to make available and your audience, you’ll want to think about exactly which resources you want to expose as well as the operations you want to expose on them. As previously mentioned, this will probably be tied to any existing contracts you have with your customers.
You should also think about any usage limits that you want to enforce for your customers. Again this may be based on customer type, with higher paying customers receiving a higher usage allowance. You might also want to assess the performance of the different API calls at this point with a view to implementing different usage limits and access rights per method. Are there any methods that are computationally more expensive than others? And if so, is this something that you want to offer with the same usage limits as for other "cheaper" calls? Another alternative would be to only offer such methods to customers on higher plans.
The next thing to think about is the authentication method that you want for your API. API security tends to be a trade off between API credential security and usability of your API. Typically, more secure authentication methods tend to be a hurdle to API integration for your customers. For a customer integration use case, a good compromise between the two would be the combination of an application identifier and a secret key to secure access to your API. Ideally, applications should be able to keep a number of valid secret keys in rotation that can be easily revoked if any of them become compromised.
1.1.5. Visibility
How you want to publicize and document your API is an important next step to think about. Even though API access will only be available to existing customers, you should still provide a public documentation portal. This will help differentiate you from your competitors, especially if they do not provide an API to enable automation of workflows.
To reduce any friction when provisioning API access for your customers, you should automatically provide API access to any new customers on signup. This will mean that API account creation and management will be maintained on your side.
As such, any customer-specific areas such as API credentials and usage statistics should be available directly from your core product. This can be done by providing single sign-on to the provided Developer Portal or by pulling in the relevant data using 3scale’s Account Management API.
1.1.6. APIUX
Once you’re clear on all of the above, it’s important to think about what the experience is going to be like for customers integrating with your API. Part of this will be relevant when designing your APIs and choosing an authentication method, but it’s also important to document your API in a way that allows for quick and easy testing and integration by your customers.
Some of this will be covered by providing API access credentials to your customers by default as well as providing interactive documentation for customers to test out your API. If you want to encourage customers to use your API, it’s a good idea to showcase innovative integrations in a "Customer Success Stories" section on your Developer Portal.
These are all conscious decisions that should be taken upfront when deciding to expose your API, it doesn’t mean that you can’t change them later, but it’s good to have a clear idea of the above and how you are going to implement them.
SendGrid will serve as an example to see the best way to achieve this with 3scale. SendGrid provides a number of APIs that allow their customers and resellers to automate processes and integrate with their own platform and tools. You can find out more about what their APIs look like here. SendGrid maintains multiple versions of their API. The earliest version (v1) is currently deprecated, so this example will mainly be focusing on their v2 and v3 APIs. These use basic authentication for access and return JSON data responses.
1.2. Defining the API in 3scale
The first thing to do, after creating a 3scale account of course, is to define all of the existing endpoints for your API and set these up within 3scale. Set this up within the API service which is created by default with your 3scale account by going to the Definition view within the API service.
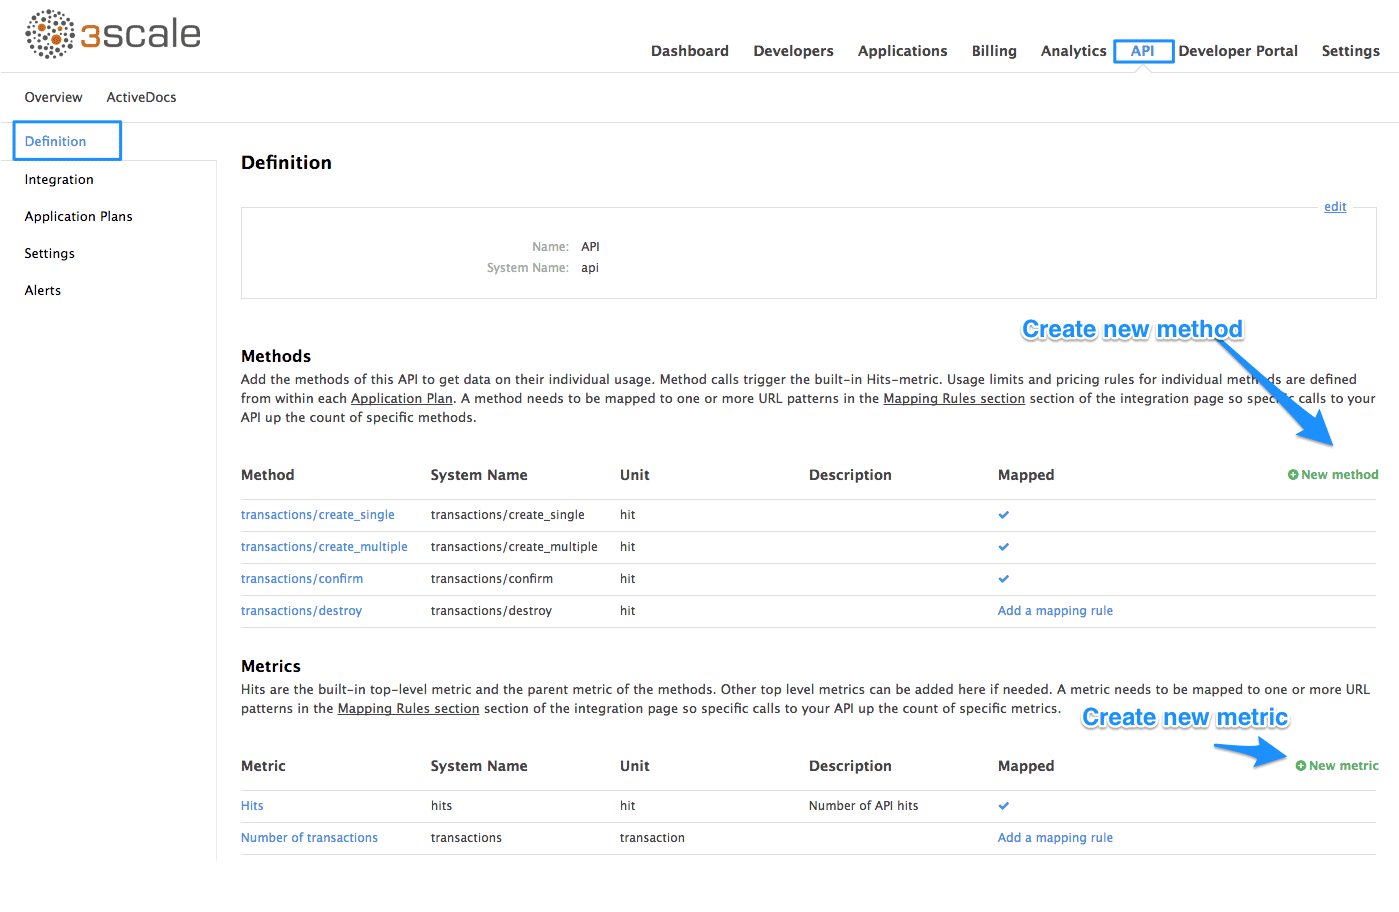
Now create all of the endpoints that you want to expose and track as methods. Methods are the means by which 3scale tracks usage of the APIs. You can set up a method for each of the API endpoints (and potentially also operations on those API endpoints) available under the APIs. You can be as specific or as broad as you like when defining your methods. For now, you’re only interested in tracking usage at the API level, so begin by creating a metric for each SendGrid API.
1.3. Integrating the API with 3scale
Now that you’ve created all of the endpoints that you want to expose and track in 3scale, and you have defined how customers will access the API, you need to set up the API gateway to easily integrate with 3scale. For this, you’re first going to use the APIcast Cloud Gateway. This is a hosted API gateway based on NGINX that 3scale provides to test-run your API integration with 3scale in a staging environment. This will allow you to confirm that your setup is correct so far and that the endpoints you’ve entered will be tracked correctly in 3scale.
Go ahead and set up the staging cloud gateway by navigating to the Integration page. The first thing to do here is to enter in your API base URL, including the port number such as 80 for HTTP and 443 for HTTPS. This will be your private API backend, which will only be accessible through the API gateway. This would typically be some internal address for the API backend. The next field specifies the APIcast cloud gateway location. Your calls to the API backend will go to through this host, and this will be what you hit during your tests instead of calling the private API backend directly.
The next step is to map your actual API endpoints or paths to the metrics you just defined in the application plan. Since there are many actions available on these API endpoints, you’ll create a rule for all the HTTP methods available on the API paths.
Once the setup is done, you can test the integration with the staging APIcast Cloud Gateway to ensure the setup will work in production. If all is well, you should get a green line showing a correct test integration between 3scale and your API backend.

Now that you’ve tested the integration, the final step is to set up the authentication mode that your customers will use to access the API. The SendGrid Web API uses a pair of credentials: api_user and api_key to authenticate an API call. These are sent as query parameters. This maps to the app_id/app_key authentication mode in 3scale. Change to this auth mode by changing the integration settings.
Once that is done, also modify the gateway authentication settings. In order to match the SendGrid API as closely as possible, change the 3scale credential name to the equivalent SendGrid credential name. Leave the setting for the credentials location as is, as the SendGrid credentials are also sent as query parameters.
Finally, you also want to restrict calls to your API backend to come from your gateway only. You can do this by specifying a secret token that the gateway should send with every request. That way, you can ensure any calls you get are from the gateway and your API backend can reject any calls not containing this token. For now, leave this at its default value.
You can now download the generated NGINX configuration to set up your own on-premise gateway.
1.4. Manage API access
Now that you have the gateway set up, you can start creating application plans to allow different types of access to your API. You’ll want to look at which additional metrics you want to expose and track for the different application plans, as well as what usage limits you want to enforce for their applications using your API.
1.4.1. Application plans
Application plans can determine can determine rate limits, which methods or resources are accessible, and which features are enabled. Every application accessing your API will be associated with an application plan.
You’ll already have two application plans created by default with your 3scale account: Basic and Unlimited. Delete these and create new ones to fit in with your plans for exposing your APIs to different types of customers, depending on their existing pricing plan with SendGrid. SendGrid provides four different pricing plans – Bronze, Silver, Gold and Platinum – each with access to a different set of APIs. As such, you’ll create matching application plans in 3scale to differentiate between them.
You’ll want to give your customers access to all of the APIs available under their SendGrid plan by default when they create an account, so leave the Applications require approval checkbox unticked in every case.
In each plan, disable any metrics that are not available under that plan. Later on, you might also choose to track usage at the individual endpoint level and create methods for that.
As for the SendGrid monthly plans, you’ll only allow access to the Web APIs for the Bronze plan. So disable all other APIs in the Bronze application plan.
1.4.2. Limits
To begin with, you don’t really want to place any limits on customers using your API. However, you will enforce an overall throttling limit on the hits metric to ensure your API is not brought down by large numbers of requests from a rogue app or script.
That’s the initial setup you need to do. You can always come back to your application plans to add any new methods as well as to change or refine any limits later on, once your API is running in production and you have a better understanding of your customers' usage patterns. As your API program matures, you can look for ways to use your API for upsell opportunities based on your customers' usage.
1.5. Engage developers
Now that you’ve set some limits, the next step is to set up the Developer Portal so your customers can find out more about the API, get their API credentials, and monitor their usage.
The final things to set up on your 3scale account are all around customizing the Developer Portal to fit your particular needs and so that it conforms to the look and feel and of your product branding.
You can do this through:
- Setting up a custom domain for your Developer Portal such as developer.sendgrid.com.
- Setting up an API contact email such as api@sendgrid.com for emails from your 3scale account to your API consumers.
- Customizing the Developer Portal so it matches the look and feel of your brand.
- Editing the email templates to tailor the messages you want to send to your customers.
- Using liquids to control the information that gets shown to different customers.
- Adding a favicon
For the favicon, the path has to be different from the standard /favicon.ico, as this is already taken by the default 3scale one.
You need to upload your favicon into the 3scale CMS by creating a new file. In this, place it in the images folder and call it icon.ico. You’ll then refer to it from the main layout with the following snippet placed in the head element, as below:
<!-- Favicon -->
    <link rel="shortcut icon" href="/images/icon.ico" type="image/x-icon" />
You’ll also want to set up some interactive documentation (ActiveDocs) so your customers can explore the API without needing to write any code. If you already have a Swagger spec for your, API you can simply navigate to the API and ActiveDocs section, Create a new spec and paste your Swagger spec in.
1.6. Exposing the API
Now that you have the API integrated and have customized your Developer Portal to fit your needs, you can start thinking about giving customers access to the APIs.
Since you want to allow customers to get access to the API by default, you’ll want to create an account for them in 3scale when they sign up to any monthly plan in SendGrid. You can use the signup express method in the 3scale Account Management API to do this. The idea is that you’ll call this method from your own account creation code, as in the snippet below.
curl -v -X POST "https://sendgrid-admin.3scale.net/admin/api/signup.xml" -d 'provider_key=PROVIDER_KEY&org_name=COMPANY_NAME&username=USERNAME&email=EMAIL&password=PASSWORD&application_plan_id=MONTHLY_PLAN_ID'
You’ll need to make sure you pass in the correct application plan ID in 3scale to match the equivalent monthly plan in SendGrid so customers get access to the relevant APIs.
You’ll also disable signups directly on the 3scale Developer Portal to prevent anyone who’s not a customer from getting access credentials to your APIs.

Finally, to make the experience completely seamless, you’ll use 3scale’s SSO capabilities to automatically login your customers to the 3scale Developer Portal when they want to get their access credentials. This will require you to previously authenticate them on your side. You can read more about how to use 3scale’s SSO here.
That’s all regarding the integration and setup of your 3scale account. However that’s by no means all that 3scale provides. Once your API has been up and running for a while, the analytics module can help give some insight into the usage patterns for your API, which of your customers are most engaged, as well as which are the busiest hours and days for your API. You can read all about how to make the most of the 3scale Analytics here and here.
What are you waiting for? If you haven’t already done so, start your free trial now and give it a go.