
Deployment Options
Deploy APIcast API Gateway on OpenShift, natively, or using Docker.
Abstract
Chapter 1. APIcast Overview
APIcast is an NGINX based API gateway used to integrate your internal and external API services with the Red Hat 3scale Platform.
The latest released and supported version of APIcast is 2.0.
In this guide you will learn more about deployment options, environments provided, and how to get started.
1.1. Prerequisites
APIcast is not a standalone API gateway, it needs connection to 3scale API Manager.
- You will need a working 3scale On-Premises instance.
1.2. Deployment options
You can use APIcast hosted or self-managed, in both cases, it needs connection to the rest of the 3scale API management platform:
- APIcast hosted: 3scale hosts APIcast in the cloud. In this case, APIcast is already deployed for you and it is limited to 50,000 calls per day.
- APIcast built-in: Two APIcast (staging and production) come by default with the 3scale API Management Platform (AMP) installation. They come pre-configured and ready to use out-of-the-box.
APIcast self-managed: You can deploy APIcast wherever you want. The self-managed mode is the intended mode of operation for production environments. Here are a few recommended options to deploy APIcast:
- the Docker containerized environment: Download a ready to use Docker-formatted container image, which includes all of the dependencies to run APIcast in a Docker-formatted container.
- OpenShift: Run APIcast on a supported version of OpenShift. You can connect self-managed APIcasts both to a 3scale AMP installation or to a 3scale online account.
1.3. Environments
By default, when you create a 3scale account, you get APIcast hosted in two different environments:
- Staging: Intended to be used only while configuring and testing your API integration. When you have confirmed that your setup is working as expected, then you can choose to deploy it to the production environment.
- Production: Limited to 50,000 calls per day and supports the following out-of-the-box authentication options: API key, and App ID and App key pair.
1.4. API configuration
Follow the next steps to configure APIcast in no time.
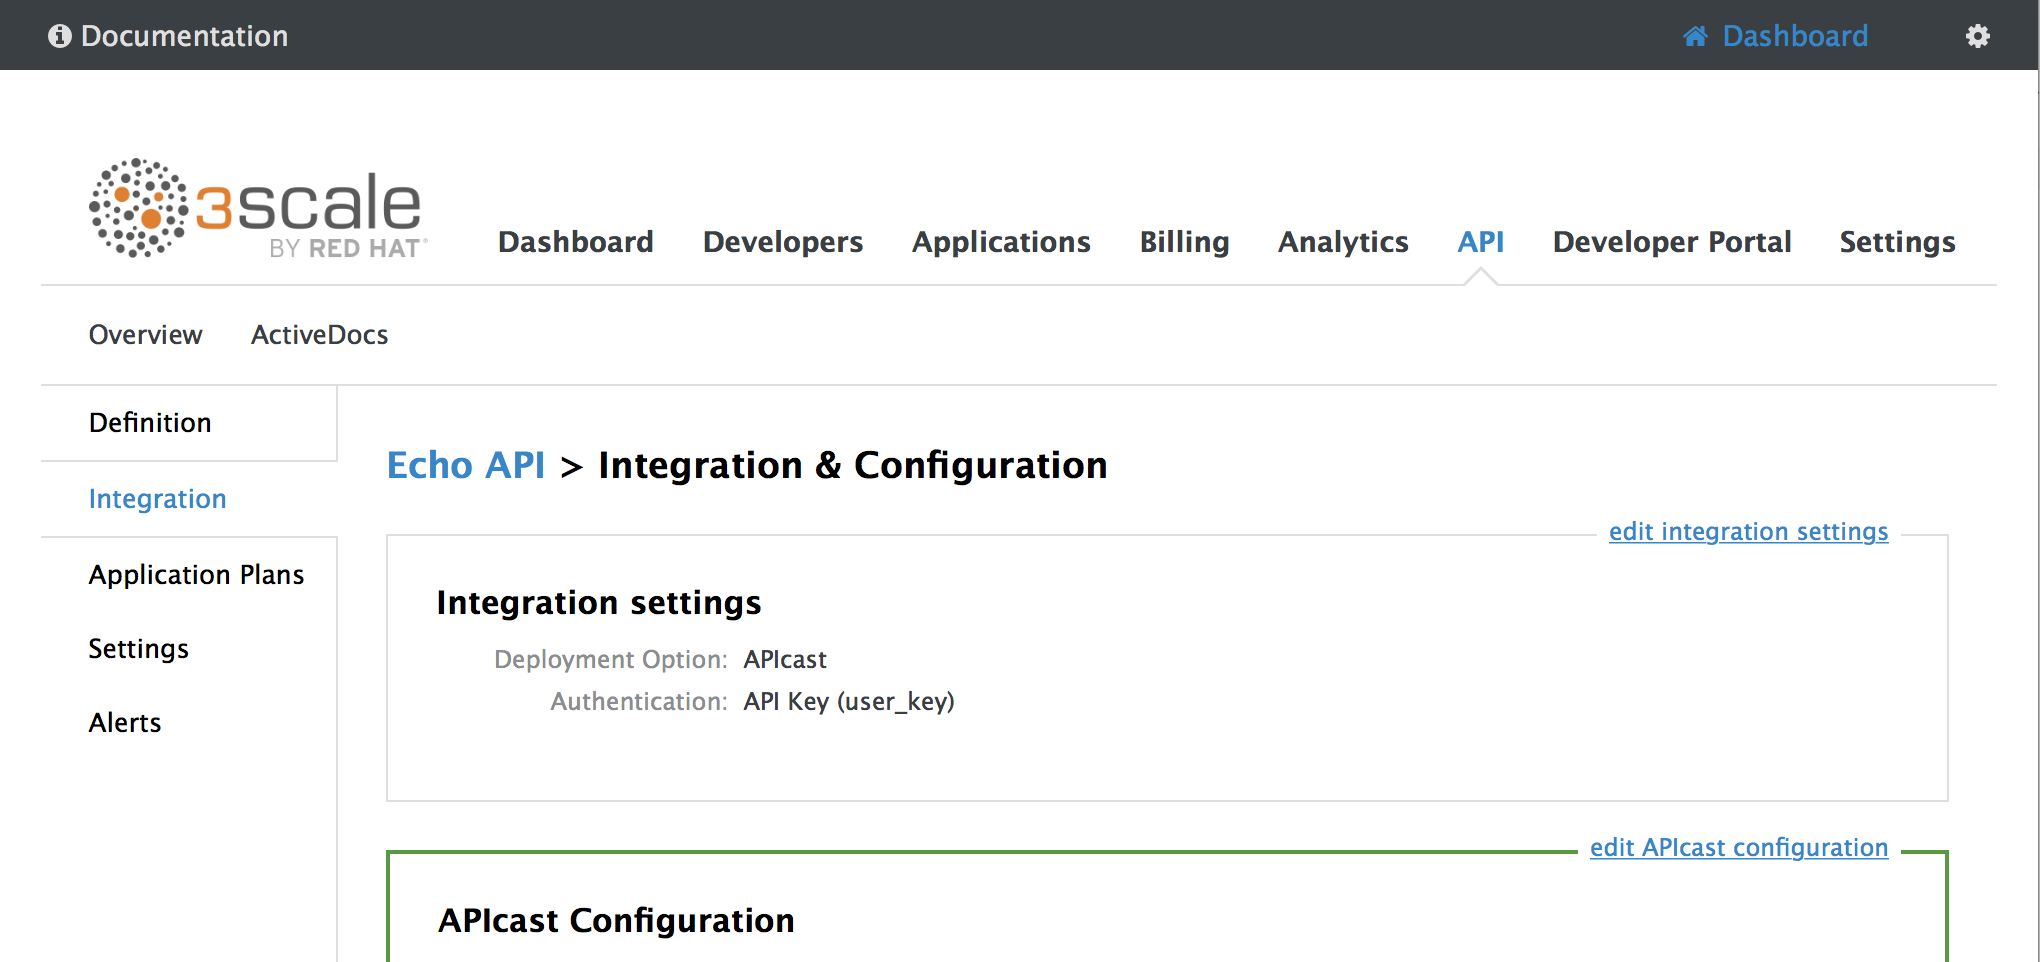
1.5. Configure the integration settings
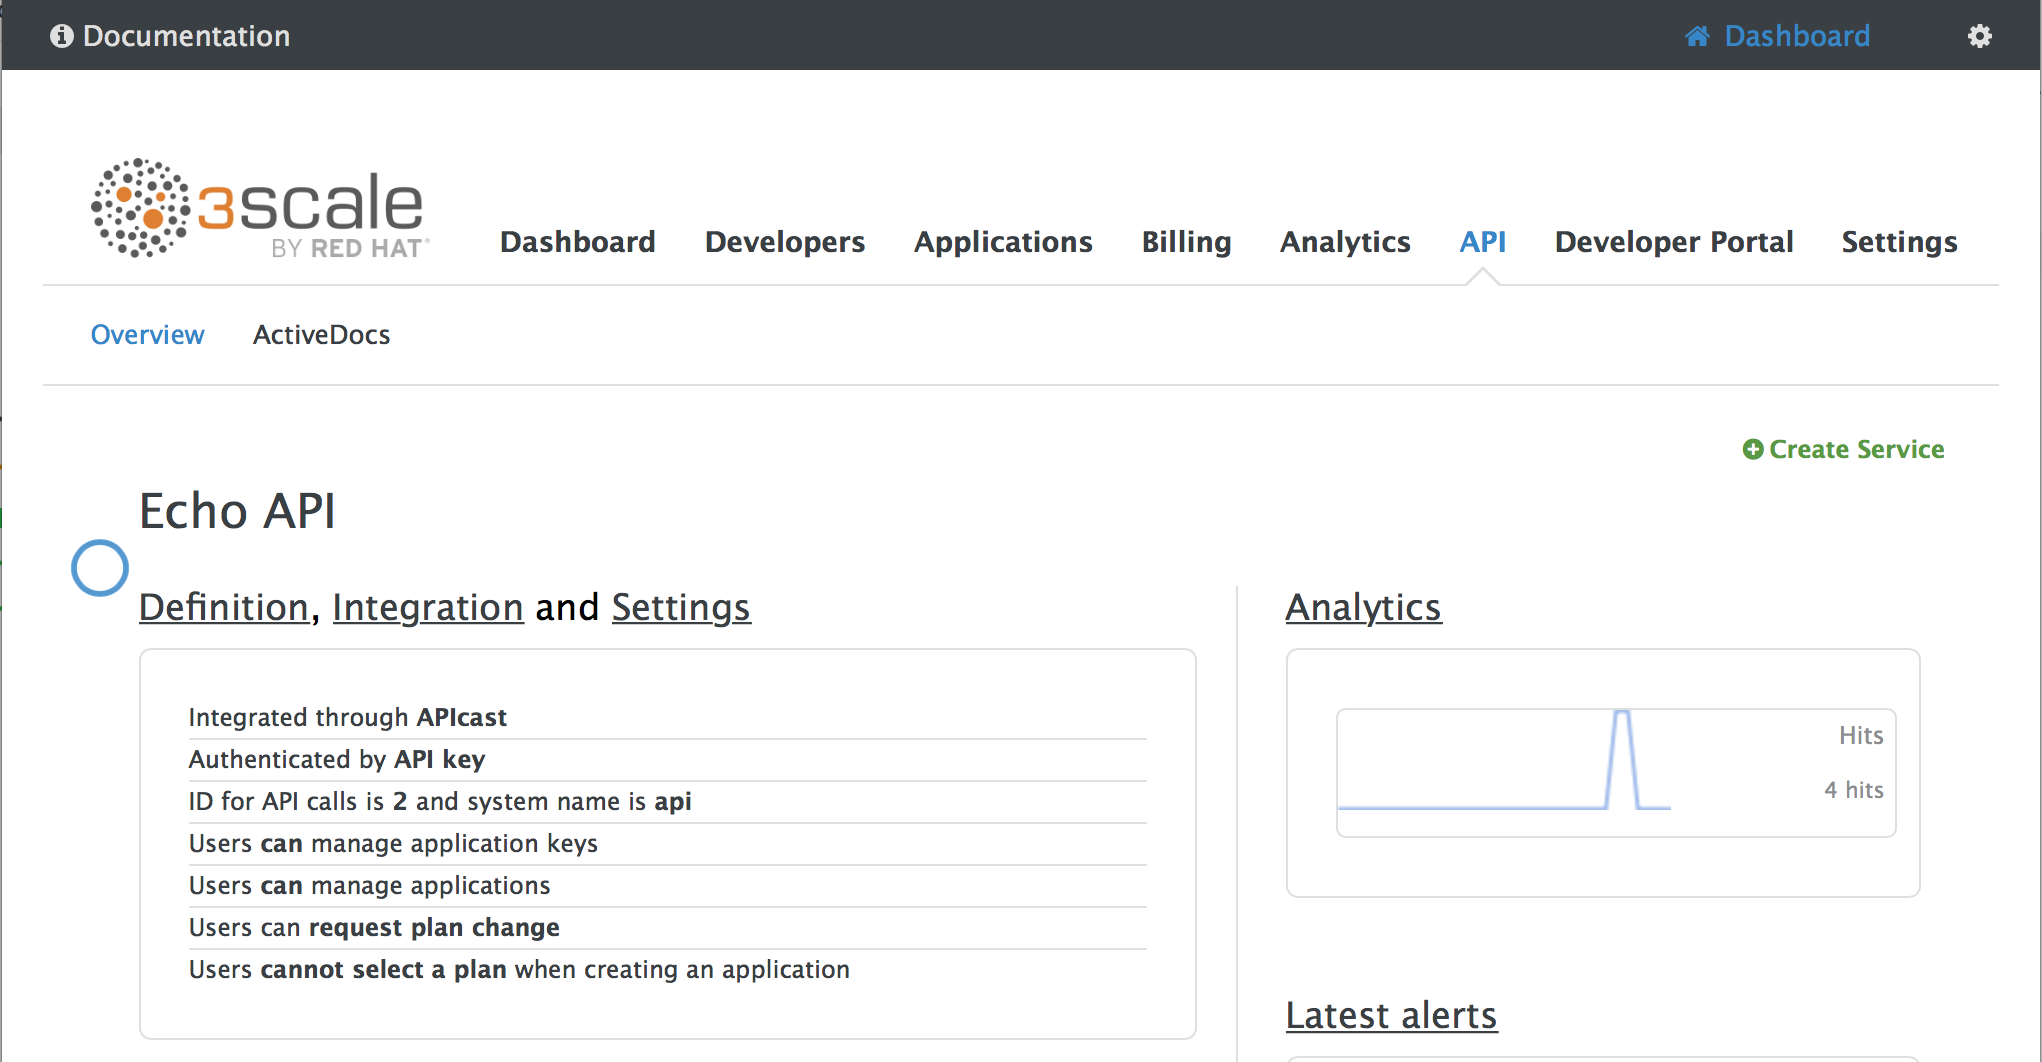
Go to the Dashboard → API tab and click on the Integration link. If you have more than one API in your account, you will need to select the API first.
On top of the Integration page you will see your integration options. By default, the deloyment option is APIcast hosted, and the authentication mode is API key. You can change these settings by clicking on edit integration settings in the top right corner. Note that OAuth 2.0 authentication is only available for the Self-managed deployment.
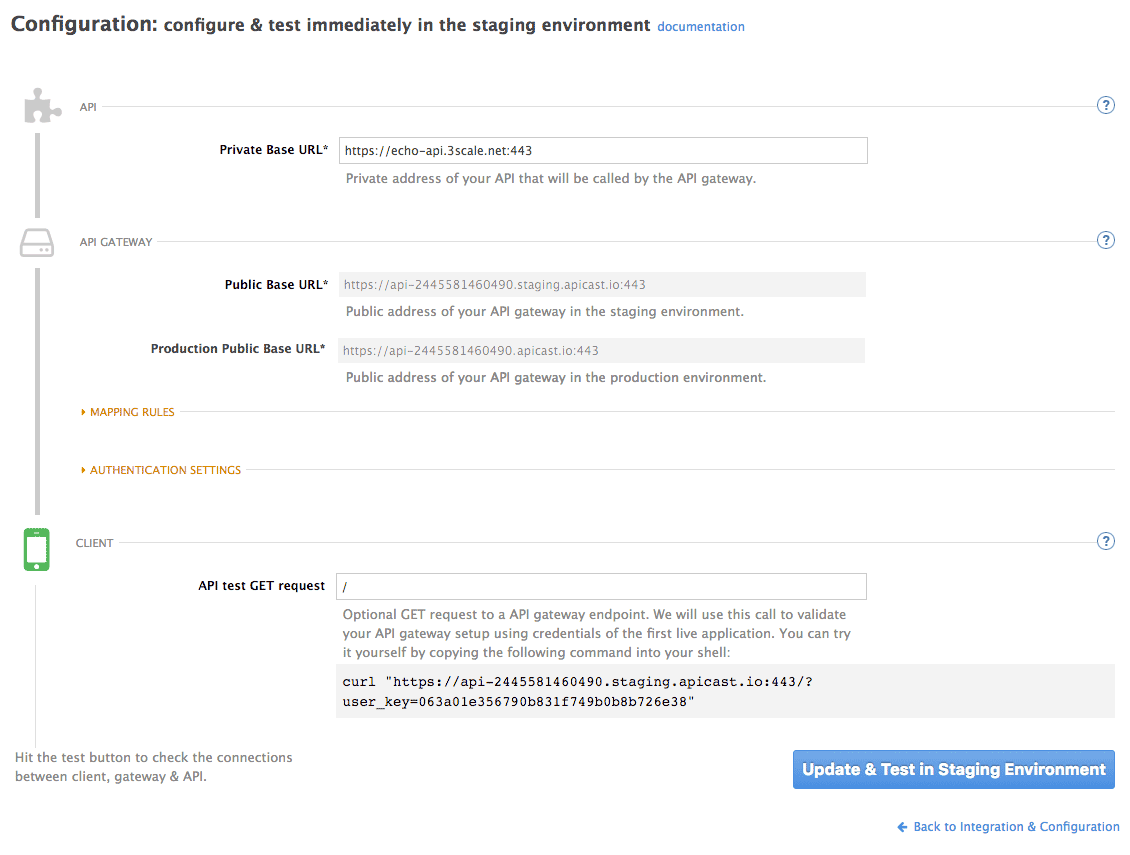
1.6. Configure your service
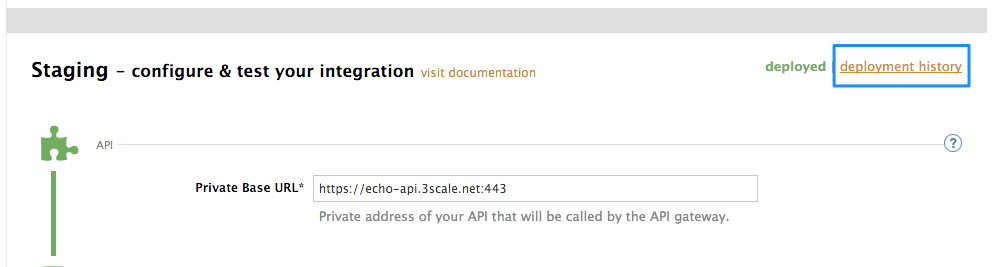
You will need to declare your API backend in the Private Base URL field, which is the endpoint host of your API backend. APIcast will redirect all traffic to your API backend after all authentication, authorization, rate limits and statistics have been processed.
Typically, the Private Base URL of your API will be something like https://api-backend.yourdomain.com:443, on the domain that you manage (yourdomain.com). For instance, if you were integrating with the Twitter API the Private Base URL would be https://api.twitter.com/. In this example will use the Echo API hosted by 3scale – a simple API that accepts any path and returns information about the request (path, request parameters, headers, etc.). Its Private Base URL is https://echo-api.3scale.net:443. Private Base URL

Test your private (unmanaged) API is working. For example, for the Echo API we can make the following call with curl command:
curl "https://echo-api.3scale.net:443"
You will get the following response:
{
    "method": "GET",
    "path": "/",
    "args": "",
    "body": "",
    "headers": {
      "HTTP_VERSION": "HTTP/1.1",
      "HTTP_HOST": "echo-api.3scale.net",
      "HTTP_ACCEPT": "*/*",
      "HTTP_USER_AGENT": "curl/7.51.0",
      "HTTP_X_FORWARDED_FOR": "2.139.235.79, 10.0.103.58",
      "HTTP_X_FORWARDED_HOST": "echo-api.3scale.net",
      "HTTP_X_FORWARDED_PORT": "443",
      "HTTP_X_FORWARDED_PROTO": "https",
      "HTTP_FORWARDED": "for=10.0.103.58;host=echo-api.3scale.net;proto=https"
    },
    "uuid": "ee626b70-e928-4cb1-a1a4-348b8e361733"
  }
Once you have confirmed that your API is working, you will need to configure the test call for the hosted staging environment. Enter a path existing in your API in the API test GET request field (for example, /v1/word/good.json).
Save the settings by clicking on the Update & Test Staging Configuration button in the bottom right part of the page. This will deploy the APIcast configuration to the 3scale hosted staging environment. If everything is configured correctly, the vertical line on the left should turn green.
If you are using one of the Self-managed deployment options, save the configuration from the GUI and make sure it is pointing to your deployed API gateway by adding the correct host in the staging or production Public base URL field. Before making any calls to your production gateway, do not forget to click on the Promote v.x to Production button.
Find the sample curl at the bottom of the staging section and run it from the console:
curl "https://XXX.staging.apicast.io:443/v1/word/good.json?user_key=YOUR_USER_KEY"
You should get the same response as above, however, this time the request will go through the 3scale hosted APIcast instance. Note: You should make sure you have an application with valid credentials for the service. If you are using the default API service created on sign up to 3scale, you should already have an application. Otherwise, if you see USER_KEY or APP_ID and APP_KEY values in the test curl, you need to create an application for this service first.
Now you have your API integrated with 3scale.
3scale hosted APIcast gateway does the validation of the credentials and applies the rate limits that you defined for the application plan of the application. If you try to make a call without credentials, or with invalid credentials, you will see an error message. The code and the text of the message can be configured, check out the Advanced APIcast configuration article for more information.
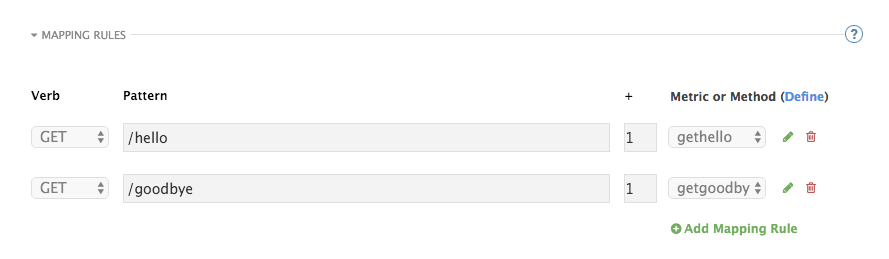
1.7. Mapping rules
By default we start with a very simple mapping rule,

This rule means that any GET request that starts with / will increment the metric hits by 1. This mapping rule will match any request to your API. Most likely you will change this rule since it is too generic.
The mapping rules define which metrics (and methods) you want to report depending on the requests to your API. For instance, below you can see the rules for the Echo API that serves us as an example:
The matching of the rules is done by prefix and can be arbitrarily complex (the notation follows Swagger and ActiveDocs specification)
-
You can do a match on the path over a literal string:
/hello -
Mapping rules can contain named wildcards:
/{word}
This rule will match anything in the placeholder {word}, making requests like /morning match the rule.
Wildcards can appear between slashes or between slash and dot.
-
Mapping rules can also include parameters on the query string or in the body:
/{word}?value={value}
APIcast will try to fetch the parameters from the query string when it’s a GET and from the body when it is a POST, DELETE, PUT.
Parameters can also have named wildcards.
Note that all mapping rules are evaluated. There is no precedence (order does not matter). If we added a rule /v1 to the example on the figure above, it would always be matched for the requests whose path starts with /v1 regardless if it is /v1/word or /v1/sentence. Keep in mind that if two different rules increment the same metric by one, and the two rules are matched, the metric will be incremented by two.
1.8. Mapping rules workflow
The intended workflow to define mapping rules is as follows:
- You can add new rules by clicking the Add Mapping Rule button. Then you select an HTTP method, a pattern, a metric (or method) and finally its increment. When you are done, click Update & Test Staging Configuration to apply the changes.
- Mapping rules will be grayed out on the next reload to prevent accidental modifications.
- To edit an existing mapping rule you must enable it first by clicking the pencil icon on the right.
- To delete a rule click on the trash icon.
- Modifications and deletions will be saved when you hit the Update & Test Staging Configuration button.
For more advanced configuration options, you can check the APIcast advanced configuration tutorial.
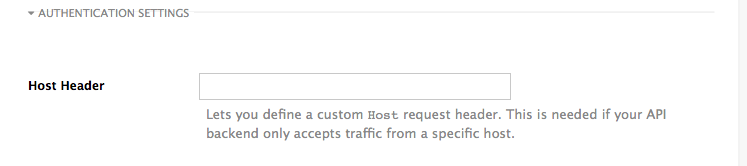
1.9. Host Header
This option is only needed for those API backends that reject traffic unless the Host header matches the expected one. In these cases, having a gateway in front of your API backend will cause problems since the Host will be the one of the gateway, e.g. xxx-yyy.staging.apicast.io
To avoid this issue you can define the host your API backend expects in the Host Header field in the Authentication Settings, and the hosted APIcast instance will rewrite the host.
1.10. Production deployment
Once you have configured your API integration and verified it is working in the Staging environment, you can go ahead with one of the APIcast production deployments. See the Deployment options in the beginning of this article.
At the bottom of the Integration page you will find the Production section. You will find two fields here: the Private Base URL, which will be the same as you configured in the Staging section, and the Public Base URL.
1.11. Public Base URL
The Public Base URL is the URL, which your developers will use to make requests to your API, protected by 3scale. This will be the URL of your APIcast instance.
In APIcast hosted, the Public Base URL is set by 3scale and cannot be changed.
If you are using one of the Self-managed deployment options, you can choose your own Public Base URL for each one of the environments provided (staging and production), on a domain name you are managing. Note that this URL should be different from the one of your API backend, and could be something like https://api.yourdomain.com:443, where yourdomain.com is the domain that belongs to you. After setting the Public Base URL make sure you save the changes and, if necessary, promote the changes in staging to production.
Please note that APIcast v2 will only accept calls to the hostname which is specified in the Public Base URL. For example, if for the Echo API used as an example above, we specify https://echo-api.3scale.net:443 as the Public Base URL, the correct call would be be:
curl "https://echo-api.3scale.net:443/hello?user_key=YOUR_USER_KEY"
In case you do not yet have a public domain for your API, you can also use the APIcast IP in the requests, but you still need to specify a value in the Public Base URL field (even if the domain is not real), and in this case make sure you provide the host in the Host header, for example:
curl "http://192.0.2.12:80/hello?user_key=YOUR_USER_KEY" -H "Host: echo-api.3scale.net"
If you are deploying on local machine, you can also just use "localhost" as the domain, so the Public Base URL will look like http://localhost:80, and then you can make requests like this:
curl "http://localhost:80/hello?user_key=YOUR_USER_KEY"
In case you have multiple API services, you will need to set this Public Base URL appropriately for each service. APIcast will route the requests based on the hostname.
1.12. Protecting your API backend
Once you have APIcast working in production, you might want to restrict direct access to your API backend without credentials. The easiest way to do this is by using the Secret Token set by APIcast. Please refer to the Advanced APIcast configuration for information on how to set it up.
1.13. Using APIcast with private APIs
With APIcast it is possible to protect the APIs which are not publicly accessible on the Internet. The requirements that must be met are:
- APIcast self-managed must be used as the deployment option
- APIcast needs to be accessible from the public internet and be able to make outbound calls to the 3scale Service Management API
- the API backend should be accessible by APIcast
In this case you can set your internal domain name or the IP address of your API in the Private Base URL field and follow the rest of the steps as usual. Note, however, that you will not be able to take advantage of the Staging environment, and the test calls will not be successful, as the Staging APIcast instance is hosted by 3scale and will not have access to your private API backend). But once you deploy APIcast in your production environment, if the configuration is correct, APIcast will work as expected.
Chapter 2. APIcast Hosted
Once you complete this tutorial, you’ll have your API fully protected by a secure gateway in the cloud.
APIcast hosted is the best deployment option if you want to launch your API as fast as possible, or if you want to make the minimum infrastructure changes on your side.
2.1. Prerequisites
- You have reviewed the deployment alternatives and decided to use APIcast hosted to integrate your API with 3scale.
- Your API backend service is accessible over the public Internet (a secure communication will be established to prevent users from bypassing the access control gateway).
- You do not expect demand for your API to exceed the limit of 50,000 hits/day (beyond this, we recommend upgrading to the self-managed gateway).
2.2. Step 1: Deploy your API with APIcast hosted in a staging environment
The first step is to configure your API and test it in your staging environment. Define the private base URL and its endpoints, choose the placement of credentials and other configuration details that you can read about here. Once you’re done entering your configuration, go ahead and click on Update & Test Staging Environment button to run a test call that will go through the APIcast staging instance to your API.
If everything was configured correctly, you should see a green confirmation message.
Before moving on to the next step, make sure that you have configured a secret token to be validated by your backend service. You can define the value for the secret token under Authentication Settings. This will ensure that nobody can bypass APIcast’s access control.
2.3. Step 2: Deploy your API with the APIcast hosted into production
At this point, you’re ready to take your API configuration to a production environment. To deploy your 3scale-hosted APIcast instance, go back to the 'Integration and Configuration' page and click on the 'Promote to v.x to Production' button. Repeat this step to promote further changes in your staging environment to your production environment.
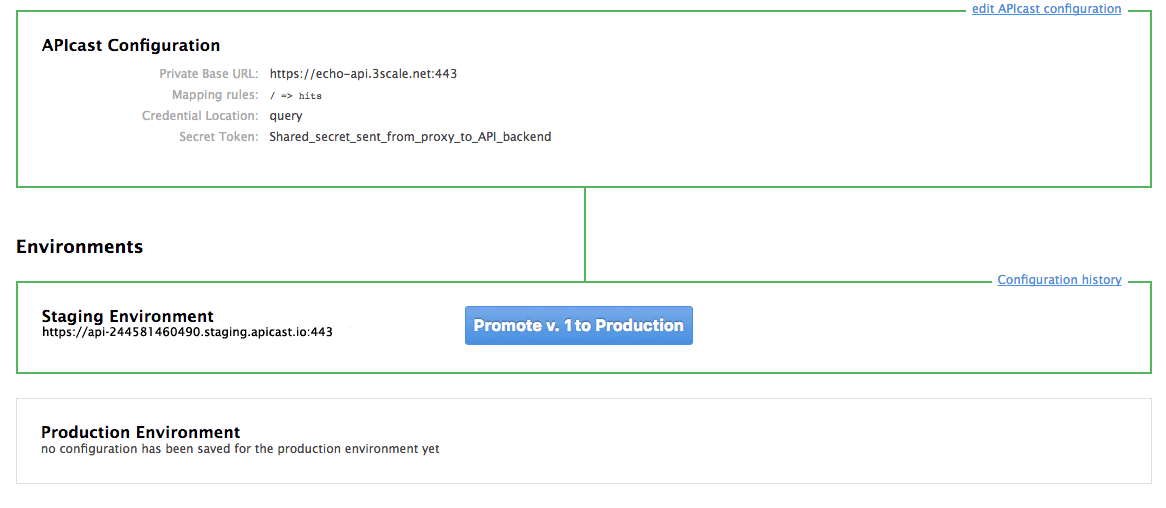
It will take between 5 and 7 minutes for your configuration to deploy and propagate to all the cloud APIcast instances. During redeployment, your API will not experience any downtime. However, API calls may return different responses depending on which instance serves the call. You’ll know it has been deployed once the box around your production environment has turned green.
Both the staging and production APIcast instances have base URLs on the apicast.io domain. You can easily tell them apart because the staging environment URLs have a staging subdomain. For example:
- staging: https://api-2445581448324.staging.apicast.io:443
- production: https://api-2445581448324.apicast.io:443
2.3.1. Bear in mind
- 50,000 hits/day is the maximum allowed for your API through the APIcast production cloud instance. You can check your API usage in the Analytics section of your Admin Portal.
- There is a hard throttle limit of 20 hits/second on any spike in API traffic.
-
Above the throttle limit, APIcast returns a response code of
403. This is the same as the default for an application over rate limits. If you want to differentiate the errors, please check the response body.
Chapter 3. APIcast on the Docker containerized environment
This is a step-by-step guide to deploy APIcast inside a Docker-formatted container ready to be used as a 3scale API gateway.
3.1. Prerequisites
You must configure APIcast in your 3scale Admin Portal as per the APIcast Overview.
3.2. Step 1: Install the Docker containerized environment
This guide covers the steps to set up the Docker containerized environment on Red Hat Enterprise Linux (RHEL) 7.
Docker-formatted containers provided by Red Hat are released as part of the Extras channel in RHEL. To enable additional repositories, you can use either the Subscription Manager or the yum config manager. For details, see the RHEL product documentation.
To deploy RHEL 7 on an AWS EC2 instance, take the following steps:
-
List all repositories:
sudo yum repolist all. -
Find the
*-extrasrepository. -
Enable the
extrasrepository:sudo yum-config-manager --enable rhui-REGION-rhel-server-extras. -
Install the Docker containerized environment package:
sudo yum install docker.
For other operating systems, refer to the following Docker documentation:
3.3. Step 2: Run the Docker containerized environment gateway
-
Start the Docker daemon:
sudo systemctl start docker.service. -
Check if the Docker daemon is running:
sudo systemctl status docker.service. You can download a ready to use Docker-formatted container image from the Red Hat registry:sudo docker pull registry.access.redhat.com/3scale-amp22/apicast-gateway:1.8. Run APIcast in a Docker-formatted container:
sudo docker run --name apicast --rm -p 8080:8080 -e THREESCALE_PORTAL_ENDPOINT=https://<access_token>@<domain>-admin.3scale.net registry.access.redhat.com/3scale-amp22/apicast-gateway:1.8.Here,
<access_token>is the Access Token for the 3scale Account Management API. You can use the the Provider Key instead of the access token.<domain>-admin.3scale.netis the URL of your 3scale admin portal.
This command runs a Docker-formatted container called "apicast" on port 8080 and fetches the JSON configuration file from your 3scale portal. For other configuration options, see the APIcast Overview guide.
3.3.1. The Docker command options
You can use the following options with the docker run command:
-
--rm: Automatically removes the container when it exits. -
-dor--detach: Runs the container in the background and prints the container ID. When it is not specified, the container runs in the foreground mode and you can stop it usingCTRL + c. When started in the detached mode, you can reattach to the container with thedocker attachcommand, for example,docker attach apicast. -
-por--publish: Publishes a container’s port to the host. The value should have the format<host port="">:<container port="">, so-p 80:8080will bind port8080of the container to port80of the host machine. For example, the Management API uses port8090, so you may want to publish this port by adding-p 8090:8090to thedocker runcommand. -
-eor--env: Sets environment variables. -
-vor--volume: Mounts a volume. The value is typically represented as<host path="">:<container path="">[:<options>].<options>is an optional attribute; you can set it to:roto specify that the volume will be read only (by default, it is mounted in read-write mode). Example:-v /host/path:/container/path:ro.
For more information on available options, see Docker run reference.
3.4. Step 3: Testing APIcast
The preceding steps ensure that your Docker-formatted container is running with your own configuration file and the Docker-formatted image from the 3scale registry. You can test calls through APIcast on port 8080 and provide the correct authentication credentials, which you can get from your 3scale account.
Test calls will not only verify that APIcast is running correctly but also that authentication and reporting is being handled successfully.
Ensure that the host you use for the calls is the same as the one configured in the Public Base URL field on the Integration page.
3.5. Step 4: Troubleshooting APIcast on the Docker containerized environment
3.5.1. Cannot connect to the Docker daemon error
The docker: Cannot connect to the Docker daemon. Is the docker daemon running on this host? error message may be because the Docker service hasn’t started. You can check the status of the Docker daemon by running the sudo systemctl status docker.service command.
Ensure that you are run this command as the root user because the Docker containerized environment requires root permissions in RHEL by default. For more information, see here).
3.5.2. Basic Docker command-line interface commands
If you started the container in the detached mode (-d option) and want to check the logs for the running APIcast instance, you can use the log command: sudo docker logs <container>. Where ,<container> is the container name ("apicast" in the example above) or the container ID. You can get a list of the running containers and their IDs and names by using the sudo docker ps command.
To stop the container, run the sudo docker stop <container> command. You can also remove the container by running the sudo docker rm <container> command.
For more information on available commands, see Docker commands reference.
3.6. Step 5: Customising the Gateway
There are some customizations that cannot be managed through the admin portal and require writing custom logic to APIcast itself.
3.6.1. Custom Lua logic
The easiest way to customise APIcast logic is to rewrite the existing file with your own and attach it as a volume.
-v $(pwd)/path_to/file.lua:/opt/app-root/src/src/file.lua:ro
The -v flag attaches the local file to the stated path in the Docker-formatted container.
3.6.2. Customising the configuration files
The same steps apply to custom configuration files as the Lua scripting. If you want to add to the existing conf files rather than overwriting, ensure the name of your new file does not clash with pre-existing ones. This will automatically be included in the main nginx.conf.
To edit the config.json file, you can fetch this file from your admin portal with the following URL: https://<account>-admin.3scale.net/admin/api/nginx/spec.json and copy and paste the contents locally. You can pass this local JSON file with the following command to start APIcast:
docker run --name apicast --rm -p 8080:8080 -v $(pwd)/path_to/config.json:/opt/app/config.json:ro -e THREESCALE_CONFIG_FILE=/opt/app/config.json
You should now be able to run APIcast on the Docker containerized environment. For other deployment options, check out the related articles.
Chapter 4. Running APIcast on Red Hat OpenShift
This tutorial describes how to deploy the APIcast API Gateway on Red Hat OpenShift.
4.1. Prerequisites
To follow the tutorial steps below, you will first need to configure APIcast in your 3scale Admin Portal as per the APIcast Overview. Make sure Self-managed Gateway is selected as the deployment option in the integration settings. You should have both Staging and Production environment configured to proceed.
4.2. Step 1: Set up OpenShift
If you already have a running OpenShift cluster, you can skip this step. Otherwise, continue reading.
For production deployments you can follow the instructions for OpenShift installation. In order to get started quickly in development environments, there are a couple of ways you can install OpenShift:
-
Using
oc cluster upcommand – https://github.com/openshift/origin/blob/master/docs/cluster_up_down.md (used in this tutorial, with detailed instructions for Mac and Windows in addition to Linux which we cover here) - All-In-One Virtual Machine using Vagrant – https://www.openshift.org/vm
In this tutorial the OpenShift cluster will be installed using:
- Red Hat Enterprise Linux (RHEL) 7
- Docker containerized environment v1.10.3
- OpenShift Origin command line interface (CLI) - v1.3.1
4.2.1. Install the Docker containerized environment
Docker-formatted container images provided by Red Hat are released as part of the Extras channel in RHEL. To enable additional repositories, you can use either the Subscription Manager, or yum config manager. See the RHEL product documentation for details.
For a RHEL 7 deployed on a AWS EC2 instance we’ll use the following the instructions:
List all repositories:
sudo yum repolist all
Find the *-extras repository.
Enable extras repository:
sudo yum-config-manager --enable rhui-REGION-rhel-server-extras
Install Docker-formatted container images:
sudo yum install docker docker-registry
Add an insecure registry of
172.30.0.0/16by adding or uncommenting the following line in/etc/sysconfig/dockerfile:INSECURE_REGISTRY='--insecure-registry 172.30.0.0/16'
Start the Docker containerized environment:
sudo systemctl start docker
You can verify that the Docker containerized environment is running with the command:
sudo systemctl status docker
4.2.2. Start OpenShift cluster
Download the latest stable release of the client tools (openshift-origin-client-tools-VERSION-linux-64bit.tar.gz) from OpenShift releases page, and place the Linux oc binary extracted from the archive in your PATH.
-
Please be aware that the
oc clusterset of commands are only available in the 1.3+ or newer releases. -
the docker command runs as the
rootuser, so you will need to run anyocor docker commands with root privileges.
Open a terminal with a user that has permission to run docker commands and run:
oc cluster up
At the bottom of the output you will find information about the deployed cluster:
    -- Server Information ...
      OpenShift server started.
      The server is accessible via web console at:
      https://172.30.0.112:8443

      You are logged in as:
        User:     developer
        Password: developer

      To login as administrator:
        oc login -u system:admin
Note the IP address that is assigned to your OpenShift server, we will refer to it in the tutorial as OPENSHIFT-SERVER-IP.
4.2.2.1. Setting up OpenShift cluster on a remote server
In case you are deploying the OpenShift cluster on a remote server, you will need to explicitly specify a public hostname and a routing suffix on starting the cluster, in order to be able to access the OpenShift web console remotely.
For example, if you are deploying on an AWS EC2 instance, you should specify the following options:
oc cluster up --public-hostname=ec2-54-321-67-89.compute-1.amazonaws.com --routing-suffix=54.321.67.89.xip.io
where ec2-54-321-67-89.compute-1.amazonaws.com is the Public Domain, and 54.321.67.89 is the IP of the instance. You will then be able to access the OpenShift web console at https://ec2-54-321-67-89.compute-1.amazonaws.com:8443.
4.3. Step 2: Deploy APIcast using the OpenShift template
By default you are logged in as developer and can proceed to the next step.
Otherwise login into OpenShift using the
oc logincommand from the OpenShift Client tools you downloaded and installed in the previous step. The default login credentials are username = "developer" and password = "developer":oc login https://OPENSHIFT-SERVER-IP:8443
You should see
Login successful.in the output.Create your project. This example sets the display name as gateway
oc new-project "3scalegateway" --display-name="gateway" --description="3scale gateway demo"
The response should look like this:
Now using project "3scalegateway" on server "https://172.30.0.112:8443".
Ignore the suggested next steps in the text output at the command prompt and proceed to the next step below.
Create a new Secret to reference your project by replacing
<access_token>and<domain>with yours.oc secret new-basicauth apicast-configuration-url-secret --password=https://<access_token>@<domain>-admin.3scale.net
Here
<access_token>is an Access Token (not a Service Token) for the 3scale Account Management API, and<domain>-admin.3scale.netis the URL of your 3scale Admin Portal.The response should look like this:
secret/apicast-configuration-url-secret
Create an application for your APIcast Gateway from the template, and start the deployment:
oc new-app -f https://raw.githubusercontent.com/3scale/3scale-amp-openshift-templates/2.2.0.GA/apicast-gateway/apicast.yml
You should see the following messages at the bottom of the output:
--> Creating resources with label app=3scale-gateway ...
    deploymentconfig "apicast" created
    service "apicast" created
--> Success
    Run 'oc status' to view your app.
4.4. Step 3: Create routes in OpenShift console
Open the web console for your OpenShift cluster in your browser: https://OPENSHIFT-SERVER-IP:8443/console/
Use the value specified in
--public-hostnameinstead ofOPENSHIFT-SERVER-IPif you started OpenShift cluster on a remote server.You should see the login screen:
 Note
NoteYou may receive a warning about an untrusted web-site. This is expected, as we are trying to access the web console through secure protocol, without having configured a valid certificate. While you should avoid this in production environment, for this test setup you can go ahead and create an exception for this address.
Log in using the developer credentials created or obtained in the Setup OpenShift section above.
You will see a list of projects, including the "gateway" project you created from the command line above.

If you do not see your gateway project, you probably created it with a different user and will need to assign the policy role to to this user.
Click on "gateway" and you will see the Overview tab.
OpenShift downloaded the code for APIcast and started the deployment. You may see the message Deployment #1 running when the deployment is in progress.
When the build completes, the UI will refresh and show two instances of APIcast ( 2 pods ) that have been started by OpenShift, as defined in the template.
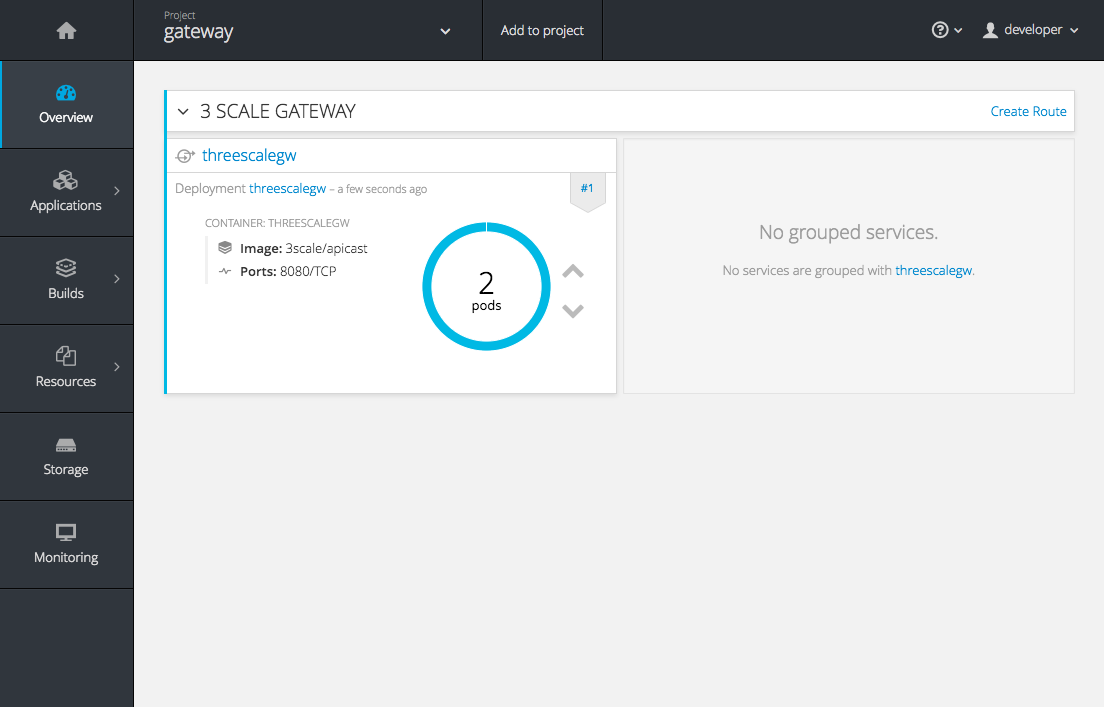
Each APIcast instance, upon starting, downloads the required configuration from 3scale using the settings you provided on the Integration page of your 3scale Admin Portal.
OpenShift will maintain two APIcast instances and monitor the health of both; any unhealthy APIcast instance will automatically be replaced with a new one.
In order to allow your APIcast instances to receive traffic, you’ll need to create a route. Start by clicking on Create Route.
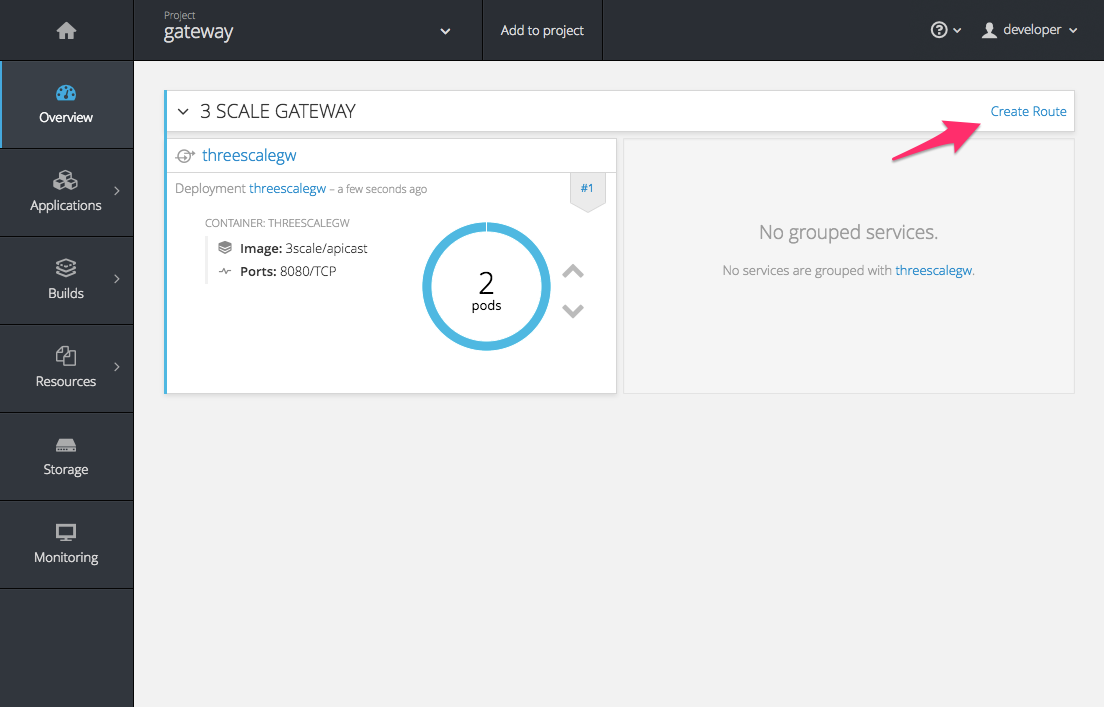
Enter the same host you set in 3scale above in the section Public Base URL (without the http:// and without the port) , e.g.
gateway.openshift.demo, then click the Create button.
Create a new route for every 3scale service you define. Alternatively, you could avoid having to create a new route for every 3scale service you define by deploying a wildcard router.
Chapter 5. Advanced APIcast Configuration
This section covers the advanced settings option of 3scale’s API gateway in the staging environment.
5.1. Define a secret token
For security reasons, any request from 3scale’s gateway to your API backend will contain a header called X-3scale-proxy-secret-token. You can set the value of this header in Authentication Settings on the Integration page.
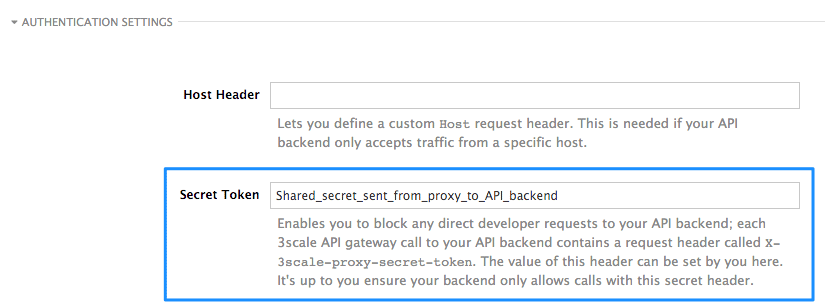
Setting the secret token will act as a shared secret between the proxy and your API so that you can block all API requests that do not come from the gateway if you so wish. This gives an extra layer of security to protect your public endpoint while you’re in the process of setting up your traffic management policies with the sandbox gateway.
Your API backend must have a public resolvable domain for the gateway to work, so anyone who might know your API backend could bypass the credentials checking. This should not be a problem because the API gateway in the staging environment is not meant for production use, but it’s always better to have a fence available.
5.2. Credentials
The API credentials within 3scale are always user_key or app_id/app_key depending on the authentication mode you’re using (OAuth is not available for the API gateway in the staging environment). However, you might want to use different credential names in your API. In this case, you’ll need to set custom names for the user_key if you’re using API key mode:

or for the app_id and app_key:
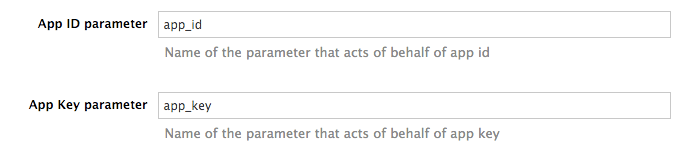
For instance, you could rename app_id to key if that fits your API better. The gateway will take the name key and convert it to app_id before doing the authorization call to 3scale’s backend. Note that the new credential name has to be alphanumeric.
You can decide whether your API passes credentials in the query string (or body if not a GET) or in the headers.

5.3. Error messages
Another important element for a full-fledged configuration is to define your own custom error messages.
It’s important to note that 3scale’s API gateway in the staging environment will do a pass through of any error message generated by your API. However, since the management layer of your API is now carried out by the gateway, there are some errors that your API will never see since some requests will be terminated by the gateway.
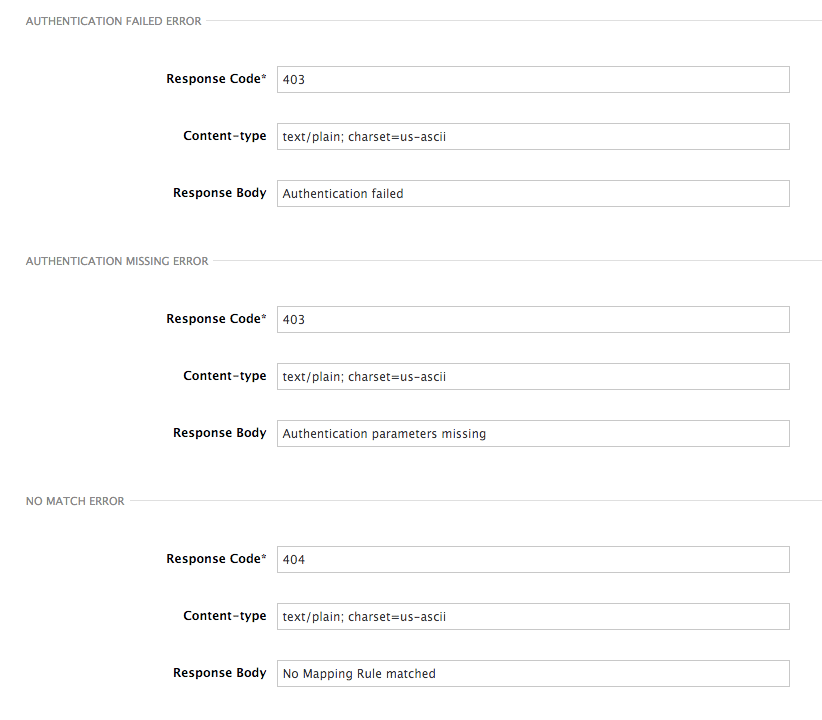
These errors are the following:
- Authentication missing: this error will be generated whenever an API request does not contain any credentials. This occurs when users forget to add their credentials to an API request.
- Authentication failed: this error will be generated whenever an API request does not contain valid credentials. This can be because the credentials are fake or because the application has been temporarily suspended.
- No match: this error means that the request did not match any mapping rule, therefore no metric is updated. This is not necessary an error, but it means that either the user is trying random paths or that your mapping rules do not cover legitimate cases.
5.4. Configuration History
Every time you click on the Update & Test Staging Configuration button, the current configuration will be saved in a JSON file. The staging gateway will pull the latest configuration with each new request. For each environment, staging or production, you can see a history of all the previous configuration files.
Note that it is not possible to automatically roll back to previous versions. Instead we provide a history of all your configuration versions with their associated JSON files. These files can be used to check what configuration you had deployed at any moment on time. If you want to, you can recreate any deployments manually.
5.5. Debugging
Setting up the gateway configuration is easy, but still some errors can occur on the way. For those cases the gateway can return some useful debug information that will be helpful to track down what is going on.
To enable the debug mode on 3scale’s API gateway in the staging environment you can add the following header with your provider key to a request to your gateway: X-3scale-debug: YOUR_PROVIDER_KEY
When the header is found and the provider key is valid, the gateway will add the following information to the response headers:
X-3scale-matched-rules: /v1/word/{word}.json, /v1
  X-3scale-credentials: app_key=APP_KEY&app_id=APP_ID
X-3scale-usage: usage[version_1]=1&usage[word]=1
Basically, X-3scale-matched-rules tells you which mapping rules have been activated by the request. Note that it is a list. The header X-3scale-credentials returns the credentials that have been passed to 3scale’s backend. Finally X-3scale-usage tells you the usage that will be reported to 3scale’s backend.
You can check the logic for your mapping rules and usage reporting in the Lua file, in the function extract_usage_x() where x is your service_id.
...
    local args = get_auth_params(nil, method)
    local m =  ngx.re.match(path,[=[^/v1/word/([\w_\.-]+)\.json]=])
    if (m and method == "GET") then
      -- rule: /v1/word/{word}.json --
      params["word"] = m[1]
      table.insert(matched_rules, "/v1/word/{word}.json")
      usage_t["word"] = set_or_inc(usage_t, "word", 1)
      found = true
    end
  ...
In this example, the comment -- rule: /v1/word/{word}.json -- shows which particular rule the Lua code refers to. Each rule has a Lua snippet like the one above. Comments are delimited by -- , --[[, ]]-- in Lua, and with # in NGINX.
Unfortunately, there is no automatic rollback for Lua files if you make any changes. However, if your current configuration is not working but the previous one was OK, you can download the previous configuration files from the deployment history.
Chapter 6. APIcast Policies
APIcast policies are units of functionality that modify how APIcast operates. Policies can be enabled, disabled, and configured to control how they modify APIcast. Use policies to add functionality that is not available in a default APIcast deployment. You can create your own policies, or use standard policies provided by Red Hat 3scale.
Control policies for a service with a policy chain. Policy chains do the following:
- specify what policies APIcast uses
- provide configuration information for policies 3scale uses
- specify the order in which 3scale loads policies
Red Hat 3scale provides a method for adding custom policies, but does not support custom policies.
In order to modify APIcast behavior with custom policies, you must do the following:
- Add custom policies to APIcast
- Define a policy chain that configures APIcast policies
- Add the policy chain to APIcast
6.1. APIcast Standard Policies
Red Hat 3scale provides a number of standard policies:
- Authentication Caching
- CORS
- Echo
- Headers
- Token Introspection
- SOAP
- Upstream
- URL rewriting
You can enable and configure standard policies in the 3scale API Management.
6.1.1. Authentication caching
The authentication caching policy caches authentication calls made to APIcast. You can select an operating mode to configure the cache operations.
Authentication caching is available in the following modes:
1. Strict - Cache only authorized calls.
"Strict" mode only caches authorized calls. If a policy is running under the "strict" mode and if a call fails or is denied, the policy invalidates the cache entry. If the backend becomes unreachable, all cached calls are rejected, regardless of their cached status.
2. Resilient – Authorize according to last request when backend is down.
The "Resilient" mode caches both authorized and denied calls. If the policy is running under the "resilient" mode, failed calls do not invalidate an existing cache entry. If the backend becomes unreachable, calls hitting the cache continue to be authorized or denied based on their cached status.
3. Allow - When backend is down, allow everything unless seen before and denied.
The "Allow" mode caches both authorized and denied calls. If the policy is running under the "allow" mode, cached calls continue to be denied or allowed based on the cached status. However, any new calls are cached as authorized.
Operating in the "allow" mode has security implications. Consider these implications and exercise caution when using the "allow" mode.
4. None - Disable caching.
The "None" mode disables caching. This mode is useful if you want the policy to remain active, but do not want to use caching.
Configuration properties
| property | description | values | required? |
|---|---|---|---|
| caching_type |
The | data type: enumerated string [resilient, strict, allow, none] | yes |
Policy object example
{
  "name": "caching",
  "version": "builtin",
  "configuration": {
    "caching_type": "allow"
  }
}
For information on how to configure policies, see the Creating a policy chain section of the documentation.
6.1.2. APIcast CORS request handling Policy
The Cross Origin Resource Sharing (CORS) request handling policy allows you to control CORS behavior by allowing you to specify:
- allowed headers
- allowed methods
- allow credentials
- allowed origin headers
The CORS request handling policy will block all unspecified CORS requests.
Configuration properties
| property | description | values | required? |
|---|---|---|---|
| allow_headers |
The | data type: array of strings, must be a CORS header | no |
| allow_methods |
The | data type: array of enumerated strings [GET, HEAD, POST, PUT, DELETE, PATCH, OPTIONS, TRACE, CONNECT] | no |
| allow_origin |
The | data type: string | no |
| allow_credentials |
The | data type: boolean | no |
Policy object example
{
  "name": "cors",
  "version": "builtin",
  "configuration": {
    "allow_headers": [
      "App-Id", "App-Key",
      "Content-Type", "Accept"
    ],
    "allow_credentials": true,
    "allow_methods": [
      "GET", "POST"
    ],
    "allow_origin": "https://example.com"
  }
}
For information on how to configure policies, refer to the Creating a policy chain section of the documentation.
6.1.3. Echo
The echo policy prints an incoming request back to the client, along with an optional HTTP status code.
Configuration properties
| property | description | values | required? |
|---|---|---|---|
| status | The HTTP status code the echo policy will return to the client | data type: integer | no |
| exit |
Specifies which exit mode the echo policy will use. The | data type: enumerated string [request, set] | yes |
Policy object example
{
  "name": "echo",
  "version": "builtin",
  "configuration": {
    "status": 404,
    "exit": "request"
  }
}
For information on how to configure policies, refer to the Creating a policy chain section of the documentation.
6.1.4. APIcast Headers Policy
The APIcast Headers policy allows you to modify existing headers or define additional headers to add to or remove from an incoming request or response. You can modify both response and request headers.
Configuration properties
| property | description | values | required? |
|---|---|---|---|
| op |
The | data type: enumerated string [add, set, push] | yes |
| header |
The | Any string | yes |
| value |
The | Any string | yes |
Policy object example
{
  "name": "headers",
  "version": "builtin",
  "configuration": {
    "response": [
      {
        "op": "add",
        "header": "Custom-Header",
        "value": "any-value"
      }
    ],
    "request": [
      {
        "op": "set",
        "header": "Authorization",
        "value": "Basic dXNlcm5hbWU6cGFzc3dvcmQ="
      }
    ]
  }
}
For information on how to configure policies, refer to the Creating a policy chain section of the documentation.
6.1.5. Token introspection
Red Hat does not offer support for this policy.
The Token introspection policy performs OAuth 2.0 token introspection each time a request is made. The Token introspection policy operates using the following fields:
- Client ID
- Introspection URL
- Client secret
| property | description | values | required? |
|---|---|---|---|
| introspection_url |
The | data type: string, Any valid url | yes |
| client_id |
The | data type: string, any valid client ID | yes |
| client_secret |
The | data type: string, any valid client secret | yes |
Policy object example
{
  "name": "token_introspection",
  "version": "builtin",
  "configuration": {
    "introspection_url": "https://idp.example.com/token/introspect",
    "client_id": "myclient",
    "client_secret": "mysecret"
  }
}
For information on how to configure policies, refer to the Creating a policy chain section of the documentation.
6.1.6. SOAP
The SOAP policy matches SOAP action URIs provided in the SOAPAction or Content-Type header of an HTTP request with mapping rules specified in the policy.
Configuration properties
| property | description | values | required? |
|---|---|---|---|
| pattern |
The | data type: string | yes |
| metric_system_name |
The | data type: string, must be a valid metric | yes |
Policy object example
{
  "name": "soap",
  "version": "builtin",
  "configuration": {
    "mapping_rules": [
      {
        "pattern": "http://example.com/soap#request",
        "metric_system_name": "soap",
        "delta": 1
      }
    ]
  }
}
For information on how to configure policies, refer to the Creating a policy chain section of the documentation.
6.1.7. Upstream policy
The upstream policy allows you to parse the Host request header using regular expressions and replace the upstream URL defined in the Private Base URL with a different URL.
For Example:
A policy with a regex /foo, and URL field newexample.com would replace the URL https://www.example.com/foo/123/ with newexample.com
Policy chain reference:
| property | description | values | required? |
|---|---|---|---|
| regex |
The | data type: string, Must be a valid regular expression syntax | yes |
| url |
Using the | data type: string, ensure this is a valid URL | yes |
Policy object example
{
  "name": "upstream",
  "version": "builtin",
  "configuration": {
    "rules": [
      {
        "regex": "^/v1/.*",
        "url": "https://api-v1.example.com",

      }
    ]
  }
}
For information on how to configure policies, refer to the Creating a policy chain section of the documentation.
6.1.8. URL rewriting
The URL rewriting policy allows you to modify the path of a request using the OpenResty web platform sub and gsub operations.
Configuration properties
| property | description | values | required? |
|---|---|---|---|
| op |
The | data type: enumerated string [sub, gsub] | yes |
| regex |
The | data type: string, must be a valid regular expression | yes |
| replace |
The | data type: string | yes |
| options |
Using the |
data type: string, must be a valid OpenResty | no |
| break |
If | data type: boolean | no |
Policy object example
{
  "name": "url_rewriting",
  "version": "builtin",
  "configuration": {
    "commands": [
      {
        "op": "gsub",
        "regex": "^/v1/products",
        "break": false,
        "replace": "/api/internal/products",
        "options": "oji"
      }
    ]
  }
}
For information on how to configure policies, refer to the Creating a policy chain section of the documentation.
6.2. Enabling a standard Policy
Perform the following procedure to enable policies in the admin portal UI:
- Log in to your AMP
- Navigate to the API page and select the desired API
-
From the Integration page, select
edit APIcast configuration
-
Under the POLICIES section, click
add policy
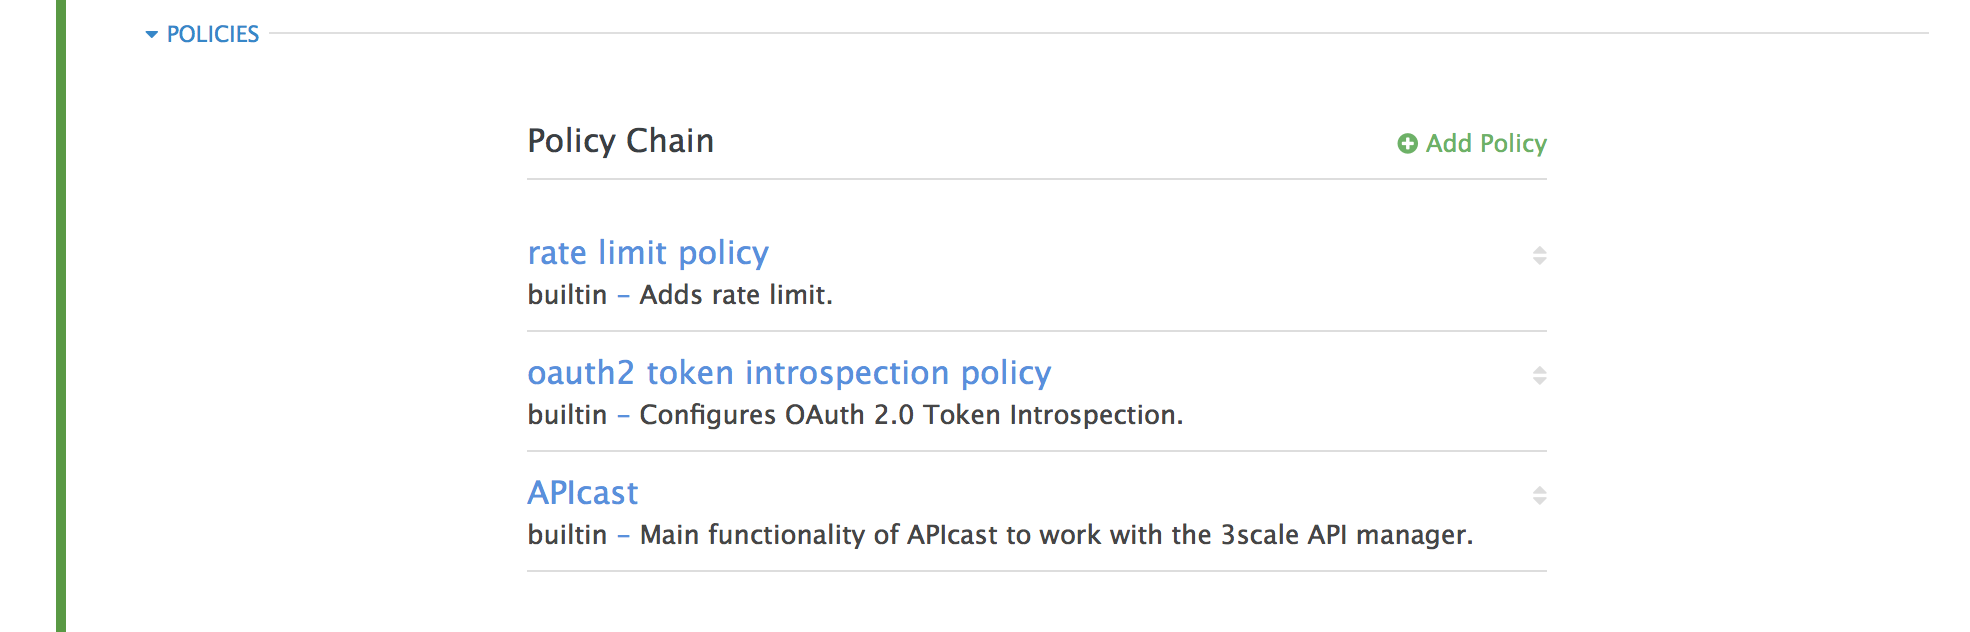
- Select the policy you want to add and fill out the required fields
- Click the Update and test in Staging Environment button to save the policy chain
6.3. Creating custom APIcast policies
You can create custom APIcast policies entirely or modify the standard policies.
In order to create custom policies, you must understand the following:
- policies are written in lua
- policies must adhere to and be placed in the proper file directory
- policy behavior is affected by how they are placed in a policy chain
6.4. Adding custom policies to APIcast
If you have created custom policies, you must add them to APIcast. How you do this depends on where APIcast is deployed.
You can add custom policies to the following APIcast self-managed deployments:
- APIcast built-in gateways as part of a 3scale on-premises deployment on OpenShift
- APIcast on OpenShift and the Docker containerized environment
You cannot add custom policies to APIcast hosted.
Never make policy changes directly onto a production gateway. Always test your changes.
6.4.1. Adding custom policies to APIcast built-in
To add custom APIcast policies to an On-Premises deployment, you must build an OpenShift image containing your custom policies and add it to your deployment. Red Hat 3scale provides a sample repository you can use as a framework to create and add custom policies to an on-premises deployment.
This sample repository contains the correct directory structure for a custom policy, as well as a template which creates an image stream and BuildConfigs for building a new APIcast OpenShift image containing any custom policies you create.
When you build apicast-custom-policies, the build process "pushes" a new image to the amp-apicast:latest tag. When there is an image change on this image stream tag (:latest), both the apicast-staging and the apicast-production tags, by default, are configured to automatically start new deployment. To avoid any disruptions to your production service (or staging, if you prefer) it is recommended to disable automatic deployment ("Automatically start a new deployment when the image changes" checkbox), or configure a different image stream tag for production (e.g. amp-apicast:production).
Follow these steps to add a custom policy to an on-premises deployment:
- Fork the https://github.com/3scale/apicast-example-policy [public repository with the policy example] or create a private repository with its content. You need to have the code of your custom policy available in a Git repository for OpenShift to build the image. Note that in order to use a private Git repository, you must set up the secrets in OpenShift.
- Clone the repository locally, add the implementation for your policy, and push the changes to your Git repository.
Update the
openshift.ymltemplate. Specifically, change the following parameters:-
spec.source.git.uri: https://github.com/3scale/apicast-example-policy.gitin the policy BuildConfig – change it to your Git repository location. -
spec.source.images[0].paths.sourcePath: /opt/app-root/policies/examplein the custom policies BuildConfig - changeexampleto the name of the custom policy that you have added under thepoliciesdirectory in the repository. -
Optionally, update the OpenShift object names and image tags. However, you must ensure that the changes are coherent (example:
apicast-example-policyBuildConfig builds and pushes theapicast-policy:exampleimage that is then used as a source by theapicast-custom-policiesBuildConfig. So, the tag should be the same).
-
Create the OpenShift objects by running the command:
oc new-app -f openshift.yml --param AMP_RELEASE=2.2.0
In case the builds do not start automatically, run the following two commands. In case you changed it, replace
apicast-example-policywith your own BuildConfig name (e.g.apicast-<name>-policy). Wait for the first command to complete before you execute the second one.oc start-build apicast-example-policy oc start-build apicast-custom-policies
If the build-in APIcast images have a trigger on them tracking the changes in the amp-apicast:latest image stream, the new deployment for APIcast will start. After apicast-staging has restarted, go to the Integration page on the admin portal, and click the Add Policy button to see your custom policy listed. After selecting and configuring it, click Update & test in Staging Environment to make your custom policy work in the staging APIcast.
6.4.2. Adding custom policies to APIcast on another OpenShift Container Platform
You can add custom policies to APIcast on OpenShift Container Platform (OCP) by fetching APIcast images containing your custom policies from the the Integrated OpenShift Container Registry.
Add custom policies to APIcast on another OpenShift Container Platform
- Add policies to APIcast built-in
- If you are not deploying your APIcast gateway on your primary OpenShift cluster, establish access to the internal registry on your primary OpenShift cluster.
- Download the 3scale 2.2 APIcast OpenShift template.
To modify the template, replace the default
imagedirectory with the full image name in your internal registry.image: <registry>/<project>/amp-apicast:latest
Deploy APIcast using the OpenShift template, specifying your customized image:
oc new-app -f customizedApicast.yml
6.5. Creating a policy chain in the AMP
Create a policy chain in the AMP as part of your APIcast gateway configuration. Follow these steps to modify the policy chain in the UI:
- Log in to your AMP
- Navigate to the API page and select the desired API
-
From the Integration page, select
edit APIcast configuration
- Under the POLICIES section, use the arrow icons to reorder policies in the policy chain. Always place the APIcast policy last in the policy chain.
- Click the Update and test in Staging Environment button to save the policy chain
6.6. Creating a policy chain JSON configuration file
If you are using a native deployment of APIcast, you can create a JSON configuration file to control your policy chain outside of the AMP.
A JSON configuration file policy chain contains a JSON array composed of the following information:
-
the
servicesobject with anidvalue that specifies which service the policy chain applies to by number -
the
proxyobject, which contains the policy_chain and subsequent objects -
the
policy_chainobject, which contains the values that define the policy chain -
individual
policyobjects which specify bothnameandconfigurationdata necessary to identify the policy and configure policy behavior
The following is an example policy chain for a custom policy sample_policy_1 and the API introspection standard policy token_introspection:
{
  "services":[
    {
      "id":1,
      "proxy":{
        "policy_chain":[
          {
            "name":"sample_policy_1", "version": "1.0",
            "configuration":{
              "sample_config_param_1":["value_1"],
              "sample_config_param_2":["value_2"]
            }
          },
          {
            "name": "token_introspection", "version": "builtin",
            "configuration": {
              introspection_url:["https://tokenauthorityexample.com"],
              client_id:["exampleName"],
              client_secret:["secretexamplekey123"]
          },
          {
             "name": "apicast", "version": "builtin",
          }
        ]
      }
    }
  ]
}
All policy chains must include the built-in policy apicast. Where you place APIcast in the policy chain will affect policy behavior.
Chapter 7. APIcast Environment Variables
APIcast environment variables allow you to modify behavior for APIcast. The following values are supported environment variables:
- Unsupported or deprecated environment variables are not listed
- Some environment variable functionality may have moved to APIcast policies
| Name | Description | Default Value | Values |
|---|---|---|---|
| APICAST_LOG_FILE |
The APICAST_LOG_FILE variable defines the file that will store the OpenResty web platform error log used by the | stderr | must be a valid file path |
| APICAST_LOG_LEVEL | The APICAST_LOG_LEVEL variable specifies the log level for the OpenResty web platform logs. | Warn | debug, info, notice, warn, error, crit, alert, emerg |
| APICAST_CONFIGURATION_LOADER |
The APICAST_CONFIGURATION_LOADER variable specifies which method APIcast should use when it loads its configuration. The boot method requests configuration from the API manager when the gateway starts. The lazy method loads configuration in real-time with each incoming request. If you want to refresh configuration with each request, you must specify the lazy method and set the | lazy | boot, lazy |
| APICAST_RESPONSE_CODES | When the APICAST_RESPONSE_CODES variable is set to true, APIcast will log response codes returned by the API backend in 3scale. In some plans this information can later be consulted from the 3scale admin portal. Find more information about the Response Codes feature in the response codes tracking section of the 3scale documentation. | false |
|
| APICAST_CONFIGURATION_CACHE |
Specifies the duration, in seconds, in which APIcast will store the configuration. Red Hat 3scale recommends you set the value to either 0 or greater than 60. If you are using the | 0 | any number greater than 60 |
| REDIS_HOST | APIcast requires a running Redis in memory database instance for the OAuth 2.0 Authorization code flow. The REDIS_HOST parameter is used to set the IP of the Redis in memory database instance. | 127.0.0.1 | Any valid IP |
| REDIS_PORT | APIcast requires a running Redis in memory database instance for the OAuth 2.0 Authorization code flow. The REDIS_PORT parameter can be used to set the port of the Redis instance. | 6379 | Any valid port |
| REDIS_URL | APIcast requires a running Redis in memory database instance for the OAuth 2.0 Authorization code flow. The REDIS_URL parameter specifies the full URI as DSN of the Redis in memory database instance. . This variable takes precedence over REDIS_PORT and REDIS_HOST. | No value |
|
| APICAST_OAUTH_TOKENS_TTL | When OAuth authentication is enabled, the APICAST_OAUTH_TOKENS_TTL variable specifies the time-to-live, in seconds, of the tokens created. | 604800 | A numeric value |
| RESOLVER | Allows you to specify a custom DNS resolver that will be used by OpenResty web platform. If the RESOLVER parameter is empty, the DNS resolver will be autodiscovered. | No value | |
| THREESCALE_DEPLOYMENT_ENV |
The THREESCALE_DEPLOYMENT_ENV variable defines the 3scale staging or production environment from which the configuration will be downloaded when using a new APIcast. The variable will also be used in the | production | staging, production |
| THREESCALE_PORTAL_ENDPOINT |
The THREESCALE_PORTAL_ENDPOINT variable stores a URI that includes your password and portal endpoint in the following format: | none | a URI, written as indicated in the description |
| THREESCALE_CONFIG_FILE |
The THREESCALE_CONFIG_FILE variable specifies the path to a JSON file containing configuration data for the APIcast gateway. The configuration can be downloaded from the 3scale admin portal using the the following format: | ||
| BACKEND_ENDPOINT_OVERRIDE | The BACKEND_ENDPOINT_OVERRIDE variable specifies a URI which overrides any backend endpoint specified in the configuration. This is useful when deploying APIcast outside of an AMP deployed on OpenShift. | ||
| APICAST_MANAGEMENT_API | The APICAST_MANAGEMENT_API variable enables the APIcast management API, which controls the APIcast configuration. | disabled | disabled, status, debug |
| OPENSSL_VERIFY | The OPENSSL_VERIFY variable controls OpenSSL peer verification. OpenSSL does not have access to system certificate store. Instead, you must create a custom certificate bundle and add it to your trusted certificates. Red Hat 3scale recommends you use the lua_ssl_trusted_certificate directive and point it to the certificate bundle generated by the export-builtin-trusted-certs development utility. | 0/false | 0, false: disable peer verification 1, true: enable peer verification |
| APICAST_ENVIRONMENT |
The APICAST_ENVRIONMENT variable is a colon separated list specifying environments or paths APIcast should load. Use the APICAST_ENVRIONMENT parameter instead of the | none | string[:], Example: production:cloud-hosted |
| APICAST_SERVICES | The APICAST_SERVICES variable allows you to filter services configured in the 3scale API Manager, and only uses the configuration for specific services in the gateway, discarding those services' IDs that are not specified in the list. Service IDs can be found on the Dashboard > APIs page, tagged as ID for API calls. | none | a comma-separated list of service IDs |
| APICAST_POLICY_LOAD_PATH | The APICAST_POLICY_LOAD_PATH variable specifies a list of directories from which APIcast will load policies. | APICAST_DIR/policies | string[:], Example: ~/apicast/policies:$PWD/policies |
| APICAST_PROXY_HTTPS_CERTIFICATE | The APICAST_PROXY_HTTPS_CERTIFICATE variable specifies the file path to a client SSL certificate which APIcast uses to connect with the upstream. All services in the configuration use this certificate. | none | string, Example: /home/apicast/my_certificate.crt |
| APICAST_PROXY_HTTPS_CERTIFICATE_KEY | The APICAST_PROXY_HTTPS_CERTIFICATE_KEY variable specifies the file path to the client SSL certificate key file. | none | string, must be a vaild file path, Example: /home/apicast/my_certificate.key |
| APICAST_PROXY_HTTPS_SESSION_REUSE |
The APICAST_PROXY_HTTPS_SESSION_REUSE variable specifies whether or not APIcast will reuse SSL sessions. If set to | on | enumerated string: on, off |
| APICAST_PROXY_HTTPS_PASSWORD_FILE |
The APICAST_PROXY_HTTPS_PASSWORD_FILE variable specifies the path to a file containing passphrases for SSL certificate keys specified in the | none | string, must be a valid filepath, Example: /home/apicast/passwords.txt |
Chapter 8. Code Libraries
3scale plugins allow you to connect to the 3scale architecture in a variety of core programming languages. Plugins can be deployed anywhere to act as control agents for your API traffic. Download the latest version of the plugin and gems for the programming language of your choice along with their corresponding documentation below.
You can also find us on GitHub. For other technical details, refer to the technical overview.
8.1. Python
Download the code here.
Standard distutils installation – unpack the file and from the new directory run:
sudo python setup.py install
Or you can put ThreeScale.py in the same directory as your program. See the README for some usage examples.
8.2. Ruby gem
You can download from GitHub or install it directly using:
gem install 3scale_client
8.3. Perl
Download the code bundle here.
It requires:
- » LWP::UserAgent (installed by default on most systems)
- » XML::Parser (now standard in perl >= 5.6)
Run this to install into the default library location:
perl Makefile.PL && make install
Run this for further install options:
make help
8.4. PHP
Download the code here and drop into your code directory – see the README in the bundle.
8.5. Java
Download the JAR bundle here.
Just unpack it into a directory and then run the maven build.
8.6. .NET
Download the code here, and see the bundled README.txt for instructions.
8.7. Node.js
Download the code here,or install it through the package manager npm:
npm install 3scale
Chapter 9. Plugin Setup
By the time you complete this tutorial, you’ll have configured your API to use the available 3scale code plugins to manage access traffic.
There are several different ways to add 3scale API Management to your API – including using APIcast (API gateway), Amazon API Gateway with Lambda, 3scale Service Management API, or code plugins. This tutorial drills down into how to use the code plugin method to get you set up.
9.1. How plugins work
3scale API plugins are available for a variety of implementation languages including Java, Ruby, PHP, .NET, and others – the full list can be found in the code libraries section. The plugins provide a wrapper for the 3scale Service Management API. Find the Service Management API in the 3scale ActiveDocs, available in your Admin Portal, under the Documentation → 3scale API Docs section, to enable:
- API access control and security
- API traffic reporting
- API monetization
This wrapper connects back into the 3scale system to set and manage policies, keys, rate limits, and other controls that you can put in place through the interface. Check out the Getting Started guide to see how to configure these elements.
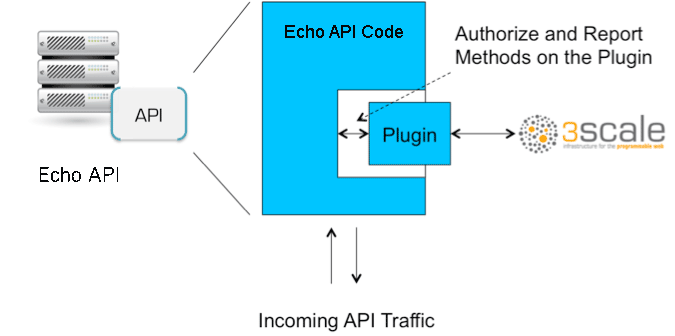
Plugins are deployed within your API code to insert a traffic filter on all calls as shown in the figure.
9.2. Step 1: Select your language and download the plugin
Once you’ve created your 3scale account (signup here), navigate to the code libraries section on this site and choose a plugin in the language you plan to work with. Click through to the code repository to get the bundle in the form that you need.
If your language is not supported or listed, let us know and we’ll inform you of any ongoing support efforts for your language. Alternatively, you can connect directly to the 3scale Service Management API.
9.3. Step 2: Check the metrics you’ve set for your API
As described in the API definition tutorial, you can configure multiple metrics and methods for your API on the API control panel. Each metric and method has a system name that will be required when configuring your plugin. You can find the metrics in API > Definition area of your Admin Portal.
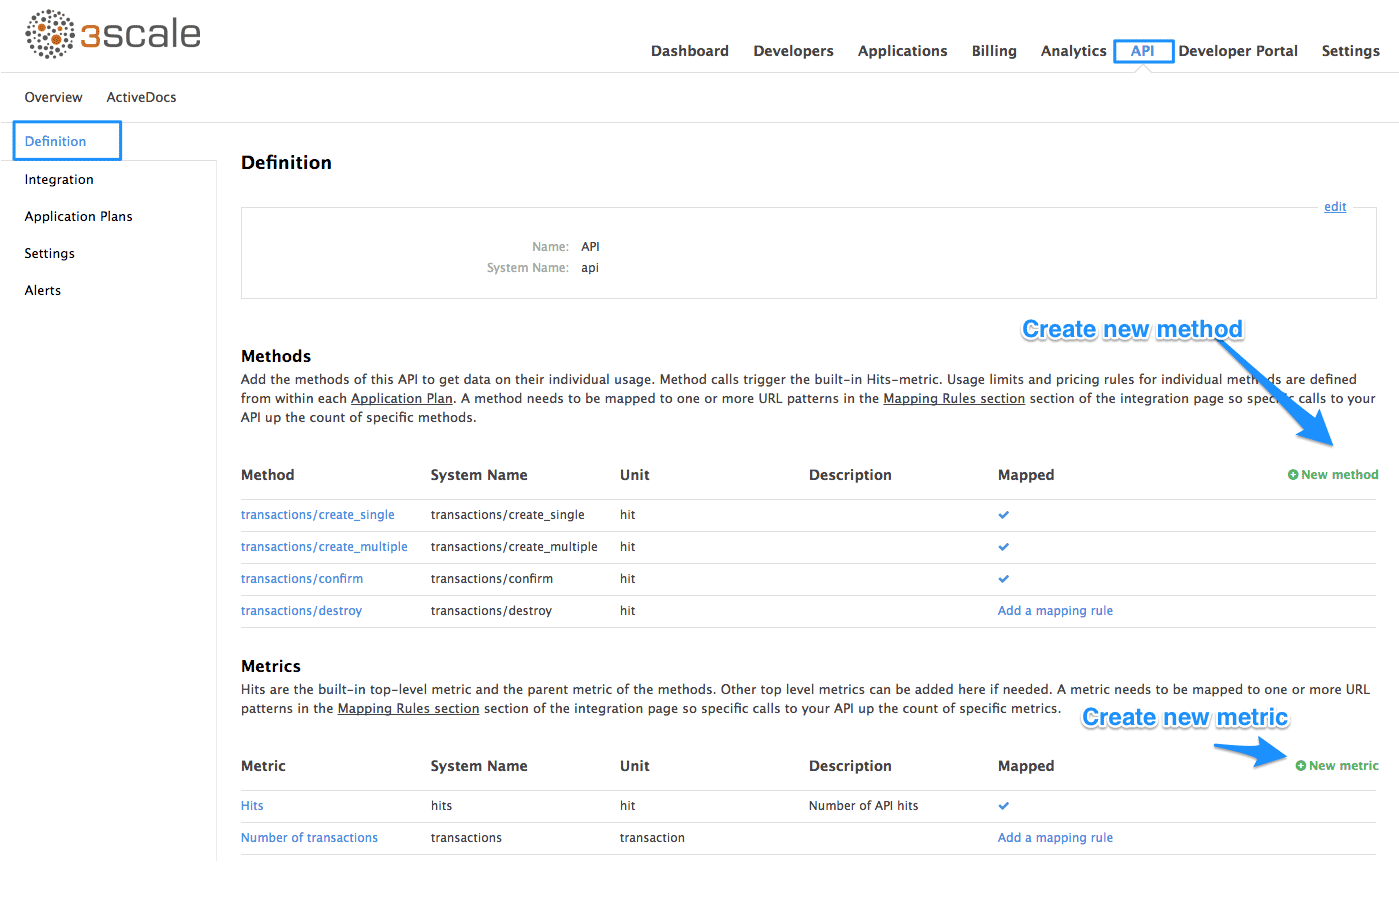
For more advanced information on metrics, methods, and rate limits see the specific tutorial on rate limits.
9.4. Step 3: Install the plugin code to your application
Armed with this information, return to the code and add the downloaded code bundle to your application. This step varies for each type of plugin, and the form that it takes depends on the way each language framework uses libraries. For the purposes of this tutorial, this example will proceed with Ruby plugin instructions. Other plugins integration details are included in the README documentation of each repository.
This library is distributed as a gem, for which Ruby 2.1 or JRuby 9.1.1.0 are minimum requirements:
gem install 3scale_client
Or alternatively, download the source code from GitHub.
If you are using Bundler, please add this to your Gemfile:
gem '3scale_client'
and do a bundle install.
If you are using Rails' config.gems, put this into your config/environment.rb
config.gem '3scale_client'
Otherwise, require the gem in whatever way is natural to your framework of choice.
Then, create an instance of the client:
client = ThreeScale::Client.new(service_tokens: true)
unless you specify service_tokens: true you will be expected to specify a provider_key parameter, which is deprecated in favor of Service Tokens:
client = ThreeScale::Client.new(provider_key: 'your_provider_key')
This will comunicate with the 3scale platform SaaS default server.
If you want to create a Client with a given host and port when connecting to an on-premise instance of the 3scale platform, you can specify them when creating the instance:
client = ThreeScale::Client.new(service_tokens: true, host: 'service_management_api.example.com', port: 80)
or
client = ThreeScale::Client.new(provider_key: 'your_provider_key', host: 'service_management_api.example.com', port: 80)
Because the object is stateless, you can create just one and store it globally. Then you can perform calls in the client:
  client.authorize(service_token: 'token', service_id: '123', usage: usage)
  client.report(service_token: 'token', service_id: '123', usage: usage)
If you had configured a (deprecated) provider key, you would instead use:
client.authrep(service_id: '123', usage: usage)
service_id is mandatory since November 2016, both when using service tokens and when using provider keys
You might use the option warn_deprecated: false to avoid deprecation warnings. This is enabled by default.
SSL and Persistence
Starting with version 2.4.0 you can use two more options: secure and persistent like:
client = ThreeScale::Client.new(provider_key: '...', secure: true, persistent: true)
secure
Enabling secure will force all traffic going through HTTPS. Because estabilishing SSL/TLS for every call is expensive, there is persistent.
persistent
Enabling persistent will use HTTP Keep-Alive to keep open connection to our servers. This option requires installing gem net-http-persistent.
9.5. Step 4: Add calls to authorize as API traffic arrives
The plugin supports the 3 main calls to the 3scale backend:
- authrep grants access to your API and reports the traffic on it in one call.
- authorize grants access to your API.
- report reports traffic on your API.
9.5.1. Usage on authrep mode
You can make request to this backend operation using service_token and service_id, and an authentication pattern like user_key, or app_id with an optional key, like this:
response = client.authrep(service_token: 'token', service_id: 'service_id', app_id: 'app_id', app_key: 'app_key')
Then call the success? method on the returned object to see if the authorization was successful.
if response.success?
  # All fine, the usage will be reported automatically. Proceeed.
else
  # Something's wrong with this application.
end
The example is using the app_id authentication pattern, but you can also use other patterns such as user_key.
Example:
class ApplicationController < ActionController
  # Call the authenticate method on each request to the API
  before_filter :authenticate

  # You only need to instantiate a new Client once and store it as a global variable
  # If you used a provider key it is advisable to fetch it from the environment, as
  # it is secret.
  def create_client
    @@threescale_client ||= ThreeScale::Client.new(service_tokens: true)
  end

  # To record usage, create a new metric in your application plan. You will use the
  # "system name" that you specifed on the metric/method to pass in as the key to the usage hash.
  # The key needs to be a symbol.
  # A way to pass the metric is to add a parameter that will pass the name of the metric/method along
  #
  # Note that you don't always want to retrieve the service token and service id from
  # the parameters - this will depend on your application.
  def authenticate
    response = create_client.authrep(service_token: params['service_token']
                                     service_id: params['service_id'],
                                     app_id: params['app_id'],
                                     app_key: params['app_key'],
                                     usage: { params['metric'].to_sym => 1 })
    if response.success?
      return true
      # All fine, the usage will be reported automatically. Proceeed.
    else
      # Something's wrong with this application.
      puts "#{response.error_message}"
      # raise error
    end
  end
end
9.6. Step 5: Deploy and run traffic
Once the required calls are added to your code, you can deploy (ideally to a staging/testing environment) and make API calls to your endpoints. As the traffic reaches the API, it will be filtered by the plugin and keys checked against issues API credentials. Refer to the Getting Started guide for how to generate valid keys – a set will have also been created as sample data in your 3scale account.
To see if traffic is flowing, log in to your API Admin Portal and navigate to the Analytics tab – there you will see traffic reported via the plugin.
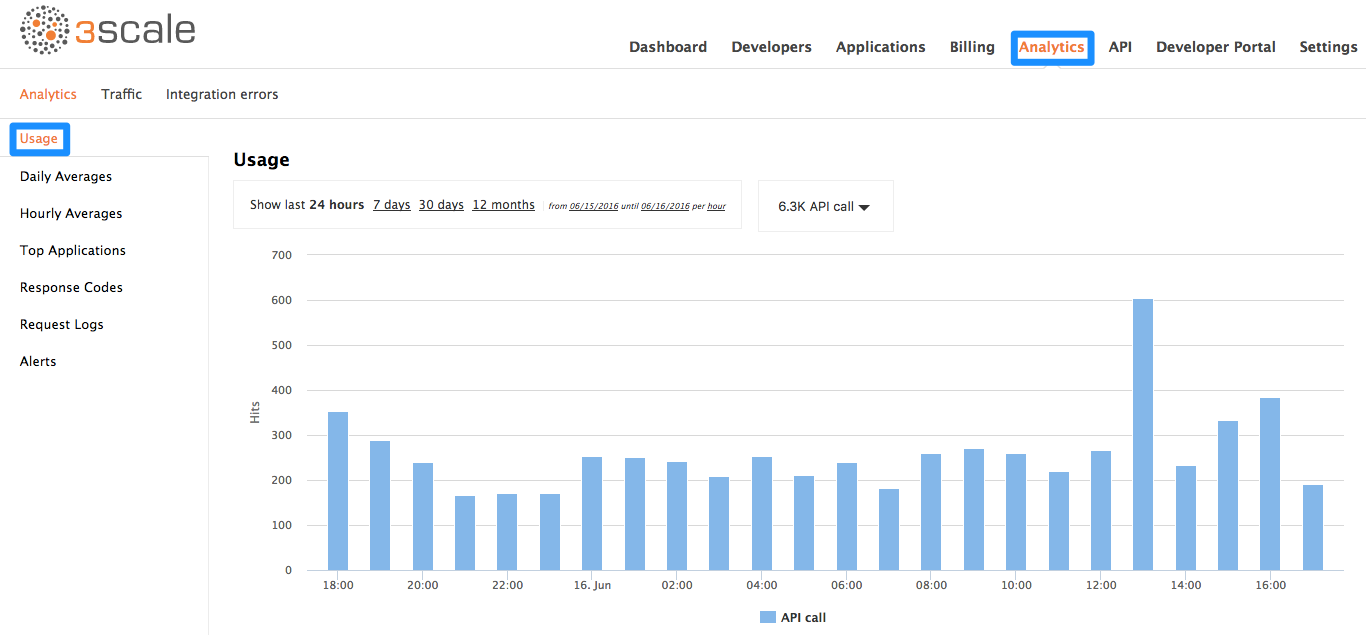
Once the application is making calls to the API, they will become visible on the statistics dashboard and the Statistics > Usage page for more detailed view.
If you’re receiving errors in the connection, you can also check the "Errors" menu item under Monitoring.