
Operating 3scale
How to automate deployment, scale your environment, and troubleshoot issues
Abstract
Making open source more inclusive
Red Hat is committed to replacing problematic language in our code, documentation, and web properties. We are beginning with these four terms: master, slave, blacklist, and whitelist. Because of the enormity of this endeavor, these changes will be implemented gradually over several upcoming releases. For more details, see our CTO Chris Wright’s message.
Chapter 1. 3scale general configuration options
As a Red Hat 3scale API Management administrator, there are general configuration options available to you in your installation or account to adjust settings.
1.1. Configuring a valid login session length
As a Red Hat 3scale API Management administrator, you can configure a valid login session length for the Admin Portal and the Developer Portal so there is a limit for maximum timeout and inactivity.
To implement a valid login session length you must set USER_SESSION_TTL to seconds. For example 1,800 seconds is 30 minutes. If the value is null, that is, not set, or is set to an empty string, the session default length is for 2 weeks.
Prerequisites
- A 3scale account with administrator privileges.
Procedure
Update the
USER_SESSION_TTLvalue in thesystem-appsecret in seconds:$ oc patch secret system-app -p '{"stringData": {"USER_SESSION_TTL": "'1800'"}}'Rollout
system-app:$ oc rollout latest dc/system-app
Chapter 2. 3scale operations and scaling
This document is not intended for local installations on laptops or similar end user equipment.
This section describes operations and scaling tasks of a Red Hat 3scale API Management 2.13 installation.
Prerequisites
- An installed and initially configured 3scale On-Premises instance on a supported OpenShift version.
To carry out 3scale operations and scaling tasks, perform the steps outlined in the following sections:
2.1. Redeploying APIcast
You can test and promote system changes through the 3scale Admin Portal.
Prerequisites
- A deployed instance of 3scale On-premises.
- You have chosen your APIcast deployment method.
By default, APIcast deployments on OpenShift, both embedded and on other OpenShift clusters, are configured to allow you to publish changes to your staging and production gateways through the 3scale Admin Portal.
To redeploy APIcast on OpenShift:
Procedure
- Make system changes.
- In the Admin Portal, deploy to staging and test.
- In the Admin Portal, promote to production.
By default, APIcast retrieves and publishes the promoted update once every 5 minutes.
If you are using APIcast on the Docker containerized environment or a native installation, configure your staging and production gateways, and indicate how often the gateway retrieves published changes. After you have configured your APIcast gateways, you can redeploy APIcast through the 3scale Admin Portal.
To redeploy APIcast on the Docker containerized environment or a native installations:
Procedure
- Configure your APIcast gateway and connect it to 3scale On-premises.
- Make system changes.
- In the Admin Portal, deploy to staging and test.
- In the Admin Portal, promote to production.
APIcast retrieves and publishes the promoted update at the configured frequency.
2.2. Scaling up 3scale on-premise
As your APIcast deployment grows, you may need to increase the amount of storage available. How you scale up storage depends on which type of file system you are using for your persistent storage.
If you are using a network file system (NFS), you can scale up your persistent volume (PV) using this command:
$ oc edit pv <pv_name>
If you are using any other storage method, you must scale up your persistent volume manually using one of the methods listed in the following sections.
2.2.1. Method 1: Backing up and swapping persistent volumes
Procedure
- Back up the data on your existing persistent volume.
- Create and attach a target persistent volume, scaled for your new size requirements.
-
Create a pre-bound persistent volume claim, specify: The size of your new PVC (PersistentVolumeClaim) and the persistent volume name using the
volumeNamefield. - Restore data from your backup onto your newly created PV.
Modify your deployment configuration with the name of your new PV:
$ oc edit dc/system-app
- Verify your new PV is configured and working correctly.
- Delete your previous PVC to release its claimed resources.
2.2.2. Method 2: Backing up and redeploying 3scale
Procedure
- Back up the data on your existing persistent volume.
- Shut down your 3scale pods.
- Create and attach a target persistent volume, scaled for your new size requirements.
- Restore data from your backup onto your newly created PV.
Create a pre-bound persistent volume claim. Specify:
- The size of your new PVC
-
The persistent volume name using the
volumeNamefield.
- Deploy your amp.yml.
- Verify your new PV is configured and working correctly.
- Delete your previous PVC to release its claimed resources.
2.2.3. Configuring 3scale on-premise deployments
The key deployment configurations to be scaled for 3scale are:
- APIcast production
- Backend listener
- Backend worker
2.2.3.1. Scaling via the OCP
Via OpenShift Container Platform (OCP) using an APIManager CR, you can scale the deployment configuration either up or down.
To scale a particular deployment configuration, use the following:
Scale up an APIcast production deployment configuration with the following APIManager CR:
apiVersion: apps.3scale.net/v1alpha1
kind: APIManager
metadata:
  name: example-apimanager
spec:
  apicast:
    productionSpec:
      replicas: X
Scale up the backend listener, backend worker, and backend cron components of your deployment configuration with the following APIManager CR:
apiVersion: apps.3scale.net/v1alpha1
kind: APIManager
metadata:
  name: example-apimanager
spec:
  backend:
    listenerSpec:
      replicas: X
    workerSpec:
      replicas: Y
    cronSpec:
      replicas: Z
Set the appropriate environment variable to the desired number of processes per pod.
PUMA_WORKERSforbackend-listenerpods:$ oc set env dc/backend-listener --overwrite PUMA_WORKERS=<number_of_processes>
UNICORN_WORKERSforsystem-apppods:$ oc set env dc/system-app --overwrite UNICORN_WORKERS=<number_of_processes>
2.2.3.2. Vertical and horizontal hardware scaling
You can increase the performance of your 3scale deployment on OpenShift by adding resources. You can add more compute nodes as pods to your OpenShift cluster, as horizontal scaling or you can allocate more resources to existing compute nodes as vertical scaling.
Horizontal scaling
You can add more compute nodes as pods to your OpenShift. If the additional compute nodes match the existing nodes in your cluster, you do not have to reconfigure any environment variables.
Vertical scaling
You can allocate more resources to existing compute nodes. If you allocate more resources, you must add additional processes to your pods to increase performance.
Avoid the use of computing nodes with different specifications and configurations in your 3scale deployment.
2.2.3.3. Scaling up routers
As traffic increases, ensure your Red Hat OCP routers can adequately handle requests. If your routers are limiting the throughput of your requests, you must scale up your router nodes.
2.3. Operations troubleshooting
This section explains how to configure 3scale audit logging to display on OpenShift, and how to access 3scale logs and job queues on OpenShift.
2.3.1. Configuring 3scale audit logging on OpenShift
This enables all logs to be in one place for querying by Elasticsearch, Fluentd, and Kibana (EFK) logging tools. These tools provide increased visibility on changes made to your 3scale configuration, who made these changes, and when. For example, this includes changes to billing, application plans, API configuration, and more.
Prerequisites
- A 3scale 2.13 deployment.
Procedure
Configure audit logging to stdout to forward all application logs to standard OpenShift pod logs.
Some considerations:
-
By default, audit logging to
stdoutis disabled when 3scale is deployed on-premises; you need to configure this feature to have it fully functional. -
Audit logging to
stdoutis not available for 3scale hosted.
2.3.2. Enabling audit logging
3scale uses a features.yml configuration file to enable some global features. To enable audit logging to stdout, you must mount this file from a ConfigMap to replace the default file. The OpenShift pods that depend on features.yml are system-app and system-sidekiq.
Prerequisites
- You must have administrator access for the 3scale project.
Procedure
Enter the following command to enable audit logging to
stdout:oc patch configmap system -p '{"data": {"features.yml": "features: &default\n logging:\n audits_to_stdout: true\n\nproduction:\n <<: *default\n"}}'Export the following environment variable:
export PATCH_SYSTEM_VOLUMES='{"spec":{"template":{"spec":{"volumes":[{"emptyDir":{"medium":"Memory"},"name":"system-tmp"},{"configMap":{"items":[{"key":"zync.yml","path":"zync.yml"},{"key":"rolling_updates.yml","path":"rolling_updates.yml"},{"key":"service_discovery.yml","path":"service_discovery.yml"},{"key":"features.yml","path":"features.yml"}],"name":"system"},"name":"system-config"}]}}}}'Enter the following command to apply the updated deployment configuration to the relevant OpenShift pods:
oc patch dc system-app -p $PATCH_SYSTEM_VOLUMES
oc patch dc system-sidekiq -p $PATCH_SYSTEM_VOLUMES
2.3.3. Configuring logging for Red Hat OpenShift
When you have enabled audit logging to forward 3scale application logs to OpenShift, you can use logging tools to monitor your 3scale applications.
For details on configuring logging on Red Hat OpenShift, see the following:
2.3.4. Accessing your logs
Each component’s deployment configuration contains logs for access and exceptions. If you encounter issues with your deployment, check these logs for details.
Follow these steps to access logs in 3scale:
Procedure
Find the ID of the pod you want logs for:
oc get pods
Enter
oc logsand the ID of your chosen pod:oc logs <pod>
The system pod has two containers, each with a separate log. To access a container’s log, specify the
--containerparameter with thesystem-providerandsystem-developerpods:oc logs <pod> --container=system-provider oc logs <pod> --container=system-developer
2.3.5. Checking job queues
Job queues contain logs of information sent from the system-sidekiq pods. Use these logs to check if your cluster is processing data. You can query the logs using the OpenShift CLI:
oc get jobs
oc logs <job>
2.3.6. Preventing monotonic growth
To prevent monotonic growth, 3scale schedules by default, automatic purging of the following tables:
- user_sessions - clean up is triggered once a week, deletes records older than two weeks.
- audits - clean up is triggered once a day, deletes records older than three months.
- log_entries - clean up triggered once a day, deletes records older than six months.
- event_store_events - clean up is triggered once a week, deletes records older than a week.
With the exception of the above listed table, the following table requires manual purging by the database administrator:
- alerts
Table 2.1. SQL purging commands
| Database type | SQL command |
|---|---|
| MySQL |
DELETE FROM alerts WHERE timestamp < NOW() - INTERVAL 14 DAY; |
| PostgreSQL |
DELETE FROM alerts WHERE timestamp < NOW() - INTERVAL '14 day'; |
| Oracle |
DELETE FROM alerts WHERE timestamp <= TRUNC(SYSDATE) - 14; |
Additional resources
- For more information about the Openshift Container Platform (OCP), see the OCP documentation.
- Automatically scaling pods.
- Adding Compute Nodes.
- Optimizing Routing.
Chapter 3. Monitoring 3scale
Prometheus is container-native software built for storing historical data and for monitoring large, scalable systems. It gathers data over an extended time, rather than just for the currently running session. Alerting rules in Prometheus are managed by Alertmanager.
You use Prometheus and Alertmanager to monitor and store 3scale data so that you can use a graphical tool, such as Grafana, to visualize and run queries on the data.
Prometheus is an open-source system monitoring toolkit and Grafana is an open-source dashboard toolkit. Red Hat support for Prometheus and Grafana is limited to the configuration recommendations provided in Red Hat product documentation.
The 3scale operator allows you to use an existing Prometheus and Grafana operator installation to monitor 3scale usage and resources.
- The 3scale operator creates monitoring resources, but does not prevent modification of those resources.
- You must install the 3scale operator and Prometheus operator in the same namespace or use cluster-wide operators.
Prerequisites
- The 3scale operator is installed.
The Prometheus operator is installed in the cluster. The Prometheus operator is an operator for creating and managing Prometheus instances. It provides the
Prometheuscustom resource definition required by 3scale monitoring.The following Prometheus operator and image versions are tested with 3scale:
-
Prometheus operator
v0.37.0 -
Prometheus image:
quay.io/prometheus/prometheus:v2.16.0
-
Prometheus operator
The Grafana operator is installed in the cluster. The Grafana operator is an operator for creating and managing Grafana instances. It provides the
GrafanaDashboardcustom resource definition required by 3scale monitoring.The following Grafana operator and image versions are tested with 3scale:
-
Grafana operator
v3.9.0 -
Grafana image:
registry.hub.docker.com/grafana/grafana:7.1.1
-
Grafana operator
If your cluster is exposed on the Internet, make sure to protect the Prometheus and Grafana services.
This section describes how to enable monitoring of a 3scale instance, so that you can view the Grafana dashboards.
3.1. Enabling monitoring for 3scale
To monitor 3scale, you must enable monitoring by setting an APIManager custom resource.
Procedure
Configure 3scale to enable monitoring by setting the
spec.monitoring.enabledparameter of the 3scale deployment YAML totrue. For example:Create an APIManager custom resource named
3scale-monitoring.ymlto enable monitoring:apiVersion: apps.3scale.net/v1alpha1 kind: APIManager metadata: name: apimanager1 spec: wildcardDomain: example.com monitoring: enabled: true enablePrometheusRules: false 1- 1
- You can optionally disable
PrometheusRules, which is otherwise enabled by default.
Log in to your OpenShift cluster. You must log in as a user with an edit cluster role in the OpenShift project of the 3scale, for example,
cluster-admin.oc login
Switch to your 3scale project.
oc project <project_name>
Deploy the custom resource:
$ oc apply -f 3scale-monitoring.yml
3.2. Configuring Prometheus to monitor 3scale
You must deploy and configure Prometheus using the Prometheus custom resource to enable monitoring of 3scale.
Make sure permissions are set correctly as described in Prometheus documentation.
Procedure
Deploy the Prometheus custom resource as follows depending on whether you want to monitor all resources in the cluster or only 3scale resources:
To monitor all resources in the cluster, set the
spec.podMonitorSelectorattribute to{}and set thespec.ruleSelectorattribute to{}. For example, apply the following custom resource:apiVersion: monitoring.coreos.com/v1 kind: Prometheus metadata: name: example spec: podMonitorSelector: {} ruleSelector: {}If you deployed 3scale and the Prometheus operator in the same OpenShift project, and assuming the value of
APP_LABELis set to the default3scale-api-management, monitor 3scale resources using the following steps:Set the
spec.podMonitorSelectorattribute to:podMonitorSelector: matchExpressions: - key: app operator: In values: - 3scale-api-managementSet the
spec.ruleSelectorattribute to:matchExpressions: - key: app operator: In values: - 3scale-api-managementFor example, apply the following custom resource:
apiVersion: monitoring.coreos.com/v1
kind: Prometheus
metadata:
  name: example
spec:
 podMonitorSelector:
  matchExpressions:
  - key: app
      operator: In
      values:
      - 3scale-api-management
 ruleSelector:
   matchExpressions:
   - key: app
     operator: In
     values:
     - 3scale-api-management
If you deployed 3scale and the Prometheus operator in different OpenShift projects, monitor 3scale resources using the following steps:
-
Label the OpenShift project where 3scale is deployed with
MYLABELKEY=MYLABELVALUE Use a
podMonitorNamespaceSelectorfilter to select the 3scale pods. For example, apply the following custom resource:apiVersion: monitoring.coreos.com/v1 kind: Prometheus metadata: name: example spec: podMonitorSelector: {} ruleSelector: {} podMonitorNamespaceSelector: matchExpressions: - key: MYLABELKEY operator: In values: - MYLABELVALUE
-
Label the OpenShift project where 3scale is deployed with
To ensure that dashboards and alerts work as expected, you must incorporate Kubernetes metrics, that is, kube-state-metrics, by performing one of the following:
- Federate the Prometheus instance with the cluster default Prometheus instance.
- Configure your own scraping jobs to get metrics from kubelet, etcd and others.
Additional resources
- For more information about Prometheus, see the Prometheus documentation.
3.3. Configuring Grafana to monitor 3scale
You must configure Grafana in order to enable monitoring of 3scale.
Procedure
Make sure Grafana services are configured to monitor the
GrafanaDashboardsresources by overwriting theapp=3scale-api-managementlabel. For example, apply the following custom resource:apiVersion: integreatly.org/v1alpha1 kind: Grafana metadata: name: grafana spec: dashboardLabelSelector: - matchExpressions: - key: app operator: In values: - 3scale-api-managementGrafana Dashboards created by the 3scale operator are labeled as follows:
app: 3scale-api-management
monitoring-key: middleware
-
If the Grafana operator is installed in a different namespace than 3scale, configure it to monitor resources outside the namespace using the
--namespacesor--scan-alloperator flags. See the Grafana documentation for more information about the operator flags. Create a
GrafanaDataSourcecustom resource of typeprometheusto make the Prometheus data available in Grafana. For example:apiVersion: integreatly.org/v1alpha1 kind: GrafanaDataSource metadata: name: prometheus spec: name: middleware datasources: - name: Prometheus type: prometheus access: proxy url: http://prometheus-operated:9090 isDefault: true version: 1 editable: true jsonData: timeInterval: "5s"where
http://prometheus-operated:9090is the Prometheus route.- Make sure permissions are set correctly as described in the Grafana documentation.
Additional resources
- For more information about Grafana, see the Grafana documentation.
3.4. Viewing metrics for 3scale
After configuring 3scale, Prometheus, and Grafana you can view the metrics described in this section.
Procedure
- Log into the Grafana console.
Check that you can view metrics for the following:
- Kubernetes resources at pod and namespace level where 3scale is installed
- APIcast Staging
- APIcast Production
- Backend worker
- Backend listener
- System
- Zync
3.5. 3scale system metrics exposed to Prometheus
You can configure the following ports to use 3scale system pods with Prometheus endpoints to expose metrics.
Table 3.1. 3scale system ports
| system-app | Port |
|---|---|
|
| 9394 |
|
| 9395 |
|
| 9396 |
| system-sidekiq | Port |
|---|---|
|
| 9394 |
The endpoints are only accessible internally using:
http://${service}:${port}/metricsFor example:
http://system-developer:9394/metrics
Additional resources
- For information about monitoring APIcast, see the Exposing 3scale APIcast Metrics to Prometheus guide.
- For information about securing Prometheus, see the Prometheus security documentation.
- For information about securing Grafana, see the permissions and security Grafana documentation.
Chapter 4. 3scale automation using webhooks
Webhooks is a feature that facilitates automation, and is also used to integrate other systems based on events that occur in 3scale. When specified events happen within the 3scale system, your applications will be notified with a webhook message. As an example, by configuring webhooks, you can use the data from a new account signup to populate your Developer Portal.
4.1. Overview of webhooks
A webhook is a custom HTTP callback triggered by an event selected from the available ones in the Webhooks configuration window. When one of these events occurs, the 3scale system makes an HTTP or HTTPS request to the URL address specified in the webhooks section. With webhooks, you can configure the listener to invoke some desired behavior such as event tracking.
The format of the webhook is always the same. It makes a post to the endpoint with an XML document of the following structure:
<?xml version="1.0" encoding="UTF-8"?>
<event>
  <type>application</type>
  <action>updated</action>
  <object>
    THE APPLICATION OBJECT AS WOULD BE RETURNED BY A GET ON THE ACCOUNT MANAGEMENT
    API
  </object>
</event>
Each element provides information:
-
<type>: Gives you the subject of the event such as application, account, and so on. -
<action>: Specifies what has been done, by using values such as updated, created, deleted. -
<object>: Constitutes the XML object itself in the same format that is returned by the Account Management API. To check this, you can use our interactive ActiveDocs.
If you need to provide assurance that the webhook was issued by 3scale, expose an HTTPS webhook URL and add a custom parameter to your webhook declaration in 3scale. For example: https://your-webhook-endpoint?someSecretParameterName=someSecretParameterValue. Decide on the parameter name and value. Then, inside your webhook endpoint, check for the presence of this parameter value.
4.2. Configuring webhooks
Procedure
- Select Account Settings from the Dashboard menu, then navigate to Integrate > Webhooks.
Indicate the behavior for webhooks. There are two options:
- Webhooks enabled: Select this checkbox to enable or disable webhooks.
Actions in the admin portal also trigger webhooks: Select this checkbox to trigger a webhook when an event happens. Consider the following:
- When making calls to the internal 3scale APIs configured with the triggering events, use an access token; not a provider key.
- If you leave this checkbox cleared, only actions in the Developer Portal trigger webhooks.
- Specify the URL address for notification of the selected events when they trigger.
- Select the events that will trigger the callback to the indicated URL address.
Once you have configured the settings, click Update webhooks settings to save your changes.
4.3. Troubleshooting webhooks
If you experience an outage for your listening endpoint, you can recover failed deliveries. 3scale will consider a webhook delivered if your endpoint responds with a 200 code. Otherwise, it will retry 5 times with a 60 seconds gap. After any recovery from an outage, or periodically, you should run a check and if applicable clean up the queue. You can find more information about the following methods in ActiveDocs:
- Webhooks list failed deliveries
- Webhooks delete failed deliveries
Chapter 5. The 3scale toolbox
The 3scale toolbox is a Ruby client that enables you to manage 3scale products from the command line.
Within 3scale documentation, there is information about the installation of the 3scale toolbox, supported toolbox commands, services, plans, troubleshooting issues with SSL and TLS, etc. Refer to one of the sections below for more details:
- Installing the toolbox
- Supported toolbox commands
- Importing services
- Copying services
- Copying service settings only
- OpenAPI authentication
- Importing OpenAPI definitions
- Importing a 3scale backend from an OpenAPI definition
- Managing remote access credentials
- Creating application plans
- Creating metrics
- Creating methods
- Creating services
- Creating ActiveDocs
- Listing proxy configurations
- Copying a policy registry
- Listing applications
- Exporting products
- Importing products
- Export and import a product policy chain
- Copying API backends
- Troubleshooting issues with SSL and TLS
5.1. Installing the toolbox
The officially supported method of installing the 3scale toolbox is using the 3scale toolbox container image.
5.1.1. Installing the toolbox container image
This section explains how to install the toolbox container image.
Prerequisites
- See the 3scale toolbox image in the Red Hat Ecosystem Catalog.
- You must have a Red Hat registry service account.
- The examples in this topic assume that you have Podman installed.
Procedure
Log in to the Red Hat Ecosystem Catalog:
$ podman login registry.redhat.io
Username: ${REGISTRY-SERVICE-ACCOUNT-USERNAME}
Password: ${REGISTRY-SERVICE-ACCOUNT-PASSWORD}
Login Succeeded!
Pull the toolbox container image:
$ podman pull registry.redhat.io/3scale-amp2/toolbox-rhel8:3scale2.13
Verify the installation:
$ podman run registry.redhat.io/3scale-amp2/toolbox-rhel8:3scale2.13 3scale help
Additional resources
- For details on installing the toolbox image with OpenShift, Podman, or Docker, see the instructions on getting the image in the Red Hat Ecosystem Catalog.
-
See also the instructions for installing the 3scale toolbox on Kubernetes. You must use the correct image name and the
occommand instead ofkubectlon OpenShift.
5.2. Supported toolbox commands
Use the 3scale toolbox to manage your API from the command line tool (CLI).
The update command has been removed and replaced by the copy command.
The following commands are supported:
COMMANDS
    account              account super command
    activedocs           activedocs super command
    application          application super command
    application-plan     application-plan super command
    backend              backend super command
    copy                 copy super command
    help                 print help
    import               import super command
    method               method super command
    metric               metric super command
    policy-registry      policy-registry super command
    product              product super command
    proxy-config         proxy-config super command
    remote               remotes super command
    service              services super command

OPTIONS
    -c --config-file=<value>      3scale toolbox configuration file
                                  (default: $HOME/.3scalerc.yaml)
    -h --help                     show help for this command
    -k --insecure                 Proceed and operate even for server
                                  connections otherwise considered insecure
    -v --version                  Prints the version of this command
       --verbose                  Verbose mode
5.3. Importing services
Import services from a CSV file by specifying the following fields in the order specified below. Include these headers in your CSV file:
service_name,endpoint_name,endpoint_http_method,endpoint_path,auth_mode,endpoint_system_name,type
You need the following information:
-
A 3scale admin account:
{3SCALE_ADMIN} The domain your 3scale instance is running on:
{DOMAIN_NAME}- If you are using hosted APICast this is 3scale.net
-
The access key of your account:
{ACCESS_KEY} -
The CSV file of services, for example:
examples/import_example.csv
Import the services by running:
Example
$ podman run -v $PWD/examples/import_example.csv:/tmp/import_example.csv registry.redhat.io/3scale-amp2/toolbox-rhel8:3scale2.13 3scale import csv --destination=https://{ACCESS_KEY}@{3SCALE_ADMIN}-admin.{DOMAIN_NAME} --file=/tmp/import_example.csv
This example uses a Podman volume to mount the resource file in the container. It assumes that the file is available in the current $PWD folder.
5.4. Copying services
Create a new service based on an existing one from the same account or from another account. When you copy a service, the relevant ActiveDocs are also copied.
You need the following information:
-
The service id you want to copy:
{SERVICE_ID} -
A 3scale admin account:
{3SCALE_ADMIN} The domain your 3scale instance is running on:
{DOMAIN_NAME}- If you are using hosted APICast this is 3scale.net
-
The access key of your account:
{ACCESS_KEY} -
The access key of the destination account if you are copying to a different account:
{DEST_KEY} -
The name for the new service:
{NEW_NAME}
Example
$ podman run registry.redhat.io/3scale-amp2/toolbox-rhel8:3scale2.13 3scale copy service {SERVICE_ID} --source=https://{ACCESS_KEY}@{3SCALE_ADMIN}-admin.{DOMAIN_NAME} --destination=https://{DEST_KEY}@{3SCALE_ADMIN}-admin.{DOMAIN_NAME} --target_system_name={NEW_NAME}
If the service to be copied has custom policies, make sure that their respective custom policy definitions already exist in the destination where the service is to be copied. To learn more about copying custom policy definitions check out the Copying a policy registry
5.5. Copying service settings only
You can bulk copy the service and proxy settings, metrics, methods, application plans, application plan limits, as well as mapping rules from a service to another existing service.
You need the following information:
-
The service id you want to copy:
{SERVICE_ID} -
The service id of the destination:
{DEST_ID} -
A 3scale admin account:
{3SCALE_ADMIN} The domain your 3scale instance is running on:
{DOMAIN_NAME}- If you are using hosted APICast this is 3scale.net
-
The access key of your account:
{ACCESS_KEY} -
The access key of the destination account:
{DEST_KEY}
Additionally, you can use the optional flags:
-
The
-fflag to remove existing target service mapping rules before copying. -
The
-rflag to copy only mapping rules to target service.
The update command has been removed and replaced by the copy command.
The following example command does a bulk copy from one service to another existing service:
$ podman run registry.redhat.io/3scale-amp2/toolbox-rhel8:3scale2.13 3scale copy [opts] service --source=https://{ACCESS_KEY}@{3SCALE_ADMIN}-admin.{DOMAIN_NAME} --destination=https://{DEST_KEY}@{3SCALE_ADMIN}-admin.{DOMAIN_NAME} {SERVICE_ID} {DEST_ID}5.6. OpenAPI Authentication
By implementing OpenAPI authentication with the 3scale toolbox, you can ensure that only authorized users have access to your APIs, safeguard sensitive data, and efficiently manage API usage. This approach will reinforces your API infrastructure and fosters trust among developers and consumers.
Only one top-level security requirement is supported; operation-level security requirements are not supported.
Supported security schemes: apiKey and oauth2 with any flow type.
For the apiKey security scheme type:
- The credentials location is read from the OpenAPI in field of the security scheme object.
- Auth user key is read from the OpenAPI name field of the security scheme object.
Partial example of OpenAPI 3.0.2 with apiKey security requirement:
openapi: "3.0.2"
security:
  - petstore_api_key: []
components:
  securitySchemes:
    petstore_api_key:
      type: apiKey
      name: api_key
      in: header
      ...
For the oauth2 security scheme type:
-
The credentials location is hard-coded to
headers. -
OpenID Connect Issuer Type defaults to
rest. You can be override this using the--oidc-issuer-type=<value>command option. -
OpenID Connect Issuer is not read from OpenAPI. Since 3scale requires that the issuer URL must include a client secret, the issue must be set using this
--oidc-issuer-endpoint=<value>command option. - OIDC AUTHORIZATION FLOW is read from the flows field of the security scheme object.
Partial example of OpenAPI 3.0.2 with oauth2 security requirement:
openapi: "3.0.2"
security:
    - petstore_oauth:
      - write:pets
      - read:pets
  components:
    securitySchemes:
      petstore_oauth:
        type: oauth2
        flows:
          clientCredentials:
            tokenUrl: http://example.org/api/oauth/dialog
            scopes:
              write:pets: modify pets in your account
              read:pets: read your pets
              ...
When OpenAPI does not specify any security requirements:
- The product is considered as an Open API.
-
The
default_credentials3scale policy is added. Note: This is also called asanonymous_policy. -
You require the command
--default-credentials-userkey. Note: The command fails if is not provided.
Additional resources
5.7. Importing OpenAPI definitions
To create a new service or to update an existing service, you can import the OpenAPI definition from a local file or a URL. The default service name for the import is specified by the info.title in the OpenAPI definition. However, you can override this service name using --target_system_name=<NEW NAME>. This will update the service name if it already exists, or create a new service name if it does not.
The import openapi command has the following format:
$ 3scale import openapi [opts] -d=<destination> <specification>
The OpenAPI <specification> can be one of the following:
-
/path/to/your/definition/file.[json|yaml|yml] -
http[s]://domain/resource/path.[json|yaml|yml]
Example
$ podman run registry.redhat.io/3scale-amp2/toolbox-rhel8:3scale2.13 3scale import openapi [opts] -d=https://{DEST_KEY}@{3SCALE_ADMIN}-admin.{DOMAIN_NAME} my-test-api.json
Command options
The import openapi command options include:
-d --destination=<value>-
3scale target instance in format:
http[s]://<authentication>@3scale_domain. -t --target_system_name=<value>- 3scale target system name.
--backend-api-secret-token=<value>- Custom secret token sent by the API gateway to the backend API.
--backend-api-host-header=<value>- Custom host header sent by the API gateway to the backend API.
For more options, see the 3scale import openapi --help command.
OpenAPI import rules
The supported security schemes are apiKey and oauth2 with any OAuth flow type.
The OpenAPI specification must be one of the following:
- Filename in the available path.
-
URL from where toolbox can download the content. The supported schemes are
httpandhttps. -
Read from
stdinstandard input stream. This is controlled by setting the-value.
The following additional rules apply when importing OpenAPI definitions:
- Definitions are validated as OpenAPI 2.0 or OpenAPI 3.0.
- All mapping rules from the OpenAPI definition are imported. You can view these in API > Integration.
- All mapping rules in the 3scale product are replaced.
- Only methods included in the OpenAPI definition are modified.
-
All methods that were present only in the OpenAPI definition are attached to the
Hitsmetric. -
To replace methods, the method names must be identical to the methods defined in the OpenAPI definition
operation.operationIdby using exact pattern matching.
The toolbox will add a default_credentials policy, which is also known as an anonymous_policy, if it is not already in the policy chain. The default_credentials policy will be configured with the userkey provided in an optional parameter --default-credentials-userkey.
OpenAPI 3.0 provides a way to specify security for your API using its security schemes and security requirements features. For more information, see the official Swagger Authentication and Authorization documentation.
OpenAPI 3.0 limitations
The following limitations apply when importing OpenAPI 3.0 definitions:
-
Only the first
server.urlelement in theserverslist is parsed as a private URL. Theserver.urlelement’spathcomponent will be used as the OpenAPI’sbasePathproperty. - The toolbox will not parse servers in the path item and servers in the operation objects.
- Multiple flows in the security scheme object not supported.
5.8. Importing a 3scale backend from an OpenAPI definition
You can use the toolbox import command to import an OpenAPI definition and create a 3scale backend API. The command line option --backend enables this feature. 3scale uses the OpenAPI definition to create and store a backend and its private base URL, as well as its mapping rules and methods.
Prerequisites
- A user account with administrator privileges for a 3scale 2.13 On-Premises instance.
- An OAS document that defines your API.
Procedure
Use the following format to run the
importcommand to create a backend:$ 3scale import openapi -d <remote> --backend <OAS>
-
Replace
<remote>with the URL for the 3scale instance in which to create the backend. Use this format:http[s]://<authentication>@3scale_domain Replace
<OAS>with the/path/to/your/oasdoc.yaml.Table 5.1. Additional OpenAPI definition options
Options Description -o --output=<value>The output format. Can be either JSON or YAML.
--override-private-base-url=<value>3scale reads the backend’s private endpoint from the OpenAPI definition’s
servers[0].urlfield. To override the setting in that field, specify this option and replace<value>with the private base URL of your choice. When the OpenAPI definition does not specify a value in theservers[0].urlfield and you do not specify the this option in theimportcommand, execution fails.--prefix-matchingUse prefix matching instead of strict matching on mapping rules derived from OpenAPI operations.
--skip-openapi-validationSkip OpenAPI schema validation.
-t --target_system_name=<value>Target system name is a unique key in your tenant. System name can be inferred from the OpenAPI definition, however you can override that with your own name by using this parameter.
5.9. Managing remote access credentials
To facilitate working with remote 3scale instances, you can use the 3scale toolbox to define the remote URL addresses and authentication details to access those remote instances in a configuration file. You can then refer to these remotes using a short name in any toolbox command.
The default location for the configuration file is $HOME/.3scalerc.yaml. However, you can specify another location using the THREESCALE_CLI_CONFIG environment variable or the --config-file <config_file> toolbox option.
When adding remote access credentials, you can specify an access_token or a provider_key:
-
http[s]://<access_token>@<3scale-instance-domain> -
http[s]://<provider_key>@<3scale-instance-domain>
5.9.1. Adding remote access credentials
The following example command adds a remote 3scale instance with the short <name> at <url>:
3scale remote add [--config-file <config_file>] <name> <url>
Example
$ podman run --name toolbox-container registry.redhat.io/3scale-amp2/toolbox-rhel8:3scale2.13 3scale remote add instance_a https://123456789@example_a.net

$ podman commit toolbox-container toolbox
This example creates the remote instance and commits the container to create a new image. You can then run the new image with the remote information included. For example, the following command uses the new image to show the newly added remote:
$ podman run toolbox 3scale remote list
instance_a https://example_a.net 123456789
Other toolbox commands can then use the newly created image to access the added remotes. This example uses an image named toolbox instead of registry.redhat.io/3scale-amp2/toolbox-rhel8:3scale2.13.
Storing secrets for toolbox in a container is a potential security risk, for example when distributing the container with secrets to other users or using the container for automation. Use secured volumes in Podman or secrets in OpenShift.
Additional resources
For more details on using Podman, see:
5.9.2. Listing remote access credentials
The following example command shows how to list remote access credentials:
3scale remote list [--config-file <config_file>]
This command shows the list of added remote 3scale instances in the following format: <name> <URL> <authentication-key>:
Example
$ podman run <toolbox_image_with_remotes_added> 3scale remote list
instance_a https://example_a.net 123456789
instance_b https://example_b.net 987654321
5.9.3. Removing remote access credentials
The following example command shows how to remove remote access credentials:
3scale remote remove [--config-file <config_file>] <name>
This command removes the remote 3scale instance with the short <name>:
Example
$ podman run <toolbox_image_with_remote_added> 3scale remote remove instance_a
5.9.4. Renaming remote access credentials
The following example command shows how to rename remote access credentials:
3scale remote rename [--config-file <config_file>] <old_name> <new_name>
This command renames the remote 3scale instance with the short <old_name> to <new_name>:
Example
$ podman run <toolbox_image_with_remote_added> 3scale remote rename instance_a instance_b
5.10. Creating application plans
Use the 3scale toolbox to create, update, list, delete, show, or export/import application plans in your Developer Portal.
5.10.1. Creating a new application plan
Use the following steps to create a new application plan:
- You have to provide the application plan name.
-
To override the
system-name, use the optional parameter. - If an application plan with the same name already exists, you will see an error message.
-
Set as
defaultthe application plan by using the--defaultflag. Create a
publishedapplication plan by using the--publishflag.-
By default, it will be
hidden.
-
By default, it will be
Create a
disabledapplication plan by using the--disabledflag.-
By default, it will be
enabled.
-
By default, it will be
The
servicepositional argument is a service reference and can be either serviceidor servicesystem_name.- The toolbox uses either one.
The following command creates a new application plan:
3scale application-plan create [opts] <remote> <service> <plan-name>
Use the following options while creating application plans:
Options
       --approval-required=<value>    The application requires approval:
                                      true or false
       --cost-per-month=<value>       Cost per month
       --default                      Make the default application plan
       --disabled                     Disable all methods and metrics in
                                      the application plan
    -o --output=<value>               Output format on stdout:
                                      one of json|yaml
    -p --published                    Publish the application plan
       --setup-fee=<value>            Set-up fee
    -t --system-name=<value>          Set application plan system name
       --trial-period-days=<value>    The trial period in days

Options for application-plan
    -c --config-file=<value>          3scale toolbox configuration file:
                                      defaults to $HOME/.3scalerc.yaml
    -h --help                         Print help for this command
    -k --insecure                     Proceed and operate even for server
                                      connections otherwise considered
                                      insecure
    -v --version                      Print the version of this command
       --verbose                      Verbose mode
5.10.2. Creating or updating application plans
Use the following steps to create a new application plan if it does not exist, or to update an existing one:
-
Update the
defaultapplication plan by using the--defaultflag. -
Update the
publishedapplication plan by using the--publishflag. -
Update the
hiddenapplication plan by using the--hideflag. -
Update the
disabledapplication plan by using the--disabledflag. -
Update the
enabledapplication plan by using the--enabledflag.
The
servicepositional argument is a service reference and can be either serviceidor servicesystem_name.- The toolbox uses either one.
The
planpositional argument is a plan reference and can be either planidor plansystem_name.- The toolbox uses either one.
The following command updates the application plan:
3scale application-plan create [opts] <remote> <service> <plan>
Use the following options while updating application plans:
Options
       --approval-required=<value>    The application requires approval:
                                      true or false
       --cost-per-month=<value>       Cost per month
       --default                      Make the default application plan
       --disabled                     Disable all methods and metrics in
                                      the application plan
       --enabled                      Enable the application plan
       --hide                         Hide the application plan
    -n --name=<value>                 Set the plan name
    -o --output=<value>               Output format on stdout:
                                      one of json|yaml
    -p --publish                      Publish the application plan
       --setup-fee=<value>            Set-up fee
       --trial-period-days=<value>    The trial period in days

Options for application-plan
    -c --config-file=<value>          3scale toolbox configuration file:
                                      defaults to $HOME/.3scalerc.yaml
    -h --help                         Print help for this command
    -k --insecure                     Proceed and operate even for server
                                      connections otherwise considered
                                      insecure
    -v --version                      Print the version of this command
       --verbose                      Verbose mode
5.10.3. Listing application plans
The following command lists the application plan:
3scale application-plan list [opts] <remote> <service>
Use the following options while listing application plans:
Options
    -o --output=<value>           Output format on stdout:
                                  one of json|yaml

Options for application-plan
    -c --config-file=<value>      3scale toolbox configuration file:
                                  defaults to $HOME/.3scalerc.yaml
    -h --help                     Print help for this command
    -k --insecure                 Proceed and operate even for server
                                  connections otherwise considered insecure
    -v --version                  Print the version of this command
       --verbose                  Verbose mode
5.10.4. Showing application plans
The following command shows the application plan:
3scale application-plan show [opts] <remote> <service> <plan>
Use the following options while showing application plans:
Options
    -o --output=<value>           Output format on stdout:
                                  one of json|yaml

Options for application-plan
    -c --config-file=<value>      3scale toolbox configuration file:
                                  defaults to $HOME/.3scalerc.yaml
    -h --help                     Print help for this command
    -k --insecure                 Proceed and operate even for server
                                  connections otherwise considered insecure
    -v --version                  Print the version of this command
       --verbose                  Verbose mode
5.10.5. Deleting application plans
The following command deletes the application plan:
3scale application-plan delete [opts] <remote> <service> <plan>
Use the following options while deleting application plans:
Options for application-plan
    -c --config-file=<value>      3scale toolbox configuration file:
                                  defaults to $HOME/.3scalerc.yaml
    -h --help                     Print help for this command
    -k --insecure                 Proceed and operate even for server
                                  connections otherwise considered insecure
    -v --version                  Print the version of this command
       --verbose                  Verbose mode
5.10.6. Exporting/importing application plans
You can export or import a single application plan to or from yaml content.
Note the following:
- Limits defined in the application plan are included.
- Pricing rules defined in the application plan are included.
- Metrics/methods referenced by limits and pricing rules are included.
- Features defined in the application plan are included.
-
Service can be referenced by
idorsystem_name. -
Application Plan can be referenced by
idorsystem_name.
5.10.6.1. Exporting an application plan to a file
The following command exports the application plan:
3scale application-plan export [opts] <remote> <service_system_name> <plan_system_name>
Example
$ podman run -u root -v $PWD:/tmp registry.redhat.io/3scale-amp2/toolbox-rhel8:3scale2.13 3scale application-plan export --file=/tmp/plan.yaml remote_name service_name plan_name
This example uses a Podman volume to mount the exported file in the container for output to the current $PWD folder.
Specific to the export command:
- Read only operation on remote service and application plan.
Command output can be
stdoutor file.-
If not specified by
-foption, by default,yamlcontent will be written onstdout.
-
If not specified by
Use the following options while exporting application plans:
Options
    -f --file=<value>             Write to file instead of stdout

Options for application-plan
    -c --config-file=<value>      3scale toolbox configuration file:
                                  defaults to $HOME/.3scalerc.yaml
    -h --help                     Print help for this command
    -k --insecure                 Proceed and operate even for server
                                  connections otherwise considered insecure
    -v --version                  Print the version of this command
       --verbose                  Verbose mode
5.10.6.2. Importing an application plan from a file
The following command imports the application plan:
3scale application-plan import [opts] <remote> <service_system_name>
Example
$ podman run -v $PWD/plan.yaml:/tmp/plan.yaml registry.redhat.io/3scale-amp2/toolbox-rhel8:3scale2.13 3scale application-plan import --file=/tmp/plan.yaml remote_name service_name
This example uses a Podman volume to mount the imported file in the container from the current $PWD folder.
5.10.6.3. Importing an application plan from a URL
3scale application-plan import -f http[s]://domain/resource/path.yaml remote_name service_name
Specific to import command:
Command input content can be
stdin, file or URL format.-
If not specified by
-foption, by default,yamlcontent will be read fromstdin.
-
If not specified by
- If application plan cannot be found in remote service, it will be created.
Optional param
-p,--planto override remote target application planidorsystem_name.-
If not specified by
-poption, by default, application plan will be referenced by plan attributesystem_namefromyamlcontent.
-
If not specified by
- Any metric or method from yaml content that cannot be found in remote service, will be created.
Use the following options while importing application plans:
Options
    -f --file=<value>                  Read from file or URL instead of
                                       stdin
    -p --plan=<value>                  Override application plan reference

Options for application-plan
    -c --config-file=<value>           3scale toolbox configuration file:
                                       defaults to $HOME/.3scalerc.yaml
    -h --help                          Print help for this command
    -k --insecure                      Proceed and operate even for server
                                       connections otherwise considered
                                       insecure
    -v --version                       Print the version of this command
       --verbose                       Verbose mode
5.11. Creating metrics
Use the 3scale toolbox to create, update, list, and delete metrics in your Developer Portal.
Use the following steps for creating metrics:
- You have to provide the metric name.
-
To override the
system-name, use the optional parameter. - If metrics with the same name already exist, you will see an error message.
Create a
disabledmetric by using the--disabledflag.-
By default, it will be
enabled.
-
By default, it will be
The
servicepositional argument is a service reference and can be either serviceidor servicesystem_name.- The toolbox uses either one.
The following command creates metrics:
3scale metric create [opts] <remote> <service> <metric-name>
Use the following options while creating metrics:
Options
       --description=<value>      Set a metric description
       --disabled                 Disable this metric in all application
                                  plans
    -o --output=<value>           Output format on stdout:
                                  one of json|yaml
    -t --system-name=<value>      Set the application plan system name
       --unit=<value>             Metric unit: default hit

Options for metric
    -c --config-file=<value>      3scale toolbox configuration file:
                                  defaults to $HOME/.3scalerc.yaml
    -h --help                     Print help for this command
    -k --insecure                 Proceed and operate even for server
                                  connections otherwise considered insecure
    -v --version                  Print the version of this command
       --verbose                  Verbose mode
5.11.1. Creating or updating metrics
Use the following steps to create new metrics if they do not exist, or to update an existing one:
- If metrics with the same name already exist, you will see an error message.
-
Update a
disabledmetric by using the--disabledflag. -
Update to
enabledmetric by using the--enabledflag.
The
servicepositional argument is a service reference and can be either serviceidor servicesystem_name.- The toolbox uses either one.
The
metricpositional argument is a metric reference and can be either metricidor metricsystem_name.- The toolbox uses either one.
The following commmand updates metrics:
3scale metric apply [opts] <remote> <service> <metric>
Use the following options while updating metrics:
Options
       --description=<value>      Set a metric description
       --disabled                 Disable this metric in all application
                                  plans
       --enabled                  Enable this metric in all application
                                  plans
    -n --name=<value>             This will set the metric name
       --unit=<value>             Metric unit: default hit
    -o --output=<value>           Output format on stdout:
                                  one of json|yaml

Options for metric
    -c --config-file=<value>      3scale toolbox configuration file:
                                  defaults to $HOME/.3scalerc.yaml
    -h --help                     Print help for this command
    -k --insecure                 Proceed and operate even for server
                                  connections otherwise considered insecure
    -v --version                  Print the version of this command
       --verbose                  Verbose mode
5.11.2. Listing metrics
The following command lists metrics:
3scale metric list [opts] <remote> <service>
Use the following options while listing metrics:
Options
    -o --output=<value>           Output format on stdout:
                                  one of json|yaml

Options for metric
    -c --config-file=<value>      3scale toolbox configuration file:
                                  defaults to $HOME/.3scalerc.yaml
    -h --help                     Print help for this command
    -k --insecure                 Proceed and operate even for server
                                  connections otherwise considered insecure
    -v --version                  Print the version of this command
       --verbose                  Verbose mode
5.11.3. Deleting metrics
The following command deletes metrics:
3scale metric delete [opts] <remote> <service> <metric>
Use the following options while deleting metrics:
Options for metric
    -c --config-file=<value>      3scale toolbox configuration file:
                                  defaults to $HOME/.3scalerc.yaml
    -h --help                     Print help for this command
    -k --insecure                 Proceed and operate even for server
                                  connections otherwise considered insecure
    -v --version                  Print the version of this command
       --verbose                  Verbose mode
5.12. Creating methods
Use the 3scale toolbox to create, apply, list, and delete methods in your Developer Portal.
5.12.1. Creating methods
Use the following steps for creating methods:
- You have to provide the method name.
-
To override the
system-name, use the optional parameter. - If a method with the same name already exists, you will see an error message.
Create a
disabledmethod by--disabledflag.-
By default, it will be
enabled.
-
By default, it will be
The
servicepositional argument is a service reference and can be either serviceidor servicesystem_name.- The toolbox uses either one.
The following command creates a method:
3scale method create [opts] <remote> <service> <method-name>
Use the following options while creating methods:
Options
       --description=<value>      Set a method description
       --disabled                 Disable this method in all
                                  application plans
    -o --output=<value>           Output format on stdout:
                                  one of json|yaml
    -t --system-name=<value>      Set the method system name

Options for method
    -c --config-file=<value>      3scale toolbox configuration file:
                                  defaults to $HOME/.3scalerc.yaml
    -h --help                     Print help for this command
    -k --insecure                 Proceed and operate even for server
                                  connections otherwise considered insecure
    -v --version                  Print the version of this command
       --verbose                  Verbose mode
5.12.2. Creating or updating methods
Use the steps below for creating new methods if they do not exist, or to update existing ones:
- If a method with the same name already exists, the command will return an error message.
-
Update to
disabledmethod by using--disabled flag. -
Update to
enabledmethod by using--enabled flag.
The
servicepositional argument is a service reference and can be either serviceidor servicesystem_name.- The toolbox uses either one.
The
methodpositional argument is a method reference and can be either methodidor methodsystem_name.- The toolbox uses either one.
The following command updates a method:
3scale method apply [opts] <remote> <service> <method>
Use the following options while updating methods:
Options
       --description=<value>      Set a method description
       --disabled                 Disable this method in all
                                  application plans
       --enabled                  Enable this method in all
                                  application plans
    -n --name=<value>             Set the method name
    -o --output=<value>           Output format on stdout:
                                  one of json|yaml

Options for method
    -c --config-file=<value>      3scale toolbox configuration file:
                                  defaults to $HOME/.3scalerc.yaml
    -h --help                     Print help for this command
    -k --insecure                 Proceed and operate even for server
                                  connections otherwise considered insecure
    -v --version                  Print the version of this command
       --verbose                  Verbose mode
5.12.3. Listing methods
The following command lists methods:
3scale method list [opts] <remote> <service>
Use the following options while listing methods:
Options
    -o --output=<value>           Output format on stdout:
                                  one of json|yaml

Options for method
    -c --config-file=<value>      3scale toolbox configuration file:
                                  defaults to $HOME/.3scalerc.yaml
    -h --help                     Print help for this command
    -k --insecure                 Proceed and operate even for server
                                  connections otherwise considered insecure
    -v --version                  Print the version of this command
       --verbose                  Verbose mode
5.12.4. Deleting methods
The following command deletes methods:
3scale method delete [opts] <remote> <service> <metric>
Use the following options while deleting methods:
Options for method
    -c --config-file=<value>      3scale toolbox configuration file:
                                  defaults to $HOME/.3scalerc.yaml
    -h --help                     Print help for this command
    -k --insecure                 Proceed and operate even for server
                                  connections otherwise considered insecure
    -v --version                  Print the version of this command
       --verbose                  Verbose mode
5.13. Creating services
Use the 3scale toolbox to create, apply, list, show, or delete services in your Developer Portal.
5.13.1. Creating a new service
The following command creates a new service:
3scale service create [options] <remote> <service-name>
Use the following options while creating services:
Options
    -a --authentication-mode=<value>     Specify authentication mode of
                                         the service:
                                          - '1' for API key
                                          - '2' for App Id/App Key
                                          - 'oauth' for OAuth mode
                                          - 'oidc' for OpenID Connect
    -d --deployment-mode=<value>         Specify the deployment mode of
                                         the service
       --description=<value>             Specify the description of the
                                         service
    -o --output=<value>                  Output format on stdout:
                                         one of json|yaml
    -s --system-name=<value>             Specify the system-name of the
                                         service
       --support-email=<value>           Specify the support email of the
                                         service

Options for service
    -c --config-file=<value>             3scale toolbox configuration file:
                                         defaults to $HOME/.3scalerc.yaml
    -h --help                            Print help for this command
    -k --insecure                        Proceed and operate even for
                                         server connections otherwise
                                         considered insecure
    -v --version                         Print the version of this command
       --verbose                         Verbose mode
5.13.2. Creating or updating services
Use the following to create new services if they do not exist, or to update an existing one:
service-id_or_system-namepositional argument is a service reference.-
It can be either service
id, or servicesystem_name. - Toolbox will automatically figure this out.
-
It can be either service
-
This command is
idempotent.
The following command updates services:
3scale service apply <remote> <service-id_or_system-name>
Use the following options while updating services:
Options
    -a --authentication-mode=<value>     Specify authentication mode of
                                         the service:
                                           - '1' for API key
                                           - '2' for App Id/App Key
                                           - 'oauth' for OAuth mode
                                           - 'oidc' for OpenID Connect
    -d --deployment-mode=<value>         Specify the deployment mode of
                                         the service
       --description=<value>             Specify the description of the
                                         service
    -n --name=<value>                    Specify the name of the metric
       --support-email=<value>           Specify the support email of the
                                         service
    -o --output=<value>                  Output format on stdout:
                                         one of json|yaml

Options for services
    -c --config-file=<value>             3scale toolbox configuration file:
                                         defaults to $HOME/.3scalerc.yaml
    -h --help                            Print help for this command
    -k --insecure                        Proceed and operate even for
                                         server connections otherwise
                                         considered insecure
    -v --version                         Print the version of this command
       --verbose                         Verbose mode
5.13.3. Listing services
The following command lists services:
3scale service list <remote>
Use the following options while listing services:
Options
    -o --output=<value>           Output format on stdout:
                                  one of json|yaml

Options for services
    -c --config-file=<value>      3scale toolbox configuration file:
                                  defaults to $HOME/.3scalerc.yaml
    -h --help                     Print help for this command
    -k --insecure                 Proceed and operate even for server
                                  connections otherwise considered insecure
    -v --version                  Print the version of this command
       --verbose                  Verbose mode
5.13.4. Showing services
The following command shows services:
3scale service show <remote> <service-id_or_system-name>
Use the following options while showing services:
Options
    -o --output=<value>           Output format on stdout:
                                  one of json|yaml

Options for services
    -c --config-file=<value>      3scale toolbox configuration file:
                                  defaults to $HOME/.3scalerc.yaml
    -h --help                     Print help for this command
    -k --insecure                 Proceed and operate even for server
                                  connections otherwise considered insecure
    -v --version                  Print the version of this command
       --verbose                  Verbose mode
5.13.5. Deleting services
The following command deletes services:
3scale service delete <remote> <service-id_or_system-name>
Use the following options while deleting services:
Options for services
    -c --config-file=<value>      3scale toolbox configuration file:
                                  defaults to $HOME/.3scalerc.yaml
    -h --help                     Print help for this command
    -k --insecure                 Proceed and operate even for server
                                  connections otherwise considered insecure
    -v --version                  Print the version of this command
       --verbose                  Verbose mode
5.14. Creating ActiveDocs
Use the 3scale toolbox to create, update, list, or delete ActiveDocs in your Developer Portal.
5.14.1. Creating new ActiveDocs
To create a new ActiveDocs from your API definition compliant with the OpenAPI specification:
Add your API definition to 3scale, optionally giving it a name:
3scale activedocs create <remote> <activedocs-name> <specification>
The OpenAPI specification for the ActiveDocs is required and must be one of the following values:
- Filename in the available path.
-
URL from where toolbox can download the content. The supported schemes are
httpandhttps. Read from
stdinstandard input stream. This is controlled by setting the-value.Use the following options while creating ActiveDocs:
Options
    -d --description=<value>        Specify the description of
                                    the ActiveDocs
    -i --service-id=<value>         Specify the Service ID
                                    associated to the ActiveDocs
    -o --output=<value>             Output format on stdout: one
                                    of json|yaml
    -p --published                  Specify to publish the
                                    ActiveDocs on the Developer
                                    Portal. Otherwise it is hidden.
    -s --system-name=<value>        Specify the system-name of
                                    the ActiveDocs
       --skip-swagger-validations   Specify to skip validation
                                    of the Swagger specification
Options for ActiveDocs
    -c --config-file=<value>        toolbox configuration file.
                                    Defaults to $HOME/.3scalerc.yaml
    -h --help                       Print help for this command
    -k --insecure                   Proceed and operate even for
                                    server connections otherwise
                                    considered insecure
    -v --version                    Print the version of this command
       --verbose                    Verbose mode
- Publish the definition in your Developer Portal.
5.14.2. Creating or updating ActiveDocs
Use the following command to create new ActiveDocs if they do not exist, or to update existing ActiveDocs with a new API definition:
3scale activedocs apply <remote> <activedocs_id_or_system_name>
Use the following options while updating ActiveDocs:
Options
  -d --description=<value>              Specify the description of the
                                        ActiveDocs
       --hide                           Specify to hide the ActiveDocs
                                        on the Developer Portal
 -i --service-id=<value>                Specify the Service ID associated
                                        to the ActiveDocs
 -o --output=<value>                    Output format on stdout:
                                        one of json|yaml
    --openapi-spec=<value>              Specify the Swagger specification.
                                        Can be a file, a URL or '-' to read
                                        from stdin. This is a mandatory
                                        option when applying the ActiveDoc
                                        for the first time.
 -p --publish                           Specify to publish the ActiveDocs
                                        on the Developer Portal. Otherwise
                                        it is hidden
 -s --name=<value>                      Specify the name of the ActiveDocs
    --skip-swagger-validations=<value>  Specify whether to skip validation
                                        of the Swagger specification: true
                                        or false. Defaults to true.

Options for ActiveDocs
    -c --config-file=<value>           3scale toolbox configuration file:
                                       defaults to $HOME/.3scalerc.yaml
    -h --help                          Print help for this command
    -k --insecure                      Proceed and operate even for server
                                       connections otherwise considered
                                       insecure
    -v --version                       Print the version of this command
       --verbose                       Verbose mode
The behavior of activedocs apply --skip-swagger-validations changed in 3scale 2.8. You may need to update existing scripts using activedocs apply. Previously, if you did not specify this option in each activedocs apply command, validation was not skipped. Now, --skip-swagger-validations is true by default.
5.14.3. Listing ActiveDocs
Use the following command to get information about all ActiveDocs in the Developer Portal, including:
- id
- name
- system name
- description
- published (which means it can be shown in the developer portal)
- creation date
- latest updated date
The following command lists all defined ActiveDocs:
3scale activedocs list <remote>
Use the following options while listing ActiveDocs:
Options
    -o --output=<value>           Output format on stdout:
                                  one of json|yaml
    -s --service-ref=<value>      Filter the ActiveDocs by service
                                  reference
Options for ActiveDocs
    -c --config-file=<value>      3scale toolbox configuration file:
                                  defaults to $HOME/.3scalerc.yaml
    -h --help                     Print help for this command
    -k --insecure                 Proceed and operate even for server
                                  connections otherwise considered insecure
    -v --version                  Print the version of this command
       --verbose                  Verbose mode
5.14.4. Deleting ActiveDocs
The following command removes ActiveDocs:
3scale activedocs delete <remote> <activedocs-id_or-system-name>
Use the following options while deleting ActiveDocs:
Options for ActiveDocs
    -c --config-file=<value>      3scale toolbox configuration file:
                                  defaults to $HOME/.3scalerc.yaml
    -h --help                     Print help for this command
    -k --insecure                 Proceed and operate even for server
                                  connections otherwise considered insecure
    -v --version                  Print the version of this command
       --verbose                  Verbose mode
5.15. Listing proxy configurations
Use the 3scale toolbox to list, show, promote all defined proxy configurations in your Developer Portal.
The following command lists proxy configurations:
3scale proxy-config list <remote> <service> <environment>
Use the following options while listing proxy configurations:
Options
    -o --output=<value>           Output format on stdout:
                                  one of json|yaml

Options for proxy-config
    -c --config-file=<value>      3scale toolbox configuration file:
                                  defaults to $HOME/.3scalerc.yaml
    -h --help                     Print help for this command
    -k --insecure                 Proceed and operate even for server
                                  connections otherwise considered insecure
    -v --version                  Print the version of this command
       --verbose                  Verbose mode
5.15.1. Showing proxy configurations
The following command shows proxy configurations:
3scale proxy-config show <remote> <service> <environment>
Use the following options while showing proxy configurations:
Options
       --config-version=<value>   Specify the proxy configuration version.
                                  If not specified, defaults to latest
    -o --output=<value>           Output format on stdout:
                                  one of json|yaml

Options for proxy-config
    -c --config-file=<value>      3scale toolbox configuration file:
                                  defaults to $HOME/.3scalerc.yaml
    -h --help                     Print help for this command
    -k --insecure                 Proceed and operate even for server
                                  connections otherwise considered
                                  insecure
    -v --version                  Print the version of this command
       --verbose                  Verbose mode
5.15.2. Promoting proxy configurations
The following command promotes the latest staging proxy configuration to the production environment:
3scale proxy-config promote <remote> <service>
Use the following options while promoting the latest staging proxy configurations to the production environment:
Options for proxy-config
    -c --config-file=<value>      3scale toolbox configuration file:
                                  defaults to $HOME/.3scalerc.yaml
    -h --help                     Print help for this command
    -k --insecure                 Proceed and operate even for server
                                  connections otherwise considered insecure
    -v --version                  Print the version of this command
       --verbose                  Verbose mode
5.15.3. Exporting proxy configurations
Use the proxy-config export command, for example, if you have a self-managed APIcast gateway not connected to your 3scale instance. In this scenario, inject the 3scale configuration manually or by using the APICast deployment and configuration options. In both cases, you must provide the 3scale configuration.
The following command exports a configuration that you can inject into the APIcast gateway:
3scale proxy-config export <remote>
You can specify the following options when exporting a proxy configuration for the provider account that will be used as a 3scale configuration file:
Options for proxy-config
--environment=<value>      Gateway environment. Must be 'sandbox' or
                           'production' (default: sandbox)
-o --output=<value>        Output format. One of: json|yaml
5.15.4. Deploying proxy configurations
The following deploy command promotes your APIcast configuration to the staging environment in 3scale or to a production environment if you are using Service Mesh.
3scale proxy deploy <remote> <service>
You can specify the following option when using the deploy command to promote your APIcast configuration to the staging environment:
-o --output=<value> Output format. One of: json|yaml
5.15.5. Updating proxy configurations
The following update command updates your APIcast configuration.
3scale proxy update <remote> <service>
You can specify the following options when using the update command to update your APIcast configuration:
-o --output=<value>           Output format. One of: json|yaml
-p --param=<value>            APIcast configuration parameters. Format:
                              [--param key=value]. Multiple options allowed.
5.15.6. Showing proxy configurations
The following show command fetches your undeployed APIcast configuration.
3scale proxy show <remote> <service>
You can specify the following options when using the show command to fetch your undeployed APIcast configuration:
-o --output=<value> Output format. One of: json|yaml
5.15.7. Deploying proxy configurations (Deprecated)
In 3scale 2.12, support for the proxy-config deploy command is deprecated.
Use the the following commands:
-
proxy deploy -
proxy update -
proxy show
For more information, see Deploying proxy configurations.
The following deploy command promotes your APIcast configuration to the staging environment in 3scale or to a production environment if you are using Service Mesh.
3scale proxy-config deploy <remote> <service>
You can specify the following option when using the deploy command to promote your APIcast configuration to the staging environment:
-o --output=<value> Output format. One of: json|yaml
Additional resources
5.16. Copying a policy registry
Use the toolbox command to copy a policy registry from a 3scale source account to a target account when:
- Missing custom policies are being created in target account.
- Matching custom policies are being updated in target account.
- This copy command is idempotent.
- Missing custom policies are defined as custom policies that exist in source account and do not exist in an account tenant.
- Matching custom policies are defined as custom policies that exists in both source and target account.
The following command copies a policy registry:
3scale policy-registry copy [opts] <source_remote> <target_remote>
Option for policy-registry
    -c --config-file=<value>      3scale toolbox configuration file:
                                  defaults to $HOME/.3scalerc.yaml
    -h --help                     Print help for this command
    -k --insecure                 Proceed and operate even for server
                                  connections otherwise considered insecure
    -v --version                  Print the version of this command
       --verbose                  Verbose mode
5.17. Listing applications
Use the 3scale toolbox to list, create, show, apply, or delete applications Developer Portal.
The following command lists applications:
3scale application list [opts] <remote>
Use the following options while listing applications:
OPTIONS
       --account=<value>          Filter by account
    -o --output=<value>           Output format on stdout:
                                  one of json|yaml
       --plan=<value>             Filter by application plan. Service
                                  option required.
       --service=<value>          Filter by service

OPTIONS FOR APPLICATION
    -c --config-file=<value>      3scale toolbox configuration file:
                                  defaults to $HOME/.3scalerc.yaml
    -h --help                     Print help for this command
    -k --insecure                 Proceed and operate even for server
                                  connections otherwise considered insecure
    -v --version                  Print the version of this command
       --verbose                  Verbose mode
5.17.1. Creating applications
Use the create command to create one application linked to a given 3scale account and application plan.
The required positional paramaters are as follows:
-
<service>reference. It can be either serviceid, or servicesystem_name. <account>reference. It can be one of the following:-
Account
id -
username,email, oruser_idof the admin user of the account -
provider_key
-
Account
-
<application plan>reference. It can be either planid, or plansystem_name. -
<name>application name.
The following command creates applications:
3scale application create [opts] <remote> <account> <service> <application-plan> <name>
Use the following options while creating applications:
OPTIONS
       --application-id=<value>     App ID or Client ID (for OAuth and
                                    OpenID Connect authentication modes)
                                    of the application to be created.
       --application-key=<value>    App Key(s) or Client Secret (for OAuth
                                    and OpenID Connect authentication
                                    modes) of the application created.
       --description=<value>        Application description
    -o --output=<value>             Output format on stdout:
                                    one of json|yaml
       --redirect-url=<value>       OpenID Connect redirect url
       --user-key=<value>           User Key (API Key) of the application
                                    to be created.

OPTIONS FOR APPLICATION
    -c --config-file=<value>      3scale toolbox configuration file:
                                  defaults to $HOME/.3scalerc.yaml
    -h --help                     Print help for this command
    -k --insecure                 Proceed and operate even for server
                                  connections otherwise considered insecure
    -v --version                  Print the version of this command
       --verbose                  Verbose mode
5.17.2. Showing applications
The following command shows applications:
3scale application show [opts] <remote> <application>
Application parameters allow:
-
User_key- API key -
App_id- from app_id/app_key pair or Client ID for OAuth and OpenID Connect (OIDC) authentication modes -
Application internal
id
OPTIONS
    -o --output=<value>           Output format on stdout:
                                  one of json|yaml

OPTIONS FOR APPLICATION
    -c --config-file=<value>      3scale toolbox configuration file:
                                  defaults to $HOME/.3scalerc.yaml
    -h --help                     Print help for this command
    -k --insecure                 Proceed and operate even for server
                                  connections otherwise considered insecure
    -v --version                  Print the version of this command
       --verbose                  Verbose mode
5.17.3. Creating or updating applications
Use the following command to create new applications if they do not exist, or to update existing applications:
3scale application apply [opts] <remote> <application>
Application parameters allow:
-
User_key- API key -
App_id- from app_id/app_key pair or Client ID for OAuth and OIDC authentication modes -
Application internal
id accountoptional argument is required when application is not found and needs to be created. It can be one of the following:-
Account
id -
username,email, oruser_idof the administrator user of the 3scale account -
provider_key
-
Account
-
namecannot be used as unique identifier because application name is not unique in 3scale. -
Resume a suspended application by
--resumeflag. -
Suspends an application - changes the state to suspended by the
--suspendflag.
Use the following options while updating applications:
OPTIONS
       --account=<value>           Application's account. Required when
                                   creating
       --application-key=<value>   App Key(s) or Client Secret (for OAuth
                                   and OpenID Connect authentication
                                   modes) of the application to be
                                   created. Only used when application
                                   does not exist.
       --description=<value>       Application description
       --name=<value>              Application name
    -o --output=<value>            Output format on stdout:
                                   one of json|yaml
       --plan=<value>              Application's plan. Required when
                                   creating.
       --redirect-url=<value>      OpenID Connect redirect url
       --resume                    Resume a suspended application
       --service=<value>           Application's service. Required when
                                   creating.
       --suspend                   Suspends an application (changes the
                                   state to suspended)
       --user-key=<value>          User Key (API Key) of the application
                                   to be created.

OPTIONS FOR APPLICATION
    -c --config-file=<value>      3scale toolbox configuration file:
                                  defaults to $HOME/.3scalerc.yaml
    -h --help                     Show help for this command
    -k --insecure                 Proceed and operate even for server
                                  connections otherwise considered insecure
    -v --version                  Print the version of this command
       --verbose                  Verbose mode.
5.17.4. Deleting applications
The following command deletes an application:
3scale application delete [opts] <remote> <application>
Application parameters allow:
-
User_key- API key -
App_id- from app_id/app_key pair or Client ID for OAuth and OIDC authentication modes -
Application internal
id
5.18. Exporting products
You can export a 3scale product definition in .yaml format so that you can import that product into a 3scale instance that has no connectivity with the source 3scale instance. You must set up a 3scale product before you can export that product. See Creating new products to test API calls.
When two 3scale instances have network connectivity, use the toolbox 3scale copy command when you want to use the same 3scale product in both 3scale instances.
Description
When you export a 3scale product, the toolbox serializes the product definition in .yaml format that adheres to the Product and Backend custom resource definitions (CRDs). For more information, see Using the 3scale operator to configure and provision 3scale. Along with the basic information for the product, the output .yaml includes:
- Backends that are linked to the product.
- Metrics, methods and mapping rules for linked backends.
- Limits and pricing rules defined in application plans.
- Metrics and methods that are referenced by limits and pricing rules.
Exporting a product is a read-only operation. In other words, it is safe to repeatedly export a product. The toolbox does not change the product being exported. If you want to, you can modify the .yaml output before you import it into another 3scale instance.
Exporting a 3scale product is intended for the following situations:
-
There is no connectivity between the source and destination 3scale instances. For example, there might be severe network restrictions that prevent running the toolbox
3scale copycommand when you want to use the same product in more than one 3scale instance. -
You want to use Git or some other source control system to maintain 3scale product definitions in
.yamlformat.
The 3scale toolbox export and import commands might also be useful for backing up and restoring product definitions.
Format
Use this format for running the export command:
$ 3scale product export [-f output-file] <remote> <product>
The export command can send output to stdout or to a file. The default is stdout. To send output to a file, specify the -f or --file option with the name of a .yaml file.
Replace <remote> with a 3scale provider account alias or URL that is associated with the 3scale instance from which you are exporting the product. For more information about specifying this, see Managing remote access credentials.
Replace <product> with the system name or 3scale ID of the product that you want to export. This product must be associated with the 3scale provider account that you specified. You can find a product’s system name in the 3scale GUI on the product’s Overview page. To obtain a product’s 3scale ID, run the toolbox 3scale services show command.
Example
The following command exports the petstore product from the 3scale instance associated with the my-3scale-1 provider account and outputs it to the petstore-product.yaml file:
$ 3scale product export -f petstore-product.yaml my-3scale-1 petstore
Following is a serialization example for the Default API product:
apiVersion: v1
kind: List
items:
- apiVersion: capabilities.3scale.net/v1beta1
  kind: Product
  metadata:
    annotations:
      3scale_toolbox_created_at: '2021-02-17T10:59:23Z'
      3scale_toolbox_version: 0.17.1
    name: api.xysnalcj
  spec:
    name: Default API
    systemName: api
    description: ''
    mappingRules:
    - httpMethod: GET
      pattern: "/v2"
      metricMethodRef: hits
      increment: 1
      last: false
    metrics:
      hits:
        friendlyName: Hits
        unit: hit
        description: Number of API hits
    methods:
      servicemethod01:
        friendlyName: servicemethod01
        description: ''
    policies:
    - name: apicast
      version: builtin
      configuration: {}
      enabled: true
    applicationPlans:
      basic:
        name: Basic
        appsRequireApproval: false
        trialPeriod: 0
        setupFee: 0.0
        custom: false
        state: published
        costMonth: 0.0
        pricingRules:
        - from: 1
          to: 1000
          pricePerUnit: 1.0
          metricMethodRef:
            systemName: hits
        limits:
        - period: hour
          value: 1222222
          metricMethodRef:
            systemName: hits
            backend: backend_01
    backendUsages:
      backend_01:
        path: "/v1/pets"
      backend_02:
        path: "/v1/cats"
    deployment:
      apicastSelfManaged:
        authentication:
          oidc:
            issuerType: rest
            issuerEndpoint: https://hello:test@example.com/auth/realms/3scale-api-consumers
            jwtClaimWithClientID: azp
            jwtClaimWithClientIDType: plain
            authenticationFlow:
              standardFlowEnabled: false
              implicitFlowEnabled: true
              serviceAccountsEnabled: false
              directAccessGrantsEnabled: true
            credentials: query
            security:
              hostHeader: ''
              secretToken: some_secret
            gatewayResponse:
              errorStatusAuthFailed: 403
              errorHeadersAuthFailed: text/plain; charset=us-ascii
              errorAuthFailed: Authentication failed
              errorStatusAuthMissing: 403
              errorHeadersAuthMissing: text/plain; charset=us-ascii
              errorAuthMissing: Authentication parameters missing
              errorStatusNoMatch: 404
              errorHeadersNoMatch: text/plain; charset=us-ascii
              errorNoMatch: No Mapping Rule matched
              errorStatusLimitsExceeded: 429
              errorHeadersLimitsExceeded: text/plain; charset=us-ascii
              errorLimitsExceeded: Usage limit exceeded
        stagingPublicBaseURL: http://staging.example.com:80
        productionPublicBaseURL: http://example.com:80
- apiVersion: capabilities.3scale.net/v1beta1
  kind: Backend
  metadata:
    annotations:
      3scale_toolbox_created_at: '2021-02-17T10:59:34Z'
      3scale_toolbox_version: 0.17.1
    name: backend.01.pcjwxbdu
  spec:
    name: Backend 01
    systemName: backend_01
    privateBaseURL: https://b1.example.com:443
    description: new desc
    mappingRules:
    - httpMethod: GET
      pattern: "/v1/pets"
      metricMethodRef: hits
      increment: 1
      last: false
    metrics:
      hits:
        friendlyName: Hits
        unit: hit
        description: Number of API hits
    methods:
      mybackendmethod01:
        friendlyName: mybackendmethod01
        description: ''
- apiVersion: capabilities.3scale.net/v1beta1
  kind: Backend
  metadata:
    annotations:
      3scale_toolbox_created_at: '2021-02-17T10:59:34Z'
      3scale_toolbox_version: 0.17.1
    name: backend.02.tiedgjsk
  spec:
    name: Backend 02
    systemName: backend_02
    privateBaseURL: https://b2.example.com:443
    description: ''
    mappingRules:
    - httpMethod: GET
      pattern: "/v1/cats"
      metricMethodRef: hits
      increment: 1
      last: false
    metrics:
      hits:
        friendlyName: Hits
        unit: hit
        description: Number of API hits
    methods:
      backend02_method01:
        friendlyName: backend02_method01
        description: ''
Exporting and piping to Product CRs
When you run the export command you can pipe the output to create a product custom resource (CR). Which 3scale instance contains this CR depends on the following:
-
If the
threescale-provider-accountsecret is defined, the 3scale operator creates the product CR in the 3scale instance identified by that secret. -
If the
threescale-provider-accountsecret is not defined, then if there is a 3scale instance installed in the namespace that the new product CR would be in, the 3scale operator creates the product CR in that namespace. -
If the
threescale-provider-accountsecret is not defined, and if the namespace that the new product CR would be in does not contain a 3scale instance, then the 3scale operator marks the product CR with a failed status.
Suppose that you run the following command in a namespace that contains a threescale-provider-account secret. The toolbox pipes the petstore CR to the 3scale instance identified in the threescale-provider-account secret:
$ 3scale product export my-3scale-1 petstore | oc apply -f -
5.19. Importing products
To use the same 3scale product in more than one 3scale instance when the source and destination 3scale instances do not have network connectivity, export a 3scale product from one 3scale instance and import it into another 3scale instance. To import a product, run the toolbox 3scale product import command.
When two 3scale instances have network connectivity, use the toolbox 3scale copy command when you want to use the same 3scale product in both 3scale instances.
Description
When you import a 3scale product, the toolbox expects a serialized product definition in .yaml format that adheres to the Product and Backend custom resource definitions (CRDs). You can obtain this .yaml content by running the toolbox 3scale product export command or by manually creating the .yaml formatted product definition.
If you exported the product, the imported definition contains what was exported, which can include:
- Backends that are linked to the product.
- Metrics, methods and mapping rules for linked backends.
- Limits and pricing rules defined in application plans.
- Metrics and methods that are referenced by limits and pricing rules.
If you want to, you can modify exported .yaml output before you import it into another 3scale instance.
The import command is idempotent. You can run it any number of times to import the same product and the resulting 3scale configuration remains the same. If there is an error during the import process, it is safe to re-run the command. If the import process cannot find the product in the 3scale instance, it creates the product. It also creates any metric, method, or backend that is defined in the .yaml definition and that it cannot find in the 3scale instance.
Importing a 3scale product is intended for the following situations:
-
There is no connectivity between the source and destination 3scale instances. For example, there might be severe network restrictions that prevent running the toolbox
3scale copycommand when you want to use the same product in more than one 3scale instance. -
You want to use Git or some other source control system to maintain 3scale product definitions in
.yamlformat.
The 3scale toolbox export and import commands might also be useful for backing up and restoring product definitions.
Format
Use this format for running the import command:
3scale product import [<options>] <remote>
The import command takes .yaml input from stdin or from a file. The default is stdin.
You can specify these options:
-
-for--filefollowed by a file name obtains input from the.yamlfile that you specify. This file must contain a 3scale product definition that adheres to the 3scaleProductandBackendCRDs. -
-oor--outputfollowed byjsonoryamloutputs the report that lists what was imported in the format that you specify. The default output format isjson.
Replace <remote> with a 3scale provider account alias or URL associated with the 3scale instance into which you want to import the product. For more information about specifying this, see Managing remote access credentials.
Example
The following command imports the product that is defined in petstore-product.yaml into the 3scale instance associated with the my-3scale-2 provider account. By default, the report of what was imported is in .json format.
3scale product import -f petstore-product.yaml my-3scale-2
The import command outputs a report that lists the imported items, for example:
api:
  product_id: 2555417888846
  backends:
    backend_01:
      backend_id: 73310
      missing_metrics_created: 1
      missing_methods_created: 1
      missing_mapping_rules_created: 1
    backend_02:
      backend_id: 73311
      missing_metrics_created: 0
      missing_methods_created: 2
      missing_mapping_rules_created: 1
  missing_methods_created: 1
  missing_metrics_created: 1
  missing_mapping_rules_created: 2
  missing_application_plans_created: 2
  application_plans:
    basic:
      application_plan_id: 2357356246461
      missing_limits_created: 7
      missing_pricing_rules_created: 7
    unlimited:
      application_plan_id: 2357356246462
      missing_limits_created: 1
      missing_pricing_rules_created: 0
An example of a serialized product definition is at the end of Exporting products.
5.20. Export and import a product policy chain
You can export or import your product’s policy chain to or from yaml or json content. In a command line, reference the product by its id or system value. You must set up a 3scale product before you can export or import a product’s policy chain. See: Creating new products to test API calls.
Features of the export command
- The command is a read-only operation for remote products.
-
The command will write its output by default to the standard output
stdout. The-fflag can be used to write the command’s output to a file. -
Command output formats are in either
jsonoryaml. Note that the default format isyaml.
Help options for the export product policy chain
NAME
    export - export product policy chain
USAGE
    3scale policies export [opts] <remote>
    <product>
DESCRIPTION
    export product policy chain
OPTIONS
    -f --file=<value>             Write to file instead of stdout
    -o --output=<value>           Output format. One of: json|yaml
Command format
The following is the format of the command to export the policy chain to a file in yaml:
$ 3scale policies export -f policies.yaml -o yaml remote_name product_name
Features of the the import command:
-
The command will read input from standard input or
stdin. When-f FILEflag is set, input will be read from a file. When-uURL flag is set, input will be read from the URL. -
The imported content can be either
yamlorjson. You do not need to specify the format because the toolbox automatically detects it. -
The existing policy chain is overwritten with the newly imported one.
SETsemantics are then implemented. - All content validation is delegated to the 3scale API.
Help options for the import product policy chain
NAME
    import - import product policy chain
USAGE
    3scale policies import [opts] <remote>
    <product>
DESCRIPTION
    import product policy chain
OPTIONS
    -f --file=<value>             Read from file
    -u --url=<value>              Read from url
Command format
The following is the format of the command to import the policy chain from a file:
$ 3scale policies import -f plan.yaml remote_name product_name
The following is the format of the command to import the policy chain from a URI:
$ 3scale policies import -f http[s]://domain/resource/path.yaml remote_name product_name
5.21. Copying API backends
Create a copy of the specified source API backend on the specified 3scale system. The target system is first searched by the source backend system name by default:
- If a backend with the selected system name is not found, it is created.
- If a backend with the selected system name is found, it is replaced. Only missing metrics and methods are created, while mapping rules are entirely replaced with the new ones.
You can override the system name using the --target_system_name option.
Copied components
The following API backend components are copied:
- Metrics
- Methods
- Mapping rules: these are copied and replaced.
Procedure
Enter the following command to copy an API backend:
3scale backend copy [opts] -s <source_remote> -d <target_remote> <source_backend>
The specified 3scale instance can be a remote name or a URL.
NoteYou can copy a single API backend only per command. You can copy multiple backends using multiple commands. You can copy the same backend multiple times by specifying a different
--target_system_name name.
Use following options when copying API backends:
Options
    -d --destination=<value>             3scale target instance: URL or
                                         remote name (required).
    -s --source=<value>                  3scale source instance: URL or
                                         remote name (required).
    -t --target_system_name=<value>      Target system name: defaults to
                                         source system name.
The following example command shows you how to copy an API backend multiple times by specifying a different value for --target_system_name:
$ podman run registry.redhat.io/3scale-amp2/toolbox-rhel8:3scale2.13 3scale backend copy [-t target_system_name] -s 3scale1 -d 3scale2 api_backend_01
5.22. Copying API products
Create a copy of the specified source API product on the target 3scale system. By default, the source API product system name first searches the target system:
-
If a product with the selected
system-nameis not found, it is created. -
If a product with the selected
system-nameis found, it is updated. Only missing metrics and methods are created, while mapping rules are entirely replaced with the new ones.
You can override the system name using the --target_system_name option.
Copied components
The following API product components are copied:
- Configuration and settings
- Metrics and methods
- Mapping rules: these are copied and replaced.
- Application plans, pricing rules, and limits
- Application usage rules
- Policies
- Backends
- ActiveDocs
Procedure
Enter the following command to copy an API product:
3scale product copy [opts] -s <source_remote> -d <target_remote> <source_product>
The specified 3scale instance can be a remote name or a URL.
NoteYou can copy a single API product only per command. You can copy multiple products using multiple commands. You can copy the same product multiple times by specifying a different
--target_system_name name.
Use following options when copying API products:
Options
    -d --destination=<value>             3scale target instance: URL or
                                         remote name (required).
    -s --source=<value>                  3scale source instance: URL or
                                         remote name (required).
    -t --target_system_name=<value>      Target system name: defaults to
                                         source system name.
The following example command shows you how to copy an API product multiple times by specifying a different value for --target_system_name:
$ podman run registry.redhat.io/3scale-amp2/toolbox-rhel8:3scale2.13 3scale product copy [-t target_system_name] -s 3scale1 -d 3scale2 my_api_product_01
5.23. Troubleshooting issues with SSL and TLS
This section explains how to resolve issues with Secure Sockets Layer/Transport Layer Security (SSL/TLS).
If you are experiencing issues related to self-signed SSL certificates, you can download and use remote host certificates as described in this section. For example, typical errors include SSL certificate problem: self signed certificate or self signed certificate in certificate chain.
Procedure
Download the remote host certificate using
openssl. For example:$ echo | openssl s_client -showcerts -servername self-signed.badssl.com -connect self-signed.badssl.com:443 2>/dev/null | sed -ne '/-BEGIN CERTIFICATE-/,/-END CERTIFICATE-/p' > self-signed-cert.pem
Ensure that the certificate is working correctly using
curl. For example:$ SSL_CERT_FILE=self-signed-cert.pem curl -v https://self-signed.badssl.com
If the certificate is working correctly, you will no longer get the SSL error. If the certificate is not working correctly, try running the
curlcommand with the-koption (or its long form,--insecure). This indicates that you want to proceed even for server connections that are otherwise considered insecure.Add the
SSL_CERT_FILEenvironment variable to your3scalecommands. For example:$ podman run --env "SSL_CERT_FILE=/tmp/self-signed-cert.pem" -v $PWD/self-signed-cert.pem:/tmp/self-signed-cert.pem registry.redhat.io/3scale-amp2/toolbox-rhel7:3scale2.13 3scale service list https://{ACCESS_KEY}@{3SCALE_ADMIN}-admin.{DOMAIN_NAME}This example uses a Podman volume to mount the certificate file in the container. It assumes that the file is available in the current
$PWDfolder.An alternative approach would be to create your own toolbox image using the 3scale toolbox image as the base image and then install your own trusted certificate store.
Additional resources
- For more details on SSL certificates, see the Red Hat Certificate System documentation.
- For more details on Podman, see Building, running, and managing Linux containers on Red Hat Enterprise Linux 8.
Chapter 6. Mapping API environments in 3scale
An API provider gives access to the APIs managed through the 3scale Admin Portal. You then deploy the API backends in many environments. API backend environments include the following:
- Different environments used for development, quality assurance (QA), staging, and production.
- Different environments used for teams or departments that manage their own set of API backends.
A Red Hat 3scale API Management product represents a single API or subset of an API, but it is also used to map and manage different API backend environments.
To find out about mapping API environments for your 3scale product, see the following sections:
6.1. Product per environment
This method uses a separate 3scale Product for each API backend environment. In each product, configure a production gateway and a staging gateway, so the changes to the gateway configuration can be tested safely and promoted to the production configuration as you would with your API backends.
Production Product => Production Product APIcast gateway => Production Product API upstream
Staging Product => Staging Product APIcast gateway => Staging Product API upstream
Configure the product for the API backend environment as follows:
- Create a backend with a base URL for the API backend for the environment.
- Add the backend to the product for the environment with a backend path /.
Development environment
Create development backend
- Name: Dev
- Private Base URL: URL of the API backend
Create Dev product
-
Production Public Base URL:
https://dev-api-backend.yourdomain.com -
Staging Public Base URL:
https://dev-api-backend.yourdomain.com - Add Dev Backend with a backend path /
-
Production Public Base URL:
QA environment
Create QA backend
- Name: QA
- Private Base URL: URL of the API backend
Create QA product
-
Production Public Base URL:
https://qa-api-backend.yourdomain.com -
Staging Public Base URL:
https://qa-api-backend.yourdomain.com - Add QA Backend with a backend path /
-
Production Public Base URL:
Production environment
Create production backend
- Name: Prod
- Private Base URL: URL of the API backend
Create Prod product
-
Production Public Base URL:
https://prod-api-backend.yourdomain.com -
Staging Public Base URL:
https://prod-api-backend.yourdomain.com - Add production Backend with a backend path /
-
Production Public Base URL:
Additional resources
- For more information about the 3scale product, see First steps with 3scale.
6.2. 3scale On-premises instances
For 3scale On-premises instances, there are multiple ways to set up 3scale to manage API back-end environments.
- A separate 3scale instance for each API back-end environment
- A single 3scale instance that uses the multitenancy feature
6.2.1. Separating 3scale instances per environment
In this approach a separate 3scale instance is deployed for each API back-end environment. The benefit of this architecture is that each environment will be isolated from one another, therefore there are no shared databases or other resources. For example, any load testing being done in one environment will not impact the resources in other environments.
This separation of installations has benefits as described above, however, it would require more operational resources and maintenance. These additional resources would be required on the OpenShift administration layer and not necessarily on the 3scale layer.
6.2.2. Separating 3scale tenants per environment
In this approach a single 3scale instance is used but the multitenancy feature is used to support multiple API back ends.
There are two options:
- Create a 1-to-1 mapping between environments and 3scale products within a single tenant.
Create a 1-to-1 mapping between environments and tenants with one or more products per tenant as required.
- There would be three tenants corresponding to API back-end environments - dev-tenant, qa-tenant, prod-tenant. The benefit of this approach is that it allows for a logical separation of environments but uses shared physical resources.
Shared physical resources will ultimately need to be taken into consideration when analysing the best strategy for mapping API environments to a single installation with multiple tenants.
6.3. 3scale mixed approach
The approaches described in 3scale On-premises instances can be combined. For example:
- A separate 3scale instance for production
- A separate 3scale instance with separate tenant for non-production environments in dev and qa
6.4. 3scale with APIcast gateways
For 3scale On-premises instances, there are two alternatives to set up 3scale to manage API backend environments:
- Each 3scale installation comes with two built-in APIcast gateways, for staging and production.
- Deploy additional APIcast gateways externally to the OpenShift cluster where 3scale is running.
6.4.1. APIcast built-in default gateways
When APIcast built-in gateways are used, the API back end configured using the above approaches described in 3scale with APIcast gateways will be handled automatically. When a tenant is added by a 3scale Master Admin, a route is created for the tenant in production and staging built-in APIcast gateways. See Understanding multitenancy subdomains
-
<API_NAME>-<TENANT_NAME>-apicast.staging.<WILDCARD_DOMAIN> -
<API_NAME>-<TENANT_NAME>-apicast.production.<WIDLCARD_DOMAIN>
Therefore, each API back-end environment mapped to a different tenant would get its own route. For example:
-
Dev
<API_NAME>-dev-apicast.staging.<WILDCARD_DOMAIN> -
QA
<API_NAME>-qa-apicast.staging.<WILDCARD_DOMAIN> -
Prod
<API_NAME>-prod-apicast.staging.<WILDCARD_DOMAIN>
6.4.2. Additional APIcast gateways
Additional APIcast gateways are those deployed on a different OpenShift cluster than the one on which 3scale instance is running. There is more than one way to set up and use additional APIcast gateways. The value of environment variable THREESCALE_PORTAL_ENDPOINT used when starting APIcast depends how the additional APIcast gateways are set up.
A separate APIcast gateway can be used for each API back-end environment. For example:
DEV_APICAST -> DEV_TENANT ; DEV_APICAST started with THREESCALE_PORTAL_ENDPOINT = admin portal for DEV_TENANT
QA_APICAST -> QA_TENANT ; QA_APICAST started with THREESCALE_PORTAL_ENDPOINT = admin portal for QA_APICAST
PROD_APICAST -> PROD_TENANT ; PROD_APICAST started with THREESCALE_PORTAL_ENDPOINT = admin portal for PROD_APICAST
The THREESCALE_PORTAL_ENDPOINT is used by APIcast to download the configuration. Each tenant that maps to an API backend environment uses a separate APIcast gateway. The THREESCALE_PORTAL_ENDPOINT is set to the Admin Portal for the tenant containing all the product configurations specific to that API backend environment.
A single APIcast gateway can be used with multiple API back-end environments. In this case THREESCALE_PORTAL_ENDPOINT is set to the Master Admin Portal.
Additional resources
- For more information about the API provider, see the glossary.
- For more information about the 3scale product, see the glossary.
Chapter 7. Automating API lifecycle with 3scale toolbox
This topic explains the concepts of the API lifecycle with Red Hat 3scale API Management and shows how API providers can automate the deployment stage using Jenkins Continuous Integration/Continuous Deployment (CI/CD) pipelines with 3scale toolbox commands. It describes how to deploy the sample Jenkins CI/CD pipelines, how to create a custom Jenkins pipeline using the 3scale shared library, and how create a custom pipeline from scratch:
7.1. Overview of the API lifecycle stages
The API lifecycle describes all the required activities from when an API is created until it is deprecated. 3scale enables API providers to perform full API lifecycle management. This section explains each stage in the API lifecycle and describes its goal and expected outcome.
The following diagram shows the API provider-based stages on the left, and the API consumer-based stages on the right:

Red Hat currently supports the design, implement, deploy, secure, and manage phases of the API provider cycle, and all phases of the API consumer cycle.
7.1.1. API provider cycle
The API provider cycle stages are based on specifying, developing, and deploying your APIs. The following describes the goal and outcome of each stage:
Table 7.1. API provider lifecycle stages
| Stage | Goal | Outcome |
|---|---|---|
| 1. Strategy | Determine the corporate strategy for the APIs, including goals, resources, target market, timeframe, and make a plan. | The corporate strategy is defined with a clear plan to achieve the goals. |
| 2. Design | Create the API contract early to break dependencies between projects, gather feedback, and reduce risks and time to market (for example, using Apicurio Studio). | A consumer-focused API contract defines the messages that can be exchanged with the API. The API consumers have provided feedback. |
| 3. Mock | Further specify the API contract with real-world examples and payloads that can be used by API consumers to start their implementation. | A mock API is live and returns real-world examples. The API contract is complete with examples. |
| 4. Test | Further specify the API contract with business expectations that can be used to test the developed API. | A set of acceptance tests is created. The API documentation is complete with business expectations. |
| 5. Implement | Implement the API, using an integration framework such as Red Hat Fuse or a development language of your choice. Ensure that the implementation matches the API contract. | The API is implemented. If custom API management features are required, 3scale APIcast policies are also developed. |
| 6. Deploy | Automate the API integration, tests, deployment, and management using a CI/CD pipeline with 3scale toolbox. | A CI/CD pipeline integrates, tests, deploys, and manages the API to the production environment in an automated way. |
| 7. Secure | Ensure that the API is secure (for example, using secure development practices and automated security testing). | Security guidelines, processes, and gates are in place. |
| 8. Manage | Manage API promotion between environments, versioning, deprecation, and retirement at scale. | Processes and tools are in place to manage APIs at scale (for example, semantic versioning to prevent breaking changes to the API). |
7.1.2. API consumer cycle
The API consumer cycle stages are based on promoting, distributing, and refining your APIs for consumption. The following describes the goal and outcome of each stage:
Table 7.2. API consumer lifecycle stages
| Stage | Goal | Outcome |
|---|---|---|
| 9. Discover | Promote the API to third-party developers, partners, and internal users. | A developer portal is live and up-to-date documentation is continuously pushed to this developer portal (for example, using 3scale ActiveDocs). |
| 10. Develop | Guide and enable third-party developers, partners, and internal users to develop applications based on the API. | The developer portal includes best practices, guides, and recommendations. API developers have access to a mock and test endpoint to develop their software. |
| 11. Consume | Handle the growing API consumption and manage the API consumers at scale. | Staged application plans are available for consumption, and up-to-date prices and limits are continuously pushed. API consumers can integrate API key or client ID/secret generation from their CI/CD pipeline. |
| 12. Monitor | Gather factual and quantified feedback about API health, quality, and developer engagement (for example, a metric for Time to first Hello World!). | A monitoring system is in place. Dashboards show KPIs for the API (for example, uptime, requests per minute, latency, and so on). |
| 13. Monetize | Drive new incomes at scale (this stage is optional). | For example, when targeting a large number of small API consumers, monetization is enabled and consumers are billed based on usage in an automated way. |
7.2. Deploying the sample Jenkins CI/CD pipelines
API lifecycle automation with 3scale toolbox focuses on the deployment stage of the API lifecycle and enables you to use CI/CD pipelines to automate your API management solution. This topic explains how to deploy the sample Jenkins pipelines that call the 3scale toolbox:
- Section 7.2.1, “Sample Jenkins CI/CD pipelines”
- Section 7.2.2, “Setting up your 3scale Hosted environment”
- Section 7.2.3, “Setting up your 3scale On-premises environment”
- Section 7.2.4, “Deploying Red Hat Single Sign-On for OpenID Connect”
- Section 7.2.5, “Installing the 3scale toolbox and enabling access”
- Section 7.2.6, “Deploying the API backends”
- Section 7.2.7, “Deploying self-managed APIcast instances”
- Section 7.2.8, “Installing and deploying the sample pipelines”
- Section 7.2.9, “Limitations of API lifecycle automation with 3scale toolbox”
7.2.1. Sample Jenkins CI/CD pipelines
The following samples are provided in the Red Hat Integration repository as examples of how to create and deploy your Jenkins pipelines for API lifecycle automation:
Table 7.3. Sample Jenkins shared library pipelines
| Sample pipeline | Target environment | Security |
|---|---|---|
| 3scale Hosted | API key | |
| 3scale Hosted and 3scale On-premises with APIcast self-managed | None | |
| 3scale Hosted and 3scale On-premises with APIcast self-managed | OpenID Connect (OIDC) | |
| 3scale Hosted on development, test and production, with APIcast self-managed | API key | |
| 3scale Hosted on development, test and production, with APIcast self-managed | API key, none, OIDC |
These samples use a 3scale Jenkins shared library that calls the 3scale toolbox to demonstrate key API management capabilities. After you have performed the setup steps in this topic, you can install the pipelines using the OpenShift templates provided for each of the sample use cases in the Red Hat Integration repository.
The sample pipelines and applications are provided as examples only. The underlying APIs, CLIs, and other interfaces leveraged by the sample pipelines are fully supported by Red Hat. Any modifications that you make to the pipelines are not directly supported by Red Hat.
7.2.2. Setting up your 3scale Hosted environment
Setting up a 3scale Hosted environment is required by all of the sample Jenkins CI/CD pipelines.
The SaaS - API key, Multi-environment, and Semantic versioning sample pipelines use 3scale Hosted only. The Hybrid - open and Hybrid - OIDC pipelines also use 3scale On-premises. See also Setting up your 3scale On-premises environment.
Prerequisites
- You must have a Linux workstation.
- You must have a 3scale Hosted environment.
You must have an OpenShift 3.11 cluster. OpenShift 4 is currently not supported.
- For more information about supported configurations, see the Red Hat 3scale API Management Supported Configurations page.
- Ensure that wildcard routes have been enabled on the OpenShift router, as explained in the OpenShift documentation.
Procedure
- Log in to your 3scale Hosted Admin Portal console.
- Generate a new access token with write access to the Account Management API.
Save the generated access token for later use. For example:
export SAAS_ACCESS_TOKEN=123...456
Save the name of your 3scale tenant for later use. This is the string before
-admin.3scale.netin your Admin Portal URL. For example:export SAAS_TENANT=my_username
- Navigate to Audience > Accounts > Listing in the Admin Portal.
- Click Developer.
Save the Developer Account ID. This is the last part of the URL after
/buyers/accounts/. For example:export SAAS_DEVELOPER_ACCOUNT_ID=123...456
7.2.3. Setting up your 3scale On-premises environment
Setting up a 3scale on-premises environment is required by the Hybrid - open and Hybrid - OIDC sample Jenkins CI/CD pipelines only.
If you wish to use these Hybrid sample pipelines, you must set up a 3scale On-premises environment and a 3scale Hosted environment. See also Setting up your 3scale Hosted environment.
Prerequisites
- You must have a Linux workstation.
- You must have a 3scale on-premises environment. For details on installing 3scale on-premises using a template on OpenShift, see the 3scale installation documentation.
You must have an OpenShift 3.11 cluster. OpenShift 4 is currently not supported.
- For more information about supported configurations, see the Red Hat 3scale API Management Supported Configurations page.
- Ensure that wildcard routes have been enabled on the OpenShift router, as explained in the OpenShift documentation.
Procedure
- Log in to your 3scale On-premises Admin Portal console.
- Generate a new access token with write access to the Account Management API.
Save the generated access token for later use. For example:
export SAAS_ACCESS_TOKEN=123...456
Save the name of your 3scale tenant for later use:
export ONPREM_ADMIN_PORTAL_HOSTNAME="$(oc get route system-provider-admin -o jsonpath='{.spec.host}')"Define your wildcard routes:
export OPENSHIFT_ROUTER_SUFFIX=app.openshift.test # Replace me!

export APICAST_ONPREM_STAGING_WILDCARD_DOMAIN=onprem-staging.$OPENSHIFT_ROUTER_SUFFIX

export APICAST_ONPREM_PRODUCTION_WILDCARD_DOMAIN=onprem-production.$OPENSHIFT_ROUTER_SUFFIX
NoteYou must set the value of
OPENSHIFT_ROUTER_SUFFIXto the suffix of your OpenShift router (for example,app.openshift.test).Add the wildcard routes to your existing 3scale on-premises instance:
oc create route edge apicast-wildcard-staging --service=apicast-staging --hostname="wildcard.$APICAST_ONPREM_STAGING_WILDCARD_DOMAIN" --insecure-policy=Allow --wildcard-policy=Subdomain

oc create route edge apicast-wildcard-production --service=apicast-production --hostname="wildcard.$APICAST_ONPREM_PRODUCTION_WILDCARD_DOMAIN" --insecure-policy=Allow --wildcard-policy=Subdomain
- Navigate to Audience > Accounts > Listing in the Admin Portal.
- Click Developer.
Save the Developer Account ID. This is the last part of the URL after
/buyers/accounts/:export ONPREM_DEVELOPER_ACCOUNT_ID=5
7.2.4. Deploying Red Hat Single Sign-On for OpenID Connect
If you are using the Hybrid - OpenID Connect (OIDC) or Semantic versioning sample pipelines, perform the steps in this section to deploy Red Hat Single Sign-On (RH-SSO) with 3scale. This is required for OIDC authentication, which is used in both samples.
Procedure
Deploy RH-SSO 7.3 as explained in the RH-SSO documentation.
The following example commands provide a short summary:
oc replace -n openshift --force -f https://raw.githubusercontent.com/jboss-container-images/redhat-sso-7-openshift-image/sso73-dev/templates/sso73-image-stream.json

oc replace -n openshift --force -f https://raw.githubusercontent.com/jboss-container-images/redhat-sso-7-openshift-image/sso73-dev/templates/sso73-x509-postgresql-persistent.json

oc -n openshift import-image redhat-sso73-openshift:1.0

oc policy add-role-to-user view system:serviceaccount:$(oc project -q):default

oc new-app --template=sso73-x509-postgresql-persistent --name=sso -p DB_USERNAME=sso -p SSO_ADMIN_USERNAME=admin -p DB_DATABASE=sso
Save the host name of your RH-SSO installation for later use:
export SSO_HOSTNAME="$(oc get route sso -o jsonpath='{.spec.host}')"- Configure RH-SSO for 3scale as explained in the 3scale Developer Portal documentation.
Save the realm name, client ID, and client secret for later use:
export REALM=3scale

export CLIENT_ID=3scale-admin

export CLIENT_SECRET=123...456
7.2.5. Installing the 3scale toolbox and enabling access
This section describes how to install the toolbox, create your remote 3scale instance, and provision the secret used to access the Admin Portal.
Procedure
- Install the 3scale toolbox locally as explained in The 3scale toolbox.
Run the appropriate toolbox command to create your 3scale remote instance:
3scale Hosted
3scale remote add 3scale-saas "https://$SAAS_ACCESS_TOKEN@$SAAS_TENANT-admin.3scale.net/"
3scale On-premises
3scale remote add 3scale-onprem "https://$ONPREM_ACCESS_TOKEN@$ONPREM_ADMIN_PORTAL_HOSTNAME/"
Run the following OpenShift command to provision the secret containing your 3scale Admin Portal and access token:
oc create secret generic 3scale-toolbox -n "$TOOLBOX_NAMESPACE" --from-file="$HOME/.3scalerc.yaml"
7.2.6. Deploying the API backends
This section shows how to deploy the example API backends provided with the sample pipelines. You can substitute your own API backends as needed when creating and deploying your own pipelines
Procedure
Deploy the example Beer Catalog API backend for use with the following samples:
-
SaaS - API key -
Hybrid - open Hybrid - OIDCoc new-app -n "$TOOLBOX_NAMESPACE" -i openshift/redhat-openjdk18-openshift:1.4 https://github.com/microcks/api-lifecycle.git --context-dir=/beer-catalog-demo/api-implementation --name=beer-catalog oc expose -n "$TOOLBOX_NAMESPACE" svc/beer-catalog
-
Save the Beer Catalog API host name for later use:
export BEER_CATALOG_HOSTNAME="$(oc get route -n "$TOOLBOX_NAMESPACE" beer-catalog -o jsonpath='{.spec.host}')"Deploy the example Red Hat Event API backend for use with the following samples:
-
Multi-environment Semantic versioningoc new-app -n "$TOOLBOX_NAMESPACE" -i openshift/nodejs:10 'https://github.com/nmasse-itix/rhte-api.git#085b015' --name=event-api oc expose -n "$TOOLBOX_NAMESPACE" svc/event-api
-
Save the Event API host name for later use:
export EVENT_API_HOSTNAME="$(oc get route -n "$TOOLBOX_NAMESPACE" event-api -o jsonpath='{.spec.host}')"
7.2.7. Deploying self-managed APIcast instances
This section is for use with APIcast self-managed instances in 3scale Hosted environments. It applies to all of the sample pipelines except SaaS - API key.
Procedure
Define your wildcard routes:
export APICAST_SELF_MANAGED_STAGING_WILDCARD_DOMAIN=saas-staging.$OPENSHIFT_ROUTER_SUFFIX

export APICAST_SELF_MANAGED_PRODUCTION_WILDCARD_DOMAIN=saas-production.$OPENSHIFT_ROUTER_SUFFIX
Deploy the APIcast self-managed instances in your project:
oc create secret generic 3scale-tenant --from-literal=password=https://$SAAS_ACCESS_TOKEN@$SAAS_TENANT-admin.3scale.net

oc create -f https://raw.githubusercontent.com/3scale/apicast/v3.5.0/openshift/apicast-template.yml

oc new-app --template=3scale-gateway --name=apicast-staging -p CONFIGURATION_URL_SECRET=3scale-tenant -p CONFIGURATION_CACHE=0 -p RESPONSE_CODES=true -p LOG_LEVEL=info -p CONFIGURATION_LOADER=lazy -p APICAST_NAME=apicast-staging -p DEPLOYMENT_ENVIRONMENT=sandbox -p IMAGE_NAME=registry.redhat.io/3scale-amp2/apicast-gateway-rhel8:3scale2.13

oc new-app --template=3scale-gateway --name=apicast-production -p CONFIGURATION_URL_SECRET=3scale-tenant -p CONFIGURATION_CACHE=60 -p RESPONSE_CODES=true -p LOG_LEVEL=info -p CONFIGURATION_LOADER=boot -p APICAST_NAME=apicast-production -p DEPLOYMENT_ENVIRONMENT=production -p IMAGE_NAME=registry.redhat.io/3scale-amp2/apicast-gateway-rhel8:3scale2.13

oc scale dc/apicast-staging --replicas=1

oc scale dc/apicast-production --replicas=1

oc create route edge apicast-staging --service=apicast-staging --hostname="wildcard.$APICAST_SELF_MANAGED_STAGING_WILDCARD_DOMAIN" --insecure-policy=Allow --wildcard-policy=Subdomain

oc create route edge apicast-production --service=apicast-production --hostname="wildcard.$APICAST_SELF_MANAGED_PRODUCTION_WILDCARD_DOMAIN" --insecure-policy=Allow --wildcard-policy=Subdomain
7.2.8. Installing and deploying the sample pipelines
After you have set up the required environments, you can install and deploy the sample pipelines using the OpenShift templates provided for each of the sample use cases in the Red Hat Integration repository. For example, this section shows the SaaS - API Key sample only.
Procedure
Use the provided OpenShift template to install the Jenkins pipeline:
oc process -f saas-usecase-apikey/setup.yaml \
           -p DEVELOPER_ACCOUNT_ID="$SAAS_DEVELOPER_ACCOUNT_ID" \
           -p PRIVATE_BASE_URL="http://$BEER_CATALOG_HOSTNAME" \
           -p NAMESPACE="$TOOLBOX_NAMESPACE" |oc create -f -
Deploy the sample as follows:
oc start-build saas-usecase-apikey
Additional resource
7.2.9. Limitations of API lifecycle automation with 3scale toolbox
The following limitations apply in this release:
- OpenShift support
- The sample pipelines are supported on OpenShift 3.11 only. OpenShift 4 is currently not supported. For more information about supported configurations, see the Red Hat 3scale API Management Supported Configurations page.
- Updating applications
-
You can use the
3scale application applytoolbox command for applications to both create and update applications. Create commands support account, plan, service, and application key. - Update commands do not support changes to account, plan, or service. If changes are passed, the pipelines will be triggered, no errors will be shown, but those fields will not be updated.
-
You can use the
- Copying services
-
When using the
3scale copy servicetoolbox command to copy a service with custom policies, you must copy the custom policies first and separately.
7.3. Creating pipelines using the 3scale Jenkins shared library
This section provides best practices for creating a custom Jenkins pipeline that uses the 3scale toolbox. It explains how to write a Jenkins pipeline in Groovy that uses the 3scale Jenkins shared library to call the toolbox based on an example application. For more details, see Jenkins shared libraries.
Red Hat supports the Jenkins pipeline samples provided in the Red Hat Integration repository.
Any modifications made to these pipelines are not directly supported by Red Hat. Custom pipelines that you create for your environment are not supported.
Prerequisites
- Deploying the sample Jenkins CI/CD pipelines.
- You must have an OpenAPI specification file for your API. For example, you can generate this using Apicurio Studio.
Procedure
Add the following to the beginning of your Jenkins pipeline to reference the 3scale shared library from your pipeline:
#!groovy

library identifier: '3scale-toolbox-jenkins@master',
   retriever: modernSCM([$class: 'GitSCMSource',
     remote: 'https://github.com/rh-integration/3scale-toolbox-jenkins.git'])
Declare a global variable to hold the
ThreescaleServiceobject so that you can use it from the different stages of your pipeline.def service = null
Create the
ThreescaleServicewith all the relevant information:stage("Prepare") { service = toolbox.prepareThreescaleService( openapi: [ filename: "swagger.json" ], environment: [ baseSystemName: "my_service" ], toolbox: [ openshiftProject: "toolbox", destination: "3scale-tenant", secretName: "3scale-toolbox" ], service: [:], applications: [ [ name: "my-test-app", description: "This is used for tests", plan: "test", account: "<CHANGE_ME>" ] ], applicationPlans: [ [ systemName: "test", name: "Test", defaultPlan: true, published: true ], [ systemName: "silver", name: "Silver" ], [ artefactFile: "https://raw.githubusercontent.com/my_username/API-Lifecycle-Mockup/master/testcase-01/plan.yaml"], ] ) echo "toolbox version = " + service.toolbox.getToolboxVersion() }-
openapi.filenameis the path to the file containing the OpenAPI specification. -
environment.baseSystemNameis used to compute the finalsystem_name, based onenvironment.environmentNameand the API major version from the OpenAPI specificationinfo.version. -
toolbox.openshiftProjectis the OpenShift project in which Kubernetes jobs will be created. -
toolbox.secretNameis the name of the Kubernetes secret containing the 3scale toolbox configuration file, as shown in Installing the 3scale toolbox and enabling access. -
toolbox.destinationis the name of the 3scale toolbox remote instance. -
applicationPlansis a list of application plans to create by using a.yamlfile or by providing application plan property details.
-
Add a pipeline stage to provision the service in 3scale:
stage("Import OpenAPI") {
  service.importOpenAPI()
  echo "Service with system_name ${service.environment.targetSystemName} created !"
}
Add a stage to create the application plans:
stage("Create an Application Plan") {
  service.applyApplicationPlans()
}
Add a global variable and a stage to create the test application:
stage("Create an Application") {
  service.applyApplication()
}
Add a stage to run your integration tests. When using APIcast Hosted instances, you must fetch the proxy definition to extract the staging public URL:
stage("Run integration tests") {
  def proxy = service.readProxy("sandbox")
  sh """set -e +x
  curl -f -w "ListBeers: %{http_code}\n" -o /dev/null -s ${proxy.sandbox_endpoint}/api/beer -H 'api-key: ${service.applications[0].userkey}'
  curl -f -w "GetBeer: %{http_code}\n" -o /dev/null -s ${proxy.sandbox_endpoint}/api/beer/Weissbier -H 'api-key: ${service.applications[0].userkey}'
  curl -f -w "FindBeersByStatus: %{http_code}\n" -o /dev/null -s ${proxy.sandbox_endpoint}/api/beer/findByStatus/   available -H 'api-key: ${service.applications[0].userkey}'
  """
}
Add a stage to promote your API to production:
stage("Promote to production") {
  service.promoteToProduction()
}
Additional resources
7.4. Creating pipelines using a Jenkinsfile
This section provides best practices for writing a custom Jenkinsfile from scratch in Groovy that uses the 3scale toolbox.
Red Hat supports the Jenkins pipeline samples provided in the Red Hat Integration repository.
Any modifications made to these pipelines are not directly supported by Red Hat. Custom pipelines that you create for your environment are not supported. This section is provided for reference only.
Prerequisites
- Deploying the sample Jenkins CI/CD pipelines.
- You must have an OpenAPI specification file for your API. For example, you can generate this using Apicurio Studio.
Procedure
Write a utility function to call the 3scale toolbox. The following creates a Kubernetes job that runs the 3scale toolbox:
#!groovy

def runToolbox(args) {
  def kubernetesJob = [
    "apiVersion": "batch/v1",
    "kind": "Job",
    "metadata": [
      "name": "toolbox"
    ],
    "spec": [
      "backoffLimit": 0,
      "activeDeadlineSeconds": 300,
      "template": [
        "spec": [
          "restartPolicy": "Never",
          "containers": [
            [
             "name": "job",
             "image": "registry.redhat.io/3scale-amp2/toolbox-rhel7:3scale2.13",
             "imagePullPolicy": "Always",
             "args": [ "3scale", "version" ],
             "env": [
               [ "name": "HOME", "value": "/config" ]
             ],
             "volumeMounts": [
               [ "mountPath": "/config", "name": "toolbox-config" ],
               [ "mountPath": "/artifacts", "name": "artifacts" ]
              ]
            ]
          ],
          "volumes": [
            [ "name": "toolbox-config", "secret": [ "secretName": "3scale-toolbox" ] ],
            [ "name": "artifacts", "configMap": [ "name": "openapi" ] ]
          ]
        ]
      ]
    ]
  ]

  kubernetesJob.spec.template.spec.containers[0].args = args

  sh "rm -f -- job.yaml"
  writeYaml file: "job.yaml", data: kubernetesJob

  sh """set -e
  oc delete job toolbox --ignore-not-found
  sleep 2
  oc create -f job.yaml
  sleep 20 # Adjust the sleep duration to your server velocity
  """

  def logs = sh(script: "set -e; oc logs -f job/toolbox", returnStdout: true)
  echo logs
  return logs
}
Kubernetes object template
This function uses a Kubernetes object template to run the 3scale toolbox, which you can adjust to your needs. It sets the 3scale toolbox CLI arguments and writes the resulting Kubernetes job definition to a YAML file, cleans up any previous run of the toolbox, creates the Kubernetes job, and waits:
-
You can adjust the wait duration to your server velocity to match the time that a pod needs to transition between the
Createdand theRunningstate. You can refine this step using a polling loop. -
The OpenAPI specification file is fetched from a
ConfigMapnamedopenapi. -
The 3scale Admin Portal hostname and access token are fetched from a secret named
3scale-toolbox, as shown in Installing the 3scale toolbox and enabling access. -
The
ConfigMapwill be created by the pipeline in step 3. However, the secret was already provisioned outside the pipeline and is subject to Role-Based Access Control (RBAC) for enhanced security.
-
You can adjust the wait duration to your server velocity to match the time that a pod needs to transition between the
Define the global environment variables to use with 3scale toolbox in your Jenkins pipeline stages. For example:
3scale Hosted
def targetSystemName = "saas-apikey-usecase"
def targetInstance = "3scale-saas"
def privateBaseURL = "http://echo-api.3scale.net"
def testUserKey = "abcdef1234567890"
def developerAccountId = "john"
3scale On-premises
When using self-managed APIcast or an on-premises installation of 3scale, you must declare two more variables:
def publicStagingBaseURL = "http://my-staging-api.example.test"
def publicProductionBaseURL = "http://my-production-api.example.test"
The variables are described as follows:
-
targetSystemName: The name of the service to be created. -
targetInstance: This matches the name of the 3scale remote instance created in Installing the 3scale toolbox and enabling access. -
privateBaseURL: The endpoint host of your API backend. -
testUserKey: The user API key used to run the integration tests. It can be hardcoded as shown or generated from an HMAC function. -
developerAccountId: The ID of the target account in which the test application will be created. -
publicStagingBaseURL: The public staging base URL of the service to be created. -
publicProductionBaseURL: The public production base URL of the service to be created.
-
Add a pipeline stage to fetch the OpenAPI specification file and provision it as a
ConfigMapon OpenShift as follows:node() { stage("Fetch OpenAPI") { sh """set -e curl -sfk -o swagger.json https://raw.githubusercontent.com/microcks/api-lifecycle/master/beer-catalog-demo/api-contracts/beer-catalog-api-swagger.json oc delete configmap openapi --ignore-not-found oc create configmap openapi --from-file="swagger.json" """ }Add a pipeline stage that uses the 3scale toolbox to import the API into 3scale:
3scale Hosted
stage("Import OpenAPI") {
  runToolbox([ "3scale", "import", "openapi", "-d", targetInstance, "/artifacts/swagger.json", "--override-private-base-url=${privateBaseURL}", "-t", targetSystemName ])
}
3scale On-premises
When using self-managed APIcast or an on-premises installation of 3scale, you must also specify the options for the public staging and production base URLs:
stage("Import OpenAPI") {
  runToolbox([ "3scale", "import", "openapi", "-d", targetInstance, "/artifacts/swagger.json", "--override-private-base-url=${privateBaseURL}", "-t", targetSystemName, "--production-public-base-url=${publicProductionBaseURL}", "--staging-public-base-url=${publicStagingBaseURL}" ])
}
Add pipeline stages that use the toolbox to create a 3scale application plan and an application:
stage("Create an Application Plan") {
  runToolbox([ "3scale", "application-plan", "apply", targetInstance, targetSystemName, "test", "-n", "Test Plan", "--default" ])
}

stage("Create an Application") {
  runToolbox([ "3scale", "application", "apply", targetInstance, testUserKey, "--account=${developerAccountId}", "--name=Test Application", "--description=Created by Jenkins", "--plan=test", "--service=${targetSystemName}" ])
}
stage("Run integration tests") { def proxyDefinition = runToolbox([ "3scale", "proxy", "show", targetInstance, targetSystemName, "sandbox" ]) def proxy = readJSON text: proxyDefinition proxy = proxy.content.proxy sh """set -e echo "Public Staging Base URL is ${proxy.sandbox_endpoint}" echo "userkey is ${testUserKey}" curl -vfk ${proxy.sandbox_endpoint}/beer -H 'api-key: ${testUserKey}' curl -vfk ${proxy.sandbox_endpoint}/beer/Weissbier -H 'api-key: ${testUserKey}' curl -vfk ${proxy.sandbox_endpoint}/beer/findByStatus/available -H 'api-key: ${testUserKey}' """ }Add a stage that uses the toolbox to promote the API to your production environment.
stage("Promote to production") {
  runToolbox([ "3scale", "proxy", "promote", targetInstance,  targetSystemName ])
}
Additional resources
Chapter 8. Using the 3scale operator to configure and provision 3scale
As a 3scale administrator, you can use the 3scale operator to configure 3scale services and provision 3scale resources. You use the operator in the OpenShift Container Platform (OCP) user interface. Using the operator is an alternative to configuring and provisioning 3scale in the Admin Portal or by using the 3scale internal API.
When you use the 3scale operator to configure a service or provision a resource the only way to update that service or resource is to update its custom resource (CR). While new services and resources appear in the Admin Portal, you cannot update the service or resource in the Admin Portal or by using the internal 3scale API. If you try to, the operator reverts updates and the CR remains as it was.
3scale operator for capabilities is a Technology Preview feature only. Technology Preview features are not supported with Red Hat production service level agreements (SLAs) and might not be functionally complete. Red Hat does not recommend using them in production. These features provide early access to upcoming product features, enabling customers to test functionality and provide feedback during the development process. For more information about the support scope of Red Hat Technology Preview features, see Technology Preview Features Support Scope.
This chapter includes details about how operator application capabilities work and how to use the operator to deploy custom resources:
Additionally, there is information about the limitations of capabilities when using the 3scale operator.
8.1. General prerequisites
To configure and provision 3scale by using the 3scale operator, these are the required elements:
- A user account with administrator privileges for 3scale 2.13 On-Premises instance
- 3scale operator installed.
OpenShift Container Platform 4 with a user account that has administrator privileges in the OpenShift cluster.
- For more information about supported configurations, see the Red Hat 3scale API Management Supported Configurations page.
8.2. Application capabilities via the 3scale operator
The 3scale operator contains these featured capabilities:
- Allows interaction with the underlying Red Hat 3scale API Management solution.
- Manages the 3scale application declaratively using custom resources from OpenShift.
The diagram below shows 3scale entities and relations that are eligible for management using OpenShift custom resources in a declarative way. Products contain one or more backends. At the product level, you can configure applications, application plans, as well as mapping rules. At the backend level, you can set up metrics, methods and mapping rules for each backend.

The 3scale operator provides custom resource definitions and their relations, which are visible in the following diagram.
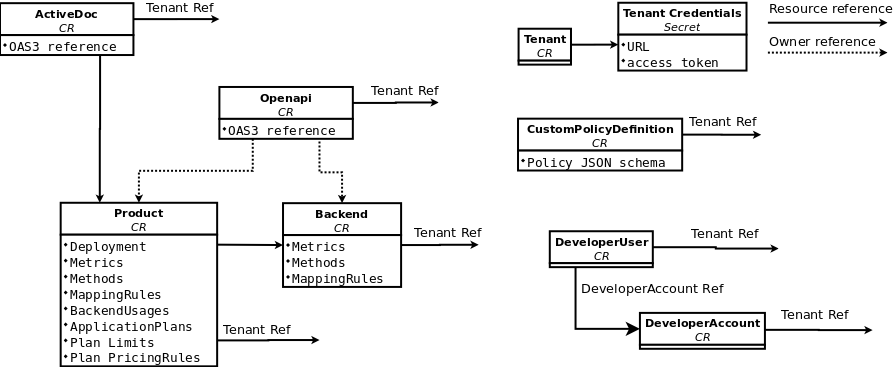
8.3. Deploying your first 3scale product and backend
Using Openshift Container Platform in your newly created tenant, you will deploy your first 3scale product and backend with the minimum required configuration.
Prerequisites
The same installation requirements as listed in General prerequisites, with these considerations:
- The 3scale account can be local in the working OpenShift namespace or a remote installation.
- The required parameters from this account are the 3scale Admin URL address and the access token.
Procedure
Create a secret for the 3scale provider account using the credentials from the 3scale Admin Portal. For example:
adminURL=https://3scale-admin.example.comandtoken=123456.oc create secret generic threescale-provider-account --from-literal=adminURL=https://3scale-admin.example.com --from-literal=token=123456
Configure the 3scale backend with the upstream API URL:
Create a YAML file with the following content:
apiVersion: capabilities.3scale.net/v1beta1
kind: Backend
metadata:
  name: backend1
spec:
  name: "Operated Backend 1"
  systemName: "backend1"
  privateBaseURL: "https://api.example.com"
- Once you create the file, the operator will confirm if the step was successful.
- For more details about the fields of Backend custom resource and possible values, see the Backend CRD Reference.
Create a custom resource:
oc create -f backend1.yaml
Configure the 3scale product:
Create a product with all the default settings applied to the previously created backend:
apiVersion: capabilities.3scale.net/v1beta1 kind: Product metadata: name: product1 spec: name: "OperatedProduct 1" systemName: "operatedproduct1" backendUsages: backend1: path: /- Once you create the file, the operator will confirm if the step was successful.
- For more details about the fields of the Product custom resource and possible values, see the Product CRD Reference.
Create a custom resource:
oc create -f product1.yaml
Created custom resources will take a few seconds to populate your 3scale instance. To confirm when resources are synchronized, you can choose one of these alternatives:
- Verify the status field of the object.
Use the
oc waitcommands:oc wait --for=condition=Synced --timeout=-1s backend/backend1 oc wait --for=condition=Synced --timeout=-1s product/product1
8.4. Promoting a product’s APIcast configuration
Using the 3scale operator, you can promote the product’s APIcast configuration to staging or production. The ProxyConfigPromote custom resource (CR) promotes the latest APIcast configuration to the staging environment. Optionally, you can configure the ProxyConfigPromote CR to promote to the production environment as well.
ProxyConfigPromote objects only take effect when created. After creation, any updates on them are not reconciled.
Prerequisites
The same installation requirements as listed in General prerequisites, including:
- Have a product CR already created.
Procedure
Create and save a YAML file with the following content:
apiVersion: capabilities.3scale.net/v1beta1
kind: ProxyConfigPromote
metadata:
  name: proxyconfigpromote-sample
spec:
  productCRName: product1-sample
To promote the APIcast configuration to the production environment, set the optional field
spec.productiontotrue:apiVersion: capabilities.3scale.net/v1beta1 kind: ProxyConfigPromote metadata: name: proxyconfigpromote-sample spec: productCRName: product1-sample production: true
To delete the
ProxyConfigPromote objectafter a successful promotion, set the optional fieldspec.deleteCRtotrue:apiVersion: capabilities.3scale.net/v1beta1 kind: ProxyConfigPromote metadata: name: proxyconfigpromote-sample spec: productCRName: product1-sample deleteCR: true
To check the status condition of the file, type the following command:
oc get proxyconfigpromote proxyconfigpromote-sample -o yaml
The output should show the satus is
Ready:apiVersion: capabilities.3scale.net/v1beta1 kind: ProxyConfigPromote metadata: name: proxyconfigpromote-sample spec: productCRName: product1-sample status: conditions: - lastTransitionTime: "2022-10-28T11:35:19Z" status: "True" type: Ready
Create the custom resource:
oc create -f proxyconfigpromote-sample.yaml
For the given example, the output would be:
proxyconfigpromote.capabilities.3scale.net/proxyconfigpromote-sample created
Additional resources
8.5. How the 3scale operator identifies the tenant that a custom resource links to
You can deploy 3scale custom resources (CRs) to manage a variety of 3scale objects. A 3scale CR links to exactly one tenant.
If the 3scale operator is installed in the same namespace as 3scale the default behavior is that a 3scale CR links to that 3scale instance’s default tenant. To link a 3scale CR to a different tenant, you can do one of the following:
Create the
threescale-provider-accountsecret in the namespace that contains the 3scale CR. When you deploy a 3scale CR, the operator reads this secret to identify the tenant that the CR links to. For the operator to use this secret, one of the following must be true:-
The 3scale CR specifies the
spec.providerAccountReffield as null. The 3scale CR omits the
spec.providerAccountReffield.The
threescale-provider-accountsecret identifies the tenant that the CR links to. The secret must contain a reference to a 3scale instance in the form of a URL and credentials for accessing a tenant in that 3scale instance in the form of a token. For example:oc create secret generic threescale-provider-account --from-literal=adminURL=https://3scale-admin.example.com --from-literal=token=123456
The
threescale-provider-accountsecret can identify any tenant in any 3scale instance as long as the HTTP connection is available. In other words, a 3scale CR and the 3scale instance that contains the tenant that the CR links to can be in different namespaces, or in different OpenShift clusters.
-
The 3scale CR specifies the
In the 3scale CR, specify
spec.providerAccountRefand set it to the name of a local reference to an OpenShiftSecretthat identifies the tenant. In the following 3scaleDeveloperAccountCR example,mytenantis the secret:apiVersion: capabilities.3scale.net/v1beta1 kind: DeveloperAccount metadata: name: developeraccount-simple-sample spec: orgName: Ecorp providerAccountRef: name: mytenantIn the secret:
-
adminURLspecifies the URL for a 3scale instance that can be in any namespace. tokenspecifies credentials for access to one tenant in that 3scale instance. This tenant can be the default tenant or any other tenant in that instance.Typically, when you deploy a tenant custom resource you create this secret. For example:
apiVersion: v1
kind: Secret
metadata:
  name: mytenant
type: Opaque
stringData:
  adminURL: https://my3scale-admin.example.com:443
  token: "XXXXXXXXXXXXXXXXXXXXXXXXXXXXXXXXXXXXXXXXXXX"
-
If the 3scale operator cannot identify the tenant that a CR links to, the operator generates an error message.
8.6. Deploying 3scale OpenAPI custom resources
An OpenAPI custom resource (CR) is one way to import an OpenAPI Specification (OAS) document that you can use for ActiveDocs in the Developer Portal. The OAS is a standard that does not tie you to using one particular programming language for your APIs. Humans and computers can more easily understand the capabilities of the API product without source code access, documentation, or network traffic inspection.
Prerequisites
- A user account with administrator privileges for a 3scale 2.13 On-Premises instance.
- An OAS document that defines your API.
-
An understanding of how an
OpenAPICR links to a tenant.
8.6.1. Deploying a 3scale OpenAPI custom resource that imports an OAS document from a secret
Deploy an OpenAPI custom resource (CR) so that you can create 3scale backends and products.
The operator reads only the content in the secret. The operator does not read the field name in the secret.
Prerequisites
You understand How the 3scale operator identifies the tenant that a custom resource links to.
Procedure
Define a secret that contains an OAS document. For example, you might create the
myoasdoc1.yamlwith this content:openapi: "3.0.2" info: title: "some title" description: "some description" version: "1.0.0" paths: /pet: get: operationId: "getPet" responses: 405: description: "invalid input"Create the secret. For example:
$ oc create secret generic myoasdoc1 --from-file myoasdoc1.yaml

secret/myoasdoc1 created
Define your
OpenAPICR. Be sure to specify a reference to the secret that contains your OAS document. For example, you might create themyopenapicr1.yamlfile:apiVersion: capabilities.3scale.net/v1beta1 kind: OpenAPI metadata: name: myopenapicr1 spec: openapiRef: secretRef: name: myoasdoc1Create the resource you just defined. For example:
$ oc create -f myopenapicr1.yaml
For the given example, the output would be:
openapi.capabilities.3scale.net/myopenapicr1 created
8.6.2. Features of 3scale OpenAPI custom resource definitions
Knowledge of the OpenAPI custom resource definition (CRD) deployment features will help you with configuration of the 3scale product, backend, and the subsequent creation of ActiveDocs for the Developer Portal.
The OAS document can be read from the following:
- The Kubernetes secret
- The URL in both http and https formats
-
In an OAS document, the
info.titlesetting must not exceed 215 characters. The operator uses this setting to create OpenShift object names, which have length limitations. -
Only the first
servers[0].urlelement in a server list is parsed as a private URL. The OpenAPI Specification (OAS) uses itsbasePathcomponent ofservers[0].urlelement. -
The
OpenAPICRD supports a single top level security requirement, however it does not support operational level security. -
The
OpenAPICRD supports theapiKeysecurity scheme.
Additional resources
8.6.3. Import rules when defining OpenAPI custom resources
The import rules specify how the OpenAPI Specification (OAS) works with 3scale when you are setting up an OpenAPI document for your 3scale deployment.
Product name
The default product system name is taken from the info.title field in the OpenAPI document. To override the product name in an OpenAPI document, specify the spec.productSystemName field in an OpenAPI custom resource (CR).
Private base URL
The private base URL is read from the OpenAPI CR servers[0].url field. You can override this by using the spec.privateBaseURL field in your OpenAPI CR.
3scale methods
Each operation that is defined in the imported OpenAPI document translates to one 3scale method at the product level. The method name is read from the operationId field of the operation object.
3scale mapping rules
Each operation that is defined in the imported OpenAPI document translates to one 3scale mapping rule at the product level. Previously existing mapping rules are replaced by those imported with the OpenAPI CR.
In an OpenAPI document, the paths object provides mapping rules for verb and pattern properties. 3scale methods are associated accordingly to the operationId.
The delta value is hard-coded to 1.
By default, Strict matching policy is configured. Matching policy can be switched to Prefix matching using the spec.PrefixMatching field of the OpenAPI CRD.
Authentication
Just one top level security requirement is supported. Operation level security requirements are not supported.
The supported security scheme is apiKey.
The apiKey security scheme type:
-
credentials location will be read from the OpenAPI document
infield of the security scheme object. -
Auth user key will be read from the OpenAPI document
namefield of the security scheme object.
The following is a partial example of OAS 3.0.2 with apiKey security requirement:
openapi: "3.0.2"
security:
  - petstore_api_key: []
components:
  securitySchemes:
    petstore_api_key:
      type: apiKey
      name: api_key
      in: header
When the OpenAPI document does not specify any security requirements, the following applies:
-
The product authentication will be configured for
apiKey. -
credentials location will default to 3scale value
As query parameters (GET) or body parameters (POST/PUT/DELETE). -
The Auth user key defaults to 3scale value
user_key.
3scale Authentication Security can be set using the spec.privateAPIHostHeader and the spec.privateAPISecretToken fields of the OpenAPI CRD.
ActiveDocs
No 3scale ActiveDoc is created.
3scale product policy chain
The 3scale policy chain is the default one 3scale creates.
3scale deployment mode
By default, the configured 3scale deployment mode will be APIcast 3scale managed. However, when the spec.productionPublicBaseURL or the spec.stagingPublicBaseURL, or both fields are present in an OpenAPI CR, the product’s deployment mode is APIcast self-managed.
Example of a OpenAPI CR with custom public base URL:
apiVersion: capabilities.3scale.net/v1beta1
kind: OpenAPI
metadata:
  name: openapi1
spec:
  openapiRef:
    url: "https://raw.githubusercontent.com/OAI/OpenAPI-Specification/master/examples/v3.0/petstore.yaml"
  productionPublicBaseURL: "https://production.my-gateway.example.com"
  stagingPublicBaseURL: "https://staging.my-gateway.example.com"
8.6.4. Deploying a 3scale OpenAPI custom resource that imports an OAS document from a URL
You can deploy an OpenAPI custom resource that imports an OAS document from a URL that you specify. You can then use this OAS document as the foundation for ActiveDocs for your API in the Developer Portal.
Prerequisites
If you are creating an
OpenAPIcustom resource that does not link to the default tenant in the 3scale instance that is in the same namespace then the namespace that will contain theOpenAPICR contains a secret that identifies the tenant that theOpenAPICR links to. The name of the secret is one of the following:-
threescale-provider-account - User defined
This secret contains the URL for a 3scale instance and a token that contains credentials for access to one tenant in that 3scale instance.
-
Procedure
- In your OpenShift account, navigate to Operators > Installed operators.
- Click the 3scale operator.
- Choose the YAML tab.
Create an
OpenAPIcustom resource. For example:apiVersion: capabilities.3scale.net/v1beta1 kind: OpenAPI metadata: name: openapi1 spec: openapiRef: url: "https://raw.githubusercontent.com/OAI/OpenAPI-Specification/master/examples/v3.0/petstore.yaml" providerAccountRef: name: mytenant-
Click Save. It takes a few seconds for the 3scale operator to create the
OpenAPICR.
Verification
-
In OpenShift, in the 3scale Product Overview page, confirm that the Synced condition is marked as
True. - Go to your 3scale account.
-
Confirm that the OAS document is present. For the example above, you would see a new OAS document named
openapi1.
8.6.5. Additional resources
8.7. Deploying 3scale ActiveDoc custom resources
Red Hat 3scale API Management ActiveDocs are based on API definition documents that define RESTful web services that conform to the OpenAPI Specification. An ActiveDoc custom resource (CR) is one way to import an OpenAPI Specification (OAS) document that you can use for ActiveDocs in the Developer Portal. The OAS is a standard that does not tie you to using one particular programming language for your APIs. Humans and computers can more easily understand the capabilities of the API product without source code access, documentation, or network traffic inspection.
Prerequisites
- A user account with administrator privileges for a 3scale 2.13 On-Premises instance.
- An OAS document that defines your API.
-
An understanding of how an
ActiveDocCR links to a tenant.
8.7.1. Deploying a 3scale ActiveDoc custom resource that imports an OAS document from a secret
Deploy an ActiveDoc custom resource (CR) so that you can create 3scale backends and products.
The operator reads only the content in the secret. The operator does not read the field name in the secret. For example, data is structured in key: value pairs where value represents the content of a file and key is the file name. The file name is ignored by the operator in this context of ActiveDoc CRD. The operator reads only the content of the file.
Prerequisites
- You understand How the 3scale operator identifies the tenant that a custom resource links to.
Define a secret that contains an OAS (OpenAPI Specification) document. For example, you might create the
myoasdoc1.yamlwith this content:openapi: "3.0.2" info: title: "some title" description: "some description" version: "1.0.0" paths: /pet: get: operationId: "getPet" responses: 405: description: "invalid input"
Procedure
Create the secret. For example:
$ oc create secret generic myoasdoc1 --from-file myoasdoc1.yaml

secret/myoasdoc1 created
Define your
ActiveDocCR. Be sure to specify a reference to the secret that contains your OAS document. For example, you might create themyactivedoccr1.yamlfile:apiVersion: capabilities.3scale.net/v1beta1 kind: ActiveDoc metadata: name: myactivedoccr1 spec: name: "Operated ActiveDoc From secret" activeDocOpenAPIRef: secretRef: name: myoasdoc1Create the resource you just defined. For example:
$ oc create -f myactivedoccr1.yaml
For the given example, the output would be:
activedoc.capabilities.3scale.net/myactivedoccr1 created
Verification
- Log in to your Red Hat OpenShift Container Platform (OCP) administrator account.
- Navigate to Operators > Installed Operators.
- Click Red Hat Integration - 3scale.
- Click the Active Doc tab.
-
Confirm that the OAS document is present. For the example above, you would see a new OAS document named
myactivedoccr1.
8.7.2. Features of 3scale ActiveDoc custom resource definitions
The ActiveDoc custom resource definition (CRD) concerns product documentation in the OpenAPI document format for developers. Knowledge of the ActiveDoc CRD deployment features help you with the creation of ActiveDocs for the Developer Portal.
An
ActiveDocCR, can read and OpenAPI document from either of the following:- Secret
-
A URL in either
httporhttpsformat
-
Optionally, you can link the
ActiveDocCR with a 3scale product using theproductSystemNamefield. The value must be thesystem_nameof the 3scale product’s CR. -
You can publish or hide the
ActiveDocdocument in 3scale using thepublishedfield. By default, this is set to behidden. -
You can skip OpenAPI 3.0 validation using the
skipSwaggerValidationsfield. By default, theActiveDocCR is validated.
Additional resources
8.7.3. Deploying a 3scale ActiveDoc custom resource that imports an OAS document from a URL
You can deploy an ActiveDoc custom resource (CR) that imports an OAS (OpenAPI Specification) document from a URL that you specify. You can then use this OAS document as the foundation for ActiveDocs for your API in the Developer Portal.
Prerequisites
Procedure
- In your OpenShift account, navigate to Operators > Installed operators.
- Click the 3scale operator.
- Click the Active Doc tab.
Create an
ActiveDocCR. For example:apiVersion: capabilities.3scale.net/v1beta1 kind: ActiveDoc metadata: name: myactivedoccr1 spec: openapiRef: url: "https://raw.githubusercontent.com/OAI/OpenAPI-Specification/master/examples/v3.0/petstore.yaml" providerAccountRef: name: mytenantOptional. For self-managed APIcast, in the
ActiveDocCR, set theproductionPublicBaseURLandstagingPublicBaseURLfields to the URLs for your deployment. For example:apiVersion: capabilities.3scale.net/v1beta1 kind: ActiveDoc metadata: name: myactivedoccr1 spec: openapiRef: url: "https://raw.githubusercontent.com/OAI/OpenAPI-Specification/master/examples/v3.0/petstore.yaml" productionPublicBaseURL: "https://production.my-gateway.example.com" stagingPublicBaseURL: "https://staging.my-gateway.example.com"-
Click Save. It takes a few seconds for the 3scale operator to create the
ActiveDocCR.
Verification
- Log in to your Red Hat OpenShift Container Platform (OCP) administrator account.
- Navigate to Operators > Installed Operators.
- Click Red Hat Integration 3scale.
- Click the Active Doc tab.
-
Confirm that the OAS document is present. For the example above, you would see a new OAS document named
myactivedoccr1.
8.7.4. Additional resources
8.10. Deploying 3scale CustomPolicyDefinition custom resources
You can use a CustomPolicyDefinition CRD to configure your custom policy in a 3scale product from the Admin Portal.
When the 3scale operator finds a new CustomPolicyDefinition CR, the operator identifies the tenant that owns the CR as described in How the 3scale operator identifies the tenant that a custom resource links to.
Prerequisites
- The 3scale operator is installed.
- You have a custom policy file ready to be deployed.
- You have already injected the custom policy in the gateway.
Procedure
Define a
CustomPolicyDefinitioncustom resource and save it in, for example, themy-apicast-custom-policy-definition.yamlfile:apiVersion: capabilities.3scale.net/v1beta1 kind: CustomPolicyDefinition metadata: name: custompolicydefinition-sample spec: version: "0.1" name: "APIcast Example Policy" schema: name: "APIcast Example Policy" version: "0.1" $schema: "http://apicast.io/policy-v1/schema#manifest#" summary: "This is just an example." configuration: type: object properties: {}Deploy the
CustomPolicyDefinitionCR:oc create -f my-apicast-custom-policy-definition.yaml
Additional resources
8.11. Deploying a tenant custom resource
A Tenant custom resource is also known as the Provider Account.
When you deploy an APIManager custom resource (CR) you are using the 3scale operator to deploy 3scale. A default 3scale installation includes a default tenant ready to be used. Optionally, you can create other tenants by deploying Tenant custom resources.
Prerequisites
- General prerequisites
-
An OpenShift role that has
createpermission in the newTenantCR’s namespace.
Procedure
Navigate to the OpenShift project in which 3scale is installed. For example, if the name of the project is
my-3scale-project, run the following command:oc project my-3scale-project
Create a secret that contains the password for the 3scale admin account for the new tenant. In the definition of the
TenantCR, set thepasswordCredentialsRefattribute to the name of this secret. In the example of aTenantCR definition in step 4,ADMIN_SECRETis the placeholder for this secret. The following command provides an example of creating the secret:oc create secret generic ecorp-admin-secret --from-literal=admin_password=<admin password value>
Obtain the 3scale master account hostname. When you deploy 3scale by using the operator, the master account has a fixed URL with this pattern:
master.${wildcardDomain}If you have access to the namespace where 3scale is installed, you can obtain the master account hostname with this command:
oc get routes --field-selector=spec.to.name==system-master -o jsonpath="{.items[].spec.host}"In the example of a
TenantCR definition in step 4,MASTER_HOSTNAMEis the placeholder for this name.Create a file that defines the new
Tenantcustom resource.In the definition of the
TenantCR, set themasterCredentialsRef.nameattribute tosystem-seed. You can perform tenant management tasks only by using the 3scale master account credentials, preferably an access token. During deployment of anAPIManagerCR, the operator creates the secret that contains master account credentials. The name of the secret issystem-seed.If 3scale is installed in cluster wide mode, you can deploy the new tenant in a namespace that is different from the namespace that contains 3scale. To do this, set
masterCredentialsRef.namespaceto the namespace that contains the 3scale installation.The following example assumes that 3scale is installed in cluster wide mode.
apiVersion: capabilities.3scale.net/v1alpha1
kind: Tenant
metadata:
  name: ecorp-tenant
  namespace: <namespace-in-which-to-create-Tenant-CR>
spec:
  username: admin
  systemMasterUrl: https://<MASTER_HOSTNAME>
  email: admin@ecorp.com
  organizationName: ECorp
  masterCredentialsRef:
    name: system-seed
    namespace: <namespace-where-3scale-is-deployed>
  passwordCredentialsRef:
    name: <ADMIN_SECRET>
  tenantSecretRef:
    name: tenant-secret
Create the
Tenantcustom resource. For example, if you saved the previous example CR in themytenant.yamlfile, you would run:oc create -f mytenant.yaml
As a result of this command:
-
The operator deploys a tenant in the 3scale installation pointed to by the setting of the
spec.systemMasterUrlattribute. The 3scale operator creates a secret that contains credentials for the new tenant. The name of the secret is the value you specified for the
tenantSecretRef.nameattribute. This secret contains the new tenant`s admin URL and access token.As a reference, this is an example of the secret that the operator creates:
apiVersion: v1
kind: Secret
metadata:
  name: tenant-secret
type: Opaque
stringData:
  adminURL: https://my3scale-admin.example.com:443
  token: "XXXXXXXXXXXXXXXXXXXXXXXXXXXXXXXXXXXXXXXXXXX"
-
You can now deploy
Product,Backend,OpenAPI,DeveloperAccount, andDeveloperUserCRs that link to your new tenant.
-
The operator deploys a tenant in the 3scale installation pointed to by the setting of the
Deleting a Tenant custom resource
To delete a deployed Tenant custom resource, you can specify the name of the file that contains the resource definition, for example:
oc delete -f mytenant.yaml
Alternatively, you can run the oc delete command, specify the name in the Tenant CR and also specify the tenant’s namespace. For example:
oc delete tenant.capabilities.3scale.net mytenant -n mynamespace
When you delete a tenant, the 3scale operator does the following:
- Hides the tenant from the 3scale installation.
- Deletes the deployed custom resources that the tenant owns.
- Marks the tenant to be deleted after 15 days.
After you delete a tenant, you cannot recover it. You have 15 days to back up any resources that the tenant owned and you can do this only in the Admin Portal. After 15 days, 3scale deletes the tenant. To comply with data protection laws, some data is kept for future reference.
Do not delete a tenant in the Admin Portal if you deployed that tenant with a Tenant CR. If you do, the operator creates another tenant by using the CR for the tenant that you tried to delete.
Additional resources
8.12. Managing 3scale developers by deploying custom resources
As a 3scale administrator, you can use custom resources (CRs) to deploy developer accounts that group together individual developer users. These accounts let you organize and manage developer access to 3scale-managed APIs in the Developer Portal.
A tenant can contain any number of developer accounts and each developer account links to exactly one tenant. A developer account can contain any number of developer users and each developer user links to exactly one developer account. The tenant plan determines any limits on how many developer accounts you can create and how many developer users can be grouped in each developer account.
To use developer custom resources, 3scale must have been installed by the 3scale operator. You can deploy developer custom resources in only the namespace that contains the 3scale operator. Deployment of developer custom resources is an alternative to managing developers by using the 3scale Admin Portal or the 3scale internal API.
When you create developer accounts or developer users by deploying custom resources you cannot use the Admin Portal or the internal 3scale API to update those developer accounts or developer users. It is important to be aware of this because after you deploy a developer CR, the Admin Portal displays the new developer account or new developer user in its Accounts page. If you try to use the Admin Portal or API to update a developer account or developer user that was deployed with a CR, the 3scale operator reverts the changes to reflect the deployed CR. This is a limitation that is expected to be removed in a future release. You can, however, use the Admin Portal or API to delete a developer account or developer user that you created by deploying a CR.
8.12.1. Prerequisites
- 3scale was installed by the 3scale operator.
-
Access token with read and write permissions in the
Account ManagementAPI scope, which provides administrator privileges for 3scale.
8.12.2. Managing 3scale developer accounts by deploying DeveloperAccount custom resources
When you use the 3scale operator to install 3scale you can deploy DeveloperAccount and DeveloperUser custom resources (CRs). These CRs let you create and update accounts for developer access to 3scale-managed APIs in the Developer Portal.
To deploy a new DeveloperAccount CR, you must also deploy a DeveloperUser CR for a user who has the admin role. The procedure provided here is for deploying a new DeveloperAccount CR. After you deploy a DeveloperAccount CR, the procedure for updating or deleting it is the same as for any other CR.
You can deploy CRs only in the namespace that contains the 3scale operator.
Prerequisites
- An understanding of how the 3scale operator identifies the tenant that a custom resource links to.
If you are creating a
DeveloperAccountcustom resource that does not link to the default tenant in the 3scale instance that is in the same namespace then the namespace that will contain theDeveloperAccountCR contains a secret that identifies the tenant that theDeveloperAccountCR links to. The name of the secret is one of the following:-
threescale-provider-account - User defined
This secret contains the URL for a 3scale instance and a token that contains credentials for access to one tenant in that 3scale instance.
-
-
You have the user name, password, and email address for at least one developer user who will have the
adminrole in the newDeveloperAccountCR.
Procedure
In the namespace that contains the 3scale operator, create and save a resource file that defines a secret that contains the user name and password for a developer user who will have the
adminrole in the new developer account resource. For example, themyusername01.yamlfile might contain:apiVersion: v1 kind: Secret metadata: name: myusername01 stringData: password: "123456"
Create the secret. For example:
oc create -f myusername01.yaml
For the given example, the output would be:
secret/myusername01 created
Create and save a
.yamlfile that defines aDeveloperUserCR for a developer who has theadminrole. ThisDeveloperUserCR is required for the 3scale operator to deploy a newDeveloperAccountCR. For example, thedeveloperuser01.yamlfile might contain:apiVersion: capabilities.3scale.net/v1beta1 kind: DeveloperUser metadata: name: developeruser01 spec: username: myusername01 email: myusername01@example.com passwordCredentialsRef: name: myusername01 role: admin developerAccountRef: name: developeraccount1 providerAccountRef: name: mytenantIn a
DeveloperUserCR:-
The developer user account name, user name, and email must be unique in the tenant that the containing
DeveloperAccountlinks to. -
The developer account name that you specify here must match the name of the
DeveloperAccountCR that you are deploying in this procedure. It does not matter whether you create theDeveloperAccountCR before or after you create thisDeveloperUserCR. -
The tenant that a
DeveloperUserCR links to must be the same tenant that the specifiedDeveloperAccountCR links to.
-
The developer user account name, user name, and email must be unique in the tenant that the containing
Create the resource you just defined. For example:
oc create -f developeruser01.yaml
For the given example, the output would be:
developeruser.capabilities.3scale.net/developeruser01 created
Create and save a
.yamlfile that defines aDeveloperAccountCR. In this.yamlfile, thespec.OrgNamefield must specify an organization name. For example, thedeveloperaccount01.yamlfile might contain:apiVersion: capabilities.3scale.net/v1beta1 kind: DeveloperAccount metadata: name: developeraccount01 spec: orgName: Ecorp providerAccountRef: name: mytenantCreate the resource you just defined. For example:
oc create -f developeraccount01.yaml
For the given example, the output would be:
developeraccount.capabilities.3scale.net/developeraccount01 created
Next steps
It takes a few seconds for the 3scale operator to update the 3scale configuration to reflect new or updated custom resources. To check whether the operator is propagating custom resource information successfully, check the DeveloperAccount custom resource status field or run the oc wait command, for example:
oc wait --for=condition=Ready --timeout=30s developeraccount/developeraccount1
In case of failure, the custom resource’s status field indicates if the error is transient or permanent, and provides an error message that helps fix the problem.
Notify any new developer users that they can log in to the Developer Portal. You might also need to communicate their log-in credentials.
You can update a deployed DeveloperAccount custom resource in the same way that you update any other custom resource. For example, in the OpenShift project that contains the tenant that owns the DeveloperAccount CR that you want to update, you would run the following command to update the devaccount1 CR:
oc edit developeraccount devaccount1
8.12.3. Managing 3scale developer users by deploying DeveloperUser custom resources
When you use the 3scale operator to install 3scale you can deploy DeveloperUser custom resources (CRs) for managing developer access to 3scale-managed APIs in the Developer Portal. The procedure provided here is for deploying a new DeveloperUser CR. After you deploy a DeveloperUser CR, the procedure for updating or deleting it is the same as for any other CR.
You can deploy CRs only in the namespace that contains the 3scale operator.
Prerequisites
- An understanding of how the 3scale operator identifies the tenant that a custom resource links to.
There is at least one deployed
DeveloperAccountcustom resource that contains at least one deployedDeveloperUserCR for a user who has theadminrole. If you are creating aDeveloperUsercustom resource that does not link to the default tenant in the 3scale instance that is in the same namespace then the namespace that will contain theDeveloperUserCR contains a secret that identifies the tenant that theDeveloperUserCR links to. The name of the secret is one of the following:-
threescale-provider-account - User defined
This secret contains the URL for a 3scale instance and a token that contains credentials for access to one tenant in that 3scale instance.
-
-
For a new
DeveloperUsercustom resource, you have that developer’s user name, password, and email address.
Procedure
In the namespace that contains the 3scale operator, create and save a resource file that defines a secret that contains the user name and password for a developer user. For example, the
myusername02.yamlfile might contain:apiVersion: v1 kind: Secret metadata: name: myusername02 stringData: password: "987654321"
Create the secret. For example:
oc create -f myusername02.yaml
For the given example, the output would be:
secret/myusername02 created
Create and save a
.yamlfile that defines aDeveloperUserCR. In thespec.rolefield, specifyadminormember. For example, thedeveloperuser02.yamlfile might contain:apiVersion: capabilities.3scale.net/v1beta1 kind: DeveloperUser metadata: name: developeruser02 spec: username: myusername02 email: myusername02@example.com passwordCredentialsRef: name: myusername02 role: member developerAccountRef: name: developeraccount1 providerAccountRef: name: mytenantIn a
DeveloperUserCR:-
The developer user name (specified in the
metadata.namefield), the user name, and email must be unique in the tenant that the containingDeveloperAccountlinks to. -
The
developerAccountReffield must specify the name of a deployedDeveloperAccountCR. -
The tenant that a
DeveloperUserCR links to must be the same tenant that the specifiedDeveloperAccountCR links to.
-
The developer user name (specified in the
Create the resource you just defined. For example:
oc create -f developefuser02.yaml
For the given example, the output would be:
developeruser.capabilities.3scale.net/developeruser02 created
Next steps
It takes a few seconds for the 3scale operator to update the 3scale configuration to reflect new or updated custom resources. To check whether the operator is propagating custom resource information successfully, check the DeveloperUser custom resource status field or run the oc wait command, for example:
oc wait --for=condition=Ready --timeout=30s developeruser/developeruser02
In case of failure, the custom resource’s status field indicates if the error is transient or permanent, and provides an error message that helps fix the problem.
Notify any new developer users that they can log in to the Developer Portal. You might also need to communicate their log-in credentials.
You can update a deployed DeveloperUser custom resource in the same way that you update any other custom resource.
Additional resources
8.12.4. Deleting DeveloperAccount or DeveloperUser custom resources
You can delete a 3scale developer entity by deleting the custom resource that manages it. When you delete a DeveloperAccount custom resource the 3scale operator also deletes any DeveloperUser CRs that link to the deleted DeveloperAccount CR.
The only way to delete a developer account or developer user defined by a custom resource is to follow the procedure described here. Do not use the Admin Portal nor the 3scale API to delete a developer entity that was deployed as a custom resource.
Prerequisites
3scale administrator permissions or an OpenShift role that has delete permissions in the namespace that contains the custom resource you want to delete. To confirm that you can delete a particular custom resource, run the
oc auth can-i deletecommand. For example, if the name in theDeveloperAccountCR isdevaccount1, run this command:oc auth can-i delete developeraccount.capabilities.3scale.net/devaccount1 -n my-namespace
-
The
DeveloperAccountorDeveloperUserCR to be deleted links to a valid tenant.
Procedure
In the OpenShift project that contains the tenant that the CR links to, run the
oc deletecommand to delete aDeveloperAccountorDeveloperUsercustom resource. For example, if you deployed aDeveloperAccountCR that was defined in thedevaccount1.yamlfile, you would run the following command:oc delete -f devaccount1.yaml
Alternatively, you can run the
oc deletecommand and specify the name of the CR as specified in its definition. For example:oc delete developeraccount.capabilities.3scale.net/devaccount1
8.13. Limitations of 3scale operator capabilities
In Red Hat 3scale API Management 2.13, 3scale operator contains these limitations with capabilities:
- Deletion of a backend custom resource definition (CRD) is not reconciled: existing backends in 3scale will not be deleted.
- Deletion of a product CRD is not reconciled: existing products in 3scale will not be deleted.
- Deletion of DeveloperAccount or DeveloperUser custom resources is not reconciled. While the operator receives the deletion event, the operator does not act on the event. The developer account or developer user remains. If you try to create a new developer account or developer user with the same account name, username or email address as a custom resource that you deleted, you receive an error that the account already exists. You must specify different parameters to create the account.
- Single Sign-On (SSO) authentication for the Admin Portal.
- SSO authentication for the Developer Portal.
- ActiveDocs CRD not currently available.
- Gateway Policy CRD not currently available.
- Product CRD Gateway does not support response custom code and errors
- 3scale operator CRD holding OAS3 does not reference as source of truth for 3scale product configuration.
8.14. Additional resources
For more information, check the following guides:
Chapter 9. 3scale backup and restore
This section provides you, as the administrator of a Red Hat 3scale API Management installation, the information needed to:
- Set up the backup procedures for persistent data.
- Perform a restore from backup of the persistent data.
In case of issues with one or more of the MySQL databases, you will be able to restore 3scale correctly to its previous operational state.
9.1. Prerequisites
- A 3scale 2.13 instance. For more information about how to install 3scale, see Installing 3scale on OpenShift.
An OpenShift Container Platform 4.x user account with one of the following roles in the OpenShift cluster:
- cluster-admin
- admin
- edit
A user with an edit cluster role locally binded in the namespace of a 3scale installation can perform backup and restore procedures.
The following contains information about how to set up the backup procedures for persistent data, perform a restore from backup of the persistent data. In case of a failure with one or more of the MySQL databases, I will then be able to restore 3scale correctly to its previous operational state.
9.2. Persistent volumes and considerations
Persistent volumes
- A persistent volume (PV) provided to the cluster by the underlying infrastructure.
- Storage service external to the cluster. This can be in the same data center or elsewhere.
Considerations
The backup and restore procedures for persistent data vary depending on the storage type in use. To ensure the backups and restores preserve data consistency, it is not sufficient to backup the underlying PVs for a database. For example, do not capture only partial writes and partial transactions. Use the database’s backup mechanisms instead.
Some parts of the data are synchronized between different components. One copy is considered the source of truth for the data set. The other is a copy that is not modified locally, but synchronized from the source of truth. In these cases, upon completion, the source of truth should be restored, and copies in other components synchronized from it.
9.3. Using data sets
This section explains in more detail about different data sets in the different persistent stores, their purpose, the storage type used, and whether or not it is the source of truth.
The full state of a 3scale deployment is stored across the following DeploymentConfig objects and their PVs:
| Name | Description |
|---|---|
|
MySQL database ( | |
| Volume for Files | |
|
Redis database ( | |
|
Redis database ( |
9.3.1. Defining system-mysql
system-mysql is a relational database which stores information about users, accounts, APIs, plans, and more, in the 3scale Admin Console.
A subset of this information related to services is synchronized to the Backend component and stored in backend-redis. system-mysql is the source of truth for this information.
9.3.2. Defining system-storage
system-storage stores files to be read and written by the System component.
They fall into two categories:
-
Configuration files read by the
Systemcomponent at run-time - Static files, for example, HTML, CSS, JS, uploaded to system by its CMS feature, for the purpose of creating a Developer Portal
System can be scaled horizontally with multiple pods uploading and reading said static files, hence the need for a ReadWriteMany (RWX) PersistentVolume.
9.3.3. Defining backend-redis
backend-redis contains multiple data sets used by the Backend component:
-
Usages: This is API usage information aggregated by
Backend. It is used byBackendfor rate-limiting decisions and bySystemto display analytics information in the UI or via API. -
Config: This is configuration information about services, rate-limits, and more, that is synchronized from
Systemvia an internal API. This is not the source of truth of this information, howeverSystemandsystem-mysqlis. - Queues: This is queues of background jobs to be executed by worker processes. These are ephemeral and are deleted once processed.
9.3.4. Defining system-redis
system-redis contains queues for jobs to be processed in background. These are ephemeral and are deleted once processed.
9.4. Backing up system databases
The following commands are in no specific order and can be used as you need them to back up and archive system databases.
9.4.1. Backing up system-mysql
Execute MySQL Backup Command:
oc rsh $(oc get pods -l 'deploymentConfig=system-mysql' -o json | jq -r '.items[0].metadata.name') bash -c 'export MYSQL_PWD=${MYSQL_ROOT_PASSWORD}; mysqldump --single-transaction -hsystem-mysql -uroot system' | gzip > system-mysql-backup.gz9.4.2. Backing up system-storage
Archive the system-storage files to another storage:
oc rsync $(oc get pods -l 'deploymentConfig=system-app' -o json | jq '.items[0].metadata.name' -r):/opt/system/public/system ./local/dir
9.4.3. Backing up backend-redis
Backup the dump.rdb file from redis:
oc cp $(oc get pods -l 'deploymentConfig=backend-redis' -o json | jq '.items[0].metadata.name' -r):/var/lib/redis/data/dump.rdb ./backend-redis-dump.rdb
9.4.4. Backing up system-redis
Backup the dump.rdb file from redis:
oc cp $(oc get pods -l 'deploymentConfig=system-redis' -o json | jq '.items[0].metadata.name' -r):/var/lib/redis/data/dump.rdb ./system-redis-dump.rdb
9.4.5. Backing up zync-database
Backup the zync_production database:
oc rsh $(oc get pods -l 'deploymentConfig=zync-database' -o json | jq -r '.items[0].metadata.name') bash -c 'pg_dump zync_production' | gzip > zync-database-backup.gz
9.4.6. Backing up OpenShift secrets and ConfigMaps
The following is the list of commands for OpenShift secrets and ConfigMaps:
9.4.6.1. OpenShift secrets
oc get secrets system-smtp -o json > system-smtp.json
oc get secrets system-seed -o json > system-seed.json
oc get secrets system-database -o json > system-database.json
oc get secrets backend-internal-api -o json > backend-internal-api.json
oc get secrets system-events-hook -o json > system-events-hook.json
oc get secrets system-app -o json > system-app.json
oc get secrets system-recaptcha -o json > system-recaptcha.json
oc get secrets system-redis -o json > system-redis.json
oc get secrets zync -o json > zync.json
oc get secrets system-master-apicast -o json > system-master-apicast.json
9.4.6.2. ConfigMaps
oc get configmaps system-environment -o json > system-environment.json
oc get configmaps apicast-environment -o json > apicast-environment.json
9.5. Restoring system databases
Prevent record creation by scaling down pods like system-app or disabling routes.
In the commands and snippets examples that follow, replace ${DEPLOYMENT_NAME} with the name you defined when you created your 3scale deployment.
Ensure the output includes at least a pair of braces {} and is not empty.
Procedure
Store current number of replicas to scale up later:
SYSTEM_SPEC=`oc get APIManager/${DEPLOYMENT_NAME} -o jsonpath='{.spec.system.appSpec}'`Verify the result of the previous command and check the content of
$SYSTEM_SPEC:echo $SYSTEM_SPEC
Patch the APIManager CR using the following command that scales the number of replicas to
0:$ oc patch APIManager/${DEPLOYMENT_NAME} --type merge -p '{"spec": {"system": {"appSpec": {"replicas": 0}}}}'Alternatively, to scale down
system-app, edit the existingAPIManager/${DEPLOMENT_NAME}and set the number of system replicas to zero as shown in the following example:apiVersion: apps.3scale.net/v1alpha1 kind: APIManager metadata: name: <DEPLOYMENT_NAME> spec: system: appSpec: replicas: 0
Use the following procedures to restore OpenShift secrets and system databases:
9.5.1. Restoring an operator-based deployment
Use the following steps to restore operator-based deployments.
Procedure
- Install the 3scale operator on OpenShift.
Restore secrets before creating an APIManager resource:
$ oc apply -f system-smtp.json
$ oc apply -f system-seed.json
$ oc apply -f system-database.json
$ oc apply -f backend-internal-api.json
$ oc apply -f system-events-hook.json
$ oc apply -f system-app.json
$ oc apply -f system-recaptcha.json
$ oc apply -f system-redis.json
$ oc apply -f zync.json
$ oc apply -f system-master-apicast.json
Restore ConfigMaps before creating an APIManager resource:
$ oc apply -f system-environment.json
$ oc apply -f apicast-environment.json
- Deploy 3scale with the operator using the APIManager CR.
9.5.2. Restoring system-mysql
Procedure
Copy the MySQL dump to the system-mysql pod:
$ oc cp ./system-mysql-backup.gz $(oc get pods -l 'deploymentConfig=system-mysql' -o json | jq '.items[0].metadata.name' -r):/var/lib/mysql
Decompress the backup file:
$ oc rsh $(oc get pods -l 'deploymentConfig=system-mysql' -o json | jq -r '.items[0].metadata.name') bash -c 'gzip -d ${HOME}/system-mysql-backup.gz'Restore the MySQL DB Backup file:
$ oc rsh $(oc get pods -l 'deploymentConfig=system-mysql' -o json | jq -r '.items[0].metadata.name') bash -c 'export MYSQL_PWD=${MYSQL_ROOT_PASSWORD}; mysql -hsystem-mysql -uroot system < ${HOME}/system-mysql-backup'
9.5.3. Restoring system-storage
Restore the Backup file to system-storage:
$ oc rsync ./local/dir/system/ $(oc get pods -l 'deploymentConfig=system-app' -o json | jq '.items[0].metadata.name' -r):/opt/system/public/system
9.5.4. Restoring zync-database
Instructions to restore zync-database for a 3scale operator deployment.
9.5.4.1. Operator-based deployments
Follow the instructions under Deploying 3scale using the operator, in particular Deploying the APIManager CR to redeploy your 3scale instance.
Procedure
Store the number of replicas, by replacing
${DEPLOYMENT_NAME}with the name you defined when you created your 3scale deployment:ZYNC_SPEC=`oc get APIManager/${DEPLOYMENT_NAME} -o json | jq -r '.spec.zync'`Scale down the zync DeploymentConfig to 0 pods:
$ oc patch APIManager/${DEPLOYMENT_NAME} --type merge -p '{"spec": {"zync": {"appSpec": {"replicas": 0}, "queSpec": {"replicas": 0}}}}'Copy the zync database dump to the
zync-databasepod:$ oc cp ./zync-database-backup.gz $(oc get pods -l 'deploymentConfig=zync-database' -o json | jq '.items[0].metadata.name' -r):/var/lib/pgsql/
Decompress the backup file:
$ oc rsh $(oc get pods -l 'deploymentConfig=zync-database' -o json | jq -r '.items[0].metadata.name') bash -c 'gzip -d ${HOME}/zync-database-backup.gz'Restore zync database backup file:
$ oc rsh $(oc get pods -l 'deploymentConfig=zync-database' -o json | jq -r '.items[0].metadata.name') bash -c 'psql zync_production -f ${HOME}/zync-database-backup'Restore to the original count of replicas:
$ oc patch APIManager/${DEPLOYMENT_NAME} --type json -p '[{"op": "replace", "path": "/spec/zync", "value":'"$ZYNC_SPEC"'}]'If the output of following command does not contain the
replicaskey:$ echo $ZYNC_SPEC
Then, run the following additional command to scale up
zync:$ oc patch dc/zync -p '{"spec": {"replicas": 1}}'
9.5.4.2. Restoring 3scale options with backend-redis and system-redis
By restoring 3scale, you will restore backend-redis and system-redis. These components have the following functions:
*backend-redis: The database that supports application authentication and rate limiting in 3scale. It is also used for statistics storage and temporary job storage. *system-redis: Provides temporary storage for background jobs for 3scale and is also used as a message bus for Ruby processes of system-app pods.
The backend-redis component
The backend-redis component has two databases, data and queues. In default 3scale deployment, data and queues are deployed in the Redis database, but in different logical database indexes /0 and /1. Restoring data database runs without any issues, however restoring queues database can lead to duplicated jobs.
Regarding duplication of jobs, in 3scale the backend workers process background jobs in a matter of milliseconds. If backend-redis fails 30 seconds after the last database snapshot and you try to restore it, the background jobs that happened during those 30 seconds are performed twice because backend does not have a system in place to avoid duplication.
In this scenario, you must restore the backup as the /0 database index contains data that is not saved anywhere else. Restoring /0 database index means that you must also restore the /1 database index since one cannot be stored without the other. When you choose to separate databases on different servers and not one database in different indexes, the size of the queue will be approximately zero, so it is preferable not to restore backups and lose a few background jobs. This will be the case in a 3scale Hosted setup you will need to therefore apply different backup and restore strategies for both.
The `system-redis`component
The majority of the 3scale system background jobs are idempotent, that is, identical requests return an identical result no matter how many times you run them.
The following is a list of examples of events handled by background jobs in system:
- Notification jobs such as plan trials about to expire, credit cards about to expire, activation reminders, plan changes, invoice state changes, PDF reports.
- Billing such as invoicing and charging.
- Deletion of complex objects.
- Backend synchronization jobs.
- Indexation jobs, for example with sphinx.
- Sanitisation jobs, for example invoice IDs.
- Janitorial tasks such as purging audits, user sessions, expired tokens, log entries, suspending inactive accounts.
- Traffic updates.
- Proxy configuration change monitoring and proxy deployments.
- Background signup jobs,
- Zync jobs such as Single sign-on (SSO) synchronization, routes creation.
If you are restoring the above list of background jobs, 3scale’s system maintains the state of each restored job. It is important to check the integrity of the system after the restoration is complete.
9.5.5. Ensuring information consistency between backend and system
After restoring backend-redis a sync of the Config information from system should be forced to ensure the information in backend is consistent with that in system, which is the source of truth.
9.5.5.1. Managing the deployment configuration for backend-redis
These steps are intended for running instances of backend-redis.
Procedure
Edit the
redis-configconfigmap:$ oc edit configmap redis-config
Comment
SAVEcommands in theredis-configconfigmap:#save 900 1 #save 300 10 #save 60 10000
Set
appendonlyto no in theredis-configconfigmap:appendonly no
Redeploy
backend-redisto load the new configurations:$ oc rollout latest dc/backend-redis
Check the status of the rollout to ensure it has finished:
$ oc rollout status dc/backend-redis
Rename the
dump.rdbfile:$ oc rsh $(oc get pods -l 'deploymentConfig=backend-redis' -o json | jq '.items[0].metadata.name' -r) bash -c 'mv ${HOME}/data/dump.rdb ${HOME}/data/dump.rdb-old'Rename the
appendonly.aoffile:$ oc rsh $(oc get pods -l 'deploymentConfig=backend-redis' -o json | jq '.items[0].metadata.name' -r) bash -c 'mv ${HOME}/data/appendonly.aof ${HOME}/data/appendonly.aof-old'Move the backup file to the POD:
$ oc cp ./backend-redis-dump.rdb $(oc get pods -l 'deploymentConfig=backend-redis' -o json | jq '.items[0].metadata.name' -r):/var/lib/redis/data/dump.rdb
Redeploy
backend-redisto load the backup:$ oc rollout latest dc/backend-redis
Check the status of the rollout to ensure it has finished:
$ oc rollout status dc/backend-redis
Create the
appendonlyfile:$ oc rsh $(oc get pods -l 'deploymentConfig=backend-redis' -o json | jq '.items[0].metadata.name' -r) bash -c 'redis-cli BGREWRITEAOF'
After a while, ensure that the AOF rewrite is complete:
$ oc rsh $(oc get pods -l 'deploymentConfig=backend-redis' -o json | jq '.items[0].metadata.name' -r) bash -c 'redis-cli info' | grep aof_rewrite_in_progress
-
While
aof_rewrite_in_progress = 1, the execution is in progress. -
Check periodically until
aof_rewrite_in_progress = 0. Zero indicates that the execution is complete.
-
While
Edit the
redis-configconfigmap:$ oc edit configmap redis-config
Uncomment
SAVEcommands in theredis-configconfigmap:save 900 1 save 300 10 save 60 10000
Set
appendonlyto yes in theredis-configconfigmap:appendonly yes
Redeploy
backend-redisto reload the default configurations:$ oc rollout latest dc/backend-redis
Check the status of the rollout to ensure it has finished:
$ oc rollout status dc/backend-redis
9.5.5.2. Managing the deployment configuration for system-redis
These steps are intended for running instances of system-redis.
Procedure
Edit the
redis-configconfigmap:$ oc edit configmap redis-config
Comment
SAVEcommands in theredis-configconfigmap:#save 900 1 #save 300 10 #save 60 10000
Set
appendonlyto no in theredis-configconfigmap:appendonly no
Redeploy
system-redisto load the new configurations:$ oc rollout latest dc/system-redis
Check the status of the rollout to ensure it has finished:
$ oc rollout status dc/system-redis
Rename the
dump.rdbfile:$ oc rsh $(oc get pods -l 'deploymentConfig=system-redis' -o json | jq '.items[0].metadata.name' -r) bash -c 'mv ${HOME}/data/dump.rdb ${HOME}/data/dump.rdb-old'Rename the
appendonly.aoffile:$ oc rsh $(oc get pods -l 'deploymentConfig=system-redis' -o json | jq '.items[0].metadata.name' -r) bash -c 'mv ${HOME}/data/appendonly.aof ${HOME}/data/appendonly.aof-old'Move the
Backupfile to the POD:$ oc cp ./system-redis-dump.rdb $(oc get pods -l 'deploymentConfig=system-redis' -o json | jq '.items[0].metadata.name' -r):/var/lib/redis/data/dump.rdb
Redeploy
system-redisto load the backup:$ oc rollout latest dc/system-redis
Check the status of the rollout to ensure it has finished:
$ oc rollout status dc/system-redis
Create the
appendonlyfile:$ oc rsh $(oc get pods -l 'deploymentConfig=system-redis' -o json | jq '.items[0].metadata.name' -r) bash -c 'redis-cli BGREWRITEAOF'
After a while, ensure that the AOF rewrite is complete:
$ oc rsh $(oc get pods -l 'deploymentConfig=system-redis' -o json | jq '.items[0].metadata.name' -r) bash -c 'redis-cli info' | grep aof_rewrite_in_progress
-
While
aof_rewrite_in_progress = 1, the execution is in progress. -
Check periodically until
aof_rewrite_in_progress = 0. Zero indicates that the execution is complete.
-
While
Edit the
redis-configconfigmap:$ oc edit configmap redis-config
Uncomment
SAVEcommands in theredis-configconfigmap:save 900 1 save 300 10 save 60 10000
Set
appendonlyto yes in theredis-configconfigmap:appendonly yes
Redeploy
system-redisto reload the default configurations:$ oc rollout latest dc/system-redis
Check the status of the rollout to ensure it has finished:
$ oc rollout status dc/system-redis
9.5.6. Restoring backend-worker
These steps are intended to restore backend-worker.
Procedure
Restore to the latest version of
backend-worker:$ oc rollout latest dc/backend-worker
Check the status of the rollout to ensure it has finished:
$ oc rollout status dc/backend-worker
9.5.7. Restoring system-app
These steps are intended to restore system-app.
Procedure
To scale up
system-app, edit the existingAPIManager/${DEPLOYMENT_NAME}and change.spec.system.appSpec.replicasback to original number of replicas or run the following command to apply previously stored specification:$ oc patch APIManager/${DEPLOYMENT_NAME} --type json -p '[{"op": "replace", "path": "/spec/system/appSpec", "value":'"$SYSTEM_SPEC"'}]'If the output of following command does not contain the
replicaskey:$ echo $SYSTEM_SPEC
Then, run the following additional command to scale up
system-app:$ oc patch dc/system-app -p '{"spec": {"replicas": 1}}'
Restore to the latest version of
system-app:$ oc rollout latest dc/system-app
Check the status of the rollout to ensure it has finished:
$ oc rollout status dc/system-app
9.5.8. Restoring system-sidekiq
These steps are intended to restore system-sidekiq.
Procedure
Restore to the latest version of
system-sidekiq:$ oc rollout latest dc/system-sidekiq
Check the status of the rollout to ensure it has finished:
$ oc rollout status dc/system-sidekiq
9.5.8.1. Restoring system-sphinx
These steps are intended to restore system-sphinx.
Procedure
Restore to the latest version of
system-sphinx:$ oc rollout latest dc/system-sphinx
Check the status of the rollout to ensure it has finished:
$ oc rollout status dc/system-sphinx
9.5.8.2. Restoring OpenShift routes managed by zync
Force zync to recreate missing OpenShift routes:
$ oc rsh $(oc get pods -l 'deploymentConfig=system-sidekiq' -o json | jq '.items[0].metadata.name' -r) bash -c 'bundle exec rake zync:resync:domains'
Chapter 10. Configuring reCAPTCHA for 3scale
This document describes how to configure reCAPTCHA for Red Hat 3scale API Management On-premises to protect against spam.
Prerequisites
- An installed and configured 3scale On-Premises instance on a supported OpenShift version.
- Get a site key and the secret key for reCAPTCHA v2. See the Register a new site web page.
- Add the Developer Portal domain to an allowlist if you want to use domain name validation.
To configure reCAPTCHA for 3scale, perform the steps outlined in the following procedure:
10.1. Configuring reCAPTCHA for spam protection in 3scale
To configure reCAPTCHA for spam protection, you have two options how to patch the secret file that contains the reCAPTCHA. These options are in the OpenShift Container Platform (OCP) user interface or using the command line interface (CLI).
Procedure
- OCP 4.x: Navigate to Project: [Your_project_name] > Workloads > Secrets.
Edit the
system-recaptchasecret file.The
PRIVATE_KEYandPUBLIC_KEYfrom the reCAPTHCA service must be in base64 format encoding. Transform the keys to base64 encoding manually.
The CLI reCAPTCHA option does not require base64 format encoding.
CLI: Type the following command:
oc patch secret/system-recaptcha -p '{"stringData": {"PUBLIC_KEY": "public-key-from-service", "PRIVATE_KEY": "private-key-from-service"}}'
Post-procedure steps
- Redeploy the system pod after you have completed one of the above options.
In the 3scale Admin Portal turn on spam protection against users that are not signed:
- Navigate to Audience > Developer Portal > Spam Protection.
Select one of the following options:
- Always - reCAPTCHA will always appear when a form is presented to a user who is not logged in.
- Suspicious only - reCAPTCHA is only shown if the automated checks detect a possible spammer.
- Never - turns off Spam protection.
After system-app has redeployed, the pages that use spam protection on the Developer Portal will show the reCAPTCHA I’m not a robot checkbox.
Additional resources
- See ReCAPTCHA home page for more information, guides, and support.
Chapter 11. The 3scale WebAssembly module
The threescale-wasm-auth module is a WebAssembly module that plugs into Service Mesh and enables it to authorize the incoming requests with Red Hat 3scale API Management. It expands on Service Mesh capabilities and offers full API management capabilities, including authentication, analytics, and billing for your microservices.
Service Mesh focuses on the infrastructure layer with features like traffic management, service discovery, load balancing, and security. API management focuses on creating, publishing, and managing APIs.
Together, Service Mesh and 3scale can improve the reliability, scalability, security, and performance of your microservices and APIs.
The threescale-wasm-auth module runs on integrations of 3scale 2.11 or later with Red Hat OpenShift Service Mesh 2.1.0 or later.
Prerequisites
- A 3scale account with administrator privileges.
A Service Mesh 2.4 or later installation.
- Service Mesh 2.3 currently does not work due to OSSM-3647.
- For Service Mesh 2.1 and 2.2, refer to Using the 3scale WebAssembly module.
An application running within Service Mesh.
- Use the Bookinfo example application.
Cluster administrators on OpenShift Container Platform (OCP) can configure the threescale-wasm-auth module to authorize HTTP requests to 3scale through the WasmPlugin custom resource. The Service Mesh then injects the module into sidecars, exposing the host services and allows you to use the module to process proxy requests.
From a 3scale perspective, the threescale-wasm-auth module serves as a gateway and replaces APIcast when integrating with Service Mesh. This means some of the APIcast features cannot be used, notably policies and staging and production environments.
11.1. Deploying the Bookinfo application to Service Mesh
You can use the example Bookinfo application from Service Mesh to demonstrate the procedure of configuring Service Mesh with 3scale.
Procedure
Deploy Bookinfo application:
Verify that the application is available:
$ export GATEWAY_URL=$(oc -n istio-system get route istio-ingressgateway -o jsonpath='{.spec.host}')

$ curl -I "http://$GATEWAY_URL/productpage"
HTTP/1.1 200 OK
11.2. Creating a product in 3scale
A product is a customer-facing API that can redirect or use multiple internal APIs, called backends. When using 3scale with Service Mesh, backends are not used. The link between a product and the private base URL is made in the mesh. For this reason, only the product is needed.
Procedure
- Create a new product, application plan, and application. See Creating new products to test API calls.
Change deployment to Istio:
- Navigate to [Your_product_name] > Integration > Settings.
- Change Deployment to Istio.
- Click Update Product to update configuration.
Promote the configuration:
- Navigate to [Your_product_name] > Integration > Configuration.
- Click Update Configuration.
11.3. Connecting 3scale with Service Mesh
Create the ServiceEntry custom resource (CR) and DestinationRule CR in the service-mesh/istio-system namespace or the bookinfo namespace. It should be in a namespace containing ServiceMeshControlPlane.
To reach 3scale from Service Mesh you must configure both tenant and backend URLs as an external service through the ServiceEntry and DestinationRule (CRs). This enables the threescale-wasm-auth module to access both backend, which handles request authorization, and system, from which the product configuration is fetched.
11.3.1. Adding 3scale URLs to Service Mesh
ServiceEntry is needed to allow requests to the service from within the Service Mesh, and DestinationRule is there to configure a secure connection for 3scale services.
11.3.1.1. Adding a tenant URL to Service Mesh
Procedure
Collect system tenant URLs:
- This is a URL of the 3scale Admin Portal you used to create the product.
Create
ServiceEntryfor system:oc apply -n <bookinfo> -f -<<EOF apiVersion: networking.istio.io/v1beta1 kind: ServiceEntry metadata: name: <service_entry_threescale_system> spec: hosts: - <system_hostname> ports: - number: 443 name: https protocol: HTTPS location: MESH_EXTERNAL resolution: DNS EOFCreate
DestinationRulefor system:oc apply -n <bookinfo> -f -<<EOF apiVersion: networking.istio.io/v1beta1 kind: DestinationRule metadata: name: <destination_rule_threescale_system> spec: host: <system_hostname> trafficPolicy: tls: mode: SIMPLE sni: <system_hostname> EOF
Additional resources
11.4. Adding backend URL to Service Mesh
By incorporating the 3scale backend URL into your Service Mesh setup, you can establish a secure communication channel between your microservices and the 3scale backend. The integration enables the implementation of authentication, analytics, and billing features for managing APIs in the Service Mesh environment. The backend can be accessed externally using the exposed route and internally using the OpenShift service.
11.4.1. Using 3scale on a different cluster from Service Mesh
Procedure
Collect backend URLs:
-
For 3scale Hosted, the backend URL is:
su1.3scale.net For 3scale On-premises, fetch the URL using the following command:
$ oc get -n <3scale_namespace> route backend --template="{{.spec.host}}"
-
For 3scale Hosted, the backend URL is:
Create
ServiceEntryfor backend:oc apply -n <bookinfo> -f -<<EOF apiVersion: networking.istio.io/v1beta1 kind: ServiceEntry metadata: name: <service_entry_threescale_backend> spec: hosts: - <backend_hostname> ports: - number: 443 name: https protocol: HTTPS location: MESH_EXTERNAL resolution: DNS EOFCreate
DestinationRulefor backend:oc apply -n <bookinfo> -f -<<EOF apiVersion: networking.istio.io/v1beta1 kind: DestinationRule metadata: name: <destination_rule_threescale_backend> spec: host: <backend_hostname> trafficPolicy: tls: mode: SIMPLE sni: <backend_hostname> EOF
11.5. Using 3scale on the same cluster as Service Mesh
The following procedure is an alternative to Adding backend URL to service mesh.
To have the threescale-wasm-auth module authorize requests against 3scale, the module must have access to 3scale services. You can do this within Red Hat OpenShift Service Mesh by applying an external ServiceEntry object and a corresponding DestinationRule object for TLS configuration to use the HTTPS protocol.
The custom resources (CRs) set up the service entries and destination rules for secure access from within Service Mesh to 3scale for the backend and system components of the Service Management API and the Account Management API. The Service Management API receives queries for the authorization status of each request. The Account Management API provides API management configuration settings for your services.
Procedure
Create
ServiceEntryfor Backend:oc apply -n <bookinfo> -f -<<EOF apiVersion: networking.istio.io/v1beta1 kind: ServiceEntry metadata: name: <service_entry_threescale_backend> spec: hosts: - backend-listener.<3scale_namespace>.svc.cluster.local ports: - number: 80 name: http protocol: HTTP location: MESH_EXTERNAL resolution: DNS EOFCreate
DestinationRulefor Backend:oc apply -n <bookinfo> -f -<<EOF apiVersion: networking.istio.io/v1beta1 kind: DestinationRule metadata: name: <destination_rule_threescale_backend> spec: host: backend-listener.<3scale_namespace>.svc.cluster.local EOF
11.6. Creating a WasmPlugin custom resource
Service Mesh provides a custom resource definition (CRD) to specify and apply Proxy-WASM extensions to sidecar proxies, known as the WasmPlugin. Service Mesh applies the custom resource (CR) to the set of workloads that require HTTP API management with 3scale.
Procedure
- Identify the OpenShift Container Platform (OCP) namespace, for example the bookinfo project, on your Service Mesh deployment that you will apply this module to.
Obtain pull secret with registry.redhat.io credentials.
-
Create the new pull secret resource in same namespace as the
WasmPlugin.
-
Create the new pull secret resource in same namespace as the
You must declare the namespace where the
threescale-wasm-authmodule is deployed, alongside a selector to identify the set of applications the module will apply to. The following example is the YAML format for the CR forthreescale-wasm-authmodule:apiVersion: extensions.istio.io/v1alpha1 kind: WasmPlugin metadata: name: <threescale_wasm_plugin_name> namespace: <namespace> spec: url: oci://registry.redhat.io/3scale-amp2/3scale-auth-wasm-rhel8:0.0.3 imagePullSecret: <pull_secret_resource> phase: AUTHZ priority: 100 match: - mode: CLIENT selector: matchLabels: app: <selector> pluginConfig: api: v1 system: name: system upstream: name: outbound|443||<system_host> url: <system_url> timeout: 5000 token: <access_token> backend: name: backend upstream: name: outbound|<backend_port>||<backend_host> url: <backend_url> timeout: 5000 extensions: - no_body services: - id: '<product_id>' authorities: - "*" credentials: user_key: - query_string: keys: - user_key - header: keys: - user_key-
The
spec.pluginConfigfield varies depending on the application. All other fields persist across multiple instances of this custom resource. -
This particular
WasmPluginspec.pluginConfigis configured withuser_keyauthentication provided in a query string. Explanation:
-
name: Specifies the unique name or identifier for theWasmPluginwithin 3scale. -
namespace: Namespace of the workload. -
imagePullSecret: The name of the pull secret you created in step 2. -
selector: Workload label selector. Use the productpage of the bookinfo project. -
backend-port: Depends on which 3scale you are using. See Adding 3scale URLs to Service Mesh. For example, internal 3scale Uses port 80 and the external 3scale uses port 443. -
backend-host,system-host: Use the same hosts you used in Adding 3scale URLs to Service Mesh. -
system-url,backend-url: Use their respective hosts and add a protocol. For example,https://<system-host>. -
access-token: Access token to the system tenant. -
product_id: The ID of the product you would like to use. If you want multiple products, define multiple products under the services section.
-
After you have the module configuration in
spec.pluginConfigand the rest of the custom resource, apply them with theoc applycommand:$ oc apply -f threescale-wasm-auth-bookinfo.yaml
-
The
11.6.1. 3scale WasmPlugin authentication options
These are examples of configuration for 3scale User key (App id/App key) authentication.
User key
apiVersion: extensions.istio.io/v1alpha1
kind: WasmPlugin
metadata:
  name: <threescale_wasm_plugin_name>
spec:
 ...
  pluginConfig:
  ...
    services:
    - id: '<service_id>'
      authorities:
      - "*"
      credentials:
        user_key:
          - query_string:
              keys:
                - user_key
          - header:
              keys:
                - user_key
App Id and App key
apiVersion: extensions.istio.io/v1alpha1
kind: WasmPlugin
metadata:
  name: <threescale_wasm_plugin_name>
spec:
  ...
  pluginConfig:
    ...
    services:
    - id: '<service_id>'
      authorities:
      - "*"
      credentials:
        app_id:
          - query_string:
              keys:
                - app_id
          - header:
              keys:
                - app_id
        app_key:
          - query_string:
              keys:
                - app_key
          - header:
              keys:
                - app_key
OIDC
Apart from the WasmPlugin itself, for OpenID Connect (OIDC) to work you also need additional custom resource called RequestAuthentication. When you apply the RequestAuthentication, it configures Envoy with a native plugin to validate JWT tokens. The proxy validates everything before running the module so any requests that fail do not make it to the 3scale WebAssembly module.
apiVersion: security.istio.io/v1beta1
kind: RequestAuthentication
metadata:
  name: jwt-example
  namespace: <bookinfo>
spec:
  selector:
    matchLabels:
      app: <productpage>
  jwtRules:
  - issuer: >-
      "<url>/auth/realms/<realm_name>"
    jwksUri: >-
      "<url>/auth/realms/<realm_name>/protocol/openid-connect/certs"
Explanation
-
<url>: The URL of and OIDC instance, when configured with keycloak, is used to specify the keycloak OIDC provider’s metadata endpoint for authentication configuration. -
<realm_name>: The name of the realm used in OIDC.
apiVersion: extensions.istio.io/v1alpha1
kind: WasmPlugin
metadata:
  name: <threescale_wasm_plugin_name>
spec:
  ...
  pluginConfig:
    ...
    services:
    - id: '<service_id>'
      authorities:
      - "*"
      credentials:
  app_id:
    - filter:
        path:
          - envoy.filters.http.jwt_authn
          - "0"
        keys:
          - azp
          - aud
        ops:
          - take:
              head: 1
Additional resources
11.7. Testing the configured API
You can verify the effectiveness of your API configuration by conducting an authentication check when making calls to your application. By thoroughly testing the authentication mechanism, you can ensure that only authorized requests are processed, maintaining the security and integrity of your application.
Procedure
Try a call to the Bookinfo application with the
WasmPluginapplied. It should be rejected as we did not include any authentication:$ export GATEWAY_URL=$(oc -n istio-system get route istio-ingressgateway -o jsonpath='{.spec.host}') $ curl -I "http://$GATEWAY_URL/productpage" HTTP/1.1 403Retrieve user key for authentication:
- Navigate to [Your_product_name] > Applications > Listings.
- Select your application.
- Look for Authentication > User Key.
Try the call again with user key present.
$ curl -I "http://$GATEWAY_URL/productpage?user_key=$USER_KEY"
HTTP/1.1 200 OK
Verify that the hit was registered in metrics.
- Navigate to [Your_product_name] > Analytics > Traffic.
- You should see your calls registered.
11.8. The 3scale WebAssembly module configuration
The WasmPlugin custom resource spec provides the configuration that the Proxy-WASM module reads from.
The spec is embedded in the host and read by the Proxy-WASM module. Typically, the configurations are in the JSON file format for the modules to parse. However, the WasmPlugin resource can interpret the spec value as YAML and convert it to JSON for consumption by the module.
If you use the Proxy-WASM module in stand-alone mode, you must write the configuration using the JSON format. Using the JSON format means using escaping and quoting where needed within the host configuration files, for example Envoy. When you use the WebAssembly module with the WasmPlugin resource, the configuration is in the YAML format. In this case, an invalid configuration forces the module to show diagnostics based on its JSON representation to a sidecar’s logging stream.
The EnvoyFilter custom resource is not a supported API, although it can be used in some 3scale Istio adapter or Service Mesh releases. Using the EnvoyFilter custom resource is not recommended. Use the WasmPlugin API instead of the EnvoyFilter custom resource. If you must use the EnvoyFilter custom resource, you must specify the spec in JSON format.
11.8.1. Configuring the 3scale WebAssembly module
The architecture of the 3scale WebAssembly module configuration depends on the 3scale account and authorization service, and the list of services to handle.
Prerequisites
The prerequisites are a set of minimum mandatory fields in all cases:
-
For the 3scale account and authorization service: the
backend-listenerURL. - For the list of services to handle: the service IDs and at least one credential look up method and where to find it.
-
You will find examples for dealing with
userkey,appidwithappkey, and OpenID Connect (OIDC) patterns. -
The WebAssembly module uses the settings you specified in the static configuration. For example, if you add a mapping rule configuration to the module, it will always apply, even when the 3scale Admin Portal has no such mapping rule. The rest of the
WasmPluginresource exists around thespec.pluginConfigYAML entry.
11.8.2. The 3scale WebAssembly module api object
The api top-level string from the 3scale WebAssembly module defines which version of the configuration the module will use.
A non-existent or unsupported version of the api object renders the 3scale WebAssembly module inoperable.
The api top-level string example
apiVersion: extensions.istio.io/v1alpha1
kind: WasmPlugin
metadata:
  name: <threescale_wasm_plugin_name>
  namespace: <bookinfo>
spec:
  pluginConfig:
    api: v1
...
The api entry defines the rest of the values for the configuration. The only accepted value is v1. New settings that break compatibility with the current configuration or need more logic that modules using v1 cannot handle will require different values.
11.8.3. The 3scale WebAssembly module system object
The system top-level object specifies how to access the 3scale Account Management API for a specific account. The upstream field is the most important part of the object. The system object is optional, but recommended unless you are providing a fully static configuration for the 3scale WebAssembly module. The later is an option if you do not want to provide connectivity to the system component of 3scale.
When you provide static configuration objects in addition to the system object, the static ones always take precedence.
apiVersion: extensions.istio.io/v1alpha1
kind: WasmPlugin
metadata:
  name: <threescale_wasm_plugin_name>
spec:
  pluginConfig:
    system:
      name: <saas_porta>
      upstream: <object>
      token: <my_account_token>
      ttl: 300
  ...
Table 11.1. system object fields
| Name | Description | Required |
|---|---|---|
|
| An identifier for the 3scale service, currently not referenced elsewhere. | Optional |
|
|
The details about a network host to be contacted. | Yes |
|
| A 3scale personal access token with read permissions. | Yes |
|
| The minimum amount of seconds to consider a configuration retrieved from this host as valid before trying to fetch new changes. The default is 600 seconds (10 minutes). Note: there is no maximum amount, but the module will generally fetch any configuration within a reasonable amount of time after this TTL elapses. | Optional |
11.8.4. The 3scale WebAssembly module upstream object
The upstream object describes an external host to which the proxy can perform calls.
apiVersion: maistra.io/v1
upstream:
  name: outbound|443||multitenant.3scale.net
  url: "https://myaccount-admin.3scale.net/"
  timeout: 5000
...
Table 11.2. upstream object fields
| Name | Description | Required |
|---|---|---|
|
|
| Yes |
|
| The complete URL to access the described service. Unless implied by the scheme, you must include the TCP port. | Yes |
|
| Timeout in milliseconds so that connections to this service that take more than the amount of time to respond will be considered errors. Default is 1000 seconds. | Optional |
11.8.5. The 3scale WebAssembly module backend object
The backend top-level object specifies how to access the 3scale Service Management API for authorizing and reporting HTTP requests. This service is provided by the Backend component of 3scale.
apiVersion: extensions.istio.io/v1alpha1
kind: WasmPlugin
metadata:
  name: <threescale_wasm_plugin_name>
spec:
  pluginConfig:
    ...
    backend:
      name: backend
      upstream: <object>
    ...
Table 11.3. backend object fields
| Name | Description | Required |
|---|---|---|
|
| An identifier for the 3scale backend, currently not referenced elsewhere. | Optional |
|
| The details about a network host to be contacted. This must refer to the 3scale Account Management API host, known, system. | Yes. The most important and required field. |
11.8.6. The 3scale WebAssembly module services object
The services top-level object specifies which service identifiers are handled by this particular instance of the module.
You must specify which ones are handled because accounts have multiple services. The rest of the configuration revolves around how to configure services.
The services field is required. It is an array that must contain at least one service to be useful.
apiVersion: extensions.istio.io/v1alpha1
kind: WasmPlugin
metadata:
  name: <threescale_wasm_plugin_name>
spec:
  pluginConfig:
    ...
    services:
    - id: "2555417834789"
      token: service_token
      authorities:
        - "*.app"
        - 0.0.0.0
        - "0.0.0.0:8443"
      credentials: <object>
      mapping_rules: <object>
    ...
Each element in the services array represents a 3scale service.
Table 11.4. services object fields
| Name | Description | Required |
|---|---|---|
|
| An identifier for this 3scale service, currently not referenced elsewhere. | Yes |
|
|
This
| Optional |
|
| An array of strings, each one representing the Authority of a URL to match. These strings accept glob patterns supporting the asterisk (*), plus sign (+), and question mark (?) matchers. | Yes |
|
| An object defining which kind of credentials to look for and where. | Yes |
|
| An array of objects representing mapping rules and 3scale methods to hit. | Optional |
11.8.7. The 3scale WebAssembly module credentials object
The credentials object is a component of the service object. credentials specifies which kind of credentials to be looked up and the steps to perform this action.
All fields are optional, but you must specify at least one, user_key or app_id. The order in which you specify each credential is irrelevant because it is pre-established by the module. Only specify one instance of each credential.
apiVersion: extensions.istio.io/v1alpha1
kind: WasmPlugin
metadata:
  name: <threescale_wasm_plugin_name>
spec:
  pluginConfig:
    ...
    services:
    - credentials:
        user_key: <array_of_lookup_queries>
        app_id: <array_of_lookup_queries>
        app_key: <array_of_lookup_queries>
    ...
Table 11.5. credentials object fields
| Name | Description | Required |
|---|---|---|
|
| This is an array of lookup queries that defines a 3scale user key. A user key is commonly known as an API key. | Optional |
|
|
This is an array of lookup queries that define a 3scale application identifier. Application identifiers are provided by 3scale or by using an identity provider like Red Hat Single Sign-On (RH-SS0), or OpenID Connect (OIDC). The resolution of the lookup queries specified here, whenever it is successful and resolves to two values, it sets up the | Optional |
|
|
This is an array of lookup queries that define a 3scale application key. Application keys without a resolved | Optional |
11.8.8. The 3scale WebAssembly module lookup queries
The lookup query object is part of any of the fields in the credentials object. It specifies how a given credential field should be found and processed. When evaluated, a successful resolution means that one or more values were found. A failed resolution means that no values were found.
Arrays of lookup queries describe a short-circuit or relationship: a successful resolution of one of the queries stops the evaluation of any remaining queries and assigns the value or values to the specified credential-type. Each query in the array is independent of each other.
A lookup query is made up of a single field, a source object, which can be one of a number of source types. See the following example:
apiVersion: extensions.istio.io/v1alpha1
kind: WasmPlugin
metadata:
  name: <threescale_wasm_plugin_name>
spec:
  pluginConfig:
    ...
    services:
    - credentials:
        user_key:
          - <source_type>: <object>
          - <source_type>: <object>
          ...
        app_id:
          - <source_type>: <object>
          ...
        app_key:
          - <source_type>: <object>
          ...
    ...
A source object exists as part of an array of sources within any of the credentials object fields. The object field name, referred to as a source-type is any one of the following:
-
header: The lookup query receives HTTP request headers as input. -
query_string: Thelookup queryreceives the URL query string parameters as input. -
filter: Thelookup queryreceives filter metadata as input.
All source-type objects have at least the following two fields:
Table 11.6. source-type object fields
| Name | Description | Required |
|---|---|---|
|
|
An array of strings, each one a | Yes |
|
|
An array of | Optional |
|
|
Shows the path in the metadata used to look up data. However, it is not required when | Optional |
When a key matches the input data, the rest of the keys are not evaluated and the source resolution algorithm jumps to executing the operations (ops) specified, if any. If no ops are specified, the result value of the matching key, if any, is returned.
Operations provide a way to specify certain conditions and transformations for inputs you have after the first phase looks up a key. Use operations when you need to transform, decode, and assert properties, however they do not provide a mature language to deal with all needs and lack Turing-completeness.
A stack stored the outputs of operations. When evaluated, the lookup query finishes by assigning the value or values at the bottom of the stack, depending on how many values the credential consumes.
11.8.9. The 3scale WebAssembly module operations object
Each element in the ops array belonging to a specific source type is an operation object that either applies transformations to values or performs tests. The field name to use for such an object is the name of the operation itself, and any values are the parameters to the operation, which could be structure objects, for example, maps with fields and values, lists, or strings.
Most operations attend to one or more inputs, and produce one or more outputs. When they consume inputs or produce outputs, they work with a stack of values: each value consumed by the operations is popped from the stack of values and initially populated with any source matches. The values outputted by them are pushed to the stack. Other operations do not consume or produce outputs other than asserting certain properties, but they inspect a stack of values.
When resolution finishes, the values picked up by the next step, such as assigning the values to be an app_id, app_key, or user_key, are taken from the bottom values of the stack.
There are a few different operations categories:
-
decode: These transform an input value by decoding it to get a different format. -
string: These take a string value as input and perform transformations and checks on it. -
stack: These take a set of values in the input and perform multiple stack transformations and selection of specific positions in the stack. -
check: These assert properties about sets of operations in a side-effect free way. -
control: These perform operations that allow for modifying the evaluation flow. -
format: These parse the format-specific structure of input values and look up values in it.
All operations are specified by the name identifiers as strings.
Additional resources
11.8.10. The 3scale WebAssembly module mapping_rules object
The mapping_rules object is part of the service object. It specifies a set of REST path patterns and related 3scale metrics and count increments to use when the patterns match.
You need the value if no dynamic configuration is provided in the system top-level object. If the object is provided in addition to the system top-level entry, then the mapping_rules object is evaluated first.
mapping_rules is an array object. Each element of that array is a mapping_rule object. The evaluated matching mapping rules on an incoming request provide the set of 3scale methods for authorization and reporting to the APIManager. When multiple matching rules refer to the same methods, there is a summation of deltas when calling into 3scale. For example, if two rules increase the Hits method twice with deltas of 1 and 3, a single method entry for Hits reporting to 3scale has a delta of 4.
11.8.11. The 3scale WebAssembly module mapping_rule object
The mapping_rule object is part of an array in the mapping_rules object.
The mapping_rule object fields specify the following information:
- The HTTP request method to match.
- A pattern to match the path against.
- The 3scale methods to report along with the amount to report. The order in which you specify the fields determines the evaluation order.
Table 11.7. mapping_rule object fields
| Name | Description | Required |
|---|---|---|
|
| Specifies a string representing an HTTP request method, also known as verb. Values accepted match the any one of the accepted HTTP method names, case-insensitive. A special value of any matches any method. | Yes |
|
|
The pattern to match the HTTP request’s URI path component. This pattern follows the same syntax as documented by 3scale. It allows wildcards, use of the asterisk (*) character, using any sequence of characters between braces such as | Yes |
|
|
A list of
Embed the
| Yes |
|
| Whether the successful matching of this rule should stop the evaluation of more mapping rules. |
Optional Boolean. The default is |
The following example is independent of existing hierarchies between methods in 3scale. That is, anything run on the 3scale side will not affect this. For example, the Hits metric might be a parent of them all, so it stores 4 hits due to the sum of all reported methods in the authorized request and calls the 3scale Authrep API endpoint.
The example below uses a GET request to a path, /products/1/sold, that matches all the rules.
mapping_rules GET request example
apiVersion: extensions.istio.io/v1alpha1
kind: WasmPlugin
metadata:
  name: <threescale_wasm_plugin_name>
spec:
  pluginConfig:
    ...
    mapping_rules:
      - method: GET
        pattern: /
        usages:
          - name: hits
            delta: 1
      - method: GET
        pattern: /products/
        usages:
          - name: products
            delta: 1
      - method: ANY
        pattern: /products/{id}/sold
        usages:
          - name: sales
            delta: 1
          - name: products
            delta: 1
    ...
All usages get added to the request the module performs to 3scale with usage data as follows:
- Hits: 1
- products: 2
- sales: 1
11.9. The 3scale WebAssembly module examples for credentials use cases
You will spend most of your time applying configuration steps to obtain credentials in the requests to your services.
The following are credentials examples, which you can modify to adapt to specific use cases.
You can combine them all, although when you specify multiple source objects with their own lookup queries, they are evaluated in order until one of them successfully resolves.
11.9.1. API key (user_key) in query string parameters
The following example looks up a user_key in a query string parameter or header of the same name:
credentials:
  user_key:
    - query_string:
        keys:
          - user_key
    - header:
        keys:
          - user_key
11.9.2. Application ID and key
The following example looks up app_key and app_id credentials in a query or headers.
credentials:
  app_id:
    - header:
        keys:
          - app_id
    - query_string:
        keys:
          - app_id
  app_key:
    - header:
        keys:
          - app_key
    - query_string:
        keys:
          - app_key
11.9.3. Authorization header
A request includes an app_id and app_key in an authorization header. If there is at least one or two values outputted at the end, then you can assign the app_key.
The resolution here assigns the app_key if there is one or two outputted at the end.
The authorization header specifies a value with the type of authorization and its value is encoded as Base64. This means you can split the value by a space character, take the second output and then split it again using a colon (:) as the separator. For example, if you use this format app_id:app_key, the header looks like the following example for credential:
aladdin:opensesame: Authorization: Basic YWxhZGRpbjpvcGVuc2VzYW1l
You must use lowercase header field names as shown in the following example:
credentials:
  app_id:
    - header:
        keys:
          - authorization
        ops:
          - split:
              separator: " "
              max: 2
          - length:
              min: 2
          - drop:
              head: 1
          - base64_urlsafe
          - split:
              max: 2
  app_key:
    - header:
        keys:
          - app_key
The previous example use case looks at the headers for an authorization:
-
It takes its string value and split it by a space, checking that it generates at least two values of a
credential-type and thecredentialitself, then dropping thecredential-type. It then decodes the second value containing the data it needs, and splits it by using a colon (:) character to have an operations stack including first the
app_id, then theapp_key, if it exists.-
If
app_keydoes not exist in the authorization header then its specific sources are checked. For example, the header with the keyapp_keyin this case.
-
If
-
To add extra conditions to
credentials, allowBasicauthorizations, whereapp_idis eitheraladdinoradmin, or anyapp_idbeing at least 8 characters in length. app_keymust contain a value and have a minimum of 64 characters as shown in the following example:credentials: app_id: - header: keys: - authorization ops: - split: separator: " " max: 2 - length: min: 2 - reverse - glob: - Basic - drop: tail: 1 - base64_urlsafe - split: max: 2 - test: if: length: min: 2 then: - strlen: max: 63 - or: - strlen: min: 1 - drop: tail: 1 - assert: - and: - reverse - or: - strlen: min: 8 - glob: - aladdin - admin-
After picking up the
authorizationheader value, you get aBasiccredential-type by reversing the stack so that the type is placed on top. -
Run a glob match on it. When it validates, and the credential is decoded and split, you get the
app_idat the bottom of the stack, and potentially theapp_keyat the top. Run a
test:if there are two values in the stack, meaning anapp_keywas acquired.-
Ensure the string length is between 1 and 63, including
app_idandapp_key. If the key’s length is zero, drop it and continue as if no key exists. If there was only anapp_idand noapp_key, the missing else branch indicates a successful test and evaluation continues.
-
Ensure the string length is between 1 and 63, including
The last operation, assert, indicates that no side-effects make it into the stack. You can then modify the stack:
Reverse the stack to have the
app_idat the top.-
Whether or not an
app_keyis present, reversing the stack ensuresapp_idis at the top.
-
Whether or not an
Use
andto preserve the contents of the stack across tests.Then use one of the following possibilities:
-
Make sure
app_idhas a string length of at least 8. -
Make sure
app_idmatches eitheraladdinoradmin.
-
Make sure
11.9.4. OpenID Connect (OIDC) use case
For Service Mesh and the 3scale Istio adapter, you must deploy a RequestAuthentication as shown in the following example, filling in your own workload data and jwtRules:
apiVersion: security.istio.io/v1beta1
kind: RequestAuthentication
metadata:
  name: jwt-example
  namespace: <bookinfo>
spec:
  selector:
    matchLabels:
      app: <productpage>
  jwtRules:
  - issuer: >-
      "<url>/auth/realms/<realm_name>"
    jwksUri: >-
      "<url>/auth/realms/<realm_name>/protocol/openid-connect/certs"
When you apply the RequestAuthentication, it configures Envoy with a native plugin to validate JWT tokens. The proxy validates everything before running the module so any requests that fail do not make it to the 3scale WebAssembly module.
When a JWT token is validated, the proxy stores its contents in an internal metadata object, with an entry whose key depends on the specific configuration of the plugin. This use case gives you the ability to look up structure objects with a single entry containing an unknown key name.
The 3scale app_id for OIDC matches the OAuth client_id. This is found in the azp or aud fields of JWT tokens.
To get app_id field from Envoy’s native JWT authentication filter, see the following example:
credentials:
  app_id:
    - filter:
        path:
          - envoy.filters.http.jwt_authn
          - "0"
        keys:
          - azp
          - aud
        ops:
          - take:
              head: 1
The example instructs the module to use the filter source type to look up filter metadata for an object from the Envoy-specific JWT authentication native plugin. This plugin includes the JWT token as part of a structure object with a single entry and a pre-configured name. Use 0 to specify that you will only access the single entry.
The resulting value is a structure for which you will resolve two fields:
-
azp: The value whereapp_idis found. -
aud: The value where this information can also be found.
The operation ensures only one value is held for assignment.
11.9.5. Picking up the JWT token from a header
Some setups might have validation processes for JWT tokens where the validated token would reach this module via a header in JSON format.
To get the app_id, see the following example:
credentials:
  app_id:
    - header:
        keys:
          - x-jwt-payload
        ops:
          - base64_urlsafe
          - json:
            - keys:
              - azp
              - aud
          - take:
              head: 1
11.10. 3scale WebAssembly module minimal working configuration
The following is an example of a 3scale WebAssembly module minimal working configuration. You can copy and paste this and edit it to work with your own configuration.
apiVersion: extensions.istio.io/v1alpha1
kind: WasmPlugin
metadata:
  name: <threescale_wasm_plugin_name>
spec:
  url: oci://registry.redhat.io/3scale-amp2/3scale-auth-wasm-rhel8:0.0.3
  imagePullSecret: <pull_secret_resource>
  phase: AUTHZ
  match:
    - mode: SERVER
  priority: 100
  selector:
    matchLabels:
      app: <productpage>
  pluginConfig:
    api: v1
    system:
      name: <system_name>
      upstream:
        name: outbound|443||multitenant.3scale.net
        url: https://istiodevel-admin.3scale.net/
        timeout: 5000
      token: <token>
    backend:
      name: <backend_name>
      upstream:
        name: outbound|443||su1.3scale.net
        url: https://su1.3scale.net/
        timeout: 5000
      extensions:
      - no_body
    services:
    - id: '2555417834780'
      authorities:
      - "*"
      credentials:
        user_key:
          - query_string:
              keys:
                - <user_key>
          - header:
              keys:
                - <user_key>
        app_id:
          - query_string:
              keys:
                - <app_id>
          - header:
              keys:
                - <app_id>
        app_key:
          - query_string:
              keys:
                - <app_key>
          - header:
              keys:
- <app_key>Chapter 12. Troubleshooting the API infrastructure
This guide aims to help you identify and fix the cause of issues with your API infrastructure.
API Infrastructure is a lengthy and complex topic. However, at a minimum, you will have three moving parts in your Infrastructure:
- The API gateway
- 3scale
- The API
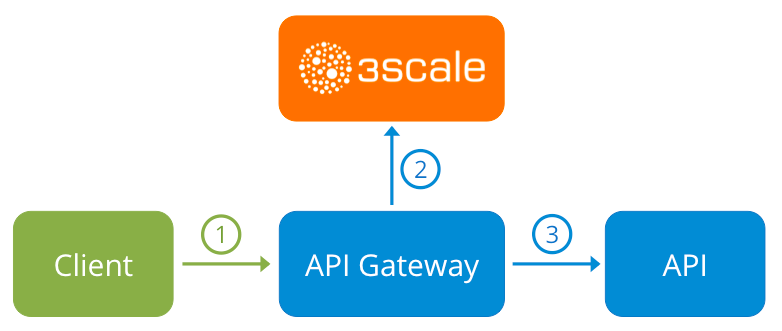
Errors in any of these three elements result in API consumers being unable to access your API. However, it is difficult to find the component that caused the failure. This guide gives you some tips to troubleshoot your infrastructure to identify the problem.
Use the following sections to identify and fix common issues that may occur:
12.1. Common integration issues
There are some evidences that can point to some very common issues with your integration with 3scale. These will vary depending on whether you are at the beginning of your API project, setting up your infrastructure, or are already live in production.
12.1.1. Integration issues
The following sections attempt to outline some common issues you may see in the APIcast error log during the initial phases of your integration with 3scale: at the beginning using APIcast Hosted and prior to go-live, running the self-managed APIcast.
12.1.1.1. APIcast Hosted
When you are first integrating your API with APIcast Hosted on the Service Integration screen, you might get some of the following errors shown on the page or returned by the test call you make to check for a successful integration.
Test request failed: execution expiredCheck that your API is reachable from the public internet. APIcast Hosted cannot be used with private APIs. If you do not want to make your API publicly available to integrate with APIcast Hosted, you can set up a private secret between APIcast Hosted and your API to reject any calls not coming from the API gateway.
The accepted format is
protocol://address(:port)Remove any paths at the end of your APIs private base URL. You can add these in the "mapping rules" pattern or at the beginning of the API test GET request.
Test request failed with HTTP code XXX-
405: Check that the endpoint accepts GET requests. APIcast only supports GET requests to test the integration. -
403: Authentication parameters missing: If your API already has some authentication in place, APIcast will be unable to make a test request. -
403: Authentication failed: If this is not the first service you have created with 3scale, check that you have created an application under the service with credentials to make the test request. If it is the first service you are integrating, ensure that you have not deleted the test account or application that you created on signup.
-
12.1.1.2. APIcast self-managed
After you have successfully tested the integration with APIcast self-managed, you might want to host the API gateway yourself. Following are some errors you may encounter when you first install your self-managed gateway and call your API through it.
upstream timed out (110: Connection timed out) while connecting to upstreamCheck that there are no firewalls or proxies between the API Gateway and the public Internet that would prevent your self-managed gateway from reaching 3scale.
failed to get list of services: invalid status: 403 (Forbidden)2018/06/04 08:04:49 [emerg] 14#14: [lua] configuration_loader.lua:134: init(): failed to load configuration, exiting (code 1) 2018/06/04 08:04:49 [warn] 22#22: *2 [lua] remote_v2.lua:163: call(): failed to get list of services: invalid status: 403 (Forbidden) url: https://example-admin.3scale.net/admin/api/services.json , context: ngx.timer ERROR: /opt/app-root/src/src/apicast/configuration_loader.lua:57: missing configuration
Check that the Access Token that you used in the
THREESCALE_PORTAL_ENDOINTvalue is correct and that it has the Account Management API scope. Verify it with acurlcommand:curl -v "https://example-admin.3scale.net/admin/api/services.json?access_token=<YOUR_ACCESS_TOKEN>"It should return a 200 response with a JSON body. If it returns an error status code, check the response body for details.
service not found for host apicast.example.com2018/06/04 11:06:15 [warn] 23#23: *495 [lua] find_service.lua:24: find_service(): service not found for host apicast.example.com, client: 172.17.0.1, server: _, request: "GET / HTTP/1.1", host: "apicast.example.com"
This error indicates that the Public Base URL has not been configured properly. You should ensure that the configured Public Base URL is the same that you use for the request to self-managed APIcast. After configuring the correct Public Base URL:
-
Ensure that APIcast is configured for "production" (default configuration for standalone APIcast if not overriden with
THREESCALE_DEPLOYMENT_ENVvariable). Ensure that you promote the configuration to production. -
Restart APIcast, if you have not configured auto-reloading of configuration using
APICAST_CONFIGURATION_CACHEandAPICAST_CONFIGURATION_LOADERenvironment variables.
-
Ensure that APIcast is configured for "production" (default configuration for standalone APIcast if not overriden with
Following are some other symptoms that may point to an incorrect APIcast self-managed integration:
- Mapping rules not matched / Double counting of API calls: Depending on the way you have defined the mapping between methods and actual URL endpoints on your API, you might find that sometimes methods either don’t get matched or get incremented more than once per request. To troubleshoot this, make a test call to your API with the 3scale debug header. This will return a list of all the methods that have been matched by the API call.
- Authentication parameters not found: Ensure your are sending the parameters to the correct location as specified in the Service Integration screen. If you do not send credentials as headers, the credentials must be sent as query parameters for GET requests and body parameters for all other HTTP methods. Use the 3scale debug header to double-check the credentials that are being read from the request by the API gateway.
12.1.2. Production issues
It is rare to run into issues with your API gateway after you have fully tested your setup and have been live with your API for a while. However, here are some of the issues you might encounter in a live production environment.
12.1.2.1. Availability issues
Availability issues are normally characterised by upstream timed out errors in your nginx error.log; example:
upstream timed out (110: Connection timed out) while connecting to upstream, client: X.X.X.X, server: api.example.com, request: "GET /RESOURCE?CREDENTIALS HTTP/1.1", upstream: "http://Y.Y.Y.Y:80/RESOURCE?CREDENTIALS", host: "api.example.com"
If you are experiencing intermittent 3scale availability issues, following may be the reasons for this:
You are resolving to an old 3scale IP that is no longer in use.
The latest version of the API gateway configuration files defines 3scale as a variable to force IP resolution each time. For a quick fix, reload your NGINX instance. For a long-term fix, ensure that instead of defining the 3scale backend in an upstream block, you define it as a variable within each server block; example:
server {
  # Enabling the Lua code cache is strongly encouraged for production use. Here it is enabled
  .
  .
  .
  set $threescale_backend "https://su1.3scale.net:443";
When you refer to it:
location = /threescale_authrep {
  internal;
  set $provider_key "YOUR_PROVIDER_KEY";

  proxy_pass $threescale_backend/transactions/authrep.xml?provider_key=$provider_key&service_id=$service_id&$usage&$credentials&log%5Bcode%5D=$arg_code&log%5Brequest%5D=$arg_req&log%5Bresponse%5D=$arg_resp;
}
You are missing some 3scale IPs from your whitelist. Following is the current list of IPs that 3scale resolves to:
- 75.101.142.93
- 174.129.235.69
- 184.73.197.122
- 50.16.225.117
- 54.83.62.94
- 54.83.62.186
- 54.83.63.187
54.235.143.255
The above issues refer to problems with perceived 3scale availability. However, you might encounter similar issues with your API availability from the API gateway if your API is behind an AWS ELB. This is because NGINX, by default, does DNS resolution at start-up time and then caches the IP addresses. However, ELBs do not ensure static IP addresses and these might change frequently. Whenever the ELB changes to a different IP, NGINX is unable to reach it.
The solution for this is similar to the above fix for forcing runtime DNS resolution.
-
Set a specific DNS resolver such as Google DNS, by adding this line at the top of the
httpsection:resolver 8.8.8.8 8.8.4.4;. -
Set your API base URL as a variable anywhere near the top of the
serversection.set $api_base "http://api.example.com:80"; -
Inside the
location /section, find theproxy_passline and replace it withproxy_pass $api_base;.
-
Set a specific DNS resolver such as Google DNS, by adding this line at the top of the
12.1.3. Post-deploy issues
If you make changes to your API such as adding a new endpoint, you must ensure that you add a new method and URL mapping before downloading a new set of configuration files for your API gateway.
The most common problem when you have modified the configuration downloaded from 3scale will be code errors in the Lua, which will result in a 500 - Internal server error such as:
curl -v -X GET "http://localhost/"
* About to connect() to localhost port 80 (#0)
*   Trying 127.0.0.1... connected
> GET / HTTP/1.1
> User-Agent: curl/7.22.0 (x86_64-pc-linux-gnu) libcurl/7.22.0 OpenSSL/1.0.1 zlib/1.2.3.4 libidn/1.23 librtmp/2.3
> Host: localhost
> Accept: */*
>
< HTTP/1.1 500 Internal Server Error
< Server: openresty/1.5.12.1
< Date: Thu, 04 Feb 2016 10:22:25 GMT
< Content-Type: text/html
< Content-Length: 199
< Connection: close
<

<head><title>500 Internal Server Error</title></head>

<center><h1>500 Internal Server Error</h1></center>
<hr><center>openresty/1.5.12.1</center>


* Closing connection #0
You can see the nginx error.log to know the cause, such as:
2016/02/04 11:22:25 [error] 8980#0: *1 lua entry thread aborted: runtime error: /home/pili/NGINX/troubleshooting/nginx.lua:66: bad argument #3 to '_newindex' (number expected, got nil)
stack traceback:
coroutine 0:
  [C]: in function '_newindex'
  /home/pili/NGINX/troubleshooting/nginx.lua:66: in function 'error_authorization_failed'
  /home/pili/NGINX/troubleshooting/nginx.lua:330: in function 'authrep'
  /home/pili/NGINX/troubleshooting/nginx.lua:283: in function 'authorize'
  /home/pili/NGINX/troubleshooting/nginx.lua:392: in function  while sending to client, client: 127.0.0.1, server: api-2445581381726.staging.apicast.io, request: "GET / HTTP/1.1", host: "localhost"
In the access.log this will look like the following:
127.0.0.1 - - [04/Feb/2016:11:22:25 +0100] "GET / HTTP/1.1" 500 199 "-" "curl/7.22.0 (x86_64-pc-linux-gnu) libcurl/7.22.0 OpenSSL/1.0.1 zlib/1.2.3.4 libidn/1.23 librtmp/2.3"
The above section gives you a an overview of the most common, well-known issues that you might encounter at any stage of your 3scale journey.
If all of these have been checked and you are still unable to find the cause and solution for your issue, you should proceed to the more detailed section on Identifying API request issues. Start at your API and work your way back to the client in order to try to identify the point of failure.
12.2. Handling API infrastructure issues
If you are experiencing failures when connecting to a server, whether that is the API gateway, 3scale, or your API, the following troubleshooting steps should be your first port of call:
12.2.1. Can we connect?
Use telnet to check the basic TCP/IP connectivity telnet api.example.com 443
- Success
telnet echo-api.3scale.net 80
Trying 52.21.167.109...
Connected to tf-lb-i2t5pgt2cfdnbdfh2c6qqoartm-829217110.us-east-1.elb.amazonaws.com.
Escape character is '^]'.
Connection closed by foreign host.
- Failure
telnet su1.3scale.net 443
Trying 174.129.235.69...
telnet: Unable to connect to remote host: Connection timed out
12.2.2. Server connection issues
Try to connect to the same server from different network locations, devices, and directions. For example, if your client is unable to reach your API, try to connect to your API from a machine that should have access such as the API gateway.
If any of the attempted connections succeed, you can rule out any problems with the actual server and concentrate your troubleshooting on the network between them, as this is where the problem will most likely be.
12.2.3. Is it a DNS issue?
Try to connect to the server by using its IP address instead of its hostname e.g. telnet 94.125.104.17 80 instead of telnet apis.io 80
This will rule out any problems with the DNS.
You can get the IP address for a server using dig for example for 3scale dig su1.3scale.net or dig any su1.3scale.net if you suspect there may be multiple IPs that a host may resolve to.
NB: Some hosts block `dig any`
12.2.4. Is it an SSL issue?
You can use OpenSSL to test:
Secure connections to a host or IP, such as from the shell prompt
openssl s_client -connect su1.3scale.net:443Output:
CONNECTED(00000003)
depth=1 C = US, O = GeoTrust Inc., CN = GeoTrust SSL CA - G3
verify error:num=20:unable to get local issuer certificate
---
Certificate chain
 0 s:/C=ES/ST=Barcelona/L=Barcelona/O=3scale Networks, S.L./OU=IT/CN=*.3scale.net
   i:/C=US/O=GeoTrust Inc./CN=GeoTrust SSL CA - G3
 1 s:/C=US/O=GeoTrust Inc./CN=GeoTrust SSL CA - G3
   i:/C=US/O=GeoTrust Inc./CN=GeoTrust Global CA
---
Server certificate
-----BEGIN CERTIFICATE-----
MIIE8zCCA9ugAwIBAgIQcz2Y9JNxH7f2zpOT0DajUjANBgkqhkiG9w0BAQsFADBE
...
TRUNCATED
...
3FZigX+OpWLVRjYsr0kZzX+HCerYMwc=
-----END CERTIFICATE-----
subject=/C=ES/ST=Barcelona/L=Barcelona/O=3scale Networks, S.L./OU=IT/CN=*.3scale.net
issuer=/C=US/O=GeoTrust Inc./CN=GeoTrust SSL CA - G3
---
Acceptable client certificate CA names
/C=ES/ST=Barcelona/L=Barcelona/O=3scale Networks, S.L./OU=IT/CN=*.3scale.net
/C=US/O=GeoTrust Inc./CN=GeoTrust SSL CA - G3
Client Certificate Types: RSA sign, DSA sign, ECDSA sign
Requested Signature Algorithms: RSA+SHA512:DSA+SHA512:ECDSA+SHA512:RSA+SHA384:DSA+SHA384:ECDSA+SHA384:RSA+SHA256:DSA+SHA256:ECDSA+SHA256:RSA+SHA224:DSA+SHA224:ECDSA+SHA224:RSA+SHA1:DSA+SHA1:ECDSA+SHA1:RSA+MD5
Shared Requested Signature Algorithms: RSA+SHA512:DSA+SHA512:ECDSA+SHA512:RSA+SHA384:DSA+SHA384:ECDSA+SHA384:RSA+SHA256:DSA+SHA256:ECDSA+SHA256:RSA+SHA224:DSA+SHA224:ECDSA+SHA224:RSA+SHA1:DSA+SHA1:ECDSA+SHA1
Peer signing digest: SHA512
Server Temp Key: ECDH, P-256, 256 bits
---
SSL handshake has read 3281 bytes and written 499 bytes
---
New, TLSv1/SSLv3, Cipher is ECDHE-RSA-AES256-GCM-SHA384
Server public key is 2048 bit
Secure Renegotiation IS supported
Compression: NONE
Expansion: NONE
No ALPN negotiated
SSL-Session:
    Protocol  : TLSv1.2
    Cipher    : ECDHE-RSA-AES256-GCM-SHA384
    Session-ID: A85EFD61D3BFD6C27A979E95E66DA3EC8F2E7B3007C0166A9BCBDA5DCA5477B8
    Session-ID-ctx:
    Master-Key: F7E898F1D996B91D13090AE9D5624FF19DFE645D5DEEE2D595D1B6F79B1875CF935B3A4F6ECCA7A6D5EF852AE3D4108B
    Key-Arg   : None
    PSK identity: None
    PSK identity hint: None
    SRP username: None
    TLS session ticket lifetime hint: 300 (seconds)
    TLS session ticket:
    0000 - a8 8b 6c ac 9c 3c 60 78-2c 5c 8a de 22 88 06 15   ..l..<`x,\.."...
    0010 - eb be 26 6c e6 7b 43 cc-ae 9b c0 27 6c b7 d9 13   ..&l.{C....'l...
    0020 - 84 e4 0d d5 f1 ff 4c 08-7a 09 10 17 f3 00 45 2c   ......L.z.....E,
    0030 - 1b e7 47 0c de dc 32 eb-ca d7 e9 26 33 26 8b 8e   ..G...2....&3&..
    0040 - 0a 86 ee f0 a9 f7 ad 8a-f7 b8 7b bc 8c c2 77 7b   ..........{...w{
    0050 - ae b7 57 a8 40 1b 75 c8-25 4f eb df b0 2b f6 b7   ..W.@.u.%O...+..
    0060 - 8b 8e fc 93 e4 be d6 60-0f 0f 20 f1 0a f2 cf 46   .......`.. ....F
    0070 - b0 e6 a1 e5 31 73 c2 f5-d4 2f 57 d1 b0 8e 51 cc   ....1s.../W...Q.
    0080 - ff dd 6e 4f 35 e4 2c 12-6c a2 34 26 84 b3 0c 19   ..nO5.,.l.4&....
    0090 - 8a eb 80 e0 4d 45 f8 4a-75 8e a2 06 70 84 de 10   ....ME.Ju...p...

    Start Time: 1454932598
    Timeout   : 300 (sec)
    Verify return code: 20 (unable to get local issuer certificate)
---
SSLv3 support (NOT supported by 3scale)
openssl s_client -ssl3 -connect su.3scale.net:443Output
CONNECTED(00000003)
140735196860496:error:14094410:SSL routines:ssl3_read_bytes:sslv3 alert handshake failure:s3_pkt.c:1456:SSL alert number 40
140735196860496:error:1409E0E5:SSL routines:ssl3_write_bytes:ssl handshake failure:s3_pkt.c:644:
---
no peer certificate available
---
No client certificate CA names sent
---
SSL handshake has read 7 bytes and written 0 bytes
---
New, (NONE), Cipher is (NONE)
Secure Renegotiation IS NOT supported
Compression: NONE
Expansion: NONE
No ALPN negotiated
SSL-Session:
    Protocol  : SSLv3
    Cipher    : 0000
    Session-ID:
    Session-ID-ctx:
    Master-Key:
    Key-Arg   : None
    PSK identity: None
    PSK identity hint: None
    SRP username: None
    Start Time: 1454932872
    Timeout   : 7200 (sec)
    Verify return code: 0 (ok)
---
For more details, see the OpenSSL man pages.
12.3. Identifying API request issues
To identify where an issue with requests to your API might lie, go through the following checks.
12.3.1. API
To confirm that the API is up and responding to requests, make the same request directly to your API (not going through the API gateway). You should ensure that you are sending the same parameters and headers as the request that goes through the API gateway. If you are unsure of the exact request that is failing, capture the traffic between the API gateway and your API.
If the call succeeds, you can rule out any problems with the API, otherwise you should troubleshoot your API further.
12.3.2. API Gateway > API
To rule out any network issues between the API gateway and the API, make the same call as before — directly to your API — from your API gateway server.
If the call succeeds, you can move on to troubleshooting the API gateway itself.
12.3.3. API gateway
There are a number of steps to go through to check that the API gateway is working correctly.
12.3.3.1. Is the API gateway up and running?
Log in to the machine where the gateway is running. If this fails, your gateway server might be down.
After you have logged in, check that the NGINX process is running. For this, run ps ax | grep nginx or htop.
NGINX is running if you see nginx master process and nginx worker process in the list.
12.3.3.2. Are there any errors in the gateway logs?
Following are some common errors you might see in the gateway logs, for example in error.log:
API gateway can’t connect to API
upstream timed out (110: Connection timed out) while connecting to upstream, client: X.X.X.X, server: api.example.com, request: "GET /RESOURCE?CREDENTIALS HTTP/1.1", upstream: "http://Y.Y.Y.Y:80/RESOURCE?CREDENTIALS", host: "api.example.com"
API gateway cannot connect to 3scale
2015/11/20 11:33:51 [error] 3578#0: *1 upstream timed out (110: Connection timed out) while connecting to upstream, client: 127.0.0.1, server: , request: "GET /api/activities.json?user_key=USER_KEY HTTP/1.1", subrequest: "/threescale_authrep", upstream: "https://54.83.62.186:443/transactions/authrep.xml?provider_key=YOUR_PROVIDER_KEY&service_id=SERVICE_ID&usage[hits]=1&user_key=USER_KEY&log%5Bcode%5D=", host: "localhost"
12.3.4. API gateway > 3scale
Once you are sure the API gateway is running correctly, the next step is troubleshooting the connection between the API gateway and 3scale.
12.3.4.1. Can the API gateway reach 3scale?
If you are using NGINX as your API gateway, the following message displays in the nginx error logs when the gateway is unable to contact 3scale.
2015/11/20 11:33:51 [error] 3578#0: *1 upstream timed out (110: Connection timed out) while connecting to upstream, client: 127.0.0.1, server: , request: "GET /api/activities.json?user_key=USER_KEY HTTP/1.1", subrequest: "/threescale_authrep", upstream: "https://54.83.62.186:443/transactions/authrep.xml?provider_key=YOUR_PROVIDER_KEY&service_id=SERVICE_ID&usage[hits]=1&user_key=USER_KEY&log%5Bcode%5D=", host: "localhost"
Here, note the upstream value. This IP corresponds to one of the IPs that the 3scale product resolves to. This implies that there is a problem reaching 3scale. You can do a reverse DNS lookup to check the domain for an IP by calling nslookup.
For example, because the API gateway is unable to reach 3scale, it does not mean that 3scale is down. One of the most common reasons for this would be firewall rules preventing the API gateway from connecting to 3scale.
There may be network issues between the gateway and 3scale that could cause connections to timeout. In this case, you should go through the steps in troubleshooting generic connectivity issues to identify where the problem lies.
To rule out networking issues, use traceroute or MTR to check the routing and packet transmission. You can also run the same command from a machine that is able to connect to 3scale and your API gateway and compare the output.
Additionally, to see the traffic that is being sent between your API gateway and 3scale, you can use tcpdump as long as you temporarily switch to using the HTTP endpoint for the 3scale product (su1.3scale.net).
12.3.4.2. Is the API gateway resolving 3scale addresses correctly?
Ensure you have the resolver directive added to your nginx.conf.
For example, in nginx.conf:
http {
  lua_shared_dict api_keys 10m;
  server_names_hash_bucket_size 128;
  lua_package_path ";;$prefix/?.lua;";
  init_by_lua 'math.randomseed(ngx.time()) ; cjson = require("cjson")';

  resolver 8.8.8.8 8.8.4.4;
You can substitute the Google DNS (8.8.8.8 and 8.8.4.4) with your preferred DNS.
To check DNS resolution from your API gateway, call nslookup as follows with the specified resolver IP:
nslookup su1.3scale.net 8.8.8.8
;; connection timed out; no servers could be reached
The above example shows the response returned if Google DNS cannot be reached. If this is the case, you must update the resolver IPs. You might also see the following alert in your nginx error.log:
2016/05/09 14:15:15 [alert] 9391#0: send() failed (1: Operation not permitted) while resolving, resolver: 8.8.8.8:53
Finally, run dig any su1.3scale.net to see the IP addresses currently in operation for the 3scale Service Management API. Note that this is not the entire range of IP addresses that might be used by 3scale. Some may be swapped in and out for capacity reasons. Additionally, you may add more domain names for the 3scale service in the future. For this you should always test against the specific address that are supplied to you during integration, if applicable.
12.3.4.3. Is the API gateway calling 3scale correctly?
If you want to check the request your API gateway is making to 3scale for troubleshooting purposes only you can add the following snippet to the 3scale authrep location in nginx.conf (/threescale_authrep for API Key and App\_id authentication modes):
body_filter_by_lua_block{
  if ngx.req.get_headers()["X-3scale-debug"] == ngx.var.provider_key then
    local resp = ""
    ngx.ctx.buffered = (ngx.ctx.buffered or "") .. string.sub(ngx.arg[1], 1, 1000)
    if ngx.arg[2] then
      resp = ngx.ctx.buffered
    end

    ngx.log(0, ngx.req.raw_header())
    ngx.log(0, resp)
  end
}
This snippet will add the following extra logging to the nginx error.log when the X-3scale-debug header is sent, e.g. curl -v -H 'X-3scale-debug: YOUR_PROVIDER_KEY' -X GET "https://726e3b99.ngrok.com/api/contacts.json?access_token=7c6f24f5"
This will produce the following log entries:
2016/05/05 14:24:33 [] 7238#0: *57 [lua] body_filter_by_lua:7: GET /api/contacts.json?access_token=7c6f24f5 HTTP/1.1
Host: 726e3b99.ngrok.io
User-Agent: curl/7.43.0
Accept: */*
X-Forwarded-Proto: https
X-Forwarded-For: 2.139.235.79

 while sending to client, client: 127.0.0.1, server: pili-virtualbox, request: "GET /api/contacts.json?access_token=7c6f24f5 HTTP/1.1", subrequest: "/threescale_authrep", upstream: "https://54.83.62.94:443/transactions/oauth_authrep.xml?provider_key=REDACTED&service_id=REDACTED&usage[hits]=1&access_token=7c6f24f5", host: "726e3b99.ngrok.io"
2016/05/05 14:24:33 [] 7238#0: *57 [lua] body_filter_by_lua:8: <?xml version="1.0" encoding="UTF-8"?><error code="access_token_invalid">access_token "7c6f24f5" is invalid: expired or never defined</error> while sending to client, client: 127.0.0.1, server: pili-virtualbox, request: "GET /api/contacts.json?access_token=7c6f24f5 HTTP/1.1", subrequest: "/threescale_authrep", upstream: "https://54.83.62.94:443/transactions/oauth_authrep.xml?provider_key=REDACTED&service_id=REDACTED&usage[hits]=1&access_token=7c6f24f5", host: "726e3b99.ngrok.io"
The first entry (2016/05/05 14:24:33 [] 7238#0: *57 [lua] body_filter_by_lua:7:) prints out the request headers sent to 3scale, in this case: Host, User-Agent, Accept, X-Forwarded-Proto and X-Forwarded-For.
The second entry (2016/05/05 14:24:33 [] 7238#0: *57 [lua] body_filter_by_lua:8:) prints out the response from 3scale, in this case: <error code="access_token_invalid">access_token "7c6f24f5" is invalid: expired or never defined</error>.
Both will print out the original request (GET /api/contacts.json?access_token=7c6f24f5) and subrequest location (/threescale_authrep) as well as the upstream request (upstream: "https://54.83.62.94:443/transactions/threescale_authrep.xml?provider_key=REDACTED&service_id=REDACTED&usage[hits]=1&access_token=7c6f24f5".) This last value allows you to see which of the 3scale IPs have been resolved and also the exact request made to 3scale.
12.3.5. 3scale
12.3.5.1. Is 3scale returning an error?
It is also possible that 3scale is available but is returning an error to your API gateway which would prevent calls going through to your API. Try to make the authorization call directly in 3scale and check the response. If you get an error, check the #troubleshooting-api-error-codes[Error Codes] section to see what the issue is.
12.3.5.2. Use the 3scale debug headers
You can also turn on the 3scale debug headers by making a call to your API with the X-3scale-debug header, example:
curl -v -X GET "https://api.example.com/endpoint?user_key" X-3scale-debug: YOUR_SERVICE_TOKEN
This will return the following headers with the API response:
X-3scale-matched-rules: /, /api/contacts.json
< X-3scale-credentials: access_token=TOKEN_VALUE
< X-3scale-usage: usage[hits]=2
< X-3scale-hostname: HOSTNAME_VALUE
12.3.5.3. Check the integration errors
You can also check the integration errors on your Admin Portal to check for any issues reporting traffic to 3scale. See https://YOUR_DOMAIN-admin.3scale.net/apiconfig/errors.
One of the reasons for integration errors can be sending credentials in the headers with underscores_in_headers directive not enabled in server block.
12.3.6. Client API gateway
12.3.6.1. Is the API gateway reachable from the public internet?
Try directing a browser to the IP address (or domain name) of your gateway server. If this fails, ensure that you have opened the firewall on the relevant ports.
12.3.6.2. Is the API gateway reachable by the client?
If possible, try to connect to the API gateway from the client using one of the methods outlined earlier (telnet, curl, etc.) If the connection fails, the problem lies in the network between the two.
Otherwise, you should move on to troubleshooting the client making the calls to the API.
12.3.7. Client
12.3.7.1. Test the same call using a different client
If a request is not returning the expected result, test with a different HTTP client. For example, if you are calling an API with a Java HTTP client and you see something wrong, cross-check with cURL.
You can also call the API through a proxy between the client and the gateway to capture the exact parameters and headers being sent by the client.
12.3.7.2. Inspect the traffic sent by client
Use a tool like Wireshark to see the requests being made by the client. This will allow you to identify if the client is making calls to the API and the details of the request.
12.4. ActiveDocs issues
Sometimes calls that work when you call the API from the command line fail when going through ActiveDocs.
To enable ActiveDocs calls to work, we send these out through a proxy on our side. This proxy will add certain headers that can sometimes cause issues on the API if they are not expected. To identify if this is the case, try the following steps:
12.4.1. Use petstore.swagger.io
Swagger provides a hosted swagger-ui at petstore.swagger.io which you can use to test your Swagger spec and API going through the latest version of swagger-ui. If both swagger-ui and ActiveDocs fail in the same way, you can rule out any issues with ActiveDocs or the ActiveDocs proxy and focus the troubleshooting on your own spec. Alternatively, you can check the swagger-ui GitHub repo for any known issues with the current version of swagger-ui.
12.4.2. Check that firewall allows connections from ActiveDocs proxy
We recommend to not whitelist IP address for clients using your API. The ActiveDocs proxy uses floating IP addresses for high availability and there is currently no mechanism to notify of any changes to these IPs.
12.4.3. Call the API with incorrect credentials
One way to identify whether the ActiveDocs proxy is working correctly is to call your API with invalid credentials. This will help you to confirm or rule out any problems with both the ActiveDocs proxy and your API gateway.
If you get a 403 code back from the API call (or from the code you have configured on your gateway for invalid credentials), the problem lies with your API because the calls are reaching your gateway.
12.4.4. Compare calls
To identify any differences in headers and parameters between calls made from ActiveDocs versus outside of ActiveDocs, run calls through services such as APItools on-premise or Runscope. This will allow you to inspect and compare your HTTP calls before sending them to your API. You will then be able to identify potential headers and/or parameters in the request that could cause issues.
12.5. Logging in NGINX
For a comprehensive guide on this, see the NGINX Logging and Monitoring docs.
12.5.1. Enabling debugging log
To find out more about enabling debugging log, see the NGINX debugging log documentation.
12.6. 3scale error codes
To double-check the error codes that are returned by the 3scale Service Management API endpoints, see the 3scale API Documentation page by following these steps:
- Click the question mark (?) icon, which is in the upper-right corner of the Admin Portal.
- Choose 3scale API Docs.
The following is a list HTTP response codes returned by 3scale, and the conditions under which they are returned:
400: Bad request. This can be because of:
- Invalid encoding
- Payload too large
-
Content type is invalid (for POST calls). Valid values for the
Content-Typeheader are:application/x-www-form-urlencoded,multipart/form-data, or empty header.
403:
- Credentials are not valid
- Sending body data to 3scale for a GET request
- 404: Non-existent entity referenced, such as applications, metrics, etc.
409:
- Usage limits exceeded
- Application is not active
-
Application key is invalid or missing (for
app_id/app_keyauthentication method) - Referrer is not allowed or missing (when referrer filters are enabled and required)
- 422: Missing required parameters
Most of these error responses will also contain an XML body with a machine readable error category and a human readable explanation.
When using the standard API gateway configuration, any return code different from 200 provided by 3scale can result in a response to the client with one of the following codes:
- 403
- 404