
Creating the Developer Portal
A good developer portal is a must have to assure adoption of your API. Create yours in no time.
Abstract
Making open source more inclusive
Red Hat is committed to replacing problematic language in our code, documentation, and web properties. We are beginning with these four terms: master, slave, blacklist, and whitelist. Because of the enormity of this endeavor, these changes will be implemented gradually over several upcoming releases. For more details, see our CTO Chris Wright’s message.
Chapter 1. Overview of creating your Developer Portal for 3scale-managed APIs
Your 3scale Developer Portal is the website that API consumers use to:
- Sign up for access to your 3scale-managed, upstream API
- Read documentation about how to use your upstream API
3scale provides a sample Developer Portal with features that most API providers want to implement in their Developer Portal. This native Developer Portal uses the sample Echo API to demonstrate the structure of a typical Developer Portal. After you explore the native Developer Portal, there are instructions for changing it so you can learn how to create your own Developer Portal.
There are no prerequisites for exploring and modifying the native Developer Portal. However, after you modify the native Developer Portal to create your own Developer Portal, you must also implement sign-in workflows and authentication before you open your Developer Portal to API consumers.
1.1. Touring the 3scale editing environment for creating your Developer Portal
Before you start to create your Developer Portal, explore the sample Echo API Developer Portal provided with 3scale. The Echo API Developer Portal is your starting point for creating your own Developer Portal. You do not create a Developer Portal from scratch. Instead, you modify the native Echo API Developer Portal to create a Developer Portal that has the look and feel that you want.
Procedure
- In the 3scale Admin Portal, expand the context selector at the top and click Audience.
In the navigation tree on the left, expand Developer Portal and click Content. This displays the main editing environment for creating your Developer Portal:
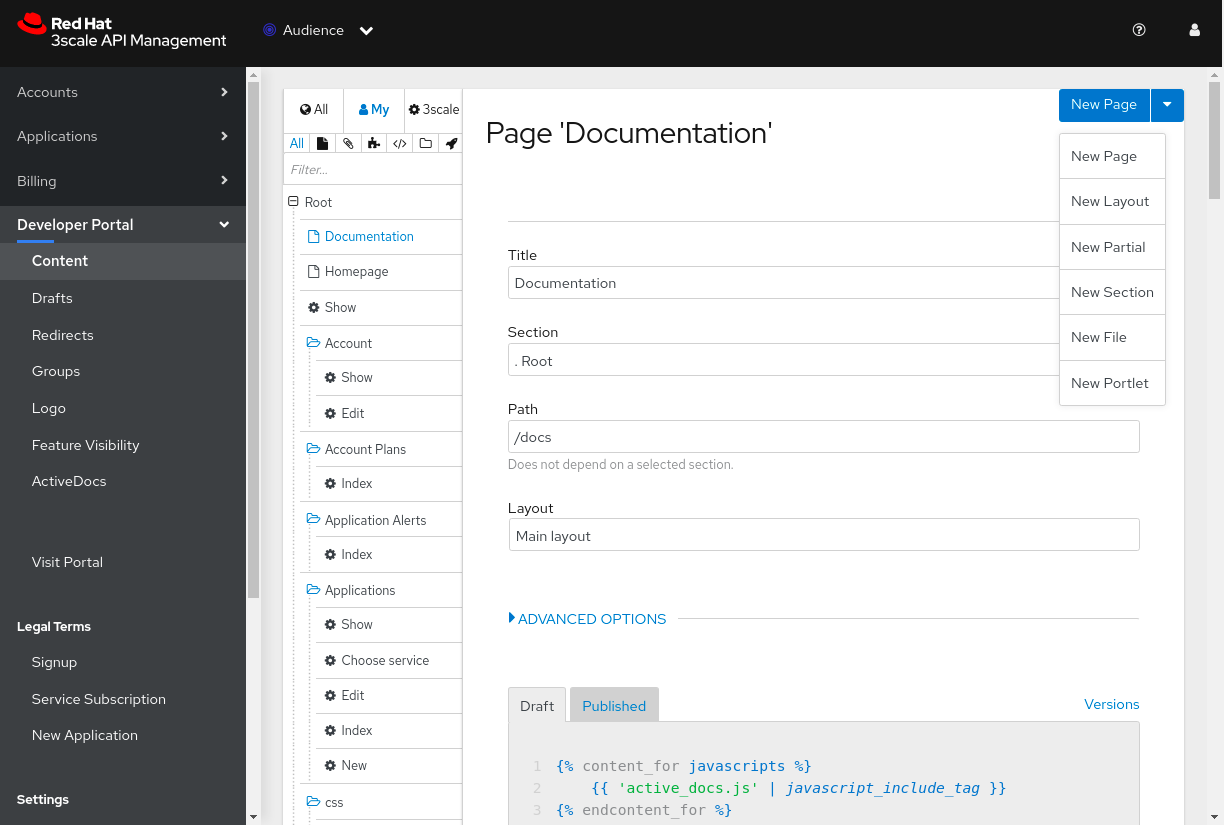
Under Root, 3scale displays the Developer Portal resources hierarchy:
- Documentation, Homepage, and Show are the foundation pages for the Developer Portal. For each page, scroll down to see the HTML that defines the page content.
- Folders below those pages contain pages that pull your 3scale resources into the Developer Portal. For example, the Account folder contains pages for displaying and editing 3scale accounts that a 3scale administrator created in the Admin Portal. Use these pages as a starting point and modify them as needed.
- In the upper right, the New Page drop-down lets you add a page, layout, partial, section, file, or portlet. Select each one to see the information you provide to create one.
- With Developer Portal > Content selected, scroll down the resources hierarchy to almost the bottom until you see Layouts and click Main layout.
Scroll back up to the top so that the Layout ‘Main Layout” heading is visible.
After the internal title and system name, you can see that Liquid is enabled. Liquid is the framework that 3scale uses to display and process most of the data from the 3scale system. The code that defines page content contains Liquid markup as well as HTML. You can see this in the Draft tab, which contains the code for the main layout for Developer Portal pages.
- In the navigation tree on the left, below Developer Portal > Content, click each sub-category in turn to explore it: Drafts, Redirects, Groups, Logo, Feature Visibility, and ActiveDocs.
In the navigation tree on the left, below Developer Portal, click Visit Portal, which is the last entry.
A new browser tab displays the website for the development version of the 3scale-provided Echo API Developer Portal. You use this development version to view the 3scale native Developer Portal. You can then iteratively customize and view changes that you make to the native Developer Portal to create your own Developer Portal.
You know that this is the development version of the Developer Portal because it has a dark gray panel on the right with Draft|Published at the top. The Draft view supports iterative/incremental improvements. When the Draft version looks and behaves the way you want it to, you can publish it.
The panel on the right lists the elements that provide the content for the current page:
- Page Homepage
- Layout Main layout
- Partial Submenu
- Partial analytics
- Click Page Homepage. A new browser tab displays the Developer Portal editing environment with Page 'Homepage' open for editing.
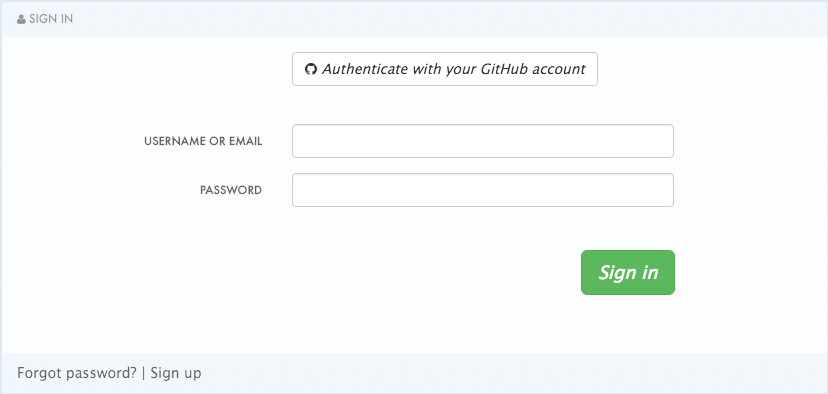
Go back to the development version of the Echo API Developer Portal and in the upper right, click SIGN IN, which displays the SIGN IN page that API consumers use to sign in to your Developer Portal.
In the gray panel on the right, below the list of templates, is a username and a password that you can use to simulate signing in to your Developer Portal:
-
In the SIGN IN page, in the USERNAME OR EMAIL field, enter
John, which is the username listed in the gray panel on the right. -
In the PASSWORD field, enter
123456, which is the password listed in the gray panel. - Click Sign In to display the Developer Portal as your API consumers would see it.
-
In the SIGN IN page, in the USERNAME OR EMAIL field, enter
Next steps
Continue to explore the native Developer Portal as much as you want. When you are comfortable navigating the editing environment and the development version of the Echo API Developer Portal, follow the procedure for Modifying the 3scale native Developer Portal.
1.2. Modifying the 3scale native Developer Portal
After exploring the Echo API Developer Portal, make some changes to it before you start to create your own Developer Portal. These practice steps are helpful preparation for creating your Developer Portal.
This procedure replaces the sample 3scale Echo API landing page heading with a heading for the common Swagger Petstore API. It also shows you how to update your Developer Portal to display documentation for the Petstore API.
Procedure
- In the 3scale Admin Portal, expand the context selector at the top and click Audience.
- In the navigation tree on the left, expand Developer Portal and click Content.
Under Root, click Homepage, which is the internal title of the Developer Portal landing page, and change the landing page heading that appears in the development version of your Developer Portal:
- In Page 'Homepage', scroll down to see the code that renders the landing page.
In line
5, change<h1>Echo API</h1>
to
<h1>Petstore API</h1>
- At the bottom of the page, click Publish.
- In the navigation tree on the left, below Developer Portal, click Visit Portal to display the development version of your Developer Portal and see that the landing page heading is now Petstore API.
- Remain in the development version of your Developer Portal and click Documentation, which is in the top menu bar. The Developer Portal displays ActiveDocs for the Echo API.
- Return to the 3scale Admin Portal and select Developer Portal > ActiveDocs to see an entry for the Echo API. 3scale provides an OpenAPI document that defines the Echo API. 3scale uses this OpenAPI document to display ActiveDocs for the Echo API.
Import an OpenAPI document that defines the Swagger Petstore API:
- Go to https://petstore.swagger.io/v2/swagger.json and copy the JSON content to your clipboard.
- Return to the 3scale Admin Portal with Developer Portal > ActiveDocs selected.
- On the ActiveDocs page, click Create a new spec.
-
In the Name field, enter
Petstore. - Select Publish?.
- Click in the API JSON Spec window and paste the Swagger Petstore JSON content from your clipboard.
- Click Create Spec at the bottom of the page. 3scale displays ActiveDocs for the Petstore API.
- In the navigation tree on the left, under Developer Portal, click ActiveDocs. After Echo API, there is a second entry for Petstore.
Display documentation for the Petstore API in your Developer Portal:
- In the navigation tree on the left, under Developer Portal, click Content.
- Under Root, click Documentation, which is the internal title of the Developer Portal documentation page.
In Page 'Documentation', scroll down to see the code that renders the documentation landing page. Line
5identifies the OpenAPI document for which your Developer Portal displays ActiveDocs. The default value of line5is:{% assign spec = provider.api_specs.first %}Default behavior is that your Developer Portal displays ActiveDocs for the first entry in the Developer Portal > ActiveDocs page, which is initially the Echo API. This figure highlights line
5:
Modify line
5to changeprovider.api_specs.firstto have an index that identifies the second entry in the ActiveDocs page:{% assign spec = provider.api_specs[1] %}Default behavior is that your Developer Portal displays ActiveDocs for only one OpenAPI document. To display ActiveDocs for more than one OpenAPI document, you must modify the Documentation page beyond this simple change.
- At the bottom of the page, click Publish.
- In the navigation tree on the left, below Developer Portal, click Visit Portal to display the development version of your Developer Portal.
- In the top menu bar, click Documentation to see documentation for Swagger Petstore.
Next steps
Start creating your Developer Portal by changing the native Developer Portal pages so they display information about access to your 3scale-managed API and documentation for your API.
1.3. Descriptions of additional 3scale features for modifying the native Developer Portal
3scale provides many features for customizing the native Developer Portal to create your own Developer Portal.
During development of your Developer Portal, anyone who needs to view your Developer Portal must specify an access code. Keep this access code in place while API providers are performing the required tasks for opening your Developer Portal to access by API consumers The access code ensures that only you or anyone with this code can view your Developer Portal. The access code is in the Domains & Access page, which is available in the Admin Portal by selecting Audience > Developer Portal > Domains & Access.
The following list introduces some of the features for modifying the native Developer Portal:
In the Developer Portal > Content environment, the New Page drop-down in the upper right lets you add the following elements to your Developer Portal:
- Page - basic unit of Developer Portal content.
- Layout - a template that multiple pages can use.
- Partial - content that can be reused in other partials, in layouts, and in pages.
- Section - functionally equivalent to a directory. Create sections to organize Developer Portal content.
- File - a resource that you want your Developer Portal to use such as a stylesheet, an image, or a script.
- Portlet - external RSS feed, table of contents, or latest forum posts.
- You can input code in HTML, Markdown, or Textile. The code editor supports code highlighting, tabulations, line numbers, and other features.
You can preview the draft or published version of a page. Below a page’s text editor, clicking Preview displays the development version of the Developer Portal.
The preview has a dark gray vertical bar on the right side. At the top of the dark gray bar, one of Draft | Published is highlighted to indicate which version you are viewing. This bar contains links to the editing environment for the following:
- The page.
- The layout that the page uses.
- Any partials that the page uses. A partial is code that can be reused in many places on different pages.
The Draft view of the development version of the Developer Portal supports iterative/incremental improvements. When the Draft version looks and behaves correctly, you can publish it. When the access code is in place, publishing a page means that you can view what an API consumer would see if your Developer Portal was live. When the access code is no longer in place, publishing a page updates that page in your live Developer Portal.
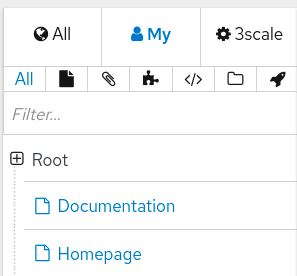
The filter field lets you search for resources in your Developer Portal environment. 3scale displays only the elements that you are searching for, which makes it easier to find just what you want to work on. The filter field is just below the icons:
- The Developer Portal > Redirects page lets you set up redirects from one Developer Portal URL to another. For example, if you deprecate a page that you created, you can redirect requests to the new page.
Placeholders are editable fields. For example, the Developer Portal > Content > Login > New page has several placeholders:
<input id="session_username" name="username" tabindex="1"
  autofocus="autofocus" type="text"
  placeholder="Authenticate with your email"
  class="form-control">
...
<input id="session_password" name="password" tabindex="2"
  type="password"
  placeholder="…and password"
  class="form-control">
This code generates the following fields in your Developer Portal:

You can update the placeholder text and publish it to see the update in your Developer Portal. For example, you can change
Authenticate with your emailtoAuthenticate email. After you publish the page, you can see the updated prompt in your Developer Portal, for example:
1.4. How 3scale layouts and partials reuse Developer Portal content
In the Developer Portal > Content environment, when you scroll down in the resource hierarchy you can see headings for Layouts and Partials. Layouts and partials let you reuse content in your Developer Portal:
- A layout defines the basic structure for a page and functions as a page template. Every page that uses a particular layout contains the content that the layout defines. As you can see in the resource hierarchy under Layouts, your native Developer Portal provides an Error layout and a Main layout. You can modify the code for these layouts and you can create layouts.
A partial defines code that you use in more than one place in your Developer Portal. For example, a partial can define the footer in all layouts or the sidebar on multiple pages. You can use a partial in a page, a layout, another partial, or an email template. In the resource hierarchy, under Partials, you can see the partials that the native Developer Portal provides. There are partials for gathering analytics, subscribing to application plans, displaying submenus, and more. Again, you can modify these partials and you can create partials.
In a page, layout, partial, or email template, to use a partial, you specify an
includecommand with the name of the partial. For example, to use the submenu partial, you would specify{% include “submenu” %}
Layouts and partials have draft and published states as well as a version history. For example, you can save a draft, publish it, and revert to the last published version.
To learn about editing and writing code for layouts and partials, see the 3scale Liquid Reference.
1.5. Adding images and other assets to your Developer Portal for 3scale-managed APIs
Typically, you want to use your own images, files, or other assets to customize the native Developer Portal. To do this, add the file to the Developer Portal content library, make a note of its path in this environment, and then in code you add a link to the location of the file in the content library.
Prerequisites
- Access to the image, file, or other asset that you want to use in your Developer Portal
Procedure
Add your asset to the Developer Portal content library:
- In the Developer Portal > Content environment, in the upper right, expand New Page and select New File.
- Under Upload File, click in the Section field to display a list of the directories in which you can store the asset you are adding and click the appropriate directory to select it. For example, you might select |- images.
- Optional. In the Path field, enter any additional path levels that are useful for you.
- Select Downloadable.
- Click Choose File, navigate to the file you want to add, select it and click Open.
-
Optional. In the Tag list field, enter a Liquid tag that you want to use to include this new content in code, for example, you might enter
my-logo. - Click Create File to add your asset to the Developer Portal content library.
-
Make a note of the path to the asset you added. For example, if you added the
MyLogo.pngimage to the images section, the path would be/images/MyLogo.png. To use the asset in code, insert an HTML
<a>element. For example:<a href="/images/MyLogo.png"/>
Alternatively, if you added a Liquid tag to your asset, you can use the asset in code by specifying the tag, for example:
{% my-logo %}
1.6. Considerations for customizing the native Developer Portal for 3scale-managed APIs
Before you start customizing the native Developer Portal to create your own Developer Portal, you should have a plan for its basic elements, reusable content, page hierarchy, page headers and footers, and branding.
Basic Developer Portal elements - The plan for your Developer Portal should include:
- Site map: Skeleton of how your portal is organized.
- Top menu bar: Navigation that is repeated on each page.
- Side menu bars: Access to individual pages in each section.
- Page layout guidelines: For a consistent look and feel.
- Reusable content - Layouts and partials ensure consistency in your Developer Portal. Create them before you start creating pages.
Page hierarchy - Beginning at the root level in your site map, create a section for each of your top menu items.
Next, create the pages needed for each top menu item. When you create a page, be sure to associate it with the correct section. This creates a consistent structure for URL paths in your Developer Portal. To code a page with a markup language such as Textile or Markdown, expand the page’s ADVANCED OPTIONS. The Handler field identifies the markup language.
- Page headers and footers - Repetitive page elements are typically defined in partials. When you have only a few layouts, you might prefer to define headers and footers directly in your layouts rather than in partials.
Branding - The default native Developer Portal stylesheet,
default.css, is large and complex. Rather than extending this stylesheet, create your own stylesheet with customizations that overwrite the defaults.You can create a new stylesheet in the same way you create a page. Choose the css section and an appropriate MIME content type in the advanced page settings. Then in your layouts, after the link to
default.css, add a link to your custom stylesheet. For example, if you createmy-custom.css, you would insert:<link rel="stylesheet" href="/css/my-custom.css" />
Built-in features that you cannot modify include:
- Pagination
- Message menu
- Forums - You can change only the layout.
- Payment - Only a few text fields in these pages are editable.
1.7. Requirements for allowing access to your Developer Portal for 3scale-managed APIs
Before you can give API consumers access to your Developer Portal, API providers must perform the following tasks. These tasks can be performed concurrently:
Change the 3scale native Developer Portal to have the look and feel that you want:
- Liquids: Developer Portal shows how to use Liquid markup to display and process 3scale system data related to your API. Liquid markup is the primary way to add logic to your Developer Portal pages.
- Customizing the Developer Portal layout describes how to change the native Developer Portal to match your own branding. A standard cascading stylesheet (CSS) is available to provide an easy starting point for your customizations.
- Change built-in pages explains how to use CSS and JavaScript to modify or hide an element in a system-generated page. All pages provided as part of the native Developer Portal are referred to as system-generated pages.
A developer who is familiar with HTML, CSS, Liquid, and web sites in general can modify the native Echo API Developer Portal to create your Developer Portal web pages. This developer can create pages and modify code in system-generated pages to create whatever you want API consumers to see in your Developer Portal.
Define 3scale API products, backends, and application plans, and assign policies to products.
A 3scale product is the 3scale resource that exposes your API to consumers. In your Developer Portal, API consumers read the documentation for a product and subscribe to use the API provided by a product. A 3scale product has the following characteristics:
- Bundles one or more backends, which are internal 3scale APIs that you have created.
- Has an application plan that defines the rules for using the product with regard to limits, pricing, and available features.
- Has an APIcast gateway configuration for how the gateway should process API consumer calls before sending them to your API. Policies that you add to a product change the default APIcast gateway behavior.
See the Admin Portal Guide.
Import the OpenAPI document that defines and documents your 3scale-managed API.
The foundation for your Developer Portal is an OpenAPI document that defines your API. When you import an OpenAPI document into 3scale, 3scale creates or updates ActiveDocs so you immediately have functional documentation for your API. In your Developer Portal, API consumers use this documentation to explore, test, and integrate with your API.
For each operation defined in an OpenAPI document, importing the document causes 3scale to create a method and a mapping rule. Methods and mapping rules help enforce the limits and rules for API consumer access to your API.
The 3scale guide, Providing APIs in the Developer Portal contains information and procedures for working with 3scale and OpenAPI documents. In particular, see How to write an OpenAPI document for use as a 3scale specification and Adding ActiveDocs to 3scale.
Configure the workflow for how an API consumer signs up for access to your 3scale-managed API.
Signup workflows are a critical aspect of API consumer experience with your Developer Portal. The workflow can range from self-service to total control over who gains access to what. Accounts, services, and application plans offer multiple levels of granularity. At each level, you control whether there is an approval gate that you operate and whether the API consumer is required to make any choices.
For maximum automation and self-service, you can remove all approval steps and enable all possible default plans. Immediately after signup, your Developer Portal can issue a key that provides API consumer access to your Developer Portal.
The native Developer Portal provides commonly used fields for user, account, and application signups. You might need to add custom fields to these typically used fields. For details, see Configuring signup flows and Custom signup form fields. Be sure to configure workflows before you customize email templates.
Implement authentication of API consumers.
Authentication of API consumer access to your Developer Portal secures your Developer Portal resources and your APIs. You can use any of the following methods to authenticate access to your Developer Portal:
Customize 3scale native templates for email communication between your Developer Portal and API consumers.
Many different events require communication between your Developer Portal and API consumers including providing an account activation link upon signup, password recovery, service charges, change notifications, and many more. 3scale provides templates for each typical email type that a Developer Portal sends to API consumers.
After you have defined signup workflows, customize the content of email messages. This lets you closely match the workflows that you set up for your Developer Portal.
See Email templates and Liquids: Email templates.
Specify terms, conditions, and policies that API consumers must agree to for access to your 3scale-managed API.
When you allow API consumers to sign up and call your API, you typically want them to agree to your terms, conditions and policies before you grant access. You can have different versions of terms and conditions, for example, for signup, for using particular applications, or for using particular services, if your Developer Portal provides more than one service.
If you are charging for use of your API, you probably want agreement to your credit card policies.
Set up API consumer billing and credit card gateways.
The 3scale billing process runs daily. It creates invoices for each API consumer account that is subscribed to a paid service. An invoice can be in one of the following states: open, finalized, pending, unpaid, paid, failed, canceled. 3scale uses the payment gateway that you configure to process invoices.
The 3scale billing process can run in a prepaid or postpaid mode. Billing in 3scale is based on the calendar month and there are special events that happen on the first day of the month.
The last task you must perform before your Developer Portal goes live is to remove the access code. Do this only after authentication for access to your Developer Portal is in place and after you have thoroughly tested your Developer Portal to confirm that it is behaving as you want it to.
To delete the access code, display the Developer Portal > Content environment. In the lower right, click Open your Portal to the world and confirm this action.
1.8. Optional steps for customizing your Developer Portal for 3scale-managed APIs
Beyond the requirements for opening your Developer Portal to API consumers, you might want to do the following:
Provide multiple APIs in your Developer Portal.
Each OpenAPI document that you import into 3scale provides the foundation for a separate API offering, also referred to as a separate service. To configure your Developer Portal to provide multiple services, the main task is to create a page that lets an API consumer choose which service or services to subscribe to.
For details, see Multi-service signup.
Mark Developer Portal pages or portions of pages as visible to only the API consumers you specify.
You might need to have parts of your Developer Portal accessible to only a specific group of API consumers. You can restrict access to a page, part of a page, or a menu selection, which typically corresponds to a section.
A handy way to restrict access to a section is to map each section to a logical group of API consumers. For example, suppose there are API consumers who are partners. You can create a group called partners and give only that group access to a particular section.
You can provide access to restricted content to API consumers based on a change in state. For example, when an API consumer upgrades to a new application plan additional pages might automatically become visible to that API consumer.
Another way to restrict access is to require an API consumer to log in to view certain content.
For details, see Restricted content.
Implement webhooks.
Webhooks let you tightly integrate 3scale with your back-office workflow. When specified events happen in the 3scale system, your back-office applications can be notified with a webhook message. Your application can then use that data, for example, information about a new account, to populate your Developer Portal.
For details, see Webhooks.
1.9. Updating Developer Portals used in 3scale releases earlier than 2.8
In 3scale 2.8, external assets were moved from Content Delivery Networks (CDN) to the 3scale codebase. Consequently, starting with 3scale 2.8, the native Developer Portal is created by using the cdn_asset Liquid tag. If you are upgrading from a 3scale release that is earlier than 2.8, you must update your Developer Portal to use the new assets with the cdn_asset tag. With the use of this tag, there is no longer a dependency for downloading assets from external websites.
Prerequisites
- An installation of 3scale 2.8 or later
- A Developer Portal that you created with 3scale 2.7 or earlier
Procedure
In the 3scale Admin Portal, with Audience > Developer Portal > Content selected, at the top of the resource hierarchy, click
</>to display only layouts: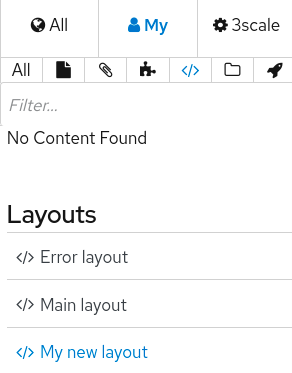
- Under Layouts, click Main layout.
In the code editor for the main layout, on or around line
17, replace this line:{{ '//netdna.bootstrapcdn.com/font-awesome/4.3.0/css/font-awesome.css' | stylesheet_link_tag }}with this line:
{% cdn_asset /font-awesome/4.3.0/css/font-awesome.css %}On or around line
19, replace this line:{{ '//ajax.googleapis.com/ajax/libs/jquery/1.7.1/jquery.min.js' | javascript_include_tag }}with this line:
{% cdn_asset /jquery/1.7.1/jquery.min.js %}- Scroll down and click Publish.
-
Go to the top of the resource hierarchy and click
 to display partials.
- Under Partials, click stats/chart.
In the code editor for stats/chart, on or around line
3, replace this line:{{ '//ajax.googleapis.com/ajax/libs/jqueryui/1.11.4/themes/ui-lightness/jquery-ui.css' | stylesheet_link_tag }}with this line:
{% cdn_asset /jquery-ui/1.11.4/jquery-ui.css %}- Scroll down and click Publish.
- Optional. If you created files based on the main layout or based on the stats/chart partial, you must similarly update those files.
Additional resources
- Liquid drops, tags, and filters in the 3scale Liquid Reference
Chapter 2. Custom signup form fields
Learn how to add custom signup fields and the different options around this feature.
By default, 3scale provides commonly used fields at user/account/application signup. You may need to add your own custom fields to these common defaults.
In your Admin Portal, go to Audience > Accounts > Field Definitions where you can see the default form fields and define new ones.
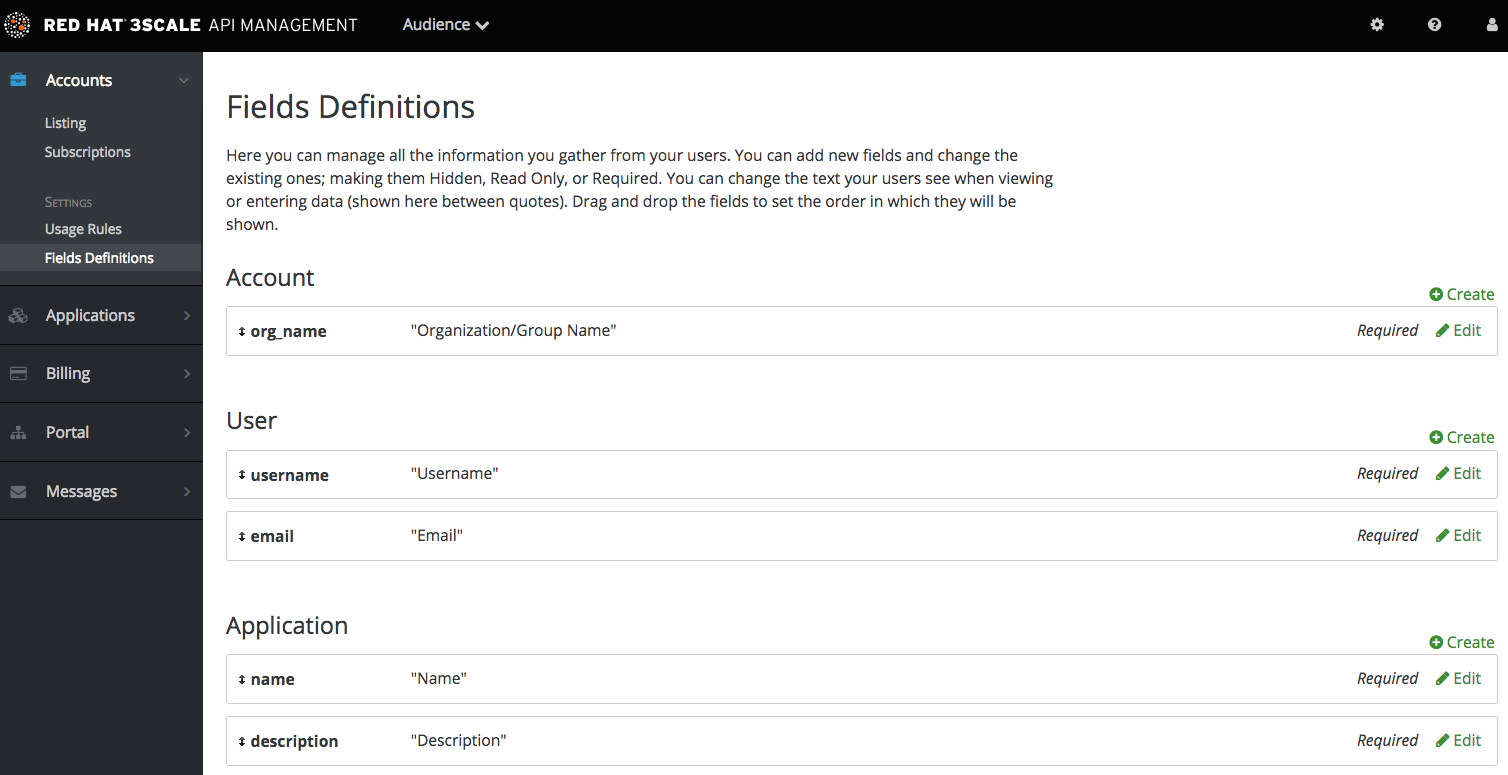
The new account/user signup page is actually an amalgamation of the first two sections. The account fields appear at the top, followed by the user fields, followed by the password fields which don’t need to be configured.

Try adding 3 extra fields, 2 to the user signup section and 1 to the account section. Click create, add the following new field definition and then create it. The required checkbox will, of course, make it mandatory on the signup form. There are also options to make things hidden and read only. A hidden field may be added, for example, when you want new signups to have fields set that you don’t necessarily want to highlight to them, such as access_restricted_areas which would be empty by default. As an admin, you can update this to true later on a per-user basis. Your page logic could read it in to determine what to display. A read-only field might be, for example, browser location, which you could use JavaScript on page load to set.

Now try adding a drop-down to the user signup form. Call it "employment type". Add these comma-separated values into the choices field: full time, part time, contract. The drop-down will be populated with these values.

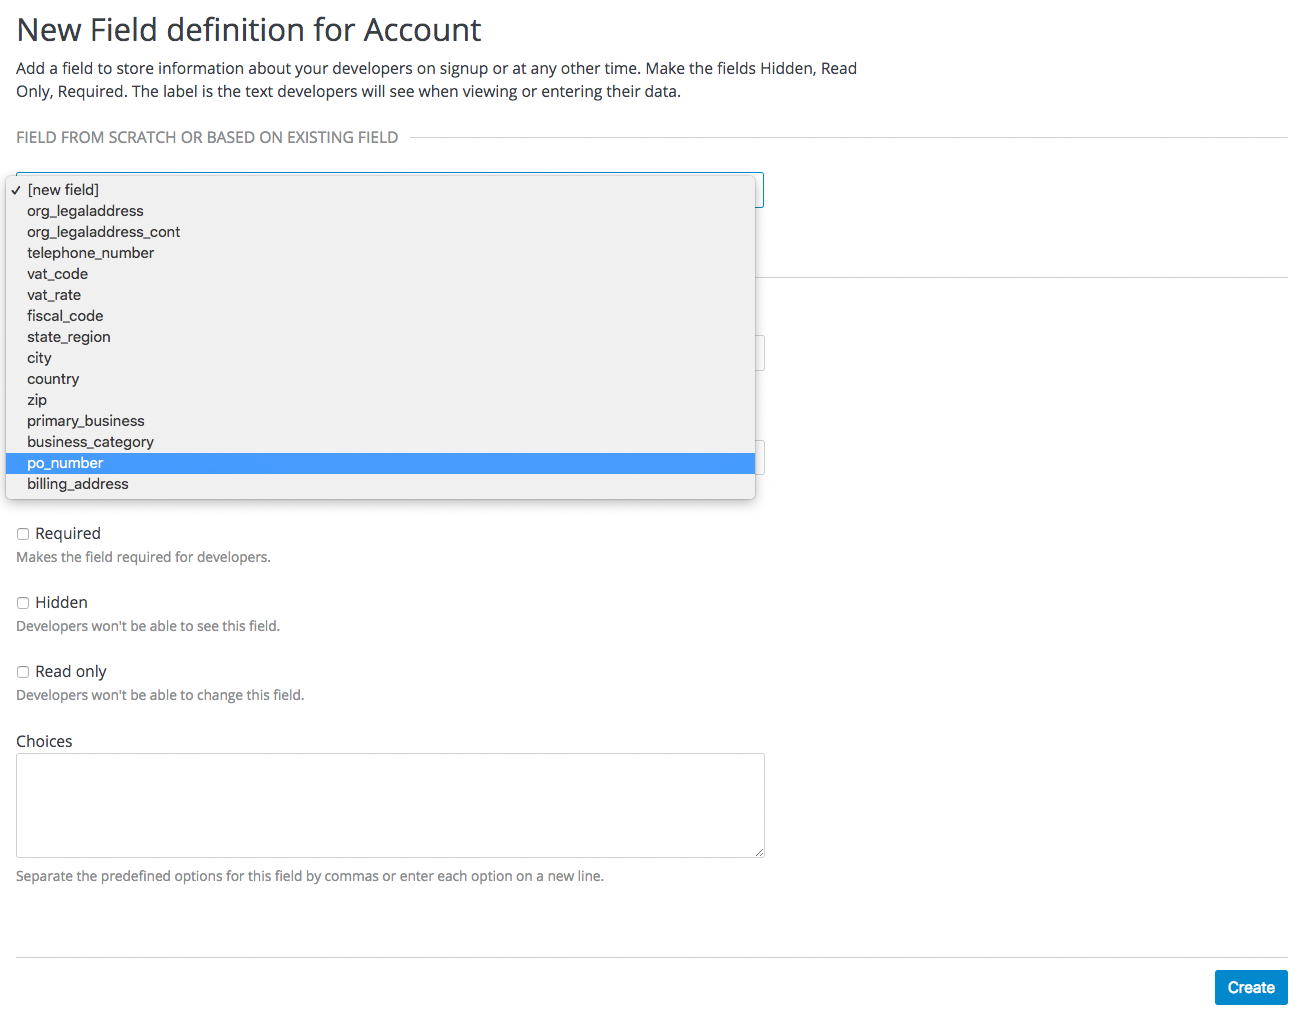
Now add a pre-defined field to the account. Usually the fields you add have no system functionality – they simply hold data that you can access later. (See restricted content.)
Create a field as normal. Then on the drop-down above "name", choose po_number. With this field, a PO number will appear on 3scale-generated invoices sent to this developer account. System-generated fields can be overridden by your admins at any time. Give the field a name – something like "PO number" – and create it.
Now take a look at your work. You can see the free text last name and the employment type drop-down have been added to the User section. The PO number system field, also free text, has been added to the Account section.

Finally, these custom fields can be set using the 3scale ActiveDocs; for example, application create.
Chapter 3. Configuring signup flows
In this section, you’ll see which settings to configure to adjust signup workflows.
Signup workflows are a critical aspect of the developer experience you provide through your Developer Portal. The process can range from being completely automatic and self-service to the other extreme of requiring total control over who gains access to what, with various levels of granularity.
The 3scale platform allows you to model your API with a combination of account (optional), service (optional), and application plans. For each of these plans, you can control whether there is an approval gate that you operate. For each one, you also determine whether there is a default, or the developer is required to take the next step and make a choice.
For the extreme of maximum automation and self-service, remove all approval steps and enable all possible default plans. This way, a key can be issued to provide access to your API immediately after signup.
3.1. Removing all approval steps
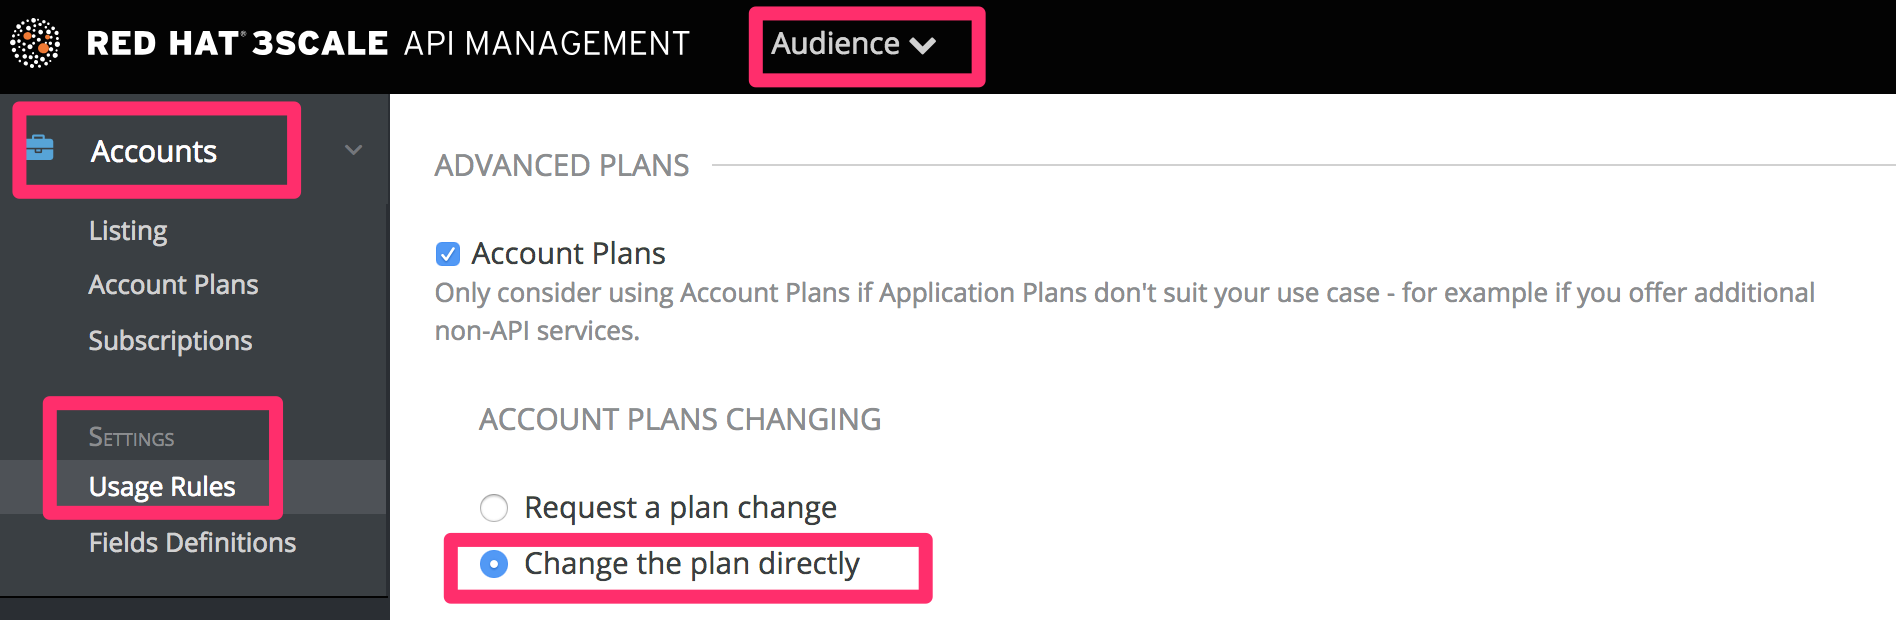
To remove approvals, go to Audience > Accounts > Usage Rules and in the Signup section, make sure the option of Developers are allowed to sign up themselves is checked.

Optionally, if you have account and service plans enabled, scroll down the page and make sure the option Change plan directly is enabled in both cases:
3.2. Enabling all possible default plans
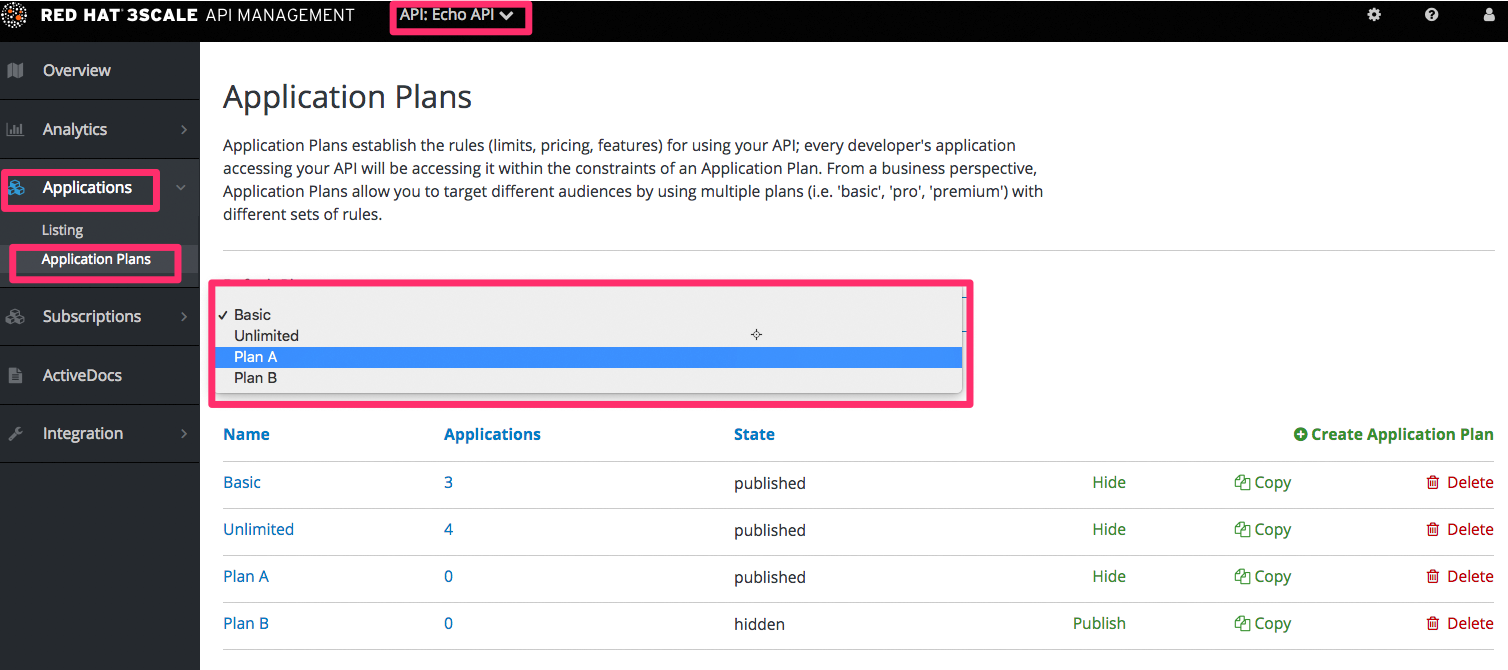
Application plans
Optionally, if you have account and service plans enabled, choose default plans for those too
Account plans (optional)

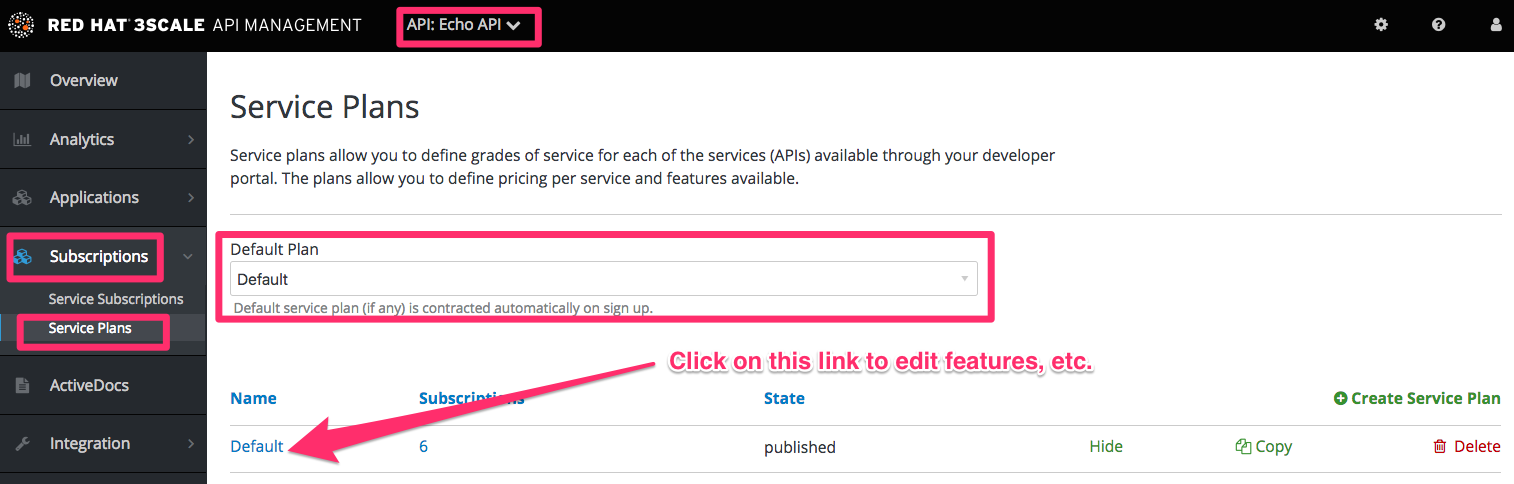
Service plans (optional)
3.3. Testing the workflow
Once you’ve made your desired settings changes, test out the results by going to your Developer Portal and attempting to sign up as a new developer. Experiment and make any necessary adjustments to get exactly the right workflow for your API. When you’re happy with the workflow, it’s a good time to check your email notifications to make sure they provide the right information for your developers.

Chapter 4. Multi-service signup
By the end of this section, you’ll be familiar with the procedure to create and customize a multiple-service signup page.
If you’re using the multiple services functionality, you’re able to customize the signup procedure to allow customers to subscribe to different services.
4.1. Prequisites
You should be familiar with layout and page creation procedures as well as with the basics of Liquid formatting tags. For more details about liquid tags, see Liquid reference. "Multiple Service" functionality must also be enabled on your account (available for Pro plan and up).
It’s strongly recommend that you read about signup workflows, so you’ll have the whole setup prepared and know how it works.
4.2. Introduction
Start the process by creating a new layout, which will serve as the template for your multi-service signup page. Go into the Layouts section of the CMS system, and create the new layout. You can call it multipleservicesignup to be able to easily distinguish it from the other layouts. In the editor, paste the general structure of your standard layout (such as home or main layout). Now delete everything you don’t need – all the containers, sidebars, additional boxes, etc.

Having created the backbone of your layout, proceed to customizing the code for signup.
4.3. Multi-service signup
4.3.1. Retrieving information about services
In order to retrieve all the information about the services that you need to construct the proper signup link, you have to loop through the service objects. Services are a part of the model object.
{% for service in provider.services %}
  .
  .
  .
{% endfor %}
4.3.2. Configuring the signup columns
You already have your layout and loop accessing the service objects. Now decide how you want to display information about the service and the signup link. For example, divide them into columns with a service description and a signup link at the bottom. Every column will be a div box with a service-column class to contain all the necessary information.
{% for service in provider.services %}
  <div class="service-column">
    <p>{{ service.name }}</p>
    <p>{{ service.description }}</p>
    .
    .
    .
  </div>
{% endfor %}
The container inside serves as a custom description field. service.name is the service name, which in this case will be the container’s name.
4.3.3. Configuring the subscription
Now the main part of your custom service signup – to create the signup link, extract the signup URL and the service ID. Take the signup URL from URL’s object and the service ID from your service object on which you iterate in the loop. The final link code will look like this:
<a href="{{ urls.signup }}?{{ service | toparam }}">Signup to {{ service.name }}</a>You also have to take into account that the user may already have signed up for some of your services. Create a conditional block to check.
{% unless service.subscribed? %}
  <a href="{{ urls.signup }}?{{ service | toparam }}">Signup to {{ service.name }}</a>
{% endunless %}
With this, you can generate the final code:
{% for service in provider.services %}
  <div class="service-column">
      <p>{{ service.name }}</p>
      <p>{{ service.description }}</p>
      {% unless service.subscribed? %}
        <a href="{{ urls.signup }}?{{ service | to_param }}">Signup to {{ service.name }}</a>
      {% endunless %}
  </div>
{% endfor %}
4.3.4. Styling
Add some final touches to the generated markup, depending on the number of services you have. In the case of this example it’s two, so the CSS code for the service-column div will be:
.service-column {
    float: left;
    margin-left: 10%;
    width: 45%;
}
.service-column:first-child {
  margin-left: 0;
}
In the example, we’ve used the percentage-based layout to dynamicaly assign the width of the column basic on the containing div’s dimensions.
Now you should have a properly working and good-looking multiple services subscripition page. Congratulations!
If you’d like to display the columns in a specific order, try using conditional expressions (if/else/case) conditioning the service name or another value you know.
Chapter 5. Developer Portal authentication
Follow these steps to configure access to your developer portal.
This article shows how to enable and disable the different types of authentication that can be made available on your developer portal to allow your developers to sign up or sign in.
At the moment, 3scale supports several methods of authenticating to the Developer Portal, which are covered in the following sections:
By default, only one type of authentication will be enabled on your developer portal, two if you signed up on 3scale.net:
- Username/email and password
- Authentication via GitHub (using the 3scale GitHub application) - only enabled by default if you signed up on 3scale.net
Older 3scale accounts (created prior to December 14th, 2015) might need to follow an extra step in order to enable GitHub and Auth0 authentication.
If this applies to you, you will need to add the following code snippet to the login and signup templates in order to enable this feature in both forms.
{% include 'login/sso' %}5.1. Enabling and disabling username/email and password
By default, the username/email and password authentication is enabled on your developer portal. Usually there is no change to be made here, as this is a standard way for your developers to create an account and to login.
However, in some rare cases you might want to remove this authentication type. To do so, edit the Login > New template as in the screenshot below:

If you need to add back the username/email and password authentication to your developer portal, just remove the liquid comment tags added in the previous step.
5.2. Enabling and disabling authentication via GitHub
In order to enable your own GitHub application, first you will need to create one and retrieve the corresponding credentials.
There are two different ways you can configure authentication via GitHub:
- Using the 3scale GitHub application (enabled by default for hosted 3scale accounts)
- Using your own GitHub application (for on-premises installations)
To make changes to this default configuration, you can go to your 3scale Admin Portal, in Audience > Developer Portal > SSO Integrations you will see the following screen:

Click on GitHub to access the configuration screen:

From this screen you can:
- Make the GitHub authentication available or unavailable on your developer portal – to do so, simply check or uncheck the "Published" box.
-
Choose the 3scale branded GitHub application or add your own GitHub application – the 3scale GitHub application is enabled (published) by default. You can configure your own GitHub application by clicking on Edit and entering the details of the OAuth application created in GitHub ("Client" and "Client secret"). Please note that in order to make the integration work properly with your own GitHub application, you should configure the authorization callback URL of your GitHub application using the "Callback URL" that you should see after switching to the "custom branded" option (e.g.
https://yourdomain.3scale.net/auth/github/callback). - Test that the configured authentication flow works as expected.
5.3. Enabling and disabling authentication via Auth0
5.3.1. Note
This feature is only available on the Enterprise plans.
In order to have your developers authenticate using Auth0, you first need to have a valid Auth0 subscription.
Authentication via Auth0 won’t be enabled by default. If you want to use your Auth0 account in conjunction with 3scale to manage the access to your developer portal, you can follow these steps to configure it:
Go to your 3scale Admin Portal, in Audience > Developer Portal > SSO Integrations click on Auth0.

On this configuration screen, you’ll need to add the details of your Auth0 account. Once you’ve entered the client ID, client secret, and site, check the "Published" box and click on Create Auth0 to make it available on your developer portal.
5.4. Enabling and disabling authentication through Red Hat Single Sign-On
This feature is only available on enterprise plans.
Red Hat Single Sign-On (RH-SSO) is an integrated Sign-On solution (SSO) that, when used in conjunction with 3scale, allows you to authenticate your developers using any of the available RH-SSO identity brokering and user federation options.
Refer to the supported configurations page for information on which versions of Red Hat Single Sign-On are compatible with 3scale.
5.4.1. Before You Begin
Before you can integrate Red Hat Single Sign-On with 3scale, you must have a working Red Hat Single Sign-On instance. Refer to the Red Hat Single Sign-On documentation for installation instructions: Installing RH-SSO 7.2
5.4.2. Configuring RH SSO to authenticate the Developer Portal
Perform the following steps to configure Red Hat Single Sign-On:
- Create a realm as described in the Red Hat Single Sign-On documentation.
- Add a client by going to Clients and clicking on Create.
Fill in the form considering the following fields and values:
- Client ID: type the desired name for your client.
-
Enabled: switch to
ON. -
Consent Required: switch to
OFF. - Client Protocol: select openid-connect.
- Access Type: select confidential.
-
Standard Flow Enabled: switch to
ON. -
Root URL: type your 3scale admin portal URL. This should be the URL address that you use to log in into your developer portal, e.g.:
https://yourdomain.3scale.netor your custom URL. Valid Redirect URLs: type your developer portal again by
/*like this:https://yourdomain.3scale.net/*.All the other parameters should be left empty or switched to
OFF.
Get the client secret with the following steps:
- Go to the Client you just created.
- Click on Credentials tab.
Select Client Id and Secret in Client Authenticator field.

Configure the
email_verifiedmapper. 3scale requires that theemail_verifiedclaim of the user data is set totrue. In order to map the "Email Verified" user attribute to theemail_verifiedclaim:- Go to the Mappers tab of the client.
Click Add Builtin.

Select the email verified option, and click Add selected to save the changes.

If you manage the users in the Red Hat Single Sign-On local database, make sure that the Email Verified attribute of the user is set to
ON.If you use User Federation, in the client created previously for 3scale SSO integration, you can configure a hardcoded claim by setting the token name to
email_verifiedand the claim value totrue.
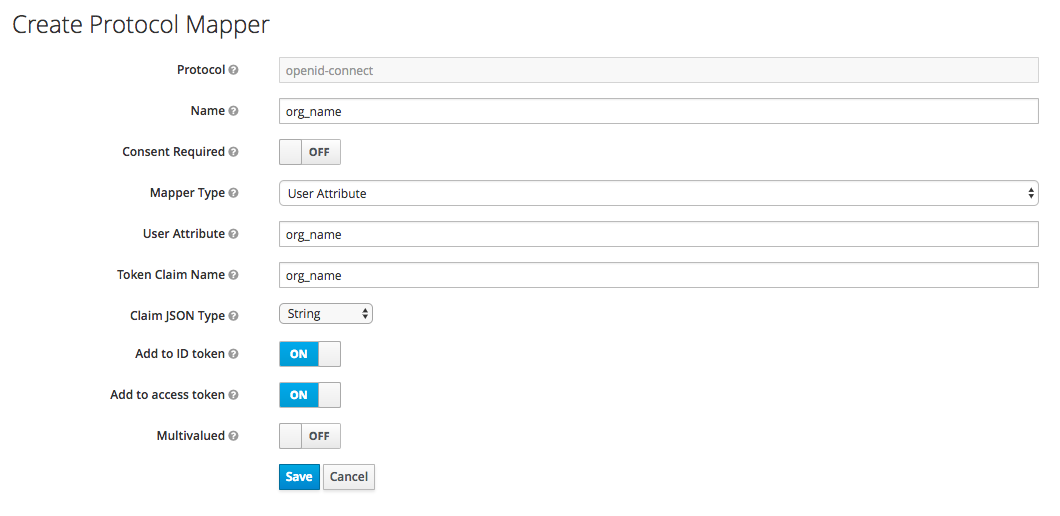
Optionally, configure the
org_namemapper.
When a user signs up in 3scale, the user is requested to fill in the signup form with the Organization Name value. In order to make the signup via Red Hat Single Sign-On transparent for the user by not requiring to fill in the signup form on the developer portal, you need to configure an additionalorg_namemapper:- Go to the Mappers tab of the client.
- Click Create.
Fill the mapper parameters as follows:
-
Name: type any desired name, e.g.
org_name. -
Consent Required: switch to
OFF. - Mapper Type: select User Attribute.
- User Attribute: type org_name.
- Token Claim Name: type org_name.
- Claim JSON Type: select String.
-
Add to ID token: switch to
ON. -
Add to access token: switch to
ON. -
Add to userinfo: switch to
ON. -
Multivalued: switch to
OFF.
-
Name: type any desired name, e.g.
Click Save.
If the users in Red Hat Single Sign-On have the attribute
org_name, 3scale will be able to create an account automatically. If not, then the user will be asked to indicate Organization Name before the account can be created. Alternatively, a mapper of type Hardcoded claim can be created to set the organization name to a hardcoded value for all users signing in with the Red Hat Single Sign-On account.
-
To test the integration, you need to add a user. To achieve this, navigate to Users, click Add user, and fill the required fields. Note that when you create an User in Red Hat Single Sign-On the Email Verified attribute (
email_verified) should be set toON, otherwise the user will not be activated in 3scale.
Using Red Hat Single Sign-On as an identity broker
You can use Red Hat Single Sign-On as an identity broker or configure it to federate external databases. For more information about how to configure these, see the Red Hat Single Sign-On documentation for identity brokering and user federation.
If you decide to use Red Hat Single Sign-On as an identity broker, and if you want your developers to be able to skip both the RH-SSO and 3scale account creation steps, we recommend the following configuration. In the example provided, we are using GitHub as our identity provider.
In Red Hat Single Sign-On, after configuring GitHub in Identity providers, go to the tab called Mappers and click Create.

- Give it a name so you can identify it.
- In Mapper Type select Attribute Importer.
- In Social Profile JSON Field Path add company, which is the name of the attribute on GitHub.
In User Attribute Name add org_name, that is how we called the attribute in Red Hat Single Sign-On.
NoteRed Hat Single Sign-On requires first and last name as well as email as mandatory fields. 3scale requires email address, username, and organization name. So in addition to configuring a mapper for the organization name, and for your users to be able to skip both sign up forms, make sure that:
- In the IdP account, they have their first name and last name set.
- In the IdP account, their email address is accessible. E.g. In GitHub, if you set up your email address as private, it won’t be shared.
5.4.3. Configuring 3scale to authenticate the Developer Portal
As an API provider, configure 3scale to allow authentication for the Developer Portal using Red Hat Single Sign-On (RH-SSO).
Authentication through RH-SSO is not enabled by default. RH-SSO is available for only enterprise 3scale accounts, so you need to ask your account manager to enable the authentication via RH-SSO.
Prerequisites
- Your enterprise 3scale account is set up to enable RH-SSO.
You know the following details after Configuring RH SSO to authenticate the Developer Portal:
- Client: Name of your client in RH-SSO
- Client secret: Client secret in RH-SSO
- Realm: Realm name and URL address to your RH-SSO account
Procedure
- In the 3scale Admin Portal, select Audience > Developer Portal > SSO Integrations.
- Click Red Hat Single Sign-On.
- Specify the details of the RH-SSO client that you have configured in Section 5.4.2, “Configuring RH SSO to authenticate the Developer Portal”: client, client secret and realm.
- To save your changes, click Create Red Hat Single Sign-On
Chapter 6. Red Hat Single Sign On for Developer Portal
Red Hat Single Sign On (RH SSO) allows you to manage access control of multiple independent systems. By following this guide, you’ll be able to allow users that are logged in to your system to log in automatically to your 3scale-powered Developer Portal without being prompted to log in again.
This article shows how existing user credentials of your website can be used to automatically log in to your 3scale-powered Developer Portal.
This feature is meant for API providers that already own the identity of their API consumers (username and password) – such as when the API provider is also the identity provider.
6.1. Creating users in the 3scale platform
First of all, the API consumer must have an account in your Developer Portal. You can import your users to 3scale using the Account Management API or create them manually. Find the Account Management API in the 3scale ActiveDocs, available in your Admin Portal, under the Documentation (question mark icon (?) in the top right corner) → 3scale API Docs section.
6.2. Requesting a login link
Once the user exists, you can use an API request call to generate a URL with a built-in SSO token:
curl -X POST -d "provider_key=YOUR_PROVIDER_KEY&username=USERNAME&expires_in=60" https://YOUR_ADMIN_PORTAL.3scale.net/admin/api/sso_tokens.xml
There are 2 parameters in this call: username to specify who you are requesting the token for and expires_in which is the number of seconds that the token will be valid for (it defaults to 10 minutes).
You can also pass an additional parameter redirect_url with a location to redirect the user after a successful login. This parameter should be percent encoded. The XML response will contain a URL with a secret token included:
<?xml version="1.0" encoding="UTF-8"?>
<sso_url>
https://YOUR_DEVELOPER_PORTAL/session/create?expires_at=1365087501&token=Q0dNWGtjL2h2MnloR11yWmNwazVZY0NhenlabnBoRUNaNUlyWjZaVG8wMnBGdVNhT0VGN1NUb3FRc1pwSnRrclBZSTIwOUFwRkVTc3NuK1JTbjUrMEE9PS0tY1ZrOGFldzFJNkxna1hrQzQyZ0NGQT09--712f2990ac9248ab4b8962be6467fb149b346000
</sso_url>
You can pass either user_id or username to identify the 3scale user. Typically, the username will be the same for your system and 3scale portal. In that case, using the username should be easy since it does not require any additional information to be stored on your side. However, if you need to do some pairing and machine processes to the URLs anyway, you might be better off with user_id.
6.3. Redirecting users with automatic login
The response contains an RH SSO login URL with a token:
https://YOUR_DEVELOPER_PORTAL/session/create?expires_at=1365087501&token=Q0dNWGtjL2h2MnloR11yWmNwazVZY0NhenlabnBoRUNaNUlyWjZaVG8wMnBGdVNhT0VGN1NUb3FRc1pwSnRrclBZSTIwOUFwRkVTc3NuK1JTbjUrMEE9PS0tY1ZrOGFldzFJNkxna1hrQzQyZ0NGQT09--712f2990ac9248ab4b8962be6467fb149b346000
The URL contains all the required information for the 3scale Developer Portal SSO to log you in. You can embed it directly into web. However, the URL can expire before the user clicks it, so it is recommended to have a generic link on your page that will dynamically request a fresh SSO URL and redirect to it. This way, the user will be seamlessly logged in to the Developer Portal.
The URL address needs to be unescaped. If you want to try it manually in a browser, remember to replace the & with & in your browser. Also any % encodings in the token need to be replaced by their unescaped character.
Chapter 7. Restricted content
Here you can learn how to have content in your Developer Portal that is only visible for some users.
You may need to have some pages of your Developer Portal that are only accessible for a specific group of developers, either part of a page or items in a certain menu. Both goals are achievable through the two techniques introduced below.
7.1. Restricted pages
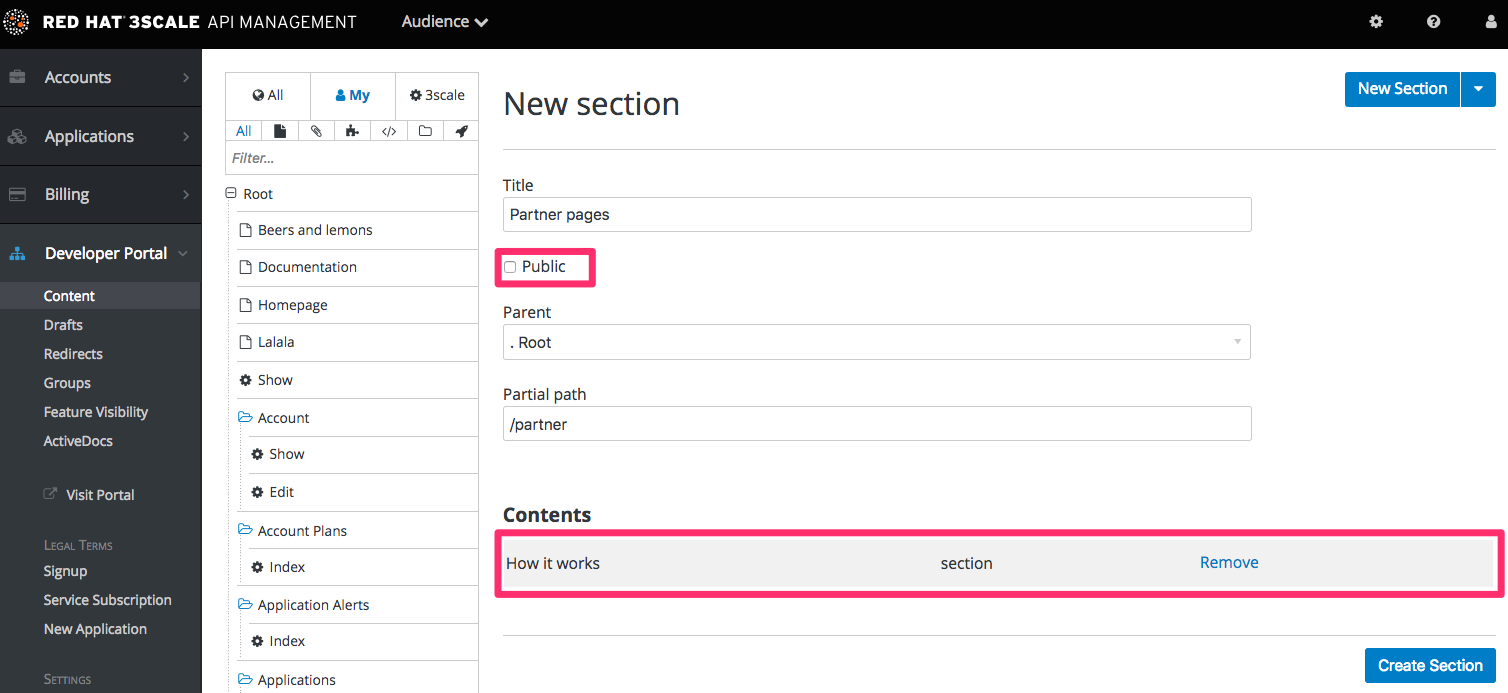
When creating restricted sections, it is useful to do it so that each section maps to a logical group of users. For this example, assume that there is a group of developers called "partners".
Create a new section in the Developer Portal for every page or group of pages that you want to restrict access to. Uncheck the "public" status field. Then drag and drop any pages you want inside this section.
Create a group and give it access to the section you created.

Now every time you have to grant one of your users access to this section, all you have to do is assign them to this group. To do this, go into the corresponding account detail page, then to "Group Permissions." Once there, check the boxes for the sections you want to allow.

7.2. Restricted blocks of content
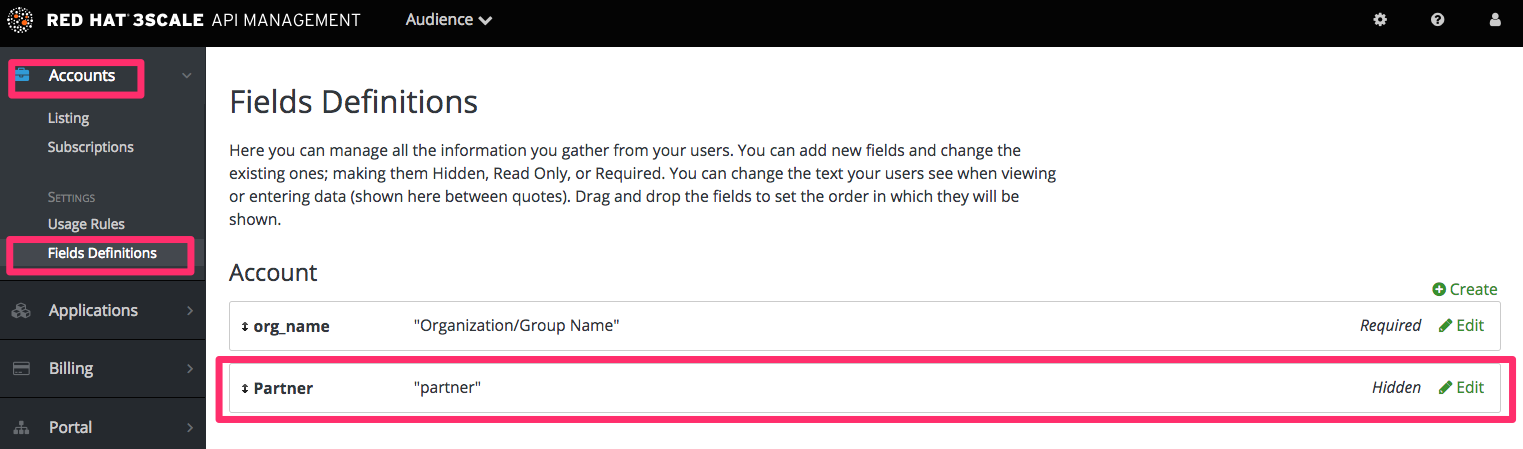
Liquid tags are a very powerful way to customize your Developer Portal. Use them here to hide or display parts of a page based on a condition. 3scale allows you to create custom fields for accounts, applications, and users. You can leverage this to store information that is useful for you as the API provider. Here you’ll create an custom field attached to all accounts and use it to indicate whether a given account is a partner or not. You can create this field by going to Audience > Account > Field Definitions. Add a field to the Account section, and mark it as hidden so it will not be displayed on the signup page or anywhere else on the portal.
With the custom field in place, you are now able to show special content to partners by wrapping it in a conditional like in the following snippet:
{{ if current_account.extra_fields.partner == 'true' }}
  // content only accessible to partners
{{ endif }}
Or use the inverse logic if it suits your case better:
{{ unless current_account.extra_fields.partner == 'true' }}
  // content forbidden for partners
{{ endunless }}
From here on, whenever you want to show these pieces of hidden content to a user, all you need to do is type in 'true' in the partner field of their account detail page.
7.3. Automating the configuration of extra fields
You can provide access to restricted content to developers based on a change in state. For instance, when they upgrade their application plan.
Streamline the process of access provision by using webhooks together with the Account Management API. The Account Management API is in the 3scale ActiveDocs, available in your Admin Portal:
- Click on Documentation, a question mark icon (?) located in the upper right side of the window.
- Choose 3scale API Docs.
- Get the new plan of the developer who will access the restricted content, by checking the message sent by the webhook request.
- Based on the developer’s new plan, grant access to the private content by calling the API to update the partner field.
7.4. Requiring user login
In addition to the two ways to restrict access to content described above, there is another technique that can be useful: requiring a logged-in user.
This is very easy to achieve using Liquid tags. All you have to do is wrap the content that will be available only for logged-in users inside the following conditional:
{{ if current_user }}
// only visible if the user is logged in
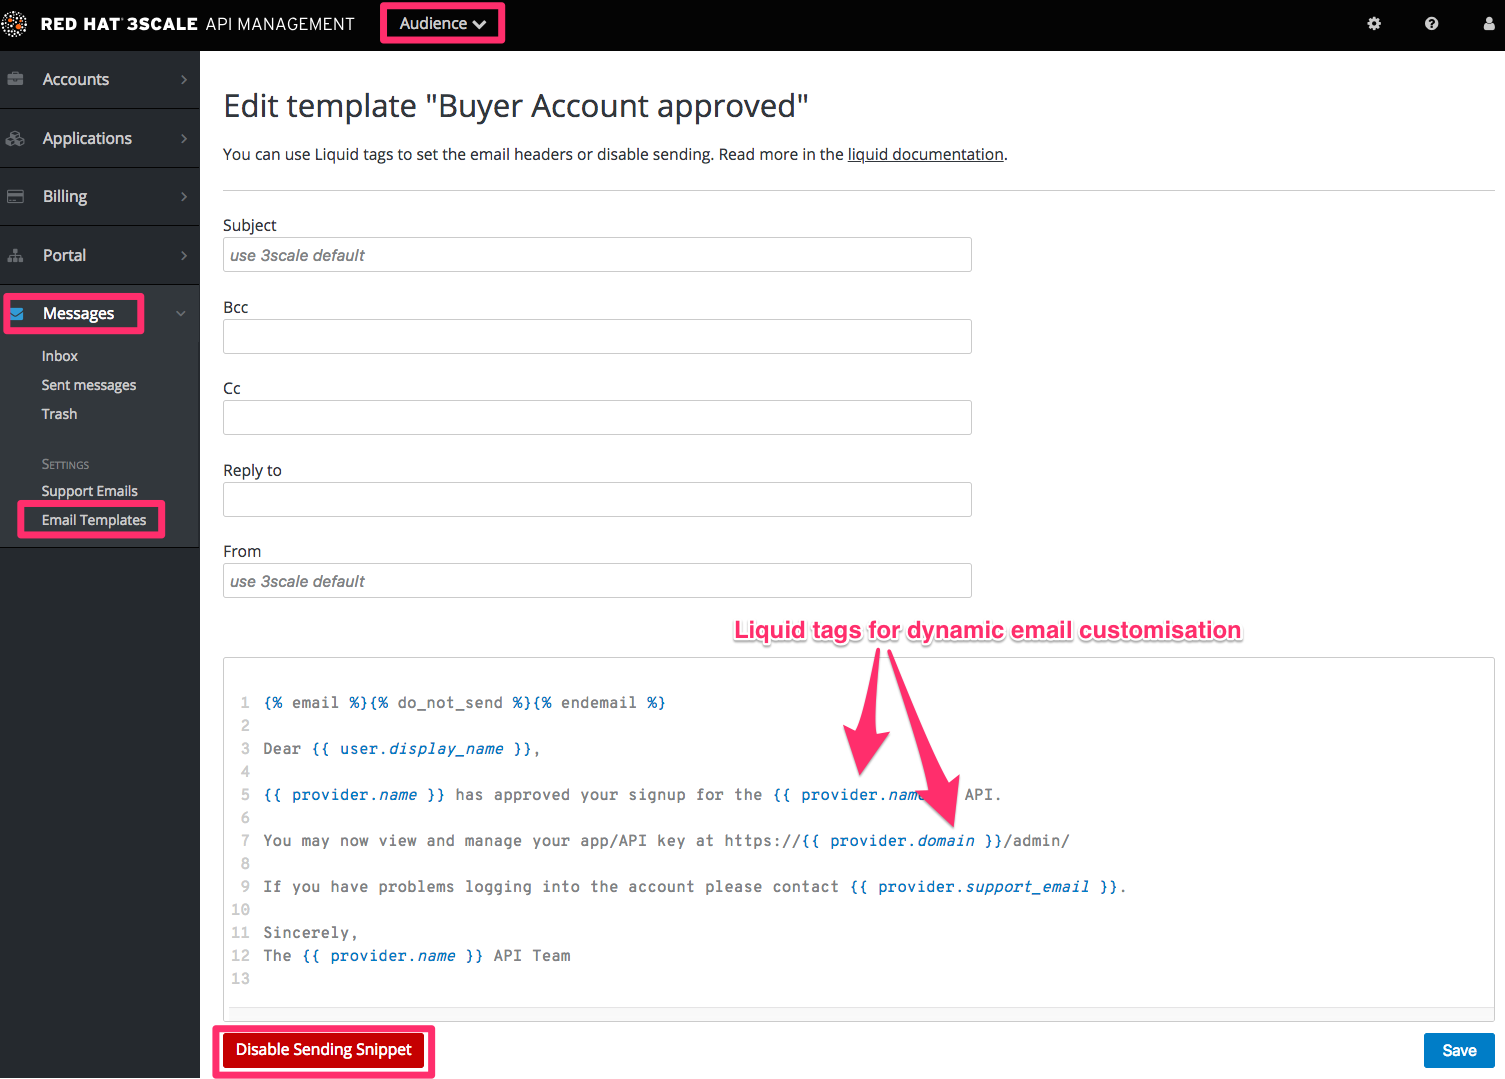
{{ endif }}Chapter 8. Email Templates
By the end of this section, you will have edited and saved a custom email template.
You can completely customize the content of all standard email communication with developers, allowing you to closely match the workflows you’ve set up for your Developer Portal.
8.1. Customizing email templates
8.1.1. Define your workflows before email configuration
There are a lot of email template options, only a subset of which will be relevant for your workflows. Save yourself time by making sure you’re happy with your workflows before beginning to edit the email templates. This way, you’ll only edit the templates that you’ll actually use.
8.1.2. Test your workflow and identify active email templates
Perform a dry run of your finalized workflows, making sure to test all the possible branches (such as approval and rejection). Then, identify each email notification that your test developer account receives to determine what to edit in the next step.
8.1.3. Edit and save your custom template
The first time you edit a template, you’ll actually “create” a custom template. Then in subsequent edits, you’ll save your changes. Warning: there is no version control. We recommend you make a local copy if you want to be able to revert changes.
You can use liquid tags for dynamic content in your email. We especially recommend you make backups when you make changes to the liquid tags.
8.1.4. Repeat for all templates in your workflows
Complete these same steps until you’ve covered all possible branches for your workflows.
8.2. More information
- Before customizing your email templates, it’s best to have the signup flows fully finalized and tested.
- If you intend to change any of the liquid tags within the email templates, be sure to read up on the liquid reference documentation.
Chapter 9. Liquids: Developer Portal
This section contains information about Liquid formatting tags and how they work in the 3scale system, including the different elements of the markup, the connections between them, and short examples of how to use them in your Developer Portal.
To learn the basics about Liquids, see the Liquid reference.
9.1. Using Liquids in the Developer Portal
This section explains how to enable liquid markup processing in layouts and pages.
9.1.1. Enabling Liquids
Liquid markup processing is enabled by default for all partials and email templates. Enabling them on layouts is done by ticking the checkbox right under the system_name input field. However, to enable them on pages, you will have to go to the advanced options section of the page.
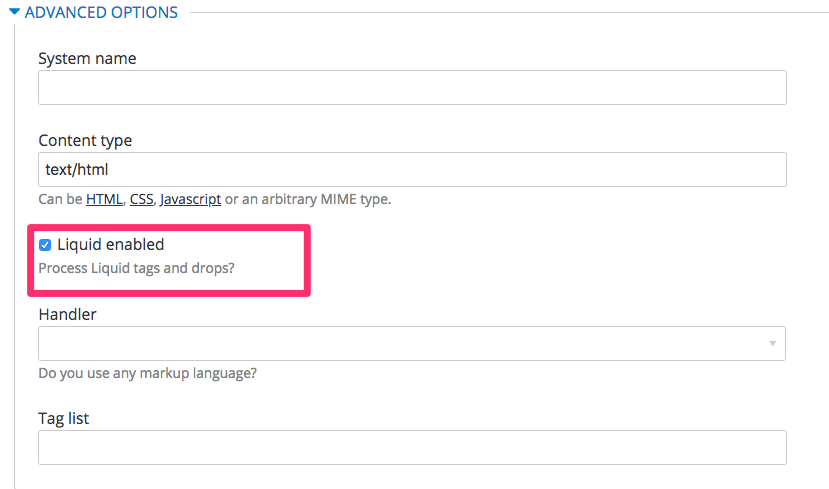
Just expand the Advanced options section and mark the Liquid enabled checkbox. From now on, all the liquid markup will be processed by the internal engine, and the Developer Portal built-in editor will also add code highlighting for liquid.
9.1.2. Different use on pages, partials, and layouts
The use of liquids usually differs slightly between pages, partials and layouts. Within pages, liquids are single-use elements; while liquids with partials and layouts are the reusable elements of the Developer Portal. This means that instead of applying multiple layouts or partials with small changes to different pages, you can add some logic liquid tags, and alter the layout depending on the page the user is on.
<!-- if we are inside '/documentation' URL -->
<li class="{% if request.request_uri contains "/documentation" %}active{% endif %}"><!-- add the active class to the menu item -->
  <a href="/documentation">Documentation</a>
</li>
9.1.3. Use with CSS/JS
Liquid markup does not just work with HTML, you can easily combine it with CSS and/or JavaScript code for even more control. To enable liquid in a stylesheet or JS, create them as a page and follow the same steps as if you were enabling it for a normal page. Having done that, you’ll be able to add some conditional markup in CSS or use the server-side data in JavaScript. Just remember to set the content type of the page as CSS or JS.
9.2. Usage of liquids in email templates
This section explains how you can use liquid tags to customize email templates.
9.2.1. Differences from Developer Portal
As previously mentioned, liquid tags can also be used to customize the email templates sent to your users. All the general rules for writing liquid mentioned before also apply to the email templates, with some exceptions:
-
There is no commonly shared list of variables that are available on every template. Instead, you will have to do some testing using the previously mentioned
{% debug:help %}tag. -
Since emails are by nature different from web pages, you will have limited or no access to some tags. For example,
{{ request.request_uri }}will not make sense, as an email does not have a URL.
9.3. Troubleshooting
This troubleshooting section will help you debug and fix typical errors that might occur.
9.3.1. Debugging
If something is not working as intended, but is saved correctly, check the following:
- All the tags are closed correctly
- You are referring to variables available on the current page
- You are not trying to access an array – for example current_account.applications is an array of applications
- The logic is correct
9.3.2. Typical errors and ways to solve them
-
If the document cannot be saved due to a liquid error, it is usually because some tags or drops were not closed correctly. Check that all your
{% %}and{{ }}tags were properly closed and that the logic expressions, for example, if, for and so on, are terminated correctly with endif, enfor. Normally if this is the case, an error will be displayed at the top of the page above the editor with a descriptive error message. -
If everything saved correctly and you do not see any effect, check that you are not referring to an empty element and you are not using a logic tag to display content.
{% %}will never render any content, besides usage in tags which is already an alias of a more complex set of tags and drops. -
If only a
#symbol is displayed, it means that you have tried to display an element that is an array. Check the section on the liquid hierarchy.
9.3.3. Contacting support
If you still have a problem, you can open a new case via the Red Hat Customer Portal.
Chapter 10. Liquids: Email Templates
3scale offers features to customize the email templates with your organization’s own messaging and terminology. You can also take advantage of liquid drops to display personalized information for each of your customers.
Similar to how liquid drops are used in the Developer Portal, every email template has its own context. This means that liquid drops available in one email template may not necessarily be available for other email templates.
This reference outlines which liquid drops are available where, with email templates grouped together by subject matter and the set of liquid drops that they support.
10.1. Account management
These email templates fall under the account management category:
- Buyer Account confirmed
- Buyer Account approved
- Buyer account rejected
For these templates, you can use the following liquid drops:
-
user ⇒ User -
domain ⇒ String -
account ⇒ Account -
provider ⇒ Provider -
support_email ⇒ String
Additionally, the following template:
Password recovery for buyer
has access to the these liquid drops:
-
user ⇒ User -
provider ⇒ Provider -
url ⇒ url
The email to invite additional users to an account:
Invitation
has access to:
-
account ⇒ Account -
provider ⇒ Provider -
url ⇒ url
10.2. Credit card notifications
- Credit card expired notification for provider
- Credit Card expired notification for buyer
You can use the following liquid drops:
-
user_account ⇒ Account -
account ⇒ Account -
provider_account ⇒ Provider -
provider ⇒ Provider
10.3. Limit alerts
- Alert notification for provider (>= 100%)
- Alert notification for buyer (>= 100%)
- Alert notification for provider (< 100%)
- Alert notification for buyer (< 100%)
have access to:
-
application ⇒ Application -
account ⇒ Account -
provider ⇒ Provider -
service ⇒ Service -
alert ⇒ Alert
10.4. Applications
The following email templates all deal with application and application plan notifications.
- Application created for provider
They have access to:
-
url ⇒ url
Application plan change request notification email templates:
- Plan change request for buyer
- Plan change request for provider
They have access to:
-
application ⇒ Application -
provider ⇒ Provider -
account ⇒ Account -
user ⇒ User -
plan ⇒ Plan -
credit_card_url ⇒ credit_card_url
The following email templates contain a number of available drops, such as:
- Application plan changed for buyer
- Application plan changed for provider
- Application trial period expired for buyer
They have access to:
-
provider ⇒ Provider -
account ⇒ Account -
user ⇒ User -
plan ⇒ Plan
As well as all of the above liquid drops, the following application plan messages…
- Application suspended for buyer
- Application accepted for buyer
- Application rejected for buyer
- Application contract cancelled for provider
have the additional liquid drops listed
-
application ⇒ Application -
service ⇒ Service
More liquid drops accumulate for the following email templates for application keys:
- Application key created for buyer
- Application key deleted for buyer
-
key ⇒ key
10.5. Invoicing
The following email template…
- Review invoices prior to charging for provider
has access to:
-
provider ⇒ Provider -
url ⇒ String>
Additionally, the following templates…
- Invoice charge failure for provider without retry
- Invoice upcoming charge for buyer
- Invoice charge failure for provider with retry
- Invoice charge failure for buyer without retry
- Invoice charged successfully for buyer
- Invoice charge failure for buyer with retry
share the following liquids:
-
account ⇒ Account -
provider ⇒ Provider -
cost ⇒ cost -
invoice_url ⇒ invoice_url -
payment_url ⇒ payment_url
10.6. Services
The following email templates:
- Service contract cancelled for provider
- Service trial period expired for buyer
- Service plan changed for provider
- Service contract suspended for buyer
have access to:
-
provider ⇒ Provider -
account ⇒ Account -
user ⇒ User -
plan ⇒ Plan
As well as the above liquid drops, the following service templates…
- Service created for provider
- Service accepted for buyer
- Service rejected for buyer
have the additional liquid drops listed:
-
service ⇒ Service -
service_contract ⇒ Contract -
subscription ⇒ Contract
10.7. Signup
The following email templates…
- Sign-up notification for provider
- Sign-up notification for buyer
have access to:
-
user ⇒ User -
provider ⇒ Provider -
url ⇒ activate_url
Chapter 11. Customizing the Developer Portal layout
You can customize the look and feel of the entire Developer Portal to match your own branding. A standard CSS stylesheet is available to provide an easy starting point for your customizations. To create layout templates, use the code for Main layout as your starting point.
In this tutorial, you’ll add your own CSS customizations to your Developer Portal and reload it to put your new styling changes live.
11.1. Creating a new CSS file
There is a default stylesheet, default.css. It is quite large and complex, so rather than extend it, it’s better to create your own stylesheet for any of your own customizations to overwrite the defaults. You create a new stylesheet the same way you create a page (just remember to choose an appropriate MIME content type in the advanced page settings).
It’s important that the selected layout is blank. Otherwise the page layout HTML will obscure the CSS rules.
11.2. Linking the stylesheet into your page layout
Add the link to your custom CSS in each of your layout templates (or in a partial if you have a common HEAD section) after the link to bootstrap.css. For example:
<link rel="stylesheet" href="/stylesheets/custom.css">
Now enjoy the beauty of your own unique branding!
11.3. Defining page layout templates
The general idea is to define a separate layout for each of the different page styles in your portal. There is one standard layout called Main layout when you start. Do not make any changes to this layout until you are an expert at using the Developer Portal because this layout is used by all system-generated pages.
Typically, you want a unique style for the home page of your portal. The Main layout template is a starting point for your customizations. To create a page layout template:
- Open Main layout and copy its code to the clipboard.
- Create a new layout, give it a title, a system name, and select Liquid enabled.
- Paste the Main layout code into your new layout.
Remove the sidebar menu by deleting this line from your new layout:
{% include 'submenu'%}- Customize the code to create your layout template.
Chapter 12. Change built-in pages
By the end of this section, you will be able to modify, and configure the visibility of any element in the system-generated pages.
Some elements generated by the system are not possible to modify from the Developer Portal, such as the Signup, Dashboard, and Account pages. This guide shows how to customize with CSS and JavaScript the content on these pages.
The system-generated pages follow backend rules for access and visibility so their URLs must be specific and hard coded values. A Knowledge Base article in the customer portal provides a list of system-generated pages and their URLs.
The 3scale system-generated pages are subject to change (although infrequently). These changes may break any customizations that you implement following this guide. If you can avoid using these hacks, please do so. Before you continue, please be sure that you’ll be able to monitor for any disruptive changes and do the necessary maintenance work to keep your portal functioning correctly.
12.1. Identify the elements
The first and most important thing to do is identify what you want to hide. To do that, use Firebug (or any other developer tools such as Chrome Developer tools or Opera Dragonfly). Choose the desired element, and in the console, right click on it and select Copy CSS path. This way you save the exact CSS path to make it easy to manipulate. Remember, if the element is a part of the sidebar navigation widget, you’ll also have to specify which position in the list. For this, you can use either the "+" selector (for example, to choose 3rd li element: ul + li + li + li) or the :nth-child(n) CSS3 pseudoclass.

12.2. Modify or hide the elements
Now, having identified the elements, you can change their display settings. Depending on the type of element, you can choose from two possible methods: CSS manipulation or jQuery script. CSS manipulation is more lightweight and reliable, but doesn’t work well for some kinds of elements that exist on a number of pages (for example, the 3rd element in the sidebar of the Admin Portal’s Dashboard also exists in the Account section but has a different value). Some trickier implementations require use of CSS3 which is not supported by old browsers. In the next two steps, you’ll see both of these approaches.
12.3. Option A: CSS
As an example, try to hide the latest element from the Dashboard page. Following the first step, you have identified its CSS path as:
#three-scale .dashboard_bubble
Keep in mind that it’s the second box with the same path, so you’ll use the "+" selector. Your path will now look like this:
.main_layout #three-scale .dashboard_bubble + .dashboard_bubble
/* or */
.main_layout #three-scale .dashboard_bubble:nth-child(1)
Changing display property to none makes that box invisible:
.main_layout #three-scale .dashboard_bubble:nth-child(1) {
  display: none;
}
12.4. Option B: jQuery
If you have a trickier element to hide such as a sidebar menu element, it’s better to use some jQuery. The CSS path of these elements is identical on the Dashboard and Account sections, and you don’t want to hide elements in both sections. So choose the element based on the CSS path and the content. In this example, assume you want to hide the messages section from the Dashboard’s sidebar. Your CSS path is:
#three-scale #submenu li a
In order to match the content, you’ll use the .text() function. You’ll also include the code inside the document’s head and inside the ready function so it’s executed after all the content has been generated.

The resulting code snippet will look like this:
$(function() {
  $('#three-scale #submenu li a').each(function() {
    if ($(this).text() == "Messages")
      $(this).parent().css('display', 'none');
  });
});
This is not the only solution. It just shows one possible way of doing it. The same example could be done using pure CSS with CSS3 selectors basing on the attributes values. For the complete CSS3 selectors specification, take a look here.
Chapter 13. Setting terms and conditions
When you allow developers to sign up for your API, you will probably want to get them to agree to your Terms and Conditions to make some of your policies clear before you grant them access.
There may be different versions of your Terms and Conditions you want developers to abide by. These are easy to set up at different points throughout the registration process. For example:
- Signup Terms and Conditionss
- Application Terms and Conditions
- Service/subscription Terms and Conditions (only available when you have multiple services)
Additionally, if you are charging for use of your API, you may want to make your credit card policies explicit. 3scale provides an easy way to set up the following kinds of credit card policy URLs:
- Legal Terms
- Privacy
- Refunds
13.1. Terms and conditions
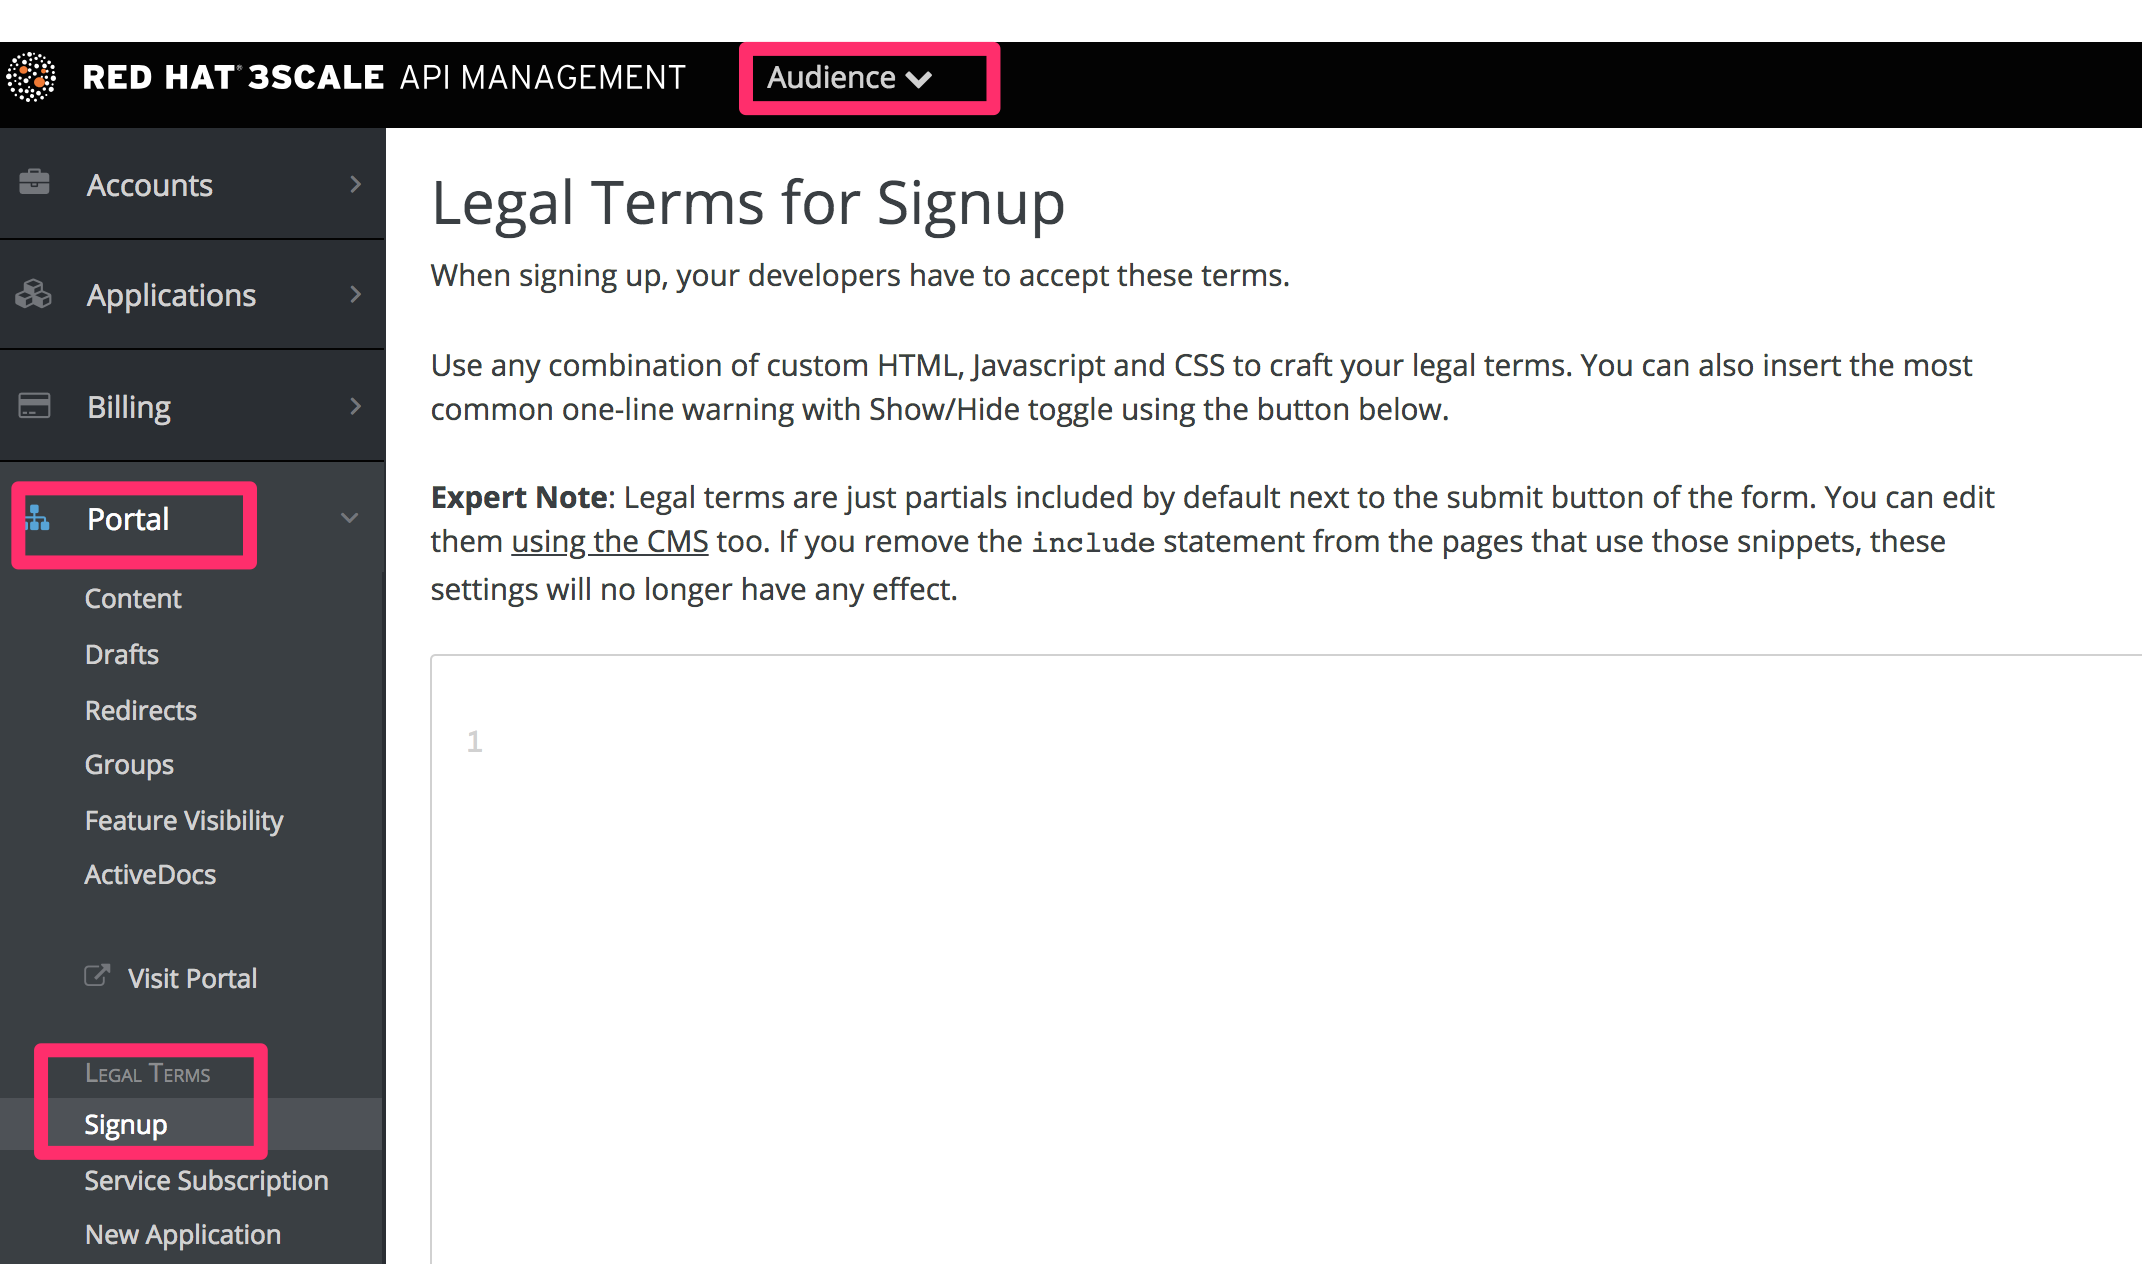
This part of the workflow is easy to set up in the Admin Portal by following the steps below.
Go to Audience > Developer Portal > Signup, where you will be presented with a blank page to populate with your signup legal terms. You can use any combination of HTML, JavaScript, and CSS. There is also some toggling code provided by clicking Insert toggling code. The content you write in this box will appear just above the Sign Up button on the Signup page of your Developer Portal.
Once you have filled out your Terms and Conditions, save them by clicking Update.
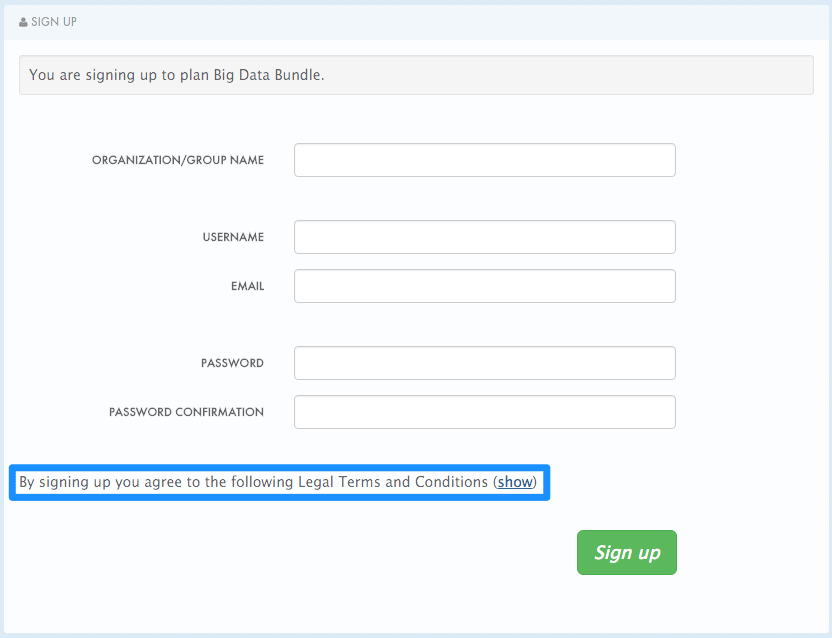
If you have used the toggling code, it will display "By signing up you agree to the following Legal Terms and Conditions" followed by a link that toggles between showing and hiding the Terms and Conditions you specified.
This is placed on the Signup page by default, but it is a partial (signup_licence) that can be included anywhere on your Developer Portal. To remove this from the Signup page, simply remove the {% include 'signup_licence' %} line from the page. Similarly, if you want to include it somewhere else, you can use the same partial by means of the snippet, which can be placed anywhere on your Developer Portal.
You might also want your users to accept another set of Terms and Conditions when they create a new application (new_application_licence partial) and/or when they subscribe to a new service (service_subscription_licence partial). To set these up, you can follow the same procedure outlined above.
13.2. Credit card policies
You can also define other URLs where different policies reside. Set them up by going to Audience > Billing > Credit Card Policies and setting the path where your policy pages will be located.

In order for these links to work, you will then need to create new pages in the Developer Portal.

Once that is done, you can reference them using the URL’s liquid drop. For example:
<a href="{{ urls.credit_card_terms }}">Legal Terms</a>
<a href="{{ urls.credit_card_privacy }}">Privacy</a>
<a href="{{ urls.credit_card_refunds }}">Refunds</a>
And that’s it!