
Chapter 4. APIcast policies
APIcast policies are units of functionality that modify how APIcast operates. Policies can be enabled, disabled, and configured to control how they modify APIcast. Use policies to add functionality that is not available in a default APIcast deployment. You can create your own policies, or use standard policies provided by Red Hat 3scale.
The following topics provide information about the standard APIcast policies, creating a policy chain, and creating custom APIcast policies.
4.1. Standard policies to change default 3scale APIcast behavior
3scale provides built-in, standard policies that are units of functionality that modify how APIcast processes requests and responses. You can enable, disable, or configure policies to control how they modify APIcast.
For details, see Enabling policies in the 3scale Admin Portal. 3scale provides the following standard policies:
- 3scale Auth Caching
- 3scale Batcher
- 3scale Referrer
- Anonymous Access
- Camel Service
- Conditional Policy
- Content Caching
- CORS Request Handling
- Custom Metrics
- Echo
- Edge Limiting
- Header Modification
- HTTP Status Code Overwrite
- HTTP2 Endpoint
- IP Check
- JWT Claim Check
- Liquid Context Debug
- Logging
- Maintenance Mode
- NGINX Filter
- OAuth 2.0 Mutual TLS Client Authentication
- OAuth 2.0 Token Introspection
- On Fail
- Proxy Service
- Rate Limit Headers
- Response Request Content Limits
- Retry
- RH-SSO/Keycloak Role Check
- Routing
- SOAP
- TLS Client Certificate Validation
- TLS Termination
- Upstream
- Upstream Connection
- Upstream Mutual TLS
- URL Rewriting
- URL Rewriting With Captures
- Websocket
4.1.1. Enabling policies in the 3scale Admin Portal
In the Admin Portal, you can enable one or more policies for each 3scale API product.
Prerequisites
- A 3scale API product
Procedure
- Log in to 3scale.
- In the Admin Portal dashboard, select the API product for which you want to enable the policy.
- From [your_product_name], navigate to Integration > Policies.
-
Under the POLICIES section, click
Add policy. - Select the policy you want to add and enter values in any required fields.
- Click Update Policy Chain to save the policy chain.
4.1.2. 3scale Auth Caching
The 3scale Auth Caching policy caches authentication calls made to APIcast. You can select an operating mode to configure the cache operations.
3scale Auth Caching is available in the following modes:
1. Strict - Cache only authorized calls.
"Strict" mode only caches authorized calls. If a policy is running under the "strict" mode and if a call fails or is denied, the policy invalidates the cache entry. If the backend becomes unreachable, all cached calls are rejected, regardless of their cached status.
2. Resilient – Authorize according to last request when backend is down.
The "Resilient" mode caches both authorized and denied calls. If the policy is running under the "resilient" mode, failed calls do not invalidate an existing cache entry. If the backend becomes unreachable, calls hitting the cache continue to be authorized or denied based on their cached status.
3. Allow - When backend is down, allow everything unless seen before and denied.
The "Allow" mode caches both authorized and denied calls. If the policy is running under the "allow" mode, cached calls continue to be denied or allowed based on the cached status. However, any new calls are cached as authorized.
Operating in the "allow" mode has security implications. Consider these implications and exercise caution when using the "allow" mode.
4. None - Disable caching.
The "None" mode disables caching. This mode is useful if you want the policy to remain active, but do not want to use caching.
Configuration properties
| property | description | values | required? |
|---|---|---|---|
| caching_type |
The | data type: enumerated string [resilient, strict, allow, none] | yes |
Policy object example
{
  "name": "caching",
  "version": "builtin",
  "configuration": {
    "caching_type": "allow"
  }
}
For information on how to configure policies, see the Creating a policy chain section of the documentation.
4.1.3. 3scale Batcher
The 3scale Batcher policy provides an alternative to the standard APIcast authorization mechanism, in which one call to the 3scale backend (Service Management API) is made for each API request that APIcast receives.
The 3scale Batcher policy caches authorization statuses and batches usage reports, thereby significantly reducing the number of requests to the 3scale backend. With the 3scale Batcher policy you can improve APIcast performance by reducing latency and increasing throughput.
When the 3scale Batcher policy is enabled, APIcast uses the following authorization flow:
On each request, the policy checks whether the credentials are cached:
- If the credentials are cached, the policy uses the cached authorization status instead of calling the 3scale backend.
- If the credentials are not cached, the policy calls the backend and caches the authorization status with a configurable Time to Live (TTL).
- Instead of reporting the usage corresponding to the request to the 3scale backend immediately, the policy accumulates their usage counters to report them to the backend in batches. A separate thread reports the accumulated usage counters to the 3scale backend in a single call, with a configurable frequency.
The 3scale Batcher policy improves the throughput, but with reduced accuracy. The usage limits and the current utilization are stored in 3scale, and APIcast can only get the correct authorization status when making calls to the 3scale backend. When the 3scale Batcher policy is enabled, there is a period of time in which APIcast is not sending calls to 3scale. During this time window, applications making calls might go over the defined limits.
Use this policy for high-load APIs if the throughput is more important than the accuracy of the rate limiting. The 3scale Batcher policy gives better results in terms of accuracy when the reporting frequency and authorization TTL are much less than the rate limiting period. For example, if the limits are per day and the reporting frequency and authorization TTL are configured to be several minutes.
The 3scale Batcher policy supports the following configuration settings:
auths_ttl: Sets the TTL in seconds when the authorization cache expires.-
When the authorization for the current call is cached, APIcast uses the cached value. After the time set in the
auths_ttlparameter, APIcast removes the cache and calls the 3scale backend to retrieve the authorization status. -
Set the
auths_ttlparameter to a value other than0. Settingauths_ttlto a value of0would update the authorization counter the first time the request is cached, resulting in rate limits not being effective.
-
When the authorization for the current call is cached, APIcast uses the cached value. After the time set in the
-
batch_report_seconds: Sets the frequency of batch reports APIcast sends to the 3scale backend. The default value is10seconds.
To use this policy, enable both the 3scale APIcast and 3scale Batcher policy in the policy chain.
4.1.4. 3scale Referrer
The 3scale Referrer policy enables the Referrer Filtering feature. When the policy is enabled in the service policy chain, APIcast sends the value of the 3scale Referrer policy to the Service Management API as an upwards AuthRep call. The value of the 3scale Referrer policy is sent in the referrer parameter in the call.
For more information on how Referrer Filtering works, see the Referrer Filtering section under Authentication Patterns.
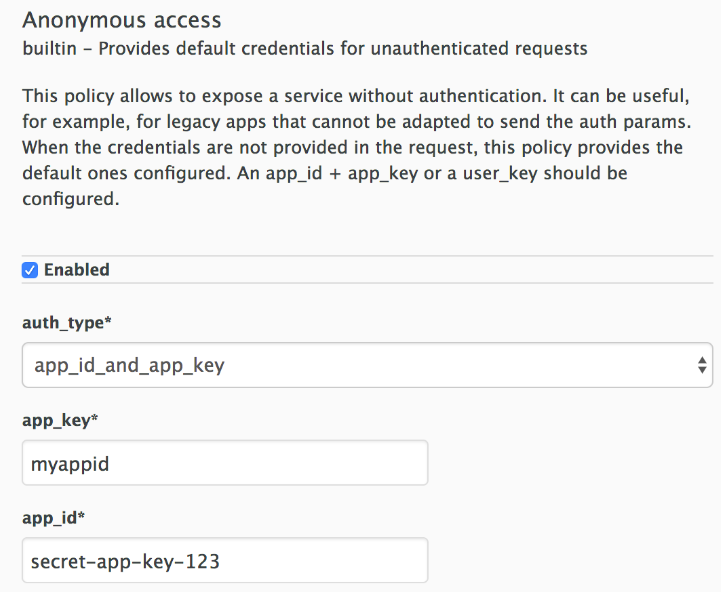
4.1.5. Anonymous Access
The Anonymous Access policy exposes a service without authentication. It can be useful, for example, for legacy applications that cannot be adapted to send the authentication parameters. The Anonymous Access policy supports services with only API Key and App Id / App Key authentication options. When the policy is enabled for API requests that do not have any credentials provided, APIcast will authorize the calls using the default credentials configured in the policy. For the API calls to be authorized, the application with the configured credentials must exist and be active.
Using the Application Plans, you can configure the rate limits on the application used for the default credentials.
You need to place the Anonymous Access policy before the APIcast Policy, when using these two policies together in the policy chain.
Following are the required configuration properties for the policy:
auth_type: Select a value from one of the alternatives below and make sure the property corresponds to the authentication option configured for the API:
- app_id_and_app_key: For App ID / App Key authentication option.
- user_key: For API key authentication option.
- app_id (only for app_id_and_app_key auth type): The App Id of the application that will be used for authorization if no credentials are provided with the API call.
- app_key (only for app_id_and_app_key auth type): The App Key of the application that will be used for authorization if no credentials are provided with the API call.
- user_key (only for the user_key auth_type): The API Key of the application that will be used for authorization if no credentials are provided with the API call.
Figure 4.1. Anonymous Access policy
4.1.6. Camel Service
You can use the Camel Service policy to define an HTTP proxy where the 3scale traffic is sent over the defined Apache Camel proxy. In this case, Camel works as a reverse HTTP proxy, where APIcast sends the traffic to Camel, and Camel then sends the traffic on to the API backend.
The following example shows the traffic flow:
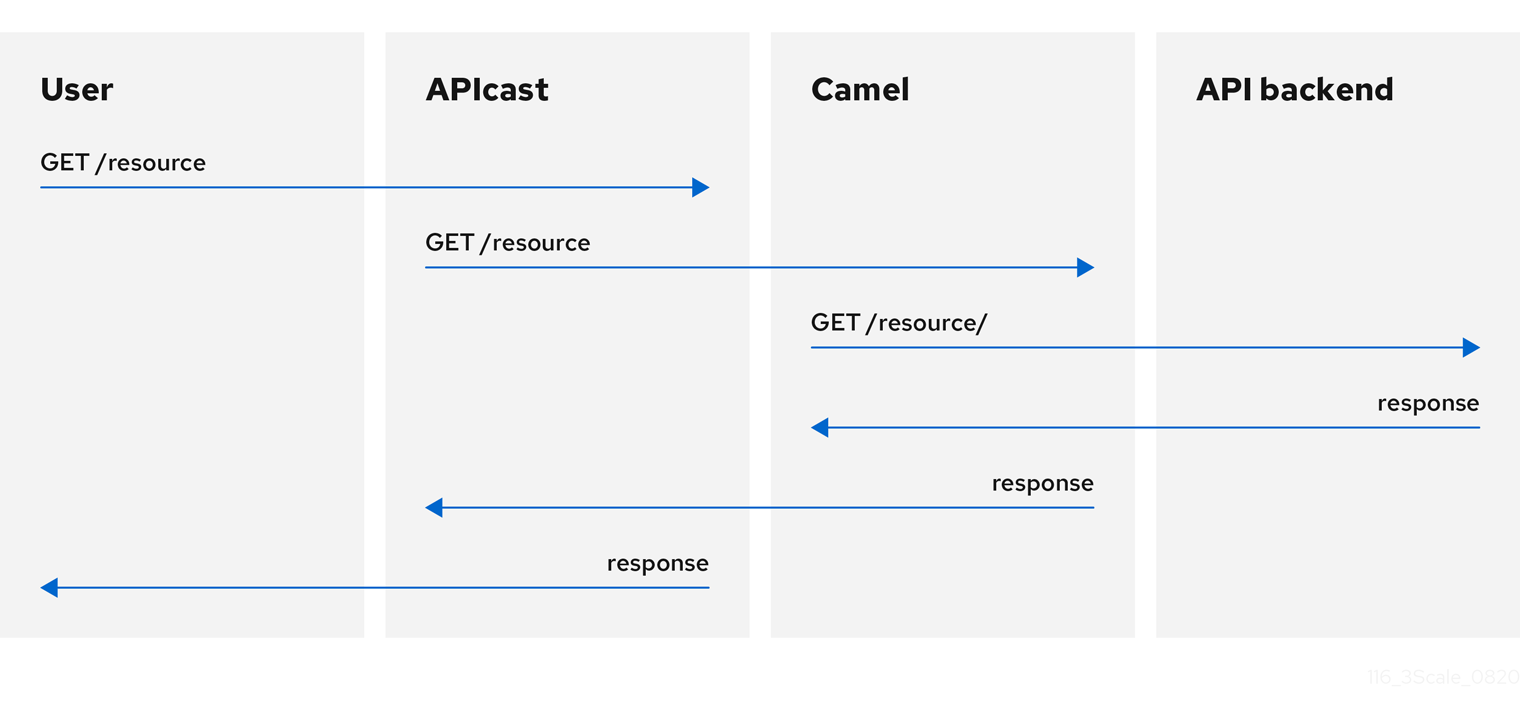
All APIcast traffic sent to the 3scale backend does not use the Camel proxy. This policy only applies to the Camel proxy and the communication between APIcast and API backend.
If you want to send all traffic through a proxy, you must use an HTTP_PROXY environment variable.
- The Camel Service policy disables all load-balancing policies, and traffic is sent to the Camel proxy.
-
If the
HTTP_PROXY,HTTPS_PROXY, orALL_PROXYparameters are defined, this policy overwrites those values. - The proxy connection does not support authentication. You use the Header Modification policy for authentication.
Configuration
The following example shows the policy chain configuration:
"policy_chain": [
    {
      "name": "apicast.policy.apicast"
    },
    {
      "name": "apicast.policy.camel",
      "configuration": {
          "all_proxy": "http://192.168.15.103:8080/",
          "http_proxy": "http://192.168.15.103:8080/",
          "https_proxy": "http://192.168.15.103:8443/"
      }
    }
]
The all_proxy value is used if http_proxy or https_proxy is not defined.
Example use case
The Camel Service policy is designed to apply more fine-grained policies and transformation in 3scale using Apache Camel. This policy supports integration with Apache Camel over HTTP and HTTPS. For more details, see Chapter 6, Transforming 3scale message content using policy extensions in Fuse.
For details on using a generic HTTP proxy policy, see Section 4.1.25, “Proxy Service”.
Example project
See the camel-netty-proxy example available from the Camel proxy policy on GitHub. This example project shows an HTTP proxy that transforms the response body from the API backend to uppercase.
4.1.7. Conditional Policy
The Conditional Policy is different from other APIcast policies as it contains a chain of policies. It defines a condition that is evaluated on each nginx phase, for example, access, rewrite, log and so on. When the condition is true, the Conditional Policy runs that phase for each of the policies that it contains in its chain.
The APIcast Conditional Policy is a Technology Preview feature only. Technology Preview features are not supported with Red Hat production service level agreements (SLAs) and might not be functionally complete. Red Hat does not recommend using them in production. These features provide early access to upcoming product features, enabling customers to test functionality and provide feedback during the development process. For more information about the support scope of Red Hat Technology Preview features, see Technology Preview Features Support Scope.
The following example assumes that the Conditional Policy defines the following condition: the request method is POST.
APIcast --> Caching --> Conditional --> Upstream

                             |
                             v

                          Headers

                             |
                             v

                       URL Rewriting
In this case, when the request is a POST, the order of execution for each phase will be the following:
- APIcast
- Caching
- Headers
- URL Rewriting
- Upstream
When the request is not POST, the order of execution for each phase will be the following:
- APIcast
- Caching
- Upstream
Conditions
The condition that determines whether to run the policies in the chain of the Conditional Policy can be expressed using JSON and uses liquid templating.
This example checks whether the request path is /example_path:
{
  "left": "{{ uri }}",
  "left_type": "liquid",
  "op": "==",
  "right": "/example_path",
  "right_type": "plain"
}
Both the left and right operands can be evaluated either as liquid or as plain strings. Plain strings are the default.
You can combine the operations with and or or. This configuration checks the same as the previous example plus the value of the Backend header:
{
  "operations": [
    {
      "left": "{{ uri }}",
      "left_type": "liquid",
      "op": "==",
      "right": "/example_path",
      "right_type": "plain"
    },
    {
      "left": "{{ headers['Backend'] }}",
      "left_type": "liquid",
      "op": "==",
      "right": "test_upstream",
      "right_type": "plain"
    }
  ],
  "combine_op": "and"
}
For more details see, policy config schema.
Supported variables in liquid
- uri
- host
- remote_addr
- headers['Some-Header']
The updated list of variables can be found here: ngx_variable.lua
This example executes the upstream policy when the Backend header of the request is staging:
{
   "name":"conditional",
   "version":"builtin",
   "configuration":{
      "condition":{
         "operations":[
            {
               "left":"{{ headers['Backend'] }}",
               "left_type":"liquid",
               "op":"==",
               "right":"staging"
            }
         ]
      },
      "policy_chain":[
         {
            "name":"upstream",
            "version": "builtin",
            "configuration":{
               "rules":[
                  {
                     "regex":"/",
                     "url":"http://my_staging_environment"
                  }
               ]
            }
         }
      ]
   }
}
4.1.8. Content Caching
The Content Caching policy allows you to enable and disable caching based on customized conditions. These conditions can only be applied on the client request, where upstream responses cannot be used in the policy.
When the Content Caching policy is in a policy chain, APIcast converts a HEAD request to a GET request before sending the request upstream. If you do not want this conversion, do not add the Content Caching policy to a policy chain.
If a cache-control header is sent, it will take priority over the timeout set by APIcast.
The following example configuration will cache the response if the Method is GET.
Example configuration
{
  "name": "apicast.policy.content_caching",
  "version": "builtin",
  "configuration": {
    "rules": [
      {
        "cache": true,
        "header": "X-Cache-Status-POLICY",
        "condition": {
          "combine_op": "and",
          "operations": [
            {
              "left": "{{method}}",
              "left_type": "liquid",
              "op": "==",
              "right": "GET"
            }
          ]
        }
      }
    ]
  }
}
Supported configuration
-
Set the Content Caching policy to disabled for any of the following methods:
POST,PUT, orDELETE. - If one rule matches, and it enables the cache, the execution will be stopped and it will not be disabled. Sort by priority is important here.
Upstream response headers
The NGINX proxy_cache_valid directive information can only be set globally, with the APICAST_CACHE_STATUS_CODES and APICAST_CACHE_MAX_TIME. If your upstream requires a different behavior regarding timeouts, use the Cache-Control header.
4.1.9. CORS Request Handling
The Cross Origin Resource Sharing (CORS) Request Handling policy allows you to control CORS behavior by allowing you to specify:
- Allowed headers
- Allowed methods
- Allowed origin headers
- Allowed credentials
- Max age
The CORS Request Handling policy will block all unspecified CORS requests.
You need to place the CORS Request Handling policy before the APIcast Policy, when using these two policies together in the policy chain.
Configuration properties
| property | description | values | required? |
|---|---|---|---|
| allow_headers |
The | data type: array of strings, must be a CORS header | no |
| allow_methods |
The | data type: array of enumerated strings [GET, HEAD, POST, PUT, DELETE, PATCH, OPTIONS, TRACE, CONNECT] | no |
| allow_origin |
The | data type: string | no |
| allow_credentials |
The | data type: boolean | no |
| max_age |
The | data type: integer | no |
Policy object example
{
  "name": "cors",
 "version": "builtin",
 "configuration": {
   "allow_headers": [
     "App-Id", "App-Key",
     "Content-Type", "Accept"
   ],
   "allow_credentials": true,
   "allow_methods": [
     "GET", "POST"
   ],
   "allow_origin": "https://example.com",
   "max_age" : 200
  }
}
For information about how to configure policies, see Modifying policy chains in the 3scale Admin Portal.
4.1.10. Custom Metrics
The Custom Metrics policy adds the availability to add metrics after the response sent by the upstream API. The main use case for this policy is to add metrics based on response code status, headers, or different NGINX variables.
Limitations of custom metrics
- When authentication happens before the request is sent to the upstream API, a second call to the back end will be made to report the new metrics to the upstream API.
- This policy does not work with batching policy.
- Metrics need to be created in the Admin Portal before the policy will push the metric values.
Examples for request flows
The following chart shows the request flow example of when authentication is not cached, as well as the flow when authentication is cached.
Configuration examples
This policy increments the metric error by the header increment if the upstream API returns a 400 status:
{
  "name": "apicast.policy.custom_metrics",
  "configuration": {
    "rules": [
      {
        "metric": "error",
        "increment": "{{ resp.headers['increment'] }}",
        "condition": {
          "operations": [
            {
              "right": "{{status}}",
              "right_type": "liquid",
              "left": "400",
              "op": "=="
            }
          ],
          "combine_op": "and"
        }
      }
    ]
  }
}
This policy increments the hits metric with the status_code information if the upstream API return a 200 status:
{
  "name": "apicast.policy.custom_metrics",
  "configuration": {
    "rules": [
      {
        "metric": "hits_{{status}}",
        "increment": "1",
        "condition": {
          "operations": [
            {
              "right": "{{status}}",
              "right_type": "liquid",
              "left": "200",
              "op": "=="
            }
          ],
          "combine_op": "and"
        }
      }
    ]
  }
}
4.1.11. Echo
The Echo policy prints an incoming request back to the client, along with an optional HTTP status code.
Configuration properties
| property | description | values | required? |
|---|---|---|---|
| status | The HTTP status code the Echo policy will return to the client | data type: integer | no |
| exit |
Specifies which exit mode the Echo policy will use. The | data type: enumerated string [request, set] | yes |
Policy object example
{
  "name": "echo",
  "version": "builtin",
  "configuration": {
    "status": 404,
    "exit": "request"
  }
}
For information about how to configure policies, see the Creating a policy chain in 3scale section of the documentation.
4.1.12. Edge Limiting
The Edge Limiting policy aims to provide flexible rate limiting for the traffic sent to the backend API and can be used with the default 3scale authorization. Some examples of the use cases supported by the policy include:
-
End-user rate limiting: Rate limit by the value of the
sub(subject) claim of a JWT token passed in the Authorization header of the request. This is configured as{{ jwt.sub }}. - Requests Per Second (RPS) rate limiting.
- Global rate limits per service: Apply limits per service rather than per application.
- Concurrent connection limit: Set the number of concurrent connections allowed.
Types of limits
The policy supports the following types of limits that are provided by the lua-resty-limit-traffic library:
-
leaky_bucket_limiters: Based on the leaky bucket algorithm, which builds on the average number of requests plus a maximum burst size. -
fixed_window_limiters: Based on a fixed window of time: last n seconds. -
connection_limiters: Based on the concurrent number of connections.
You can scope any limit by service or globally.
Limit definition
The limits have a key that encodes the entities that are used to define the limit, such as an IP address, a service, an endpoint, an identifier, the value for a specific header, and other entities. This key is specified in the key parameter of the limiter.
key is an object that is defined by the following properties:
-
name: Defines the name of the key. It must be unique in the scope. scope: Defines the scope of the key. The supported scopes are:-
Per service scope that affects one service (
service). -
Global scope that affects all the services (
global).
-
Per service scope that affects one service (
name_type: Definies how thenamevalue is evaluated:-
As plain text (
plain) -
As Liquid (
liquid)
-
As plain text (
Each limit also has some parameters that vary depending on their type:
leaky_bucket_limiters:rate,burst.-
rate: Defines how many requests can be made per second without a delay. -
burst: Defines the amount of requests per second that can exceed the allowed rate. An artificial delay is introduced for requests above the allowed rate specified byrate. After exceeding the rate by more requests per second than defined inburst, the requests get rejected.
-
-
fixed_window_limiters:count,window.countdefines how many requests can be made per number of seconds defined inwindow. connection_limiters:conn,burst,delay.-
conn: Defines the maximum number of the concurrent connections allowed. It allows exceeding that number byburstconnections per second. -
delay: Defines the number of seconds to delay the connections that exceed the limit.
-
Examples
Allow 10 requests per minute to service_A:
{
  "key": { "name": "service_A" },
  "count": 10,
  "window": 60
}
Allow 100 connections with bursts of 10 with a delay of 1 second:
{
  "key": { "name": "service_A" },
  "conn": 100,
  "burst": 10,
  "delay": 1
}
You can define several limits for each service. In case multiple limits are defined, the request can be rejected or delayed if at least one limit is reached.
Liquid templating
The Edge Limiting policy allows specifying the limits for the dynamic keys by supporting Liquid variables in the keys. For this, the name_type parameter of the key must be set to liquid and the name parameter can then use Liquid variables. For example, {{ remote_addr }} for the client IP address, or {{ jwt.sub }} for the sub claim of the JWT token.
Example
{
  "key": { "name": "{{ jwt.sub }}", "name_type": "liquid" },
  "count": 10,
  "window": 60
}
For more information about Liquid support, see Section 5.1, “Using variables and filters in policies”.
Applying conditions
Each limiter must have a condition that defines when the limiter is applied. The condition is specified in the condition property of the limiter.
condition is defined by the following properties:
-
combine_op: The boolean operator applied to the list of operations. Values oforandandare supported. operations: A list of conditions that need to be evaluated. Each operation is represented by an object with the following properties:-
left: The left part of the operation. -
left_type: How theleftproperty is evaluated (plain or liquid). -
right: The right part of the operation. -
right_type: How therightproperty is evaluated (plain or liquid). -
op: Operator applied between the left and the right parts. The following two values are supported:==(equals) and!=(not equals).
-
Example
"condition": {
  "combine_op": "and",
  "operations": [
    {
      "op": "==",
      "right": "GET",
      "left_type": "liquid",
      "left": "{{ http_method }}",
      "right_type": "plain"
    }
  ]
}
Configuring storage of rate limit counters
By default, the Edge Limiting policy uses the OpenResty shared dictionary for the rate limiting counters. However, you can use an external Redis server instead of the shared dictionary. This can be useful when multiple APIcast instances are deployed. You can configure the Redis server using the redis_url parameter.
Error handling
The limiters support the following parameters to configure how the errors are handled:
limits_exceeded_error: Specifies the error status code and message that will be returned to the client when the configured limits are exceeded. The following parameters should be configured:-
status_code: The status code of the request when the limits are exceeded. Default:429. error_handling: Specifies how to handle the error, with following options:-
exit: Stops processing request and returns an error message. -
log: Completes processing request and returns output logs.
-
-
configuration_error: Specifies the error status code and message that will be returned to the client in case of incorrect configuration. The following parameters should be configured:-
status_code: The status code when there is a configuration issue. Default:500. error_handling: Specifies how to handle the error, with following options:-
exit: Stops processing request and returns an error message. -
log: Completes processing request and returns output logs.
-
-
4.1.13. Header Modification
The Header Modification policy allows you to modify the existing headers or define additional headers to add to or remove from an incoming request or response. You can modify both response and request headers.
The Header Modification policy supports the following configuration parameters:
-
request: List of operations to apply to the request headers -
response: List of operations to apply to the response headers
Each operation consists of the following parameters:
-
op: Specifies the operation to be applied. Theaddoperation adds a value to an existing header. Thesetoperation creates a header and value, and will overwrite an existing header’s value if one already exists. Thepushoperation creates a header and value, but will not overwrite an existing header’s value if one already exists. Instead,pushwill add the value to the existing header. Thedeleteoperation removes the header. -
header: Specifies the header to be created or modified and can be any string that can be used as a header name (e.g.Custom-Header). -
value_type: Defines how the header value will be evaluated and can either beplainfor plain text orliquidfor evaluation as a Liquid template. For more information, see Section 5.1, “Using variables and filters in policies”. -
value: Specifies the value that will be used for the header. For value type "liquid" the value should be in the format{{ variable_from_context }}. Not needed when deleting.
Policy object example
{
  "name": "headers",
  "version": "builtin",
  "configuration": {
    "response": [
      {
        "op": "add",
        "header": "Custom-Header",
        "value_type": "plain",
        "value": "any-value"
      }
    ],
    "request": [
      {
        "op": "set",
        "header": "Authorization",
        "value_type": "plain",
        "value": "Basic dXNlcm5hbWU6cGFzc3dvcmQ="
      },
      {
        "op": "set",
        "header": "Service-ID",
        "value_type": "liquid",
        "value": "{{service.id}}"
      }
    ]
  }
}
For information about how to configure policies, see the Creating a policy chain in 3scale section of the documentation.
4.1.14. HTTP Status Code Overwrite
As an API provider, you can add the HTTP Status Code Overwrite policy to an API product. This policy lets you change an upstream response code to a response code that you specify. 3scale applies the HTTP Status Code Overwrite policy to the response codes sent from the upstream service. In other words, when an API that 3scale exposes returns a code that does not fit your situation, you can configure the HTTP Status Code Overwrite policy to change that code to a response code that is meaningful for your application.
In a policy chain, any policies that produce response codes that you want to change must be before the HTTP Status Code Overwrite policy. If there are no policies that produce Status Codes that you want to change then the policy chain position of the HTTP Status Code Overwrite policy does not matter.
In the Admin Portal, add the HTTP Status Code Overwrite policy to a product’s policy chain. In the policy chain, click the policy to specify the upstream response code that you want to change and the response code that you want returned instead. Click the plus sign for each additional upstream response code that you want to overwrite. For example, you could use the HTTP Status Code Overwrite policy to change upstream 201, "Created", response codes, to 200, "OK", response codes.
Another example of a response code that you might want to change is the response when a content limit is exceeded. The upstream might return 413, payload too large, when a response code of 414, request-URI too long, would be more helpful.
An alternative to adding the HTTP Status Code Overwrite policy in the Admin Portal is to use the 3scale API with a policy chain configuration file.
Example
The following JSON configuration in your policy chain configuration file would overwrite two upstream response codes.
{
  "name": "statuscode_overwrite",
  "version": "builtin",
  "configuration": {
    "http_statuses": [
      {
        "upstream": 200,
        "apicast": 201
      },
      {
        "upstream": 413,
        "apicast": 414
      }
    ]
  }
}
4.1.15. HTTP2 Endpoint
The HTTP2 Endpoint policy enables HTTP/2 protocol connections between consumer applications that send requests and APIcast. When the HTTP2 Endpoint policy is in a product’s policy chain, the entire communications flow, from a consumer application that makes a request, to APIcast, to the upstream service, can use the HTTP/2 protocol.
When the HTTP2 Endpoint policy is in a policy chain:
-
Request authentication must be by means of JSON web tokens or
App_IDandApp_Keypairs. API key authentication is not supported. - The HTTP2 Endpoint policy must be before the 3scale APIcast policy.
- The upstream service’s backends can implement HTTP/1.1 plaintext or Transport Layer Security (TLS).
- The policy chain must also include the TLS Termination policy.
4.1.16. IP Check
The IP Check policy is used to deny or allow requests based on a list of IPs.
Configuration properties
| property | description | data type | required? |
|---|---|---|---|
| check_type |
The |
string, must be either | yes |
| ips |
The | array of strings, must be valid IP addresses | yes |
| error_msg |
The | string | no |
| client_ip_sources |
The |
array of strings, valid options are one or more of | no |
Policy object example
{
  "name": "ip_check",
  "configuration": {
    "ips": [ "3.4.5.6", "1.2.3.0/4" ],
    "check_type": "blacklist",
    "client_ip_sources": ["X-Forwarded-For", "X-Real-IP", "last_caller"],
    "error_msg": "A custom error message"
  }
}
For information about how to configure policies, see the Creating a policy chain in 3scale section of the documentation.
4.1.17. JWT Claim Check
Based on JSON Web Token (JWT) claims, the JWT Claim Check policy allows you to define new rules to block resource targets and methods.
About JWT Claim Check policy
In order to route based on the value of a JWT claim, you need a policy in the chain that validates the JWT and stores the claim in the context that the policies share.
If the JWT Claim Check policy is blocking a resource and a method, the policy also validates the JWT operations. Alternatively, in case that the method resource does not match, the request continues to the backend API.
Example: In case of a GET request, the JWT needs to have the role claim as admin, if not the request will be denied. On the other hand, any non GET request will not validate the JWT operations, so POST resource is allowed without JWT constraint.
{
  "name": "apicast.policy.jwt_claim_check",
  "configuration": {
      "error_message": "Invalid JWT check",
      "rules": [
          {
              "operations": [
                  {"op": "==", "jwt_claim": "role", "jwt_claim_type": "plain", "value": "admin"}
              ],
              "combine_op":"and",
              "methods": ["GET"],
              "resource": "/resource",
              "resource_type": "plain"
          }
      ]
  }
}
Configuring JWT Claim Check policy in your policy chain
To configure the JWT Claim Check policy in your policy chain:
- You need to have access to a 3scale installation.
- You need to wait for all the deployments to finish.
Configuring the policy
- To add the JWT Claim Check policy to your API, follow the steps described in Enabling policies in the 3scale Admin Portal and choose JWT Claim Check.
- Click the JWT Claim Check link.
- To enable the policy, select the Enabled checkbox.
-
To add rules, click the plus
+icon. - Specify the resource_type.
- Choose the operator.
- Indicate the resource controlled by the rule.
-
To add the allowed methods, click the plus
+icon. - Type the error message to show to the user when traffic is blocked.
When you have finished setting up your API with JWT Claim Check, click Update Policy.
You can add more resource types and allowed methods by clicking the plus
+icon in the corresponding section.- Click Update Policy Chain to save your changes.
4.1.18. Liquid Context Debug
The Liquid Context Debug policy is meant only for debugging purposes in the development environment and not in production.
This policy responds to the API request with a JSON, containing the objects and values that are available in the context and can be used for evaluating Liquid templates. When combined with the 3scale APIcast or upstream policy, Liquid Context Debug must be placed before them in the policy chain in order to work correctly. To avoid circular references, the policy only includes duplicated objects once and replaces them with a stub value.
An example of the value returned by APIcast when the policy is enabled:
    {
      "jwt": {
        "azp": "972f7b4f",
        "iat": 1537538097,
        ...
        "exp": 1537574096,
        "typ": "Bearer"
      },
      "credentials": {
        "app_id": "972f7b4f"
      },
      "usage": {
        "deltas": {
          "hits": 1
        },
        "metrics": [
          "hits"
        ]
      },
      "service": {
        "id": "2",
        ...
      }
      ...
    }
4.1.19. Logging
The Logging policy has two purposes:
- To enable and disable access log output.
- To create a custom access log format for each service and be able to set conditions to write custom access log.
You can combine the Logging policy with the global setting for the location of access logs. Set the APICAST_ACCESS_LOG_FILE environment variable to configure the location of APIcast access logs. By default, this variable is set to /dev/stdout, which is the standard output device. For further details about global APIcast parameters, see Chapter 7, APIcast environment variables.
Additionally, the Logging policy has these features:
-
This policy only supports the
enable_access_logsconfiguration parameter. -
To enable the access logs, select the
enable_access_logsparameter or disable the Logging policy. To disable access logging for an API:
- Enable the policy.
-
Clear the
enable_access_logsparameter -
Click the
Submitbutton.
- By default, this policy is not enabled in policy chains.
4.1.19.1. Configuring the logging policy for all APIs
The APICAST_ENVIRONMENT can be used to load a configuration that makes the policy apply globally to all API products. The following is an example of how this can be achieved. APICAST_ENVIRONMENT is used to point to the path of a file, which depending on the type of deployment, template or operator, needs to be provided differently.
To configure the logging policy globally, consider the following depending on your deployment-type:
- For template-based deployments: it is a requirement to mount the file on the container via ConfigMap and VolumeMount.
For 3scale operator-based deployments:
- Previous to 3scale 2.11, it is a requirement to mount the file on the container via ConfigMap and VolumeMount.
- As of 3scale 2.11, it is a requirement to use a secret referenced in the APIManager custom resource (CR).
For the APIcast operator deployments:
- Previous to 3scale 2.11 this could not be configured.
- As of 3scale 2.11, it is a requirement to use a secret referenced in the APIManager custom resource (CR).
- For APIcast self-managed deployed on Docker, it is a requirement to mount the file on the container.
Logging options help to avoid issues with logs that are not correctly formatted in APIs.
The following is an example of a policy that loads in all services:
custom_env.lua file
local cjson = require('cjson')
local PolicyChain = require('apicast.policy_chain')
local policy_chain = context.policy_chain

local logging_policy_config = cjson.decode([[
{
  "enable_access_logs": false,
  "custom_logging": "\"{{request}}\" to service {{service.id}} and {{service.name}}"
}
]])

policy_chain:insert( PolicyChain.load_policy('logging', 'builtin', logging_policy_config), 1)

return {
  policy_chain = policy_chain,
  port = { metrics = 9421 },
}
4.1.19.1.1. Configuring the logging policy for all APIs by mounting the file on the container via ConfigMap and VolumeMount
Create a ConfigMap with the
custom_env.luafile:oc create configmap logging --from-file=/path/to/custom_env.lua
Mount a volume for the ConfigMap, for example for
apicast-staging:oc set volume dc/apicast-staging --add --name=logging --mount-path=/opt/app-root/src/config/custom_env.lua --sub-path=custom_env.lua -t configmap --configmap-name=logging
Set the environment variable:
oc set env dc/apicast-staging APICAST_ENVIRONMENT=/opt/app-root/src/config/custom_env.lua
4.1.19.1.2. Configuring the logging policy for all APIs using a secret referenced in the APIManager custom resource (CR)
From 3scale 2.11 in operator-based deployments, configure the logging policy as a secret and reference the secret in the APIManager custom resource (CR).
The following procedure is valid for the 3scale operator only. You can however configure the APIcast operator in a similar way using these steps.
Prerequisites
- One or more custom environments coded with Lua.
Procedure
Create a secret with the custom environment content:
$ oc create secret generic custom-env --from-file=./custom_env.lua
Configure and deploy the APIManager CR with the APIcast custom environment:
apimanager.yaml content:
apiVersion: apps.3scale.net/v1alpha1
kind: APIManager
metadata:
  name: apimanager-apicast-custom-environment
spec:
  apicast:
    productionSpec:
      customEnvironments:
        - secretRef:
            name: custom-env
    stagingSpec:
      customEnvironments:
        - secretRef:
            name: custom-env
Deploy the APIManager CR:
$ oc apply -f apimanager.yaml
If the secret does not exist, the operator marks the CR as failed. Changes to the secret will require a redeployment of the pod/container in order to reflect in APIcast.
Updating the custom environment
If you need to modify the custom environment content, there are two options:
Recommended: Create another secret with a different name and update the APIManager CR field:
customEnvironments[].secretRef.name
The operator triggers a rolling update loading the new custom environment content.
-
Update the existing secret content and redeploy APIcast turning
spec.apicast.productionSpec.replicasorspec.apicast.stagingSpec.replicasto 0 and then back to the previous value.
4.1.19.1.3. Configuring the logging policy for all APIs for APIcast self-managed deployed on Docker
Run APIcast with this specific environment by mounting custom_env.lua using the following docker command:
docker run --name apicast --rm -p 8080:8080 \
    -v $(pwd):/config \
    -e APICAST_ENVIRONMENT=/config/custom_env.lua \
    -e THREESCALE_PORTAL_ENDPOINT=https://ACCESS_TOKEN@ADMIN_PORTAL_DOMAIN \
    quay.io/3scale/apicast:master
These are key concepts of the docker command to consider:
-
Share the current Lua file to the container
-v $(pwd):/config. -
Set the APICAST_ENVIRONMENT variable to the Lua file that is stored in the
/configdirectory.
4.1.19.2. Examples of the logging policy
These are examples of the Logging policy, with the following caveats:
-
If
custom_loggingorenable_json_logsproperty is enabled, default access log will be disabled. -
If
enable_json_logsis enabled, thecustom_loggingfield will be omitted.
Disabling access log
{
  "name": "apicast.policy.logging",
  "configuration": {
    "enable_access_logs": false
  }
}
Enabling custom access log
{
  "name": "apicast.policy.logging",
  "configuration": {
    "enable_access_logs": false,
    "custom_logging": "[{{time_local}}] {{host}}:{{server_port}} {{remote_addr}}:{{remote_port}} \"{{request}}\" {{status}} {{body_bytes_sent}} ({{request_time}}) {{post_action_impact}}",
  }
}
Enabling custom access log with the service identifier
{
  "name": "apicast.policy.logging",
  "configuration": {
    "enable_access_logs": false,
    "custom_logging": "\"{{request}}\" to service {{service.id}} and {{service.serializable.name}}",
  }
}
Configuring access logs in JSON format
{
  "name": "apicast.policy.logging",
  "configuration": {
    "enable_access_logs": false,
    "enable_json_logs": true,
    "json_object_config": [
      {
        "key": "host",
        "value": "{{host}}",
        "value_type": "liquid"
      },
      {
        "key": "time",
        "value": "{{time_local}}",
        "value_type": "liquid"
      },
      {
        "key": "custom",
        "value": "custom_method",
        "value_type": "plain"
      }
    ]
  }
}
Configuring a custom access log only for a successful request
{
  "name": "apicast.policy.logging",
  "configuration": {
    "enable_access_logs": false,
    "custom_logging": "\"{{request}}\" to service {{service.id}} and {{service.name}}",
    "condition": {
      "operations": [
        {"op": "==", "match": "{{status}}", "match_type": "liquid", "value": "200"}
      ],
      "combine_op": "and"
    }
  }
}
Customizing access logs where the response status matches either 200 or 500
{
  "name": "apicast.policy.logging",
  "configuration": {
    "enable_access_logs": false,
    "custom_logging": "\"{{request}}\" to service {{service.id}} and {{service.name}}",
    "condition": {
      "operations": [
        {"op": "==", "match": "{{status}}", "match_type": "liquid", "value": "200"},
        {"op": "==", "match": "{{status}}", "match_type": "liquid", "value": "500"}
      ],
      "combine_op": "or"
    }
  }
}
4.1.19.3. Additional information about custom logging
For custom logging, you can use Liquid templates with exported variables. These variables include:
-
NGINX default directive variable: log_format. For example:
{{remote_addr}}. Response and request headers:
-
{{req.headers.FOO}}: To get the FOO header in the request. -
{{res.headers.FOO}}: To retrieve the FOO header on response.
-
Service information, such as
{{service.id}}, and all the service properties provided by these parameters:- THREESCALE_CONFIG_FILE
- THREESCALE_PORTAL_ENDPOINT
4.1.20. Maintenance Mode
The Maintenance Mode policy allows you reject incoming requests with a specified status code and message. It is useful for maintenance periods or to temporarily block an API.
Configuration properties
The following is a list of possible properties and default values.
| property | value | default | description |
|---|---|---|---|
| status | integer, optional | 503 | Response code |
| message | string, optional | 503 Service Unavailable - Maintenance | Response message |
Maintenance Mode policy example
{
  "policy_chain": [
    {"name": "maintenance-mode", "version": "1.0.0",
    "configuration": {"message": "Be back soon..", "status": 503} },
  ]
}
Apply maintenance mode for a specific upstream
{
    "name": "maintenance_mode",
    "version": "builtin",
    "configuration": {
        "message_content_type": "text/plain; charset=utf-8",
        "message": "Echo API /test is currently Unavailable",
        "condition": {
            "combine_op": "and",
            "operations": [
                {
                    "left_type": "liquid",
                    "right_type": "plain",
                    "op": "==",
                    "left": "{{ original_request.path }}",
                    "right": "/test"
                }
            ]
        },
        "status": 503
    }
}
For information about how to configure policies, see the Creating a policy chain in 3scale section of the documentation.
4.1.21. NGINX Filter
NGINX automatically checks some request headers and rejects requests when it cannot validate those headers. For example, NGINX rejects requests that have If-Match headers that NGINX cannot validate. If you want NGINX to skip validation of particular headers, add the NGINX Filter policy.
When you add the NGINX Filter policy, you specify one or more request headers for which you want NGINX to skip validation. For each header that you specify, you indicate whether or not to keep the header in the request. For example, the following JSON code adds the NGINX Filter policy so that it skips validation of If-Match headers but keeps If-Match headers in requests that are forwarded to the upstream server.
{ "name": "apicast.policy.nginx_filters",
  "configuration": {
    "headers": [
      {"name": "If-Match", "append": true}
    ]
  }
}
The next example also skips validation of If-Match headers but this code instructs NGINX to delete If-Match headers before sending requests to the upstream server.
{ "name": "apicast.policy.nginx_filters",
  "configuration": {
    "headers": [
      {"name": "If-Match", "append": false}
    ]
  }
}
Regardless of whether or not you append the specified header to the request that goes to the upstream server, you avoid an NGINX 412 response code when NGINX cannot validate a header that you specify.
Specifying the same header for the Header Modification policy and for the NGINX Filter policy is a potential source of conflict.
4.1.22. OAuth 2.0 Mutual TLS Client Authentication
This policy executes OAuth 2.0 Mutual TLS Client Authentication for every API call.
An example of the OAuth 2.0 Mutual TLS Client Authentication policy JSON is shown below:
{
  "$schema": "http://apicast.io/policy-v1/schema#manifest#",
  "name": "OAuth 2.0 Mutual TLS Client Authentication",
  "summary": "Configure OAuth 2.0 Mutual TLS Client Authentication.",
  "description": ["This policy executes OAuth 2.0 Mutual TLS Client Authentication ",
    "(https://tools.ietf.org/html/draft-ietf-oauth-mtls-12) for every API call."
  ],
  "version": "builtin",
  "configuration": {
    "type": "object",
    "properties": { }
  }
}
4.1.23. OAuth 2.0 Token Introspection
The OAuth 2.0 Token Introspection policy allows validating the JSON Web Token (JWT) token used for services with the OpenID Connect (OIDC) authentication option using the Token Introspection Endpoint of the token issuer (Red Hat Single Sign-On).
APIcast supports the following authentication types in the auth_type field to determine the Token Introspection Endpoint and the credentials APIcast uses when calling this endpoint:
use_3scale_oidc_issuer_endpoint: APIcast uses the client credentials, Client ID and Client Secret, as well as the Token Introspection Endpoint from the OIDC Issuer setting configured on the Service Integration page. APIcast discovers the Token Introspection endpoint from thetoken_introspection_endpointfield. This field is located in the.well-known/openid-configurationendpoint that is returned by the OIDC issuer.Authentication type set to
use_3scale_oidc_issuer_endpoint:"policy_chain": [ … { "name": "apicast.policy.token_introspection", "configuration": { "auth_type": "use_3scale_oidc_issuer_endpoint" } } … ],client_id+client_secret: This option enables you to specify a different Token Introspection Endpoint, as well as the Client ID and Client Secret APIcast uses to request token information. When using this option, set the following configuration parameters:-
client_id: Sets the Client ID for the Token Introspection Endpoint. -
client_secret: Sets the Client Secret for the Token Introspection Endpoint. introspection_url: Sets the Introspection Endpoint URL.Authentication type set to
client_id+client_secret:"policy_chain": [ … { "name": "apicast.policy.token_introspection", "configuration": { "auth_type": "client_id+client_secret", "client_id": "myclient", "client_secret": "mysecret", "introspection_url": "http://red_hat_single_sign-on/token/introspection" } } … ],
-
Regardless of the setting in the auth_type field, APIcast uses Basic Authentication to authorize the Token Introspection call (Authorization: Basic <token> header, where <token> is Base64-encoded <client_id>:<client_secret> setting).

The response of the Token Introspection Endpoint contains the active attribute. APIcast checks the value of this attribute. Depending on the value of the attribute, APIcast authorizes or rejects the call:
-
true: The call is authorized -
false: The call is rejected with theAuthentication Failederror
The policy allows enabling caching of the tokens to avoid calling the Token Introspection Endpoint on every call for the same JWT token. To enable token caching for the Token Introspection Policy, set the max_cached_tokens field to a value from 0, which disables the feature, and 10000. Additionally, you can set a Time to Live (TTL) value from 1 to 3600 seconds for tokens in the max_ttl_tokens field.
4.1.24. On Fail
As an API provider, you can add the On Fail policy to an API product. When the On Fail policy is in a policy chain and execution of a policy fails for a given API consumer request, APIcast does the following:
- Stops processing the request
- Returns the status code you specify to the application that sent the request
The On Fail policy is useful when APIcast cannot process a policy, perhaps because of an incorrect configuration or because of non-compliant code in a custom policy. Without the On Fail policy in the policy chain, APIcast skips a policy it cannot apply, processes any other policies in the chain, and sends the request to the upstream API. With the On Fail policy in the policy chain, APIcast rejects the request.
In a policy chain, the On Fail policy can be in any position.
In the Admin Portal, add the On Fail policy to a product’s policy chain. In the policy chain, click the policy to specify the status code that you want APIcast to return when it applies the On Fail policy. For example, you could specify 400, which indicates a bad request from the client.
4.1.25. Proxy Service
You can use the Proxy Service policy to define a generic HTTP proxy where the 3scale traffic will be sent using the defined proxy. In this case, the proxy service works as a reverse HTTP proxy, where APIcast sends the traffic to the HTTP proxy, and the proxy then sends the traffic on to the API backend.
The following example shows the traffic flow:
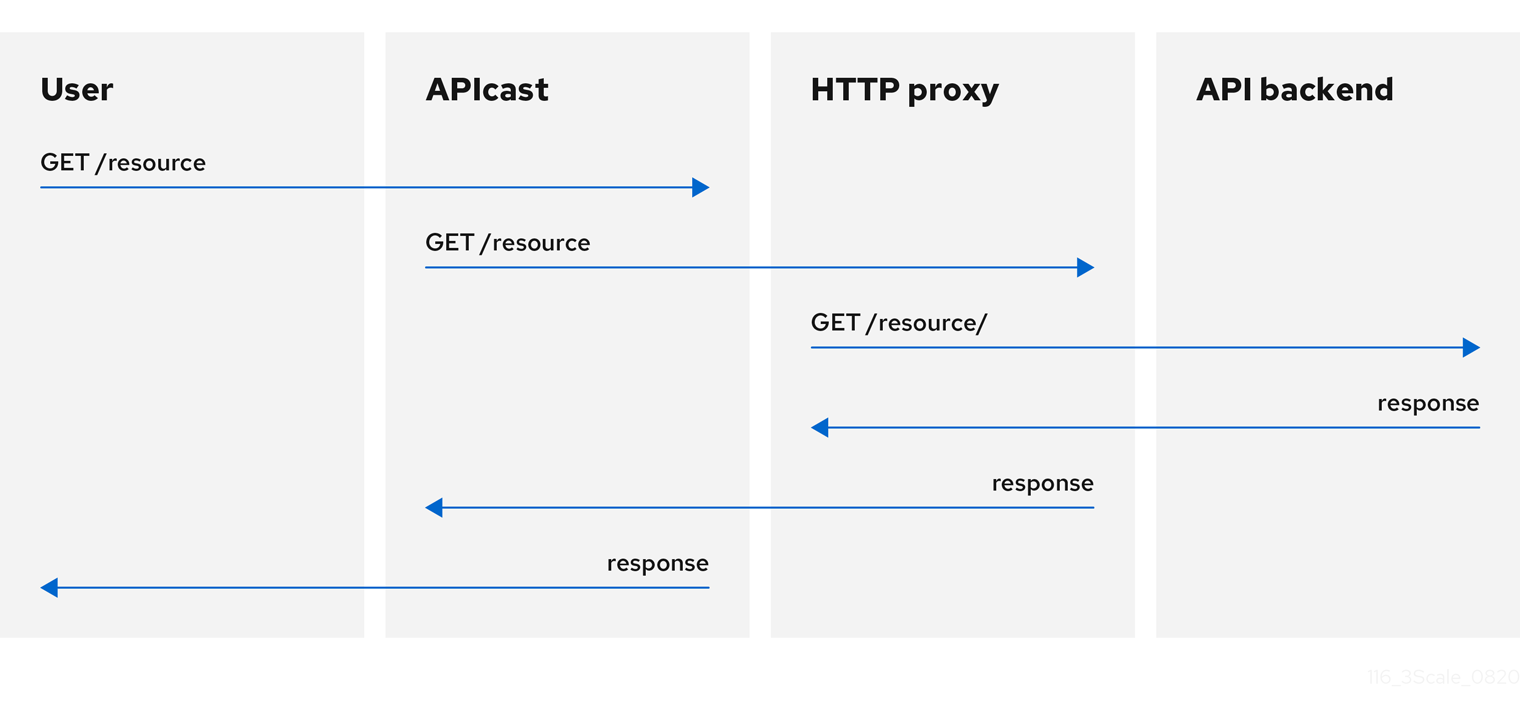
All APIcast traffic sent to the 3scale backend does not use the proxy. This policy only applies to the proxy and the communication between APIcast and API backend.
If you want to send all traffic through a proxy, you must use an HTTP_PROXY environment variable.
- The Proxy Service policy disables all load-balancing policies, and traffic is sent to the proxy.
-
If the
HTTP_PROXY,HTTPS_PROXY, orALL_PROXYparameters are defined, this policy overwrites those values. - The proxy connection does not support authentication. You use the Header Modification policy for authentication.
Configuration
The following example shows the policy chain configuration:
"policy_chain": [
    {
      "name": "apicast.policy.apicast"
    },
    {
      "name": "apicast.policy.http_proxy",
      "configuration": {
          "all_proxy": "http://192.168.15.103:8888/",
          "https_proxy": "https://192.168.15.103:8888/",
          "http_proxy": "https://192.168.15.103:8888/"
      }
    }
]
The all_proxy value is used if http_proxy or https_proxy is not defined.
Example use case
The Proxy Service policy was designed to apply more fine-grained policies and transformation in 3scale using Apache Camel over HTTP. However, you can also use the Proxy Service policy as a generic HTTP proxy service. For integration with Apache Camel over HTTPS, see Section 4.1.6, “Camel Service”.
Example project
See the camel-netty-proxy example on GitHub. This project shows an HTTP proxy that transforms the response body from the API backend to uppercase.
4.1.26. Rate Limit Headers
The Rate Limit Headers policy adds RateLimit headers to response messages when your application subscribes to an application plan with rate limits. These headers provide useful information about the configured request quota limit and the remaining request quota and seconds in the current time window.
In the policy chain for a product, if you add the Rate Limit Headers policy it must be before the 3scale APIcast policy. If the 3scale APIcast policy is before the Rate Limit Headers policy then the Rate Limit Headers policy does not work.
RateLimit headers
The following RateLimit headers are added to each message:
-
RateLimit-Limit: Displays the total request quota in the configured time window, for example,10requests. -
RateLimit-Remaining: Displays the remaining request quota in the current time window, for example,5requests. -
RateLimit-Reset: Displays the remaining seconds in the current time window, for example,30seconds. The behavior of this header is compatible with thedelta-secondsnotation of theRetry-Afterheader.
By default, there are no rate limit headers in the response message when the Rate Limit Headers policy is not configured or when your application plan does not have any rate limits.
If you are requesting an API metric with no rate limits but the parent metric has limits configured, the rate limit headers are still included in the response because the parent limits apply.
4.1.27. Response/Request Content Limits
As an API provider, you can add the Response/Request Content Limits policy to an API product. This policy lets you limit the size of a request to an upstream API as well as the size of a response from an upstream API. Without this policy, the request/response size is unlimited.
This policy is helpful for preventing overloading of:
- A backend because it must act on a payload that is too large.
- An end-user (API consumer) because it receives more data than it can handle.
In a request or in a response, the content-length header is required for 3scale to apply the Response/Request Content Limits policy.
In the Admin Portal, after you add the Response/Request Content Limits policy to a product, click it to specify the limits in bytes. You can specify the request limit, or the response limit, or both. The default value, 0, indicates an unlimited size.
Alternatively, you can add this policy by updating your policy chain configuration file, for example:
{
  "name": "apicast.policy.limits",
  "configuration":
  {
    "request": 100,
    "response": 100
  }
}
4.1.28. Retry
The Retry policy sets the number of retry requests to the upstream API. The retry policy is configured per service, so users can enable retries for as few or as many of their services as desired, as well as configure different retry values for different services.
As of 3scale 2.11, it is not possible to configure which cases to retry from the policy. This is controlled with the environment variable APICAST_UPSTREAM_RETRY_CASES, which applies retry requests to all services. For more on this, check out APICAST_UPSTREAM_RETRY_CASES.
An example of the retry policy JSON is shown below:
{
  "$schema": "http://apicast.io/policy-v1/schema#manifest#",
  "name": "Retry",
  "summary": "Allows retry requests to the upstream",
  "description": "Allows retry requests to the upstream",
  "version": "builtin",
  "configuration": {
    "type": "object",
    "properties": {
      "retries": {
        "description": "Number of retries",
        "type": "integer",
        "minimum": 1,
        "maximum": 10
      }
    }
  }
}
4.1.29. RH-SSO/Keycloak Role Check
This policy adds role check when used with the OpenID Connect authentication option. This policy verifies realm roles and client roles in the access token issued by Red Hat Single Sign-On (RH-SSO). The realm roles are specified when you want to add role check to every client resource of 3scale.
There are the two types of role checks that the type property specifies in the policy configuration:
- whitelist: This is the default. When whitelist is used, APIcast will check if the specified scopes are present in the JWT token and will reject the call if the JWT doesn’t have the scopes.
- blacklist: When blacklist is used, APIcast will reject the calls if the JWT token contains the blacklisted scopes.
It is not possible to configure both checks – blacklist and whitelist in the same policy, but you can add more than one instance of the RH-SSO/Keycloak Role Check policy to the APIcast policy chain.
You can configure a list of scopes via the scopes property of the policy configuration.
Each scope object has the following properties:
- resource: Resource endpoint controlled by the role. This is the same format as Mapping Rules. The pattern matches from the beginning of the string and to make an exact match you must append $ at the end.
resource_type: This defines how the resource value is evaluated.
- As plain text (plain): Evaluates the resource value as plain text. Example: /api/v1/products$.
- As Liquid text (liquid): Allows using Liquid in the resource value. Example: /resource_{{ jwt.aud }} manages access to the resource containing the Client ID.
methods: Use this parameter to list the allowed HTTP methods in APIcast, based on the user roles in RH-SSO. As examples, you can allow methods that have:
-
The
role1realm role to access/resource1. For those methods that do not have this realm role, you need to specify the blacklist. -
The
client1role calledrole1to access/resource1. -
The
role1androle2realm roles to access/resource1. Specify the roles in realm_roles. You can also indicate the scope for each role. -
The client role called
role1of the application client, which is the recipient of the access token, to access/resource1. Useliquidclient type to specify the JSON Web Token (JWT) information to the client. -
The client role including the client ID of the application client, the recipient of the access token, to access
/resource1. Useliquidclient type to specify the JWT information to thenameof the client role. -
The client role called
role1to access the resource including the application client ID. Useliquidclient type to specify the JWT information to theresource.
-
The
realm_roles: Use it to check the realm role. See the Realm Roles in Red Hat Single Sign-On documentation.
The realm roles are present in the JWT issued by Red Hat Single Sign-On.
  "realm_access": {
    "roles": [
      "<realm_role_A>", "<realm_role_B>"
    ]
  }
The real roles must be specified in the policy.
"realm_roles": [
  { "name": "<realm_role_A>" }, { "name": "<realm_role_B>" }
]
Following are the available properties of each object in the realm_roles array:
- name: Specifies the name of the role.
- name_type: Defines how the name must be evaluated; the value can be plain or liquid. This works the same way as for the resource_type.
client_roles: Use client_roles to check for the particular access roles in the client namespace. See the Client Roles in Red Hat Single Sign-On documentation.
The client roles are present in the JWT under the resource_access claim.
  "resource_access": {
    "<client_A>": {
      "roles": [
        "<client_role_A>", "<client_role_B>"
      ]
    },
    "<client_B>": {
      "roles": [
        "<client_role_A>", "<client_role_B>"
      ]
    }
  }
Specify the client roles in the policy.
"client_roles": [
  { "name": "<client_role_A>", "client": "<client_A>" },
  { "name": "<client_role_B>", "client": "<client_A>" },
  { "name": "<client_role_A>", "client": "<client_B>" },
  { "name": "<client_role_B>", "client": "<client_B>" }
]
Following are the available properties of each object in the client_roles array:
- name: Specifies the name of the role.
- name_type: Defines how the name value must be evaluated; the value can be plain or liquid. This works the same way as for the resource_type.
- client: Specifies the client of the role. When it is not defined, this policy uses the aud claim as the client.
- client_type: Defines how the client value must be evaluated; The value can be plain or liquid. This works the same way as for the resource_type.
4.1.30. Routing
The Routing policy allows you to route requests to different target endpoints. You can define target endpoints and then you will be able to route incoming requests from the UI to those using regular expressions.
Routing is based on the following rules:
When you add the Routing policy to a policy chain, the Routing policy must always be immediately before the standard 3scale APIcast policy. In other words, there cannot be any policies between the Routing policy and the 3scale APIcast policy. This ensures correct APIcast output in the request that APIcast sends to the upstream API. Here are two examples of correct policy chains:
Liquid Context Debug
JWT Claim Check
Routing
3scale APIcast
Liquid Context Debug
Routing
3scale APIcast
JWT Claim Check
Routing rules
- If multiple rules exist, the Routing policy applies the first match. You can sort these rules.
- If no rules match, the policy will not change the upstream and will use the defined Private Base URL defined in the service configuration.
Request path rule
This is a configuration that routes to http://example.com when the path is /accounts:
 {
    "name": "routing",
    "version": "builtin",
    "configuration": {
      "rules": [
        {
          "url": "http://example.com",
          "condition": {
            "operations": [
              {
                "match": "path",
                "op": "==",
                "value": "/accounts"
              }
            ]
          }
        }
      ]
    }
  }
Header rule
This is a configuration that routes to http://example.com when the value of the header Test-Header is 123:
 {
    "name": "routing",
    "version": "builtin",
    "configuration": {
      "rules": [
        {
          "url": "http://example.com",
          "condition": {
            "operations": [
              {
                "match": "header",
                "header_name": "Test-Header",
                "op": "==",
                "value": "123"
              }
            ]
          }
        }
      ]
    }
  }
Query argument rule
This is a configuration that routes to http://example.com when the value of the query argument test_query_arg is 123:
 {
    "name": "routing",
    "version": "builtin",
    "configuration": {
      "rules": [
        {
          "url": "http://example.com",
          "condition": {
            "operations": [
              {
                "match": "query_arg",
                "query_arg_name": "test_query_arg",
                "op": "==",
                "value": "123"
              }
            ]
          }
        }
      ]
    }
  }
JWT claim rule
To route based on the value of a JWT claim, there needs to be a policy in the chain that validates the JWT and stores it in the context that the policies share.
This is a configuration that routes to http://example.com when the value of the JWT claim test_claim is 123:
 {
    "name": "routing",
    "version": "builtin",
    "configuration": {
      "rules": [
        {
          "url": "http://example.com",
          "condition": {
            "operations": [
              {
                "match": "jwt_claim",
                "jwt_claim_name": "test_claim",
                "op": "==",
                "value": "123"
              }
            ]
          }
        }
      ]
    }
  }
Multiple operations rule
Rules can have multiple operations and route to the given upstream only when all of them evaluate to true by using 'and' combine_op, or when at least one of them evaluates to true by using 'or' combine_op. The default value of combine_op is 'and'.
This is a configuration that routes to http://example.com when the path of the request is /accounts and when the value of the header Test-Header is 123:
 {
    "name": "routing",
    "version": "builtin",
    "configuration": {
      "rules": [
        {
          "url": "http://example.com",
          "condition": {
            "combine_op": "and",
            "operations": [
              {
                "match": "path",
                "op": "==",
                "value": "/accounts"
              },
              {
                "match": "header",
                "header_name": "Test-Header",
                "op": "==",
                "value": "123"
              }
            ]
          }
        }
      ]
    }
  }
This is a configuration that routes to http://example.com when the path of the request is /accounts or when the value of the header Test-Header is 123:
 {
    "name": "routing",
    "version": "builtin",
    "configuration": {
      "rules": [
        {
          "url": "http://example.com",
          "condition": {
            "combine_op": "or",
            "operations": [
              {
                "match": "path",
                "op": "==",
                "value": "/accounts"
              },
              {
                "match": "header",
                "header_name": "Test-Header",
                "op": "==",
                "value": "123"
              }
            ]
          }
        }
      ]
    }
  }
Combining rules
Rules can be combined. When there are several rules, the upstream selected is one of the first rules that evaluates to true.
This is a configuration with several rules:
 {
    "name": "routing",
    "version": "builtin",
    "configuration": {
      "rules": [
        {
          "url": "http://some_upstream.com",
          "condition": {
            "operations": [
              {
                "match": "path",
                "op": "==",
                "value": "/accounts"
              }
            ]
          }
        },
        {
          "url": "http://another_upstream.com",
          "condition": {
            "operations": [
              {
                "match": "path",
                "op": "==",
                "value": "/users"
              }
            ]
          }
        }
      ]
    }
  }
Catch-all rules
A rule without operations always matches. This can be useful to define catch-all rules.
This configuration routes the request to http://some_upstream.com if the path is /abc, routes the request to http://another_upstream.com if the path is /def, and finally, routes the request to http://default_upstream.com if none of the previous rules evaluated to true:
 {
    "name": "routing",
    "version": "builtin",
    "configuration": {
      "rules": [
        {
          "url": "http://some_upstream.com",
          "condition": {
            "operations": [
              {
                "match": "path",
                "op": "==",
                "value": "/abc"
              }
            ]
          }
        },
        {
          "url": "http://another_upstream.com",
          "condition": {
            "operations": [
              {
                "match": "path",
                "op": "==",
                "value": "/def"
              }
            ]
          }
        },
        {
          "url": "http://default_upstream.com",
          "condition": {
            "operations": []
          }
        }
      ]
    }
  }
Supported operations
The supported operations are ==, !=, and matches. The latter matches a string with a regular expression and it is implemented using ngx.re.match
This is a configuration that uses !=. It routes to http://example.com when the path is not /accounts:
 {
    "name": "routing",
    "version": "builtin",
    "configuration": {
      "rules": [
        {
          "url": "http://example.com",
          "condition": {
            "operations": [
              {
                "match": "path",
                "op": "!=",
                "value": "/accounts"
              }
            ]
          }
        }
      ]
    }
  }
Liquid templating
It is possible to use liquid templating for the values of the configuration. This allows you to define rules with dynamic values if a policy in the chain stores the key my_var in the context.
This is a configuration that uses that value to route the request:
 {
    "name": "routing",
    "version": "builtin",
    "configuration": {
      "rules": [
        {
          "url": "http://example.com",
          "condition": {
            "operations": [
              {
                "match": "header",
                "header_name": "Test-Header",
                "op": "==",
                "value": "{{ my_var }}",
                "value_type": "liquid"
              }
            ]
          }
        }
      ]
    }
  }
Set the host used in the host_header
By default, when a request is routed, the policy sets the Host header using the host of the URL of the rule that matched. It is possible to specify a different host with the host_header attribute.
This is a configuration that specifies some_host.com as the host of the Host header:
 {
    "name": "routing",
    "version": "builtin",
    "configuration": {
      "rules": [
        {
          "url": "http://example.com",
          "host_header": "some_host.com",
          "condition": {
            "operations": [
              {
                "match": "path",
                "op": "==",
                "value": "/"
              }
            ]
          }
        }
      ]
    }
  }
4.1.31. SOAP
The SOAP policy matches SOAP action URIs provided in the SOAPAction or Content-Type header of an HTTP request with mapping rules specified in the policy.
Configuration properties
| property | description | values | required? |
|---|---|---|---|
| pattern |
The | data type: string | yes |
| metric_system_name |
The | data type: string, must be a valid metric | yes |
Policy object example
{
  "name": "soap",
  "version": "builtin",
  "configuration": {
    "mapping_rules": [
      {
        "pattern": "http://example.com/soap#request",
        "metric_system_name": "soap",
        "delta": 1
      }
    ]
  }
}
For information on how to configure policies, see the Creating a policy chain in 3scale section of the documentation.
4.1.32. TLS Client Certificate Validation
With the TLS Client Certificate Validation policy, APIcast implements a TLS handshake and validates the client certificate against a whitelist. A whitelist contains certificates signed by the Certified Authority (CA) or just plain client certificates. In case of an expired or invalid certificate, the request is rejected and no other policies will be processed.
The client connects to APIcast to send a request and provides a Client Certificate. APIcast verifies the authenticity of the provided certificate in the incoming request according to the policy configuration. APIcast can also be configured to use a client certificate of its own to use it when connecting to the upstream.
Setting up APIcast to work with TLS Client Certificate Validation
APIcast needs to be configured to terminate TLS. Follow the steps below to configure the validation of client certificates provided by users on APIcast with the Client Certificate Validation policy.
You must have access to a 3scale installation. You must wait for all the deployments to finish.
Setting up APIcast to work with the policy
To set up APIcast and configure it to terminate TLS, follow these steps:
You need to get the access token and deploy APIcast self-managed, as indicated in Deploying APIcast using the OpenShift template.
NoteAPIcast self-managed deployment is required as the APIcast instance needs to be reconfigured to use some certificates for the whole gateway.
For testing purposes only, you can use the lazy loader with no cache and staging environment and
--paramflags for the ease of testingoc new-app -f https://raw.githubusercontent.com/3scale/3scale-amp-openshift-templates/master/apicast-gateway/apicast.yml --param CONFIGURATION_LOADER=lazy --param DEPLOYMENT_ENVIRONMENT=staging --param CONFIGURATION_CACHE=0
- Generate certificates for testing purposes. Alternatively, for production deployment, you can use the certificates provided by a Certificate Authority.
Create a Secret with TLS certificates
oc create secret tls apicast-tls
--cert=ca/certs/server.crt
--key=ca/keys/server.key
Mount the Secret inside the APIcast deployment
oc set volume dc/apicast --add --name=certificates --mount-path=/var/run/secrets/apicast --secret-name=apicast-tls
Configure APIcast to start listening on port 8443 for HTTPS
oc set env dc/apicast APICAST_HTTPS_PORT=8443 APICAST_HTTPS_CERTIFICATE=/var/run/secrets/apicast/tls.crt APICAST_HTTPS_CERTIFICATE_KEY=/var/run/secrets/apicast/tls.key
Expose 8443 on the Service
oc patch service apicast -p '{"spec":{"ports":[{"name":"https","port":8443,"protocol":"TCP"}]}}'Delete the default route
oc delete route api-apicast-staging
Expose the
apicastservice as a routeoc create route passthrough --service=apicast --port=https --hostname=api-3scale-apicast-staging.$WILDCARD_DOMAIN
NoteThis step is needed for every API you are going to use and the domain changes for every API.
Verify that the previously deployed gateway works and the configuration was saved, by specifying [Your_user_key] in the placeholder.
curl https://api-3scale-apicast-staging.$WILDCARD_DOMAIN?user_key=[Your_user_key] -v --cacert ca/certs/ca.crt
Configuring TLS Client Certificate Validation in your policy chain
To configure TLS Client Certificate Validation in your policy chain, you need 3scale login credentials. Also, you need to have configured APIcast with the TLS Client Certificate Validation policy.
- To add the TLS Client Certificate Validation policy to your API, follow the steps described in Enabling policies in the 3scale Admin Portal and choose TLS Client Certificate Validation.
- Click the TLS Client Certificate Validation link.
- To enable the policy, select the Enabled checkbox.
-
To add certificates to the whitelist, click the plus
+icon. -
Specify the certificate including
-----BEGIN CERTIFICATE-----and-----END CERTIFICATE-----. - When you have finished setting up your API with TLS Client Certificate Validation, click Update Policy.
Additionally:
-
You can add more certificates by clicking the plus
+icon. - You can also reorganize the certificates by clicking the up and down arrows.
To save your changes, click Update Policy Chain.
Verifying functionality of the TLS Client Certificate Validation policy
To verify the functionality of the TLS Client Certificate Validation policy, you need 3scale login credentials. Also, you need to have configured APIcast with the TLS Client Certificate Validation policy.
You can verify the applied policy by specifying [Your_user_key] in the placeholder.
curl https://api-3scale-apicast-staging.$WILDCARD_DOMAIN\?user_key\=[Your_user_key] -v --cacert ca/certs/ca.crt --cert ca/certs/client.crt --key ca/keys/client.key

curl https://api-3scale-apicast-staging.$WILDCARD_DOMAIN\?user_key\=[Your_user_key] -v --cacert ca/certs/ca.crt --cert ca/certs/server.crt --key ca/keys/server.key

curl https://api-3scale-apicast-staging.$WILDCARD_DOMAIN\?user_key\=[Your_user_key] -v --cacert ca/certs/ca.crt
Removing a certificate from the whitelist
To remove a certificate from the whitelist, you need 3scale login credentials. You need to have set up APIcast with the TLS Client Certificate Validation policy. You need to have added the certificate to the whitelist, by configuring TLS Client Certificate Validation in your policy chain.
- Click the TLS Client Certificate Validation link.
-
To remove certificates from the whitelist, click the
xicon. - When you have finished removing the certificates, click Update Policy.
To save your changes, click Update Policy Chain.
For more information about working with certificates, you can refer to Red Hat Certificate System.
4.1.33. TLS Termination
This section provides information about the Transport Layer Security (TLS) Termination policy: concepts, configuration, verification and file removal from the policy.
With the TLS Termination policy, you can configure APIcast to finish TLS requests for each API without using a single certificate for all APIs. APIcast pulls the configuration setting before establishing a connection to the client; in this way, APIcast uses the certificates from the policy and makes the TLS terminate. This policy works with these sources:
- Stored in the policy configuration.
- Stored on the file system.
By default, this policy is not enabled in policy chains.
Configuring TLS Termination in your policy chain
This section describes the prerequisites and steps to configure the TLS Termination in your policy chain, with Privacy Enhanced Mail (PEM) formatted certificates. Prerequisites are:
- Certificate issued by user
- A PEM-formatted server certificate
- A PEM-formatted certificate private key
Follow this procedure:
- To add the TLS Termination policy to your API, follow the steps described in Enabling a standard Policy and choose TLS Termination.
- Click the TLS Termination link.
- To enable the policy, select the Enabled checkbox.
-
To add TLS certificates to the policy, click the plus
+icon. Choose the source of your certificates:
Embedded certificate is selected by default. Upload these certificates:
- PEM formatted certificate private key: Click Browse to select and upload.
- PEM formatted certificate: Click Browse to select and upload.
Certificate from filesystem - select and specify these certificate paths:
- Path to the certificate
- Path to certificate private key
- When you have finished setting up your API with TLS Termination, click Update Policy.
Additionally:
-
You can add more certificates by clicking the plus
+icon. - You can also reorganize the certificates by clicking the up and down arrows.
To save your changes, click Update Policy Chain.
Verifying functionality of the TLS Termination policy
You must have 3scale login credentials. You must have configured APIcast with the TLS Termination policy.
You can test in the command line if the policy works with the following command:
curl “${public_URL}:${port}/?user_key=${user_key}" --cacert ${path_to_certificate}/ca.pem -vwhere:
-
public_URL= The staging public base URL -
port= The port number -
user_key= The user key you want to authenticate with -
path_to_certificate= The path to the CA certificate in your local file system
Removing files from TLS Termination
This section describes the steps to remove the certificate and key files from the TLS Termination policy.
- You need 3scale login credentials.
- You need to have added the certificate to the policy, by configuring APIcast with the TLS Termination policy.
To remove a certificate:
- Click the TLS Termination link.
-
To remove certificates and keys, click the
xicon. - When you have finished removing the certificates, click Update Policy.
To save your changes, click Update Policy Chain.
4.1.34. Upstream
The Upstream policy allows you to parse the Host request header using regular expressions and replace the upstream URL defined in the Private Base URL with a different URL.
For Example:
A policy with a regex /foo, and URL field newexample.com would replace the URL https://www.example.com/foo/123/ with newexample.com
Policy chain reference:
| property | description | values | required? |
|---|---|---|---|
| regex |
The | data type: string, Must be a valid regular expression syntax | yes |
| url |
Using the | data type: string, ensure this is a valid URL | yes |
Policy object example
{
  "name": "upstream",
  "version": "builtin",
  "configuration": {
    "rules": [
      {
        "regex": "^/v1/.*",
        "url": "https://api-v1.example.com",

      }
    ]
  }
}
For information on how to configure policies, see the Creating a policy chain in 3scale section of the documentation.
4.1.35. Upstream Connection
The Upstream Connection policy allows you to change the default values of the following directives, for each API, depending on how you have configured the API backend server in your 3scale installation:
-
proxy_connect_timeout -
proxy_send_timeout -
proxy_read_timeout
To configure the Upstream Connection policy:
- You must have access to a 3scale installation.
- You need to wait for all the deployments to finish.
Follow this procedure:
- To add the Upstream Connection policy to your API, follow the steps described in Enabling policies in the 3scale Admin Portal and choose Upstream Connection.
- Click the Upstream Connection link.
- To enable the policy, select the Enabled checkbox.
Configure the options for the connections to the upstream:
-
send_timeout -
connect_timeout -
read_timeout
-
- When you have finished setting up your API with Upstream Connection, click Update Policy.
To save your changes, click Update Policy Chain.
4.1.36. Upstream Mutual TLS
With the Upstream Mutual TLS policy, you can establish and validate mutual TLS connections between APIcast and upstream APIs based on the certificates set in the configuration.
When the verify field is enabled, the policy also verifies the server certificate from the upstream APIs. The ca_certificates contains a Privacy Enhanced Mail (PEM) formatted certificate, including the -----BEGIN CERTIFICATE----- and -----END CERTIFICATE----- that the APIcast uses to validate the server.
You must enable the verify field and have ca_certificates filled for verification of the upstream API’s certificate to take place. When the verify field is not enabled, only the check for the APIcast certificate at upstream APIs occurs.
To configure Upstream Mutual TLS in your policy chain, you need to have access to a 3scale installation.
- To add the Upstream Mutual TLS policy to your API, follow the steps described in Enabling policies in the 3scale Admin Portal and choose Upstream Mutual TLS.
- Click the Upstream Mutual TLS link.
- To enable the policy, select the Enabled checkbox.
Choose a Certificate type:
- path: If you want to specify the path of a certificate, such as the one generated by OpenShift.
- embedded: If you want to use a third-party generated certificate, by uploading it from your file system.
- In Certificate, specify the client certificate.
- Indicate the key in Certificate key.
- When you have finished setting up your API with Upstream Mutual TLS, click Update Policy Chain.
To promote your changes:
- Go to [Your_product] page > Integration > Configuration.
- Under APIcast Configuration, click Promote v# to Staging APIcast.
v# represents the version number of the configuration to be promoted.
Path configuration
Use the certificates path for OpenShift and Kubernetes secrets as follows:
{
  "name": "apicast.policy.upstream_mtls",
  "configuration": {
      "certificate": "/secrets/client.cer",
      "certificate_type": "path",
      "certificate_key": "/secrets/client.key",
      "certificate_key_type": "path"
  }
}
Embedded configuration
Use the following configuration for http forms and file upload:
{
  "name": "apicast.policy.upstream_mtls",
  "configuration": {
    "certificate_type": "embedded",
    "certificate_key_type": "embedded",
    "certificate": "data:application/pkix-cert;name=client.cer;base64,XXXXXXXXXXX",
    "certificate_key": "data:application/x-iwork-keynote-sffkey;name=client.key;base64,XXXXXXXX"
  }
}
For more details about the additional fields, ca_certificates and verify for Upstream Mutual TLS, policy config schema.
Additional considerations
The Upstream mutual TLS policy will overwrite APICAST_PROXY_HTTPS_CERTIFICATE_KEY and APICAST_PROXY_HTTPS_CERTIFICATE environment variable values. It uses the certificates set by the policy, so those environment variables will have no effect.
4.1.37. URL Rewriting
The URL Rewriting policy allows you to modify the path of a request and the query string.
When combined with the 3scale APIcast policy, if the URL Rewriting policy is placed before the APIcast policy in the policy chain, the APIcast mapping rules will apply to the modified path. If the URL Rewriting policy is placed after APIcast in the policy chain, then the mapping rules will apply to the original path.
The policy supports the following two sets of operations:
-
commands: List of commands to be applied to rewrite the path of the request. -
query_args_commands: List of commands to be applied to rewrite the query string of the request.
Commands for rewriting the path
Following are the configuration parameters that each command in the commands list consists of:
-
op: Operation to be applied. The options available are:subandgsub. Thesuboperation replaces only the first occurrence of a match with your specified regular expression. Thegsuboperation replaces all occurrences of a match with your specified regular expression. See the documentation for the sub and gsub operations. -
regex: Perl-compatible regular expression to be matched. -
replace: Replacement string that is used in the event of a match. -
options: This is optional. Options that define how the regex matching is performed. For information on available options, see the ngx.re.match section of the OpenResty Lua module project documentation. -
break: This is optional. When set to true with the checkbox enabled, if the command rewrote the URL, it will be the last one applied and all posterior commands in the list will be discarded.
Commands for rewriting the query string
Following are configuration parameters that each command in the query_args_commands list consists of:
op: Operation to be applied to the query arguments. The following options are available:-
add: Add a value to an existing argument. -
set: Create the arg when not set and replace its value when set. -
push: Create the arg when not set and add the value when set. -
delete: Delete an arg.
-
-
arg: The query argument name that the operation is applied on. -
value: Specifies the value that is used for the query argument. For value type "liquid" the value should be in the format{{ variable_from_context }}. For thedeleteoperation the value is not taken into account. -
value_type: This is optional. Defines how the query argument value is evaluated and can either beplainfor plain text orliquidfor evaluation as a Liquid template. For more information, see Section 5.1, “Using variables and filters in policies”. If not specified, the type "plain" is used by default.
Example
The URL Rewriting policy is configured as follows:
{
  "name": "url_rewriting",
  "version": "builtin",
  "configuration": {
    "query_args_commands": [
      {
        "op": "add",
        "arg": "addarg",
        "value_type": "plain",
        "value": "addvalue"
      },
      {
        "op": "delete",
        "arg": "user_key",
        "value_type": "plain",
        "value": "any"
      },
      {
        "op": "push",
        "arg": "pusharg",
        "value_type": "plain",
        "value": "pushvalue"
      },
      {
        "op": "set",
        "arg": "setarg",
        "value_type": "plain",
        "value": "setvalue"
      }
    ],
    "commands": [
      {
        "op": "sub",
        "regex": "^/api/v\\d+/",
        "replace": "/internal/",
        "options": "i"
      }
    ]
  }
The original request URI that is sent to the APIcast:
https://api.example.com/api/v1/products/123/details?user_key=abc123secret&pusharg=first&setarg=original
The URI that APIcast sends to the API backend after applying the URL rewriting:
https://api-backend.example.com/internal/products/123/details?pusharg=first&pusharg=pushvalue&setarg=setvalue
The following transformations are applied:
-
The substring
/api/v1/matches the only path rewriting command and it is replaced by/internal/. -
user_keyquery argument is deleted. -
The value
pushvalueis added as an additional value to thepushargquery argument. -
The value
originalof the query argumentsetargis replaced with the configured valuesetvalue. -
The command
addwas not applied because the query argumentaddargis not present in the original URL.
For information on how to configure policies, see the Creating a policy chain in 3scale section of the documentation.
4.1.38. URL Rewriting with Captures
The URL Rewriting with Captures policy is an alternative to the URL Rewriting policy and allows rewriting the URL of the API request before passing it to the API backend.
The URL Rewriting with Captures policy retrieves arguments in the URL and uses their values in the rewritten URL.
The policy supports the transformations configuration parameter. It is a list of objects that describe which transformations are applied to the request URL. Each tranformation object consist of two properties:
-
match_rule: This rule is matched to the incoming request URL. It can contain named arguments in the{nameOfArgument}format; these arguments can be used in the rewritten URL. The URL is compared tomatch_ruleas a regular expression. The value that matches named arguments must contain only the following characters (in PCRE regex notation):[\w-.~%!$&'()*,;=@:]. Other regex tokens can be used in thematch_ruleexpression, such as^for the beginning of the string and$for the end of the string. -
template: The template for the URL that the original URL is rewritten with; it can use named arguments from thematch_rule.
The query parameters of the original URL are merged with the query parameters specified in the template.
Example
The URL Rewriting with Captures policy is configured as follows:
{
  "name": "rewrite_url_captures",
  "version": "builtin",
  "configuration": {
    "transformations": [
      {
        "match_rule": "/api/v1/products/{productId}/details",
        "template": "/internal/products/details?id={productId}&extraparam=anyvalue"
      }
    ]
  }
}
The original request URI that is sent to the APIcast:
https://api.example.com/api/v1/products/123/details?user_key=abc123secret
The URI that APIcast sends to the API backend after applying the URL rewriting:
https://api-backend.example.com/internal/products/details?user_key=abc123secret&extraparam=anyvalue&id=123
4.1.39. Websocket
The Websocket policy enables WebSocket protocol connections to upstream APIs. If you plan to enable the WebSocket protocol, consider the following:
- The WebSocket protocol does not support JSON Web Tokens.
- The WebSocket protocol does not allow additional headers.
- The WebSocket protocol is not part of the HTTP/2 standard.
For a given upstream API for which you enable WebSocket connections, you can define its backends as http[s] or ws[s].
If you add the Websocket policy to a policy chain, ensure that the Websocket policy is before the 3scale APIcast policy.
4.2. Policy chains from 3scale standard policies
For each API product, you can specify a policy chain. A policy chain does the following:
- Specifies the policies that APIcast applies to requests.
- Provides configuration information for those policies.
- Determines the order in which APIcast applies policies.
To correctly order policies in a chain, it is important to understand how APIcast applies policies to API consumer requests.
4.2.1. How APIcast NGINX phases process 3scale policies
The 3scale API gateway, or APIcast, uses the NGINX proxy web server to apply policies. When APIcast receives a request from an API consumer, APIcast processes the request in an ordered series of NGINX phases. In each NGINX phase, APIcast can modify the original request by applying these policies:
- Policies in the upstream API policy chain. A policy chain is an ordered list of policies. By default, the policy chain for an upstream API includes the 3scale APIcast policy. An API provider can add policies to the policy chain for a 3scale product. APIcast applies policies in an upstream API policy chain to API consumer requests sent to only that upstream API.
- Policies in the global 3scale policy chain. An API provider can set 3scale environment variables to update the global policy chain. APIcast applies policies in the global policy chain to all API consumer requests.
If the same policy is in an upstream API policy chain and in the global policy chain, the policy configuration in the upstream API policy chain has precedence.
After APIcast performs the processing required in all NGINX phases, APIcast sends the result in a request to the upstream API. Consequently, to achieve the desired behavior, it is important to understand the order in which NGINX phases process policies because processing can modify the API consumer request.
Order and description of NGINX phases
When APIcast receives a request from an API consumer, APIcast processes the request by applying the policies in the upstream API’s policy chain and in the global policy chain. Each 3scale policy defines one or more functions. APIcast executes policy functions in an ordered series of NGINX phases. In each phase, NGINX runs any functions that are defined in the policies being applied and that specify execution in that phase. The following table lists the NGINX phases that run policy functions. Additional NGINX phases, not listed in this table, perform processing that is not affected by the order of policies in a policy chain.
| NGINX phases in order | Description of processing in this phase |
|---|---|
|
| Runs any functions that modify the request’s target URI. |
|
| Runs any functions that verify the client’s authorization to make the request. |
|
|
Generates the request content to be sent to the upstream API. |
|
| Runs any load balancing functions. |
|
| Runs any functions that process the request header. |
|
| Runs any functions that process the request body. |
|
| Runs any functions that process the request after NGINX has run functions on the header and body. |
|
| Generates log information about the request. |
|
| Operates on any data that is received from the Prometheus endpoint. |
Examples of NGINX phases that perform processing that is not affected by policy order:
-
When APIcast starts, NGINX executes tasks associated with the
initphase. -
When an APIcast worker starts, NGINX executes tasks associated with the
init_workerphase. -
When APIcast terminates an HTTPS connection, NGINX executes tasks associated with the
ssl_certificatephase.
Order in which NGINX runs policy functions
API providers can add one or more policies to a 3scale product to form a policy chain. In each phase, NGINX processes only those policy functions that specify execution in that phase. Each policy function specifies how APIcast should change its default behavior during processing in one NGINX phase. For example, in the header_filter phase, NGINX processes functions that specify header_filter and that presumably operate on request headers. In each phase, NGINX processes relevant functions in the order in which they are in the policy chain.
Policies can share data by means of a context object. Policies can read from and modify the context object in each phase.
The order in which NGINX executes policy functions depends on the following:
- The position of the policy in the policy chain
- The NGINX phase that processes a particular policy function
To obtain the desired behavior, you must correctly specify the policy chain order because the result of applying a policy can vary according to its place in a policy chain. The following diagram shows an example of the order in which NGINX applies policies.

In the previous figure, policy A is first in the policy chain. However, NGINX processes a function in policy B first because that function is related to NGINX’s first phase, the rewrite phase.
Now consider a product’s policy chain that contains policy A and then policy B with these functions:
Policy A specifies:
-
Function
A1for NGINX to run in theaccessphase -
Function
A2for NGINX to run in theheader_filterphase
-
Function
Policy B specifies:
-
Function
B1for NGINX to run in therewritephase -
Function
B2for NGINX to run in theheader_filterphase
-
Function
The following figure shows the order in which NGINX runs the product’s policy functions.
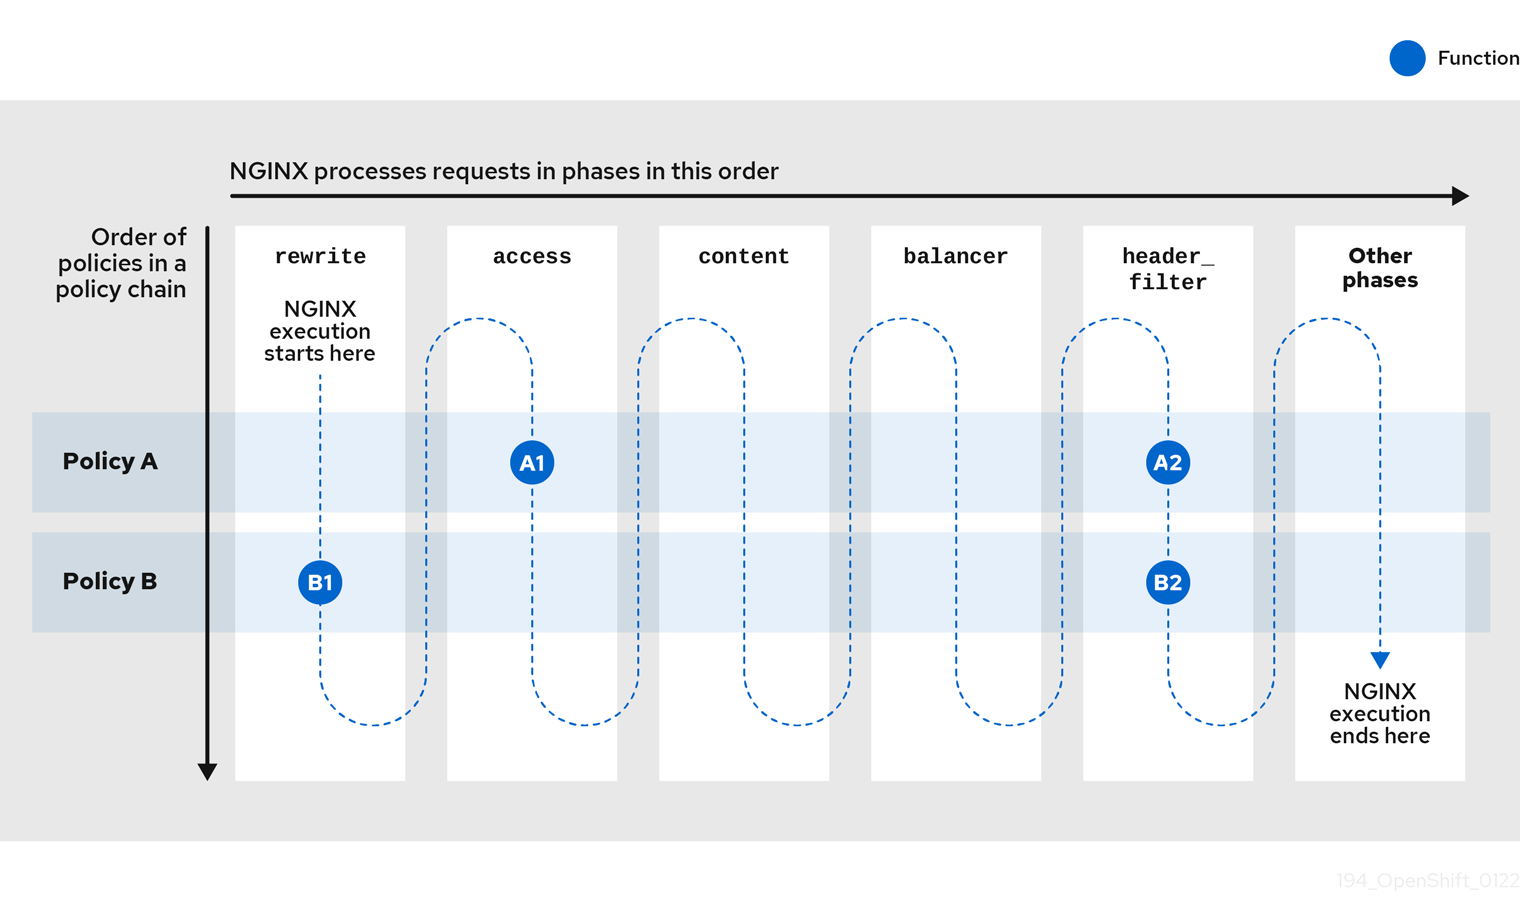
When APIcast receives a request for access to the upstream API exposed by this product, APIcast checks the product’s policy chain and runs the functions as described in the following table:
| NGINX phases in order | Functions that NGINX runs in this phase |
|---|---|
|
|
Runs the function |
|
|
Runs the function |
|
|
Neither policy A nor policy B specifies a function for execution in the |
|
|
Neither policy A nor policy B specifies a function for execution in the |
|
|
The policy chain specifies policy A and then policy B. Consequently, this phase runs the function |
|
| Neither policy A nor policy B specifies a function for execution in this phase. |
|
| Neither policy A nor policy B specifies a function for execution in this phase. |
|
| Neither policy A nor policy B specifies a function for execution in this phase. |
In this example, policy A is first in the policy chain but a function in policy B is the first function that NGINX runs. This is because policy B specifies a function B1 that NGINX processes in the rewrite phase, which comes before the other phases.
For another example, consider this policy chain:
- URL Rewriting
- 3scale APIcast (default policy assigned to all products)
The URL Rewriting policy modifies a request’s target path. APIcast runs the URL Rewriting function in the rewrite phase. The 3scale APIcast policy defines a function that APIcast runs in the rewrite phase as well as functions that APIcast runs in three other phases. When the URL Rewriting policy is first, the 3scale APIcast policy applies mapping rules to the rewritten path. If the 3scale APIcast policy is first and the URL Rewriting policy is second, the 3scale APIcast policy applies mapping rules to the original path.
4.2.2. Modifying policy chains in the 3scale Admin Portal
Modify a product’s policy chain in the 3scale Admin Portal as part of your APIcast gateway configuration.
Procedure
- Log in to 3scale.
- Navigate to the API product you want to configure the policy chain for.
- In [your_product_name] > Integration > Policies, click Add policy.
- Under the Policy Chain section, use the arrow icons to reorder policies in the policy chain.
- Click Update Policy Chain to save the policy chain.
Next steps
In the Admin Portal’s left-side navigation panel, there is now a warning that indicates that there are Configuration changes that you have not promoted to APIcast. Promote the policy chain updates to Staging APIcast and test the update as needed. After confirming the desired behavior, promote the update to Production APIcast. If the APICAST_CONFIGURATION_CACHE environment variable is set to a number greater than zero (the default) it takes that number of seconds for APIcast to use the updated configuration.
4.2.3. Creating 3scale policy chains in JSON configuration files
If you are using a native deployment of APIcast, you can create a JSON configuration file to control your policy chain outside.
A JSON configuration file policy chain contains a JSON array composed of the following information:
-
servicesobject with anidvalue that specifies which service the policy chain applies to by number -
proxyobject, which contains thepolicy_chainobject and subsequent objects -
policy_chainobject, which contains the values that define the policy chain -
Individual
policyobjects that specify bothnameandconfigurationdata necessary to identify the policy and configure policy behavior
The following is an example policy chain for a custom policy sample_policy_1 and the API introspection standard policy token_introspection:
{
  "services":[
    {
      "id":1,
      "proxy":{
        "policy_chain":[
          {
            "name":"sample_policy_1", "version": "1.0",
            "configuration":{
              "sample_config_param_1":["value_1"],
              "sample_config_param_2":["value_2"]
            }
          },
          {
            "name": "token_introspection", "version": "builtin",
            "configuration": {
              introspection_url:["https://tokenauthorityexample.com"],
              client_id:["exampleName"],
              client_secret:["secretexamplekey123"]
          },
          {
             "name": "apicast", "version": "builtin",
          }
        ]
      }
    }
  ]
}
All policy chains must include the builtin policy apicast. Where you place the apicast policy in the policy chain affects policy behavior.
4.2.4. NGINX phases that run 3scale standard policy functions
The following table lists the main NGINX phases with the standard policies that define functions that NGINX runs in that phase. The table lists the phases in the order in which NGINX processes them.
A policy chain can contain more than one policy that NGINX processes in a particular phase. In this situation, ensure that the order of the policies in the chain is the correct order for processing the API request to obtain the desired result. The table lists the policies in alphabetical order.
| NGINX phases in order | Standard policies that define functions that are processed in this phase |
|---|---|
|
|
3scale APIcast |
|
|
3scale APIcast |
|
|
3scale APIcast |
|
| Upstream Mutual TLS |
|
|
CORS Request Handling |
|
| Response/Request Content Limits |
|
|
3scale APIcast |
|
|
Edge Limiting |
4.2.5. 3scale standard policies and the NGINX phases that process them
The following table lists the standard policies and the NGINX phase or phases that run that policy’s function or functions. Use this table to correctly order policies in a policy chain to produce the correct request for the upstream API.
| Standard policies | NGINX phases that run policy functions |
|---|---|
| 3scale APIcast |
|
| Anonymous Access |
|
| 3scale Auth Caching | In a policy chain, the position of this policy does not matter. |
| 3scale Batcher |
|
| 3scale Referrer |
|
| Camel Service |
|
| Conditional Policy | In a policy chain, the position of this policy does not matter. |
| Content Caching |
|
| CORS Request Handling |
|
| Custom metrics |
|
| Echo |
|
| Edge Limiting |
|
| Header Modification |
|
| HTTP Response Code Overwrite |
|
| IP Check |
|
| JWT Claim Check |
|
| Liquid Context Debug |
|
| Logging |
|
| Maintenance Mode |
|
| NGINX Filter |
|
| OAuth 2.0 Mutual TLS Client Authentication |
|
| OAuth 2.0 Token Introspection |
|
| Proxy Service | In a policy chain, the position of this policy does not matter. |
| Rate Limit Headers |
|
| Response/Request Content Limits |
|
| Retry | In a policy chain, the position of this policy does not matter. |
| RH-SSO/Keycloak Role Check |
|
| Routing |
|
| SOAP |
|
| TLS Client Certificate Validation |
|
| TLS Termination |
|
| Upstream |
|
| Upstream Connection | In a policy chain, the position of this policy does not matter. |
| Upstream Mutual TLS |
|
| URL Rewriting |
|
| URL Rewriting with Captures |
|
| Websocket |
|
4.3. Custom 3scale APIcast policies
Configure custom policies to modify APIcast behavior. First, define a policy chain that configures APIcast policies, including your custom policies; then, add the policy chain to APIcast.
Red Hat 3scale provides a method for adding custom policies, but does not support custom policies.
Custom policies for APIcast depend on the configuration of your 3scale deployment:
- Add custom policies to these APIcast self-managed deployments: APIcast on OpenShift, and APIcast on the containerized environment you have installed.
- You cannot add custom policies to APIcast hosted.
Never make policy changes directly onto a production gateway. Always test your changes.
4.3.1. About custom policies for 3scale APIcast deployments
You can create custom APIcast policies entirely or modify the standard policies.
To create custom policies, you must understand the following:
- Policies are written in Lua.
- Policies must adhere to and be placed in the proper file directory.
- Policy behavior is affected by how they are placed in a policy chain.
- The interface to add custom policies is fully supported, but not the custom policies themselves.
4.3.2. Adding custom policies to 3scale embedded APIcast
To add custom APIcast policies to an on-premises deployment, you must build an OpenShift image containing your custom policies and add it to your deployment. 3scale provides a sample repository you can use as a framework to create and add custom policies to an on-premises deployment.
This sample repository contains the correct directory structure for a custom policy, as well as a template which creates an image stream and BuildConfigs for building a new APIcast OpenShift image containing any custom policies you create.
When you build apicast-custom-policies, the build process pushes a new image to the amp-apicast:latest tag. When there is an image change on this image stream, both the apicast-staging and the apicast-production tags, by default, are configured to automatically start new deployment. To avoid any disruptions to staging or to your production service disable automatic deployment by unselecting the "Automatically start a new deployment when the image changes" checkbox. Or, configure a different image stream tag for production, for example, amp-apicast:production.
Procedure
Create a
docker-registrysecret using the credentials you created in Creating a registry service account, following these considerations:-
Replace
your-registry-service-account-usernamewith the username created in the format, 12345678|username. -
Replace
your-registry-service-account-passwordwith the password string below the username, under the Token Information tab. Create a
docker-registrysecret for every newnamespacewhere the image streams reside and which use registry.redhat.io.Run this command to create a
docker-registrysecret:oc create secret docker-registry threescale-registry-auth \ --docker-server=registry.redhat.io \ --docker-username="your-registry-service-account-username" \ --docker-password="your-registry-service-account-password"
-
Replace
- Fork the public repository with the policy example or create a private repository with its content. You need to have the code of your custom policy available in a Git repository for OpenShift to build the image. Note that in order to use a private Git repository, you must set up the secrets in OpenShift.
- Clone the repository locally, add the implementation for your policy, and push the changes to your Git repository.
Update the
openshift.ymltemplate. Specifically, change the following parameters:-
spec.source.git.uri: https://github.com/3scale/apicast-example-policy.gitin the policy BuildConfig – change it to your Git repository location. -
spec.source.images[0].paths.sourcePath: /opt/app-root/policies/examplein the custom policies BuildConfig - changeexampleto the name of the custom policy that you have added under thepoliciesdirectory in the repository. -
Optionally, update the OpenShift object names and image tags. However, you must ensure that the changes are coherent. For example:
apicast-example-policyBuildConfig builds and pushes theapicast-policy:exampleimage that is then used as a source by theapicast-custom-policiesBuildConfig. So, the tag should be the same.
-
Create the OpenShift objects by running the command:
oc new-app -f openshift.yml --param AMP_RELEASE=2.11
In case the builds do not start automatically, run the following two commands. In case you changed it, replace
apicast-example-policywith your own BuildConfig name, for example,apicast-<name>-policy. Wait for the first command to complete before you execute the second one.oc start-build apicast-example-policy oc start-build apicast-custom-policies
If the built-in APIcast images have a trigger on them tracking the changes in the
amp-apicast:latestimage stream, the new deployment for APIcast will start. Afterapicast-staginghas restarted, navigate to Integration > Policies , and click the Add Policy button to see your custom policy listed. After selecting and configuring it, click Update Policy Chain to make your custom policy work in the staging APIcast.
4.3.3. Adding custom policies to 3scale in another OpenShift Container Platform
You can add custom policies to APIcast on OpenShift Container Platform (OCP) by fetching APIcast images containing your custom policies from the Integrated OpenShift Container Platform registry.
Procedure
- Add policies to APIcast built-in.
- If you are not deploying your APIcast gateway on your primary OpenShift cluster, establish access to the internal registry on your primary OpenShift cluster.
- Download the 3scale 2.11 APIcast OpenShift template.
To modify the template, replace the default
imagedirectory with the full image name in your internal registry.image: <registry>/<project>/amp-apicast:latest
Deploy APIcast using the OpenShift template, specifying your customized image:
oc new-app -f customizedApicast.yml
When custom policies are added to APIcast and a new image is built, those policies are automatically displayed as available in the Admin Portal when APIcast is deployed with the image. Existing services can see this new policy in the list of available policies, so it can be used in any policy chain.
When a custom policy is removed from an image and APIcast is restarted, the policy will no longer be available in the list, so you can no longer add it to a policy chain.
4.3.4. Including external Lua dependencies in 3scale custom policies
You can add an external Lua dependency to a custom policy so that APIcast can use a Lua library that is not yet in your 3scale image.
The procedure here shows you how to do this by using an example of a custom policy that transforms a response body from JSON to XML. The example custom policy requires the xml2lua XML parser, which is written in Lua. The complete example shows a short cut for building and testing but you cannot deploy your custom policy by following only the example procedure. To deploy a custom policy that has an external Lua dependency, you must perform the steps in this procedure as well as the procedure for Adding custom policies to 3scale in another OpenShift Container Platform.
The JSON to XML custom policy is only an example. It is not for use in a production environment.
Prerequisties
- A 3scale custom policy
- Access to an external Lua library
Procedure
In the directory that contains your custom policy, add a file that identifies the external Lua library.
The name of the file must be
Roverfile. In theJSON to XMLcustom policy example,Roverfilehas this content:luarocks { group 'production' { module { 'xml2lua' }, } }lua-roveris a wrapper around LuaRocks.lua-roverprovides transitive locking for dependencies. LuaRocks is a package manager for Lua modules.In the directory that contains your custom policy, add a
lua-roverlock file.The name of the file must be
Roverfile.lock. In theJSON to XMLcustom policy example,Roverfile.lockhas this content:xml2lua 1.5-2||productionbash-4.4
Together,
RoverfileandRoverfile.lockenable APIcast or the 3scale operator to fetch the dependent library.In the file that defines your custom policy, add a line that specifies the Lua dependency. The
JSON to XMLcustom policy example specifies this line:local xml2lua = require("xml2lua")In the Dockerfile that you use to build your custom policy, copy
RoverfileandRoverfile.lock, and runrover install. TheJSON to XMLcustom policy example adds these lines to its Dockerfile:COPY Roverfile . COPY Roverfile.lock . RUN rover install --roverfile=/opt/app-root/src/Roverfile
Your Dockerfile can use APIcast or the 3scale operator to build the policy.
In the
Makefilefor your custom policy, specify thebuildtarget as you would for any custom policy.For example, the
buildtarget might look like this:TARGET_IMAGE="apicast/json_to_xml:latest" # IP="http://localhost:8080" build: docker build . --build-arg IMAGE=registry.redhat.io/3scale-amp2/apicast-gateway-rhel8:3scale2.11 -t $(TARGET_IMAGE)
Next steps
The remaining steps for deploying a custom policy that has an external Lua dependency are the same as they are for deploying other custom policies. That is, you need to push the image into your repository and replace the APIcast image with the one you just built.
Additional resources