
Chapter 5. Developer Portal authentication
Follow these steps to configure access to your developer portal.
This article shows how to enable and disable the different types of authentication that can be made available on your developer portal to allow your developers to sign up or sign in.
At the moment, 3scale supports several methods of authenticating to the Developer Portal, which are covered in the following sections:
By default, only one type of authentication will be enabled on your developer portal, two if you signed up on 3scale.net:
- Username/email and password
- Authentication via GitHub (using the 3scale GitHub application) - only enabled by default if you signed up on 3scale.net

Older 3scale accounts (created prior to December 14th, 2015) might need to follow an extra step in order to enable GitHub and Auth0 authentication.
If this applies to you, you will need to add the following code snippet to the login and signup templates in order to enable this feature in both forms.
{% include 'login/sso' %}5.1. Enabling and disabling username/email and password
By default, the username/email and password authentication is enabled on your developer portal. Usually there is no change to be made here, as this is a standard way for your developers to create an account and to login.
However, in some rare cases you might want to remove this authentication type. To do so, edit the Login > New template as in the screenshot below:

If you need to add back the username/email and password authentication to your developer portal, just remove the liquid comment tags added in the previous step.
5.2. Enabling and disabling authentication via GitHub
In order to enable your own GitHub application, first you will need to create one and retrieve the corresponding credentials.
There are two different ways you can configure authentication via GitHub:
- Using the 3scale GitHub application (enabled by default for hosted 3scale accounts)
- Using your own GitHub application (for on-premises installations)
To make changes to this default configuration, you can go to your 3scale Admin Portal, in Audience > Developer Portal > SSO Integrations you will see the following screen:

Click on GitHub to access the configuration screen:
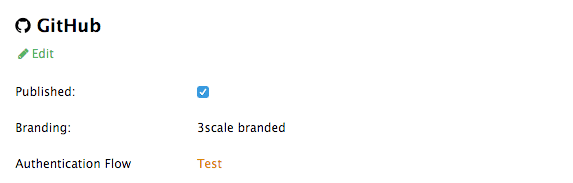
From this screen you can:
- Make the GitHub authentication available or unavailable on your developer portal – to do so, simply check or uncheck the "Published" box.
-
Choose the 3scale branded GitHub application or add your own GitHub application – the 3scale GitHub application is enabled (published) by default. You can configure your own GitHub application by clicking on Edit and entering the details of the OAuth application created in GitHub ("Client" and "Client secret"). Please note that in order to make the integration work properly with your own GitHub application, you should configure the authorization callback URL of your GitHub application using the "Callback URL" that you should see after switching to the "custom branded" option (e.g.
https://yourdomain.3scale.net/auth/github/callback). - Test that the configured authentication flow works as expected.
5.3. Enabling and disabling authentication via Auth0
5.3.1. Note
This feature is only available on the Enterprise plans.
In order to have your developers authenticate using Auth0, you first need to have a valid Auth0 subscription.
Authentication via Auth0 won’t be enabled by default. If you want to use your Auth0 account in conjunction with 3scale to manage the access to your developer portal, you can follow these steps to configure it:
Go to your 3scale Admin Portal, in Audience > Developer Portal > SSO Integrations click on Auth0.

On this configuration screen, you’ll need to add the details of your Auth0 account. Once you’ve entered the client ID, client secret, and site, check the "Published" box and click on Create Auth0 to make it available on your developer portal.
5.4. Enabling and disabling authentication through Red Hat Single Sign-On
This feature is only available on enterprise plans.
Red Hat Single Sign-On (RH-SSO) is an integrated Sign-On solution (SSO) that, when used in conjunction with 3scale, allows you to authenticate your developers using any of the available RH-SSO identity brokering and user federation options.
Refer to the supported configurations page for information on which versions of Red Hat Single Sign-On are compatible with 3scale.
5.4.1. Before You Begin
Before you can integrate Red Hat Single Sign-On with 3scale, you must have a working Red Hat Single Sign-On instance. Refer to the Red Hat Single Sign-On documentation for installation instructions: Installing RH-SSO 7.2
5.4.2. Configuring RH SSO to authenticate the Developer Portal
Perform the following steps to configure Red Hat Single Sign-On:
- Create a realm as described in the Red Hat Single Sign-On documentation.
- Add a client by going to Clients and clicking on Create.
Fill in the form considering the following fields and values:
- Client ID: type the desired name for your client.
-
Enabled: switch to
ON. -
Consent Required: switch to
OFF. - Client Protocol: select openid-connect.
- Access Type: select confidential.
-
Standard Flow Enabled: switch to
ON. -
Root URL: type your 3scale admin portal URL. This should be the URL address that you use to log in into your developer portal, e.g.:
https://yourdomain.3scale.netor your custom URL. Valid Redirect URLs: type your developer portal again by
/*like this:https://yourdomain.3scale.net/*.All the other parameters should be left empty or switched to
OFF.
Get the client secret with the following steps:
- Go to the Client you just created.
- Click on Credentials tab.
Select Client Id and Secret in Client Authenticator field.

Configure the
email_verifiedmapper. 3scale requires that theemail_verifiedclaim of the user data is set totrue. In order to map the "Email Verified" user attribute to theemail_verifiedclaim:- Go to the Mappers tab of the client.
Click Add Builtin.

Select the email verified option, and click Add selected to save the changes.

If you manage the users in the Red Hat Single Sign-On local database, make sure that the Email Verified attribute of the user is set to
ON.If you use User Federation, in the client created previously for 3scale SSO integration, you can configure a hardcoded claim by setting the token name to
email_verifiedand the claim value totrue.
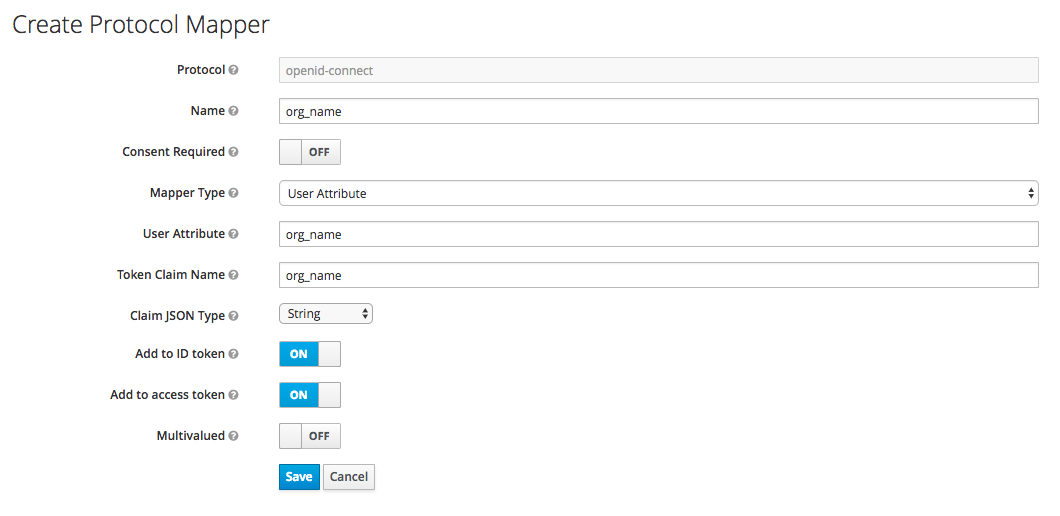
Optionally, configure the
org_namemapper.
When a user signs up in 3scale, the user is requested to fill in the signup form with the Organization Name value. In order to make the signup via Red Hat Single Sign-On transparent for the user by not requiring to fill in the signup form on the developer portal, you need to configure an additionalorg_namemapper:- Go to the Mappers tab of the client.
- Click Create.
Fill the mapper parameters as follows:
-
Name: type any desired name, e.g.
org_name. -
Consent Required: switch to
OFF. - Mapper Type: select User Attribute.
- User Attribute: type org_name.
- Token Claim Name: type org_name.
- Claim JSON Type: select String.
-
Add to ID token: switch to
ON. -
Add to access token: switch to
ON. -
Add to userinfo: switch to
ON. -
Multivalued: switch to
OFF.
-
Name: type any desired name, e.g.
Click Save.
If the users in Red Hat Single Sign-On have the attribute
org_name, 3scale will be able to create an account automatically. If not, then the user will be asked to indicate Organization Name before the account can be created. Alternatively, a mapper of type Hardcoded claim can be created to set the organization name to a hardcoded value for all users signing in with the Red Hat Single Sign-On account.
-
To test the integration, you need to add a user. To achieve this, navigate to Users, click Add user, and fill the required fields. Note that when you create an User in Red Hat Single Sign-On the Email Verified attribute (
email_verified) should be set toON, otherwise the user will not be activated in 3scale.
Using Red Hat Single Sign-On as an identity broker
You can use Red Hat Single Sign-On as an identity broker or configure it to federate external databases. For more information about how to configure these, see the Red Hat Single Sign-On documentation for identity brokering and user federation.
If you decide to use Red Hat Single Sign-On as an identity broker, and if you want your developers to be able to skip both the RH-SSO and 3scale account creation steps, we recommend the following configuration. In the example provided, we are using GitHub as our identity provider.
In Red Hat Single Sign-On, after configuring GitHub in Identity providers, go to the tab called Mappers and click Create.
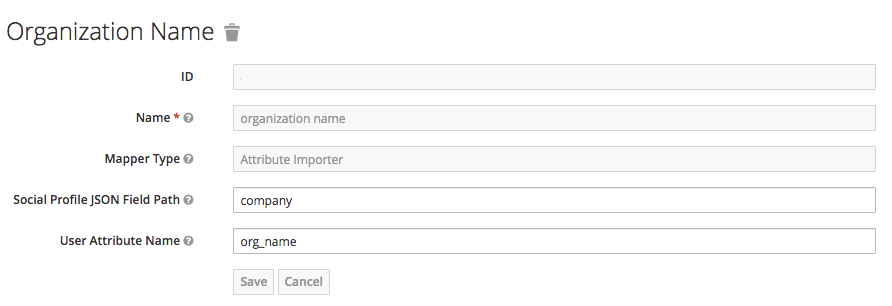
- Give it a name so you can identify it.
- In Mapper Type select Attribute Importer.
- In Social Profile JSON Field Path add company, which is the name of the attribute on GitHub.
In User Attribute Name add org_name, that is how we called the attribute in Red Hat Single Sign-On.
NoteRed Hat Single Sign-On requires first and last name as well as email as mandatory fields. 3scale requires email address, username, and organization name. So in addition to configuring a mapper for the organization name, and for your users to be able to skip both sign up forms, make sure that:
- In the IdP account, they have their first name and last name set.
- In the IdP account, their email address is accessible. E.g. In GitHub, if you set up your email address as private, it won’t be shared.
5.4.3. Configuring 3scale to authenticate the Developer Portal
As an API provider, configure 3scale to allow authentication for the Developer Portal using Red Hat Single Sign-On (RH-SSO).
Authentication through RH-SSO is not enabled by default. RH-SSO is available for only enterprise 3scale accounts, so you need to ask your account manager to enable the authentication via RH-SSO.
Prerequisites
- Your enterprise 3scale account is set up to enable RH-SSO.
You know the following details after Configuring RH SSO to authenticate the Developer Portal:
- Client: Name of your client in RH-SSO
- Client secret: Client secret in RH-SSO
- Realm: Realm name and URL address to your RH-SSO account
Procedure
- In the 3scale Admin Portal, select Audience > Developer Portal > SSO Integrations.
- Click Red Hat Single Sign-On.
- Specify the details of the RH-SSO client that you have configured in Section 5.4.2, “Configuring RH SSO to authenticate the Developer Portal”: client, client secret and realm.
- To save your changes, click Create Red Hat Single Sign-On