
Chapter 1. API Deployment On Microsoft Azure
Since APIs are platform agnostic, they can be deployed on any platform. This tutorial is fast web API deployment on Microsoft Azure. You will use the Ruby Grape gem to create the API interface, an NGINX proxy, Thin server, and Capistrano to deploy using the command line.
For the purpose of this tutorial, you can use any Ruby-based API running on Thin server, or you can clone the Echo-API.
1.1. Create and configure Microsoft Azure VM
Start to generate a X509 certificate with a 2048-bit RSA keypair to ssh into your Azure VM. It will be useful when you will set up your VM.
To generate this type of key, you can run the following command:
openssl req -x509 -nodes -days 365 -newkey rsa:2048 -keyout myPrivateKey.key -out myCert.pem
Now, get started by creating your Microsoft Azure account. For this tutorial, you can use the free trial option. Once the Azure account is created, go to the Dashboard on the Virtual Machines tab. There, you will be guided to create your first VM. Choose the from gallery option and select an Ubuntu Server 12.04 LTS.
On step 2 you will be able to upload the pem you created earlier, you should not be prompted for your password again.
In steps 3 and 4, choose the options that best suit your needs.
It will take a couple of minutes for your VM to be ready. When it is, you will be able to access its dashboard where you can monitor activity (CPU, disk, network) of your VM and upgrade its size.
The VM comes with a few packages installed, so you’ll need to access it to install other components. Once the key is created, you can ssh to your VM.
ssh -i myPrivateKey.key -p 22 username@servicename.cloudapp.net
Once in the VM, run the following commands to install everything you need:
sudo apt-get -y update
sudo apt-get -y upgrade
sudo apt-get -y install ruby1.9.3 build-essential libsqlite3-dev libpcre3 libpcre3-dev libssl-dev openssl libreadline6 libreadline6-dev libxml2-dev libxslt1-dev
You can check that Ruby installation is complete by running:
ruby -v
It should output something like ruby 1.9.3p194 (2012-04-20 revision 35410) [x86_64-linux].
You also need to install bundler and thin:
sudo gem install bundler
sudo gem install thin
Now, you should have everything you need on the VM. Go back to its dashboard and click on the endpoints tab. There, add the HTTP endpoint on port 80, and the fields should autofill.
1.2. Install OpenResty
In order to streamline this step, we recommend that you install the fantastic OpenResty web application. It’s the standard NGINX core bundled with almost all the necessary third-party NGINX modules built in.
On your Azure VM Compile and install NGINX:
cd ~
sudo wget http://agentzh.org/misc/nginx/ngx_openresty-VERSION.tar.gz
sudo tar -zxvf ngx_openresty-VERSION.tar.gz
cd ngx_openresty-VERSION/
sudo ./configure --prefix=/opt/openresty --with-luajit --with-http_iconv_module -j2
sudo make
sudo make install
1.3. Configure your GitHub repo
This tutorial uses GitHub to host the code. If you don’t already have a repo for your API, make sure to create one and host it on github.com. If you’re not familiar with Git and GitHub, check out this great tutorial.
To use Git on your VM and have access to your GitHub repo, you need to generate an SSH key on your VM and add it to Github as explained here.
1.3.1. Warning
Hosting your code on a public GitHub repo makes it vulnerable. Make sure it does not contain any sensitive information such as provider keys before pushing it publicly.
1.4. Configure your API
This is how the system will work:
- Thin server will be launched on port 8000.
-
The upstream
YOURAPINAMEis listening on localhost:8000. -
Upcoming connections on port 80 (as defined in the
serversection) are "redirected" toYOURAPINAME.
1.4.1. On 3scale
Rather than reinvent the wheel and implement rate limits, access controls, and analytics from scratch, you’ll use 3scale. If you don’t have an account yet, sign up here, activate it, and log in to the new instance through the links provided. The first time you log in, choose the option for some sample data to be created, so you’ll have some API keys to use later. Go through the tour to get a glimpse of the systems functionality (optional) and then go ahead with implementation.
To get some instant results, start with the API gateway in the staging environment, which can be used while in development. Then configure an NGINX proxy, which can scale up for full production deployments.
There is some documentation on configuring the API proxy here and more advanced configuration options here.
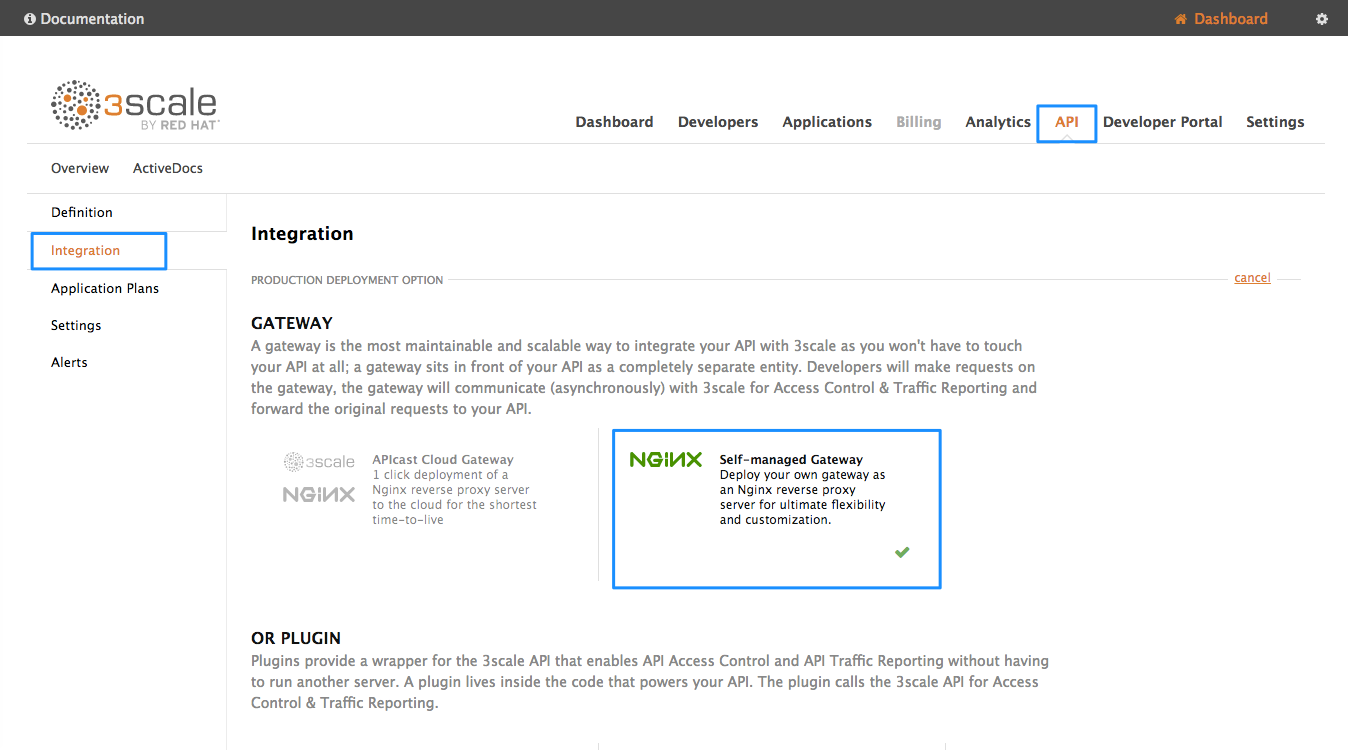
Once you sign in to your 3scale account, launch your API on the main Dashboard screen or Go to API→Select the service (API)→Integration in the sidebar→Proxy https://www.3scale.net/2015/06/how-to-deploy-an-api-amazon-ec2/
Set the address of your API backend -
`http://YOURAPP.cloudapp.net:80`
After creating some app credentials in 3scale, you can test your API by hitting the staging API gateway endpoint:
`https://XXX.staging.apicast.io/v1/words/awesome.json?app_id=APP_ID&app_key=APP_KEY`
where, XXX is specific to your staging API gateway and APP_ID and APP_KEY are the ID and key of one of the sample applications you created when you first logged in to your 3scale account. (If you missed that step, just create a developer account and an application within that account.)
Try it without app credentials, next with incorrect credentials. Then once authenticated, within and over any rate limits that you’ve defined. Once it’s working to your satisfaction, download the config files for NGINX.
Any time you have errors, check whether you can access the API directly: your-public-dns:3000/v1/words/awesome.json. If it’s not available, check whether the AWS instance is running and whether the Thin server is running on the instance.*
There, you will be able to change your API backend address to http://YOURAPP.cloudapp.net:80.
Once you’re done, click on Download your nginx config. That will download an archive containing the .conf and .lua file you’re going to use to configure your app.
Modify the .conf accordingly:
If the API gateway and the API are on the same VM, delete the block:
upstream backend_YOURAPP.cloudapp.net{
server ....
}…and replace it with…
upstream YOURAPINAME {
server 127.0.0.1:8000;
}YOURAPINAME can only contain URL valid characters as defined in RFC 3986.
In the .lua file, modify the line ngx.var.proxy_pass = "http://backend_YOURAPP.cloudapp.net".
With ngx.var.proxy_pass = "http://YOURAPINAME" in all cases.
Replace server_name api.2445580546262.proxy.3scale.net; with
server_name YOURSERVICENAME.cloudapp.net;
In the server block, add this on top:
root /home/USERNAME/apps/YOURAPINAME/current;
access_log /home/USERNAME/apps/YOURAPINAME/current/log/thin.log;
error_log /home/USERNAME/apps/YOURAPINAME/current/log/error.log;
Replace access_by_lua_file lua_tmp.lua;
…with… access_by_lua_file /opt/openresty/nginx/conf/lua_tmp.lua;
Before post_action /out_of_band_authrep_action; add:
proxy_set_header X-Forwarded-For $proxy_add_x_forwarded_for;
proxy_set_header Host $http_host;
Finally, rename those files nginx.conf and tmp_lua.lua.
1.4.2. Capistrano setup
Use Capistrano to deploy the API. Capistrano is an automation tool, which will let you set up tasks for your deployments and execute them using a command line interface. Capistrano is used on your local machine to deploy on your remote VM.
To install Capistrano, add this line to your gem file: gem 'capistrano'
Run the following command locally to install the new gems and set up Capistrano: bundle capify.
Copy nginx.conf and tmp_lua.lua into /config.
1.5. Capistrano setup
When you ran the capify command, you created two files, Capfile and deploy.rb. In deploy.rb, you describe all the commands necessary to deploy your app.
In /config edit deploy.rb and replace the content with the following:
require "bundler/capistrano"
set :application, "YOURAPINAME"
set :user,"USERNAME"
set :scm, :git
set :repository, "git@github.com:GITHUBUSERNAME/REPO.git"
set :branch, "master"

set :use_sudo, false

server "VNDNSname", :web, :app, :db, primary: true

set :deploy_to, "/home/#{user}/apps/#{application}"
default_run_options[:pty] = true
ssh_options[:forward_agent] = false
ssh_options[:port] = 22
ssh_options[:keys] = ["/PATH/TO/myPrivateKey.key"]

namespace :deploy do
    task :start, :roles => [:web, :app] do
      run "cd #{deploy_to}/current && nohup bundle exec thin start -C config/production_config.yml -R config.ru"
      sudo "/opt/openresty/nginx/sbin/nginx -p /opt/openresty/nginx/ -c /opt/openresty/nginx/conf/nginx.conf"
    end

    task :stop, :roles => [:web, :app] do
      run "kill -QUIT cat /opt/openresty/nginx/logs/nginx.pid"
      run "cd #{deploy_to}/current && nohup bundle exec thin stop -C config/production_config.yml -R config.ru"
    end

    task :restart, :roles => [:web, :app] do
      deploy.stop
      deploy.start
    end

    task :setup_config, roles: :app do
      sudo "ln -nfs #{current_path}/config/nginx.conf /opt/openresty/nginx/conf/nginx.conf"
      sudo "ln -nfs #{current_path}/config/lua_tmp.lua /opt/openresty/nginx/conf/lua_tmp.lua"
      sudo "mkdir -p #{shared_path}/config"
    end
    after "deploy:setup", "deploy:setup_config"
end
This will ensure that Capistrano doesn’t try to run rake:migrate. (This is not a Rails project!)
task :cold do
  deploy.update
  deploy.start
end
In above text, replace the following:
-
VNDNSnamewith your .cloudapp.net DNS. -
YOURAPINAMEwith your applicationame. -
USERNAMEwith the username used to login into the VM. -
GITHUBUSERNAMEwith your Github username. -
REPOwith your Github repo name. -
/PATH/TOwith the path to access the SSH key created before.
The above works well if you don’t have a database in your API. If you do have a database, comment the lines:
task :cold do
  deploy.update
  deploy.start
end
You also need to add a file production_config.yml in /config to configure the Thin server.
environment: production
chdir: /home/USERNAME/apps/YOURAPINAME/current/
address: 127.0.0.1
user: USERNAME
port: 8000
pid: /home/USERNAME/apps/YOURAPINAME/current/tmp/thin.pid
rackup: /home/USERNAME/apps/YOURAPINAME/current/config.ru
log: /home/USERNAME/apps/YOURAPINAME/current/log/thin.log
max_conns: 1024
timeout: 30
max_persistent_conns: 512
daemonize: true
Again, change usernames and paths accordingly.
Commit the changes on the project and upload them to GitHub.
git add .
git commit -m "adding config files"
git push
You are almost done.
1.6. Deploy
From your local development machine, run the following command to set up the remote Azure VM:
cap deploy:setup
You should not be prompted for a password if the path to your ssh key is correct.
Capistrano will connect to your VM and create an apps directory under the home directory of the user account.
Now, you can deploy your API to the VM and launch Thin server using the command: cap deploy:cold
This command should get the latest commit on your GitHub. Launch OpenResty and Thin server.
Your API should now be available on the URL:
MYAPI.cloudapp.net/path/to/resources
1.6.1. Troubleshooting
If you are not able to access to your API, ssh to your VM and check that you can call it on localhost using curl. Like this:
curl -X GET http://localhost:8000/v2/words/hello.json?app_id=APPID&app_key=APPKEY`
If it works, there is something wrong in nginx configuration.
You can check nginx logs on your VM with
cat /opt/openresty/nginx/logs/error.log
You should now have an API running on an Azure Linux instance.
Hope you enjoyed this tutorial. Please let us know if you have any questions or comments. We look forward to hearing from you.