
Chapter 24. Credit card gateways for payments
As a 3scale API provider, define the payment gateways for credit cards to monetize subscriptions to your APIs.
24.1. Credit card gateways supported by 3scale
3scale integrates with the following payment gateways for credit card transactions:
- Braintree
- Stripe
Online payment services must display a mandate when collecting credit card data. A mandate is a record of the permission a customer has given you to debit their payment method. The mandate should state clearly that the supplied payment method will be used to collect subsequent payments for services. For more information regarding mandates for Stripe and Braintree, see the external documentation links for the respective payment gateways listed under Additional resources.
Adyen, Authorize.Net and Ogone integrations are deprecated. New integrations with these gateways are not supported. Existing integrations can be supported, but the recommendation is to migrate to one of the fully supported payment gateways: Stripe and Braintree.
Additional resources
- Stripe: Accept a SEPA Direct Debit payment
- Braintree: Recurring Transactions
24.2. Configuring Stripe as a credit card gateway
As a 3scale API provider, configure the Admin Portal and the Developer Portal with Stripe as a payment gateway to receive payments from subscriptions to your APIs by using Stripe as a credit card gateway.
Prerequisites
You must have a Stripe account.
- Stripe recommends you use separate Stripe sub-accounts for each business or project.
- See the Stripe documentation for Multiple Accounts.
- You must have Stripe administrator permissions.
Procedure
To configure 3scale with Stripe as a payment gateway, follow these steps:
- Generating an access token with the Billing API scope in the 3scale Admin Portal.
- Obtaining the keys and the webhook secret from Stripe.
- Configuring charging in the 3scale Admin Portal.
- Editing credit card details in the 3scale Developer Portal
-
Updating the text of
unsuccessfully chargedemail response.
24.2.1. Generating an access token with the Billing API scope in the 3scale Admin Portal
- In the 3scale Admin Portal, go to Account Settings > Personal > Tokens.
Create a Read & Write token with the Billing API scope:
- Click Add Access Token.
- Specify a name for the token.
- Choose the scope: Billing API.
- Select the permission level: Read & Write.
- Click Create Access token.
Copy the access token.
- Ensure you copy the access token to a file text. The access token will not be displayed afterwards.
- To finish the token generation, click I have copied the token.
24.2.2. Obtaining the keys and the webhook secret from Stripe
- Configuring the webhook in Stripe is required.
- Use the webhook to notify 3scale that the payment has succeeded.
- 3scale then updates the state of the invoice and prevents further attempts to charge.
In your Stripe account, get the Secret Key, and the Publishable Key:
- Open the Stripe dashboard.
- Find your API keys by following the instructions in the Stripe documentation.
- Copy the Secret Key, and the Publishable Key
Still in your Stripe account, create a Webhook Signing Secret:
- Go to Developers > Webhooks.
- Click Add endpoint
Fill in with the following endpoint URL:
https://<Your-provider-admin-domain>/api/payment_callbacks/stripe_callbacks?access_token=<value-of-access-token>
-
In Events to send, add
payment_intent.succeeded. - Click Add endpoint.
- Click to reveal the signing secret of the webhook you just created and take note of this secret. This is the Webhook Signing Secret.
24.2.3. Configuring charging in the 3scale Admin Portal
In the 3scale Admin Portal:
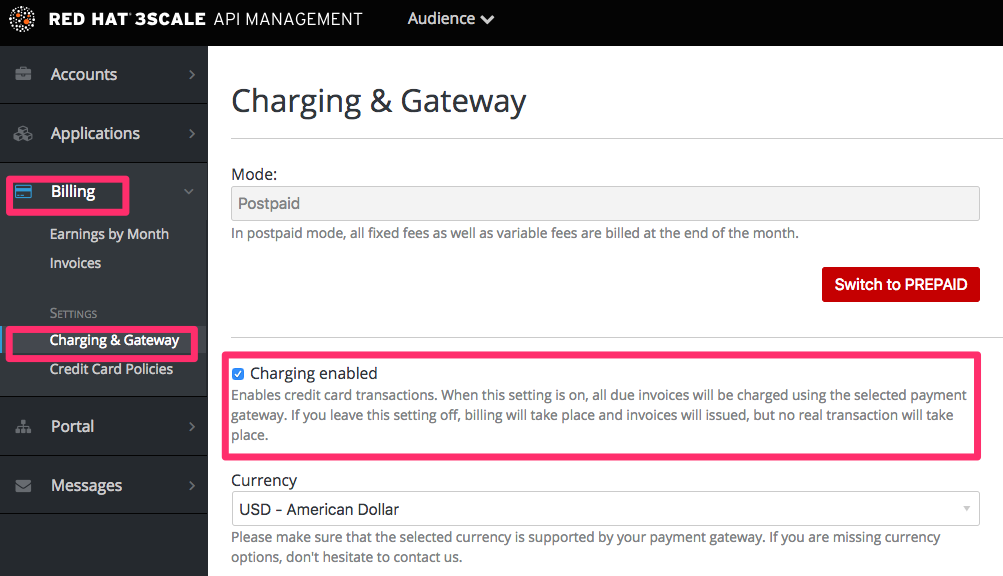
- Go to Audience > Billing > Charging & Gateway.
- Select Charging enabled and click Save.
- In Credit card gateway > Gateway, select Stripe as the gateway.
- Add the Secret Key, the Publishable Key and the Webhook Signing Secret you obtained from your Stripe account in Section 24.2.2, “Obtaining the keys and the webhook secret from Stripe”.
- Click Save.
24.2.4. Editing credit card details in the 3scale Developer Portal
- Login to the 3scale Developer Portal with a developer account.
- Go to Settings > Credit Card Details.
- Add the following credit card details: credit card number, expiration date and CVC.
- Click Save details.
24.2.5. Updating the text of unsuccessfully charged email response
In connection with the fixes for SCA payments, the text of the invoice_messenger_unsuccessfully_charged_for_buyer.text.liquid email requires a manual update in 3scale 2.10.
- In the 3scale Admin Portal, go to Audience > Messages > Email Templates.
- Select Invoice charge failure for buyer with retry.
- Click Override.
Update the template message: This is the complete text to be used in the unsuccessfully charged email response:
Dear {{ account.name }}, Thank you for using our service. We're sorry to inform you that your last payment was declined. This may have been caused by a few common reasons: - A new authentication policy enforced by your bank - An expired credit card - Insufficient funds on the account To continue using your service, verify the status of your credit card and update or re-enter the credit card details at {{payment_url}}. If you need help, don't hesitate to contact us at {{ provider.finance_support_email }}. Best regards, The {{ provider.name }} API Team- Click Create Email Template.
With these steps, you have updated the email template for the unsuccessfully charged email response.
Additional resources
24.3. Configuring Braintree as a credit card gateway
As a 3scale API provider, configure the Admin Portal and the Developer Portal with Braintree as a payment gateway to receive payments from subscriptions to your APIs by using Braintree.
Prerequisites
- You must have an account with Braintree.
If you want to ensure a secure checkout for your customers with 3D Secure (3DS), you must have 3DS enabled in your Braintree account before you enable 3DS for 3scale.
-
By default, both 3scale and Braintree have 3DS as
off(disabled).
-
By default, both 3scale and Braintree have 3DS as
Procedure
To configure 3scale with Braintree as a payment gateway, follow these steps:
Obtaining the keys and the merchant identifier from Braintree
From your Braintree account, get the Public Key, the Merchant ID, and the Private Key. For more information about obtaining these values, refer to the Braintree documentation listed under Additional resources.
Configuring charging in the 3scale Admin Portal
In the 3scale Admin Portal:
- Go to Audience > Billing > Charging & Gateway.
- Select Charging enabled.
Select the currency.
- The currency type specified on the 3scale Billing page must match the currency type used in your Braintree merchant account.
- Click Save.
- Under Credit card gateway > Gateway, select Braintree as the gateway.
- Add the Public Key, the Merchant ID and the Private Key you obtained from your Braintree account in Obtaining the keys and the merchant identifier from Braintree.
- To enable 3DS, select 3D Secure Enabled.
- Click Save changes.
Editing credit card details in the 3scale Developer Portal
As a 3scale API consumer, add or edit the credit card details in the 3scale Developer Portal. To match the financial details with the entity that has issued your credit card, all the fields listed in this window are mandatory.
- Login to the 3scale Developer Portal with a developer account.
- Go to Settings > Credit Card Details.
- Click the Add Credit Card Details and Billing Address link.
- Add the payment details: first name, last name, phone.
- Add the credit card details: credit card number, expiration date and CVC.
- Add the billing address details: company, street address, zip/postal code, city and state/region. Then, select the country.
- Click Save details.
- If you are prompted, complete two-factor authentication (2FA) for your purchase. For example, if your bank has enabled the SMS 2FA option, you will have to complete the authentication process using this method.
Additional resources
- For more details about obtaining the Public Key, the Merchant ID and the Private Key from your Braintree account, see Braintree Articles: Important Gateway Credentials.
24.4. Allowing payments of rejected invoices via the Developer Portal
As a 3scale API provider, allow the payment of rejected invoices via the Developer Portal. To enable these payments, update the Invoices template in the Admin Portal. Note that this procedure is intended for existing instances of the Developer Portal.
Prerequisites
Procedure
To allow payments of rejected invoices via the Developer Portal, follow these steps:
- In the 3scale Admin Portal, go to Audience > Developer Portal > Content.
- Edit Root > Invoices > Show template.
Replace these lines of code:
<a href="{{ urls.invoices }}">
  <i class="fa fa-chevron-left"></i>
    Cancel
    </a>
    {{ invoice.period_begin | date: '%B, %Y' }} Invoice
With this snippet:
<div class="clearfix">
  <a href="{{ urls.invoices }}">
    <i class="fa fa-chevron-left"></i>
      Cancel
    </a>
    {{ invoice.period_begin | date: '%B, %Y' }} Invoice
    {% if invoice.pay_now? %}
      <a href="{{invoice.url}}/payment" class="pull-right btn btn-success pay-invoice-btn">Pay invoice</a>
    {% endif %}
</div>
24.5. Troubleshooting issues with credit card gateways
As a 3scale API provider working with either Stripe or Braintree as payment gateways, you can troubleshoot some issues with these credit card gateways.
Stripe
-
To map your data from Stripe with your data on 3scale, you can use the Stripe field called
metadata.3scale_account_referencewhich is composed of3scale-[PROVIDER_ID]-[DEVELOPER_ACCOUNT_ID]
Braintree
- In case your Braintree account is in the sandbox mode and you encounter any problems, you will have to change it to production.
For credit cards that are stored in the 3scale Developer Portal without 3D Secure (3Ds) enabled, these are the suggested solutions to integrate 3scale with Braintree:
- 3scale API providers: follow the steps listed in Configuring charging in the 3scale Admin Portal.
- 3scale API consumers: follow the steps listed in Editing credit card details in the 3scale Developer Portal.
-
To map your data from Braintree with your data on 3scale, you can use the Braintree field called
customer.idwhich is composed of3scale-[PROVIDER_ID]-[DEVELOPER_ACCOUNT_ID]
24.5.1. Deprecated payment gateways
This section provides general information about deprecated payment gateways: Adyen, OGone and Authorize.net. The information here is for existing integrations only. New integrations with these gateways are not supported.
24.5.1.1. Adyen integration
Adyen integration is deprecated. New integrations are not supported. For integrations existing before 22nd of August 2019, Red Hat provides support, but recommends to migrate to one of the fully supported payment gateways: Stripe and Braintree.
After completing these steps, you will have configured Adyen as a payment gateway for your account. This will allow your developers to enter their credit card details, and you can automatically charge them through Adyen for access to your API, according to the calculated invoices.
Setting up your payment gateway is a key step enabling credit card charging for use of your paid API. There are a number of alternative payment gateways you can use with your 3scale account. Here we cover the steps for Adyen.
24.5.1.1.1. Prerequisites
- Before you start these steps, you will need to open an account with Adyen.
- You need a Company account and a Merchant account within it (sub-account).
- There are a number of requirements that must be fulfilled before you can apply for a live account with Adyen. You can see what those requirements are here.
- The account should be in production mode.
24.5.1.1.2. Configuring Adyen integration
Find the information in your Adyen account
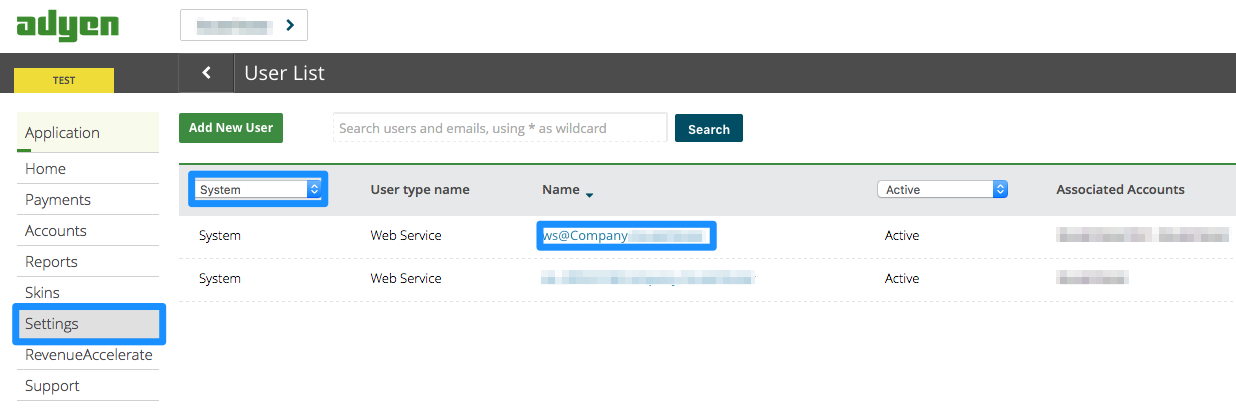
- To begin, log into your Adyen account. Then find your credentials in the Settings > Users area, and select System from the dropdown menu in the following view:
- Click on the Company account (the account at the top of the list). You will then be taken to the Company account settings view:
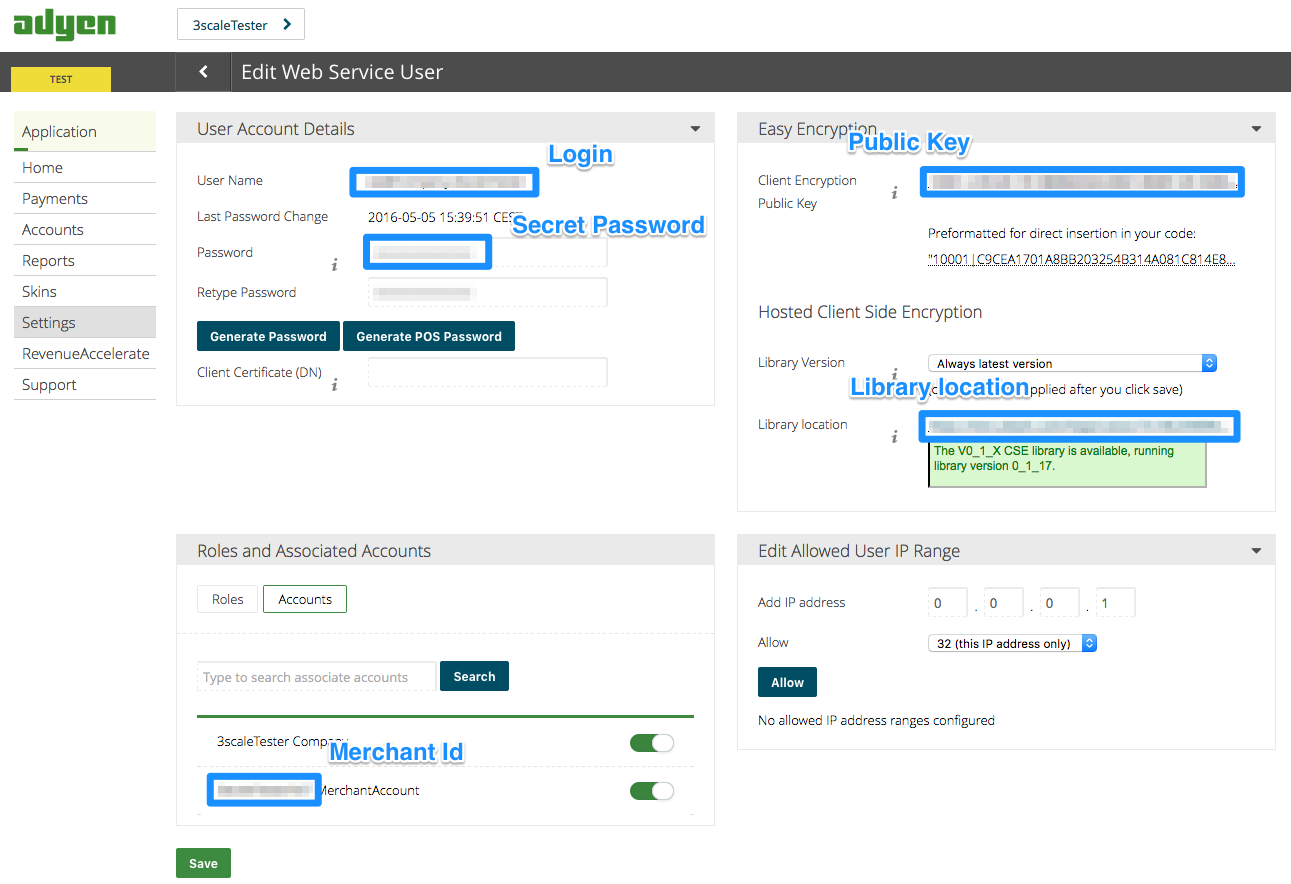
- Finally you have access to the Login, Secret Password, Client Encryption Public Key, Merchant ID, and Library location that you will need for the 3scale billing settings.
- To view the Public Key, you must click on Generate Password and copy this password somewhere.
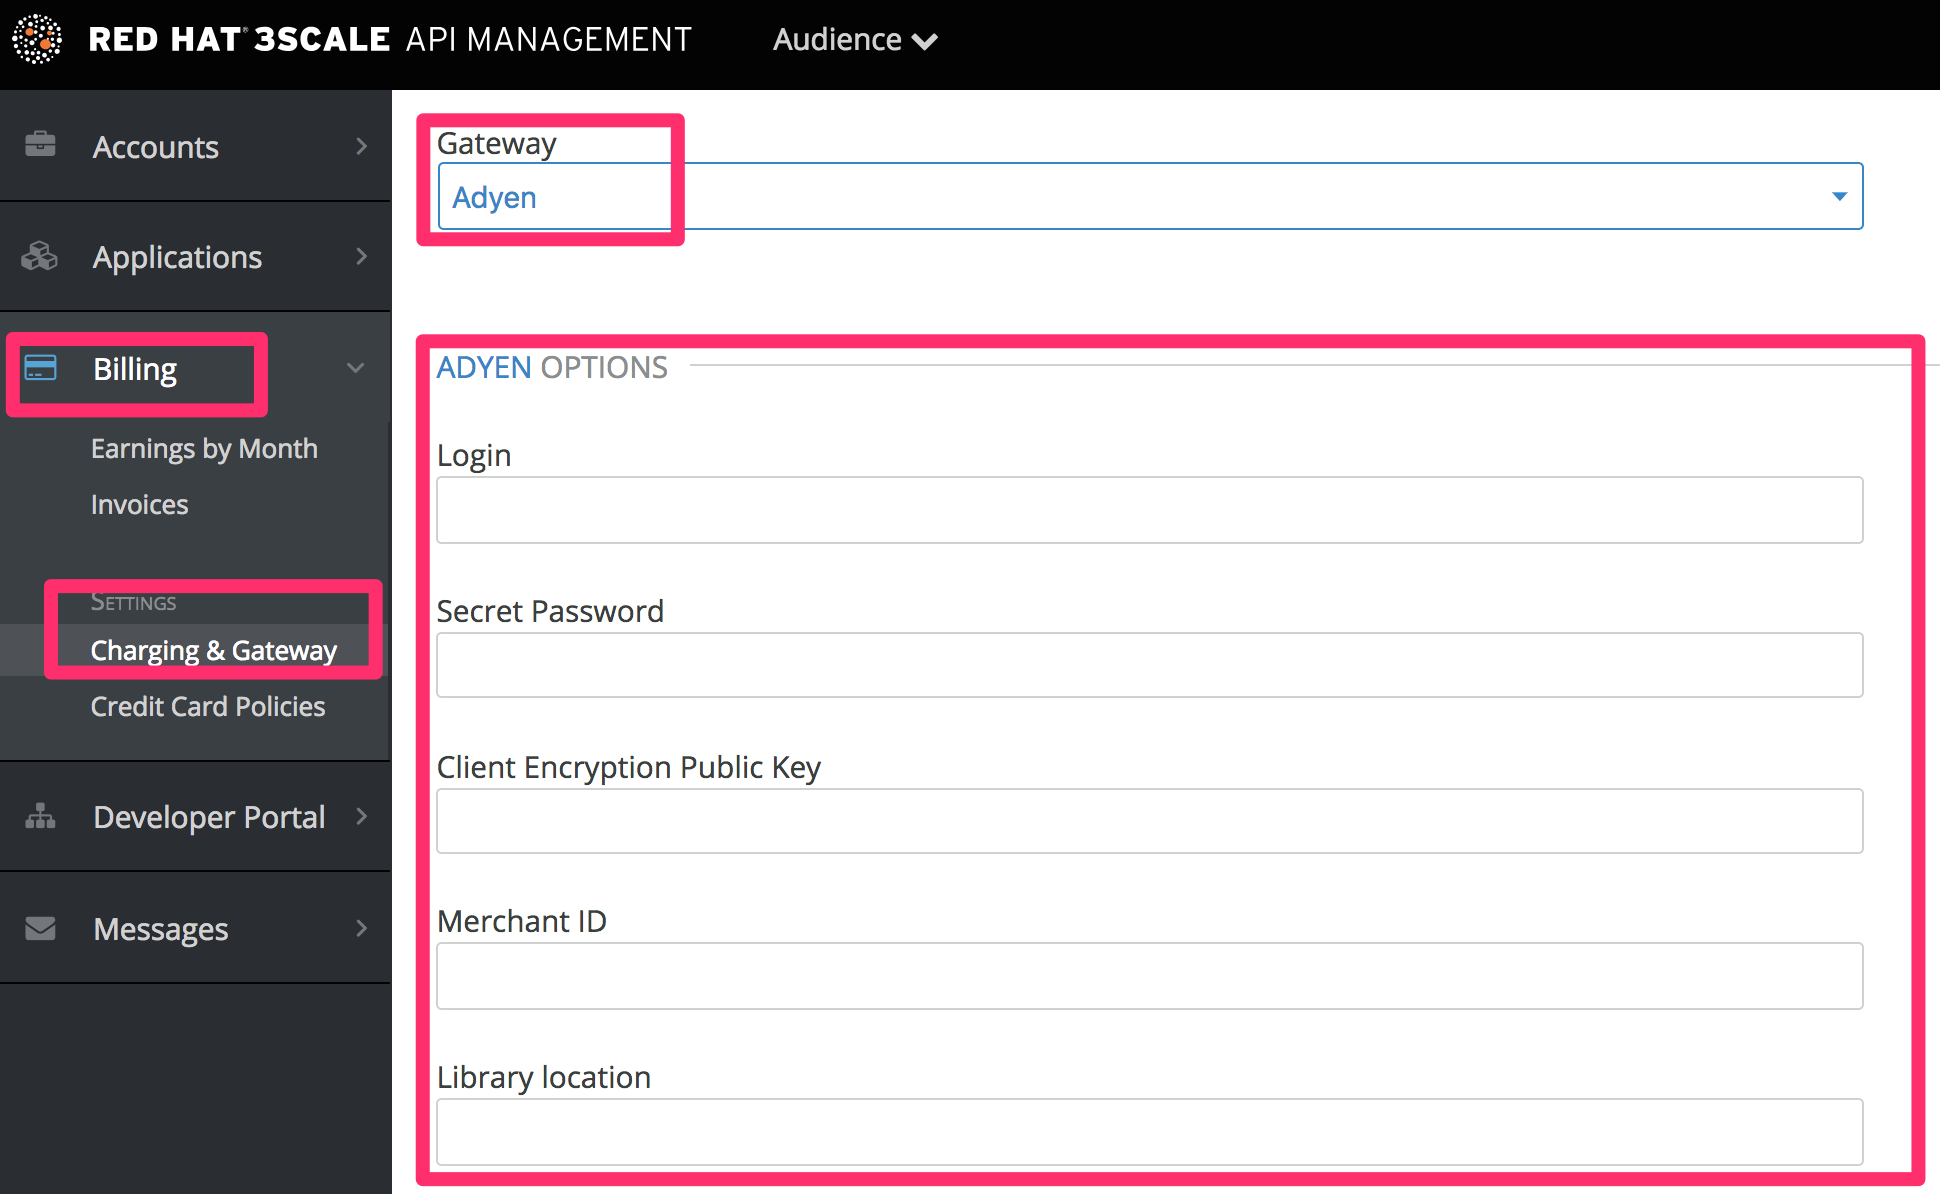
Configure your payment gateway in your 3scale account
- In Audience > Billing > Charging & Gateway, enable charging by checking the box and click Save.
- You will see all the fields you need to setup to create the link to your Adyen gateway.
- You must select Adyen from the Gateway dropdown menu and save changes.
Enable the alias additional data in the Adyen API response
By default when credit card authorization requests are sent from 3scale to Adyen, the returned response does not include the unique identifier of the credit card.
To ensure that the correct credit card reference is saved in 3scale and the correct card is charged, this additional data needs to be enabled.
Contact Adyen support to enable the alias additional data in the response for the authorization request.
Test your billing workflow
- Make sure you accelerate the test cycle by enabling Prepaid Mode to generate the charge within a day or so.
Then choose an existing test account and create an invoice with a line item charge added.
- Charge the account immediately.
- This testing approach will incur some minor costs, but it is worth it for the peace of mind that everything works fine, before you have real paying developers using your API.
The payment gateway is now set up, but your users might not be able to use it yet since it is not configured in the CMS. Go to the developer portal tab, and find the template called Payment Gateway / Show on the left navigation pane.
If it is not there already, add the following snippet after the block of code beginning with {% when "stripe" %}
{% when "adyen12" %}
{% if current_account.has_billing_address? %}
  {% adyen12_form %}
{% else %}
  <p><a href="{{ current_account.edit_adyen12_billing_address_url }}">First add a billing address</a></p>
{% endif %}- For accounts created before 11th May 2016 you must add the snippet above manually. After said date this will be included in the template by default.
-
In order to map your data from Adyen with your data on 3scale, you can use the Adyen field called
shopperReferencewhich is composed of3scale-[PROVIDER_ID]-[DEVELOPER_ACCOUNT_ID]
24.5.1.2. Ogone Integration
Ogone integration is deprecated. New integrations are not supported. For integrations existing before 27th of July 2018, Red Hat provides support, but recommends to migrate to one of the fully supported payment gateways: Stripe and Braintree.
These are the steps to set up the Ogone gateway in order to to charge for use of your API.
24.5.1.2.1. Step 1: Get your API keys from Ogone
You’ll need to open an account with Ogone. You need a premium Ogone ecommerce account – the Horizon activated with Alias Manager option. It’s a paid option, which can be activated by Ogone or by Merchant through backoffice > options > your options.
The PSPID is used to log into your Ogone account. Then you can find the UserID under Configuration > Users.

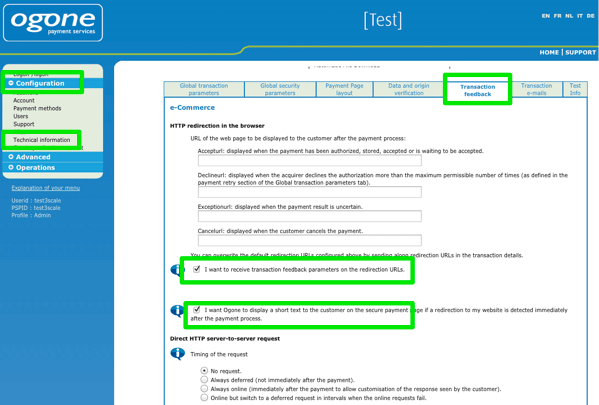
Make sure that the technical settings of your Ogone account are active. On the Transaction Feedback page, you’ll find the SHA-OUT passphrase. On this page you should also ensure that the two settings have checkboxes marked as shown:
Finally the SHA-IN passphrase is found on the Date and origin verification page:

24.5.1.2.2. Step 2: Configure your settings in 3scale
You need to tell 3scale to start using these API keys. To do this, log in to your 3scale Admin Portal and go to Settings > Billing.

If the Charging Enabled flag is not active, enable it and click Save.
You should see a drop-down called Gateway near the bottom of the page. Change it to Ogone.

The form below the drop-down should change to show two fields. Insert your Ogone API keys and click Save.

You might see a couple of alerts when you change your payment gateway. This is expected. Read and accept them if they appear.
The payment gateway is now set up, but your users might not be able to use it yet since it’s not configured in the CMS. Go to the Developer Portal page and click on the template called Payment Gateway / Show on the left navigation pane.

If it’s not there already, add the following code before {% when "braintree_blue" %}:
{% when "ogone" %}
  {% if current_account.has_billing_address? %}
    {% if current_account.credit_card_stored? %}
      {% ogone_form "Edit Credit Card Details" %}
    {% else %}
      {% ogone_form "Add Credit Card Details" %}
    {% endif %}
  {% else %}
    <p><a href="{{ current_account.edit_ogone_billing_address_url }}">First add a billing address</a></p>
  {% endif %}
Finally click Save and Publish. Your users should now be able to pay using the Ogone gateway.
24.5.1.2.2.1. Note
In order to map your data from Ogone with your data on 3scale, you can use the Ogone field called alias which is composed of 3scale-[PROVIDER_ID]-[DEVELOPER_ACCOUNT_ID]
24.5.1.2.2.2. Troubleshooting
In case something is not working, you can try checking the following tips:
- An overview of all payment methods that work with the alias manager can be found in this document: Payment methods processing/procedure overview.
- In the Ogone admin console go to Technical information → Transaction feedback. Scroll to Directlink/Dynamic Parameters and select all parameters. This will allow you to troubleshoot the error easier (as the error message will be included in the invoice).
- Try to change your ogone password and update this setting in the 3scale console
- Verify if your user was created in your Ogone account with the checkbox "Special user for API (no access to the admin)" checked. You can also search the Ogone Support FAQ for "API user" for the details.
- Make sure that you are entering in 3scale the password of the "API user", and not the password of Ogone PSPID-account
- In case you are using the sandbox mode in Ogone and encounter any errors, change it to production.
24.5.1.3. Authorize.Net Integration
Authorize.Net integration is deprecated. New integrations are not supported. For integrations existing before 27th of July 2018, Red Hat provides support, but recommends to migrate to one of the fully supported payment gateways: Stripe and Braintree.
Integrate the Authorize.Net payment gateway with the Red Hat 3scale billing system.
Prerequisites:
- A valid Authorize.Net account
The following Authorize.Net credentials
- API login ID
- Transaction key
Configure 3scale API Management:
- Log in to your 3scale admin portal.
- Navigate to the Settings → Billing page.
- Under the Basics section, select Authorize.Net from the dropdown menu.
- Under the Authorize.Net Options section, enter your Authorize.Net API login ID and transaction key.
- Select the Save Changes button.