
Providing APIs in the Developer Portal
A properly configured Developer Portal provides plenty of functionalities for API management.
Abstract
Preface
An OpenAPI document that defines your API is the foundation for your Developer Portal.
Making open source more inclusive
Red Hat is committed to replacing problematic language in our code, documentation, and web properties. We are beginning with these four terms: master, slave, blacklist, and whitelist. Because of the enormity of this endeavor, these changes will be implemented gradually over several upcoming releases. For more details, see our CTO Chris Wright’s message.
Part I. OpenAPI Specification
Chapter 1. An introduction to OpenAPI Specification
In Red Hat 3scale API Management, the OpenAPI Specification (OAS) helps you to optimally manage OpenAPI documents. The OpenAPI Specification (OAS) provides you with the tools to update an existing service or create a new one.
The following are special considerations about OAS in 3scale:
- You can also import an OpenAPI specification (OpenAPI document) with the 3scale toolbox. See Importing OpenAPI definitions.
- Regarding OAS 3.0, 3scale 2.8 introduces changes. For more details, refer to Section 2.1, “OpenAPI Specification 3.0 usage with 3scale”.
Prerequisites
- An OpenAPI document that defines your API.
-
A 3scale 2-saas instance tenant’s credentials (
tokenorprovider_key).
With OAS, the following features are available in 3scale:
When you import an OpenAPI document, you create or update ActiveDocs. See How to write an OpenAPI document for use as a 3scale specification.
-
Ability to pass the 3scale service
system_nameas an optional parameter that defaults to info.title field from OAS. Methods are created for each operation defined in the OpenAPI specification.
-
Method names are taken from the
operation.operationIdfield.
-
Method names are taken from the
All existing mapping rules get deleted before importing a new API definition.
- Methods will be not deleted if they exist before running the command.
- Mapping rules get created for each operation defined in the OpenAPI specification.
One of the following channels provides the OpenAPI definition resource:
- Filename in the available path
- URL format - toolbox will try to download from given address.
- Read from stdin standard input stream.
1.1. Command line options for importing OpenAPI documents in 3scale
The 3scale command line interface (CLI) provides several options for importing OpenAPI documents that define APIs that you want to manage in 3scale. The following is the help information for the openapi option:
NAME
    openapi - Import API definition in OpenAPI specification

USAGE
    3scale import openapi [opts] -d <dst> <spec>

DESCRIPTION
    Using an API definition format like OpenAPI, import to your 3scale API

OPTIONS
       -d --destination=<value>                   3scale target instance.
                                                  Format: "http[s]://<authentication>@3scale_domain"

 -t --target_system_name=<value>            Target system name

OPTIONS FOR IMPORT
    -c --config-file=<value>                      3scale toolbox
                                                  configuration file
                                                  (default:
                                                  $HOME/.3scalerc.yaml)
    -h --help                                     show help for this command
    -k --insecure                                 Proceed and operate even
                                                  for server connections
                                                  otherwise considered
                                                  insecure
    -v --version                                  Prints the version of this
                                                  command
1.2. Different sources to import API specifications
There are different sources available to you as a 3scale administrator for importing API specifications. These are outlined in the following table, which shows the usage options for detecting OpenAPI definitions from the filename path, the URL, and stdin.
Table 1.1. Detecting OpenAPI definitions
| Description | Formats | Command line usage |
|---|---|---|
| Detecting OpenAPI definition from the filename path. The format is automatically detected from filename extension. | json and yaml |
$ 3scale import openapi -d <destination> /path/to/your/spec/file.[json|yaml|yml] |
| Detecting OpenAPI definition from a URL. The format is automatically detected from URL’s path extension. | json and yaml |
$ 3scale import openapi -d <destination> http[s]://domain/resource/path.[json|yaml|yml] |
|
Detecting OpenAPI definition from stdin. The command line parameter for the OpenAPI resource is | json and yaml |
$ tool_to_read_openapi_from_source | 3scale import openapi -d <destination> - |
Chapter 2. How to configure OpenAPI Specification
For the OpenAPI Specification to work with 3scale, it needs to configured correctly for the version you intend to use.
Prerequisites
- An OpenAPI document that defines your API.
-
A 3scale 2-saas instance tenant’s credentials (
tokenorprovider_key).
2.1. OpenAPI Specification 3.0 usage with 3scale
3scale provides the following support for using OAS 3.0:
-
swagger-uihas been updated in the Developer Portal to support OAS 3.0 -
swagger-uiis now included as a webpack asset (node_modules). Formerly, it was added from Content Delivery Networks (CDNs). -
In the Admin Portal, any new OAS 3.0 document is identified automatically and processed accordingly, by using the features provided by
swagger-ui. Note that this functionality requires configuration in the Developer Portal.
You can add OAS 3.0 specifications to ActiveDocs and display them in the Developer Portal, considering the following points:
- You must upgrade the templates manually.
- The ActiveDoc does not have additional features such as credential injection when attempting requests, and autocompletion using real data like service name.
2.1.1. Configure the Developer Portal with OAS 3.0
This snippet includes the new version of swagger-ui, and renders the first ActiveDoc available. Note that it will also render OAS 2.0 but without any of the usual ActiveDocs features.
Support for OAS 3.0 specifications requires the following content in the default documentation page:
{% content_for javascripts %}
 {{ 'active_docs.js' | javascript_include_tag }}
{% endcontent_for %}

{% assign spec = provider.api_specs.first %}

<h1>Documentation</h1>

<div class="swagger-section">
 <div id="message-bar" class="swagger-ui-wrap"></div>
 <div id="swagger-ui-container" class="swagger-ui-wrap"></div>
</div>

<script type="text/javascript">
 (function () {
   var url = "{{spec.url}}";
   var serviceEndpoint = "{{spec.api_product_production_public_base_url}}"
   SwaggerUI({ url: url, dom_id: "#swagger-ui-container" }, serviceEndpoint);
 }());
</script>
Update the Developer Portal with OAS 3.0
If you have configured OAS 3.0 in 3scale 2.8 and want to continue using OAS 3.0, you need to update the template.
This is the template to configure:
{% content_for javascripts %}
{{ 'active_docs.js' | javascript_include_tag }}
{% endcontent_for %}
<h1>Documentation</h1>
<div class="swagger-section">
<div id="message-bar" class="swagger-ui-wrap"> </div>
<div id="swagger-ui-container" class="swagger-ui-wrap"></div>
</div>
<script type="text/javascript">
(function () {
var url = "{{provider.api_specs.first.url}}";
SwaggerUI({ url: url, dom_id: "#swagger-ui-container" });
}());
</script>To update the template, replace the default Documentation page with the snippet included in Section 2.1.1, “Configure the Developer Portal with OAS 3.0”.
2.2. OpenAPI Specification 2.0 usage with 3scale
You can add OAS 2.0 specifications to ActiveDocs and display them in the Developer Portal, considering the following points:
- You must upgrade the templates manually.
- The ActiveDoc does not have additional features such as credential injection when attempting requests, and auto-completion using real data like service name.
Support for OAS 2.0 specifications requires the following content in the default documentation page:
<h1>Documentation</h1>
{% cdn_asset /swagger-ui/2.2.10/swagger-ui.js %}
{% cdn_asset /swagger-ui/2.2.10/swagger-ui.css %}

{% include 'shared/swagger_ui' %}

<script type="text/javascript">
  $(function () {
    window.swaggerUi.options['url'] = "{{provider.api_specs.first.url}}";
    window.swaggerUi.load();
  });
</script>
2.3. Upgrading the Swagger user interface 2.1.3 to 2.2.10
If you are using a version of 3scale that contains Swagger UI 2.1.3, you can upgrade to Swagger UI version 2.2.10.
Previous implementations of Swagger UI 2.1.3 in the 3scale Developer Portal rely on the presence of a single {% active_docs version: "2.0" %} liquid tag in the Documentation page. With the introduction of support for Swagger 2.2.10 in 3scale, the implementation method changes to multiple cdn_asset and include liquid tags.
For versions of Swagger UI 2.1.3 and earlier, 3scale continues to use the legacy active_docs liquid tag method to call the UI.
Prerequisites
- A 3scale instance with administrator access.
- A 3scale instance that contains Swagger UI 2.1.3.
Procedure
- Log in to your 3scale Admin Portal.
-
Navigate to the
Developer Portal→Documentationpage, or the page in which you want to update your Swagger UI implementation In the
Drafttab of the code pane, replace the{% active_docs version: "2.0" %}liquid tag with thecdn_assetliquid tag and the new partialshared/swagger_ui:{% cdn_asset /swagger-ui/2.2.10/swagger-ui.js %} {% cdn_asset /swagger-ui/2.2.10/swagger-ui.css %} {% include 'shared/swagger_ui' %}Optional: By default, Swagger UI loads the ActiveDocs specification published in APIs > ActiveDocs. Load a different specification by adding the following
window.swaggerUi.optionsline before thewindow.swaggerUi.load();line, where<SPEC_SYSTEM_NAME>is the system name of the specification you want to load:window.swaggerUi.options['url'] = "{{provider.api_specs.<SPEC_SYSTEM_NAME>.url}}";
Part II. API documentation in the Developer Portal
Chapter 3. Update To ActiveDocs 2.0
The details of this section are for reference only. This option is no longer supported and you should consider migrating away from this configuration at the earliest opportunity.
By the end of this tutorial, you will know what changes you need to make to your ActiveDocs configuration to successfully upgrade to version 2.0.
For instructions applicable to the configuration of ActiveDocs 2.0, you can refer to Adding Specifications to 3scale. Detailed spec-related differences can be found on the official Swagger 1.2 to 2.0 Migration Guide. This article simply documents the extra steps to upgrade to ActiveDocs 2.0.
If your ActiveDocs spec is still in version 1.0, then please first convert it to version 1.2.
3.1. Step 1: Apply the appropriate naming convention to your specification
Navigate to the API → ActiveDocs tab in your Admin Portal. This will lead you to the list of your service specs. You should have already added a service spec (see Create a service specification).

You should apply appropriate names to achieve the desired effect in your Developer Portal – the heading of your ActiveDocs API listing will appear as "System name: Description". You may need to recreate the spec again simply by copying the JSON spec and other fields, as the system name is read-only.
3.2. Step 2: Modify service spec
The specification for ActiveDocs 2.0 has some important changes to those for version as compared to version 1.2. See the Swagger 1.2 to 2.0 Migration Guide for detailed information. The most important changes are:
-
the
"swaggerVersion": "1.2"root element is now "swagger": "2.0" and it is a required field. - The "info" object becomes required.
-
The
"apiVersion": "1.0"becomes required and is now part of the "info" object:"info": { "version": "1.0", … } - The description in the "info" object becomes non-mandatory.
- The license name field becomes required if "license" object is present.
-
The
"basePath": "https://example.com/api"field is split into three fields:"host": "example.com","basePath": "/api"and"schemes": [ "http" ]. None of these fields is mandatory.
3.3. Step 3: Add the Javascript and HTML content to your CMS page
Add the following code snippet to your CMS page, where SERVICE_NAME should be the system name of the service spec.
<h1>Documentation</h1>
<p>Use our live documentation to learn about Echo API </p>
{% active_docs version: "2.0" services: "SERVICE_NAME" %}
<script type="text/javascript">
  $(function () {
    {% comment %}
    // you have access to swaggerUi.options object to customize its behaviour
    // such as setting a different docExpansion mode
    window.swaggerUi.options['docExpansion'] = 'none';
    // or even getting the swagger specification loaded from a different url
    window.swaggerUi.options['url'] = "http://petstore.swagger.io/v2/swagger.json";
    {% endcomment %}
  window.swaggerUi.load();
});

</script>
If you want to include multiple Swagger specs on one page, you may use this customized snippet:
{% active_docs version: "2.0" services: "oauth" %}


<script type="text/javascript">
  $(function () {
    window.swaggerUi.load(); // <-- loads first swagger-ui
     // do second swagger-ui
     var url = "/swagger/spec/sentiment.json";
    window.anotherSwaggerUi = new SwaggerUi({
      url: url,
      dom_id: "another-swagger-ui-container",
      supportedSubmitMethods: ['get', 'post', 'put', 'delete', 'patch'],
      onComplete: function(swaggerApi, swaggerUi) {
        $('#another-swagger-ui-container pre code').each(function(i, e) {hljs.highlightBlock(e)});
      },
      onFailure: function(data) {
        log("Unable to Load Sentiment-SwaggerUI");
      },
      docExpansion: "list",
      transport: function(httpClient, obj) {
        log("[swagger-ui]>>> custom transport.");
        return ApiDocsProxy.execute(httpClient, obj);
      }
    });
     window.anotherSwaggerUi.load();
   });
</script>
3.4. Step 4: Test your API using ActiveDocs 1.2
Remember to enable Liquid tags on your CMS configuration page.

- Finally, while in the preview mode, close the right-hand vertical sidebar to see ActiveDocs 2.0.
The new styles are compliant with the newer Swagger spec (2.0). If you would like to change the look and feel, you would have to override the styles. Since the CSS for Swagger is included together with the HTML, you would have to define the styles with a higher specificity or with the !important tag.
Chapter 4. Adding ActiveDocs to 3scale
3scale offers a framework to create interactive documentation for your API.
With OpenAPI Specification (OAS), you have functional documentation for your API, which will help your developers explore, test, and integrate with your API.
4.1. Setting up ActiveDocs in 3scale
You can add ActiveDocs to your API in the 3scale user interface to obtain a framework for creating interactive documentation for your API.
Prerequisites
- An OpenAPI document that defines your API.
-
A 3scale 2-saas instance tenant’s credentials (
tokenorprovider_key).
Procedure
Navigate to [your_API_name] → ActiveDocs in your Admin Portal. 3scale displays the list of your service specifications for your API. This is initially empty.
You can add as many service specifications as you want. Typically, each service specification corresponds to one of your APIs. For example, 3scale has specifications for each 3scale API, such as Service Management, Account Management, Analytics, and Billing.
Click Create a new spec.
When you add a new service specification, provide the following:
- Name
- System name. This is required to reference the service specification from the Developer Portal.
Choose whether you want the specification to be published or not. If you do not publish, the new specification will not be available in the Developer Portal.
NoteIf you create, but do not publish your new specification, it will remain available to you for publication at a later time of your choosing.
- Add a description that is meant for only your consumption.
Add the API JSON specification.
Generate the specification of your API according to the specification proposed by OpenAPI Specification (OAS). In this tutorial we assume that you already have a valid OAS-compliant specification of your API.
Working with your first ActiveDoc
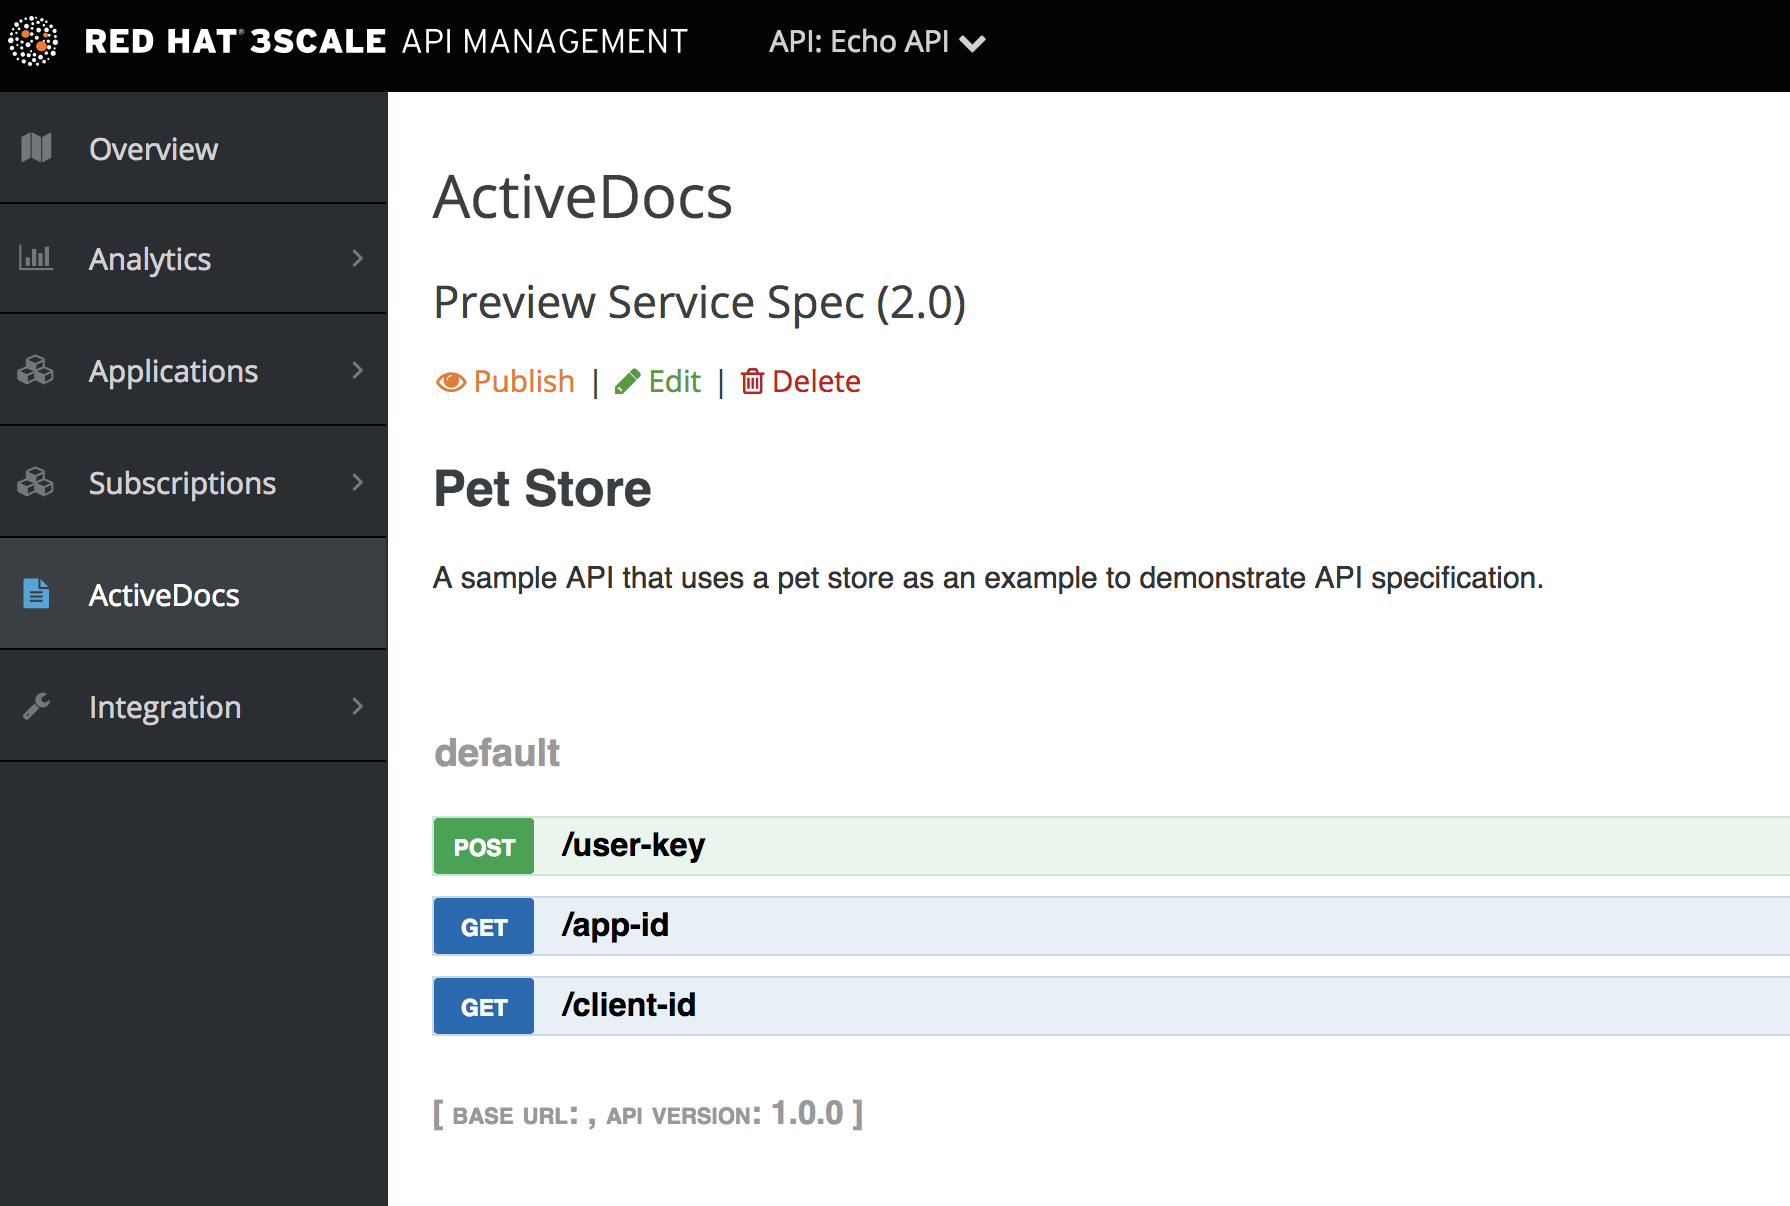
After you add your first ActiveDoc, you can see it listed in [your_API_name] → ActiveDocs. You can edit it as necessary, delete it, or switch it from public to private. You can detach it from your API or attach it to any other API. You can see all your ActiveDocs, whether or not they are attached to an API in Audience → Developer Portal → ActiveDocs.
You can preview what your ActiveDocs looks like by clicking the name you gave the service specification, for example, Pet Store. You can do this even if the specification is not published yet.
This is what an ActiveDoc looks like:
Chapter 5. How to write an OpenAPI document for use as a 3scale OpenAPI spec
If you only want to read the code, all the examples are on OAS Petstore example source code.
3scale ActiveDocs are based on the specification of RESTful web services called Swagger (from Wordnik). This example is based on the Extended OpenAPI Specification Petstore example and draws all the specification data from the OpenAPI Specification 2.0 specification document.
Prerequisites
- An OpenAPI Specification (OAS) compliant specification for your REST API is required to power ActiveDocs on your Developer Portal.
OAS is not only a specification. It also provides a full feature framework:
- Servers for the specification of the resources in multiple languages (NodeJS, Scala, and others).
- A set of HTML/CSS/Javascripts assets that take the specification file and generate the attractive UI.
- A OAS codegen project, which allows generation of client libraries automatically from a Swagger-compliant server. Support to create client-side libraries in a number of modern languages.
5.1. Setting up 3scale ActiveDocs and OAS
ActiveDocs is an instance of OAS. With ActiveDocs, you do not have to run your own OAS server or deal with the user interface components of the interactive documentation. The interactive documentation is served and rendered from your 3scale Developer Portal.
3scale 2.8 introduced OAS 3.0 with limited support in ActiveDocs. This means that some features working with ActiveDocs, such as autocompletion, are not yet fully integrated, and consequently 3scale defaults to OAS 2.0 when creating new accounts. For more details about OAS 3.0 and ActiveDocs, refer to Section 2.1, “OpenAPI Specification 3.0 usage with 3scale”.
Prerequisites
- Ensure that the template used in the Developer Portal implements the same OAS version specified in the Admin Portal.
Procedure
- Build a specification of your API compliant with OAS.
- Add the specification to your Admin Portal.
Results
Interactive documentation for your API is now available. API consumers can send requests to your API through your Developer Portal.
If you already have a OAS-compliant specification of your API, you can add it in your Developer Portal. See the tutorial on the ActiveDocs configuration.
3scale extends OAS in several ways to accommodate certain features that are needed for Developer Portal interactive API documentation:
- Auto-fill of API keys
- OAS proxy to allow calls to non-CORS enabled APIs
5.2. OpenAPI document example: Petstore API
To read the specification from the original source, see the OpenAPI Specification.
On the OAS site, there are multiple examples of OpenAPI documents that define APIs. If you like to learn by example, you can follow the example of the Petstore API by the OAS API Team.
The Petstore API is an extremely simple API. It is meant as a learning tool, not for production.
Petstore API methods
The Petstore API is composed of 4 methods:
-
GET /api/pets- returns all pets from the system -
POST /api/pets- creates a new pet in the store -
GET /api/pets/{id}- returns a pet based on a single ID -
DELETE /api/pets/{id}- deletes a single pet based on the ID
The Petstore API is integrated with 3scale, and for this reason you must add an additional parameter for authentication. For example, with the user key authentication method, an API consumer must put the user key parameter in the header of each request. For information about other authentication methods, see Authentication patterns.
User key parameters
user_key: {user_key}
The user_key will be sent by the API consumers in their requests to your API. The API consumers will obtain those keys the 3scale administrator’s Developer Portal. On receiving the key, the 3scale administrator must perform the authorization check against 3scale, using the Service Management API.
More on the OpenAPI Specification
For your API consumers, the documentation of your API represented in cURL calls would look like this:
curl -X GET "http://example.com/api/pets?tags=TAGS&limit=LIMIT" -H "user_key: {user_key}"
curl -X POST "http://example.com/api/pets" -H "user_key: {user_key}" -d "{ "name": "NAME", "tag": "TAG", "id": ID }"
curl -X GET "http://example.com/api/pets/{id}" -H "user_key: {user_key}"
curl -X DELETE "http://example.com/api/pets/{id}" -H "user_key: {user_key}"
5.3. Additional OAS specification information
If you want your documentation to look like the OAS Petstore Documentation, you must create a Swagger-compliant specification like the associated Petstore swagger.json file. You can use this specification out-of-the-box to test your ActiveDocs. But remember that this is not your API.
OAS relies on a resource declaration that maps to a hash encoded in JSON. Use the Petstore swagger.json file as an example and learn about each object.
OAS object
This is the root document object for the API specification. It lists all the highest level fields.
The host must be a domain and not an IP address. 3scale proxies the requests made against your Developer Portal to your host and renders the results. This requires your host and basePath endpoint to be approved by 3scale for security reasons. You can declare only a host that is your own. 3scale reserves the right to terminate your account if it is detected that you are proxying a domain that does not belong to you. This means that local host or any other wildcard domain does not work.
info object
The info object provides the metadata about the API. This content is presented in the ActiveDocs page.
paths object
The paths object holds the relative paths to the individual endpoints. The path is appended to the basePath to construct the full URL. The paths might be empty because of access control list (ACL) constraints.
Parameters that are not objects use primitive data types. In Swagger, primitive data types are based on the types supported by the JSON-Schema Draft 4. There is an additional primitive data type file but 3scale uses it only if the API endpoint has CORS enabled. With CORS enabled, the upload does not go through the api-docs gateway, where it would be rejected.
Currently OAS supports the following dataTypes:
- integer with possible formats: int32 and int64. Both formats are signed.
- number with possible formats: float and double
- plain string
- string with possible formats: byte, date, date-time, password and binary
- boolean
Additional resources
5.4. OAS design and editing tools
The following tools are useful for designing and editing the OpenAPI specification that defines your API:
The open source Apicurio Studio enables you to design and edit your OpenAPI-based APIs in a web-based application. Apicurio Studio provides a design view so you do not need detailed knowledge of the OpenAPI specification. The source view enables expert users to edit directly in YAML or JSON. For more details, see Getting Started with Apicurio Studio.
Red Hat also provides a lightweight version of Apicurio Studio named API Designer, which is included with Fuse Online on OpenShift. For more details, see Developing and Deploying API Provider Integrations.
- The JSON Editor Online is useful if you are very familiar with the JSON notation. It gives a pretty format to compact JSON and provides a JSON object browser.
- The Swagger Editor enables you to create and edit your OAS API specification written in YAML in your browser and preview it in real time. You can also generate a valid JSON specification, which you can upload later in your 3scale Admin Portal. You can use the live demo version with limited functionality or deploy your own OAS Editor.
5.5. ActiveDocs auto-fill of API credentials
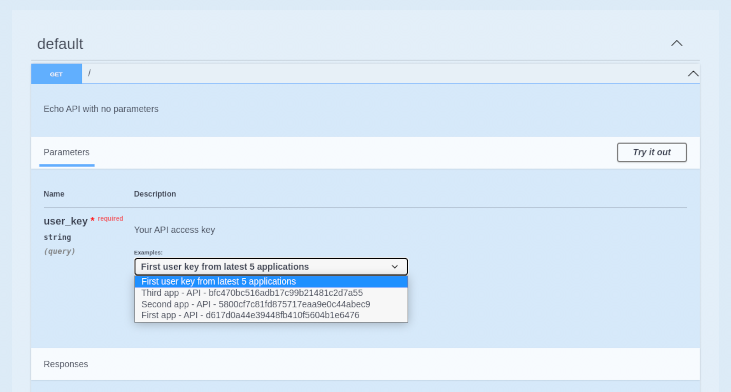
Auto-fill of API credentials is a useful extension to OAS in 3scale ActiveDocs. You can define the x-data-threescale-name field with the following values depending on your API authentication mode:
-
user_keys: Returns the user keys for applications of the services that use API key authentication only. -
app_ids: Returns the IDs for applications of the services that use App ID/App Key. OAuth and OpenID Connect are also supported for backwards compatibility. -
app_keys: Returns the keys for applications of services that use App ID/App Key. OAuth and OpenID Connect are also supported for backwards compatibility.
The x-data-threescale-name field is an OAS extension that is ignored outside the domain of ActiveDocs.
API key authentication example
The following example shows using "x-data-threescale-name": "user_keys" for API key authentication only:
"parameters": [
  {
    "name": "user_key",
    "in": "query",
    "description": "Your API access key",
    "required": true,
    "schema": {
      "type": "string"
    },
    "x-data-threescale-name": "user_keys"
  }
]
For the parameters declared with x-data-threescale-name, when you log in to the Developer Portal you will see a drop-down list with the 5 latest keys, user key, App Id or App key, according to the value configured in the specification. So you can auto-fill the input without having to copy and paste the value:
Chapter 6. ActiveDocs and OAuth
ActiveDocs allows your users to test and call your OAuth-enabled API from one place.
Prerequisites
- You need to have a Red Hat Single Sign-On instance set up, and OpenID Connect integration configured. See OpenID Connect integration documentation for information on how to set it up.
- Additionally, you need to be familiar with how to set up ActiveDocs – see Adding ActiveDocs to 3scale and Creating an OpenAPI specification.
6.1. Example of client credentials and resource owner flows in a 3scale specification
This first example is for an API using the OAuth 2.0 client credentials flow in a 3scale specification. This API accepts any path and returns information about the request (path, request parameters, headers, and more). The Echo API is accessible only by using a valid access token. Users of the API are able to call it only after they have exchanged their credentials (client_id and client_secret) for an access token.
For users to be able to call the API from ActiveDocs, they must request an access token. Since this is just a call to an OAuth authorization server, you can create an ActiveDocs specification for the OAuth token endpoint. This allows calls to this endpoint from within ActiveDocs. In this case, for a client credentials flow, the Swagger JSON specification looks like this:
{
  "swagger": "2.0",
  "info": {
    "version": "v1",
    "title": "OAuth for Echo API",
    "description": "OAuth2.0 Client Credentails Flow for authentication of our Echo API.",
    "contact": {
      "name": "API Support",
      "url": "http://www.swagger.io/support",
      "email": "support@swagger.io"
    }
  },
  "host": "red-hat-sso-instance.example.com",
  "basePath": "/auth/realms/realm-example/protocol/openid-connect",
  "schemes": [
    "http"
  ],
  "paths": {
    "/token": {
      "post": {
        "description": "This operation returns the access token for the API. You must call this before calling any other endpoints.",
        "operationId": "oauth",
        "parameters": [
          {
            "name": "client_id",
            "description": "Your client id",
            "type": "string",
            "in": "query",
            "required": true
          },
          {
            "name": "client_secret",
            "description": "Your client secret",
            "type": "string",
            "in": "query",
            "required": true
          },
          {
            "name": "grant_type",
            "description": "OAuth2 Grant Type",
            "type": "string",
            "default": "client_credentials",
            "required": true,
            "in": "query",
            "enum": [
                "client_credentials",
                "authorization_code",
                "refresh_token",
                "password"
            ]
          }
        ]
      }
    }
  }
}
For a resource owner OAuth flow, add parameters for a username and password and other parameters that you require in order to issue an access token. For this client credentials flow example, you are sending the client_id and client_secret, which can be populated from the 3scale values for signed-in users, as well as the grant_type.
Then in the ActiveDocs specification for the Echo API, add the access_token parameter instead of the client_id and the client_secret.
{
  "swagger": "2.0",
  "info": {
    "version": "v1",
    "title": "Echo API",
    "description": "A simple API that accepts any path and returns information about the request",
    "contact": {
      "name": "API Support",
      "url": "http://www.swagger.io/support",
      "email": "support@swagger.io"
    }
  },
  "host": "echo-api.3scale.net",
  "basePath": "/v1/words",
  "schemes": [
    "http"
  ],
  "produces": [
    "application/json"
  ],
  "paths": {
    "/{word}.json": {
      "get": {
        "description": "This operation returns information about the request (path, request parameters, headers, etc.),
        "operationId": "wordsGet",
        "summary": "Returns the path of a given word",
        "parameters": [
          {
            "name": "word",
            "description": "The word related to the path",
            "type": "string",
            "in": "path",
            "required": true
          },
          {
            "name": "access_token",
            "description": "Your access token",
            "type": "string",
            "in": "query",
            "required": true
          }
        ]
      }
    }
  }
}
You can then include your ActiveDocs in the Developer Portal as usual. In this case, since you want to specify the order in which they display to have the OAuth endpoint first, it looks like this:
{% active_docs version: "2.0" services: "oauth" %}


<script type="text/javascript">
  $(function () {
    window.swaggerUi.load(); // <-- loads first swagger-ui

    // do second swagger-ui

    var url = "/swagger/spec/echo-api.json";
    window.anotherSwaggerUi = new SwaggerUi({
      url: url,
      dom_id: "another-swagger-ui-container",
      supportedSubmitMethods: ['get', 'post', 'put', 'delete', 'patch'],
      onComplete: function(swaggerApi, swaggerUi) {
        $('#another-swagger-ui-container pre code').each(function(i, e) {hljs.highlightBlock(e)});
      },
      onFailure: function(data) {
        log("Unable to Load Echo-API-SwaggerUI");
      },
      docExpansion: "list",
      transport: function(httpClient, obj) {
        log("[swagger-ui]>>> custom transport.");
        return ApiDocsProxy.execute(httpClient, obj);
      }
    });

    window.anotherSwaggerUi.load();

  });
</script>
6.2. Publishing ActiveDocs in the Developer Portal
By the end of this tutorial, you will have published your ActiveDocs in your Developer Portal and your API documentation will be automated.
Prerequisites
- An OpenAPI Specification (OAS) compliant specification for your REST API is required to power ActiveDocs on your Developer Portal.
Procedure
Add the following snippet to the content of any page of your Developer Portal. You must do this through the 3scale Admin Portal.
NoteSERVICE_NAMEshould be the system name of the service specification, which ispet_storein the example.Developer Portal configuration using OAS 3.0
{% content_for javascripts %}
 {{ 'active_docs.js' | javascript_include_tag }}
{% endcontent_for %}

{% assign spec = provider.api_specs.first %}

<h1>Documentation</h1>

<div class="swagger-section">
 <div id="message-bar" class="swagger-ui-wrap"></div>
 <div id="swagger-ui-container" class="swagger-ui-wrap"></div>
</div>

<script type="text/javascript">
 (function () {
   var url = "{{spec.url}}";
   var serviceEndpoint = "{{spec.api_product_production_public_base_url}}"
   SwaggerUI({ url: url, dom_id: "#swagger-ui-container" }, serviceEndpoint);
 }());
</script>
Developer Portal configuration using OAS 2.0
<h1>Documentation</h1>
<p>Use our live documentation to learn about Echo API</p>
{% active_docs version: "2.0" services: "SERVICE_NAME" %}
{% cdn_asset /swagger-ui/2.2.10/swagger-ui.js %} {% cdn_asset /swagger-ui/2.2.10/swagger-ui.css %} {% include 'shared/swagger_ui' %}
<script type="text/javascript">
  $(function () {
    {% comment %}
      // you have access to swaggerUi.options object to customize its behavior
      // such as setting a different docExpansion mode
      window.swaggerUi.options['docExpansion'] = 'none';
      // or even getting the swagger specification loaded from a different url
      window.swaggerUi.options['url'] = "http://petstore.swagger.io/v2/swagger.json";
    {% endcomment %}
    window.swaggerUi.load();
  });
</script>
These are some additional considerations when publishing ActiveDocs in the Developer Portal:
- You can specify only one service on one page. If you want to display multiple specifications, the best way is to do it on different pages.
- This snippet requires jQuery, which is included by default in the main layout of your Developer Portal. If you remove the jQuery dependency from the main layout, you must add this dependency on the page containing ActiveDocs.
- Make sure you have Liquid tags enabled on the Admin Portal.
-
The version used in the Liquid tag for OAS 2.0
{{ '{% active_docs version: "2.0" ' }}%}should correspond to that of the Swagger spec.
If you want to fetch your specification from an external source, change the JavaScript code as follows:
$(function () {
 window.swaggerUi.options['url'] = "SWAGGER_JSON_URL";
 window.swaggerUi.load();
});
Note that the line containing the source of the specification, window.swaggerUi.options['url'] = "SWAGGER_JSON_URL";, is outside of the comments block.
Verification steps
After you have created an OpenAPI specification and you have added it to 3scale, it is time to publish the specification and link it on your Developer Portal to be used by your API developers.
Chapter 7. APIcast self-managed (old version) and OAuth 2.0
The details of this section are for reference only. This option is no longer supported and you should consider migrating away from this configuration at the earliest opportunity.
SSL use is mandatory for all OAuth calls.
This document refers to OAuth for an old version of APIcast which consists of Nginx downloadable configuration files. Note that since May 2017, that version is no longer available in the GUI for new customers. For details on OAuth support in the latest version of APIcast, please see here.
This tutorial shows the necessary steps to set up APIcast self-managed with 3scale’s OAuth extensions to make APIcast act as an OAuth 2.0 provider.
Currently, only the authorization code (server-side) grant flow is available in APIcast. However, you can find config templates for all other flows on this GitHub repository.
7.1. Prerequisites
As 3scale doesn’t hold any details about the users that you authenticate, in order to integrate with 3scale using OAuth 2.0, we require that you handle user authentication on your side. To do this, you’ll have to provide the URL for a page where APIcast can send users to authorize an application. This page should be behind a login so that the user can be correctly identified and authenticated. Once the user has been authenticated and the application authorized, you should redirect back to APIcast with the outcome of the authorization grant from the user.
When APIcast redirects a user to the authorization URL, it will send the following parameters along with the request:
-
scope:the plan ID that the application belongs to. The application plan defines the scope in 3scale. -
state:a hash value shared between APIcast and the API to identify request and ensure its authenticity. -
tok:the value of the access token that will be given to the user if the application is authorized. The token will only be issued when it’s exchanged for an authorization code. If the authorization code is not exchanged, the access token will expire after 10 minutes.
If the user successfully identifies himself and authorizes the application, the authorization page should redirect to an endpoint on APIcast. By default this is located at /callback, but it can easily be changed within the APIcast config files to suit your needs.
Take a look and see how to set this up.
7.2. OAuth Configuration
To proceed with the installation, you’ll need to follow most of the same steps as with the basic APIcast Integration to configure your API and define your methods and enpdoints. You can find these steps in the link: Installing APIcast document. Additionally, you will need to make sure the following steps are followed:
7.2.1. Step 1: Edit Integration Settings
As per the screenshot below, you will need to set the "Production Deployment Option" to Self-Managed Gateway, as OAuth is not currently available on APIcast hosted.
On the same page, you will also need to set the "Authentication" to OAuth 2.0.
7.2.2. Step 2: Declare your OAuth Authorization Endpoint
This will be the url that your users are presented with when they need to log in to your service to authenticate themselves and provide consent.
The APIcast OAuth extension allows APIcast to act as an OAuth provider. However, you still need to provide an authorization endpoint for users to authenticate themselves and approve/reject third-party application access. This authorization endpoint should be behind a login so a user can be identified and authenticated. Once the approval is done, you will need to redirect your logged in user to the callback endpoint on APIcast, so it can take care of the rest of the workflow.
7.2.3. Step 3: Download the APIcast config files
3scale automatically generates all the files needed to use APIcast as your API gateway and OAuth provider based on the data you input into the integration page. Once you have entered all the required information, you can download these files and install them on your own APIcast instance. The zip file downloaded will contain a separate *.lua file for each service defined as well as lua files to support the OAuth handshake and a nginx_\*.conf file which is shared across services.
If you have multiple services defined, the user downloading the configuration files will receive a zip file where the Lua files will only contain Service tokens corresponding to the services that they have access to. This way the Provider Key is kept secret to full admins only.
7.3. Running your self-managed APIcast instance (production)
If you’re familiar with NGINX, it shouldn’t take you long to get APIcast up and running locally. Note that your NGINX installation must have the Lua plugin, and for some of the OAuth 2.0 grant types, you must also have Redis installed on your server.
If you’re not familiar with NGINX, we recommend you install OpenResty, a fantastic web application, which is basically a bundle of the standard NGINX core with almost all of the third-party NGINX modules that you’ll need built in.
7.3.1. Step 1: Install the dependencies (for Ubuntu)
For Debian/Ubuntu linux distribution you should install the following packages using apt-get:
sudo apt-get install libreadline-dev libncurses5-dev libpcre3 libpcre3-dev libssl-dev perl
sudo apt-get build-dep nginx
For different systems, check out the OpenResty documentation.
7.3.2. Step 2: Compile and install OpenResty
Download the code and compile it, change VERSION with your desired version (we usually recommend running the latest stable version.)
wget http://agentzh.org/misc/nginx/ngx_openresty-VERSION.tar.gz
tar -zxvf ngx_openresty-VERSION.tar.gz
cd ngx_openresty-VERSION/

./configure --prefix=/opt/openresty --with-luajit --with-http_iconv_module -j2

make
make install
At this point, you have NGINX and Lua installed using the OpenResty bundle.
7.3.3. Step 3: Install Redis
Download and install Redis on APIcast server (we recommend to always use the latest stable version.)
tar zxvf  redis-VERSION.tar.gz
cd redis-VERSION
make
sudo make install
In order to to install and run the Redis server, run the following, accepting all the default values:
sudo ./utils/install_server.sh
7.3.4. Step 4: Download the APIcast configuration from 3scale
Please note that only the authorization code (server-side) grant flow configs are currently available for download from the Integration page. However, you can find configuration templates for all other flows on our GitHub repository here.
Download the APIcast configuration files from 3scale by clicking the Download button. This will give you a zip file with six files inside:
-
authorize.lua- This file contains the logic for authorizing the client, redirecting the end_user to the OAuth login page, generating the access token, and checking that the return URL matches the one specified by the API buyer. It runs when the /authorize endpoint is hit. -
authorized_callback.lua- This file contains the logic for redirecting an API end user back to the API buyer’s redirect URL. As an API provider, you’ll need to call this endpoint once your user successfully logs in and authorizes the API buyer’s requested access. This file gets executed when the /callback endpoint is called by your web application. -
get_token.lua- This file contains the logic to return the access token for the client identified by a client_id. It gets executed when the /oauth/token endpoint is called. -
nginx_*.conf- The .conf is a typical NGINX config file. Feel free to edit it or to copy/paste it into your existing .conf if you are already running NGINX. -
nginx_*.lua- This file contains the logic that you defined on the web interface to track usage for various metrics and methods. -
threescale_utils.lua
7.3.5. Step 5: Start and stop APIcast
The only thing left to do is start APIcast. There are many ways to do this, but the most straight-forward is:
sudo /opt/openresty/nginx/sbin/nginx -p /opt/openresty/nginx/ -c /opt/openresty/nginx/conf/YOUR-CONFIG-FILE.conf
The example assumes that the working directory of APIcast is /opt/openresty/nginx which is the path you passed during the installation to configure --prefix=/opt/openresty. You can change it, but be aware of the user privileges.
The example also assumes that the .conf generated by 3scale is placed at /opt/openresty/nginx/conf/. Of course, you should place the files and the directories at the location that best suits your production environment, as well as to start and stop the process as a system daemon instead of by executing the binary directly.
To stop a running APIcast instance:
sudo /opt/openresty/nginx/sbin/nginx -p /opt/openresty/nginx/ -c /opt/openresty/nginx/conf/YOUR-CONFIG-FILE.conf -s stop
The option -s let you pass a signal to nginx. The process that will be stopped is the one whose .pid is stored in /opt/openresty/nginx/logs/nginx.pid.
The APIcast logs are in the same directory by default: /opt/openresty/nginx/logs/. Check the error.log when setting up the whole process.
7.3.6. Step 6: Test your OAuth Flow
The best way to test that your API now supports OAuth is to use Google’s OAuth playground: https://developers.google.com/oauthplayground
You will need to set the redirect URL for the application you want to use to test this to the google OAuth Playground URL: https://developers.google.com/oauthplayground
You can then fill in the settings as in the screenshot below:

The authorization and token endpoint URLs are the URLs from your APIcast instance. In the scope, put the name of the application plan for the application (for example, “Default”).
Click on Authorize API, which will redirect you to your login URL. Then, log in to a user account on your application and authorize the application. Once that’s done, you’ll be redirected back to the Google OAuth Playground with an authorization code. Exchange this for an access token. You now have an access token to call protected endpoints on your API.
You can now make a request to your API, but replacing your API backend host name (in the example echo-api.3scale.net) by the hostname of your APIcast instance and adding the access_token parameter. For example:
curl -X GET "http://YOUR_APICAST_HOST/read?access_token=YOUR_ACCESS_TOKEN"
Now you have your API integrated with 3scale.