Red Hat Training
A Red Hat training course is available for OpenShift Online
Chapter 5. Beyond the Basics
5.1. Overview
This getting started experience walks you through the “long way” of getting the same sample project from the Basic Walkthrough topic up and running on OpenShift Online.
If you are unfamiliar with the core concepts of OpenShift version 3, you might want to start by reading about what’s new. This version of OpenShift is significantly different from version 2.
The following sections guide you through creating a project that contains a sample Node.js application that will serve a welcome page and the current hit count (stored in a database). This involves creating two pods:
- one to host the Node.js application
- one to host the MongoDB database
The tutorial assumes that you have:
5.2. Setup
In this section, you will fork the OpenShift Node.js sample application on GitHub and clone the repository to your local machine so that you can deploy and edit the app.
You can skip this step if you already forked the openshift/nodejs-ex repository when following the Basic Walkthrough topic.
On GitHub, navigate to the openshift/nodejs-ex repository. In the top-right corner of the page, click Fork:

Next, execute the following commands on your local machine to clone the sample application and change to the new directory:
$ git clone https://github.com/<your_github_username>/nodejs-ex
$ cd nodejs-ex
That’s it! Now, you have a fork of the original openshift/nodejs-ex example application Git repository and a copy on your local machine.
5.3. Installing the OpenShift CLI
In this section, you will install the OpenShift CLI. The OpenShift CLI exposes commands for managing your applications, as well as lower level tools to interact with each component of your system.
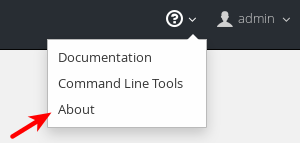
First, download the OpenShift Online CLI from the About page in the OpenShift Online web console.

The CLI is available for Linux (32- or 64-bit), Mac OS X, and Windows. After you have downloaded the CLI, return to these steps.
Next, unpack or unzip the archive and move the
ocbinary to a directory on yourPATH.NoteTo check your
PATHon Linux or Mac OS X, open the Terminal and run:$ echo $PATH
To check it on Windows, open the Command Prompt and run:
C:\> path
After it is installed, you can use the
occommand from your command shell.Then, visit the About page in the OpenShift Online web console.

Copy the
oc logincommand shown with your current session token to log in to OpenShift Online from the CLI:$ oc login https://<your_cluster_ID>.openshift.com --token=<your_session_token>
The
oc logincommand is the best way to initially set up the OpenShift Online CLI. The information is automatically saved in a CLI configuration file that is then used for subsequent commands.
5.4. Creating a New Application from Source Code
In this section, you will deploy your first application to OpenShift Online using the web console.
First, create a new project. Replace
<project_name>below with a unique name for your project, such as<your_github_username>-example:$ oc new-project <project_name>
After creating the new project, you will be automatically switched to the new project namespace.
If you followed the Basic Walkthrough topic, you already created your first project. You must switch to your project namespace and clear out the original sample application.
Use the following command to find the name of your existing project(s):
$ oc get projects
Next, switch to your project namespace:
$ oc project <your_project_name>
Then, delete all existing objects in your project:
$ oc delete all --all
Use the following command to find the name of your existing persistent volume claims:
$ oc get pvc
Finally, delete your existing persistent volume claims with:
$ oc delete pvc mongodb
Next, create a new application from your forked copy of the nodejs-ex source code file:
$ oc new-app https://github.com/<your_github_username>/nodejs-ex --name nodejs-mongodb-example
NoteThe
--nameoption will apply a name ofnodejs-mongodb-exampleto all the resources created by theoc new-appcommand, for easy management later.The tool will inspect the source code, locate an appropriate image that can build the source code, create an image stream for the new application image that will be built, then create the correct build configuration, deployment configuration and service definition.
The
oc new-appcommand kicks off a build after all required dependencies are confirmed and automatically deploys the application after the image is available.
You can follow along on the Overview page for your project in the web console to see the new resource being created and watch the progress of the build and deployment. When the Node.js pod is running, the build is complete.
You can also use the oc status command to check the status of your new nodejs app, as well as oc get pods to check when the pod is up and running.
The oc get services command tells you what IP address the service is running; the default port it deploys to is 8080.
5.5. Configuring Routes
In this section, you will configure a route to expose your Node.js service to external requests.
First, find your service name (which should be
nodejs-mongodb-examplewith:$ oc get services
Next, create a route to expose your service to external requests:
$ oc expose service/nodejs-mongodb-example
Now you can find the external host/port for your service with:
$ oc get routes
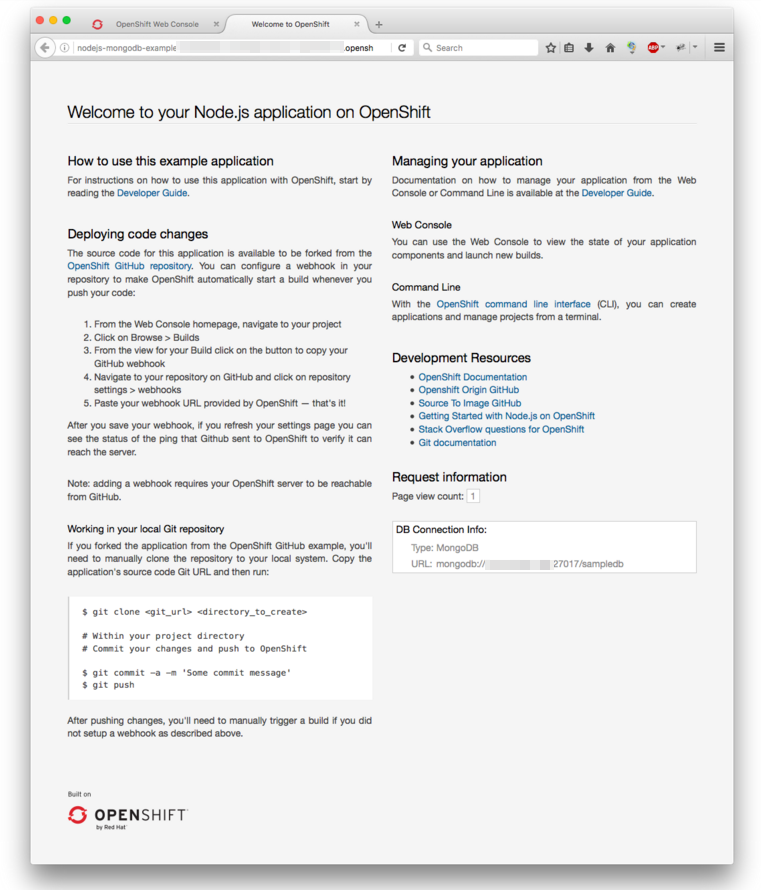
Finally, copy the route HOST/PORT for your application and paste it in the browser to view your application:

5.6. Provisioning a Database
In this section, you will add a MongoDB service to your project.
You may have noticed the No database configured under Request information when you viewed the index page of your application. Let’s fix that by adding a MongoDB service.
Add the OpenShift Online-provided MongoDB database to your project with:
$ oc new-app mongodb-persistent \
-p MONGODB_USER=admin \
-p MONGODB_PASSWORD=secret \
-p MONGODB_ADMIN_PASSWORD=super-secret
NoteThe
-pflag sets the parameter values used by the mongodb-persistent database template.- Note the name of the MongoDB service before heading to the next section.
5.7. Setting Environment Variables
In this section, you will configure the Node.js service to connect to your new MongoDB service.
You must add the environment variable
MONGO_URLto your Node.js web service so that it will utilize the MongoDB service, and enable the "Page view count" feature. Run:$ oc set env dc/nodejs-mongodb-example MONGO_URL='mongodb://admin:secret@<MongoDB-service-name>:27017/sampledb'
NoteServices in the same project have automatically resolvable DNS names.
For example:
$ oc set env dc/nodejs-mongodb-example
MONGO_URL='mongodb://admin:secret@mongodb-persistent:27017/sampledb'
Next, run
oc statusto confirm that an updated deployment has been kicked off. After the deployment completes, you will now have a Node.js welcome page showing the current hit count, as stored in a MongoDB database.NoteUse the following to get a list of environment variables set for all pods in the project:
$ oc set env pods --all --list
5.8. Configuring Automated Builds
In this section, you will configure a GitHub webhook to automatically trigger a rebuild of your application whenever you push code changes to your forked repository.
First, run the following command to display the webhook URLs associated with your build configuration:
$ oc describe buildConfig nodejs-mongodb-example
Copy the webhook GitHub URL output by the above command. The webhook URL will be in the following format:
http://<openshift_api_host:port>/osapi/v1/namespaces/<namespace>/buildconfigs/frontend/webhooks/<your_secret_key>/github
Next, navigate to your forked repository on GitHub, then:
- Click Settings.
- Click Webhooks & Services.
- Click Add webhook
- Paste your webhook URL into the Payload URL field and click Add webhook to save.
That’s it! Your application will now automatically rebuild when you push code changes to your forked GitHub repository.
5.9. Pushing a Code Change
In this section, you will learn how to push a local code change to the application.
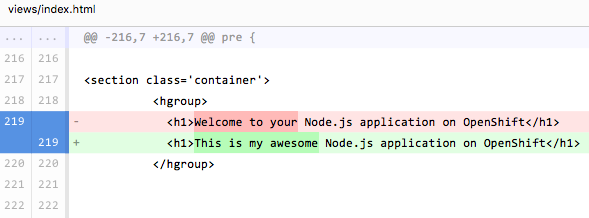
- On your local machine, use a text editor to open the sample application’s source for the file nodejs-ex/views/index.html.
Make a code change that will be visible from within your application. For example, change the title on line 219:

Commit the changes in Git, and push the change to your GitHub repository:
$ git add nodejs-ex/views/index.html
$ git commit -m "Updates heading on welcome page"
$ git push origin master
- If your webhook is correctly configured, your application will immediately rebuild itself based on your changes. You can follow along on the Overview page for your project in the web console to see watch the progress of the build and deployment. View your application using a web browser to see your changes once the deployment is completed.
Now all you need to do is push code updates, and OpenShift Online handles the rest.
5.10. Failure Notifications
For each of your projects, you can choose to receive email notifications about various failures, including dead or failed deployments, dead builds, and dead or failed persistent volume claims (PVCs).
5.11. What’s Next?
The following sections provide some next steps now that you have finished your initial walkthrough of OpenShift Online 3.
5.11.1. OpenShift Online Usage Considerations
5.11.2. Other Quickstarts
Similar to OpenShift Online 2, OpenShift Online 3 provides out of the box a set of languages and databases for developers with corresponding implementations and tutorials that allow you to kickstart your application development. Language support centers around the Quickstart templates, which in turn leverage builder images.
Check out the Creating New Applications topic and try out Quickstart templates for the following languages:
| Language | Implementations and Tutorials |
|---|---|
| Java |
Other images provided by OpenShift Online include:
In addition, JBoss Middleware has put together a broad range of OpenShift Online templates.
The technologies available with the xPaaS services in particular include:
- Java EE 6 Application Server provided by JBoss EAP 6
- Integration and Messaging Services provided by JBoss Fuse and JBoss A-MQ
- Data Grid Service provided by JBoss Data Grid
- Real Time Decision Service provided by JBoss BRMS
- Java Web Server 3.0 provided by Tomcat 7 and Tomcat 8
With each of these offerings, a series of combinations are provided:
- HTTP only versus HTTP and HTTPS
- No database required, or the use of either MongoDB, PostgreSQL, or MySQL
- If desired, integration with A-MQ
5.11.3. Using rsync
See Copying Files for steps on using oc rsync to copy local files to or from a remote directory in a container.
5.11.4. Configuring Autoscaling
See Pod Autoscaling for steps on automatically increasing or decreasing the scale of a replication controller or deployment configuration, based on metrics.
You can also check out the OpenShift blog for an article on autoscaling.
5.11.5. Explore the Developer Guide
Further explore the Developer Guide. For example, start with the Planning Your Development Process and Creating New Applications topics.
5.11.6. Troubleshooting
Review common tips and suggestions.

