
Creating Images
OpenShift Enterprise 3.0 Image Creation Guide
Abstract
Chapter 1. Overview
This guide provides best practices on writing and testing Docker images that can be used on OpenShift.
Chapter 2. Guidelines
2.1. Overview
When creating Docker images to run on OpenShift, there are a number of best practices to consider as an image author to ensure a good experience for consumers of those images. Because images are intended to be immutable and used as-is, the following guidelines help ensure that your images are highly consumable and easy to use on OpenShift.
2.2. General Docker Guidelines
The following guidelines apply when creating a Docker image in general, and are independent of whether the images are used on OpenShift. Also see the following references for more comprehensive guidelines:
- Docker documentation - Best practices for writing Dockerfiles
- Project Atomic documentation - Guidance for Docker Image Authors
Reuse Images
Wherever possible, we recommend that you base your image on an appropriate upstream image using the FROM statement. This ensures your image can easily pick up security fixes from an upstream image when it is updated, rather than you having to update your dependencies directly.
In addition, use tags in the FROM instruction (for example, rhel:rhel7) to make it clear to users exactly which version of an image your image is based on. Using a tag other than latest ensures your image is not subjected to breaking changes that might go into the latest version of an upstream image.
Maintain Compatibility Within Tags
When tagging your own images, we recommend that you try to maintain backwards compatibility within a tag. For example, if you provide an image named foo and it currently includes version 1.0, you might provide a tag of foo:v1. When you update the image, as long as it continues to be compatible with the original image, you can continue to tag the new image foo:v1, and downstream consumers of this tag will be able to get updates without being broken.
If you later release an incompatible update, then you should switch to a new tag, for example foo:v2. This allows downstream consumers to move up to the new version at will, but not be inadvertently broken by the new incompatible image. Any downstream consumer using foo:latest takes on the risk of any incompatible changes being introduced.
Avoid Multiple Processes
We recommend that you do not start multiple services, such as a database and SSHD, inside one container. This is not necessary because containers are lightweight and can be easily linked together for orchestrating multiple processes. OpenShift allows you to easily collocate and co-manage related images by grouping them into a single pod.
This collocation ensures the containers share a network namespace and storage for communication. Updates are also less disruptive as each image can be updated less frequently and independently. Signal handling flows are also clearer with a single process as you do not need to manage routing signals to spawned processes.
Use exec in Wrapper Scripts
See the "Always exec in Wrapper Scripts" section of the Project Atomic documentation for more information.
Also note that your process runs as PID 1 when running in a Docker container. This means that if your main process terminates, the entire container is stopped, killing any child processes you may have launched from your PID 1 process.
See the "Docker and the PID 1 zombie reaping problem" blog article for additional implications. Also see the "Demystifying the init system (PID 1)" blog article for a deep dive on PID 1 and init systems.
Clean Temporary Files
All temporary files you create during the build process should be removed. This also includes any files added with the ADD command. For example, we strongly recommended that you run the yum clean command after performing yum install operations.
You can prevent the yum cache from ending up in an image layer by creating your RUN statement as follows:
RUN yum -y install mypackage && yum -y install myotherpackage && yum clean all -y
Note that if you instead write:
RUN yum -y install mypackage
RUN yum -y install myotherpackage && yum clean all -y
Then the first yum invocation leaves extra files in that layer, and these files cannot be removed when the yum clean operation is run later. The extra files are not visible in the final image, but they are present in the underlying layers.
The current Docker build process does not allow a command run in a later layer to shrink the space used by the image when something was removed in an earlier layer. However, this may change in the future. This means that if you perform an rm command in a later layer, although the files are hidden it does not reduce the overall size of the image to be downloaded. Therefore, as with the yum clean example, it is best to remove files in the same command that created them, where possible, so they do not end up written to a layer.
In addition, performing multiple commands in a single RUN statement reduces the number of layers in your image, which improves download and extraction time.
Place Instructions in the Proper Order
Docker reads the Dockerfile and runs the instructions from top to bottom. Every instruction that is successfully executed creates a layer which can be reused the next time this or another image is built. It is very important to place instructions that will rarely change at the top of your Dockerfile. Doing so ensures the next builds of the same image are very fast because the cache is not invalidated by upper layer changes.
For example, if you are working on a Dockerfile that contains an ADD command to install a file you are iterating on, and a RUN command to yum install a package, it is best to put the ADD command last:
FROM foo
RUN yum -y install mypackage && yum clean all -y
ADD myfile /test/myfile
This way each time you edit myfile and rerun docker build, the system reuses the cached layer for the yum command and only generates the new layer for the ADD operation.
If instead you wrote the Dockerfile as:
FROM foo
ADD myfile /test/myfile
RUN yum -y install mypackage && yum clean all -y
Then each time you changed myfile and reran docker build, the ADD operation would invalidate the RUN layer cache, so the yum operation would need to be rerun as well.
Mark Important Ports
See the "Always EXPOSE Important Ports" section of the Project Atomic documentation for more information.
Set Environment Variables
It is good practice to set environment variables with the ENV instruction. One example is to set the version of your project. This makes it easy for people to find the version without looking at the Dockerfile. Another example is advertising a path on the system that could be used by another process, such as JAVA_HOME.
Avoid Default Passwords
It is best to avoid setting default passwords. Many people will extend the image and forget to remove or change the default password. This can lead to security issues if a user in production is assigned a well-known password. Passwords should be configurable using an environment variable instead. See the Using Environment Variables for Configuration topic for more information.
If you do choose to set a default password, ensure that an appropriate warning message is displayed when the container is started. The message should inform the user of the value of the default password and explain how to change it, such as what environment variable to set.
Avoid SSHD
It is best to avoid running SSHD in your image. For accessing running containers, You can use the docker exec command locally to access containers that are running. Alternatively, you can use the OpenShift tooling since it allows you to execute arbitrary commands in images that are running. Installing and running SSHD in your image opens up additional vectors for attack and requirements for security patching.
Use Volumes for Persistent Data
Images should use a Docker volume for persistent data. This way OpenShift mounts the network storage to the node running the container, and if the container moves to a new node the storage is reattached to that node. By using the volume for all persistent storage needs, the content is preserved even if the container is restarted or moved. If your image writes data to arbitrary locations within the container, that content might not be preserved.
All data that needs to be preserved even after the container is destroyed must be written to a volume. With Docker 1.5, there will be a readonly flag for containers which can be used to strictly enforce good practices about not writing data to ephemeral storage in a container. Designing your image around that capability now will make it easier to take advantage of it later.
Furthermore, explicitly defining volumes in your Dockerfile makes it easy for consumers of the image to understand what volumes they need to define when running your image.
See the Kubernetes documentation for more information on how volumes are used in OpenShift.
Even with persistent volumes, each instance of your image has its own volume, and the filesystem is not shared between instances. This means the volume cannot be used to share state in a cluster.
2.3. OpenShift-Specific Guidelines
The following are guidelines that apply when creating Docker images specifically for use on OpenShift.
Enable Images for Source-To-Image (S2I)
For images that are intended to run application code provided by a third party, such as a Ruby image designed to run Ruby code provided by a developer, you can enable your image to work with the Source-to-Image (S2I) build tool. S2I is a framework which makes it easy to write images that take application source code as an input and produce a new image that runs the assembled application as output.
For example, this Python image defines S2I scripts for building various versions of Python applications.
For more details about how to write S2I scripts for your image, see the S2I Requirements topic.
Support Arbitrary User IDs
In order to support running containers with volumes mounted in a secure fashion, images should be capable of being run as any arbitrary user ID. When OpenShift mounts volumes for a container, it configures the volume so it can only be written to be a particular user ID, and then runs the image using that same user ID. This ensures the volume is only accessible to the appropriate container, but requires the image be able to run as an arbitrary user ID.
To accomplish this, directories that must be written to by processes in the image should be world-writable. In addition, the processes running in the container must not listen on privileged ports (ports below 1024).
Lastly, the final USER declaration in the Dockerfile should specify the user ID (numeric value) and not the user name. This allows OpenShift to validate the authority the image is attempting to run with and prevent running images that are trying to run as root, because running containers as a privileged user exposes potential security holes. If the image does not specify a USER, it inherits the USER from the parent image.
If your S2I image does not include a USER declaration with a numeric user, your builds will fail by default. In order to allow images that use either named users or the root (0) user to build in OpenShift, you can add the project’s builder service account (system:serviceaccount:<your-project>:builder) to the privileged security context constraint (SCC). Alternatively, you can allow all images to run as any user.
Use Services for Inter-image Communication
For cases where your image needs to communicate with a service provided by another image, such as a web front end image that needs to access a database image to store and retrieve data, your image should consume an OpenShift service. Services provide a static endpoint for access which does not change as containers are stopped, started, or moved. In addition, services provide load balancing for requests.
Provide Common Libraries
For images that are intended to run application code provided by a third party, ensure that your image contains commonly used libraries for your platform. In particular, provide database drivers for common databases used with your platform. For example, provide JDBC drivers for MySQL and PostgreSQL if you are creating a Java framework image. Doing so prevents the need for common dependencies to be downloaded during application assembly time, speeding up application image builds. It also simplifies the work required by application developers to ensure all of their dependencies are met.
Use Environment Variables for Configuration
Users of your image should be able to configure it without having to create a downstream image based on your image. This means that the runtime configuration should be handled using environment variables. For a simple configuration, the running process can consume the environment variables directly. For a more complicated configuration or for runtimes which do not support this, configure the runtime by defining a template configuration file that is processed during startup. During this processing, values supplied using environment variables can be substituted into the configuration file or used to make decisions about what options to set in the configuration file.
It is also possible and recommended to pass secrets such as certificates and keys into the container using environment variables. This ensures that the secret values do not end up committed in an image and leaked into a Docker registry.
Providing environment variables allows consumers of your image to customize behavior, such as database settings, passwords, and performance tuning, without having to introduce a new layer on top of your image. Instead, they can simply define environment variable values when defining a pod and change those settings without rebuilding the image.
For extremely complex scenarios, configuration can also be supplied using volumes that would be mounted into the container at runtime. However, if you elect to do it this way you must ensure that your image provides clear error messages on startup when the necessary volume or configuration is not present.
This topic is related to the Using Services for Inter-image Communication topic in that configuration like datasources should be defined in terms of environment variables that provide the service endpoint information. This allows an application to dynamically consume a datasource service that is defined in the OpenShift environment without modifying the application image.
In addition, tuning should be done by inspecting the cgroups settings for the container. This allows the image to tune itself to the available memory, CPU, and other resources. For example, Java-based images should tune their heap based on the cgroup maximum memory parameter to ensure they do not exceed the limits and get an out-of-memory error.
See the following references for more on how to manage cgroup quotas in Docker containers:
- Blog article - Resource management in Docker
- Docker documentation - Runtime Metrics
- Blog article - Memory inside Linux containers
Set Image Metadata
Defining image metadata helps OpenShift better consume your Docker images, allowing OpenShift to create a better experience for developers using your image. For example, you can add metadata to provide helpful descriptions of your image, or offer suggestions on other images that may also be needed.
See the Image Metadata topic for more information on supported metadata and how to define them.
Clustering
You must fully understand what it means to run multiple instances of your image. In the simplest case, the load balancing function of a service handles routing traffic to all instances of your image. However, many frameworks need to share information in order to perform leader election or failover state; for example, in session replication.
Consider how your instances accomplish this communication when running in OpenShift. Although pods can communicate directly with each other, their IP addresses change anytime the pod starts, stops, or is moved. Therefore, it is important for your clustering scheme to be dynamic.
Logging
It is best to send all logging to standard out. OpenShift collects standard out from containers and sends it to the centralized logging service where it can be viewed. If you need to separate log content, prefix the output with an appropriate keyword, which makes it possible to filter the messages.
If your image logs to a file, users must use manual operations to enter the running container and retrieve or view the log file.
2.4. External References
Chapter 3. Image Metadata
3.1. Overview
Defining image metadata helps OpenShift better consume your Docker images, allowing OpenShift to create a better experience for developers using your image. For example, you can add metadata to provide helpful descriptions of your image, or offer suggestions on other images that may also be needed.
This topic only defines the metadata needed by the current set of use cases. Additional metadata or use cases may be added in the future.
3.2. Defining Image Metadata
You can use the LABEL instruction in a Dockerfile to define image metadata. Labels are similar to environment variables in that they are key value pairs attached to an image or a container. Labels are different from environment variable in that they are not visible to the running application and they can also be used for fast look-up of images and containers.
Docker documentation for more information on the LABEL instruction.
The label names should typically be namespaced. The namespace should be set accordingly to reflect the project that is going to pick up the labels and use them. For OpenShift the namespace should be set to io.openshift and for Kubernetes the namespace is io.k8s.
See the Docker custom metadata documentation for details about the format.
Table 3.1. Supported Metadata
| Variable | Description |
|---|---|
|
| This label contains a list of tags represented as list of comma separated string values. The tags are the way to categorize the Docker images into broad areas of functionality. Tags help UI and generation tools to suggest relevant Docker images during the application creation process. LABEL io.openshift.tags mongodb,mongodb24,nosql |
|
|
Specifies a list of tags that the generation tools and the UI might use to provide relevant suggestions if you don’t have the Docker images with given tags already. For example, if the Docker image wants LABEL io.openshift.wants mongodb,redis |
|
| This label can be used to give the Docker image consumers more detailed information about the service or functionality this image provides. The UI can then use this description together with the Docker image name to provide more human friendly information to end users. LABEL io.k8s.description The MySQL 5.5 Server with master-slave replication support |
|
|
This label contains a list of service ports that match with the
The format is LABEL io.openshift.expose-services 2020/udp:ftp,8080:https |
|
|
An image might use this variable to suggest that it does not support scaling. The UI will then communicate this to consumers of that image. Being not-scalable basically means that the value of LABEL io.openshift.non-scalable true |
|
| This label suggests how much resources the Docker image might need in order to work properly. The UI might warn the user that deploying this Docker image may exceed their user quota. The values must be compatible with Kubernetes quantity. LABEL io.openshift.min-memory 8Gi LABEL io.openshift.min-cpu 4 |
Chapter 4. S2I Requirements
4.1. Overview
Source-to-Image (S2I) is a framework that makes it easy to write images that take application source code as an input and produce a new image that runs the assembled application as output.
The main advantage of using S2I for building reproducible Docker images is the ease of use for developers. As a builder image author, you must understand two basic concepts in order for your images to provide the best possible S2I performance: the build process and S2I scripts.
4.2. Build Process
The build process consists of the following three fundamental elements, which are combined into a final Docker image:
- sources
- S2I scripts
- builder image
During the build process, S2I must place sources and scripts inside the builder image. To do so, S2I creates a tar file that contains the sources and scripts, then streams that file into the builder image. Before executing the assemble script, S2I untars that file and places its contents into the location specified with the --destination flag or the io.openshift.s2i.destination label from the builder image, with the default location being the /tmp directory.
For this process to happen, your image must supply the tar archiving utility (the tar command available in $PATH) and the command line interpreter (the /bin/sh command); this allows your image to use the fastest possible build path. If the tar or /bin/sh command is not available, the sti build process is forced to automatically perform an additional Docker build to put both the sources and the scripts inside the image, and only then run the usual sti build procedure.
See the following diagram for the basic S2I build workflow:
Figure 4.1. Build Workflow
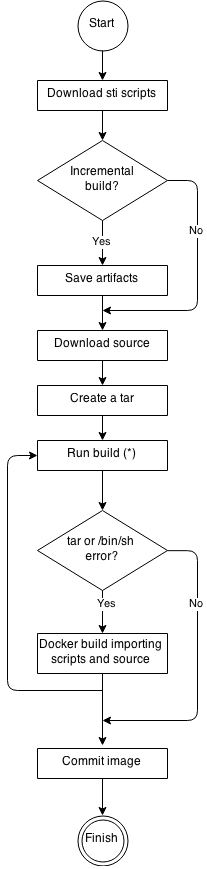
-
Run build’s responsibility is to untar the sources, scripts and artifacts (if such exist) and invoke the
assemblescript. If this is the second run (after catchingtar//bin/shnot found error) it is responsible only for invokingassemblescript, since both scripts and sources are already there.
4.3. S2I Scripts
You can write S2I scripts in any programming language, as long as the scripts are executable inside the builder image. S2I supports multiple options providing assemble/run/save-artifacts scripts. All of these locations are checked on each build in the following order:
-
A script found at the
--scripts-urlURL -
A script found in the application source
.sti/bindirectory -
A script found at the default image URL (
io.openshift.s2i.scripts-urllabel)
Both the io.openshift.s2i.scripts-url label specified in the image and the --scripts-url flag can take one of the following form:
-
image://path_to_scripts_dir- absolute path inside the image to a directory where the S2I scripts are located -
file://path_to_scripts_dir- relative or absolute path to a directory on the host where the S2I scripts are located -
http(s)://path_to_scripts_dir- URL to a directory where the S2I scripts are located
In case where the scripts are already placed inside the image (using --scripts-url or io.openshift.s2i.scripts-url with value image:///path/in/image) then setting --destination or io.openshift.s2i.destination label applies only to sources and artifacts.
Table 4.1. S2I Scripts
| Script | Description |
|---|---|
| assemble (required) | The assemble script builds the application artifacts from a source and places them into appropriate directories inside the image. The workflow for this script is:
|
| run (required) | The run script executes your application. |
| save-artifacts (optional) | The save-artifacts script gathers all dependencies that can speed up the build processes that follow. For example:
These dependencies are gathered into a tar file and streamed to the standard output. |
| usage (optional) | The usage script allows you to inform the user how to properly use your image. |
| test/run (optional) | The test/run script allows you to create a simple process to check if the image is working correctly. The proposed flow of that process is:
See the Testing S2I Images topic for more information. Note The suggested location to put the test application built by your test/run script is the test/test-app directory in your image repository. See the S2I documentation for more information. |
Example S2I Scripts
The following examples are written in Bash and it is assumed all tar contents are unpacked into the /tmp/sti directory.
Example 4.1. assemble script:
#!/bin/bash

# restore build artifacts
if [ "$(ls /tmp/sti/artifacts/ 2>/dev/null)" ]; then
    mv /tmp/sti/artifacts/* $HOME/.
fi

# move the application source
mv /tmp/sti/src $HOME/src

# build application artifacts
pushd ${HOME}
make all

# install the artifacts
make install
popd
Example 4.2. run script:
#!/bin/bash

# run the application
/opt/application/run.sh
Example 4.3. save-artifacts script:
#!/bin/bash

pushd ${HOME}
if [ -d deps ]; then
    # all deps contents to tar stream
    tar cf - deps
fi
popd
Example 4.4. usage script:
#!/bin/bash

# inform the user how to use the image
cat <<EOF
This is a S2I sample builder image, to use it, install
https://github.com/openshift/source-to-image
EOF
4.4. Using Images with ONBUILD Instructions
The ONBUILD instructions can be found in many official Docker images. For example:
See the Docker documentation for more information on ONBUILD.
Upon start S2I detects whether the builder image uses ONBUILD instructions. If there are none, the regular S2I build is performed, otherwise a different strategy is chosen. During such a S2I build, all ONBUILD instructions are executed in the order they were defined in the builder image’s Dockerfile. The S2I scripts are not required for this strategy, but they can be used as a supplement to existing ONBUILD instructions.
Many official Docker images that use ONBUILD do not declare the image CMD or ENTRYPOINT, and for that, S2I must know how to run your application. There are two methods for defining the ENTRYPOINT:
-
Include the run script in your application root folder. S2I recognizes it and sets it as the application image
ENTRYPOINT. -
Use the S2I scripts. If you provide them, the run script is set as an image
ENTRYPOINT. If the S2I scripts location also includes the assemble script, that script is executed as the last instruction of the underlying Docker build.
Chapter 5. Testing S2I Images
5.1. Overview
As an Source-to-Image (S2I) builder image author, you can test your S2I image locally and use the OpenShift build system for automated testing and continuous integration.
Check the S2I Requirements topic to learn more about the S2I architecture before proceeding.
As described in the S2I Requirements topic, S2I requires the assemble and run scripts to be present in order to successfully execute the S2I build. Providing the save-artifacts script reuses the build artifacts, and providing the usage script ensures that usage information is printed to console when someone runs the Docker image outside of the S2I.
The goal of testing an S2I image is to make sure that all of these described commands work properly, even if the base Docker image has changed or the tooling used by the commands was updated.
5.2. Testing Requirements
The standard location for the test script is test/run. This script is invoked by the OpenShift S2I image builder and it could be a simple Bash script or a static Go binary.
The test/run script performs the S2I build, so you must have the S2I binary available in your $PATH. If required, follow the installation instructions in the S2I README.
S2I combines the application source code and builder image, so in order to test it you need a sample application source to verify that the source successfully transforms into a runnable Docker image. The sample application should be simple, but it should exercise the crucial steps of assemble and run scripts.
5.3. Generating Scripts and Tools
The S2I tooling comes with powerful generation tools to speed up the process of creating a new S2I image. The sti create command produces all the necessary S2I scripts and testing tools along with the Makefile:
The generated test/run script must be adjusted to be useful, but it provides a good starting point to begin developing.
The test/run script produced by the sti create command requires that the sample application sources are inside the test/test-app directory.
5.4. Testing Locally
The easiest way to run the S2I image tests locally is to use the generated Makefile. If you did not use the sti create command, you can copy the following Makefile template and replace the IMAGE_NAME parameter with your image name.
Example 5.1. Sample Makefile
IMAGE_NAME = openshift/ruby-20-centos7

build:
	docker build -t $(IMAGE_NAME) .

.PHONY: test
test:
	docker build -t $(IMAGE_NAME)-candidate .
	IMAGE_NAME=$(IMAGE_NAME)-candidate test/run
5.5. Basic Testing Workflow
The test script assumes you have already built the image you want to test. If required, first build the S2I image using:
The following steps describe the default workflow to test S2I image builders:
Verify the usage script is working:
Build the image:
- Optionally, if you support save-artifacts, execute step 2 once again to verify that saving and restoring artifacts works properly.
Run the container:
- Verify the container is running and the application is responding.
Executing these steps is generally enough to tell if the builder image is working as expected.
5.6. Using OpenShift Build for Automated Testing
Another way you can execute the S2I image tests is to use the OpenShift platform itself as a continuous integration system. The OpenShift platform is capable of building Docker images and is highly customizable.
To set up an S2I image builder continuous integration system, define a Custom build and use the openshift/sti-image-builder image. This image executes all the steps mentioned in the Basic Testing Workflow section and creates a new S2I builder image.
Example 5.2. Sample CustomBuild
{
  "kind": "BuildConfig",
  "apiVersion": "v1",
  "metadata": {
    "name": "ruby-20-centos7-build"
  },
  "spec": {
    "triggers": [
      {
        "type": "GitHub",
        "github": {
          "secret": "secret101"
        }
      }
    ],
    "source": {
      "type": "Git",
      "git": {
        "uri": "https://github.com/openshift/sti-ruby"
      }
    },
    "strategy": {
      "type": "Custom",
      "customStrategy": {
        "from": {
          "kind": "DockerImage",
          "name": "openshift/sti-image-builder"
        },
        "env": [
          {
            "name": "IMAGE_NAME",
            "value": "openshift/ruby-20-centos7"
          },
          {
            "name": "CONTEXT_DIR",
            "value": "/2.0/"
          }
        ],
        "exposeDockerSocket": true
      }
    },
    "output": {
      "to": {
        "kind": "ImageStreamTag",
        "name": "ruby-20-centos7:latest"
      }
    }
  }
}
You can use the oc create command to create this BuildConfig. After you create the BuildConfig, you can start the build using the following command:
If your OpenShift instance is hosted on a public IP address, the build can be triggered each time you push into your S2I builder image GitHub repository. See webhook triggers for more information.
You can also use the CustomBuild to trigger a rebuild of your application based on the S2I image you updated. See image change triggers for more information.
Chapter 6. Custom Builder
6.1. Overview
Custom build is designed to fill the gap that was created when everybody jumped into creating Docker images. Still there is a requirement to produce individual artifacts (packages, jars, wars, installable zips, base images etc.) This is where Custom build is the perfect match to fill in that gap. Additionally Custom build allows implementing any extended build process for example, CI/CD flow that runs unit or integration tests. The limit here is just the imagination of the custom builder image author.
To fully utilize the power of Custom build one needs to be understand how to create a builder image that will be capable of building desired objects.
6.2. Custom Builder Image
The builder image upon invocation receives following environment variables with the information needed to proceed with the build:
Table 6.1. Custom Builder Environment Variables
| Variable name | Description |
|---|---|
|
| This variable specifies the entire serialized Build object. |
|
| This variable specifies the URL to a repository with sources to build. |
|
| This variable specifies the path to the Docker socket, if exposing the Docker socket was enabled on BuildConfig. |
6.3. Custom Builder Workflow
Although the custom builder image author has a great flexibility in defining the build process on its own, still they should follow a few required steps necessary to seamlessly run a build inside of OpenShift. The required steps for a custom builder image are following:
- Read the Build definition, which contains all the necessary information about input parameters for the build.
- Run the build process.
- If your build produces image, push it to the Build's output location if the output location is defined. Other output locations can be passed with environment variable for now.
Chapter 7. Revision History: Creating Images
7.1. Thu May 19 2016
| Affected Topic | Description of Change |
|---|---|
|
Updated the example in the Using OpenShift Build for Automated Testing section to use |
7.2. Tue Jun 23 2015
OpenShift Enterprise 3.0 release.