
Nodes
OpenShift Dedicated Nodes
Abstract
Chapter 1. Overview of nodes
1.1. About nodes
A node is a virtual or bare-metal machine in a Kubernetes cluster. Worker nodes host your application containers, grouped as pods. The control plane nodes run services that are required to control the Kubernetes cluster. In OpenShift Dedicated, the control plane nodes contain more than just the Kubernetes services for managing the OpenShift Dedicated cluster.
Having stable and healthy nodes in a cluster is fundamental to the smooth functioning of your hosted application. In OpenShift Dedicated, you can access, manage, and monitor a node through the Node object representing the node. Using the OpenShift CLI (oc) or the web console, you can perform the following operations on a node.
The following components of a node are responsible for maintaining the running of pods and providing the Kubernetes runtime environment.
- Container runtime
- The container runtime is responsible for running containers. Kubernetes offers several runtimes such as containerd, cri-o, rktlet, and Docker.
- Kubelet
- Kubelet runs on nodes and reads the container manifests. It ensures that the defined containers have started and are running. The kubelet process maintains the state of work and the node server. Kubelet manages network rules and port forwarding. The kubelet manages containers that are created by Kubernetes only.
- Kube-proxy
- Kube-proxy runs on every node in the cluster and maintains the network traffic between the Kubernetes resources. A Kube-proxy ensures that the networking environment is isolated and accessible.
- DNS
- Cluster DNS is a DNS server which serves DNS records for Kubernetes services. Containers started by Kubernetes automatically include this DNS server in their DNS searches.

Read operations
The read operations allow an administrator or a developer to get information about nodes in an OpenShift Dedicated cluster.
- List all the nodes in a cluster.
- Get information about a node, such as memory and CPU usage, health, status, and age.
- List pods running on a node.
Enhancement operations
OpenShift Dedicated allows you to do more than just access and manage nodes; as an administrator, you can perform the following tasks on nodes to make the cluster more efficient, application-friendly, and to provide a better environment for your developers.
- Manage node-level tuning for high-performance applications that require some level of kernel tuning by using the Node Tuning Operator.
- Run background tasks on nodes automatically with daemon sets. You can create and use daemon sets to create shared storage, run a logging pod on every node, or deploy a monitoring agent on all nodes.
1.2. About pods
A pod is one or more containers deployed together on a node. As a cluster administrator, you can define a pod, assign it to run on a healthy node that is ready for scheduling, and manage. A pod runs as long as the containers are running. You cannot change a pod once it is defined and is running. Some operations you can perform when working with pods are:
Read operations
As an administrator, you can get information about pods in a project through the following tasks:
- List pods associated with a project, including information such as the number of replicas and restarts, current status, and age.
- View pod usage statistics such as CPU, memory, and storage consumption.
Management operations
The following list of tasks provides an overview of how an administrator can manage pods in an OpenShift Dedicated cluster.
Control scheduling of pods using the advanced scheduling features available in OpenShift Dedicated:
- Node-to-pod binding rules such as pod affinity, node affinity, and anti-affinity.
- Node labels and selectors.
- Taints and tolerations.
- Pod topology spread constraints.
- Configure how pods behave after a restart using pod controllers and restart policies.
- Limit both egress and ingress traffic on a pod.
- Add and remove volumes to and from any object that has a pod template. A volume is a mounted file system available to all the containers in a pod. Container storage is ephemeral; you can use volumes to persist container data.
Enhancement operations
You can work with pods more easily and efficiently with the help of various tools and features available in OpenShift Dedicated. The following operations involve using those tools and features to better manage pods.
-
Secrets: Some applications need sensitive information, such as passwords and usernames. An administrator can use the
Secretobject to provide sensitive data to pods using theSecretobject.
1.3. About containers
A container is the basic unit of an OpenShift Dedicated application, which comprises the application code packaged along with its dependencies, libraries, and binaries. Containers provide consistency across environments and multiple deployment targets: physical servers, virtual machines (VMs), and private or public cloud.
Linux container technologies are lightweight mechanisms for isolating running processes and limiting access to only designated resources. As an administrator, You can perform various tasks on a Linux container, such as:
OpenShift Dedicated provides specialized containers called Init containers. Init containers run before application containers and can contain utilities or setup scripts not present in an application image. You can use an Init container to perform tasks before the rest of a pod is deployed.
Apart from performing specific tasks on nodes, pods, and containers, you can work with the overall OpenShift Dedicated cluster to keep the cluster efficient and the application pods highly available.
1.4. Glossary of common terms for OpenShift Dedicated nodes
This glossary defines common terms that are used in the node content.
- Container
- It is a lightweight and executable image that comprises software and all its dependencies. Containers virtualize the operating system, as a result, you can run containers anywhere from a data center to a public or private cloud to even a developer’s laptop.
- Daemon set
- Ensures that a replica of the pod runs on eligible nodes in an OpenShift Dedicated cluster.
- egress
- The process of data sharing externally through a network’s outbound traffic from a pod.
- garbage collection
- The process of cleaning up cluster resources, such as terminated containers and images that are not referenced by any running pods.
- Ingress
- Incoming traffic to a pod.
- Job
- A process that runs to completion. A job creates one or more pod objects and ensures that the specified pods are successfully completed.
- Labels
- You can use labels, which are key-value pairs, to organise and select subsets of objects, such as a pod.
- Node
- A worker machine in the OpenShift Dedicated cluster. A node can be either be a virtual machine (VM) or a physical machine.
- Node Tuning Operator
- You can use the Node Tuning Operator to manage node-level tuning by using the TuneD daemon. It ensures custom tuning specifications are passed to all containerized TuneD daemons running in the cluster in the format that the daemons understand. The daemons run on all nodes in the cluster, one per node.
- Self Node Remediation Operator
- The Operator runs on the cluster nodes and identifies and reboots nodes that are unhealthy.
- Pod
- One or more containers with shared resources, such as volume and IP addresses, running in your OpenShift Dedicated cluster. A pod is the smallest compute unit defined, deployed, and managed.
- Toleration
- Indicates that the pod is allowed (but not required) to be scheduled on nodes or node groups with matching taints. You can use tolerations to enable the scheduler to schedule pods with matching taints.
- Taint
- A core object that comprises a key,value, and effect. Taints and tolerations work together to ensure that pods are not scheduled on irrelevant nodes.
Chapter 2. Working with pods
2.1. Using pods
A pod is one or more containers deployed together on one host, and the smallest compute unit that can be defined, deployed, and managed.
2.1.1. Understanding pods
Pods are the rough equivalent of a machine instance (physical or virtual) to a Container. Each pod is allocated its own internal IP address, therefore owning its entire port space, and containers within pods can share their local storage and networking.
Pods have a lifecycle; they are defined, then they are assigned to run on a node, then they run until their container(s) exit or they are removed for some other reason. Pods, depending on policy and exit code, might be removed after exiting, or can be retained to enable access to the logs of their containers.
OpenShift Dedicated treats pods as largely immutable; changes cannot be made to a pod definition while it is running. OpenShift Dedicated implements changes by terminating an existing pod and recreating it with modified configuration, base image(s), or both. Pods are also treated as expendable, and do not maintain state when recreated. Therefore pods should usually be managed by higher-level controllers, rather than directly by users.
Bare pods that are not managed by a replication controller will be not rescheduled upon node disruption.
2.1.2. Example pod configurations
OpenShift Dedicated leverages the Kubernetes concept of a pod, which is one or more containers deployed together on one host, and the smallest compute unit that can be defined, deployed, and managed.
The following is an example definition of a pod. It demonstrates many features of pods, most of which are discussed in other topics and thus only briefly mentioned here:
Pod object definition (YAML)
kind: Pod
apiVersion: v1
metadata:
  name: example
  labels:
    environment: production
    app: abc 1
spec:
  restartPolicy: Always 2
  securityContext: 3
    runAsNonRoot: true
    seccompProfile:
      type: RuntimeDefault
  containers: 4
    - name: abc
      args:
      - sleep
      - "1000000"
      volumeMounts: 5
       - name: cache-volume
         mountPath: /cache 6
      image: registry.access.redhat.com/ubi7/ubi-init:latest 7
      securityContext:
        allowPrivilegeEscalation: false
        runAsNonRoot: true
        capabilities:
          drop: ["ALL"]
      resources:
        limits:
          memory: "100Mi"
          cpu: "1"
        requests:
          memory: "100Mi"
          cpu: "1"
  volumes: 8
  - name: cache-volume
    emptyDir:
      sizeLimit: 500Mi
- 1
- Pods can be "tagged" with one or more labels, which can then be used to select and manage groups of pods in a single operation. The labels are stored in key/value format in the
metadatahash. - 2
- The pod restart policy with possible values
Always,OnFailure, andNever. The default value isAlways. - 3
- OpenShift Dedicated defines a security context for containers which specifies whether they are allowed to run as privileged containers, run as a user of their choice, and more. The default context is very restrictive but administrators can modify this as needed.
- 4
containersspecifies an array of one or more container definitions.- 5
- The container specifies where external storage volumes are mounted within the container.
- 6
- Specify the volumes to provide for the pod. Volumes mount at the specified path. Do not mount to the container root,
/, or any path that is the same in the host and the container. This can corrupt your host system if the container is sufficiently privileged, such as the host/dev/ptsfiles. It is safe to mount the host by using/host. - 7
- Each container in the pod is instantiated from its own container image.
- 8
- The pod defines storage volumes that are available to its container(s) to use.
If you attach persistent volumes that have high file counts to pods, those pods can fail or can take a long time to start. For more information, see When using Persistent Volumes with high file counts in OpenShift, why do pods fail to start or take an excessive amount of time to achieve "Ready" state?.
This pod definition does not include attributes that are filled by OpenShift Dedicated automatically after the pod is created and its lifecycle begins. The Kubernetes pod documentation has details about the functionality and purpose of pods.
2.1.3. Additional resources
- For more information on pods and storage see Understanding persistent storage and Understanding ephemeral storage.
2.2. Viewing pods
As an administrator, you can view the pods in your cluster and to determine the health of those pods and the cluster as a whole.
2.2.1. About pods
OpenShift Dedicated leverages the Kubernetes concept of a pod, which is one or more containers deployed together on one host, and the smallest compute unit that can be defined, deployed, and managed. Pods are the rough equivalent of a machine instance (physical or virtual) to a container.
You can view a list of pods associated with a specific project or view usage statistics about pods.
2.2.2. Viewing pods in a project
You can view a list of pods associated with the current project, including the number of replica, the current status, number or restarts and the age of the pod.
Procedure
To view the pods in a project:
Change to the project:
$ oc project <project-name>
Run the following command:
$ oc get pods
For example:
$ oc get pods
Example output
NAME                       READY   STATUS    RESTARTS   AGE
console-698d866b78-bnshf   1/1     Running   2          165m
console-698d866b78-m87pm   1/1     Running   2          165m
Add the
-o wideflags to view the pod IP address and the node where the pod is located.$ oc get pods -o wide
Example output
NAME                       READY   STATUS    RESTARTS   AGE    IP            NODE                           NOMINATED NODE
console-698d866b78-bnshf   1/1     Running   2          166m   10.128.0.24   ip-10-0-152-71.ec2.internal    <none>
console-698d866b78-m87pm   1/1     Running   2          166m   10.129.0.23   ip-10-0-173-237.ec2.internal   <none>
2.2.3. Viewing pod usage statistics
You can display usage statistics about pods, which provide the runtime environments for containers. These usage statistics include CPU, memory, and storage consumption.
Prerequisites
-
You must have
cluster-readerpermission to view the usage statistics. - Metrics must be installed to view the usage statistics.
Procedure
To view the usage statistics:
Run the following command:
$ oc adm top pods
For example:
$ oc adm top pods -n openshift-console
Example output
NAME                         CPU(cores)   MEMORY(bytes)
console-7f58c69899-q8c8k     0m           22Mi
console-7f58c69899-xhbgg     0m           25Mi
downloads-594fcccf94-bcxk8   3m           18Mi
downloads-594fcccf94-kv4p6   2m           15Mi
Run the following command to view the usage statistics for pods with labels:
$ oc adm top pod --selector=''
You must choose the selector (label query) to filter on. Supports
=,==, and!=.For example:
$ oc adm top pod --selector='name=my-pod'
2.2.4. Viewing resource logs
You can view the log for various resources in the OpenShift CLI (oc) and web console. Logs read from the tail, or end, of the log.
Prerequisites
-
Access to the OpenShift CLI (
oc).
Procedure (UI)
In the OpenShift Dedicated console, navigate to Workloads → Pods or navigate to the pod through the resource you want to investigate.
NoteSome resources, such as builds, do not have pods to query directly. In such instances, you can locate the Logs link on the Details page for the resource.
- Select a project from the drop-down menu.
- Click the name of the pod you want to investigate.
- Click Logs.
Procedure (CLI)
View the log for a specific pod:
$ oc logs -f <pod_name> -c <container_name>
where:
-f- Optional: Specifies that the output follows what is being written into the logs.
<pod_name>- Specifies the name of the pod.
<container_name>- Optional: Specifies the name of a container. When a pod has more than one container, you must specify the container name.
For example:
$ oc logs ruby-58cd97df55-mww7r
$ oc logs -f ruby-57f7f4855b-znl92 -c ruby
The contents of log files are printed out.
View the log for a specific resource:
$ oc logs <object_type>/<resource_name> 1- 1
- Specifies the resource type and name.
For example:
$ oc logs deployment/ruby
The contents of log files are printed out.
2.3. Configuring an OpenShift Dedicated cluster for pods
As an administrator, you can create and maintain an efficient cluster for pods.
By keeping your cluster efficient, you can provide a better environment for your developers using such tools as what a pod does when it exits, ensuring that the required number of pods is always running, when to restart pods designed to run only once, limit the bandwidth available to pods, and how to keep pods running during disruptions.
2.3.1. Configuring how pods behave after restart
A pod restart policy determines how OpenShift Dedicated responds when Containers in that pod exit. The policy applies to all Containers in that pod.
The possible values are:
-
Always- Tries restarting a successfully exited Container on the pod continuously, with an exponential back-off delay (10s, 20s, 40s) capped at 5 minutes. The default isAlways. -
OnFailure- Tries restarting a failed Container on the pod with an exponential back-off delay (10s, 20s, 40s) capped at 5 minutes. -
Never- Does not try to restart exited or failed Containers on the pod. Pods immediately fail and exit.
After the pod is bound to a node, the pod will never be bound to another node. This means that a controller is necessary in order for a pod to survive node failure:
| Condition | Controller Type | Restart Policy |
|---|---|---|
| Pods that are expected to terminate (such as batch computations) | Job |
|
| Pods that are expected to not terminate (such as web servers) | Replication controller |
|
| Pods that must run one-per-machine | Daemon set | Any |
If a Container on a pod fails and the restart policy is set to OnFailure, the pod stays on the node and the Container is restarted. If you do not want the Container to restart, use a restart policy of Never.
If an entire pod fails, OpenShift Dedicated starts a new pod. Developers must address the possibility that applications might be restarted in a new pod. In particular, applications must handle temporary files, locks, incomplete output, and so forth caused by previous runs.
Kubernetes architecture expects reliable endpoints from cloud providers. When a cloud provider is down, the kubelet prevents OpenShift Dedicated from restarting.
If the underlying cloud provider endpoints are not reliable, do not install a cluster using cloud provider integration. Install the cluster as if it was in a no-cloud environment. It is not recommended to toggle cloud provider integration on or off in an installed cluster.
For details on how OpenShift Dedicated uses restart policy with failed Containers, see the Example States in the Kubernetes documentation.
2.3.2. Limiting the bandwidth available to pods
You can apply quality-of-service traffic shaping to a pod and effectively limit its available bandwidth. Egress traffic (from the pod) is handled by policing, which simply drops packets in excess of the configured rate. Ingress traffic (to the pod) is handled by shaping queued packets to effectively handle data. The limits you place on a pod do not affect the bandwidth of other pods.
Procedure
To limit the bandwidth on a pod:
Write an object definition JSON file, and specify the data traffic speed using
kubernetes.io/ingress-bandwidthandkubernetes.io/egress-bandwidthannotations. For example, to limit both pod egress and ingress bandwidth to 10M/s:Limited
Podobject definition{ "kind": "Pod", "spec": { "containers": [ { "image": "openshift/hello-openshift", "name": "hello-openshift" } ] }, "apiVersion": "v1", "metadata": { "name": "iperf-slow", "annotations": { "kubernetes.io/ingress-bandwidth": "10M", "kubernetes.io/egress-bandwidth": "10M" } } }Create the pod using the object definition:
$ oc create -f <file_or_dir_path>
2.3.3. Understanding how to use pod disruption budgets to specify the number of pods that must be up
A pod disruption budget allows the specification of safety constraints on pods during operations, such as draining a node for maintenance.
PodDisruptionBudget is an API object that specifies the minimum number or percentage of replicas that must be up at a time. Setting these in projects can be helpful during node maintenance (such as scaling a cluster down or a cluster upgrade) and is only honored on voluntary evictions (not on node failures).
A PodDisruptionBudget object’s configuration consists of the following key parts:
- A label selector, which is a label query over a set of pods.
An availability level, which specifies the minimum number of pods that must be available simultaneously, either:
-
minAvailableis the number of pods must always be available, even during a disruption. -
maxUnavailableis the number of pods can be unavailable during a disruption.
-
Available refers to the number of pods that has condition Ready=True. Ready=True refers to the pod that is able to serve requests and should be added to the load balancing pools of all matching services.
A maxUnavailable of 0% or 0 or a minAvailable of 100% or equal to the number of replicas is permitted but can block nodes from being drained.
The default setting for maxUnavailable is 1 for all the machine config pools in OpenShift Dedicated. It is recommended to not change this value and update one control plane node at a time. Do not change this value to 3 for the control plane pool.
You can check for pod disruption budgets across all projects with the following:
$ oc get poddisruptionbudget --all-namespaces
Example output
NAMESPACE                              NAME                                    MIN AVAILABLE   MAX UNAVAILABLE   ALLOWED DISRUPTIONS   AGE
openshift-apiserver                    openshift-apiserver-pdb                 N/A             1                 1                     121m
openshift-cloud-controller-manager     aws-cloud-controller-manager            1               N/A               1                     125m
openshift-cloud-credential-operator    pod-identity-webhook                    1               N/A               1                     117m
openshift-cluster-csi-drivers          aws-ebs-csi-driver-controller-pdb       N/A             1                 1                     121m
openshift-cluster-storage-operator     csi-snapshot-controller-pdb             N/A             1                 1                     122m
openshift-cluster-storage-operator     csi-snapshot-webhook-pdb                N/A             1                 1                     122m
openshift-console                      console                                 N/A             1                 1                     116m
#...
The PodDisruptionBudget is considered healthy when there are at least minAvailable pods running in the system. Every pod above that limit can be evicted.
Depending on your pod priority and preemption settings, lower-priority pods might be removed despite their pod disruption budget requirements.
2.3.3.1. Specifying the number of pods that must be up with pod disruption budgets
You can use a PodDisruptionBudget object to specify the minimum number or percentage of replicas that must be up at a time.
Procedure
To configure a pod disruption budget:
Create a YAML file with the an object definition similar to the following:
apiVersion: policy/v1 1
kind: PodDisruptionBudget
metadata:
  name: my-pdb
spec:
  minAvailable: 2  2
  selector:  3
    matchLabels:
      name: my-pod
- 1
PodDisruptionBudgetis part of thepolicy/v1API group.- 2
- The minimum number of pods that must be available simultaneously. This can be either an integer or a string specifying a percentage, for example,
20%. - 3
- A label query over a set of resources. The result of
matchLabelsandmatchExpressionsare logically conjoined. Leave this parameter blank, for exampleselector {}, to select all pods in the project.
Or:
apiVersion: policy/v1 1
kind: PodDisruptionBudget
metadata:
  name: my-pdb
spec:
  maxUnavailable: 25% 2
  selector: 3
    matchLabels:
      name: my-pod
- 1
PodDisruptionBudgetis part of thepolicy/v1API group.- 2
- The maximum number of pods that can be unavailable simultaneously. This can be either an integer or a string specifying a percentage, for example,
20%. - 3
- A label query over a set of resources. The result of
matchLabelsandmatchExpressionsare logically conjoined. Leave this parameter blank, for exampleselector {}, to select all pods in the project.
Run the following command to add the object to project:
$ oc create -f </path/to/file> -n <project_name>
2.4. Providing sensitive data to pods by using secrets
Additional resources
Some applications need sensitive information, such as passwords and user names, that you do not want developers to have.
As an administrator, you can use Secret objects to provide this information without exposing that information in clear text.
2.4.1. Understanding secrets
The Secret object type provides a mechanism to hold sensitive information such as passwords, OpenShift Dedicated client configuration files, private source repository credentials, and so on. Secrets decouple sensitive content from the pods. You can mount secrets into containers using a volume plugin or the system can use secrets to perform actions on behalf of a pod.
Key properties include:
- Secret data can be referenced independently from its definition.
- Secret data volumes are backed by temporary file-storage facilities (tmpfs) and never come to rest on a node.
- Secret data can be shared within a namespace.
YAML Secret object definition
apiVersion: v1
kind: Secret
metadata:
  name: test-secret
  namespace: my-namespace
type: Opaque 1
data: 2
  username: <username> 3
  password: <password>
stringData: 4
  hostname: myapp.mydomain.com 5
- 1
- Indicates the structure of the secret’s key names and values.
- 2
- The allowable format for the keys in the
datafield must meet the guidelines in the DNS_SUBDOMAIN value in the Kubernetes identifiers glossary. - 3
- The value associated with keys in the
datamap must be base64 encoded. - 4
- Entries in the
stringDatamap are converted to base64 and the entry will then be moved to thedatamap automatically. This field is write-only; the value will only be returned via thedatafield. - 5
- The value associated with keys in the
stringDatamap is made up of plain text strings.
You must create a secret before creating the pods that depend on that secret.
When creating secrets:
- Create a secret object with secret data.
- Update the pod’s service account to allow the reference to the secret.
-
Create a pod, which consumes the secret as an environment variable or as a file (using a
secretvolume).
2.4.1.1. Types of secrets
The value in the type field indicates the structure of the secret’s key names and values. The type can be used to enforce the presence of user names and keys in the secret object. If you do not want validation, use the opaque type, which is the default.
Specify one of the following types to trigger minimal server-side validation to ensure the presence of specific key names in the secret data:
-
kubernetes.io/service-account-token. Uses a service account token. -
kubernetes.io/basic-auth. Use with Basic Authentication. -
kubernetes.io/ssh-auth. Use with SSH Key Authentication. -
kubernetes.io/tls. Use with TLS certificate authorities.
Specify type: Opaque if you do not want validation, which means the secret does not claim to conform to any convention for key names or values. An opaque secret, allows for unstructured key:value pairs that can contain arbitrary values.
You can specify other arbitrary types, such as example.com/my-secret-type. These types are not enforced server-side, but indicate that the creator of the secret intended to conform to the key/value requirements of that type.
For examples of different secret types, see the code samples in Using Secrets.
2.4.1.2. Secret data keys
Secret keys must be in a DNS subdomain.
2.4.1.3. Automatically generated secrets
By default, OpenShift Dedicated creates the following secrets for each service account:
- A dockercfg image pull secret
A service account token secret
NotePrior to OpenShift Dedicated 4.11, a second service account token secret was generated when a service account was created. This service account token secret was used to access the Kubernetes API.
Starting with OpenShift Dedicated 4.11, this second service account token secret is no longer created. This is because the
LegacyServiceAccountTokenNoAutoGenerationupstream Kubernetes feature gate was enabled, which stops the automatic generation of secret-based service account tokens to access the Kubernetes API.After upgrading to 4, any existing service account token secrets are not deleted and continue to function.
This service account token secret and docker configuration image pull secret are necessary to integrate the OpenShift image registry into the cluster’s user authentication and authorization system.
However, if you do not enable the ImageRegistry capability or if you disable the integrated OpenShift image registry in the Cluster Image Registry Operator’s configuration, these secrets are not generated for each service account.
Do not rely on these automatically generated secrets for your own use; they might be removed in a future OpenShift Dedicated release.
Workloads are automatically injected with a projected volume to obtain a bound service account token. If your workload needs an additional service account token, add an additional projected volume in your workload manifest. Bound service account tokens are more secure than service account token secrets for the following reasons:
- Bound service account tokens have a bounded lifetime.
- Bound service account tokens contain audiences.
- Bound service account tokens can be bound to pods or secrets and the bound tokens are invalidated when the bound object is removed.
For more information, see Configuring bound service account tokens using volume projection.
You can also manually create a service account token secret to obtain a token, if the security exposure of a non-expiring token in a readable API object is acceptable to you. For more information, see Creating a service account token secret.
Additional resources
- For information about creating a service account token secret, see Creating a service account token secret.
2.4.2. Understanding how to create secrets
As an administrator you must create a secret before developers can create the pods that depend on that secret.
When creating secrets:
Create a secret object that contains the data you want to keep secret. The specific data required for each secret type is descibed in the following sections.
Example YAML object that creates an opaque secret
apiVersion: v1
kind: Secret
metadata:
  name: test-secret
type: Opaque 1
data: 2
  username: <username>
  password: <password>
stringData: 3
  hostname: myapp.mydomain.com
  secret.properties: |
    property1=valueA
    property2=valueB
Use either the
dataorstringdatafields, not both.Update the pod’s service account to reference the secret:
YAML of a service account that uses a secret
apiVersion: v1
kind: ServiceAccount
 ...
secrets:
- name: test-secret
Create a pod, which consumes the secret as an environment variable or as a file (using a
secretvolume):YAML of a pod populating files in a volume with secret data
apiVersion: v1 kind: Pod metadata: name: secret-example-pod spec: securityContext: runAsNonRoot: true seccompProfile: type: RuntimeDefault containers: - name: secret-test-container image: busybox command: [ "/bin/sh", "-c", "cat /etc/secret-volume/*" ] volumeMounts: 1 - name: secret-volume mountPath: /etc/secret-volume 2 readOnly: true 3 securityContext: allowPrivilegeEscalation: false capabilities: drop: [ALL] volumes: - name: secret-volume secret: secretName: test-secret 4 restartPolicy: Never- 1
- Add a
volumeMountsfield to each container that needs the secret. - 2
- Specifies an unused directory name where you would like the secret to appear. Each key in the secret data map becomes the filename under
mountPath. - 3
- Set to
true. If true, this instructs the driver to provide a read-only volume. - 4
- Specifies the name of the secret.
YAML of a pod populating environment variables with secret data
apiVersion: v1 kind: Pod metadata: name: secret-example-pod spec: securityContext: runAsNonRoot: true seccompProfile: type: RuntimeDefault containers: - name: secret-test-container image: busybox command: [ "/bin/sh", "-c", "export" ] env: - name: TEST_SECRET_USERNAME_ENV_VAR valueFrom: secretKeyRef: 1 name: test-secret key: username securityContext: allowPrivilegeEscalation: false capabilities: drop: [ALL] restartPolicy: Never- 1
- Specifies the environment variable that consumes the secret key.
YAML of a build config populating environment variables with secret data
apiVersion: build.openshift.io/v1 kind: BuildConfig metadata: name: secret-example-bc spec: strategy: sourceStrategy: env: - name: TEST_SECRET_USERNAME_ENV_VAR valueFrom: secretKeyRef: 1 name: test-secret key: username from: kind: ImageStreamTag namespace: openshift name: 'cli:latest'- 1
- Specifies the environment variable that consumes the secret key.
2.4.2.1. Secret creation restrictions
To use a secret, a pod needs to reference the secret. A secret can be used with a pod in three ways:
- To populate environment variables for containers.
- As files in a volume mounted on one or more of its containers.
- By kubelet when pulling images for the pod.
Volume type secrets write data into the container as a file using the volume mechanism. Image pull secrets use service accounts for the automatic injection of the secret into all pods in a namespace.
When a template contains a secret definition, the only way for the template to use the provided secret is to ensure that the secret volume sources are validated and that the specified object reference actually points to a Secret object. Therefore, a secret needs to be created before any pods that depend on it. The most effective way to ensure this is to have it get injected automatically through the use of a service account.
Secret API objects reside in a namespace. They can only be referenced by pods in that same namespace.
Individual secrets are limited to 1MB in size. This is to discourage the creation of large secrets that could exhaust apiserver and kubelet memory. However, creation of a number of smaller secrets could also exhaust memory.
2.4.2.2. Creating an opaque secret
As an administrator, you can create an opaque secret, which allows you to store unstructured key:value pairs that can contain arbitrary values.
Procedure
Create a
Secretobject in a YAML file on a control plane node.For example:
apiVersion: v1 kind: Secret metadata: name: mysecret type: Opaque 1 data: username: <username> password: <password>- 1
- Specifies an opaque secret.
Use the following command to create a
Secretobject:$ oc create -f <filename>.yaml
To use the secret in a pod:
- Update the pod’s service account to reference the secret, as shown in the "Understanding how to create secrets" section.
-
Create the pod, which consumes the secret as an environment variable or as a file (using a
secretvolume), as shown in the "Understanding how to create secrets" section.
Additional resources
- For more information on using secrets in pods, see Understanding how to create secrets.
2.4.2.3. Creating a service account token secret
As an administrator, you can create a service account token secret, which allows you to distribute a service account token to applications that must authenticate to the API.
It is recommended to obtain bound service account tokens using the TokenRequest API instead of using service account token secrets. The tokens obtained from the TokenRequest API are more secure than the tokens stored in secrets, because they have a bounded lifetime and are not readable by other API clients.
You should create a service account token secret only if you cannot use the TokenRequest API and if the security exposure of a non-expiring token in a readable API object is acceptable to you.
See the Additional resources section that follows for information on creating bound service account tokens.
Procedure
Create a
Secretobject in a YAML file on a control plane node:Example
secretobject:apiVersion: v1 kind: Secret metadata: name: secret-sa-sample annotations: kubernetes.io/service-account.name: "sa-name" 1 type: kubernetes.io/service-account-token 2Use the following command to create the
Secretobject:$ oc create -f <filename>.yaml
To use the secret in a pod:
- Update the pod’s service account to reference the secret, as shown in the "Understanding how to create secrets" section.
-
Create the pod, which consumes the secret as an environment variable or as a file (using a
secretvolume), as shown in the "Understanding how to create secrets" section.
Additional resources
- For more information on using secrets in pods, see Understanding how to create secrets.
2.4.2.4. Creating a basic authentication secret
As an administrator, you can create a basic authentication secret, which allows you to store the credentials needed for basic authentication. When using this secret type, the data parameter of the Secret object must contain the following keys encoded in the base64 format:
-
username: the user name for authentication -
password: the password or token for authentication
You can use the stringData parameter to use clear text content.
Procedure
Create a
Secretobject in a YAML file on a control plane node:Example
secretobjectapiVersion: v1 kind: Secret metadata: name: secret-basic-auth type: kubernetes.io/basic-auth 1 data: stringData: 2 username: admin password: <password>
Use the following command to create the
Secretobject:$ oc create -f <filename>.yaml
To use the secret in a pod:
- Update the pod’s service account to reference the secret, as shown in the "Understanding how to create secrets" section.
-
Create the pod, which consumes the secret as an environment variable or as a file (using a
secretvolume), as shown in the "Understanding how to create secrets" section.
Additional resources
- For more information on using secrets in pods, see Understanding how to create secrets.
2.4.2.5. Creating an SSH authentication secret
As an administrator, you can create an SSH authentication secret, which allows you to store data used for SSH authentication. When using this secret type, the data parameter of the Secret object must contain the SSH credential to use.
Procedure
Create a
Secretobject in a YAML file on a control plane node:Example
secretobject:apiVersion: v1 kind: Secret metadata: name: secret-ssh-auth type: kubernetes.io/ssh-auth 1 data: ssh-privatekey: | 2 MIIEpQIBAAKCAQEAulqb/Y ...
Use the following command to create the
Secretobject:$ oc create -f <filename>.yaml
To use the secret in a pod:
- Update the pod’s service account to reference the secret, as shown in the "Understanding how to create secrets" section.
-
Create the pod, which consumes the secret as an environment variable or as a file (using a
secretvolume), as shown in the "Understanding how to create secrets" section.
Additional resources
2.4.2.6. Creating a Docker configuration secret
As an administrator, you can create a Docker configuration secret, which allows you to store the credentials for accessing a container image registry.
-
kubernetes.io/dockercfg. Use this secret type to store your local Docker configuration file. Thedataparameter of thesecretobject must contain the contents of a.dockercfgfile encoded in the base64 format. -
kubernetes.io/dockerconfigjson. Use this secret type to store your local Docker configuration JSON file. Thedataparameter of thesecretobject must contain the contents of a.docker/config.jsonfile encoded in the base64 format.
Procedure
Create a
Secretobject in a YAML file on a control plane node.Example Docker configuration
secretobjectapiVersion: v1 kind: Secret metadata: name: secret-docker-cfg namespace: my-project type: kubernetes.io/dockerconfig 1 data: .dockerconfig:bm5ubm5ubm5ubm5ubm5ubm5ubm5ubmdnZ2dnZ2dnZ2dnZ2dnZ2dnZ2cgYXV0aCBrZXlzCg== 2
Example Docker configuration JSON
secretobjectapiVersion: v1 kind: Secret metadata: name: secret-docker-json namespace: my-project type: kubernetes.io/dockerconfig 1 data: .dockerconfigjson:bm5ubm5ubm5ubm5ubm5ubm5ubm5ubmdnZ2dnZ2dnZ2dnZ2dnZ2dnZ2cgYXV0aCBrZXlzCg== 2
Use the following command to create the
Secretobject$ oc create -f <filename>.yaml
To use the secret in a pod:
- Update the pod’s service account to reference the secret, as shown in the "Understanding how to create secrets" section.
-
Create the pod, which consumes the secret as an environment variable or as a file (using a
secretvolume), as shown in the "Understanding how to create secrets" section.
Additional resources
- For more information on using secrets in pods, see Understanding how to create secrets.
2.4.2.7. Creating a secret using the web console
You can create secrets using the web console.
Procedure
- Navigate to Workloads → Secrets.
Click Create → From YAML.
Edit the YAML manually to your specifications, or drag and drop a file into the YAML editor. For example:
apiVersion: v1
kind: Secret
metadata:
  name: example
  namespace: <namespace>
type: Opaque 1
data:
  username: <base64 encoded username>
  password: <base64 encoded password>
stringData: 2
  hostname: myapp.mydomain.com
- 1
- This example specifies an opaque secret; however, you may see other secret types such as service account token secret, basic authentication secret, SSH authentication secret, or a secret that uses Docker configuration.
- 2
- Entries in the
stringDatamap are converted to base64 and the entry will then be moved to thedatamap automatically. This field is write-only; the value will only be returned via thedatafield.
- Click Create.
Click Add Secret to workload.
- From the drop-down menu, select the workload to add.
- Click Save.
2.4.3. Understanding how to update secrets
When you modify the value of a secret, the value (used by an already running pod) will not dynamically change. To change a secret, you must delete the original pod and create a new pod (perhaps with an identical PodSpec).
Updating a secret follows the same workflow as deploying a new Container image. You can use the kubectl rolling-update command.
The resourceVersion value in a secret is not specified when it is referenced. Therefore, if a secret is updated at the same time as pods are starting, the version of the secret that is used for the pod is not defined.
Currently, it is not possible to check the resource version of a secret object that was used when a pod was created. It is planned that pods will report this information, so that a controller could restart ones using an old resourceVersion. In the interim, do not update the data of existing secrets, but create new ones with distinct names.
2.4.4. Creating and using secrets
As an administrator, you can create a service account token secret. This allows you to distribute a service account token to applications that must authenticate to the API.
Procedure
Create a service account in your namespace by running the following command:
$ oc create sa <service_account_name> -n <your_namespace>
Save the following YAML example to a file named
service-account-token-secret.yaml. The example includes aSecretobject configuration that you can use to generate a service account token:apiVersion: v1 kind: Secret metadata: name: <secret_name> 1 annotations: kubernetes.io/service-account.name: "sa-name" 2 type: kubernetes.io/service-account-token 3
Generate the service account token by applying the file:
$ oc apply -f service-account-token-secret.yaml
Get the service account token from the secret by running the following command:
$ oc get secret <sa_token_secret> -o jsonpath='{.data.token}' | base64 --decode 1Example output
ayJhbGciOiJSUzI1NiIsImtpZCI6IklOb2dtck1qZ3hCSWpoNnh5YnZhSE9QMkk3YnRZMVZoclFfQTZfRFp1YlUifQ.eyJpc3MiOiJrdWJlcm5ldGVzL3NlcnZpY2VhY2NvdW50Iiwia3ViZXJuZXRlcy5pby9zZXJ2aWNlYWNjb3VudC9uYW1lc3BhY2UiOiJkZWZhdWx0Iiwia3ViZXJuZXRlcy5pby9zZXJ2aWNlYWNjb3VudC9zZWNyZXQubmFtZSI6ImJ1aWxkZXItdG9rZW4tdHZrbnIiLCJrdWJlcm5ldGVzLmlvL3NlcnZpY2VhY2NvdW50L3NlcnZpY2UtYWNjb3VudC5uYW1lIjoiYnVpbGRlciIsImt1YmVybmV0ZXMuaW8vc2VydmljZWFjY291bnQvc2VydmljZS1hY2NvdW50LnVpZCI6IjNmZGU2MGZmLTA1NGYtNDkyZi04YzhjLTNlZjE0NDk3MmFmNyIsInN1YiI6InN5c3RlbTpzZXJ2aWNlYWNjb3VudDpkZWZhdWx0OmJ1aWxkZXIifQ.OmqFTDuMHC_lYvvEUrjr1x453hlEEHYcxS9VKSzmRkP1SiVZWPNPkTWlfNRp6bIUZD3U6aN3N7dMSN0eI5hu36xPgpKTdvuckKLTCnelMx6cxOdAbrcw1mCmOClNscwjS1KO1kzMtYnnq8rXHiMJELsNlhnRyyIXRTtNBsy4t64T3283s3SLsancyx0gy0ujx-Ch3uKAKdZi5iT-I8jnnQ-ds5THDs2h65RJhgglQEmSxpHrLGZFmyHAQI-_SjvmHZPXEc482x3SkaQHNLqpmrpJorNqh1M8ZHKzlujhZgVooMvJmWPXTb2vnvi3DGn2XI-hZxl1yD2yGH1RBpYUHA
- 1
- Replace <sa_token_secret> with the name of your service token secret.
Use your service account token to authenticate with the API of your cluster:
$ curl -X GET <openshift_cluster_api> --header "Authorization: Bearer <token>" 1 2
2.4.5. About using signed certificates with secrets
To secure communication to your service, you can configure OpenShift Dedicated to generate a signed serving certificate/key pair that you can add into a secret in a project.
A service serving certificate secret is intended to support complex middleware applications that need out-of-the-box certificates. It has the same settings as the server certificates generated by the administrator tooling for nodes and masters.
Service Pod spec configured for a service serving certificates secret.
apiVersion: v1
kind: Service
metadata:
  name: registry
  annotations:
    service.beta.openshift.io/serving-cert-secret-name: registry-cert1
# ...
- 1
- Specify the name for the certificate
Other pods can trust cluster-created certificates (which are only signed for internal DNS names), by using the CA bundle in the /var/run/secrets/kubernetes.io/serviceaccount/service-ca.crt file that is automatically mounted in their pod.
The signature algorithm for this feature is x509.SHA256WithRSA. To manually rotate, delete the generated secret. A new certificate is created.
2.4.5.1. Generating signed certificates for use with secrets
To use a signed serving certificate/key pair with a pod, create or edit the service to add the service.beta.openshift.io/serving-cert-secret-name annotation, then add the secret to the pod.
Procedure
To create a service serving certificate secret:
-
Edit the
Podspec for your service. Add the
service.beta.openshift.io/serving-cert-secret-nameannotation with the name you want to use for your secret.kind: Service apiVersion: v1 metadata: name: my-service annotations: service.beta.openshift.io/serving-cert-secret-name: my-cert 1 spec: selector: app: MyApp ports: - protocol: TCP port: 80 targetPort: 9376The certificate and key are in PEM format, stored in
tls.crtandtls.keyrespectively.Create the service:
$ oc create -f <file-name>.yaml
View the secret to make sure it was created:
View a list of all secrets:
$ oc get secrets
Example output
NAME                     TYPE                                  DATA      AGE
my-cert                  kubernetes.io/tls                     2         9m
View details on your secret:
$ oc describe secret my-cert
Example output
Name:         my-cert
Namespace:    openshift-console
Labels:       <none>
Annotations:  service.beta.openshift.io/expiry: 2023-03-08T23:22:40Z
              service.beta.openshift.io/originating-service-name: my-service
              service.beta.openshift.io/originating-service-uid: 640f0ec3-afc2-4380-bf31-a8c784846a11
              service.beta.openshift.io/expiry: 2023-03-08T23:22:40Z

Type:  kubernetes.io/tls

Data
====
tls.key:  1679 bytes
tls.crt:  2595 bytes
Edit your
Podspec with that secret.apiVersion: v1 kind: Pod metadata: name: my-service-pod spec: securityContext: runAsNonRoot: true seccompProfile: type: RuntimeDefault containers: - name: mypod image: redis volumeMounts: - name: my-container mountPath: "/etc/my-path" securityContext: allowPrivilegeEscalation: false capabilities: drop: [ALL] volumes: - name: my-volume secret: secretName: my-cert items: - key: username path: my-group/my-username mode: 511When it is available, your pod will run. The certificate will be good for the internal service DNS name,
<service.name>.<service.namespace>.svc.The certificate/key pair is automatically replaced when it gets close to expiration. View the expiration date in the
service.beta.openshift.io/expiryannotation on the secret, which is in RFC3339 format.NoteIn most cases, the service DNS name
<service.name>.<service.namespace>.svcis not externally routable. The primary use of<service.name>.<service.namespace>.svcis for intracluster or intraservice communication, and with re-encrypt routes.
2.4.6. Troubleshooting secrets
If a service certificate generation fails with (service’s service.beta.openshift.io/serving-cert-generation-error annotation contains):
secret/ssl-key references serviceUID 62ad25ca-d703-11e6-9d6f-0e9c0057b608, which does not match 77b6dd80-d716-11e6-9d6f-0e9c0057b60
The service that generated the certificate no longer exists, or has a different serviceUID. You must force certificates regeneration by removing the old secret, and clearing the following annotations on the service service.beta.openshift.io/serving-cert-generation-error, service.beta.openshift.io/serving-cert-generation-error-num:
Delete the secret:
$ oc delete secret <secret_name>
Clear the annotations:
$ oc annotate service <service_name> service.beta.openshift.io/serving-cert-generation-error-
$ oc annotate service <service_name> service.beta.openshift.io/serving-cert-generation-error-num-
The command removing annotation has a - after the annotation name to be removed.
2.5. Creating and using config maps
The following sections define config maps and how to create and use them.
2.5.1. Understanding config maps
Many applications require configuration by using some combination of configuration files, command line arguments, and environment variables. In OpenShift Dedicated, these configuration artifacts are decoupled from image content to keep containerized applications portable.
The ConfigMap object provides mechanisms to inject containers with configuration data while keeping containers agnostic of OpenShift Dedicated. A config map can be used to store fine-grained information like individual properties or coarse-grained information like entire configuration files or JSON blobs.
The ConfigMap object holds key-value pairs of configuration data that can be consumed in pods or used to store configuration data for system components such as controllers. For example:
ConfigMap Object Definition
kind: ConfigMap
apiVersion: v1
metadata:
  creationTimestamp: 2016-02-18T19:14:38Z
  name: example-config
  namespace: my-namespace
data: 1
  example.property.1: hello
  example.property.2: world
  example.property.file: |-
    property.1=value-1
    property.2=value-2
    property.3=value-3
binaryData:
  bar: L3Jvb3QvMTAw 2
You can use the binaryData field when you create a config map from a binary file, such as an image.
Configuration data can be consumed in pods in a variety of ways. A config map can be used to:
- Populate environment variable values in containers
- Set command-line arguments in a container
- Populate configuration files in a volume
Users and system components can store configuration data in a config map.
A config map is similar to a secret, but designed to more conveniently support working with strings that do not contain sensitive information.
Config map restrictions
A config map must be created before its contents can be consumed in pods.
Controllers can be written to tolerate missing configuration data. Consult individual components configured by using config maps on a case-by-case basis.
ConfigMap objects reside in a project.
They can only be referenced by pods in the same project.
The Kubelet only supports the use of a config map for pods it gets from the API server.
This includes any pods created by using the CLI, or indirectly from a replication controller. It does not include pods created by using the OpenShift Dedicated node’s --manifest-url flag, its --config flag, or its REST API because these are not common ways to create pods.
2.5.2. Creating a config map in the OpenShift Dedicated web console
You can create a config map in the OpenShift Dedicated web console.
Procedure
To create a config map as a cluster administrator:
-
In the Administrator perspective, select
Workloads→Config Maps. - At the top right side of the page, select Create Config Map.
- Enter the contents of your config map.
- Select Create.
-
In the Administrator perspective, select
To create a config map as a developer:
-
In the Developer perspective, select
Config Maps. - At the top right side of the page, select Create Config Map.
- Enter the contents of your config map.
- Select Create.
-
In the Developer perspective, select
2.5.3. Creating a config map by using the CLI
You can use the following command to create a config map from directories, specific files, or literal values.
Procedure
Create a config map:
$ oc create configmap <configmap_name> [options]
2.5.3.1. Creating a config map from a directory
You can create a config map from a directory by using the --from-file flag. This method allows you to use multiple files within a directory to create a config map.
Each file in the directory is used to populate a key in the config map, where the name of the key is the file name, and the value of the key is the content of the file.
For example, the following command creates a config map with the contents of the example-files directory:
$ oc create configmap game-config --from-file=example-files/
View the keys in the config map:
$ oc describe configmaps game-config
Example output
Name:           game-config
Namespace:      default
Labels:         <none>
Annotations:    <none>

Data

game.properties:        158 bytes
ui.properties:          83 bytes
You can see that the two keys in the map are created from the file names in the directory specified in the command. The content of those keys might be large, so the output of oc describe only shows the names of the keys and their sizes.
Prerequisite
You must have a directory with files that contain the data you want to populate a config map with.
The following procedure uses these example files:
game.propertiesandui.properties:$ cat example-files/game.properties
Example output
enemies=aliens
lives=3
enemies.cheat=true
enemies.cheat.level=noGoodRotten
secret.code.passphrase=UUDDLRLRBABAS
secret.code.allowed=true
secret.code.lives=30
$ cat example-files/ui.properties
Example output
color.good=purple
color.bad=yellow
allow.textmode=true
how.nice.to.look=fairlyNice
Procedure
Create a config map holding the content of each file in this directory by entering the following command:
$ oc create configmap game-config \
    --from-file=example-files/
Verification
Enter the
oc getcommand for the object with the-ooption to see the values of the keys:$ oc get configmaps game-config -o yaml
Example output
apiVersion: v1
data:
  game.properties: |-
    enemies=aliens
    lives=3
    enemies.cheat=true
    enemies.cheat.level=noGoodRotten
    secret.code.passphrase=UUDDLRLRBABAS
    secret.code.allowed=true
    secret.code.lives=30
  ui.properties: |
    color.good=purple
    color.bad=yellow
    allow.textmode=true
    how.nice.to.look=fairlyNice
kind: ConfigMap
metadata:
  creationTimestamp: 2016-02-18T18:34:05Z
  name: game-config
  namespace: default
  resourceVersion: "407"
  selflink: /api/v1/namespaces/default/configmaps/game-config
  uid: 30944725-d66e-11e5-8cd0-68f728db1985
2.5.3.2. Creating a config map from a file
You can create a config map from a file by using the --from-file flag. You can pass the --from-file option multiple times to the CLI.
You can also specify the key to set in a config map for content imported from a file by passing a key=value expression to the --from-file option. For example:
$ oc create configmap game-config-3 --from-file=game-special-key=example-files/game.properties
If you create a config map from a file, you can include files containing non-UTF8 data that are placed in this field without corrupting the non-UTF8 data. OpenShift Dedicated detects binary files and transparently encodes the file as MIME. On the server, the MIME payload is decoded and stored without corrupting the data.
Prerequisite
You must have a directory with files that contain the data you want to populate a config map with.
The following procedure uses these example files:
game.propertiesandui.properties:$ cat example-files/game.properties
Example output
enemies=aliens
lives=3
enemies.cheat=true
enemies.cheat.level=noGoodRotten
secret.code.passphrase=UUDDLRLRBABAS
secret.code.allowed=true
secret.code.lives=30
$ cat example-files/ui.properties
Example output
color.good=purple
color.bad=yellow
allow.textmode=true
how.nice.to.look=fairlyNice
Procedure
Create a config map by specifying a specific file:
$ oc create configmap game-config-2 \
    --from-file=example-files/game.properties \
    --from-file=example-files/ui.properties
Create a config map by specifying a key-value pair:
$ oc create configmap game-config-3 \
    --from-file=game-special-key=example-files/game.properties
Verification
Enter the
oc getcommand for the object with the-ooption to see the values of the keys from the file:$ oc get configmaps game-config-2 -o yaml
Example output
apiVersion: v1
data:
  game.properties: |-
    enemies=aliens
    lives=3
    enemies.cheat=true
    enemies.cheat.level=noGoodRotten
    secret.code.passphrase=UUDDLRLRBABAS
    secret.code.allowed=true
    secret.code.lives=30
  ui.properties: |
    color.good=purple
    color.bad=yellow
    allow.textmode=true
    how.nice.to.look=fairlyNice
kind: ConfigMap
metadata:
  creationTimestamp: 2016-02-18T18:52:05Z
  name: game-config-2
  namespace: default
  resourceVersion: "516"
  selflink: /api/v1/namespaces/default/configmaps/game-config-2
  uid: b4952dc3-d670-11e5-8cd0-68f728db1985
Enter the
oc getcommand for the object with the-ooption to see the values of the keys from the key-value pair:$ oc get configmaps game-config-3 -o yaml
Example output
apiVersion: v1 data: game-special-key: |- 1 enemies=aliens lives=3 enemies.cheat=true enemies.cheat.level=noGoodRotten secret.code.passphrase=UUDDLRLRBABAS secret.code.allowed=true secret.code.lives=30 kind: ConfigMap metadata: creationTimestamp: 2016-02-18T18:54:22Z name: game-config-3 namespace: default resourceVersion: "530" selflink: /api/v1/namespaces/default/configmaps/game-config-3 uid: 05f8da22-d671-11e5-8cd0-68f728db1985- 1
- This is the key that you set in the preceding step.
2.5.3.3. Creating a config map from literal values
You can supply literal values for a config map.
The --from-literal option takes a key=value syntax, which allows literal values to be supplied directly on the command line.
Procedure
Create a config map by specifying a literal value:
$ oc create configmap special-config \
    --from-literal=special.how=very \
    --from-literal=special.type=charm
Verification
Enter the
oc getcommand for the object with the-ooption to see the values of the keys:$ oc get configmaps special-config -o yaml
Example output
apiVersion: v1
data:
  special.how: very
  special.type: charm
kind: ConfigMap
metadata:
  creationTimestamp: 2016-02-18T19:14:38Z
  name: special-config
  namespace: default
  resourceVersion: "651"
  selflink: /api/v1/namespaces/default/configmaps/special-config
  uid: dadce046-d673-11e5-8cd0-68f728db1985
2.5.4. Use cases: Consuming config maps in pods
The following sections describe some uses cases when consuming ConfigMap objects in pods.
2.5.4.1. Populating environment variables in containers by using config maps
You can use config maps to populate individual environment variables in containers or to populate environment variables in containers from all keys that form valid environment variable names.
As an example, consider the following config map:
ConfigMap with two environment variables
apiVersion: v1
kind: ConfigMap
metadata:
  name: special-config 1
  namespace: default 2
data:
  special.how: very 3
  special.type: charm 4
ConfigMap with one environment variable
apiVersion: v1
kind: ConfigMap
metadata:
  name: env-config 1
  namespace: default
data:
  log_level: INFO 2
Procedure
You can consume the keys of this
ConfigMapin a pod usingconfigMapKeyRefsections.Sample
Podspecification configured to inject specific environment variablesapiVersion: v1 kind: Pod metadata: name: dapi-test-pod spec: securityContext: runAsNonRoot: true seccompProfile: type: RuntimeDefault containers: - name: test-container image: gcr.io/google_containers/busybox command: [ "/bin/sh", "-c", "env" ] env: 1 - name: SPECIAL_LEVEL_KEY 2 valueFrom: configMapKeyRef: name: special-config 3 key: special.how 4 - name: SPECIAL_TYPE_KEY valueFrom: configMapKeyRef: name: special-config 5 key: special.type 6 optional: true 7 envFrom: 8 - configMapRef: name: env-config 9 securityContext: allowPrivilegeEscalation: false capabilities: drop: [ALL] restartPolicy: Never- 1
- Stanza to pull the specified environment variables from a
ConfigMap. - 2
- Name of a pod environment variable that you are injecting a key’s value into.
- 3 5
- Name of the
ConfigMapto pull specific environment variables from. - 4 6
- Environment variable to pull from the
ConfigMap. - 7
- Makes the environment variable optional. As optional, the pod will be started even if the specified
ConfigMapand keys do not exist. - 8
- Stanza to pull all environment variables from a
ConfigMap. - 9
- Name of the
ConfigMapto pull all environment variables from.
When this pod is run, the pod logs will include the following output:
SPECIAL_LEVEL_KEY=very
log_level=INFO
SPECIAL_TYPE_KEY=charm is not listed in the example output because optional: true is set.
2.5.4.2. Setting command-line arguments for container commands with config maps
You can use a config map to set the value of the commands or arguments in a container by using the Kubernetes substitution syntax $(VAR_NAME).
As an example, consider the following config map:
apiVersion: v1
kind: ConfigMap
metadata:
  name: special-config
  namespace: default
data:
  special.how: very
  special.type: charm
Procedure
To inject values into a command in a container, you must consume the keys you want to use as environment variables. Then you can refer to them in a container’s command using the
$(VAR_NAME)syntax.Sample pod specification configured to inject specific environment variables
apiVersion: v1 kind: Pod metadata: name: dapi-test-pod spec: securityContext: runAsNonRoot: true seccompProfile: type: RuntimeDefault containers: - name: test-container image: gcr.io/google_containers/busybox command: [ "/bin/sh", "-c", "echo $(SPECIAL_LEVEL_KEY) $(SPECIAL_TYPE_KEY)" ] 1 env: - name: SPECIAL_LEVEL_KEY valueFrom: configMapKeyRef: name: special-config key: special.how - name: SPECIAL_TYPE_KEY valueFrom: configMapKeyRef: name: special-config key: special.type securityContext: allowPrivilegeEscalation: false capabilities: drop: [ALL] restartPolicy: Never- 1
- Inject the values into a command in a container using the keys you want to use as environment variables.
When this pod is run, the output from the echo command run in the test-container container is as follows:
very charm
2.5.4.3. Injecting content into a volume by using config maps
You can inject content into a volume by using config maps.
Example ConfigMap custom resource (CR)
apiVersion: v1
kind: ConfigMap
metadata:
  name: special-config
  namespace: default
data:
  special.how: very
  special.type: charm
Procedure
You have a couple different options for injecting content into a volume by using config maps.
The most basic way to inject content into a volume by using a config map is to populate the volume with files where the key is the file name and the content of the file is the value of the key:
apiVersion: v1 kind: Pod metadata: name: dapi-test-pod spec: securityContext: runAsNonRoot: true seccompProfile: type: RuntimeDefault containers: - name: test-container image: gcr.io/google_containers/busybox command: [ "/bin/sh", "-c", "cat", "/etc/config/special.how" ] volumeMounts: - name: config-volume mountPath: /etc/config securityContext: allowPrivilegeEscalation: false capabilities: drop: [ALL] volumes: - name: config-volume configMap: name: special-config 1 restartPolicy: Never- 1
- File containing key.
When this pod is run, the output of the cat command will be:
very
You can also control the paths within the volume where config map keys are projected:
apiVersion: v1 kind: Pod metadata: name: dapi-test-pod spec: securityContext: runAsNonRoot: true seccompProfile: type: RuntimeDefault containers: - name: test-container image: gcr.io/google_containers/busybox command: [ "/bin/sh", "-c", "cat", "/etc/config/path/to/special-key" ] volumeMounts: - name: config-volume mountPath: /etc/config securityContext: allowPrivilegeEscalation: false capabilities: drop: [ALL] volumes: - name: config-volume configMap: name: special-config items: - key: special.how path: path/to/special-key 1 restartPolicy: Never- 1
- Path to config map key.
When this pod is run, the output of the cat command will be:
very
2.6. Including pod priority in pod scheduling decisions
You can enable pod priority and preemption in your cluster. Pod priority indicates the importance of a pod relative to other pods and queues the pods based on that priority. pod preemption allows the cluster to evict, or preempt, lower-priority pods so that higher-priority pods can be scheduled if there is no available space on a suitable node pod priority also affects the scheduling order of pods and out-of-resource eviction ordering on the node.
To use priority and preemption, reference a priority class in the pod specification to apply that weight for scheduling.
2.6.1. Understanding pod priority
When you use the Pod Priority and Preemption feature, the scheduler orders pending pods by their priority, and a pending pod is placed ahead of other pending pods with lower priority in the scheduling queue. As a result, the higher priority pod might be scheduled sooner than pods with lower priority if its scheduling requirements are met. If a pod cannot be scheduled, scheduler continues to schedule other lower priority pods.
2.6.1.1. Pod priority classes
You can assign pods a priority class, which is a non-namespaced object that defines a mapping from a name to the integer value of the priority. The higher the value, the higher the priority.
A priority class object can take any 32-bit integer value smaller than or equal to 1000000000 (one billion). Reserve numbers larger than or equal to one billion for critical pods that must not be preempted or evicted. By default, OpenShift Dedicated has two reserved priority classes for critical system pods to have guaranteed scheduling.
$ oc get priorityclasses
Example output
NAME                      VALUE        GLOBAL-DEFAULT   AGE
system-node-critical      2000001000   false            72m
system-cluster-critical   2000000000   false            72m
openshift-user-critical   1000000000   false            3d13h
cluster-logging           1000000      false            29s
system-node-critical - This priority class has a value of 2000001000 and is used for all pods that should never be evicted from a node. Examples of pods that have this priority class are
sdn-ovs,sdn, and so forth. A number of critical components include thesystem-node-criticalpriority class by default, for example:- master-api
- master-controller
- master-etcd
- sdn
- sdn-ovs
- sync
system-cluster-critical - This priority class has a value of 2000000000 (two billion) and is used with pods that are important for the cluster. Pods with this priority class can be evicted from a node in certain circumstances. For example, pods configured with the
system-node-criticalpriority class can take priority. However, this priority class does ensure guaranteed scheduling. Examples of pods that can have this priority class are fluentd, add-on components like descheduler, and so forth. A number of critical components include thesystem-cluster-criticalpriority class by default, for example:- fluentd
- metrics-server
- descheduler
-
openshift-user-critical - You can use the
priorityClassNamefield with important pods that cannot bind their resource consumption and do not have predictable resource consumption behavior. Prometheus pods under theopenshift-monitoringandopenshift-user-workload-monitoringnamespaces use theopenshift-user-criticalpriorityClassName. Monitoring workloads usesystem-criticalas their firstpriorityClass, but this causes problems when monitoring uses excessive memory and the nodes cannot evict them. As a result, monitoring drops priority to give the scheduler flexibility, moving heavy workloads around to keep critical nodes operating. - cluster-logging - This priority is used by Fluentd to make sure Fluentd pods are scheduled to nodes over other apps.
2.6.1.2. Pod priority names
After you have one or more priority classes, you can create pods that specify a priority class name in a Pod spec. The priority admission controller uses the priority class name field to populate the integer value of the priority. If the named priority class is not found, the pod is rejected.
2.6.2. Understanding pod preemption
When a developer creates a pod, the pod goes into a queue. If the developer configured the pod for pod priority or preemption, the scheduler picks a pod from the queue and tries to schedule the pod on a node. If the scheduler cannot find space on an appropriate node that satisfies all the specified requirements of the pod, preemption logic is triggered for the pending pod.
When the scheduler preempts one or more pods on a node, the nominatedNodeName field of higher-priority Pod spec is set to the name of the node, along with the nodename field. The scheduler uses the nominatedNodeName field to keep track of the resources reserved for pods and also provides information to the user about preemptions in the clusters.
After the scheduler preempts a lower-priority pod, the scheduler honors the graceful termination period of the pod. If another node becomes available while scheduler is waiting for the lower-priority pod to terminate, the scheduler can schedule the higher-priority pod on that node. As a result, the nominatedNodeName field and nodeName field of the Pod spec might be different.
Also, if the scheduler preempts pods on a node and is waiting for termination, and a pod with a higher-priority pod than the pending pod needs to be scheduled, the scheduler can schedule the higher-priority pod instead. In such a case, the scheduler clears the nominatedNodeName of the pending pod, making the pod eligible for another node.
Preemption does not necessarily remove all lower-priority pods from a node. The scheduler can schedule a pending pod by removing a portion of the lower-priority pods.
The scheduler considers a node for pod preemption only if the pending pod can be scheduled on the node.
2.6.2.1. Non-preempting priority classes
Pods with the preemption policy set to Never are placed in the scheduling queue ahead of lower-priority pods, but they cannot preempt other pods. A non-preempting pod waiting to be scheduled stays in the scheduling queue until sufficient resources are free and it can be scheduled. Non-preempting pods, like other pods, are subject to scheduler back-off. This means that if the scheduler tries unsuccessfully to schedule these pods, they are retried with lower frequency, allowing other pods with lower priority to be scheduled before them.
Non-preempting pods can still be preempted by other, high-priority pods.
2.6.2.2. Pod preemption and other scheduler settings
If you enable pod priority and preemption, consider your other scheduler settings:
- Pod priority and pod disruption budget
- A pod disruption budget specifies the minimum number or percentage of replicas that must be up at a time. If you specify pod disruption budgets, OpenShift Dedicated respects them when preempting pods at a best effort level. The scheduler attempts to preempt pods without violating the pod disruption budget. If no such pods are found, lower-priority pods might be preempted despite their pod disruption budget requirements.
- Pod priority and pod affinity
- Pod affinity requires a new pod to be scheduled on the same node as other pods with the same label.
If a pending pod has inter-pod affinity with one or more of the lower-priority pods on a node, the scheduler cannot preempt the lower-priority pods without violating the affinity requirements. In this case, the scheduler looks for another node to schedule the pending pod. However, there is no guarantee that the scheduler can find an appropriate node and pending pod might not be scheduled.
To prevent this situation, carefully configure pod affinity with equal-priority pods.
2.6.2.3. Graceful termination of preempted pods
When preempting a pod, the scheduler waits for the pod graceful termination period to expire, allowing the pod to finish working and exit. If the pod does not exit after the period, the scheduler kills the pod. This graceful termination period creates a time gap between the point that the scheduler preempts the pod and the time when the pending pod can be scheduled on the node.
To minimize this gap, configure a small graceful termination period for lower-priority pods.
2.6.3. Configuring priority and preemption
You apply pod priority and preemption by creating a priority class object and associating pods to the priority by using the priorityClassName in your pod specs.
You cannot add a priority class directly to an existing scheduled pod.
Procedure
To configure your cluster to use priority and preemption:
Define a pod spec to include the name of a priority class by creating a YAML file similar to the following:
apiVersion: v1 kind: Pod metadata: name: nginx labels: env: test spec: containers: - name: nginx image: nginx imagePullPolicy: IfNotPresent priorityClassName: system-cluster-critical 1- 1
- Specify the priority class to use with this pod.
Create the pod:
$ oc create -f <file-name>.yaml
You can add the priority name directly to the pod configuration or to a pod template.
2.7. Placing pods on specific nodes using node selectors
A node selector specifies a map of key-value pairs. The rules are defined using custom labels on nodes and selectors specified in pods.
For the pod to be eligible to run on a node, the pod must have the indicated key-value pairs as the label on the node.
If you are using node affinity and node selectors in the same pod configuration, see the important considerations below.
2.7.1. Using node selectors to control pod placement
You can use node selectors on pods and labels on nodes to control where the pod is scheduled. With node selectors, OpenShift Dedicated schedules the pods on nodes that contain matching labels.
You add labels to a node, a compute machine set, or a machine config. Adding the label to the compute machine set ensures that if the node or machine goes down, new nodes have the label. Labels added to a node or machine config do not persist if the node or machine goes down.
To add node selectors to an existing pod, add a node selector to the controlling object for that pod, such as a ReplicaSet object, DaemonSet object, StatefulSet object, Deployment object, or DeploymentConfig object. Any existing pods under that controlling object are recreated on a node with a matching label. If you are creating a new pod, you can add the node selector directly to the pod spec. If the pod does not have a controlling object, you must delete the pod, edit the pod spec, and recreate the pod.
You cannot add a node selector directly to an existing scheduled pod.
Prerequisites
To add a node selector to existing pods, determine the controlling object for that pod. For example, the router-default-66d5cf9464-m2g75 pod is controlled by the router-default-66d5cf9464 replica set:
$ oc describe pod router-default-66d5cf9464-7pwkc
Example output
kind: Pod
apiVersion: v1
metadata:
# ...
Name:               router-default-66d5cf9464-7pwkc
Namespace:          openshift-ingress
# ...
Controlled By:      ReplicaSet/router-default-66d5cf9464
# ...
The web console lists the controlling object under ownerReferences in the pod YAML:
apiVersion: v1
kind: Pod
metadata:
  name: router-default-66d5cf9464-7pwkc
# ...
  ownerReferences:
    - apiVersion: apps/v1
      kind: ReplicaSet
      name: router-default-66d5cf9464
      uid: d81dd094-da26-11e9-a48a-128e7edf0312
      controller: true
      blockOwnerDeletion: true
# ...
Procedure
Add the matching node selector to a pod:
To add a node selector to existing and future pods, add a node selector to the controlling object for the pods:
Example
ReplicaSetobject with labelskind: ReplicaSet apiVersion: apps/v1 metadata: name: hello-node-6fbccf8d9 # ... spec: # ... template: metadata: creationTimestamp: null labels: ingresscontroller.operator.openshift.io/deployment-ingresscontroller: default pod-template-hash: 66d5cf9464 spec: nodeSelector: kubernetes.io/os: linux node-role.kubernetes.io/worker: '' type: user-node 1 # ...- 1
- Add the node selector.
To add a node selector to a specific, new pod, add the selector to the
Podobject directly:Example
Podobject with a node selectorapiVersion: v1 kind: Pod metadata: name: hello-node-6fbccf8d9 # ... spec: nodeSelector: region: east type: user-node # ...NoteYou cannot add a node selector directly to an existing scheduled pod.
Chapter 3. Automatically scaling pods with the Custom Metrics Autoscaler Operator
3.1. Release notes
3.1.1. Custom Metrics Autoscaler Operator release notes
The release notes for the Custom Metrics Autoscaler Operator for Red Hat OpenShift describe new features and enhancements, deprecated features, and known issues.
The Custom Metrics Autoscaler Operator uses the Kubernetes-based Event Driven Autoscaler (KEDA) and is built on top of the OpenShift Dedicated horizontal pod autoscaler (HPA).
The Custom Metrics Autoscaler Operator for Red Hat OpenShift is provided as an installable component, with a distinct release cycle from the core OpenShift Dedicated. The Red Hat OpenShift Container Platform Life Cycle Policy outlines release compatibility.
3.1.1.1. Supported versions
The following table defines the Custom Metrics Autoscaler Operator versions for each OpenShift Dedicated version.
| Version | OpenShift Dedicated version | General availability |
|---|---|---|
| 2.12.1 | 4.15 | General availability |
| 2.12.1 | 4.14 | General availability |
| 2.12.1 | 4.13 | General availability |
| 2.12.1 | 4.12 | General availability |
3.1.1.2. Custom Metrics Autoscaler Operator 2.12.1-376 release notes
This release of the Custom Metrics Autoscaler Operator 2.12.1-376 provides security updates and bug fixes for running the Operator in an OpenShift Dedicated cluster. The following advisory is available for the RHSA-2024:1812.
Before installing this version of the Custom Metrics Autoscaler Operator, remove any previously installed Technology Preview versions or the community-supported version of KEDA.
3.1.1.2.1. Bug fixes
- Previously, if invalid values, such as nonexistent namespaces, were specified in scaled object metadata, the underlying scaler clients would not free, or close, their client descriptors, resulting in a slow memory leak. This fix properly closes the underlying client descriptors when there are errors, preventing memory from leaking. (OCPBUGS-30145)
-
Previously the
ServiceMonitorcustom resource (CR) for thekeda-metrics-apiserverpod was not functioning, because the CR referenced an incorrect metrics port name ofhttp. This fix corrects theServiceMonitorCR to reference the proper port name ofmetrics. As a result, the Service Monitor functions properly. (OCPBUGS-25806)
3.1.2. Release notes for past releases of the Custom Metrics Autoscaler Operator
The following release notes are for previous versions of the Custom Metrics Autoscaler Operator.
For the current version, see Custom Metrics Autoscaler Operator release notes.
3.1.2.1. Custom Metrics Autoscaler Operator 2.11.2-322 release notes
This release of the Custom Metrics Autoscaler Operator 2.11.2-322 provides security updates and bug fixes for running the Operator in an OpenShift Dedicated cluster. The following advisory is available for the RHSA-2023:6144.
Before installing this version of the Custom Metrics Autoscaler Operator, remove any previously installed Technology Preview versions or the community-supported version of KEDA.
3.1.2.1.1. Bug fixes
- Because the Custom Metrics Autoscaler Operator version 3.11.2-311 was released without a required volume mount in the Operator deployment, the Custom Metrics Autoscaler Operator pod would restart every 15 minutes. This fix adds the required volume mount to the Operator deployment. As a result, the Operator no longer restarts every 15 minutes. (OCPBUGS-22361)
3.1.2.2. Custom Metrics Autoscaler Operator 2.11.2-311 release notes
This release of the Custom Metrics Autoscaler Operator 2.11.2-311 provides new features and bug fixes for running the Operator in an OpenShift Dedicated cluster. The components of the Custom Metrics Autoscaler Operator 2.11.2-311 were released in RHBA-2023:5981.
Before installing this version of the Custom Metrics Autoscaler Operator, remove any previously installed Technology Preview versions or the community-supported version of KEDA.
3.1.2.2.1. New features and enhancements
3.1.2.2.1.1. Red Hat OpenShift Service on AWS (ROSA) and OpenShift Dedicated are now supported
The Custom Metrics Autoscaler Operator 2.11.2-311 can be installed on OpenShift ROSA and OpenShift Dedicated managed clusters. Previous versions of the Custom Metrics Autoscaler Operator could be installed only in the openshift-keda namespace. This prevented the Operator from being installed on OpenShift ROSA and OpenShift Dedicated clusters. This version of Custom Metrics Autoscaler allows installation to other namespaces such as openshift-operators or keda, enabling installation into ROSA and Dedicated clusters.
3.1.2.2.2. Bug fixes
-
Previously, if the Custom Metrics Autoscaler Operator was installed and configured, but not in use, the OpenShift CLI reported the
couldn’t get resource list for external.metrics.k8s.io/v1beta1: Got empty response for: external.metrics.k8s.io/v1beta1error after anyoccommand was entered. The message, although harmless, could have caused confusion. With this fix, theGot empty response for: external.metrics…error no longer appears inappropriately. (OCPBUGS-15779) - Previously, any annotation or label change to objects managed by the Custom Metrics Autoscaler were reverted by Custom Metrics Autoscaler Operator any time the Keda Controller was modified, for example after a configuration change. This caused continuous changing of labels in your objects. The Custom Metrics Autoscaler now uses its own annotation to manage labels and annotations, and annotation or label are no longer inappropriately reverted. (OCPBUGS-15590)
3.1.2.3. Custom Metrics Autoscaler Operator 2.10.1-267 release notes
This release of the Custom Metrics Autoscaler Operator 2.10.1-267 provides new features and bug fixes for running the Operator in an OpenShift Dedicated cluster. The components of the Custom Metrics Autoscaler Operator 2.10.1-267 were released in RHBA-2023:4089.
Before installing this version of the Custom Metrics Autoscaler Operator, remove any previously installed Technology Preview versions or the community-supported version of KEDA.
3.1.2.3.1. Bug fixes
-
Previously, the
custom-metrics-autoscalerandcustom-metrics-autoscaler-adapterimages did not contain time zone information. Because of this, scaled objects with cron triggers failed to work because the controllers were unable to find time zone information. With this fix, the image builds now include time zone information. As a result, scaled objects containing cron triggers now function properly. (OCPBUGS-15264) -
Previously, the Custom Metrics Autoscaler Operator would attempt to take ownership of all managed objects, including objects in other namespaces and cluster-scoped objects. Because of this, the Custom Metrics Autoscaler Operator was unable to create the role binding for reading the credentials necessary to be an API server. This caused errors in the
kube-systemnamespace. With this fix, the Custom Metrics Autoscaler Operator skips adding theownerReferencefield to any object in another namespace or any cluster-scoped object. As a result, the role binding is now created without any errors. (OCPBUGS-15038) -
Previously, the Custom Metrics Autoscaler Operator added an
ownerReferencesfield to theopenshift-kedanamespace. While this did not cause functionality problems, the presence of this field could have caused confusion for cluster administrators. With this fix, the Custom Metrics Autoscaler Operator does not add theownerReferencefield to theopenshift-kedanamespace. As a result, theopenshift-kedanamespace no longer has a superfluousownerReferencefield. (OCPBUGS-15293) -
Previously, if you used a Prometheus trigger configured with authentication method other than pod identity, and the
podIdentityparameter was set tonone, the trigger would fail to scale. With this fix, the Custom Metrics Autoscaler for OpenShift now properly handles thenonepod identity provider type. As a result, a Prometheus trigger configured with authentication method other than pod identity, and thepodIdentityparameter sset tononenow properly scales. (OCPBUGS-15274)
3.1.2.4. Custom Metrics Autoscaler Operator 2.10.1 release notes
This release of the Custom Metrics Autoscaler Operator 2.10.1 provides new features and bug fixes for running the Operator in an OpenShift Dedicated cluster. The components of the Custom Metrics Autoscaler Operator 2.10.1 were released in RHEA-2023:3199.
Before installing this version of the Custom Metrics Autoscaler Operator, remove any previously installed Technology Preview versions or the community-supported version of KEDA.
3.1.2.4.1. New features and enhancements
3.1.2.4.1.1. Custom Metrics Autoscaler Operator general availability
The Custom Metrics Autoscaler Operator is now generally available as of Custom Metrics Autoscaler Operator version 2.10.1.
Scaling by using a scaled job is a Technology Preview feature only. Technology Preview features are not supported with Red Hat production service level agreements (SLAs) and might not be functionally complete. Red Hat does not recommend using them in production. These features provide early access to upcoming product features, enabling customers to test functionality and provide feedback during the development process.
For more information about the support scope of Red Hat Technology Preview features, see Technology Preview Features Support Scope.
3.1.2.4.1.2. Performance metrics
You can now use the Prometheus Query Language (PromQL) to query metrics on the Custom Metrics Autoscaler Operator.
3.1.2.4.1.3. Pausing the custom metrics autoscaling for scaled objects
You can now pause the autoscaling of a scaled object, as needed, and resume autoscaling when ready.
3.1.2.4.1.4. Replica fall back for scaled objects
You can now specify the number of replicas to fall back to if a scaled object fails to get metrics from the source.
3.1.2.4.1.5. Customizable HPA naming for scaled objects
You can now specify a custom name for the horizontal pod autoscaler in scaled objects.
3.1.2.4.1.6. Activation and scaling thresholds
Because the horizontal pod autoscaler (HPA) cannot scale to or from 0 replicas, the Custom Metrics Autoscaler Operator does that scaling, after which the HPA performs the scaling. You can now specify when the HPA takes over autoscaling, based on the number of replicas. This allows for more flexibility with your scaling policies.
3.1.2.5. Custom Metrics Autoscaler Operator 2.8.2-174 release notes
This release of the Custom Metrics Autoscaler Operator 2.8.2-174 provides new features and bug fixes for running the Operator in an OpenShift Dedicated cluster. The components of the Custom Metrics Autoscaler Operator 2.8.2-174 were released in RHEA-2023:1683.
The Custom Metrics Autoscaler Operator version 2.8.2-174 is a Technology Preview feature.
3.1.2.5.1. New features and enhancements
3.1.2.5.1.1. Operator upgrade support
You can now upgrade from a prior version of the Custom Metrics Autoscaler Operator. See "Changing the update channel for an Operator" in the "Additional resources" for information on upgrading an Operator.
3.1.2.5.1.2. must-gather support
You can now collect data about the Custom Metrics Autoscaler Operator and its components by using the OpenShift Dedicated must-gather tool. Currently, the process for using the must-gather tool with the Custom Metrics Autoscaler is different than for other operators. See "Gathering debugging data in the "Additional resources" for more information.
3.1.2.6. Custom Metrics Autoscaler Operator 2.8.2 release notes
This release of the Custom Metrics Autoscaler Operator 2.8.2 provides new features and bug fixes for running the Operator in an OpenShift Dedicated cluster. The components of the Custom Metrics Autoscaler Operator 2.8.2 were released in RHSA-2023:1042.
The Custom Metrics Autoscaler Operator version 2.8.2 is a Technology Preview feature.
3.1.2.6.1. New features and enhancements
3.1.2.6.1.1. Audit Logging
You can now gather and view audit logs for the Custom Metrics Autoscaler Operator and its associated components. Audit logs are security-relevant chronological sets of records that document the sequence of activities that have affected the system by individual users, administrators, or other components of the system.
3.1.2.6.1.2. Scale applications based on Apache Kafka metrics
You can now use the KEDA Apache kafka trigger/scaler to scale deployments based on an Apache Kafka topic.
3.1.2.6.1.3. Scale applications based on CPU metrics
You can now use the KEDA CPU trigger/scaler to scale deployments based on CPU metrics.
3.1.2.6.1.4. Scale applications based on memory metrics
You can now use the KEDA memory trigger/scaler to scale deployments based on memory metrics.
3.2. Custom Metrics Autoscaler Operator overview
As a developer, you can use Custom Metrics Autoscaler Operator for Red Hat OpenShift to specify how OpenShift Dedicated should automatically increase or decrease the number of pods for a deployment, stateful set, custom resource, or job based on custom metrics that are not based only on CPU or memory.
The Custom Metrics Autoscaler Operator is an optional operator, based on the Kubernetes Event Driven Autoscaler (KEDA), that allows workloads to be scaled using additional metrics sources other than pod metrics.
The custom metrics autoscaler currently supports only the Prometheus, CPU, memory, and Apache Kafka metrics.
The Custom Metrics Autoscaler Operator scales your pods up and down based on custom, external metrics from specific applications. Your other applications continue to use other scaling methods. You configure triggers, also known as scalers, which are the source of events and metrics that the custom metrics autoscaler uses to determine how to scale. The custom metrics autoscaler uses a metrics API to convert the external metrics to a form that OpenShift Dedicated can use. The custom metrics autoscaler creates a horizontal pod autoscaler (HPA) that performs the actual scaling.
To use the custom metrics autoscaler, you create a ScaledObject or ScaledJob object for a workload, which is a custom resource (CR) that defines the scaling metadata. You specify the deployment or job to scale, the source of the metrics to scale on (trigger), and other parameters such as the minimum and maximum replica counts allowed.
You can create only one scaled object or scaled job for each workload that you want to scale. Also, you cannot use a scaled object or scaled job and the horizontal pod autoscaler (HPA) on the same workload.
The custom metrics autoscaler, unlike the HPA, can scale to zero. If you set the minReplicaCount value in the custom metrics autoscaler CR to 0, the custom metrics autoscaler scales the workload down from 1 to 0 replicas to or up from 0 replicas to 1. This is known as the activation phase. After scaling up to 1 replica, the HPA takes control of the scaling. This is known as the scaling phase.
Some triggers allow you to change the number of replicas that are scaled by the cluster metrics autoscaler. In all cases, the parameter to configure the activation phase always uses the same phrase, prefixed with activation. For example, if the threshold parameter configures scaling, activationThreshold would configure activation. Configuring the activation and scaling phases allows you more flexibility with your scaling policies. For example, you can configure a higher activation phase to prevent scaling up or down if the metric is particularly low.
The activation value has more priority than the scaling value in case of different decisions for each. For example, if the threshold is set to 10, and the activationThreshold is 50, if the metric reports 40, the scaler is not active and the pods are scaled to zero even if the HPA requires 4 instances.
Figure 3.1. Custom metrics autoscaler workflow
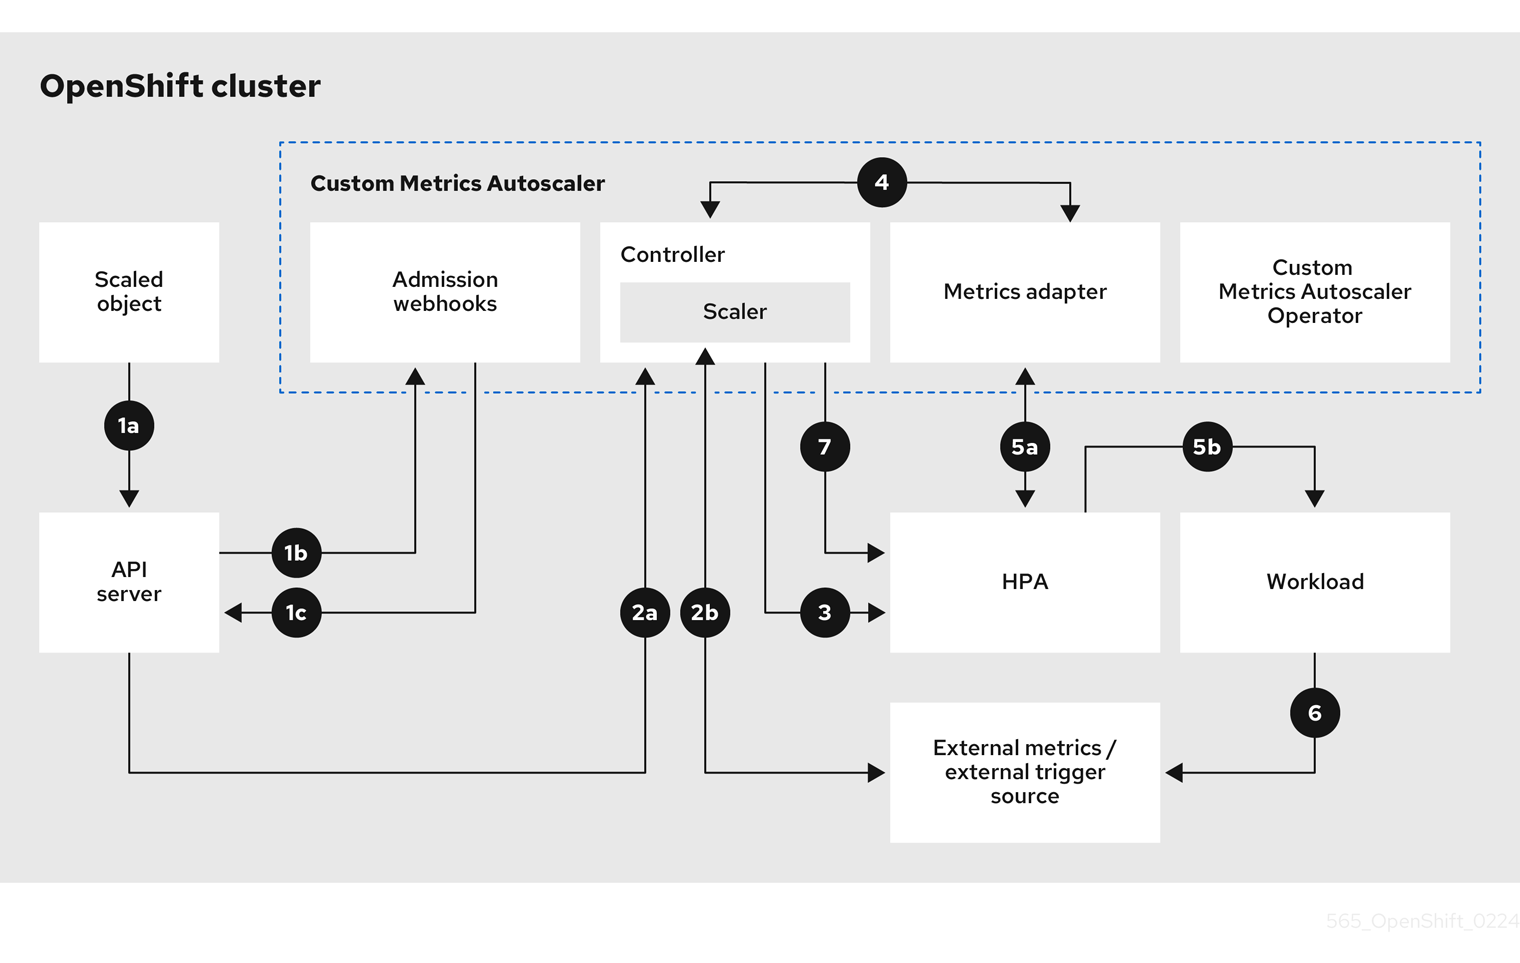
- You create or modify a scaled object custom resource for a workload on a cluster. The object contains the scaling configuration for that workload. Prior to accepting the new object, the OpenShift API server sends it to the custom metrics autoscaler admission webhooks process to ensure that the object is valid. If validation succeeds, the API server persists the object.
- The custom metrics autoscaler controller watches for new or modified scaled objects. When the OpenShift API server notifies the controller of a change, the controller monitors any external trigger sources, also known as data sources, that are specified in the object for changes to the metrics data. One or more scalers request scaling data from the external trigger source. For example, for a Kafka trigger type, the controller uses the Kafka scaler to communicate with a Kafka instance to obtain the data requested by the trigger.
- The controller creates a horizontal pod autoscaler object for the scaled object. As a result, the Horizontal Pod Autoscaler (HPA) Operator starts monitoring the scaling data associated with the trigger. The HPA requests scaling data from the cluster OpenShift API server endpoint.
- The OpenShift API server endpoint is served by the custom metrics autoscaler metrics adapter. When the metrics adapter receives a request for custom metrics, it uses a GRPC connection to the controller to request it for the most recent trigger data received from the scaler.
- The HPA makes scaling decisions based upon the data received from the metrics adapter and scales the workload up or down by increasing or decreasing the replicas.
- As a it operates, a workload can affect the scaling metrics. For example, if a workload is scaled up to handle work in a Kafka queue, the queue size decreases after the workload processes all the work. As a result, the workload is scaled down.
-
If the metrics are in a range specified by the
minReplicaCountvalue, the custom metrics autoscaler controller disables all scaling, and leaves the replica count at a fixed level. If the metrics exceed that range, the custom metrics autoscaler controller enables scaling and allows the HPA to scale the workload. While scaling is disabled, the HPA does not take any action.
3.3. Installing the custom metrics autoscaler
You can use the OpenShift Dedicated web console to install the Custom Metrics Autoscaler Operator.
The installation creates the following five CRDs:
-
ClusterTriggerAuthentication -
KedaController -
ScaledJob -
ScaledObject -
TriggerAuthentication
3.3.1. Installing the custom metrics autoscaler
You can use the following procedure to install the Custom Metrics Autoscaler Operator.
Prerequisites
You have access to the cluster as a user with the
cluster-adminrole.If your OpenShift Dedicated cluster is in a cloud account that is owned by Red Hat (non-CCS), you must request
cluster-adminprivileges.- Remove any previously-installed Technology Preview versions of the Cluster Metrics Autoscaler Operator.
Remove any versions of the community-based KEDA.
Also, remove the KEDA 1.x custom resource definitions by running the following commands:
$ oc delete crd scaledobjects.keda.k8s.io
$ oc delete crd triggerauthentications.keda.k8s.io
-
Ensure that the
kedanamespace exists. If not, you must manaully create thekedanamespace.
Procedure
- In the OpenShift Dedicated web console, click Operators → OperatorHub.
- Choose Custom Metrics Autoscaler from the list of available Operators, and click Install.
- On the Install Operator page, ensure that the A specific namespace on the cluster option is selected for Installation Mode.
- For Installed Namespace, click Select a namespace.
Click Select Project:
-
If the
kedanamespace exists, select keda from the list. If the
kedanamespace does not exist:- Select Create Project to open the Create Project window.
-
In the Name field, enter
keda. -
In the Display Name field, enter a descriptive name, such as
keda. - Optional: In the Display Name field, add a description for the namespace.
- Click Create.
-
If the
- Click Install.
Verify the installation by listing the Custom Metrics Autoscaler Operator components:
- Navigate to Workloads → Pods.
-
Select the
kedaproject from the drop-down menu and verify that thecustom-metrics-autoscaler-operator-*pod is running. -
Navigate to Workloads → Deployments to verify that the
custom-metrics-autoscaler-operatordeployment is running.
Optional: Verify the installation in the OpenShift CLI using the following command:
$ oc get all -n keda
The output appears similar to the following:
Example output
NAME                                                      READY   STATUS    RESTARTS   AGE
pod/custom-metrics-autoscaler-operator-5fd8d9ffd8-xt4xp   1/1     Running   0          18m

NAME                                                 READY   UP-TO-DATE   AVAILABLE   AGE
deployment.apps/custom-metrics-autoscaler-operator   1/1     1            1           18m

NAME                                                            DESIRED   CURRENT   READY   AGE
replicaset.apps/custom-metrics-autoscaler-operator-5fd8d9ffd8   1         1         1       18m
Install the
KedaControllercustom resource, which creates the required CRDs:- In the OpenShift Dedicated web console, click Operators → Installed Operators.
- Click Custom Metrics Autoscaler.
- On the Operator Details page, click the KedaController tab.
On the KedaController tab, click Create KedaController and edit the file.
kind: KedaController
apiVersion: keda.sh/v1alpha1
metadata:
  name: keda
  namespace: keda
spec:
  watchNamespace: '' 1
  operator:
    logLevel: info 2
    logEncoder: console 3
  metricsServer:
    logLevel: '0' 4
    auditConfig: 5
      logFormat: "json"
      logOutputVolumeClaim: "persistentVolumeClaimName"
      policy:
        rules:
        - level: Metadata
        omitStages: ["RequestReceived"]
        omitManagedFields: false
      lifetime:
        maxAge: "2"
        maxBackup: "1"
        maxSize: "50"
  serviceAccount: {}
- 1
- Specifies a single namespace in which the Custom Metrics Autoscaler Operator should scale applications. Leave it blank or leave it empty to scale applications in all namespaces. This field should have a namespace or be empty. The default value is empty.
- 2
- Specifies the level of verbosity for the Custom Metrics Autoscaler Operator log messages. The allowed values are
debug,info,error. The default isinfo. - 3
- Specifies the logging format for the Custom Metrics Autoscaler Operator log messages. The allowed values are
consoleorjson. The default isconsole. - 4
- Specifies the logging level for the Custom Metrics Autoscaler Metrics Server. The allowed values are
0forinfoand4ordebug. The default is0. - 5
- Activates audit logging for the Custom Metrics Autoscaler Operator and specifies the audit policy to use, as described in the "Configuring audit logging" section.
- Click Create to create the KEDA controller.
3.4. Understanding custom metrics autoscaler triggers
Triggers, also known as scalers, provide the metrics that the Custom Metrics Autoscaler Operator uses to scale your pods.
The custom metrics autoscaler currently supports only the Prometheus, CPU, memory, and Apache Kafka triggers.
You use a ScaledObject or ScaledJob custom resource to configure triggers for specific objects, as described in the sections that follow.
3.4.1. Understanding the Prometheus trigger
You can scale pods based on Prometheus metrics, which can use the installed OpenShift Dedicated monitoring or an external Prometheus server as the metrics source. See "Additional resources" for information on the configurations required to use the OpenShift Dedicated monitoring as a source for metrics.
If Prometheus is collecting metrics from the application that the custom metrics autoscaler is scaling, do not set the minimum replicas to 0 in the custom resource. If there are no application pods, the custom metrics autoscaler does not have any metrics to scale on.
Example scaled object with a Prometheus target
apiVersion: keda.sh/v1alpha1
kind: ScaledObject
metadata:
  name: prom-scaledobject
  namespace: my-namespace
spec:
# ...
  triggers:
  - type: prometheus 1
    metadata:
      serverAddress: https://thanos-querier.openshift-monitoring.svc.cluster.local:9092 2
      namespace: kedatest 3
      metricName: http_requests_total 4
      threshold: '5' 5
      query: sum(rate(http_requests_total{job="test-app"}[1m])) 6
      authModes: basic 7
      cortexOrgID: my-org 8
      ignoreNullValues: "false" 9
      unsafeSsl: "false" 10
- 1
- Specifies Prometheus as the trigger type.
- 2
- Specifies the address of the Prometheus server. This example uses OpenShift Dedicated monitoring.
- 3
- Optional: Specifies the namespace of the object you want to scale. This parameter is mandatory if using OpenShift Dedicated monitoring as a source for the metrics.
- 4
- Specifies the name to identify the metric in the
external.metrics.k8s.ioAPI. If you are using more than one trigger, all metric names must be unique. - 5
- Specifies the value that triggers scaling. Must be specified as a quoted string value.
- 6
- Specifies the Prometheus query to use.
- 7
- Specifies the authentication method to use. Prometheus scalers support bearer authentication (
bearer), basic authentication (basic), or TLS authentication (tls). You configure the specific authentication parameters in a trigger authentication, as discussed in a following section. As needed, you can also use a secret. - 8
- 9
- Optional: Specifies how the trigger should proceed if the Prometheus target is lost.
-
If
true, the trigger continues to operate if the Prometheus target is lost. This is the default behavior. -
If
false, the trigger returns an error if the Prometheus target is lost.
-
If
- 10
- Optional: Specifies whether the certificate check should be skipped. For example, you might skip the check if you use self-signed certificates at the Prometheus endpoint.
-
If
true, the certificate check is performed. -
If
false, the certificate check is not performed. This is the default behavior.
-
If
3.4.1.1. Configuring the custom metrics autoscaler to use OpenShift Dedicated monitoring
You can use the installed OpenShift Dedicated Prometheus monitoring as a source for the metrics used by the custom metrics autoscaler. However, there are some additional configurations you must perform.
These steps are not required for an external Prometheus source.
You must perform the following tasks, as described in this section:
- Create a service account to get a token.
- Create a role.
- Add that role to the service account.
- Reference the token in the trigger authentication object used by Prometheus.
Prerequisites
- OpenShift Dedicated monitoring must be installed.
- Monitoring of user-defined workloads must be enabled in OpenShift Dedicated monitoring, as described in the Creating a user-defined workload monitoring config map section.
- The Custom Metrics Autoscaler Operator must be installed.
Procedure
Change to the project with the object you want to scale:
$ oc project my-project
Use the following command to create a service account, if your cluster does not have one:
$ oc create serviceaccount <service_account>
where:
- <service_account>
- Specifies the name of the service account.
Use the following command to locate the token assigned to the service account:
$ oc describe serviceaccount <service_account>
where:
- <service_account>
- Specifies the name of the service account.
Example output
Name: thanos Namespace: my-project Labels: <none> Annotations: <none> Image pull secrets: thanos-dockercfg-nnwgj Mountable secrets: thanos-dockercfg-nnwgj Tokens: thanos-token-9g4n5 1 Events: <none>- 1
- Use this token in the trigger authentication.
Create a trigger authentication with the service account token:
Create a YAML file similar to the following:
apiVersion: keda.sh/v1alpha1
kind: TriggerAuthentication
metadata:
  name: keda-trigger-auth-prometheus
spec:
  secretTargetRef: 1
  - parameter: bearerToken 2
    name: thanos-token-9g4n5 3
    key: token 4
  - parameter: ca
    name: thanos-token-9g4n5
    key: ca.crt
Create the CR object:
$ oc create -f <file-name>.yaml
Create a role for reading Thanos metrics:
Create a YAML file with the following parameters:
apiVersion: rbac.authorization.k8s.io/v1
kind: Role
metadata:
  name: thanos-metrics-reader
rules:
- apiGroups:
  - ""
  resources:
  - pods
  verbs:
  - get
- apiGroups:
  - metrics.k8s.io
  resources:
  - pods
  - nodes
  verbs:
  - get
  - list
  - watch
Create the CR object:
$ oc create -f <file-name>.yaml
Create a role binding for reading Thanos metrics:
Create a YAML file similar to the following:
apiVersion: rbac.authorization.k8s.io/v1
kind: RoleBinding
metadata:
  name: thanos-metrics-reader 1
  namespace: my-project 2
roleRef:
  apiGroup: rbac.authorization.k8s.io
  kind: Role
  name: thanos-metrics-reader
subjects:
- kind: ServiceAccount
  name: thanos 3
  namespace: my-project 4
Create the CR object:
$ oc create -f <file-name>.yaml
You can now deploy a scaled object or scaled job to enable autoscaling for your application, as described in "Understanding how to add custom metrics autoscalers". To use OpenShift Dedicated monitoring as the source, in the trigger, or scaler, you must include the following parameters:
-
triggers.typemust beprometheus -
triggers.metadata.serverAddressmust behttps://thanos-querier.openshift-monitoring.svc.cluster.local:9092 -
triggers.metadata.authModesmust bebearer -
triggers.metadata.namespacemust be set to the namespace of the object to scale -
triggers.authenticationRefmust point to the trigger authentication resource specified in the previous step
3.4.2. Understanding the CPU trigger
You can scale pods based on CPU metrics. This trigger uses cluster metrics as the source for metrics.
The custom metrics autoscaler scales the pods associated with an object to maintain the CPU usage that you specify. The autoscaler increases or decreases the number of replicas between the minimum and maximum numbers to maintain the specified CPU utilization across all pods. The memory trigger considers the memory utilization of the entire pod. If the pod has multiple containers, the memory trigger considers the total memory utilization of all containers in the pod.
-
This trigger cannot be used with the
ScaledJobcustom resource. -
When using a memory trigger to scale an object, the object does not scale to
0, even if you are using multiple triggers.
Example scaled object with a CPU target
apiVersion: keda.sh/v1alpha1
kind: ScaledObject
metadata:
  name: cpu-scaledobject
  namespace: my-namespace
spec:
# ...
  triggers:
  - type: cpu 1
    metricType: Utilization 2
    metadata:
      value: '60' 3
  minReplicaCount: 1 4
- 1
- Specifies CPU as the trigger type.
- 2
- Specifies the type of metric to use, either
UtilizationorAverageValue. - 3
- Specifies the value that triggers scaling. Must be specified as a quoted string value.
-
When using
Utilization, the target value is the average of the resource metrics across all relevant pods, represented as a percentage of the requested value of the resource for the pods. -
When using
AverageValue, the target value is the average of the metrics across all relevant pods.
-
When using
- 4
- Specifies the minimum number of replicas when scaling down. For a CPU trigger, enter a value of
1or greater, because the HPA cannot scale to zero if you are using only CPU metrics.
3.4.3. Understanding the memory trigger
You can scale pods based on memory metrics. This trigger uses cluster metrics as the source for metrics.
The custom metrics autoscaler scales the pods associated with an object to maintain the average memory usage that you specify. The autoscaler increases and decreases the number of replicas between the minimum and maximum numbers to maintain the specified memory utilization across all pods. The memory trigger considers the memory utilization of entire pod. If the pod has multiple containers, the memory utilization is the sum of all of the containers.
-
This trigger cannot be used with the
ScaledJobcustom resource. -
When using a memory trigger to scale an object, the object does not scale to
0, even if you are using multiple triggers.
Example scaled object with a memory target
apiVersion: keda.sh/v1alpha1
kind: ScaledObject
metadata:
  name: memory-scaledobject
  namespace: my-namespace
spec:
# ...
  triggers:
  - type: memory 1
    metricType: Utilization 2
    metadata:
      value: '60' 3
      containerName: api 4
- 1
- Specifies memory as the trigger type.
- 2
- Specifies the type of metric to use, either
UtilizationorAverageValue. - 3
- Specifies the value that triggers scaling. Must be specified as a quoted string value.
-
When using
Utilization, the target value is the average of the resource metrics across all relevant pods, represented as a percentage of the requested value of the resource for the pods. -
When using
AverageValue, the target value is the average of the metrics across all relevant pods.
-
When using
- 4
- Optional: Specifies an individual container to scale, based on the memory utilization of only that container, rather than the entire pod. In this example, only the container named
apiis to be scaled.
3.4.4. Understanding the Kafka trigger
You can scale pods based on an Apache Kafka topic or other services that support the Kafka protocol. The custom metrics autoscaler does not scale higher than the number of Kafka partitions, unless you set the allowIdleConsumers parameter to true in the scaled object or scaled job.
If the number of consumer groups exceeds the number of partitions in a topic, the extra consumer groups remain idle. To avoid this, by default the number of replicas does not exceed:
- The number of partitions on a topic, if a topic is specified
- The number of partitions of all topics in the consumer group, if no topic is specified
-
The
maxReplicaCountspecified in scaled object or scaled job CR
You can use the allowIdleConsumers parameter to disable these default behaviors.
Example scaled object with a Kafka target
apiVersion: keda.sh/v1alpha1
kind: ScaledObject
metadata:
  name: kafka-scaledobject
  namespace: my-namespace
spec:
# ...
  triggers:
  - type: kafka 1
    metadata:
      topic: my-topic 2
      bootstrapServers: my-cluster-kafka-bootstrap.openshift-operators.svc:9092 3
      consumerGroup: my-group 4
      lagThreshold: '10' 5
      activationLagThreshold: '5' 6
      offsetResetPolicy: latest 7
      allowIdleConsumers: true 8
      scaleToZeroOnInvalidOffset: false 9
      excludePersistentLag: false 10
      version: '1.0.0' 11
      partitionLimitation: '1,2,10-20,31' 12
- 1
- Specifies Kafka as the trigger type.
- 2
- Specifies the name of the Kafka topic on which Kafka is processing the offset lag.
- 3
- Specifies a comma-separated list of Kafka brokers to connect to.
- 4
- Specifies the name of the Kafka consumer group used for checking the offset on the topic and processing the related lag.
- 5
- Optional: Specifies the average target value that triggers scaling. Must be specified as a quoted string value. The default is
5. - 6
- Optional: Specifies the target value for the activation phase. Must be specified as a quoted string value.
- 7
- Optional: Specifies the Kafka offset reset policy for the Kafka consumer. The available values are:
latestandearliest. The default islatest. - 8
- Optional: Specifies whether the number of Kafka replicas can exceed the number of partitions on a topic.
-
If
true, the number of Kafka replicas can exceed the number of partitions on a topic. This allows for idle Kafka consumers. -
If
false, the number of Kafka replicas cannot exceed the number of partitions on a topic. This is the default.
-
If
- 9
- Specifies how the trigger behaves when a Kafka partition does not have a valid offset.
-
If
true, the consumers are scaled to zero for that partition. -
If
false, the scaler keeps a single consumer for that partition. This is the default.
-
If
- 10
- Optional: Specifies whether the trigger includes or excludes partition lag for partitions whose current offset is the same as the current offset of the previous polling cycle.
-
If
true, the scaler excludes partition lag in these partitions. -
If
false, the trigger includes all consumer lag in all partitions. This is the default.
-
If
- 11
- Optional: Specifies the version of your Kafka brokers. Must be specified as a quoted string value. The default is
1.0.0. - 12
- Optional: Specifies a comma-separated list of partition IDs to scope the scaling on. If set, only the listed IDs are considered when calculating lag. Must be specified as a quoted string value. The default is to consider all partitions.
3.5. Understanding custom metrics autoscaler trigger authentications
A trigger authentication allows you to include authentication information in a scaled object or a scaled job that can be used by the associated containers. You can use trigger authentications to pass OpenShift Dedicated secrets, platform-native pod authentication mechanisms, environment variables, and so on.
You define a TriggerAuthentication object in the same namespace as the object that you want to scale. That trigger authentication can be used only by objects in that namespace.
Alternatively, to share credentials between objects in multiple namespaces, you can create a ClusterTriggerAuthentication object that can be used across all namespaces.
Trigger authentications and cluster trigger authentication use the same configuration. However, a cluster trigger authentication requires an additional kind parameter in the authentication reference of the scaled object.
Example trigger authentication with a secret
kind: TriggerAuthentication
apiVersion: keda.sh/v1alpha1
metadata:
  name: secret-triggerauthentication
  namespace: my-namespace 1
spec:
  secretTargetRef: 2
  - parameter: user-name 3
    name: my-secret 4
    key: USER_NAME 5
  - parameter: password
    name: my-secret
    key: USER_PASSWORD
- 1
- Specifies the namespace of the object you want to scale.
- 2
- Specifies that this trigger authentication uses a secret for authorization.
- 3
- Specifies the authentication parameter to supply by using the secret.
- 4
- Specifies the name of the secret to use.
- 5
- Specifies the key in the secret to use with the specified parameter.
Example cluster trigger authentication with a secret
kind: ClusterTriggerAuthentication
apiVersion: keda.sh/v1alpha1
metadata: 1
  name: secret-cluster-triggerauthentication
spec:
  secretTargetRef: 2
  - parameter: user-name 3
    name: secret-name 4
    key: USER_NAME 5
  - parameter: user-password
    name: secret-name
    key: USER_PASSWORD
- 1
- Note that no namespace is used with a cluster trigger authentication.
- 2
- Specifies that this trigger authentication uses a secret for authorization.
- 3
- Specifies the authentication parameter to supply by using the secret.
- 4
- Specifies the name of the secret to use.
- 5
- Specifies the key in the secret to use with the specified parameter.
Example trigger authentication with a token
kind: TriggerAuthentication
apiVersion: keda.sh/v1alpha1
metadata:
  name: token-triggerauthentication
  namespace: my-namespace 1
spec:
  secretTargetRef: 2
  - parameter: bearerToken 3
    name: my-token-2vzfq 4
    key: token 5
  - parameter: ca
    name: my-token-2vzfq
    key: ca.crt
- 1
- Specifies the namespace of the object you want to scale.
- 2
- Specifies that this trigger authentication uses a secret for authorization.
- 3
- Specifies the authentication parameter to supply by using the token.
- 4
- Specifies the name of the token to use.
- 5
- Specifies the key in the token to use with the specified parameter.
Example trigger authentication with an environment variable
kind: TriggerAuthentication
apiVersion: keda.sh/v1alpha1
metadata:
  name: env-var-triggerauthentication
  namespace: my-namespace 1
spec:
  env: 2
  - parameter: access_key 3
    name: ACCESS_KEY 4
    containerName: my-container 5
- 1
- Specifies the namespace of the object you want to scale.
- 2
- Specifies that this trigger authentication uses environment variables for authorization.
- 3
- Specify the parameter to set with this variable.
- 4
- Specify the name of the environment variable.
- 5
- Optional: Specify a container that requires authentication. The container must be in the same resource as referenced by
scaleTargetRefin the scaled object.
Example trigger authentication with pod authentication providers
kind: TriggerAuthentication
apiVersion: keda.sh/v1alpha1
metadata:
  name: pod-id-triggerauthentication
  namespace: my-namespace 1
spec:
  podIdentity: 2
    provider: aws-eks 3
3.5.1. Using trigger authentications
You use trigger authentications and cluster trigger authentications by using a custom resource to create the authentication, then add a reference to a scaled object or scaled job.
Prerequisites
- The Custom Metrics Autoscaler Operator must be installed.
If you are using a secret, the
Secretobject must exist, for example:Example secret
apiVersion: v1
kind: Secret
metadata:
  name: my-secret
data:
  user-name: <base64_USER_NAME>
  password: <base64_USER_PASSWORD>
Procedure
Create the
TriggerAuthenticationorClusterTriggerAuthenticationobject.Create a YAML file that defines the object:
Example trigger authentication with a secret
kind: TriggerAuthentication
apiVersion: keda.sh/v1alpha1
metadata:
  name: prom-triggerauthentication
  namespace: my-namespace
spec:
  secretTargetRef:
  - parameter: user-name
    name: my-secret
    key: USER_NAME
  - parameter: password
    name: my-secret
    key: USER_PASSWORD
Create the
TriggerAuthenticationobject:$ oc create -f <filename>.yaml
Create or edit a
ScaledObjectYAML file that uses the trigger authentication:Create a YAML file that defines the object by running the following command:
Example scaled object with a trigger authentication
apiVersion: keda.sh/v1alpha1 kind: ScaledObject metadata: name: scaledobject namespace: my-namespace spec: scaleTargetRef: name: example-deployment maxReplicaCount: 100 minReplicaCount: 0 pollingInterval: 30 triggers: - type: prometheus metadata: serverAddress: https://thanos-querier.openshift-monitoring.svc.cluster.local:9092 namespace: kedatest # replace <NAMESPACE> metricName: http_requests_total threshold: '5' query: sum(rate(http_requests_total{job="test-app"}[1m])) authModes: "basic" authenticationRef: name: prom-triggerauthentication 1 kind: TriggerAuthentication 2Example scaled object with a cluster trigger authentication
apiVersion: keda.sh/v1alpha1 kind: ScaledObject metadata: name: scaledobject namespace: my-namespace spec: scaleTargetRef: name: example-deployment maxReplicaCount: 100 minReplicaCount: 0 pollingInterval: 30 triggers: - type: prometheus metadata: serverAddress: https://thanos-querier.openshift-monitoring.svc.cluster.local:9092 namespace: kedatest # replace <NAMESPACE> metricName: http_requests_total threshold: '5' query: sum(rate(http_requests_total{job="test-app"}[1m])) authModes: "basic" authenticationRef: name: prom-cluster-triggerauthentication 1 kind: ClusterTriggerAuthentication 2Create the scaled object by running the following command:
$ oc apply -f <filename>
3.6. Pausing the custom metrics autoscaler for a scaled object
You can pause and restart the autoscaling of a workload, as needed.
For example, you might want to pause autoscaling before performing cluster maintenance or to avoid resource starvation by removing non-mission-critical workloads.
3.6.1. Pausing a custom metrics autoscaler
You can pause the autoscaling of a scaled object by adding the autoscaling.keda.sh/paused-replicas annotation to the custom metrics autoscaler for that scaled object. The custom metrics autoscaler scales the replicas for that workload to the specified value and pauses autoscaling until the annotation is removed.
apiVersion: keda.sh/v1alpha1
kind: ScaledObject
metadata:
  annotations:
    autoscaling.keda.sh/paused-replicas: "4"
# ...
Procedure
Use the following command to edit the
ScaledObjectCR for your workload:$ oc edit ScaledObject scaledobject
Add the
autoscaling.keda.sh/paused-replicasannotation with any value:apiVersion: keda.sh/v1alpha1 kind: ScaledObject metadata: annotations: autoscaling.keda.sh/paused-replicas: "4" 1 creationTimestamp: "2023-02-08T14:41:01Z" generation: 1 name: scaledobject namespace: my-project resourceVersion: '65729' uid: f5aec682-acdf-4232-a783-58b5b82f5dd0- 1
- Specifies that the Custom Metrics Autoscaler Operator is to scale the replicas to the specified value and stop autoscaling.
3.6.2. Restarting the custom metrics autoscaler for a scaled object
You can restart a paused custom metrics autoscaler by removing the autoscaling.keda.sh/paused-replicas annotation for that ScaledObject.
apiVersion: keda.sh/v1alpha1
kind: ScaledObject
metadata:
  annotations:
    autoscaling.keda.sh/paused-replicas: "4"
# ...
Procedure
Use the following command to edit the
ScaledObjectCR for your workload:$ oc edit ScaledObject scaledobject
Remove the
autoscaling.keda.sh/paused-replicasannotation.apiVersion: keda.sh/v1alpha1 kind: ScaledObject metadata: annotations: autoscaling.keda.sh/paused-replicas: "4" 1 creationTimestamp: "2023-02-08T14:41:01Z" generation: 1 name: scaledobject namespace: my-project resourceVersion: '65729' uid: f5aec682-acdf-4232-a783-58b5b82f5dd0- 1
- Remove this annotation to restart a paused custom metrics autoscaler.
3.7. Gathering audit logs
You can gather audit logs, which are a security-relevant chronological set of records documenting the sequence of activities that have affected the system by individual users, administrators, or other components of the system.
For example, audit logs can help you understand where an autoscaling request is coming from. This is key information when backends are getting overloaded by autoscaling requests made by user applications and you need to determine which is the troublesome application.
3.7.1. Configuring audit logging
You can configure auditing for the Custom Metrics Autoscaler Operator by editing the KedaController custom resource. The logs are sent to an audit log file on a volume that is secured by using a persistent volume claim in the KedaController CR.
Prerequisites
- The Custom Metrics Autoscaler Operator must be installed.
Procedure
Edit the
KedaControllercustom resource to add theauditConfigstanza:kind: KedaController apiVersion: keda.sh/v1alpha1 metadata: name: keda namespace: keda spec: # ... metricsServer: # ... auditConfig: logFormat: "json" 1 logOutputVolumeClaim: "pvc-audit-log" 2 policy: rules: 3 - level: Metadata omitStages: "RequestReceived" 4 omitManagedFields: false 5 lifetime: 6 maxAge: "2" maxBackup: "1" maxSize: "50"- 1
- Specifies the output format of the audit log, either
legacyorjson. - 2
- Specifies an existing persistent volume claim for storing the log data. All requests coming to the API server are logged to this persistent volume claim. If you leave this field empty, the log data is sent to stdout.
- 3
- Specifies which events should be recorded and what data they should include:
-
None: Do not log events. -
Metadata: Log only the metadata for the request, such as user, timestamp, and so forth. Do not log the request text and the response text. This is the default. -
Request: Log only the metadata and the request text but not the response text. This option does not apply for non-resource requests. -
RequestResponse: Log event metadata, request text, and response text. This option does not apply for non-resource requests.
-
- 4
- Specifies stages for which no event is created.
- 5
- Specifies whether to omit the managed fields of the request and response bodies from being written to the API audit log, either
trueto omit the fields orfalseto include the fields. - 6
- Specifies the size and lifespan of the audit logs.
-
maxAge: The maximum number of days to retain audit log files, based on the timestamp encoded in their filename. -
maxBackup: The maximum number of audit log files to retain. Set to0to retain all audit log files. -
maxSize: The maximum size in megabytes of an audit log file before it gets rotated.
-
Verification
View the audit log file directly:
Obtain the name of the
keda-metrics-apiserver-*pod:oc get pod -n keda
Example output
NAME                                                  READY   STATUS    RESTARTS   AGE
custom-metrics-autoscaler-operator-5cb44cd75d-9v4lv   1/1     Running   0          8m20s
keda-metrics-apiserver-65c7cc44fd-rrl4r               1/1     Running   0          2m55s
keda-operator-776cbb6768-zpj5b                        1/1     Running   0          2m55s
View the log data by using a command similar to the following:
$ oc logs keda-metrics-apiserver-<hash>|grep -i metadata 1- 1
- Optional: You can use the
grepcommand to specify the log level to display:Metadata,Request,RequestResponse.
For example:
$ oc logs keda-metrics-apiserver-65c7cc44fd-rrl4r|grep -i metadata
Example output
 ...
{"kind":"Event","apiVersion":"audit.k8s.io/v1","level":"Metadata","auditID":"4c81d41b-3dab-4675-90ce-20b87ce24013","stage":"ResponseComplete","requestURI":"/healthz","verb":"get","user":{"username":"system:anonymous","groups":["system:unauthenticated"]},"sourceIPs":["10.131.0.1"],"userAgent":"kube-probe/1.28","responseStatus":{"metadata":{},"code":200},"requestReceivedTimestamp":"2023-02-16T13:00:03.554567Z","stageTimestamp":"2023-02-16T13:00:03.555032Z","annotations":{"authorization.k8s.io/decision":"allow","authorization.k8s.io/reason":""}}
 ...
Alternatively, you can view a specific log:
Use a command similar to the following to log into the
keda-metrics-apiserver-*pod:$ oc rsh pod/keda-metrics-apiserver-<hash> -n keda
For example:
$ oc rsh pod/keda-metrics-apiserver-65c7cc44fd-rrl4r -n keda
Change to the
/var/audit-policy/directory:sh-4.4$ cd /var/audit-policy/
List the available logs:
sh-4.4$ ls
Example output
log-2023.02.17-14:50 policy.yaml
View the log, as needed:
sh-4.4$ cat <log_name>/<pvc_name>|grep -i <log_level> 1- 1
- Optional: You can use the
grepcommand to specify the log level to display:Metadata,Request,RequestResponse.
For example:
sh-4.4$ cat log-2023.02.17-14:50/pvc-audit-log|grep -i Request
Example output
 ...
{"kind":"Event","apiVersion":"audit.k8s.io/v1","level":"Request","auditID":"63e7f68c-04ec-4f4d-8749-bf1656572a41","stage":"ResponseComplete","requestURI":"/openapi/v2","verb":"get","user":{"username":"system:aggregator","groups":["system:authenticated"]},"sourceIPs":["10.128.0.1"],"responseStatus":{"metadata":{},"code":304},"requestReceivedTimestamp":"2023-02-17T13:12:55.035478Z","stageTimestamp":"2023-02-17T13:12:55.038346Z","annotations":{"authorization.k8s.io/decision":"allow","authorization.k8s.io/reason":"RBAC: allowed by ClusterRoleBinding \"system:discovery\" of ClusterRole \"system:discovery\" to Group \"system:authenticated\""}}
 ...
3.8. Gathering debugging data
When opening a support case, it is helpful to provide debugging information about your cluster to Red Hat Support.
To help troubleshoot your issue, provide the following information:
-
Data gathered using the
must-gathertool. - The unique cluster ID.
You can use the must-gather tool to collect data about the Custom Metrics Autoscaler Operator and its components, including the following items:
-
The
kedanamespace and its child objects. - The Custom Metric Autoscaler Operator installation objects.
- The Custom Metric Autoscaler Operator CRD objects.
3.8.1. Gathering debugging data
The following command runs the must-gather tool for the Custom Metrics Autoscaler Operator:
$ oc adm must-gather --image="$(oc get packagemanifests openshift-custom-metrics-autoscaler-operator \
-n openshift-marketplace \
-o jsonpath='{.status.channels[?(@.name=="stable")].currentCSVDesc.annotations.containerImage}')"
The standard OpenShift Dedicated must-gather command, oc adm must-gather, does not collect Custom Metrics Autoscaler Operator data.
Prerequisites
-
You are logged in to OpenShift Dedicated as a user with the
dedicated-adminrole. -
The OpenShift Dedicated CLI (
oc) installed.
Procedure
-
Navigate to the directory where you want to store the
must-gatherdata. Perform one of the following:
To get only the Custom Metrics Autoscaler Operator
must-gatherdata, use the following command:$ oc adm must-gather --image="$(oc get packagemanifests openshift-custom-metrics-autoscaler-operator \ -n openshift-marketplace \ -o jsonpath='{.status.channels[?(@.name=="stable")].currentCSVDesc.annotations.containerImage}')"The custom image for the
must-gathercommand is pulled directly from the Operator package manifests, so that it works on any cluster where the Custom Metric Autoscaler Operator is available.To gather the default
must-gatherdata in addition to the Custom Metric Autoscaler Operator information:Use the following command to obtain the Custom Metrics Autoscaler Operator image and set it as an environment variable:
$ IMAGE="$(oc get packagemanifests openshift-custom-metrics-autoscaler-operator \
  -n openshift-marketplace \
  -o jsonpath='{.status.channels[?(@.name=="stable")].currentCSVDesc.annotations.containerImage}')"
Use the
oc adm must-gatherwith the Custom Metrics Autoscaler Operator image:$ oc adm must-gather --image-stream=openshift/must-gather --image=${IMAGE}
Example 3.1. Example must-gather output for the Custom Metric Autoscaler:
└── keda
    ├── apps
    │   ├── daemonsets.yaml
    │   ├── deployments.yaml
    │   ├── replicasets.yaml
    │   └── statefulsets.yaml
    ├── apps.openshift.io
    │   └── deploymentconfigs.yaml
    ├── autoscaling
    │   └── horizontalpodautoscalers.yaml
    ├── batch
    │   ├── cronjobs.yaml
    │   └── jobs.yaml
    ├── build.openshift.io
    │   ├── buildconfigs.yaml
    │   └── builds.yaml
    ├── core
    │   ├── configmaps.yaml
    │   ├── endpoints.yaml
    │   ├── events.yaml
    │   ├── persistentvolumeclaims.yaml
    │   ├── pods.yaml
    │   ├── replicationcontrollers.yaml
    │   ├── secrets.yaml
    │   └── services.yaml
    ├── discovery.k8s.io
    │   └── endpointslices.yaml
    ├── image.openshift.io
    │   └── imagestreams.yaml
    ├── k8s.ovn.org
    │   ├── egressfirewalls.yaml
    │   └── egressqoses.yaml
    ├── keda.sh
    │   ├── kedacontrollers
    │   │   └── keda.yaml
    │   ├── scaledobjects
    │   │   └── example-scaledobject.yaml
    │   └── triggerauthentications
    │       └── example-triggerauthentication.yaml
    ├── monitoring.coreos.com
    │   └── servicemonitors.yaml
    ├── networking.k8s.io
    │   └── networkpolicies.yaml
    ├── keda.yaml
    ├── pods
    │   ├── custom-metrics-autoscaler-operator-58bd9f458-ptgwx
    │   │   ├── custom-metrics-autoscaler-operator
    │   │   │   └── custom-metrics-autoscaler-operator
    │   │   │       └── logs
    │   │   │           ├── current.log
    │   │   │           ├── previous.insecure.log
    │   │   │           └── previous.log
    │   │   └── custom-metrics-autoscaler-operator-58bd9f458-ptgwx.yaml
    │   ├── custom-metrics-autoscaler-operator-58bd9f458-thbsh
    │   │   └── custom-metrics-autoscaler-operator
    │   │       └── custom-metrics-autoscaler-operator
    │   │           └── logs
    │   ├── keda-metrics-apiserver-65c7cc44fd-6wq4g
    │   │   ├── keda-metrics-apiserver
    │   │   │   └── keda-metrics-apiserver
    │   │   │       └── logs
    │   │   │           ├── current.log
    │   │   │           ├── previous.insecure.log
    │   │   │           └── previous.log
    │   │   └── keda-metrics-apiserver-65c7cc44fd-6wq4g.yaml
    │   └── keda-operator-776cbb6768-fb6m5
    │       ├── keda-operator
    │       │   └── keda-operator
    │       │       └── logs
    │       │           ├── current.log
    │       │           ├── previous.insecure.log
    │       │           └── previous.log
    │       └── keda-operator-776cbb6768-fb6m5.yaml
    ├── policy
    │   └── poddisruptionbudgets.yaml
    └── route.openshift.io
        └── routes.yaml
Create a compressed file from the
must-gatherdirectory that was created in your working directory. For example, on a computer that uses a Linux operating system, run the following command:$ tar cvaf must-gather.tar.gz must-gather.local.5421342344627712289/ 1- 1
- Replace
must-gather-local.5421342344627712289/with the actual directory name.
- Attach the compressed file to your support case on the Red Hat Customer Portal.
3.9. Viewing Operator metrics
The Custom Metrics Autoscaler Operator exposes ready-to-use metrics that it pulls from the on-cluster monitoring component. You can query the metrics by using the Prometheus Query Language (PromQL) to analyze and diagnose issues. All metrics are reset when the controller pod restarts.
3.9.1. Accessing performance metrics
You can access the metrics and run queries by using the OpenShift Dedicated web console.
Procedure
- Select the Administrator perspective in the OpenShift Dedicated web console.
- Select Observe → Metrics.
- To create a custom query, add your PromQL query to the Expression field.
- To add multiple queries, select Add Query.
3.9.1.1. Provided Operator metrics
The Custom Metrics Autoscaler Operator exposes the following metrics, which you can view by using the OpenShift Dedicated web console.
Table 3.1. Custom Metric Autoscaler Operator metrics
| Metric name | Description |
|---|---|
|
|
Whether the particular scaler is active or inactive. A value of |
|
| The current value for each scaler’s metric, which is used by the Horizontal Pod Autoscaler (HPA) in computing the target average. |
|
| The latency of retrieving the current metric from each scaler. |
|
| The number of errors that have occurred for each scaler. |
|
| The total number of errors encountered for all scalers. |
|
| The number of errors that have occurred for each scaled obejct. |
|
| The total number of Custom Metrics Autoscaler custom resources in each namespace for each custom resource type. |
|
| The total number of triggers by trigger type. |
Custom Metrics Autoscaler Admission webhook metrics
The Custom Metrics Autoscaler Admission webhook also exposes the following Prometheus metrics.
| Metric name | Description |
|---|---|
|
| The number of scaled object validations. |
|
| The number of validation errors. |
3.10. Understanding how to add custom metrics autoscalers
To add a custom metrics autoscaler, create a ScaledObject custom resource for a deployment, stateful set, or custom resource. Create a ScaledJob custom resource for a job.
You can create only one scaled object for each workload that you want to scale. Also, you cannot use a scaled object and the horizontal pod autoscaler (HPA) on the same workload.
3.10.1. Adding a custom metrics autoscaler to a workload
You can create a custom metrics autoscaler for a workload that is created by a Deployment, StatefulSet, or custom resource object.
Prerequisites
- The Custom Metrics Autoscaler Operator must be installed.
If you use a custom metrics autoscaler for scaling based on CPU or memory:
Your cluster administrator must have properly configured cluster metrics. You can use the
oc describe PodMetrics <pod-name>command to determine if metrics are configured. If metrics are configured, the output appears similar to the following, with CPU and Memory displayed under Usage.$ oc describe PodMetrics openshift-kube-scheduler-ip-10-0-135-131.ec2.internal
Example output
Name:         openshift-kube-scheduler-ip-10-0-135-131.ec2.internal
Namespace:    openshift-kube-scheduler
Labels:       <none>
Annotations:  <none>
API Version:  metrics.k8s.io/v1beta1
Containers:
  Name:  wait-for-host-port
  Usage:
    Memory:  0
  Name:      scheduler
  Usage:
    Cpu:     8m
    Memory:  45440Ki
Kind:        PodMetrics
Metadata:
  Creation Timestamp:  2019-05-23T18:47:56Z
  Self Link:           /apis/metrics.k8s.io/v1beta1/namespaces/openshift-kube-scheduler/pods/openshift-kube-scheduler-ip-10-0-135-131.ec2.internal
Timestamp:             2019-05-23T18:47:56Z
Window:                1m0s
Events:                <none>
The pods associated with the object you want to scale must include specified memory and CPU limits. For example:
Example pod spec
apiVersion: v1
kind: Pod
# ...
spec:
  containers:
  - name: app
    image: images.my-company.example/app:v4
    resources:
      limits:
        memory: "128Mi"
        cpu: "500m"
# ...
Procedure
Create a YAML file similar to the following. Only the name
<2>, object name<4>, and object kind<5>are required:Example scaled object
apiVersion: keda.sh/v1alpha1 kind: ScaledObject metadata: annotations: autoscaling.keda.sh/paused-replicas: "0" 1 name: scaledobject 2 namespace: my-namespace spec: scaleTargetRef: apiVersion: apps/v1 3 name: example-deployment 4 kind: Deployment 5 envSourceContainerName: .spec.template.spec.containers[0] 6 cooldownPeriod: 200 7 maxReplicaCount: 100 8 minReplicaCount: 0 9 metricsServer: 10 auditConfig: logFormat: "json" logOutputVolumeClaim: "persistentVolumeClaimName" policy: rules: - level: Metadata omitStages: "RequestReceived" omitManagedFields: false lifetime: maxAge: "2" maxBackup: "1" maxSize: "50" fallback: 11 failureThreshold: 3 replicas: 6 pollingInterval: 30 12 advanced: restoreToOriginalReplicaCount: false 13 horizontalPodAutoscalerConfig: name: keda-hpa-scale-down 14 behavior: 15 scaleDown: stabilizationWindowSeconds: 300 policies: - type: Percent value: 100 periodSeconds: 15 triggers: - type: prometheus 16 metadata: serverAddress: https://thanos-querier.openshift-monitoring.svc.cluster.local:9092 namespace: kedatest metricName: http_requests_total threshold: '5' query: sum(rate(http_requests_total{job="test-app"}[1m])) authModes: basic authenticationRef: 17 name: prom-triggerauthentication kind: TriggerAuthentication- 1
- Optional: Specifies that the Custom Metrics Autoscaler Operator is to scale the replicas to the specified value and stop autoscaling, as described in the "Pausing the custom metrics autoscaler for a workload" section.
- 2
- Specifies a name for this custom metrics autoscaler.
- 3
- Optional: Specifies the API version of the target resource. The default is
apps/v1. - 4
- Specifies the name of the object that you want to scale.
- 5
- Specifies the
kindasDeployment,StatefulSetorCustomResource. - 6
- Optional: Specifies the name of the container in the target resource, from which the custom metrics autoscaler gets environment variables holding secrets and so forth. The default is
.spec.template.spec.containers[0]. - 7
- Optional. Specifies the period in seconds to wait after the last trigger is reported before scaling the deployment back to
0if theminReplicaCountis set to0. The default is300. - 8
- Optional: Specifies the maximum number of replicas when scaling up. The default is
100. - 9
- Optional: Specifies the minimum number of replicas when scaling down.
- 10
- Optional: Specifies the parameters for audit logs. as described in the "Configuring audit logging" section.
- 11
- Optional: Specifies the number of replicas to fall back to if a scaler fails to get metrics from the source for the number of times defined by the
failureThresholdparameter. For more information on fallback behavior, see the KEDA documentation. - 12
- Optional: Specifies the interval in seconds to check each trigger on. The default is
30. - 13
- Optional: Specifies whether to scale back the target resource to the original replica count after the scaled object is deleted. The default is
false, which keeps the replica count as it is when the scaled object is deleted. - 14
- Optional: Specifies a name for the horizontal pod autoscaler. The default is
keda-hpa-{scaled-object-name}. - 15
- Optional: Specifies a scaling policy to use to control the rate to scale pods up or down, as described in the "Scaling policies" section.
- 16
- Specifies the trigger to use as the basis for scaling, as described in the "Understanding the custom metrics autoscaler triggers" section. This example uses OpenShift Dedicated monitoring.
- 17
- Optional: Specifies a trigger authentication or a cluster trigger authentication. For more information, see Understanding the custom metrics autoscaler trigger authentication in the Additional resources section.
-
Enter
TriggerAuthenticationto use a trigger authentication. This is the default. -
Enter
ClusterTriggerAuthenticationto use a cluster trigger authentication.
-
Enter
Create the custom metrics autoscaler by running the following command:
$ oc create -f <filename>.yaml
Verification
View the command output to verify that the custom metrics autoscaler was created:
$ oc get scaledobject <scaled_object_name>
Example output
NAME            SCALETARGETKIND      SCALETARGETNAME        MIN   MAX   TRIGGERS     AUTHENTICATION               READY   ACTIVE   FALLBACK   AGE
scaledobject    apps/v1.Deployment   example-deployment     0     50    prometheus   prom-triggerauthentication   True    True     True       17s
Note the following fields in the output:
-
TRIGGERS: Indicates the trigger, or scaler, that is being used. -
AUTHENTICATION: Indicates the name of any trigger authentication being used. READY: Indicates whether the scaled object is ready to start scaling:-
If
True, the scaled object is ready. -
If
False, the scaled object is not ready because of a problem in one or more of the objects you created.
-
If
ACTIVE: Indicates whether scaling is taking place:-
If
True, scaling is taking place. -
If
False, scaling is not taking place because there are no metrics or there is a problem in one or more of the objects you created.
-
If
FALLBACK: Indicates whether the custom metrics autoscaler is able to get metrics from the source-
If
False, the custom metrics autoscaler is getting metrics. -
If
True, the custom metrics autoscaler is getting metrics because there are no metrics or there is a problem in one or more of the objects you created.
-
If
-
3.10.2. Additional resources
3.11. Removing the Custom Metrics Autoscaler Operator
You can remove the custom metrics autoscaler from your OpenShift Dedicated cluster. After removing the Custom Metrics Autoscaler Operator, remove other components associated with the Operator to avoid potential issues.
Delete the KedaController custom resource (CR) first. If you do not delete the KedaController CR, OpenShift Dedicated can hang when you delete the keda project. If you delete the Custom Metrics Autoscaler Operator before deleting the CR, you are not able to delete the CR.
3.11.1. Uninstalling the Custom Metrics Autoscaler Operator
Use the following procedure to remove the custom metrics autoscaler from your OpenShift Dedicated cluster.
Prerequisites
- The Custom Metrics Autoscaler Operator must be installed.
Procedure
- In the OpenShift Dedicated web console, click Operators → Installed Operators.
- Switch to the keda project.
Remove the
KedaControllercustom resource.- Find the CustomMetricsAutoscaler Operator and click the KedaController tab.
- Find the custom resource, and then click Delete KedaController.
- Click Uninstall.
Remove the Custom Metrics Autoscaler Operator:
- Click Operators → Installed Operators.
-
Find the CustomMetricsAutoscaler Operator and click the Options menu
 and select Uninstall Operator.
- Click Uninstall.
Optional: Use the OpenShift CLI to remove the custom metrics autoscaler components:
Delete the custom metrics autoscaler CRDs:
-
clustertriggerauthentications.keda.sh -
kedacontrollers.keda.sh -
scaledjobs.keda.sh -
scaledobjects.keda.sh -
triggerauthentications.keda.sh
$ oc delete crd clustertriggerauthentications.keda.sh kedacontrollers.keda.sh scaledjobs.keda.sh scaledobjects.keda.sh triggerauthentications.keda.sh
Deleting the CRDs removes the associated roles, cluster roles, and role bindings. However, there might be a few cluster roles that must be manually deleted.
-
List any custom metrics autoscaler cluster roles:
$ oc get clusterrole | grep keda.sh
Delete the listed custom metrics autoscaler cluster roles. For example:
$ oc delete clusterrole.keda.sh-v1alpha1-admin
List any custom metrics autoscaler cluster role bindings:
$ oc get clusterrolebinding | grep keda.sh
Delete the listed custom metrics autoscaler cluster role bindings. For example:
$ oc delete clusterrolebinding.keda.sh-v1alpha1-admin
Delete the custom metrics autoscaler project:
$ oc delete project keda
Delete the Cluster Metric Autoscaler Operator:
$ oc delete operator/openshift-custom-metrics-autoscaler-operator.keda
Chapter 4. Controlling pod placement onto nodes (scheduling)
4.1. Controlling pod placement using the scheduler
Pod scheduling is an internal process that determines placement of new pods onto nodes within the cluster.
The scheduler code has a clean separation that watches new pods as they get created and identifies the most suitable node to host them. It then creates bindings (pod to node bindings) for the pods using the master API.
- Default pod scheduling
- OpenShift Dedicated comes with a default scheduler that serves the needs of most users. The default scheduler uses both inherent and customization tools to determine the best fit for a pod.
- Advanced pod scheduling
In situations where you might want more control over where new pods are placed, the OpenShift Dedicated advanced scheduling features allow you to configure a pod so that the pod is required or has a preference to run on a particular node or alongside a specific pod.
You can control pod placement by using the following scheduling features:
4.1.1. About the default scheduler
The default OpenShift Dedicated pod scheduler is responsible for determining the placement of new pods onto nodes within the cluster. It reads data from the pod and finds a node that is a good fit based on configured profiles. It is completely independent and exists as a standalone solution. It does not modify the pod; it creates a binding for the pod that ties the pod to the particular node.
4.1.1.1. Understanding default scheduling
The existing generic scheduler is the default platform-provided scheduler engine that selects a node to host the pod in a three-step operation:
- Filters the nodes
- The available nodes are filtered based on the constraints or requirements specified. This is done by running each node through the list of filter functions called predicates, or filters.
- Prioritizes the filtered list of nodes
- This is achieved by passing each node through a series of priority, or scoring, functions that assign it a score between 0 - 10, with 0 indicating a bad fit and 10 indicating a good fit to host the pod. The scheduler configuration can also take in a simple weight (positive numeric value) for each scoring function. The node score provided by each scoring function is multiplied by the weight (default weight for most scores is 1) and then combined by adding the scores for each node provided by all the scores. This weight attribute can be used by administrators to give higher importance to some scores.
- Selects the best fit node
- The nodes are sorted based on their scores and the node with the highest score is selected to host the pod. If multiple nodes have the same high score, then one of them is selected at random.
4.1.2. Scheduler use cases
One of the important use cases for scheduling within OpenShift Dedicated is to support flexible affinity and anti-affinity policies.
4.1.2.1. Affinity
Administrators should be able to configure the scheduler to specify affinity at any topological level, or even at multiple levels. Affinity at a particular level indicates that all pods that belong to the same service are scheduled onto nodes that belong to the same level. This handles any latency requirements of applications by allowing administrators to ensure that peer pods do not end up being too geographically separated. If no node is available within the same affinity group to host the pod, then the pod is not scheduled.
If you need greater control over where the pods are scheduled, see Controlling pod placement on nodes using node affinity rules and Placing pods relative to other pods using affinity and anti-affinity rules.
These advanced scheduling features allow administrators to specify which node a pod can be scheduled on and to force or reject scheduling relative to other pods.
4.1.2.2. Anti-affinity
Administrators should be able to configure the scheduler to specify anti-affinity at any topological level, or even at multiple levels. Anti-affinity (or 'spread') at a particular level indicates that all pods that belong to the same service are spread across nodes that belong to that level. This ensures that the application is well spread for high availability purposes. The scheduler tries to balance the service pods across all applicable nodes as evenly as possible.
If you need greater control over where the pods are scheduled, see Controlling pod placement on nodes using node affinity rules and Placing pods relative to other pods using affinity and anti-affinity rules.
These advanced scheduling features allow administrators to specify which node a pod can be scheduled on and to force or reject scheduling relative to other pods.
4.2. Placing pods relative to other pods using affinity and anti-affinity rules
Affinity is a property of pods that controls the nodes on which they prefer to be scheduled. Anti-affinity is a property of pods that prevents a pod from being scheduled on a node.
In OpenShift Dedicated, pod affinity and pod anti-affinity allow you to constrain which nodes your pod is eligible to be scheduled on based on the key-value labels on other pods.
4.2.1. Understanding pod affinity
Pod affinity and pod anti-affinity allow you to constrain which nodes your pod is eligible to be scheduled on based on the key/value labels on other pods.
- Pod affinity can tell the scheduler to locate a new pod on the same node as other pods if the label selector on the new pod matches the label on the current pod.
- Pod anti-affinity can prevent the scheduler from locating a new pod on the same node as pods with the same labels if the label selector on the new pod matches the label on the current pod.
For example, using affinity rules, you could spread or pack pods within a service or relative to pods in other services. Anti-affinity rules allow you to prevent pods of a particular service from scheduling on the same nodes as pods of another service that are known to interfere with the performance of the pods of the first service. Or, you could spread the pods of a service across nodes, availability zones, or availability sets to reduce correlated failures.
A label selector might match pods with multiple pod deployments. Use unique combinations of labels when configuring anti-affinity rules to avoid matching pods.
There are two types of pod affinity rules: required and preferred.
Required rules must be met before a pod can be scheduled on a node. Preferred rules specify that, if the rule is met, the scheduler tries to enforce the rules, but does not guarantee enforcement.
Depending on your pod priority and preemption settings, the scheduler might not be able to find an appropriate node for a pod without violating affinity requirements. If so, a pod might not be scheduled.
To prevent this situation, carefully configure pod affinity with equal-priority pods.
You configure pod affinity/anti-affinity through the Pod spec files. You can specify a required rule, a preferred rule, or both. If you specify both, the node must first meet the required rule, then attempts to meet the preferred rule.
The following example shows a Pod spec configured for pod affinity and anti-affinity.
In this example, the pod affinity rule indicates that the pod can schedule onto a node only if that node has at least one already-running pod with a label that has the key security and value S1. The pod anti-affinity rule says that the pod prefers to not schedule onto a node if that node is already running a pod with label having key security and value S2.
Sample Pod config file with pod affinity
apiVersion: v1
kind: Pod
metadata:
  name: with-pod-affinity
spec:
  securityContext:
    runAsNonRoot: true
    seccompProfile:
      type: RuntimeDefault
  affinity:
    podAffinity: 1
      requiredDuringSchedulingIgnoredDuringExecution: 2
      - labelSelector:
          matchExpressions:
          - key: security 3
            operator: In 4
            values:
            - S1 5
        topologyKey: topology.kubernetes.io/zone
  containers:
  - name: with-pod-affinity
    image: docker.io/ocpqe/hello-pod
    securityContext:
      allowPrivilegeEscalation: false
      capabilities:
        drop: [ALL]
- 1
- Stanza to configure pod affinity.
- 2
- Defines a required rule.
- 3 5
- The key and value (label) that must be matched to apply the rule.
- 4
- The operator represents the relationship between the label on the existing pod and the set of values in the
matchExpressionparameters in the specification for the new pod. Can beIn,NotIn,Exists, orDoesNotExist.
Sample Pod config file with pod anti-affinity
apiVersion: v1
kind: Pod
metadata:
  name: with-pod-antiaffinity
spec:
  securityContext:
    runAsNonRoot: true
    seccompProfile:
      type: RuntimeDefault
  affinity:
    podAntiAffinity: 1
      preferredDuringSchedulingIgnoredDuringExecution: 2
      - weight: 100  3
        podAffinityTerm:
          labelSelector:
            matchExpressions:
            - key: security 4
              operator: In 5
              values:
              - S2
          topologyKey: kubernetes.io/hostname
  containers:
  - name: with-pod-affinity
    image: docker.io/ocpqe/hello-pod
    securityContext:
      allowPrivilegeEscalation: false
      capabilities:
        drop: [ALL]
- 1
- Stanza to configure pod anti-affinity.
- 2
- Defines a preferred rule.
- 3
- Specifies a weight for a preferred rule. The node with the highest weight is preferred.
- 4
- Description of the pod label that determines when the anti-affinity rule applies. Specify a key and value for the label.
- 5
- The operator represents the relationship between the label on the existing pod and the set of values in the
matchExpressionparameters in the specification for the new pod. Can beIn,NotIn,Exists, orDoesNotExist.
If labels on a node change at runtime such that the affinity rules on a pod are no longer met, the pod continues to run on the node.
4.2.2. Configuring a pod affinity rule
The following steps demonstrate a simple two-pod configuration that creates pod with a label and a pod that uses affinity to allow scheduling with that pod.
You cannot add an affinity directly to a scheduled pod.
Procedure
Create a pod with a specific label in the pod spec:
Create a YAML file with the following content:
apiVersion: v1
kind: Pod
metadata:
  name: security-s1
  labels:
    security: S1
spec:
  securityContext:
    runAsNonRoot: true
    seccompProfile:
      type: RuntimeDefault
  containers:
  - name: security-s1
    image: docker.io/ocpqe/hello-pod
    securityContext:
      runAsNonRoot: true
      seccompProfile:
        type: RuntimeDefault
Create the pod.
$ oc create -f <pod-spec>.yaml
When creating other pods, configure the following parameters to add the affinity:
Create a YAML file with the following content:
apiVersion: v1
kind: Pod
metadata:
  name: security-s1-east
# ...
spec:
  affinity: 1
    podAffinity:
      requiredDuringSchedulingIgnoredDuringExecution: 2
      - labelSelector:
          matchExpressions:
          - key: security 3
            values:
            - S1
            operator: In 4
        topologyKey: topology.kubernetes.io/zone 5
# ...
- 1
- Adds a pod affinity.
- 2
- Configures the
requiredDuringSchedulingIgnoredDuringExecutionparameter or thepreferredDuringSchedulingIgnoredDuringExecutionparameter. - 3
- Specifies the
keyandvaluesthat must be met. If you want the new pod to be scheduled with the other pod, use the samekeyandvaluesparameters as the label on the first pod. - 4
- Specifies an
operator. The operator can beIn,NotIn,Exists, orDoesNotExist. For example, use the operatorInto require the label to be in the node. - 5
- Specify a
topologyKey, which is a prepopulated Kubernetes label that the system uses to denote such a topology domain.
Create the pod.
$ oc create -f <pod-spec>.yaml
4.2.3. Configuring a pod anti-affinity rule
The following steps demonstrate a simple two-pod configuration that creates pod with a label and a pod that uses an anti-affinity preferred rule to attempt to prevent scheduling with that pod.
You cannot add an affinity directly to a scheduled pod.
Procedure
Create a pod with a specific label in the pod spec:
Create a YAML file with the following content:
apiVersion: v1
kind: Pod
metadata:
  name: security-s1
  labels:
    security: S1
spec:
  securityContext:
    runAsNonRoot: true
    seccompProfile:
      type: RuntimeDefault
  containers:
  - name: security-s1
    image: docker.io/ocpqe/hello-pod
    securityContext:
      allowPrivilegeEscalation: false
      capabilities:
        drop: [ALL]
Create the pod.
$ oc create -f <pod-spec>.yaml
When creating other pods, configure the following parameters:
Create a YAML file with the following content:
apiVersion: v1
kind: Pod
metadata:
  name: security-s2-east
# ...
spec:
# ...
  affinity: 1
    podAntiAffinity:
      preferredDuringSchedulingIgnoredDuringExecution: 2
      - weight: 100 3
        podAffinityTerm:
          labelSelector:
            matchExpressions:
            - key: security 4
              values:
              - S1
              operator: In 5
          topologyKey: kubernetes.io/hostname 6
# ...
- 1
- Adds a pod anti-affinity.
- 2
- Configures the
requiredDuringSchedulingIgnoredDuringExecutionparameter or thepreferredDuringSchedulingIgnoredDuringExecutionparameter. - 3
- For a preferred rule, specifies a weight for the node, 1-100. The node that with highest weight is preferred.
- 4
- Specifies the
keyandvaluesthat must be met. If you want the new pod to not be scheduled with the other pod, use the samekeyandvaluesparameters as the label on the first pod. - 5
- Specifies an
operator. The operator can beIn,NotIn,Exists, orDoesNotExist. For example, use the operatorInto require the label to be in the node. - 6
- Specifies a
topologyKey, which is a prepopulated Kubernetes label that the system uses to denote such a topology domain.
Create the pod.
$ oc create -f <pod-spec>.yaml
4.2.4. Sample pod affinity and anti-affinity rules
The following examples demonstrate pod affinity and pod anti-affinity.
4.2.4.1. Pod Affinity
The following example demonstrates pod affinity for pods with matching labels and label selectors.
The pod team4 has the label
team:4.apiVersion: v1 kind: Pod metadata: name: team4 labels: team: "4" # ... spec: securityContext: runAsNonRoot: true seccompProfile: type: RuntimeDefault containers: - name: ocp image: docker.io/ocpqe/hello-pod securityContext: allowPrivilegeEscalation: false capabilities: drop: [ALL] # ...The pod team4a has the label selector
team:4underpodAffinity.apiVersion: v1 kind: Pod metadata: name: team4a # ... spec: securityContext: runAsNonRoot: true seccompProfile: type: RuntimeDefault affinity: podAffinity: requiredDuringSchedulingIgnoredDuringExecution: - labelSelector: matchExpressions: - key: team operator: In values: - "4" topologyKey: kubernetes.io/hostname containers: - name: pod-affinity image: docker.io/ocpqe/hello-pod securityContext: allowPrivilegeEscalation: false capabilities: drop: [ALL] # ...- The team4a pod is scheduled on the same node as the team4 pod.
4.2.4.2. Pod Anti-affinity
The following example demonstrates pod anti-affinity for pods with matching labels and label selectors.
The pod pod-s1 has the label
security:s1.apiVersion: v1 kind: Pod metadata: name: pod-s1 labels: security: s1 # ... spec: securityContext: runAsNonRoot: true seccompProfile: type: RuntimeDefault containers: - name: ocp image: docker.io/ocpqe/hello-pod securityContext: allowPrivilegeEscalation: false capabilities: drop: [ALL] # ...The pod pod-s2 has the label selector
security:s1underpodAntiAffinity.apiVersion: v1 kind: Pod metadata: name: pod-s2 # ... spec: securityContext: runAsNonRoot: true seccompProfile: type: RuntimeDefault affinity: podAntiAffinity: requiredDuringSchedulingIgnoredDuringExecution: - labelSelector: matchExpressions: - key: security operator: In values: - s1 topologyKey: kubernetes.io/hostname containers: - name: pod-antiaffinity image: docker.io/ocpqe/hello-pod securityContext: allowPrivilegeEscalation: false capabilities: drop: [ALL] # ...-
The pod pod-s2 cannot be scheduled on the same node as
pod-s1.
4.2.4.3. Pod Affinity with no Matching Labels
The following example demonstrates pod affinity for pods without matching labels and label selectors.
The pod pod-s1 has the label
security:s1.apiVersion: v1 kind: Pod metadata: name: pod-s1 labels: security: s1 # ... spec: securityContext: runAsNonRoot: true seccompProfile: type: RuntimeDefault containers: - name: ocp image: docker.io/ocpqe/hello-pod securityContext: allowPrivilegeEscalation: false capabilities: drop: [ALL] # ...The pod pod-s2 has the label selector
security:s2.apiVersion: v1 kind: Pod metadata: name: pod-s2 # ... spec: securityContext: runAsNonRoot: true seccompProfile: type: RuntimeDefault affinity: podAffinity: requiredDuringSchedulingIgnoredDuringExecution: - labelSelector: matchExpressions: - key: security operator: In values: - s2 topologyKey: kubernetes.io/hostname containers: - name: pod-affinity image: docker.io/ocpqe/hello-pod securityContext: allowPrivilegeEscalation: false capabilities: drop: [ALL] # ...The pod pod-s2 is not scheduled unless there is a node with a pod that has the
security:s2label. If there is no other pod with that label, the new pod remains in a pending state:Example output
NAME      READY     STATUS    RESTARTS   AGE       IP        NODE
pod-s2    0/1       Pending   0          32s       <none>
4.3. Controlling pod placement on nodes using node affinity rules
Affinity is a property of pods that controls the nodes on which they prefer to be scheduled.
In OpenShift Dedicated node affinity is a set of rules used by the scheduler to determine where a pod can be placed. The rules are defined using custom labels on the nodes and label selectors specified in pods.
4.3.1. Understanding node affinity
Node affinity allows a pod to specify an affinity towards a group of nodes it can be placed on. The node does not have control over the placement.
For example, you could configure a pod to only run on a node with a specific CPU or in a specific availability zone.
There are two types of node affinity rules: required and preferred.
Required rules must be met before a pod can be scheduled on a node. Preferred rules specify that, if the rule is met, the scheduler tries to enforce the rules, but does not guarantee enforcement.
If labels on a node change at runtime that results in an node affinity rule on a pod no longer being met, the pod continues to run on the node.
You configure node affinity through the Pod spec file. You can specify a required rule, a preferred rule, or both. If you specify both, the node must first meet the required rule, then attempts to meet the preferred rule.
The following example is a Pod spec with a rule that requires the pod be placed on a node with a label whose key is e2e-az-NorthSouth and whose value is either e2e-az-North or e2e-az-South:
Example pod configuration file with a node affinity required rule
apiVersion: v1
kind: Pod
metadata:
  name: with-node-affinity
spec:
  securityContext:
    runAsNonRoot: true
    seccompProfile:
      type: RuntimeDefault
  affinity:
    nodeAffinity: 1
      requiredDuringSchedulingIgnoredDuringExecution: 2
        nodeSelectorTerms:
        - matchExpressions:
          - key: e2e-az-NorthSouth 3
            operator: In 4
            values:
            - e2e-az-North 5
            - e2e-az-South 6
  containers:
  - name: with-node-affinity
    image: docker.io/ocpqe/hello-pod
    securityContext:
      allowPrivilegeEscalation: false
      capabilities:
        drop: [ALL]
# ...
- 1
- The stanza to configure node affinity.
- 2
- Defines a required rule.
- 3 5 6
- The key/value pair (label) that must be matched to apply the rule.
- 4
- The operator represents the relationship between the label on the node and the set of values in the
matchExpressionparameters in thePodspec. This value can beIn,NotIn,Exists, orDoesNotExist,Lt, orGt.
The following example is a node specification with a preferred rule that a node with a label whose key is e2e-az-EastWest and whose value is either e2e-az-East or e2e-az-West is preferred for the pod:
Example pod configuration file with a node affinity preferred rule
apiVersion: v1
kind: Pod
metadata:
  name: with-node-affinity
spec:
  securityContext:
    runAsNonRoot: true
    seccompProfile:
      type: RuntimeDefault
  affinity:
    nodeAffinity: 1
      preferredDuringSchedulingIgnoredDuringExecution: 2
      - weight: 1 3
        preference:
          matchExpressions:
          - key: e2e-az-EastWest 4
            operator: In 5
            values:
            - e2e-az-East 6
            - e2e-az-West 7
  containers:
  - name: with-node-affinity
    image: docker.io/ocpqe/hello-pod
    securityContext:
      allowPrivilegeEscalation: false
      capabilities:
        drop: [ALL]
# ...
- 1
- The stanza to configure node affinity.
- 2
- Defines a preferred rule.
- 3
- Specifies a weight for a preferred rule. The node with highest weight is preferred.
- 4 6 7
- The key/value pair (label) that must be matched to apply the rule.
- 5
- The operator represents the relationship between the label on the node and the set of values in the
matchExpressionparameters in thePodspec. This value can beIn,NotIn,Exists, orDoesNotExist,Lt, orGt.
There is no explicit node anti-affinity concept, but using the NotIn or DoesNotExist operator replicates that behavior.
If you are using node affinity and node selectors in the same pod configuration, note the following:
-
If you configure both
nodeSelectorandnodeAffinity, both conditions must be satisfied for the pod to be scheduled onto a candidate node. -
If you specify multiple
nodeSelectorTermsassociated withnodeAffinitytypes, then the pod can be scheduled onto a node if one of thenodeSelectorTermsis satisfied. -
If you specify multiple
matchExpressionsassociated withnodeSelectorTerms, then the pod can be scheduled onto a node only if allmatchExpressionsare satisfied.
4.3.2. Configuring a required node affinity rule
Required rules must be met before a pod can be scheduled on a node.
Procedure
The following steps demonstrate a simple configuration that creates a node and a pod that the scheduler is required to place on the node.
Create a pod with a specific label in the pod spec:
Create a YAML file with the following content:
NoteYou cannot add an affinity directly to a scheduled pod.
Example output
apiVersion: v1
kind: Pod
metadata:
  name: s1
spec:
  affinity: 1
    nodeAffinity:
      requiredDuringSchedulingIgnoredDuringExecution: 2
        nodeSelectorTerms:
        - matchExpressions:
          - key: e2e-az-name 3
            values:
            - e2e-az1
            - e2e-az2
            operator: In 4
#...
- 1
- Adds a pod affinity.
- 2
- Configures the
requiredDuringSchedulingIgnoredDuringExecutionparameter. - 3
- Specifies the
keyandvaluesthat must be met. If you want the new pod to be scheduled on the node you edited, use the samekeyandvaluesparameters as the label in the node. - 4
- Specifies an
operator. The operator can beIn,NotIn,Exists, orDoesNotExist. For example, use the operatorInto require the label to be in the node.
Create the pod:
$ oc create -f <file-name>.yaml
4.3.3. Configuring a preferred node affinity rule
Preferred rules specify that, if the rule is met, the scheduler tries to enforce the rules, but does not guarantee enforcement.
Procedure
The following steps demonstrate a simple configuration that creates a node and a pod that the scheduler tries to place on the node.
Create a pod with a specific label:
Create a YAML file with the following content:
NoteYou cannot add an affinity directly to a scheduled pod.
apiVersion: v1
kind: Pod
metadata:
  name: s1
spec:
  affinity: 1
    nodeAffinity:
      preferredDuringSchedulingIgnoredDuringExecution: 2
      - weight: 3
        preference:
          matchExpressions:
          - key: e2e-az-name 4
            values:
            - e2e-az3
            operator: In 5
#...
- 1
- Adds a pod affinity.
- 2
- Configures the
preferredDuringSchedulingIgnoredDuringExecutionparameter. - 3
- Specifies a weight for the node, as a number 1-100. The node with highest weight is preferred.
- 4
- Specifies the
keyandvaluesthat must be met. If you want the new pod to be scheduled on the node you edited, use the samekeyandvaluesparameters as the label in the node. - 5
- Specifies an
operator. The operator can beIn,NotIn,Exists, orDoesNotExist. For example, use the operatorInto require the label to be in the node.
Create the pod.
$ oc create -f <file-name>.yaml
4.3.4. Sample node affinity rules
The following examples demonstrate node affinity.
4.3.4.1. Node affinity with matching labels
The following example demonstrates node affinity for a node and pod with matching labels:
The Node1 node has the label
zone:us:$ oc label node node1 zone=us
TipYou can alternatively apply the following YAML to add the label:
kind: Node
apiVersion: v1
metadata:
  name: <node_name>
  labels:
    zone: us
#...
The pod-s1 pod has the
zoneanduskey/value pair under a required node affinity rule:$ cat pod-s1.yaml
Example output
apiVersion: v1
kind: Pod
metadata:
  name: pod-s1
spec:
  securityContext:
    runAsNonRoot: true
    seccompProfile:
      type: RuntimeDefault
  containers:
    - image: "docker.io/ocpqe/hello-pod"
      name: hello-pod
      securityContext:
        allowPrivilegeEscalation: false
        capabilities:
          drop: [ALL]
  affinity:
    nodeAffinity:
      requiredDuringSchedulingIgnoredDuringExecution:
        nodeSelectorTerms:
          - matchExpressions:
            - key: "zone"
              operator: In
              values:
              - us
#...
The pod-s1 pod can be scheduled on Node1:
$ oc get pod -o wide
Example output
NAME     READY     STATUS       RESTARTS   AGE      IP      NODE
pod-s1   1/1       Running      0          4m       IP1     node1
4.3.4.2. Node affinity with no matching labels
The following example demonstrates node affinity for a node and pod without matching labels:
The Node1 node has the label
zone:emea:$ oc label node node1 zone=emea
TipYou can alternatively apply the following YAML to add the label:
kind: Node
apiVersion: v1
metadata:
  name: <node_name>
  labels:
    zone: emea
#...
The pod-s1 pod has the
zoneanduskey/value pair under a required node affinity rule:$ cat pod-s1.yaml
Example output
apiVersion: v1
kind: Pod
metadata:
  name: pod-s1
spec:
  securityContext:
    runAsNonRoot: true
    seccompProfile:
      type: RuntimeDefault
  containers:
    - image: "docker.io/ocpqe/hello-pod"
      name: hello-pod
      securityContext:
        allowPrivilegeEscalation: false
        capabilities:
          drop: [ALL]
  affinity:
    nodeAffinity:
      requiredDuringSchedulingIgnoredDuringExecution:
        nodeSelectorTerms:
          - matchExpressions:
            - key: "zone"
              operator: In
              values:
              - us
#...
The pod-s1 pod cannot be scheduled on Node1:
$ oc describe pod pod-s1
Example output
...

Events:
 FirstSeen LastSeen Count From              SubObjectPath  Type                Reason
 --------- -------- ----- ----              -------------  --------            ------
 1m        33s      8     default-scheduler Warning        FailedScheduling    No nodes are available that match all of the following predicates:: MatchNodeSelector (1).
4.4. Placing pods onto overcommited nodes
In an overcommited state, the sum of the container compute resource requests and limits exceeds the resources available on the system. Overcommitment might be desirable in development environments where a trade-off of guaranteed performance for capacity is acceptable.
Requests and limits enable administrators to allow and manage the overcommitment of resources on a node. The scheduler uses requests for scheduling your container and providing a minimum service guarantee. Limits constrain the amount of compute resource that may be consumed on your node.
4.4.1. Understanding overcommitment
Requests and limits enable administrators to allow and manage the overcommitment of resources on a node. The scheduler uses requests for scheduling your container and providing a minimum service guarantee. Limits constrain the amount of compute resource that may be consumed on your node.
OpenShift Dedicated administrators can control the level of overcommit and manage container density on nodes by configuring masters to override the ratio between request and limit set on developer containers. In conjunction with a per-project LimitRange object specifying limits and defaults, this adjusts the container limit and request to achieve the desired level of overcommit.
That these overrides have no effect if no limits have been set on containers. Create a LimitRange object with default limits, per individual project, or in the project template, to ensure that the overrides apply.
After these overrides, the container limits and requests must still be validated by any LimitRange object in the project. It is possible, for example, for developers to specify a limit close to the minimum limit, and have the request then be overridden below the minimum limit, causing the pod to be forbidden. This unfortunate user experience should be addressed with future work, but for now, configure this capability and LimitRange objects with caution.
4.4.2. Understanding nodes overcommitment
In an overcommitted environment, it is important to properly configure your node to provide best system behavior.
When the node starts, it ensures that the kernel tunable flags for memory management are set properly. The kernel should never fail memory allocations unless it runs out of physical memory.
To ensure this behavior, OpenShift Dedicated configures the kernel to always overcommit memory by setting the vm.overcommit_memory parameter to 1, overriding the default operating system setting.
OpenShift Dedicated also configures the kernel not to panic when it runs out of memory by setting the vm.panic_on_oom parameter to 0. A setting of 0 instructs the kernel to call oom_killer in an Out of Memory (OOM) condition, which kills processes based on priority
You can view the current setting by running the following commands on your nodes:
$ sysctl -a |grep commit
Example output
#...
vm.overcommit_memory = 0
#...
$ sysctl -a |grep panic
Example output
#...
vm.panic_on_oom = 0
#...
The above flags should already be set on nodes, and no further action is required.
You can also perform the following configurations for each node:
- Disable or enforce CPU limits using CPU CFS quotas
- Reserve resources for system processes
- Reserve memory across quality of service tiers
4.5. Controlling pod placement using node taints
Taints and tolerations allow the node to control which pods should (or should not) be scheduled on them.
4.5.1. Understanding taints and tolerations
A taint allows a node to refuse a pod to be scheduled unless that pod has a matching toleration.
You apply taints to a node through the Node specification (NodeSpec) and apply tolerations to a pod through the Pod specification (PodSpec). When you apply a taint a node, the scheduler cannot place a pod on that node unless the pod can tolerate the taint.
Example taint in a node specification
apiVersion: v1
kind: Node
metadata:
  name: my-node
#...
spec:
  taints:
  - effect: NoExecute
    key: key1
    value: value1
#...
Example toleration in a Pod spec
apiVersion: v1
kind: Pod
metadata:
  name: my-pod
#...
spec:
  tolerations:
  - key: "key1"
    operator: "Equal"
    value: "value1"
    effect: "NoExecute"
    tolerationSeconds: 3600
#...
Taints and tolerations consist of a key, value, and effect.
Table 4.1. Taint and toleration components
| Parameter | Description | ||||||
|---|---|---|---|---|---|---|---|
|
|
The | ||||||
|
|
The | ||||||
|
| The effect is one of the following:
| ||||||
|
|
|
If you add a
NoScheduletaint to a control plane node, the node must have thenode-role.kubernetes.io/master=:NoScheduletaint, which is added by default.For example:
apiVersion: v1
kind: Node
metadata:
  annotations:
    machine.openshift.io/machine: openshift-machine-api/ci-ln-62s7gtb-f76d1-v8jxv-master-0
    machineconfiguration.openshift.io/currentConfig: rendered-master-cdc1ab7da414629332cc4c3926e6e59c
  name: my-node
#...
spec:
  taints:
  - effect: NoSchedule
    key: node-role.kubernetes.io/master
#...
A toleration matches a taint:
If the
operatorparameter is set toEqual:-
the
keyparameters are the same; -
the
valueparameters are the same; -
the
effectparameters are the same.
-
the
If the
operatorparameter is set toExists:-
the
keyparameters are the same; -
the
effectparameters are the same.
-
the
The following taints are built into OpenShift Dedicated:
-
node.kubernetes.io/not-ready: The node is not ready. This corresponds to the node conditionReady=False. -
node.kubernetes.io/unreachable: The node is unreachable from the node controller. This corresponds to the node conditionReady=Unknown. -
node.kubernetes.io/memory-pressure: The node has memory pressure issues. This corresponds to the node conditionMemoryPressure=True. -
node.kubernetes.io/disk-pressure: The node has disk pressure issues. This corresponds to the node conditionDiskPressure=True. -
node.kubernetes.io/network-unavailable: The node network is unavailable. -
node.kubernetes.io/unschedulable: The node is unschedulable. -
node.cloudprovider.kubernetes.io/uninitialized: When the node controller is started with an external cloud provider, this taint is set on a node to mark it as unusable. After a controller from the cloud-controller-manager initializes this node, the kubelet removes this taint. node.kubernetes.io/pid-pressure: The node has pid pressure. This corresponds to the node conditionPIDPressure=True.ImportantOpenShift Dedicated does not set a default pid.available
evictionHard.
4.5.1.1. Understanding how to use toleration seconds to delay pod evictions
You can specify how long a pod can remain bound to a node before being evicted by specifying the tolerationSeconds parameter in the Pod specification or MachineSet object. If a taint with the NoExecute effect is added to a node, a pod that does tolerate the taint, which has the tolerationSeconds parameter, the pod is not evicted until that time period expires.
Example output
apiVersion: v1
kind: Pod
metadata:
  name: my-pod
#...
spec:
  tolerations:
  - key: "key1"
    operator: "Equal"
    value: "value1"
    effect: "NoExecute"
    tolerationSeconds: 3600
#...
Here, if this pod is running but does not have a matching toleration, the pod stays bound to the node for 3,600 seconds and then be evicted. If the taint is removed before that time, the pod is not evicted.
4.5.1.2. Understanding how to use multiple taints
You can put multiple taints on the same node and multiple tolerations on the same pod. OpenShift Dedicated processes multiple taints and tolerations as follows:
- Process the taints for which the pod has a matching toleration.
The remaining unmatched taints have the indicated effects on the pod:
-
If there is at least one unmatched taint with effect
NoSchedule, OpenShift Dedicated cannot schedule a pod onto that node. -
If there is no unmatched taint with effect
NoSchedulebut there is at least one unmatched taint with effectPreferNoSchedule, OpenShift Dedicated tries to not schedule the pod onto the node. If there is at least one unmatched taint with effect
NoExecute, OpenShift Dedicated evicts the pod from the node if it is already running on the node, or the pod is not scheduled onto the node if it is not yet running on the node.- Pods that do not tolerate the taint are evicted immediately.
-
Pods that tolerate the taint without specifying
tolerationSecondsin theirPodspecification remain bound forever. -
Pods that tolerate the taint with a specified
tolerationSecondsremain bound for the specified amount of time.
-
If there is at least one unmatched taint with effect
For example:
Add the following taints to the node:
$ oc adm taint nodes node1 key1=value1:NoSchedule
$ oc adm taint nodes node1 key1=value1:NoExecute
$ oc adm taint nodes node1 key2=value2:NoSchedule
The pod has the following tolerations:
apiVersion: v1
kind: Pod
metadata:
  name: my-pod
#...
spec:
  tolerations:
  - key: "key1"
    operator: "Equal"
    value: "value1"
    effect: "NoSchedule"
  - key: "key1"
    operator: "Equal"
    value: "value1"
    effect: "NoExecute"
#...
In this case, the pod cannot be scheduled onto the node, because there is no toleration matching the third taint. The pod continues running if it is already running on the node when the taint is added, because the third taint is the only one of the three that is not tolerated by the pod.
4.5.1.3. Understanding pod scheduling and node conditions (taint node by condition)
The Taint Nodes By Condition feature, which is enabled by default, automatically taints nodes that report conditions such as memory pressure and disk pressure. If a node reports a condition, a taint is added until the condition clears. The taints have the NoSchedule effect, which means no pod can be scheduled on the node unless the pod has a matching toleration.
The scheduler checks for these taints on nodes before scheduling pods. If the taint is present, the pod is scheduled on a different node. Because the scheduler checks for taints and not the actual node conditions, you configure the scheduler to ignore some of these node conditions by adding appropriate pod tolerations.
To ensure backward compatibility, the daemon set controller automatically adds the following tolerations to all daemons:
- node.kubernetes.io/memory-pressure
- node.kubernetes.io/disk-pressure
- node.kubernetes.io/unschedulable (1.10 or later)
- node.kubernetes.io/network-unavailable (host network only)
You can also add arbitrary tolerations to daemon sets.
The control plane also adds the node.kubernetes.io/memory-pressure toleration on pods that have a QoS class. This is because Kubernetes manages pods in the Guaranteed or Burstable QoS classes. The new BestEffort pods do not get scheduled onto the affected node.
4.5.1.4. Understanding evicting pods by condition (taint-based evictions)
The Taint-Based Evictions feature, which is enabled by default, evicts pods from a node that experiences specific conditions, such as not-ready and unreachable. When a node experiences one of these conditions, OpenShift Dedicated automatically adds taints to the node, and starts evicting and rescheduling the pods on different nodes.
Taint Based Evictions have a NoExecute effect, where any pod that does not tolerate the taint is evicted immediately and any pod that does tolerate the taint will never be evicted, unless the pod uses the tolerationSeconds parameter.
The tolerationSeconds parameter allows you to specify how long a pod stays bound to a node that has a node condition. If the condition still exists after the tolerationSeconds period, the taint remains on the node and the pods with a matching toleration are evicted. If the condition clears before the tolerationSeconds period, pods with matching tolerations are not removed.
If you use the tolerationSeconds parameter with no value, pods are never evicted because of the not ready and unreachable node conditions.
OpenShift Dedicated evicts pods in a rate-limited way to prevent massive pod evictions in scenarios such as the master becoming partitioned from the nodes.
By default, if more than 55% of nodes in a given zone are unhealthy, the node lifecycle controller changes that zone’s state to PartialDisruption and the rate of pod evictions is reduced. For small clusters (by default, 50 nodes or less) in this state, nodes in this zone are not tainted and evictions are stopped.
For more information, see Rate limits on eviction in the Kubernetes documentation.
OpenShift Dedicated automatically adds a toleration for node.kubernetes.io/not-ready and node.kubernetes.io/unreachable with tolerationSeconds=300, unless the Pod configuration specifies either toleration.
apiVersion: v1
kind: Pod
metadata:
  name: my-pod
#...
spec:
  tolerations:
  - key: node.kubernetes.io/not-ready
    operator: Exists
    effect: NoExecute
    tolerationSeconds: 300 1
  - key: node.kubernetes.io/unreachable
    operator: Exists
    effect: NoExecute
    tolerationSeconds: 300
#...- 1
- These tolerations ensure that the default pod behavior is to remain bound for five minutes after one of these node conditions problems is detected.
You can configure these tolerations as needed. For example, if you have an application with a lot of local state, you might want to keep the pods bound to node for a longer time in the event of network partition, allowing for the partition to recover and avoiding pod eviction.
Pods spawned by a daemon set are created with NoExecute tolerations for the following taints with no tolerationSeconds:
-
node.kubernetes.io/unreachable -
node.kubernetes.io/not-ready
As a result, daemon set pods are never evicted because of these node conditions.
4.5.1.5. Tolerating all taints
You can configure a pod to tolerate all taints by adding an operator: "Exists" toleration with no key and values parameters. Pods with this toleration are not removed from a node that has taints.
Pod spec for tolerating all taints
apiVersion: v1
kind: Pod
metadata:
  name: my-pod
#...
spec:
  tolerations:
  - operator: "Exists"
#...
4.5.2. Adding taints and tolerations
You add tolerations to pods and taints to nodes to allow the node to control which pods should or should not be scheduled on them. For existing pods and nodes, you should add the toleration to the pod first, then add the taint to the node to avoid pods being removed from the node before you can add the toleration.
Procedure
Add a toleration to a pod by editing the
Podspec to include atolerationsstanza:Sample pod configuration file with an Equal operator
apiVersion: v1
kind: Pod
metadata:
  name: my-pod
#...
spec:
  tolerations:
  - key: "key1" 1
    value: "value1"
    operator: "Equal"
    effect: "NoExecute"
    tolerationSeconds: 3600 2
#...
For example:
Sample pod configuration file with an Exists operator
apiVersion: v1 kind: Pod metadata: name: my-pod #... spec: tolerations: - key: "key1" operator: "Exists" 1 effect: "NoExecute" tolerationSeconds: 3600 #...- 1
- The
Existsoperator does not take avalue.
This example places a taint on
node1that has keykey1, valuevalue1, and taint effectNoExecute.Add a taint to a node by using the following command with the parameters described in the Taint and toleration components table:
$ oc adm taint nodes <node_name> <key>=<value>:<effect>
For example:
$ oc adm taint nodes node1 key1=value1:NoExecute
This command places a taint on
node1that has keykey1, valuevalue1, and effectNoExecute.NoteIf you add a
NoScheduletaint to a control plane node, the node must have thenode-role.kubernetes.io/master=:NoScheduletaint, which is added by default.For example:
apiVersion: v1
kind: Node
metadata:
  annotations:
    machine.openshift.io/machine: openshift-machine-api/ci-ln-62s7gtb-f76d1-v8jxv-master-0
    machineconfiguration.openshift.io/currentConfig: rendered-master-cdc1ab7da414629332cc4c3926e6e59c
  name: my-node
#...
spec:
  taints:
  - effect: NoSchedule
    key: node-role.kubernetes.io/master
#...
The tolerations on the pod match the taint on the node. A pod with either toleration can be scheduled onto
node1.
4.5.2.1. Adding taints and tolerations using a compute machine set
You can add taints to nodes using a compute machine set. All nodes associated with the MachineSet object are updated with the taint. Tolerations respond to taints added by a compute machine set in the same manner as taints added directly to the nodes.
Procedure
Add a toleration to a pod by editing the
Podspec to include atolerationsstanza:Sample pod configuration file with
EqualoperatorapiVersion: v1 kind: Pod metadata: name: my-pod #... spec: tolerations: - key: "key1" 1 value: "value1" operator: "Equal" effect: "NoExecute" tolerationSeconds: 3600 2 #...
For example:
Sample pod configuration file with
ExistsoperatorapiVersion: v1 kind: Pod metadata: name: my-pod #... spec: tolerations: - key: "key1" operator: "Exists" effect: "NoExecute" tolerationSeconds: 3600 #...Add the taint to the
MachineSetobject:Edit the
MachineSetYAML for the nodes you want to taint or you can create a newMachineSetobject:$ oc edit machineset <machineset>
Add the taint to the
spec.template.specsection:Example taint in a compute machine set specification
apiVersion: machine.openshift.io/v1beta1
kind: MachineSet
metadata:
  name: my-machineset
#...
spec:
#...
  template:
#...
    spec:
      taints:
      - effect: NoExecute
        key: key1
        value: value1
#...
This example places a taint that has the key
key1, valuevalue1, and taint effectNoExecuteon the nodes.Scale down the compute machine set to 0:
$ oc scale --replicas=0 machineset <machineset> -n openshift-machine-api
TipYou can alternatively apply the following YAML to scale the compute machine set:
apiVersion: machine.openshift.io/v1beta1
kind: MachineSet
metadata:
  name: <machineset>
  namespace: openshift-machine-api
spec:
  replicas: 0
Wait for the machines to be removed.
Scale up the compute machine set as needed:
$ oc scale --replicas=2 machineset <machineset> -n openshift-machine-api
Or:
$ oc edit machineset <machineset> -n openshift-machine-api
Wait for the machines to start. The taint is added to the nodes associated with the
MachineSetobject.
4.5.2.2. Binding a user to a node using taints and tolerations
If you want to dedicate a set of nodes for exclusive use by a particular set of users, add a toleration to their pods. Then, add a corresponding taint to those nodes. The pods with the tolerations are allowed to use the tainted nodes or any other nodes in the cluster.
If you want ensure the pods are scheduled to only those tainted nodes, also add a label to the same set of nodes and add a node affinity to the pods so that the pods can only be scheduled onto nodes with that label.
Procedure
To configure a node so that users can use only that node:
Add a corresponding taint to those nodes:
For example:
$ oc adm taint nodes node1 dedicated=groupName:NoSchedule
TipYou can alternatively apply the following YAML to add the taint:
kind: Node apiVersion: v1 metadata: name: my-node #... spec: taints: - key: dedicated value: groupName effect: NoSchedule #...- Add a toleration to the pods by writing a custom admission controller.
4.5.2.3. Creating a project with a node selector and toleration
You can create a project that uses a node selector and toleration, which are set as annotations, to control the placement of pods onto specific nodes. Any subsequent resources created in the project are then scheduled on nodes that have a taint matching the toleration.
Prerequisites
- A label for node selection has been added to one or more nodes by using a compute machine set or editing the node directly.
- A taint has been added to one or more nodes by using a compute machine set or editing the node directly.
Procedure
Create a
Projectresource definition, specifying a node selector and toleration in themetadata.annotationssection:Example
project.yamlfilekind: Project apiVersion: project.openshift.io/v1 metadata: name: <project_name> 1 annotations: openshift.io/node-selector: '<label>' 2 scheduler.alpha.kubernetes.io/defaultTolerations: >- [{"operator": "Exists", "effect": "NoSchedule", "key": "<key_name>"} 3 ]
Use the
oc applycommand to create the project:$ oc apply -f project.yaml
Any subsequent resources created in the <project_name> namespace should now be scheduled on the specified nodes.
Additional resources
- Adding taints and tolerations manually to nodes or with compute machine sets
4.5.2.4. Controlling nodes with special hardware using taints and tolerations
In a cluster where a small subset of nodes have specialized hardware, you can use taints and tolerations to keep pods that do not need the specialized hardware off of those nodes, leaving the nodes for pods that do need the specialized hardware. You can also require pods that need specialized hardware to use specific nodes.
You can achieve this by adding a toleration to pods that need the special hardware and tainting the nodes that have the specialized hardware.
Procedure
To ensure nodes with specialized hardware are reserved for specific pods:
Add a toleration to pods that need the special hardware.
For example:
apiVersion: v1
kind: Pod
metadata:
  name: my-pod
#...
spec:
  tolerations:
    - key: "disktype"
      value: "ssd"
      operator: "Equal"
      effect: "NoSchedule"
      tolerationSeconds: 3600
#...
Taint the nodes that have the specialized hardware using one of the following commands:
$ oc adm taint nodes <node-name> disktype=ssd:NoSchedule
Or:
$ oc adm taint nodes <node-name> disktype=ssd:PreferNoSchedule
TipYou can alternatively apply the following YAML to add the taint:
kind: Node
apiVersion: v1
metadata:
  name: my_node
#...
spec:
  taints:
    - key: disktype
      value: ssd
      effect: PreferNoSchedule
#...
4.5.3. Removing taints and tolerations
You can remove taints from nodes and tolerations from pods as needed. You should add the toleration to the pod first, then add the taint to the node to avoid pods being removed from the node before you can add the toleration.
Procedure
To remove taints and tolerations:
To remove a taint from a node:
$ oc adm taint nodes <node-name> <key>-
For example:
$ oc adm taint nodes ip-10-0-132-248.ec2.internal key1-
Example output
node/ip-10-0-132-248.ec2.internal untainted
To remove a toleration from a pod, edit the
Podspec to remove the toleration:apiVersion: v1 kind: Pod metadata: name: my-pod #... spec: tolerations: - key: "key2" operator: "Exists" effect: "NoExecute" tolerationSeconds: 3600 #...
4.6. Placing pods on specific nodes using node selectors
A node selector specifies a map of key/value pairs that are defined using custom labels on nodes and selectors specified in pods.
For the pod to be eligible to run on a node, the pod must have the same key/value node selector as the label on the node.
4.6.1. About node selectors
You can use node selectors on pods and labels on nodes to control where the pod is scheduled. With node selectors, OpenShift Dedicated schedules the pods on nodes that contain matching labels.
You can use a node selector to place specific pods on specific nodes, cluster-wide node selectors to place new pods on specific nodes anywhere in the cluster, and project node selectors to place new pods in a project on specific nodes.
For example, as a cluster administrator, you can create an infrastructure where application developers can deploy pods only onto the nodes closest to their geographical location by including a node selector in every pod they create. In this example, the cluster consists of five data centers spread across two regions. In the U.S., label the nodes as us-east, us-central, or us-west. In the Asia-Pacific region (APAC), label the nodes as apac-east or apac-west. The developers can add a node selector to the pods they create to ensure the pods get scheduled on those nodes.
A pod is not scheduled if the Pod object contains a node selector, but no node has a matching label.
If you are using node selectors and node affinity in the same pod configuration, the following rules control pod placement onto nodes:
-
If you configure both
nodeSelectorandnodeAffinity, both conditions must be satisfied for the pod to be scheduled onto a candidate node. -
If you specify multiple
nodeSelectorTermsassociated withnodeAffinitytypes, then the pod can be scheduled onto a node if one of thenodeSelectorTermsis satisfied. -
If you specify multiple
matchExpressionsassociated withnodeSelectorTerms, then the pod can be scheduled onto a node only if allmatchExpressionsare satisfied.
- Node selectors on specific pods and nodes
You can control which node a specific pod is scheduled on by using node selectors and labels.
To use node selectors and labels, first label the node to avoid pods being descheduled, then add the node selector to the pod.
NoteYou cannot add a node selector directly to an existing scheduled pod. You must label the object that controls the pod, such as deployment config.
For example, the following
Nodeobject has theregion: eastlabel:Sample
Nodeobject with a labelkind: Node apiVersion: v1 metadata: name: ip-10-0-131-14.ec2.internal selfLink: /api/v1/nodes/ip-10-0-131-14.ec2.internal uid: 7bc2580a-8b8e-11e9-8e01-021ab4174c74 resourceVersion: '478704' creationTimestamp: '2019-06-10T14:46:08Z' labels: kubernetes.io/os: linux topology.kubernetes.io/zone: us-east-1a node.openshift.io/os_version: '4.5' node-role.kubernetes.io/worker: '' topology.kubernetes.io/region: us-east-1 node.openshift.io/os_id: rhcos node.kubernetes.io/instance-type: m4.large kubernetes.io/hostname: ip-10-0-131-14 kubernetes.io/arch: amd64 region: east 1 type: user-node #...- 1
- Labels to match the pod node selector.
A pod has the
type: user-node,region: eastnode selector:Sample
Podobject with node selectorsapiVersion: v1 kind: Pod metadata: name: s1 #... spec: nodeSelector: 1 region: east type: user-node #...- 1
- Node selectors to match the node label. The node must have a label for each node selector.
When you create the pod using the example pod spec, it can be scheduled on the example node.
- Default cluster-wide node selectors
With default cluster-wide node selectors, when you create a pod in that cluster, OpenShift Dedicated adds the default node selectors to the pod and schedules the pod on nodes with matching labels.
For example, the following
Schedulerobject has the default cluster-wideregion=eastandtype=user-nodenode selectors:Example Scheduler Operator Custom Resource
apiVersion: config.openshift.io/v1
kind: Scheduler
metadata:
  name: cluster
#...
spec:
  defaultNodeSelector: type=user-node,region=east
#...
A node in that cluster has the
type=user-node,region=eastlabels:Example
NodeobjectapiVersion: v1 kind: Node metadata: name: ci-ln-qg1il3k-f76d1-hlmhl-worker-b-df2s4 #... labels: region: east type: user-node #...Example
Podobject with a node selectorapiVersion: v1 kind: Pod metadata: name: s1 #... spec: nodeSelector: region: east #...When you create the pod using the example pod spec in the example cluster, the pod is created with the cluster-wide node selector and is scheduled on the labeled node:
Example pod list with the pod on the labeled node
NAME     READY   STATUS    RESTARTS   AGE   IP           NODE                                       NOMINATED NODE   READINESS GATES
pod-s1   1/1     Running   0          20s   10.131.2.6   ci-ln-qg1il3k-f76d1-hlmhl-worker-b-df2s4   <none>           <none>
NoteIf the project where you create the pod has a project node selector, that selector takes preference over a cluster-wide node selector. Your pod is not created or scheduled if the pod does not have the project node selector.
- Project node selectors
With project node selectors, when you create a pod in this project, OpenShift Dedicated adds the node selectors to the pod and schedules the pods on a node with matching labels. If there is a cluster-wide default node selector, a project node selector takes preference.
For example, the following project has the
region=eastnode selector:Example
NamespaceobjectapiVersion: v1 kind: Namespace metadata: name: east-region annotations: openshift.io/node-selector: "region=east" #...The following node has the
type=user-node,region=eastlabels:Example
NodeobjectapiVersion: v1 kind: Node metadata: name: ci-ln-qg1il3k-f76d1-hlmhl-worker-b-df2s4 #... labels: region: east type: user-node #...When you create the pod using the example pod spec in this example project, the pod is created with the project node selectors and is scheduled on the labeled node:
Example
PodobjectapiVersion: v1 kind: Pod metadata: namespace: east-region #... spec: nodeSelector: region: east type: user-node #...Example pod list with the pod on the labeled node
NAME     READY   STATUS    RESTARTS   AGE   IP           NODE                                       NOMINATED NODE   READINESS GATES
pod-s1   1/1     Running   0          20s   10.131.2.6   ci-ln-qg1il3k-f76d1-hlmhl-worker-b-df2s4   <none>           <none>
A pod in the project is not created or scheduled if the pod contains different node selectors. For example, if you deploy the following pod into the example project, it is not be created:
Example
Podobject with an invalid node selectorapiVersion: v1 kind: Pod metadata: name: west-region #... spec: nodeSelector: region: west #...
4.6.2. Using node selectors to control pod placement
You can use node selectors on pods and labels on nodes to control where the pod is scheduled. With node selectors, OpenShift Dedicated schedules the pods on nodes that contain matching labels.
You add labels to a node, a compute machine set, or a machine config. Adding the label to the compute machine set ensures that if the node or machine goes down, new nodes have the label. Labels added to a node or machine config do not persist if the node or machine goes down.
To add node selectors to an existing pod, add a node selector to the controlling object for that pod, such as a ReplicaSet object, DaemonSet object, StatefulSet object, Deployment object, or DeploymentConfig object. Any existing pods under that controlling object are recreated on a node with a matching label. If you are creating a new pod, you can add the node selector directly to the pod spec. If the pod does not have a controlling object, you must delete the pod, edit the pod spec, and recreate the pod.
You cannot add a node selector directly to an existing scheduled pod.
Prerequisites
To add a node selector to existing pods, determine the controlling object for that pod. For example, the router-default-66d5cf9464-m2g75 pod is controlled by the router-default-66d5cf9464 replica set:
$ oc describe pod router-default-66d5cf9464-7pwkc
Example output
kind: Pod
apiVersion: v1
metadata:
# ...
Name:               router-default-66d5cf9464-7pwkc
Namespace:          openshift-ingress
# ...
Controlled By:      ReplicaSet/router-default-66d5cf9464
# ...
The web console lists the controlling object under ownerReferences in the pod YAML:
apiVersion: v1
kind: Pod
metadata:
  name: router-default-66d5cf9464-7pwkc
# ...
  ownerReferences:
    - apiVersion: apps/v1
      kind: ReplicaSet
      name: router-default-66d5cf9464
      uid: d81dd094-da26-11e9-a48a-128e7edf0312
      controller: true
      blockOwnerDeletion: true
# ...
Procedure
Add the matching node selector to a pod:
To add a node selector to existing and future pods, add a node selector to the controlling object for the pods:
Example
ReplicaSetobject with labelskind: ReplicaSet apiVersion: apps/v1 metadata: name: hello-node-6fbccf8d9 # ... spec: # ... template: metadata: creationTimestamp: null labels: ingresscontroller.operator.openshift.io/deployment-ingresscontroller: default pod-template-hash: 66d5cf9464 spec: nodeSelector: kubernetes.io/os: linux node-role.kubernetes.io/worker: '' type: user-node 1 # ...- 1
- Add the node selector.
To add a node selector to a specific, new pod, add the selector to the
Podobject directly:Example
Podobject with a node selectorapiVersion: v1 kind: Pod metadata: name: hello-node-6fbccf8d9 # ... spec: nodeSelector: region: east type: user-node # ...NoteYou cannot add a node selector directly to an existing scheduled pod.
Additional resources
4.7. Controlling pod placement by using pod topology spread constraints
You can use pod topology spread constraints to control the placement of your pods across nodes, zones, regions, or other user-defined topology domains.
4.7.1. About pod topology spread constraints
By using a pod topology spread constraint, you provide fine-grained control over the distribution of pods across failure domains to help achieve high availability and more efficient resource utilization.
OpenShift Dedicated administrators can label nodes to provide topology information, such as regions, zones, nodes, or other user-defined domains. After these labels are set on nodes, users can then define pod topology spread constraints to control the placement of pods across these topology domains.
You specify which pods to group together, which topology domains they are spread among, and the acceptable skew. Only pods within the same namespace are matched and grouped together when spreading due to a constraint.
4.7.2. Configuring pod topology spread constraints
The following steps demonstrate how to configure pod topology spread constraints to distribute pods that match the specified labels based on their zone.
You can specify multiple pod topology spread constraints, but you must ensure that they do not conflict with each other. All pod topology spread constraints must be satisfied for a pod to be placed.
Prerequisites
-
A user with the
dedicated-adminrole has added the required labels to nodes.
Procedure
Create a
Podspec and specify a pod topology spread constraint:Example
pod-spec.yamlfileapiVersion: v1 kind: Pod metadata: name: my-pod labels: region: us-east spec: securityContext: runAsNonRoot: true seccompProfile: type: RuntimeDefault topologySpreadConstraints: - maxSkew: 1 1 topologyKey: topology.kubernetes.io/zone 2 whenUnsatisfiable: DoNotSchedule 3 labelSelector: 4 matchLabels: region: us-east 5 matchLabelKeys: - my-pod-label 6 containers: - image: "docker.io/ocpqe/hello-pod" name: hello-pod securityContext: allowPrivilegeEscalation: false capabilities: drop: [ALL]- 1
- The maximum difference in number of pods between any two topology domains. The default is
1, and you cannot specify a value of0. - 2
- The key of a node label. Nodes with this key and identical value are considered to be in the same topology.
- 3
- How to handle a pod if it does not satisfy the spread constraint. The default is
DoNotSchedule, which tells the scheduler not to schedule the pod. Set toScheduleAnywayto still schedule the pod, but the scheduler prioritizes honoring the skew to not make the cluster more imbalanced. - 4
- Pods that match this label selector are counted and recognized as a group when spreading to satisfy the constraint. Be sure to specify a label selector, otherwise no pods can be matched.
- 5
- Be sure that this
Podspec also sets its labels to match this label selector if you want it to be counted properly in the future. - 6
- A list of pod label keys to select which pods to calculate spreading over.
Create the pod:
$ oc create -f pod-spec.yaml
4.7.3. Example pod topology spread constraints
The following examples demonstrate pod topology spread constraint configurations.
4.7.3.1. Single pod topology spread constraint example
This example Pod spec defines one pod topology spread constraint. It matches on pods labeled region: us-east, distributes among zones, specifies a skew of 1, and does not schedule the pod if it does not meet these requirements.
kind: Pod
apiVersion: v1
metadata:
  name: my-pod
  labels:
    region: us-east
spec:
  securityContext:
    runAsNonRoot: true
    seccompProfile:
      type: RuntimeDefault
  topologySpreadConstraints:
  - maxSkew: 1
    topologyKey: topology.kubernetes.io/zone
    whenUnsatisfiable: DoNotSchedule
    labelSelector:
      matchLabels:
        region: us-east
  containers:
  - image: "docker.io/ocpqe/hello-pod"
    name: hello-pod
    securityContext:
      allowPrivilegeEscalation: false
      capabilities:
        drop: [ALL]
4.7.3.2. Multiple pod topology spread constraints example
This example Pod spec defines two pod topology spread constraints. Both match on pods labeled region: us-east, specify a skew of 1, and do not schedule the pod if it does not meet these requirements.
The first constraint distributes pods based on a user-defined label node, and the second constraint distributes pods based on a user-defined label rack. Both constraints must be met for the pod to be scheduled.
kind: Pod
apiVersion: v1
metadata:
  name: my-pod-2
  labels:
    region: us-east
spec:
  securityContext:
    runAsNonRoot: true
    seccompProfile:
      type: RuntimeDefault
  topologySpreadConstraints:
  - maxSkew: 1
    topologyKey: node
    whenUnsatisfiable: DoNotSchedule
    labelSelector:
      matchLabels:
        region: us-east
  - maxSkew: 1
    topologyKey: rack
    whenUnsatisfiable: DoNotSchedule
    labelSelector:
      matchLabels:
        region: us-east
  containers:
  - image: "docker.io/ocpqe/hello-pod"
    name: hello-pod
    securityContext:
      allowPrivilegeEscalation: false
      capabilities:
        drop: [ALL]
Chapter 5. Using Jobs and DaemonSets
5.1. Running background tasks on nodes automatically with daemon sets
As an administrator, you can create and use daemon sets to run replicas of a pod on specific or all nodes in an OpenShift Dedicated cluster.
A daemon set ensures that all (or some) nodes run a copy of a pod. As nodes are added to the cluster, pods are added to the cluster. As nodes are removed from the cluster, those pods are removed through garbage collection. Deleting a daemon set will clean up the pods it created.
You can use daemon sets to create shared storage, run a logging pod on every node in your cluster, or deploy a monitoring agent on every node.
For security reasons, the cluster administrators and the project administrators can create daemon sets.
For more information on daemon sets, see the Kubernetes documentation.
Daemon set scheduling is incompatible with project’s default node selector. If you fail to disable it, the daemon set gets restricted by merging with the default node selector. This results in frequent pod recreates on the nodes that got unselected by the merged node selector, which in turn puts unwanted load on the cluster.
5.1.1. Scheduled by default scheduler
A daemon set ensures that all eligible nodes run a copy of a pod. Normally, the node that a pod runs on is selected by the Kubernetes scheduler. However, daemon set pods are created and scheduled by the daemon set controller. That introduces the following issues:
-
Inconsistent pod behavior: Normal pods waiting to be scheduled are created and in Pending state, but daemon set pods are not created in
Pendingstate. This is confusing to the user. - Pod preemption is handled by default scheduler. When preemption is enabled, the daemon set controller will make scheduling decisions without considering pod priority and preemption.
The ScheduleDaemonSetPods feature, enabled by default in OpenShift Dedicated, lets you schedule daemon sets using the default scheduler instead of the daemon set controller, by adding the NodeAffinity term to the daemon set pods, instead of the spec.nodeName term. The default scheduler is then used to bind the pod to the target host. If node affinity of the daemon set pod already exists, it is replaced. The daemon set controller only performs these operations when creating or modifying daemon set pods, and no changes are made to the spec.template of the daemon set.
kind: Pod
apiVersion: v1
metadata:
  name: hello-node-6fbccf8d9-9tmzr
#...
spec:
  nodeAffinity:
    requiredDuringSchedulingIgnoredDuringExecution:
      nodeSelectorTerms:
      - matchFields:
        - key: metadata.name
          operator: In
          values:
          - target-host-name
#...
In addition, a node.kubernetes.io/unschedulable:NoSchedule toleration is added automatically to daemon set pods. The default scheduler ignores unschedulable Nodes when scheduling daemon set pods.
5.1.2. Creating daemonsets
When creating daemon sets, the nodeSelector field is used to indicate the nodes on which the daemon set should deploy replicas.
Prerequisites
Before you start using daemon sets, disable the default project-wide node selector in your namespace, by setting the namespace annotation
openshift.io/node-selectorto an empty string:$ oc patch namespace myproject -p \ '{"metadata": {"annotations": {"openshift.io/node-selector": ""}}}'TipYou can alternatively apply the following YAML to disable the default project-wide node selector for a namespace:
apiVersion: v1
kind: Namespace
metadata:
  name: <namespace>
  annotations:
    openshift.io/node-selector: ''
#...
Procedure
To create a daemon set:
Define the daemon set yaml file:
apiVersion: apps/v1 kind: DaemonSet metadata: name: hello-daemonset spec: selector: matchLabels: name: hello-daemonset 1 template: metadata: labels: name: hello-daemonset 2 spec: nodeSelector: 3 role: worker containers: - image: openshift/hello-openshift imagePullPolicy: Always name: registry ports: - containerPort: 80 protocol: TCP resources: {} terminationMessagePath: /dev/termination-log serviceAccount: default terminationGracePeriodSeconds: 10 #...Create the daemon set object:
$ oc create -f daemonset.yaml
To verify that the pods were created, and that each node has a pod replica:
Find the daemonset pods:
$ oc get pods
Example output
hello-daemonset-cx6md   1/1       Running   0          2m
hello-daemonset-e3md9   1/1       Running   0          2m
View the pods to verify the pod has been placed onto the node:
$ oc describe pod/hello-daemonset-cx6md|grep Node
Example output
Node: openshift-node01.hostname.com/10.14.20.134
$ oc describe pod/hello-daemonset-e3md9|grep Node
Example output
Node: openshift-node02.hostname.com/10.14.20.137
- If you update a daemon set pod template, the existing pod replicas are not affected.
- If you delete a daemon set and then create a new daemon set with a different template but the same label selector, it recognizes any existing pod replicas as having matching labels and thus does not update them or create new replicas despite a mismatch in the pod template.
- If you change node labels, the daemon set adds pods to nodes that match the new labels and deletes pods from nodes that do not match the new labels.
To update a daemon set, force new pod replicas to be created by deleting the old replicas or nodes.
5.2. Running tasks in pods using jobs
A job executes a task in your OpenShift Dedicated cluster.
A job tracks the overall progress of a task and updates its status with information about active, succeeded, and failed pods. Deleting a job will clean up any pod replicas it created. Jobs are part of the Kubernetes API, which can be managed with oc commands like other object types.
Sample Job specification
apiVersion: batch/v1
kind: Job
metadata:
  name: pi
spec:
  parallelism: 1    1
  completions: 1    2
  activeDeadlineSeconds: 1800 3
  backoffLimit: 6   4
  template:         5
    metadata:
      name: pi
    spec:
      containers:
      - name: pi
        image: perl
        command: ["perl",  "-Mbignum=bpi", "-wle", "print bpi(2000)"]
      restartPolicy: OnFailure    6
#...
Additional resources
- Jobs in the Kubernetes documentation
5.2.1. Understanding jobs and cron jobs
A job tracks the overall progress of a task and updates its status with information about active, succeeded, and failed pods. Deleting a job cleans up any pods it created. Jobs are part of the Kubernetes API, which can be managed with oc commands like other object types.
There are two possible resource types that allow creating run-once objects in OpenShift Dedicated:
- Job
A regular job is a run-once object that creates a task and ensures the job finishes.
There are three main types of task suitable to run as a job:
Non-parallel jobs:
- A job that starts only one pod, unless the pod fails.
- The job is complete as soon as its pod terminates successfully.
Parallel jobs with a fixed completion count:
- a job that starts multiple pods.
-
The job represents the overall task and is complete when there is one successful pod for each value in the range
1to thecompletionsvalue.
Parallel jobs with a work queue:
- A job with multiple parallel worker processes in a given pod.
- OpenShift Dedicated coordinates pods to determine what each should work on or use an external queue service.
- Each pod is independently capable of determining whether or not all peer pods are complete and that the entire job is done.
- When any pod from the job terminates with success, no new pods are created.
- When at least one pod has terminated with success and all pods are terminated, the job is successfully completed.
When any pod has exited with success, no other pod should be doing any work for this task or writing any output. Pods should all be in the process of exiting.
For more information about how to make use of the different types of job, see Job Patterns in the Kubernetes documentation.
- Cron job
A job can be scheduled to run multiple times, using a cron job.
A cron job builds on a regular job by allowing you to specify how the job should be run. Cron jobs are part of the Kubernetes API, which can be managed with
occommands like other object types.Cron jobs are useful for creating periodic and recurring tasks, like running backups or sending emails. Cron jobs can also schedule individual tasks for a specific time, such as if you want to schedule a job for a low activity period. A cron job creates a
Jobobject based on the timezone configured on the control plane node that runs the cronjob controller.WarningA cron job creates a
Jobobject approximately once per execution time of its schedule, but there are circumstances in which it fails to create a job or two jobs might be created. Therefore, jobs must be idempotent and you must configure history limits.
5.2.1.1. Understanding how to create jobs
Both resource types require a job configuration that consists of the following key parts:
- A pod template, which describes the pod that OpenShift Dedicated creates.
The
parallelismparameter, which specifies how many pods running in parallel at any point in time should execute a job.-
For non-parallel jobs, leave unset. When unset, defaults to
1.
-
For non-parallel jobs, leave unset. When unset, defaults to
The
completionsparameter, specifying how many successful pod completions are needed to finish a job.-
For non-parallel jobs, leave unset. When unset, defaults to
1. - For parallel jobs with a fixed completion count, specify a value.
-
For parallel jobs with a work queue, leave unset. When unset defaults to the
parallelismvalue.
-
For non-parallel jobs, leave unset. When unset, defaults to
5.2.1.2. Understanding how to set a maximum duration for jobs
When defining a job, you can define its maximum duration by setting the activeDeadlineSeconds field. It is specified in seconds and is not set by default. When not set, there is no maximum duration enforced.
The maximum duration is counted from the time when a first pod gets scheduled in the system, and defines how long a job can be active. It tracks overall time of an execution. After reaching the specified timeout, the job is terminated by OpenShift Dedicated.
5.2.1.3. Understanding how to set a job back off policy for pod failure
A job can be considered failed, after a set amount of retries due to a logical error in configuration or other similar reasons. Failed pods associated with the job are recreated by the controller with an exponential back off delay (10s, 20s, 40s …) capped at six minutes. The limit is reset if no new failed pods appear between controller checks.
Use the spec.backoffLimit parameter to set the number of retries for a job.
5.2.1.4. Understanding how to configure a cron job to remove artifacts
Cron jobs can leave behind artifact resources such as jobs or pods. As a user it is important to configure history limits so that old jobs and their pods are properly cleaned. There are two fields within cron job’s spec responsible for that:
-
.spec.successfulJobsHistoryLimit. The number of successful finished jobs to retain (defaults to 3). -
.spec.failedJobsHistoryLimit. The number of failed finished jobs to retain (defaults to 1).
5.2.1.5. Known limitations
The job specification restart policy only applies to the pods, and not the job controller. However, the job controller is hard-coded to keep retrying jobs to completion.
As such, restartPolicy: Never or --restart=Never results in the same behavior as restartPolicy: OnFailure or --restart=OnFailure. That is, when a job fails it is restarted automatically until it succeeds (or is manually discarded). The policy only sets which subsystem performs the restart.
With the Never policy, the job controller performs the restart. With each attempt, the job controller increments the number of failures in the job status and create new pods. This means that with each failed attempt, the number of pods increases.
With the OnFailure policy, kubelet performs the restart. Each attempt does not increment the number of failures in the job status. In addition, kubelet will retry failed jobs starting pods on the same nodes.
5.2.2. Creating jobs
You create a job in OpenShift Dedicated by creating a job object.
Procedure
To create a job:
Create a YAML file similar to the following:
apiVersion: batch/v1
kind: Job
metadata:
  name: pi
spec:
  parallelism: 1    1
  completions: 1    2
  activeDeadlineSeconds: 1800 3
  backoffLimit: 6   4
  template:         5
    metadata:
      name: pi
    spec:
      containers:
      - name: pi
        image: perl
        command: ["perl",  "-Mbignum=bpi", "-wle", "print bpi(2000)"]
      restartPolicy: OnFailure    6
#...
- 1
- Optional: Specify how many pod replicas a job should run in parallel; defaults to
1.-
For non-parallel jobs, leave unset. When unset, defaults to
1.
-
For non-parallel jobs, leave unset. When unset, defaults to
- 2
- Optional: Specify how many successful pod completions are needed to mark a job completed.
-
For non-parallel jobs, leave unset. When unset, defaults to
1. - For parallel jobs with a fixed completion count, specify the number of completions.
-
For parallel jobs with a work queue, leave unset. When unset defaults to the
parallelismvalue.
-
For non-parallel jobs, leave unset. When unset, defaults to
- 3
- Optional: Specify the maximum duration the job can run.
- 4
- Optional: Specify the number of retries for a job. This field defaults to six.
- 5
- Specify the template for the pod the controller creates.
- 6
- Specify the restart policy of the pod:
-
Never. Do not restart the job. -
OnFailure. Restart the job only if it fails. Always. Always restart the job.For details on how OpenShift Dedicated uses restart policy with failed containers, see the Example States in the Kubernetes documentation.
-
Create the job:
$ oc create -f <file-name>.yaml
You can also create and launch a job from a single command using oc create job. The following command creates and launches a job similar to the one specified in the previous example:
$ oc create job pi --image=perl -- perl -Mbignum=bpi -wle 'print bpi(2000)'
5.2.3. Creating cron jobs
You create a cron job in OpenShift Dedicated by creating a job object.
Procedure
To create a cron job:
Create a YAML file similar to the following:
apiVersion: batch/v1
kind: CronJob
metadata:
  name: pi
spec:
  schedule: "*/1 * * * *"          1
  concurrencyPolicy: "Replace"     2
  startingDeadlineSeconds: 200     3
  suspend: true                    4
  successfulJobsHistoryLimit: 3    5
  failedJobsHistoryLimit: 1        6
  jobTemplate:                     7
    spec:
      template:
        metadata:
          labels:                  8
            parent: "cronjobpi"
        spec:
          containers:
          - name: pi
            image: perl
            command: ["perl",  "-Mbignum=bpi", "-wle", "print bpi(2000)"]
          restartPolicy: OnFailure 9
- 1
- Schedule for the job specified in cron format. In this example, the job will run every minute.
- 2
- An optional concurrency policy, specifying how to treat concurrent jobs within a cron job. Only one of the following concurrent policies may be specified. If not specified, this defaults to allowing concurrent executions.
-
Allowallows cron jobs to run concurrently. -
Forbidforbids concurrent runs, skipping the next run if the previous has not finished yet. -
Replacecancels the currently running job and replaces it with a new one.
-
- 3
- An optional deadline (in seconds) for starting the job if it misses its scheduled time for any reason. Missed jobs executions will be counted as failed ones. If not specified, there is no deadline.
- 4
- An optional flag allowing the suspension of a cron job. If set to
true, all subsequent executions will be suspended. - 5
- The number of successful finished jobs to retain (defaults to 3).
- 6
- The number of failed finished jobs to retain (defaults to 1).
- 7
- Job template. This is similar to the job example.
- 8
- Sets a label for jobs spawned by this cron job.
- 9
- The restart policy of the pod. This does not apply to the job controller.Note
The
.spec.successfulJobsHistoryLimitand.spec.failedJobsHistoryLimitfields are optional. These fields specify how many completed and failed jobs should be kept. By default, they are set to3and1respectively. Setting a limit to0corresponds to keeping none of the corresponding kind of jobs after they finish.
Create the cron job:
$ oc create -f <file-name>.yaml
You can also create and launch a cron job from a single command using oc create cronjob. The following command creates and launches a cron job similar to the one specified in the previous example:
$ oc create cronjob pi --image=perl --schedule='*/1 * * * *' -- perl -Mbignum=bpi -wle 'print bpi(2000)'
With oc create cronjob, the --schedule option accepts schedules in cron format.
Chapter 6. Working with nodes
6.1. Viewing and listing the nodes in your OpenShift Dedicated cluster
You can list all the nodes in your cluster to obtain information such as status, age, memory usage, and details about the nodes.
When you perform node management operations, the CLI interacts with node objects that are representations of actual node hosts. The master uses the information from node objects to validate nodes with health checks.
6.1.1. About listing all the nodes in a cluster
You can get detailed information on the nodes in the cluster.
The following command lists all nodes:
$ oc get nodes
The following example is a cluster with healthy nodes:
$ oc get nodes
Example output
NAME                   STATUS    ROLES     AGE       VERSION
master.example.com     Ready     master    7h        v1.28.5
node1.example.com      Ready     worker    7h        v1.28.5
node2.example.com      Ready     worker    7h        v1.28.5
The following example is a cluster with one unhealthy node:
$ oc get nodes
Example output
NAME                   STATUS                      ROLES     AGE       VERSION
master.example.com     Ready                       master    7h        v1.28.5
node1.example.com      NotReady,SchedulingDisabled worker    7h        v1.28.5
node2.example.com      Ready                       worker    7h        v1.28.5
The conditions that trigger a
NotReadystatus are shown later in this section.The
-o wideoption provides additional information on nodes.$ oc get nodes -o wide
Example output
NAME                STATUS   ROLES    AGE    VERSION   INTERNAL-IP    EXTERNAL-IP   OS-IMAGE                                                       KERNEL-VERSION                 CONTAINER-RUNTIME
master.example.com  Ready    master   171m   v1.28.5   10.0.129.108   <none>        Red Hat Enterprise Linux CoreOS 48.83.202103210901-0 (Ootpa)   4.18.0-240.15.1.el8_3.x86_64   cri-o://1.28.5-30.rhaos4.10.gitf2f339d.el8-dev
node1.example.com   Ready    worker   72m    v1.28.5   10.0.129.222   <none>        Red Hat Enterprise Linux CoreOS 48.83.202103210901-0 (Ootpa)   4.18.0-240.15.1.el8_3.x86_64   cri-o://1.28.5-30.rhaos4.10.gitf2f339d.el8-dev
node2.example.com   Ready    worker   164m   v1.28.5   10.0.142.150   <none>        Red Hat Enterprise Linux CoreOS 48.83.202103210901-0 (Ootpa)   4.18.0-240.15.1.el8_3.x86_64   cri-o://1.28.5-30.rhaos4.10.gitf2f339d.el8-dev
The following command lists information about a single node:
$ oc get node <node>
For example:
$ oc get node node1.example.com
Example output
NAME                   STATUS    ROLES     AGE       VERSION
node1.example.com      Ready     worker    7h        v1.28.5
The following command provides more detailed information about a specific node, including the reason for the current condition:
$ oc describe node <node>
For example:
$ oc describe node node1.example.com
Example output
Name:               node1.example.com 1
Roles:              worker 2
Labels:             kubernetes.io/os=linux
                    kubernetes.io/hostname=ip-10-0-131-14
                    kubernetes.io/arch=amd64 3
                    node-role.kubernetes.io/worker=
                    node.kubernetes.io/instance-type=m4.large
                    node.openshift.io/os_id=rhcos
                    node.openshift.io/os_version=4.5
                    region=east
                    topology.kubernetes.io/region=us-east-1
                    topology.kubernetes.io/zone=us-east-1a
Annotations:        cluster.k8s.io/machine: openshift-machine-api/ahardin-worker-us-east-2a-q5dzc  4
                    machineconfiguration.openshift.io/currentConfig: worker-309c228e8b3a92e2235edd544c62fea8
                    machineconfiguration.openshift.io/desiredConfig: worker-309c228e8b3a92e2235edd544c62fea8
                    machineconfiguration.openshift.io/state: Done
                    volumes.kubernetes.io/controller-managed-attach-detach: true
CreationTimestamp:  Wed, 13 Feb 2019 11:05:57 -0500
Taints:             <none>  5
Unschedulable:      false
Conditions:                 6
  Type             Status  LastHeartbeatTime                 LastTransitionTime                Reason                       Message
  ----             ------  -----------------                 ------------------                ------                       -------
  OutOfDisk        False   Wed, 13 Feb 2019 15:09:42 -0500   Wed, 13 Feb 2019 11:05:57 -0500   KubeletHasSufficientDisk     kubelet has sufficient disk space available
  MemoryPressure   False   Wed, 13 Feb 2019 15:09:42 -0500   Wed, 13 Feb 2019 11:05:57 -0500   KubeletHasSufficientMemory   kubelet has sufficient memory available
  DiskPressure     False   Wed, 13 Feb 2019 15:09:42 -0500   Wed, 13 Feb 2019 11:05:57 -0500   KubeletHasNoDiskPressure     kubelet has no disk pressure
  PIDPressure      False   Wed, 13 Feb 2019 15:09:42 -0500   Wed, 13 Feb 2019 11:05:57 -0500   KubeletHasSufficientPID      kubelet has sufficient PID available
  Ready            True    Wed, 13 Feb 2019 15:09:42 -0500   Wed, 13 Feb 2019 11:07:09 -0500   KubeletReady                 kubelet is posting ready status
Addresses:   7
  InternalIP:   10.0.140.16
  InternalDNS:  ip-10-0-140-16.us-east-2.compute.internal
  Hostname:     ip-10-0-140-16.us-east-2.compute.internal
Capacity:    8
 attachable-volumes-aws-ebs:  39
 cpu:                         2
 hugepages-1Gi:               0
 hugepages-2Mi:               0
 memory:                      8172516Ki
 pods:                        250
Allocatable:
 attachable-volumes-aws-ebs:  39
 cpu:                         1500m
 hugepages-1Gi:               0
 hugepages-2Mi:               0
 memory:                      7558116Ki
 pods:                        250
System Info:    9
 Machine ID:                              63787c9534c24fde9a0cde35c13f1f66
 System UUID:                             EC22BF97-A006-4A58-6AF8-0A38DEEA122A
 Boot ID:                                 f24ad37d-2594-46b4-8830-7f7555918325
 Kernel Version:                          3.10.0-957.5.1.el7.x86_64
 OS Image:                                Red Hat Enterprise Linux CoreOS 410.8.20190520.0 (Ootpa)
 Operating System:                        linux
 Architecture:                            amd64
 Container Runtime Version:               cri-o://1.28.5-0.6.dev.rhaos4.3.git9ad059b.el8-rc2
 Kubelet Version:                         v1.28.5
 Kube-Proxy Version:                      v1.28.5
PodCIDR:                                  10.128.4.0/24
ProviderID:                               aws:///us-east-2a/i-04e87b31dc6b3e171
Non-terminated Pods:                      (12 in total)  10
  Namespace                               Name                                   CPU Requests  CPU Limits  Memory Requests  Memory Limits
  ---------                               ----                                   ------------  ----------  ---------------  -------------
  openshift-cluster-node-tuning-operator  tuned-hdl5q                            0 (0%)        0 (0%)      0 (0%)           0 (0%)
  openshift-dns                           dns-default-l69zr                      0 (0%)        0 (0%)      0 (0%)           0 (0%)
  openshift-image-registry                node-ca-9hmcg                          0 (0%)        0 (0%)      0 (0%)           0 (0%)
  openshift-ingress                       router-default-76455c45c-c5ptv         0 (0%)        0 (0%)      0 (0%)           0 (0%)
  openshift-machine-config-operator       machine-config-daemon-cvqw9            20m (1%)      0 (0%)      50Mi (0%)        0 (0%)
  openshift-marketplace                   community-operators-f67fh              0 (0%)        0 (0%)      0 (0%)           0 (0%)
  openshift-monitoring                    alertmanager-main-0                    50m (3%)      50m (3%)    210Mi (2%)       10Mi (0%)
  openshift-monitoring                    node-exporter-l7q8d                    10m (0%)      20m (1%)    20Mi (0%)        40Mi (0%)
  openshift-monitoring                    prometheus-adapter-75d769c874-hvb85    0 (0%)        0 (0%)      0 (0%)           0 (0%)
  openshift-multus                        multus-kw8w5                           0 (0%)        0 (0%)      0 (0%)           0 (0%)
  openshift-sdn                           ovs-t4dsn                              100m (6%)     0 (0%)      300Mi (4%)       0 (0%)
  openshift-sdn                           sdn-g79hg                              100m (6%)     0 (0%)      200Mi (2%)       0 (0%)
Allocated resources:
  (Total limits may be over 100 percent, i.e., overcommitted.)
  Resource                    Requests     Limits
  --------                    --------     ------
  cpu                         380m (25%)   270m (18%)
  memory                      880Mi (11%)  250Mi (3%)
  attachable-volumes-aws-ebs  0            0
Events:     11
  Type     Reason                   Age                From                      Message
  ----     ------                   ----               ----                      -------
  Normal   NodeHasSufficientPID     6d (x5 over 6d)    kubelet, m01.example.com  Node m01.example.com status is now: NodeHasSufficientPID
  Normal   NodeAllocatableEnforced  6d                 kubelet, m01.example.com  Updated Node Allocatable limit across pods
  Normal   NodeHasSufficientMemory  6d (x6 over 6d)    kubelet, m01.example.com  Node m01.example.com status is now: NodeHasSufficientMemory
  Normal   NodeHasNoDiskPressure    6d (x6 over 6d)    kubelet, m01.example.com  Node m01.example.com status is now: NodeHasNoDiskPressure
  Normal   NodeHasSufficientDisk    6d (x6 over 6d)    kubelet, m01.example.com  Node m01.example.com status is now: NodeHasSufficientDisk
  Normal   NodeHasSufficientPID     6d                 kubelet, m01.example.com  Node m01.example.com status is now: NodeHasSufficientPID
  Normal   Starting                 6d                 kubelet, m01.example.com  Starting kubelet.
#...
- 1
- The name of the node.
- 2
- The role of the node, either
masterorworker. - 3
- The labels applied to the node.
- 4
- The annotations applied to the node.
- 5
- The taints applied to the node.
- 6
- The node conditions and status. The
conditionsstanza lists theReady,PIDPressure,PIDPressure,MemoryPressure,DiskPressureandOutOfDiskstatus. These condition are described later in this section. - 7
- The IP address and hostname of the node.
- 8
- The pod resources and allocatable resources.
- 9
- Information about the node host.
- 10
- The pods on the node.
- 11
- The events reported by the node.
Among the information shown for nodes, the following node conditions appear in the output of the commands shown in this section:
Table 6.1. Node Conditions
| Condition | Description |
|---|---|
|
|
If |
|
|
If |
|
|
If |
|
|
If |
|
|
If |
|
|
If |
|
|
If |
|
| Pods cannot be scheduled for placement on the node. |
6.1.2. Listing pods on a node in your cluster
You can list all the pods on a specific node.
Procedure
To list all or selected pods on one or more nodes:
$ oc describe node <node1> <node2>
For example:
$ oc describe node ip-10-0-128-218.ec2.internal
To list all or selected pods on selected nodes:
$ oc describe node --selector=<node_selector>
$ oc describe node --selector=kubernetes.io/os
Or:
$ oc describe node -l=<pod_selector>
$ oc describe node -l node-role.kubernetes.io/worker
To list all pods on a specific node, including terminated pods:
$ oc get pod --all-namespaces --field-selector=spec.nodeName=<nodename>
6.1.3. Viewing memory and CPU usage statistics on your nodes
You can display usage statistics about nodes, which provide the runtime environments for containers. These usage statistics include CPU, memory, and storage consumption.
Prerequisites
-
You must have
cluster-readerpermission to view the usage statistics. - Metrics must be installed to view the usage statistics.
Procedure
To view the usage statistics:
$ oc adm top nodes
Example output
NAME                                   CPU(cores)   CPU%      MEMORY(bytes)   MEMORY%
ip-10-0-12-143.ec2.compute.internal    1503m        100%      4533Mi          61%
ip-10-0-132-16.ec2.compute.internal    76m          5%        1391Mi          18%
ip-10-0-140-137.ec2.compute.internal   398m         26%       2473Mi          33%
ip-10-0-142-44.ec2.compute.internal    656m         43%       6119Mi          82%
ip-10-0-146-165.ec2.compute.internal   188m         12%       3367Mi          45%
ip-10-0-19-62.ec2.compute.internal     896m         59%       5754Mi          77%
ip-10-0-44-193.ec2.compute.internal    632m         42%       5349Mi          72%
To view the usage statistics for nodes with labels:
$ oc adm top node --selector=''
You must choose the selector (label query) to filter on. Supports
=,==, and!=.
6.2. Using the Node Tuning Operator
Learn about the Node Tuning Operator and how you can use it to manage node-level tuning by orchestrating the tuned daemon.
Purpose
The Node Tuning Operator helps you manage node-level tuning by orchestrating the TuneD daemon and achieves low latency performance by using the Performance Profile controller. The majority of high-performance applications require some level of kernel tuning. The Node Tuning Operator provides a unified management interface to users of node-level sysctls and more flexibility to add custom tuning specified by user needs.
The Operator manages the containerized TuneD daemon for OpenShift Dedicated as a Kubernetes daemon set. It ensures the custom tuning specification is passed to all containerized TuneD daemons running in the cluster in the format that the daemons understand. The daemons run on all nodes in the cluster, one per node.
Node-level settings applied by the containerized TuneD daemon are rolled back on an event that triggers a profile change or when the containerized TuneD daemon is terminated gracefully by receiving and handling a termination signal.
The Node Tuning Operator uses the Performance Profile controller to implement automatic tuning to achieve low latency performance for OpenShift Dedicated applications.
The cluster administrator configures a performance profile to define node-level settings such as the following:
- Updating the kernel to kernel-rt.
- Choosing CPUs for housekeeping.
- Choosing CPUs for running workloads.
Currently, disabling CPU load balancing is not supported by cgroup v2. As a result, you might not get the desired behavior from performance profiles if you have cgroup v2 enabled. Enabling cgroup v2 is not recommended if you are using performance profiles.
The Node Tuning Operator is part of a standard OpenShift Dedicated installation in version 4.1 and later.
In earlier versions of OpenShift Dedicated, the Performance Addon Operator was used to implement automatic tuning to achieve low latency performance for OpenShift applications. In OpenShift Dedicated 4.11 and later, this functionality is part of the Node Tuning Operator.
6.2.1. Accessing an example Node Tuning Operator specification
Use this process to access an example Node Tuning Operator specification.
Procedure
Run the following command to access an example Node Tuning Operator specification:
oc get tuned.tuned.openshift.io/default -o yaml -n openshift-cluster-node-tuning-operator
The default CR is meant for delivering standard node-level tuning for the OpenShift Dedicated platform and it can only be modified to set the Operator Management state. Any other custom changes to the default CR will be overwritten by the Operator. For custom tuning, create your own Tuned CRs. Newly created CRs will be combined with the default CR and custom tuning applied to OpenShift Dedicated nodes based on node or pod labels and profile priorities.
While in certain situations the support for pod labels can be a convenient way of automatically delivering required tuning, this practice is discouraged and strongly advised against, especially in large-scale clusters. The default Tuned CR ships without pod label matching. If a custom profile is created with pod label matching, then the functionality will be enabled at that time. The pod label functionality will be deprecated in future versions of the Node Tuning Operator.
6.2.2. Custom tuning specification
The custom resource (CR) for the Operator has two major sections. The first section, profile:, is a list of TuneD profiles and their names. The second, recommend:, defines the profile selection logic.
Multiple custom tuning specifications can co-exist as multiple CRs in the Operator’s namespace. The existence of new CRs or the deletion of old CRs is detected by the Operator. All existing custom tuning specifications are merged and appropriate objects for the containerized TuneD daemons are updated.
Management state
The Operator Management state is set by adjusting the default Tuned CR. By default, the Operator is in the Managed state and the spec.managementState field is not present in the default Tuned CR. Valid values for the Operator Management state are as follows:
- Managed: the Operator will update its operands as configuration resources are updated
- Unmanaged: the Operator will ignore changes to the configuration resources
- Removed: the Operator will remove its operands and resources the Operator provisioned
Profile data
The profile: section lists TuneD profiles and their names.
profile:
- name: tuned_profile_1
  data: |
    # TuneD profile specification
    [main]
    summary=Description of tuned_profile_1 profile

    [sysctl]
    net.ipv4.ip_forward=1
    # ... other sysctl's or other TuneD daemon plugins supported by the containerized TuneD

# ...

- name: tuned_profile_n
  data: |
    # TuneD profile specification
    [main]
    summary=Description of tuned_profile_n profile

    # tuned_profile_n profile settings
Recommended profiles
The profile: selection logic is defined by the recommend: section of the CR. The recommend: section is a list of items to recommend the profiles based on a selection criteria.
recommend:
<recommend-item-1>
# ...
<recommend-item-n>
The individual items of the list:
- machineConfigLabels: 1
    <mcLabels> 2
  match: 3
    <match> 4
  priority: <priority> 5
  profile: <tuned_profile_name> 6
  operand: 7
    debug: <bool> 8
    tunedConfig:
      reapply_sysctl: <bool> 9
- 1
- Optional.
- 2
- A dictionary of key/value
MachineConfiglabels. The keys must be unique. - 3
- If omitted, profile match is assumed unless a profile with a higher priority matches first or
machineConfigLabelsis set. - 4
- An optional list.
- 5
- Profile ordering priority. Lower numbers mean higher priority (
0is the highest priority). - 6
- A TuneD profile to apply on a match. For example
tuned_profile_1. - 7
- Optional operand configuration.
- 8
- Turn debugging on or off for the TuneD daemon. Options are
truefor on orfalsefor off. The default isfalse. - 9
- Turn
reapply_sysctlfunctionality on or off for the TuneD daemon. Options aretruefor on andfalsefor off.
<match> is an optional list recursively defined as follows:
- label: <label_name> 1
  value: <label_value> 2
  type: <label_type> 3
    <match> 4
If <match> is not omitted, all nested <match> sections must also evaluate to true. Otherwise, false is assumed and the profile with the respective <match> section will not be applied or recommended. Therefore, the nesting (child <match> sections) works as logical AND operator. Conversely, if any item of the <match> list matches, the entire <match> list evaluates to true. Therefore, the list acts as logical OR operator.
If machineConfigLabels is defined, machine config pool based matching is turned on for the given recommend: list item. <mcLabels> specifies the labels for a machine config. The machine config is created automatically to apply host settings, such as kernel boot parameters, for the profile <tuned_profile_name>. This involves finding all machine config pools with machine config selector matching <mcLabels> and setting the profile <tuned_profile_name> on all nodes that are assigned the found machine config pools. To target nodes that have both master and worker roles, you must use the master role.
The list items match and machineConfigLabels are connected by the logical OR operator. The match item is evaluated first in a short-circuit manner. Therefore, if it evaluates to true, the machineConfigLabels item is not considered.
When using machine config pool based matching, it is advised to group nodes with the same hardware configuration into the same machine config pool. Not following this practice might result in TuneD operands calculating conflicting kernel parameters for two or more nodes sharing the same machine config pool.
Example: Node or pod label based matching
- match:
  - label: tuned.openshift.io/elasticsearch
    match:
    - label: node-role.kubernetes.io/master
    - label: node-role.kubernetes.io/infra
    type: pod
  priority: 10
  profile: openshift-control-plane-es
- match:
  - label: node-role.kubernetes.io/master
  - label: node-role.kubernetes.io/infra
  priority: 20
  profile: openshift-control-plane
- priority: 30
  profile: openshift-node
The CR above is translated for the containerized TuneD daemon into its recommend.conf file based on the profile priorities. The profile with the highest priority (10) is openshift-control-plane-es and, therefore, it is considered first. The containerized TuneD daemon running on a given node looks to see if there is a pod running on the same node with the tuned.openshift.io/elasticsearch label set. If not, the entire <match> section evaluates as false. If there is such a pod with the label, in order for the <match> section to evaluate to true, the node label also needs to be node-role.kubernetes.io/master or node-role.kubernetes.io/infra.
If the labels for the profile with priority 10 matched, openshift-control-plane-es profile is applied and no other profile is considered. If the node/pod label combination did not match, the second highest priority profile (openshift-control-plane) is considered. This profile is applied if the containerized TuneD pod runs on a node with labels node-role.kubernetes.io/master or node-role.kubernetes.io/infra.
Finally, the profile openshift-node has the lowest priority of 30. It lacks the <match> section and, therefore, will always match. It acts as a profile catch-all to set openshift-node profile, if no other profile with higher priority matches on a given node.
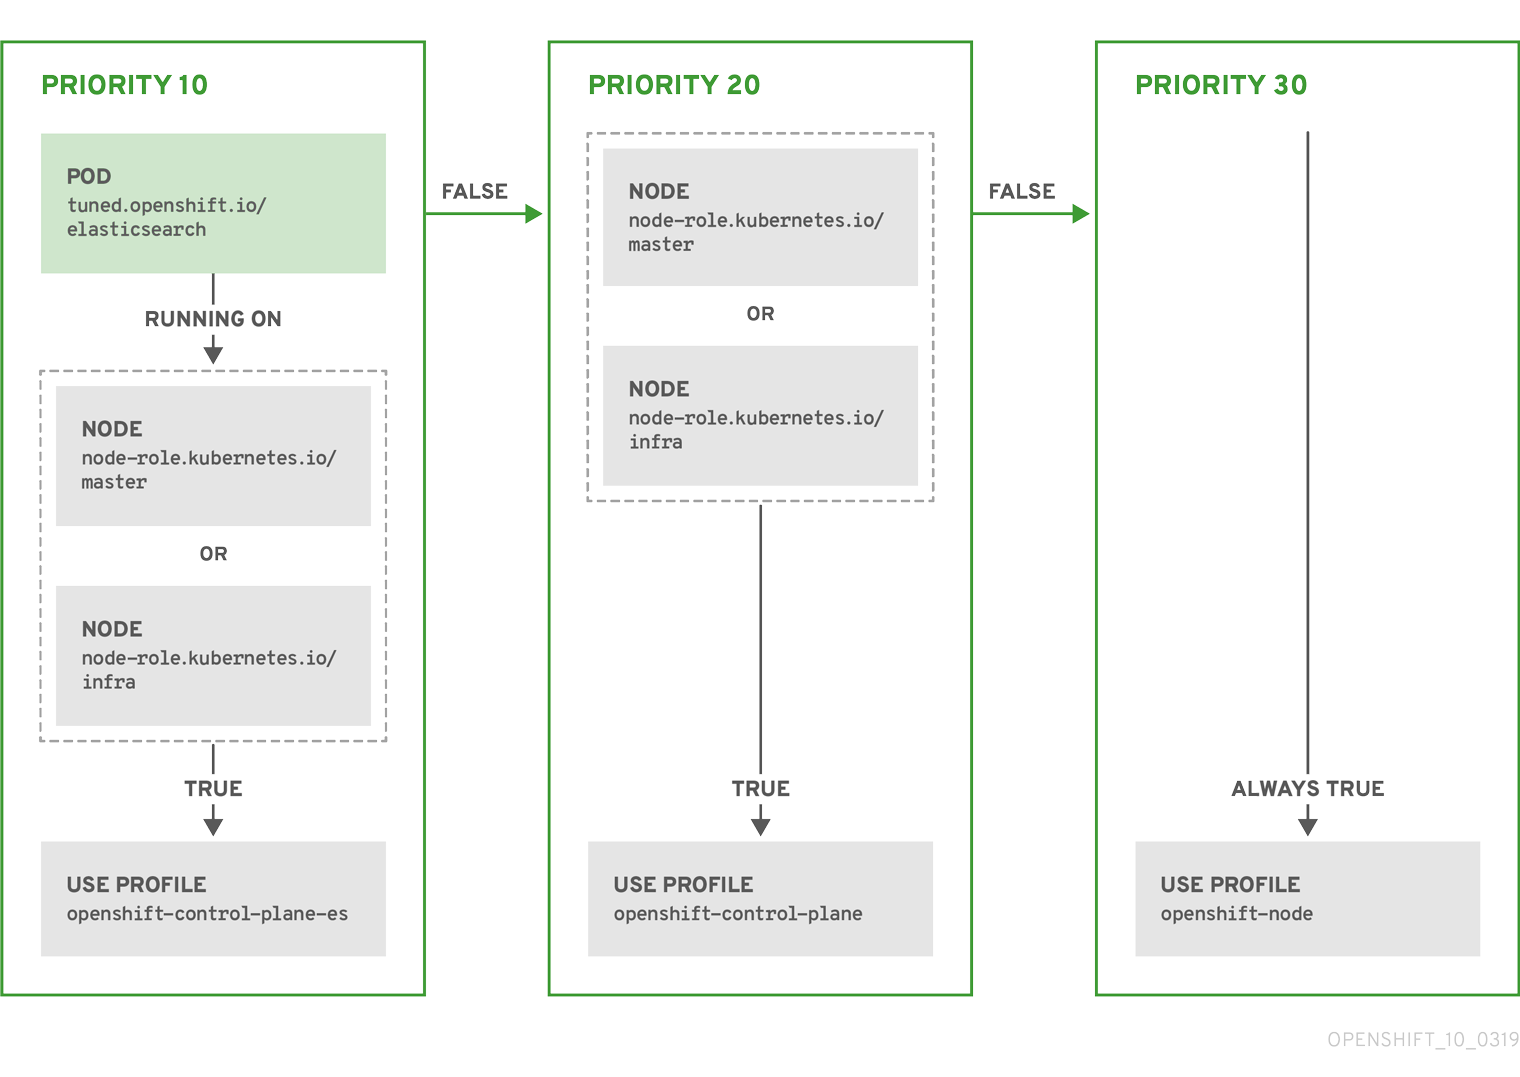
Example: Machine config pool based matching
apiVersion: tuned.openshift.io/v1
kind: Tuned
metadata:
  name: openshift-node-custom
  namespace: openshift-cluster-node-tuning-operator
spec:
  profile:
  - data: |
      [main]
      summary=Custom OpenShift node profile with an additional kernel parameter
      include=openshift-node
      [bootloader]
      cmdline_openshift_node_custom=+skew_tick=1
    name: openshift-node-custom

  recommend:
  - machineConfigLabels:
      machineconfiguration.openshift.io/role: "worker-custom"
    priority: 20
    profile: openshift-node-custom
To minimize node reboots, label the target nodes with a label the machine config pool’s node selector will match, then create the Tuned CR above and finally create the custom machine config pool itself.
Cloud provider-specific TuneD profiles
With this functionality, all Cloud provider-specific nodes can conveniently be assigned a TuneD profile specifically tailored to a given Cloud provider on a OpenShift Dedicated cluster. This can be accomplished without adding additional node labels or grouping nodes into machine config pools.
This functionality takes advantage of spec.providerID node object values in the form of <cloud-provider>://<cloud-provider-specific-id> and writes the file /var/lib/tuned/provider with the value <cloud-provider> in NTO operand containers. The content of this file is then used by TuneD to load provider-<cloud-provider> profile if such profile exists.
The openshift profile that both openshift-control-plane and openshift-node profiles inherit settings from is now updated to use this functionality through the use of conditional profile loading. Neither NTO nor TuneD currently include any Cloud provider-specific profiles. However, it is possible to create a custom profile provider-<cloud-provider> that will be applied to all Cloud provider-specific cluster nodes.
Example GCE Cloud provider profile
apiVersion: tuned.openshift.io/v1
kind: Tuned
metadata:
  name: provider-gce
  namespace: openshift-cluster-node-tuning-operator
spec:
  profile:
  - data: |
      [main]
      summary=GCE Cloud provider-specific profile
      # Your tuning for GCE Cloud provider goes here.
    name: provider-gce
Due to profile inheritance, any setting specified in the provider-<cloud-provider> profile will be overwritten by the openshift profile and its child profiles.
6.2.3. Default profiles set on a cluster
The following are the default profiles set on a cluster.
apiVersion: tuned.openshift.io/v1
kind: Tuned
metadata:
  name: default
  namespace: openshift-cluster-node-tuning-operator
spec:
  profile:
  - data: |
      [main]
      summary=Optimize systems running OpenShift (provider specific parent profile)
      include=-provider-${f:exec:cat:/var/lib/tuned/provider},openshift
    name: openshift
  recommend:
  - profile: openshift-control-plane
    priority: 30
    match:
    - label: node-role.kubernetes.io/master
    - label: node-role.kubernetes.io/infra
  - profile: openshift-node
    priority: 40
Starting with OpenShift Dedicated 4.9, all OpenShift TuneD profiles are shipped with the TuneD package. You can use the oc exec command to view the contents of these profiles:
$ oc exec $tuned_pod -n openshift-cluster-node-tuning-operator -- find /usr/lib/tuned/openshift{,-control-plane,-node} -name tuned.conf -exec grep -H ^ {} \;6.2.4. Supported TuneD daemon plugins
Excluding the [main] section, the following TuneD plugins are supported when using custom profiles defined in the profile: section of the Tuned CR:
- audio
- cpu
- disk
- eeepc_she
- modules
- mounts
- net
- scheduler
- scsi_host
- selinux
- sysctl
- sysfs
- usb
- video
- vm
- bootloader
There is some dynamic tuning functionality provided by some of these plugins that is not supported. The following TuneD plugins are currently not supported:
- script
- systemd
The TuneD bootloader plugin only supports Red Hat Enterprise Linux CoreOS (RHCOS) worker nodes.
Additional resources
6.3. Remediating, fencing, and maintaining nodes
When node-level failures occur, such as the kernel hangs or network interface controllers (NICs) fail, the work required from the cluster does not decrease, and workloads from affected nodes need to be restarted somewhere. Failures affecting these workloads risk data loss, corruption, or both. It is important to isolate the node, known as fencing, before initiating recovery of the workload, known as remediation, and recovery of the node.
For more information on remediation, fencing, and maintaining nodes, see the Workload Availability for Red Hat OpenShift documentation.
6.4. Machine Config Daemon metrics
The Machine Config Daemon is a part of the Machine Config Operator. It runs on every node in the cluster. The Machine Config Daemon manages configuration changes and updates on each of the nodes.
6.4.1. Machine Config Daemon metrics
Beginning with OpenShift Dedicated 4.3, the Machine Config Daemon provides a set of metrics. These metrics can be accessed using the Prometheus Cluster Monitoring stack.
The following table describes this set of metrics. Some entries contain commands for getting specific logs. Hpwever, the most comprehensive set of logs is available using the oc adm must-gather command.
Metrics marked with * in the Name and Description columns represent serious errors that might cause performance problems. Such problems might prevent updates and upgrades from proceeding.
Table 6.2. MCO metrics
| Name | Format | Description | Notes |
|---|---|---|---|
|
|
| Shows the OS that MCD is running on, such as RHCOS or RHEL. In case of RHCOS, the version is provided. | |
|
| Logs errors received during failed drain. * |
While drains might need multiple tries to succeed, terminal failed drains prevent updates from proceeding. The For further investigation, see the logs by running:
| |
|
|
| Logs errors encountered during pivot. * | Pivot errors might prevent OS upgrades from proceeding.
For further investigation, run this command to see the logs from the
|
|
|
| State of Machine Config Daemon for the indicated node. Possible states are "Done", "Working", and "Degraded". In case of "Degraded", the reason is included. | For further investigation, see the logs by running:
|
|
| Logs kubelet health failures. * | This is expected to be empty, with failure count of 0. If failure count exceeds 2, the error indicating threshold is exceeded. This indicates a possible issue with the health of the kubelet. For further investigation, run this command to access the node and see all its logs:
| |
|
|
| Logs the failed reboots and the corresponding errors. * | This is expected to be empty, which indicates a successful reboot. For further investigation, see the logs by running:
|
|
|
| Logs success or failure of configuration updates and the corresponding errors. |
The expected value is For further investigation, see the logs by running:
|
Additional resources
Chapter 7. Working with containers
7.1. Understanding Containers
The basic units of OpenShift Dedicated applications are called containers. Linux container technologies are lightweight mechanisms for isolating running processes so that they are limited to interacting with only their designated resources.
Many application instances can be running in containers on a single host without visibility into each others' processes, files, network, and so on. Typically, each container provides a single service (often called a "micro-service"), such as a web server or a database, though containers can be used for arbitrary workloads.
The Linux kernel has been incorporating capabilities for container technologies for years. OpenShift Dedicated and Kubernetes add the ability to orchestrate containers across multi-host installations.
7.1.1. About containers and RHEL kernel memory
Due to Red Hat Enterprise Linux (RHEL) behavior, a container on a node with high CPU usage might seem to consume more memory than expected. The higher memory consumption could be caused by the kmem_cache in the RHEL kernel. The RHEL kernel creates a kmem_cache for each cgroup. For added performance, the kmem_cache contains a cpu_cache, and a node cache for any NUMA nodes. These caches all consume kernel memory.
The amount of memory stored in those caches is proportional to the number of CPUs that the system uses. As a result, a higher number of CPUs results in a greater amount of kernel memory being held in these caches. Higher amounts of kernel memory in these caches can cause OpenShift Dedicated containers to exceed the configured memory limits, resulting in the container being killed.
To avoid losing containers due to kernel memory issues, ensure that the containers request sufficient memory. You can use the following formula to estimate the amount of memory consumed by the kmem_cache, where nproc is the number of processing units available that are reported by the nproc command. The lower limit of container requests should be this value plus the container memory requirements:
$(nproc) X 1/2 MiB
7.1.2. About the container engine and container runtime
A container engine is a piece of software that processes user requests, including command line options and image pulls. The container engine uses a container runtime, also called a lower-level container runtime, to run and manage the components required to deploy and operate containers. You likely will not need to interact with the container engine or container runtime.
The OpenShift Dedicated documentation uses the term container runtime to refer to the lower-level container runtime. Other documentation can refer to the container engine as the container runtime.
OpenShift Dedicated uses CRI-O as the container engine and runC or crun as the container runtime. The default container runtime is runC.
7.2. Using Init Containers to perform tasks before a pod is deployed
OpenShift Dedicated provides init containers, which are specialized containers that run before application containers and can contain utilities or setup scripts not present in an app image.
7.2.1. Understanding Init Containers
You can use an Init Container resource to perform tasks before the rest of a pod is deployed.
A pod can have Init Containers in addition to application containers. Init containers allow you to reorganize setup scripts and binding code.
An Init Container can:
- Contain and run utilities that are not desirable to include in the app Container image for security reasons.
- Contain utilities or custom code for setup that is not present in an app image. For example, there is no requirement to make an image FROM another image just to use a tool like sed, awk, python, or dig during setup.
- Use Linux namespaces so that they have different filesystem views from app containers, such as access to secrets that application containers are not able to access.
Each Init Container must complete successfully before the next one is started. So, Init Containers provide an easy way to block or delay the startup of app containers until some set of preconditions are met.
For example, the following are some ways you can use Init Containers:
Wait for a service to be created with a shell command like:
for i in {1..100}; do sleep 1; if dig myservice; then exit 0; fi; done; exit 1Register this pod with a remote server from the downward API with a command like:
$ curl -X POST http://$MANAGEMENT_SERVICE_HOST:$MANAGEMENT_SERVICE_PORT/register -d ‘instance=$()&ip=$()’
-
Wait for some time before starting the app Container with a command like
sleep 60. - Clone a git repository into a volume.
- Place values into a configuration file and run a template tool to dynamically generate a configuration file for the main app Container. For example, place the POD_IP value in a configuration and generate the main app configuration file using Jinja.
See the Kubernetes documentation for more information.
7.2.2. Creating Init Containers
The following example outlines a simple pod which has two Init Containers. The first waits for myservice and the second waits for mydb. After both containers complete, the pod begins.
Procedure
Create the pod for the Init Container:
Create a YAML file similar to the following:
apiVersion: v1
kind: Pod
metadata:
  name: myapp-pod
  labels:
    app: myapp
spec:
  securityContext:
    runAsNonRoot: true
    seccompProfile:
      type: RuntimeDefault
  containers:
  - name: myapp-container
    image: registry.access.redhat.com/ubi9/ubi:latest
    command: ['sh', '-c', 'echo The app is running! && sleep 3600']
    securityContext:
      allowPrivilegeEscalation: false
      capabilities:
        drop: [ALL]
  initContainers:
  - name: init-myservice
    image: registry.access.redhat.com/ubi9/ubi:latest
    command: ['sh', '-c', 'until getent hosts myservice; do echo waiting for myservice; sleep 2; done;']
    securityContext:
      allowPrivilegeEscalation: false
      capabilities:
        drop: [ALL]
  - name: init-mydb
    image: registry.access.redhat.com/ubi9/ubi:latest
    command: ['sh', '-c', 'until getent hosts mydb; do echo waiting for mydb; sleep 2; done;']
    securityContext:
      allowPrivilegeEscalation: false
      capabilities:
        drop: [ALL]
Create the pod:
$ oc create -f myapp.yaml
View the status of the pod:
$ oc get pods
Example output
NAME                          READY     STATUS              RESTARTS   AGE
myapp-pod                     0/1       Init:0/2            0          5s
The pod status,
Init:0/2, indicates it is waiting for the two services.
Create the
myserviceservice.Create a YAML file similar to the following:
kind: Service
apiVersion: v1
metadata:
  name: myservice
spec:
  ports:
  - protocol: TCP
    port: 80
    targetPort: 9376
Create the pod:
$ oc create -f myservice.yaml
View the status of the pod:
$ oc get pods
Example output
NAME                          READY     STATUS              RESTARTS   AGE
myapp-pod                     0/1       Init:1/2            0          5s
The pod status,
Init:1/2, indicates it is waiting for one service, in this case themydbservice.
Create the
mydbservice:Create a YAML file similar to the following:
kind: Service
apiVersion: v1
metadata:
  name: mydb
spec:
  ports:
  - protocol: TCP
    port: 80
    targetPort: 9377
Create the pod:
$ oc create -f mydb.yaml
View the status of the pod:
$ oc get pods
Example output
NAME                          READY     STATUS              RESTARTS   AGE
myapp-pod                     1/1       Running             0          2m
The pod status indicated that it is no longer waiting for the services and is running.
7.3. Using volumes to persist container data
Files in a container are ephemeral. As such, when a container crashes or stops, the data is lost. You can use volumes to persist the data used by the containers in a pod. A volume is directory, accessible to the Containers in a pod, where data is stored for the life of the pod.
7.3.1. Understanding volumes
Volumes are mounted file systems available to pods and their containers which may be backed by a number of host-local or network attached storage endpoints. Containers are not persistent by default; on restart, their contents are cleared.
To ensure that the file system on the volume contains no errors and, if errors are present, to repair them when possible, OpenShift Dedicated invokes the fsck utility prior to the mount utility. This occurs when either adding a volume or updating an existing volume.
The simplest volume type is emptyDir, which is a temporary directory on a single machine. Administrators may also allow you to request a persistent volume that is automatically attached to your pods.
emptyDir volume storage may be restricted by a quota based on the pod’s FSGroup, if the FSGroup parameter is enabled by your cluster administrator.
7.3.2. Working with volumes using the OpenShift Dedicated CLI
You can use the CLI command oc set volume to add and remove volumes and volume mounts for any object that has a pod template like replication controllers or deployment configs. You can also list volumes in pods or any object that has a pod template.
The oc set volume command uses the following general syntax:
$ oc set volume <object_selection> <operation> <mandatory_parameters> <options>
- Object selection
-
Specify one of the following for the
object_selectionparameter in theoc set volumecommand:
Table 7.1. Object Selection
| Syntax | Description | Example |
|---|---|---|
|
|
Selects |
|
|
|
Selects |
|
|
|
Selects resources of type |
|
|
|
Selects all resources of type |
|
|
| File name, directory, or URL to file to use to edit the resource. |
|
- Operation
-
Specify
--addor--removefor theoperationparameter in theoc set volumecommand. - Mandatory parameters
- Any mandatory parameters are specific to the selected operation and are discussed in later sections.
- Options
- Any options are specific to the selected operation and are discussed in later sections.
7.3.3. Listing volumes and volume mounts in a pod
You can list volumes and volume mounts in pods or pod templates:
Procedure
To list volumes:
$ oc set volume <object_type>/<name> [options]
List volume supported options:
| Option | Description | Default |
|---|---|---|
|
| Name of the volume. | |
|
|
Select containers by name. It can also take wildcard |
|
For example:
To list all volumes for pod p1:
$ oc set volume pod/p1
To list volume v1 defined on all deployment configs:
$ oc set volume dc --all --name=v1
7.3.4. Adding volumes to a pod
You can add volumes and volume mounts to a pod.
Procedure
To add a volume, a volume mount, or both to pod templates:
$ oc set volume <object_type>/<name> --add [options]
Table 7.2. Supported Options for Adding Volumes
| Option | Description | Default |
|---|---|---|
|
| Name of the volume. | Automatically generated, if not specified. |
|
|
Name of the volume source. Supported values: |
|
|
|
Select containers by name. It can also take wildcard |
|
|
|
Mount path inside the selected containers. Do not mount to the container root, | |
|
|
Host path. Mandatory parameter for | |
|
|
Name of the secret. Mandatory parameter for | |
|
|
Name of the configmap. Mandatory parameter for | |
|
|
Name of the persistent volume claim. Mandatory parameter for | |
|
|
Details of volume source as a JSON string. Recommended if the desired volume source is not supported by | |
|
|
Display the modified objects instead of updating them on the server. Supported values: | |
|
| Output the modified objects with the given version. |
|
For example:
To add a new volume source emptyDir to the registry
DeploymentConfigobject:$ oc set volume dc/registry --add
TipYou can alternatively apply the following YAML to add the volume:
Example 7.1. Sample deployment config with an added volume
kind: DeploymentConfig apiVersion: apps.openshift.io/v1 metadata: name: registry namespace: registry spec: replicas: 3 selector: app: httpd template: metadata: labels: app: httpd spec: volumes: 1 - name: volume-pppsw emptyDir: {} containers: - name: httpd image: >- image-registry.openshift-image-registry.svc:5000/openshift/httpd:latest ports: - containerPort: 8080 protocol: TCP- 1
- Add the volume source emptyDir.
To add volume v1 with secret secret1 for replication controller r1 and mount inside the containers at /data:
$ oc set volume rc/r1 --add --name=v1 --type=secret --secret-name='secret1' --mount-path=/data
TipYou can alternatively apply the following YAML to add the volume:
Example 7.2. Sample replication controller with added volume and secret
kind: ReplicationController apiVersion: v1 metadata: name: example-1 namespace: example spec: replicas: 0 selector: app: httpd deployment: example-1 deploymentconfig: example template: metadata: creationTimestamp: null labels: app: httpd deployment: example-1 deploymentconfig: example spec: volumes: 1 - name: v1 secret: secretName: secret1 defaultMode: 420 containers: - name: httpd image: >- image-registry.openshift-image-registry.svc:5000/openshift/httpd:latest volumeMounts: 2 - name: v1 mountPath: /dataTo add existing persistent volume v1 with claim name pvc1 to deployment configuration dc.json on disk, mount the volume on container c1 at /data, and update the
DeploymentConfigobject on the server:$ oc set volume -f dc.json --add --name=v1 --type=persistentVolumeClaim \ --claim-name=pvc1 --mount-path=/data --containers=c1
TipYou can alternatively apply the following YAML to add the volume:
Example 7.3. Sample deployment config with persistent volume added
kind: DeploymentConfig apiVersion: apps.openshift.io/v1 metadata: name: example namespace: example spec: replicas: 3 selector: app: httpd template: metadata: labels: app: httpd spec: volumes: - name: volume-pppsw emptyDir: {} - name: v1 1 persistentVolumeClaim: claimName: pvc1 containers: - name: httpd image: >- image-registry.openshift-image-registry.svc:5000/openshift/httpd:latest ports: - containerPort: 8080 protocol: TCP volumeMounts: 2 - name: v1 mountPath: /dataTo add a volume v1 based on Git repository https://github.com/namespace1/project1 with revision 5125c45f9f563 for all replication controllers:
$ oc set volume rc --all --add --name=v1 \
  --source='{"gitRepo": {
                "repository": "https://github.com/namespace1/project1",
                "revision": "5125c45f9f563"
            }}'
7.3.5. Updating volumes and volume mounts in a pod
You can modify the volumes and volume mounts in a pod.
Procedure
Updating existing volumes using the --overwrite option:
$ oc set volume <object_type>/<name> --add --overwrite [options]
For example:
To replace existing volume v1 for replication controller r1 with existing persistent volume claim pvc1:
$ oc set volume rc/r1 --add --overwrite --name=v1 --type=persistentVolumeClaim --claim-name=pvc1
TipYou can alternatively apply the following YAML to replace the volume:
Example 7.4. Sample replication controller with persistent volume claim named
pvc1kind: ReplicationController apiVersion: v1 metadata: name: example-1 namespace: example spec: replicas: 0 selector: app: httpd deployment: example-1 deploymentconfig: example template: metadata: labels: app: httpd deployment: example-1 deploymentconfig: example spec: volumes: - name: v1 1 persistentVolumeClaim: claimName: pvc1 containers: - name: httpd image: >- image-registry.openshift-image-registry.svc:5000/openshift/httpd:latest ports: - containerPort: 8080 protocol: TCP volumeMounts: - name: v1 mountPath: /data- 1
- Set persistent volume claim to
pvc1.
To change the
DeploymentConfigobject d1 mount point to /opt for volume v1:$ oc set volume dc/d1 --add --overwrite --name=v1 --mount-path=/opt
TipYou can alternatively apply the following YAML to change the mount point:
Example 7.5. Sample deployment config with mount point set to
opt.kind: DeploymentConfig apiVersion: apps.openshift.io/v1 metadata: name: example namespace: example spec: replicas: 3 selector: app: httpd template: metadata: labels: app: httpd spec: volumes: - name: volume-pppsw emptyDir: {} - name: v2 persistentVolumeClaim: claimName: pvc1 - name: v1 persistentVolumeClaim: claimName: pvc1 containers: - name: httpd image: >- image-registry.openshift-image-registry.svc:5000/openshift/httpd:latest ports: - containerPort: 8080 protocol: TCP volumeMounts: 1 - name: v1 mountPath: /opt- 1
- Set the mount point to
/opt.
7.3.6. Removing volumes and volume mounts from a pod
You can remove a volume or volume mount from a pod.
Procedure
To remove a volume from pod templates:
$ oc set volume <object_type>/<name> --remove [options]
Table 7.3. Supported options for removing volumes
| Option | Description | Default |
|---|---|---|
|
| Name of the volume. | |
|
|
Select containers by name. It can also take wildcard |
|
|
| Indicate that you want to remove multiple volumes at once. | |
|
|
Display the modified objects instead of updating them on the server. Supported values: | |
|
| Output the modified objects with the given version. |
|
For example:
To remove a volume v1 from the
DeploymentConfigobject d1:$ oc set volume dc/d1 --remove --name=v1
To unmount volume v1 from container c1 for the
DeploymentConfigobject d1 and remove the volume v1 if it is not referenced by any containers on d1:$ oc set volume dc/d1 --remove --name=v1 --containers=c1
To remove all volumes for replication controller r1:
$ oc set volume rc/r1 --remove --confirm
7.3.7. Configuring volumes for multiple uses in a pod
You can configure a volume to allows you to share one volume for multiple uses in a single pod using the volumeMounts.subPath property to specify a subPath value inside a volume instead of the volume’s root.
You cannot add a subPath parameter to an existing scheduled pod.
Procedure
To view the list of files in the volume, run the
oc rshcommand:$ oc rsh <pod>
Example output
sh-4.2$ ls /path/to/volume/subpath/mount
example_file1 example_file2 example_file3
Specify the
subPath:Example
Podspec withsubPathparameterapiVersion: v1 kind: Pod metadata: name: my-site spec: securityContext: runAsNonRoot: true seccompProfile: type: RuntimeDefault containers: - name: mysql image: mysql volumeMounts: - mountPath: /var/lib/mysql name: site-data subPath: mysql 1 securityContext: allowPrivilegeEscalation: false capabilities: drop: [ALL] - name: php image: php volumeMounts: - mountPath: /var/www/html name: site-data subPath: html 2 securityContext: allowPrivilegeEscalation: false capabilities: drop: [ALL] volumes: - name: site-data persistentVolumeClaim: claimName: my-site-data
7.4. Mapping volumes using projected volumes
A projected volume maps several existing volume sources into the same directory.
The following types of volume sources can be projected:
- Secrets
- Config Maps
- Downward API
All sources are required to be in the same namespace as the pod.
7.4.1. Understanding projected volumes
Projected volumes can map any combination of these volume sources into a single directory, allowing the user to:
- automatically populate a single volume with the keys from multiple secrets, config maps, and with downward API information, so that I can synthesize a single directory with various sources of information;
- populate a single volume with the keys from multiple secrets, config maps, and with downward API information, explicitly specifying paths for each item, so that I can have full control over the contents of that volume.
When the RunAsUser permission is set in the security context of a Linux-based pod, the projected files have the correct permissions set, including container user ownership. However, when the Windows equivalent RunAsUsername permission is set in a Windows pod, the kubelet is unable to correctly set ownership on the files in the projected volume.
Therefore, the RunAsUsername permission set in the security context of a Windows pod is not honored for Windows projected volumes running in OpenShift Dedicated.
The following general scenarios show how you can use projected volumes.
- Config map, secrets, Downward API.
-
Projected volumes allow you to deploy containers with configuration data that includes passwords. An application using these resources could be deploying Red Hat OpenStack Platform (RHOSP) on Kubernetes. The configuration data might have to be assembled differently depending on if the services are going to be used for production or for testing. If a pod is labeled with production or testing, the downward API selector
metadata.labelscan be used to produce the correct RHOSP configs. - Config map + secrets.
- Projected volumes allow you to deploy containers involving configuration data and passwords. For example, you might execute a config map with some sensitive encrypted tasks that are decrypted using a vault password file.
- ConfigMap + Downward API.
-
Projected volumes allow you to generate a config including the pod name (available via the
metadata.nameselector). This application can then pass the pod name along with requests to easily determine the source without using IP tracking. - Secrets + Downward API.
-
Projected volumes allow you to use a secret as a public key to encrypt the namespace of the pod (available via the
metadata.namespaceselector). This example allows the Operator to use the application to deliver the namespace information securely without using an encrypted transport.
7.4.1.1. Example Pod specs
The following are examples of Pod specs for creating projected volumes.
Pod with a secret, a Downward API, and a config map
apiVersion: v1
kind: Pod
metadata:
  name: volume-test
spec:
  securityContext:
    runAsNonRoot: true
    seccompProfile:
      type: RuntimeDefault
  containers:
  - name: container-test
    image: busybox
    volumeMounts: 1
    - name: all-in-one
      mountPath: "/projected-volume"2
      readOnly: true 3
    securityContext:
      allowPrivilegeEscalation: false
      capabilities:
        drop: [ALL]
  volumes: 4
  - name: all-in-one 5
    projected:
      defaultMode: 0400 6
      sources:
      - secret:
          name: mysecret 7
          items:
            - key: username
              path: my-group/my-username 8
      - downwardAPI: 9
          items:
            - path: "labels"
              fieldRef:
                fieldPath: metadata.labels
            - path: "cpu_limit"
              resourceFieldRef:
                containerName: container-test
                resource: limits.cpu
      - configMap: 10
          name: myconfigmap
          items:
            - key: config
              path: my-group/my-config
              mode: 0777 11
- 1
- Add a
volumeMountssection for each container that needs the secret. - 2
- Specify a path to an unused directory where the secret will appear.
- 3
- Set
readOnlytotrue. - 4
- Add a
volumesblock to list each projected volume source. - 5
- Specify any name for the volume.
- 6
- Set the execute permission on the files.
- 7
- Add a secret. Enter the name of the secret object. Each secret you want to use must be listed.
- 8
- Specify the path to the secrets file under the
mountPath. Here, the secrets file is in /projected-volume/my-group/my-username. - 9
- Add a Downward API source.
- 10
- Add a ConfigMap source.
- 11
- Set the mode for the specific projection
If there are multiple containers in the pod, each container needs a volumeMounts section, but only one volumes section is needed.
Pod with multiple secrets with a non-default permission mode set
apiVersion: v1
kind: Pod
metadata:
  name: volume-test
spec:
  securityContext:
    runAsNonRoot: true
    seccompProfile:
      type: RuntimeDefault
  containers:
  - name: container-test
    image: busybox
    volumeMounts:
    - name: all-in-one
      mountPath: "/projected-volume"
      readOnly: true
    securityContext:
      allowPrivilegeEscalation: false
      capabilities:
        drop: [ALL]
  volumes:
  - name: all-in-one
    projected:
      defaultMode: 0755
      sources:
      - secret:
          name: mysecret
          items:
            - key: username
              path: my-group/my-username
      - secret:
          name: mysecret2
          items:
            - key: password
              path: my-group/my-password
              mode: 511
The defaultMode can only be specified at the projected level and not for each volume source. However, as illustrated above, you can explicitly set the mode for each individual projection.
7.4.1.2. Pathing Considerations
- Collisions Between Keys when Configured Paths are Identical
If you configure any keys with the same path, the pod spec will not be accepted as valid. In the following example, the specified path for
mysecretandmyconfigmapare the same:apiVersion: v1 kind: Pod metadata: name: volume-test spec: securityContext: runAsNonRoot: true seccompProfile: type: RuntimeDefault containers: - name: container-test image: busybox volumeMounts: - name: all-in-one mountPath: "/projected-volume" readOnly: true securityContext: allowPrivilegeEscalation: false capabilities: drop: [ALL] volumes: - name: all-in-one projected: sources: - secret: name: mysecret items: - key: username path: my-group/data - configMap: name: myconfigmap items: - key: config path: my-group/data
Consider the following situations related to the volume file paths.
- Collisions Between Keys without Configured Paths
- The only run-time validation that can occur is when all the paths are known at pod creation, similar to the above scenario. Otherwise, when a conflict occurs the most recent specified resource will overwrite anything preceding it (this is true for resources that are updated after pod creation as well).
- Collisions when One Path is Explicit and the Other is Automatically Projected
- In the event that there is a collision due to a user specified path matching data that is automatically projected, the latter resource will overwrite anything preceding it as before
7.4.2. Configuring a Projected Volume for a Pod
When creating projected volumes, consider the volume file path situations described in Understanding projected volumes.
The following example shows how to use a projected volume to mount an existing secret volume source. The steps can be used to create a user name and password secrets from local files. You then create a pod that runs one container, using a projected volume to mount the secrets into the same shared directory.
The user name and password values can be any valid string that is base64 encoded.
The following example shows admin in base64:
$ echo -n "admin" | base64
Example output
YWRtaW4=
The following example shows the password 1f2d1e2e67df in base64:
$ echo -n "1f2d1e2e67df" | base64
Example output
MWYyZDFlMmU2N2Rm
Procedure
To use a projected volume to mount an existing secret volume source.
Create the secret:
Create a YAML file similar to the following, replacing the password and user information as appropriate:
apiVersion: v1
kind: Secret
metadata:
  name: mysecret
type: Opaque
data:
  pass: MWYyZDFlMmU2N2Rm
  user: YWRtaW4=
Use the following command to create the secret:
$ oc create -f <secrets-filename>
For example:
$ oc create -f secret.yaml
Example output
secret "mysecret" created
You can check that the secret was created using the following commands:
$ oc get secret <secret-name>
For example:
$ oc get secret mysecret
Example output
NAME       TYPE      DATA      AGE
mysecret   Opaque    2         17h
$ oc get secret <secret-name> -o yaml
For example:
$ oc get secret mysecret -o yaml
apiVersion: v1
data:
  pass: MWYyZDFlMmU2N2Rm
  user: YWRtaW4=
kind: Secret
metadata:
  creationTimestamp: 2017-05-30T20:21:38Z
  name: mysecret
  namespace: default
  resourceVersion: "2107"
  selfLink: /api/v1/namespaces/default/secrets/mysecret
  uid: 959e0424-4575-11e7-9f97-fa163e4bd54c
type: Opaque
Create a pod with a projected volume.
Create a YAML file similar to the following, including a
volumessection:kind: Pod metadata: name: test-projected-volume spec: securityContext: runAsNonRoot: true seccompProfile: type: RuntimeDefault containers: - name: test-projected-volume image: busybox args: - sleep - "86400" volumeMounts: - name: all-in-one mountPath: "/projected-volume" readOnly: true securityContext: allowPrivilegeEscalation: false capabilities: drop: [ALL] volumes: - name: all-in-one projected: sources: - secret: name: mysecret 1- 1
- The name of the secret you created.
Create the pod from the configuration file:
$ oc create -f <your_yaml_file>.yaml
For example:
$ oc create -f secret-pod.yaml
Example output
pod "test-projected-volume" created
Verify that the pod container is running, and then watch for changes to the pod:
$ oc get pod <name>
For example:
$ oc get pod test-projected-volume
The output should appear similar to the following:
Example output
NAME                    READY     STATUS    RESTARTS   AGE
test-projected-volume   1/1       Running   0          14s
In another terminal, use the
oc execcommand to open a shell to the running container:$ oc exec -it <pod> <command>
For example:
$ oc exec -it test-projected-volume -- /bin/sh
In your shell, verify that the
projected-volumesdirectory contains your projected sources:/ # ls
Example output
bin               home              root              tmp
dev               proc              run               usr
etc               projected-volume  sys               var
7.5. Allowing containers to consume API objects
The Downward API is a mechanism that allows containers to consume information about API objects without coupling to OpenShift Dedicated. Such information includes the pod’s name, namespace, and resource values. Containers can consume information from the downward API using environment variables or a volume plugin.
7.5.1. Expose pod information to Containers using the Downward API
The Downward API contains such information as the pod’s name, project, and resource values. Containers can consume information from the downward API using environment variables or a volume plugin.
Fields within the pod are selected using the FieldRef API type. FieldRef has two fields:
| Field | Description |
|---|---|
|
| The path of the field to select, relative to the pod. |
|
|
The API version to interpret the |
Currently, the valid selectors in the v1 API include:
| Selector | Description |
|---|---|
|
| The pod’s name. This is supported in both environment variables and volumes. |
|
| The pod’s namespace.This is supported in both environment variables and volumes. |
|
| The pod’s labels. This is only supported in volumes and not in environment variables. |
|
| The pod’s annotations. This is only supported in volumes and not in environment variables. |
|
| The pod’s IP. This is only supported in environment variables and not volumes. |
The apiVersion field, if not specified, defaults to the API version of the enclosing pod template.
7.5.2. Understanding how to consume container values using the downward API
You containers can consume API values using environment variables or a volume plugin. Depending on the method you choose, containers can consume:
- Pod name
- Pod project/namespace
- Pod annotations
- Pod labels
Annotations and labels are available using only a volume plugin.
7.5.2.1. Consuming container values using environment variables
When using a container’s environment variables, use the EnvVar type’s valueFrom field (of type EnvVarSource) to specify that the variable’s value should come from a FieldRef source instead of the literal value specified by the value field.
Only constant attributes of the pod can be consumed this way, as environment variables cannot be updated once a process is started in a way that allows the process to be notified that the value of a variable has changed. The fields supported using environment variables are:
- Pod name
- Pod project/namespace
Procedure
Create a new pod spec that contains the environment variables you want the container to consume:
Create a
pod.yamlfile similar to the following:apiVersion: v1 kind: Pod metadata: name: dapi-env-test-pod spec: securityContext: runAsNonRoot: true seccompProfile: type: RuntimeDefault containers: - name: env-test-container image: gcr.io/google_containers/busybox command: [ "/bin/sh", "-c", "env" ] env: - name: MY_POD_NAME valueFrom: fieldRef: fieldPath: metadata.name - name: MY_POD_NAMESPACE valueFrom: fieldRef: fieldPath: metadata.namespace securityContext: allowPrivilegeEscalation: false capabilities: drop: [ALL] restartPolicy: Never # ...Create the pod from the
pod.yamlfile:$ oc create -f pod.yaml
Verification
Check the container’s logs for the
MY_POD_NAMEandMY_POD_NAMESPACEvalues:$ oc logs -p dapi-env-test-pod
7.5.2.2. Consuming container values using a volume plugin
You containers can consume API values using a volume plugin.
Containers can consume:
- Pod name
- Pod project/namespace
- Pod annotations
- Pod labels
Procedure
To use the volume plugin:
Create a new pod spec that contains the environment variables you want the container to consume:
Create a
volume-pod.yamlfile similar to the following:kind: Pod apiVersion: v1 metadata: labels: zone: us-east-coast cluster: downward-api-test-cluster1 rack: rack-123 name: dapi-volume-test-pod annotations: annotation1: "345" annotation2: "456" spec: securityContext: runAsNonRoot: true seccompProfile: type: RuntimeDefault containers: - name: volume-test-container image: gcr.io/google_containers/busybox command: ["sh", "-c", "cat /tmp/etc/pod_labels /tmp/etc/pod_annotations"] volumeMounts: - name: podinfo mountPath: /tmp/etc readOnly: false securityContext: allowPrivilegeEscalation: false capabilities: drop: [ALL] volumes: - name: podinfo downwardAPI: defaultMode: 420 items: - fieldRef: fieldPath: metadata.name path: pod_name - fieldRef: fieldPath: metadata.namespace path: pod_namespace - fieldRef: fieldPath: metadata.labels path: pod_labels - fieldRef: fieldPath: metadata.annotations path: pod_annotations restartPolicy: Never # ...Create the pod from the
volume-pod.yamlfile:$ oc create -f volume-pod.yaml
Verification
Check the container’s logs and verify the presence of the configured fields:
$ oc logs -p dapi-volume-test-pod
Example output
cluster=downward-api-test-cluster1 rack=rack-123 zone=us-east-coast annotation1=345 annotation2=456 kubernetes.io/config.source=api
7.5.3. Understanding how to consume container resources using the Downward API
When creating pods, you can use the Downward API to inject information about computing resource requests and limits so that image and application authors can correctly create an image for specific environments.
You can do this using environment variable or a volume plugin.
7.5.3.1. Consuming container resources using environment variables
When creating pods, you can use the Downward API to inject information about computing resource requests and limits using environment variables.
When creating the pod configuration, specify environment variables that correspond to the contents of the resources field in the spec.container field.
If the resource limits are not included in the container configuration, the downward API defaults to the node’s CPU and memory allocatable values.
Procedure
Create a new pod spec that contains the resources you want to inject:
Create a
pod.yamlfile similar to the following:apiVersion: v1 kind: Pod metadata: name: dapi-env-test-pod spec: containers: - name: test-container image: gcr.io/google_containers/busybox:1.24 command: [ "/bin/sh", "-c", "env" ] resources: requests: memory: "32Mi" cpu: "125m" limits: memory: "64Mi" cpu: "250m" env: - name: MY_CPU_REQUEST valueFrom: resourceFieldRef: resource: requests.cpu - name: MY_CPU_LIMIT valueFrom: resourceFieldRef: resource: limits.cpu - name: MY_MEM_REQUEST valueFrom: resourceFieldRef: resource: requests.memory - name: MY_MEM_LIMIT valueFrom: resourceFieldRef: resource: limits.memory # ...Create the pod from the
pod.yamlfile:$ oc create -f pod.yaml
7.5.3.2. Consuming container resources using a volume plugin
When creating pods, you can use the Downward API to inject information about computing resource requests and limits using a volume plugin.
When creating the pod configuration, use the spec.volumes.downwardAPI.items field to describe the desired resources that correspond to the spec.resources field.
If the resource limits are not included in the container configuration, the Downward API defaults to the node’s CPU and memory allocatable values.
Procedure
Create a new pod spec that contains the resources you want to inject:
Create a
pod.yamlfile similar to the following:apiVersion: v1 kind: Pod metadata: name: dapi-env-test-pod spec: containers: - name: client-container image: gcr.io/google_containers/busybox:1.24 command: ["sh", "-c", "while true; do echo; if [[ -e /etc/cpu_limit ]]; then cat /etc/cpu_limit; fi; if [[ -e /etc/cpu_request ]]; then cat /etc/cpu_request; fi; if [[ -e /etc/mem_limit ]]; then cat /etc/mem_limit; fi; if [[ -e /etc/mem_request ]]; then cat /etc/mem_request; fi; sleep 5; done"] resources: requests: memory: "32Mi" cpu: "125m" limits: memory: "64Mi" cpu: "250m" volumeMounts: - name: podinfo mountPath: /etc readOnly: false volumes: - name: podinfo downwardAPI: items: - path: "cpu_limit" resourceFieldRef: containerName: client-container resource: limits.cpu - path: "cpu_request" resourceFieldRef: containerName: client-container resource: requests.cpu - path: "mem_limit" resourceFieldRef: containerName: client-container resource: limits.memory - path: "mem_request" resourceFieldRef: containerName: client-container resource: requests.memory # ...Create the pod from the
volume-pod.yamlfile:$ oc create -f volume-pod.yaml
7.5.4. Consuming secrets using the Downward API
When creating pods, you can use the downward API to inject secrets so image and application authors can create an image for specific environments.
Procedure
Create a secret to inject:
Create a
secret.yamlfile similar to the following:apiVersion: v1 kind: Secret metadata: name: mysecret data: password: <password> username: <username> type: kubernetes.io/basic-auth
Create the secret object from the
secret.yamlfile:$ oc create -f secret.yaml
Create a pod that references the
usernamefield from the aboveSecretobject:Create a
pod.yamlfile similar to the following:apiVersion: v1 kind: Pod metadata: name: dapi-env-test-pod spec: securityContext: runAsNonRoot: true seccompProfile: type: RuntimeDefault containers: - name: env-test-container image: gcr.io/google_containers/busybox command: [ "/bin/sh", "-c", "env" ] env: - name: MY_SECRET_USERNAME valueFrom: secretKeyRef: name: mysecret key: username securityContext: allowPrivilegeEscalation: false capabilities: drop: [ALL] restartPolicy: Never # ...Create the pod from the
pod.yamlfile:$ oc create -f pod.yaml
Verification
Check the container’s logs for the
MY_SECRET_USERNAMEvalue:$ oc logs -p dapi-env-test-pod
7.5.5. Consuming configuration maps using the Downward API
When creating pods, you can use the Downward API to inject configuration map values so image and application authors can create an image for specific environments.
Procedure
Create a config map with the values to inject:
Create a
configmap.yamlfile similar to the following:apiVersion: v1 kind: ConfigMap metadata: name: myconfigmap data: mykey: myvalue
Create the config map from the
configmap.yamlfile:$ oc create -f configmap.yaml
Create a pod that references the above config map:
Create a
pod.yamlfile similar to the following:apiVersion: v1 kind: Pod metadata: name: dapi-env-test-pod spec: securityContext: runAsNonRoot: true seccompProfile: type: RuntimeDefault containers: - name: env-test-container image: gcr.io/google_containers/busybox command: [ "/bin/sh", "-c", "env" ] env: - name: MY_CONFIGMAP_VALUE valueFrom: configMapKeyRef: name: myconfigmap key: mykey securityContext: allowPrivilegeEscalation: false capabilities: drop: [ALL] restartPolicy: Always # ...Create the pod from the
pod.yamlfile:$ oc create -f pod.yaml
Verification
Check the container’s logs for the
MY_CONFIGMAP_VALUEvalue:$ oc logs -p dapi-env-test-pod
7.5.6. Referencing environment variables
When creating pods, you can reference the value of a previously defined environment variable by using the $() syntax. If the environment variable reference can not be resolved, the value will be left as the provided string.
Procedure
Create a pod that references an existing environment variable:
Create a
pod.yamlfile similar to the following:apiVersion: v1 kind: Pod metadata: name: dapi-env-test-pod spec: securityContext: runAsNonRoot: true seccompProfile: type: RuntimeDefault containers: - name: env-test-container image: gcr.io/google_containers/busybox command: [ "/bin/sh", "-c", "env" ] env: - name: MY_EXISTING_ENV value: my_value - name: MY_ENV_VAR_REF_ENV value: $(MY_EXISTING_ENV) securityContext: allowPrivilegeEscalation: false capabilities: drop: [ALL] restartPolicy: Never # ...Create the pod from the
pod.yamlfile:$ oc create -f pod.yaml
Verification
Check the container’s logs for the
MY_ENV_VAR_REF_ENVvalue:$ oc logs -p dapi-env-test-pod
7.5.7. Escaping environment variable references
When creating a pod, you can escape an environment variable reference by using a double dollar sign. The value will then be set to a single dollar sign version of the provided value.
Procedure
Create a pod that references an existing environment variable:
Create a
pod.yamlfile similar to the following:apiVersion: v1 kind: Pod metadata: name: dapi-env-test-pod spec: securityContext: runAsNonRoot: true seccompProfile: type: RuntimeDefault containers: - name: env-test-container image: gcr.io/google_containers/busybox command: [ "/bin/sh", "-c", "env" ] env: - name: MY_NEW_ENV value: $$(SOME_OTHER_ENV) securityContext: allowPrivilegeEscalation: false capabilities: drop: [ALL] restartPolicy: Never # ...Create the pod from the
pod.yamlfile:$ oc create -f pod.yaml
Verification
Check the container’s logs for the
MY_NEW_ENVvalue:$ oc logs -p dapi-env-test-pod
7.6. Copying files to or from an OpenShift Dedicated container
You can use the CLI to copy local files to or from a remote directory in a container using the rsync command.
7.6.1. Understanding how to copy files
The oc rsync command, or remote sync, is a useful tool for copying database archives to and from your pods for backup and restore purposes. You can also use oc rsync to copy source code changes into a running pod for development debugging, when the running pod supports hot reload of source files.
$ oc rsync <source> <destination> [-c <container>]
7.6.1.1. Requirements
- Specifying the Copy Source
The source argument of the
oc rsynccommand must point to either a local directory or a pod directory. Individual files are not supported.When specifying a pod directory the directory name must be prefixed with the pod name:
<pod name>:<dir>
If the directory name ends in a path separator (
/), only the contents of the directory are copied to the destination. Otherwise, the directory and its contents are copied to the destination.- Specifying the Copy Destination
-
The destination argument of the
oc rsynccommand must point to a directory. If the directory does not exist, butrsyncis used for copy, the directory is created for you. - Deleting Files at the Destination
-
The
--deleteflag may be used to delete any files in the remote directory that are not in the local directory. - Continuous Syncing on File Change
Using the
--watchoption causes the command to monitor the source path for any file system changes, and synchronizes changes when they occur. With this argument, the command runs forever.Synchronization occurs after short quiet periods to ensure a rapidly changing file system does not result in continuous synchronization calls.
When using the
--watchoption, the behavior is effectively the same as manually invokingoc rsyncrepeatedly, including any arguments normally passed tooc rsync. Therefore, you can control the behavior via the same flags used with manual invocations ofoc rsync, such as--delete.
7.6.2. Copying files to and from containers
Support for copying local files to or from a container is built into the CLI.
Prerequisites
When working with oc rsync, note the following:
rsync must be installed. The
oc rsynccommand uses the localrsynctool, if present on the client machine and the remote container.If
rsyncis not found locally or in the remote container, a tar archive is created locally and sent to the container where the tar utility is used to extract the files. If tar is not available in the remote container, the copy will fail.The tar copy method does not provide the same functionality as
oc rsync. For example,oc rsynccreates the destination directory if it does not exist and only sends files that are different between the source and the destination.NoteIn Windows, the
cwRsyncclient should be installed and added to the PATH for use with theoc rsynccommand.
Procedure
To copy a local directory to a pod directory:
$ oc rsync <local-dir> <pod-name>:/<remote-dir> -c <container-name>
For example:
$ oc rsync /home/user/source devpod1234:/src -c user-container
To copy a pod directory to a local directory:
$ oc rsync devpod1234:/src /home/user/source
Example output
$ oc rsync devpod1234:/src/status.txt /home/user/
7.6.3. Using advanced Rsync features
The oc rsync command exposes fewer command line options than standard rsync. In the case that you want to use a standard rsync command line option that is not available in oc rsync, for example the --exclude-from=FILE option, it might be possible to use standard rsync 's --rsh (-e) option or RSYNC_RSH environment variable as a workaround, as follows:
$ rsync --rsh='oc rsh' --exclude-from=<file_name> <local-dir> <pod-name>:/<remote-dir>
or:
Export the RSYNC_RSH variable:
$ export RSYNC_RSH='oc rsh'
Then, run the rsync command:
$ rsync --exclude-from=<file_name> <local-dir> <pod-name>:/<remote-dir>
Both of the above examples configure standard rsync to use oc rsh as its remote shell program to enable it to connect to the remote pod, and are an alternative to running oc rsync.
7.7. Executing remote commands in an OpenShift Dedicated container
You can use the CLI to execute remote commands in an OpenShift Dedicated container.
7.7.1. Executing remote commands in containers
Support for remote container command execution is built into the CLI.
Procedure
To run a command in a container:
$ oc exec <pod> [-c <container>] -- <command> [<arg_1> ... <arg_n>]
For example:
$ oc exec mypod date
Example output
Thu Apr 9 02:21:53 UTC 2015
For security purposes, the oc exec command does not work when accessing privileged containers except when the command is executed by a cluster-admin user.
7.7.2. Protocol for initiating a remote command from a client
Clients initiate the execution of a remote command in a container by issuing a request to the Kubernetes API server:
/proxy/nodes/<node_name>/exec/<namespace>/<pod>/<container>?command=<command>
In the above URL:
-
<node_name>is the FQDN of the node. -
<namespace>is the project of the target pod. -
<pod>is the name of the target pod. -
<container>is the name of the target container. -
<command>is the desired command to be executed.
For example:
/proxy/nodes/node123.openshift.com/exec/myns/mypod/mycontainer?command=date
Additionally, the client can add parameters to the request to indicate if:
- the client should send input to the remote container’s command (stdin).
- the client’s terminal is a TTY.
- the remote container’s command should send output from stdout to the client.
- the remote container’s command should send output from stderr to the client.
After sending an exec request to the API server, the client upgrades the connection to one that supports multiplexed streams; the current implementation uses HTTP/2.
The client creates one stream each for stdin, stdout, and stderr. To distinguish among the streams, the client sets the streamType header on the stream to one of stdin, stdout, or stderr.
The client closes all streams, the upgraded connection, and the underlying connection when it is finished with the remote command execution request.
7.8. Using port forwarding to access applications in a container
OpenShift Dedicated supports port forwarding to pods.
7.8.1. Understanding port forwarding
You can use the CLI to forward one or more local ports to a pod. This allows you to listen on a given or random port locally, and have data forwarded to and from given ports in the pod.
Support for port forwarding is built into the CLI:
$ oc port-forward <pod> [<local_port>:]<remote_port> [...[<local_port_n>:]<remote_port_n>]
The CLI listens on each local port specified by the user, forwarding using the protocol described below.
Ports may be specified using the following formats:
|
| The client listens on port 5000 locally and forwards to 5000 in the pod. |
|
| The client listens on port 6000 locally and forwards to 5000 in the pod. |
|
| The client selects a free local port and forwards to 5000 in the pod. |
OpenShift Dedicated handles port-forward requests from clients. Upon receiving a request, OpenShift Dedicated upgrades the response and waits for the client to create port-forwarding streams. When OpenShift Dedicated receives a new stream, it copies data between the stream and the pod’s port.
Architecturally, there are options for forwarding to a pod’s port. The supported OpenShift Dedicated implementation invokes nsenter directly on the node host to enter the pod’s network namespace, then invokes socat to copy data between the stream and the pod’s port. However, a custom implementation could include running a helper pod that then runs nsenter and socat, so that those binaries are not required to be installed on the host.
7.8.2. Using port forwarding
You can use the CLI to port-forward one or more local ports to a pod.
Procedure
Use the following command to listen on the specified port in a pod:
$ oc port-forward <pod> [<local_port>:]<remote_port> [...[<local_port_n>:]<remote_port_n>]
For example:
Use the following command to listen on ports
5000and6000locally and forward data to and from ports5000and6000in the pod:$ oc port-forward <pod> 5000 6000
Example output
Forwarding from 127.0.0.1:5000 -> 5000 Forwarding from [::1]:5000 -> 5000 Forwarding from 127.0.0.1:6000 -> 6000 Forwarding from [::1]:6000 -> 6000
Use the following command to listen on port
8888locally and forward to5000in the pod:$ oc port-forward <pod> 8888:5000
Example output
Forwarding from 127.0.0.1:8888 -> 5000 Forwarding from [::1]:8888 -> 5000
Use the following command to listen on a free port locally and forward to
5000in the pod:$ oc port-forward <pod> :5000
Example output
Forwarding from 127.0.0.1:42390 -> 5000 Forwarding from [::1]:42390 -> 5000
Or:
$ oc port-forward <pod> 0:5000
7.8.3. Protocol for initiating port forwarding from a client
Clients initiate port forwarding to a pod by issuing a request to the Kubernetes API server:
/proxy/nodes/<node_name>/portForward/<namespace>/<pod>
In the above URL:
-
<node_name>is the FQDN of the node. -
<namespace>is the namespace of the target pod. -
<pod>is the name of the target pod.
For example:
/proxy/nodes/node123.openshift.com/portForward/myns/mypod
After sending a port forward request to the API server, the client upgrades the connection to one that supports multiplexed streams; the current implementation uses Hyptertext Transfer Protocol Version 2 (HTTP/2).
The client creates a stream with the port header containing the target port in the pod. All data written to the stream is delivered via the kubelet to the target pod and port. Similarly, all data sent from the pod for that forwarded connection is delivered back to the same stream in the client.
The client closes all streams, the upgraded connection, and the underlying connection when it is finished with the port forwarding request.
Chapter 8. Working with clusters
8.1. Viewing system event information in an OpenShift Dedicated cluster
Events in OpenShift Dedicated are modeled based on events that happen to API objects in an OpenShift Dedicated cluster.
8.1.1. Understanding events
Events allow OpenShift Dedicated to record information about real-world events in a resource-agnostic manner. They also allow developers and administrators to consume information about system components in a unified way.
8.1.2. Viewing events using the CLI
You can get a list of events in a given project using the CLI.
Procedure
To view events in a project use the following command:
$ oc get events [-n <project>] 1- 1
- The name of the project.
For example:
$ oc get events -n openshift-config
Example output
LAST SEEN TYPE REASON OBJECT MESSAGE 97m Normal Scheduled pod/dapi-env-test-pod Successfully assigned openshift-config/dapi-env-test-pod to ip-10-0-171-202.ec2.internal 97m Normal Pulling pod/dapi-env-test-pod pulling image "gcr.io/google_containers/busybox" 97m Normal Pulled pod/dapi-env-test-pod Successfully pulled image "gcr.io/google_containers/busybox" 97m Normal Created pod/dapi-env-test-pod Created container 9m5s Warning FailedCreatePodSandBox pod/dapi-volume-test-pod Failed create pod sandbox: rpc error: code = Unknown desc = failed to create pod network sandbox k8s_dapi-volume-test-pod_openshift-config_6bc60c1f-452e-11e9-9140-0eec59c23068_0(748c7a40db3d08c07fb4f9eba774bd5effe5f0d5090a242432a73eee66ba9e22): Multus: Err adding pod to network "openshift-sdn": cannot set "openshift-sdn" ifname to "eth0": no netns: failed to Statfs "/proc/33366/ns/net": no such file or directory 8m31s Normal Scheduled pod/dapi-volume-test-pod Successfully assigned openshift-config/dapi-volume-test-pod to ip-10-0-171-202.ec2.internal
To view events in your project from the OpenShift Dedicated console.
- Launch the OpenShift Dedicated console.
- Click Home → Events and select your project.
Move to resource that you want to see events. For example: Home → Projects → <project-name> → <resource-name>.
Many objects, such as pods and deployments, have their own Events tab as well, which shows events related to that object.
8.1.3. List of events
This section describes the events of OpenShift Dedicated.
Table 8.1. Configuration events
| Name | Description |
|---|---|
|
| Failed pod configuration validation. |
Table 8.2. Container events
| Name | Description |
|---|---|
|
| Back-off restarting failed the container. |
|
| Container created. |
|
| Pull/Create/Start failed. |
|
| Killing the container. |
|
| Container started. |
|
| Preempting other pods. |
|
| Container runtime did not stop the pod within specified grace period. |
Table 8.3. Health events
| Name | Description |
|---|---|
|
| Container is unhealthy. |
Table 8.4. Image events
| Name | Description |
|---|---|
|
| Back off Ctr Start, image pull. |
|
| The image’s NeverPull Policy is violated. |
|
| Failed to pull the image. |
|
| Failed to inspect the image. |
|
| Successfully pulled the image or the container image is already present on the machine. |
|
| Pulling the image. |
Table 8.5. Image Manager events
| Name | Description |
|---|---|
|
| Free disk space failed. |
|
| Invalid disk capacity. |
Table 8.6. Node events
| Name | Description |
|---|---|
|
| Volume mount failed. |
|
| Host network not supported. |
|
| Host/port conflict. |
|
| Kubelet setup failed. |
|
| Undefined shaper. |
|
| Node is not ready. |
|
| Node is not schedulable. |
|
| Node is ready. |
|
| Node is schedulable. |
|
| Node selector mismatch. |
|
| Out of disk. |
|
| Node rebooted. |
|
| Starting kubelet. |
|
| Failed to attach volume. |
|
| Failed to detach volume. |
|
| Failed to expand/reduce volume. |
|
| Successfully expanded/reduced volume. |
|
| Failed to expand/reduce file system. |
|
| Successfully expanded/reduced file system. |
|
| Failed to unmount volume. |
|
| Failed to map a volume. |
|
| Failed unmaped device. |
|
| Volume is already mounted. |
|
| Volume is successfully detached. |
|
| Volume is successfully mounted. |
|
| Volume is successfully unmounted. |
|
| Container garbage collection failed. |
|
| Image garbage collection failed. |
|
| Failed to enforce System Reserved Cgroup limit. |
|
| Enforced System Reserved Cgroup limit. |
|
| Unsupported mount option. |
|
| Pod sandbox changed. |
|
| Failed to create pod sandbox. |
|
| Failed pod sandbox status. |
Table 8.7. Pod worker events
| Name | Description |
|---|---|
|
| Pod sync failed. |
Table 8.8. System Events
| Name | Description |
|---|---|
|
| There is an OOM (out of memory) situation on the cluster. |
Table 8.9. Pod events
| Name | Description |
|---|---|
|
| Failed to stop a pod. |
|
| Failed to create a pod container. |
|
| Failed to make pod data directories. |
|
| Network is not ready. |
|
|
Error creating: |
|
|
Created pod: |
|
|
Error deleting: |
|
|
Deleted pod: |
Table 8.10. Horizontal Pod AutoScaler events
| Name | Description |
|---|---|
| SelectorRequired | Selector is required. |
|
| Could not convert selector into a corresponding internal selector object. |
|
| HPA was unable to compute the replica count. |
|
| Unknown metric source type. |
|
| HPA was able to successfully calculate a replica count. |
|
| Failed to convert the given HPA. |
|
| HPA controller was unable to get the target’s current scale. |
|
| HPA controller was able to get the target’s current scale. |
|
| Failed to compute desired number of replicas based on listed metrics. |
|
|
New size: |
|
|
New size: |
|
| Failed to update status. |
Table 8.11. Network events (openshift-sdn)
| Name | Description |
|---|---|
|
| Starting OpenShift SDN. |
|
| The pod’s network interface has been lost and the pod will be stopped. |
Table 8.12. Network events (kube-proxy)
| Name | Description |
|---|---|
|
|
The service-port |
Table 8.13. Volume events
| Name | Description |
|---|---|
|
| There are no persistent volumes available and no storage class is set. |
|
| Volume size or class is different from what is requested in claim. |
|
| Error creating recycler pod. |
|
| Occurs when volume is recycled. |
|
| Occurs when pod is recycled. |
|
| Occurs when volume is deleted. |
|
| Error when deleting the volume. |
|
| Occurs when volume for the claim is provisioned either manually or via external software. |
|
| Failed to provision volume. |
|
| Error cleaning provisioned volume. |
|
| Occurs when the volume is provisioned successfully. |
|
| Delay binding until pod scheduling. |
Table 8.14. Lifecycle hooks
| Name | Description |
|---|---|
|
| Handler failed for pod start. |
|
| Handler failed for pre-stop. |
|
| Pre-stop hook unfinished. |
Table 8.15. Deployments
| Name | Description |
|---|---|
|
| Failed to cancel deployment. |
|
| Canceled deployment. |
|
| Created new replication controller. |
|
| No available Ingress IP to allocate to service. |
Table 8.16. Scheduler events
| Name | Description |
|---|---|
|
|
Failed to schedule pod: |
|
|
By |
|
|
Successfully assigned |
Table 8.17. Daemon set events
| Name | Description |
|---|---|
|
| This daemon set is selecting all pods. A non-empty selector is required. |
|
|
Failed to place pod on |
|
|
Found failed daemon pod |
Table 8.18. LoadBalancer service events
| Name | Description |
|---|---|
|
| Error creating load balancer. |
|
| Deleting load balancer. |
|
| Ensuring load balancer. |
|
| Ensured load balancer. |
|
|
There are no available nodes for |
|
|
Lists the new |
|
|
Lists the new IP address. For example, |
|
|
Lists external IP address. For example, |
|
|
Lists the new UID. For example, |
|
|
Lists the new |
|
|
Lists the new |
|
| Updated load balancer with new hosts. |
|
| Error updating load balancer with new hosts. |
|
| Deleting load balancer. |
|
| Error deleting load balancer. |
|
| Deleted load balancer. |
8.2. Estimating the number of pods your OpenShift Dedicated nodes can hold
As a cluster administrator, you can use the OpenShift Cluster Capacity Tool to view the number of pods that can be scheduled to increase the current resources before they become exhausted, and to ensure any future pods can be scheduled. This capacity comes from an individual node host in a cluster, and includes CPU, memory, disk space, and others.
8.2.1. Understanding the OpenShift Cluster Capacity Tool
The OpenShift Cluster Capacity Tool simulates a sequence of scheduling decisions to determine how many instances of an input pod can be scheduled on the cluster before it is exhausted of resources to provide a more accurate estimation.
The remaining allocatable capacity is a rough estimation, because it does not count all of the resources being distributed among nodes. It analyzes only the remaining resources and estimates the available capacity that is still consumable in terms of a number of instances of a pod with given requirements that can be scheduled in a cluster.
Also, pods might only have scheduling support on particular sets of nodes based on its selection and affinity criteria. As a result, the estimation of which remaining pods a cluster can schedule can be difficult.
You can run the OpenShift Cluster Capacity Tool as a stand-alone utility from the command line, or as a job in a pod inside an OpenShift Dedicated cluster. Running the tool as job inside of a pod enables you to run it multiple times without intervention.
8.2.2. Running the OpenShift Cluster Capacity Tool on the command line
You can run the OpenShift Cluster Capacity Tool from the command line to estimate the number of pods that can be scheduled onto your cluster.
You create a sample pod spec file, which the tool uses for estimating resource usage. The pod spec specifies its resource requirements as limits or requests. The cluster capacity tool takes the pod’s resource requirements into account for its estimation analysis.
Prerequisites
- Run the OpenShift Cluster Capacity Tool, which is available as a container image from the Red Hat Ecosystem Catalog.
Create a sample pod spec file:
Create a YAML file similar to the following:
apiVersion: v1 kind: Pod metadata: name: small-pod labels: app: guestbook tier: frontend spec: securityContext: runAsNonRoot: true seccompProfile: type: RuntimeDefault containers: - name: php-redis image: gcr.io/google-samples/gb-frontend:v4 imagePullPolicy: Always resources: limits: cpu: 150m memory: 100Mi requests: cpu: 150m memory: 100Mi securityContext: allowPrivilegeEscalation: false capabilities: drop: [ALL]Create the cluster role:
$ oc create -f <file_name>.yaml
For example:
$ oc create -f pod-spec.yaml
Procedure
To use the cluster capacity tool on the command line:
From the terminal, log in to the Red Hat Registry:
$ podman login registry.redhat.io
Pull the cluster capacity tool image:
$ podman pull registry.redhat.io/openshift4/ose-cluster-capacity
Run the cluster capacity tool:
$ podman run -v $HOME/.kube:/kube:Z -v $(pwd):/cc:Z ose-cluster-capacity \ /bin/cluster-capacity --kubeconfig /kube/config --<pod_spec>.yaml /cc/<pod_spec>.yaml \ --verbose
where:
- <pod_spec>.yaml
- Specifies the pod spec to use.
- verbose
- Outputs a detailed description of how many pods can be scheduled on each node in the cluster.
Example output
small-pod pod requirements: - CPU: 150m - Memory: 100Mi The cluster can schedule 88 instance(s) of the pod small-pod. Termination reason: Unschedulable: 0/5 nodes are available: 2 Insufficient cpu, 3 node(s) had taint {node-role.kubernetes.io/master: }, that the pod didn't tolerate. Pod distribution among nodes: small-pod - 192.168.124.214: 45 instance(s) - 192.168.124.120: 43 instance(s)In the above example, the number of estimated pods that can be scheduled onto the cluster is 88.
8.2.3. Running the OpenShift Cluster Capacity Tool as a job inside a pod
Running the OpenShift Cluster Capacity Tool as a job inside of a pod allows you to run the tool multiple times without needing user intervention. You run the OpenShift Cluster Capacity Tool as a job by using a ConfigMap object.
Prerequisites
Download and install OpenShift Cluster Capacity Tool.
Procedure
To run the cluster capacity tool:
Create the cluster role:
Create a YAML file similar to the following:
kind: ClusterRole apiVersion: rbac.authorization.k8s.io/v1 metadata: name: cluster-capacity-role rules: - apiGroups: [""] resources: ["pods", "nodes", "persistentvolumeclaims", "persistentvolumes", "services", "replicationcontrollers"] verbs: ["get", "watch", "list"] - apiGroups: ["apps"] resources: ["replicasets", "statefulsets"] verbs: ["get", "watch", "list"] - apiGroups: ["policy"] resources: ["poddisruptionbudgets"] verbs: ["get", "watch", "list"] - apiGroups: ["storage.k8s.io"] resources: ["storageclasses"] verbs: ["get", "watch", "list"]
Create the cluster role by running the following command:
$ oc create -f <file_name>.yaml
For example:
$ oc create sa cluster-capacity-sa
Create the service account:
$ oc create sa cluster-capacity-sa -n default
Add the role to the service account:
$ oc adm policy add-cluster-role-to-user cluster-capacity-role \ system:serviceaccount:<namespace>:cluster-capacity-sawhere:
- <namespace>
- Specifies the namespace where the pod is located.
Define and create the pod spec:
Create a YAML file similar to the following:
apiVersion: v1 kind: Pod metadata: name: small-pod labels: app: guestbook tier: frontend spec: securityContext: runAsNonRoot: true seccompProfile: type: RuntimeDefault containers: - name: php-redis image: gcr.io/google-samples/gb-frontend:v4 imagePullPolicy: Always resources: limits: cpu: 150m memory: 100Mi requests: cpu: 150m memory: 100Mi securityContext: allowPrivilegeEscalation: false capabilities: drop: [ALL]Create the pod by running the following command:
$ oc create -f <file_name>.yaml
For example:
$ oc create -f pod.yaml
Created a config map object by running the following command:
$ oc create configmap cluster-capacity-configmap \ --from-file=pod.yaml=pod.yamlThe cluster capacity analysis is mounted in a volume using a config map object named
cluster-capacity-configmapto mount the input pod spec filepod.yamlinto a volumetest-volumeat the path/test-pod.Create the job using the below example of a job specification file:
Create a YAML file similar to the following:
apiVersion: batch/v1 kind: Job metadata: name: cluster-capacity-job spec: parallelism: 1 completions: 1 template: metadata: name: cluster-capacity-pod spec: containers: - name: cluster-capacity image: openshift/origin-cluster-capacity imagePullPolicy: "Always" volumeMounts: - mountPath: /test-pod name: test-volume env: - name: CC_INCLUSTER 1 value: "true" command: - "/bin/sh" - "-ec" - | /bin/cluster-capacity --podspec=/test-pod/pod.yaml --verbose restartPolicy: "Never" serviceAccountName: cluster-capacity-sa volumes: - name: test-volume configMap: name: cluster-capacity-configmap- 1
- A required environment variable letting the cluster capacity tool know that it is running inside a cluster as a pod.
Thepod.yamlkey of theConfigMapobject is the same as thePodspec file name, though it is not required. By doing this, the input pod spec file can be accessed inside the pod as/test-pod/pod.yaml.
Run the cluster capacity image as a job in a pod by running the following command:
$ oc create -f cluster-capacity-job.yaml
Verification
Check the job logs to find the number of pods that can be scheduled in the cluster:
$ oc logs jobs/cluster-capacity-job
Example output
small-pod pod requirements: - CPU: 150m - Memory: 100Mi The cluster can schedule 52 instance(s) of the pod small-pod. Termination reason: Unschedulable: No nodes are available that match all of the following predicates:: Insufficient cpu (2). Pod distribution among nodes: small-pod - 192.168.124.214: 26 instance(s) - 192.168.124.120: 26 instance(s)
8.3. Restrict resource consumption with limit ranges
By default, containers run with unbounded compute resources on an OpenShift Dedicated cluster. With limit ranges, you can restrict resource consumption for specific objects in a project:
- pods and containers: You can set minimum and maximum requirements for CPU and memory for pods and their containers.
-
Image streams: You can set limits on the number of images and tags in an
ImageStreamobject. - Images: You can limit the size of images that can be pushed to an internal registry.
- Persistent volume claims (PVC): You can restrict the size of the PVCs that can be requested.
If a pod does not meet the constraints imposed by the limit range, the pod cannot be created in the namespace.
8.3.1. About limit ranges
A limit range, defined by a LimitRange object, restricts resource consumption in a project. In the project you can set specific resource limits for a pod, container, image, image stream, or persistent volume claim (PVC).
All requests to create and modify resources are evaluated against each LimitRange object in the project. If the resource violates any of the enumerated constraints, the resource is rejected.
The following shows a limit range object for all components: pod, container, image, image stream, or PVC. You can configure limits for any or all of these components in the same object. You create a different limit range object for each project where you want to control resources.
Sample limit range object for a container
apiVersion: "v1"
kind: "LimitRange"
metadata:
name: "resource-limits"
spec:
limits:
- type: "Container"
max:
cpu: "2"
memory: "1Gi"
min:
cpu: "100m"
memory: "4Mi"
default:
cpu: "300m"
memory: "200Mi"
defaultRequest:
cpu: "200m"
memory: "100Mi"
maxLimitRequestRatio:
cpu: "10"
8.3.1.1. About component limits
The following examples show limit range parameters for each component. The examples are broken out for clarity. You can create a single LimitRange object for any or all components as necessary.
8.3.1.1.1. Container limits
A limit range allows you to specify the minimum and maximum CPU and memory that each container in a pod can request for a specific project. If a container is created in the project, the container CPU and memory requests in the Pod spec must comply with the values set in the LimitRange object. If not, the pod does not get created.
-
The container CPU or memory request and limit must be greater than or equal to the
minresource constraint for containers that are specified in theLimitRangeobject. The container CPU or memory request and limit must be less than or equal to the
maxresource constraint for containers that are specified in theLimitRangeobject.If the
LimitRangeobject defines amaxCPU, you do not need to define a CPUrequestvalue in thePodspec. But you must specify a CPUlimitvalue that satisfies the maximum CPU constraint specified in the limit range.The ratio of the container limits to requests must be less than or equal to the
maxLimitRequestRatiovalue for containers that is specified in theLimitRangeobject.If the
LimitRangeobject defines amaxLimitRequestRatioconstraint, any new containers must have both arequestand alimitvalue. OpenShift Dedicated calculates the limit-to-request ratio by dividing thelimitby therequest. This value should be a non-negative integer greater than 1.For example, if a container has
cpu: 500in thelimitvalue, andcpu: 100in therequestvalue, the limit-to-request ratio forcpuis5. This ratio must be less than or equal to themaxLimitRequestRatio.
If the Pod spec does not specify a container resource memory or limit, the default or defaultRequest CPU and memory values for containers specified in the limit range object are assigned to the container.
Container LimitRange object definition
apiVersion: "v1" kind: "LimitRange" metadata: name: "resource-limits" 1 spec: limits: - type: "Container" max: cpu: "2" 2 memory: "1Gi" 3 min: cpu: "100m" 4 memory: "4Mi" 5 default: cpu: "300m" 6 memory: "200Mi" 7 defaultRequest: cpu: "200m" 8 memory: "100Mi" 9 maxLimitRequestRatio: cpu: "10" 10
- 1
- The name of the LimitRange object.
- 2
- The maximum amount of CPU that a single container in a pod can request.
- 3
- The maximum amount of memory that a single container in a pod can request.
- 4
- The minimum amount of CPU that a single container in a pod can request.
- 5
- The minimum amount of memory that a single container in a pod can request.
- 6
- The default amount of CPU that a container can use if not specified in the
Podspec. - 7
- The default amount of memory that a container can use if not specified in the
Podspec. - 8
- The default amount of CPU that a container can request if not specified in the
Podspec. - 9
- The default amount of memory that a container can request if not specified in the
Podspec. - 10
- The maximum limit-to-request ratio for a container.
8.3.1.1.2. Pod limits
A limit range allows you to specify the minimum and maximum CPU and memory limits for all containers across a pod in a given project. To create a container in the project, the container CPU and memory requests in the Pod spec must comply with the values set in the LimitRange object. If not, the pod does not get created.
If the Pod spec does not specify a container resource memory or limit, the default or defaultRequest CPU and memory values for containers specified in the limit range object are assigned to the container.
Across all containers in a pod, the following must hold true:
-
The container CPU or memory request and limit must be greater than or equal to the
minresource constraints for pods that are specified in theLimitRangeobject. -
The container CPU or memory request and limit must be less than or equal to the
maxresource constraints for pods that are specified in theLimitRangeobject. -
The ratio of the container limits to requests must be less than or equal to the
maxLimitRequestRatioconstraint specified in theLimitRangeobject.
Pod LimitRange object definition
apiVersion: "v1" kind: "LimitRange" metadata: name: "resource-limits" 1 spec: limits: - type: "Pod" max: cpu: "2" 2 memory: "1Gi" 3 min: cpu: "200m" 4 memory: "6Mi" 5 maxLimitRequestRatio: cpu: "10" 6
- 1
- The name of the limit range object.
- 2
- The maximum amount of CPU that a pod can request across all containers.
- 3
- The maximum amount of memory that a pod can request across all containers.
- 4
- The minimum amount of CPU that a pod can request across all containers.
- 5
- The minimum amount of memory that a pod can request across all containers.
- 6
- The maximum limit-to-request ratio for a container.
8.3.1.1.3. Image limits
A LimitRange object allows you to specify the maximum size of an image that can be pushed to an OpenShift image registry.
When pushing images to an OpenShift image registry, the following must hold true:
-
The size of the image must be less than or equal to the
maxsize for images that is specified in theLimitRangeobject.
Image LimitRange object definition
apiVersion: "v1" kind: "LimitRange" metadata: name: "resource-limits" 1 spec: limits: - type: openshift.io/Image max: storage: 1Gi 2
The image size is not always available in the manifest of an uploaded image. This is especially the case for images built with Docker 1.10 or higher and pushed to a v2 registry. If such an image is pulled with an older Docker daemon, the image manifest is converted by the registry to schema v1 lacking all the size information. No storage limit set on images prevent it from being uploaded.
The issue is being addressed.
8.3.1.1.4. Image stream limits
A LimitRange object allows you to specify limits for image streams.
For each image stream, the following must hold true:
-
The number of image tags in an
ImageStreamspecification must be less than or equal to theopenshift.io/image-tagsconstraint in theLimitRangeobject. -
The number of unique references to images in an
ImageStreamspecification must be less than or equal to theopenshift.io/imagesconstraint in the limit range object.
Imagestream LimitRange object definition
apiVersion: "v1" kind: "LimitRange" metadata: name: "resource-limits" 1 spec: limits: - type: openshift.io/ImageStream max: openshift.io/image-tags: 20 2 openshift.io/images: 30 3
The openshift.io/image-tags resource represents unique image references. Possible references are an ImageStreamTag, an ImageStreamImage and a DockerImage. Tags can be created using the oc tag and oc import-image commands. No distinction is made between internal and external references. However, each unique reference tagged in an ImageStream specification is counted just once. It does not restrict pushes to an internal container image registry in any way, but is useful for tag restriction.
The openshift.io/images resource represents unique image names recorded in image stream status. It allows for restriction of a number of images that can be pushed to the OpenShift image registry. Internal and external references are not distinguished.
8.3.1.1.5. Persistent volume claim limits
A LimitRange object allows you to restrict the storage requested in a persistent volume claim (PVC).
Across all persistent volume claims in a project, the following must hold true:
-
The resource request in a persistent volume claim (PVC) must be greater than or equal the
minconstraint for PVCs that is specified in theLimitRangeobject. -
The resource request in a persistent volume claim (PVC) must be less than or equal the
maxconstraint for PVCs that is specified in theLimitRangeobject.
PVC LimitRange object definition
apiVersion: "v1" kind: "LimitRange" metadata: name: "resource-limits" 1 spec: limits: - type: "PersistentVolumeClaim" min: storage: "2Gi" 2 max: storage: "50Gi" 3
8.3.2. Creating a Limit Range
To apply a limit range to a project:
Create a
LimitRangeobject with your required specifications:apiVersion: "v1" kind: "LimitRange" metadata: name: "resource-limits" 1 spec: limits: - type: "Pod" 2 max: cpu: "2" memory: "1Gi" min: cpu: "200m" memory: "6Mi" - type: "Container" 3 max: cpu: "2" memory: "1Gi" min: cpu: "100m" memory: "4Mi" default: 4 cpu: "300m" memory: "200Mi" defaultRequest: 5 cpu: "200m" memory: "100Mi" maxLimitRequestRatio: 6 cpu: "10" - type: openshift.io/Image 7 max: storage: 1Gi - type: openshift.io/ImageStream 8 max: openshift.io/image-tags: 20 openshift.io/images: 30 - type: "PersistentVolumeClaim" 9 min: storage: "2Gi" max: storage: "50Gi"
- 1
- Specify a name for the
LimitRangeobject. - 2
- To set limits for a pod, specify the minimum and maximum CPU and memory requests as needed.
- 3
- To set limits for a container, specify the minimum and maximum CPU and memory requests as needed.
- 4
- Optional. For a container, specify the default amount of CPU or memory that a container can use, if not specified in the
Podspec. - 5
- Optional. For a container, specify the default amount of CPU or memory that a container can request, if not specified in the
Podspec. - 6
- Optional. For a container, specify the maximum limit-to-request ratio that can be specified in the
Podspec. - 7
- To set limits for an Image object, set the maximum size of an image that can be pushed to an OpenShift image registry.
- 8
- To set limits for an image stream, set the maximum number of image tags and references that can be in the
ImageStreamobject file, as needed. - 9
- To set limits for a persistent volume claim, set the minimum and maximum amount of storage that can be requested.
Create the object:
$ oc create -f <limit_range_file> -n <project> 1- 1
- Specify the name of the YAML file you created and the project where you want the limits to apply.
8.3.3. Viewing a limit
You can view any limits defined in a project by navigating in the web console to the project’s Quota page.
You can also use the CLI to view limit range details:
Get the list of
LimitRangeobject defined in the project. For example, for a project called demoproject:$ oc get limits -n demoproject
NAME CREATED AT resource-limits 2020-07-15T17:14:23Z
Describe the
LimitRangeobject you are interested in, for example theresource-limitslimit range:$ oc describe limits resource-limits -n demoproject
Name: resource-limits Namespace: demoproject Type Resource Min Max Default Request Default Limit Max Limit/Request Ratio ---- -------- --- --- --------------- ------------- ----------------------- Pod cpu 200m 2 - - - Pod memory 6Mi 1Gi - - - Container cpu 100m 2 200m 300m 10 Container memory 4Mi 1Gi 100Mi 200Mi - openshift.io/Image storage - 1Gi - - - openshift.io/ImageStream openshift.io/image - 12 - - - openshift.io/ImageStream openshift.io/image-tags - 10 - - - PersistentVolumeClaim storage - 50Gi - - -
8.3.4. Deleting a Limit Range
To remove any active LimitRange object to no longer enforce the limits in a project:
Run the following command:
$ oc delete limits <limit_name>
8.4. Configuring cluster memory to meet container memory and risk requirements
As a cluster administrator, you can help your clusters operate efficiently through managing application memory by:
- Determining the memory and risk requirements of a containerized application component and configuring the container memory parameters to suit those requirements.
- Configuring containerized application runtimes (for example, OpenJDK) to adhere optimally to the configured container memory parameters.
- Diagnosing and resolving memory-related error conditions associated with running in a container.
8.4.1. Understanding managing application memory
It is recommended to fully read the overview of how OpenShift Dedicated manages Compute Resources before proceeding.
For each kind of resource (memory, CPU, storage), OpenShift Dedicated allows optional request and limit values to be placed on each container in a pod.
Note the following about memory requests and memory limits:
Memory request
- The memory request value, if specified, influences the OpenShift Dedicated scheduler. The scheduler considers the memory request when scheduling a container to a node, then fences off the requested memory on the chosen node for the use of the container.
- If a node’s memory is exhausted, OpenShift Dedicated prioritizes evicting its containers whose memory usage most exceeds their memory request. In serious cases of memory exhaustion, the node OOM killer may select and kill a process in a container based on a similar metric.
- The cluster administrator can assign quota or assign default values for the memory request value.
- The cluster administrator can override the memory request values that a developer specifies, to manage cluster overcommit.
Memory limit
- The memory limit value, if specified, provides a hard limit on the memory that can be allocated across all the processes in a container.
- If the memory allocated by all of the processes in a container exceeds the memory limit, the node Out of Memory (OOM) killer will immediately select and kill a process in the container.
- If both memory request and limit are specified, the memory limit value must be greater than or equal to the memory request.
- The cluster administrator can assign quota or assign default values for the memory limit value.
-
The minimum memory limit is 12 MB. If a container fails to start due to a
Cannot allocate memorypod event, the memory limit is too low. Either increase or remove the memory limit. Removing the limit allows pods to consume unbounded node resources.
8.4.1.1. Managing application memory strategy
The steps for sizing application memory on OpenShift Dedicated are as follows:
Determine expected container memory usage
Determine expected mean and peak container memory usage, empirically if necessary (for example, by separate load testing). Remember to consider all the processes that may potentially run in parallel in the container: for example, does the main application spawn any ancillary scripts?
Determine risk appetite
Determine risk appetite for eviction. If the risk appetite is low, the container should request memory according to the expected peak usage plus a percentage safety margin. If the risk appetite is higher, it may be more appropriate to request memory according to the expected mean usage.
Set container memory request
Set container memory request based on the above. The more accurately the request represents the application memory usage, the better. If the request is too high, cluster and quota usage will be inefficient. If the request is too low, the chances of application eviction increase.
Set container memory limit, if required
Set container memory limit, if required. Setting a limit has the effect of immediately killing a container process if the combined memory usage of all processes in the container exceeds the limit, and is therefore a mixed blessing. On the one hand, it may make unanticipated excess memory usage obvious early ("fail fast"); on the other hand it also terminates processes abruptly.
Note that some OpenShift Dedicated clusters may require a limit value to be set; some may override the request based on the limit; and some application images rely on a limit value being set as this is easier to detect than a request value.
If the memory limit is set, it should not be set to less than the expected peak container memory usage plus a percentage safety margin.
Ensure application is tuned
Ensure application is tuned with respect to configured request and limit values, if appropriate. This step is particularly relevant to applications which pool memory, such as the JVM. The rest of this page discusses this.
8.4.2. Understanding OpenJDK settings for OpenShift Dedicated
The default OpenJDK settings do not work well with containerized environments. As a result, some additional Java memory settings must always be provided whenever running the OpenJDK in a container.
The JVM memory layout is complex, version dependent, and describing it in detail is beyond the scope of this documentation. However, as a starting point for running OpenJDK in a container, at least the following three memory-related tasks are key:
- Overriding the JVM maximum heap size.
- Encouraging the JVM to release unused memory to the operating system, if appropriate.
- Ensuring all JVM processes within a container are appropriately configured.
Optimally tuning JVM workloads for running in a container is beyond the scope of this documentation, and may involve setting multiple additional JVM options.
8.4.2.1. Understanding how to override the JVM maximum heap size
For many Java workloads, the JVM heap is the largest single consumer of memory. Currently, the OpenJDK defaults to allowing up to 1/4 (1/-XX:MaxRAMFraction) of the compute node’s memory to be used for the heap, regardless of whether the OpenJDK is running in a container or not. It is therefore essential to override this behavior, especially if a container memory limit is also set.
There are at least two ways the above can be achieved:
If the container memory limit is set and the experimental options are supported by the JVM, set
-XX:+UnlockExperimentalVMOptions -XX:+UseCGroupMemoryLimitForHeap.NoteThe
UseCGroupMemoryLimitForHeapoption has been removed in JDK 11. Use-XX:+UseContainerSupportinstead.This sets
-XX:MaxRAMto the container memory limit, and the maximum heap size (-XX:MaxHeapSize/-Xmx) to 1/-XX:MaxRAMFraction(1/4 by default).Directly override one of
-XX:MaxRAM,-XX:MaxHeapSizeor-Xmx.This option involves hard-coding a value, but has the advantage of allowing a safety margin to be calculated.
8.4.2.2. Understanding how to encourage the JVM to release unused memory to the operating system
By default, the OpenJDK does not aggressively return unused memory to the operating system. This may be appropriate for many containerized Java workloads, but notable exceptions include workloads where additional active processes co-exist with a JVM within a container, whether those additional processes are native, additional JVMs, or a combination of the two.
Java-based agents can use the following JVM arguments to encourage the JVM to release unused memory to the operating system:
-XX:+UseParallelGC -XX:MinHeapFreeRatio=5 -XX:MaxHeapFreeRatio=10 -XX:GCTimeRatio=4 -XX:AdaptiveSizePolicyWeight=90.
These arguments are intended to return heap memory to the operating system whenever allocated memory exceeds 110% of in-use memory (-XX:MaxHeapFreeRatio), spending up to 20% of CPU time in the garbage collector (-XX:GCTimeRatio). At no time will the application heap allocation be less than the initial heap allocation (overridden by -XX:InitialHeapSize / -Xms). Detailed additional information is available Tuning Java’s footprint in OpenShift (Part 1), Tuning Java’s footprint in OpenShift (Part 2), and at OpenJDK and Containers.
8.4.2.3. Understanding how to ensure all JVM processes within a container are appropriately configured
In the case that multiple JVMs run in the same container, it is essential to ensure that they are all configured appropriately. For many workloads it will be necessary to grant each JVM a percentage memory budget, leaving a perhaps substantial additional safety margin.
Many Java tools use different environment variables (JAVA_OPTS, GRADLE_OPTS, and so on) to configure their JVMs and it can be challenging to ensure that the right settings are being passed to the right JVM.
The JAVA_TOOL_OPTIONS environment variable is always respected by the OpenJDK, and values specified in JAVA_TOOL_OPTIONS will be overridden by other options specified on the JVM command line. By default, to ensure that these options are used by default for all JVM workloads run in the Java-based agent image, the OpenShift Dedicated Jenkins Maven agent image sets:
JAVA_TOOL_OPTIONS="-XX:+UnlockExperimentalVMOptions -XX:+UseCGroupMemoryLimitForHeap -Dsun.zip.disableMemoryMapping=true"
The UseCGroupMemoryLimitForHeap option has been removed in JDK 11. Use -XX:+UseContainerSupport instead.
This does not guarantee that additional options are not required, but is intended to be a helpful starting point.
8.4.3. Finding the memory request and limit from within a pod
An application wishing to dynamically discover its memory request and limit from within a pod should use the Downward API.
Procedure
Configure the pod to add the
MEMORY_REQUESTandMEMORY_LIMITstanzas:Create a YAML file similar to the following:
apiVersion: v1 kind: Pod metadata: name: test spec: securityContext: runAsNonRoot: true seccompProfile: type: RuntimeDefault containers: - name: test image: fedora:latest command: - sleep - "3600" env: - name: MEMORY_REQUEST 1 valueFrom: resourceFieldRef: containerName: test resource: requests.memory - name: MEMORY_LIMIT 2 valueFrom: resourceFieldRef: containerName: test resource: limits.memory resources: requests: memory: 384Mi limits: memory: 512Mi securityContext: allowPrivilegeEscalation: false capabilities: drop: [ALL]Create the pod by running the following command:
$ oc create -f <file-name>.yaml
Verification
Access the pod using a remote shell:
$ oc rsh test
Check that the requested values were applied:
$ env | grep MEMORY | sort
Example output
MEMORY_LIMIT=536870912 MEMORY_REQUEST=402653184
The memory limit value can also be read from inside the container by the /sys/fs/cgroup/memory/memory.limit_in_bytes file.
8.4.4. Understanding OOM kill policy
OpenShift Dedicated can kill a process in a container if the total memory usage of all the processes in the container exceeds the memory limit, or in serious cases of node memory exhaustion.
When a process is Out of Memory (OOM) killed, this might result in the container exiting immediately. If the container PID 1 process receives the SIGKILL, the container will exit immediately. Otherwise, the container behavior is dependent on the behavior of the other processes.
For example, a container process exited with code 137, indicating it received a SIGKILL signal.
If the container does not exit immediately, an OOM kill is detectable as follows:
Access the pod using a remote shell:
# oc rsh test
Run the following command to see the current OOM kill count in
/sys/fs/cgroup/memory/memory.oom_control:$ grep '^oom_kill ' /sys/fs/cgroup/memory/memory.oom_control
Example output
oom_kill 0
Run the following command to provoke an OOM kill:
$ sed -e '' </dev/zero
Example output
Killed
Run the following command to view the exit status of the
sedcommand:$ echo $?
Example output
137
The
137code indicates the container process exited with code 137, indicating it received a SIGKILL signal.Run the following command to see that the OOM kill counter in
/sys/fs/cgroup/memory/memory.oom_controlincremented:$ grep '^oom_kill ' /sys/fs/cgroup/memory/memory.oom_control
Example output
oom_kill 1
If one or more processes in a pod are OOM killed, when the pod subsequently exits, whether immediately or not, it will have phase Failed and reason OOMKilled. An OOM-killed pod might be restarted depending on the value of
restartPolicy. If not restarted, controllers such as the replication controller will notice the pod’s failed status and create a new pod to replace the old one.Use the follwing command to get the pod status:
$ oc get pod test
Example output
NAME READY STATUS RESTARTS AGE test 0/1 OOMKilled 0 1m
If the pod has not restarted, run the following command to view the pod:
$ oc get pod test -o yaml
Example output
... status: containerStatuses: - name: test ready: false restartCount: 0 state: terminated: exitCode: 137 reason: OOMKilled phase: FailedIf restarted, run the following command to view the pod:
$ oc get pod test -o yaml
Example output
... status: containerStatuses: - name: test ready: true restartCount: 1 lastState: terminated: exitCode: 137 reason: OOMKilled state: running: phase: Running
8.4.5. Understanding pod eviction
OpenShift Dedicated may evict a pod from its node when the node’s memory is exhausted. Depending on the extent of memory exhaustion, the eviction may or may not be graceful. Graceful eviction implies the main process (PID 1) of each container receiving a SIGTERM signal, then some time later a SIGKILL signal if the process has not exited already. Non-graceful eviction implies the main process of each container immediately receiving a SIGKILL signal.
An evicted pod has phase Failed and reason Evicted. It will not be restarted, regardless of the value of restartPolicy. However, controllers such as the replication controller will notice the pod’s failed status and create a new pod to replace the old one.
$ oc get pod test
Example output
NAME READY STATUS RESTARTS AGE test 0/1 Evicted 0 1m
$ oc get pod test -o yaml
Example output
... status: message: 'Pod The node was low on resource: [MemoryPressure].' phase: Failed reason: Evicted
8.5. Configuring your cluster to place pods on overcommitted nodes
In an overcommitted state, the sum of the container compute resource requests and limits exceeds the resources available on the system. For example, you might want to use overcommitment in development environments where a trade-off of guaranteed performance for capacity is acceptable.
Containers can specify compute resource requests and limits. Requests are used for scheduling your container and provide a minimum service guarantee. Limits constrain the amount of compute resource that can be consumed on your node.
The scheduler attempts to optimize the compute resource use across all nodes in your cluster. It places pods onto specific nodes, taking the pods' compute resource requests and nodes' available capacity into consideration.
OpenShift Dedicated administrators can control the level of overcommit and manage container density on nodes. You can configure cluster-level overcommit using the ClusterResourceOverride Operator to override the ratio between requests and limits set on developer containers. In conjunction with node overcommit, you can adjust the resource limit and request to achieve the desired level of overcommit.
In OpenShift Dedicated, you must enable cluster-level overcommit. Node overcommitment is enabled by default. See Disabling overcommitment for a node.
8.5.1. Resource requests and overcommitment
For each compute resource, a container may specify a resource request and limit. Scheduling decisions are made based on the request to ensure that a node has enough capacity available to meet the requested value. If a container specifies limits, but omits requests, the requests are defaulted to the limits. A container is not able to exceed the specified limit on the node.
The enforcement of limits is dependent upon the compute resource type. If a container makes no request or limit, the container is scheduled to a node with no resource guarantees. In practice, the container is able to consume as much of the specified resource as is available with the lowest local priority. In low resource situations, containers that specify no resource requests are given the lowest quality of service.
Scheduling is based on resources requested, while quota and hard limits refer to resource limits, which can be set higher than requested resources. The difference between request and limit determines the level of overcommit; for instance, if a container is given a memory request of 1Gi and a memory limit of 2Gi, it is scheduled based on the 1Gi request being available on the node, but could use up to 2Gi; so it is 200% overcommitted.
8.5.2. Cluster-level overcommit using the Cluster Resource Override Operator
The Cluster Resource Override Operator is an admission webhook that allows you to control the level of overcommit and manage container density across all the nodes in your cluster. The Operator controls how nodes in specific projects can exceed defined memory and CPU limits.
You must install the Cluster Resource Override Operator using the OpenShift Dedicated console or CLI as shown in the following sections. During the installation, you create a ClusterResourceOverride custom resource (CR), where you set the level of overcommit, as shown in the following example:
apiVersion: operator.autoscaling.openshift.io/v1
kind: ClusterResourceOverride
metadata:
name: cluster 1
spec:
podResourceOverride:
spec:
memoryRequestToLimitPercent: 50 2
cpuRequestToLimitPercent: 25 3
limitCPUToMemoryPercent: 200 4
# ...- 1
- The name must be
cluster. - 2
- Optional. If a container memory limit has been specified or defaulted, the memory request is overridden to this percentage of the limit, between 1-100. The default is 50.
- 3
- Optional. If a container CPU limit has been specified or defaulted, the CPU request is overridden to this percentage of the limit, between 1-100. The default is 25.
- 4
- Optional. If a container memory limit has been specified or defaulted, the CPU limit is overridden to a percentage of the memory limit, if specified. Scaling 1Gi of RAM at 100 percent is equal to 1 CPU core. This is processed prior to overriding the CPU request (if configured). The default is 200.
The Cluster Resource Override Operator overrides have no effect if limits have not been set on containers. Create a LimitRange object with default limits per individual project or configure limits in Pod specs for the overrides to apply.
When configured, overrides can be enabled per-project by applying the following label to the Namespace object for each project:
apiVersion: v1
kind: Namespace
metadata:
# ...
labels:
clusterresourceoverrides.admission.autoscaling.openshift.io/enabled: "true"
# ...
The Operator watches for the ClusterResourceOverride CR and ensures that the ClusterResourceOverride admission webhook is installed into the same namespace as the operator.
8.5.2.1. Installing the Cluster Resource Override Operator using the web console
You can use the OpenShift Dedicated web console to install the Cluster Resource Override Operator to help control overcommit in your cluster.
Prerequisites
-
The Cluster Resource Override Operator has no effect if limits have not been set on containers. You must specify default limits for a project using a
LimitRangeobject or configure limits inPodspecs for the overrides to apply.
Procedure
To install the Cluster Resource Override Operator using the OpenShift Dedicated web console:
In the OpenShift Dedicated web console, navigate to Home → Projects
- Click Create Project.
-
Specify
clusterresourceoverride-operatoras the name of the project. - Click Create.
Navigate to Operators → OperatorHub.
- Choose ClusterResourceOverride Operator from the list of available Operators and click Install.
- On the Install Operator page, make sure A specific Namespace on the cluster is selected for Installation Mode.
- Make sure clusterresourceoverride-operator is selected for Installed Namespace.
- Select an Update Channel and Approval Strategy.
- Click Install.
On the Installed Operators page, click ClusterResourceOverride.
- On the ClusterResourceOverride Operator details page, click Create ClusterResourceOverride.
On the Create ClusterResourceOverride page, click YAML view and edit the YAML template to set the overcommit values as needed:
apiVersion: operator.autoscaling.openshift.io/v1 kind: ClusterResourceOverride metadata: name: cluster 1 spec: podResourceOverride: spec: memoryRequestToLimitPercent: 50 2 cpuRequestToLimitPercent: 25 3 limitCPUToMemoryPercent: 200 4 # ...
- 1
- The name must be
cluster. - 2
- Optional. Specify the percentage to override the container memory limit, if used, between 1-100. The default is 50.
- 3
- Optional. Specify the percentage to override the container CPU limit, if used, between 1-100. The default is 25.
- 4
- Optional. Specify the percentage to override the container memory limit, if used. Scaling 1Gi of RAM at 100 percent is equal to 1 CPU core. This is processed prior to overriding the CPU request, if configured. The default is 200.
- Click Create.
Check the current state of the admission webhook by checking the status of the cluster custom resource:
- On the ClusterResourceOverride Operator page, click cluster.
On the ClusterResourceOverride Details page, click YAML. The
mutatingWebhookConfigurationRefsection appears when the webhook is called.apiVersion: operator.autoscaling.openshift.io/v1 kind: ClusterResourceOverride metadata: annotations: kubectl.kubernetes.io/last-applied-configuration: | {"apiVersion":"operator.autoscaling.openshift.io/v1","kind":"ClusterResourceOverride","metadata":{"annotations":{},"name":"cluster"},"spec":{"podResourceOverride":{"spec":{"cpuRequestToLimitPercent":25,"limitCPUToMemoryPercent":200,"memoryRequestToLimitPercent":50}}}} creationTimestamp: "2019-12-18T22:35:02Z" generation: 1 name: cluster resourceVersion: "127622" selfLink: /apis/operator.autoscaling.openshift.io/v1/clusterresourceoverrides/cluster uid: 978fc959-1717-4bd1-97d0-ae00ee111e8d spec: podResourceOverride: spec: cpuRequestToLimitPercent: 25 limitCPUToMemoryPercent: 200 memoryRequestToLimitPercent: 50 status: # ... mutatingWebhookConfigurationRef: 1 apiVersion: admissionregistration.k8s.io/v1 kind: MutatingWebhookConfiguration name: clusterresourceoverrides.admission.autoscaling.openshift.io resourceVersion: "127621" uid: 98b3b8ae-d5ce-462b-8ab5-a729ea8f38f3 # ...- 1
- Reference to the
ClusterResourceOverrideadmission webhook.
8.5.2.2. Installing the Cluster Resource Override Operator using the CLI
You can use the OpenShift Dedicated CLI to install the Cluster Resource Override Operator to help control overcommit in your cluster.
Prerequisites
-
The Cluster Resource Override Operator has no effect if limits have not been set on containers. You must specify default limits for a project using a
LimitRangeobject or configure limits inPodspecs for the overrides to apply.
Procedure
To install the Cluster Resource Override Operator using the CLI:
Create a namespace for the Cluster Resource Override Operator:
Create a
Namespaceobject YAML file (for example,cro-namespace.yaml) for the Cluster Resource Override Operator:apiVersion: v1 kind: Namespace metadata: name: clusterresourceoverride-operator
Create the namespace:
$ oc create -f <file-name>.yaml
For example:
$ oc create -f cro-namespace.yaml
Create an Operator group:
Create an
OperatorGroupobject YAML file (for example, cro-og.yaml) for the Cluster Resource Override Operator:apiVersion: operators.coreos.com/v1 kind: OperatorGroup metadata: name: clusterresourceoverride-operator namespace: clusterresourceoverride-operator spec: targetNamespaces: - clusterresourceoverride-operatorCreate the Operator Group:
$ oc create -f <file-name>.yaml
For example:
$ oc create -f cro-og.yaml
Create a subscription:
Create a
Subscriptionobject YAML file (for example, cro-sub.yaml) for the Cluster Resource Override Operator:apiVersion: operators.coreos.com/v1alpha1 kind: Subscription metadata: name: clusterresourceoverride namespace: clusterresourceoverride-operator spec: channel: "4" name: clusterresourceoverride source: redhat-operators sourceNamespace: openshift-marketplace
Create the subscription:
$ oc create -f <file-name>.yaml
For example:
$ oc create -f cro-sub.yaml
Create a
ClusterResourceOverridecustom resource (CR) object in theclusterresourceoverride-operatornamespace:Change to the
clusterresourceoverride-operatornamespace.$ oc project clusterresourceoverride-operator
Create a
ClusterResourceOverrideobject YAML file (for example, cro-cr.yaml) for the Cluster Resource Override Operator:apiVersion: operator.autoscaling.openshift.io/v1 kind: ClusterResourceOverride metadata: name: cluster 1 spec: podResourceOverride: spec: memoryRequestToLimitPercent: 50 2 cpuRequestToLimitPercent: 25 3 limitCPUToMemoryPercent: 200 4- 1
- The name must be
cluster. - 2
- Optional. Specify the percentage to override the container memory limit, if used, between 1-100. The default is 50.
- 3
- Optional. Specify the percentage to override the container CPU limit, if used, between 1-100. The default is 25.
- 4
- Optional. Specify the percentage to override the container memory limit, if used. Scaling 1Gi of RAM at 100 percent is equal to 1 CPU core. This is processed prior to overriding the CPU request, if configured. The default is 200.
Create the
ClusterResourceOverrideobject:$ oc create -f <file-name>.yaml
For example:
$ oc create -f cro-cr.yaml
Verify the current state of the admission webhook by checking the status of the cluster custom resource.
$ oc get clusterresourceoverride cluster -n clusterresourceoverride-operator -o yaml
The
mutatingWebhookConfigurationRefsection appears when the webhook is called.Example output
apiVersion: operator.autoscaling.openshift.io/v1 kind: ClusterResourceOverride metadata: annotations: kubectl.kubernetes.io/last-applied-configuration: | {"apiVersion":"operator.autoscaling.openshift.io/v1","kind":"ClusterResourceOverride","metadata":{"annotations":{},"name":"cluster"},"spec":{"podResourceOverride":{"spec":{"cpuRequestToLimitPercent":25,"limitCPUToMemoryPercent":200,"memoryRequestToLimitPercent":50}}}} creationTimestamp: "2019-12-18T22:35:02Z" generation: 1 name: cluster resourceVersion: "127622" selfLink: /apis/operator.autoscaling.openshift.io/v1/clusterresourceoverrides/cluster uid: 978fc959-1717-4bd1-97d0-ae00ee111e8d spec: podResourceOverride: spec: cpuRequestToLimitPercent: 25 limitCPUToMemoryPercent: 200 memoryRequestToLimitPercent: 50 status: # ... mutatingWebhookConfigurationRef: 1 apiVersion: admissionregistration.k8s.io/v1 kind: MutatingWebhookConfiguration name: clusterresourceoverrides.admission.autoscaling.openshift.io resourceVersion: "127621" uid: 98b3b8ae-d5ce-462b-8ab5-a729ea8f38f3 # ...- 1
- Reference to the
ClusterResourceOverrideadmission webhook.
8.5.2.3. Configuring cluster-level overcommit
The Cluster Resource Override Operator requires a ClusterResourceOverride custom resource (CR) and a label for each project where you want the Operator to control overcommit.
Prerequisites
-
The Cluster Resource Override Operator has no effect if limits have not been set on containers. You must specify default limits for a project using a
LimitRangeobject or configure limits inPodspecs for the overrides to apply.
Procedure
To modify cluster-level overcommit:
Edit the
ClusterResourceOverrideCR:apiVersion: operator.autoscaling.openshift.io/v1 kind: ClusterResourceOverride metadata: name: cluster spec: podResourceOverride: spec: memoryRequestToLimitPercent: 50 1 cpuRequestToLimitPercent: 25 2 limitCPUToMemoryPercent: 200 3 # ...- 1
- Optional. Specify the percentage to override the container memory limit, if used, between 1-100. The default is 50.
- 2
- Optional. Specify the percentage to override the container CPU limit, if used, between 1-100. The default is 25.
- 3
- Optional. Specify the percentage to override the container memory limit, if used. Scaling 1Gi of RAM at 100 percent is equal to 1 CPU core. This is processed prior to overriding the CPU request, if configured. The default is 200.
Ensure the following label has been added to the Namespace object for each project where you want the Cluster Resource Override Operator to control overcommit:
apiVersion: v1 kind: Namespace metadata: # ... labels: clusterresourceoverrides.admission.autoscaling.openshift.io/enabled: "true" 1 # ...- 1
- Add this label to each project.
8.5.3. Node-level overcommit
You can use various ways to control overcommit on specific nodes, such as quality of service (QOS) guarantees, CPU limits, or reserve resources. You can also disable overcommit for specific nodes and specific projects.
8.5.3.1. Understanding compute resources and containers
The node-enforced behavior for compute resources is specific to the resource type.
8.5.3.1.1. Understanding container CPU requests
A container is guaranteed the amount of CPU it requests and is additionally able to consume excess CPU available on the node, up to any limit specified by the container. If multiple containers are attempting to use excess CPU, CPU time is distributed based on the amount of CPU requested by each container.
For example, if one container requested 500m of CPU time and another container requested 250m of CPU time, then any extra CPU time available on the node is distributed among the containers in a 2:1 ratio. If a container specified a limit, it will be throttled not to use more CPU than the specified limit. CPU requests are enforced using the CFS shares support in the Linux kernel. By default, CPU limits are enforced using the CFS quota support in the Linux kernel over a 100ms measuring interval, though this can be disabled.
8.5.3.1.2. Understanding container memory requests
A container is guaranteed the amount of memory it requests. A container can use more memory than requested, but once it exceeds its requested amount, it could be terminated in a low memory situation on the node. If a container uses less memory than requested, it will not be terminated unless system tasks or daemons need more memory than was accounted for in the node’s resource reservation. If a container specifies a limit on memory, it is immediately terminated if it exceeds the limit amount.
8.5.3.2. Understanding overcomitment and quality of service classes
A node is overcommitted when it has a pod scheduled that makes no request, or when the sum of limits across all pods on that node exceeds available machine capacity.
In an overcommitted environment, it is possible that the pods on the node will attempt to use more compute resource than is available at any given point in time. When this occurs, the node must give priority to one pod over another. The facility used to make this decision is referred to as a Quality of Service (QoS) Class.
A pod is designated as one of three QoS classes with decreasing order of priority:
Table 8.19. Quality of Service Classes
| Priority | Class Name | Description |
|---|---|---|
| 1 (highest) | Guaranteed | If limits and optionally requests are set (not equal to 0) for all resources and they are equal, then the pod is classified as Guaranteed. |
| 2 | Burstable | If requests and optionally limits are set (not equal to 0) for all resources, and they are not equal, then the pod is classified as Burstable. |
| 3 (lowest) | BestEffort | If requests and limits are not set for any of the resources, then the pod is classified as BestEffort. |
Memory is an incompressible resource, so in low memory situations, containers that have the lowest priority are terminated first:
- Guaranteed containers are considered top priority, and are guaranteed to only be terminated if they exceed their limits, or if the system is under memory pressure and there are no lower priority containers that can be evicted.
- Burstable containers under system memory pressure are more likely to be terminated once they exceed their requests and no other BestEffort containers exist.
- BestEffort containers are treated with the lowest priority. Processes in these containers are first to be terminated if the system runs out of memory.
8.5.3.2.1. Understanding how to reserve memory across quality of service tiers
You can use the qos-reserved parameter to specify a percentage of memory to be reserved by a pod in a particular QoS level. This feature attempts to reserve requested resources to exclude pods from lower OoS classes from using resources requested by pods in higher QoS classes.
OpenShift Dedicated uses the qos-reserved parameter as follows:
-
A value of
qos-reserved=memory=100%will prevent theBurstableandBestEffortQoS classes from consuming memory that was requested by a higher QoS class. This increases the risk of inducing OOM onBestEffortandBurstableworkloads in favor of increasing memory resource guarantees forGuaranteedandBurstableworkloads. -
A value of
qos-reserved=memory=50%will allow theBurstableandBestEffortQoS classes to consume half of the memory requested by a higher QoS class. -
A value of
qos-reserved=memory=0%will allow aBurstableandBestEffortQoS classes to consume up to the full node allocatable amount if available, but increases the risk that aGuaranteedworkload will not have access to requested memory. This condition effectively disables this feature.
8.5.3.3. Understanding swap memory and QOS
You can disable swap by default on your nodes to preserve quality of service (QOS) guarantees. Otherwise, physical resources on a node can oversubscribe, affecting the resource guarantees the Kubernetes scheduler makes during pod placement.
For example, if two guaranteed pods have reached their memory limit, each container could start using swap memory. Eventually, if there is not enough swap space, processes in the pods can be terminated due to the system being oversubscribed.
Failing to disable swap results in nodes not recognizing that they are experiencing MemoryPressure, resulting in pods not receiving the memory they made in their scheduling request. As a result, additional pods are placed on the node to further increase memory pressure, ultimately increasing your risk of experiencing a system out of memory (OOM) event.
If swap is enabled, any out-of-resource handling eviction thresholds for available memory will not work as expected. Take advantage of out-of-resource handling to allow pods to be evicted from a node when it is under memory pressure, and rescheduled on an alternative node that has no such pressure.
8.5.3.4. Understanding nodes overcommitment
In an overcommitted environment, it is important to properly configure your node to provide best system behavior.
When the node starts, it ensures that the kernel tunable flags for memory management are set properly. The kernel should never fail memory allocations unless it runs out of physical memory.
To ensure this behavior, OpenShift Dedicated configures the kernel to always overcommit memory by setting the vm.overcommit_memory parameter to 1, overriding the default operating system setting.
OpenShift Dedicated also configures the kernel not to panic when it runs out of memory by setting the vm.panic_on_oom parameter to 0. A setting of 0 instructs the kernel to call oom_killer in an Out of Memory (OOM) condition, which kills processes based on priority
You can view the current setting by running the following commands on your nodes:
$ sysctl -a |grep commit
Example output
#... vm.overcommit_memory = 0 #...
$ sysctl -a |grep panic
Example output
#... vm.panic_on_oom = 0 #...
The above flags should already be set on nodes, and no further action is required.
You can also perform the following configurations for each node:
- Disable or enforce CPU limits using CPU CFS quotas
- Reserve resources for system processes
- Reserve memory across quality of service tiers
8.5.3.5. Disabling or enforcing CPU limits using CPU CFS quotas
Nodes by default enforce specified CPU limits using the Completely Fair Scheduler (CFS) quota support in the Linux kernel.
If you disable CPU limit enforcement, it is important to understand the impact on your node:
- If a container has a CPU request, the request continues to be enforced by CFS shares in the Linux kernel.
- If a container does not have a CPU request, but does have a CPU limit, the CPU request defaults to the specified CPU limit, and is enforced by CFS shares in the Linux kernel.
- If a container has both a CPU request and limit, the CPU request is enforced by CFS shares in the Linux kernel, and the CPU limit has no impact on the node.
Prerequisites
Obtain the label associated with the static
MachineConfigPoolCRD for the type of node you want to configure by entering the following command:$ oc edit machineconfigpool <name>
For example:
$ oc edit machineconfigpool worker
Example output
apiVersion: machineconfiguration.openshift.io/v1 kind: MachineConfigPool metadata: creationTimestamp: "2022-11-16T15:34:25Z" generation: 4 labels: pools.operator.machineconfiguration.openshift.io/worker: "" 1 name: worker- 1
- The label appears under Labels.
TipIf the label is not present, add a key/value pair such as:
$ oc label machineconfigpool worker custom-kubelet=small-pods
Procedure
Create a custom resource (CR) for your configuration change.
Sample configuration for a disabling CPU limits
apiVersion: machineconfiguration.openshift.io/v1 kind: KubeletConfig metadata: name: disable-cpu-units 1 spec: machineConfigPoolSelector: matchLabels: pools.operator.machineconfiguration.openshift.io/worker: "" 2 kubeletConfig: cpuCfsQuota: false 3
Run the following command to create the CR:
$ oc create -f <file_name>.yaml
8.5.3.6. Reserving resources for system processes
To provide more reliable scheduling and minimize node resource overcommitment, each node can reserve a portion of its resources for use by system daemons that are required to run on your node for your cluster to function. In particular, it is recommended that you reserve resources for incompressible resources such as memory.
Procedure
To explicitly reserve resources for non-pod processes, allocate node resources by specifying resources available for scheduling. For more details, see Allocating Resources for Nodes.
8.5.3.7. Disabling overcommitment for a node
When enabled, overcommitment can be disabled on each node.
Procedure
To disable overcommitment in a node run the following command on that node:
$ sysctl -w vm.overcommit_memory=0
8.5.4. Project-level limits
To help control overcommit, you can set per-project resource limit ranges, specifying memory and CPU limits and defaults for a project that overcommit cannot exceed.
For information on project-level resource limits, see Additional resources.
Alternatively, you can disable overcommitment for specific projects.
8.5.4.1. Disabling overcommitment for a project
When enabled, overcommitment can be disabled per-project. For example, you can allow infrastructure components to be configured independently of overcommitment.
Procedure
To disable overcommitment in a project:
- Edit the namespace object file.
Add the following annotation:
apiVersion: v1 kind: Namespace metadata: annotations: quota.openshift.io/cluster-resource-override-enabled: "false" 1 # ...- 1
- Setting this annotation to
falsedisables overcommit for this namespace.