
Chapter 2. Container security
2.1. Understanding container security
Securing a containerized application relies on multiple levels of security:
Container security begins with a trusted base container image and continues through the container build process as it moves through your CI/CD pipeline.
ImportantImage streams by default do not automatically update. This default behavior might create a security issue because security updates to images referenced by an image stream do not automatically occur. For information about how to override this default behavior, see Configuring periodic importing of imagestreamtags.
- When a container is deployed, its security depends on it running on secure operating systems and networks, and establishing firm boundaries between the container itself and the users and hosts that interact with it.
- Continued security relies on being able to scan container images for vulnerabilities and having an efficient way to correct and replace vulnerable images.
Beyond what a platform such as OpenShift Container Platform offers out of the box, your organization will likely have its own security demands. Some level of compliance verification might be needed before you can even bring OpenShift Container Platform into your data center.
Likewise, you may need to add your own agents, specialized hardware drivers, or encryption features to OpenShift Container Platform, before it can meet your organization’s security standards.
This guide provides a high-level walkthrough of the container security measures available in OpenShift Container Platform, including solutions for the host layer, the container and orchestration layer, and the build and application layer. It then points you to specific OpenShift Container Platform documentation to help you achieve those security measures.
This guide contains the following information:
- Why container security is important and how it compares with existing security standards.
- Which container security measures are provided by the host (RHCOS and RHEL) layer and which are provided by OpenShift Container Platform.
- How to evaluate your container content and sources for vulnerabilities.
- How to design your build and deployment process to proactively check container content.
- How to control access to containers through authentication and authorization.
- How networking and attached storage are secured in OpenShift Container Platform.
- Containerized solutions for API management and SSO.
The goal of this guide is to understand the incredible security benefits of using OpenShift Container Platform for your containerized workloads and how the entire Red Hat ecosystem plays a part in making and keeping containers secure. It will also help you understand how you can engage with the OpenShift Container Platform to achieve your organization’s security goals.
2.1.1. What are containers?
Containers package an application and all its dependencies into a single image that can be promoted from development, to test, to production, without change. A container might be part of a larger application that works closely with other containers.
Containers provide consistency across environments and multiple deployment targets: physical servers, virtual machines (VMs), and private or public cloud.
Some of the benefits of using containers include:
| Infrastructure | Applications |
|---|---|
| Sandboxed application processes on a shared Linux operating system kernel | Package my application and all of its dependencies |
| Simpler, lighter, and denser than virtual machines | Deploy to any environment in seconds and enable CI/CD |
| Portable across different environments | Easily access and share containerized components |
See Understanding Linux containers from the Red Hat Customer Portal to find out more about Linux containers. To learn about RHEL container tools, see Building, running, and managing containers in the RHEL product documentation.
2.1.2. What is OpenShift Container Platform?
Automating how containerized applications are deployed, run, and managed is the job of a platform such as OpenShift Container Platform. At its core, OpenShift Container Platform relies on the Kubernetes project to provide the engine for orchestrating containers across many nodes in scalable data centers.
Kubernetes is a project, which can run using different operating systems and add-on components that offer no guarantees of supportability from the project. As a result, the security of different Kubernetes platforms can vary.
OpenShift Container Platform is designed to lock down Kubernetes security and integrate the platform with a variety of extended components. To do this, OpenShift Container Platform draws on the extensive Red Hat ecosystem of open source technologies that include the operating systems, authentication, storage, networking, development tools, base container images, and many other components.
OpenShift Container Platform can leverage Red Hat’s experience in uncovering and rapidly deploying fixes for vulnerabilities in the platform itself as well as the containerized applications running on the platform. Red Hat’s experience also extends to efficiently integrating new components with OpenShift Container Platform as they become available and adapting technologies to individual customer needs.
Additional resources
2.2. Understanding host and VM security
Both containers and virtual machines provide ways of separating applications running on a host from the operating system itself. Understanding RHCOS, which is the operating system used by OpenShift Container Platform, will help you see how the host systems protect containers and hosts from each other.
2.2.1. Securing containers on Red Hat Enterprise Linux CoreOS (RHCOS)
Containers simplify the act of deploying many applications to run on the same host, using the same kernel and container runtime to spin up each container. The applications can be owned by many users and, because they are kept separate, can run different, and even incompatible, versions of those applications at the same time without issue.
In Linux, containers are just a special type of process, so securing containers is similar in many ways to securing any other running process. An environment for running containers starts with an operating system that can secure the host kernel from containers and other processes running on the host, as well as secure containers from each other.
Because OpenShift Container Platform 4.8 runs on RHCOS hosts, with the option of using Red Hat Enterprise Linux (RHEL) as worker nodes, the following concepts apply by default to any deployed OpenShift Container Platform cluster. These RHEL security features are at the core of what makes running containers in OpenShift Container Platform more secure:
- Linux namespaces enable creating an abstraction of a particular global system resource to make it appear as a separate instance to processes within a namespace. Consequently, several containers can use the same computing resource simultaneously without creating a conflict. Container namespaces that are separate from the host by default include mount table, process table, network interface, user, control group, UTS, and IPC namespaces. Those containers that need direct access to host namespaces need to have elevated permissions to request that access. See Overview of Containers in Red Hat Systems from the RHEL 7 container documentation for details on the types of namespaces.
- SELinux provides an additional layer of security to keep containers isolated from each other and from the host. SELinux allows administrators to enforce mandatory access controls (MAC) for every user, application, process, and file.
Disabling SELinux on RHCOS nodes is not supported.
- CGroups (control groups) limit, account for, and isolate the resource usage (CPU, memory, disk I/O, network, etc.) of a collection of processes. CGroups are used to ensure that containers on the same host are not impacted by each other.
- Secure computing mode (seccomp) profiles can be associated with a container to restrict available system calls. See page 94 of the OpenShift Security Guide for details about seccomp.
- Deploying containers using RHCOS reduces the attack surface by minimizing the host environment and tuning it for containers. The CRI-O container engine further reduces that attack surface by implementing only those features required by Kubernetes and OpenShift Container Platform to run and manage containers, as opposed to other container engines that implement desktop-oriented standalone features.
RHCOS is a version of Red Hat Enterprise Linux (RHEL) that is specially configured to work as control plane (master) and worker nodes on OpenShift Container Platform clusters. So RHCOS is tuned to efficiently run container workloads, along with Kubernetes and OpenShift Container Platform services.
To further protect RHCOS systems in OpenShift Container Platform clusters, most containers, except those managing or monitoring the host system itself, should run as a non-root user. Dropping the privilege level or creating containers with the least amount of privileges possible is recommended best practice for protecting your own OpenShift Container Platform clusters.
Additional resources
- How nodes enforce resource constraints
- Managing security context constraints
- Supported platforms for OpenShift clusters
- Requirements for a cluster with user-provisioned infrastructure
- Choosing how to configure RHCOS
- Ignition
- Kernel arguments
- Kernel modules
- FIPS cryptography
- Disk encryption
- Chrony time service
- OpenShift Container Platform cluster updates
2.2.2. Comparing virtualization and containers
Traditional virtualization provides another way to keep application environments separate on the same physical host. However, virtual machines work in a different way than containers. Virtualization relies on a hypervisor spinning up guest virtual machines (VMs), each of which has its own operating system (OS), represented by a running kernel, as well as the running application and its dependencies.
With VMs, the hypervisor isolates the guests from each other and from the host kernel. Fewer individuals and processes have access to the hypervisor, reducing the attack surface on the physical server. That said, security must still be monitored: one guest VM might be able to use hypervisor bugs to gain access to another VM or the host kernel. And, when the OS needs to be patched, it must be patched on all guest VMs using that OS.
Containers can be run inside guest VMs, and there might be use cases where this is desirable. For example, you might be deploying a traditional application in a container, perhaps to lift-and-shift an application to the cloud.
Container separation on a single host, however, provides a more lightweight, flexible, and easier-to-scale deployment solution. This deployment model is particularly appropriate for cloud-native applications. Containers are generally much smaller than VMs and consume less memory and CPU.
See Linux Containers Compared to KVM Virtualization in the RHEL 7 container documentation to learn about the differences between container and VMs.
2.2.3. Securing OpenShift Container Platform
When you deploy OpenShift Container Platform, you have the choice of an installer-provisioned infrastructure (there are several available platforms) or your own user-provisioned infrastructure. Some low-level security-related configuration, such as enabling FIPS compliance or adding kernel modules required at first boot, might benefit from a user-provisioned infrastructure. Likewise, user-provisioned infrastructure is appropriate for disconnected OpenShift Container Platform deployments.
Keep in mind that, when it comes to making security enhancements and other configuration changes to OpenShift Container Platform, the goals should include:
- Keeping the underlying nodes as generic as possible. You want to be able to easily throw away and spin up similar nodes quickly and in prescriptive ways.
- Managing modifications to nodes through OpenShift Container Platform as much as possible, rather than making direct, one-off changes to the nodes.
In pursuit of those goals, most node changes should be done during installation through Ignition or later using MachineConfigs that are applied to sets of nodes by the Machine Config Operator. Examples of security-related configuration changes you can do in this way include:
- Adding kernel arguments
- Adding kernel modules
- Enabling support for FIPS cryptography
- Configuring disk encryption
- Configuring the chrony time service
Besides the Machine Config Operator, there are several other Operators available to configure OpenShift Container Platform infrastructure that are managed by the Cluster Version Operator (CVO). The CVO is able to automate many aspects of OpenShift Container Platform cluster updates.
2.3. Hardening RHCOS
RHCOS was created and tuned to be deployed in OpenShift Container Platform with few if any changes needed to RHCOS nodes. Every organization adopting OpenShift Container Platform has its own requirements for system hardening. As a RHEL system with OpenShift-specific modifications and features added (such as Ignition, ostree, and a read-only /usr to provide limited immutability), RHCOS can be hardened just as you would any RHEL system. Differences lie in the ways you manage the hardening.
A key feature of OpenShift Container Platform and its Kubernetes engine is to be able to quickly scale applications and infrastructure up and down as needed. Unless it is unavoidable, you do not want to make direct changes to RHCOS by logging into a host and adding software or changing settings. You want to have the OpenShift Container Platform installer and control plane manage changes to RHCOS so new nodes can be spun up without manual intervention.
So, if you are setting out to harden RHCOS nodes in OpenShift Container Platform to meet your security needs, you should consider both what to harden and how to go about doing that hardening.
2.3.1. Choosing what to harden in RHCOS
The RHEL 8 Security Hardening guide describes how you should approach security for any RHEL system.
Use this guide to learn how to approach cryptography, evaluate vulnerabilities, and assess threats to various services. Likewise, you can learn how to scan for compliance standards, check file integrity, perform auditing, and encrypt storage devices.
With the knowledge of what features you want to harden, you can then decide how to harden them in RHCOS.
2.3.2. Choosing how to harden RHCOS
Direct modification of RHCOS systems in OpenShift Container Platform is discouraged. Instead, you should think of modifying systems in pools of nodes, such as worker nodes and control plane nodes (also known as the master nodes). When a new node is needed, in non-bare metal installs, you can request a new node of the type you want and it will be created from an RHCOS image plus the modifications you created earlier.
There are opportunities for modifying RHCOS before installation, during installation, and after the cluster is up and running.
2.3.2.1. Hardening before installation
For bare metal installations, you can add hardening features to RHCOS before beginning the OpenShift Container Platform installation. For example, you can add kernel options when you boot the RHCOS installer to turn security features on or off, such as SELinux booleans or various low-level settings, such as symmetric multithreading.
Although bare metal RHCOS installations are more difficult, they offer the opportunity of getting operating system changes in place before starting the OpenShift Container Platform installation. This can be important when you need to ensure that certain features, such as disk encryption or special networking settings, be set up at the earliest possible moment.
Disabling SELinux on RHCOS nodes is not supported.
2.3.2.2. Hardening during installation
You can interrupt the OpenShift Container Platform installation process and change Ignition configs. Through Ignition configs, you can add your own files and systemd services to the RHCOS nodes. You can also make some basic security-related changes to the install-config.yaml file used for installation. Contents added in this way are available at each node’s first boot.
2.3.2.3. Hardening after the cluster is running
After the OpenShift Container Platform cluster is up and running, there are several ways to apply hardening features to RHCOS:
-
Daemon set: If you need a service to run on every node, you can add that service with a Kubernetes
DaemonSetobject. -
Machine config:
MachineConfigobjects contain a subset of Ignition configs in the same format. By applying machine configs to all worker or control plane nodes, you can ensure that the next node of the same type that is added to the cluster has the same changes applied.
All of the features noted here are described in the OpenShift Container Platform product documentation.
Additional resources
- OpenShift Security Guide
- Choosing how to configure RHCOS
- Modifying Nodes
- Manually creating the installation configuration file
- Creating the Kubernetes manifest and Ignition config files
- Installing RHCOS by using an ISO image
- Customizing nodes
- Adding kernel arguments to Nodes
-
Installation configuration parameters - see
fips - Support for FIPS cryptography
- RHEL core crypto components
2.4. Container image signatures
Red Hat delivers signatures for the images in the Red Hat Container Registries. Those signatures can be automatically verified when being pulled to OpenShift Container Platform 4 clusters by using the Machine Config Operator (MCO).
Quay.io serves most of the images that make up OpenShift Container Platform, and only the release image is signed. Release images refer to the approved OpenShift Container Platform images, offering a degree of protection against supply chain attacks. However, some extensions to OpenShift Container Platform, such as logging, monitoring, and service mesh, are shipped as Operators from the Operator Lifecycle Manager (OLM). Those images ship from the Red Hat Ecosystem Catalog Container images registry.
To verify the integrity of those images between Red Hat registries and your infrastructure, enable signature verification.
2.4.1. Enabling signature verification for Red Hat Container Registries
Enabling container signature validation for Red Hat Container Registries requires writing a signature verification policy file specifying the keys to verify images from these registries. For RHEL8 nodes, the registries are already defined in /etc/containers/registries.d by default.
Procedure
Create a Butane config file,
51-worker-rh-registry-trust.bu, containing the necessary configuration for the worker nodes.NoteSee "Creating machine configs with Butane" for information about Butane.
variant: openshift
version: 4.8.0
metadata:
  name: 51-worker-rh-registry-trust
  labels:
    machineconfiguration.openshift.io/role: worker
storage:
  files:
  - path: /etc/containers/policy.json
    mode: 0644
    overwrite: true
    contents:
      inline: |
        {
          "default": [
            {
              "type": "insecureAcceptAnything"
            }
          ],
          "transports": {
            "docker": {
              "registry.access.redhat.com": [
                {
                  "type": "signedBy",
                  "keyType": "GPGKeys",
                  "keyPath": "/etc/pki/rpm-gpg/RPM-GPG-KEY-redhat-release"
                }
              ],
              "registry.redhat.io": [
                {
                  "type": "signedBy",
                  "keyType": "GPGKeys",
                  "keyPath": "/etc/pki/rpm-gpg/RPM-GPG-KEY-redhat-release"
                }
              ]
            },
            "docker-daemon": {
              "": [
                {
                  "type": "insecureAcceptAnything"
                }
              ]
            }
          }
        }
Use Butane to generate a machine config YAML file,
51-worker-rh-registry-trust.yaml, containing the file to be written to disk on the worker nodes:$ butane 51-worker-rh-registry-trust.bu -o 51-worker-rh-registry-trust.yaml
Apply the created machine config:
$ oc apply -f 51-worker-rh-registry-trust.yaml
Check that the worker machine config pool has rolled out with the new machine config:
Check that the new machine config was created:
$ oc get mc
Sample output
NAME                                               GENERATEDBYCONTROLLER                      IGNITIONVERSION   AGE
00-master                                          a2178ad522c49ee330b0033bb5cb5ea132060b0a   3.2.0             25m
00-worker                                          a2178ad522c49ee330b0033bb5cb5ea132060b0a   3.2.0             25m
01-master-container-runtime                        a2178ad522c49ee330b0033bb5cb5ea132060b0a   3.2.0             25m
01-master-kubelet                                  a2178ad522c49ee330b0033bb5cb5ea132060b0a   3.2.0             25m
01-worker-container-runtime                        a2178ad522c49ee330b0033bb5cb5ea132060b0a   3.2.0             25m
01-worker-kubelet                                  a2178ad522c49ee330b0033bb5cb5ea132060b0a   3.2.0             25m
51-master-rh-registry-trust                                                                   3.2.0             13s
51-worker-rh-registry-trust                                                                   3.2.0             53s 1
99-master-generated-crio-seccomp-use-default                                                  3.2.0             25m
99-master-generated-registries                     a2178ad522c49ee330b0033bb5cb5ea132060b0a   3.2.0             25m
99-master-ssh                                                                                 3.2.0             28m
99-worker-generated-crio-seccomp-use-default                                                  3.2.0             25m
99-worker-generated-registries                     a2178ad522c49ee330b0033bb5cb5ea132060b0a   3.2.0             25m
99-worker-ssh                                                                                 3.2.0             28m
rendered-master-af1e7ff78da0a9c851bab4be2777773b   a2178ad522c49ee330b0033bb5cb5ea132060b0a   3.2.0             8s
rendered-master-cd51fd0c47e91812bfef2765c52ec7e6   a2178ad522c49ee330b0033bb5cb5ea132060b0a   3.2.0             24m
rendered-worker-2b52f75684fbc711bd1652dd86fd0b82   a2178ad522c49ee330b0033bb5cb5ea132060b0a   3.2.0             24m
rendered-worker-be3b3bce4f4aa52a62902304bac9da3c   a2178ad522c49ee330b0033bb5cb5ea132060b0a   3.2.0             48s 2
Check that the worker machine config pool is updating with the new machine config:
$ oc get mcp
Sample output
NAME CONFIG UPDATED UPDATING DEGRADED MACHINECOUNT READYMACHINECOUNT UPDATEDMACHINECOUNT DEGRADEDMACHINECOUNT AGE master rendered-master-af1e7ff78da0a9c851bab4be2777773b True False False 3 3 3 0 30m worker rendered-worker-be3b3bce4f4aa52a62902304bac9da3c False True False 3 0 0 0 30m 1- 1
- When the
UPDATINGfield isTrue, the machine config pool is updating with the new machine config. When the field becomesFalse, the worker machine config pool has rolled out to the new machine config.
If your cluster uses any RHEL7 worker nodes, when the worker machine config pool is updated, create YAML files on those nodes in the
/etc/containers/registries.ddirectory, which specify the location of the detached signatures for a given registry server. The following example works only for images hosted inregistry.access.redhat.comandregistry.redhat.io.Start a debug session to each RHEL7 worker node:
$ oc debug node/<node_name>
Change your root directory to
/host:sh-4.2# chroot /host
Create a
/etc/containers/registries.d/registry.redhat.io.yamlfile that contains the following:docker: registry.redhat.io: sigstore: https://registry.redhat.io/containers/sigstoreCreate a
/etc/containers/registries.d/registry.access.redhat.com.yamlfile that contains the following:docker: registry.access.redhat.com: sigstore: https://access.redhat.com/webassets/docker/content/sigstore- Exit the debug session.
2.4.2. Verifying the signature verification configuration
After you apply the machine configs to the cluster, the Machine Config Controller detects the new MachineConfig object and generates a new rendered-worker-<hash> version.
Prerequisites
- You enabled signature verification by using a machine config file.
Procedure
On the command line, run the following command to display information about a desired worker:
$ oc describe machineconfigpool/worker
Example output of initial worker monitoring
Name:         worker
Namespace:
Labels:       machineconfiguration.openshift.io/mco-built-in=
Annotations:  <none>
API Version:  machineconfiguration.openshift.io/v1
Kind:         MachineConfigPool
Metadata:
  Creation Timestamp:  2019-12-19T02:02:12Z
  Generation:          3
  Resource Version:    16229
  Self Link:           /apis/machineconfiguration.openshift.io/v1/machineconfigpools/worker
  UID:                 92697796-2203-11ea-b48c-fa163e3940e5
Spec:
  Configuration:
    Name:  rendered-worker-f6819366eb455a401c42f8d96ab25c02
    Source:
      API Version:  machineconfiguration.openshift.io/v1
      Kind:         MachineConfig
      Name:         00-worker
      API Version:  machineconfiguration.openshift.io/v1
      Kind:         MachineConfig
      Name:         01-worker-container-runtime
      API Version:  machineconfiguration.openshift.io/v1
      Kind:         MachineConfig
      Name:         01-worker-kubelet
      API Version:  machineconfiguration.openshift.io/v1
      Kind:         MachineConfig
      Name:         51-worker-rh-registry-trust
      API Version:  machineconfiguration.openshift.io/v1
      Kind:         MachineConfig
      Name:         99-worker-92697796-2203-11ea-b48c-fa163e3940e5-registries
      API Version:  machineconfiguration.openshift.io/v1
      Kind:         MachineConfig
      Name:         99-worker-ssh
  Machine Config Selector:
    Match Labels:
      machineconfiguration.openshift.io/role:  worker
  Node Selector:
    Match Labels:
      node-role.kubernetes.io/worker:
  Paused:                              false
Status:
  Conditions:
    Last Transition Time:  2019-12-19T02:03:27Z
    Message:
    Reason:
    Status:                False
    Type:                  RenderDegraded
    Last Transition Time:  2019-12-19T02:03:43Z
    Message:
    Reason:
    Status:                False
    Type:                  NodeDegraded
    Last Transition Time:  2019-12-19T02:03:43Z
    Message:
    Reason:
    Status:                False
    Type:                  Degraded
    Last Transition Time:  2019-12-19T02:28:23Z
    Message:
    Reason:
    Status:                False
    Type:                  Updated
    Last Transition Time:  2019-12-19T02:28:23Z
    Message:               All nodes are updating to rendered-worker-f6819366eb455a401c42f8d96ab25c02
    Reason:
    Status:                True
    Type:                  Updating
  Configuration:
    Name:  rendered-worker-d9b3f4ffcfd65c30dcf591a0e8cf9b2e
    Source:
      API Version:            machineconfiguration.openshift.io/v1
      Kind:                   MachineConfig
      Name:                   00-worker
      API Version:            machineconfiguration.openshift.io/v1
      Kind:                   MachineConfig
      Name:                   01-worker-container-runtime
      API Version:            machineconfiguration.openshift.io/v1
      Kind:                   MachineConfig
      Name:                   01-worker-kubelet
      API Version:            machineconfiguration.openshift.io/v1
      Kind:                   MachineConfig
      Name:                   99-worker-92697796-2203-11ea-b48c-fa163e3940e5-registries
      API Version:            machineconfiguration.openshift.io/v1
      Kind:                   MachineConfig
      Name:                   99-worker-ssh
  Degraded Machine Count:     0
  Machine Count:              1
  Observed Generation:        3
  Ready Machine Count:        0
  Unavailable Machine Count:  1
  Updated Machine Count:      0
Events:                       <none>
Run the
oc describecommand again:$ oc describe machineconfigpool/worker
Example output after the worker is updated
... Last Transition Time: 2019-12-19T04:53:09Z Message: All nodes are updated with rendered-worker-f6819366eb455a401c42f8d96ab25c02 Reason: Status: True Type: Updated Last Transition Time: 2019-12-19T04:53:09Z Message: Reason: Status: False Type: Updating Configuration: Name: rendered-worker-f6819366eb455a401c42f8d96ab25c02 Source: API Version: machineconfiguration.openshift.io/v1 Kind: MachineConfig Name: 00-worker API Version: machineconfiguration.openshift.io/v1 Kind: MachineConfig Name: 01-worker-container-runtime API Version: machineconfiguration.openshift.io/v1 Kind: MachineConfig Name: 01-worker-kubelet API Version: machineconfiguration.openshift.io/v1 Kind: MachineConfig Name: 51-worker-rh-registry-trust API Version: machineconfiguration.openshift.io/v1 Kind: MachineConfig Name: 99-worker-92697796-2203-11ea-b48c-fa163e3940e5-registries API Version: machineconfiguration.openshift.io/v1 Kind: MachineConfig Name: 99-worker-ssh Degraded Machine Count: 0 Machine Count: 3 Observed Generation: 4 Ready Machine Count: 3 Unavailable Machine Count: 0 Updated Machine Count: 3 ...NoteThe
Observed Generationparameter shows an increased count based on the generation of the controller-produced configuration. This controller updates this value even if it fails to process the specification and generate a revision. TheConfiguration Sourcevalue points to the51-worker-rh-registry-trustconfiguration.Confirm that the
policy.jsonfile exists with the following command:$ oc debug node/<node> -- chroot /host cat /etc/containers/policy.json
Example output
Starting pod/<node>-debug ...
To use host binaries, run `chroot /host`
{
  "default": [
    {
      "type": "insecureAcceptAnything"
    }
  ],
  "transports": {
    "docker": {
      "registry.access.redhat.com": [
        {
          "type": "signedBy",
          "keyType": "GPGKeys",
          "keyPath": "/etc/pki/rpm-gpg/RPM-GPG-KEY-redhat-release"
        }
      ],
      "registry.redhat.io": [
        {
          "type": "signedBy",
          "keyType": "GPGKeys",
          "keyPath": "/etc/pki/rpm-gpg/RPM-GPG-KEY-redhat-release"
        }
      ]
    },
    "docker-daemon": {
      "": [
        {
          "type": "insecureAcceptAnything"
        }
      ]
    }
  }
}
Confirm that the
registry.redhat.io.yamlfile exists with the following command:$ oc debug node/<node> -- chroot /host cat /etc/containers/registries.d/registry.redhat.io.yaml
Example output
Starting pod/<node>-debug ...
To use host binaries, run `chroot /host`
docker:
     registry.redhat.io:
         sigstore: https://registry.redhat.io/containers/sigstore
Confirm that the
registry.access.redhat.com.yamlfile exists with the following command:$ oc debug node/<node> -- chroot /host cat /etc/containers/registries.d/registry.access.redhat.com.yaml
Example output
Starting pod/<node>-debug ...
To use host binaries, run `chroot /host`
docker:
     registry.access.redhat.com:
         sigstore: https://access.redhat.com/webassets/docker/content/sigstore
2.4.3. Additional resources
2.5. Understanding compliance
For many OpenShift Container Platform customers, regulatory readiness, or compliance, on some level is required before any systems can be put into production. That regulatory readiness can be imposed by national standards, industry standards or the organization’s corporate governance framework.
2.5.1. Understanding compliance and risk management
FIPS compliance is one of the most critical components required in highly secure environments, to ensure that only supported cryptographic technologies are allowed on nodes.
The use of FIPS Validated / Modules in Process cryptographic libraries is only supported on OpenShift Container Platform deployments on the x86_64 architecture.
To understand Red Hat’s view of OpenShift Container Platform compliance frameworks, refer to the Risk Management and Regulatory Readiness chapter of the OpenShift Security Guide Book.
Additional resources
2.6. Securing container content
To ensure the security of the content inside your containers you need to start with trusted base images, such as Red Hat Universal Base Images, and add trusted software. To check the ongoing security of your container images, there are both Red Hat and third-party tools for scanning images.
2.6.1. Securing inside the container
Applications and infrastructures are composed of readily available components, many of which are open source packages such as, the Linux operating system, JBoss Web Server, PostgreSQL, and Node.js.
Containerized versions of these packages are also available. However, you need to know where the packages originally came from, what versions are used, who built them, and whether there is any malicious code inside them.
Some questions to answer include:
- Will what is inside the containers compromise your infrastructure?
- Are there known vulnerabilities in the application layer?
- Are the runtime and operating system layers current?
By building your containers from Red Hat Universal Base Images (UBI) you are assured of a foundation for your container images that consists of the same RPM-packaged software that is included in Red Hat Enterprise Linux. No subscriptions are required to either use or redistribute UBI images.
To assure ongoing security of the containers themselves, security scanning features, used directly from RHEL or added to OpenShift Container Platform, can alert you when an image you are using has vulnerabilities. OpenSCAP image scanning is available in RHEL and the Red Hat Quay Container Security Operator can be added to check container images used in OpenShift Container Platform.
2.6.2. Creating redistributable images with UBI
To create containerized applications, you typically start with a trusted base image that offers the components that are usually provided by the operating system. These include the libraries, utilities, and other features the application expects to see in the operating system’s file system.
Red Hat Universal Base Images (UBI) were created to encourage anyone building their own containers to start with one that is made entirely from Red Hat Enterprise Linux rpm packages and other content. These UBI images are updated regularly to keep up with security patches and free to use and redistribute with container images built to include your own software.
Search the Red Hat Ecosystem Catalog to both find and check the health of different UBI images. As someone creating secure container images, you might be interested in these two general types of UBI images:
-
UBI: There are standard UBI images for RHEL 7 and 8 (
ubi7/ubiandubi8/ubi), as well as minimal images based on those systems (ubi7/ubi-minimalandubi8/ubi-mimimal). All of these images are preconfigured to point to free repositories of RHEL software that you can add to the container images you build, using standardyumanddnfcommands. Red Hat encourages people to use these images on other distributions, such as Fedora and Ubuntu. -
Red Hat Software Collections: Search the Red Hat Ecosystem Catalog for
rhscl/to find images created to use as base images for specific types of applications. For example, there are Apache httpd (rhscl/httpd-*), Python (rhscl/python-*), Ruby (rhscl/ruby-*), Node.js (rhscl/nodejs-*) and Perl (rhscl/perl-*) rhscl images.
Keep in mind that while UBI images are freely available and redistributable, Red Hat support for these images is only available through Red Hat product subscriptions.
See Using Red Hat Universal Base Images in the Red Hat Enterprise Linux documentation for information on how to use and build on standard, minimal and init UBI images.
2.6.3. Security scanning in RHEL
For Red Hat Enterprise Linux (RHEL) systems, OpenSCAP scanning is available from the openscap-utils package. In RHEL, you can use the openscap-podman command to scan images for vulnerabilities. See Scanning containers and container images for vulnerabilities in the Red Hat Enterprise Linux documentation.
OpenShift Container Platform enables you to leverage RHEL scanners with your CI/CD process. For example, you can integrate static code analysis tools that test for security flaws in your source code and software composition analysis tools that identify open source libraries to provide metadata on those libraries such as known vulnerabilities.
2.6.3.1. Scanning OpenShift images
For the container images that are running in OpenShift Container Platform and are pulled from Red Hat Quay registries, you can use an Operator to list the vulnerabilities of those images. The Red Hat Quay Container Security Operator can be added to OpenShift Container Platform to provide vulnerability reporting for images added to selected namespaces.
Container image scanning for Red Hat Quay is performed by the Clair security scanner. In Red Hat Quay, Clair can search for and report vulnerabilities in images built from RHEL, CentOS, Oracle, Alpine, Debian, and Ubuntu operating system software.
2.6.4. Integrating external scanning
OpenShift Container Platform makes use of object annotations to extend functionality. External tools, such as vulnerability scanners, can annotate image objects with metadata to summarize results and control pod execution. This section describes the recognized format of this annotation so it can be reliably used in consoles to display useful data to users.
2.6.4.1. Image metadata
There are different types of image quality data, including package vulnerabilities and open source software (OSS) license compliance. Additionally, there may be more than one provider of this metadata. To that end, the following annotation format has been reserved:
quality.images.openshift.io/<qualityType>.<providerId>: {}Table 2.1. Annotation key format
| Component | Description | Acceptable values |
|---|---|---|
|
| Metadata type |
|
|
| Provider ID string |
|
2.6.4.1.1. Example annotation keys
quality.images.openshift.io/vulnerability.blackduck: {}
quality.images.openshift.io/vulnerability.jfrog: {}
quality.images.openshift.io/license.blackduck: {}
quality.images.openshift.io/vulnerability.openscap: {}
The value of the image quality annotation is structured data that must adhere to the following format:
Table 2.2. Annotation value format
| Field | Required? | Description | Type |
|---|---|---|---|
|
| Yes | Provider display name | String |
|
| Yes | Scan timestamp | String |
|
| No | Short description | String |
|
| Yes | URL of information source or more details. Required so user may validate the data. | String |
|
| No | Scanner version | String |
|
| No | Compliance pass or fail | Boolean |
|
| No | Summary of issues found | List (see table below) |
The summary field must adhere to the following format:
Table 2.3. Summary field value format
| Field | Description | Type |
|---|---|---|
|
| Display label for component (for example, "critical," "important," "moderate," "low," or "health") | String |
|
| Data for this component (for example, count of vulnerabilities found or score) | String |
|
|
Component index allowing for ordering and assigning graphical representation. The value is range | Integer |
|
| URL of information source or more details. Optional. | String |
2.6.4.1.2. Example annotation values
This example shows an OpenSCAP annotation for an image with vulnerability summary data and a compliance boolean:
OpenSCAP annotation
{
  "name": "OpenSCAP",
  "description": "OpenSCAP vulnerability score",
  "timestamp": "2016-09-08T05:04:46Z",
  "reference": "https://www.open-scap.org/930492",
  "compliant": true,
  "scannerVersion": "1.2",
  "summary": [
    { "label": "critical", "data": "4", "severityIndex": 3, "reference": null },
    { "label": "important", "data": "12", "severityIndex": 2, "reference": null },
    { "label": "moderate", "data": "8", "severityIndex": 1, "reference": null },
    { "label": "low", "data": "26", "severityIndex": 0, "reference": null }
  ]
}
This example shows the Container images section of the Red Hat Ecosystem Catalog annotation for an image with health index data with an external URL for additional details:
Red Hat Ecosystem Catalog annotation
{
  "name": "Red Hat Ecosystem Catalog",
  "description": "Container health index",
  "timestamp": "2016-09-08T05:04:46Z",
  "reference": "https://access.redhat.com/errata/RHBA-2016:1566",
  "compliant": null,
  "scannerVersion": "1.2",
  "summary": [
    { "label": "Health index", "data": "B", "severityIndex": 1, "reference": null }
  ]
}
2.6.4.2. Annotating image objects
While image stream objects are what an end user of OpenShift Container Platform operates against, image objects are annotated with security metadata. Image objects are cluster-scoped, pointing to a single image that may be referenced by many image streams and tags.
2.6.4.2.1. Example annotate CLI command
Replace <image> with an image digest, for example sha256:401e359e0f45bfdcf004e258b72e253fd07fba8cc5c6f2ed4f4608fb119ecc2:
$ oc annotate image <image> \
    quality.images.openshift.io/vulnerability.redhatcatalog='{ \
    "name": "Red Hat Ecosystem Catalog", \
    "description": "Container health index", \
    "timestamp": "2020-06-01T05:04:46Z", \
    "compliant": null, \
    "scannerVersion": "1.2", \
    "reference": "https://access.redhat.com/errata/RHBA-2020:2347", \
    "summary": "[ \
      { "label": "Health index", "data": "B", "severityIndex": 1, "reference": null } ]" }'
2.6.4.3. Controlling pod execution
Use the images.openshift.io/deny-execution image policy to programmatically control if an image can be run.
2.6.4.3.1. Example annotation
annotations:
  images.openshift.io/deny-execution: true
2.6.4.4. Integration reference
In most cases, external tools such as vulnerability scanners develop a script or plugin that watches for image updates, performs scanning, and annotates the associated image object with the results. Typically this automation calls the OpenShift Container Platform 4.8 REST APIs to write the annotation. See OpenShift Container Platform REST APIs for general information on the REST APIs.
2.6.4.4.1. Example REST API call
The following example call using curl overrides the value of the annotation. Be sure to replace the values for <token>, <openshift_server>, <image_id>, and <image_annotation>.
Patch API call
$ curl -X PATCH \
  -H "Authorization: Bearer <token>" \
  -H "Content-Type: application/merge-patch+json" \
  https://<openshift_server>:6443/apis/image.openshift.io/v1/images/<image_id> \
  --data '{ <image_annotation> }'
The following is an example of PATCH payload data:
Patch call data
{
"metadata": {
  "annotations": {
    "quality.images.openshift.io/vulnerability.redhatcatalog":
       "{ 'name': 'Red Hat Ecosystem Catalog', 'description': 'Container health index', 'timestamp': '2020-06-01T05:04:46Z', 'compliant': null, 'reference': 'https://access.redhat.com/errata/RHBA-2020:2347', 'summary': [{'label': 'Health index', 'data': '4', 'severityIndex': 1, 'reference': null}] }"
    }
  }
}
Additional resources
2.7. Using container registries securely
Container registries store container images to:
- Make images accessible to others
- Organize images into repositories that can include multiple versions of an image
- Optionally limit access to images, based on different authentication methods, or make them publicly available
There are public container registries, such as Quay.io and Docker Hub where many people and organizations share their images. The Red Hat Registry offers supported Red Hat and partner images, while the Red Hat Ecosystem Catalog offers detailed descriptions and health checks for those images. To manage your own registry, you could purchase a container registry such as Red Hat Quay.
From a security standpoint, some registries provide special features to check and improve the health of your containers. For example, Red Hat Quay offers container vulnerability scanning with Clair security scanner, build triggers to automatically rebuild images when source code changes in GitHub and other locations, and the ability to use role-based access control (RBAC) to secure access to images.
2.7.1. Knowing where containers come from?
There are tools you can use to scan and track the contents of your downloaded and deployed container images. However, there are many public sources of container images. When using public container registries, you can add a layer of protection by using trusted sources.
2.7.2. Immutable and certified containers
Consuming security updates is particularly important when managing immutable containers. Immutable containers are containers that will never be changed while running. When you deploy immutable containers, you do not step into the running container to replace one or more binaries. From an operational standpoint, you rebuild and redeploy an updated container image to replace a container instead of changing it.
Red Hat certified images are:
- Free of known vulnerabilities in the platform components or layers
- Compatible across the RHEL platforms, from bare metal to cloud
- Supported by Red Hat
The list of known vulnerabilities is constantly evolving, so you must track the contents of your deployed container images, as well as newly downloaded images, over time. You can use Red Hat Security Advisories (RHSAs) to alert you to any newly discovered issues in Red Hat certified container images, and direct you to the updated image. Alternatively, you can go to the Red Hat Ecosystem Catalog to look up that and other security-related issues for each Red Hat image.
2.7.3. Getting containers from Red Hat Registry and Ecosystem Catalog
Red Hat lists certified container images for Red Hat products and partner offerings from the Container Images section of the Red Hat Ecosystem Catalog. From that catalog, you can see details of each image, including CVE, software packages listings, and health scores.
Red Hat images are actually stored in what is referred to as the Red Hat Registry, which is represented by a public container registry (registry.access.redhat.com) and an authenticated registry (registry.redhat.io). Both include basically the same set of container images, with registry.redhat.io including some additional images that require authentication with Red Hat subscription credentials.
Container content is monitored for vulnerabilities by Red Hat and updated regularly. When Red Hat releases security updates, such as fixes to glibc, DROWN, or Dirty Cow, any affected container images are also rebuilt and pushed to the Red Hat Registry.
Red Hat uses a health index to reflect the security risk for each container provided through the Red Hat Ecosystem Catalog. Because containers consume software provided by Red Hat and the errata process, old, stale containers are insecure whereas new, fresh containers are more secure.
To illustrate the age of containers, the Red Hat Ecosystem Catalog uses a grading system. A freshness grade is a measure of the oldest and most severe security errata available for an image. "A" is more up to date than "F". See Container Health Index grades as used inside the Red Hat Ecosystem Catalog for more details on this grading system.
See the Red Hat Product Security Center for details on security updates and vulnerabilities related to Red Hat software. Check out Red Hat Security Advisories to search for specific advisories and CVEs.
2.7.4. OpenShift Container Registry
OpenShift Container Platform includes the OpenShift Container Registry, a private registry running as an integrated component of the platform that you can use to manage your container images. The OpenShift Container Registry provides role-based access controls that allow you to manage who can pull and push which container images.
OpenShift Container Platform also supports integration with other private registries that you might already be using, such as Red Hat Quay.
Additional resources
2.7.5. Storing containers using Red Hat Quay
Red Hat Quay is an enterprise-quality container registry product from Red Hat. Development for Red Hat Quay is done through the upstream Project Quay. Red Hat Quay is available to deploy on-premise or through the hosted version of Red Hat Quay at Quay.io.
Security-related features of Red Hat Quay include:
- Time machine: Allows images with older tags to expire after a set period of time or based on a user-selected expiration time.
- Repository mirroring: Lets you mirror other registries for security reasons, such hosting a public repository on Red Hat Quay behind a company firewall, or for performance reasons, to keep registries closer to where they are used.
- Action log storage: Save Red Hat Quay logging output to Elasticsearch storage to allow for later search and analysis.
- Clair security scanning: Scan images against a variety of Linux vulnerability databases, based on the origins of each container image.
- Internal authentication: Use the default local database to handle RBAC authentication to Red Hat Quay or choose from LDAP, Keystone (OpenStack), JWT Custom Authentication, or External Application Token authentication.
- External authorization (OAuth): Allow authorization to Red Hat Quay from GitHub, GitHub Enterprise, or Google Authentication.
- Access settings: Generate tokens to allow access to Red Hat Quay from docker, rkt, anonymous access, user-created accounts, encrypted client passwords, or prefix username autocompletion.
Ongoing integration of Red Hat Quay with OpenShift Container Platform continues, with several OpenShift Container Platform Operators of particular interest. The Quay Bridge Operator lets you replace the internal OpenShift Container Platform registry with Red Hat Quay. The Quay Red Hat Quay Container Security Operator lets you check vulnerabilities of images running in OpenShift Container Platform that were pulled from Red Hat Quay registries.
2.8. Securing the build process
In a container environment, the software build process is the stage in the life cycle where application code is integrated with the required runtime libraries. Managing this build process is key to securing the software stack.
2.8.1. Building once, deploying everywhere
Using OpenShift Container Platform as the standard platform for container builds enables you to guarantee the security of the build environment. Adhering to a "build once, deploy everywhere" philosophy ensures that the product of the build process is exactly what is deployed in production.
It is also important to maintain the immutability of your containers. You should not patch running containers, but rebuild and redeploy them.
As your software moves through the stages of building, testing, and production, it is important that the tools making up your software supply chain be trusted. The following figure illustrates the process and tools that could be incorporated into a trusted software supply chain for containerized software:
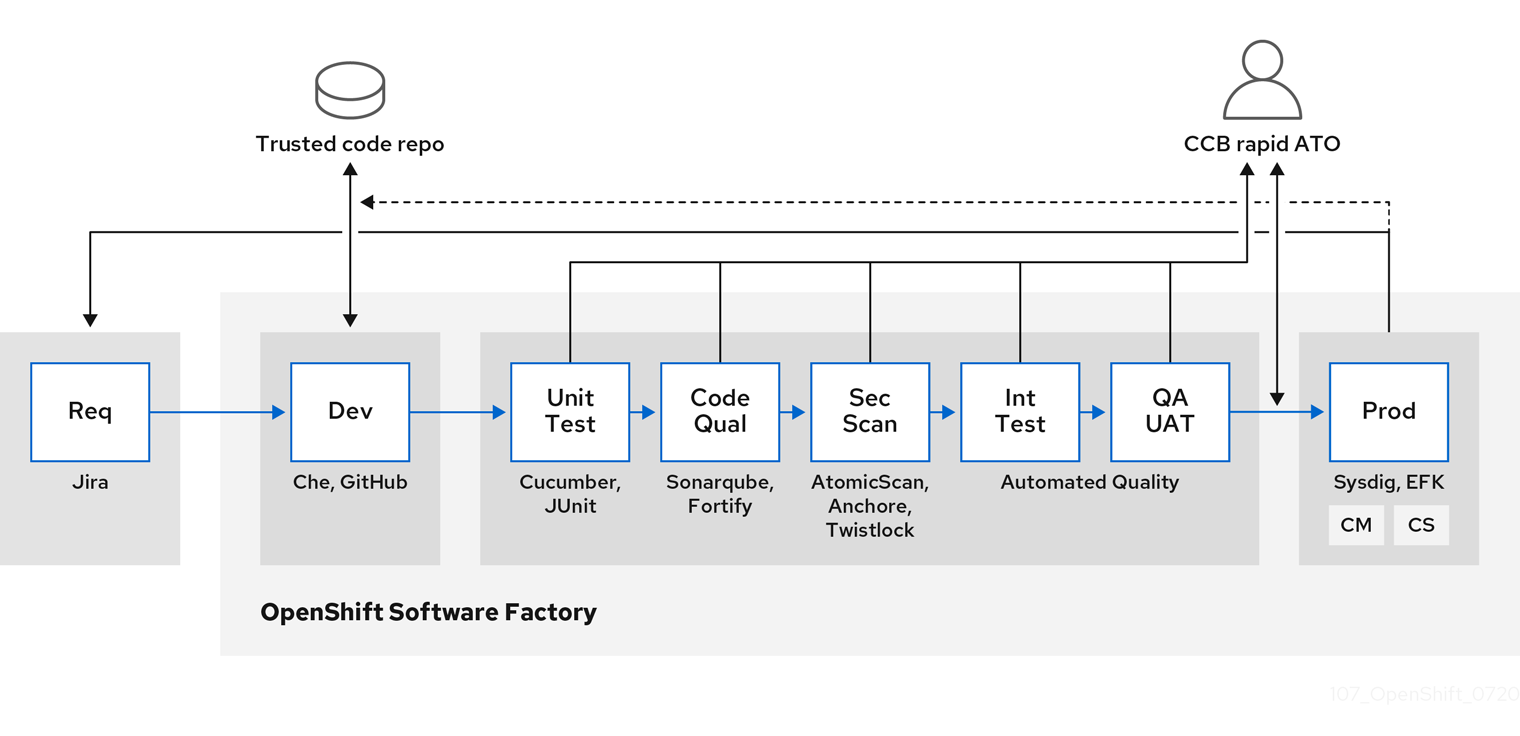
OpenShift Container Platform can be integrated with trusted code repositories (such as GitHub) and development platforms (such as Che) for creating and managing secure code. Unit testing could rely on Cucumber and JUnit. You could inspect your containers for vulnerabilities and compliance issues with Anchore or Twistlock, and use image scanning tools such as AtomicScan or Clair. Tools such as Sysdig could provide ongoing monitoring of your containerized applications.
2.8.2. Managing builds
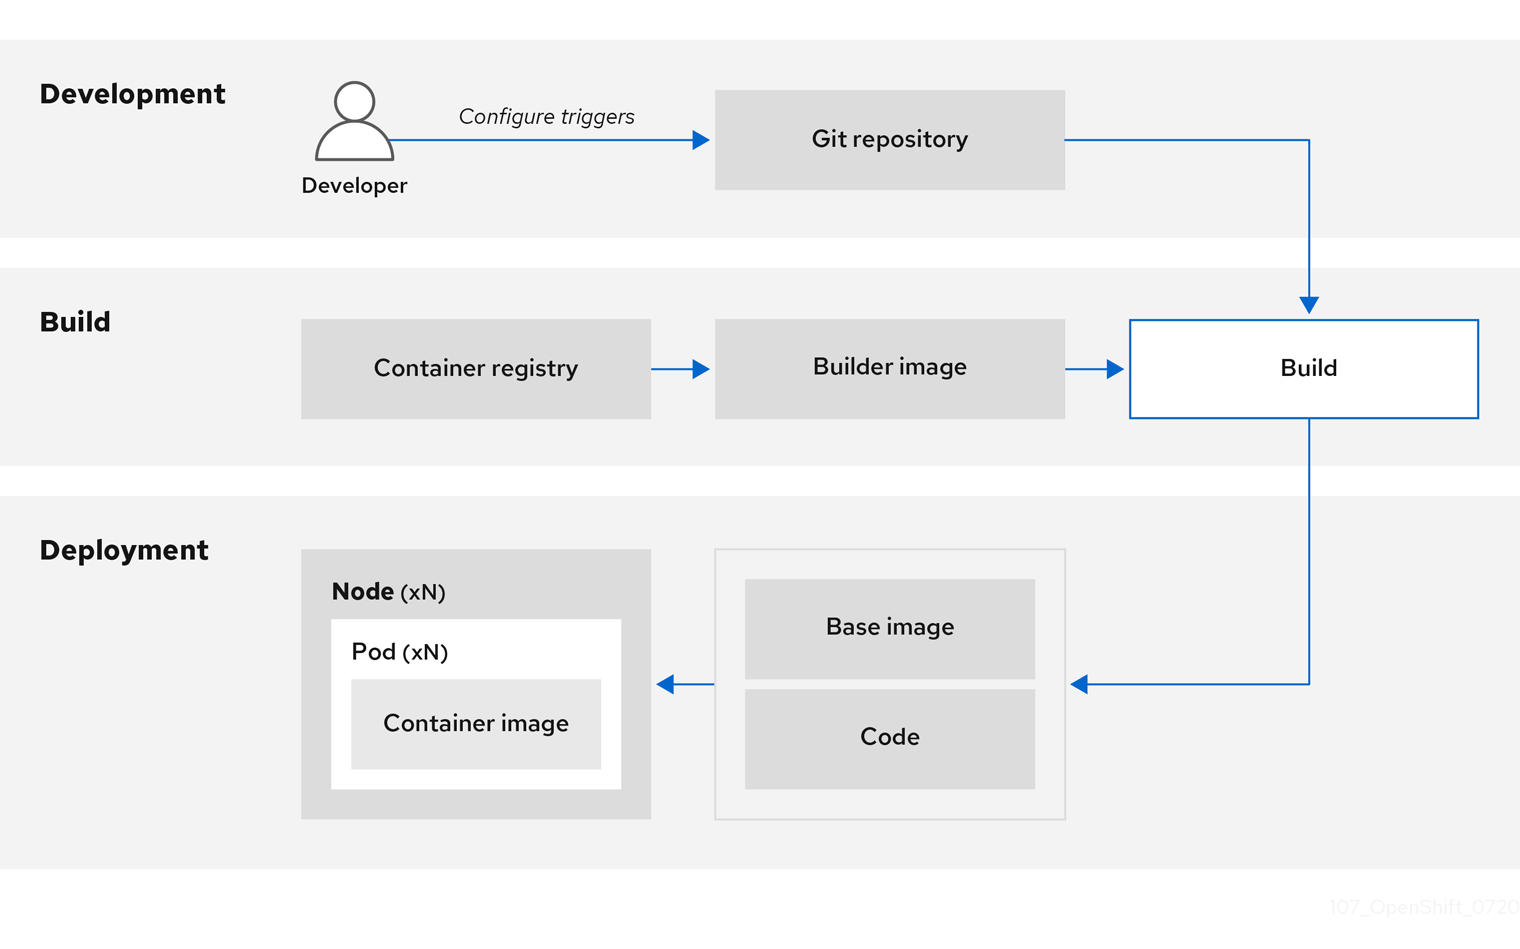
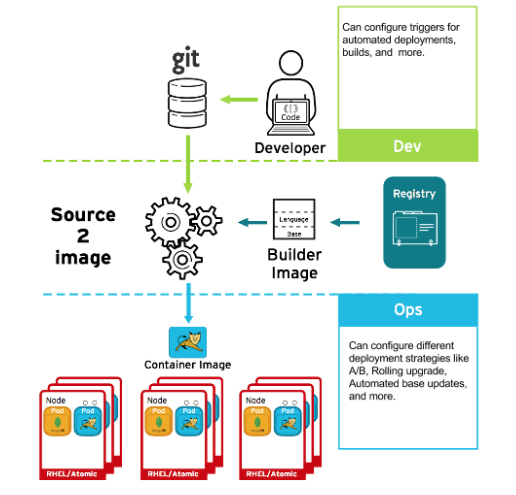
You can use Source-to-Image (S2I) to combine source code and base images. Builder images make use of S2I to enable your development and operations teams to collaborate on a reproducible build environment. With Red Hat S2I images available as Universal Base Image (UBI) images, you can now freely redistribute your software with base images built from real RHEL RPM packages. Red Hat has removed subscription restrictions to allow this.
When developers commit code with Git for an application using build images, OpenShift Container Platform can perform the following functions:
- Trigger, either by using webhooks on the code repository or other automated continuous integration (CI) process, to automatically assemble a new image from available artifacts, the S2I builder image, and the newly committed code.
- Automatically deploy the newly built image for testing.
- Promote the tested image to production where it can be automatically deployed using a CI process.
You can use the integrated OpenShift Container Registry to manage access to final images. Both S2I and native build images are automatically pushed to your OpenShift Container Registry.
In addition to the included Jenkins for CI, you can also integrate your own build and CI environment with OpenShift Container Platform using RESTful APIs, as well as use any API-compliant image registry.
2.8.3. Securing inputs during builds
In some scenarios, build operations require credentials to access dependent resources, but it is undesirable for those credentials to be available in the final application image produced by the build. You can define input secrets for this purpose.
For example, when building a Node.js application, you can set up your private mirror for Node.js modules. To download modules from that private mirror, you must supply a custom .npmrc file for the build that contains a URL, user name, and password. For security reasons, you do not want to expose your credentials in the application image.
Using this example scenario, you can add an input secret to a new BuildConfig object:
Create the secret, if it does not exist:
$ oc create secret generic secret-npmrc --from-file=.npmrc=~/.npmrc
This creates a new secret named
secret-npmrc, which contains the base64 encoded content of the~/.npmrcfile.Add the secret to the
sourcesection in the existingBuildConfigobject:source: git: uri: https://github.com/sclorg/nodejs-ex.git secrets: - destinationDir: . secret: name: secret-npmrcTo include the secret in a new
BuildConfigobject, run the following command:$ oc new-build \ openshift/nodejs-010-centos7~https://github.com/sclorg/nodejs-ex.git \ --build-secret secret-npmrc
2.8.4. Designing your build process
You can design your container image management and build process to use container layers so that you can separate control.
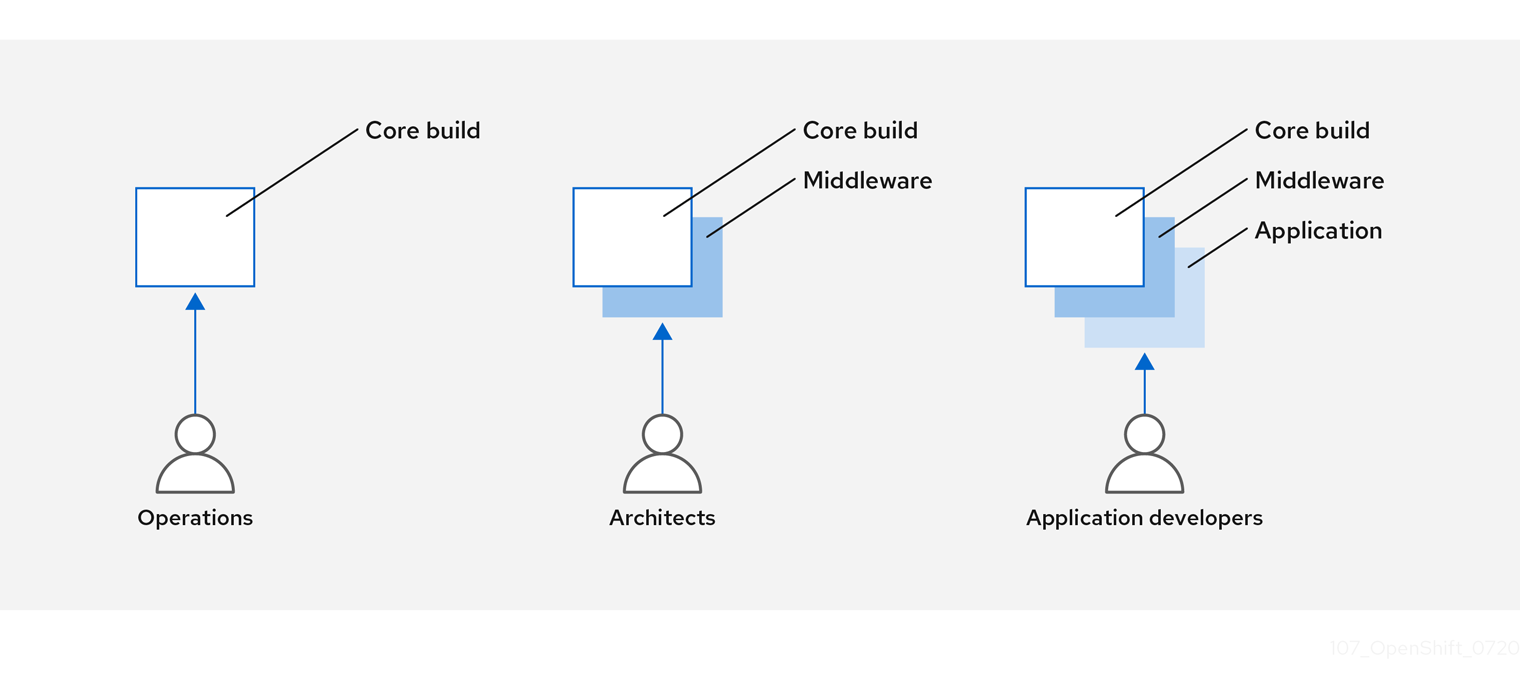
For example, an operations team manages base images, while architects manage middleware, runtimes, databases, and other solutions. Developers can then focus on application layers and focus on writing code.
Because new vulnerabilities are identified daily, you need to proactively check container content over time. To do this, you should integrate automated security testing into your build or CI process. For example:
- SAST / DAST – Static and Dynamic security testing tools.
- Scanners for real-time checking against known vulnerabilities. Tools like these catalog the open source packages in your container, notify you of any known vulnerabilities, and update you when new vulnerabilities are discovered in previously scanned packages.
Your CI process should include policies that flag builds with issues discovered by security scans so that your team can take appropriate action to address those issues. You should sign your custom built containers to ensure that nothing is tampered with between build and deployment.
Using GitOps methodology, you can use the same CI/CD mechanisms to manage not only your application configurations, but also your OpenShift Container Platform infrastructure.
2.8.5. Building Knative serverless applications
Relying on Kubernetes and Kourier, you can build, deploy, and manage serverless applications by using OpenShift Serverless in OpenShift Container Platform.
As with other builds, you can use S2I images to build your containers, then serve them using Knative services. View Knative application builds through the Topology view of the OpenShift Container Platform web console.
2.8.6. Additional resources
2.9. Deploying containers
You can use a variety of techniques to make sure that the containers you deploy hold the latest production-quality content and that they have not been tampered with. These techniques include setting up build triggers to incorporate the latest code and using signatures to ensure that the container comes from a trusted source and has not been modified.
2.9.1. Controlling container deployments with triggers
If something happens during the build process, or if a vulnerability is discovered after an image has been deployed, you can use tooling for automated, policy-based deployment to remediate. You can use triggers to rebuild and replace images, ensuring the immutable containers process, instead of patching running containers, which is not recommended.
For example, you build an application using three container image layers: core, middleware, and applications. An issue is discovered in the core image and that image is rebuilt. After the build is complete, the image is pushed to your OpenShift Container Registry. OpenShift Container Platform detects that the image has changed and automatically rebuilds and deploys the application image, based on the defined triggers. This change incorporates the fixed libraries and ensures that the production code is identical to the most current image.
You can use the oc set triggers command to set a deployment trigger. For example, to set a trigger for a deployment called deployment-example:
$ oc set triggers deploy/deployment-example \
    --from-image=example:latest \
    --containers=web
2.9.2. Controlling what image sources can be deployed
It is important that the intended images are actually being deployed, that the images including the contained content are from trusted sources, and they have not been altered. Cryptographic signing provides this assurance. OpenShift Container Platform enables cluster administrators to apply security policy that is broad or narrow, reflecting deployment environment and security requirements. Two parameters define this policy:
- one or more registries, with optional project namespace
- trust type, such as accept, reject, or require public key(s)
You can use these policy parameters to allow, deny, or require a trust relationship for entire registries, parts of registries, or individual images. Using trusted public keys, you can ensure that the source is cryptographically verified. The policy rules apply to nodes. Policy may be applied uniformly across all nodes or targeted for different node workloads (for example, build, zone, or environment).
Example image signature policy file
{
    "default": [{"type": "reject"}],
    "transports": {
        "docker": {
            "access.redhat.com": [
                {
                    "type": "signedBy",
                    "keyType": "GPGKeys",
                    "keyPath": "/etc/pki/rpm-gpg/RPM-GPG-KEY-redhat-release"
                }
            ]
        },
        "atomic": {
            "172.30.1.1:5000/openshift": [
                {
                    "type": "signedBy",
                    "keyType": "GPGKeys",
                    "keyPath": "/etc/pki/rpm-gpg/RPM-GPG-KEY-redhat-release"
                }
            ],
            "172.30.1.1:5000/production": [
                {
                    "type": "signedBy",
                    "keyType": "GPGKeys",
                    "keyPath": "/etc/pki/example.com/pubkey"
                }
            ],
            "172.30.1.1:5000": [{"type": "reject"}]
        }
    }
}
The policy can be saved onto a node as /etc/containers/policy.json. Saving this file to a node is best accomplished using a new MachineConfig object. This example enforces the following rules:
-
Require images from the Red Hat Registry (
registry.access.redhat.com) to be signed by the Red Hat public key. -
Require images from your OpenShift Container Registry in the
openshiftnamespace to be signed by the Red Hat public key. -
Require images from your OpenShift Container Registry in the
productionnamespace to be signed by the public key forexample.com. -
Reject all other registries not specified by the global
defaultdefinition.
2.9.3. Using signature transports
A signature transport is a way to store and retrieve the binary signature blob. There are two types of signature transports.
-
atomic: Managed by the OpenShift Container Platform API. -
docker: Served as a local file or by a web server.
The OpenShift Container Platform API manages signatures that use the atomic transport type. You must store the images that use this signature type in your OpenShift Container Registry. Because the docker/distribution extensions API auto-discovers the image signature endpoint, no additional configuration is required.
Signatures that use the docker transport type are served by local file or web server. These signatures are more flexible; you can serve images from any container image registry and use an independent server to deliver binary signatures.
However, the docker transport type requires additional configuration. You must configure the nodes with the URI of the signature server by placing arbitrarily-named YAML files into a directory on the host system, /etc/containers/registries.d by default. The YAML configuration files contain a registry URI and a signature server URI, or sigstore:
Example registries.d file
docker:
    access.redhat.com:
        sigstore: https://access.redhat.com/webassets/docker/content/sigstore
In this example, the Red Hat Registry, access.redhat.com, is the signature server that provides signatures for the docker transport type. Its URI is defined in the sigstore parameter. You might name this file /etc/containers/registries.d/redhat.com.yaml and use the Machine Config Operator to automatically place the file on each node in your cluster. No service restart is required since policy and registries.d files are dynamically loaded by the container runtime.
2.9.4. Creating secrets and config maps
The Secret object type provides a mechanism to hold sensitive information such as passwords, OpenShift Container Platform client configuration files, dockercfg files, and private source repository credentials. Secrets decouple sensitive content from pods. You can mount secrets into containers using a volume plugin or the system can use secrets to perform actions on behalf of a pod.
For example, to add a secret to your deployment configuration so that it can access a private image repository, do the following:
Procedure
- Log in to the OpenShift Container Platform web console.
- Create a new project.
-
Navigate to Resources → Secrets and create a new secret. Set
Secret TypetoImage SecretandAuthentication TypetoImage Registry Credentialsto enter credentials for accessing a private image repository. -
When creating a deployment configuration (for example, from the Add to Project → Deploy Image page), set the
Pull Secretto your new secret.
Config maps are similar to secrets, but are designed to support working with strings that do not contain sensitive information. The ConfigMap object holds key-value pairs of configuration data that can be consumed in pods or used to store configuration data for system components such as controllers.
2.9.5. Automating continuous deployment
You can integrate your own continuous deployment (CD) tooling with OpenShift Container Platform.
By leveraging CI/CD and OpenShift Container Platform, you can automate the process of rebuilding the application to incorporate the latest fixes, testing, and ensuring that it is deployed everywhere within the environment.
Additional resources
2.10. Securing the container platform
OpenShift Container Platform and Kubernetes APIs are key to automating container management at scale. APIs are used to:
- Validate and configure the data for pods, services, and replication controllers.
- Perform project validation on incoming requests and invoke triggers on other major system components.
Security-related features in OpenShift Container Platform that are based on Kubernetes include:
- Multitenancy, which combines Role-Based Access Controls and network policies to isolate containers at multiple levels.
- Admission plugins, which form boundaries between an API and those making requests to the API.
OpenShift Container Platform uses Operators to automate and simplify the management of Kubernetes-level security features.
2.10.1. Isolating containers with multitenancy
Multitenancy allows applications on an OpenShift Container Platform cluster that are owned by multiple users, and run across multiple hosts and namespaces, to remain isolated from each other and from outside attacks. You obtain multitenancy by applying role-based access control (RBAC) to Kubernetes namespaces.
In Kubernetes, namespaces are areas where applications can run in ways that are separate from other applications. OpenShift Container Platform uses and extends namespaces by adding extra annotations, including MCS labeling in SELinux, and identifying these extended namespaces as projects. Within the scope of a project, users can maintain their own cluster resources, including service accounts, policies, constraints, and various other objects.
RBAC objects are assigned to projects to authorize selected users to have access to those projects. That authorization takes the form of rules, roles, and bindings:
- Rules define what a user can create or access in a project.
- Roles are collections of rules that you can bind to selected users or groups.
- Bindings define the association between users or groups and roles.
Local RBAC roles and bindings attach a user or group to a particular project. Cluster RBAC can attach cluster-wide roles and bindings to all projects in a cluster. There are default cluster roles that can be assigned to provide admin, basic-user, cluster-admin, and cluster-status access.
2.10.2. Protecting control plane with admission plugins
While RBAC controls access rules between users and groups and available projects, admission plugins define access to the OpenShift Container Platform master API. Admission plugins form a chain of rules that consist of:
- Default admissions plugins: These implement a default set of policies and resources limits that are applied to components of the OpenShift Container Platform control plane.
- Mutating admission plugins: These plugins dynamically extend the admission chain. They call out to a webhook server and can both authenticate a request and modify the selected resource.
- Validating admission plugins: These validate requests for a selected resource and can both validate the request and ensure that the resource does not change again.
API requests go through admissions plugins in a chain, with any failure along the way causing the request to be rejected. Each admission plugin is associated with particular resources and only responds to requests for those resources.
2.10.2.1. Security context constraints (SCCs)
You can use security context constraints (SCCs) to define a set of conditions that a pod must run with to be accepted into the system.
Some aspects that can be managed by SCCs include:
- Running of privileged containers
- Capabilities a container can request to be added
- Use of host directories as volumes
- SELinux context of the container
- Container user ID
If you have the required permissions, you can adjust the default SCC policies to be more permissive, if required.
2.10.2.2. Granting roles to service accounts
You can assign roles to service accounts, in the same way that users are assigned role-based access. There are three default service accounts created for each project. A service account:
- is limited in scope to a particular project
- derives its name from its project
- is automatically assigned an API token and credentials to access the OpenShift Container Registry
Service accounts associated with platform components automatically have their keys rotated.
2.10.3. Authentication and authorization
2.10.3.1. Controlling access using OAuth
You can use API access control via authentication and authorization for securing your container platform. The OpenShift Container Platform master includes a built-in OAuth server. Users can obtain OAuth access tokens to authenticate themselves to the API.
As an administrator, you can configure OAuth to authenticate using an identity provider, such as LDAP, GitHub, or Google. The identity provider is used by default for new OpenShift Container Platform deployments, but you can configure this at initial installation time or post-installation.
2.10.3.2. API access control and management
Applications can have multiple, independent API services which have different endpoints that require management. OpenShift Container Platform includes a containerized version of the 3scale API gateway so that you can manage your APIs and control access.
3scale gives you a variety of standard options for API authentication and security, which can be used alone or in combination to issue credentials and control access: standard API keys, application ID and key pair, and OAuth 2.0.
You can restrict access to specific endpoints, methods, and services and apply access policy for groups of users. Application plans allow you to set rate limits for API usage and control traffic flow for groups of developers.
For a tutorial on using APIcast v2, the containerized 3scale API Gateway, see Running APIcast on Red Hat OpenShift in the 3scale documentation.
2.10.3.3. Red Hat Single Sign-On
The Red Hat Single Sign-On server enables you to secure your applications by providing web single sign-on capabilities based on standards, including SAML 2.0, OpenID Connect, and OAuth 2.0. The server can act as a SAML or OpenID Connect–based identity provider (IdP), mediating with your enterprise user directory or third-party identity provider for identity information and your applications using standards-based tokens. You can integrate Red Hat Single Sign-On with LDAP-based directory services including Microsoft Active Directory and Red Hat Enterprise Linux Identity Management.
2.10.3.4. Secure self-service web console
OpenShift Container Platform provides a self-service web console to ensure that teams do not access other environments without authorization. OpenShift Container Platform ensures a secure multitenant master by providing the following:
- Access to the master uses Transport Layer Security (TLS)
- Access to the API Server uses X.509 certificates or OAuth access tokens
- Project quota limits the damage that a rogue token could do
- The etcd service is not exposed directly to the cluster
2.10.4. Managing certificates for the platform
OpenShift Container Platform has multiple components within its framework that use REST-based HTTPS communication leveraging encryption via TLS certificates. OpenShift Container Platform’s installer configures these certificates during installation. There are some primary components that generate this traffic:
- masters (API server and controllers)
- etcd
- nodes
- registry
- router
2.10.4.1. Configuring custom certificates
You can configure custom serving certificates for the public hostnames of the API server and web console during initial installation or when redeploying certificates. You can also use a custom CA.
Additional resources
- Introduction to OpenShift Container Platform
- Using RBAC to define and apply permissions
- About admission plugins
- Managing security context constraints
- SCC reference commands
- Examples of granting roles to service accounts
- Configuring the internal OAuth server
- Understanding identity provider configuration
- Certificate types and descriptions
- Proxy certificates
2.11. Securing networks
Network security can be managed at several levels. At the pod level, network namespaces can prevent containers from seeing other pods or the host system by restricting network access. Network policies give you control over allowing and rejecting connections. You can manage ingress and egress traffic to and from your containerized applications.
2.11.1. Using network namespaces
OpenShift Container Platform uses software-defined networking (SDN) to provide a unified cluster network that enables communication between containers across the cluster.
Network policy mode, by default, makes all pods in a project accessible from other pods and network endpoints. To isolate one or more pods in a project, you can create NetworkPolicy objects in that project to indicate the allowed incoming connections. Using multitenant mode, you can provide project-level isolation for pods and services.
2.11.2. Isolating pods with network policies
Using network policies, you can isolate pods from each other in the same project. Network policies can deny all network access to a pod, only allow connections for the ingress controller, reject connections from pods in other projects, or set similar rules for how networks behave.
Additional resources
2.11.3. Using multiple pod networks
Each running container has only one network interface by default. The Multus CNI plugin lets you create multiple CNI networks, and then attach any of those networks to your pods. In that way, you can do things like separate private data onto a more restricted network and have multiple network interfaces on each node.
Additional resources
2.11.4. Isolating applications
OpenShift Container Platform enables you to segment network traffic on a single cluster to make multitenant clusters that isolate users, teams, applications, and environments from non-global resources.
Additional resources
2.11.5. Securing ingress traffic
There are many security implications related to how you configure access to your Kubernetes services from outside of your OpenShift Container Platform cluster. Besides exposing HTTP and HTTPS routes, ingress routing allows you to set up NodePort or LoadBalancer ingress types. NodePort exposes an application’s service API object from each cluster worker. LoadBalancer lets you assign an external load balancer to an associated service API object in your OpenShift Container Platform cluster.
Additional resources
2.11.6. Securing egress traffic
OpenShift Container Platform provides the ability to control egress traffic using either a router or firewall method. For example, you can use IP whitelisting to control database access. A cluster administrator can assign one or more egress IP addresses to a project in an OpenShift Container Platform SDN network provider. Likewise, a cluster administrator can prevent egress traffic from going outside of an OpenShift Container Platform cluster using an egress firewall.
By assigning a fixed egress IP address, you can have all outgoing traffic assigned to that IP address for a particular project. With the egress firewall, you can prevent a pod from connecting to an external network, prevent a pod from connecting to an internal network, or limit a pod’s access to specific internal subnets.
2.12. Securing attached storage
OpenShift Container Platform supports multiple types of storage, both for on-premise and cloud providers. In particular, OpenShift Container Platform can use storage types that support the Container Storage Interface.
2.12.1. Persistent volume plugins
Containers are useful for both stateless and stateful applications. Protecting attached storage is a key element of securing stateful services. Using the Container Storage Interface (CSI), OpenShift Container Platform can incorporate storage from any storage back end that supports the CSI interface.
OpenShift Container Platform provides plugins for multiple types of storage, including:
- Red Hat OpenShift Container Storage *
- AWS Elastic Block Stores (EBS) *
- AWS Elastic File System (EFS) *
- Azure Disk *
- Azure File *
- OpenStack Cinder *
- GCE Persistent Disks *
- VMware vSphere *
- Network File System (NFS)
- FlexVolume
- Fibre Channel
- iSCSI
Plugins for those storage types with dynamic provisioning are marked with an asterisk (*). Data in transit is encrypted via HTTPS for all OpenShift Container Platform components communicating with each other.
You can mount a persistent volume (PV) on a host in any way supported by your storage type. Different types of storage have different capabilities and each PV’s access modes are set to the specific modes supported by that particular volume.
For example, NFS can support multiple read/write clients, but a specific NFS PV might be exported on the server as read-only. Each PV has its own set of access modes describing that specific PV’s capabilities, such as ReadWriteOnce, ReadOnlyMany, and ReadWriteMany.
2.12.3. Block storage
For block storage providers like AWS Elastic Block Store (EBS), GCE Persistent Disks, and iSCSI, OpenShift Container Platform uses SELinux capabilities to secure the root of the mounted volume for non-privileged pods, making the mounted volume owned by and only visible to the container with which it is associated.
2.13. Monitoring cluster events and logs
The ability to monitor and audit an OpenShift Container Platform cluster is an important part of safeguarding the cluster and its users against inappropriate usage.
There are two main sources of cluster-level information that are useful for this purpose: events and logging.
2.13.1. Watching cluster events
Cluster administrators are encouraged to familiarize themselves with the Event resource type and review the list of system events to determine which events are of interest. Events are associated with a namespace, either the namespace of the resource they are related to or, for cluster events, the default namespace. The default namespace holds relevant events for monitoring or auditing a cluster, such as node events and resource events related to infrastructure components.
The master API and oc command do not provide parameters to scope a listing of events to only those related to nodes. A simple approach would be to use grep:
$ oc get event -n default | grep Node
Example output
1h 20h 3 origin-node-1.example.local Node Normal NodeHasDiskPressure ...
A more flexible approach is to output the events in a form that other tools can process. For example, the following example uses the jq tool against JSON output to extract only NodeHasDiskPressure events:
$ oc get events -n default -o json \
  | jq '.items[] | select(.involvedObject.kind == "Node" and .reason == "NodeHasDiskPressure")'
Example output
{
  "apiVersion": "v1",
  "count": 3,
  "involvedObject": {
    "kind": "Node",
    "name": "origin-node-1.example.local",
    "uid": "origin-node-1.example.local"
  },
  "kind": "Event",
  "reason": "NodeHasDiskPressure",
  ...
}
Events related to resource creation, modification, or deletion can also be good candidates for detecting misuse of the cluster. The following query, for example, can be used to look for excessive pulling of images:
$ oc get events --all-namespaces -o json \
  | jq '[.items[] | select(.involvedObject.kind == "Pod" and .reason == "Pulling")] | length'
Example output
4
When a namespace is deleted, its events are deleted as well. Events can also expire and are deleted to prevent filling up etcd storage. Events are not stored as a permanent record and frequent polling is necessary to capture statistics over time.
2.13.2. Logging
Using the oc log command, you can view container logs, build configs and deployments in real time. Different can users have access different access to logs:
- Users who have access to a project are able to see the logs for that project by default.
- Users with admin roles can access all container logs.
To save your logs for further audit and analysis, you can enable the cluster-logging add-on feature to collect, manage, and view system, container, and audit logs. You can deploy, manage, and upgrade OpenShift Logging through the OpenShift Elasticsearch Operator and Red Hat OpenShift Logging Operator.
2.13.3. Audit logs
With audit logs, you can follow a sequence of activities associated with how a user, administrator, or other OpenShift Container Platform component is behaving. API audit logging is done on each server.
Additional resources