
Chapter 8. Deploying installer-provisioned clusters on bare metal
8.1. Overview
Installer-provisioned installation provides support for installing OpenShift Container Platform on bare metal nodes. This guide provides a methodology to achieving a successful installation.
During installer-provisioned installation on bare metal, the installer on the bare metal node labeled as provisioner creates a bootstrap VM. The role of the bootstrap VM is to assist in the process of deploying an OpenShift Container Platform cluster. The bootstrap VM connects to the baremetal network and to the provisioning network, if present, via the network bridges.
When the installation of OpenShift Container Platform control plane nodes is complete and fully operational, the installer destroys the bootstrap VM automatically and moves the virtual IP addresses (VIPs) to the appropriate nodes accordingly. The API VIP moves to the control plane nodes and the Ingress VIP moves to the worker nodes.
8.2. Prerequisites
Installer-provisioned installation of OpenShift Container Platform requires:
- One provisioner node with Red Hat Enterprise Linux (RHEL) 8.x installed.
- Three control plane nodes.
- Baseboard Management Controller (BMC) access to each node.
At least one network:
- One required routable network
- One optional network for provisioning nodes; and,
- One optional management network.
Before starting an installer-provisioned installation of OpenShift Container Platform, ensure the hardware environment meets the following requirements.
8.2.1. Node requirements
Installer-provisioned installation involves a number of hardware node requirements:
-
CPU architecture: All nodes must use
x86_64CPU architecture. - Similar nodes: Red Hat recommends nodes have an identical configuration per role. That is, Red Hat recommends nodes be the same brand and model with the same CPU, memory, and storage configuration.
-
Baseboard Management Controller: The
provisionernode must be able to access the baseboard management controller (BMC) of each OpenShift Container Platform cluster node. You may use IPMI, Redfish, or a proprietary protocol. -
Latest generation: Nodes must be of the most recent generation. Because the installer-provisioned installation relies on BMC protocols, the hardware must support IPMI cipher suite 17. Additionally, RHEL 8 ships with the most recent drivers for RAID controllers. Ensure that the nodes are recent enough to support RHEL 8 for the
provisionernode and RHCOS 8 for the control plane and worker nodes. - Registry node: (Optional) If setting up a disconnected mirrored registry, it is recommended the registry reside in its own node.
-
Provisioner node: Installer-provisioned installation requires one
provisionernode. - Control plane: Installer-provisioned installation requires three control plane nodes for high availability.
- Worker nodes: While not required, a typical production cluster has one or more worker nodes. Smaller clusters are more resource efficient for administrators and developers during development, production, and testing.
-
Network interfaces: Each node must have at least one network interface for the routable
baremetalnetwork. Each node must have one network interface for aprovisioningnetwork when using theprovisioningnetwork for deployment. Using theprovisioningnetwork is the default configuration. Network interface naming must be consistent across control plane nodes for the provisioning network. For example, if a control plane node uses theeth0NIC for the provisioning network, the other control plane nodes must use it as well. Unified Extensible Firmware Interface (UEFI): Installer-provisioned installation requires UEFI boot on all OpenShift Container Platform nodes when using IPv6 addressing on the
provisioningnetwork. In addition, UEFI Device PXE Settings must be set to use the IPv6 protocol on theprovisioningnetwork NIC, but omitting theprovisioningnetwork removes this requirement.ImportantWhen starting the installation from virtual media such as an ISO image, delete all old UEFI boot table entries. If the boot table includes entries that are not generic entries provided by the firmware, the installation might fail.
- Secure Boot: Many production scenarios require nodes with Secure Boot enabled to verify the node only boots with trusted software, such as UEFI firmware drivers, EFI applications, and the operating system. To deploy an OpenShift Container Platform cluster with Secure Boot, you must enable UEFI boot mode and Secure Boot on each control plane node and each worker node. Red Hat supports Secure Boot only when installer-provisioned installations use Red Fish Virtual Media. Red Hat does not support Secure Boot with self-generated keys.
8.2.2. Firmware requirements for installing with virtual media
The installer for installer-provisioned OpenShift Container Platform clusters validates the hardware and firmware compatibility with Redfish virtual media. The following table lists supported firmware for installer-provisioned OpenShift Container Platform clusters deployed with Redfish virtual media.
Table 8.1. Firmware compatibility for Redfish virtual media
| Hardware | Model | Management | Firmware Versions |
|---|---|---|---|
| HP | 10th Generation | iLO5 | N/A |
| Dell | 14th Generation | iDRAC 9 | v4.20.20.20 - 04.40.00.00 |
| 13th Generation | iDRAC 8 | v2.75.75.75+ |
Refer to the hardware documentation for the nodes or contact the hardware vendor for information on updating the firmware.
For HP servers, Redfish virtual media is not supported on 9th generation systems running iLO4, because Ironic does not support iLO4 with virtual media.
For Dell servers, ensure the OpenShift Container Platform cluster nodes have AutoAttach Enabled through the iDRAC console. The menu path is: Configuration → Virtual Media → Attach Mode → AutoAttach . With iDRAC 9 firmware version 04.40.00.00, the Virtual Console plug-in defaults to eHTML5, which causes problems with the InsertVirtualMedia workflow. Set the plug-in to HTML5 to avoid this issue. The menu path is: Configuration → Virtual console → Plug-in Type → HTML5 .
The installer will not initiate installation on a node if the node firmware is below the foregoing versions when installing with virtual media.
8.2.3. Network requirements
Installer-provisioned installation of OpenShift Container Platform involves several network requirements. First, installer-provisioned installation involves an optional non-routable provisioning network for provisioning the operating system on each bare metal node. Second, installer-provisioned installation involves a routable baremetal network.
8.2.3.1. Configuring NICs
OpenShift Container Platform deploys with two networks:
-
provisioning: Theprovisioningnetwork is an optional non-routable network used for provisioning the underlying operating system on each node that is a part of the OpenShift Container Platform cluster. When deploying using theprovisioningnetwork, the first NIC on each node, such aseth0oreno1, must interface with theprovisioningnetwork. -
baremetal: Thebaremetalnetwork is a routable network. When deploying using theprovisioningnetwork, the second NIC on each node, such aseth1oreno2, must interface with thebaremetalnetwork. When deploying without aprovisioningnetwork, you can use any NIC on each node to interface with thebaremetalnetwork.
Each NIC should be on a separate VLAN corresponding to the appropriate network.
8.2.3.2. Configuring the DNS server
Clients access the OpenShift Container Platform cluster nodes over the baremetal network. A network administrator must configure a subdomain or subzone where the canonical name extension is the cluster name.
<cluster_name>.<domain-name>
For example:
test-cluster.example.com
OpenShift Container Platform includes functionality that uses cluster membership information to generate A/AAAA records. This resolves the node names to their IP addresses. Once the nodes are registered with the API, the cluster can disperse node information without using CoreDNS-mDNS. This eliminates the network traffic associated with multicast DNS.
8.2.3.3. Dynamic Host Configuration Protocol (DHCP) requirements
By default, installer-provisioned installation deploys ironic-dnsmasq with DHCP enabled for the provisioning network. No other DHCP servers should be running on the provisioning network when the provisioningNetwork configuration setting is set to managed, which is the default value. If you have a DHCP server running on the provisioning network, you must set the provisioningNetwork configuration setting to unmanaged in the install-config.yaml file.
Network administrators must reserve IP addresses for each node in the OpenShift Container Platform cluster for the baremetal network on an external DHCP server.
8.2.3.4. Reserving IP addresses for nodes with the DHCP server
For the baremetal network, a network administrator must reserve a number of IP addresses to ensure that they do not change after deployment, including:
Two virtual IP addresses:
- One IP address for the API endpoint.
- One IP address for the wildcard ingress endpoint.
- One IP address for the provisioner node.
- One IP address for each control plane (master) node.
- One IP address for each worker node.
Some administrators prefer to use static IP addresses so that each node’s IP address remains constant in the absence of a DHCP server. To use static IP addresses in the OpenShift Container Platform cluster, reserve the IP addresses with an infinite lease. During deployment, the installer will reconfigure the NICs from DHCP assigned addresses to static IP addresses. NICs with DHCP leases that are not infinite will remain configured to use DHCP.
Setting IP addresses with an infinite lease is incompatible with network configuration deployed by using the Machine Config Operator.
Your DHCP server must provide a DHCP expiration time of 4294967295 seconds to properly set an infinite lease as specified by rfc2131. If a lesser value is returned for the DHCP infinite lease time, the node reports an error and a permanent IP is not set for the node. In RHEL 8, dhcpd does not provide infinite leases. If you want to use the provisioner node to serve dynamic IP addresses with infinite lease times, use dnsmasq rather than dhcpd.
Do not change a worker node’s IP address manually after deployment. To change the IP address of a worker node after deployment, you must mark the worker node unschedulable, evacuate the pods, delete the node, and recreate it with the new IP address. See "Working with nodes" for additional details. To change the IP address of a control plane node after deployment, contact support.
The storage interface requires a DHCP reservation.
The following table provides an exemplary embodiment of fully qualified domain names. The API and Nameserver addresses begin with canonical name extensions. The hostnames of the control plane and worker nodes are exemplary, so you can use any host naming convention you prefer.
| Usage | Host Name | IP |
|---|---|---|
| API | api.<cluster_name>.<domain> | <ip> |
| Ingress LB (apps) | *.apps.<cluster_name>.<domain> | <ip> |
| Provisioner node | provisioner.<cluster_name>.<domain> | <ip> |
| Master-0 | openshift-master-0.<cluster_name>.<domain> | <ip> |
| Master-1 | openshift-master-1.<cluster_name>.<domain> | <ip> |
| Master-2 | openshift-master-2.<cluster_name>.<domain> | <ip> |
| Worker-0 | openshift-worker-0.<cluster_name>.<domain> | <ip> |
| Worker-1 | openshift-worker-1.<cluster_name>.<domain> | <ip> |
| Worker-n | openshift-worker-n.<cluster_name>.<domain> | <ip> |
8.2.3.5. Network Time Protocol (NTP)
Each OpenShift Container Platform node in the cluster must have access to an NTP server. OpenShift Container Platform nodes use NTP to synchronize their clocks. For example, cluster nodes use SSL certificates that require validation, which might fail if the date and time between the nodes are not in sync.
Define a consistent clock date and time format in each cluster node’s BIOS settings, or installation might fail.
You may reconfigure the control plane nodes to act as NTP servers on disconnected clusters, and reconfigure worker nodes to retrieve time from the control plane nodes.
8.2.3.6. State-driven network configuration requirements (Technology Preview)
OpenShift Container Platform supports additional post-installation state-driven network configuration on the secondary network interfaces of cluster nodes using kubernetes-nmstate. For example, system administrators might configure a secondary network interface on cluster nodes after installation for a storage network.
Configuration must occur before scheduling pods.
State-driven network configuration requires installing kubernetes-nmstate, and also requires Network Manager running on the cluster nodes. See OpenShift Virtualization > Kubernetes NMState (Tech Preview) for additional details.
8.2.3.7. Port access for the out-of-band management IP address
The out-of-band management IP address is on a separate network from the node. To ensure that the out-of-band management can communicate with the baremetal node during installation, the out-of-band management IP address address must be granted access to the TCP 6180 port.
8.2.4. Configuring nodes
Configuring nodes when using the provisioning network
Each node in the cluster requires the following configuration for proper installation.
A mismatch between nodes will cause an installation failure.
While the cluster nodes can contain more than two NICs, the installation process only focuses on the first two NICs:
| NIC | Network | VLAN |
| NIC1 |
| <provisioning-vlan> |
| NIC2 |
| <baremetal-vlan> |
NIC1 is a non-routable network (provisioning) that is only used for the installation of the OpenShift Container Platform cluster.
The Red Hat Enterprise Linux (RHEL) 8.x installation process on the provisioner node might vary. To install Red Hat Enterprise Linux (RHEL) 8.x using a local Satellite server or a PXE server, PXE-enable NIC2.
| PXE | Boot order |
|
NIC1 PXE-enabled | 1 |
|
NIC2 | 2 |
Ensure PXE is disabled on all other NICs.
Configure the control plane and worker nodes as follows:
| PXE | Boot order |
| NIC1 PXE-enabled (provisioning network) | 1 |
Configuring nodes without the provisioning network
The installation process requires one NIC:
| NIC | Network | VLAN |
| NICx |
| <baremetal-vlan> |
NICx is a routable network (baremetal) that is used for the installation of the OpenShift Container Platform cluster, and routable to the internet.
Configuring nodes for Secure Boot
Secure Boot prevents a node from booting unless it verifies the node is using only trusted software, such as UEFI firmware drivers, EFI applications and the operating system. Red Hat only supports Secure Boot when deploying with RedFish Virtual Media.
To enable Secure Boot, refer to the hardware guide for the node. To enable Secure Boot, execute the following:
- Boot the node and enter the BIOS menu.
- Set the node’s boot mode to UEFI Enabled.
Enable Secure Boot.
ImportantRed Hat does not support Secure Boot with self-generated keys.
8.2.5. Out-of-band management
Nodes will typically have an additional NIC used by the Baseboard Management Controllers (BMCs). These BMCs must be accessible from the provisioner node.
Each node must be accessible via out-of-band management. When using an out-of-band management network, the provisioner node requires access to the out-of-band management network for a successful OpenShift Container Platform 4 installation.
The out-of-band management setup is out of scope for this document. We recommend setting up a separate management network for out-of-band management. However, using the provisioning network or the baremetal network are valid options.
8.2.6. Required data for installation
Prior to the installation of the OpenShift Container Platform cluster, gather the following information from all cluster nodes:
Out-of-band management IP
Examples
- Dell (iDRAC) IP
- HP (iLO) IP
- Fujitsu (iRMC) IP
When using the provisioning network
-
NIC1 (
provisioning) MAC address -
NIC2 (
baremetal) MAC address
When omitting the provisioning network
-
NICx (
baremetal) MAC address
8.2.7. Validation checklist for nodes
When using the provisioning network
-
❏ NIC1 VLAN is configured for the
provisioningnetwork. (optional) -
❏ NIC1 is PXE-enabled on the provisioner, control plane (master), and worker nodes when using a
provisioningnetwork. (optional) -
❏ NIC2 VLAN is configured for the
baremetalnetwork. - ❏ PXE has been disabled on all other NICs.
- ❏ Control plane and worker nodes are configured.
- ❏ All nodes accessible via out-of-band management.
- ❏ A separate management network has been created. (optional)
- ❏ Required data for installation.
When omitting the provisioning network
-
❏ NICx VLAN is configured for the
baremetalnetwork. - ❏ Control plane and worker nodes are configured.
- ❏ All nodes accessible via out-of-band management.
- ❏ A separate management network has been created. (optional)
- ❏ Required data for installation.
8.3. Setting up the environment for an OpenShift installation
8.3.1. Installing RHEL on the provisioner node
With the networking configuration complete, the next step is to install RHEL 8.x on the provisioner node. The installer uses the provisioner node as the orchestrator while installing the OpenShift Container Platform cluster. For the purposes of this document, installing RHEL on the provisioner node is out of scope. However, options include but are not limited to using a RHEL Satellite server, PXE, or installation media.
8.3.2. Preparing the provisioner node for OpenShift Container Platform installation
Perform the following steps to prepare the environment.
Procedure
-
Log in to the provisioner node via
ssh. Create a non-root user (
kni) and provide that user withsudoprivileges:# useradd kni # passwd kni # echo "kni ALL=(root) NOPASSWD:ALL" | tee -a /etc/sudoers.d/kni # chmod 0440 /etc/sudoers.d/kni
Create an
sshkey for the new user:# su - kni -c "ssh-keygen -t ed25519 -f /home/kni/.ssh/id_rsa -N ''"
Log in as the new user on the provisioner node:
# su - kni
$
Use Red Hat Subscription Manager to register the provisioner node:
$ sudo subscription-manager register --username=<user> --password=<pass> --auto-attach
$ sudo subscription-manager repos --enable=rhel-8-for-x86_64-appstream-rpms --enable=rhel-8-for-x86_64-baseos-rpms
NoteFor more information about Red Hat Subscription Manager, see Using and Configuring Red Hat Subscription Manager.
Install the following packages:
$ sudo dnf install -y libvirt qemu-kvm mkisofs python3-devel jq ipmitool
Modify the user to add the
libvirtgroup to the newly created user:$ sudo usermod --append --groups libvirt <user>
Restart
firewalldand enable thehttpservice:$ sudo systemctl start firewalld $ sudo firewall-cmd --zone=public --add-service=http --permanent $ sudo firewall-cmd --reload
Start and enable the
libvirtdservice:$ sudo systemctl enable libvirtd --now
Create the
defaultstorage pool and start it:$ sudo virsh pool-define-as --name default --type dir --target /var/lib/libvirt/images $ sudo virsh pool-start default $ sudo virsh pool-autostart default
Configure networking.
NoteYou can also configure networking from the web console.
Export the
baremetalnetwork NIC name:$ export PUB_CONN=<baremetal_nic_name>
Configure the
baremetalnetwork:$ sudo nohup bash -c " nmcli con down \"$PUB_CONN\" nmcli con delete \"$PUB_CONN\" # RHEL 8.1 appends the word \"System\" in front of the connection, delete in case it exists nmcli con down \"System $PUB_CONN\" nmcli con delete \"System $PUB_CONN\" nmcli connection add ifname baremetal type bridge con-name baremetal nmcli con add type bridge-slave ifname \"$PUB_CONN\" master baremetal pkill dhclient;dhclient baremetal "If you are deploying with a
provisioningnetwork, export theprovisioningnetwork NIC name:$ export PROV_CONN=<prov_nic_name>
If you are deploying with a
provisioningnetwork, configure theprovisioningnetwork:$ sudo nohup bash -c " nmcli con down \"$PROV_CONN\" nmcli con delete \"$PROV_CONN\" nmcli connection add ifname provisioning type bridge con-name provisioning nmcli con add type bridge-slave ifname \"$PROV_CONN\" master provisioning nmcli connection modify provisioning ipv6.addresses fd00:1101::1/64 ipv6.method manual nmcli con down provisioning nmcli con up provisioning "NoteThe
sshconnection might disconnect after executing these steps.The IPv6 address can be any address as long as it is not routable via the
baremetalnetwork.Ensure that UEFI is enabled and UEFI PXE settings are set to the IPv6 protocol when using IPv6 addressing.
Configure the IPv4 address on the
provisioningnetwork connection.$ nmcli connection modify provisioning ipv4.addresses 172.22.0.254/24 ipv4.method manual
sshback into theprovisionernode (if required).# ssh kni@provisioner.<cluster-name>.<domain>
Verify the connection bridges have been properly created.
$ sudo nmcli con show
NAME               UUID                                  TYPE      DEVICE
baremetal          4d5133a5-8351-4bb9-bfd4-3af264801530  bridge    baremetal
provisioning       43942805-017f-4d7d-a2c2-7cb3324482ed  bridge    provisioning
virbr0             d9bca40f-eee1-410b-8879-a2d4bb0465e7  bridge    virbr0
bridge-slave-eno1  76a8ed50-c7e5-4999-b4f6-6d9014dd0812  ethernet  eno1
bridge-slave-eno2  f31c3353-54b7-48de-893a-02d2b34c4736  ethernet  eno2
Create a
pull-secret.txtfile.$ vim pull-secret.txt
In a web browser, navigate to Install OpenShift on Bare Metal with installer-provisioned infrastructure, and scroll down to the Downloads section. Click Copy pull secret. Paste the contents into the
pull-secret.txtfile and save the contents in thekniuser’s home directory.
8.3.3. Retrieving the OpenShift Container Platform installer
Use the latest-4.x version of the installer to deploy the latest generally available version of OpenShift Container Platform:
$ export VERSION=latest-4.7
export RELEASE_IMAGE=$(curl -s https://mirror.openshift.com/pub/openshift-v4/clients/ocp/$VERSION/release.txt | grep 'Pull From: quay.io' | awk -F ' ' '{print $3}')
Additional resources
- See OpenShift Container Platform upgrade channels and releases for an explanation of the different release channels.
8.3.4. Extracting the OpenShift Container Platform installer
After retrieving the installer, the next step is to extract it.
Procedure
Set the environment variables:
$ export cmd=openshift-baremetal-install
$ export pullsecret_file=~/pull-secret.txt
$ export extract_dir=$(pwd)
Get the
ocbinary:$ curl -s https://mirror.openshift.com/pub/openshift-v4/clients/ocp/$VERSION/openshift-client-linux.tar.gz | tar zxvf - oc
Extract the installer:
$ sudo cp oc /usr/local/bin
$ oc adm release extract --registry-config "${pullsecret_file}" --command=$cmd --to "${extract_dir}" ${RELEASE_IMAGE}
$ sudo cp openshift-baremetal-install /usr/local/bin
8.3.5. Creating an RHCOS images cache (optional)
To employ image caching, you must download two images: the Red Hat Enterprise Linux CoreOS (RHCOS) image used by the bootstrap VM and the RHCOS image used by the installer to provision the different nodes. Image caching is optional, but especially useful when running the installer on a network with limited bandwidth.
If you are running the installer on a network with limited bandwidth and the RHCOS images download takes more than 15 to 20 minutes, the installer will timeout. Caching images on a web server will help in such scenarios.
Use the following steps to install a container that contains the images.
Install
podman.$ sudo dnf install -y podman
Open firewall port
8080to be used for RHCOS image caching.$ sudo firewall-cmd --add-port=8080/tcp --zone=public --permanent
$ sudo firewall-cmd --reload
Create a directory to store the
bootstraposimageandclusterosimage.$ mkdir /home/kni/rhcos_image_cache
Set the appropriate SELinux context for the newly created directory.
$ sudo semanage fcontext -a -t httpd_sys_content_t "/home/kni/rhcos_image_cache(/.*)?"
$ sudo restorecon -Rv rhcos_image_cache/
Get the commit ID from the installer. The ID determines which images the installer needs to download.
$ export COMMIT_ID=$(/usr/local/bin/openshift-baremetal-install version | grep '^built from commit' | awk '{print $4}')Get the URI for the RHCOS image that the installer will deploy on the nodes.
$ export RHCOS_OPENSTACK_URI=$(curl -s -S https://raw.githubusercontent.com/openshift/installer/$COMMIT_ID/data/data/rhcos.json | jq .images.openstack.path | sed 's/"//g')
Get the URI for the RHCOS image that the installer will deploy on the bootstrap VM.
$ export RHCOS_QEMU_URI=$(curl -s -S https://raw.githubusercontent.com/openshift/installer/$COMMIT_ID/data/data/rhcos.json | jq .images.qemu.path | sed 's/"//g')
Get the path where the images are published.
$ export RHCOS_PATH=$(curl -s -S https://raw.githubusercontent.com/openshift/installer/$COMMIT_ID/data/data/rhcos.json | jq .baseURI | sed 's/"//g')
Get the SHA hash for the RHCOS image that will be deployed on the bootstrap VM.
$ export RHCOS_QEMU_SHA_UNCOMPRESSED=$(curl -s -S https://raw.githubusercontent.com/openshift/installer/$COMMIT_ID/data/data/rhcos.json | jq -r '.images.qemu["uncompressed-sha256"]')
Get the SHA hash for the RHCOS image that will be deployed on the nodes.
$ export RHCOS_OPENSTACK_SHA_COMPRESSED=$(curl -s -S https://raw.githubusercontent.com/openshift/installer/$COMMIT_ID/data/data/rhcos.json | jq -r '.images.openstack.sha256')
Download the images and place them in the
/home/kni/rhcos_image_cachedirectory.$ curl -L ${RHCOS_PATH}${RHCOS_QEMU_URI} -o /home/kni/rhcos_image_cache/${RHCOS_QEMU_URI} $ curl -L ${RHCOS_PATH}${RHCOS_OPENSTACK_URI} -o /home/kni/rhcos_image_cache/${RHCOS_OPENSTACK_URI}Confirm SELinux type is of
httpd_sys_content_tfor the newly created files.$ ls -Z /home/kni/rhcos_image_cache
Create the pod.
$ podman run -d --name rhcos_image_cache \
-v /home/kni/rhcos_image_cache:/var/www/html \
-p 8080:8080/tcp \
quay.io/centos7/httpd-24-centos7:latest
8.3.6. Configuration files
8.3.6.1. Configuring the install-config.yaml file
The install-config.yaml file requires some additional details. Most of the information is teaching the installer and the resulting cluster enough about the available hardware so that it is able to fully manage it.
Configure
install-config.yaml. Change the appropriate variables to match the environment, includingpullSecretandsshKey.apiVersion: v1 baseDomain: <domain> metadata: name: <cluster-name> networking: machineCIDR: <public-cidr> networkType: OVNKubernetes compute: - name: worker replicas: 2 1 controlPlane: name: master replicas: 3 platform: baremetal: {} platform: baremetal: apiVIP: <api-ip> ingressVIP: <wildcard-ip> provisioningNetworkInterface: <NIC1> provisioningNetworkCIDR: <CIDR> hosts: - name: openshift-master-0 role: master bmc: address: ipmi://<out-of-band-ip> 2 username: <user> password: <password> bootMACAddress: <NIC1-mac-address> hardwareProfile: default - name: <openshift-master-1> role: master bmc: address: ipmi://<out-of-band-ip> 3 username: <user> password: <password> bootMACAddress: <NIC1-mac-address> hardwareProfile: default - name: <openshift-master-2> role: master bmc: address: ipmi://<out-of-band-ip> 4 username: <user> password: <password> bootMACAddress: <NIC1-mac-address> hardwareProfile: default - name: <openshift-worker-0> role: worker bmc: address: ipmi://<out-of-band-ip> 5 username: <user> password: <password> bootMACAddress: <NIC1-mac-address> hardwareProfile: unknown - name: <openshift-worker-1> role: worker bmc: address: ipmi://<out-of-band-ip> username: <user> password: <password> bootMACAddress: <NIC1-mac-address> hardwareProfile: unknown pullSecret: '<pull_secret>' sshKey: '<ssh_pub_key>'
Create a directory to store cluster configs.
$ mkdir ~/clusterconfigs
$ cp install-config.yaml ~/clusterconfigs
Ensure all bare metal nodes are powered off prior to installing the OpenShift Container Platform cluster.
$ ipmitool -I lanplus -U <user> -P <password> -H <management-server-ip> power off
Remove old bootstrap resources if any are left over from a previous deployment attempt.
for i in $(sudo virsh list | tail -n +3 | grep bootstrap | awk {'print $2'});
do
  sudo virsh destroy $i;
  sudo virsh undefine $i;
  sudo virsh vol-delete $i --pool $i;
  sudo virsh vol-delete $i.ign --pool $i;
  sudo virsh pool-destroy $i;
  sudo virsh pool-undefine $i;
done
8.3.6.2. Setting proxy settings within the install-config.yaml file (optional)
To deploy an OpenShift Container Platform cluster using a proxy, make the following changes to the install-config.yaml file.
apiVersion: v1
baseDomain: <domain>
proxy:
  httpProxy: http://USERNAME:PASSWORD@proxy.example.com:PORT
  httpsProxy: https://USERNAME:PASSWORD@proxy.example.com:PORT
  noProxy: <WILDCARD_OF_DOMAIN>,<PROVISIONING_NETWORK/CIDR>,<BMC_ADDRESS_RANGE/CIDR>
The following is an example of noProxy with values.
noProxy: .example.com,172.22.0.0/24,10.10.0.0/24
With a proxy enabled, set the appropriate values of the proxy in the corresponding key/value pair.
Key considerations:
-
If the proxy does not have an HTTPS proxy, change the value of
httpsProxyfromhttps://tohttp://. -
If using a provisioning network, include it in the
noProxysetting, otherwise the installer will fail. -
Set all of the proxy settings as environment variables within the provisioner node. For example,
HTTP_PROXY,HTTPS_PROXY, andNO_PROXY.
When provisioning with IPv6, you cannot define a CIDR address block in the noProxy settings. You must define each address separately.
8.3.6.3. Modifying the install-config.yaml file for no provisioning network (optional)
To deploy an OpenShift Container Platform cluster without a provisioning network, make the following changes to the install-config.yaml file.
platform:
  baremetal:
    apiVIP: <apiVIP>
    ingressVIP: <ingress/wildcard VIP>
    provisioningNetwork: "Disabled"
8.3.6.4. Configuring managed Secure Boot in the install-config.yaml file (optional)
You can enable managed Secure Boot when deploying an installer-provisioned cluster using Redfish BMC addressing, such as redfish, redfish-virtualmedia, or idrac-virtualmedia. To enable managed Secure Boot, add the bootMode configuration setting to each node:
Example
hosts:
  - name: openshift-master-0
    role: master
    bmc:
      address: redfish://<out_of_band_ip> 1
      username: <user>
      password: <password>
    bootMACAddress: <NIC1_mac_address>
    rootDeviceHints:
     deviceName: "/dev/sda"
    bootMode: UEFISecureBoot 2
- 1
- Ensure the
bmc.addresssetting usesredfish,redfish-virtualmedia, oridrac-virtualmediaas the protocol. For additional information, see "BMC addressing for HPE iLO" or "BMC addressing for Dell iDRAC". - 2
- The
bootModesetting isUEFIby default. To enable managed Secure Boot, change it toUEFISecureBoot.
To ensure the nodes can support managed Secure Boot, see "Configuring nodes" in the "Prerequisites". If the nodes do not support managed Secure Boot, see "Configuring nodes for Secure Boot manually" in the "Configuring nodes" section. Configuring Secure Boot manually requires Redfish virtual media.
Red Hat does not support Secure Boot with IPMI because IPMI does not provide Secure Boot management facilities.
8.3.6.5. Additional install-config parameters
See the following tables for the required parameters, the hosts parameter, and the bmc parameter for the install-config.yaml file.
Table 8.2. Required parameters
| Parameters | Default | Description |
|---|---|---|
|
|
The domain name for the cluster. For example, | |
|
|
The | |
|
|
The | |
metadata:
    name:
|
The name to be given to the OpenShift Container Platform cluster. For example, | |
networking:
    machineCIDR:
|
The public CIDR (Classless Inter-Domain Routing) of the external network. For example, | |
compute: - name: worker | The OpenShift Container Platform cluster requires a name be provided for worker (or compute) nodes even if there are zero nodes. | |
compute:
    replicas: 2
| Replicas sets the number of worker (or compute) nodes in the OpenShift Container Platform cluster. | |
controlPlane:
    name: master
| The OpenShift Container Platform cluster requires a name for control plane (master) nodes. | |
controlPlane:
    replicas: 3
| Replicas sets the number of control plane (master) nodes included as part of the OpenShift Container Platform cluster. | |
|
| The default configuration used for machine pools without a platform configuration. | |
|
|
| The VIP to use for internal API communication. This setting must either be provided or pre-configured in the DNS so that the default name resolves correctly. |
|
|
|
|
|
|
| The VIP to use for ingress traffic. |
Table 8.3. Optional Parameters
| Parameters | Default | Description |
|---|---|---|
|
|
|
Defines the IP range for nodes on the |
|
|
|
The CIDR for the network to use for provisioning. This option is required when not using the default address range on the |
|
|
The third IP address of the |
The IP address within the cluster where the provisioning services run. Defaults to the third IP address of the |
|
|
The second IP address of the |
The IP address on the bootstrap VM where the provisioning services run while the installer is deploying the control plane (master) nodes. Defaults to the second IP address of the |
|
|
|
The name of the |
|
|
|
The name of the |
|
| The default configuration used for machine pools without a platform configuration. | |
|
|
A URL to override the default operating system image for the bootstrap node. The URL must contain a SHA-256 hash of the image. For example: | |
|
|
A URL to override the default operating system for cluster nodes. The URL must include a SHA-256 hash of the image. For example, | |
|
|
Set this parameter to
Set this parameter to | |
|
| Set this parameter to the appropriate HTTP proxy used within your environment. | |
|
| Set this parameter to the appropriate HTTPS proxy used within your environment. | |
|
| Set this parameter to the appropriate list of exclusions for proxy usage within your environment. |
Hosts
The hosts parameter is a list of separate bare metal assets used to build the cluster.
| Name | Default | Description |
|
|
The name of the | |
|
|
The role of the bare metal node. Either | |
|
| Connection details for the baseboard management controller. See the BMC addressing section for additional details. | |
|
|
The MAC address of the NIC that the host uses for the Note
You must provide a valid MAC address from the host if you disabled the |
8.3.6.6. BMC addressing
Most vendors support BMC addressing with the Intelligent Platform Management Interface (IPMI). IPMI does not encrypt communications. It is suitable for use within a data center over a secured or dedicated management network. Check with your vendor to see if they support Redfish network boot. Redfish delivers simple and secure management for converged, hybrid IT and the Software Defined Data Center (SDDC). Redfish is human readable and machine capable, and leverages common Internet and web services standards to expose information directly to the modern tool chain. If your hardware does not support Redfish network boot, use IPMI.
IPMI
Hosts using IPMI use the ipmi://<out-of-band-ip>:<port> address format, which defaults to port 623 if not specified. The following example demonstrates an IPMI configuration within the install-config.yaml file.
platform:
  baremetal:
    hosts:
      - name: openshift-master-0
        role: master
        bmc:
          address: ipmi://<out-of-band-ip>
          username: <user>
          password: <password>
Redfish network boot
To enable Redfish, use redfish:// or redfish+http:// to disable TLS. The installer requires both the hostname or the IP address and the path to the system ID. The following example demonstrates a Redfish configuration within the install-config.yaml file.
platform:
  baremetal:
    hosts:
      - name: openshift-master-0
        role: master
        bmc:
          address: redfish://<out-of-band-ip>/redfish/v1/Systems/1
          username: <user>
          password: <password>
While it is recommended to have a certificate of authority for the out-of-band management addresses, you must include disableCertificateVerification: True in the bmc configuration if using self-signed certificates. The following example demonstrates a Redfish configuration using the disableCertificateVerification: True configuration parameter within the install-config.yaml file.
platform:
  baremetal:
    hosts:
      - name: openshift-master-0
        role: master
        bmc:
          address: redfish://<out-of-band-ip>/redfish/v1/Systems/1
          username: <user>
          password: <password>
          disableCertificateVerification: True
8.3.6.7. BMC addressing for Dell
The address field for each bmc entry is a URL for connecting to the OpenShift Container Platform cluster nodes, including the type of controller in the URL scheme and its location on the network.
platform:
  baremetal:
    hosts:
      - name: <hostname>
        role: <master | worker>
        bmc:
          address: <address>
          username: <user>
          password: <password>
For Dell hardware, Red Hat supports Redfish virtual media, Redfish network boot, and IPMI.
Table 8.4. BMC address formats for Dell hardware
| Protocol | Address Format |
|---|---|
| Redfish virtual media |
|
| Redfish network boot |
|
| IPMI |
|
Use idrac-virtualmedia as the protocol for Redfish virtual media. redfish-virtualmedia will not work on Dell hardware. Dell’s idrac-virtualmedia uses the Redfish standard with Dell’s OEM extensions.
See the following sections for additional details.
Redfish virtual media for Dell
For Redfish virtual media on Dell servers, use idrac-virtualmedia:// in the address setting. Using redfish-virtualmedia:// will not work.
The following example demonstrates using iDRAC virtual media within the install-config.yaml file.
platform:
  baremetal:
    hosts:
      - name: openshift-master-0
        role: master
        bmc:
          address: idrac-virtualmedia://<out-of-band-ip>/redfish/v1/Systems/System.Embedded.1
          username: <user>
          password: <password>
While it is recommended to have a certificate of authority for the out-of-band management addresses, you must include disableCertificateVerification: True in the bmc configuration if using self-signed certificates. The following example demonstrates a Redfish configuration using the disableCertificateVerification: True configuration parameter within the install-config.yaml file.
platform:
  baremetal:
    hosts:
      - name: openshift-master-0
        role: master
        bmc:
          address: idrac-virtualmedia://<out-of-band-ip>/redfish/v1/Systems/System.Embedded.1
          username: <user>
          password: <password>
          disableCertificateVerification: True
Currently, Redfish is only supported on Dell with iDRAC firmware versions 4.20.20.20 through 04.40.00.00 for installer-provisioned installations on bare metal deployments. There is a known issue with version 04.40.00.00. With iDRAC 9 firmware version 04.40.00.00, the Virtual Console plug-in defaults to eHTML5, which causes problems with the InsertVirtualMedia workflow. Set the plug-in to HTML5 to avoid this issue. The menu path is: Configuration → Virtual console → Plug-in Type → HTML5 .
Ensure the OpenShift Container Platform cluster nodes have AutoAttach Enabled through the iDRAC console. The menu path is: Configuration → Virtual Media → Attach Mode → AutoAttach .
Use idrac-virtualmedia:// as the protocol for Redfish virtual media. Using redfish-virtualmedia:// will not work on Dell hardware, because the idrac-virtualmedia:// protocol corresponds to the idrac hardware type and the Redfish protocol in Ironic. Dell’s idrac-virtualmedia:// protocol uses the Redfish standard with Dell’s OEM extensions. Ironic also supports the idrac type with the WSMAN protocol. Therefore, you must specify idrac-virtualmedia:// to avoid unexpected behavior when electing to use Redfish with virtual media on Dell hardware.
Redfish network boot for Dell
To enable Redfish, use redfish:// or redfish+http:// to disable transport layer security (TLS). The installer requires both the hostname or the IP address and the path to the system ID. The following example demonstrates a Redfish configuration within the install-config.yaml file.
platform:
  baremetal:
    hosts:
      - name: openshift-master-0
        role: master
        bmc:
          address: redfish://<out-of-band-ip>/redfish/v1/Systems/System.Embedded.1
          username: <user>
          password: <password>
While it is recommended to have a certificate of authority for the out-of-band management addresses, you must include disableCertificateVerification: True in the bmc configuration if using self-signed certificates. The following example demonstrates a Redfish configuration using the disableCertificateVerification: True configuration parameter within the install-config.yaml file.
platform:
  baremetal:
    hosts:
      - name: openshift-master-0
        role: master
        bmc:
          address: redfish://<out-of-band-ip>/redfish/v1/Systems/System.Embedded.1
          username: <user>
          password: <password>
          disableCertificateVerification: True
Currently, Redfish is only supported on Dell with iDRAC firmware versions 4.20.20.20 through 04.40.00.00 for installer-provisioned installations on bare metal deployments. There is a known issue with version 04.40.00.00. With iDRAC 9 firmware version 04.40.00.00, the Virtual Console plug-in defaults to eHTML5, which causes problems with the InsertVirtualMedia workflow. Set the plug-in to HTML5 to avoid this issue. The menu path is: Configuration → Virtual console → Plug-in Type → HTML5 .
Ensure the OpenShift Container Platform cluster nodes have AutoAttach Enabled through the iDRAC console. The menu path is: Configuration → Virtual Media → Attach Mode → AutoAttach .
The redfish:// URL protocol corresponds to the redfish hardware type in Ironic.
8.3.6.8. BMC addressing for HPE
The address field for each bmc entry is a URL for connecting to the OpenShift Container Platform cluster nodes, including the type of controller in the URL scheme and its location on the network.
platform:
  baremetal:
    hosts:
      - name: <hostname>
        role: <master | worker>
        bmc:
          address: <address>
          username: <user>
          password: <password>
For HPE hardware, Red Hat supports Redfish virtual media, Redfish network boot, and IPMI.
Table 8.5. BMC address formats for HPE hardware
| Protocol | Address Format |
|---|---|
| Redfish virtual media |
|
| Redfish network boot |
|
| IPMI |
|
See the following sections for additional details.
Redfish virtual media for HPE
To enable Redfish virtual media for HPE servers, use redfish-virtualmedia:// in the address setting. The following example demonstrates using Redfish virtual media within the install-config.yaml file.
platform:
  baremetal:
    hosts:
      - name: openshift-master-0
        role: master
        bmc:
          address: redfish-virtualmedia://<out-of-band-ip>/redfish/v1/Systems/1
          username: <user>
          password: <password>
While it is recommended to have a certificate of authority for the out-of-band management addresses, you must include disableCertificateVerification: True in the bmc configuration if using self-signed certificates. The following example demonstrates a Redfish configuration using the disableCertificateVerification: True configuration parameter within the install-config.yaml file.
platform:
  baremetal:
    hosts:
      - name: openshift-master-0
        role: master
        bmc:
          address: redfish-virtualmedia://<out-of-band-ip>/redfish/v1/Systems/1
          username: <user>
          password: <password>
disableCertificateVerification: TrueRedfish virtual media is not supported on 9th generation systems running iLO4, because Ironic does not support iLO4 with virtual media.
Redfish network boot for HPE
To enable Redfish, use redfish:// or redfish+http:// to disable TLS. The installer requires both the hostname or the IP address and the path to the system ID. The following example demonstrates a Redfish configuration within the install-config.yaml file.
platform:
  baremetal:
    hosts:
      - name: openshift-master-0
        role: master
        bmc:
          address: redfish://<out-of-band-ip>/redfish/v1/Systems/1
          username: <user>
          password: <password>
While it is recommended to have a certificate of authority for the out-of-band management addresses, you must include disableCertificateVerification: True in the bmc configuration if using self-signed certificates. The following example demonstrates a Redfish configuration using the disableCertificateVerification: True configuration parameter within the install-config.yaml file.
platform:
  baremetal:
    hosts:
      - name: openshift-master-0
        role: master
        bmc:
          address: redfish://<out-of-band-ip>/redfish/v1/Systems/1
          username: <user>
          password: <password>
          disableCertificateVerification: True
8.3.6.9. Root device hints
The rootDeviceHints parameter enables the installer to provision the Red Hat Enterprise Linux CoreOS (RHCOS) image to a particular device. The installer examines the devices in the order it discovers them, and compares the discovered values with the hint values. The installer uses the first discovered device that matches the hint value. The configuration can combine multiple hints, but a device must match all hints for the installer to select it.
Table 8.6. Subfields
| Subfield | Description |
|---|---|
|
|
A string containing a Linux device name like |
|
|
A string containing a SCSI bus address like |
|
| A string containing a vendor-specific device identifier. The hint can be a substring of the actual value. |
|
| A string containing the name of the vendor or manufacturer of the device. The hint can be a sub-string of the actual value. |
|
| A string containing the device serial number. The hint must match the actual value exactly. |
|
| An integer representing the minimum size of the device in gigabytes. |
|
| A string containing the unique storage identifier. The hint must match the actual value exactly. |
|
| A string containing the unique storage identifier with the vendor extension appended. The hint must match the actual value exactly. |
|
| A string containing the unique vendor storage identifier. The hint must match the actual value exactly. |
|
| A boolean indicating whether the device should be a rotating disk (true) or not (false). |
Example usage
     - name: master-0
       role: master
       bmc:
         address: ipmi://10.10.0.3:6203
         username: admin
         password: redhat
       bootMACAddress: de:ad:be:ef:00:40
       rootDeviceHints:
         deviceName: "/dev/sda"
8.3.6.10. Creating the OpenShift Container Platform manifests
Create the OpenShift Container Platform manifests.
$ ./openshift-baremetal-install --dir ~/clusterconfigs create manifests
INFO Consuming Install Config from target directory
WARNING Making control-plane schedulable by setting MastersSchedulable to true for Scheduler cluster settings
WARNING Discarding the OpenShift Manifest that was provided in the target directory because its dependencies are dirty and it needs to be regenerated
8.3.7. Creating a disconnected registry (optional)
In some cases, you might want to install an OpenShift Container Platform cluster using a local copy of the installation registry. This could be for enhancing network efficiency because the cluster nodes are on a network that does not have access to the internet.
A local, or mirrored, copy of the registry requires the following:
- A certificate for the registry node. This can be a self-signed certificate.
- A web server that a container on a system will serve.
- An updated pull secret that contains the certificate and local repository information.
Creating a disconnected registry on a registry node is optional. The subsequent sections indicate that they are optional since they are steps you need to execute only when creating a disconnected registry on a registry node. You should execute all of the subsequent sub-sections labeled "(optional)" when creating a disconnected registry on a registry node.
8.3.7.1. Preparing the registry node to host the mirrored registry (optional)
Make the following changes to the registry node.
Procedure
Open the firewall port on the registry node.
$ sudo firewall-cmd --add-port=5000/tcp --zone=libvirt  --permanent
$ sudo firewall-cmd --add-port=5000/tcp --zone=public   --permanent
$ sudo firewall-cmd --reload
Install the required packages for the registry node.
$ sudo yum -y install python3 podman httpd httpd-tools jq
Create the directory structure where the repository information will be held.
$ sudo mkdir -p /opt/registry/{auth,certs,data}
8.3.7.2. Generating the self-signed certificate (optional)
Generate a self-signed certificate for the registry node and put it in the /opt/registry/certs directory.
Procedure
Adjust the certificate information as appropriate.
$ host_fqdn=$( hostname --long ) $ cert_c="<Country Name>" # Country Name (C, 2 letter code) $ cert_s="<State>" # Certificate State (S) $ cert_l="<Locality>" # Certificate Locality (L) $ cert_o="<Organization>" # Certificate Organization (O) $ cert_ou="<Org Unit>" # Certificate Organizational Unit (OU) $ cert_cn="${host_fqdn}" # Certificate Common Name (CN) $ openssl req \ -newkey rsa:4096 \ -nodes \ -sha256 \ -keyout /opt/registry/certs/domain.key \ -x509 \ -days 365 \ -out /opt/registry/certs/domain.crt \ -addext "subjectAltName = DNS:${host_fqdn}" \ -subj "/C=${cert_c}/ST=${cert_s}/L=${cert_l}/O=${cert_o}/OU=${cert_ou}/CN=${cert_cn}"NoteWhen replacing
<Country Name>, ensure that it only contains two letters. For example,US.Update the registry node’s
ca-trustwith the new certificate.$ sudo cp /opt/registry/certs/domain.crt /etc/pki/ca-trust/source/anchors/ $ sudo update-ca-trust extract
8.3.7.3. Creating the registry podman container (optional)
The registry container uses the /opt/registry directory for certificates, authentication files, and to store its data files.
The registry container uses httpd and needs an htpasswd file for authentication.
Procedure
Create an
htpasswdfile in/opt/registry/authfor the container to use.$ htpasswd -bBc /opt/registry/auth/htpasswd <user> <passwd>
Replace
<user>with the user name and<passwd>with the password.Create and start the registry container.
$ podman create \
  --name ocpdiscon-registry \
  -p 5000:5000 \
  -e "REGISTRY_AUTH=htpasswd" \
  -e "REGISTRY_AUTH_HTPASSWD_REALM=Registry" \
  -e "REGISTRY_HTTP_SECRET=ALongRandomSecretForRegistry" \
  -e "REGISTRY_AUTH_HTPASSWD_PATH=/auth/htpasswd" \
  -e "REGISTRY_HTTP_TLS_CERTIFICATE=/certs/domain.crt" \
  -e "REGISTRY_HTTP_TLS_KEY=/certs/domain.key" \
  -e "REGISTRY_COMPATIBILITY_SCHEMA1_ENABLED=true" \
  -v /opt/registry/data:/var/lib/registry:z \
  -v /opt/registry/auth:/auth:z \
  -v /opt/registry/certs:/certs:z \
  docker.io/library/registry:2
$ podman start ocpdiscon-registry
8.3.7.4. Copy and update the pull-secret (optional)
Copy the pull secret file from the provisioner node to the registry node and modify it to include the authentication information for the new registry node.
Procedure
Copy the
pull-secret.txtfile.$ scp kni@provisioner:/home/kni/pull-secret.txt pull-secret.txt
Update the
host_fqdnenvironment variable with the fully qualified domain name of the registry node.$ host_fqdn=$( hostname --long )
Update the
b64authenvironment variable with the base64 encoding of thehttpcredentials used to create thehtpasswdfile.$ b64auth=$( echo -n '<username>:<passwd>' | openssl base64 )
Replace
<username>with the user name and<passwd>with the password.Set the
AUTHSTRINGenvironment variable to use thebase64authorization string. The$USERvariable is an environment variable containing the name of the current user.$ AUTHSTRING="{\"$host_fqdn:5000\": {\"auth\": \"$b64auth\",\"email\": \"$USER@redhat.com\"}}"Update the
pull-secret.txtfile.$ jq ".auths += $AUTHSTRING" < pull-secret.txt > pull-secret-update.txt
8.3.7.5. Mirroring the repository (optional)
Procedure
Copy the
ocbinary from the provisioner node to the registry node.$ sudo scp kni@provisioner:/usr/local/bin/oc /usr/local/bin
Set the required environment variables.
Set the release version:
$ VERSION=<release_version>
For
<release_version>, specify the tag that corresponds to the version of OpenShift Container Platform to install, such as4.7.Set the local registry name and host port:
$ LOCAL_REG='<local_registry_host_name>:<local_registry_host_port>'
For
<local_registry_host_name>, specify the registry domain name for your mirror repository, and for<local_registry_host_port>, specify the port that it serves content on.Set the local repository name:
$ LOCAL_REPO='<local_repository_name>'
For
<local_repository_name>, specify the name of the repository to create in your registry, such asocp4/openshift4.
Mirror the remote install images to the local repository.
$ /usr/local/bin/oc adm release mirror \
  -a pull-secret-update.txt \
  --from=$UPSTREAM_REPO \
  --to-release-image=$LOCAL_REG/$LOCAL_REPO:${VERSION} \
  --to=$LOCAL_REG/$LOCAL_REPO
8.3.7.6. Modify the install-config.yaml file to use the disconnected registry (optional)
On the provisioner node, the install-config.yaml file should use the newly created pull-secret from the pull-secret-update.txt file. The install-config.yaml file must also contain the disconnected registry node’s certificate and registry information.
Procedure
Add the disconnected registry node’s certificate to the
install-config.yamlfile. The certificate should follow the"additionalTrustBundle: |"line and be properly indented, usually by two spaces.$ echo "additionalTrustBundle: |" >> install-config.yaml $ sed -e 's/^/ /' /opt/registry/certs/domain.crt >> install-config.yaml
Add the mirror information for the registry to the
install-config.yamlfile.$ echo "imageContentSources:" >> install-config.yaml $ echo "- mirrors:" >> install-config.yaml $ echo " - registry.example.com:5000/ocp4/openshift4" >> install-config.yaml $ echo " source: quay.io/openshift-release-dev/ocp-release" >> install-config.yaml $ echo "- mirrors:" >> install-config.yaml $ echo " - registry.example.com:5000/ocp4/openshift4" >> install-config.yaml $ echo " source: quay.io/openshift-release-dev/ocp-v4.0-art-dev" >> install-config.yaml
NoteReplace
registry.example.comwith the registry’s fully qualified domain name.
8.3.8. Deploying routers on worker nodes
During installation, the installer deploys router pods on worker nodes. By default, the installer installs two router pods. If the initial cluster has only one worker node, or if a deployed cluster requires additional routers to handle external traffic loads destined for services within the OpenShift Container Platform cluster, you can create a yaml file to set an appropriate number of router replicas.
By default, the installer deploys two routers. If the cluster has at least two worker nodes, you can skip this section.
If the cluster has no worker nodes, the installer deploys the two routers on the control plane nodes by default. If the cluster has no worker nodes, you can skip this section.
Procedure
Create a
router-replicas.yamlfile.apiVersion: operator.openshift.io/v1 kind: IngressController metadata: name: default namespace: openshift-ingress-operator spec: replicas: <num-of-router-pods> endpointPublishingStrategy: type: HostNetwork nodePlacement: nodeSelector: matchLabels: node-role.kubernetes.io/worker: ""NoteReplace
<num-of-router-pods>with an appropriate value. If working with just one worker node, setreplicas:to1. If working with more than 3 worker nodes, you can increasereplicas:from the default value2as appropriate.Save and copy the
router-replicas.yamlfile to theclusterconfigs/openshiftdirectory.cp ~/router-replicas.yaml clusterconfigs/openshift/99_router-replicas.yaml
8.3.9. Validation checklist for installation
- ❏ OpenShift Container Platform installer has been retrieved.
- ❏ OpenShift Container Platform installer has been extracted.
-
❏ Required parameters for the
install-config.yamlhave been configured. -
❏ The
hostsparameter for theinstall-config.yamlhas been configured. -
❏ The
bmcparameter for theinstall-config.yamlhas been configured. -
❏ Conventions for the values configured in the
bmcaddressfield have been applied. - ❏ Created a disconnected registry (optional).
- ❏ (optional) Validate disconnected registry settings if in use.
- ❏ (optional) Deployed routers on worker nodes.
8.3.10. Deploying the cluster via the OpenShift Container Platform installer
Run the OpenShift Container Platform installer:
$ ./openshift-baremetal-install --dir ~/clusterconfigs --log-level debug create cluster
8.3.11. Following the installation
During the deployment process, you can check the installation’s overall status by issuing the tail command to the .openshift_install.log log file in the install directory folder.
$ tail -f /path/to/install-dir/.openshift_install.log
8.3.12. Preparing to reinstall a cluster on bare metal
Before you reinstall a cluster on bare metal, you must perform cleanup operations.
Procedure
- Remove or reformat the disks for the bootstrap, control plane (also known as master) node, and worker nodes. If you are working in a hypervisor environment, you must add any disks you removed.
Delete the artifacts that the previous installation generated:
$ cd ; /bin/rm -rf auth/ bootstrap.ign master.ign worker.ign metadata.json \
.openshift_install.log .openshift_install_state.json
- Generate new manifests and Ignition config files. See “Creating the Kubernetes manifest and Ignition config files" for more information.
- Upload the new bootstrap, control plane, and compute node Ignition config files that the installation program created to your HTTP server. This will overwrite the previous Ignition files.
8.4. Expanding the cluster
After deploying an installer-provisioned OpenShift Container Platform cluster, you can use the following procedures to expand the number of worker nodes. Ensure that each prospective worker node meets the prerequisites.
Expanding the cluster using RedFish Virtual Media involves meeting minimum firmware requirements. See Firmware requirements for installing with virtual media in the Prerequisites section for additional details when expanding the cluster using RedFish Virtual Media.
8.4.1. Preparing the bare metal node
Expanding the cluster requires a DHCP server. Each node must have a DHCP reservation.
Some administrators prefer to use static IP addresses so that each node’s IP address remains constant in the absence of a DHCP server. To use static IP addresses in the OpenShift Container Platform cluster, reserve the IP addresses in the DHCP server with an infinite lease. After the installer provisions the node successfully, the dispatcher script will check the node’s network configuration. If the dispatcher script finds that the network configuration contains a DHCP infinite lease, it will recreate the connection as a static IP connection using the IP address from the DHCP infinite lease. NICs without DHCP infinite leases will remain unmodified.
Setting IP addresses with an infinite lease is incompatible with network configuration deployed by using the Machine Config Operator.
Preparing the bare metal node requires executing the following procedure from the provisioner node.
Procedure
Get the
ocbinary, if needed. It should already exist on the provisioner node.[kni@provisioner ~]$ curl -s https://mirror.openshift.com/pub/openshift-v4/clients/ocp/$VERSION/openshift-client-linux-$VERSION.tar.gz | tar zxvf - oc
[kni@provisioner ~]$ sudo cp oc /usr/local/bin
- Power off the bare metal node via the baseboard management controller and ensure it is off.
Retrieve the user name and password of the bare metal node’s baseboard management controller. Then, create
base64strings from the user name and password. In the following example, the user name isrootand the password iscalvin.[kni@provisioner ~]$ echo -ne "root" | base64
[kni@provisioner ~]$ echo -ne "calvin" | base64
Create a configuration file for the bare metal node.
[kni@provisioner ~]$ vim bmh.yaml
---
apiVersion: v1
kind: Secret
metadata:
  name: openshift-worker-<num>-bmc-secret
type: Opaque
data:
  username: <base64-of-uid>
  password: <base64-of-pwd>
---
apiVersion: metal3.io/v1alpha1
kind: BareMetalHost
metadata:
  name: openshift-worker-<num>
spec:
  online: true
  bootMACAddress: <NIC1-mac-address>
  bmc:
    address: <protocol>://<bmc-ip>
    credentialsName: openshift-worker-<num>-bmc-secret
Replace
<num>for the worker number of the bare metal node in the twonamefields and thecredentialsNamefield. Replace<base64-of-uid>with thebase64string of the user name. Replace<base64-of-pwd>with thebase64string of the password. Replace<NIC1-mac-address>with the MAC address of the bare metal node’s first NIC.Refer to the BMC addressing section for additional BMC configuration options. Replace
<protocol>with the BMC protocol, such as IPMI, RedFish, or others. Replace<bmc-ip>with the IP address of the bare metal node’s baseboard management controller.NoteIf the MAC address of an existing bare metal node matches the MAC address of a bare metal host that you are attempting to provision, then the Ironic installation will fail. If the host enrollment, inspection, cleaning, or other Ironic steps fail, the Bare Metal Operator retries the installation continuously. See Diagnosing a host duplicate MAC address for more information.
Create the bare metal node.
[kni@provisioner ~]$ oc -n openshift-machine-api create -f bmh.yaml
secret/openshift-worker-<num>-bmc-secret created
baremetalhost.metal3.io/openshift-worker-<num> created
Where
<num>will be the worker number.Power up and inspect the bare metal node.
[kni@provisioner ~]$ oc -n openshift-machine-api get bmh openshift-worker-<num>
Where
<num>is the worker node number.NAME STATUS PROVISIONING STATUS CONSUMER BMC HARDWARE PROFILE ONLINE ERROR openshift-worker-<num> OK ready ipmi://<out-of-band-ip> unknown true
8.4.1.1. Diagnosing a duplicate MAC address when provisioning a new host in the cluster
If the MAC address of an existing bare-metal node in the cluster matches the MAC address of a bare-metal host you are attempting to add to the cluster, the Bare Metal Operator associates the host with the existing node. If the host enrollment, inspection, cleaning, or other Ironic steps fail, the Bare Metal Operator retries the installation continuously. A registration error is displayed for the failed bare-metal host.
You can diagnose a duplicate MAC address by examining the bare-metal hosts that are running in the openshift-machine-api namespace.
Prerequisites
- Install an OpenShift Container Platform cluster on bare metal.
-
Install the OpenShift Container Platform CLI
oc. -
Log in as a user with
cluster-adminprivileges.
Procedure
To determine whether a bare-metal host that fails provisioning has the same MAC address as an existing node, do the following:
Get the bare-metal hosts running in the
openshift-machine-apinamespace:$ oc get bmh -n openshift-machine-api
Example output
NAME                 STATUS   PROVISIONING STATUS      CONSUMER
openshift-master-0   OK       externally provisioned   openshift-zpwpq-master-0
openshift-master-1   OK       externally provisioned   openshift-zpwpq-master-1
openshift-master-2   OK       externally provisioned   openshift-zpwpq-master-2
openshift-worker-0   OK       provisioned              openshift-zpwpq-worker-0-lv84n
openshift-worker-1   OK       provisioned              openshift-zpwpq-worker-0-zd8lm
openshift-worker-2   error    registering
To see more detailed information about the status of the failing host, run the following command replacing
<bare_metal_host_name>with the name of the host:$ oc get -n openshift-machine-api bmh <bare_metal_host_name> -o yaml
Example output
...
status:
  errorCount: 12
  errorMessage: MAC address b4:96:91:1d:7c:20 conflicts with existing node openshift-worker-1
  errorType: registration error
...
8.4.2. Provisioning the bare metal node
Provisioning the bare metal node requires executing the following procedure from the provisioner node.
Procedure
Ensure the
PROVISIONING STATUSisreadybefore provisioning the bare metal node.$ oc -n openshift-machine-api get bmh openshift-worker-<num>
Where
<num>is the worker node number.NAME STATUS PROVISIONING STATUS CONSUMER BMC HARDWARE PROFILE ONLINE ERROR openshift-worker-<num> OK ready ipmi://<out-of-band-ip> unknown true
Get a count of the number of worker nodes.
$ oc get nodes
NAME                                                STATUS   ROLES           AGE     VERSION
provisioner.openshift.example.com            Ready    master          30h     v1.16.2
openshift-master-1.openshift.example.com            Ready    master          30h     v1.16.2
openshift-master-2.openshift.example.com            Ready    master          30h     v1.16.2
openshift-master-3.openshift.example.com            Ready    master          30h     v1.16.2
openshift-worker-0.openshift.example.com            Ready    master          30h     v1.16.2
openshift-worker-1.openshift.example.com            Ready    master          30h     v1.16.2
Get the machine set.
$ oc get machinesets -n openshift-machine-api
NAME                                DESIRED   CURRENT   READY   AVAILABLE   AGE
...
openshift-worker-0.example.com      1         1         1       1           55m
openshift-worker-1.example.com      1         1         1       1           55m
Increase the number of worker nodes by one.
$ oc scale --replicas=<num> machineset <machineset> -n openshift-machine-api
Replace
<num>with the new number of worker nodes. Replace<machineset>with the name of the machine set from the previous step.Check the status of the bare metal node.
$ oc -n openshift-machine-api get bmh openshift-worker-<num>
Where
<num>is the worker node number. The status changes fromreadytoprovisioning.NAME STATUS PROVISIONING STATUS CONSUMER BMC HARDWARE PROFILE ONLINE ERROR openshift-worker-<num> OK provisioning openshift-worker-<num>-65tjz ipmi://<out-of-band-ip> unknown true
The
provisioningstatus remains until the OpenShift Container Platform cluster provisions the node. This can take 30 minutes or more. Once complete, the status will change toprovisioned.NAME STATUS PROVISIONING STATUS CONSUMER BMC HARDWARE PROFILE ONLINE ERROR openshift-worker-<num> OK provisioned openshift-worker-<num>-65tjz ipmi://<out-of-band-ip> unknown true
Once provisioned, ensure the bare metal node is ready.
$ oc get nodes
NAME                                          STATUS   ROLES   AGE     VERSION
provisioner.openshift.example.com             Ready    master  30h     v1.16.2
openshift-master-1.openshift.example.com      Ready    master  30h     v1.16.2
openshift-master-2.openshift.example.com      Ready    master  30h     v1.16.2
openshift-master-3.openshift.example.com      Ready    master  30h     v1.16.2
openshift-worker-0.openshift.example.com      Ready    master  30h     v1.16.2
openshift-worker-1.openshift.example.com      Ready    master  30h     v1.16.2
openshift-worker-<num>.openshift.example.com  Ready    worker  3m27s   v1.16.2
You can also check the kubelet.
$ ssh openshift-worker-<num>
[kni@openshift-worker-<num>]$ journalctl -fu kubelet
8.5. Troubleshooting
8.5.1. Troubleshooting the installer workflow
Prior to troubleshooting the installation environment, it is critical to understand the overall flow of the installer-provisioned installation on bare metal. The diagrams below provide a troubleshooting flow with a step-by-step breakdown for the environment.
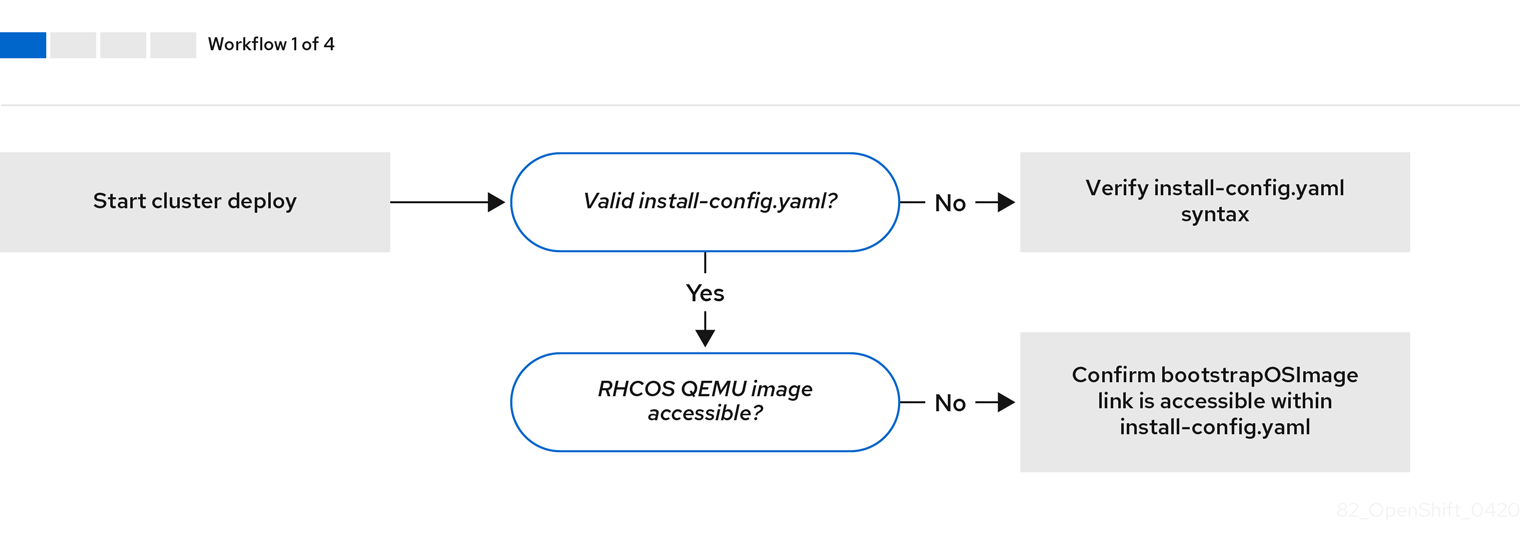
Workflow 1 of 4 illustrates a troubleshooting workflow when the install-config.yaml file has errors or the Red Hat Enterprise Linux CoreOS (RHCOS) images are inaccessible. Troubleshooting suggestions can be found at Troubleshooting install-config.yaml.
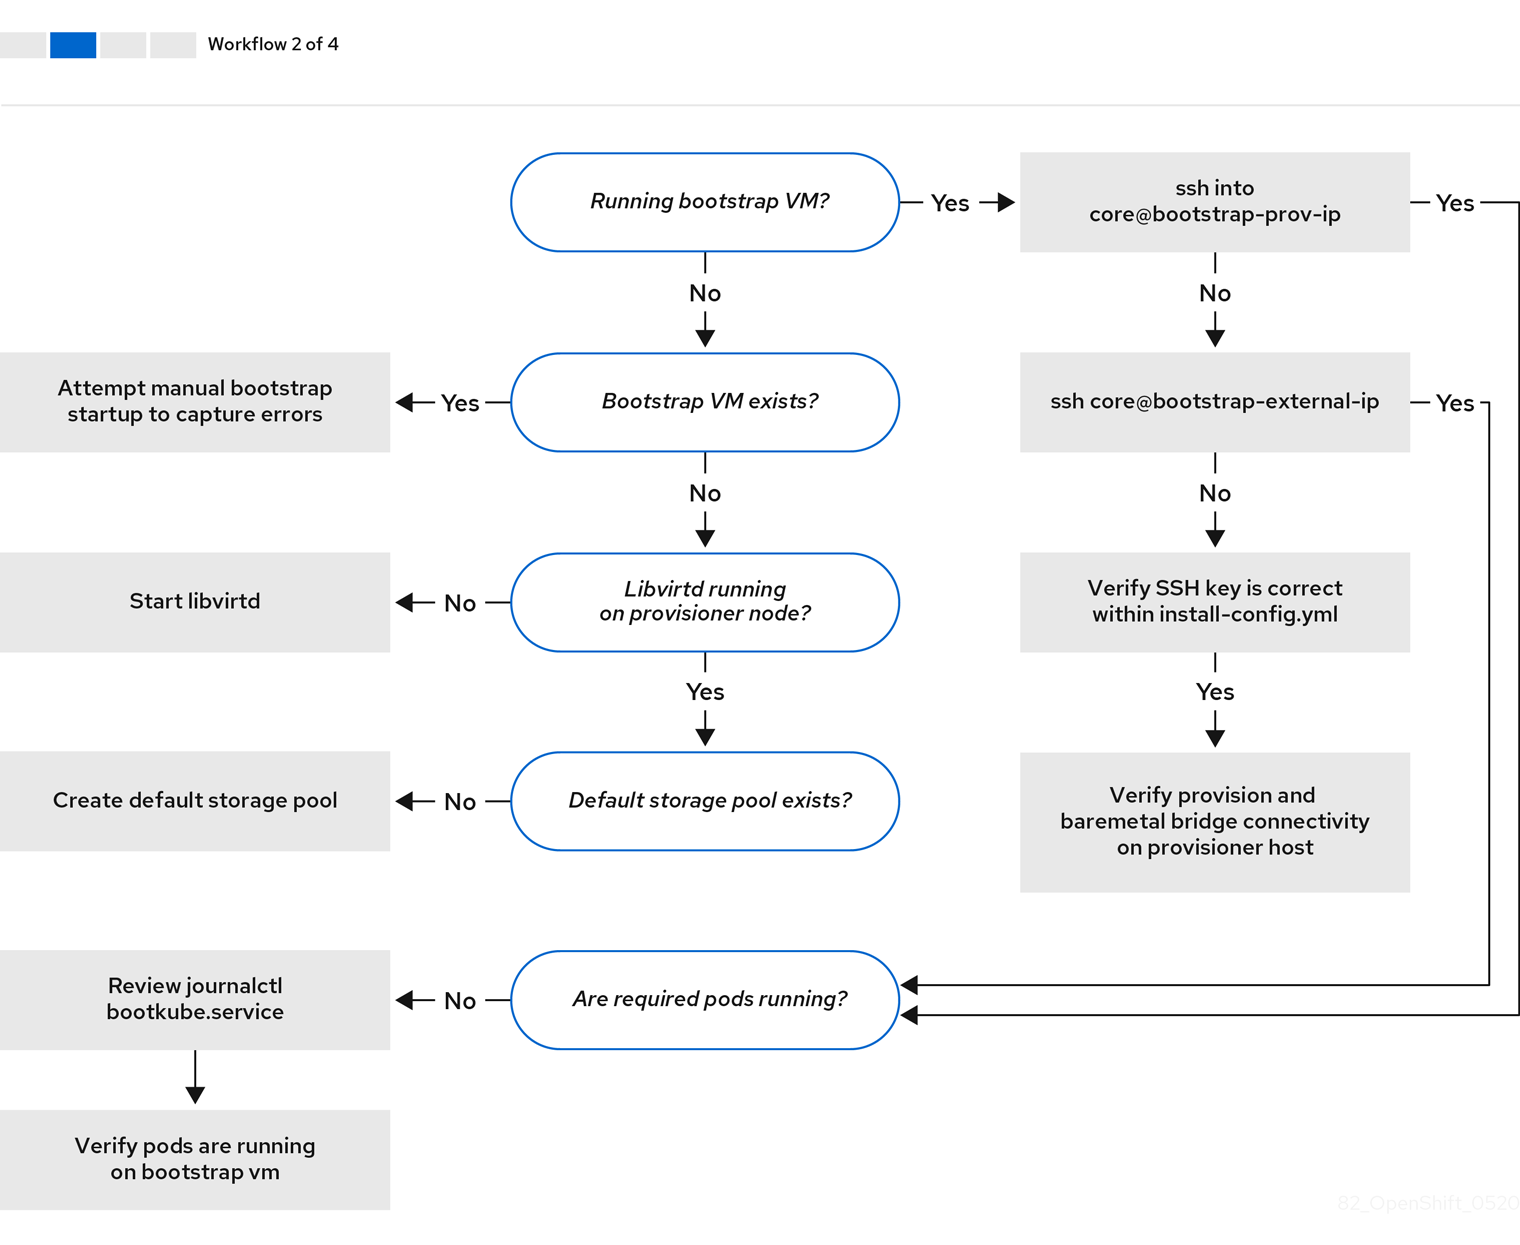
Workflow 2 of 4 illustrates a troubleshooting workflow for bootstrap VM issues, bootstrap VMs that cannot boot up the cluster nodes, and inspecting logs. When installing a OpenShift Container Platform cluster without the provisioning network, this workflow does not apply.
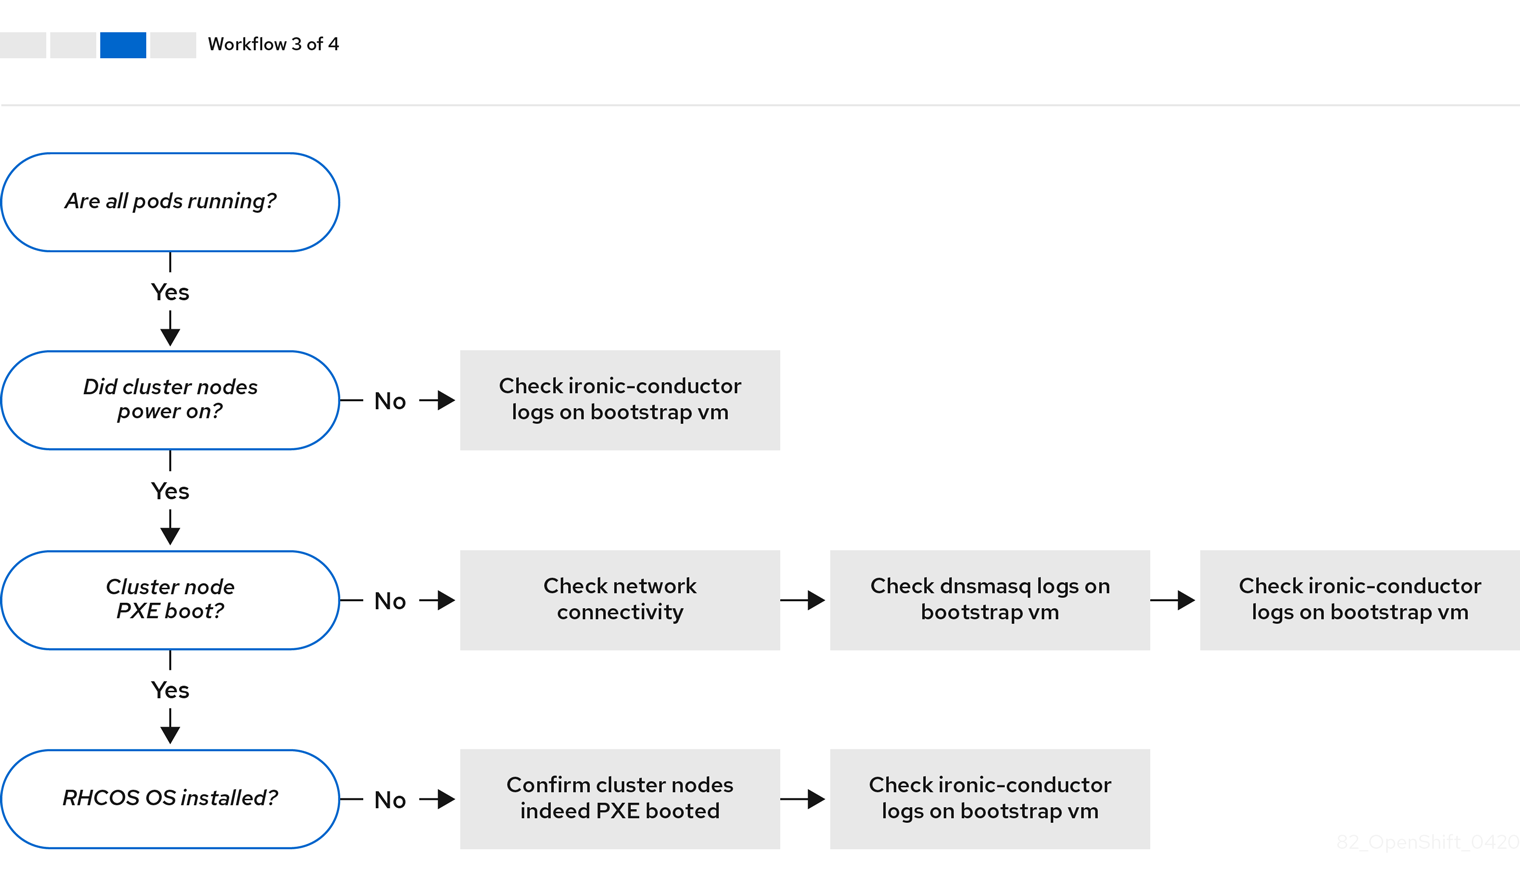
Workflow 3 of 4 illustrates a troubleshooting workflow for cluster nodes that will not PXE boot. If installing using RedFish Virtual Media, each node must meet minimum firmware requirements for the installer to deploy the node. See Firmware requirements for installing with virtual media in the Prerequisites section for additional details.
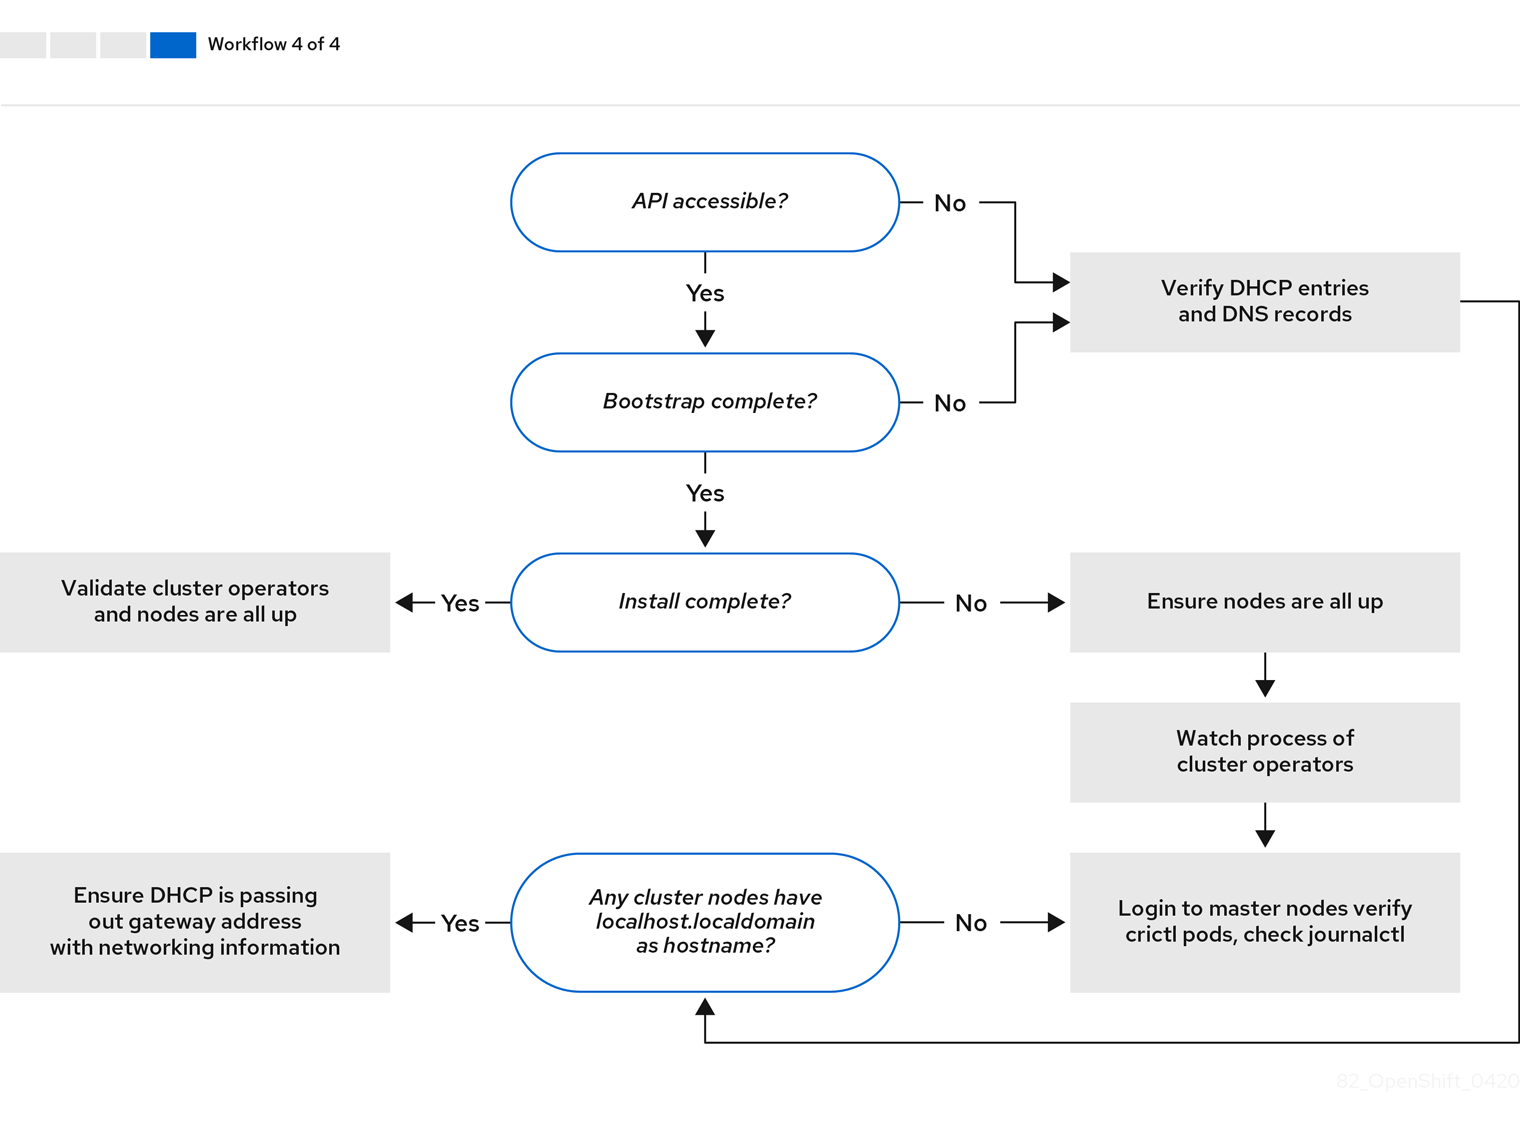
Workflow 4 of 4 illustrates a troubleshooting workflow from a non-accessible API to a validated installation.
8.5.2. Troubleshooting install-config.yaml
The install-config.yaml configuration file represents all of the nodes that are part of the OpenShift Container Platform cluster. The file contains the necessary options consisting of but not limited to apiVersion, baseDomain, imageContentSources and virtual IP addresses. If errors occur early in the deployment of the OpenShift Container Platform cluster, the errors are likely in the install-config.yaml configuration file.
Procedure
- Use the guidelines in YAML-tips.
- Verify the YAML syntax is correct using syntax-check.
Verify the Red Hat Enterprise Linux CoreOS (RHCOS) QEMU images are properly defined and accessible via the URL provided in the
install-config.yaml. For example:$ curl -s -o /dev/null -I -w "%{http_code}\n" http://webserver.example.com:8080/rhcos-44.81.202004250133-0-qemu.x86_64.qcow2.gz?sha256=7d884b46ee54fe87bbc3893bf2aa99af3b2d31f2e19ab5529c60636fbd0f1ce7If the output is
200, there is a valid response from the webserver storing the bootstrap VM image.
8.5.3. Bootstrap VM issues
The OpenShift Container Platform installer spawns a bootstrap node virtual machine, which handles provisioning the OpenShift Container Platform cluster nodes.
Procedure
About 10 to 15 minutes after triggering the installer, check to ensure the bootstrap VM is operational using the
virshcommand:$ sudo virsh list
 Id    Name                           State
 --------------------------------------------
 12    openshift-xf6fq-bootstrap      running
NoteThe name of the bootstrap VM is always the cluster name followed by a random set of characters and ending in the word "bootstrap."
If the bootstrap VM is not running after 10-15 minutes, troubleshoot why it is not running. Possible issues include:
Verify
libvirtdis running on the system:$ systemctl status libvirtd
● libvirtd.service - Virtualization daemon
   Loaded: loaded (/usr/lib/systemd/system/libvirtd.service; enabled; vendor preset: enabled)
   Active: active (running) since Tue 2020-03-03 21:21:07 UTC; 3 weeks 5 days ago
     Docs: man:libvirtd(8)
           https://libvirt.org
 Main PID: 9850 (libvirtd)
    Tasks: 20 (limit: 32768)
   Memory: 74.8M
   CGroup: /system.slice/libvirtd.service
           ├─ 9850 /usr/sbin/libvirtd
If the bootstrap VM is operational, log in to it.
Use the
virsh consolecommand to find the IP address of the bootstrap VM:$ sudo virsh console example.com
Connected to domain example.com
Escape character is ^]

Red Hat Enterprise Linux CoreOS 43.81.202001142154.0 (Ootpa) 4.3
SSH host key: SHA256:BRWJktXZgQQRY5zjuAV0IKZ4WM7i4TiUyMVanqu9Pqg (ED25519)
SSH host key: SHA256:7+iKGA7VtG5szmk2jB5gl/5EZ+SNcJ3a2g23o0lnIio (ECDSA)
SSH host key: SHA256:DH5VWhvhvagOTaLsYiVNse9ca+ZSW/30OOMed8rIGOc (RSA)
ens3:  fd35:919d:4042:2:c7ed:9a9f:a9ec:7
ens4: 172.22.0.2 fe80::1d05:e52e:be5d:263f
localhost login:
ImportantWhen deploying a OpenShift Container Platform cluster without the
provisioningnetwork, you must use a public IP address and not a private IP address like172.22.0.2.Once you obtain the IP address, log in to the bootstrap VM using the
sshcommand:NoteIn the console output of the previous step, you can use the IPv6 IP address provided by
ens3or the IPv4 IP provided byens4.$ ssh core@172.22.0.2
If you are not successful logging in to the bootstrap VM, you have likely encountered one of the following scenarios:
-
You cannot reach the
172.22.0.0/24network. Verify network connectivity on the provisioner host specifically around theprovisioningnetwork bridge. This will not be the issue if you are not using theprovisioningnetwork. -
You cannot reach the bootstrap VM via the public network. When attempting to SSH via
baremetalnetwork, verify connectivity on theprovisionerhost specifically around thebaremetalnetwork bridge. -
You encountered
Permission denied (publickey,password,keyboard-interactive). When attempting to access the bootstrap VM, aPermission deniederror might occur. Verify that the SSH key for the user attempting to log into the VM is set within theinstall-config.yamlfile.
8.5.3.1. Bootstrap VM cannot boot up the cluster nodes
During the deployment, it is possible for the bootstrap VM to fail to boot the cluster nodes, which prevents the VM from provisioning the nodes with the RHCOS image. This scenario can arise due to:
-
A problem with the
install-config.yamlfile. - Issues with out-of-band network access via the baremetal network.
To verify the issue, there are three containers related to ironic:
-
ironic-api -
ironic-conductor -
ironic-inspector
Procedure
Log in to the bootstrap VM:
$ ssh core@172.22.0.2
To check the container logs, execute the following:
[core@localhost ~]$ sudo podman logs -f <container-name>
Replace
<container-name>with one ofironic-api,ironic-conductor, orironic-inspector. If you encounter an issue where the control plane nodes are not booting up via PXE, check theironic-conductorpod. Theironic-conductorpod contains the most detail about the attempt to boot the cluster nodes, because it attempts to log in to the node over IPMI.
Potential reason
The cluster nodes might be in the ON state when deployment started.
Solution
Power off the OpenShift Container Platform cluster nodes before you begin the installation over IPMI:
$ ipmitool -I lanplus -U root -P <password> -H <out-of-band-ip> power off
8.5.3.2. Inspecting logs
When experiencing issues downloading or accessing the RHCOS images, first verify that the URL is correct in the install-config.yaml configuration file.
Example of internal webserver hosting RHCOS images
bootstrapOSImage: http://<ip:port>/rhcos-43.81.202001142154.0-qemu.x86_64.qcow2.gz?sha256=9d999f55ff1d44f7ed7c106508e5deecd04dc3c06095d34d36bf1cd127837e0c
clusterOSImage: http://<ip:port>/rhcos-43.81.202001142154.0-openstack.x86_64.qcow2.gz?sha256=a1bda656fa0892f7b936fdc6b6a6086bddaed5dafacedcd7a1e811abb78fe3b0
The ipa-downloader and coreos-downloader containers download resources from a webserver or the external quay.io registry, whichever the install-config.yaml configuration file specifies. Verify the following two containers are up and running and inspect their logs as needed:
-
ipa-downloader -
coreos-downloader
Procedure
Log in to the bootstrap VM:
$ ssh core@172.22.0.2
Check the status of the
ipa-downloaderandcoreos-downloadercontainers within the bootstrap VM:[core@localhost ~]$ sudo podman logs -f ipa-downloader
[core@localhost ~]$ sudo podman logs -f coreos-downloader
If the bootstrap VM cannot access the URL to the images, use the
curlcommand to verify that the VM can access the images.To inspect the
bootkubelogs that indicate if all the containers launched during the deployment phase, execute the following:[core@localhost ~]$ journalctl -xe
[core@localhost ~]$ journalctl -b -f -u bootkube.service
Verify all the pods, including
dnsmasq,mariadb,httpd, andironic, are running:[core@localhost ~]$ sudo podman ps
If there are issues with the pods, check the logs of the containers with issues. To check the log of the
ironic-api, execute the following:[core@localhost ~]$ sudo podman logs <ironic-api>
8.5.4. Cluster nodes will not PXE boot
When OpenShift Container Platform cluster nodes will not PXE boot, execute the following checks on the cluster nodes that will not PXE boot. This procedure does not apply when installing a OpenShift Container Platform cluster without the provisioning network.
Procedure
-
Check the network connectivity to the
provisioningnetwork. -
Ensure PXE is enabled on the NIC for the
provisioningnetwork and PXE is disabled for all other NICs. Verify that the
install-config.yamlconfiguration file has the proper hardware profile and boot MAC address for the NIC connected to theprovisioningnetwork. For example:control plane node settings
bootMACAddress: 24:6E:96:1B:96:90 # MAC of bootable provisioning NIC
hardwareProfile: default          #control plane node settings
Worker node settings
bootMACAddress: 24:6E:96:1B:96:90 # MAC of bootable provisioning NIC
hardwareProfile: unknown          #worker node settings
8.5.5. The API is not accessible
When the cluster is running and clients cannot access the API, domain name resolution issues might impede access to the API.
Procedure
Hostname Resolution: Check the cluster nodes to ensure they have a fully qualified domain name, and not just
localhost.localdomain. For example:$ hostname
If a hostname is not set, set the correct hostname. For example:
$ hostnamectl set-hostname <hostname>
Incorrect Name Resolution: Ensure that each node has the correct name resolution in the DNS server using
digandnslookup. For example:$ dig api.<cluster-name>.example.com
; <<>> DiG 9.11.4-P2-RedHat-9.11.4-26.P2.el8 <<>> api.<cluster-name>.example.com
;; global options: +cmd
;; Got answer:
;; ->>HEADER<<- opcode: QUERY, status: NOERROR, id: 37551
;; flags: qr aa rd ra; QUERY: 1, ANSWER: 1, AUTHORITY: 1, ADDITIONAL: 2

;; OPT PSEUDOSECTION:
; EDNS: version: 0, flags:; udp: 4096
; COOKIE: 866929d2f8e8563582af23f05ec44203d313e50948d43f60 (good)
;; QUESTION SECTION:
;api.<cluster-name>.example.com. IN A

;; ANSWER SECTION:
api.<cluster-name>.example.com. 10800 IN	A 10.19.13.86

;; AUTHORITY SECTION:
<cluster-name>.example.com. 10800 IN NS	<cluster-name>.example.com.

;; ADDITIONAL SECTION:
<cluster-name>.example.com. 10800 IN A	10.19.14.247

;; Query time: 0 msec
;; SERVER: 10.19.14.247#53(10.19.14.247)
;; WHEN: Tue May 19 20:30:59 UTC 2020
;; MSG SIZE  rcvd: 140
The output in the foregoing example indicates that the appropriate IP address for the
api.<cluster-name>.example.comVIP is10.19.13.86. This IP address should reside on thebaremetalnetwork.
8.5.6. Cleaning up previous installations
In the event of a previous failed deployment, remove the artifacts from the failed attempt before attempting to deploy OpenShift Container Platform again.
Procedure
Power off all bare metal nodes prior to installing the OpenShift Container Platform cluster:
$ ipmitool -I lanplus -U <user> -P <password> -H <management-server-ip> power off
Remove all old bootstrap resources if any are left over from a previous deployment attempt:
for i in $(sudo virsh list | tail -n +3 | grep bootstrap | awk {'print $2'});
do
  sudo virsh destroy $i;
  sudo virsh undefine $i;
  sudo virsh vol-delete $i --pool $i;
  sudo virsh vol-delete $i.ign --pool $i;
  sudo virsh pool-destroy $i;
  sudo virsh pool-undefine $i;
done
Remove the following from the
clusterconfigsdirectory to prevent Terraform from failing:$ rm -rf ~/clusterconfigs/auth ~/clusterconfigs/terraform* ~/clusterconfigs/tls ~/clusterconfigs/metadata.json
8.5.7. Issues with creating the registry
When creating a disconnected registry, you might encounter a "User Not Authorized" error when attempting to mirror the registry. This error might occur if you fail to append the new authentication to the existing pull-secret.txt file.
Procedure
Check to ensure authentication is successful:
$ /usr/local/bin/oc adm release mirror \ -a pull-secret-update.json --from=$UPSTREAM_REPO \ --to-release-image=$LOCAL_REG/$LOCAL_REPO:${VERSION} \ --to=$LOCAL_REG/$LOCAL_REPONoteExample output of the variables used to mirror the install images:
UPSTREAM_REPO=${RELEASE_IMAGE}
LOCAL_REG=<registry_FQDN>:<registry_port>
LOCAL_REPO='ocp4/openshift4'
The values of
RELEASE_IMAGEandVERSIONwere set during the Retrieving OpenShift Installer step of the Setting up the environment for an OpenShift installation section.After mirroring the registry, confirm that you can access it in your disconnected environment:
$ curl -k -u <user>:<password> https://registry.example.com:<registry-port>/v2/_catalog
{"repositories":["<Repo-Name>"]}
8.5.8. Miscellaneous issues
8.5.8.1. Addressing the runtime network not ready error
After the deployment of a cluster you might receive the following error:
`runtime network not ready: NetworkReady=false reason:NetworkPluginNotReady message:Network plugin returns error: Missing CNI default network`
The Cluster Network Operator is responsible for deploying the networking components in response to a special object created by the installer. It runs very early in the installation process, after the control plane (master) nodes have come up, but before the bootstrap control plane has been torn down. It can be indicative of more subtle installer issues, such as long delays in bringing up control plane (master) nodes or issues with apiserver communication.
Procedure
Inspect the pods in the
openshift-network-operatornamespace:$ oc get all -n openshift-network-operator
NAME                                    READY STATUS            RESTARTS   AGE
pod/network-operator-69dfd7b577-bg89v   0/1   ContainerCreating 0          149m
On the
provisionernode, determine that the network configuration exists:$ kubectl get network.config.openshift.io cluster -oyaml
apiVersion: config.openshift.io/v1
kind: Network
metadata:
  name: cluster
spec:
  serviceNetwork:
  - 172.30.0.0/16
  clusterNetwork:
  - cidr: 10.128.0.0/14
    hostPrefix: 23
  networkType: OpenShiftSDN
If it does not exist, the installer did not create it. To determine why the installer did not create it, execute the following:
$ openshift-install create manifests
Check that the
network-operatoris running:$ kubectl -n openshift-network-operator get pods
Retrieve the logs:
$ kubectl -n openshift-network-operator logs -l "name=network-operator"
On high availability clusters with three or more control plane (master) nodes, the Operator will perform leader election and all other Operators will sleep. For additional details, see Troubleshooting.
8.5.8.2. Cluster nodes not getting the correct IPv6 address over DHCP
If the cluster nodes are not getting the correct IPv6 address over DHCP, check the following:
- Ensure the reserved IPv6 addresses reside outside the DHCP range.
In the IP address reservation on the DHCP server, ensure the reservation specifies the correct DHCP Unique Identifier (DUID). For example:
# This is a dnsmasq dhcp reservation, 'id:00:03:00:01' is the client id and '18:db:f2:8c:d5:9f' is the MAC Address for the NIC
id:00:03:00:01:18:db:f2:8c:d5:9f,openshift-master-1,[2620:52:0:1302::6]
- Ensure that route announcements are working.
- Ensure that the DHCP server is listening on the required interfaces serving the IP address ranges.
8.5.8.3. Cluster nodes not getting the correct hostname over DHCP
During IPv6 deployment, cluster nodes must get their hostname over DHCP. Sometimes the NetworkManager does not assign the hostname immediately. A control plane (master) node might report an error such as:
Failed Units: 2
  NetworkManager-wait-online.service
  nodeip-configuration.service
This error indicates that the cluster node likely booted without first receiving a hostname from the DHCP server, which causes kubelet to boot with a localhost.localdomain hostname. To address the error, force the node to renew the hostname.
Procedure
Retrieve the
hostname:[core@master-X ~]$ hostname
If the hostname is
localhost, proceed with the following steps.NoteWhere
Xis the control plane node (also known as the master node) number.Force the cluster node to renew the DHCP lease:
[core@master-X ~]$ sudo nmcli con up "<bare-metal-nic>"
Replace
<bare-metal-nic>with the wired connection corresponding to thebaremetalnetwork.Check
hostnameagain:[core@master-X ~]$ hostname
If the hostname is still
localhost.localdomain, restartNetworkManager:[core@master-X ~]$ sudo systemctl restart NetworkManager
-
If the hostname is still
localhost.localdomain, wait a few minutes and check again. If the hostname remainslocalhost.localdomain, repeat the previous steps. Restart the
nodeip-configurationservice:[core@master-X ~]$ sudo systemctl restart nodeip-configuration.service
This service will reconfigure the
kubeletservice with the correct hostname references.Reload the unit files definition since the kubelet changed in the previous step:
[core@master-X ~]$ sudo systemctl daemon-reload
Restart the
kubeletservice:[core@master-X ~]$ sudo systemctl restart kubelet.service
Ensure
kubeletbooted with the correct hostname:[core@master-X ~]$ sudo journalctl -fu kubelet.service
If the cluster node is not getting the correct hostname over DHCP after the cluster is up and running, such as during a reboot, the cluster will have a pending csr. Do not approve a csr, or other issues might arise.
Addressing a csr
Get CSRs on the cluster:
$ oc get csr
Verify if a pending
csrcontainsSubject Name: localhost.localdomain:$ oc get csr <pending_csr> -o jsonpath='{.spec.request}' | base64 --decode | openssl req -noout -textRemove any
csrthat containsSubject Name: localhost.localdomain:$ oc delete csr <wrong_csr>
8.5.8.4. Routes do not reach endpoints
During the installation process, it is possible to encounter a Virtual Router Redundancy Protocol (VRRP) conflict. This conflict might occur if a previously used OpenShift Container Platform node that was once part of a cluster deployment using a specific cluster name is still running but not part of the current OpenShift Container Platform cluster deployment using that same cluster name. For example, a cluster was deployed using the cluster name openshift, deploying three control plane (master) nodes and three worker nodes. Later, a separate install uses the same cluster name openshift, but this redeployment only installed three control plane (master) nodes, leaving the three worker nodes from a previous deployment in an ON state. This might cause a Virtual Router Identifier (VRID) conflict and a VRRP conflict.
Get the route:
$ oc get route oauth-openshift
Check the service endpoint:
$ oc get svc oauth-openshift
NAME              TYPE        CLUSTER-IP      EXTERNAL-IP   PORT(S)   AGE
oauth-openshift   ClusterIP   172.30.19.162   <none>        443/TCP   59m
Attempt to reach the service from a control plane (master) node:
[core@master0 ~]$ curl -k https://172.30.19.162
{
  "kind": "Status",
  "apiVersion": "v1",
  "metadata": {
  },
  "status": "Failure",
  "message": "forbidden: User \"system:anonymous\" cannot get path \"/\"",
  "reason": "Forbidden",
  "details": {
  },
  "code": 403
Identify the
authentication-operatorerrors from theprovisionernode:$ oc logs deployment/authentication-operator -n openshift-authentication-operator
Event(v1.ObjectReference{Kind:"Deployment", Namespace:"openshift-authentication-operator", Name:"authentication-operator", UID:"225c5bd5-b368-439b-9155-5fd3c0459d98", APIVersion:"apps/v1", ResourceVersion:"", FieldPath:""}): type: 'Normal' reason: 'OperatorStatusChanged' Status for clusteroperator/authentication changed: Degraded message changed from "IngressStateEndpointsDegraded: All 2 endpoints for oauth-server are reporting"
Solution
- Ensure that the cluster name for every deployment is unique, ensuring no conflict.
- Turn off all the rogue nodes which are not part of the cluster deployment that are using the same cluster name. Otherwise, the authentication pod of the OpenShift Container Platform cluster might never start successfully.
8.5.8.5. Failed Ignition during Firstboot
During the Firstboot, the Ignition configuration may fail.
Procedure
Connect to the node where the Ignition configuration failed:
Failed Units: 1
  machine-config-daemon-firstboot.service
Restart the
machine-config-daemon-firstbootservice:[core@worker-X ~]$ sudo systemctl restart machine-config-daemon-firstboot.service
8.5.8.6. NTP out of sync
The deployment of OpenShift Container Platform clusters depends on NTP synchronized clocks among the cluster nodes. Without synchronized clocks, the deployment may fail due to clock drift if the time difference is greater than two seconds.
Procedure
Check for differences in the
AGEof the cluster nodes. For example:$ oc get nodes
NAME                         STATUS   ROLES    AGE   VERSION
master-0.cloud.example.com   Ready    master   145m   v1.16.2
master-1.cloud.example.com   Ready    master   135m   v1.16.2
master-2.cloud.example.com   Ready    master   145m   v1.16.2
worker-2.cloud.example.com   Ready    worker   100m   v1.16.2
Check for inconsistent timing delays due to clock drift. For example:
$ oc get bmh -n openshift-machine-api
master-1 error registering master-1 ipmi://<out-of-band-ip>
$ sudo timedatectl
               Local time: Tue 2020-03-10 18:20:02 UTC
           Universal time: Tue 2020-03-10 18:20:02 UTC
                 RTC time: Tue 2020-03-10 18:36:53
                Time zone: UTC (UTC, +0000)
System clock synchronized: no
              NTP service: active
          RTC in local TZ: no
Addressing clock drift in existing clusters
Create a
chrony.conffile and encode it asbase64string. For example:$ cat << EOF | base 64 server <NTP-server> iburst1 stratumweight 0 driftfile /var/lib/chrony/drift rtcsync makestep 10 3 bindcmdaddress 127.0.0.1 bindcmdaddress ::1 keyfile /etc/chrony.keys commandkey 1 generatecommandkey noclientlog logchange 0.5 logdir /var/log/chrony EOF- 1
- Replace
<NTP-server>with the IP address of the NTP server. Copy the output.
[text-in-base-64]
Create a
MachineConfigobject, replacing thebase64string with the[text-in-base-64]string generated in the output of the previous step. The following example adds the file to the control plane (master) nodes. You can modify the file for worker nodes or make an additional machine config for the worker role.$ cat << EOF > ./99_masters-chrony-configuration.yaml apiVersion: machineconfiguration.openshift.io/v1 kind: MachineConfig metadata: creationTimestamp: null labels: machineconfiguration.openshift.io/role: master name: 99-master-etc-chrony-conf spec: config: ignition: config: {} security: tls: {} timeouts: {} version: 3.1.0 networkd: {} passwd: {} storage: files: - contents: source: data:text/plain;charset=utf-8;base64,[text-in-base-64]1 group: name: root mode: 420 overwrite: true path: /etc/chrony.conf user: name: root osImageURL: ""- 1
- Replace
[text-in-base-64]with the base64 string.
Make a backup copy of the configuration file. For example:
$ cp 99_masters-chrony-configuration.yaml 99_masters-chrony-configuration.yaml.backup
Apply the configuration file:
$ oc apply -f ./masters-chrony-configuration.yaml
Ensure the
System clock synchronizedvalue is yes:$ sudo timedatectl
               Local time: Tue 2020-03-10 19:10:02 UTC
           Universal time: Tue 2020-03-10 19:10:02 UTC
                 RTC time: Tue 2020-03-10 19:36:53
                Time zone: UTC (UTC, +0000)
System clock synchronized: yes
              NTP service: active
          RTC in local TZ: no
To setup clock synchronization prior to deployment, generate the manifest files and add this file to the
openshiftdirectory. For example:$ cp chrony-masters.yaml ~/clusterconfigs/openshift/99_masters-chrony-configuration.yaml
Then, continue to create the cluster.
8.5.9. Reviewing the installation
After installation, ensure the installer deployed the nodes and pods successfully.
Procedure
When the OpenShift Container Platform cluster nodes are installed appropriately, the following
Readystate is seen within theSTATUScolumn:$ oc get nodes
NAME                   STATUS   ROLES           AGE  VERSION
master-0.example.com   Ready    master,worker   4h   v1.16.2
master-1.example.com   Ready    master,worker   4h   v1.16.2
master-2.example.com   Ready    master,worker   4h   v1.16.2
Confirm the installer deployed all pods successfully. The following command removes any pods that are still running or have completed as part of the output.
$ oc get pods --all-namespaces | grep -iv running | grep -iv complete