
Chapter 4. Helm CLI
4.1. Getting started with Helm 3
4.1.1. Understanding Helm
Helm is a software package manager that simplifies deployment of applications and services to OpenShift Container Platform clusters.
Helm uses a packaging format called charts. A Helm chart is a collection of files that describes the OpenShift Container Platform resources.
A running instance of the chart in a cluster is called a release. A new release is created every time a chart is installed on the cluster.
Each time a chart is installed, or a release is upgraded or rolled back, an incremental revision is created.
4.1.1.1. Key features
Helm provides the ability to:
- Search through a large collection of charts stored in the chart repository.
- Modify existing charts.
- Create your own charts with OpenShift Container Platform or Kubernetes resources.
- Package and share your applications as charts.
4.1.2. Installing Helm
The following section describes how to install Helm on different platforms using the CLI.
You can also find the URL to the latest binaries from the OpenShift Container Platform web console by clicking the ? icon in the upper-right corner and selecting Command Line Tools.
Prerequisites
- You have installed Go, version 1.13 or higher.
4.1.2.1. On Linux
Download the Helm binary and add it to your path:
# curl -L https://mirror.openshift.com/pub/openshift-v4/clients/helm/latest/helm-linux-amd64 -o /usr/local/bin/helm
Make the binary file executable:
# chmod +x /usr/local/bin/helm
Check the installed version:
$ helm version
Example output
version.BuildInfo{Version:"v3.0", GitCommit:"b31719aab7963acf4887a1c1e6d5e53378e34d93", GitTreeState:"clean", GoVersion:"go1.13.4"}
4.1.2.2. On Windows 7/8
-
Download the latest
.exefile and put in a directory of your preference. - Right click Start and click Control Panel.
- Select System and Security and then click System.
- From the menu on the left, select Advanced systems settings and click Environment Variables at the bottom.
- Select Path from the Variable section and click Edit.
-
Click New and type the path to the folder with the
.exefile into the field or click Browse and select the directory, and click OK.
4.1.2.3. On Windows 10
-
Download the latest
.exefile and put in a directory of your preference. -
Click Search and type
envorenvironment. - Select Edit environment variables for your account.
- Select Path from the Variable section and click Edit.
- Click New and type the path to the directory with the exe file into the field or click Browse and select the directory, and click OK.
4.1.2.4. On MacOS
Download the Helm binary and add it to your path:
# curl -L https://mirror.openshift.com/pub/openshift-v4/clients/helm/latest/helm-darwin-amd64 -o /usr/local/bin/helm
Make the binary file executable:
# chmod +x /usr/local/bin/helm
Check the installed version:
$ helm version
Example output
version.BuildInfo{Version:"v3.0", GitCommit:"b31719aab7963acf4887a1c1e6d5e53378e34d93", GitTreeState:"clean", GoVersion:"go1.13.4"}
4.1.3. Installing a Helm chart on an OpenShift Container Platform cluster
Prerequisites
- You have a running OpenShift Container Platform cluster and you have logged into it.
- You have installed Helm.
Procedure
Create a new project:
$ oc new-project mysql
Add a repository of Helm charts to your local Helm client:
$ helm repo add stable https://kubernetes-charts.storage.googleapis.com/
Example output
"stable" has been added to your repositories
Update the repository:
$ helm repo update
Install an example MySQL chart:
$ helm install example-mysql stable/mysql
Verify that the chart has installed successfully:
$ helm list
Example output
NAME NAMESPACE REVISION UPDATED STATUS CHART APP VERSION
example-mysql mysql 1 2019-12-05 15:06:51.379134163 -0500 EST deployed mysql-1.5.0 5.7.27
4.1.4. Creating a custom Helm chart on OpenShift Container Platform
Procedure
Create a new project:
$ oc new-project nodejs-ex-k
Download an example Node.js chart that contains OpenShift Container Platform objects:
$ git clone https://github.com/redhat-developer/redhat-helm-charts
Go to the directory with the sample chart:
$ cd redhat-helm-charts/alpha/nodejs-ex-k/
Edit the
Chart.yamlfile and add a description of your chart:apiVersion: v2 1 name: nodejs-ex-k 2 description: A Helm chart for OpenShift 3 icon: https://static.redhat.com/libs/redhat/brand-assets/latest/corp/logo.svg 4
Verify that the chart is formatted properly:
$ helm lint
Example output
[INFO] Chart.yaml: icon is recommended

1 chart(s) linted, 0 chart(s) failed
Navigate to the previous directory level:
$ cd ..
Install the chart:
$ helm install nodejs-chart nodejs-ex-k
Verify that the chart has installed successfully:
$ helm list
Example output
NAME NAMESPACE REVISION UPDATED STATUS CHART APP VERSION
nodejs-chart nodejs-ex-k 1 2019-12-05 15:06:51.379134163 -0500 EST deployed nodejs-0.1.0  1.16.0
4.2. Configuring custom Helm chart repositories
The Developer Catalog, in the Developer perspective of the web console, displays the Helm charts available in the cluster. By default, it lists the Helm charts from the Red Hat Helm chart repository. For a list of the charts see the Red Hat Helm index file.
As a cluster administrator, you can add multiple Helm chart repositories, apart from the default one, and display the Helm charts from these repositories in the Developer Catalog.
4.2.1. Adding custom Helm chart repositories
As a cluster administrator, you can add custom Helm chart repositories to your cluster and enable access to the Helm charts from these repositories in the Developer Catalog.
Procedure
To add a new Helm Chart Repository, you must add the Helm Chart Repository custom resource (CR) to your cluster.
Sample Helm Chart Repository CR
apiVersion: helm.openshift.io/v1beta1
kind: HelmChartRepository
metadata:
  name: <name>
spec:
 # optional name that might be used by console
 # name: <chart-display-name>
  connectionConfig:
    url: <helm-chart-repository-url>
For example, to add an Azure sample chart repository, run:
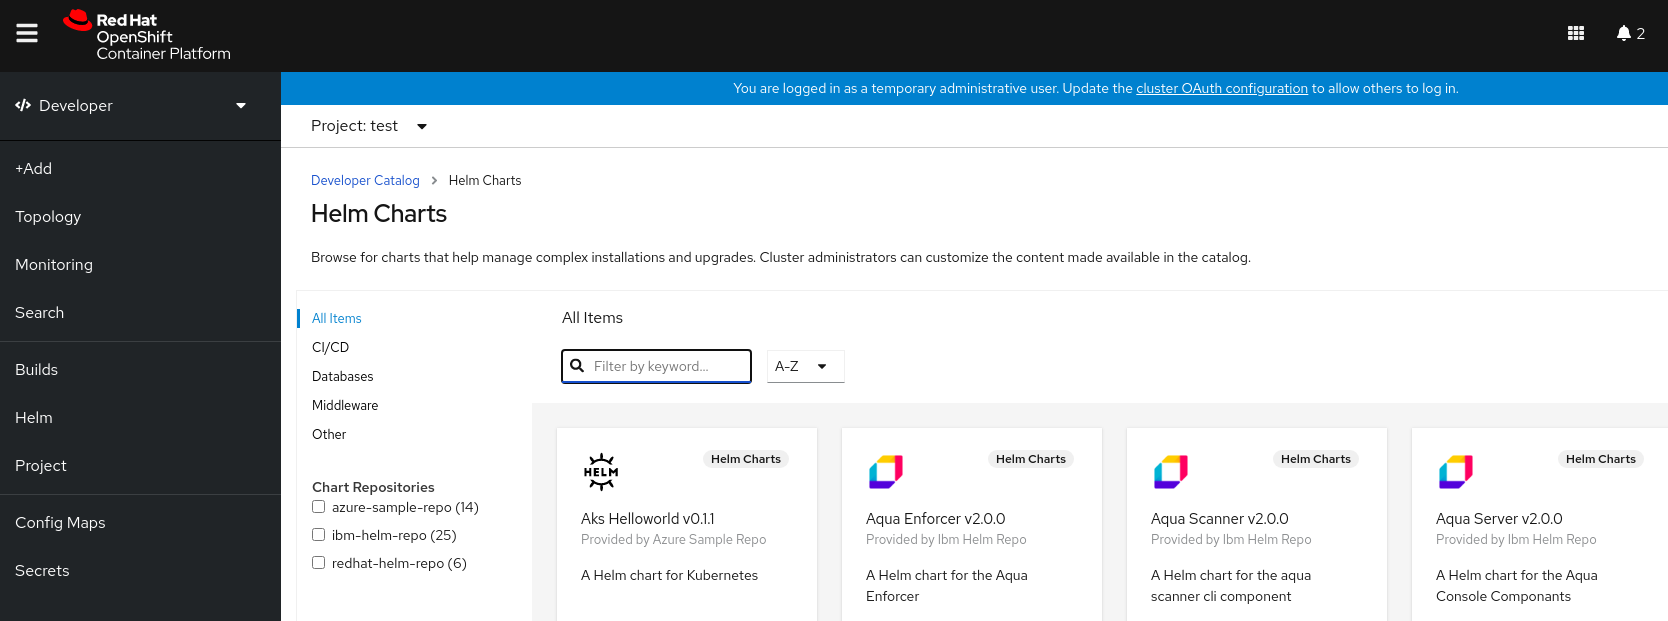
$ cat <<EOF | oc apply -f -
apiVersion: helm.openshift.io/v1beta1
kind: HelmChartRepository
metadata:
  name: azure-sample-repo
spec:
  name: azure-sample-repo
  connectionConfig:
    url: https://raw.githubusercontent.com/Azure-Samples/helm-charts/master/docs
EOF
Navigate to the Developer Catalog in the web console to verify that the Helm charts from the chart repository are displayed.
For example, use the Chart repositories filter to search for a Helm chart from the repository.
Figure 4.1. Chart repositories filter
 Note
NoteIf a cluster administrator removes all of the chart repositories, then you cannot view the Helm option in the +Add view, Developer Catalog, and left navigation panel.
4.2.2. Creating credentials and CA certificates to add Helm chart repositories
Some Helm chart repositories need credentials and custom certificate authority (CA) certificates to connect to it. You can use the web console as well as the CLI to add credentials and certificates.
Procedure
To configure the credentials and certificates, and then add a Helm chart repository using the CLI:
In the
openshift-confignamespace, create aConfigMapobject with a custom CA certificate in PEM encoded format, and store it under theca-bundle.crtkey within the config map:$ oc create configmap helm-ca-cert \ --from-file=ca-bundle.crt=/path/to/certs/ca.crt \ -n openshift-config
In the
openshift-confignamespace, create aSecretobject to add the client TLS configurations:$ oc create secret generic helm-tls-configs \ --from-file=tls.crt=/path/to/certs/client.crt \ --from-file=tls.key=/path/to/certs//client.key \ -n openshift-config
Note that the client certificate and key must be in PEM encoded format and stored under the keys
tls.crtandtls.key, respectively.Add the Helm repository as follows:
$ cat <<EOF | oc apply -f -
apiVersion: helm.openshift.io/v1beta1
kind: HelmChartRepository
metadata:
  name: <helm-repository>
spec:
  name: <helm-repository>
  connectionConfig:
    url: <URL for the Helm repository>
    tlsConfig:
        name: helm-tls-configs
    ca:
	name: helm-ca-cert
EOF
The
ConfigMapandSecretare consumed in the HelmChartRepository CR using thetlsConfigandcafields. These certificates are used to connect to the Helm repository URL.By default, all authenticated users have access to all configured charts. However, for chart repositories where certificates are needed, you must provide users with read access to the
helm-ca-certconfig map andhelm-tls-configssecret in theopenshift-confignamespace, as follows:$ cat <<EOF | kubectl apply -f - apiVersion: rbac.authorization.k8s.io/v1 kind: Role metadata: namespace: openshift-config name: helm-chartrepos-tls-conf-viewer rules: - apiGroups: [""] resources: ["configmaps"] resourceNames: ["helm-ca-cert"] verbs: ["get"] - apiGroups: [""] resources: ["secrets"] resourceNames: ["helm-tls-configs"] verbs: ["get"] --- kind: RoleBinding apiVersion: rbac.authorization.k8s.io/v1 metadata: namespace: openshift-config name: helm-chartrepos-tls-conf-viewer subjects: - kind: Group apiGroup: rbac.authorization.k8s.io name: 'system:authenticated' roleRef: apiGroup: rbac.authorization.k8s.io kind: Role name: helm-chartrepos-tls-conf-viewer EOF
4.3. Disabling Helm hart repositories
As a cluster administrator, you can remove Helm chart repositories in your cluster so they are no longer visible in the Developer Catalog.
4.3.1. Disabling Helm Chart repository in the cluster
You can disable Helm Charts in the catalog by adding the disabled property in the HelmChartRepository custom resource.
Procedure
To disable a Helm Chart repository by using CLI, add the
disabled: trueflag to the custom resource. For example, to remove an Azure sample chart repository, run:$ cat <<EOF | oc apply -f - apiVersion: helm.openshift.io/v1beta1 kind: HelmChartRepository metadata: name: azure-sample-repo spec: connectionConfig: url:https://raw.githubusercontent.com/Azure-Samples/helm-charts/master/docs disabled: true EOF
To disable a recently added Helm Chart repository by using Web Console:
-
Go to Custom Resource Definitions and search for the
HelmChartRepositorycustom resource. - Go to Instances, find the repository you want to disable, and click its name.
Go to the YAML tab, add the
disabled: trueflag in thespecsection, and clickSave.Example
spec:
  connectionConfig:
    url: <url-of-the-repositoru-to-be-disabled>
  disabled: true
The repository is now disabled and will not appear in the catalog.
-
Go to Custom Resource Definitions and search for the