
Chapter 11. Event sources
11.1. Getting started with event sources
An event source is an object that links an event producer with an event sink, or consumer. A sink can be a Knative service, channel, or broker that receives events from an event source.
11.1.1. Creating event sources
Currently, OpenShift Serverless supports the following event source types:
- API server source
-
Connects a sink to the Kubernetes API server by creating an
APIServerSourceobject. - Ping source
-
Periodically sends ping events with a constant payload. A ping source can be used as a timer, and is created as a
PingSourceobject.
Sink binding is also supported, which allows you to connect core Kubernetes resources such as Deployment, Job, or StatefulSet with a sink.
You can create and manage Knative event sources using the Developer perspective in the OpenShift Container Platform web console, the kn CLI, or by applying YAML files.
- Create an API server source.
- Create a ping source.
- Create a sink binding.
11.1.2. Additional resources
- For more information about eventing workflows using OpenShift Serverless, see Knative Eventing architecture.
11.2. Using the Knative CLI to list event sources and event source types
You can use the kn CLI to list and manage available event sources or event source types for use with Knative Eventing.
Currently, kn supports management of the following event source types:
- API server source
-
Connects a sink to the Kubernetes API server by creating an
APIServerSourceobject. - Ping source
-
Periodically sends ping events with a constant payload. A ping source can be used as a timer, and is created as a
PingSourceobject.
11.2.1. Listing available event source types using the Knative CLI
You can list the available event source types in the terminal by using the following command:
$ kn source list-types
The default output for this command will look like:
TYPE              NAME                                            DESCRIPTION
ApiServerSource   apiserversources.sources.knative.dev            Watch and send Kubernetes API events to a sink
PingSource        pingsources.sources.knative.dev                 Periodically send ping events to a sink
SinkBinding       sinkbindings.sources.knative.dev                Binding for connecting a PodSpecable to a sink
It is also possible to list available event source types in YAML format:
$ kn source list-types -o yaml
11.2.2. Listing available event sources using the Knative CLI
You can list the available event sources in the terminal by entering the following command:
$ kn source list
Example output
NAME   TYPE              RESOURCE                               SINK         READY
a1     ApiServerSource   apiserversources.sources.knative.dev   ksvc:eshow2   True
b1     SinkBinding       sinkbindings.sources.knative.dev       ksvc:eshow3   False
p1     PingSource        pingsources.sources.knative.dev        ksvc:eshow1   True
You can list event sources of a specific type only, by using the --type flag.
$ kn source list --type PingSource
Example output
NAME   TYPE              RESOURCE                               SINK         READY
p1     PingSource        pingsources.sources.knative.dev        ksvc:eshow1   True
11.2.3. Next steps
- See the documentation on Using the API server source.
- See the documentation on Using a ping source.
11.3. Using the API server source
An API server source is an event source that can be used to connect an event sink, such as a Knative service, to the Kubernetes API server. An API server source watches for Kubernetes events and forwards them to the Knative Eventing broker.
11.3.1. Prerequisites
- You must have a current installation of OpenShift Serverless, including Knative Serving and Eventing, in your OpenShift Container Platform cluster. This can be installed by a cluster administrator.
- Event sources need a service to use as an event sink. The sink is the service or application that events are sent to from the event source.
- You must create or update a service account, role and role binding for the event source.
Some of the following procedures require you to create YAML files.
If you change the names of the YAML files from those used in the examples, you must ensure that you also update the corresponding CLI commands.
11.3.2. Creating a service account, role, and binding for event sources
Procedure
Create a service account, role, and role binding for the event source by creating a file named
authentication.yamland copying the following sample code into it:apiVersion: v1 kind: ServiceAccount metadata: name: events-sa namespace: default 1 --- apiVersion: rbac.authorization.k8s.io/v1 kind: Role metadata: name: event-watcher namespace: default 2 rules: - apiGroups: - "" resources: - events verbs: - get - list - watch --- apiVersion: rbac.authorization.k8s.io/v1 kind: RoleBinding metadata: name: k8s-ra-event-watcher namespace: default 3 roleRef: apiGroup: rbac.authorization.k8s.io kind: Role name: event-watcher subjects: - kind: ServiceAccount name: events-sa namespace: default 4
NoteIf you want to re-use an existing service account with the appropriate permissions, you must modify the
authentication.yamlfor that service account.Create the service account, role binding, and cluster binding by entering the following command:
$ oc apply --filename authentication.yaml
11.3.3. Creating an ApiServerSource event source using the Developer perspective
Procedure
- Navigate to the Add page and select Event Source.
In the Event Sources page, select ApiServerSource in the Type section.

Configure the ApiServerSource settings:
-
Enter
v1as the APIVERSION, andEventas the KIND. Select the Service Account Name for the service account that you created.
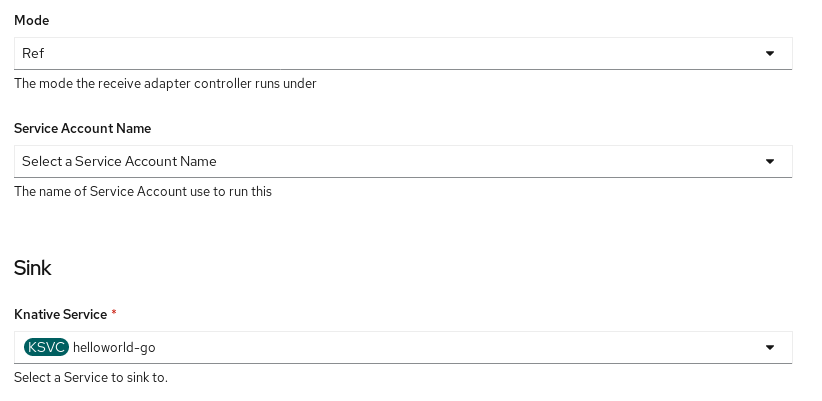
- Select the targeted Knative service from the dropdown menu in Sink → Knative Service.
-
Enter
- Click Create.
Verification
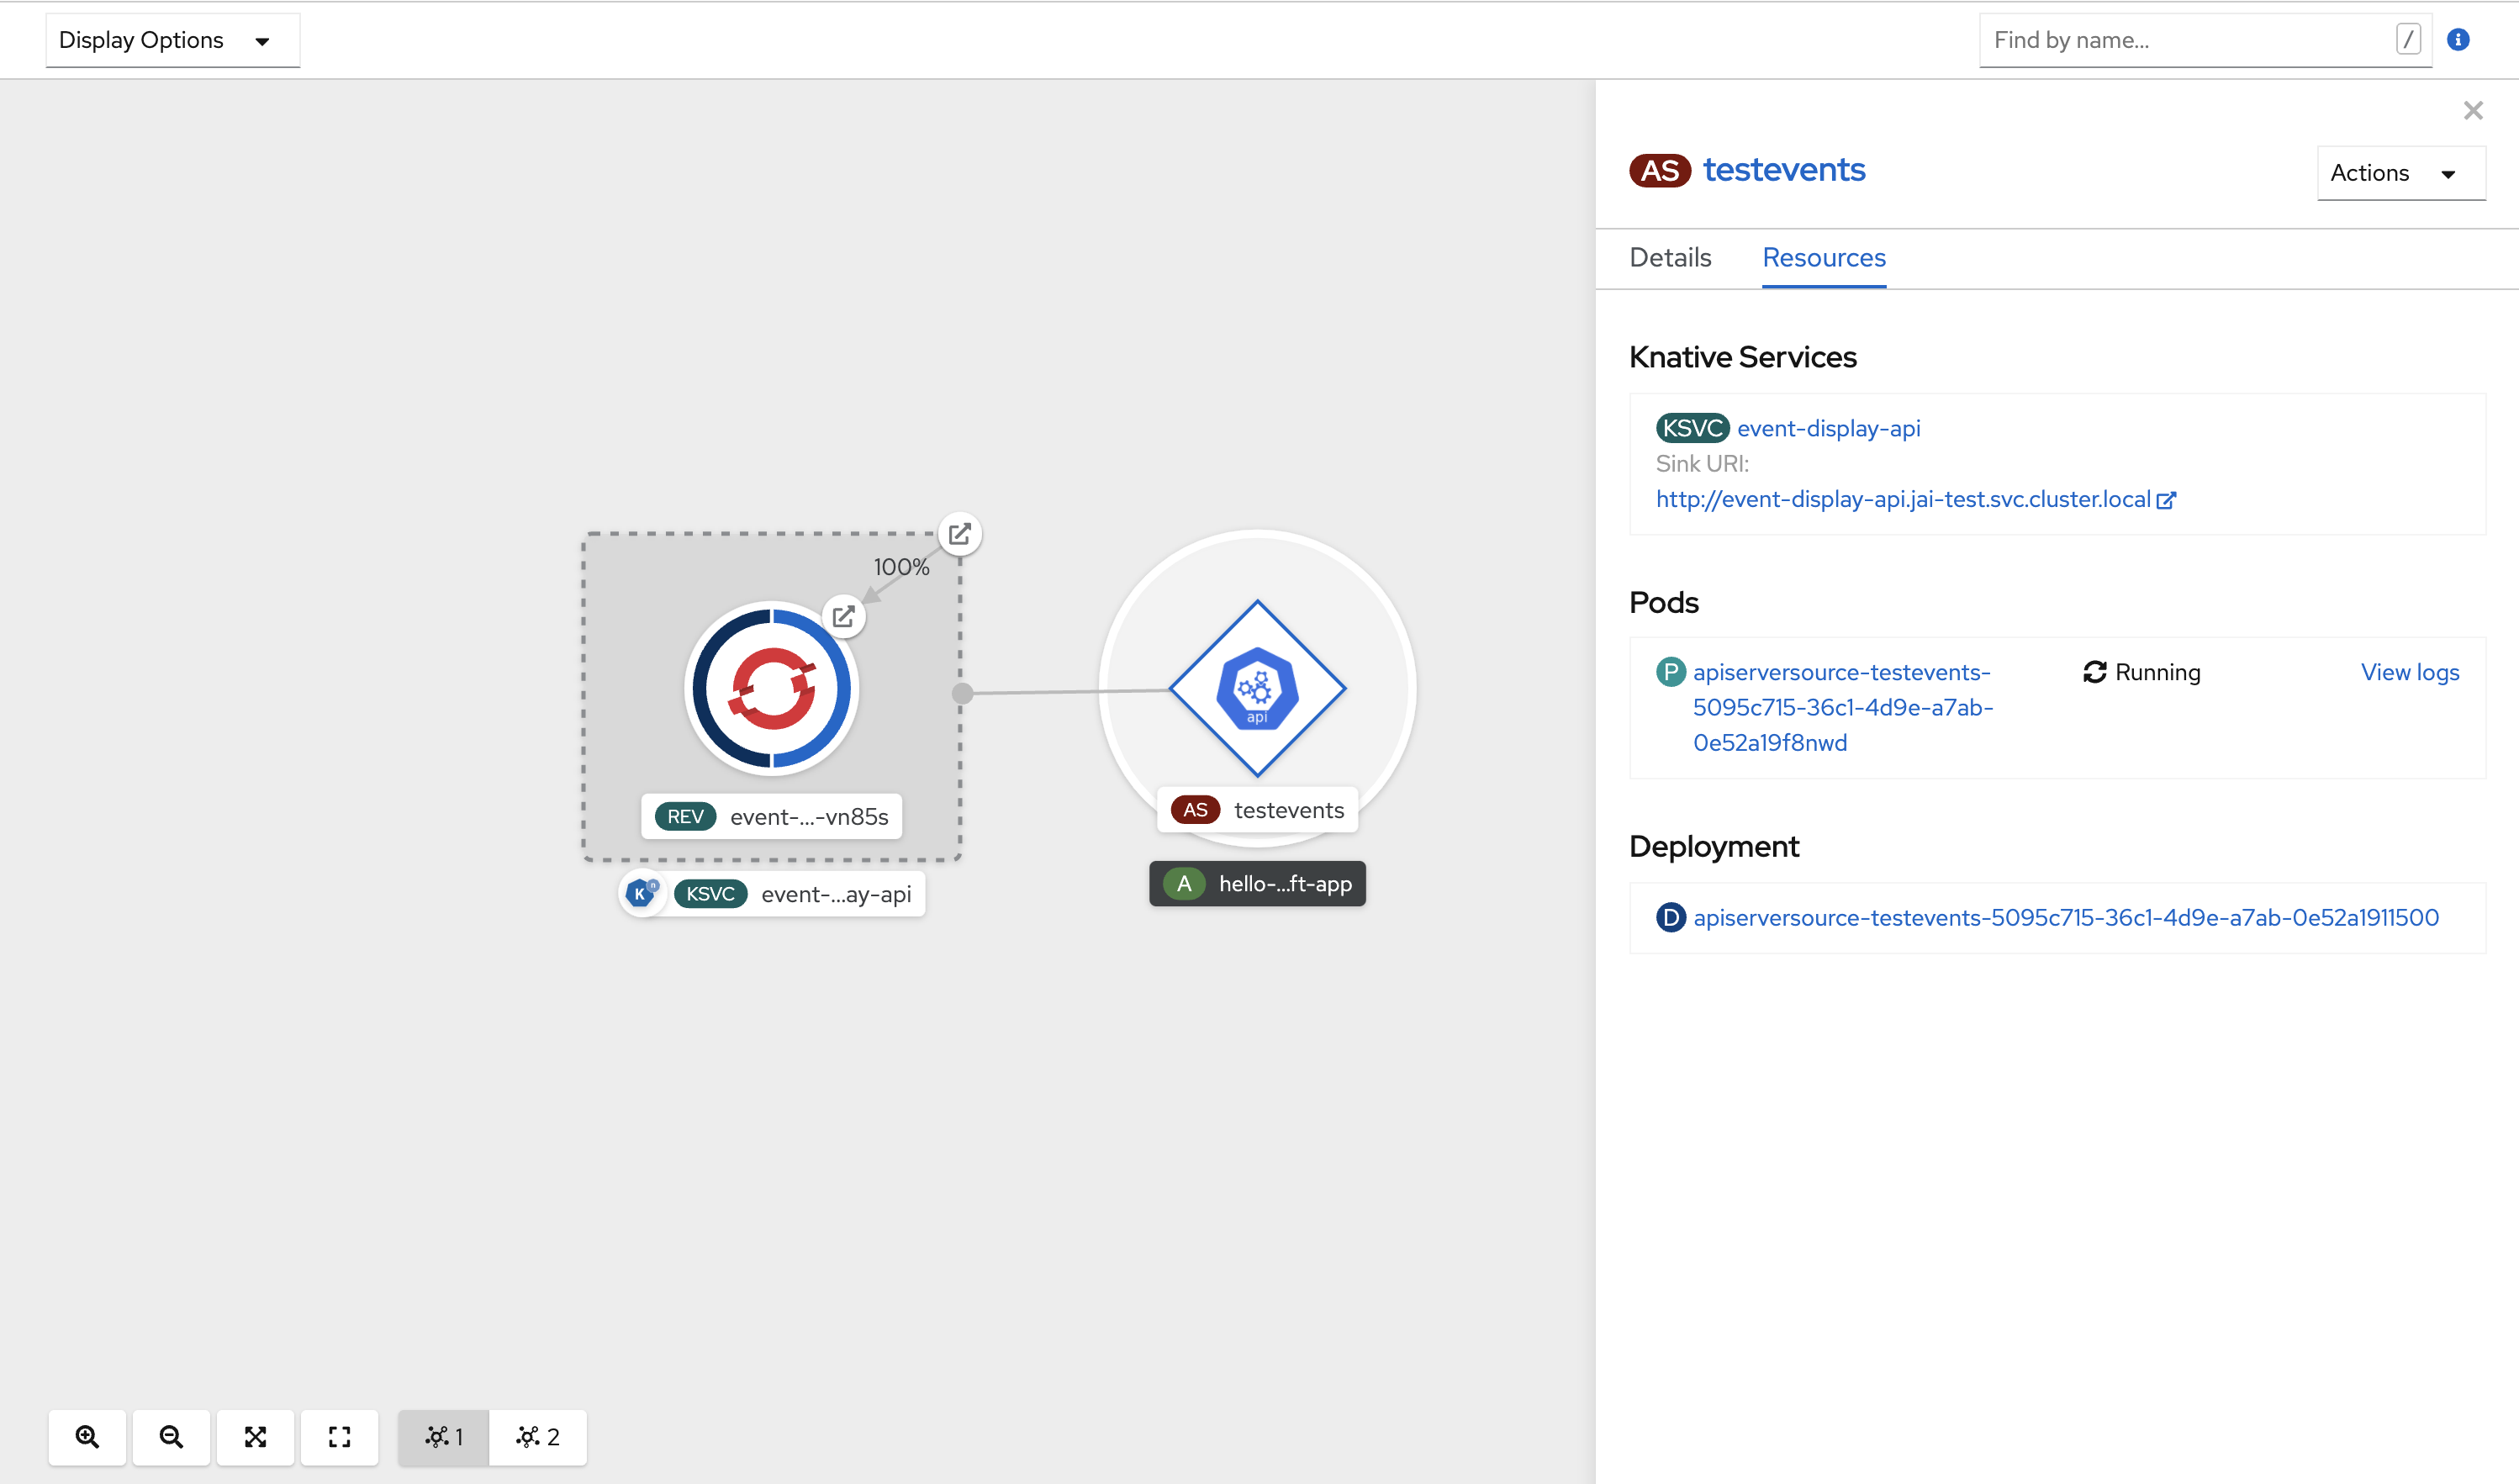
After you have created the ApiServerSource, you will see it connected to the service it is sinked to in the Topology view.
11.3.4. Deleting the ApiServerSource
Procedure
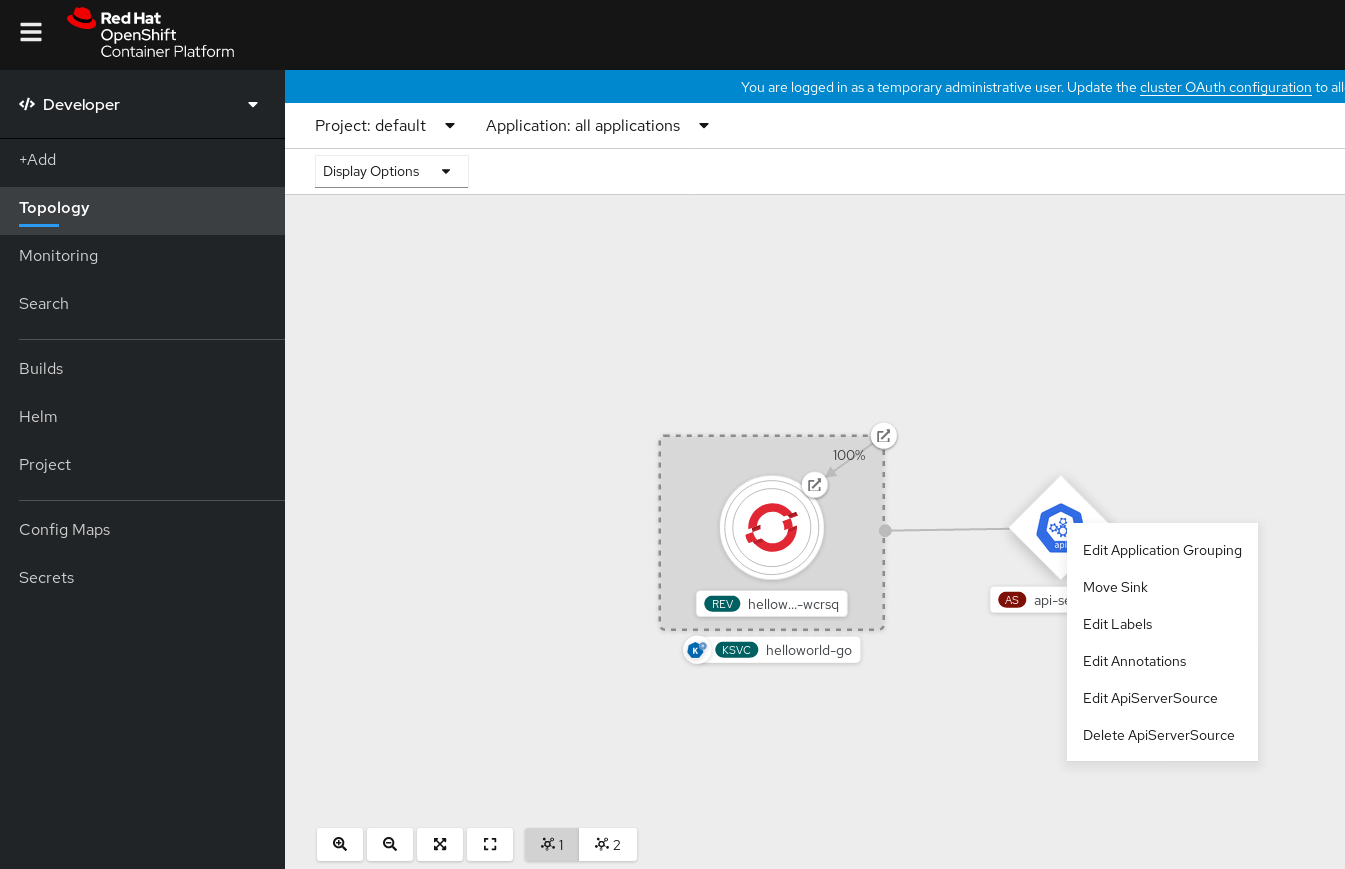
- Navigate to the Topology view.
Right-click the ApiServerSource and select Delete ApiServerSource.
11.3.5. Using the API server source with the Knative CLI
This section describes the steps required to create an ApiServerSource object using kn commands.
Prerequisites
- Knative Serving and Eventing are installed on your cluster.
-
You have created the
defaultbroker in the same namespace that the API server source will be installed in. -
You have the
knCLI installed.
Procedure
Create a service account, role, and role binding for the
ApiServerSourceobject.You can do this by creating a file named
authentication.yamland copying the following sample code into it:apiVersion: v1 kind: ServiceAccount metadata: name: events-sa namespace: default 1 --- apiVersion: rbac.authorization.k8s.io/v1 kind: Role metadata: name: event-watcher namespace: default 2 rules: - apiGroups: - "" resources: - events verbs: - get - list - watch --- apiVersion: rbac.authorization.k8s.io/v1 kind: RoleBinding metadata: name: k8s-ra-event-watcher namespace: default 3 roleRef: apiGroup: rbac.authorization.k8s.io kind: Role name: event-watcher subjects: - kind: ServiceAccount name: events-sa namespace: default 4
NoteIf you want to reuse an existing service account with the appropriate permissions, you must modify the
authentication.yamlfile for that service account.Create the service account, role binding, and cluster binding:
$ oc apply -f authentication.yaml
Create an
ApiServerSourceobject that uses a broker as an event sink:$ kn source apiserver create <event_source_name> --sink broker:<broker_name> --resource "event:v1" --service-account <service_account_name> --mode Resource
Create a Knative service that dumps incoming messages to its log:
$ kn service create <service_name> --image quay.io/openshift-knative/knative-eventing-sources-event-display:latest
Create a trigger to filter events from the
defaultbroker to the service:$ kn trigger create <trigger_name> --sink ksvc:<service_name>
Create events by launching a pod in the default namespace:
$ oc create deployment hello-node --image=quay.io/openshift-knative/knative-eventing-sources-event-display
Check that the controller is mapped correctly by inspecting the output generated by the following command:
$ kn source apiserver describe testevents
Example output
Name:                testevents
Namespace:           default
Annotations:         sources.knative.dev/creator=developer, sources.knative.dev/lastModifier=developer
Age:                 3m
ServiceAccountName:  events-sa
Mode:                Resource
Sink:
  Name:       default
  Namespace:  default
  Kind:       Broker (eventing.knative.dev/v1)
Resources:
  Kind:        event (v1)
  Controller:  false
Conditions:
  OK TYPE                     AGE REASON
  ++ Ready                     3m
  ++ Deployed                  3m
  ++ SinkProvided              3m
  ++ SufficientPermissions     3m
  ++ EventTypesProvided        3m
Verification
You can verify that the Kubernetes events were sent to Knative by looking at the message dumper function logs.
Get the pods:
$ oc get pods
View the message dumper function logs for the pods:
$ oc logs $(oc get pod -o name | grep event-display) -c user-container
Example output
☁️  cloudevents.Event
Validation: valid
Context Attributes,
  specversion: 1.0
  type: dev.knative.apiserver.resource.update
  datacontenttype: application/json
  ...
Data,
  {
    "apiVersion": "v1",
    "involvedObject": {
      "apiVersion": "v1",
      "fieldPath": "spec.containers{hello-node}",
      "kind": "Pod",
      "name": "hello-node",
      "namespace": "default",
       .....
    },
    "kind": "Event",
    "message": "Started container",
    "metadata": {
      "name": "hello-node.159d7608e3a3572c",
      "namespace": "default",
      ....
    },
    "reason": "Started",
    ...
  }
11.3.6. Deleting an API server source using the Knative CLI
This section describes the steps used to delete the ApiServerSource object, trigger, service, service account, cluster role, and cluster binding using the kn and oc commands.
Prerequisites
-
You must have the
knCLI installed.
Procedure
Delete the trigger:
$ kn trigger delete <trigger_name>
Delete the service:
$ kn service delete <service_name>
Delete the API server source:
$ kn source apiserver delete <source_name>
- Delete the service account, cluster role, and cluster binding:
$ oc delete -f authentication.yaml
11.3.7. Creating an API server source using YAML files
This guide describes the steps required to create an ApiServerSource object using YAML files.
Prerequisites
- Knative Serving and Eventing are installed on your cluster.
-
You have created the
defaultbroker in the same namespace as the one defined in theApiServerSourceobject.
Procedure
To create a service account, role, and role binding for the API server source, create a file named
authentication.yamland copy the following sample code into it:apiVersion: v1 kind: ServiceAccount metadata: name: events-sa namespace: default 1 --- apiVersion: rbac.authorization.k8s.io/v1 kind: Role metadata: name: event-watcher namespace: default 2 rules: - apiGroups: - "" resources: - events verbs: - get - list - watch --- apiVersion: rbac.authorization.k8s.io/v1 kind: RoleBinding metadata: name: k8s-ra-event-watcher namespace: default 3 roleRef: apiGroup: rbac.authorization.k8s.io kind: Role name: event-watcher subjects: - kind: ServiceAccount name: events-sa namespace: default 4
NoteIf you want to re-use an existing service account with the appropriate permissions, you must modify the
authentication.yamlfor that service account.After you have created the
authentication.yamlfile, apply it:$ oc apply -f authentication.yaml
To create an
ApiServerSourceobject, create a file namedk8s-events.yamland copy the following sample code into it:apiVersion: sources.knative.dev/v1alpha1 kind: ApiServerSource metadata: name: testevents spec: serviceAccountName: events-sa mode: Resource resources: - apiVersion: v1 kind: Event sink: ref: apiVersion: eventing.knative.dev/v1 kind: Broker name: defaultAfter you have created the
k8s-events.yamlfile, apply it:$ oc apply -f k8s-events.yaml
To check that the API server source is set up correctly, create a Knative service that dumps incoming messages to its log.
Copy the following sample YAML into a file named
service.yaml:apiVersion: serving.knative.dev/v1 kind: Service metadata: name: event-display namespace: default spec: template: spec: containers: - image: quay.io/openshift-knative/knative-eventing-sources-event-display:latestAfter you have created the
service.yamlfile, apply it:$ oc apply -f service.yaml
To create a trigger from the
defaultbroker that filters events to the service created in the previous step, create a file namedtrigger.yamland copy the following sample code into it:apiVersion: eventing.knative.dev/v1 kind: Trigger metadata: name: event-display-trigger namespace: default spec: broker: default subscriber: ref: apiVersion: serving.knative.dev/v1 kind: Service name: event-displayAfter you have created the
trigger.yamlfile, apply it:$ oc apply -f trigger.yaml
To create events, launch a pod in the
defaultnamespace:$ oc create deployment hello-node --image=quay.io/openshift-knative/knative-eventing-sources-event-display
To check that the controller is mapped correctly, enter the following command and inspect the output:
$ oc get apiserversource.sources.knative.dev testevents -o yaml
Example output
apiVersion: sources.knative.dev/v1alpha1
kind: ApiServerSource
metadata:
  annotations:
  creationTimestamp: "2020-04-07T17:24:54Z"
  generation: 1
  name: testevents
  namespace: default
  resourceVersion: "62868"
  selfLink: /apis/sources.knative.dev/v1alpha1/namespaces/default/apiserversources/testevents2
  uid: 1603d863-bb06-4d1c-b371-f580b4db99fa
spec:
  mode: Resource
  resources:
  - apiVersion: v1
    controller: false
    controllerSelector:
      apiVersion: ""
      kind: ""
      name: ""
      uid: ""
    kind: Event
    labelSelector: {}
  serviceAccountName: events-sa
  sink:
    ref:
      apiVersion: eventing.knative.dev/v1
      kind: Broker
      name: default
Verification
To verify that the Kubernetes events were sent to Knative, you can look at the message dumper function logs.
Get the pods:
$ oc get pods
View the message dumper function logs for the pods:
$ oc logs $(oc get pod -o name | grep event-display) -c user-container
Example output
☁️  cloudevents.Event
Validation: valid
Context Attributes,
  specversion: 1.0
  type: dev.knative.apiserver.resource.update
  datacontenttype: application/json
  ...
Data,
  {
    "apiVersion": "v1",
    "involvedObject": {
      "apiVersion": "v1",
      "fieldPath": "spec.containers{hello-node}",
      "kind": "Pod",
      "name": "hello-node",
      "namespace": "default",
       .....
    },
    "kind": "Event",
    "message": "Started container",
    "metadata": {
      "name": "hello-node.159d7608e3a3572c",
      "namespace": "default",
      ....
    },
    "reason": "Started",
    ...
  }
11.3.8. Deleting the API server source
This section describes how to delete the ApiServerSource object, trigger, service, service account, cluster role, and cluster binding by deleting their YAML files.
Procedure
Delete the trigger:
$ oc delete -f trigger.yaml
Delete the service:
$ oc delete -f service.yaml
Delete the API server source:
$ oc delete -f k8s-events.yaml
Delete the service account, cluster role, and cluster binding:
$ oc delete -f authentication.yaml
11.4. Using a ping source
A ping source is used to periodically send ping events with a constant payload to an event consumer. A ping source can be used to schedule sending events, similar to a timer, as shown in the example:
Example ping source
apiVersion: sources.knative.dev/v1alpha2
kind: PingSource
metadata:
  name: test-ping-source
spec:
  schedule: "*/2 * * * *" 1
  jsonData: '{"message": "Hello world!"}' 2
  sink: 3
    ref:
      apiVersion: serving.knative.dev/v1
      kind: Service
      name: event-display
- 1
- The schedule of the event specified using CRON expression.
- 2
- The event message body expressed as a JSON encoded data string.
- 3
- These are the details of the event consumer. In this example, we are using a Knative service named
event-display.
11.4.1. Creating a ping source using the Knative CLI
The following sections describe how to create, verify and remove a basic PingSource object using the kn CLI.
Prerequisites
- You have Knative Serving and Eventing installed.
-
You have the
knCLI installed.
Procedure
To verify that the ping source is working, create a simple Knative service that dumps incoming messages to the service’s logs:
$ kn service create event-display \
    --image quay.io/openshift-knative/knative-eventing-sources-event-display:latest
For each set of ping events that you want to request, create a
PingSourceobject in the same namespace as the event consumer:$ kn source ping create test-ping-source \ --schedule "*/2 * * * *" \ --data '{"message": "Hello world!"}' \ --sink ksvc:event-displayCheck that the controller is mapped correctly by entering the following command and inspecting the output:
$ kn source ping describe test-ping-source
Example output
Name:         test-ping-source
Namespace:    default
Annotations:  sources.knative.dev/creator=developer, sources.knative.dev/lastModifier=developer
Age:          15s
Schedule:     */2 * * * *
Data:         {"message": "Hello world!"}

Sink:
  Name:       event-display
  Namespace:  default
  Resource:   Service (serving.knative.dev/v1)

Conditions:
  OK TYPE                 AGE REASON
  ++ Ready                 8s
  ++ Deployed              8s
  ++ SinkProvided         15s
  ++ ValidSchedule        15s
  ++ EventTypeProvided    15s
  ++ ResourcesCorrect     15s
Verification
You can verify that the Kubernetes events were sent to the Knative event sink by looking at the logs of the sink pod.
By default, Knative services terminate their pods if no traffic is received within a 60 second period. The example shown in this guide creates a PingSource object that sends a message every 2 minutes, so each message should be observed in a newly created pod.
Watch for new pods created:
$ watch oc get pods
Cancel watching the pods using
Ctrl+C, then look at the logs of the created pod:$ oc logs $(oc get pod -o name | grep event-display) -c user-container
Example output
☁️  cloudevents.Event
Validation: valid
Context Attributes,
  specversion: 1.0
  type: dev.knative.sources.ping
  source: /apis/v1/namespaces/default/pingsources/test-ping-source
  id: 99e4f4f6-08ff-4bff-acf1-47f61ded68c9
  time: 2020-04-07T16:16:00.000601161Z
  datacontenttype: application/json
Data,
  {
    "message": "Hello world!"
  }
11.4.1.1. Remove the ping source
Delete the
PingSourceobject:$ kn delete pingsources.sources.knative.dev test-ping-source
Delete the
event-displayservice:$ kn delete service.serving.knative.dev event-display
11.4.2. Creating a ping source using YAML files
The following sections describe how to create, verify and remove a basic ping source using YAML files.
Prerequisites
- You have Knative Serving and Eventing installed.
The following procedure requires you to create YAML files.
If you change the names of the YAML files from those used in the examples, you must ensure that you also update the corresponding CLI commands.
Procedure
To verify that the ping source is working, create a simple Knative service that dumps incoming messages to the log of the service.
Copy the example YAML into a file named
service.yaml:apiVersion: serving.knative.dev/v1 kind: Service metadata: name: event-display spec: template: spec: containers: - image: quay.io/openshift-knative/knative-eventing-sources-event-display:latestApply the
service.yamlfile:$ oc apply --filename service.yaml
For each set of ping events that you want to request, create a
PingSourceobject in the same namespace as the event consumer.Copy the example YAML into a file named
ping-source.yaml:apiVersion: sources.knative.dev/v1alpha2 kind: PingSource metadata: name: test-ping-source spec: schedule: "*/2 * * * *" jsonData: '{"message": "Hello world!"}' sink: ref: apiVersion: serving.knative.dev/v1 kind: Service name: event-displayApply the
ping-source.yamlfile:$ oc apply --filename ping-source.yaml
Check that the controller is mapped correctly by entering the following command and observing the output:
$ oc get pingsource.sources.knative.dev test-ping-source -oyaml
Example output
apiVersion: sources.knative.dev/v1alpha2
kind: PingSource
metadata:
  annotations:
    sources.knative.dev/creator: developer
    sources.knative.dev/lastModifier: developer
  creationTimestamp: "2020-04-07T16:11:14Z"
  generation: 1
  name: test-ping-source
  namespace: default
  resourceVersion: "55257"
  selfLink: /apis/sources.knative.dev/v1alpha2/namespaces/default/pingsources/test-ping-source
  uid: 3d80d50b-f8c7-4c1b-99f7-3ec00e0a8164
spec:
  jsonData: '{ value: "hello" }'
  schedule: '*/2 * * * *'
  sink:
    ref:
      apiVersion: serving.knative.dev/v1
      kind: Service
      name: event-display
      namespace: default
Verification
You can verify that the Kubernetes events were sent to the Knative event sink by looking at the logs of the sink pod.
By default, Knative services terminate their pods if no traffic is received within a 60 second period. The example shown in this guide creates a PingSource object that sends a message every 2 minutes, so each message should be observed in a newly created pod.
Watch for new pods created:
$ watch oc get pods
Cancel watching the pods using
Ctrl+C, then look at the logs of the created pod:$ oc logs $(oc get pod -o name | grep event-display) -c user-container
Example output
☁️  cloudevents.Event
Validation: valid
Context Attributes,
  specversion: 1.0
  type: dev.knative.sources.ping
  source: /apis/v1/namespaces/default/pingsources/test-ping-source
  id: 042ff529-240e-45ee-b40c-3a908129853e
  time: 2020-04-07T16:22:00.000791674Z
  datacontenttype: application/json
Data,
  {
    "message": "Hello world!"
  }
11.4.2.1. Remove the PingSource
Delete the service by entering the following command:
$ oc delete --filename service.yaml
Delete the
PingSourceobject by entering the following command:$ oc delete --filename ping-source.yaml
11.5. Using sink binding
Sink binding is used to connect event producers, or event sources, to an event consumer, or event sink, for example, a Knative service or application.
Before developers can use sink binding, cluster administrators must label the namespace that will be configured in the SinkBinding object with bindings.knative.dev/include:"true":
$ oc label namespace <namespace> bindings.knative.dev/include=true
11.5.1. Using sink binding with the Knative CLI
This guide describes the steps required to create, manage, and delete a sink binding instance using the kn CLI.
Prerequisites
- You have Knative Serving and Eventing installed.
-
You have the the
knCLI installed.
The following procedure requires you to create YAML files.
If you change the names of the YAML files from those used in the examples, you must ensure that you also update the corresponding CLI commands.
Before developers can use sink binding, cluster administrators must label the namespace that will be configured in the SinkBinding object with bindings.knative.dev/include:"true":
$ oc label namespace <namespace> bindings.knative.dev/include=true
Procedure
To check that sink binding is set up correctly, create a Knative event display service, or event sink, that dumps incoming messages to its log:
$ kn service create event-display --image quay.io/openshift-knative/knative-eventing-sources-event-display:latest
Create a
SinkBindingobject that directs events to the service:$ kn source binding create bind-heartbeat --subject Job:batch/v1:app=heartbeat-cron --sink ksvc:event-display
Create a CronJob.
Create a file named
heartbeats-cronjob.yamland copy the following sample code into it:apiVersion: batch/v1beta1 kind: CronJob metadata: name: heartbeat-cron spec: spec: # Run every minute schedule: "* * * * *" jobTemplate: metadata: labels: app: heartbeat-cron bindings.knative.dev/include: "true" spec: template: spec: restartPolicy: Never containers: - name: single-heartbeat image: quay.io/openshift-knative/knative-eventing-sources-heartbeats:latest args: - --period=1 env: - name: ONE_SHOT value: "true" - name: POD_NAME valueFrom: fieldRef: fieldPath: metadata.name - name: POD_NAMESPACE valueFrom: fieldRef: fieldPath: metadata.namespaceImportantTo use sink binding, you must manually add a
bindings.knative.dev/include=truelabel to your Knative resources.For example, to add this label to a
CronJobobject, add the following lines to the Job resource YAML definition:jobTemplate: metadata: labels: app: heartbeat-cron bindings.knative.dev/include: "true"After you have created the
heartbeats-cronjob.yamlfile, apply it:$ oc apply --filename heartbeats-cronjob.yaml
Check that the controller is mapped correctly by entering the following command and inspecting the output:
$ kn source binding describe bind-heartbeat
Example output
Name:         bind-heartbeat
Namespace:    demo-2
Annotations:  sources.knative.dev/creator=minikube-user, sources.knative.dev/lastModifier=minikub ...
Age:          2m
Subject:
  Resource:   job (batch/v1)
  Selector:
    app:      heartbeat-cron
Sink:
  Name:       event-display
  Resource:   Service (serving.knative.dev/v1)

Conditions:
  OK TYPE     AGE REASON
  ++ Ready     2m
Verification
You can verify that the Kubernetes events were sent to the Knative event sink by looking at the message dumper function logs.
View the message dumper function logs:
$ oc get pods
$ oc logs $(oc get pod -o name | grep event-display) -c user-container
Example output
☁️  cloudevents.Event
Validation: valid
Context Attributes,
  specversion: 1.0
  type: dev.knative.eventing.samples.heartbeat
  source: https://knative.dev/eventing-contrib/cmd/heartbeats/#event-test/mypod
  id: 2b72d7bf-c38f-4a98-a433-608fbcdd2596
  time: 2019-10-18T15:23:20.809775386Z
  contenttype: application/json
Extensions,
  beats: true
  heart: yes
  the: 42
Data,
  {
    "id": 1,
    "label": ""
  }
11.5.2. Using sink binding with the YAML method
This guide describes the steps required to create, manage, and delete a sink binding instance using YAML files.
Prerequisites
- You have Knative Serving and Eventing installed.
The following procedure requires you to create YAML files.
If you change the names of the YAML files from those used in the examples, you must ensure that you also update the corresponding CLI commands.
Before developers can use sink binding, cluster administrators must label the namespace that will be configured in the SinkBinding object with bindings.knative.dev/include:"true":
$ oc label namespace <namespace> bindings.knative.dev/include=true
Procedure
To check that sink binding is set up correctly, create a Knative event display service, or event sink, that dumps incoming messages to its log.
Copy the following sample YAML into a file named
service.yaml:apiVersion: serving.knative.dev/v1 kind: Service metadata: name: event-display spec: template: spec: containers: - image: quay.io/openshift-knative/knative-eventing-sources-event-display:latestAfter you have created the
service.yamlfile, apply it:$ oc apply -f service.yaml
Create a
SinkBindingobject that directs events to the service.Create a file named
sinkbinding.yamland copy the following sample code into it:apiVersion: sources.knative.dev/v1alpha1 kind: SinkBinding metadata: name: bind-heartbeat spec: subject: apiVersion: batch/v1 kind: Job 1 selector: matchLabels: app: heartbeat-cron sink: ref: apiVersion: serving.knative.dev/v1 kind: Service name: event-display- 1
- In this example, any Job with the label
app: heartbeat-cronwill be bound to the event sink.
After you have created the
sinkbinding.yamlfile, apply it:$ oc apply -f sinkbinding.yaml
Create a
CronJobobject.Create a file named
heartbeats-cronjob.yamland copy the following sample code into it:apiVersion: batch/v1beta1 kind: CronJob metadata: name: heartbeat-cron spec: spec: # Run every minute schedule: "* * * * *" jobTemplate: metadata: labels: app: heartbeat-cron bindings.knative.dev/include: "true" spec: template: spec: restartPolicy: Never containers: - name: single-heartbeat image: quay.io/openshift-knative/knative-eventing-sources-heartbeats:latest args: - --period=1 env: - name: ONE_SHOT value: "true" - name: POD_NAME valueFrom: fieldRef: fieldPath: metadata.name - name: POD_NAMESPACE valueFrom: fieldRef: fieldPath: metadata.namespaceImportantTo use sink binding, you must manually add a
bindings.knative.dev/include=truelabel to your Knative resources.For example, to add this label to a cron job instance, add the following lines to the
Jobresource YAML definition:jobTemplate: metadata: labels: app: heartbeat-cron bindings.knative.dev/include: "true"After you have created the
heartbeats-cronjob.yamlfile, apply it:$ oc apply -f heartbeats-cronjob.yaml
Check that the controller is mapped correctly by entering the following command and inspecting the output:
$ oc get sinkbindings.sources.knative.dev bind-heartbeat -oyaml
Example output
spec:
  sink:
    ref:
      apiVersion: serving.knative.dev/v1
      kind: Service
      name: event-display
      namespace: default
  subject:
    apiVersion: batch/v1
    kind: Job
    namespace: default
    selector:
      matchLabels:
        app: heartbeat-cron
Verification
You can verify that the Kubernetes events were sent to the Knative event sink by looking at the message dumper function logs.
View the message dumper function logs:
$ oc get pods
$ oc logs $(oc get pod -o name | grep event-display) -c user-container
Example output
☁️  cloudevents.Event
Validation: valid
Context Attributes,
  specversion: 1.0
  type: dev.knative.eventing.samples.heartbeat
  source: https://knative.dev/eventing-contrib/cmd/heartbeats/#event-test/mypod
  id: 2b72d7bf-c38f-4a98-a433-608fbcdd2596
  time: 2019-10-18T15:23:20.809775386Z
  contenttype: application/json
Extensions,
  beats: true
  heart: yes
  the: 42
Data,
  {
    "id": 1,
    "label": ""
  }