
Chapter 1. Migrating from OpenShift Container Platform 3
1.1. About migrating OpenShift Container Platform 3 to 4
OpenShift Container Platform 4 includes new technologies and functionality that results in a cluster that is self-managing, flexible, and automated. The way that OpenShift Container Platform 4 clusters are deployed and managed drastically differs from OpenShift Container Platform 3.
To successfully transition from OpenShift Container Platform 3 to OpenShift Container Platform 4, it is important that you review the following information:
- Planning your transition
- Learn about the differences between OpenShift Container Platform versions 3 and 4. Prior to transitioning, be sure that you have reviewed and prepared for storage, networking, logging, security, and monitoring considerations.
- Performing your migration
- Learn about and use Migration Toolkit for Containers (MTC) to migrate your application workloads.
1.2. Planning your migration
Before performing your migration to OpenShift Container Platform 4.5, it is important to take the time to properly plan for the transition. OpenShift Container Platform 4 introduces architectural changes and enhancements, so the procedures that you used to manage your OpenShift Container Platform 3 cluster might not apply for OpenShift Container Platform 4.
This planning document assumes that you are transitioning from OpenShift Container Platform 3.11 to OpenShift Container Platform 4.5.
This document provides high-level information on the most important differences between OpenShift Container Platform 3 and OpenShift Container Platform 4 and the most noteworthy migration considerations. For detailed information on configuring your OpenShift Container Platform 4 cluster, review the appropriate sections of the OpenShift Container Platform documentation. For detailed information on new features and other notable technical changes, review the OpenShift Container Platform 4.5 release notes.
It is not possible to upgrade your existing OpenShift Container Platform 3 cluster to OpenShift Container Platform 4. You must start with a new OpenShift Container Platform 4 installation. Tools are available to assist in migrating your control plane settings and application workloads.
1.2.1. Comparing OpenShift Container Platform 3 and OpenShift Container Platform 4
With OpenShift Container Platform 3, administrators individually deployed Red Hat Enterprise Linux (RHEL) hosts, and then installed OpenShift Container Platform on top of these hosts to form a cluster. Administrators were responsible for properly configuring these hosts and performing updates.
OpenShift Container Platform 4 represents a significant change in the way that OpenShift Container Platform clusters are deployed and managed. OpenShift Container Platform 4 includes new technologies and functionality, such as Operators, machine sets, and Red Hat Enterprise Linux CoreOS (RHCOS), which are core to the operation of the cluster. This technology shift enables clusters to self-manage some functions previously performed by administrators. This also ensures platform stability and consistency, and simplifies installation and scaling.
For more information, see OpenShift Container Platform architecture.
1.2.1.1. Architecture differences
Immutable infrastructure
OpenShift Container Platform 4 uses Red Hat Enterprise Linux CoreOS (RHCOS), which is designed to run containerized applications, and provides efficient installation, Operator-based management, and simplified upgrades. RHCOS is an immutable container host, rather than a customizable operating system like RHEL. RHCOS enables OpenShift Container Platform 4 to manage and automate the deployment of the underlying container host. RHCOS is a part of OpenShift Container Platform, which means that everything runs inside a container and is deployed using OpenShift Container Platform.
In OpenShift Container Platform 4, control plane nodes must run RHCOS, ensuring that full-stack automation is maintained for the control plane. This makes rolling out updates and upgrades a much easier process than in OpenShift Container Platform 3.
For more information, see Red Hat Enterprise Linux CoreOS (RHCOS).
Operators
Operators are a method of packaging, deploying, and managing a Kubernetes application. Operators ease the operational complexity of running another piece of software. They watch over your environment and use the current state to make decisions in real time. Advanced Operators are designed to upgrade and react to failures automatically.
For more information, see Understanding Operators.
1.2.1.2. Installation and update differences
Installation process
To install OpenShift Container Platform 3.11, you prepared your Red Hat Enterprise Linux (RHEL) hosts, set all of the configuration values your cluster needed, and then ran an Ansible playbook to install and set up your cluster.
In OpenShift Container Platform 4.5, you use the OpenShift installation program to create a minimum set of resources required for a cluster. Once the cluster is running, you use Operators to further configure your cluster and to install new services. After first boot, Red Hat Enterprise Linux CoreOS (RHCOS) systems are managed by the Machine Config Operator (MCO) that runs in the OpenShift Container Platform cluster.
For more information, see Installation process.
If you want to add Red Hat Enterprise Linux (RHEL) (RHEL) worker machines to your OpenShift Container Platform 4.5 cluster, you use an Ansible playbook to join the RHEL worker machines after the cluster is running. For more information, see Adding RHEL compute machines to an OpenShift Container Platform cluster.
Infrastructure options
In OpenShift Container Platform 3.11, you installed your cluster on infrastructure that you prepared and maintained. In addition to providing your own infrastructure, OpenShift Container Platform 4 offers an option to deploy a cluster on infrastructure that the OpenShift Container Platform installation program provisions and the cluster maintains.
For more information, see OpenShift Container Platform installation overview.
Upgrading your cluster
In OpenShift Container Platform 3.11, you upgraded your cluster by running Ansible playbooks. In OpenShift Container Platform 4.5, the cluster manages its own updates, including updates to Red Hat Enterprise Linux CoreOS (RHCOS) on cluster nodes. You can easily upgrade your cluster by using the web console or by using the oc adm upgrade command from the OpenShift CLI and the Operators will automatically upgrade themselves. If your OpenShift Container Platform 4.5 cluster has RHEL worker machines, then you will still need to run an Ansible playbook to upgrade those worker machines.
For more information, see Updating clusters.
1.2.2. Migration considerations
Review the changes and other considerations that might affect your transition from OpenShift Container Platform 3.11 to OpenShift Container Platform 4.
1.2.2.1. Storage considerations
Review the following storage changes to consider when transitioning from OpenShift Container Platform 3.11 to OpenShift Container Platform 4.5.
Local volume persistent storage
Local storage is only supported by using the Local Storage Operator in OpenShift Container Platform 4.5. It is not supported to use the local provisioner method from OpenShift Container Platform 3.11.
For more information, see Persistent storage using local volumes.
FlexVolume persistent storage
The FlexVolume plug-in location changed from OpenShift Container Platform 3.11. The new location in OpenShift Container Platform 4.5 is /etc/kubernetes/kubelet-plugins/volume/exec. Attachable FlexVolume plug-ins are no longer supported.
For more information, see Persistent storage using FlexVolume.
Container Storage Interface (CSI) persistent storage
Persistent storage using the Container Storage Interface (CSI) was Technology Preview in OpenShift Container Platform 3.11. OpenShift Container Platform 4.5 fully supports CSI version 1.1.0 and ships with several CSI drivers. You can also install your own driver.
For more information, see Persistent storage using the Container Storage Interface (CSI).
Red Hat OpenShift Container Storage
Red Hat OpenShift Container Storage 3, which is available for use with OpenShift Container Platform 3.11, uses Red Hat Gluster Storage as the backing storage.
Red Hat OpenShift Container Storage 4, which is available for use with OpenShift Container Platform 4, uses Red Hat Ceph Storage as the backing storage.
For more information, see Persistent storage using Red Hat OpenShift Container Storage and the interoperability matrix article.
Unsupported persistent storage options
Support for the following persistent storage options from OpenShift Container Platform 3.11 has changed in OpenShift Container Platform 4.5:
- GlusterFS is no longer supported.
- CephFS as a standalone product is no longer supported.
- Ceph RBD as a standalone product is no longer supported.
If you used one of these in OpenShift Container Platform 3.11, you must choose a different persistent storage option for full support in OpenShift Container Platform 4.5.
For more information, see Understanding persistent storage.
1.2.2.2. Networking considerations
Review the following networking changes to consider when transitioning from OpenShift Container Platform 3.11 to OpenShift Container Platform 4.5.
Network isolation mode
The default network isolation mode for OpenShift Container Platform 3.11 was ovs-subnet, though users frequently switched to use ovn-multitenant. The default network isolation mode for OpenShift Container Platform 4.5 is controlled by a network policy.
If your OpenShift Container Platform 3.11 cluster used the ovs-subnet or ovs-multitenant mode, it is recommended to switch to a network policy for your OpenShift Container Platform 4.5 cluster. Network policies are supported upstream, are more flexible, and they provide the functionality that ovs-multitenant does. If you want to maintain the ovs-multitenant behavior while using a network policy in OpenShift Container Platform 4.5, follow the steps to configure multitenant isolation using network policy.
For more information, see About network policy.
Encrypting traffic between hosts
In OpenShift Container Platform 3.11, you could use IPsec to encrypt traffic between hosts. OpenShift Container Platform 4.5 does not support IPsec. It is recommended to use Red Hat OpenShift Service Mesh to enable mutual TLS between services.
For more information, see Understanding Red Hat OpenShift Service Mesh.
1.2.2.3. Logging considerations
Review the following logging changes to consider when transitioning from OpenShift Container Platform 3.11 to OpenShift Container Platform 4.5.
Deploying cluster logging
OpenShift Container Platform 4 provides a simple deployment mechanism for cluster logging, by using a Cluster Logging custom resource.
For more information, see Installing cluster logging.
Aggregated logging data
You cannot transition your aggregate logging data from OpenShift Container Platform 3.11 into your new OpenShift Container Platform 4 cluster.
For more information, see About cluster logging.
Unsupported logging configurations
Some logging configurations that were available in OpenShift Container Platform 3.11 are no longer supported in OpenShift Container Platform 4.5.
For more information on the explicitly unsupported logging cases, see Maintenance and support.
1.2.2.4. Security considerations
Review the following security changes to consider when transitioning from OpenShift Container Platform 3.11 to OpenShift Container Platform 4.5.
Unauthenticated access to discovery endpoints
In OpenShift Container Platform 3.11, an unauthenticated user could access the discovery endpoints (for example, /api/* and /apis/*). For security reasons, unauthenticated access to the discovery endpoints is no longer allowed in OpenShift Container Platform 4.5. If you do need to allow unauthenticated access, you can configure the RBAC settings as necessary; however, be sure to consider the security implications as this can expose internal cluster components to the external network.
Identity providers
Configuration for identity providers has changed for OpenShift Container Platform 4, including the following notable changes:
- The request header identity provider in OpenShift Container Platform 4.5 requires mutual TLS, where in OpenShift Container Platform 3.11 it did not.
-
The configuration of the OpenID Connect identity provider was simplified in OpenShift Container Platform 4.5. It now obtains data, which previously had to specified in OpenShift Container Platform 3.11, from the provider’s
/.well-known/openid-configurationendpoint.
For more information, see Understanding identity provider configuration.
1.2.2.5. Monitoring considerations
Review the following monitoring changes to consider when transitioning from OpenShift Container Platform 3.11 to OpenShift Container Platform 4.5.
Alert for monitoring infrastructure availability
The default alert that triggers to ensure the availability of the monitoring structure was called DeadMansSwitch in OpenShift Container Platform 3.11. This was renamed to Watchdog in OpenShift Container Platform 4. If you had PagerDuty integration set up with this alert in OpenShift Container Platform 3.11, you must set up the PagerDuty integration for the Watchdog alert in OpenShift Container Platform 4.
For more information, see Applying custom Alertmanager configuration.
1.3. Migration tools and prerequisites
You can migrate application workloads from OpenShift Container Platform 3.7, 3.9, 3.10, and 3.11 to OpenShift Container Platform 4.5 with the Migration Toolkit for Containers (MTC). MTC enables you to control the migration and to minimize application downtime.
The MTC web console and API, based on Kubernetes custom resources, enable you to migrate stateful application workloads at the granularity of a namespace.
MTC supports the file system and snapshot data copy methods for migrating data from the source cluster to the target cluster. You can select a method that is suited for your environment and is supported by your storage provider.
You can use migration hooks to run Ansible playbooks at certain points during the migration. The hooks are added when you create a migration plan.
The service catalog is deprecated in OpenShift Container Platform 4. You can migrate workload resources provisioned with the service catalog from OpenShift Container Platform 3 to 4 but you cannot perform service catalog actions such as provision, deprovision, or update on these workloads after migration.
The MTC web console displays a message if the service catalog resources cannot be migrated.
Before you begin your migration, be sure to review the information on planning your migration.
1.3.1. Migration Toolkit for Containers workflow
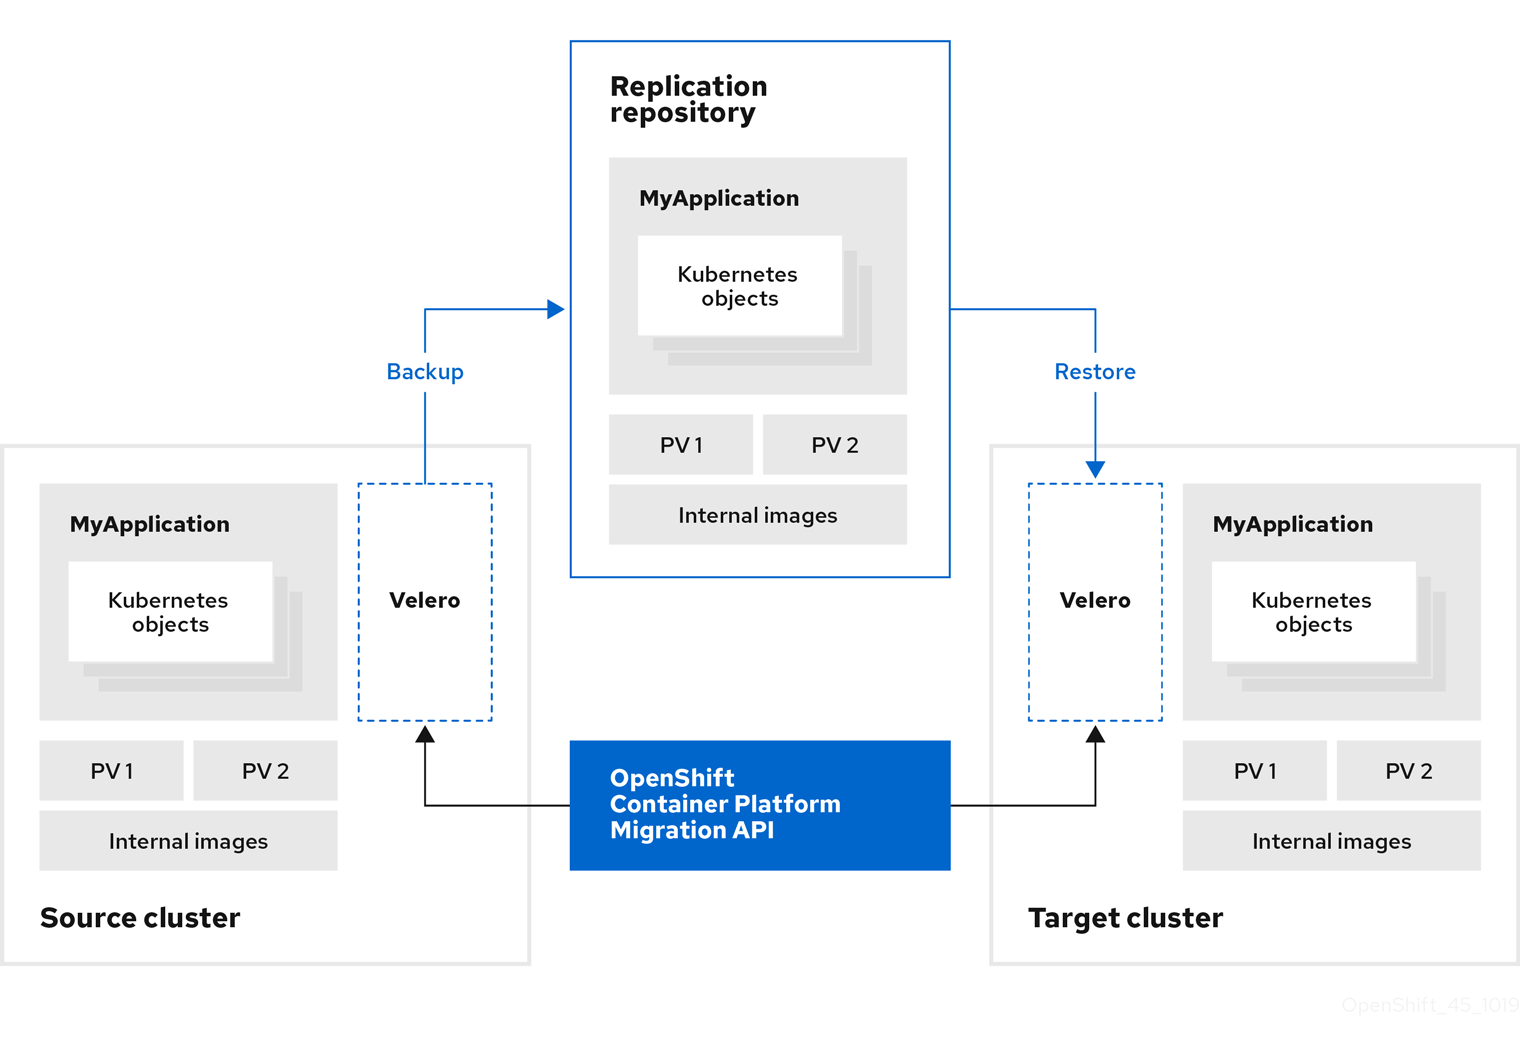
You use the Migration Toolkit for Containers (MTC) to migrate Kubernetes resources, persistent volume data, and internal container images from an OpenShift Container Platform source cluster to an OpenShift Container Platform 4.5 target cluster by using the MTC web console or the Kubernetes API.
The (MTC) migrates the following resources:
- A namespace specified in a migration plan.
Namespace-scoped resources: When the MTC migrates a namespace, it migrates all the objects and resources associated with that namespace, such as services or pods. Additionally, if a resource that exists in the namespace but not at the cluster level depends on a resource that exists at the cluster level, the MTC migrates both resources.
For example, a security context constraint (SCC) is a resource that exists at the cluster level and a service account (SA) is a resource that exists at the namespace level. If an SA exists in a namespace that the MTC migrates, the MTC automatically locates any SCCs that are linked to the SA and also migrates those SCCs. Similarly, the MTC migrates persistent volume claims that are linked to the persistent volumes of the namespace.
- Custom resources (CRs) and custom resource definitions (CRDs): The MTC automatically migrates any CRs that exist at the namespace level as well as the CRDs that are linked to those CRs.
Migrating an application with the MTC web console involves the following steps:
Install the Migration Toolkit for Containers Operator on all clusters.
You can install the Migration Toolkit for Containers Operator in a restricted environment with limited or no internet access. The source and target clusters must have network access to each other and to a mirror registry.
Configure the replication repository, an intermediate object storage that MTC uses to migrate data.
The source and target clusters must have network access to the replication repository during migration. In a restricted environment, you can use an internally hosted S3 storage repository. If you are using a proxy server, you must configure it to allow network traffic between the replication repository and the clusters.
- Add the source cluster to the MTC web console.
- Add the replication repository to the MTC web console.
Create a migration plan, with one of the following data migration options:
Copy: MTC copies the data from the source cluster to the replication repository, and from the replication repository to the target cluster.
NoteIf you are using direct image migration or direct volume migration, the images or volumes are copied directly from the source cluster to the target cluster.

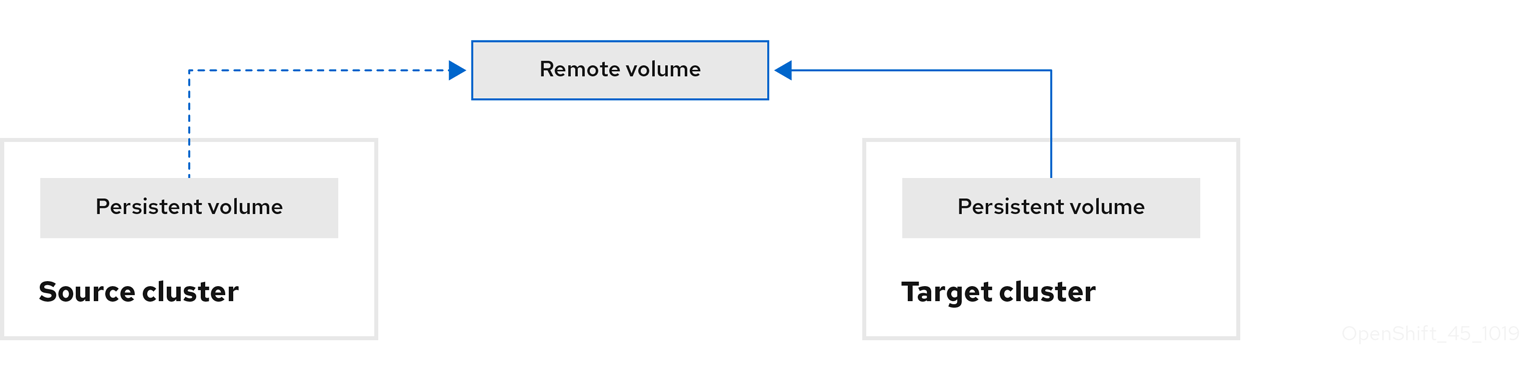
Move: MTC unmounts a remote volume, for example, NFS, from the source cluster, creates a PV resource on the target cluster pointing to the remote volume, and then mounts the remote volume on the target cluster. Applications running on the target cluster use the same remote volume that the source cluster was using. The remote volume must be accessible to the source and target clusters.
NoteAlthough the replication repository does not appear in this diagram, it is required for migration.
Run the migration plan, with one of the following options:
Stage (optional) copies data to the target cluster without stopping the application.
Staging can be run multiple times so that most of the data is copied to the target before migration. This minimizes the duration of the migration and application downtime.
- Migrate stops the application on the source cluster and recreates its resources on the target cluster. Optionally, you can migrate the workload without stopping the application.
1.3.2. Migration Toolkit for Containers custom resources
The Migration Toolkit for Containers (MTC) creates the following custom resources (CRs):
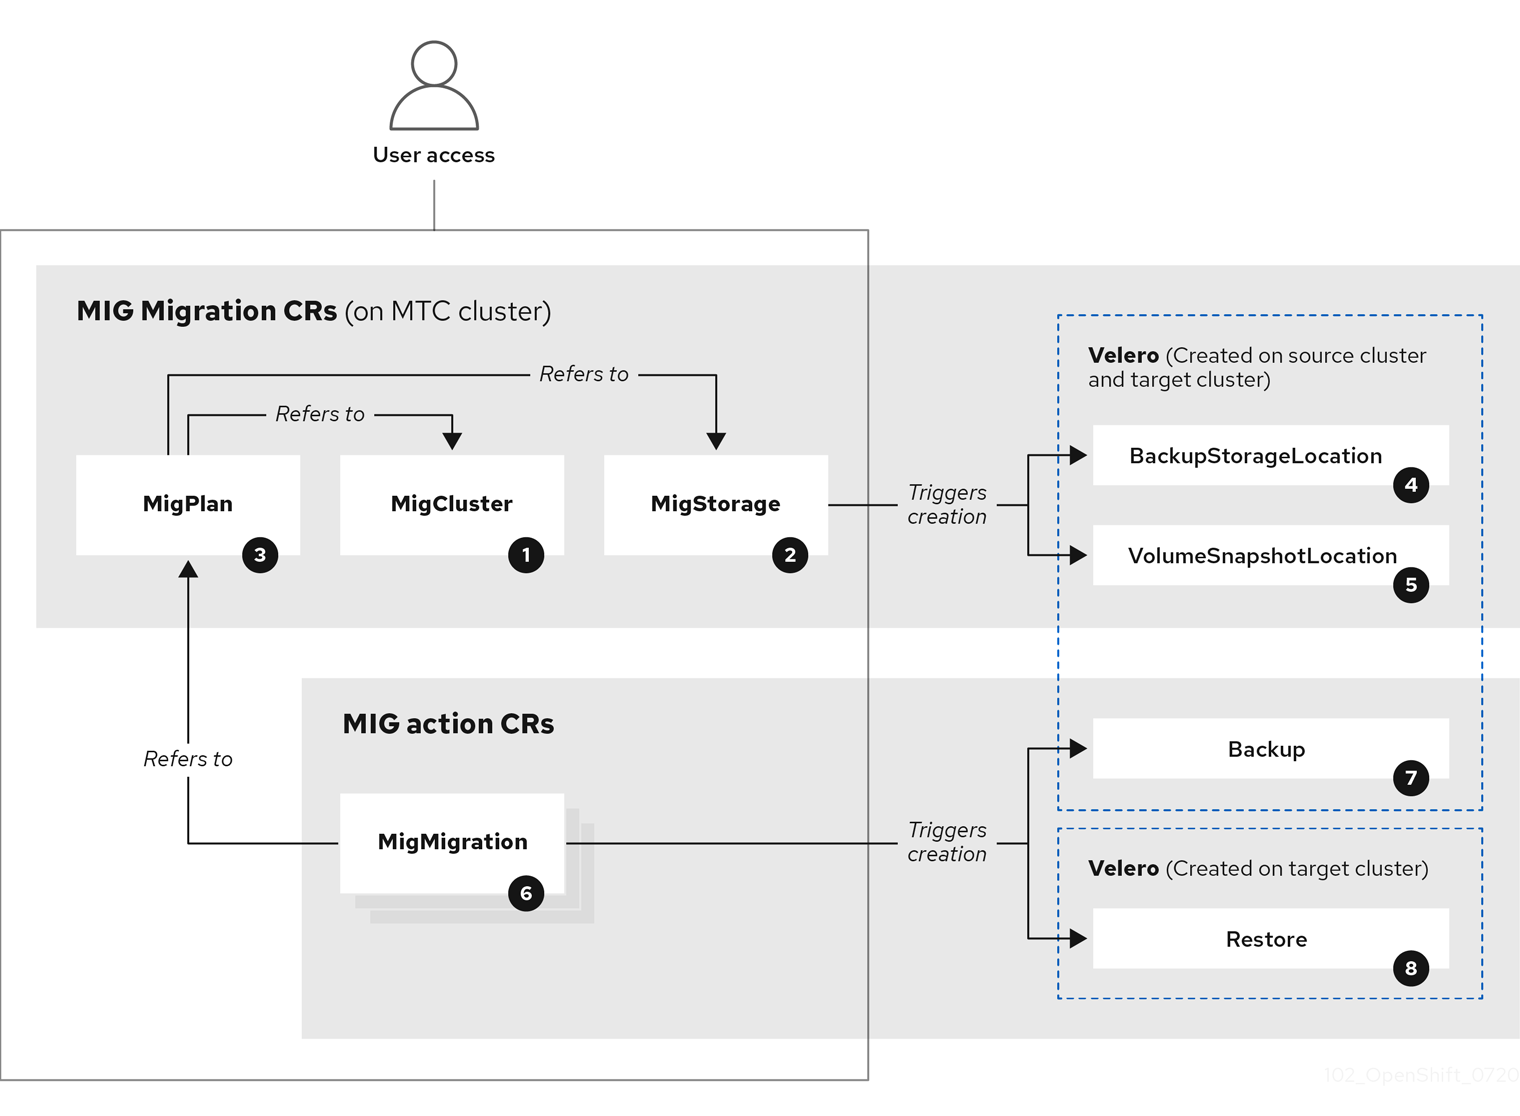
![]() MigCluster (configuration, MTC cluster): Cluster definition
MigCluster (configuration, MTC cluster): Cluster definition
![]() MigStorage (configuration, MTC cluster): Storage definition
MigStorage (configuration, MTC cluster): Storage definition
![]() MigPlan (configuration, MTC cluster): Migration plan
MigPlan (configuration, MTC cluster): Migration plan
The MigPlan CR describes the source and target clusters, replication repository, and namespaces being migrated. It is associated with 0, 1, or many MigMigration CRs.
Deleting a MigPlan CR deletes the associated MigMigration CRs.
![]() BackupStorageLocation (configuration, MTC cluster): Location of
BackupStorageLocation (configuration, MTC cluster): Location of Velero backup objects
![]() VolumeSnapshotLocation (configuration, MTC cluster): Location of
VolumeSnapshotLocation (configuration, MTC cluster): Location of Velero volume snapshots
![]() MigMigration (action, MTC cluster): Migration, created every time you stage or migrate data. Each
MigMigration (action, MTC cluster): Migration, created every time you stage or migrate data. Each MigMigration CR is associated with a MigPlan CR.
![]() Backup (action, source cluster): When you run a migration plan, the
Backup (action, source cluster): When you run a migration plan, the MigMigration CR creates two Velero backup CRs on each source cluster:
- Backup CR #1 for Kubernetes objects
- Backup CR #2 for PV data
![]() Restore (action, target cluster): When you run a migration plan, the
Restore (action, target cluster): When you run a migration plan, the MigMigration CR creates two Velero restore CRs on the target cluster:
- Restore CR #1 (using Backup CR #2) for PV data
- Restore CR #2 (using Backup CR #1) for Kubernetes objects
1.3.3. About data copy methods
The Migration Toolkit for Containers (MTC) supports the file system and snapshot data copy methods for migrating data from the source cluster to the target cluster. You can select a method that is suited for your environment and is supported by your storage provider.
1.3.3.1. File system copy method
MTC copies data files from the source cluster to the replication repository, and from there to the target cluster.
Table 1.1. File system copy method summary
| Benefits | Limitations |
|---|---|
|
|
1.3.3.2. Snapshot copy method
MTC copies a snapshot of the source cluster data to the replication repository of a cloud provider. The data is restored on the target cluster.
AWS, Google Cloud Provider, and Microsoft Azure support the snapshot copy method.
Table 1.2. Snapshot copy method summary
| Benefits | Limitations |
|---|---|
|
|
1.3.4. About migration hooks
You can use migration hooks to run custom code at certain points during a migration with the Migration Toolkit for Containers (MTC). You can add up to four migration hooks to a single migration plan, with each hook running at a different phase of the migration.
Migration hooks perform tasks such as customizing application quiescence, manually migrating unsupported data types, and updating applications after migration.
A migration hook runs on a source or a target cluster at one of the following migration steps:
-
PreBackup: Before resources are backed up on the source cluster -
PostBackup: After resources are backed up on the source cluster -
PreRestore: Before resources are restored on the target cluster -
PostRestore: After resources are restored on the target cluster
You can create a hook by using an Ansible playbook or a custom hook container.
Ansible playbook
The Ansible playbook is mounted on a hook container as a config map. The hook container runs as a job, using the cluster, service account, and namespace specified in the MigPlan custom resource (CR). The job continues to run until it reaches the the default limit of 6 retries or a successful completion. This continues even if the initial pod is evicted or killed.
The default Ansible runtime image is registry.redhat.io/rhmtc/openshift-migration-hook-runner-rhel7:1.4. This image is based on the Ansible Runner image and includes python-openshift for Ansible Kubernetes resources and an updated oc binary.
Optional: You can use a custom Ansible runtime image containing additional Ansible modules or tools instead of the default image.
Custom hook container
You can create a custom hook container that includes Ansible playbooks or custom code.
1.4. Installing and upgrading the Migration Toolkit for Containers
You can install the Migration Toolkit for Containers (MTC) on an OpenShift Container Platform 4.5 target cluster and an OpenShift Container Platform 3 source cluster.
The Migration Controller pod runs on the target cluster by default. You can configure the Migration Controller pod to run on the source cluster or on a remote cluster.
1.4.1. Installing the Migration Toolkit for Containers in a connected environment
You can install the Migration Toolkit for Containers (MTC) in a connected environment.
You must install the same MTC version on all clusters.
1.4.1.1. Installing the Migration Toolkit for Containers on an OpenShift Container Platform 4.5 target cluster
You can install the Migration Toolkit for Containers (MTC) on an OpenShift Container Platform 4.5 target cluster.
Prerequisites
-
You must be logged in as a user with
cluster-adminprivileges on all clusters.
Procedure
- In the OpenShift Container Platform web console, click Operators → OperatorHub.
- Use the Filter by keyword field to find the Migration Toolkit for Containers Operator.
Select the Migration Toolkit for Containers Operator and click Install.
NoteDo not change the subscription approval option to Automatic. The Migration Toolkit for Containers version must be the same on the source and the target clusters.
Click Install.
On the Installed Operators page, the Migration Toolkit for Containers Operator appears in the openshift-migration project with the status Succeeded.
- Click Migration Toolkit for Containers Operator.
- Under Provided APIs, locate the Migration Controller tile, and click Create Instance.
- Click Create.
- Click Workloads → Pods to verify that the MTC pods are running.
1.4.1.2. Installing the Migration Toolkit for Containers on an OpenShift Container Platform 3 source cluster
You can install the Migration Toolkit for Containers (MTC) manually on an OpenShift Container Platform 3 source cluster.
You must install the same MTC version on the OpenShift Container Platform 3 and 4 clusters.
To ensure that you have the latest version on the OpenShift Container Platform 3 cluster, download the operator.yml and controller-3.yml files when you are ready to create and run the migration plan.
Prerequisites
-
You must be logged in as a user with
cluster-adminprivileges on all clusters. -
You must have access to
registry.redhat.io. -
You must have
podmaninstalled. - The source cluster must be OpenShift Container Platform 3.7, 3.9, 3.10, or 3.11.
The source cluster must be configured to pull images from
registry.redhat.io.To pull images, you must create an image stream secret and copy it to each node in your cluster.
Procedure
Log in to
registry.redhat.iowith your Red Hat Customer Portal credentials:$ sudo podman login registry.redhat.io
Download the
operator.ymlfile:$ sudo podman cp $(sudo podman create \ registry.redhat.io/rhmtc/openshift-migration-rhel7-operator:v1.4):/operator.yml ./
Download the
controller-3.ymlfile:$ sudo podman cp $(sudo podman create \ registry.redhat.io/rhmtc/openshift-migration-rhel7-operator:v1.4):/controller-3.yml ./
- Log in to your OpenShift Container Platform 3 cluster.
Verify that the cluster can authenticate with
registry.redhat.io:$ oc run test --image registry.redhat.io/ubi8 --command sleep infinity
Create the Migration Toolkit for Containers Operator object:
$ oc create -f operator.yml
Example output
namespace/openshift-migration created rolebinding.rbac.authorization.k8s.io/system:deployers created serviceaccount/migration-operator created customresourcedefinition.apiextensions.k8s.io/migrationcontrollers.migration.openshift.io created role.rbac.authorization.k8s.io/migration-operator created rolebinding.rbac.authorization.k8s.io/migration-operator created clusterrolebinding.rbac.authorization.k8s.io/migration-operator created deployment.apps/migration-operator created Error from server (AlreadyExists): error when creating "./operator.yml": rolebindings.rbac.authorization.k8s.io "system:image-builders" already exists 1 Error from server (AlreadyExists): error when creating "./operator.yml": rolebindings.rbac.authorization.k8s.io "system:image-pullers" already exists- 1
- You can ignore
Error from server (AlreadyExists)messages. They are caused by the Migration Toolkit for Containers Operator creating resources for earlier versions of OpenShift Container Platform 3 that are provided in later releases.
Create the
MigrationControllerobject:$ oc create -f controller-3.yml
Verify that the
VeleroandResticpods are running:$ oc get pods -n openshift-migration
1.4.2. Installing the Migration Toolkit for Containers in a restricted environment
You can install the Migration Toolkit for Containers (MTC) in a restricted environment.
You must install the same MTC version on all clusters.
You can build a custom Operator catalog image for OpenShift Container Platform 4, push it to a local mirror image registry, and configure Operator Lifecycle Manager (OLM) to install the Migration Toolkit for Containers Operator from the local registry.
1.4.2.1. Building an Operator catalog image
Cluster administrators can build a custom Operator catalog image based on the Package Manifest Format to be used by Operator Lifecycle Manager (OLM). The catalog image can be pushed to a container image registry that supports Docker v2-2. For a cluster on a restricted network, this registry can be a registry that the cluster has network access to, such as a mirror registry created during a restricted network cluster installation.
The internal registry of the OpenShift Container Platform cluster cannot be used as the target registry because it does not support pushing without a tag, which is required during the mirroring process.
For this example, the procedure assumes use of a mirror registry that has access to both your network and the Internet.
Only the Linux version of the oc client can be used for this procedure, because the Windows and macOS versions do not provide the oc adm catalog build command.
Prerequisites
- Workstation with unrestricted network access
-
ocversion 4.3.5+ Linux client -
podmanversion 1.4.4+ - Access to mirror registry that supports Docker v2-2
If you are working with private registries, set the
REG_CREDSenvironment variable to the file path of your registry credentials for use in later steps. For example, for thepodmanCLI:$ REG_CREDS=${XDG_RUNTIME_DIR}/containers/auth.jsonIf you are working with private namespaces that your quay.io account has access to, you must set a Quay authentication token. Set the
AUTH_TOKENenvironment variable for use with the--auth-tokenflag by making a request against the login API using your quay.io credentials:$ AUTH_TOKEN=$(curl -sH "Content-Type: application/json" \ -XPOST https://quay.io/cnr/api/v1/users/login -d ' { "user": { "username": "'"<quay_username>"'", "password": "'"<quay_password>"'" } }' | jq -r '.token')
Procedure
On the workstation with unrestricted network access, authenticate with the target mirror registry:
$ podman login <registry_host_name>
Also authenticate with
registry.redhat.ioso that the base image can be pulled during the build:$ podman login registry.redhat.io
Build a catalog image based on the
redhat-operatorscatalog from Quay.io, tagging and pushing it to your mirror registry:$ oc adm catalog build \ --appregistry-org redhat-operators \1 --from=registry.redhat.io/openshift4/ose-operator-registry:v4.5 \2 --filter-by-os="linux/amd64" \3 --to=<registry_host_name>:<port>/olm/redhat-operators:v1 \4 [-a ${REG_CREDS}] \5 [--insecure] \6 [--auth-token "${AUTH_TOKEN}"] 7- 1
- Organization (namespace) to pull from an App Registry instance.
- 2
- Set
--fromto theose-operator-registrybase image using the tag that matches the target OpenShift Container Platform cluster major and minor version. - 3
- Set
--filter-by-osto the operating system and architecture to use for the base image, which must match the target OpenShift Container Platform cluster. Valid values arelinux/amd64,linux/ppc64le, andlinux/s390x. - 4
- Name your catalog image and include a tag, for example,
v1. - 5
- Optional: If required, specify the location of your registry credentials file.
- 6
- Optional: If you do not want to configure trust for the target registry, add the
--insecureflag. - 7
- Optional: If other application registry catalogs are used that are not public, specify a Quay authentication token.
Example output
INFO[0013] loading Bundles                               dir=/var/folders/st/9cskxqs53ll3wdn434vw4cd80000gn/T/300666084/manifests-829192605
...
Pushed sha256:f73d42950021f9240389f99ddc5b0c7f1b533c054ba344654ff1edaf6bf827e3 to example_registry:5000/olm/redhat-operators:v1
Sometimes invalid manifests are accidentally introduced catalogs provided by Red Hat; when this happens, you might see some errors:
Example output with errors
...
INFO[0014] directory                                     dir=/var/folders/st/9cskxqs53ll3wdn434vw4cd80000gn/T/300666084/manifests-829192605 file=4.2 load=package
W1114 19:42:37.876180   34665 builder.go:141] error building database: error loading package into db: fuse-camel-k-operator.v7.5.0 specifies replacement that couldn't be found
Uploading ... 244.9kB/s
These errors are usually non-fatal, and if the Operator package mentioned does not contain an Operator you plan to install or a dependency of one, then they can be ignored.
1.4.2.2. Configuring OperatorHub for restricted networks
Cluster administrators can configure OLM and OperatorHub to use local content in a restricted network environment using a custom Operator catalog image. For this example, the procedure uses a custom redhat-operators catalog image previously built and pushed to a supported registry.
Prerequisites
- Workstation with unrestricted network access
- A custom Operator catalog image pushed to a supported registry
-
ocversion 4.3.5+ -
podmanversion 1.4.4+ - Access to mirror registry that supports Docker v2-2
If you are working with private registries, set the
REG_CREDSenvironment variable to the file path of your registry credentials for use in later steps. For example, for thepodmanCLI:$ REG_CREDS=${XDG_RUNTIME_DIR}/containers/auth.json
Procedure
The
oc adm catalog mirrorcommand extracts the contents of your custom Operator catalog image to generate the manifests required for mirroring. You can choose to either:- Allow the default behavior of the command to automatically mirror all of the image content to your mirror registry after generating manifests, or
-
Add the
--manifests-onlyflag to only generate the manifests required for mirroring, but do not actually mirror the image content to a registry yet. This can be useful for reviewing what will be mirrored, and it allows you to make any changes to the mapping list if you only require a subset of the content. You can then use that file with theoc image mirrorcommand to mirror the modified list of images in a later step.
On your workstation with unrestricted network access, run the following command:
$ oc adm catalog mirror \ <registry_host_name>:<port>/olm/redhat-operators:v1 \1 <registry_host_name>:<port> \ [-a ${REG_CREDS}] \2 [--insecure] \3 --filter-by-os='.*' \4 [--manifests-only] 5- 1
- Specify your Operator catalog image.
- 2
- Optional: If required, specify the location of your registry credentials file.
- 3
- Optional: If you do not want to configure trust for the target registry, add the
--insecureflag. - 4
- This flag is currently required due to a known issue with multiple architecture support.
- 5
- Optional: Only generate the manifests required for mirroring and do not actually mirror the image content to a registry.
WarningIf the
--filter-by-osflag remains unset or set to any value other than.*, the command filters out different architectures, which changes the digest of the manifest list, also known as a multi-arch image. The incorrect digest causes deployments of those images and Operators on disconnected clusters to fail. For more information, see BZ#1890951.Example output
using database path mapping: /:/tmp/190214037 wrote database to /tmp/190214037 using database at: /tmp/190214037/bundles.db 1 ...- 1
- Temporary database generated by the command.
After running the command, a
<image_name>-manifests/directory is created in the current directory and generates the following files:-
The
imageContentSourcePolicy.yamlfile defines anImageContentSourcePolicyobject that can configure nodes to translate between the image references stored in Operator manifests and the mirrored registry. -
The
mapping.txtfile contains all of the source images and where to map them in the target registry. This file is compatible with theoc image mirrorcommand and can be used to further customize the mirroring configuration.
If you used the
--manifests-onlyflag in the previous step and want to mirror only a subset of the content:Modify the list of images in your
mapping.txtfile to your specifications. If you are unsure of the exact names and versions of the subset of images you want to mirror, use the following steps to find them:Run the
sqlite3tool against the temporary database that was generated by theoc adm catalog mirrorcommand to retrieve a list of images matching a general search query. The output helps inform how you will later edit yourmapping.txtfile.For example, to retrieve a list of images that are similar to the string
clusterlogging.4.3:$ echo "select * from related_image \ where operatorbundle_name like 'clusterlogging.4.3%';" \ | sqlite3 -line /tmp/190214037/bundles.db 1- 1
- Refer to the previous output of the
oc adm catalog mirrorcommand to find the path of the database file.
Example output
image = registry.redhat.io/openshift4/ose-logging-kibana5@sha256:aa4a8b2a00836d0e28aa6497ad90a3c116f135f382d8211e3c55f34fb36dfe61
operatorbundle_name = clusterlogging.4.3.33-202008111029.p0

image = registry.redhat.io/openshift4/ose-oauth-proxy@sha256:6b4db07f6e6c962fc96473d86c44532c93b146bbefe311d0c348117bf759c506
operatorbundle_name = clusterlogging.4.3.33-202008111029.p0
...
Use the results from the previous step to edit the
mapping.txtfile to only include the subset of images you want to mirror.For example, you can use the
imagevalues from the previous example output to find that the following matching lines exist in yourmapping.txtfile:Matching image mappings in
mapping.txtregistry.redhat.io/openshift4/ose-logging-kibana5@sha256:aa4a8b2a00836d0e28aa6497ad90a3c116f135f382d8211e3c55f34fb36dfe61=<registry_host_name>:<port>/openshift4-ose-logging-kibana5:a767c8f0 registry.redhat.io/openshift4/ose-oauth-proxy@sha256:6b4db07f6e6c962fc96473d86c44532c93b146bbefe311d0c348117bf759c506=<registry_host_name>:<port>/openshift4-ose-oauth-proxy:3754ea2b
In this example, if you only want to mirror these images, you would then remove all other entries in the
mapping.txtfile and leave only the above two lines.
Still on your workstation with unrestricted network access, use your modified
mapping.txtfile to mirror the images to your registry using theoc image mirrorcommand:$ oc image mirror \ [-a ${REG_CREDS}] \ --filter-by-os='.*' \ -f ./redhat-operators-manifests/mapping.txtWarningIf the
--filter-by-osflag remains unset or set to any value other than.*, the command filters out different architectures, which changes the digest of the manifest list, also known as a multi-arch image. The incorrect digest causes deployments of those images and Operators on disconnected clusters to fail.
Apply the
ImageContentSourcePolicyobject:$ oc apply -f ./redhat-operators-manifests/imageContentSourcePolicy.yaml
Create a
CatalogSourceobject that references your catalog image.Modify the following to your specifications and save it as a
catalogsource.yamlfile:apiVersion: operators.coreos.com/v1alpha1 kind: CatalogSource metadata: name: my-operator-catalog namespace: openshift-marketplace spec: sourceType: grpc image: <registry_host_name>:<port>/olm/redhat-operators:v1 1 displayName: My Operator Catalog publisher: grpc- 1
- Specify your custom Operator catalog image.
Use the file to create the
CatalogSourceobject:$ oc create -f catalogsource.yaml
Verify the following resources are created successfully.
Check the pods:
$ oc get pods -n openshift-marketplace
Example output
NAME                                    READY   STATUS    RESTARTS  AGE
my-operator-catalog-6njx6               1/1     Running   0         28s
marketplace-operator-d9f549946-96sgr    1/1     Running   0         26h
Check the catalog source:
$ oc get catalogsource -n openshift-marketplace
Example output
NAME                  DISPLAY               TYPE PUBLISHER  AGE
my-operator-catalog   My Operator Catalog   grpc            5s
Check the package manifest:
$ oc get packagemanifest -n openshift-marketplace
Example output
NAME    CATALOG              AGE
etcd    My Operator Catalog  34s
You can now install the Operators from the OperatorHub page on your restricted network OpenShift Container Platform cluster web console.
1.4.2.3. Installing the Migration Toolkit for Containers on an OpenShift Container Platform 4.5 target cluster in a restricted environment
You can install the Migration Toolkit for Containers (MTC) on an OpenShift Container Platform 4.5 target cluster.
Prerequisites
-
You must be logged in as a user with
cluster-adminprivileges on all clusters. - You must create a custom Operator catalog and push it to a mirror registry.
- You must configure Operator Lifecycle Manager to install the Migration Toolkit for Containers Operator from the mirror registry.
Procedure
- In the OpenShift Container Platform web console, click Operators → OperatorHub.
- Use the Filter by keyword field to find the Migration Toolkit for Containers Operator.
Select the Migration Toolkit for Containers Operator and click Install.
NoteDo not change the subscription approval option to Automatic. The Migration Toolkit for Containers version must be the same on the source and the target clusters.
Click Install.
On the Installed Operators page, the Migration Toolkit for Containers Operator appears in the openshift-migration project with the status Succeeded.
- Click Migration Toolkit for Containers Operator.
- Under Provided APIs, locate the Migration Controller tile, and click Create Instance.
- Click Create.
- Click Workloads → Pods to verify that the MTC pods are running.
1.4.2.4. Installing the Migration Toolkit for Containers on an OpenShift Container Platform 3 source cluster in a restricted environment
You can create a manifest file based on the Migration Toolkit for Containers (MTC) Operator image and edit the manifest to point to your local image registry. Then, you can use the local image to create the Migration Toolkit for Containers Operator on an OpenShift Container Platform 3 source cluster.
You must install the same MTC version on the OpenShift Container Platform 3 and 4 clusters.
To ensure that you have the latest version on the OpenShift Container Platform 3 cluster, download the operator.yml and controller-3.yml files when you are ready to create and run the migration plan.
Prerequisites
-
You must be logged in as a user with
cluster-adminprivileges on all clusters. -
You must have access to
registry.redhat.io. -
You must have
podmaninstalled. - The source cluster must be OpenShift Container Platform 3.7, 3.9, 3.10, or 3.11.
- You must have a Linux workstation with unrestricted network access.
- You must have access to a mirror registry that supports Docker v2-2
Procedure
On the workstation with unrestricted network access, log in to
registry.redhat.iowith your Red Hat Customer Portal credentials:$ sudo podman login registry.redhat.io
Download the
operator.ymlfile:$ sudo podman cp $(sudo podman create \ registry.redhat.io/rhmtc/openshift-migration-rhel7-operator:v1.4):/operator.yml ./
Download the
controller-3.ymlfile:$ sudo podman cp $(sudo podman create \ registry.redhat.io/rhmtc/openshift-migration-rhel7-operator:v1.4):/controller-3.yml ./
Obtain the Operator image value from the
mapping.txtfile that was created when you ran theoc adm catalog mirroron the OpenShift Container Platform 4 cluster:$ grep openshift-migration-rhel7-operator ./mapping.txt | grep rhmtc
The output shows the mapping between the
registry.redhat.ioimage and your mirror registry image.Example output
registry.redhat.io/rhmtc/openshift-migration-rhel7-operator@sha256:468a6126f73b1ee12085ca53a312d1f96ef5a2ca03442bcb63724af5e2614e8a=<registry.apps.example.com>/rhmtc/openshift-migration-rhel7-operator
Update the
imageandREGISTRYvalues in the Operator configuration file:containers: - name: ansible image: <registry.apps.example.com>/rhmtc/openshift-migration-rhel7-operator@sha256:<468a6126f73b1ee12085ca53a312d1f96ef5a2ca03442bcb63724af5e2614e8a> 1 ... - name: operator image: <registry.apps.example.com>/rhmtc/openshift-migration-rhel7-operator@sha256:<468a6126f73b1ee12085ca53a312d1f96ef5a2ca03442bcb63724af5e2614e8a> 2 ... env: - name: REGISTRY value: <registry.apps.example.com> 3- Log in to your OpenShift Container Platform 3 cluster.
Create the Migration Toolkit for Containers Operator object:
$ oc create -f operator.yml
Example output
namespace/openshift-migration created rolebinding.rbac.authorization.k8s.io/system:deployers created serviceaccount/migration-operator created customresourcedefinition.apiextensions.k8s.io/migrationcontrollers.migration.openshift.io created role.rbac.authorization.k8s.io/migration-operator created rolebinding.rbac.authorization.k8s.io/migration-operator created clusterrolebinding.rbac.authorization.k8s.io/migration-operator created deployment.apps/migration-operator created Error from server (AlreadyExists): error when creating "./operator.yml": rolebindings.rbac.authorization.k8s.io "system:image-builders" already exists 1 Error from server (AlreadyExists): error when creating "./operator.yml": rolebindings.rbac.authorization.k8s.io "system:image-pullers" already exists- 1
- You can ignore
Error from server (AlreadyExists)messages. They are caused by the Migration Toolkit for Containers Operator creating resources for earlier versions of OpenShift Container Platform 3 that are provided in later releases.
Create the
MigrationControllerobject:$ oc create -f controller-3.yml
Verify that the
VeleroandResticpods are running:$ oc get pods -n openshift-migration
1.4.3. Upgrading the Migration Toolkit for Containers
You can upgrade the Migration Toolkit for Containers (MTC) by using the OpenShift Container Platform web console.
You must ensure that the same MTC version is installed on all clusters.
If you are upgrading MTC version 1.3, you must perform an additional procedure to update the MigPlan custom resource (CR).
1.4.3.1. Upgrading the Migration Toolkit for Containers on an OpenShift Container Platform 4 cluster
You can upgrade the Migration Toolkit for Containers (MTC) on an OpenShift Container Platform 4 cluster by using the OpenShift Container Platform web console.
Prerequisites
-
You must be logged in as a user with
cluster-adminprivileges.
Procedure
In the OpenShift Container Platform console, navigate to Operators → Installed Operators.
Operators that have a pending upgrade display an Upgrade available status.
- Click Migration Toolkit for Containers Operator.
- Click the Subscription tab. Any upgrades requiring approval are displayed next to Upgrade Status. For example, it might display 1 requires approval.
- Click 1 requires approval, then click Preview Install Plan.
- Review the resources that are listed as available for upgrade and click Approve.
- Navigate back to the Operators → Installed Operators page to monitor the progress of the upgrade. When complete, the status changes to Succeeded and Up to date.
- Click Workloads → Pods to verify that the MTC pods are running.
1.4.3.2. Upgrading the Migration Toolkit for Containers on an OpenShift Container Platform 3 cluster
You can upgrade Migration Toolkit for Containers (MTC) on an OpenShift Container Platform 3 cluster with podman.
Prerequisites
-
You must be logged in as a user with
cluster-adminprivileges. -
You must have access to
registry.redhat.io. -
You must have
podmaninstalled.
Procedure
Log in to
registry.redhat.iowith your Red Hat Customer Portal credentials:$ sudo podman login registry.redhat.io
Download the latest
operator.ymlfile:$ sudo podman cp $(sudo podman create \ registry.redhat.io/rhmtc/openshift-migration-rhel7-operator:v1.4):/operator.yml ./ 1- 1
- You can specify a z-stream release, if necessary.
Replace the Migration Toolkit for Containers Operator:
$ oc replace --force -f operator.yml
Apply the changes:
For MTC 1.1.2 and earlier versions, delete the
Resticpods:$ oc delete pod <restic_pod>
For MTC 1.2 and later versions:
Scale the
migration-operatordeployment to0to stop the deployment:$ oc scale -n openshift-migration --replicas=0 deployment/migration-operator
Scale the
migration-operatordeployment to1to start the deployment and apply the changes:$ oc scale -n openshift-migration --replicas=1 deployment/migration-operator
Verify that the
migration-operatorwas upgraded:$ oc -o yaml -n openshift-migration get deployment/migration-operator | grep image: | awk -F ":" '{ print $NF }'Download the latest
controller-3.ymlfile:$ sudo podman cp $(sudo podman create \ registry.redhat.io/rhmtc/openshift-migration-rhel7-operator:v1.4):/controller-3.yml ./
Create the
migration-controllerobject:$ oc create -f controller-3.yml
If your OpenShift Container Platform version is 3.10 or earlier, set the security context constraint of the
migration-controllerservice account toanyuidto enable direct image migration and direct volume migration:$ oc adm policy add-scc-to-user anyuid -z migration-controller -n openshift-migration
Verify that the MTC pods are running:
$ oc get pods -n openshift-migration
If you have previously added the OpenShift Container Platform 3 cluster to the MTC web console, you must update the service account token in the web console because the upgrade process deletes and restores the
openshift-migrationnamespace:Obtain the service account token:
$ oc sa get-token migration-controller -n openshift-migration
- In the MTC web console, click Clusters.
-
Click the Options menu
 next to the cluster and select Edit.
- Enter the new service account token in the Service account token field.
- Click Update cluster and then click Close.
1.4.3.3. Upgrading MTC 1.3 to 1.4
If you are upgrading Migration Toolkit for Containers (MTC) version 1.3.x to 1.4, you must update the MigPlan custom resource (CR) manifest on the cluster on which the MigrationController pod is running.
Because the indirectImageMigration and indirectVolumeMigration parameters do not exist in MTC 1.3, their default value in version 1.4 is false, which means that direct image migration and direct volume migration are enabled. Because the direct migration requirements are not fulfilled, the migration plan cannot reach a Ready state unless these parameter values are changed to true.
Prerequisites
- You must have MTC 1.3 installed.
-
You must be logged in as a user with
cluster-adminprivileges.
Procedure
-
Log in to the cluster on which the
MigrationControllerpod is running. Get the
MigPlanCR manifest:$ oc get migplan <migplan> -o yaml -n openshift-migration
Update the following parameter values and save the file as
migplan.yaml:... spec: indirectImageMigration: true indirectVolumeMigration: true
Replace the
MigPlanCR manifest to apply the changes:$ oc replace -f migplan.yaml -n openshift-migration
Get the updated
MigPlanCR manifest to verify the changes:$ oc get migplan <migplan> -o yaml -n openshift-migration
1.5. Configuring object storage for a replication repository
You must configure an object storage to use as a replication repository. The Migration Toolkit for Containers (MTC) copies data from the source cluster to the replication repository, and then from the replication repository to the target cluster.
MTC supports the file system and snapshot data copy methods for migrating data from the source cluster to the target cluster. You can select a method that is suited for your environment and is supported by your storage provider.
The following storage providers are supported:
- Multi-Cloud Object Gateway (MCG)
- Amazon Web Services (AWS) S3
- Google Cloud Provider (GCP)
- Microsoft Azure
- Generic S3 object storage, for example, Minio or Ceph S3
In a restricted environment, you can create an internally hosted replication repository.
Prerequisites
- All clusters must have uninterrupted network access to the replication repository.
- If you use a proxy server with an internally hosted replication repository, you must ensure that the proxy allows access to the replication repository.
1.5.1. Configuring a Multi-Cloud Object Gateway storage bucket as a replication repository
You can install the OpenShift Container Storage Operator and configure a Multi-Cloud Object Gateway (MCG) storage bucket as a replication repository for the Migration Toolkit for Containers (MTC).
1.5.1.1. Installing the OpenShift Container Storage Operator
You can install the OpenShift Container Storage Operator from OperatorHub.
Procedure
- In the OpenShift Container Platform web console, click Operators → OperatorHub.
- Use Filter by keyword (in this case, OCS) to find the OpenShift Container Storage Operator.
- Select the OpenShift Container Storage Operator and click Install.
- Select an Update Channel, Installation Mode, and Approval Strategy.
Click Install.
On the Installed Operators page, the OpenShift Container Storage Operator appears in the openshift-storage project with the status Succeeded.
1.5.1.2. Creating the Multi-Cloud Object Gateway storage bucket
You can create the Multi-Cloud Object Gateway (MCG) storage bucket’s custom resources (CRs).
Procedure
Log in to the OpenShift Container Platform cluster:
$ oc login
Create the
NooBaaCR configuration file,noobaa.yml, with the following content:apiVersion: noobaa.io/v1alpha1 kind: NooBaa metadata: name: noobaa namespace: openshift-storage spec: dbResources: requests: cpu: 0.5 1 memory: 1Gi coreResources: requests: cpu: 0.5 2 memory: 1GiCreate the
NooBaaobject:$ oc create -f noobaa.yml
Create the
BackingStoreCR configuration file,bs.yml, with the following content:apiVersion: noobaa.io/v1alpha1 kind: BackingStore metadata: finalizers: - noobaa.io/finalizer labels: app: noobaa name: mcg-pv-pool-bs namespace: openshift-storage spec: pvPool: numVolumes: 3 1 resources: requests: storage: 50Gi 2 storageClass: gp2 3 type: pv-poolCreate the
BackingStoreobject:$ oc create -f bs.yml
Create the
BucketClassCR configuration file,bc.yml, with the following content:apiVersion: noobaa.io/v1alpha1 kind: BucketClass metadata: labels: app: noobaa name: mcg-pv-pool-bc namespace: openshift-storage spec: placementPolicy: tiers: - backingStores: - mcg-pv-pool-bs placement: SpreadCreate the
BucketClassobject:$ oc create -f bc.yml
Create the
ObjectBucketClaimCR configuration file,obc.yml, with the following content:apiVersion: objectbucket.io/v1alpha1 kind: ObjectBucketClaim metadata: name: migstorage namespace: openshift-storage spec: bucketName: migstorage 1 storageClassName: openshift-storage.noobaa.io additionalConfig: bucketclass: mcg-pv-pool-bc- 1
- Record the bucket name for adding the replication repository to the MTC web console.
Create the
ObjectBucketClaimobject:$ oc create -f obc.yml
Watch the resource creation process to verify that the
ObjectBucketClaimstatus isBound:$ watch -n 30 'oc get -n openshift-storage objectbucketclaim migstorage -o yaml'
This process can take five to ten minutes.
Obtain and record the following values, which are required when you add the replication repository to the MTC web console:
S3 endpoint:
$ oc get route -n openshift-storage s3
S3 provider access key:
$ oc get secret -n openshift-storage migstorage -o go-template='{{ .data.AWS_ACCESS_KEY_ID }}' | base64 --decodeS3 provider secret access key:
$ oc get secret -n openshift-storage migstorage -o go-template='{{ .data.AWS_SECRET_ACCESS_KEY }}' | base64 --decode
1.5.2. Configuring an AWS S3 storage bucket as a replication repository
You can configure an AWS S3 storage bucket as a replication repository for the Migration Toolkit for Containers (MTC).
Prerequisites
- The AWS S3 storage bucket must be accessible to the source and target clusters.
- You must have the AWS CLI installed.
If you are using the snapshot copy method:
- You must have access to EC2 Elastic Block Storage (EBS).
- The source and target clusters must be in the same region.
- The source and target clusters must have the same storage class.
- The storage class must be compatible with snapshots.
Procedure
Create an AWS S3 bucket:
$ aws s3api create-bucket \ --bucket <bucket_name> \ 1 --region <bucket_region> 2Create the IAM user
velero:$ aws iam create-user --user-name velero
Create an EC2 EBS snapshot policy:
$ cat > velero-ec2-snapshot-policy.json <<EOF
{
    "Version": "2012-10-17",
    "Statement": [
        {
            "Effect": "Allow",
            "Action": [
                "ec2:DescribeVolumes",
                "ec2:DescribeSnapshots",
                "ec2:CreateTags",
                "ec2:CreateVolume",
                "ec2:CreateSnapshot",
                "ec2:DeleteSnapshot"
            ],
            "Resource": "*"
        }
    ]
}
EOF
Create an AWS S3 access policy for one or for all S3 buckets:
$ cat > velero-s3-policy.json <<EOF { "Version": "2012-10-17", "Statement": [ { "Effect": "Allow", "Action": [ "s3:GetObject", "s3:DeleteObject", "s3:PutObject", "s3:AbortMultipartUpload", "s3:ListMultipartUploadParts" ], "Resource": [ "arn:aws:s3:::<bucket_name>/*" 1 ] }, { "Effect": "Allow", "Action": [ "s3:ListBucket", "s3:GetBucketLocation", "s3:ListBucketMultipartUploads" ], "Resource": [ "arn:aws:s3:::<bucket_name>" 2 ] } ] } EOFExample output
"Resource": [
    "arn:aws:s3:::*"
Attach the EC2 EBS policy to
velero:$ aws iam put-user-policy \ --user-name velero \ --policy-name velero-ebs \ --policy-document file://velero-ec2-snapshot-policy.json
Attach the AWS S3 policy to
velero:$ aws iam put-user-policy \ --user-name velero \ --policy-name velero-s3 \ --policy-document file://velero-s3-policy.json
Create an access key for
velero:$ aws iam create-access-key --user-name velero { "AccessKey": { "UserName": "velero", "Status": "Active", "CreateDate": "2017-07-31T22:24:41.576Z", "SecretAccessKey": <AWS_SECRET_ACCESS_KEY>, 1 "AccessKeyId": <AWS_ACCESS_KEY_ID> 2 } }
1.5.3. Configuring a Google Cloud Provider storage bucket as a replication repository
You can configure a Google Cloud Provider (GCP) storage bucket as a replication repository for the Migration Toolkit for Containers (MTC).
Prerequisites
- The GCP storage bucket must be accessible to the source and target clusters.
-
You must have
gsutilinstalled. If you are using the snapshot copy method:
- The source and target clusters must be in the same region.
- The source and target clusters must have the same storage class.
- The storage class must be compatible with snapshots.
Procedure
Log in to
gsutil:$ gsutil init
Example output
Welcome! This command will take you through the configuration of gcloud.

Your current configuration has been set to: [default]

To continue, you must login. Would you like to login (Y/n)?
Set the
BUCKETvariable:$ BUCKET=<bucket_name> 1- 1
- Specify your bucket name.
Create a storage bucket:
$ gsutil mb gs://$BUCKET/
Set the
PROJECT_IDvariable to your active project:$ PROJECT_ID=`gcloud config get-value project`
Create a
veleroIAM service account:$ gcloud iam service-accounts create velero \ --display-name "Velero Storage"Create the
SERVICE_ACCOUNT_EMAILvariable:$ SERVICE_ACCOUNT_EMAIL=`gcloud iam service-accounts list \ --filter="displayName:Velero Storage" \ --format 'value(email)'`
Create the
ROLE_PERMISSIONSvariable:$ ROLE_PERMISSIONS=( compute.disks.get compute.disks.create compute.disks.createSnapshot compute.snapshots.get compute.snapshots.create compute.snapshots.useReadOnly compute.snapshots.delete compute.zones.get )Create the
velero.servercustom role:$ gcloud iam roles create velero.server \ --project $PROJECT_ID \ --title "Velero Server" \ --permissions "$(IFS=","; echo "${ROLE_PERMISSIONS[*]}")"Add IAM policy binding to the project:
$ gcloud projects add-iam-policy-binding $PROJECT_ID \
    --member serviceAccount:$SERVICE_ACCOUNT_EMAIL \
    --role projects/$PROJECT_ID/roles/velero.server
Update the IAM service account:
$ gsutil iam ch serviceAccount:$SERVICE_ACCOUNT_EMAIL:objectAdmin gs://${BUCKET}Save the IAM service account keys to the
credentials-velerofile in the current directory:$ gcloud iam service-accounts keys create credentials-velero \ --iam-account $SERVICE_ACCOUNT_EMAIL
1.5.4. Configuring a Microsoft Azure Blob storage container as a replication repository
You can configure a Microsoft Azure Blob storage container as a replication repository for the Migration Toolkit for Containers (MTC).
Prerequisites
- You must have an Azure storage account.
- You must have the Azure CLI installed.
- The Azure Blob storage container must be accessible to the source and target clusters.
If you are using the snapshot copy method:
- The source and target clusters must be in the same region.
- The source and target clusters must have the same storage class.
- The storage class must be compatible with snapshots.
Procedure
Set the
AZURE_RESOURCE_GROUPvariable:$ AZURE_RESOURCE_GROUP=Velero_Backups
Create an Azure resource group:
$ az group create -n $AZURE_RESOURCE_GROUP --location <CentralUS> 1- 1
- Specify your location.
Set the
AZURE_STORAGE_ACCOUNT_IDvariable:$ AZURE_STORAGE_ACCOUNT_ID=velerobackups
Create an Azure storage account:
$ az storage account create \
  --name $AZURE_STORAGE_ACCOUNT_ID \
  --resource-group $AZURE_RESOURCE_GROUP \
  --sku Standard_GRS \
  --encryption-services blob \
  --https-only true \
  --kind BlobStorage \
  --access-tier Hot
Set the
BLOB_CONTAINERvariable:$ BLOB_CONTAINER=velero
Create an Azure Blob storage container:
$ az storage container create \
  -n $BLOB_CONTAINER \
  --public-access off \
  --account-name $AZURE_STORAGE_ACCOUNT_ID
Create a service principal and credentials for
velero:$ AZURE_SUBSCRIPTION_ID=`az account list --query '[?isDefault].id' -o tsv` \ AZURE_TENANT_ID=`az account list --query '[?isDefault].tenantId' -o tsv` \ AZURE_CLIENT_SECRET=`az ad sp create-for-rbac --name "velero" --role "Contributor" --query 'password' -o tsv` \ AZURE_CLIENT_ID=`az ad sp list --display-name "velero" --query '[0].appId' -o tsv`
Save the service principal credentials in the
credentials-velerofile:$ cat << EOF > ./credentials-velero AZURE_SUBSCRIPTION_ID=${AZURE_SUBSCRIPTION_ID} AZURE_TENANT_ID=${AZURE_TENANT_ID} AZURE_CLIENT_ID=${AZURE_CLIENT_ID} AZURE_CLIENT_SECRET=${AZURE_CLIENT_SECRET} AZURE_RESOURCE_GROUP=${AZURE_RESOURCE_GROUP} AZURE_CLOUD_NAME=AzurePublicCloud EOF
1.6. Migrating your applications
You can migrate your applications by using the Migration Toolkit for Containers (MTC) web console or from the command line.
1.6.1. Prerequisites
The Migration Toolkit for Containers (MTC) has the following prerequisites:
-
You must be logged in as a user with
cluster-adminprivileges on all clusters. - The MTC version must be the same on all clusters.
If your application uses internal images from the
openshiftnamespace, you must ensure that the required versions of the images are present on the target cluster.You can manually update an image stream tag in order to use a deprecated OpenShift Container Platform 3 image on an OpenShift Container Platform 4.5 cluster.
Clusters:
- The source cluster must be upgraded to the latest MTC z-stream release.
-
The cluster on which the
migration-controllerpod is running must have unrestricted network access to the other clusters. - The clusters must have unrestricted network access to each other.
- The clusters must have unrestricted network access to the replication repository.
- The clusters must be able to communicate using OpenShift routes on port 443.
- The clusters must have no critical conditions.
- The clusters must be in a ready state.
Volume migration:
- The persistent volumes (PVs) must be valid.
- The PVs must be bound to persistent volume claims.
- If you copy the PVs by using the move method, the clusters must have unrestricted network access to the remote volume.
If you copy the PVs by using the snapshot copy method, the following prerequisites apply:
- The cloud provider must support snapshots.
- The volumes must have the same cloud provider.
- The volumes must be located in the same geographic region.
- The volumes must have the same storage class.
- If you perform a direct volume migration in a proxy environment, you must configure an Stunnel TCP proxy.
- If you perform a direct image migration, you must expose the internal registry of the source cluster to external traffic.
1.6.1.1. Updating deprecated internal images with podman
If your application uses images from the openshift namespace, the required versions of the images must be present on the target cluster.
If the OpenShift Container Platform 3 image is deprecated in OpenShift Container Platform 4.5, you can manually update the image stream tag by using podman.
Prerequisites
-
You must have
podmaninstalled. -
You must be logged in as a user with
cluster-adminprivileges.
Procedure
- Expose the internal registries on the source and target clusters.
-
If you are using insecure registries, add your registry host values to the
[registries.insecure]section of/etc/container/registries.confto ensure thatpodmandoes not encounter a TLS verification error. Log in to the source cluster registry:
$ podman login -u $(oc whoami) -p $(oc whoami -t) --tls-verify=false <source_cluster>
Log in to the target cluster registry:
$ podman login -u $(oc whoami) -p $(oc whoami -t) --tls-verify=false <target_cluster>
Pull the deprecated image:
$ podman pull <source_cluster>/openshift/<image>
Tag the image for the target cluster registry:
$ podman tag <source_cluster>/openshift/<image> <target_cluster>/openshift/<image>
Push the image to the target cluster 4 registry:
$ podman push <target_cluster>/openshift/<image>
Verify that the image has a valid image stream on the target cluster:
$ oc get imagestream -n openshift | grep <image>
Example output
<image>    <target_cluster>/openshift/<image>     <versions>
more...      6 seconds ago
1.6.1.2. Creating a CA certificate bundle file
If you use a self-signed certificate to secure a cluster or a replication repository for the Migration Toolkit for Containers (MTC), certificate verification might fail with the following error message: Certificate signed by unknown authority.
You can create a custom CA certificate bundle file and upload it in the MTC web console when you add a cluster or a replication repository.
Procedure
Download a CA certificate from a remote endpoint and save it as a CA bundle file:
$ echo -n | openssl s_client -connect <host_FQDN>:<port> \ 1
  | sed -ne '/-BEGIN CERTIFICATE-/,/-END CERTIFICATE-/p' > <ca_bundle.cert> 2
1.6.1.3. Configuring a proxy for direct volume migration
If you are performing direct volume migration from a source cluster behind a proxy, you must configure an Stunnel proxy in the MigrationController custom resource (CR). Stunnel creates a transparent tunnel between the source and target clusters for the TCP connection without changing the certificates.
Direct volume migration supports only one proxy. The source cluster cannot access the route of the target cluster if the target cluster is also behind a proxy.
Prerequisites
-
You must be logged in as a user with
cluster-adminprivileges on all clusters.
Procedure
-
Log in to the cluster on which the
MigrationControllerpod runs. Get the
MigrationControllerCR manifest:$ oc get migrationcontroller <migration_controller> -n openshift-migration
Add the
stunnel_tcp_proxyparameter:apiVersion: migration.openshift.io/v1alpha1 kind: MigrationController metadata: name: migration-controller namespace: openshift-migration ... spec: stunnel_tcp_proxy: <stunnel_proxy> 1- 1
- Specify the Stunnel proxy:
http://<user_name>:<password>@<ip_address>:<port>.
-
Save the manifest as
migration-controller.yaml. Apply the updated manifest:
$ oc replace -f migration-controller.yaml -n openshift-migration
1.6.1.4. Writing an Ansible playbook for a migration hook
You can write an Ansible playbook to use as a migration hook. The hook is added to a migration plan by using the MTC web console or by specifying values for the spec.hooks parameters in the MigPlan custom resource (CR) manifest.
The Ansible playbook is mounted onto a hook container as a config map. The hook container runs as a job, using the cluster, service account, and namespace specified in the MigPlan CR. The hook container uses a specified service account token so that the tasks do not require authentication before they run in the cluster.
1.6.1.4.1. Ansible modules
You can use the Ansible shell module to run oc commands.
Example shell module
- hosts: localhost
  gather_facts: false
  tasks:
  - name: get pod name
    shell: oc get po --all-namespaces
You can use kubernetes.core modules, such as k8s_info, to interact with Kubernetes resources.
Example k8s_facts module
- hosts: localhost
  gather_facts: false
  tasks:
  - name: Get pod
    k8s_info:
      kind: pods
      api: v1
      namespace: openshift-migration
      name: "{{ lookup( 'env', 'HOSTNAME') }}"
    register: pods

  - name: Print pod name
    debug:
      msg: "{{ pods.resources[0].metadata.name }}"
You can use the fail module to produce a non-zero exit status in cases where a non-zero exit status would not normally be produced, ensuring that the success or failure of a hook is detected. Hooks run as jobs and the success or failure status of a hook is based on the exit status of the job container.
Example fail module
- hosts: localhost
  gather_facts: false
  tasks:
  - name: Set a boolean
    set_fact:
      do_fail: true

  - name: "fail"
    fail:
      msg: "Cause a failure"
    when: do_fail
1.6.1.4.2. Environment variables
The MigPlan CR name and migration namespaces are passed as environment variables to the hook container. These variables are accessed by using the lookup plug-in.
Example environment variables
- hosts: localhost
  gather_facts: false
  tasks:
  - set_fact:
      namespaces: "{{ (lookup( 'env', 'migration_namespaces')).split(',') }}"

  - debug:
      msg: "{{ item }}"
    with_items: "{{ namespaces }}"

  - debug:
      msg: "{{ lookup( 'env', 'migplan_name') }}"
1.6.1.5. Additional resources
1.6.2. Migrating your applications by using the MTC web console
You can configure clusters and a replication repository by using the MTC web console. Then, you can create and run a migration plan.
1.6.2.1. Launching the MTC web console
You can launch the Migration Toolkit for Containers (MTC) web console in a browser.
Prerequisites
- The MTC web console must have network access to the OpenShift Container Platform web console.
- The MTC web console must have network access to the OAuth authorization server.
Procedure
- Log in to the OpenShift Container Platform cluster on which you have installed MTC.
Obtain the MTC web console URL by entering the following command:
$ oc get -n openshift-migration route/migration -o go-template='https://{{ .spec.host }}'The output resembles the following:
https://migration-openshift-migration.apps.cluster.openshift.com.Launch a browser and navigate to the MTC web console.
NoteIf you try to access the MTC web console immediately after installing the Migration Toolkit for Containers Operator, the console might not load because the Operator is still configuring the cluster. Wait a few minutes and retry.
- If you are using self-signed CA certificates, you will be prompted to accept the CA certificate of the source cluster API server. The web page guides you through the process of accepting the remaining certificates.
- Log in with your OpenShift Container Platform username and password.
1.6.2.2. Adding a cluster to the Migration Toolkit for Containers web console
You can add a cluster to the Migration Toolkit for Containers (MTC) web console.
Prerequisites
If you are using Azure snapshots to copy data:
- You must specify the Azure resource group name for the cluster.
- The clusters must be in the same Azure resource group.
- The clusters must be in the same geographic location.
Procedure
- Log in to the cluster.
Obtain the
migration-controllerservice account token:$ oc sa get-token migration-controller -n openshift-migration
Example output
eyJhbGciOiJSUzI1NiIsImtpZCI6IiJ9.eyJpc3MiOiJrdWJlcm5ldGVzL3NlcnZpY2VhY2NvdW50Iiwia3ViZXJuZXRlcy5pby9zZXJ2aWNlYWNjb3VudC9uYW1lc3BhY2UiOiJtaWciLCJrdWJlcm5ldGVzLmlvL3NlcnZpY2VhY2NvdW50L3NlY3JldC5uYW1lIjoibWlnLXRva2VuLWs4dDJyIiwia3ViZXJuZXRlcy5pby9zZXJ2aWNlYWNjb3VudC9zZXJ2aWNlLWFjY291bnQubmFtZSI6Im1pZyIsImt1YmVybmV0ZXMuaW8vc2VydmljZWFjY291bnQvc2VydmljZS1hY2NvdW50LnVpZCI6ImE1YjFiYWMwLWMxYmYtMTFlOS05Y2NiLTAyOWRmODYwYjMwOCIsInN1YiI6InN5c3RlbTpzZXJ2aWNlYWNjb3VudDptaWc6bWlnIn0.xqeeAINK7UXpdRqAtOj70qhBJPeMwmgLomV9iFxr5RoqUgKchZRG2J2rkqmPm6vr7K-cm7ibD1IBpdQJCcVDuoHYsFgV4mp9vgOfn9osSDp2TGikwNz4Az95e81xnjVUmzh-NjDsEpw71DH92iHV_xt2sTwtzftS49LpPW2LjrV0evtNBP_t_RfskdArt5VSv25eORl7zScqfe1CiMkcVbf2UqACQjo3LbkpfN26HAioO2oH0ECPiRzT0Xyh-KwFutJLS9Xgghyw-LD9kPKcE_xbbJ9Y4Rqajh7WdPYuB0Jd9DPVrslmzK-F6cgHHYoZEv0SvLQi-PO0rpDrcjOEQQ
- In the MTC web console, click Clusters.
- Click Add cluster.
Fill in the following fields:
-
Cluster name: The cluster name can contain lower-case letters (
a-z) and numbers (0-9). It must not contain spaces or international characters. -
URL: Specify the API server URL, for example,
https://<www.example.com>:8443. -
Service account token: Paste the
migration-controllerservice account token. Exposed route host to image registry: If you are using direct image migration, specify the exposed route to the image registry of the source cluster, for example,
www.example.apps.cluster.com.You can specify a port. The default port is
5000.- Azure cluster: You must select this option if you use Azure snapshots to copy your data.
- Azure resource group: This field is displayed if Azure cluster is selected. Specify the Azure resource group.
- Require SSL verification: Optional: Select this option to verify SSL connections to the cluster.
- CA bundle file: This field is displayed if Require SSL verification is selected. If you created a custom CA certificate bundle file for self-signed certificates, click Browse, select the CA bundle file, and upload it.
-
Cluster name: The cluster name can contain lower-case letters (
Click Add cluster.
The cluster appears in the Clusters list.
1.6.2.3. Adding a replication repository to the MTC web console
You can add an object storage bucket as a replication repository to the Migration Toolkit for Containers (MTC) web console.
Prerequisites
- You must configure an object storage bucket for migrating the data.
Procedure
- In the MTC web console, click Replication repositories.
- Click Add repository.
Select a Storage provider type and fill in the following fields:
AWS for AWS S3, MCG, and generic S3 providers:
- Replication repository name: Specify the replication repository name in the MTC web console.
- S3 bucket name: Specify the name of the S3 bucket you created.
- S3 bucket region: Specify the S3 bucket region. Required for AWS S3. Optional for other S3 providers.
-
S3 endpoint: Specify the URL of the S3 service, not the bucket, for example,
https://<s3-storage.apps.cluster.com>. Required for a generic S3 provider. You must use thehttps://prefix. -
S3 provider access key: Specify the
<AWS_SECRET_ACCESS_KEY>for AWS or the S3 provider access key for MCG. -
S3 provider secret access key: Specify the
<AWS_ACCESS_KEY_ID>for AWS or the S3 provider secret access key for MCG. - Require SSL verification: Clear this check box if you are using a generic S3 provider.
- If you use a custom CA bundle, click Browse and browse to the Base64-encoded CA bundle file.
GCP:
- Replication repository name: Specify the replication repository name in the MTC web console.
- GCP bucket name: Specify the name of the GCP bucket.
-
GCP credential JSON blob: Specify the string in the
credentials-velerofile.
Azure:
- Replication repository name: Specify the replication repository name in the MTC web console.
- Azure resource group: Specify the resource group of the Azure Blob storage.
- Azure storage account name: Specify the Azure Blob storage account name.
-
Azure credentials - INI file contents: Specify the string in the
credentials-velerofile.
- Click Add repository and wait for connection validation.
Click Close.
The new repository appears in the Replication repositories list.
1.6.2.4. Creating a migration plan in the MTC web console
You can create a migration plan in the Migration Toolkit for Containers (MTC) web console.
Prerequisites
-
You must be logged in as a user with
cluster-adminprivileges on all clusters. - You must ensure that the same MTC version is installed on all clusters.
- You must add the clusters and the replication repository to the MTC web console.
- If you want to use the move data copy method to migrate a persistent volume (PV), the source and target clusters must have uninterrupted network access to the remote volume.
-
If you want to use direct image migration, the
MigClustercustom resource manifest of the source cluster must specify the exposed route of the internal image registry.
Procedure
- In the MTC web console, click Migration plans.
- Click Add migration plan.
Enter the Plan name and click Next.
The migration plan name must not exceed 253 lower-case alphanumeric characters (
a-z, 0-9) and must not contain spaces or underscores (_).- Select a Source cluster.
- Select a Target cluster.
- Select a Replication repository.
- Select the projects to be migrated and click Next.
- Select a Source cluster, a Target cluster, and a Repository, and click Next.
- On the Namespaces page, select the projects to be migrated and click Next.
On the Persistent volumes page, click a Migration type for each PV:
- The Copy option copies the data from the PV of a source cluster to the replication repository and then restores the data on a newly created PV, with similar characteristics, in the target cluster.
- The Move option unmounts a remote volume, for example, NFS, from the source cluster, creates a PV resource on the target cluster pointing to the remote volume, and then mounts the remote volume on the target cluster. Applications running on the target cluster use the same remote volume that the source cluster was using.
- Click Next.
On the Copy options page, select a Copy method for each PV:
- Snapshot copy backs up and restores data using the cloud provider’s snapshot functionality. It is significantly faster than Filesystem copy.
Filesystem copy backs up the files on the source cluster and restores them on the target cluster.
The file system copy method is required for direct volume migration.
- You can select Verify copy to verify data migrated with Filesystem copy. Data is verified by generating a checksum for each source file and checking the checksum after restoration. Data verification significantly reduces performance.
Select a Target storage class.
If you selected Filesystem copy, you can change the target storage class.
- Click Next.
On the Migration options page, the Direct image migration option is selected if you specified an exposed image registry route for the source cluster. The Direct PV migration option is selected if you are migrating data with Filesystem copy.
The direct migration options copy images and files directly from the source cluster to the target cluster. This option is much faster than copying images and files from the source cluster to the replication repository and then from the replication repository to the target cluster.
- Click Next.
Optional: On the Hooks page, click Add Hook to add a hook to the migration plan.
A hook runs custom code. You can add up to four hooks to a single migration plan. Each hook runs during a different migration step.
- Enter the name of the hook to display in the web console.
- If the hook is an Ansible playbook, select Ansible playbook and click Browse to upload the playbook or paste the contents of the playbook in the field.
- Optional: Specify an Ansible runtime image if you are not using the default hook image.
If the hook is not an Ansible playbook, select Custom container image and specify the image name and path.
A custom container image can include Ansible playbooks.
- Select Source cluster or Target cluster.
- Enter the Service account name and the Service account namespace.
Select the migration step for the hook:
- preBackup: Before the application workload is backed up on the source cluster
- postBackup: After the application workload is backed up on the source cluster
- preRestore: Before the application workload is restored on the target cluster
- postRestore: After the application workload is restored on the target cluster
- Click Add.
Click Finish.
The migration plan is displayed in the Migration plans list.
1.6.2.5. Running a migration plan in the MTC web console
You can stage or migrate applications and data with the migration plan you created in the Migration Toolkit for Containers (MTC) web console.
During migration, MTC sets the reclaim policy of migrated persistent volumes (PVs) to Retain on the target cluster.
The Backup custom resource contains a PVOriginalReclaimPolicy annotation that indicates the original reclaim policy. You can manually restore the reclaim policy of the migrated PVs.
Prerequisites
The MTC web console must contain the following:
-
Source cluster in a
Readystate -
Target cluster in a
Readystate - Replication repository
- Valid migration plan
Procedure
- Log in to the source cluster.
Delete old images:
$ oc adm prune images
- Log in to the MTC web console and click Migration plans.
Click the Options menu
next to a migration plan and select Stage to copy data from the source cluster to the target cluster without stopping the application.
You can run Stage multiple times to reduce the actual migration time.
-
When you are ready to migrate the application workload, the Options menu
beside a migration plan and select Migrate.
- Optional: In the Migrate window, you can select Do not stop applications on the source cluster during migration.
- Click Migrate.
When the migration is complete, verify that the application migrated successfully in the OpenShift Container Platform web console:
- Click Home → Projects.
- Click the migrated project to view its status.
- In the Routes section, click Location to verify that the application is functioning, if applicable.
- Click Workloads → Pods to verify that the pods are running in the migrated namespace.
- Click Storage → Persistent volumes to verify that the migrated persistent volume is correctly provisioned.
1.6.3. Migrating your applications from the command line
You can migrate your applications on the command line by using the MTC custom resources (CRs).
You can migrate applications from a local cluster to a remote cluster, from a remote cluster to a local cluster, and between remote clusters.
MTC terminology
The following terms are relevant for configuring clusters:
hostcluster:-
The
migration-controllerpod runs on thehostcluster. -
A
hostcluster does not require an exposed secure registry route for direct image migration.
-
The
-
Local cluster: The local cluster is often the same as the
hostcluster but this is not a requirement. Remote cluster:
- A remote cluster must have an exposed secure registry route for direct image migration.
-
A remote cluster must have a
SecretCR containing themigration-controllerservice account token.
The following terms are relevant for performing a migration:
- Source cluster: Cluster from which the applications are migrated.
- Destination cluster: Cluster to which the applications are migrated.
1.6.3.1. Migrating your applications with the Migration Toolkit for Containers API
You can migrate your applications on the command line with the Migration Toolkit for Containers (MTC) API.
You can migrate applications from a local cluster to a remote cluster, from a remote cluster to a local cluster, and between remote clusters.
This procedure describes how to perform indirect migration and direct migration:
- Indirect migration: Images, volumes, and Kubernetes objects are copied from the source cluster to the replication repository and then from the replication repository to the destination cluster.
- Direct migration: Images or volumes are copied directly from the source cluster to the destination cluster. Direct image migration and direct volume migration have significant performance benefits.
You create the following custom resources (CRs) to perform a migration:
MigClusterCR: Defines ahost, local, or remote clusterThe
migration-controllerpod runs on thehostcluster.-
SecretCR: Contains credentials for a remote cluster or storage MigStorageCR: Defines a replication repositoryDifferent storage providers require different parameters in the
MigStorageCR manifest.-
MigPlanCR: Defines a migration plan MigMigrationCR: Performs a migration defined in an associatedMigPlanYou can create multiple
MigMigrationCRs for a singleMigPlanCR for the following purposes:- To perform stage migrations, which copy most of the data without stopping the application, before running a migration. Stage migrations improve the performance of the migration.
- To cancel a migration in progress
- To roll back a completed migration
Prerequisites
-
You must have
cluster-adminprivileges for all clusters. -
You must install the OpenShift Container Platform CLI (
oc). - You must install the Migration Toolkit for Containers Operator on all clusters.
- The version of the installed Migration Toolkit for Containers Operator must be the same on all clusters.
- You must configure an object storage as a replication repository.
- If you are using direct image migration, you must expose a secure registry route on all remote clusters.
- If you are using direct volume migration, the source cluster must not have an HTTP proxy configured.
Procedure
Create a
MigClusterCR manifest for thehostcluster calledhost-cluster.yaml:apiVersion: migration.openshift.io/v1alpha1 kind: MigCluster metadata: name: host namespace: openshift-migration spec: isHostCluster: true
Create a
MigClusterCR for thehostcluster:$ oc create -f host-cluster.yaml -n openshift-migration
Create a
SecretCR manifest for each remote cluster calledcluster-secret.yaml:apiVersion: v1 kind: Secret metadata: name: <cluster_secret> namespace: openshift-config type: Opaque data: saToken: <sa_token> 1- 1
- Specify the base64-encoded
migration-controllerservice account (SA) token of the remote cluster.
You can obtain the SA token by running the following command:
$ oc sa get-token migration-controller -n openshift-migration | base64 -w 0
Create a
SecretCR for each remote cluster:$ oc create -f cluster-secret.yaml
Create a
MigClusterCR manifest for each remote cluster calledremote-cluster.yaml:apiVersion: migration.openshift.io/v1alpha1 kind: MigCluster metadata: name: <remote_cluster> namespace: openshift-migration spec: exposedRegistryPath: <exposed_registry_route> 1 insecure: false 2 isHostCluster: false serviceAccountSecretRef: name: <remote_cluster_secret> 3 namespace: openshift-config url: <remote_cluster_url> 4
- 1
- Optional: Specify the exposed registry route, for example,
docker-registry-default.apps.example.comif you are using direct image migration. - 2
- SSL verification is enabled if
false. CA certificates are not required or checked iftrue. - 3
- Specify the
SecretCR of the remote cluster. - 4
- Specify the URL of the remote cluster.
Create a
MigClusterCR for each remote cluster:$ oc create -f remote-cluster.yaml -n openshift-migration
Verify that all clusters are in a
Readystate:$ oc describe cluster <cluster_name>
Create a
SecretCR manifest for the replication repository calledstorage-secret.yaml:apiVersion: v1 kind: Secret metadata: namespace: openshift-config name: <migstorage_creds> type: Opaque data: aws-access-key-id: <key_id_base64> 1 aws-secret-access-key: <secret_key_base64> 2
AWS credentials are base64-encoded by default. If you are using another storage provider, you must encode your credentials by running the following command with each key:
$ echo -n "<key>" | base64 -w 0 1- 1
- Specify the key ID or the secret key. Both keys must be base64-encoded.
Create the
SecretCR for the replication repository:$ oc create -f storage-secret.yaml
Create a
MigStorageCR manifest for the replication repository calledmigstorage.yaml:apiVersion: migration.openshift.io/v1alpha1 kind: MigStorage metadata: name: <storage_name> namespace: openshift-migration spec: backupStorageConfig: awsBucketName: <bucket_name> 1 credsSecretRef: name: <storage_secret_ref> 2 namespace: openshift-config backupStorageProvider: <storage_provider_name> 3 volumeSnapshotConfig: credsSecretRef: name: <storage_secret_ref> 4 namespace: openshift-config volumeSnapshotProvider: <storage_provider_name> 5- 1
- Specify the bucket name.
- 2
- Specify the
SecretsCR of the object storage. You must ensure that the credentials stored in theSecretsCR of the object storage are correct. - 3
- Specify the storage provider.
- 4
- Optional: If you are copying data by using snapshots, specify the
SecretsCR of the object storage. You must ensure that the credentials stored in theSecretsCR of the object storage are correct. - 5
- Optional: If you are copying data by using snapshots, specify the storage provider.
Create the
MigStorageCR:$ oc create -f migstorage.yaml -n openshift-migration
Verify that the
MigStorageCR is in aReadystate:$ oc describe migstorage <migstorage_name>
Create a
MigPlanCR manifest calledmigplan.yaml:apiVersion: migration.openshift.io/v1alpha1 kind: MigPlan metadata: name: <migration_plan> namespace: openshift-migration spec: destMigClusterRef: name: host namespace: openshift-migration indirectImageMigration: true 1 indirectVolumeMigration: true 2 migStorageRef: name: <migstorage_ref> 3 namespace: openshift-migration namespaces: - <application_namespace> 4 srcMigClusterRef: name: <remote_cluster_ref> 5 namespace: openshift-migrationCreate the
MigPlanCR:$ oc create -f migplan.yaml -n openshift-migration
View the
MigPlaninstance to verify that it is in aReadystate:$ oc describe migplan <migplan_name> -n openshift-migration
Create a
MigMigrationCR manifest calledmigmigration.yaml:apiVersion: migration.openshift.io/v1alpha1 kind: MigMigration metadata: name: <migmigration_name> namespace: openshift-migration spec: migPlanRef: name: <migplan_name> 1 namespace: openshift-migration quiescePods: true 2 stage: false 3 rollback: false 4Create the
MigMigrationCR to start the migration defined in theMigPlanCR:$ oc create -f migmigration.yaml -n openshift-migration
Verify the progress of the migration by watching the
MigMigrationCR:$ oc watch migmigration <migmigration_name> -n openshift-migration
The output resembles the following:
Example output
Name:         c8b034c0-6567-11eb-9a4f-0bc004db0fbc
Namespace:    openshift-migration
Labels:       migration.openshift.io/migplan-name=django
Annotations:  openshift.io/touch: e99f9083-6567-11eb-8420-0a580a81020c
API Version:  migration.openshift.io/v1alpha1
Kind:         MigMigration
...
Spec:
  Mig Plan Ref:
    Name:       my_application
    Namespace:  openshift-migration
  Stage:        false
Status:
  Conditions:
    Category:              Advisory
    Last Transition Time:  2021-02-02T15:04:09Z
    Message:               Step: 19/47
    Reason:                InitialBackupCreated
    Status:                True
    Type:                  Running
    Category:              Required
    Last Transition Time:  2021-02-02T15:03:19Z
    Message:               The migration is ready.
    Status:                True
    Type:                  Ready
    Category:              Required
    Durable:               true
    Last Transition Time:  2021-02-02T15:04:05Z
    Message:               The migration registries are healthy.
    Status:                True
    Type:                  RegistriesHealthy
  Itinerary:               Final
  Observed Digest:         7fae9d21f15979c71ddc7dd075cb97061895caac5b936d92fae967019ab616d5
  Phase:                   InitialBackupCreated
  Pipeline:
    Completed:  2021-02-02T15:04:07Z
    Message:    Completed
    Name:       Prepare
    Started:    2021-02-02T15:03:18Z
    Message:    Waiting for initial Velero backup to complete.
    Name:       Backup
    Phase:      InitialBackupCreated
    Progress:
      Backup openshift-migration/c8b034c0-6567-11eb-9a4f-0bc004db0fbc-wpc44: 0 out of estimated total of 0 objects backed up (5s)
    Started:        2021-02-02T15:04:07Z
    Message:        Not started
    Name:           StageBackup
    Message:        Not started
    Name:           StageRestore
    Message:        Not started
    Name:           DirectImage
    Message:        Not started
    Name:           DirectVolume
    Message:        Not started
    Name:           Restore
    Message:        Not started
    Name:           Cleanup
  Start Timestamp:  2021-02-02T15:03:18Z
Events:
  Type    Reason   Age                 From                     Message
  ----    ------   ----                ----                     -------
  Normal  Running  57s                 migmigration_controller  Step: 2/47
  Normal  Running  57s                 migmigration_controller  Step: 3/47
  Normal  Running  57s (x3 over 57s)   migmigration_controller  Step: 4/47
  Normal  Running  54s                 migmigration_controller  Step: 5/47
  Normal  Running  54s                 migmigration_controller  Step: 6/47
  Normal  Running  52s (x2 over 53s)   migmigration_controller  Step: 7/47
  Normal  Running  51s (x2 over 51s)   migmigration_controller  Step: 8/47
  Normal  Ready    50s (x12 over 57s)  migmigration_controller  The migration is ready.
  Normal  Running  50s                 migmigration_controller  Step: 9/47
  Normal  Running  50s                 migmigration_controller  Step: 10/47
1.6.3.2. MTC custom resource manifests
Migration Toolkit for Containers (MTC) uses the following custom resource (CR) manifests to create CRs for migrating applications.
1.6.3.2.1. DirectImageMigration
The DirectImageMigration CR copies images directly from the source cluster to the destination cluster.
apiVersion: migration.openshift.io/v1alpha1
kind: DirectImageMigration
metadata:
  labels:
    controller-tools.k8s.io: "1.0"
  name: <directimagemigration_name>
spec:
  srcMigClusterRef:
    name: <source_cluster_ref> 1
    namespace: openshift-migration
  destMigClusterRef:
    name: <destination_cluster_ref> 2
    namespace: openshift-migration
  namespaces:
- <namespace> 31.6.3.2.2. DirectImageStreamMigration
The DirectImageStreamMigration CR copies image stream references directly from the source cluster to the destination cluster.
apiVersion: migration.openshift.io/v1alpha1
kind: DirectImageStreamMigration
metadata:
  labels:
    controller-tools.k8s.io: "1.0"
  name: directimagestreammigration_name
spec:
  srcMigClusterRef:
    name: <source_cluster_ref> 1
    namespace: openshift-migration
  destMigClusterRef:
    name: <destination_cluster_ref> 2
    namespace: openshift-migration
  imageStreamRef:
    name: <image_stream_name> 3
    namespace: <source_image_stream_namespace> 4
destNamespace: <destination_image_stream_namespace> 51.6.3.2.3. DirectVolumeMigration
The DirectVolumeMigration CR copies persistent volumes (PVs) directly from the source cluster to the destination cluster.
apiVersion: migration.openshift.io/v1alpha1
kind: DirectVolumeMigration
metadata:
  name: <directvolumemigration_name>
  namespace: openshift-migration
spec:
  createDestinationNamespaces: false 1
  deleteProgressReportingCRs: false 2
  destMigClusterRef:
    name: host 3
    namespace: openshift-migration
  persistentVolumeClaims:
  - name: <pvc_name> 4
    namespace: <pvc_namespace> 5
  srcMigClusterRef:
    name: <source_cluster_ref> 6
    namespace: openshift-migration
- 1
- Namespaces are created for the PVs on the destination cluster if
true. - 2
- The
DirectVolumeMigrationProgressCRs are deleted after migration iftrue. The default value isfalseso thatDirectVolumeMigrationProgressCRs are retained for troubleshooting. - 3
- Update the cluster name if the destination cluster is not the host cluster.
- 4
- Specify one or more PVCs to be migrated with direct volume migration.
- 5
- Specify the namespace of each PVC.
- 6
- Specify the
MigClusterCR name of the source cluster.
1.6.3.2.4. DirectVolumeMigrationProgress
The DirectVolumeMigrationProgress CR shows the progress of the DirectVolumeMigration CR.
apiVersion: migration.openshift.io/v1alpha1
kind: DirectVolumeMigrationProgress
metadata:
  labels:
    controller-tools.k8s.io: "1.0"
  name: directvolumemigrationprogress_name
spec:
  clusterRef:
    name: source_cluster
    namespace: openshift-migration
  podRef:
    name: rsync_pod
    namespace: openshift-migration
1.6.3.2.5. MigAnalytic
The MigAnalytic CR collects the number of images, Kubernetes resources, and the PV capacity from an associated MigPlan CR.
apiVersion: migration.openshift.io/v1alpha1
kind: MigAnalytic
metadata:
  annotations:
    migplan: <migplan_name> 1
  name: miganalytic_name
  namespace: openshift-migration
  labels:
    migplan: <migplan_name> 2
spec:
  analyzeImageCount: true 3
  analyzeK8SResources: true 4
  analyzePVCapacity: true 5
  listImages: false 6
  listImagesLimit: 50 7
  migPlanRef:
    name: migplan_name 8
namespace: openshift-migration- 1
- Specify the
MigPlanCR name associated with theMigAnalyticCR. - 2
- Specify the
MigPlanCR name associated with theMigAnalyticCR. - 3
- Optional: The number of images is returned if
true. - 4
- Optional: Returns the number, kind, and API version of the Kubernetes resources if
true. - 5
- Optional: Returns the PV capacity if
true. - 6
- Returns a list of image names if
true. Default isfalseso that the output is not excessively long. - 7
- Optional: Specify the maximum number of image names to return if
listImagesistrue. - 8
- Specify the
MigPlanCR name associated with theMigAnalyticCR.
1.6.3.2.6. MigCluster
The MigCluster CR defines a host, local, or remote cluster.
apiVersion: migration.openshift.io/v1alpha1
kind: MigCluster
metadata:
  labels:
    controller-tools.k8s.io: "1.0"
  name: host 1
  namespace: openshift-migration
spec:
  isHostCluster: true 2
  azureResourceGroup: <azure_resource_group> 3
  caBundle: <ca_bundle_base64> 4
  insecure: false 5
  refresh: false 6
# The 'restartRestic' parameter is relevant for a source cluster.
# restartRestic: true 7
# The following parameters are relevant for a remote cluster.
# isHostCluster: false
# exposedRegistryPath: 8
# url: <destination_cluster_url> 9
# serviceAccountSecretRef:
#   name: <source_secret_ref> 10
# namespace: openshift-config- 1
- Optional: Update the cluster name if the
migration-controllerpod is not running on this cluster. - 2
- The
migration-controllerpod runs on this cluster iftrue. - 3
- Optional: If the storage provider is Microsoft Azure, specify the resource group.
- 4
- Optional: If you created a certificate bundle for self-signed CA certificates and if the
insecureparameter value isfalse, specify the base64-encoded certificate bundle. - 5
- SSL verification is enabled if
false. - 6
- The cluster is validated if
true. - 7
- The
resticpods are restarted on the source cluster after thestagepods are created iftrue. - 8
- Optional: If you are using direct image migration, specify the exposed registry path of a remote cluster.
- 9
- Specify the URL of the remote cluster.
- 10
- Specify the name of the
SecretCR for the remote cluster.
1.6.3.2.7. MigHook
The MigHook CR defines an Ansible playbook or a custom image that runs tasks at a specified stage of the migration.
apiVersion: migration.openshift.io/v1alpha1
kind: MigHook
metadata:
  generateName: <hook_name_prefix> 1
  name: <hook_name> 2
  namespace: openshift-migration
spec:
  activeDeadlineSeconds: 3
  custom: false 4
  image: <hook_image> 5
  playbook: <ansible_playbook_base64> 6
  targetCluster: source 7
- 1
- Optional: A unique hash is appended to the value for this parameter so that each migration hook has a unique name. You do not need to specify the value of the
nameparameter. - 2
- Specify the migration hook name, unless you specify the value of the
generateNameparameter. - 3
- Optional: Specify the maximum number of seconds that a hook can run. The default value is
1800. - 4
- The hook is a custom image if
true. The custom image can include Ansible or it can be written in a different programming language. - 5
- Specify the custom image, for example,
quay.io/konveyor/hook-runner:latest. Required ifcustomistrue. - 6
- Specify the entire base64-encoded Ansible playbook. Required if
customisfalse. - 7
- Specify
sourceordestinationas the cluster on which the hook will run.
1.6.3.2.8. MigMigration
The MigMigration CR runs an associated MigPlan CR.
You can create multiple MigMigration CRs associated with the same MigPlan CR for the following scenarios:
- You can run multiple stage or incremental migrations to copy data without stopping the pods on the source cluster. Running stage migrations improves the performance of the actual migration.
- You can cancel a migration in progress.
- You can roll back a migration.
apiVersion: migration.openshift.io/v1alpha1
kind: MigMigration
metadata:
  labels:
    controller-tools.k8s.io: "1.0"
  name: migmigration_name
  namespace: openshift-migration
spec:
  canceled: false 1
  rollback: false 2
  stage: false 3
  quiescePods: true 4
  keepAnnotations: true 5
  verify: false 6
  migPlanRef:
    name: <migplan_ref> 7
namespace: openshift-migration- 1
- A migration in progress is canceled if
true. - 2
- A completed migration is rolled back if
true. - 3
- Data is copied incrementally and the pods on the source cluster are not stopped if
true. - 4
- The pods on the source cluster are scaled to
0after theBackupstage of a migration iftrue. - 5
- The labels and annotations applied during the migration are retained if
true. - 6
- The status of the migrated pods on the destination cluster are checked and the names of pods that are not in a
Runningstate are returned iftrue. - 7
migPlanRef.name: Specify the name of the associatedMigPlanCR.
1.6.3.2.9. MigPlan
The MigPlan CR defines the parameters of a migration plan. It contains a group of virtual machines that are being migrated with the same parameters.
apiVersion: migration.openshift.io/v1alpha1
kind: MigPlan
metadata:
  labels:
    controller-tools.k8s.io: "1.0"
  name: migplan_name
  namespace: openshift-migration
spec:
  closed: false 1
  srcMigClusterRef:
    name: <source_migcluster_ref> 2
    namespace: openshift-migration
  destMigClusterRef:
    name: <destination_migcluster_ref> 3
    namespace: openshift-migration
  hooks: 4
    - executionNamespace: <namespace> 5
      phase: <migration_phase> 6
      reference:
        name: <mighook_name> 7
        namespace: <hook_namespace> 8
      serviceAccount: <service_account> 9
  indirectImageMigration: true 10
  indirectVolumeMigration: false 11
  migStorageRef:
    name: <migstorage_name> 12
    namespace: openshift-migration
  namespaces:
  - <namespace>  13
refresh: false 14- 1
- The migration has completed if
true. You cannot create anotherMigMigrationCR for thisMigPlanCR. - 2
- Specify the name of the source cluster
MigClusterCR. - 3
- Specify the name of the destination cluster
MigClusterCR. - 4
- Optional: You can specify up to four migration hooks.
- 5
- Optional: Specify the namespace in which the hook will run.
- 6
- Optional: Specify the migration phase during which a hook runs. One hook can be assigned to one phase. The expected values are
PreBackup,PostBackup,PreRestore, andPostRestore. - 7
- Optional: Specify the name of the
MigHookCR. - 8
- Optional: Specify the namespace of
MigHookCR. - 9
- Optional: Specify a service account with
cluster-adminprivileges. - 10
- Direct image migration is disabled if
true. Images are copied from the source cluster to the replication repository and from the replication repository to the destination cluster. - 11
- Direct volume migration is disabled if
true. PVs are copied from the source cluster to the replication repository and from the replication repository to the destination cluster. - 12
- Specify the name of
MigStorageCR. - 13
- Specify one or more namespaces.
- 14
- The
MigPlanCR is validated iftrue.
1.6.3.2.10. MigStorage
The MigStorage CR describes the object storage for the replication repository. You can configure Amazon Web Services, Microsoft Azure, Google Cloud Storage, and generic S3-compatible cloud storage, for example, Minio or NooBaa.
Different providers require different parameters.
apiVersion: migration.openshift.io/v1alpha1
kind: MigStorage
metadata:
  labels:
    controller-tools.k8s.io: "1.0"
  name: migstorage_name
  namespace: openshift-migration
spec:
  backupStorageProvider: <storage_provider> 1
  volumeSnapshotProvider: 2
  backupStorageConfig:
    awsBucketName: 3
    awsRegion: 4
    credsSecretRef:
      namespace: openshift-config
      name: <storage_secret> 5
    awsKmsKeyId: 6
    awsPublicUrl: 7
    awsSignatureVersion: 8
  volumeSnapshotConfig:
    awsRegion: 9
    credsSecretRef:
      namespace: openshift-config
      name: 10
refresh: false 11- 1
- Specify the storage provider.
- 2
- Optional: If you are using the snapshot copy method, specify the storage provider.
- 3
- If you are using AWS, specify the bucket name.
- 4
- If you are using AWS, specify the bucket region, for example,
us-east-1. - 5
- Specify the name of the
SecretCR that you created for theMigStorageCR. - 6
- Optional: If you are using the AWS Key Management Service, specify the unique identifier of the key.
- 7
- Optional: If you granted public access to the AWS bucket, specify the bucket URL.
- 8
- Optional: Specify the AWS signature version for authenticating requests to the bucket, for example,
4. - 9
- Optional: If you are using the snapshot copy method, specify the geographical region of the clusters.
- 10
- Optional: If you are using the snapshot copy method, specify the name of the
SecretCR that you created for theMigStorageCR. - 11
- The cluster is validated if
true.
1.6.4. Additional resources
1.6.5. Configuring a migration plan
You can increase the number of objects to be migrated or exclude resources from the migration.
1.6.5.1. Increasing limits for large migrations
You can increase the limits on migration objects and container resources for large migrations with the Migration Toolkit for Containers (MTC).
You must test these changes before you perform a migration in a production environment.
Procedure
Edit the
MigrationControllercustom resource (CR) manifest:$ oc edit migrationcontroller -n openshift-migration
Update the following parameters:
...
mig_controller_limits_cpu: "1" 1
mig_controller_limits_memory: "10Gi" 2
...
mig_controller_requests_cpu: "100m" 3
mig_controller_requests_memory: "350Mi" 4
...
mig_pv_limit: 100 5
mig_pod_limit: 100 6
mig_namespace_limit: 10 7
...
- 1
- Specifies the number of CPUs available to the
MigrationControllerCR. - 2
- Specifies the amount of memory available to the
MigrationControllerCR. - 3
- Specifies the number of CPU units available for
MigrationControllerCR requests.100mrepresents 0.1 CPU units (100 * 1e-3). - 4
- Specifies the amount of memory available for
MigrationControllerCR requests. - 5
- Specifies the number of persistent volumes that can be migrated.
- 6
- Specifies the number of pods that can be migrated.
- 7
- Specifies the number of namespaces that can be migrated.
Create a migration plan that uses the updated parameters to verify the changes.
If your migration plan exceeds the
MigrationControllerCR limits, the MTC console displays a warning message when you save the migration plan.
1.6.5.2. Excluding resources from a migration plan
You can exclude resources, for example, image streams, persistent volumes (PVs), or subscriptions, from a Migration Toolkit for Containers (MTC) migration plan in order to reduce the resource load for migration or to migrate images or PVs with a different tool.
By default, the MTC excludes service catalog resources and Operator Lifecycle Manager (OLM) resources from migration. These resources are parts of the service catalog API group and the OLM API group, neither of which is supported for migration at this time.
Procedure
Edit the
MigrationControllercustom resource manifest:$ oc edit migrationcontroller <migration_controller> -n openshift-migration
Update the
specsection by adding a parameter to exclude specific resources or by adding a resource to theexcluded_resourcesparameter if it does not have its own exclusion parameter:apiVersion: migration.openshift.io/v1alpha1 kind: MigrationController metadata: name: migration-controller namespace: openshift-migration spec: disable_image_migration: true 1 disable_pv_migration: true 2 ... excluded_resources: 3 - imagetags - templateinstances - clusterserviceversions - packagemanifests - subscriptions - servicebrokers - servicebindings - serviceclasses - serviceinstances - serviceplans - operatorgroups - events
- 1
- Add
disable_image_migration: trueto exclude image streams from the migration. Do not edit theexcluded_resourcesparameter.imagestreamsis added toexcluded_resourceswhen theMigrationControllerpod restarts. - 2
- Add
disable_pv_migration: trueto exclude PVs from the migration plan. Do not edit theexcluded_resourcesparameter.persistentvolumesandpersistentvolumeclaimsare added toexcluded_resourceswhen theMigrationControllerpod restarts. Disabling PV migration also disables PV discovery when you create the migration plan. - 3
- You can add OpenShift Container Platform resources to the
excluded_resourceslist. Do not delete the default excluded resources. These resources are problematic to migrate and must be excluded.
-
Wait two minutes for the
MigrationControllerpod to restart so that the changes are applied. Verify that the resource is excluded:
$ oc get deployment -n openshift-migration migration-controller -o yaml | grep EXCLUDED_RESOURCES -A1
The output contains the excluded resources:
Example output
    - name: EXCLUDED_RESOURCES
      value:
      imagetags,templateinstances,clusterserviceversions,packagemanifests,subscriptions,servicebrokers,servicebindings,serviceclasses,serviceinstances,serviceplans,imagestreams,persistentvolumes,persistentvolumeclaims
1.7. Troubleshooting
You can view the Migration Toolkit for Containers (MTC) custom resources and download logs to troubleshoot a failed migration.
If the application was stopped during the failed migration, you must roll it back manually in order to prevent data corruption.
Manual rollback is not required if the application was not stopped during migration because the original application is still running on the source cluster.
1.7.1. Viewing migration Custom Resources
The Migration Toolkit for Containers (MTC) creates the following custom resources (CRs):
![]() MigCluster (configuration, MTC cluster): Cluster definition
MigCluster (configuration, MTC cluster): Cluster definition
![]() MigStorage (configuration, MTC cluster): Storage definition
MigStorage (configuration, MTC cluster): Storage definition
![]() MigPlan (configuration, MTC cluster): Migration plan
MigPlan (configuration, MTC cluster): Migration plan
The MigPlan CR describes the source and target clusters, replication repository, and namespaces being migrated. It is associated with 0, 1, or many MigMigration CRs.
Deleting a MigPlan CR deletes the associated MigMigration CRs.
![]() BackupStorageLocation (configuration, MTC cluster): Location of
BackupStorageLocation (configuration, MTC cluster): Location of Velero backup objects
![]() VolumeSnapshotLocation (configuration, MTC cluster): Location of
VolumeSnapshotLocation (configuration, MTC cluster): Location of Velero volume snapshots
![]() MigMigration (action, MTC cluster): Migration, created every time you stage or migrate data. Each
MigMigration (action, MTC cluster): Migration, created every time you stage or migrate data. Each MigMigration CR is associated with a MigPlan CR.
![]() Backup (action, source cluster): When you run a migration plan, the
Backup (action, source cluster): When you run a migration plan, the MigMigration CR creates two Velero backup CRs on each source cluster:
- Backup CR #1 for Kubernetes objects
- Backup CR #2 for PV data
![]() Restore (action, target cluster): When you run a migration plan, the
Restore (action, target cluster): When you run a migration plan, the MigMigration CR creates two Velero restore CRs on the target cluster:
- Restore CR #1 (using Backup CR #2) for PV data
- Restore CR #2 (using Backup CR #1) for Kubernetes objects
Procedure
List the
MigMigrationCRs in theopenshift-migrationnamespace:$ oc get migmigration -n openshift-migration
Example output
NAME                                   AGE
88435fe0-c9f8-11e9-85e6-5d593ce65e10   6m42s
Inspect the
MigMigrationCR:$ oc describe migmigration 88435fe0-c9f8-11e9-85e6-5d593ce65e10 -n openshift-migration
The output is similar to the following examples.
MigMigration example output
name:         88435fe0-c9f8-11e9-85e6-5d593ce65e10
namespace:    openshift-migration
labels:       <none>
annotations:  touch: 3b48b543-b53e-4e44-9d34-33563f0f8147
apiVersion:  migration.openshift.io/v1alpha1
kind:         MigMigration
metadata:
  creationTimestamp:  2019-08-29T01:01:29Z
  generation:          20
  resourceVersion:    88179
  selfLink:           /apis/migration.openshift.io/v1alpha1/namespaces/openshift-migration/migmigrations/88435fe0-c9f8-11e9-85e6-5d593ce65e10
  uid:                 8886de4c-c9f8-11e9-95ad-0205fe66cbb6
spec:
  migPlanRef:
    name:        socks-shop-mig-plan
    namespace:   openshift-migration
  quiescePods:  true
  stage:         false
status:
  conditions:
    category:              Advisory
    durable:               True
    lastTransitionTime:  2019-08-29T01:03:40Z
    message:               The migration has completed successfully.
    reason:                Completed
    status:                True
    type:                  Succeeded
  phase:                   Completed
  startTimestamp:         2019-08-29T01:01:29Z
events:                    <none>
Velero backup CR #2 example output that describes the PV data
apiVersion: velero.io/v1
kind: Backup
metadata:
  annotations:
    openshift.io/migrate-copy-phase: final
    openshift.io/migrate-quiesce-pods: "true"
    openshift.io/migration-registry: 172.30.105.179:5000
    openshift.io/migration-registry-dir: /socks-shop-mig-plan-registry-44dd3bd5-c9f8-11e9-95ad-0205fe66cbb6
  creationTimestamp: "2019-08-29T01:03:15Z"
  generateName: 88435fe0-c9f8-11e9-85e6-5d593ce65e10-
  generation: 1
  labels:
    app.kubernetes.io/part-of: migration
    migmigration: 8886de4c-c9f8-11e9-95ad-0205fe66cbb6
    migration-stage-backup: 8886de4c-c9f8-11e9-95ad-0205fe66cbb6
    velero.io/storage-location: myrepo-vpzq9
  name: 88435fe0-c9f8-11e9-85e6-5d593ce65e10-59gb7
  namespace: openshift-migration
  resourceVersion: "87313"
  selfLink: /apis/velero.io/v1/namespaces/openshift-migration/backups/88435fe0-c9f8-11e9-85e6-5d593ce65e10-59gb7
  uid: c80dbbc0-c9f8-11e9-95ad-0205fe66cbb6
spec:
  excludedNamespaces: []
  excludedResources: []
  hooks:
    resources: []
  includeClusterResources: null
  includedNamespaces:
  - sock-shop
  includedResources:
  - persistentvolumes
  - persistentvolumeclaims
  - namespaces
  - imagestreams
  - imagestreamtags
  - secrets
  - configmaps
  - pods
  labelSelector:
    matchLabels:
      migration-included-stage-backup: 8886de4c-c9f8-11e9-95ad-0205fe66cbb6
  storageLocation: myrepo-vpzq9
  ttl: 720h0m0s
  volumeSnapshotLocations:
  - myrepo-wv6fx
status:
  completionTimestamp: "2019-08-29T01:02:36Z"
  errors: 0
  expiration: "2019-09-28T01:02:35Z"
  phase: Completed
  startTimestamp: "2019-08-29T01:02:35Z"
  validationErrors: null
  version: 1
  volumeSnapshotsAttempted: 0
  volumeSnapshotsCompleted: 0
  warnings: 0
Velero restore CR #2 example output that describes the Kubernetes resources
apiVersion: velero.io/v1
kind: Restore
metadata:
  annotations:
    openshift.io/migrate-copy-phase: final
    openshift.io/migrate-quiesce-pods: "true"
    openshift.io/migration-registry: 172.30.90.187:5000
    openshift.io/migration-registry-dir: /socks-shop-mig-plan-registry-36f54ca7-c925-11e9-825a-06fa9fb68c88
  creationTimestamp: "2019-08-28T00:09:49Z"
  generateName: e13a1b60-c927-11e9-9555-d129df7f3b96-
  generation: 3
  labels:
    app.kubernetes.io/part-of: migration
    migmigration: e18252c9-c927-11e9-825a-06fa9fb68c88
    migration-final-restore: e18252c9-c927-11e9-825a-06fa9fb68c88
  name: e13a1b60-c927-11e9-9555-d129df7f3b96-gb8nx
  namespace: openshift-migration
  resourceVersion: "82329"
  selfLink: /apis/velero.io/v1/namespaces/openshift-migration/restores/e13a1b60-c927-11e9-9555-d129df7f3b96-gb8nx
  uid: 26983ec0-c928-11e9-825a-06fa9fb68c88
spec:
  backupName: e13a1b60-c927-11e9-9555-d129df7f3b96-sz24f
  excludedNamespaces: null
  excludedResources:
  - nodes
  - events
  - events.events.k8s.io
  - backups.velero.io
  - restores.velero.io
  - resticrepositories.velero.io
  includedNamespaces: null
  includedResources: null
  namespaceMapping: null
  restorePVs: true
status:
  errors: 0
  failureReason: ""
  phase: Completed
  validationErrors: null
  warnings: 15
1.7.2. Using the migration log reader
You can use the migration log reader to display a single filtered view of all the migration logs.
Procedure
Get the
mig-log-readerpod:$ oc -n openshift-migration get pods | grep log
Enter the following command to display a single migration log:
$ oc -n openshift-migration logs -f <mig-log-reader-pod> -c color 1- 1
- The
-c plainoption displays the log without colors.
1.7.3. Downloading migration logs
You can download the Velero, Restic, and MigrationController pod logs in the Migration Toolkit for Containers (MTC) web console to troubleshoot a failed migration.
Procedure
- In the MTC console, click Migration plans to view the list of migration plans.
-
Click the Options menu
of a specific migration plan and select Logs.
Click Download Logs to download the logs of the
MigrationController,Velero, andResticpods for all clusters.You can download a single log by selecting the cluster, log source, and pod source, and then clicking Download Selected.
You can access a pod log from the CLI by using the
oc logscommand:$ oc logs <pod-name> -f -n openshift-migration 1- 1
- Specify the pod name.
1.7.4. Updating deprecated APIs
If your source cluster uses deprecated APIs, the following warning message is displayed when you create a migration plan in the Migration Toolkit for Containers (MTC) web console:
Some namespaces contain GVKs incompatible with destination cluster
You can click See details to view the namespace and the incompatible APIs. This warning message does not block the migration.
During migration with the Migration Toolkit for Containers (MTC), the deprecated APIs are saved in the Velero Backup #1 for Kubernetes objects. You can download the Velero Backup, extract the deprecated API yaml files, and update them with the oc convert command. Then you can create the updated APIs on the target cluster.
Procedure
- Run the migration plan.
View the
MigPlancustom resource (CR):$ oc describe migplan <migplan_name> -n openshift-migration 1- 1
- Specify the name of the
MigPlanCR.
The output is similar to the following:
metadata:
  ...
  uid: 79509e05-61d6-11e9-bc55-02ce4781844a 1
status:
  ...
  conditions:
  - category: Warn
    lastTransitionTime: 2020-04-30T17:16:23Z
    message: 'Some namespaces contain GVKs incompatible with destination cluster.
      See: `incompatibleNamespaces` for details'
    status: "True"
    type: GVKsIncompatible
  incompatibleNamespaces:
  - gvks: 2
    - group: batch
      kind: cronjobs
      version: v2alpha1
    - group: batch
      kind: scheduledjobs
      version: v2alpha1
Get the
MigMigrationname associated with theMigPlanUID:$ oc get migmigration -o json | jq -r '.items[] | select(.metadata.ownerReferences[].uid=="<migplan_uid>") | .metadata.name' 1- 1
- Specify the
MigPlanCR UID.
Get the
MigMigrationUID associated with theMigMigrationname:$ oc get migmigration <migmigration_name> -o jsonpath='{.metadata.uid}' 1- 1
- Specify the
MigMigrationname.
Get the
VeleroBackup name associated with theMigMigrationUID:$ oc get backup.velero.io --selector migration-initial-backup="<migmigration_uid>" -o jsonpath={.items[*].metadata.name} 1- 1
- Specify the
MigMigrationUID.
Download the contents of the
VeleroBackup to your local machine by running the command for your storage provider:AWS S3:
$ aws s3 cp s3://<bucket_name>/velero/backups/<backup_name> <backup_local_dir> --recursive 1- 1
- Specify the bucket, backup name, and your local backup directory name.
GCP:
$ gsutil cp gs://<bucket_name>/velero/backups/<backup_name> <backup_local_dir> --recursive 1- 1
- Specify the bucket, backup name, and your local backup directory name.
Azure:
$ azcopy copy 'https://velerobackups.blob.core.windows.net/velero/backups/<backup_name>' '<backup_local_dir>' --recursive 1- 1
- Specify the backup name and your local backup directory name.
Extract the
VeleroBackup archive file:$ tar -xfv <backup_local_dir>/<backup_name>.tar.gz -C <backup_local_dir>
Run
oc convertin offline mode on each deprecated API:$ oc convert -f <backup_local_dir>/resources/<gvk>.json
Create the converted API on the target cluster:
$ oc create -f <gvk>.json
1.7.5. Error messages and resolutions
This section describes common error messages you might encounter with the Migration Toolkit for Containers (MTC) and how to resolve their underlying causes.
1.7.5.1. Restic timeout error
If a CA certificate error message is displayed the first time you try to access the MTC console, the likely cause is the use of self-signed CA certificates in one of the clusters.
To resolve this issue, navigate to the oauth-authorization-server URL displayed in the error message and accept the certificate. To resolve this issue permanently, add the certificate to the trust store of your web browser.
If an Unauthorized message is displayed after you have accepted the certificate, navigate to the MTC console and refresh the web page.
1.7.5.2. OAuth timeout error in the MTC console
If a connection has timed out message is displayed in the MTC console after you have accepted a self-signed certificate, the causes are likely to be the following:
- Interrupted network access to the OAuth server
- Interrupted network access to the OpenShift Container Platform console
-
Proxy configuration that blocks access to the
oauth-authorization-serverURL. See MTC console inaccessible because of OAuth timeout error for details.
You can determine the cause of the timeout.
Procedure
- Navigate to the MTC console and inspect the elements with the browser web inspector.
Check the
MigrationUIpod log:$ oc logs <MigrationUI_Pod> -n openshift-migration
1.7.5.3. PodVolumeBackups timeout error in Velero pod log
If a migration fails because Restic times out, the following error is displayed in the Velero pod log.
Example output
level=error msg="Error backing up item" backup=velero/monitoring error="timed out waiting for all PodVolumeBackups to complete" error.file="/go/src/github.com/heptio/velero/pkg/restic/backupper.go:165" error.function="github.com/heptio/velero/pkg/restic.(*backupper).BackupPodVolumes" group=v1
The default value of restic_timeout is one hour. You can increase this parameter for large migrations, keeping in mind that a higher value may delay the return of error messages.
Procedure
- In the OpenShift Container Platform web console, navigate to Operators → Installed Operators.
- Click Migration Toolkit for Containers Operator.
- In the MigrationController tab, click migration-controller.
In the YAML tab, update the following parameter value:
spec: restic_timeout: 1h 1- 1
- Valid units are
h(hours),m(minutes), ands(seconds), for example,3h30m15s.
- Click Save.
1.7.5.4. ResticVerifyErrors in the MigMigration custom resource
If data verification fails when migrating a persistent volume with the file system data copy method, the following error is displayed in the MigMigration CR.
Example output
status:
  conditions:
  - category: Warn
    durable: true
    lastTransitionTime: 2020-04-16T20:35:16Z
    message: There were verify errors found in 1 Restic volume restores. See restore `<registry-example-migration-rvwcm>`
      for details 1
    status: "True"
    type: ResticVerifyErrors 2
A data verification error does not cause the migration process to fail.
You can check the Restore CR to identify the source of the data verification error.
Procedure
- Log in to the target cluster.
View the
RestoreCR:$ oc describe <registry-example-migration-rvwcm> -n openshift-migration
The output identifies the persistent volume with
PodVolumeRestoreerrors.Example output
status:
  phase: Completed
  podVolumeRestoreErrors:
  - kind: PodVolumeRestore
    name: <registry-example-migration-rvwcm-98t49>
    namespace: openshift-migration
  podVolumeRestoreResticErrors:
  - kind: PodVolumeRestore
    name: <registry-example-migration-rvwcm-98t49>
    namespace: openshift-migration
View the
PodVolumeRestoreCR:$ oc describe <migration-example-rvwcm-98t49>
The output identifies the
Resticpod that logged the errors.Example output
  completionTimestamp: 2020-05-01T20:49:12Z
  errors: 1
  resticErrors: 1
  ...
  resticPod: <restic-nr2v5>
View the
Resticpod log to locate the errors:$ oc logs -f <restic-nr2v5>
1.7.6. Direct volume migration does not complete
If direct volume migration does not complete, the target cluster might not have the same node-selector annotations as the source cluster.
Migration Toolkit for Containers (MTC) migrates namespaces with all annotations in order to preserve security context constraints and scheduling requirements. During direct volume migration, MTC creates Rsync transfer pods on the target cluster in the namespaces that were migrated from the source cluster. If a target cluster namespace does not have the same annotations as the source cluster namespace, the Rsync transfer pods cannot be scheduled. The Rsync pods remain in a Pending state.
You can identify and fix this issue by performing the following procedure.
Procedure
Check the status of the
MigMigrationCR:$ oc describe migmigration <pod_name> -n openshift-migration
The output includes the following status message:
Example output
...
Some or all transfer pods are not running for more than 10 mins on destination cluster
...
On the source cluster, obtain the details of a migrated namespace:
$ oc get namespace <namespace> -o yaml 1- 1
- Specify the migrated namespace.
On the target cluster, edit the migrated namespace:
$ oc edit namespace <namespace>
Add missing
openshift.io/node-selectorannotations to the migrated namespace as in the following example:apiVersion: v1 kind: Namespace metadata: annotations: openshift.io/node-selector: "region=east" ...- Run the migration plan again.
1.7.7. Using the Velero CLI to debug Backup and Restore CRs
You can debug the Backup and Restore custom resources (CRs) and partial migration failures with the Velero command line interface (CLI). The Velero CLI runs in the velero pod.
1.7.7.1. Velero command syntax
Velero CLI commands use the following syntax:
$ oc exec $(oc get pods -n openshift-migration -o name | grep velero) -- ./velero <resource> <command> <resource_id>
You can specify velero-<pod> -n openshift-migration in place of $(oc get pods -n openshift-migration -o name | grep velero).
1.7.7.2. Help command
The Velero help command lists all the Velero CLI commands:
$ oc exec $(oc get pods -n openshift-migration -o name | grep velero) -- ./velero --help
1.7.7.3. Describe command
The Velero describe command provides a summary of warnings and errors associated with a Velero resource:
$ oc exec $(oc get pods -n openshift-migration -o name | grep velero) -- ./velero <resource> describe <resource_id>
Example
$ oc exec $(oc get pods -n openshift-migration -o name | grep velero) -- ./velero backup describe 0e44ae00-5dc3-11eb-9ca8-df7e5254778b-2d8ql
1.7.7.4. Logs command
The Velero logs command provides the logs associated with a Velero resource:
velero <resource> logs <resource_id>
Example
$ oc exec $(oc get pods -n openshift-migration -o name | grep velero) -- ./velero restore logs ccc7c2d0-6017-11eb-afab-85d0007f5a19-x4lbf
1.7.7.5. Debugging a partial migration failure
You can debug a partial migration failure warning message by using the Velero CLI to examine the Restore custom resource (CR) logs.
A partial failure occurs when Velero encounters an issue that does not cause a migration to fail. For example, if a custom resource definition (CRD) is missing or if there is a discrepancy between CRD versions on the source and target clusters, the migration completes but the CR is not created on the target cluster.
Velero logs the issue as a partial failure and then processes the rest of the objects in the Backup CR.
Procedure
Check the status of a
MigMigrationCR:$ oc get migmigration <migmigration> -o yaml
Example output
status:
  conditions:
  - category: Warn
    durable: true
    lastTransitionTime: "2021-01-26T20:48:40Z"
    message: 'Final Restore openshift-migration/ccc7c2d0-6017-11eb-afab-85d0007f5a19-x4lbf: partially failed on destination cluster'
    status: "True"
    type: VeleroFinalRestorePartiallyFailed
  - category: Advisory
    durable: true
    lastTransitionTime: "2021-01-26T20:48:42Z"
    message: The migration has completed with warnings, please look at `Warn` conditions.
    reason: Completed
    status: "True"
    type: SucceededWithWarnings
Check the status of the
RestoreCR by using the Velerodescribecommand:$ oc exec $(oc get pods -n openshift-migration -o name | grep velero) -n openshift-migration -- ./velero restore describe <restore>
Example output
Phase:  PartiallyFailed (run 'velero restore logs ccc7c2d0-6017-11eb-afab-85d0007f5a19-x4lbf' for more information)

Errors:
  Velero:     <none>
  Cluster:    <none>
  Namespaces:
    migration-example:  error restoring example.com/migration-example/migration-example: the server could not find the requested resource
Check the
RestoreCR logs by using the Velerologscommand:$ oc exec $(oc get pods -n openshift-migration -o name | grep velero) -n openshift-migration -- ./velero restore logs <restore>
Example output
time="2021-01-26T20:48:37Z" level=info msg="Attempting to restore migration-example: migration-example" logSource="pkg/restore/restore.go:1107" restore=openshift-migration/ccc7c2d0-6017-11eb-afab-85d0007f5a19-x4lbf
time="2021-01-26T20:48:37Z" level=info msg="error restoring migration-example: the server could not find the requested resource" logSource="pkg/restore/restore.go:1170" restore=openshift-migration/ccc7c2d0-6017-11eb-afab-85d0007f5a19-x4lbf
The
RestoreCR log error message,the server could not find the requested resource, indicates the cause of the partially failed migration.
1.7.8. Using must-gather to collect data
You must run the must-gather tool if you open a customer support case on the Red Hat Customer Portal for the Migration Toolkit for Containers (MTC).
The openshift-migration-must-gather-rhel8 image for MTC collects migration-specific logs and data that are not collected by the default must-gather image.
Procedure
-
Navigate to the directory where you want to store the
must-gatherdata. Run the
must-gathercommand:$ oc adm must-gather --image=registry.redhat.io/rhmtc/openshift-migration-must-gather-rhel8:v1.4
- Remove authentication keys and other sensitive information.
Create an archive file containing the contents of the
must-gatherdata directory:$ tar cvaf must-gather.tar.gz must-gather.local.<uid>/
- Upload the compressed file as an attachment to your customer support case.
1.7.9. Rolling back a migration
You can roll back a migration by using the MTC web console or the CLI.
1.7.9.1. Rolling back a migration in the MTC web console
You can roll back a migration by using the Migration Toolkit for Containers (MTC) web console.
If your application was stopped during a failed migration, you must roll back the migration in order to prevent data corruption in the persistent volume.
Rollback is not required if the application was not stopped during migration because the original application is still running on the source cluster.
Procedure
- In the MTC web console, click Migration plans.
-
Click the Options menu
beside a migration plan and select Rollback.
Click Rollback and wait for rollback to complete.
In the migration plan details, Rollback succeeded is displayed.
Verify that rollback was successful in the OpenShift Container Platform web console of the source cluster:
- Click Home → Projects.
- Click the migrated project to view its status.
- In the Routes section, click Location to verify that the application is functioning, if applicable.
- Click Workloads → Pods to verify that the pods are running in the migrated namespace.
- Click Storage → Persistent volumes to verify that the migrated persistent volume is correctly provisioned.
1.7.9.1.1. Rolling back a migration from the CLI
You can roll back a migration by creating a MigMigration custom resource (CR) from the CLI.
If your application was stopped during a failed migration, you must roll back the migration in order to prevent data corruption in the persistent volume.
Rollback is not required if the application was not stopped during migration because the original application is still running on the source cluster.
Procedure
Create a
MigMigrationCR based on the following example:$ cat << EOF | oc apply -f - apiVersion: migration.openshift.io/v1alpha1 kind: MigMigration metadata: labels: controller-tools.k8s.io: "1.0" name: migration-rollback namespace: openshift-migration spec: ... rollback: true ... migPlanRef: name: <migplan_name> 1 namespace: openshift-migration EOF- 1
- Specify the name of the associated
MigPlanCR.
- In the MTC web console, verify that the migrated project resources have been removed from the target cluster.
- Verify that the migrated project resources are present in the source cluster and that the application is running.
1.7.10. Known issues
This release has the following known issues:
During migration, the Migration Toolkit for Containers (MTC) preserves the following namespace annotations:
-
openshift.io/sa.scc.mcs -
openshift.io/sa.scc.supplemental-groups openshift.io/sa.scc.uid-rangeThese annotations preserve the UID range, ensuring that the containers retain their file system permissions on the target cluster. There is a risk that the migrated UIDs could duplicate UIDs within an existing or future namespace on the target cluster. (BZ#1748440)
-
- Most cluster-scoped resources are not yet handled by MTC. If your applications require cluster-scoped resources, you might have to create them manually on the target cluster.
- If a migration fails, the migration plan does not retain custom PV settings for quiesced pods. You must manually roll back the migration, delete the migration plan, and create a new migration plan with your PV settings. (BZ#1784899)
-
If a large migration fails because Restic times out, you can increase the
restic_timeoutparameter value (default:1h) in theMigrationControllercustom resource (CR) manifest. - If you select the data verification option for PVs that are migrated with the file system copy method, performance is significantly slower.
If you are migrating data from NFS storage and
root_squashis enabled,Resticmaps tonfsnobody. The migration fails and a permission error is displayed in theResticpod log. (BZ#1873641)You can resolve this issue by adding supplemental groups for
Resticto theMigrationControllerCR manifest:spec: ... restic_supplemental_groups: - 5555 - 6666
- If you perform direct volume migration with nodes that are in different availability zones, the migration might fail because the migrated pods cannot access the PVC. (BZ#1947487)