
Chapter 2. Migrating from OpenShift Container Platform 4.1
2.1. Migration tools and prerequisites
You can migrate application workloads from OpenShift Container Platform 4.1 to 4.4 with the Cluster Application Migration (CAM) tool. The CAM tool enables you to control the migration and to minimize application downtime.
You can migrate between OpenShift Container Platform clusters of the same version, for example, from 4.1 to 4.1, as long as the source and target clusters are configured correctly.
The CAM tool’s web console and API, based on Kubernetes Custom Resources, enable you to migrate stateful and stateless application workloads at the granularity of a namespace.
The CAM tool supports the file system and snapshot data copy methods for migrating data from the source cluster to the target cluster. You can select a method that is suited for your environment and is supported by your storage provider.
You can use migration hooks to run Ansible playbooks at certain points during the migration. The hooks are added when you create a migration plan.
2.1.1. Migration prerequisites
- You must upgrade the source cluster to the latest z-stream release.
-
You must have
cluster-adminprivileges on all clusters. - The source and target clusters must have unrestricted network access to the replication repository.
- The cluster on which the Migration controller is installed must have unrestricted access to the other clusters.
If your application uses images from the
openshiftnamespace, the required versions of the images must be present on the target cluster.If the required images are not present, you must update the
imagestreamtagsreferences to use an available version that is compatible with your application. If theimagestreamtagscannot be updated, you can manually upload equivalent images to the application namespaces and update the applications to reference them.
The following imagestreamtags have been removed from OpenShift Container Platform 4.2:
-
dotnet:1.0,dotnet:1.1,dotnet:2.0 -
dotnet-runtime:2.0 -
mariadb:10.1 -
mongodb:2.4,mongodb:2.6 -
mysql:5.5,mysql:5.6 -
nginx:1.8 -
nodejs:0.10,nodejs:4,nodejs:6 -
perl:5.16,perl:5.20 -
php:5.5,php:5.6 -
postgresql:9.2,postgresql:9.4,postgresql:9.5 -
python:3.3,python:3.4 -
ruby:2.0,ruby:2.2
The following imagestreamtags have been removed from OpenShift Container Platform 4.4:
-
dotnet: 2.2 -
dotnet-runtime: 2.2 -
nginx: 1.12 -
nodejs: 8, 8-RHOAR, 10-SCL -
perl:5.24 -
php: 7.0, 7.1 -
redis: 3.2
2.1.2. About the Cluster Application Migration tool
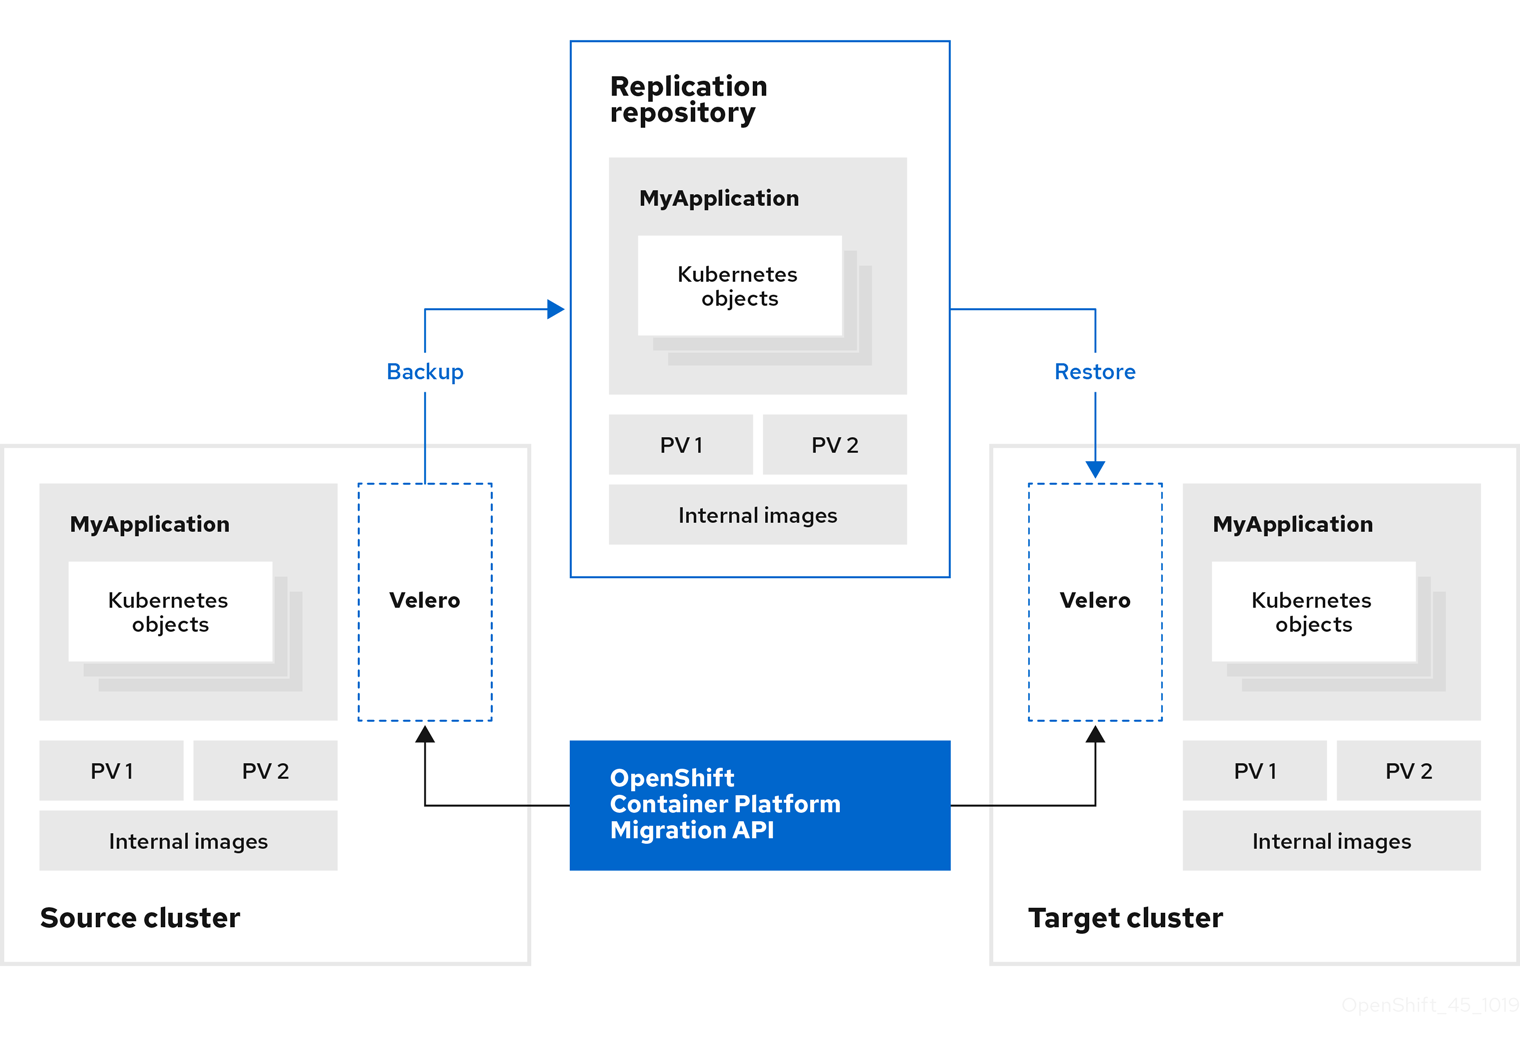
The Cluster Application Migration (CAM) tool enables you to migrate Kubernetes resources, persistent volume data, and internal container images from an OpenShift Container Platform source cluster to an OpenShift Container Platform 4.4 target cluster, using the CAM web console or the Kubernetes API.
Migrating an application with the CAM web console involves the following steps:
Install the Cluster Application Migration Operator on all clusters.
You can install the Cluster Application Migration Operator in a restricted environment with limited or no internet access. The source and target clusters must have network access to each other and to a mirror registry.
Configure the replication repository, an intermediate object storage that the CAM tool uses to migrate data.
The source and target clusters must have network access to the replication repository during migration. In a restricted environment, you can use an internally hosted S3 storage repository. If you use a proxy server, you must ensure that replication repository is whitelisted.
- Add the source cluster to the CAM web console.
- Add the replication repository to the CAM web console.
Create a migration plan, with one of the following data migration options:
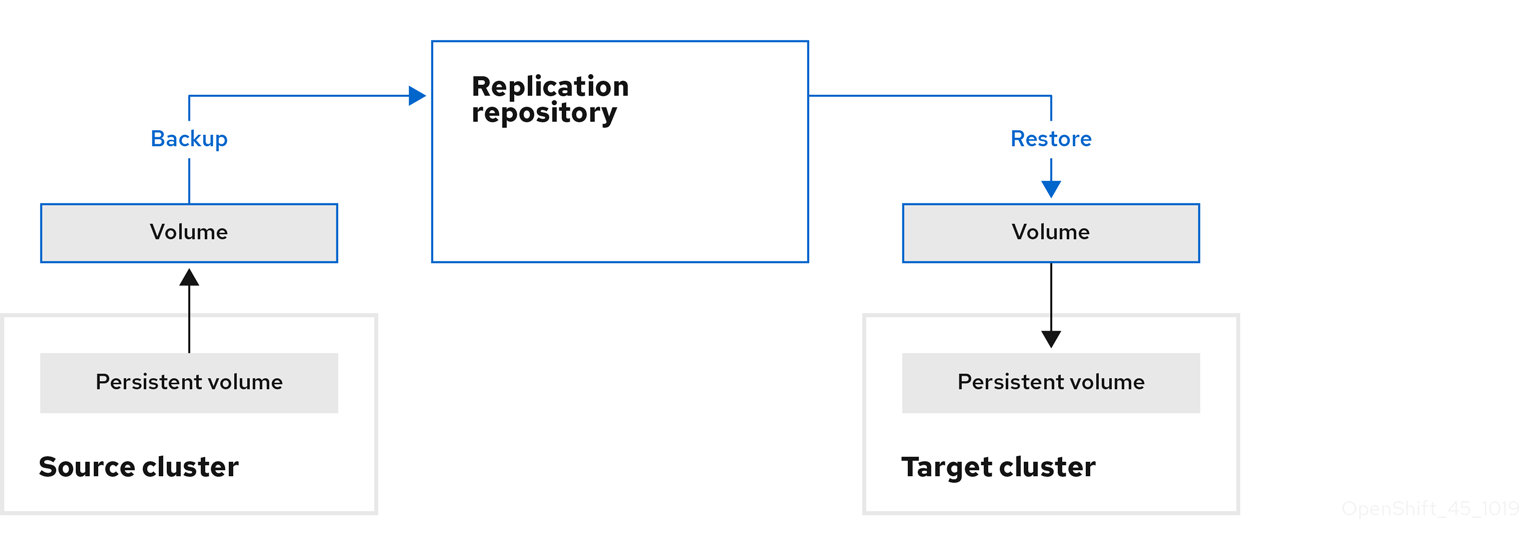
Copy: The CAM tool copies the data from the source cluster to the replication repository, and from the replication repository to the target cluster.
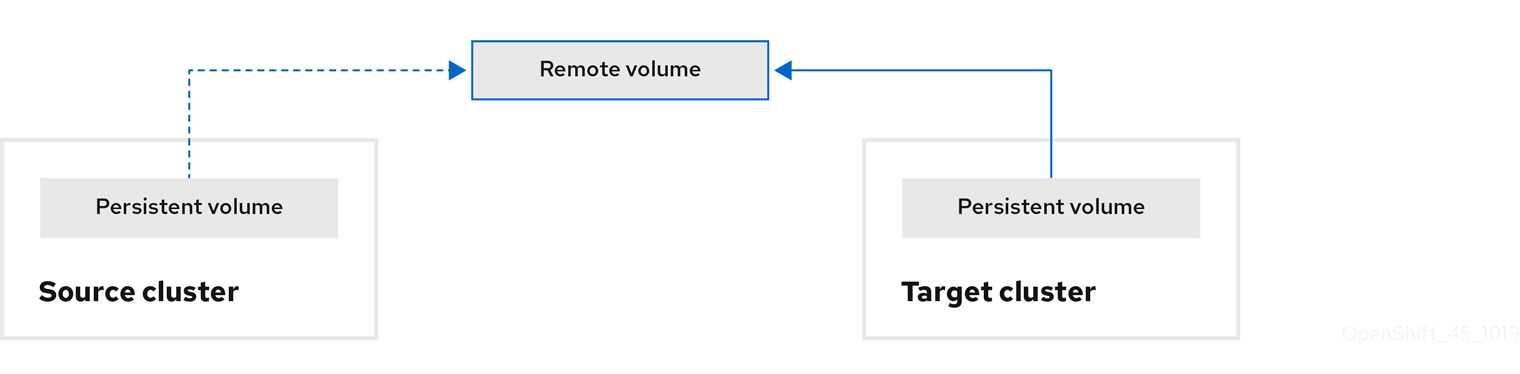
Move: The CAM tool unmounts a remote volume (for example, NFS) from the source cluster, creates a PV resource on the target cluster pointing to the remote volume, and then mounts the remote volume on the target cluster. Applications running on the target cluster use the same remote volume that the source cluster was using. The remote volume must be accessible to the source and target clusters.
NoteAlthough the replication repository does not appear in this diagram, it is required for the actual migration.
Run the migration plan, with one of the following options:
Stage (optional) copies data to the target cluster without stopping the application.
Staging can be run multiple times so that most of the data is copied to the target before migration. This minimizes the actual migration time and application downtime.
- Migrate stops the application on the source cluster and recreates its resources on the target cluster. Optionally, you can migrate the workload without stopping the application.
2.1.3. About data copy methods
The CAM tool supports the file system and snapshot data copy methods for migrating data from the source cluster to the target cluster. You can select a method that is suited for your environment and is supported by your storage provider.
2.1.3.1. File system copy method
The CAM tool copies data files from the source cluster to the replication repository, and from there to the target cluster.
Table 2.1. File system copy method summary
| Benefits | Limitations |
|---|---|
|
|
2.1.3.2. Snapshot copy method
The CAM tool copies a snapshot of the source cluster’s data to a cloud provider’s object storage, configured as a replication repository. The data is restored on the target cluster.
AWS, Google Cloud Provider, and Microsoft Azure support the snapshot copy method.
Table 2.2. Snapshot copy method summary
| Benefits | Limitations |
|---|---|
|
|
2.1.4. About migration hooks
You can use migration hooks to run Ansible playbooks at certain points during the migration. The hooks are added when you create a migration plan.
If you do not want to use Ansible playbooks, you can create a custom container image and add it to a migration plan.
Migration hooks perform tasks such as customizing application quiescence, manually migrating unsupported data types, and updating applications after migration.
A single migration hook runs on a source or target cluster at one of the following migration steps:
- PreBackup: Before backup tasks are started on the source cluster
- PostBackup: After backup tasks are complete on the source cluster
- PreRestore: Before restore tasks are started on the target cluster
PostRestore: After restore tasks are complete on the target cluster
You can assign one hook to each migration step, up to a maximum of four hooks for a single migration plan.
The default hook-runner image is registry.redhat.io/rhcam-1-2/openshift-migration-hook-runner-rhel7. This image is based on Ansible Runner and includes python-openshift for Ansible Kubernetes resources and an updated oc binary. You can also create your own hook image with additional Ansible modules or tools.
The Ansible playbook is mounted on a hook container as a ConfigMap. The hook container runs as a Job on a cluster with a specified service account and namespace. The Job runs, even if the initial Pod is evicted or killed, until it reaches the default backoffLimit (6) or successful completion.
2.2. Deploying and upgrading the Cluster Application Migration tool
You can install the Cluster Application Migration Operator on your OpenShift Container Platform 4.4 target cluster and 4.1 source cluster. The Cluster Application Migration Operator installs the Cluster Application Migration (CAM) tool on the target cluster by default.
Optional: You can configure the Cluster Application Migration Operator to install the CAM tool on an OpenShift Container Platform 3 cluster or on a remote cluster.
In a restricted environment, you can install the Cluster Application Migration Operator from a local mirror registry.
After you have installed the Cluster Application Migration Operator on your clusters, you can launch the CAM tool.
2.2.1. Installing the Cluster Application Migration Operator
You can install the Cluster Application Migration Operator with the Operator Lifecycle Manager (OLM) on an OpenShift Container Platform 4.4 target cluster and on an OpenShift Container Platform 4.1 source cluster.
2.2.1.1. Installing the Cluster Application Migration Operator on an OpenShift Container Platform 4.4 target cluster
You can install the Cluster Application Migration Operator on an OpenShift Container Platform 4.4 target cluster with the Operator Lifecycle Manager (OLM).
The Cluster Application Migration Operator installs the Cluster Application Migration tool on the target cluster by default.
Procedure
- In the OpenShift Container Platform web console, click Operators → OperatorHub.
-
Use the Filter by keyword field (in this case,
Migration) to find the Cluster Application Migration Operator. - Select the Cluster Application Migration Operator and click Install.
On the Create Operator Subscription page, click Subscribe.
On the Installed Operators page, the Cluster Application Migration Operator appears in the openshift-migration project with the status Succeeded.
- Click Cluster Application Migration Operator.
- Under Provided APIs, locate the Migration Controller tile, and click Create Instance.
- Click Create.
- Click Workloads → Pods to verify that the Controller Manager, Migration UI, Restic, and Velero pods are running.
2.2.1.2. Installing the Cluster Application Migration Operator on an OpenShift Container Platform 4.1 source cluster
You can install the Cluster Application Migration Operator on an OpenShift Container Platform 4 source cluster with the Operator Lifecycle Manager (OLM).
Procedure
- In the OpenShift Container Platform web console, click Catalog → OperatorHub.
-
Use the Filter by keyword field (in this case,
Migration) to find the Cluster Application Migration Operator. - Select the Cluster Application Migration Operator and click Install.
On the Create Operator Subscription page, click Subscribe.
On the Installed Operators page, the Cluster Application Migration Operator appears in the openshift-migration project with the status Succeeded.
- Click Cluster Application Migration Operator.
- Under Provided APIs, locate the Migration Controller tile, and click Create Instance.
Set the
migration_controllerandmigration_uiparameters tofalseand add thedeprecated_cors_configuration: trueparameter to thespecstanza:spec: ... migration_controller: false migration_ui: false ... deprecated_cors_configuration: true
- Click Create.
- Click Workloads → Pods to verify that the Restic and Velero pods are running.
2.2.2. Installing the Cluster Application Migration Operator in a restricted environment
You can build a custom Operator catalog image for OpenShift Container Platform 4, push it to a local mirror image registry, and configure the Operator Lifecycle Manager to install the Cluster Application Migration Operator from the local registry.
Additional resources
2.2.2.1. Building an Operator catalog image
Cluster administrators can build a custom Operator catalog image to be used by Operator Lifecycle Manager (OLM) and push the image to a container image registry that supports Docker v2-2. For a cluster on a restricted network, this registry can be a registry that the cluster has network access to, such as the mirror registry created during the restricted network installation.
The OpenShift Container Platform cluster’s internal registry cannot be used as the target registry because it does not support pushing without a tag, which is required during the mirroring process.
For this example, the procedure assumes use of the mirror registry that has access to both your network and the internet.
Prerequisites
- A Linux workstation with unrestricted network access
-
ocversion 4.3.5+ -
podmanversion 1.4.4+ - Access to mirror registry that supports Docker v2-2
If you are working with private registries, set the
REG_CREDSenvironment variable to the file path of your registry credentials for use in later steps. For example, for thepodmanCLI:$ REG_CREDS=${XDG_RUNTIME_DIR}/containers/auth.jsonIf you are working with private namespaces that your quay.io account has access to, you must set a Quay authentication token. Set the
AUTH_TOKENenvironment variable for use with the--auth-tokenflag by making a request against the login API using your quay.io credentials:$ AUTH_TOKEN=$(curl -sH "Content-Type: application/json" \ -XPOST https://quay.io/cnr/api/v1/users/login -d ' { "user": { "username": "'"<quay_username>"'", "password": "'"<quay_password>"'" } }' | jq -r '.token')
Procedure
On the workstation with unrestricted network access, authenticate with the target mirror registry:
$ podman login <registry_host_name>
Also authenticate with
registry.redhat.ioso that the base image can be pulled during the build:$ podman login registry.redhat.io
Build a catalog image based on the
redhat-operatorscatalog from quay.io, tagging and pushing it to your mirror registry:$ oc adm catalog build \ --appregistry-org redhat-operators \1 --from=registry.redhat.io/openshift4/ose-operator-registry:v4.4 \2 --filter-by-os="linux/amd64" \3 --to=<registry_host_name>:<port>/olm/redhat-operators:v1 \4 [-a ${REG_CREDS}] \5 [--insecure] \6 [--auth-token "${AUTH_TOKEN}"] 7 INFO[0013] loading Bundles dir=/var/folders/st/9cskxqs53ll3wdn434vw4cd80000gn/T/300666084/manifests-829192605 ... Pushed sha256:f73d42950021f9240389f99ddc5b0c7f1b533c054ba344654ff1edaf6bf827e3 to example_registry:5000/olm/redhat-operators:v1- 1
- Organization (namespace) to pull from an App Registry instance.
- 2
- Set
--fromto theose-operator-registrybase image using the tag that matches the target OpenShift Container Platform cluster major and minor version. - 3
- Set
--filter-by-osto the operating system and architecture to use for the base image, which must match the target OpenShift Container Platform cluster. Valid values arelinux/amd64,linux/ppc64le, andlinux/s390x. - 4
- Name your catalog image and include a tag, for example,
v1. - 5
- Optional: If required, specify the location of your registry credentials file.
- 6
- Optional: If you do not want to configure trust for the target registry, add the
--insecureflag. - 7
- Optional: If other application registry catalogs are used that are not public, specify a Quay authentication token.
Sometimes invalid manifests are accidentally introduced into Red Hat’s catalogs; when this happens, you might see some errors:
...
INFO[0014] directory                                     dir=/var/folders/st/9cskxqs53ll3wdn434vw4cd80000gn/T/300666084/manifests-829192605 file=4.2 load=package
W1114 19:42:37.876180   34665 builder.go:141] error building database: error loading package into db: fuse-camel-k-operator.v7.5.0 specifies replacement that couldn't be found
Uploading ... 244.9kB/s
These errors are usually non-fatal, and if the Operator package mentioned does not contain an Operator you plan to install or a dependency of one, then they can be ignored.
2.2.2.2. Configuring OperatorHub for restricted networks
Cluster administrators can configure OLM and OperatorHub to use local content in a restricted network environment using a custom Operator catalog image. For this example, the procedure uses a custom redhat-operators catalog image previously built and pushed to a supported registry.
Prerequisites
- A Linux workstation with unrestricted network access
- A custom Operator catalog image pushed to a supported registry
-
ocversion 4.3.5+ -
podmanversion 1.4.4+ - Access to mirror registry that supports Docker v2-2
If you are working with private registries, set the
REG_CREDSenvironment variable to the file path of your registry credentials for use in later steps. For example, for thepodmanCLI:$ REG_CREDS=${XDG_RUNTIME_DIR}/containers/auth.json
Procedure
Disable the default OperatorSources by adding
disableAllDefaultSources: trueto the spec:$ oc patch OperatorHub cluster --type json \ -p '[{"op": "add", "path": "/spec/disableAllDefaultSources", "value": true}]'This disables the default OperatorSources that are configured by default during an OpenShift Container Platform installation.
The
oc adm catalog mirrorcommand extracts the contents of your custom Operator catalog image to generate the manifests required for mirroring. You can choose to either:- Allow the default behavior of the command to automatically mirror all of the image content to your mirror registry after generating manifests, or
-
Add the
--manifests-onlyflag to only generate the manifests required for mirroring, but do not actually mirror the image content to a registry yet. This can be useful for reviewing what will be mirrored, and it allows you to make any changes to the mapping list if you only require a subset of the content. You can then use that file with theoc image mirrorcommand to mirror the modified list of images in a later step.
On your workstation with unrestricted network access, run the following command:
$ oc adm catalog mirror \ <registry_host_name>:<port>/olm/redhat-operators:v1 \1 <registry_host_name>:<port> \ [-a ${REG_CREDS}] \2 [--insecure] \3 [--filter-by-os="<os>/<arch>"] \4 [--manifests-only] 5- 1
- Specify your Operator catalog image.
- 2
- Optional: If required, specify the location of your registry credentials file.
- 3
- Optional: If you do not want to configure trust for the target registry, add the
--insecureflag. - 4
- Optional: Because the catalog might reference images that support multiple architectures and operating systems, you can filter by architecture and operating system to mirror only the images that match. Valid values are
linux/amd64,linux/ppc64le, andlinux/s390x. - 5
- Optional: Only generate the manifests required for mirroring and do not actually mirror the image content to a registry.
Example output
using database path mapping: /:/tmp/190214037 wrote database to /tmp/190214037 using database at: /tmp/190214037/bundles.db 1 ...- 1
- Temporary database generated by the command.
After running the command, a
<image_name>-manifests/directory is created in the current directory and generates the following files:-
The
imageContentSourcePolicy.yamlfile defines an ImageContentSourcePolicy object that can configure nodes to translate between the image references stored in Operator manifests and the mirrored registry. -
The
mapping.txtfile contains all of the source images and where to map them in the target registry. This file is compatible with theoc image mirrorcommand and can be used to further customize the mirroring configuration.
If you used the
--manifests-onlyflag in the previous step and want to mirror only a subset of the content:Modify the list of images in your
mapping.txtfile to your specifications. If you are unsure of the exact names and versions of the subset of images you want to mirror, use the following steps to find them:Run the
sqlite3tool against the temporary database that was generated by theoc adm catalog mirrorcommand to retrieve a list of images matching a general search query. The output helps inform how you will later edit yourmapping.txtfile.For example, to retrieve a list of images that are similar to the string
clusterlogging.4.3:$ echo "select * from related_image \ where operatorbundle_name like 'clusterlogging.4.3%';" \ | sqlite3 -line /tmp/190214037/bundles.db 1- 1
- Refer to the previous output of the
oc adm catalog mirrorcommand to find the path of the database file.
Example output
image = registry.redhat.io/openshift4/ose-logging-kibana5@sha256:aa4a8b2a00836d0e28aa6497ad90a3c116f135f382d8211e3c55f34fb36dfe61
operatorbundle_name = clusterlogging.4.3.33-202008111029.p0

image = registry.redhat.io/openshift4/ose-oauth-proxy@sha256:6b4db07f6e6c962fc96473d86c44532c93b146bbefe311d0c348117bf759c506
operatorbundle_name = clusterlogging.4.3.33-202008111029.p0
...
Use the results from the previous step to edit the
mapping.txtfile to only include the subset of images you want to mirror.For example, you can use the
imagevalues from the previous example output to find that the following matching lines exist in yourmapping.txtfile:Matching image mappings in
mapping.txtregistry.redhat.io/openshift4/ose-logging-kibana5@sha256:aa4a8b2a00836d0e28aa6497ad90a3c116f135f382d8211e3c55f34fb36dfe61=<registry_host_name>:<port>/openshift4-ose-logging-kibana5:a767c8f0 registry.redhat.io/openshift4/ose-oauth-proxy@sha256:6b4db07f6e6c962fc96473d86c44532c93b146bbefe311d0c348117bf759c506=<registry_host_name>:<port>/openshift4-ose-oauth-proxy:3754ea2b
In this example, if you only want to mirror these images, you would then remove all other entries in the
mapping.txtfile and leave only the above two lines.
Still on your workstation with unrestricted network access, use your modified
mapping.txtfile to mirror the images to your registry using theoc image mirrorcommand:$ oc image mirror \ [-a ${REG_CREDS}] \ -f ./redhat-operators-manifests/mapping.txt
Apply the ImageContentSourcePolicy:
$ oc apply -f ./redhat-operators-manifests/imageContentSourcePolicy.yaml
Create a CatalogSource object that references your catalog image.
Modify the following to your specifications and save it as a
catalogsource.yamlfile:apiVersion: operators.coreos.com/v1alpha1 kind: CatalogSource metadata: name: my-operator-catalog namespace: openshift-marketplace spec: sourceType: grpc image: <registry_host_name>:<port>/olm/redhat-operators:v1 1 displayName: My Operator Catalog publisher: grpc- 1
- Specify your custom Operator catalog image.
Use the file to create the CatalogSource object:
$ oc create -f catalogsource.yaml
Verify the following resources are created successfully.
Check the Pods:
$ oc get pods -n openshift-marketplace
Example output
NAME                                    READY   STATUS    RESTARTS  AGE
my-operator-catalog-6njx6               1/1     Running   0         28s
marketplace-operator-d9f549946-96sgr    1/1     Running   0         26h
Check the CatalogSource:
$ oc get catalogsource -n openshift-marketplace
Example output
NAME                  DISPLAY               TYPE PUBLISHER  AGE
my-operator-catalog   My Operator Catalog   grpc            5s
Check the PackageManifest:
$ oc get packagemanifest -n openshift-marketplace
Example output
NAME    CATALOG              AGE
etcd    My Operator Catalog  34s
You can now install the Operators from the OperatorHub page on your restricted network OpenShift Container Platform cluster web console.
2.2.2.3. Installing the Cluster Application Migration Operator on an OpenShift Container Platform 4.4 target cluster in a restricted environment
You can install the Cluster Application Migration Operator on an OpenShift Container Platform 4.4 target cluster with the Operator Lifecycle Manager (OLM).
The Cluster Application Migration Operator installs the Cluster Application Migration tool on the target cluster by default.
Prerequisites
- You created a custom Operator catalog and pushed it to a mirror registry.
- You configured OLM to install the Cluster Application Migration Operator from the mirror registry.
Procedure
- In the OpenShift Container Platform web console, click Operators → OperatorHub.
-
Use the Filter by keyword field (in this case,
Migration) to find the Cluster Application Migration Operator. - Select the Cluster Application Migration Operator and click Install.
On the Create Operator Subscription page, click Subscribe.
On the Installed Operators page, the Cluster Application Migration Operator appears in the openshift-migration project with the status Succeeded.
- Click Cluster Application Migration Operator.
- Under Provided APIs, locate the Migration Controller tile, and click Create Instance.
- Click Create.
- Click Workloads → Pods to verify that the Controller Manager, Migration UI, Restic, and Velero pods are running.
2.2.2.4. Installing the Cluster Application Migration Operator on an OpenShift Container Platform 4.1 source cluster in a restricted environment
You can install the Cluster Application Migration Operator on an OpenShift Container Platform 4 source cluster with the Operator Lifecycle Manager (OLM).
Prerequisites
- You created a custom Operator catalog and pushed it to a mirror registry.
- You configured OLM to install the Cluster Application Migration Operator from the mirror registry.
Procedure
-
Use the Filter by keyword field (in this case,
Migration) to find the Cluster Application Migration Operator. - Select the Cluster Application Migration Operator and click Install.
On the Create Operator Subscription page, click Subscribe.
On the Installed Operators page, the Cluster Application Migration Operator appears in the openshift-migration project with the status Succeeded.
- Click Cluster Application Migration Operator.
- Under Provided APIs, locate the Migration Controller tile, and click Create Instance.
- Click Create.
2.2.3. Launching the CAM web console
You can launch the CAM web console in a browser.
Procedure
- Log in to the OpenShift Container Platform cluster on which you have installed the CAM tool.
Obtain the CAM web console URL by entering the following command:
$ oc get -n openshift-migration route/migration -o go-template='https://{{ .spec.host }}'The output resembles the following:
https://migration-openshift-migration.apps.cluster.openshift.com.Launch a browser and navigate to the CAM web console.
NoteIf you try to access the CAM web console immediately after installing the Cluster Application Migration Operator, the console may not load because the Operator is still configuring the cluster. Wait a few minutes and retry.
- If you are using self-signed CA certificates, you will be prompted to accept the CA certificate of the source cluster’s API server. The web page guides you through the process of accepting the remaining certificates.
- Log in with your OpenShift Container Platform username and password.
2.2.4. Upgrading the Cluster Application Migration Tool
You can upgrade your Cluster Application Migration (CAM) tool on your source and target clusters.
If you are upgrading from CAM 1.1 to 1.2, you must update the service account token in the CAM web console.
2.2.4.1. Upgrading the CAM tool on an OpenShift Container Platform 4 cluster
You can upgrade the CAM tool on an OpenShift Container Platform 4 cluster with the Operator Lifecycle Manager.
If you selected the Automatic approval option when you subscribed to the Cluster Application Migration Operator, the CAM tool is updated automatically.
The following procedure enables you to change the Manual approval option to Automatic or to change the release channel.
Procedure
- In the OpenShift Container Platform console, navigate to Operators > Installed Operators.
- Click Cluster Application Migration Operator.
- In the Subscription tab, change the Approval option to Automatic.
Optional: Edit the Channel.
Updating the subscription deploys the updated Cluster Application Migration Operator and updates the CAM tool components.
2.2.4.2. Updating the service account token
If you are upgrading from CAM 1.1 to 1.2, you must update the service account token in the CAM web console.
CAM 1.1 uses the mig service account, while CAM 1.2 uses the migration-controller service account.
Procedure
Log in to a cluster and obtain the
migration-controllerservice account token:$ oc sa get-token -n openshift-migration migration-controller
- Log in to the CAM web console and click Clusters.
-
Click the Options menu
 of the cluster and select Edit.
- Copy the new token to the Service account token field.
Click Update cluster and then click Close.
The service account token is updated for the cluster.
2.3. Configuring a replication repository
You must configure an object storage to use as a replication repository. The Cluster Application Migration tool copies data from the source cluster to the replication repository, and then from the replication repository to the target cluster.
The CAM tool supports the file system and snapshot data copy methods for migrating data from the source cluster to the target cluster. You can select a method that is suited for your environment and is supported by your storage provider.
The following storage providers are supported:
- Multi-Cloud Object Gateway (MCG)
- Amazon Web Services (AWS) S3
- Google Cloud Provider (GCP)
- Microsoft Azure
- Generic S3 object storage, for example, Minio or Ceph S3
The source and target clusters must have network access to the replication repository during migration.
In a restricted environment, you can create an internally hosted replication repository. If you use a proxy server, you must ensure that your replication repository is whitelisted.
2.3.1. Configuring a Multi-Cloud Object Gateway storage bucket as a replication repository
You can install the OpenShift Container Storage Operator and configure a Multi-Cloud Object Gateway (MCG) storage bucket as a replication repository.
2.3.1.1. Installing the OpenShift Container Storage Operator
You can install the OpenShift Container Storage Operator from OperatorHub.
Procedure
- In the OpenShift Container Platform web console, click Operators → OperatorHub.
- Use Filter by keyword (in this case, OCS) to find the OpenShift Container Storage Operator.
- Select the OpenShift Container Storage Operator and click Install.
- Select an Update Channel, Installation Mode, and Approval Strategy.
Click Subscribe.
On the Installed Operators page, the OpenShift Container Storage Operator appears in the openshift-storage project with the status Succeeded.
2.3.1.2. Creating the Multi-Cloud Object Gateway storage bucket
You can create the Multi-Cloud Object Gateway (MCG) storage bucket’s Custom Resources (CRs).
Procedure
Log in to the OpenShift Container Platform cluster:
$ oc login
Create the
NooBaaCR configuration file,noobaa.yml, with the following content:apiVersion: noobaa.io/v1alpha1 kind: NooBaa metadata: name: noobaa namespace: openshift-storage spec: dbResources: requests: cpu: 0.5 1 memory: 1Gi coreResources: requests: cpu: 0.5 2 memory: 1GiCreate the
NooBaaobject:$ oc create -f noobaa.yml
Create the
BackingStoreCR configuration file,bs.yml, with the following content:apiVersion: noobaa.io/v1alpha1 kind: BackingStore metadata: finalizers: - noobaa.io/finalizer labels: app: noobaa name: mcg-pv-pool-bs namespace: openshift-storage spec: pvPool: numVolumes: 3 1 resources: requests: storage: 50Gi 2 storageClass: gp2 3 type: pv-poolCreate the
BackingStoreobject:$ oc create -f bs.yml
Create the
BucketClassCR configuration file,bc.yml, with the following content:apiVersion: noobaa.io/v1alpha1 kind: BucketClass metadata: labels: app: noobaa name: mcg-pv-pool-bc namespace: openshift-storage spec: placementPolicy: tiers: - backingStores: - mcg-pv-pool-bs placement: SpreadCreate the
BucketClassobject:$ oc create -f bc.yml
Create the
ObjectBucketClaimCR configuration file,obc.yml, with the following content:apiVersion: objectbucket.io/v1alpha1 kind: ObjectBucketClaim metadata: name: migstorage namespace: openshift-storage spec: bucketName: migstorage 1 storageClassName: openshift-storage.noobaa.io additionalConfig: bucketclass: mcg-pv-pool-bc- 1
- Record the bucket name for adding the replication repository to the CAM web console.
Create the
ObjectBucketClaimobject:$ oc create -f obc.yml
Watch the resource creation process to verify that the
ObjectBucketClaimstatus isBound:$ watch -n 30 'oc get -n openshift-storage objectbucketclaim migstorage -o yaml'
This process can take five to ten minutes.
Obtain and record the following values, which are required when you add the replication repository to the CAM web console:
S3 endpoint:
$ oc get route -n openshift-storage s3
S3 provider access key:
$ oc get secret -n openshift-storage migstorage -o go-template='{{ .data.AWS_ACCESS_KEY_ID }}' | base64 -dS3 provider secret access key:
$ oc get secret -n openshift-storage migstorage -o go-template='{{ .data.AWS_SECRET_ACCESS_KEY }}' | base64 -d
2.3.2. Configuring an AWS S3 storage bucket as a replication repository
You can configure an AWS S3 storage bucket as a replication repository.
Prerequisites
- The AWS S3 storage bucket must be accessible to the source and target clusters.
- You must have the AWS CLI installed.
If you are using the snapshot copy method:
- You must have access to EC2 Elastic Block Storage (EBS).
- The source and target clusters must be in the same region.
- The source and target clusters must have the same storage class.
- The storage class must be compatible with snapshots.
Procedure
Create an AWS S3 bucket:
$ aws s3api create-bucket \ --bucket <bucket_name> \ 1 --region <bucket_region> 2Create the IAM user
velero:$ aws iam create-user --user-name velero
Create an EC2 EBS snapshot policy:
$ cat > velero-ec2-snapshot-policy.json <<EOF
{
    "Version": "2012-10-17",
    "Statement": [
        {
            "Effect": "Allow",
            "Action": [
                "ec2:DescribeVolumes",
                "ec2:DescribeSnapshots",
                "ec2:CreateTags",
                "ec2:CreateVolume",
                "ec2:CreateSnapshot",
                "ec2:DeleteSnapshot"
            ],
            "Resource": "*"
        }
    ]
}
EOF
Create an AWS S3 access policy for one or for all S3 buckets:
$ cat > velero-s3-policy.json <<EOF { "Version": "2012-10-17", "Statement": [ { "Effect": "Allow", "Action": [ "s3:GetObject", "s3:DeleteObject", "s3:PutObject", "s3:AbortMultipartUpload", "s3:ListMultipartUploadParts" ], "Resource": [ "arn:aws:s3:::<bucket_name>/*" 1 ] }, { "Effect": "Allow", "Action": [ "s3:ListBucket", "s3:GetBucketLocation", "s3:ListBucketMultipartUploads" ], "Resource": [ "arn:aws:s3:::<bucket_name>" 2 ] } ] } EOF"Resource": [ "arn:aws:s3:::*"Attach the EC2 EBS policy to
velero:$ aws iam put-user-policy \ --user-name velero \ --policy-name velero-ebs \ --policy-document file://velero-ec2-snapshot-policy.json
Attach the AWS S3 policy to
velero:$ aws iam put-user-policy \ --user-name velero \ --policy-name velero-s3 \ --policy-document file://velero-s3-policy.json
Create an access key for
velero:$ aws iam create-access-key --user-name velero { "AccessKey": { "UserName": "velero", "Status": "Active", "CreateDate": "2017-07-31T22:24:41.576Z", "SecretAccessKey": <AWS_SECRET_ACCESS_KEY>, 1 "AccessKeyId": <AWS_ACCESS_KEY_ID> 2 } }
2.3.3. Configuring a Google Cloud Provider storage bucket as a replication repository
You can configure a Google Cloud Provider (GCP) storage bucket as a replication repository.
Prerequisites
- The GCP storage bucket must be accessible to the source and target clusters.
-
You must have
gsutilinstalled. If you are using the snapshot copy method:
- The source and target clusters must be in the same region.
- The source and target clusters must have the same storage class.
- The storage class must be compatible with snapshots.
Procedure
Run
gsutil initto log in:$ gsutil init Welcome! This command will take you through the configuration of gcloud. Your current configuration has been set to: [default] To continue, you must login. Would you like to login (Y/n)?
Set the
BUCKETvariable:$ BUCKET=<bucket_name> 1- 1
- Specify your bucket name.
Create a storage bucket:
$ gsutil mb gs://$BUCKET/
Set the
PROJECT_IDvariable to your active project:$ PROJECT_ID=$(gcloud config get-value project)
Create a
veleroservice account:$ gcloud iam service-accounts create velero \ --display-name "Velero Storage"Set the
SERVICE_ACCOUNT_EMAILvariable to the service account’s email address:$ SERVICE_ACCOUNT_EMAIL=$(gcloud iam service-accounts list \ --filter="displayName:Velero Storage" \ --format 'value(email)')
Grant permissions to the service account:
$ ROLE_PERMISSIONS=(
    compute.disks.get
    compute.disks.create
    compute.disks.createSnapshot
    compute.snapshots.get
    compute.snapshots.create
    compute.snapshots.useReadOnly
    compute.snapshots.delete
    compute.zones.get
)

gcloud iam roles create velero.server \
    --project $PROJECT_ID \
    --title "Velero Server" \
    --permissions "$(IFS=","; echo "${ROLE_PERMISSIONS[*]}")"

gcloud projects add-iam-policy-binding $PROJECT_ID \
    --member serviceAccount:$SERVICE_ACCOUNT_EMAIL \
    --role projects/$PROJECT_ID/roles/velero.server

gsutil iam ch serviceAccount:$SERVICE_ACCOUNT_EMAIL:objectAdmin gs://${BUCKET}
Save the service account’s keys to the
credentials-velerofile in the current directory:$ gcloud iam service-accounts keys create credentials-velero \ --iam-account $SERVICE_ACCOUNT_EMAIL
2.3.4. Configuring a Microsoft Azure Blob storage container as a replication repository
You can configure a Microsoft Azure Blob storage container as a replication repository.
Prerequisites
- You must have an Azure storage account.
- You must have the Azure CLI installed.
- The Azure Blob storage container must be accessible to the source and target clusters.
If you are using the snapshot copy method:
- The source and target clusters must be in the same region.
- The source and target clusters must have the same storage class.
- The storage class must be compatible with snapshots.
Procedure
Set the
AZURE_RESOURCE_GROUPvariable:$ AZURE_RESOURCE_GROUP=Velero_Backups
Create an Azure resource group:
$ az group create -n $AZURE_RESOURCE_GROUP --location <CentralUS> 1- 1
- Specify your location.
Set the
AZURE_STORAGE_ACCOUNT_IDvariable:$ AZURE_STORAGE_ACCOUNT_ID=velerobackups
Create an Azure storage account:
$ az storage account create \
  --name $AZURE_STORAGE_ACCOUNT_ID \
  --resource-group $AZURE_RESOURCE_GROUP \
  --sku Standard_GRS \
  --encryption-services blob \
  --https-only true \
  --kind BlobStorage \
  --access-tier Hot
Set the
BLOB_CONTAINERvariable:$ BLOB_CONTAINER=velero
Create an Azure Blob storage container:
$ az storage container create \
  -n $BLOB_CONTAINER \
  --public-access off \
  --account-name $AZURE_STORAGE_ACCOUNT_ID
Create a service principal and credentials for
velero:$ AZURE_SUBSCRIPTION_ID=`az account list --query '[?isDefault].id' -o tsv` $ AZURE_TENANT_ID=`az account list --query '[?isDefault].tenantId' -o tsv` $ AZURE_CLIENT_SECRET=`az ad sp create-for-rbac --name "velero" --role "Contributor" --query 'password' -o tsv` $ AZURE_CLIENT_ID=`az ad sp list --display-name "velero" --query '[0].appId' -o tsv`
Save the service principal’s credentials in the
credentials-velerofile:$ cat << EOF > ./credentials-velero AZURE_SUBSCRIPTION_ID=${AZURE_SUBSCRIPTION_ID} AZURE_TENANT_ID=${AZURE_TENANT_ID} AZURE_CLIENT_ID=${AZURE_CLIENT_ID} AZURE_CLIENT_SECRET=${AZURE_CLIENT_SECRET} AZURE_RESOURCE_GROUP=${AZURE_RESOURCE_GROUP} AZURE_CLOUD_NAME=AzurePublicCloud EOF
2.4. Migrating applications with the CAM web console
You can migrate application workloads by adding your clusters and replication repository to the CAM web console. Then, you can create and run a migration plan.
If your cluster or replication repository are secured with self-signed certificates, you can create a CA certificate bundle file or disable SSL verification.
2.4.1. Creating a CA certificate bundle file
If you use a self-signed certificate to secure a cluster or a replication repository, certificate verification might fail with the following error message: Certificate signed by unknown authority.
You can create a custom CA certificate bundle file and upload it in the CAM web console when you add a cluster or a replication repository.
Procedure
Download a CA certificate from a remote endpoint and save it as a CA bundle file:
$ echo -n | openssl s_client -connect <host_FQDN>:<port> \ 1
  | sed -ne '/-BEGIN CERTIFICATE-/,/-END CERTIFICATE-/p' > <ca_bundle.cert> 2
2.4.2. Adding a cluster to the CAM web console
You can add a cluster to the CAM web console.
Prerequisites
If you are using Azure snapshots to copy data:
- You must provide the Azure resource group name when you add the source cluster.
- The source and target clusters must be in the same Azure resource group and in the same location.
Procedure
- Log in to the cluster.
Obtain the service account token:
$ oc sa get-token migration-controller -n openshift-migration
eyJhbGciOiJSUzI1NiIsImtpZCI6IiJ9.eyJpc3MiOiJrdWJlcm5ldGVzL3NlcnZpY2VhY2NvdW50Iiwia3ViZXJuZXRlcy5pby9zZXJ2aWNlYWNjb3VudC9uYW1lc3BhY2UiOiJtaWciLCJrdWJlcm5ldGVzLmlvL3NlcnZpY2VhY2NvdW50L3NlY3JldC5uYW1lIjoibWlnLXRva2VuLWs4dDJyIiwia3ViZXJuZXRlcy5pby9zZXJ2aWNlYWNjb3VudC9zZXJ2aWNlLWFjY291bnQubmFtZSI6Im1pZyIsImt1YmVybmV0ZXMuaW8vc2VydmljZWFjY291bnQvc2VydmljZS1hY2NvdW50LnVpZCI6ImE1YjFiYWMwLWMxYmYtMTFlOS05Y2NiLTAyOWRmODYwYjMwOCIsInN1YiI6InN5c3RlbTpzZXJ2aWNlYWNjb3VudDptaWc6bWlnIn0.xqeeAINK7UXpdRqAtOj70qhBJPeMwmgLomV9iFxr5RoqUgKchZRG2J2rkqmPm6vr7K-cm7ibD1IBpdQJCcVDuoHYsFgV4mp9vgOfn9osSDp2TGikwNz4Az95e81xnjVUmzh-NjDsEpw71DH92iHV_xt2sTwtzftS49LpPW2LjrV0evtNBP_t_RfskdArt5VSv25eORl7zScqfe1CiMkcVbf2UqACQjo3LbkpfN26HAioO2oH0ECPiRzT0Xyh-KwFutJLS9Xgghyw-LD9kPKcE_xbbJ9Y4Rqajh7WdPYuB0Jd9DPVrslmzK-F6cgHHYoZEv0SvLQi-PO0rpDrcjOEQQ
- Log in to the CAM web console.
- In the Clusters section, click Add cluster.
Fill in the following fields:
-
Cluster name: May contain lower-case letters (
a-z) and numbers (0-9). Must not contain spaces or international characters. -
Url: URL of the cluster’s API server, for example,
https://<master1.example.com>:8443. - Service account token: String that you obtained from the source cluster.
- Azure cluster: Optional. Select it if you are using Azure snapshots to copy your data.
- Azure resource group: This field appears if Azure cluster is checked.
- If you use a custom CA bundle, click Browse and browse to the CA bundle file.
-
Cluster name: May contain lower-case letters (
Click Add cluster.
The cluster appears in the Clusters section.
2.4.3. Adding a replication repository to the CAM web console
You can add an object storage bucket as a replication repository to the CAM web console.
Prerequisites
- You must configure an object storage bucket for migrating the data.
Procedure
- Log in to the CAM web console.
- In the Replication repositories section, click Add repository.
Select a Storage provider type and fill in the following fields:
AWS for AWS S3, MCG, and generic S3 providers:
- Replication repository name: Specify the replication repository name in the CAM web console.
- S3 bucket name: Specify the name of the S3 bucket you created.
- S3 bucket region: Specify the S3 bucket region. Required for AWS S3. Optional for other S3 providers.
-
S3 endpoint: Specify the URL of the S3 service, not the bucket, for example,
https://<s3-storage.apps.cluster.com>. Required for a generic S3 provider. You must use thehttps://prefix. -
S3 provider access key: Specify the
<AWS_SECRET_ACCESS_KEY>for AWS or the S3 provider access key for MCG. -
S3 provider secret access key: Specify the
<AWS_ACCESS_KEY_ID>for AWS or the S3 provider secret access key for MCG. - Require SSL verification: Clear this check box if you are using a generic S3 provider.
- If you use a custom CA bundle, click Browse and browse to the Base64-encoded CA bundle file.
GCP:
- Replication repository name: Specify the replication repository name in the CAM web console.
- GCP bucket name: Specify the name of the GCP bucket.
-
GCP credential JSON blob: Specify the string in the
credentials-velerofile.
Azure:
- Replication repository name: Specify the replication repository name in the CAM web console.
- Azure resource group: Specify the resource group of the Azure Blob storage.
- Azure storage account name: Specify the Azure Blob storage account name.
-
Azure credentials - INI file contents: Specify the string in the
credentials-velerofile.
- Click Add repository and wait for connection validation.
Click Close.
The new repository appears in the Replication repositories section.
2.4.4. Changing migration plan limits for large migrations
You can change the migration plan limits for large migrations.
Changes should first be tested in your environment to avoid a failed migration.
A single migration plan has the following default limits:
10 namespaces
If this limit is exceeded, the CAM web console displays a Namespace limit exceeded error and you cannot create a migration plan.
100 Pods
If the Pod limit is exceeded, the CAM web console displays a warning message similar to the following example: Plan has been validated with warning condition(s). See warning message. Pod limit: 100 exceeded, found: 104.
100 persistent volumes
If the persistent volume limit is exceeded, the CAM web console displays a similar warning message.
Procedure
Edit the Migration controller CR:
$ oc get migrationcontroller -n openshift-migration
NAME AGE
migration-controller 5d19h

$ oc edit migrationcontroller -n openshift-migration
Update the following parameters:
...
migration_controller: true

# This configuration is loaded into mig-controller, and should be set on the
# cluster where `migration_controller: true`
mig_pv_limit: 100
mig_pod_limit: 100
mig_namespace_limit: 10
...
2.4.5. Creating a migration plan in the CAM web console
You can create a migration plan in the CAM web console.
Prerequisites
The CAM web console must contain the following:
- Source cluster
- Target cluster, which is added automatically during the CAM tool installation
- Replication repository
- The source and target clusters must have network access to each other and to the replication repository.
- If you use snapshots to copy data, the source and target clusters must run on the same cloud provider (AWS, GCP, or Azure) and in the same region.
Procedure
- Log in to the CAM web console.
- In the Plans section, click Add plan.
Enter the Plan name and click Next.
The Plan name can contain up to 253 lower-case alphanumeric characters (
a-z, 0-9). It must not contain spaces or underscores (_).- Select a Source cluster.
- Select a Target cluster.
- Select a Replication repository.
- Select the projects to be migrated and click Next.
Select Copy or Move for the PVs:
Copy copies the data in a source cluster’s PV to the replication repository and then restores it on a newly created PV, with similar characteristics, in the target cluster.
Optional: You can verify data copied with the filesystem method by selecting Verify copy. This option, which generates a checksum for each source file and checks it after restoration, significantly reduces performance.
- Move unmounts a remote volume (for example, NFS) from the source cluster, creates a PV resource on the target cluster pointing to the remote volume, and then mounts the remote volume on the target cluster. Applications running on the target cluster use the same remote volume that the source cluster was using. The remote volume must be accessible to the source and target clusters.
- Click Next.
Select a Copy method for the PVs:
Snapshot backs up and restores the disk using the cloud provider’s snapshot functionality. It is significantly faster than Filesystem.
NoteThe storage and clusters must be in the same region and the storage class must be compatible.
- Filesystem copies the data files from the source disk to a newly created target disk.
Select a Storage class for the PVs.
If you selected the Filesystem copy method, you can change the storage class during migration, for example, from Red Hat Gluster Storage or NFS storage to Red Hat Ceph Storage.
- Click Next.
If you want to add a migration hook, click Add Hook and perform the following steps:
- Specify the name of the hook.
- Select Ansible playbook to use your own playbook or Custom container image for a hook written in another language.
- Click Browse to upload the playbook.
- Optional: If you are not using the default Ansible runtime image, specify your custom Ansible image.
- Specify the cluster on which you want the hook to run.
- Specify the service account name.
- Specify the namespace.
Select the migration step at which you want the hook to run:
- PreBackup: Before backup tasks are started on the source cluster
- PostBackup: After backup tasks are complete on the source cluster
- PreRestore: Before restore tasks are started on the target cluster
- PostRestore: After restore tasks are complete on the target cluster
Click Add.
You can add up to four hooks to a migration plan, assigning each hook to a different migration step.
- Click Finish.
Click Close.
The migration plan appears in the Plans section.
2.4.6. Running a migration plan in the CAM web console
You can stage or migrate applications and data with the migration plan you created in the CAM web console.
Prerequisites
The CAM web console must contain the following:
- Source cluster
- Target cluster, which is added automatically during the CAM tool installation
- Replication repository
- Valid migration plan
Procedure
- Log in to the CAM web console on the target cluster.
- Select a migration plan.
Click Stage to copy data from the source cluster to the target cluster without stopping the application.
You can run Stage multiple times to reduce the actual migration time.
When you are ready to migrate the application workload, click Migrate.
Migrate stops the application workload on the source cluster and recreates its resources on the target cluster.
- Optional: In the Migrate window, you can select Do not stop applications on the source cluster during migration.
- Click Migrate.
-
Optional: To stop a migration in progress, click the Options menu
and select Cancel.
When the migration is complete, verify that the application migrated successfully in the OpenShift Container Platform web console:
- Click Home → Projects.
- Click the migrated project to view its status.
- In the Routes section, click Location to verify that the application is functioning, if applicable.
- Click Workloads → Pods to verify that the pods are running in the migrated namespace.
- Click Storage → Persistent volumes to verify that the migrated persistent volume is correctly provisioned.
2.5. Troubleshooting
You can view the migration Custom Resources (CRs) and download logs to troubleshoot a failed migration.
If the application was stopped during the failed migration, you must roll it back manually in order to prevent data corruption.
Manual rollback is not required if the application was not stopped during migration, because the original application is still running on the source cluster.
2.5.1. Viewing migration Custom Resources
The Cluster Application Migration (CAM) tool creates the following Custom Resources (CRs):
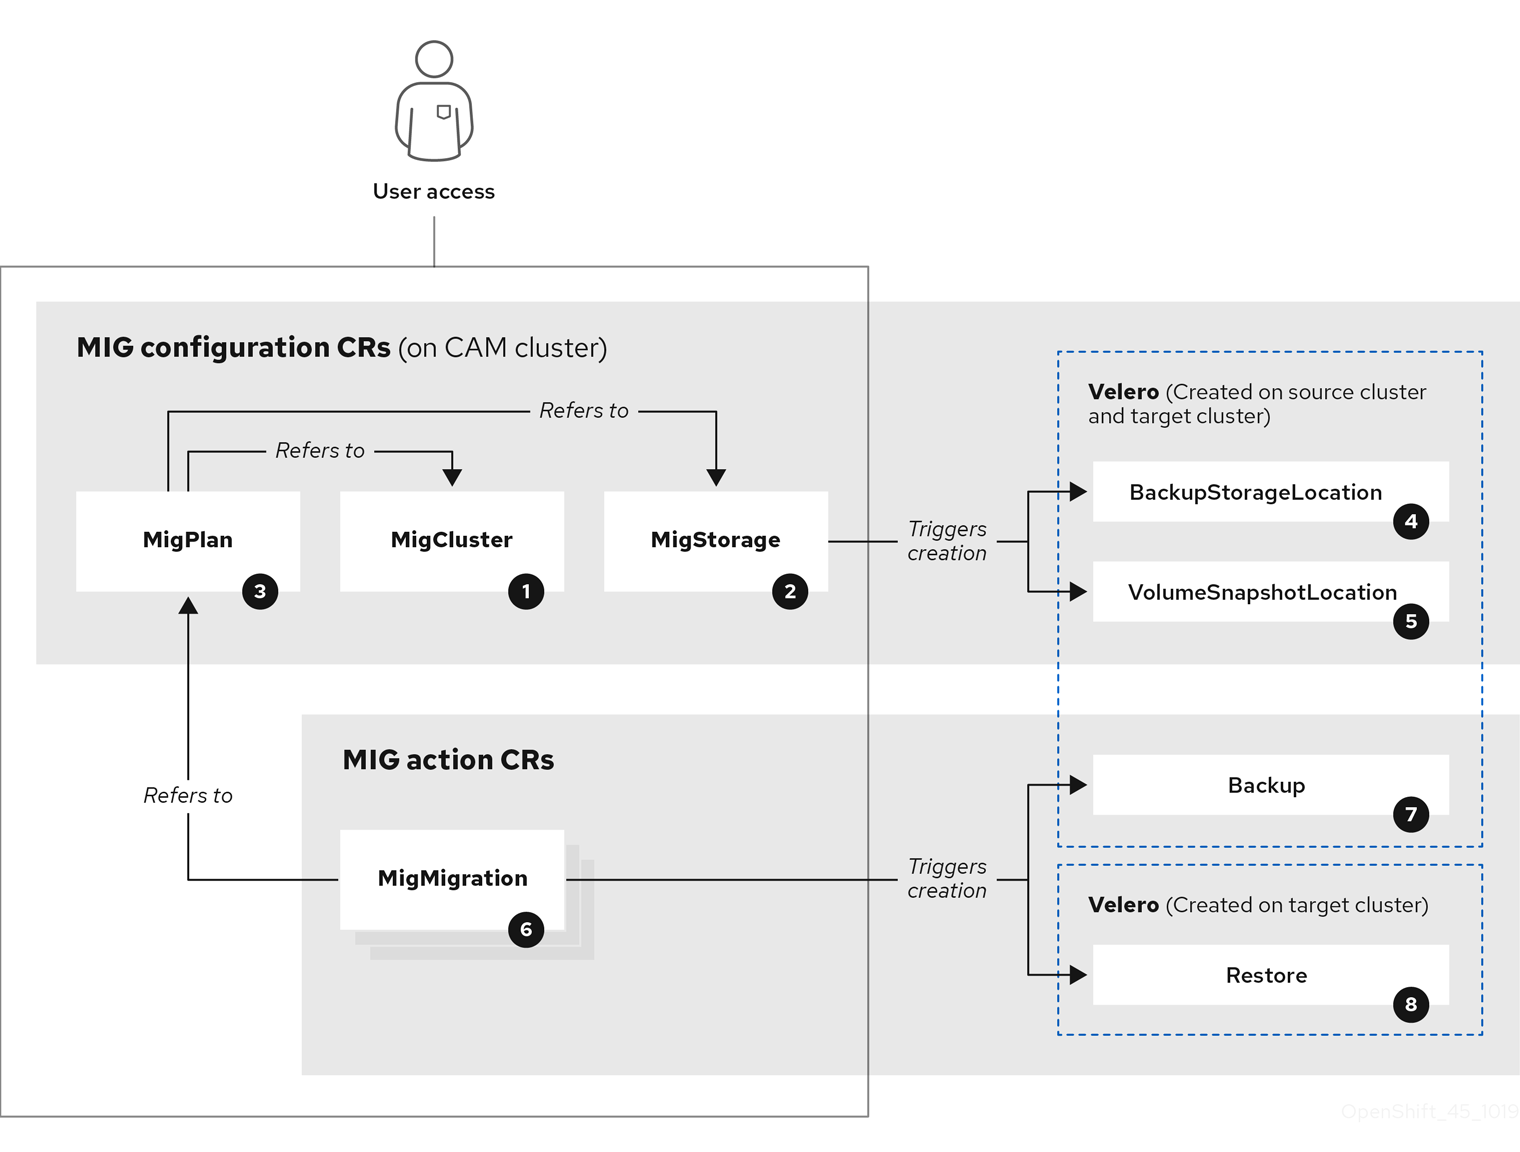
![]() MigCluster (configuration, CAM cluster): Cluster definition
MigCluster (configuration, CAM cluster): Cluster definition
![]() MigStorage (configuration, CAM cluster): Storage definition
MigStorage (configuration, CAM cluster): Storage definition
![]() MigPlan (configuration, CAM cluster): Migration plan
MigPlan (configuration, CAM cluster): Migration plan
The MigPlan CR describes the source and target clusters, repository, and namespace(s) being migrated. It is associated with 0, 1, or many MigMigration CRs.
Deleting a MigPlan CR deletes the associated MigMigration CRs.
![]() BackupStorageLocation (configuration, CAM cluster): Location of Velero backup objects
BackupStorageLocation (configuration, CAM cluster): Location of Velero backup objects
![]() VolumeSnapshotLocation (configuration, CAM cluster): Location of Velero volume snapshots
VolumeSnapshotLocation (configuration, CAM cluster): Location of Velero volume snapshots
![]() MigMigration (action, CAM cluster): Migration, created during migration
MigMigration (action, CAM cluster): Migration, created during migration
A MigMigration CR is created every time you stage or migrate data. Each MigMigration CR is associated with a MigPlan CR.
![]() Backup (action, source cluster): When you run a migration plan, the MigMigration CR creates two Velero backup CRs on each source cluster:
Backup (action, source cluster): When you run a migration plan, the MigMigration CR creates two Velero backup CRs on each source cluster:
- Backup CR #1 for Kubernetes objects
- Backup CR #2 for PV data
![]() Restore (action, target cluster): When you run a migration plan, the MigMigration CR creates two Velero restore CRs on the target cluster:
Restore (action, target cluster): When you run a migration plan, the MigMigration CR creates two Velero restore CRs on the target cluster:
- Restore CR #1 (using Backup CR #2) for PV data
- Restore CR #2 (using Backup CR #1) for Kubernetes objects
Procedure
Get the CR name:
$ oc get <migration_cr> -n openshift-migration 1- 1
- Specify the migration CR, for example,
migmigration.
The output is similar to the following:
NAME                                   AGE
88435fe0-c9f8-11e9-85e6-5d593ce65e10   6m42s
View the CR:
$ oc describe <migration_cr> <88435fe0-c9f8-11e9-85e6-5d593ce65e10> -n openshift-migration
The output is similar to the following examples.
MigMigration example
name:         88435fe0-c9f8-11e9-85e6-5d593ce65e10
namespace:    openshift-migration
labels:       <none>
annotations:  touch: 3b48b543-b53e-4e44-9d34-33563f0f8147
apiVersion:  migration.openshift.io/v1alpha1
kind:         MigMigration
metadata:
  creationTimestamp:  2019-08-29T01:01:29Z
  generation:          20
  resourceVersion:    88179
  selfLink:           /apis/migration.openshift.io/v1alpha1/namespaces/openshift-migration/migmigrations/88435fe0-c9f8-11e9-85e6-5d593ce65e10
  uid:                 8886de4c-c9f8-11e9-95ad-0205fe66cbb6
spec:
  migPlanRef:
    name:        socks-shop-mig-plan
    namespace:   openshift-migration
  quiescePods:  true
  stage:         false
status:
  conditions:
    category:              Advisory
    durable:               True
    lastTransitionTime:  2019-08-29T01:03:40Z
    message:               The migration has completed successfully.
    reason:                Completed
    status:                True
    type:                  Succeeded
  phase:                   Completed
  startTimestamp:         2019-08-29T01:01:29Z
events:                    <none>
Velero backup CR #2 example (PV data)
apiVersion: velero.io/v1
kind: Backup
metadata:
  annotations:
    openshift.io/migrate-copy-phase: final
    openshift.io/migrate-quiesce-pods: "true"
    openshift.io/migration-registry: 172.30.105.179:5000
    openshift.io/migration-registry-dir: /socks-shop-mig-plan-registry-44dd3bd5-c9f8-11e9-95ad-0205fe66cbb6
  creationTimestamp: "2019-08-29T01:03:15Z"
  generateName: 88435fe0-c9f8-11e9-85e6-5d593ce65e10-
  generation: 1
  labels:
    app.kubernetes.io/part-of: migration
    migmigration: 8886de4c-c9f8-11e9-95ad-0205fe66cbb6
    migration-stage-backup: 8886de4c-c9f8-11e9-95ad-0205fe66cbb6
    velero.io/storage-location: myrepo-vpzq9
  name: 88435fe0-c9f8-11e9-85e6-5d593ce65e10-59gb7
  namespace: openshift-migration
  resourceVersion: "87313"
  selfLink: /apis/velero.io/v1/namespaces/openshift-migration/backups/88435fe0-c9f8-11e9-85e6-5d593ce65e10-59gb7
  uid: c80dbbc0-c9f8-11e9-95ad-0205fe66cbb6
spec:
  excludedNamespaces: []
  excludedResources: []
  hooks:
    resources: []
  includeClusterResources: null
  includedNamespaces:
  - sock-shop
  includedResources:
  - persistentvolumes
  - persistentvolumeclaims
  - namespaces
  - imagestreams
  - imagestreamtags
  - secrets
  - configmaps
  - pods
  labelSelector:
    matchLabels:
      migration-included-stage-backup: 8886de4c-c9f8-11e9-95ad-0205fe66cbb6
  storageLocation: myrepo-vpzq9
  ttl: 720h0m0s
  volumeSnapshotLocations:
  - myrepo-wv6fx
status:
  completionTimestamp: "2019-08-29T01:02:36Z"
  errors: 0
  expiration: "2019-09-28T01:02:35Z"
  phase: Completed
  startTimestamp: "2019-08-29T01:02:35Z"
  validationErrors: null
  version: 1
  volumeSnapshotsAttempted: 0
  volumeSnapshotsCompleted: 0
  warnings: 0
Velero restore CR #2 example (Kubernetes resources)
apiVersion: velero.io/v1
kind: Restore
metadata:
  annotations:
    openshift.io/migrate-copy-phase: final
    openshift.io/migrate-quiesce-pods: "true"
    openshift.io/migration-registry: 172.30.90.187:5000
    openshift.io/migration-registry-dir: /socks-shop-mig-plan-registry-36f54ca7-c925-11e9-825a-06fa9fb68c88
  creationTimestamp: "2019-08-28T00:09:49Z"
  generateName: e13a1b60-c927-11e9-9555-d129df7f3b96-
  generation: 3
  labels:
    app.kubernetes.io/part-of: migration
    migmigration: e18252c9-c927-11e9-825a-06fa9fb68c88
    migration-final-restore: e18252c9-c927-11e9-825a-06fa9fb68c88
  name: e13a1b60-c927-11e9-9555-d129df7f3b96-gb8nx
  namespace: openshift-migration
  resourceVersion: "82329"
  selfLink: /apis/velero.io/v1/namespaces/openshift-migration/restores/e13a1b60-c927-11e9-9555-d129df7f3b96-gb8nx
  uid: 26983ec0-c928-11e9-825a-06fa9fb68c88
spec:
  backupName: e13a1b60-c927-11e9-9555-d129df7f3b96-sz24f
  excludedNamespaces: null
  excludedResources:
  - nodes
  - events
  - events.events.k8s.io
  - backups.velero.io
  - restores.velero.io
  - resticrepositories.velero.io
  includedNamespaces: null
  includedResources: null
  namespaceMapping: null
  restorePVs: true
status:
  errors: 0
  failureReason: ""
  phase: Completed
  validationErrors: null
  warnings: 15
2.5.2. Downloading migration logs
You can download the Velero, Restic, and Migration controller logs in the CAM web console to troubleshoot a failed migration.
Procedure
- Log in to the CAM console.
- Click Plans to view the list of migration plans.
-
Click the Options menu
of a specific migration plan and select Logs.
- Click Download Logs to download the logs of the Migration controller, Velero, and Restic for all clusters.
To download a specific log:
Specify the log options:
- Cluster: Select the source, target, or CAM host cluster.
- Log source: Select Velero, Restic, or Controller.
Pod source: Select the Pod name, for example,
controller-manager-78c469849c-v6wcfThe selected log is displayed.
You can clear the log selection settings by changing your selection.
- Click Download Selected to download the selected log.
Optionally, you can access the logs by using the CLI, as in the following example:
$ oc get pods -n openshift-migration | grep controller
controller-manager-78c469849c-v6wcf           1/1     Running     0          4h49m

$ oc logs controller-manager-78c469849c-v6wcf -f -n openshift-migration
2.5.3. Error messages
2.5.3.1. Restic timeout error message in the Velero Pod log
If a migration fails because Restic times out, the following error appears in the Velero Pod log:
level=error msg="Error backing up item" backup=velero/monitoring error="timed out waiting for all PodVolumeBackups to complete" error.file="/go/src/github.com/heptio/velero/pkg/restic/backupper.go:165" error.function="github.com/heptio/velero/pkg/restic.(*backupper).BackupPodVolumes" group=v1
The default value of restic_timeout is one hour. You can increase this parameter for large migrations, keeping in mind that a higher value may delay the return of error messages.
Procedure
- In the OpenShift Container Platform web console, navigate to Operators → Installed Operators.
- Click Cluster Application Migration Operator.
- In the MigrationController tab, click migration-controller.
In the YAML tab, update the following parameter value:
spec: restic_timeout: 1h 1- 1
- Valid units are
h(hours),m(minutes), ands(seconds), for example,3h30m15s.
- Click Save.
2.5.3.2. ResticVerifyErrors in the MigMigration Custom Resource
If data verification fails when migrating a PV with the filesystem data copy method, the following error appears in the MigMigration Custom Resource (CR):
status:
  conditions:
  - category: Warn
    durable: true
    lastTransitionTime: 2020-04-16T20:35:16Z
    message: There were verify errors found in 1 Restic volume restores. See restore `<registry-example-migration-rvwcm>`
      for details 1
    status: "True"
type: ResticVerifyErrors 2A data verification error does not cause the migration process to fail.
You can check the target cluster’s Restore CR to identify the source of the data verification error.
Procedure
- Log in to the target cluster.
View the Restore CR:
$ oc describe <registry-example-migration-rvwcm> -n openshift-migration
The output identifies the PV with
PodVolumeRestoreerrors:status: phase: Completed podVolumeRestoreErrors: - kind: PodVolumeRestore name: <registry-example-migration-rvwcm-98t49> namespace: openshift-migration podVolumeRestoreResticErrors: - kind: PodVolumeRestore name: <registry-example-migration-rvwcm-98t49> namespace: openshift-migrationView the
PodVolumeRestoreCR:$ oc describe <migration-example-rvwcm-98t49>
The output identifies the Restic Pod that logged the errors:
  completionTimestamp: 2020-05-01T20:49:12Z
  errors: 1
  resticErrors: 1
  ...
  resticPod: <restic-nr2v5>
View the Restic Pod log:
$ oc logs -f restic-nr2v5
2.5.4. Manually rolling back a migration
If your application was stopped during a failed migration, you must roll it back manually in order to prevent data corruption in the PV.
This procedure is not required if the application was not stopped during migration, because the original application is still running on the source cluster.
Procedure
On the target cluster, switch to the migrated project:
$ oc project <project>
Get the deployed resources:
$ oc get all
Delete the deployed resources to ensure that the application is not running on the target cluster and accessing data on the PVC:
$ oc delete <resource_type>
To stop a daemon set without deleting it, update the
nodeSelectorin the YAML file:apiVersion: apps/v1 kind: DaemonSet metadata: name: hello-daemonset spec: selector: matchLabels: name: hello-daemonset template: metadata: labels: name: hello-daemonset spec: nodeSelector: role: worker 1- 1
- Specify a
nodeSelectorvalue that does not exist on any node.
Update each PV’s reclaim policy so that unnecessary data is removed. During migration, the reclaim policy for bound PVs is
Retain, to ensure that data is not lost when an application is removed from the source cluster. You can remove these PVs during rollback.apiVersion: v1 kind: PersistentVolume metadata: name: pv0001 spec: capacity: storage: 5Gi accessModes: - ReadWriteOnce persistentVolumeReclaimPolicy: Retain 1 ... status: ...- 1
- Specify
RecycleorDelete.
On the source cluster, switch to your migrated project:
$ oc project <project_name>
Obtain the project’s deployed resources:
$ oc get all
Start one or more replicas of each deployed resource:
$ oc scale --replicas=1 <resource_type>/<resource_name>
-
Update the
nodeSelectorof theDaemonSetresource to its original value, if you changed it during the procedure.
2.5.5. Gathering data for a customer support case
If you open a customer support case, you can run the must-gather tool with the openshift-migration-must-gather-rhel8 image to collect information about your cluster and upload it to the Red Hat Customer Portal.
The openshift-migration-must-gather-rhel8 image collects logs and Custom Resource data that are not collected by the default must-gather image.
Procedure
-
Navigate to the directory where you want to store the
must-gatherdata. Run the
oc adm must-gathercommand:$ oc adm must-gather --image=registry.redhat.io/rhcam-1-2/openshift-migration-must-gather-rhel8
The
must-gathertool collects the cluster information and stores it in amust-gather.local.<uid>directory.-
Remove authentication keys and other sensitive information from the
must-gatherdata. Create an archive file containing the contents of the
must-gather.local.<uid>directory:$ tar cvaf must-gather.tar.gz must-gather.local.<uid>/
You can attach the compressed file to your customer support case on the Red Hat Customer Portal.
2.5.6. Known issues
This release has the following known issues:
During migration, the Cluster Application Migration (CAM) tool preserves the following namespace annotations:
-
openshift.io/sa.scc.mcs -
openshift.io/sa.scc.supplemental-groups openshift.io/sa.scc.uid-rangeThese annotations preserve the UID range, ensuring that the containers retain their file system permissions on the target cluster. There is a risk that the migrated UIDs could duplicate UIDs within an existing or future namespace on the target cluster. (BZ#1748440)
-
-
If an AWS bucket is added to the CAM web console and then deleted, its status remains
Truebecause the MigStorage CR is not updated. (BZ#1738564) - Most cluster-scoped resources are not yet handled by the CAM tool. If your applications require cluster-scoped resources, you may have to create them manually on the target cluster.
- If a migration fails, the migration plan does not retain custom PV settings for quiesced pods. You must manually roll back the migration, delete the migration plan, and create a new migration plan with your PV settings. (BZ#1784899)
-
If a large migration fails because Restic times out, you can increase the
restic_timeoutparameter value (default:1h) in the Migration controller CR. - If you select the data verification option for PVs that are migrated with the filesystem copy method, performance is significantly slower. Velero generates a checksum for each file and checks it when the file is restored.