
Chapter 3. Configuring persistent storage
3.1. Persistent storage using AWS Elastic File System
OpenShift Container Platform allows use of Amazon Web Services (AWS) Elastic File System volumes (EFS). You can provision your OpenShift Container Platform cluster with persistent storage using AWS EC2. Some familiarity with Kubernetes and AWS is assumed.
Elastic File System is a Technology Preview feature only. Technology Preview features are not supported with Red Hat production service level agreements (SLAs) and might not be functionally complete. Red Hat does not recommend using them in production. These features provide early access to upcoming product features, enabling customers to test functionality and provide feedback during the development process.
For more information about the support scope of Red Hat Technology Preview features, see https://access.redhat.com/support/offerings/techpreview/.
The Kubernetes persistent volume framework allows administrators to provision a cluster with persistent storage and gives users a way to request those resources without having any knowledge of the underlying infrastructure. AWS Elastic Block Store volumes can be provisioned dynamically. PersistentVolumes are not bound to a single project or namespace; they can be shared across the OpenShift Container Platform cluster. PersistentVolumeClaims are specific to a project or namespace and can be requested by users.
3.1.1. Prerequisites
- Configure the AWS security groups to allow inbound NFS traffic from the EFS volume’s security group.
- Configure the AWS EFS volume to allow incoming SSH traffic from any host.
Additional references
3.1.2. Store the EFS variables in a ConfigMap
It is recommended to use a ConfigMap to contain all the environment variables that are required for the EFS provisioner.
Procedure
Define an OpenShift Container Platform ConfigMap that contains the environment variables by creating a
configmap.yamlfile that contains following contents:apiVersion: v1 kind: ConfigMap metadata: name: efs-provisioner data: file.system.id: <file-system-id> 1 aws.region: <aws-region> 2 provisioner.name: openshift.org/aws-efs 3 dns.name: "" 4
- 1
- Defines the Amazon Web Services (AWS) EFS file system ID.
- 2
- The AWS region of the EFS file system, such as
us-east-1. - 3
- The name of the provisioner for the associated StorageClass.
- 4
- An optional argument that specifies the new DNS name where the EFS volume is located. If no DNS name is provided, the provisioner will search for the EFS volume at
<file-system-id>.efs.<aws-region>.amazonaws.com.
After the file has been configured, create it in your cluster by running the following command:
$ oc create -f configmap.yaml -n <namespace>
3.1.3. Configuring authorization for EFS volumes
The EFS provisioner must be authorized to communicate to the AWS endpoints, along with observing and updating OpenShift Container Platform storage resources. The following instructions create the necessary permissions for the EFS provisioner.
Procedure
Create an
efs-provisionerservice account:$ oc create serviceaccount efs-provisioner
Create a file,
clusterrole.yamlthat defines the necessary permissions:kind: ClusterRole apiVersion: rbac.authorization.k8s.io/v1 metadata: name: efs-provisioner-runner rules: - apiGroups: [""] resources: ["persistentvolumes"] verbs: ["get", "list", "watch", "create", "delete"] - apiGroups: [""] resources: ["persistentvolumeclaims"] verbs: ["get", "list", "watch", "update"] - apiGroups: ["storage.k8s.io"] resources: ["storageclasses"] verbs: ["get", "list", "watch"] - apiGroups: [""] resources: ["events"] verbs: ["create", "update", "patch"] - apiGroups: ["security.openshift.io"] resources: ["securitycontextconstraints"] verbs: ["use"] resourceNames: ["hostmount-anyuid"]Create a file,
clusterrolebinding.yaml, that defines a cluster role binding that assigns the defined role to the service account:kind: ClusterRoleBinding apiVersion: rbac.authorization.k8s.io/v1 metadata: name: run-efs-provisioner subjects: - kind: ServiceAccount name: efs-provisioner namespace: default 1 roleRef: kind: ClusterRole name: efs-provisioner-runner apiGroup: rbac.authorization.k8s.io- 1
- The namespace where the EFS provisioner pod will run. If the EFS provisioner is running in a namespace other than
default, this value must be updated.
Create a file,
role.yaml, that defines a role with the necessary permissions:kind: Role apiVersion: rbac.authorization.k8s.io/v1 metadata: name: leader-locking-efs-provisioner rules: - apiGroups: [""] resources: ["endpoints"] verbs: ["get", "list", "watch", "create", "update", "patch"]Create a file,
rolebinding.yaml, that defines a role binding that assigns this role to the service account:kind: RoleBinding apiVersion: rbac.authorization.k8s.io/v1 metadata: name: leader-locking-efs-provisioner subjects: - kind: ServiceAccount name: efs-provisioner namespace: default 1 roleRef: kind: Role name: leader-locking-efs-provisioner apiGroup: rbac.authorization.k8s.io- 1
- The namespace where the EFS provisioner pod will run. If the EFS provisioner is running in a namespace other than
default, this value must be updated.
Create the resources inside the OpenShift Container Platform cluster:
$ oc create -f clusterrole.yaml,clusterrolebinding.yaml,role.yaml,rolebinding.yaml
3.1.4. Create the EFS StorageClass
Before PersistentVolumeClaims can be created, a StorageClass must exist in the OpenShift Container Platform cluster. The following instructions create the StorageClass for the EFS provisioner.
Procedure
Define an OpenShift Container Platform ConfigMap that contains the environment variables by creating a
storageclass.yamlwith the following contents:apiVersion: storage.k8s.io/v1 kind: StorageClass metadata: name: aws-efs provisioner: openshift.org/aws-efs parameters: gidMin: "2048" 1 gidMax: "2147483647" 2 gidAllocate: "true" 3
- 1
- An optional argument that defines the minimum group ID (GID) for volume assignments. The default value is
2048. - 2
- An optional argument that defines the maximum GID for volume assignments. The default value is
2147483647. - 3
- An optional argument that determines if GIDs are assigned to volumes. If
false, dynamically provisioned volumes are not allocated GIDs, allowing all users to read and write to the created volumes. The default value istrue.
After the file has been configured, create it in your cluster by running the following command:
$ oc create -f storageclass.yaml
3.1.5. Create the EFS provisioner
The EFS provisioner is an OpenShift Container Platform Pod that mounts the EFS volume as an NFS share.
Prerequisites
- Create A ConfigMap that defines the EFS environment variables.
- Create a service account that contains the necessary cluster and role permissions.
- Create a StorageClass for provisioning volumes.
- Configure the Amazon Web Services (AWS) security groups to allow incoming NFS traffic on all OpenShift Container Platform nodes.
- Configure the AWS EFS volume security groups to allow incoming SSH traffic from all sources.
Procedure
Define the EFS provisioner by creating a
provisioner.yamlwith the following contents:kind: Pod apiVersion: v1 metadata: name: efs-provisioner spec: serviceAccount: efs-provisioner containers: - name: efs-provisioner image: quay.io/external_storage/efs-provisioner:latest env: - name: PROVISIONER_NAME valueFrom: configMapKeyRef: name: efs-provisioner key: provisioner.name - name: FILE_SYSTEM_ID valueFrom: configMapKeyRef: name: efs-provisioner key: file.system.id - name: AWS_REGION valueFrom: configMapKeyRef: name: efs-provisioner key: aws.region - name: DNS_NAME valueFrom: configMapKeyRef: name: efs-provisioner key: dns.name optional: true volumeMounts: - name: pv-volume mountPath: /persistentvolumes volumes: - name: pv-volume nfs: server: <file-system-id>.efs.<region>.amazonaws.com 1 path: / 2- 1
- Contains the DNS name of the EFS volume. This field must be updated for the Pod to discover the EFS volume.
- 2
- The mount path of the EFS volume. Each persistent volume is created as a separate subdirectory on the EFS volume. If this EFS volume is used for other projects outside of OpenShift Container Platform, then it is recommended to create a unique subdirectory OpenShift Container Platform manually on EFS for the cluster to prevent projects from accessing another project’s data. Specifying a directory that does not exist results in an error.
After the file has been configured, create it in your cluster by running the following command:
$ oc create -f provisioner.yaml
3.1.6. Create the EFS PersistentVolumeClaim
EFS PersistentVolumeClaims are created to allow Pods to mount the underlying EFS storage.
Prerequisites
- Create the EFS provisioner pod.
Procedure (UI)
- In the OpenShift Container Platform console, click Storage → Persistent Volume Claims.
- In the persistent volume claims overview, click Create Persistent Volume Claim.
Define the required options on the resulting page.
- Select the storage class that you created from the list.
- Enter a unique name for the storage claim.
- Select the access mode to determine the read and write access for the created storage claim.
Define the size of the storage claim.
NoteAlthough you must enter a size, every Pod that access the EFS volume has unlimited storage. Define a value, such as
1Mi, that will remind you that the storage size is unlimited.
- Click Create to create the persistent volume claim and generate a persistent volume.
Procedure (CLI)
Alternately, you can define EFS PersistentVolumeClaims by creating a file,
pvc.yaml, with the following contents:kind: PersistentVolumeClaim apiVersion: v1 metadata: name: efs-claim 1 namespace: test-efs annotations: volume.beta.kubernetes.io/storage-provisioner: openshift.org/aws-efs finalizers: - kubernetes.io/pvc-protection spec: accessModes: - ReadWriteOnce 2 resources: requests: storage: 5Gi 3 storageClassName: aws-efs 4 volumeMode: Filesystem
After the file has been configured, create it in your cluster by running the following command:
$ oc create -f pvc.yaml
3.2. Persistent Storage Using AWS Elastic Block Store
OpenShift Container Platform supports AWS Elastic Block Store volumes (EBS). You can provision your OpenShift Container Platform cluster with persistent storage using AWS EC2. Some familiarity with Kubernetes and AWS is assumed.
The Kubernetes persistent volume framework allows administrators to provision a cluster with persistent storage and gives users a way to request those resources without having any knowledge of the underlying infrastructure. AWS Elastic Block Store volumes can be provisioned dynamically. Persistent volumes are not bound to a single project or namespace; they can be shared across the OpenShift Container Platform cluster. Persistent volume claims are specific to a project or namespace and can be requested by users.
High-availability of storage in the infrastructure is left to the underlying storage provider.
Additional References
3.2.1. Creating the EBS Storage Class
StorageClasses are used to differentiate and delineate storage levels and usages. By defining a storage class, users can obtain dynamically provisioned persistent volumes.
Procedure
- In the OpenShift Container Platform console, click Storage → Storage Classes.
- In the storage class overview, click Create Storage Class.
Define the desired options on the page that appears.
- Enter a name to reference the storage class.
- Enter an optional description.
- Select the reclaim policy.
-
Select
kubernetes.io/aws-ebsfrom the drop down list. - Enter additional parameters for the storage class as desired.
- Click Create to create the storage class.
3.2.2. Creating the Persistent Volume Claim
Prerequisites
Storage must exist in the underlying infrastructure before it can be mounted as a volume in OpenShift Container Platform.
Procedure
- In the OpenShift Container Platform console, click Storage → Persistent Volume Claims.
- In the persistent volume claims overview, click Create Persistent Volume Claim.
Define the desired options on the page that appears.
- Select the storage class created previously from the drop-down menu.
- Enter a unique name for the storage claim.
- Select the access mode. This determines the read and write access for the created storage claim.
- Define the size of the storage claim.
- Click Create to create the persistent volume claim and generate a persistent volume.
3.2.3. Volume format
Before OpenShift Container Platform mounts the volume and passes it to a container, it checks that it contains a file system as specified by the fsType parameter in the persistent volume definition. If the device is not formatted with the file system, all data from the device is erased and the device is automatically formatted with the given file system.
This allows using unformatted AWS volumes as persistent volumes, because OpenShift Container Platform formats them before the first use.
3.2.4. Maximum number of EBS volumes on a node
By default, OpenShift Container Platform supports a maximum of 39 EBS volumes attached to one node. This limit is consistent with the AWS volume limits. The volume limit depends on the instance type.
3.3. Persistent storage using Azure
OpenShift Container Platform supports Microsoft Azure Disk volumes. You can provision your OpenShift Container Platform cluster with persistent storage using Azure. Some familiarity with Kubernetes and Azure is assumed. The Kubernetes persistent volume framework allows administrators to provision a cluster with persistent storage and gives users a way to request those resources without having any knowledge of the underlying infrastructure. Azure Disk volumes can be provisioned dynamically. Persistent volumes are not bound to a single project or namespace; they can be shared across the OpenShift Container Platform cluster. Persistent volume claims are specific to a project or namespace and can be requested by users.
High availability of storage in the infrastructure is left to the underlying storage provider.
Additional references
3.3.1. Creating the Azure storage class
StorageClasses are used to differentiate and delineate storage levels and usages. By defining a storage class, users can obtain dynamically provisioned persistent volumes.
Additional References
Procedure
- In the OpenShift Container Platform console, click Storage → Storage Classes.
- In the storage class overview, click Create Storage Class.
Define the desired options on the page that appears.
- Enter a name to reference the storage class.
- Enter an optional description.
- Select the reclaim policy.
Select
kubernetes.io/azure-diskfrom the drop down list.-
Enter the storage account type. This corresponds to your Azure storage account SKU tier. Valid options are
Premium_LRS,Standard_LRS,StandardSSD_LRS, andUltraSSD_LRS. -
Enter the kind of account. Valid options are
shared,dedicated,andmanaged.
-
Enter the storage account type. This corresponds to your Azure storage account SKU tier. Valid options are
- Enter additional parameters for the storage class as desired.
- Click Create to create the storage class.
3.3.2. Creating the Persistent Volume Claim
Prerequisites
Storage must exist in the underlying infrastructure before it can be mounted as a volume in OpenShift Container Platform.
Procedure
- In the OpenShift Container Platform console, click Storage → Persistent Volume Claims.
- In the persistent volume claims overview, click Create Persistent Volume Claim.
Define the desired options on the page that appears.
- Select the storage class created previously from the drop-down menu.
- Enter a unique name for the storage claim.
- Select the access mode. This determines the read and write access for the created storage claim.
- Define the size of the storage claim.
- Click Create to create the persistent volume claim and generate a persistent volume.
3.3.3. Volume format
Before OpenShift Container Platform mounts the volume and passes it to a container, it checks that it contains a file system as specified by the fsType parameter in the persistent volume definition. If the device is not formatted with the file system, all data from the device is erased and the device is automatically formatted with the given file system.
This allows using unformatted Azure volumes as persistent volumes, because OpenShift Container Platform formats them before the first use.
3.4. Persistent storage using Azure File
OpenShift Container Platform supports Microsoft Azure File volumes. You can provision your OpenShift Container Platform cluster with persistent storage using Azure. Some familiarity with Kubernetes and Azure is assumed.
The Kubernetes persistent volume framework allows administrators to provision a cluster with persistent storage and gives users a way to request those resources without having any knowledge of the underlying infrastructure. Azure File volumes can be provisioned dynamically.
PersistentVolumes are not bound to a single project or namespace; they can be shared across the OpenShift Container Platform cluster. PersistentVolumeClaims are specific to a project or namespace and can be requested by users for use in applications.
High availability of storage in the infrastructure is left to the underlying storage provider.
Additional references
3.4.1. Create the Azure File share PersistentVolumeClaim
To create the PersistentVolumeClaim, you must first define a Secret that contains the Azure account and key. This Secret is used in the PersistentVolume definition, and will be referenced by the PersistentVolumeClaim for use in applications.
Prerequisites
- An Azure File share exists.
- The credentials to access this share, specifically the storage account and key, are available.
Procedure
Create a Secret that contains the Azure File credentials:
$ oc create secret generic <secret-name> --from-literal=azurestorageaccountname=<storage-account> \ 1
  --from-literal=azurestorageaccountkey=<storage-account-key> 2
Create a PersistentVolume that references the Secret you created:
apiVersion: "v1"
kind: "PersistentVolume"
metadata:
  name: "pv0001" 1
spec:
  capacity:
    storage: "5Gi" 2
  accessModes:
    - "ReadWriteOnce"
  storageClassName: azure-file-sc
  azureFile:
    secretName: <secret-name> 3
    shareName: share-1 4
    readOnly: false
Create a PersistentVolumeClaim that maps to the PersistentVolume you created:
apiVersion: "v1"
kind: "PersistentVolumeClaim"
metadata:
  name: "claim1" 1
spec:
  accessModes:
    - "ReadWriteOnce"
  resources:
    requests:
      storage: "5Gi" 2
  storageClassName: azure-file-sc 3
  volumeName: "pv0001" 4
- 1
- The name of the PersistentVolumeClaim.
- 2
- The size of this PersistentVolumeClaim.
- 3
- The name of the StorageClass that is used to provision the PersistentVolume. Specify the StorageClass used in the PersistentVolume definition.
- 4
- The name of the existing PersistentVolume that references the Azure File share.
3.4.2. Mount the Azure File share in a Pod
After the PersistentVolumeClaim has been created, it can be used inside by an application. The following example demonstrates mounting this share inside of a Pod.
Prerequisites
- A PersistentVolumeClaim exists that is mapped to the underlying Azure File share.
Procedure
Create a Pod that mounts the existing PersistentVolumeClaim:
apiVersion: v1
kind: Pod
metadata:
  name: pod-name 1
spec:
  containers:
    ...
    volumeMounts:
    - mountPath: "/data" 2
      name: azure-file-share
  volumes:
    - name: azure-file-share
      persistentVolumeClaim:
        claimName: claim1 3
3.5. Persistent storage using Cinder
OpenShift Container Platform supports OpenStack Cinder. Some familiarity with Kubernetes and OpenStack is assumed.
Cinder volumes can be provisioned dynamically. Persistent volumes are not bound to a single project or namespace; they can be shared across the OpenShift Container Platform cluster. Persistent volume claims are specific to a project or namespace and can be requested by users.
Additional resources
- For more information about how OpenStack Block Storage provides persistent block storage management for virtual hard drives, see OpenStack Cinder.
3.5.1. Manual provisioning with Cinder
Storage must exist in the underlying infrastructure before it can be mounted as a volume in OpenShift Container Platform.
Prerequisites
- OpenShift Container Platform configured for Red Hat OpenStack Platform (RHOSP)
- Cinder volume ID
3.5.1.1. Creating the persistent volume
You must define your persistent volume (PV) in an object definition before creating it in OpenShift Container Platform:
Procedure
Save your object definition to a file.
cinder-persistentvolume.yaml
apiVersion: "v1"
kind: "PersistentVolume"
metadata:
  name: "pv0001" 1
spec:
  capacity:
    storage: "5Gi" 2
  accessModes:
    - "ReadWriteOnce"
  cinder: 3
    fsType: "ext3" 4
    volumeID: "f37a03aa-6212-4c62-a805-9ce139fab180" 5
- 1
- The name of the volume that is used by persistent volume claims or pods.
- 2
- The amount of storage allocated to this volume.
- 3
- Indicates
cinderfor Red Hat OpenStack Platform (RHOSP) Cinder volumes. - 4
- The file system that is created when the volume is mounted for the first time.
- 5
- The Cinder volume to use.
ImportantDo not change the
fstypeparameter value after the volume is formatted and provisioned. Changing this value can result in data loss and Pod failure.Create the object definition file you saved in the previous step.
$ oc create -f cinder-persistentvolume.yaml
3.5.1.2. Persistent volume formatting
You can use unformatted Cinder volumes as PVs because OpenShift Container Platform formats them before the first use.
Before OpenShift Container Platform mounts the volume and passes it to a container, the system checks that it contains a file system as specified by the fsType parameter in the PV definition. If the device is not formatted with the file system, all data from the device is erased and the device is automatically formatted with the given file system.
3.5.1.3. Cinder volume security
If you use Cinder PVs in your application, configure security for their deployment configurations.
Prerequisite
-
An SCC must be created that uses the appropriate
fsGroupstrategy.
Procedure
Create a service account and add it to the SCC:
$ oc create serviceaccount <service_account>
$ oc adm policy add-scc-to-user <new_scc> -z <service_account> -n <project>
In your application’s deployment configuration, provide the service account name and
securityContext:apiVersion: v1 kind: ReplicationController metadata: name: frontend-1 spec: replicas: 1 1 selector: 2 name: frontend template: 3 metadata: labels: 4 name: frontend 5 spec: containers: - image: openshift/hello-openshift name: helloworld ports: - containerPort: 8080 protocol: TCP restartPolicy: Always serviceAccountName: <service_account> 6 securityContext: fsGroup: 7777 7
- 1
- The number of copies of the Pod to run.
- 2
- The label selector of the Pod to run.
- 3
- A template for the Pod that the controller creates.
- 4
- The labels on the Pod. They must include labels from the label selector.
- 5
- The maximum name length after expanding any parameters is 63 characters.
- 6
- Specifies the service account you created.
- 7
- Specifies an
fsGroupfor the Pods.
3.6. Persistent storage using the Container Storage Interface (CSI)
The Container Storage Interface (CSI) allows OpenShift Container Platform to consume storage from storage backends that implement the CSI interface as persistent storage.
OpenShift Container Platform does not ship with any CSI drivers. It is recommended to use the CSI drivers provided by community or storage vendors.
Installation instructions differ by driver, and are found in each driver’s documentation. Follow the instructions provided by the CSI driver.
OpenShift Container Platform 4.3 supports version 1.1.0 of the CSI specification.
3.6.1. CSI Architecture
CSI drivers are typically shipped as container images. These containers are not aware of OpenShift Container Platform where they run. To use CSI-compatible storage backend in OpenShift Container Platform, the cluster administrator must deploy several components that serve as a bridge between OpenShift Container Platform and the storage driver.
The following diagram provides a high-level overview about the components running in pods in the OpenShift Container Platform cluster.
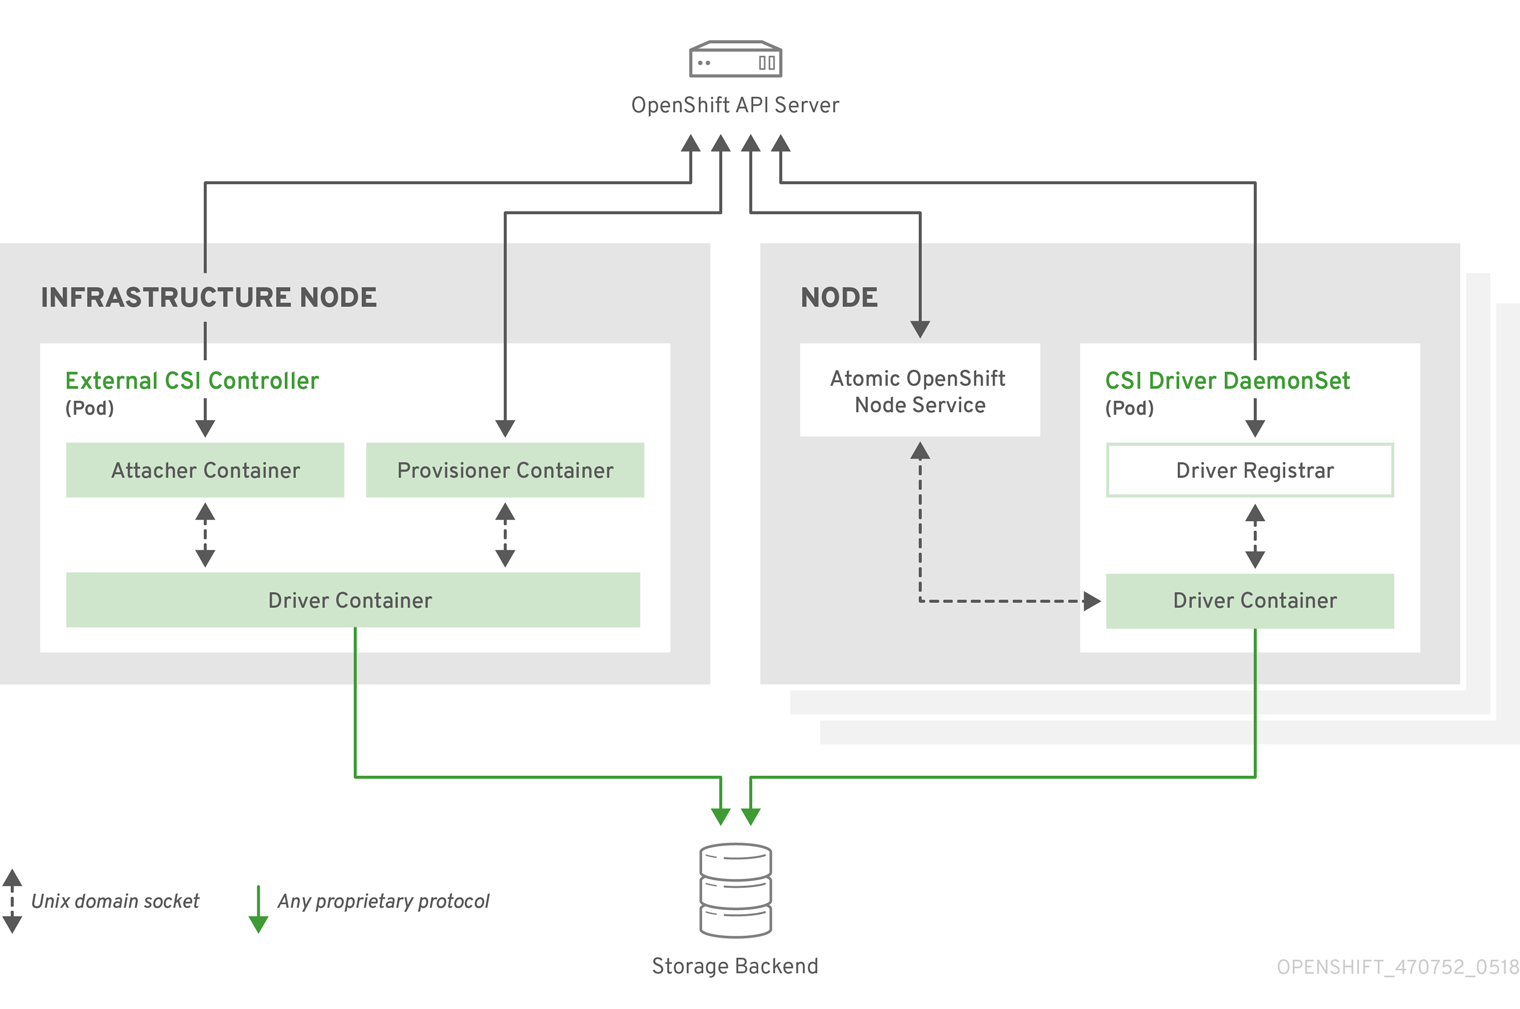
It is possible to run multiple CSI drivers for different storage backends. Each driver needs its own external controllers' deployment and DaemonSet with the driver and CSI registrar.
3.6.1.1. External CSI controllers
External CSI Controllers is a deployment that deploys one or more pods with three containers:
-
An external CSI attacher container translates
attachanddetachcalls from OpenShift Container Platform to respectiveControllerPublishandControllerUnpublishcalls to the CSI driver. -
An external CSI provisioner container that translates
provisionanddeletecalls from OpenShift Container Platform to respectiveCreateVolumeandDeleteVolumecalls to the CSI driver. - A CSI driver container
The CSI attacher and CSI provisioner containers communicate with the CSI driver container using UNIX Domain Sockets, ensuring that no CSI communication leaves the pod. The CSI driver is not accessible from outside of the pod.
attach, detach, provision, and delete operations typically require the CSI driver to use credentials to the storage backend. Run the CSI controller pods on infrastructure nodes so the credentials are never leaked to user processes, even in the event of a catastrophic security breach on a compute node.
The external attacher must also run for CSI drivers that do not support third-party attach or detach operations. The external attacher will not issue any ControllerPublish or ControllerUnpublish operations to the CSI driver. However, it still must run to implement the necessary OpenShift Container Platform attachment API.
3.6.1.2. CSI Driver DaemonSet
The CSI driver DaemonSet runs a pod on every node that allows OpenShift Container Platform to mount storage provided by the CSI driver to the node and use it in user workloads (pods) as persistent volumes (PVs). The pod with the CSI driver installed contains the following containers:
-
A CSI driver registrar, which registers the CSI driver into the
openshift-nodeservice running on the node. Theopenshift-nodeprocess running on the node then directly connects with the CSI driver using the UNIX Domain Socket available on the node. - A CSI driver.
The CSI driver deployed on the node should have as few credentials to the storage backend as possible. OpenShift Container Platform will only use the node plug-in set of CSI calls such as NodePublish/NodeUnpublish and NodeStage/NodeUnstage, if these calls are implemented.
3.6.2. Dynamic Provisioning
Dynamic provisioning of persistent storage depends on the capabilities of the CSI driver and underlying storage backend. The provider of the CSI driver should document how to create a StorageClass in OpenShift Container Platform and the parameters available for configuration.
The created StorageClass can be configured to enable dynamic provisioning.
Procedure
Create a default storage class that ensures all PVCs that do not require any special storage class are provisioned by the installed CSI driver.
# oc create -f - << EOF
apiVersion: storage.k8s.io/v1
kind: StorageClass
metadata:
  name: <storage-class> 1
  annotations:
    storageclass.kubernetes.io/is-default-class: "true"
provisioner: <provisioner-name> 2
parameters:
EOF
3.6.3. Example using the CSI driver
The following example installs a default MySQL template without any changes to the template.
Prerequisites
- The CSI driver has been deployed.
- A StorageClass has been created for dynamic provisioning.
Procedure
Create the MySQL template:
# oc new-app mysql-persistent
--> Deploying template "openshift/mysql-persistent" to project default
...

# oc get pvc
NAME              STATUS    VOLUME                                   CAPACITY
ACCESS MODES   STORAGECLASS   AGE
mysql             Bound     kubernetes-dynamic-pv-3271ffcb4e1811e8   1Gi
RWO            cinder         3s
3.7. Persistent storage using Fibre Channel
OpenShift Container Platform supports Fibre Channel, allowing you to provision your OpenShift Container Platform cluster with persistent storage using Fibre channel volumes. Some familiarity with Kubernetes and Fibre Channel is assumed.
The Kubernetes persistent volume framework allows administrators to provision a cluster with persistent storage and gives users a way to request those resources without having any knowledge of the underlying infrastructure. PersistentVolumes are not bound to a single project or namespace; they can be shared across the OpenShift Container Platform cluster. PersistentVolumeClaims are specific to a project or namespace and can be requested by users.
High availability of storage in the infrastructure is left to the underlying storage provider.
Additional references
3.7.1. Provisioning
To provision Fibre Channel volumes using the PersistentVolume API the following must be available:
-
The
targetWWNs(array of Fibre Channel target’s World Wide Names). - A valid LUN number.
- The filesystem type.
A PersistentVolume and a LUN have a one-to-one mapping between them.
Prerequisites
- Fibre Channel LUNs must exist in the underlying infrastructure.
PersistentVolume Object Definition
apiVersion: v1
kind: PersistentVolume
metadata:
  name: pv0001
spec:
  capacity:
    storage: 1Gi
  accessModes:
    - ReadWriteOnce
  fc:
    targetWWNs: ['500a0981891b8dc5', '500a0981991b8dc5'] 1
    lun: 2
    fsType: ext4
- 1
- Fibre Channel WWNs are identified as
/dev/disk/by-path/pci-<IDENTIFIER>-fc-0x<WWN>-lun-<LUN#>, but you do not need to provide any part of the path leading up to theWWN, including the0x, and anything after, including the-(hyphen).
Changing the value of the fstype parameter after the volume has been formatted and provisioned can result in data loss and pod failure.
3.7.1.1. Enforcing disk quotas
Use LUN partitions to enforce disk quotas and size constraints. Each LUN is mapped to a single PersistentVolume, and unique names must be used for PersistentVolumes.
Enforcing quotas in this way allows the end user to request persistent storage by a specific amount, such as 10Gi, and be matched with a corresponding volume of equal or greater capacity.
3.7.1.2. Fibre Channel volume security
Users request storage with a PersistentVolumeClaim. This claim only lives in the user’s namespace, and can only be referenced by a pod within that same namespace. Any attempt to access a PersistentVolume across a namespace causes the pod to fail.
Each Fibre Channel LUN must be accessible by all nodes in the cluster.
3.8. Persistent storage using FlexVolume
OpenShift Container Platform supports FlexVolume, an out-of-tree plug-in that uses an executable model to interface with drivers.
To use storage from a back-end that does not have a built-in plug-in, you can extend OpenShift Container Platform through FlexVolume drivers and provide persistent storage to applications.
Pods interact with FlexVolume drivers through the flexvolume in-tree plugin.
Additional References
3.8.1. About FlexVolume drivers
A FlexVolume driver is an executable file that resides in a well-defined directory on all nodes in the cluster. OpenShift Container Platform calls the FlexVolume driver whenever it needs to mount or unmount a volume represented by a PersistentVolume with flexVolume as the source.
Attach and detach operations are not supported in OpenShift Container Platform for FlexVolume.
3.8.2. FlexVolume driver example
The first command-line argument of the FlexVolume driver is always an operation name. Other parameters are specific to each operation. Most of the operations take a JavaScript Object Notation (JSON) string as a parameter. This parameter is a complete JSON string, and not the name of a file with the JSON data.
The FlexVolume driver contains:
-
All
flexVolume.options. -
Some options from
flexVolumeprefixed bykubernetes.io/, such asfsTypeandreadwrite. -
The content of the referenced secret, if specified, prefixed by
kubernetes.io/secret/.
FlexVolume driver JSON input example
{
	"fooServer": "192.168.0.1:1234", 1
        "fooVolumeName": "bar",
	"kubernetes.io/fsType": "ext4", 2
	"kubernetes.io/readwrite": "ro", 3
	"kubernetes.io/secret/<key name>": "<key value>", 4
	"kubernetes.io/secret/<another key name>": "<another key value>",
}
OpenShift Container Platform expects JSON data on standard output of the driver. When not specified, the output describes the result of the operation.
FlexVolume driver default output example
{
	"status": "<Success/Failure/Not supported>",
	"message": "<Reason for success/failure>"
}
Exit code of the driver should be 0 for success and 1 for error.
Operations should be idempotent, which means that the mounting of an already mounted volume should result in a successful operation.
3.8.3. Installing FlexVolume drivers
FlexVolume drivers that are used to extend OpenShift Container Platform are executed only on the node. To implement FlexVolumes, a list of operations to call and the installation path are all that is required.
Prerequisites
FlexVolume drivers must implement these operations:
initInitializes the driver. It is called during initialization of all nodes.
- Arguments: none
- Executed on: node
- Expected output: default JSON
mountMounts a volume to directory. This can include anything that is necessary to mount the volume, including finding the device and then mounting the device.
-
Arguments:
<mount-dir><json> - Executed on: node
- Expected output: default JSON
-
Arguments:
unmountUnmounts a volume from a directory. This can include anything that is necessary to clean up the volume after unmounting.
-
Arguments:
<mount-dir> - Executed on: node
- Expected output: default JSON
-
Arguments:
mountdevice- Mounts a volume’s device to a directory where individual Pods can then bind mount.
This call-out does not pass "secrets" specified in the FlexVolume spec. If your driver requires secrets, do not implement this call-out.
-
Arguments:
<mount-dir><json> - Executed on: node
Expected output: default JSON
unmountdevice- Unmounts a volume’s device from a directory.
-
Arguments:
<mount-dir> - Executed on: node
Expected output: default JSON
-
All other operations should return JSON with
{"status": "Not supported"}and exit code1.
-
All other operations should return JSON with
Procedure
To install the FlexVolume driver:
- Ensure that the executable file exists on all nodes in the cluster.
- Place the executable file at the volume plug-in path: /etc/kubernetes/kubelet-plugins/volume/exec/<vendor>~<driver>/<driver>.
For example, to install the FlexVolume driver for the storage foo, place the executable file at: /etc/kubernetes/kubelet-plugins/volume/exec/openshift.com~foo/foo.
3.8.4. Consuming storage using FlexVolume drivers
Each PersistentVolume object in OpenShift Container Platform represents one storage asset in the storage back-end, such as a volume.
Procedure
-
Use the
PersistentVolumeobject to reference the installed storage.
Persistent volume object definition using FlexVolume drivers example
apiVersion: v1
kind: PersistentVolume
metadata:
  name: pv0001 1
spec:
  capacity:
    storage: 1Gi 2
  accessModes:
    - ReadWriteOnce
  flexVolume:
    driver: openshift.com/foo 3
    fsType: "ext4" 4
    secretRef: foo-secret 5
    readOnly: true 6
    options: 7
      fooServer: 192.168.0.1:1234
      fooVolumeName: bar
- 1
- The name of the volume. This is how it is identified through persistent volume claims or from Pods. This name can be different from the name of the volume on back-end storage.
- 2
- The amount of storage allocated to this volume.
- 3
- The name of the driver. This field is mandatory.
- 4
- The file system that is present on the volume. This field is optional.
- 5
- The reference to a secret. Keys and values from this secret are provided to the FlexVolume driver on invocation. This field is optional.
- 6
- The read-only flag. This field is optional.
- 7
- The additional options for the FlexVolume driver. In addition to the flags specified by the user in the
optionsfield, the following flags are also passed to the executable:"fsType":"<FS type>", "readwrite":"<rw>", "secret/key1":"<secret1>" ... "secret/keyN":"<secretN>"
Secrets are passed only to mount or unmount call-outs.
3.9. Persistent storage using GCE Persistent Disk
OpenShift Container Platform supports GCE Persistent Disk volumes (gcePD). You can provision your OpenShift Container Platform cluster with persistent storage using GCE. Some familiarity with Kubernetes and GCE is assumed.
The Kubernetes persistent volume framework allows administrators to provision a cluster with persistent storage and gives users a way to request those resources without having any knowledge of the underlying infrastructure.
GCE Persistent Disk volumes can be provisioned dynamically.
Persistent volumes are not bound to a single project or namespace; they can be shared across the OpenShift Container Platform cluster. Persistent volume claims are specific to a project or namespace and can be requested by users.
High availability of storage in the infrastructure is left to the underlying storage provider.
Additional references
3.9.1. Creating the GCE Storage Class
StorageClasses are used to differentiate and delineate storage levels and usages. By defining a storage class, users can obtain dynamically provisioned persistent volumes.
Procedure
- In the OpenShift Container Platform console, click Storage → Storage Classes.
- In the storage class overview, click Create Storage Class.
Define the desired options on the page that appears.
- Enter a name to reference the storage class.
- Enter an optional description.
- Select the reclaim policy.
-
Select
kubernetes.io/gce-pdfrom the drop down list. - Enter additional parameters for the storage class as desired.
- Click Create to create the storage class.
3.9.2. Creating the Persistent Volume Claim
Prerequisites
Storage must exist in the underlying infrastructure before it can be mounted as a volume in OpenShift Container Platform.
Procedure
- In the OpenShift Container Platform console, click Storage → Persistent Volume Claims.
- In the persistent volume claims overview, click Create Persistent Volume Claim.
Define the desired options on the page that appears.
- Select the storage class created previously from the drop-down menu.
- Enter a unique name for the storage claim.
- Select the access mode. This determines the read and write access for the created storage claim.
- Define the size of the storage claim.
- Click Create to create the persistent volume claim and generate a persistent volume.
3.9.3. Volume format
Before OpenShift Container Platform mounts the volume and passes it to a container, it checks that it contains a file system as specified by the fsType parameter in the persistent volume definition. If the device is not formatted with the file system, all data from the device is erased and the device is automatically formatted with the given file system.
This allows using unformatted GCE volumes as persistent volumes, because OpenShift Container Platform formats them before the first use.
3.10. Persistent storage using hostPath
A hostPath volume in an OpenShift Container Platform cluster mounts a file or directory from the host node’s filesystem into your Pod. Most Pods will not need a hostPath volume, but it does offer a quick option for testing should an application require it.
The cluster administrator must configure Pods to run as privileged. This grants access to Pods in the same node.
3.10.1. Overview
OpenShift Container Platform supports hostPath mounting for development and testing on a single-node cluster.
In a production cluster, you would not use hostPath. Instead, a cluster administrator would provision a network resource, such as a GCE Persistent Disk volume, an NFS share, or an Amazon EBS volume. Network resources support the use of StorageClasses to set up dynamic provisioning.
A hostPath volume must be provisioned statically.
3.10.2. Statically provisioning hostPath volumes
A Pod that uses a hostPath volume must be referenced by manual (static) provisioning.
Procedure
Define the persistent volume (PV). Create a file,
pv.yaml, with the PersistentVolume object definition:apiVersion: v1 kind: PersistentVolume metadata: name: task-pv-volume 1 labels: type: local spec: storageClassName: manual 2 capacity: storage: 5Gi accessModes: - ReadWriteOnce 3 persistentVolumeReclaimPolicy: Retain hostPath: path: "/mnt/data" 4- 1
- The name of the volume. This name is how it is identified by PersistentVolumeClaims or Pods.
- 2
- Used to bind PersistentVolumeClaim requests to this PersistentVolume.
- 3
- The volume can be mounted as
read-writeby a single node. - 4
- The configuration file specifies that the volume is at
/mnt/dataon the cluster’s node.
Create the PV from the file:
$ oc create -f pv.yaml
Define the persistent volume claim (PVC). Create a file,
pvc.yaml, with the PersistentVolumeClaim object definition:apiVersion: v1 kind: PersistentVolumeClaim metadata: name: task-pvc-volume spec: accessModes: - ReadWriteOnce resources: requests: storage: 1Gi storageClassName: manualCreate the PVC from the file:
$ oc create -f pvc.yaml
3.10.3. Mounting the hostPath share in a privileged Pod
After the PersistentVolumeClaim has been created, it can be used inside by an application. The following example demonstrates mounting this share inside of a Pod.
Prerequisites
- A PersistentVolumeClaim exists that is mapped to the underlying hostPath share.
Procedure
Create a privileged Pod that mounts the existing PersistentVolumeClaim:
apiVersion: v1
kind: Pod
metadata:
  name: pod-name 1
spec:
  containers:
    ...
    securityContext:
      privileged: true 2
    volumeMounts:
    - mountPath: /data 3
      name: hostpath-privileged
  ...
  securityContext: {}
  volumes:
    - name: hostpath-privileged
      persistentVolumeClaim:
        claimName: task-pvc-volume 4
3.11. Persistent Storage Using iSCSI
You can provision your OpenShift Container Platform cluster with persistent storage using iSCSI. Some familiarity with Kubernetes and iSCSI is assumed.
The Kubernetes persistent volume framework allows administrators to provision a cluster with persistent storage and gives users a way to request those resources without having any knowledge of the underlying infrastructure.
High-availability of storage in the infrastructure is left to the underlying storage provider.
When you use iSCSI on Amazon Web Services, you must update the default security policy to include TCP traffic between nodes on the iSCSI ports. By default, they are ports 860 and 3260.
OpenShift assumes that all nodes in the cluster have already configured iSCSI initator, i.e. have installed iscsi-initiator-utils package and configured their initiator name in /etc/iscsi/initiatorname.iscsi. See Storage Administration Guide linked above.
3.11.1. Provisioning
Verify that the storage exists in the underlying infrastructure before mounting it as a volume in OpenShift Container Platform. All that is required for the iSCSI is the iSCSI target portal, a valid iSCSI Qualified Name (IQN), a valid LUN number, the filesystem type, and the PersistentVolume API.
Example 3.1. Persistent Volume Object Definition
apiVersion: v1
kind: PersistentVolume
metadata:
  name: iscsi-pv
spec:
  capacity:
    storage: 1Gi
  accessModes:
    - ReadWriteOnce
  iscsi:
     targetPortal: 10.16.154.81:3260
     iqn: iqn.2014-12.example.server:storage.target00
     lun: 0
     fsType: 'ext4'
3.11.2. Enforcing Disk Quotas
Use LUN partitions to enforce disk quotas and size constraints. Each LUN is one persistent volume. Kubernetes enforces unique names for persistent volumes.
Enforcing quotas in this way allows the end user to request persistent storage by a specific amount (e.g, 10Gi) and be matched with a corresponding volume of equal or greater capacity.
3.11.3. iSCSI Volume Security
Users request storage with a PersistentVolumeClaim. This claim only lives in the user’s namespace and can only be referenced by a pod within that same namespace. Any attempt to access a persistent volume claim across a namespace causes the pod to fail.
Each iSCSI LUN must be accessible by all nodes in the cluster.
3.11.3.1. Challenge Handshake Authentication Protocol (CHAP) configuration
Optionally, OpenShift can use CHAP to authenticate itself to iSCSI targets:
apiVersion: v1
kind: PersistentVolume
metadata:
  name: iscsi-pv
spec:
  capacity:
    storage: 1Gi
  accessModes:
    - ReadWriteOnce
  iscsi:
    targetPortal: 10.0.0.1:3260
    iqn: iqn.2016-04.test.com:storage.target00
    lun: 0
    fsType: ext4
    chapAuthDiscovery: true 1
    chapAuthSession: true 2
    secretRef:
name: chap-secret 33.11.4. iSCSI Multipathing
For iSCSI-based storage, you can configure multiple paths by using the same IQN for more than one target portal IP address. Multipathing ensures access to the persistent volume when one or more of the components in a path fail.
To specify multi-paths in the pod specification use the portals field. For example:
apiVersion: v1
kind: PersistentVolume
metadata:
  name: iscsi-pv
spec:
  capacity:
    storage: 1Gi
  accessModes:
    - ReadWriteOnce
  iscsi:
    targetPortal: 10.0.0.1:3260
    portals: ['10.0.2.16:3260', '10.0.2.17:3260', '10.0.2.18:3260'] 1
    iqn: iqn.2016-04.test.com:storage.target00
    lun: 0
    fsType: ext4
readOnly: false- 1
- Add additional target portals using the
portalsfield.
3.11.5. iSCSI Custom Initiator IQN
Configure the custom initiator iSCSI Qualified Name (IQN) if the iSCSI targets are restricted to certain IQNs, but the nodes that the iSCSI PVs are attached to are not guaranteed to have these IQNs.
To specify a custom initiator IQN, use initiatorName field.
apiVersion: v1
kind: PersistentVolume
metadata:
  name: iscsi-pv
spec:
  capacity:
    storage: 1Gi
  accessModes:
    - ReadWriteOnce
  iscsi:
    targetPortal: 10.0.0.1:3260
    portals: ['10.0.2.16:3260', '10.0.2.17:3260', '10.0.2.18:3260']
    iqn: iqn.2016-04.test.com:storage.target00
    lun: 0
    initiatorName: iqn.2016-04.test.com:custom.iqn 1
    fsType: ext4
readOnly: false- 1
- Specify the name of the initiator.
3.12. Persistent storage using local volumes
OpenShift Container Platform can be provisioned with persistent storage by using local volumes. Local persistent volumes allow you to access local storage devices, such as a disk or partition, by using the standard PVC interface.
Local volumes can be used without manually scheduling Pods to nodes, because the system is aware of the volume node’s constraints. However, local volumes are still subject to the availability of the underlying node and are not suitable for all applications.
Local volumes can only be used as a statically created Persistent Volume.
3.12.1. Installing the Local Storage Operator
The Local Storage Operator is not installed in OpenShift Container Platform by default. Use the following procedure to install and configure this Operator to enable local volumes in your cluster.
Prerequisites
- Access to the OpenShift Container Platform web console or command-line interface (CLI).
Procedure
Create the
local-storageproject:$ oc new-project local-storage
Optional: Allow local storage creation on master and infrastructure nodes.
You might want to use the Local Storage Operator to create volumes on master and infrastructure nodes, and not just worker nodes, to support components such as logging and monitoring.
To allow local storage creation on master and infrastructure nodes, add a toleration to the DaemonSet by entering the following commands:
$ oc patch ds local-storage-local-diskmaker -n local-storage -p '{"spec": {"template": {"spec": {"tolerations":[{"operator": "Exists"}]}}}}'$ oc patch ds local-storage-local-provisioner -n local-storage -p '{"spec": {"template": {"spec": {"tolerations":[{"operator": "Exists"}]}}}}'
From the UI
To install the Local Storage Operator from the web console, follow these steps:
- Log in to the OpenShift Container Platform web console.
- Navigate to Operators → OperatorHub.
- Type Local Storage into the filter box to locate the Local Storage Operator.
- Click Install.
- On the Create Operator Subscription page, select A specific namespace on the cluster. Select local-storage from the drop-down menu.
- Adjust the values for Update Channel and Approval Strategy to the values that you want.
- Click Subscribe.
Once finished, the Local Storage Operator will be listed in the Installed Operators section of the web console.
From the CLI
Install the Local Storage Operator from the CLI.
Create an object YAML file to define a Namespace, OperatorGroup, and Subscription for the Local Storage Operator, such as
local-storage.yaml:Example local-storage
apiVersion: v1 kind: Namespace metadata: name: local-storage --- apiVersion: operators.coreos.com/v1alpha2 kind: OperatorGroup metadata: name: local-operator-group namespace: local-storage spec: targetNamespaces: - local-storage --- apiVersion: operators.coreos.com/v1alpha1 kind: Subscription metadata: name: local-storage-operator namespace: local-storage spec: channel: "{product-version}" 1 installPlanApproval: Automatic name: local-storage-operator source: redhat-operators sourceNamespace: openshift-marketplace- 1
- This field can be edited to match your release selection of OpenShift Container Platform.
Create the Local Storage Operator object by entering the following command:
$ oc apply -f local-storage.yaml
At this point, the Operator Lifecycle Manager (OLM) is now aware of the Local Storage Operator. A ClusterServiceVersion (CSV) for the Operator should appear in the target namespace, and APIs provided by the Operator should be available for creation.
Verify local storage installation by checking that all Pods and the Local Storage Operator have been created:
Check that all the required Pods have been created:
$ oc -n local-storage get pods
NAME                                      READY   STATUS    RESTARTS   AGE
local-storage-operator-746bf599c9-vlt5t   1/1     Running   0          19m
Check the ClusterServiceVersion (CSV) YAML manifest to see that the Local Storage Operator is available in the
local-storageproject:$ oc get csvs -n local-storage NAME DISPLAY VERSION REPLACES PHASE local-storage-operator.4.2.26-202003230335 Local Storage 4.2.26-202003230335 Succeeded
After all checks have passed, the Local Storage Operator is installed successfully.
3.12.2. Provision the local volumes
Local volumes cannot be created by dynamic provisioning. Instead, PersistentVolumes must be created by the Local Storage Operator. This provisioner will look for any devices, both file system and block volumes, at the paths specified in defined resource.
Prerequisites
- The Local Storage Operator is installed.
- Local disks are attached to the OpenShift Container Platform nodes.
Procedure
Create the local volume resource. This must define the nodes and paths to the local volumes.
NoteDo not use different StorageClass names for the same device. Doing so will create multiple persistent volumes (PV)s.
Example: Filesystem
apiVersion: "local.storage.openshift.io/v1"
kind: "LocalVolume"
metadata:
  name: "local-disks"
  namespace: "local-storage" 1
spec:
  nodeSelector: 2
    nodeSelectorTerms:
    - matchExpressions:
        - key: kubernetes.io/hostname
          operator: In
          values:
          - ip-10-0-140-183
          - ip-10-0-158-139
          - ip-10-0-164-33
  storageClassDevices:
    - storageClassName: "local-sc"
      volumeMode: Filesystem 3
      fsType: xfs 4
      devicePaths: 5
        - /path/to/device 6
- 1
- The namespace where the Local Storage Operator is installed.
- 2
- Optional: A node selector containing a list of nodes where the local storage volumes are attached. This example uses the node host names, obtained from
oc get node. If a value is not defined, then the Local Storage Operator will attempt to find matching disks on all available nodes. - 3
- The volume mode, either
FilesystemorBlock, defining the type of the local volumes. - 4
- The file system that is created when the local volume is mounted for the first time.
- 5
- The path containing a list of local storage devices to choose from.
- 6
- Replace this value with your actual local disks filepath to the LocalVolume resource, such as
/dev/xvdg. PVs are created for these local disks when the provisioner is deployed successfully.
Example: Block
apiVersion: "local.storage.openshift.io/v1"
kind: "LocalVolume"
metadata:
  name: "local-disks"
  namespace: "local-storage" 1
spec:
  nodeSelector: 2
    nodeSelectorTerms:
    - matchExpressions:
        - key: kubernetes.io/hostname
          operator: In
          values:
          - ip-10-0-136-143
          - ip-10-0-140-255
          - ip-10-0-144-180
  storageClassDevices:
    - storageClassName: "localblock-sc"
      volumeMode: Block  3
      devicePaths: 4
        - /path/to/device 5
- 1
- The namespace where the Local Storage Operator is installed.
- 2
- Optional: A node selector containing a list of nodes where the local storage volumes are attached. This example uses the node host names, obtained from
oc get node. If a value is not defined, then the Local Storage Operator will attempt to find matching disks on all available nodes. - 3
- The volume mode, either
FilesystemorBlock, defining the type of the local volumes. - 4
- The path containing a list of local storage devices to choose from.
- 5
- Replace this value with your actual local disks filepath to the LocalVolume resource, such as
/dev/xvdg. PVs are created for these local disks when the provisioner is deployed successfully.
Create the local volume resource in your OpenShift Container Platform cluster, specifying the file you just created:
$ oc create -f <local-volume>.yaml
Verify that the provisioner was created, and that the corresponding DaemonSets were created:
$ oc get all -n local-storage

NAME                                          READY   STATUS    RESTARTS   AGE
pod/local-disks-local-provisioner-h97hj       1/1     Running   0          46m
pod/local-disks-local-provisioner-j4mnn       1/1     Running   0          46m
pod/local-disks-local-provisioner-kbdnx       1/1     Running   0          46m
pod/local-disks-local-diskmaker-ldldw         1/1     Running   0          46m
pod/local-disks-local-diskmaker-lvrv4         1/1     Running   0          46m
pod/local-disks-local-diskmaker-phxdq         1/1     Running   0          46m
pod/local-storage-operator-54564d9988-vxvhx   1/1     Running   0          47m

NAME                              TYPE        CLUSTER-IP       EXTERNAL-IP   PORT(S)     AGE
service/local-storage-operator    ClusterIP   172.30.49.90     <none>        60000/TCP   47m

NAME                                           DESIRED   CURRENT   READY   UP-TO-DATE   AVAILABLE   NODE SELECTOR   AGE
daemonset.apps/local-disks-local-provisioner   3         3         3       3            3           <none>          46m
daemonset.apps/local-disks-local-diskmaker     3         3         3       3            3           <none>          46m

NAME                                     READY   UP-TO-DATE   AVAILABLE   AGE
deployment.apps/local-storage-operator   1/1     1            1           47m

NAME                                                DESIRED   CURRENT   READY   AGE
replicaset.apps/local-storage-operator-54564d9988   1         1         1       47m
Note the desired and current number of DaemonSet processes. If the desired count is
0, it indicates that the label selectors were invalid.Verify that the PersistentVolumes were created:
$ oc get pv

NAME                CAPACITY   ACCESS MODES   RECLAIM POLICY   STATUS      CLAIM   STORAGECLASS   REASON   AGE
local-pv-1cec77cf   100Gi      RWO            Delete           Available           local-sc                88m
local-pv-2ef7cd2a   100Gi      RWO            Delete           Available           local-sc                82m
local-pv-3fa1c73    100Gi      RWO            Delete           Available           local-sc                48m
Editing the LocalVolume object does not change the fsType or volumeMode of existing PersistentVolumes because doing so might result in a destructive operation.
3.12.3. Create the local volume PersistentVolumeClaim
Local volumes must be statically created as a PersistentVolumeClaim (PVC) to be accessed by the Pod.
Prerequisite
- PersistentVolumes have been created using the local volume provisioner.
Procedure
Create the PVC using the corresponding StorageClass:
kind: PersistentVolumeClaim
apiVersion: v1
metadata:
  name: local-pvc-name 1
spec:
  accessModes:
  - ReadWriteOnce
  volumeMode: Filesystem 2
  resources:
    requests:
      storage: 100Gi 3
  storageClassName: local-sc 4
Create the PVC in the OpenShift Container Platform cluster, specifying the file you just created:
$ oc create -f <local-pvc>.yaml
3.12.4. Attach the local claim
After a local volume has been mapped to a PersistentVolumeClaim (PVC) it can be specified inside of a resource.
Prerequisites
- A PVC exists in the same namespace.
Procedure
Include the defined claim in the resource’s Spec. The following example declares the PVC inside a Pod:
apiVersion: v1 kind: Pod spec: ... containers: volumeMounts: - name: localpvc 1 mountPath: "/data" 2 volumes: - name: localpvc persistentVolumeClaim: claimName: localpvc 3Create the resource in the OpenShift Container Platform cluster, specifying the file you just created:
$ oc create -f <local-pod>.yaml
3.12.5. Using tolerations with Local Storage Operator Pods
Taints can be applied to nodes to prevent them from running general workloads. To allow the Local Storage Operator to use tainted nodes, you must add tolerations to the Pod or DaemonSet definition. This allows the created resources to run on these tainted nodes.
You apply tolerations to the Local Storage Operator Pod through the LocalVolume resource and apply taints to a node through the node specification. A taint on a node instructs the node to repel all Pods that do not tolerate the taint. Using a specific taint that is not on other Pods ensures that the Local Storage Operator Pod can also run on that node.
Taints and tolerations consist of a key, value, and effect. As an argument, it is expressed as key=value:effect. An operator allows you to leave one of these parameters empty.
Prerequisites
- The Local Storage Operator is installed.
- Local disks are attached to OpenShift Container Platform nodes with a taint.
- Tainted nodes are expected to provision local storage.
Procedure
To configure local volumes for scheduling on tainted nodes:
Modify the YAML file that defines the Pod and add the
LocalVolumespec, as shown in the following example:apiVersion: "local.storage.openshift.io/v1" kind: "LocalVolume" metadata: name: "local-disks" namespace: "local-storage" spec: tolerations: - key: localstorage 1 operator: Equal 2 value: "localstorage" 3 storageClassDevices: - storageClassName: "localblock-sc" volumeMode: Block 4 devicePaths: 5 - /dev/xvdg- 1
- Specify the key that you added to the node.
- 2
- Specify the
Equaloperator to require thekey/valueparameters to match. If operator is 'Exists`, the system checks that the key exists and ignores the value. If operator isEqual, then the key and value must match. - 3
- Specify the value
localof the tainted node. - 4
- The volume mode, either
FilesystemorBlock, defining the type of the local volumes. - 5
- The path containing a list of local storage devices to choose from.
The defined tolerations will be passed to the resulting DaemonSets, allowing the diskmaker and provisioner Pods to be created for nodes that contain the specified taints.
3.12.6. Deleting the Local Storage Operator’s resources
3.12.6.1. Removing a local volume
Occasionally, local volumes must be deleted. While removing the entry in the LocalVolume resource and deleting the PersistentVolume is typically enough, if you want to re-use the same device path or have it managed by a different StorageClass, then additional steps are needed.
The following procedure involves accessing a node as the root user. Modifying the state of the node beyond the steps in this procedure could result in cluster instability.
Prerequisite
The PersistentVolume must be in a
ReleasedorAvailablestate.WarningDeleting a PersistentVolume that is still in use can result in data loss or corruption.
Procedure
Edit the previously created LocalVolume to remove any unwanted disks.
Edit the cluster resource:
$ oc edit localvolume <name> -n local-storage
-
Navigate to the lines under
devicePaths, and delete any representing unwanted disks.
Delete any PersistentVolumes created.
$ oc delete pv <pv-name>
Delete any symlinks on the node.
Create a debug pod on the node:
$ oc debug node/<node-name>
Change your root directory to the host:
$ chroot /host
Navigate to the directory containing the local volume symlinks.
$ cd /mnt/local-storage/<sc-name> 1- 1
- The name of the StorageClass used to create the local volumes.
Delete the symlink belonging to the removed device.
$ rm <symlink>
3.12.6.2. Uninstalling the Local Storage Operator
To uninstall the Local Storage Operator, you must remove the Operator and all created resources in the local-storage project.
Uninstalling the Local Storage Operator while local storage PVs are still in use is not recommended. While the PVs will remain after the Operator’s removal, there might be indeterminate behavior if the Operator is uninstalled and reinstalled without removing the PVs and local storage resources.
Prerequisites
- Access to the OpenShift Container Platform web console.
Procedure
Delete any local volume resources in the project:
$ oc delete localvolume --all --all-namespaces
Uninstall the Local Storage Operator from the web console.
- Log in to the OpenShift Container Platform web console.
- Navigate to Operators → Installed Operators.
- Type Local Storage into the filter box to locate the Local Storage Operator.
-
Click the Options menu
 at the end of the Local Storage Operator.
- Click Uninstall Operator.
- Click Remove in the window that appears.
The PVs created by the Local Storage Operator will remain in the cluster until deleted. Once these volumes are no longer in use, delete them by running the following command:
$ oc delete pv <pv-name>
Delete the
local-storageproject:$ oc delete project local-storage
3.13. Persistent storage using NFS
OpenShift Container Platform clusters can be provisioned with persistent storage using NFS. Persistent volumes (PVs) and persistent volume claims (PVCs) provide a convenient method for sharing a volume across a project. While the NFS-specific information contained in a PV definition could also be defined directly in a Pod definition, doing so does not create the volume as a distinct cluster resource, making the volume more susceptible to conflicts.
Additional resources
3.13.1. Provisioning
Storage must exist in the underlying infrastructure before it can be mounted as a volume in OpenShift Container Platform. To provision NFS volumes, a list of NFS servers and export paths are all that is required.
Procedure
Create an object definition for the PV:
apiVersion: v1
kind: PersistentVolume
metadata:
  name: pv0001 1
spec:
  capacity:
    storage: 5Gi 2
  accessModes:
  - ReadWriteOnce 3
  nfs: 4
    path: /tmp 5
    server: 172.17.0.2 6
  persistentVolumeReclaimPolicy: Retain 7
- 1
- The name of the volume. This is the PV identity in various
oc <command> podcommands. - 2
- The amount of storage allocated to this volume.
- 3
- Though this appears to be related to controlling access to the volume, it is actually used similarly to labels and used to match a PVC to a PV. Currently, no access rules are enforced based on the
accessModes. - 4
- The volume type being used, in this case the
nfsplug-in. - 5
- The path that is exported by the NFS server.
- 6
- The host name or IP address of the NFS server.
- 7
- The reclaim policy for the PV. This defines what happens to a volume when released.
NoteEach NFS volume must be mountable by all schedulable nodes in the cluster.
Verify that the PV was created:
$ oc get pv
NAME     LABELS    CAPACITY     ACCESSMODES   STATUS      CLAIM  REASON    AGE
pv0001   <none>    5Gi          RWO           Available                    31s
Create a persistent volume claim that binds to the new PV:
apiVersion: v1 kind: PersistentVolumeClaim metadata: name: nfs-claim1 spec: accessModes: - ReadWriteOnce 1 resources: requests: storage: 5Gi 2Verify that the persistent volume claim was created:
$ oc get pvc
NAME         STATUS   VOLUME   CAPACITY   ACCESS MODES   STORAGECLASS   AGE
nfs-claim1   Bound    pv0001   5Gi        RWO            gp2            2m
3.13.2. Enforcing disk quotas
You can use disk partitions to enforce disk quotas and size constraints. Each partition can be its own export. Each export is one PV. OpenShift Container Platform enforces unique names for PVs, but the uniqueness of the NFS volume’s server and path is up to the administrator.
Enforcing quotas in this way allows the developer to request persistent storage by a specific amount, such as 10Gi, and be matched with a corresponding volume of equal or greater capacity.
3.13.3. NFS volume security
This section covers NFS volume security, including matching permissions and SELinux considerations. The user is expected to understand the basics of POSIX permissions, process UIDs, supplemental groups, and SELinux.
Developers request NFS storage by referencing either a PVC by name or the NFS volume plug-in directly in the volumes section of their Pod definition.
The /etc/exports file on the NFS server contains the accessible NFS directories. The target NFS directory has POSIX owner and group IDs. The OpenShift Container Platform NFS plug-in mounts the container’s NFS directory with the same POSIX ownership and permissions found on the exported NFS directory. However, the container is not run with its effective UID equal to the owner of the NFS mount, which is the desired behavior.
As an example, if the target NFS directory appears on the NFS server as:
$ ls -lZ /opt/nfs -d
drwxrws---. nfsnobody 5555 unconfined_u:object_r:usr_t:s0   /opt/nfs

$ id nfsnobody
uid=65534(nfsnobody) gid=65534(nfsnobody) groups=65534(nfsnobody)
Then the container must match SELinux labels, and either run with a UID of 65534, the nfsnobody owner, or with 5555 in its supplemental groups in order to access the directory.
The owner ID of 65534 is used as an example. Even though NFS’s root_squash maps root, uid 0, to nfsnobody, uid 65534, NFS exports can have arbitrary owner IDs. Owner 65534 is not required for NFS exports.
3.13.3.1. Group IDs
The recommended way to handle NFS access, assuming it is not an option to change permissions on the NFS export, is to use supplemental groups. Supplemental groups in OpenShift Container Platform are used for shared storage, of which NFS is an example. In contrast block storage, such as iSCSI, use the fsGroup SCC strategy and the fsGroup value in the Pod’s securityContext.
To gain access to persistent storage, it is generally preferable to use supplemental group IDs versus user IDs.
Because the group ID on the example target NFS directory is 5555, the Pod can define that group ID using supplementalGroups under the Pod’s securityContext definition. For example:
spec:
  containers:
    - name:
    ...
  securityContext: 1
    supplementalGroups: [5555] 2
Assuming there are no custom SCCs that might satisfy the Pod’s requirements, the Pod likely matches the restricted SCC. This SCC has the supplementalGroups strategy set to RunAsAny, meaning that any supplied group ID is accepted without range checking.
As a result, the above Pod passes admissions and is launched. However, if group ID range checking is desired, a custom SCC is the preferred solution. A custom SCC can be created such that minimum and maximum group IDs are defined, group ID range checking is enforced, and a group ID of 5555 is allowed.
To use a custom SCC, you must first add it to the appropriate service account. For example, use the default service account in the given project unless another has been specified on the Pod specification.
3.13.3.2. User IDs
User IDs can be defined in the container image or in the Pod definition.
It is generally preferable to use supplemental group IDs to gain access to persistent storage versus using user IDs.
In the example target NFS directory shown above, the container needs its UID set to 65534, ignoring group IDs for the moment, so the following can be added to the Pod definition:
spec:
  containers: 1
  - name:
  ...
    securityContext:
      runAsUser: 65534 2
Assuming the default project and the restricted SCC, the Pod’s requested user ID of 65534 is not allowed, and therefore the Pod fails. The Pod fails for the following reasons:
-
It requests
65534as its user ID. -
All SCCs available to the Pod are examined to see which SCC allows a user ID of
65534. While all policies of the SCCs are checked, the focus here is on user ID. -
Because all available SCCs use
MustRunAsRangefor theirrunAsUserstrategy, UID range checking is required. -
65534is not included in the SCC or project’s user ID range.
It is generally considered a good practice not to modify the predefined SCCs. The preferred way to fix this situation is to create a custom SCC A custom SCC can be created such that minimum and maximum user IDs are defined, UID range checking is still enforced, and the UID of 65534 is allowed.
To use a custom SCC, you must first add it to the appropriate service account. For example, use the default service account in the given project unless another has been specified on the Pod specification.
3.13.3.3. SELinux
By default, SELinux does not allow writing from a Pod to a remote NFS server. The NFS volume mounts correctly, but is read-only.
To enable writing to a remote NFS server, follow the below procedure.
Prerequisites
-
The
container-selinuxpackage must be installed. This package provides thevirt_use_nfsSELinux boolean.
Procedure
Enable the
virt_use_nfsboolean using the following command. The-Poption makes this boolean persistent across reboots.# setsebool -P virt_use_nfs 1
3.13.3.4. Export settings
In order to enable arbitrary container users to read and write the volume, each exported volume on the NFS server should conform to the following conditions:
Every export must be exported using the following format:
/<example_fs> *(rw,root_squash)
The firewall must be configured to allow traffic to the mount point.
For NFSv4, configure the default port
2049(nfs).NFSv4
# iptables -I INPUT 1 -p tcp --dport 2049 -j ACCEPT
For NFSv3, there are three ports to configure:
2049(nfs),20048(mountd), and111(portmapper).NFSv3
# iptables -I INPUT 1 -p tcp --dport 2049 -j ACCEPT
# iptables -I INPUT 1 -p tcp --dport 20048 -j ACCEPT
# iptables -I INPUT 1 -p tcp --dport 111 -j ACCEPT
-
The NFS export and directory must be set up so that they are accessible by the target Pods. Either set the export to be owned by the container’s primary UID, or supply the Pod group access using
supplementalGroups, as shown in group IDs above.
3.13.4. Reclaiming resources
NFS implements the OpenShift Container Platform Recyclable plug-in interface. Automatic processes handle reclamation tasks based on policies set on each persistent volume.
By default, PVs are set to Retain.
Once claim to a PVC is deleted, and the PV is released, the PV object should not be reused. Instead, a new PV should be created with the same basic volume details as the original.
For example, the administrator creates a PV named nfs1:
apiVersion: v1
kind: PersistentVolume
metadata:
  name: nfs1
spec:
  capacity:
    storage: 1Mi
  accessModes:
    - ReadWriteMany
  nfs:
    server: 192.168.1.1
    path: "/"
The user creates PVC1, which binds to nfs1. The user then deletes PVC1, releasing claim to nfs1. This results in nfs1 being Released. If the administrator wants to make the same NFS share available, they should create a new PV with the same NFS server details, but a different PV name:
apiVersion: v1
kind: PersistentVolume
metadata:
  name: nfs2
spec:
  capacity:
    storage: 1Mi
  accessModes:
    - ReadWriteMany
  nfs:
    server: 192.168.1.1
    path: "/"
Deleting the original PV and re-creating it with the same name is discouraged. Attempting to manually change the status of a PV from Released to Available causes errors and potential data loss.
3.13.5. Additional configuration and troubleshooting
Depending on what version of NFS is being used and how it is configured, there may be additional configuration steps needed for proper export and security mapping. The following are some that may apply:
|
NFSv4 mount incorrectly shows all files with ownership of |
|
| Disabling ID mapping on NFSv4 |
|
3.14. Red Hat OpenShift Container Storage
Red Hat OpenShift Container Storage is a provider of agnostic persistent storage for OpenShift Container Platform supporting file, block, and object storage, either in-house or in hybrid clouds. As a Red Hat storage solution, Red Hat OpenShift Container Storage is completely integrated with OpenShift Container Platform for deployment, management, and monitoring.
Red Hat OpenShift Container Storage provides its own documentation library. The complete set of Red Hat OpenShift Container Storage documentation identified below is available at https://access.redhat.com/documentation/en-us/red_hat_openshift_container_storage/4.3/
| If you are looking for Red Hat OpenShift Container Storage information about… | See the following Red Hat OpenShift Container Storage documentation: |
|---|---|
| What’s new, known issues, notable bug fixes, and Technology Previews | |
| Supported workloads, layouts, hardware and software requirements, sizing and scaling recommendations | Planning your Red Hat OpenShift Container Storage 4.3 deployment |
| Deploying Red Hat OpenShift Container Storage 4.3 on an existing OpenShift Container Platform cluster | |
| Managing a Red Hat OpenShift Container Storage 4.3 cluster | |
| Monitoring a Red Hat OpenShift Container Storage 4.3 cluster | |
| Migrating your OpenShift Container Platform cluster from version 3 to version 4 |
3.15. Persistent storage using VMware vSphere volumes
OpenShift Container Platform allows use of VMware vSphere’s Virtual Machine Disk (VMDK) volumes. You can provision your OpenShift Container Platform cluster with persistent storage using VMware vSphere. Some familiarity with Kubernetes and VMware vSphere is assumed.
VMware vSphere volumes can be provisioned dynamically. OpenShift Container Platform creates the disk in vSphere and attaches this disk to the correct image.
The Kubernetes persistent volume framework allows administrators to provision a cluster with persistent storage and gives users a way to request those resources without having any knowledge of the underlying infrastructure.
PersistentVolumes are not bound to a single project or namespace; they can be shared across the OpenShift Container Platform cluster. PersistentVolumeClaims are specific to a project or namespace and can be requested by users.
Additional references
3.15.1. Dynamically provisioning VMware vSphere volumes
Dynamically provisioning VMware vSphere volumes is the recommended method.
3.15.2. Prerequisites
- An OpenShift Container Platform cluster installed on a VMware vSphere version that meets the requirements for the components that you use. See Installing a cluster on vSphere for information about vSphere version support.
You can use either of the following procedures to dynamically provision these volumes using the default StorageClass.
3.15.2.1. Dynamically provisioning VMware vSphere volumes using the UI
OpenShift Container Platform installs a default StorageClass, named thin, that uses the thin disk format for provisioning volumes.
Prerequisites
- Storage must exist in the underlying infrastructure before it can be mounted as a volume in OpenShift Container Platform.
Procedure
- In the OpenShift Container Platform console, click Storage → Persistent Volume Claims.
- In the persistent volume claims overview, click Create Persistent Volume Claim.
Define the required options on the resulting page.
-
Select the
thinStorageClass. - Enter a unique name for the storage claim.
- Select the access mode to determine the read and write access for the created storage claim.
- Define the size of the storage claim.
-
Select the
- Click Create to create the PersistentVolumeClaim and generate a PersistentVolume.
3.15.2.2. Dynamically provisioning VMware vSphere volumes using the CLI
OpenShift Container Platform installs a default StorageClass, named thin, that uses the thin disk format for provisioning volumes.
Prerequisites
- Storage must exist in the underlying infrastructure before it can be mounted as a volume in OpenShift Container Platform.
Procedure (CLI)
You can define a VMware vSphere PersistentVolumeClaim by creating a file,
pvc.yaml, with the following contents:kind: PersistentVolumeClaim apiVersion: v1 metadata: name: pvc 1 spec: accessModes: - ReadWriteOnce 2 resources: requests: storage: 1Gi 3
Create the PersistentVolumeClaim from the file:
$ oc create -f pvc.yaml
3.15.3. Statically provisioning VMware vSphere volumes
To statically provision VMware vSphere volumes you must create the virtual machine disks for reference by the persistent volume framework.
Prerequisites
- Storage must exist in the underlying infrastructure before it can be mounted as a volume in OpenShift Container Platform.
Procedure
Create the virtual machine disks. Virtual machine disks (VMDKs) must be created manually before statically provisioning VMware vSphere volumes. Use either of the following methods:
Create using
vmkfstools. Access ESX through Secure Shell (SSH) and then use following command to create a VMDK volume:$ vmkfstools -c <size> /vmfs/volumes/<datastore-name>/volumes/<disk-name>.vmdk
Create using
vmware-diskmanager:$ shell vmware-vdiskmanager -c -t 0 -s <size> -a lsilogic <disk-name>.vmdk
Create a PersistentVolume that references the VMDKs. Create a file,
pv1.yaml, with the PersistentVolume object definition:apiVersion: v1 kind: PersistentVolume metadata: name: pv1 1 spec: capacity: storage: 1Gi 2 accessModes: - ReadWriteOnce persistentVolumeReclaimPolicy: Retain vsphereVolume: 3 volumePath: "[datastore1] volumes/myDisk" 4 fsType: ext4 5
- 1
- The name of the volume. This name is how it is identified by PersistentVolumeClaims or Pods.
- 2
- The amount of storage allocated to this volume.
- 3
- The volume type used, with
vsphereVolumefor vSphere volumes. The label is used to mount a vSphere VMDK volume into Pods. The contents of a volume are preserved when it is unmounted. The volume type supports VMFS and VSAN datastore. - 4
- The existing VMDK volume to use. If you used
vmkfstools, you must enclose the datastore name in square brackets,[], in the volume definition, as shown previously. - 5
- The file system type to mount. For example, ext4, xfs, or other file systems.
ImportantChanging the value of the fsType parameter after the volume is formatted and provisioned can result in data loss and Pod failure.
Create the PersistentVolume from the file:
$ oc create -f pv1.yaml
Create a PersistentVolumeClaim that maps to the PersistentVolume you created in the previous step. Create a file,
pvc1.yaml, with the PersistentVolumeClaim object definition:apiVersion: v1 kind: PersistentVolumeClaim metadata: name: pvc1 1 spec: accessModes: - ReadWriteOnce 2 resources: requests: storage: "1Gi" 3 volumeName: pv1 4
Create the PersistentVolumeClaim from the file:
$ oc create -f pvc1.yaml
3.15.3.1. Formatting VMware vSphere volumes
Before OpenShift Container Platform mounts the volume and passes it to a container, it checks that the volume contains a file system that is specified by the fsType parameter value in the PersistentVolume (PV) definition. If the device is not formatted with the file system, all data from the device is erased, and the device is automatically formatted with the specified file system.
Because OpenShift Container Platform formats them before the first use, you can use unformatted vSphere volumes as PVs.