
Chapter 14. Installing an on-premise cluster with the Agent-based Installer
14.1. Preparing to install with the Agent-based Installer
14.1.1. About the Agent-based Installer
The Agent-based installation method provides the flexibility to boot your on-premises servers in any way that you choose. It combines the ease of use of the Assisted Installation service with the ability to run offline, including in air-gapped environments. Agent-based installation is a subcommand of the OpenShift Container Platform installer. It generates a bootable ISO image containing all of the information required to deploy an OpenShift Container Platform cluster, with an available release image.
The configuration is in the same format as for the installer-provisioned infrastructure and user-provisioned infrastructure installation methods. The Agent-based Installer can also optionally generate or accept Zero Touch Provisioning (ZTP) custom resources. ZTP allows you to provision new edge sites with declarative configurations of bare-metal equipment.
14.1.2. Understanding Agent-based Installer
As an OpenShift Container Platform user, you can leverage the advantages of the Assisted Installer hosted service in disconnected environments.
The Agent-based installation comprises a bootable ISO that contains the Assisted discovery agent and the Assisted Service. Both are required to perform the cluster installation, but the latter runs on only one of the hosts.
The openshift-install agent create image subcommand generates an ephemeral ISO based on the inputs that you provide. You can choose to provide inputs through the following manifests:
Preferred:
-
install-config.yaml -
agent-config.yaml
or
Optional: ZTP manifests
-
cluster-manifests/cluster-deployment.yaml -
cluster-manifests/agent-cluster-install.yaml -
cluster-manifests/pull-secret.yaml -
cluster-manifests/infraenv.yaml -
cluster-manifests/cluster-image-set.yaml -
cluster-manifests/nmstateconfig.yaml -
mirror/registries.conf -
mirror/ca-bundle.crt
14.1.2.1. Agent-based Installer workflow
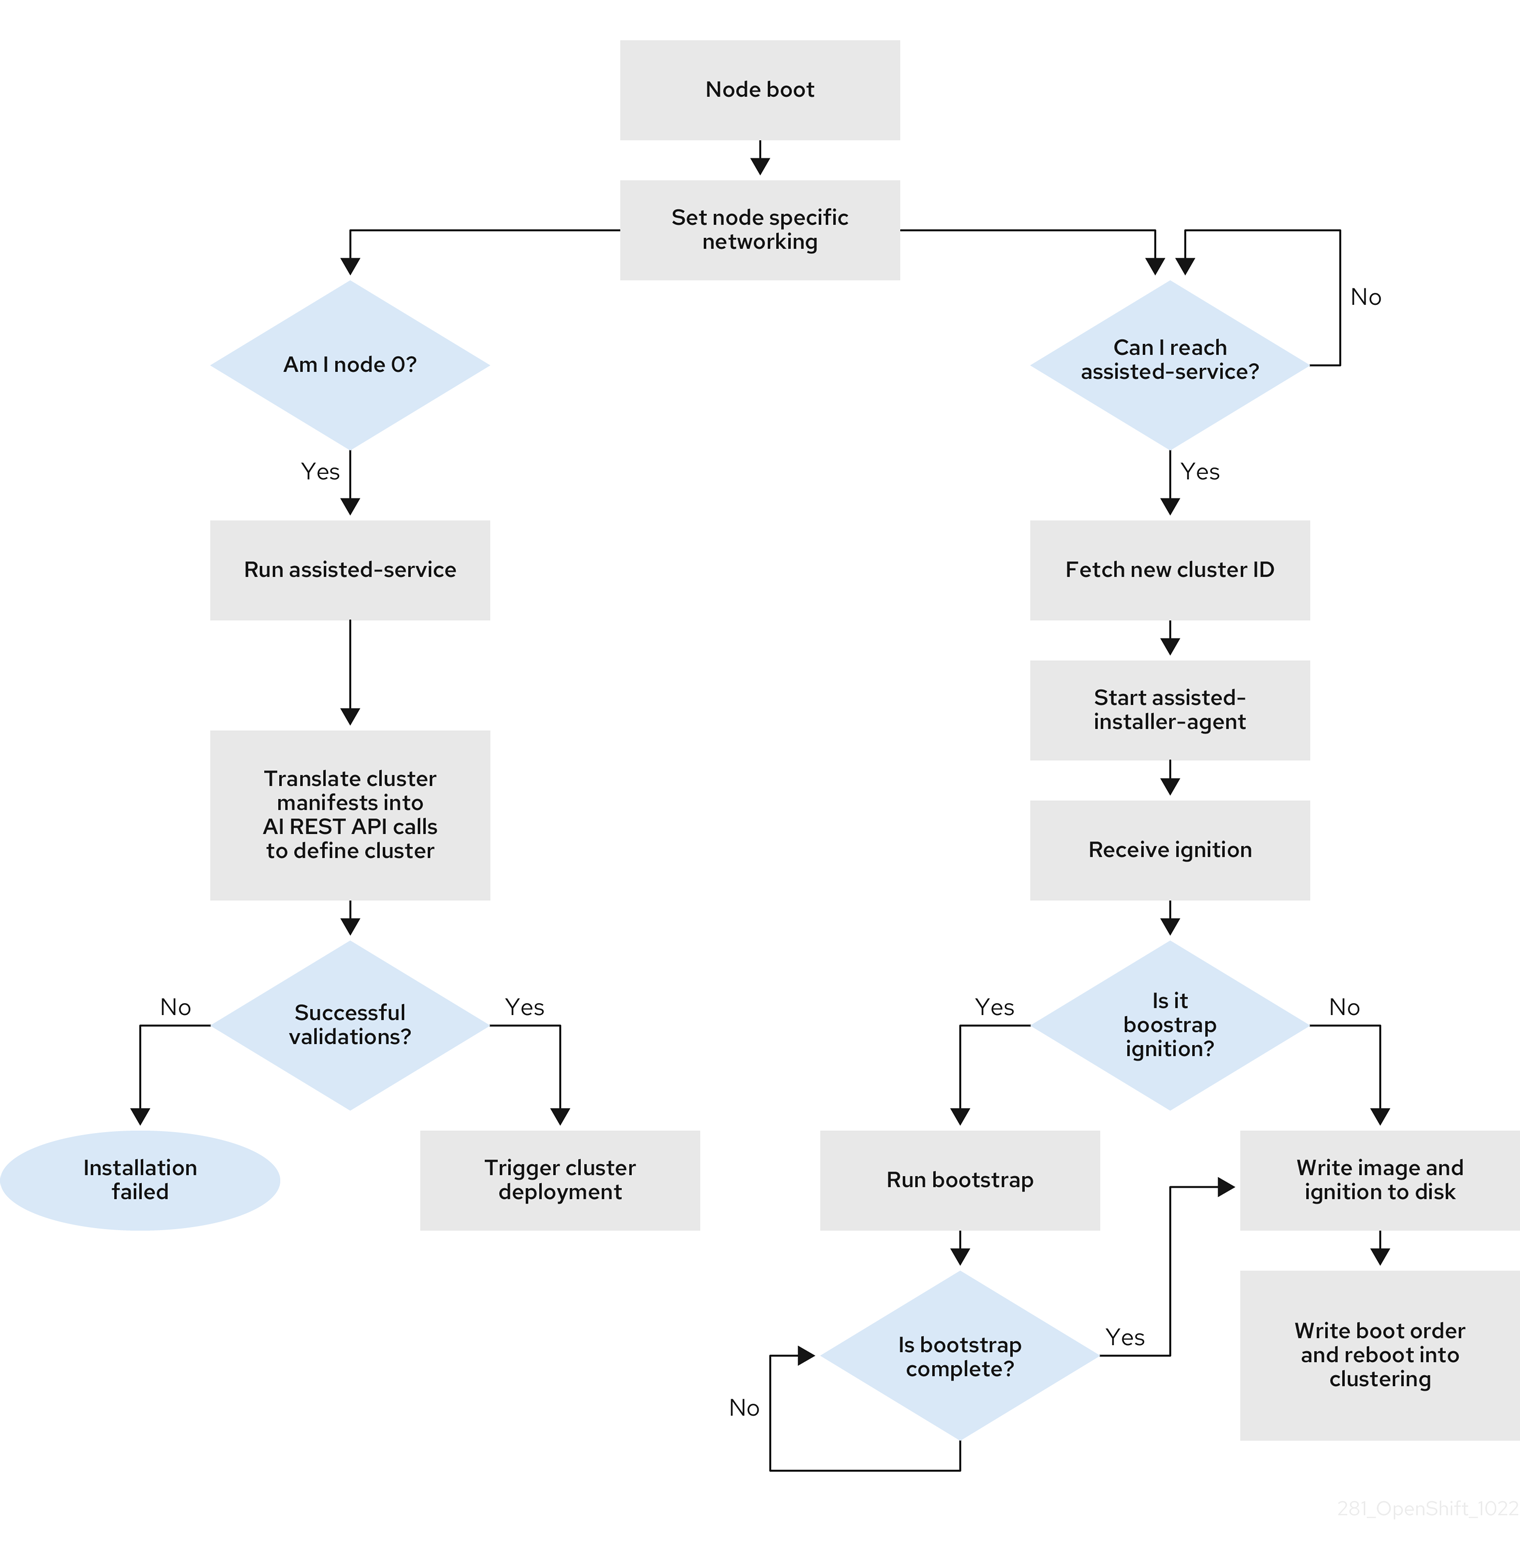
One of the control plane hosts runs the Assisted Service at the start of the boot process and eventually becomes the bootstrap host. This node is called the rendezvous host (node 0). The Assisted Service ensures that all the hosts meet the requirements and triggers an OpenShift Container Platform cluster deployment. All the nodes have the Red Hat Enterprise Linux CoreOS (RHCOS) image written to the disk. The non-bootstrap nodes reboot and initiate a cluster deployment. Once the nodes are rebooted, the rendezvous host reboots and joins the cluster. The bootstrapping is complete and the cluster is deployed.
Figure 14.1. Node installation workflow
You can install a disconnected OpenShift Container Platform cluster through the openshift-install agent create image subcommand for the following topologies:
- A single-node OpenShift Container Platform cluster (SNO): A node that is both a master and worker.
- A three-node OpenShift Container Platform cluster : A compact cluster that has three master nodes that are also worker nodes.
- Highly available OpenShift Container Platform cluster (HA): Three master nodes with any number of worker nodes.
14.1.2.2. Recommended resources for topologies
Recommended cluster resources for the following topologies:
Table 14.1. Recommended cluster resources
| Topology | Number of master nodes | Number of worker nodes | vCPU | Memory | Storage |
|---|---|---|---|---|---|
| Single-node cluster | 1 | 0 | 8 vCPU cores | 16GB of RAM | 120GB |
| Compact cluster | 3 | 0 or 1 | 8 vCPU cores | 16GB of RAM | 120GB |
| HA cluster | 3 | 2 and above | 8 vCPU cores | 16GB of RAM | 120GB |
The following platforms are supported:
-
baremetal -
vsphere noneNoteThe
noneoption is supported for only single-node OpenShift clusters with anOVNKubernetesnetwork type.
14.1.3. About FIPS compliance
For many OpenShift Container Platform customers, regulatory readiness, or compliance, on some level is required before any systems can be put into production. That regulatory readiness can be imposed by national standards, industry standards or the organization’s corporate governance framework. Federal Information Processing Standards (FIPS) compliance is one of the most critical components required in highly secure environments to ensure that only supported cryptographic technologies are allowed on nodes.
To enable FIPS mode for your cluster, you must run the installation program from a Red Hat Enterprise Linux (RHEL) computer configured to operate in FIPS mode. For more information about configuring FIPS mode on RHEL, see Installing the system in FIPS mode. The use of FIPS validated or Modules In Process cryptographic libraries is supported on OpenShift Container Platform deployments on the x86_64, ppc64le, and s390x architectures.
14.1.4. Configuring FIPS through the Agent-based Installer
During a cluster deployment, the Federal Information Processing Standards (FIPS) change is applied when the Red Hat Enterprise Linux CoreOS (RHCOS) machines are deployed in your cluster. For Red Hat Enterprise Linux (RHEL) machines, you must enable FIPS mode when you install the operating system on the machines that you plan to use as worker machines.
You can enable FIPS mode through the preferred method of install-config.yaml and agent-config.yaml:
You must set value of the
fipsfield toTruein theinstall-config.yamlfile:Sample install-config.yaml.file
apiVersion: v1
baseDomain: test.example.com
metadata:
  name: sno-cluster
fips: True
Optional: If you are using the ZTP manifests, you must set the value of
fipsasTruein theAgent-install.openshift.io/install-config-overridesfield in theagent-cluster-install.yamlfile:Sample agent-cluster-install.yaml file
apiVersion: extensions.hive.openshift.io/v1beta1
kind: AgentClusterInstall
metadata:
  annotations:
    agent-install.openshift.io/install-config-overrides: '{"fips": True}'
  name: sno-cluster
  namespace: sno-cluster-test
Additional resources
14.1.5. About networking
The rendezvous IP must be known at the time of generating the agent ISO, so that during the initial boot all the hosts can check in to the assisted service. If the IP addresses are assigned using a Dynamic Host Configuration Protocol (DHCP) server, then the rendezvousIP field must be set to an IP address of one of the hosts that will become part of the deployed control plane. In an environment without a DHCP server, you can define IP addresses statically.
In addition to static IP addresses, you can apply any network configuration that is in NMState format. This includes VLANs and NIC bonds.
14.1.5.1. DHCP
Preferred method: install-config.yaml and agent-config.yaml
You must specify the value for the rendezvousIP field. The networkConfig fields can be left blank:
Sample agent-config.yaml.file
apiVersion: v1alpha1
kind: AgentConfig
metadata:
  name: sno-cluster
rendezvousIP: 192.168.111.80 1
- 1
- The IP address for the rendezvous host.
14.1.5.2. Static networking
Preferred method:
install-config.yamlandagent-config.yamlSample agent-config.yaml.file
cat > agent-config.yaml << EOF apiVersion: v1alpha1 kind: AgentConfig metadata: name: sno-cluster rendezvousIP: 192.168.111.80 1 hosts: - hostname: master-0 interfaces: - name: eno1 macAddress: 00:ef:44:21:e6:a5 2 networkConfig: interfaces: - name: eno1 type: ethernet state: up mac-address: 00:ef:44:21:e6:a5 ipv4: enabled: true address: - ip: 192.168.111.80 3 prefix-length: 23 4 dhcp: false dns-resolver: config: server: - 192.168.111.1 5 routes: config: - destination: 0.0.0.0/0 next-hop-address: 192.168.111.1 6 next-hop-interface: eno1 table-id: 254 EOF- 1
- If a value is not specified for the
rendezvousIPfield, one address will be chosen from the static IP addresses specified in thenetworkConfigfields. - 2
- The MAC address of an interface on the host, used to determine which host to apply the configuration to.
- 3
- The static IP address of the target bare metal host.
- 4
- The static IP address’s subnet prefix for the target bare metal host.
- 5
- The DNS server for the target bare metal host.
- 6
- Next hop address for the node traffic. This must be in the same subnet as the IP address set for the specified interface.
Optional method: ZTP manifests
The optional method of the ZTP custom resources comprises 6 custom resources; you can configure static IPs in the
nmstateconfig.yamlfile.apiVersion: agent-install.openshift.io/v1beta1 kind: NMStateConfig metadata: name: master-0 namespace: openshift-machine-api labels: cluster0-nmstate-label-name: cluster0-nmstate-label-value spec: config: interfaces: - name: eth0 type: ethernet state: up mac-address: 52:54:01:aa:aa:a1 ipv4: enabled: true address: - ip: 192.168.122.2 1 prefix-length: 23 2 dhcp: false dns-resolver: config: server: - 192.168.122.1 3 routes: config: - destination: 0.0.0.0/0 next-hop-address: 192.168.122.1 4 next-hop-interface: eth0 table-id: 254 interfaces: - name: eth0 macAddress: 52:54:01:aa:aa:a1 5- 1
- The static IP address of the target bare metal host.
- 2
- The static IP address’s subnet prefix for the target bare metal host.
- 3
- The DNS server for the target bare metal host.
- 4
- Next hop address for the node traffic. This must be in the same subnet as the IP address set for the specified interface.
- 5
- The MAC address of an interface on the host, used to determine which host to apply the configuration to.
The rendezvous IP is chosen from the static IP addresses specified in the config fields.
14.1.6. Example: Bonds and VLAN interface node network configuration
The following agent-config.yaml file is an example of a manifest for bond and VLAN interfaces.
  apiVersion: v1alpha1
  kind: AgentConfig
  rendezvousIP: 10.10.10.14
  hosts:
    - hostname: master0
      role: master
      interfaces:
       - name: enp0s4
         macAddress: 00:21:50:90:c0:10
       - name: enp0s5
         macAddress: 00:21:50:90:c0:20
      networkConfig:
        interfaces:
          - name: bond0.300 1
            type: vlan 2
            state: up
            vlan:
              base-iface: bond0
              id: 300
            ipv4:
              enabled: true
              address:
                - ip: 10.10.10.14
                  prefix-length: 24
              dhcp: false
          - name: bond0 3
            type: bond 4
            state: up
            mac-address: 00:21:50:90:c0:10 5
            ipv4:
              enabled: false
            ipv6:
              enabled: false
            link-aggregation:
              mode: active-backup 6
              options:
                miimon: "150" 7
              port:
               - enp0s4
               - enp0s5
        dns-resolver: 8
          config:
            server:
              - 10.10.10.11
              - 10.10.10.12
        routes:
          config:
            - destination: 0.0.0.0/0
              next-hop-address: 10.10.10.10 9
              next-hop-interface: bond0.300 10
table-id: 254- 1 3
- Name of the interface.
- 2
- The type of interface. This example creates a VLAN.
- 4
- The type of interface. This example creates a bond.
- 5
- The mac address of the interface.
- 6
- The
modeattribute specifies the bonding mode. - 7
- Specifies the MII link monitoring frequency in milliseconds. This example inspects the bond link every 150 milliseconds.
- 8
- Optional: Specifies the search and server settings for the DNS server.
- 9
- Next hop address for the node traffic. This must be in the same subnet as the IP address set for the specified interface.
- 10
- Next hop interface for the node traffic.
14.1.7. Sample install-config.yaml file for bare metal
You can customize the install-config.yaml file to specify more details about your OpenShift Container Platform cluster’s platform or modify the values of the required parameters.
apiVersion: v1
baseDomain: example.com 1
compute: 2
- name: worker
  replicas: 0 3
controlPlane: 4
  name: master
  replicas: 1 5
metadata:
  name: sno-cluster 6
networking:
  clusterNetwork:
  - cidr: 10.128.0.0/14 7
    hostPrefix: 23 8
  networkType: OVNKubernetes 9
  serviceNetwork: 10
  - 172.30.0.0/16
platform:
  none: {} 11
fips: false 12
pullSecret: '{"auths": ...}' 13
sshKey: 'ssh-ed25519 AAAA...' 14
- 1
- The base domain of the cluster. All DNS records must be sub-domains of this base and include the cluster name.
- 2 4
- The
controlPlanesection is a single mapping, but thecomputesection is a sequence of mappings. To meet the requirements of the different data structures, the first line of thecomputesection must begin with a hyphen,-, and the first line of thecontrolPlanesection must not. Only one control plane pool is used. - 3
- This parameter controls the number of compute machines that the Agent-based installation waits to discover before triggering the installation process. It is the number of compute machines that must be booted with the generated ISO.Note
If you are installing a three-node cluster, do not deploy any compute machines when you install the Red Hat Enterprise Linux CoreOS (RHCOS) machines.
- 5
- The number of control plane machines that you add to the cluster. Because the cluster uses these values as the number of etcd endpoints in the cluster, the value must match the number of control plane machines that you deploy.
- 6
- The cluster name that you specified in your DNS records.
- 7
- A block of IP addresses from which pod IP addresses are allocated. This block must not overlap with existing physical networks. These IP addresses are used for the pod network. If you need to access the pods from an external network, you must configure load balancers and routers to manage the traffic.Note
Class E CIDR range is reserved for a future use. To use the Class E CIDR range, you must ensure your networking environment accepts the IP addresses within the Class E CIDR range.
- 8
- The subnet prefix length to assign to each individual node. For example, if
hostPrefixis set to23, then each node is assigned a/23subnet out of the givencidr, which allows for 510 (2^(32 - 23) - 2) pod IP addresses. If you are required to provide access to nodes from an external network, configure load balancers and routers to manage the traffic. - 9
- The cluster network plugin to install. The supported values are
OVNKubernetes(default value) andOpenShiftSDN. - 10
- The IP address pool to use for service IP addresses. You can enter only one IP address pool. This block must not overlap with existing physical networks. If you need to access the services from an external network, configure load balancers and routers to manage the traffic.
- 11
- You must set the platform to
nonefor a single-node cluster. You can set the platform to eithervsphereorbaremetalfor multi-node clusters.NoteIf you set the platform to
vsphereorbaremetal, you can configure IP address endpoints for cluster nodes in three ways:- IPv4
- IPv6
- IPv4 and IPv6 in parallel (dual-stack)
Example of dual-stack networking
networking: clusterNetwork: - cidr: 172.21.0.0/16 hostPrefix: 23 - cidr: fd02::/48 hostPrefix: 64 machineNetwork: - cidr: 192.168.11.0/16 - cidr: 2001:DB8::/32 serviceNetwork: - 172.22.0.0/16 - fd03::/112 networkType: OVNKubernetes platform: baremetal: apiVIPs: - 192.168.11.3 - 2001:DB8::4 ingressVIPs: - 192.168.11.4 - 2001:DB8::5 - 12
- Whether to enable or disable FIPS mode. By default, FIPS mode is not enabled. If FIPS mode is enabled, the Red Hat Enterprise Linux CoreOS (RHCOS) machines that OpenShift Container Platform runs on bypass the default Kubernetes cryptography suite and use the cryptography modules that are provided with RHCOS instead.Important
The use of FIPS validated or Modules In Process cryptographic libraries is only supported on OpenShift Container Platform deployments on the
x86_64,ppc64le, ands390xarchitectures. - 13
- This pull secret allows you to authenticate with the services that are provided by the included authorities, including Quay.io, which serves the container images for OpenShift Container Platform components.
- 14
- The SSH public key for the
coreuser in Red Hat Enterprise Linux CoreOS (RHCOS).NoteFor production OpenShift Container Platform clusters on which you want to perform installation debugging or disaster recovery, specify an SSH key that your
ssh-agentprocess uses.
14.1.8. Validation checks before agent ISO creation
The Agent-based Installer performs validation checks on user defined YAML files before the ISO is created. Once the validations are successful, the agent ISO is created.
install-config.yaml
-
baremetal,vsphereandnoneplatforms are supported. -
If
noneis used as a platform, the number of control plane replicas must be1and the total number of worker replicas must be0. -
The
networkTypeparameter must beOVNKubernetesin the case ofnoneplatform. -
apiVIPsandingressVIPsparameters must be set for bare metal and vSphere platforms. -
Some host-specific fields in the bare metal platform configuration that have equivalents in
agent-config.yamlfile are ignored. A warning message is logged if these fields are set.
agent-config.yaml
- Each interface must have a defined MAC address. Additionally, all interfaces must have a different MAC address.
- At least one interface must be defined for each host.
- World Wide Name (WWN) vendor extensions are not supported in root device hints.
-
The
roleparameter in thehostobject must have a value of eithermasterorworker.
14.1.8.1. ZTP manifests
agent-cluster-install.yaml
-
For IPv6, the only supported value for the
networkTypeparameter isOVNKubernetes. TheOpenshiftSDNvalue can be used only for IPv4.
cluster-image-set.yaml
-
The
ReleaseImageparameter must match the release defined in the installer.
14.1.9. About root device hints
The rootDeviceHints parameter enables the installer to provision the Red Hat Enterprise Linux CoreOS (RHCOS) image to a particular device. The installer examines the devices in the order it discovers them, and compares the discovered values with the hint values. The installer uses the first discovered device that matches the hint value. The configuration can combine multiple hints, but a device must match all hints for the installer to select it.
Table 14.2. Subfields
| Subfield | Description |
|---|---|
|
|
A string containing a Linux device name like |
|
|
A string containing a SCSI bus address like |
|
| A string containing a vendor-specific device identifier. The hint can be a substring of the actual value. |
|
| A string containing the name of the vendor or manufacturer of the device. The hint can be a sub-string of the actual value. |
|
| A string containing the device serial number. The hint must match the actual value exactly. |
|
| An integer representing the minimum size of the device in gigabytes. |
|
| A string containing the unique storage identifier. The hint must match the actual value exactly. |
|
| A boolean indicating whether the device should be a rotating disk (true) or not (false). |
Example usage
     - name: master-0
       role: master
       rootDeviceHints:
         deviceName: "/dev/sda"
14.1.10. Next steps
14.2. Understanding disconnected installation mirroring
You can use a mirror registry for disconnected installations and to ensure that your clusters only use container images that satisfy your organization’s controls on external content. Before you install a cluster on infrastructure that you provision in a disconnected environment, you must mirror the required container images into that environment. To mirror container images, you must have a registry for mirroring.
14.2.1. Mirroring images for a disconnected installation through the Agent-based Installer
You can use one of the following procedures to mirror your OpenShift Container Platform image repository to your mirror registry:
14.2.2. About mirroring the OpenShift Container Platform image repository for a disconnected registry
To use mirror images for a disconnected installation with the Agent-based Installer, you must modify the install-config.yaml file.
You can mirror the release image by using the output of either the oc adm release mirror or oc mirror command. This is dependent on which command you used to set up the mirror registry.
The following example shows the output of the oc adm release mirror command.
$ oc adm release mirror
Example output
To use the new mirrored repository to install, add the following
section to the install-config.yaml:

imageContentSources:

mirrors:
virthost.ostest.test.metalkube.org:5000/localimages/local-release-image
source: quay.io/openshift-release-dev/ocp-v4.0-art-dev
mirrors:
virthost.ostest.test.metalkube.org:5000/localimages/local-release-image
source: registry.ci.openshift.org/ocp/release
The following example shows part of the imageContentSourcePolicy.yaml file generated by the oc-mirror plugin. The file can be found in the results directory, for example oc-mirror-workspace/results-1682697932/.
Example imageContentSourcePolicy.yaml file
spec:
  repositoryDigestMirrors:
  - mirrors:
    - virthost.ostest.test.metalkube.org:5000/openshift/release
    source: quay.io/openshift-release-dev/ocp-v4.0-art-dev
  - mirrors:
    - virthost.ostest.test.metalkube.org:5000/openshift/release-images
    source: quay.io/openshift-release-dev/ocp-release
14.2.2.1. Configuring the Agent-based Installer to use mirrored images
You must use the output of either the oc adm release mirror command or the oc-mirror plugin to configure the Agent-based Installer to use mirrored images.
Procedure
If you used the oc-mirror plugin to mirror your release images:
-
Open the
imageContentSourcePolicy.yamllocated in the results directory, for exampleoc-mirror-workspace/results-1682697932/. -
Copy the text in the
repositoryDigestMirrorssection of the yaml file.
-
Open the
If you used the
oc adm release mirrorcommand to mirror your release images:-
Copy the text in the
imageContentSourcessection of the command output.
-
Copy the text in the
-
Paste the copied text into the
imageContentSourcesfield of theinstall-config.yamlfile. Add the certificate file used for the mirror registry to the
additionalTrustBundlefield of the yaml file.ImportantThe value must be the contents of the certificate file that you used for your mirror registry. The certificate file can be an existing, trusted certificate authority, or the self-signed certificate that you generated for the mirror registry.
Example
install-config.yamlfileadditionalTrustBundle: | -----BEGIN CERTIFICATE----- ZZZZZZZZZZZZZZZZZZZZZZZZZZZZZZZZZZZZZZZZZZZZZZZZZZZZZZZZZZZZZZZZ -----END CERTIFICATE-----If you are using {ztp} manifests: add the
registries.confandca-bundle.crtfiles to themirrorpath to add the mirror configuration in the agent ISO image.NoteYou can create the
registries.conffile from the output of either theoc adm release mirrorcommand or theoc mirrorplugin. The format of the/etc/containers/registries.conffile has changed. It is now version 2 and in TOML format.Example
registries.conffile[[registry]] location = "registry.ci.openshift.org/ocp/release" mirror-by-digest-only = true [[registry.mirror]] location = "virthost.ostest.test.metalkube.org:5000/localimages/local-release-image" [[registry]] location = "quay.io/openshift-release-dev/ocp-v4.0-art-dev" mirror-by-digest-only = true [[registry.mirror]] location = "virthost.ostest.test.metalkube.org:5000/localimages/local-release-image"
14.3. Installing an OpenShift Container Platform cluster with the Agent-based Installer
14.3.1. Prerequisites
- You reviewed details about the OpenShift Container Platform installation and update processes.
- You read the documentation on selecting a cluster installation method and preparing it for users.
- If you use a firewall or proxy, you configured it to allow the sites that your cluster requires access to.
14.3.2. Installing OpenShift Container Platform with the Agent-based Installer
The following procedure deploys a single-node OpenShift Container Platform in a disconnected environment. You can use this procedure as a basis and modify according to your requirements.
Procedure
- Log in to the OpenShift Container Platform web console using your login credentials.
Navigate to Datacenter.
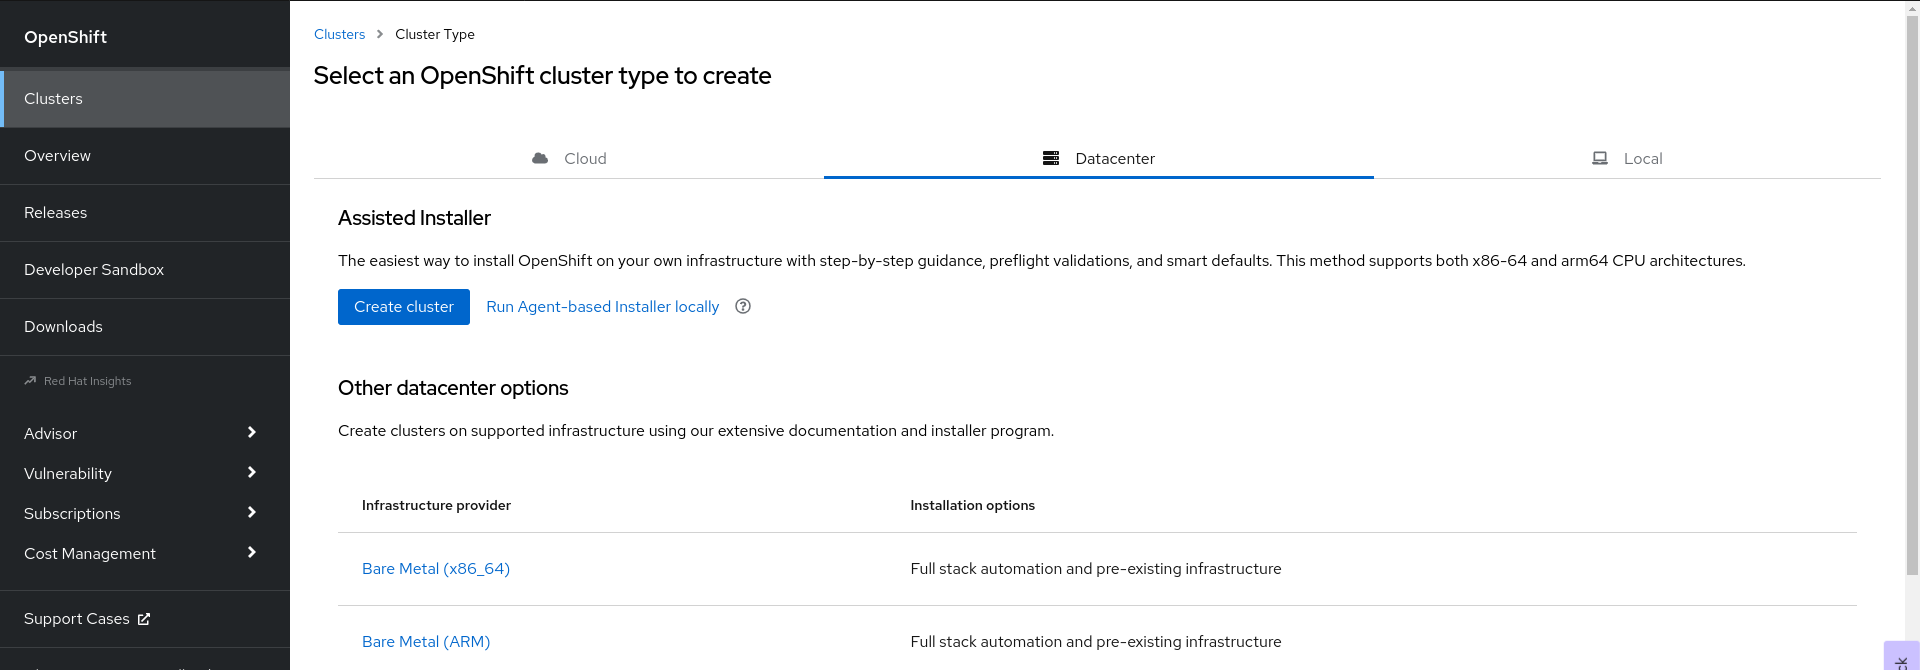
- Click Run Agent-based Installer locally. You are directed to the Install OpenShift Container Platform on Bare Metal locally with Agent page.
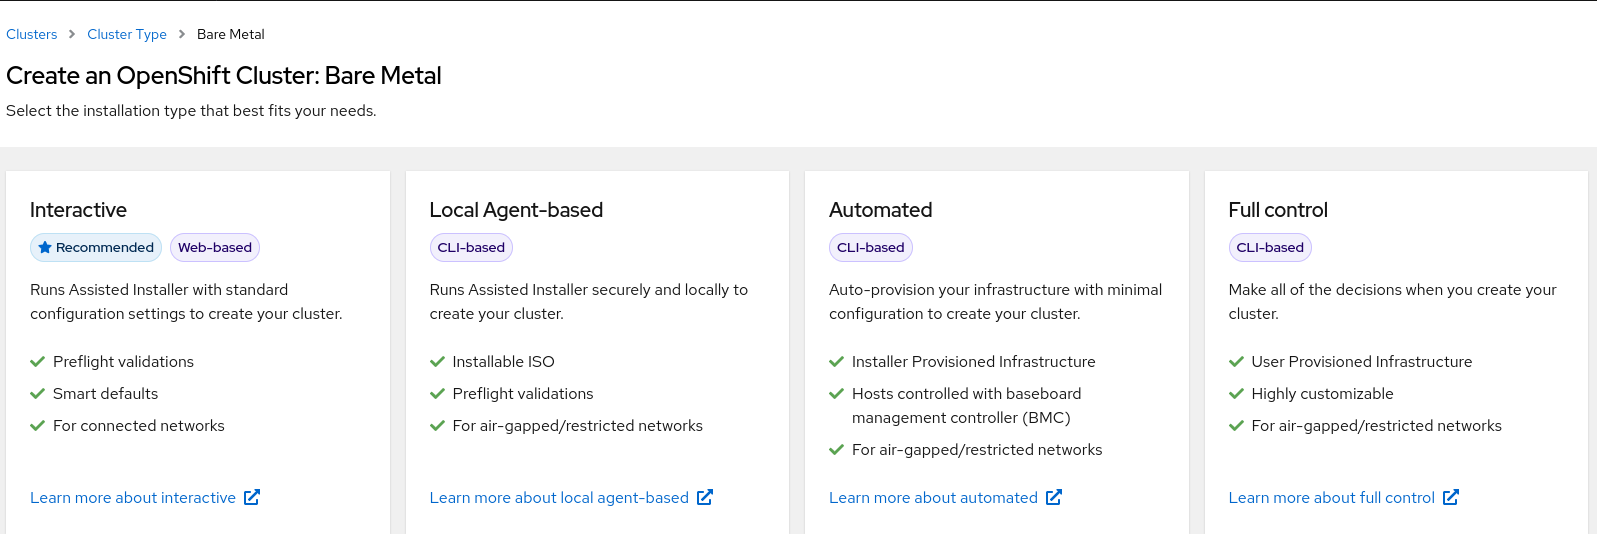
Optional: Alternatively, you can also click Bare Metal (x86_64) on the Select an OpenShift Container Platform cluster type to create page. You are directed to the Create an OpenShift Container Platform Cluster: Bare Metal page. Then, select Local Agent-based to go to the Install OpenShift Container Platform on Bare Metal locally with Agent page.
- Select the operating system and architecture.
- Click Download Installer to download and extract the install program.
- You can either download or copy the pull secret by clicking on Download pull secret or Copy pull secret.
-
Click Download command-line tools and place the
openshift-installbinary in a directory that is on yourPATH. Install
nmstatedependency by running the following command:$ sudo dnf install /usr/bin/nmstatectl -y
-
Place the
openshift-installbinary in a directory that is on your PATH. Create a directory to store the install configuration by running the following command:
$ mkdir ~/<directory_name>
NoteThis is the preferred method for the Agent-based installation. Using ZTP manifests is optional.
Create the
install-config.yamlfile:$ cat << EOF > ./my-cluster/install-config.yaml apiVersion: v1 baseDomain: test.example.com compute: - architecture: amd64 hyperthreading: Enabled name: worker replicas: 0 controlPlane: architecture: amd64 hyperthreading: Enabled name: master replicas: 1 metadata: name: sno-cluster 1 networking: clusterNetwork: - cidr: 10.128.0.0/14 hostPrefix: 23 machineNetwork: - cidr: 192.168.111.0/16 networkType: OVNKubernetes 2 serviceNetwork: - 172.30.0.0/16 platform: none: {} pullSecret: '<pull_secret>' 3 sshKey: | <ssh_pub_key> 4 EOF
NoteIf you set the platform to
vSphereorbaremetal, you can configure IP address endpoints for cluster nodes in three ways:- IPv4
- IPv6
- IPv4 and IPv6 in parallel (dual-stack)
Example of dual-stack networking
networking:
  clusterNetwork:
    - cidr: 172.21.0.0/16
      hostPrefix: 23
    - cidr: fd02::/48
      hostPrefix: 64
  machineNetwork:
    - cidr: 192.168.11.0/16
    - cidr: 2001:DB8::/32
  serviceNetwork:
    - 172.22.0.0/16
    - fd03::/112
  networkType: OVNKubernetes
platform:
  baremetal:
    apiVIPs:
    - 192.168.11.3
    - 2001:DB8::4
    ingressVIPs:
    - 192.168.11.4
    - 2001:DB8::5
IPv6 is supported only on bare metal platforms.
Create the
agent-config.yamlfile:$ cat > agent-config.yaml << EOF apiVersion: v1alpha1 kind: AgentConfig metadata: name: sno-cluster rendezvousIP: 192.168.111.80 1 hosts: 2 - hostname: master-0 3 interfaces: - name: eno1 macAddress: 00:ef:44:21:e6:a5 rootDeviceHints: 4 deviceName: /dev/sdb networkConfig: 5 interfaces: - name: eno1 type: ethernet state: up mac-address: 00:ef:44:21:e6:a5 ipv4: enabled: true address: - ip: 192.168.111.80 prefix-length: 23 dhcp: false dns-resolver: config: server: - 192.168.111.1 routes: config: - destination: 0.0.0.0/0 next-hop-address: 192.168.111.2 next-hop-interface: eno1 table-id: 254 EOF
- 1
- This IP address is used to determine which node performs the bootstrapping process as well as running the
assisted-servicecomponent. You must provide the rendezvous IP address when you do not specify at least one host’s IP address in thenetworkConfigparameter. If this address is not provided, one IP address is selected from the provided hosts'networkConfig. - 2
- Host configuration is optional. The number of hosts defined must not exceed the total number of hosts defined in the
install-config.yamlfile, which is the sum of the values of thecompute.replicasandcontrolPlane.replicasparameters. - 3
- The optional
hostnameparameter overrides the hostname obtained from either the Dynamic Host Configuration Protocol (DHCP) or a reverse DNS lookup. Each host must have a unique hostname supplied by one of these methods. - 4
- The
rootDeviceHintsparameter enables provisioning of the Red Hat Enterprise Linux CoreOS (RHCOS) image to a particular device. It examines the devices in the order it discovers them, and compares the discovered values with the hint values. It uses the first discovered device that matches the hint value. - 5
- Set this optional parameter to configure the network interface of a host in NMState format.
Create the agent image by running the following command:
$ openshift-install --dir <install_directory> agent create image
NoteRed Hat Enterprise Linux CoreOS (RHCOS) supports multipathing on the primary disk, allowing stronger resilience to hardware failure to achieve higher host availability. Multipathing is enabled by default in the agent ISO image, with a default
/etc/multipath.confconfiguration.-
Boot the
agent.x86_64.isoimage on the bare metal machines. Optional: To know when the bootstrap host (which is the rendezvous host) reboots, run the following command:
$ ./openshift-install --dir <install_directory> agent wait-for bootstrap-complete \ 1
    --log-level=info 2
Example output
...................................................................
...................................................................
INFO Bootstrap configMap status is complete
INFO cluster bootstrap is complete
The command succeeds when the Kubernetes API server signals that it has been bootstrapped on the control plane machines.
To track the progress and verify sucessful installation, run the following command:
$ openshift-install --dir <install_directory> agent wait-for install-complete 1- 1
- For
<install_directory>directory, specify the path to the directory where the agent ISO was generated.
Example output
...................................................................
...................................................................
INFO Cluster is installed
INFO Install complete!
INFO To access the cluster as the system:admin user when using 'oc', run
INFO     export KUBECONFIG=/home/core/installer/auth/kubeconfig
INFO Access the OpenShift web-console here: https://console-openshift-console.apps.sno-cluster.test.example.com
If you are using the optional method of ZTP manifests, you can configure IP address endpoints for cluster nodes through the AgentClusterInstall.yaml file in three ways:
- IPv4
- IPv6
- IPv4 and IPv6 in parallel (dual-stack)
Example of dual-stack networking
apiVIP: 192.168.11.3
ingressVIP: 192.168.11.4
clusterDeploymentRef:
  name: mycluster
imageSetRef:
  name: openshift-4.12
networking:
  clusterNetwork:
  - cidr: 172.21.0.0/16
    hostPrefix: 23
  - cidr: fd02::/48
    hostPrefix: 64
  machineNetwork:
  - cidr: 192.168.11.0/16
  - cidr: 2001:DB8::/32
  serviceNetwork:
  - 172.22.0.0/16
  - fd03::/112
  networkType: OVNKubernetes
IPv6 is supported only on bare metal platforms.
Additional resources
- See Deploying with dual-stack networking.
- See Configuring the install-config yaml file.
- See Configuring a three-node cluster to deploy three-node clusters in bare metal environments.
- See About root device hints.
- See NMState state examples.
14.3.3. Gathering log data from a failed Agent-based installation
Use the following procedure to gather log data about a failed Agent-based installation to provide for a support case.
Procedure
Run the following command and collect the output:
$ ./openshift-install --dir <install_directory> agent wait-for bootstrap-complete --log-level=debug
Example error message
...
ERROR Bootstrap failed to complete: : bootstrap process timed out: context deadline exceeded
If the output from the previous command indicates a failure, or if the bootstrap is not progressing, run the following command on node 0 and collect the output:
$ ssh core@<node-ip> sudo /usr/local/bin/agent-gather -O > <local_tmp_path>/agent-gather.tar.xz
NoteYou only need to gather data from node 0, but gathering this data from every node can be helpful.
If the bootstrap completes and the cluster nodes reboot, run the following command and collect the output:
$ ./openshift-install --dir <install_directory> agent wait-for install-complete --log-level=debug
If the output from the previous command indicates a failure, perform the following steps:
Export the
kubeconfigfile to your environment by running the following command:$ export KUBECONFIG=<install_directory>/auth/kubeconfig
To gather information for debugging, run the following command:
$ oc adm must-gather
Create a compressed file from the
must-gatherdirectory that was just created in your working directory by running the following command:$ tar cvaf must-gather.tar.gz <must_gather_directory>
-
Excluding the
/authsubdirectory, attach the installation directory used during the deployment to your support case on the Red Hat Customer Portal. - Attach all other data gathered from this procedure to your support case.
14.3.4. Sample ZTP custom resources
Optional: You can use Zero touch provisioning (ZTP) custom resource (CR) objects to install an OpenShift Container Platform cluster with the Agent-based Installer.
You can customize the following ZTP custom resources to specify more details about your OpenShift Container Platform cluster. The following sample ZTP custom resources are for a single-node cluster.
agent-cluster-install.yaml
  apiVersion: extensions.hive.openshift.io/v1beta1
  kind: AgentClusterInstall
  metadata:
    name: test-agent-cluster-install
    namespace: cluster0
  spec:
    clusterDeploymentRef:
      name: ostest
    imageSetRef:
      name: openshift-4.12
    networking:
      clusterNetwork:
      - cidr: 10.128.0.0/14
        hostPrefix: 23
      serviceNetwork:
      - 172.30.0.0/16
    provisionRequirements:
      controlPlaneAgents: 1
      workerAgents: 0
    sshPublicKey: <YOUR_SSH_PUBLIC_KEY>
cluster-deployment.yaml
apiVersion: hive.openshift.io/v1
kind: ClusterDeployment
metadata:
  name: ostest
  namespace: cluster0
spec:
  baseDomain: test.metalkube.org
  clusterInstallRef:
    group: extensions.hive.openshift.io
    kind: AgentClusterInstall
    name: test-agent-cluster-install
    version: v1beta1
  clusterName: ostest
  controlPlaneConfig:
    servingCertificates: {}
  platform:
    agentBareMetal:
      agentSelector:
        matchLabels:
          bla: aaa
  pullSecretRef:
    name: pull-secret
cluster-image-set.yaml
apiVersion: hive.openshift.io/v1
kind: ClusterImageSet
metadata:
  name: openshift-4.12
spec:
  releaseImage: registry.ci.openshift.org/ocp/release:4.12.0-0.nightly-2022-06-06-025509
infra-env.yaml
apiVersion: agent-install.openshift.io/v1beta1
kind: InfraEnv
metadata:
  name: myinfraenv
  namespace: cluster0
spec:
  clusterRef:
    name: ostest
    namespace: cluster0
  pullSecretRef:
    name: pull-secret
  sshAuthorizedKey: <YOUR_SSH_PUBLIC_KEY>
  nmStateConfigLabelSelector:
    matchLabels:
      cluster0-nmstate-label-name: cluster0-nmstate-label-value
nmstateconfig.yaml
apiVersion: agent-install.openshift.io/v1beta1
kind: NMStateConfig
metadata:
  name: master-0
  namespace: openshift-machine-api
  labels:
    cluster0-nmstate-label-name: cluster0-nmstate-label-value
spec:
  config:
    interfaces:
      - name: eth0
        type: ethernet
        state: up
        mac-address: 52:54:01:aa:aa:a1
        ipv4:
          enabled: true
          address:
            - ip: 192.168.122.2
              prefix-length: 23
          dhcp: false
    dns-resolver:
      config:
        server:
          - 192.168.122.1
    routes:
      config:
        - destination: 0.0.0.0/0
          next-hop-address: 192.168.122.1
          next-hop-interface: eth0
          table-id: 254
  interfaces:
    - name: "eth0"
      macAddress: 52:54:01:aa:aa:a1
pull-secret.yaml
apiVersion: v1
kind: Secret
type: kubernetes.io/dockerconfigjson
metadata:
  name: pull-secret
  namespace: cluster0
stringData:
  .dockerconfigjson: 'YOUR_PULL_SECRET'
Additional resources
- See Challenges of the network far edge to learn more about zero touch provisioning (ZTP).
14.4. Preparing an Agent-based installed cluster for the multicluster engine for Kubernetes Operator
You can install the multicluster engine for Kubernetes Operator and deploy a hub cluster with the Agent-based OpenShift Container Platform Installer. The following procedure is partially automated and requires manual steps after the initial cluster is deployed.
14.4.1. Prerequisites
You have read the following documentation:
- You have access to the internet to obtain the necessary container images.
-
You have installed the OpenShift CLI (
oc). - If you are installing in a disconnected environment, you must have a configured local mirror registry for disconnected installation mirroring.
14.4.2. Preparing an agent-based cluster deployment for the multicluster engine for Kubernetes Operator while disconnected
You can mirror the required OpenShift Container Platform container images, the multicluster engine for Kubernetes Operator, and the Local Storage Operator (LSO) into your local mirror registry in a disconnected environment. Ensure that you note the local DNS hostname and port of your mirror registry.
To mirror your OpenShift Container Platform image repository to your mirror registry, you can use either the oc adm release image or oc mirror command. In this procedure, the oc mirror command is used as an example.
Procedure
-
Create an
<assets_directory>folder to contain validinstall-config.yamlandagent-config.yamlfiles. This directory is used to store all the assets. To mirror an OpenShift Container Platform image repository, the multicluster engine, and the LSO, create a
ImageSetConfiguration.yamlfile with the following settings:Example
ImageSetConfiguration.yamlkind: ImageSetConfiguration apiVersion: mirror.openshift.io/v1alpha2 archiveSize: 4 1 storageConfig: 2 imageURL: <your-local-registry-dns-name>:<your-local-registry-port>/mirror/oc-mirror-metadata 3 skipTLS: true mirror: platform: architectures: - "amd64" channels: - name: stable-4.12 4 type: ocp additionalImages: - name: registry.redhat.io/ubi8/ubi:latest operators: - catalog: registry.redhat.io/redhat/redhat-operator-index:v4.12 5 packages: 6 - name: multicluster-engine 7 - name: local-storage-operator 8
- 1
- Specify the maximum size, in GiB, of each file within the image set.
- 2
- Set the back-end location to receive the image set metadata. This location can be a registry or local directory. You must specify
storageConfigvalues unless you are using the Technology Preview OCI feature. - 3
- Set the registry URL for the storage backend.
- 4
- Set the channel that contains the OpenShift Container Platform images for the version you are installing.
- 5
- Set the Operator catalog that contains the OpenShift Container Platform images that you are installing.
- 6
- Specify only certain Operator packages and channels to include in the image set. Remove this field to retrieve all packages in the catalog.
- 7
- The multicluster engine packages and channels.
- 8
- The LSO packages and channels.
NoteThis file is required by the
oc mirrorcommand when mirroring content.To mirror a specific OpenShift Container Platform image repository, the multicluster engine, and the LSO, run the following command:
$ oc mirror --dest-skip-tls --config ocp-mce-imageset.yaml docker://<your-local-registry-dns-name>:<your-local-registry-port>
Update the registry and certificate in the
install-config.yamlfile:Example
imageContentSources.yamlimageContentSources: - source: "quay.io/openshift-release-dev/ocp-release" mirrors: - "<your-local-registry-dns-name>:<your-local-registry-port>/openshift/release-images" - source: "quay.io/openshift-release-dev/ocp-v4.0-art-dev" mirrors: - "<your-local-registry-dns-name>:<your-local-registry-port>/openshift/release" - source: "registry.redhat.io/ubi8" mirrors: - "<your-local-registry-dns-name>:<your-local-registry-port>/ubi8" - source: "registry.redhat.io/multicluster-engine" mirrors: - "<your-local-registry-dns-name>:<your-local-registry-port>/multicluster-engine" - source: "registry.redhat.io/rhel8" mirrors: - "<your-local-registry-dns-name>:<your-local-registry-port>/rhel8" - source: "registry.redhat.io/redhat" mirrors: - "<your-local-registry-dns-name>:<your-local-registry-port>/redhat"Additionally, ensure your certificate is present in the
additionalTrustBundlefield of theinstall-config.yaml.Example
install-config.yamladditionalTrustBundle: | -----BEGIN CERTIFICATE----- zzzzzzzzzzz -----END CERTIFICATE-------
ImportantThe
oc mirrorcommand creates a folder calledoc-mirror-workspacewith several outputs. This includes theimageContentSourcePolicy.yamlfile that identifies all the mirrors you need for OpenShift Container Platform and your selected Operators.Generate the cluster manifests by running the following command:
$ openshift-install agent create cluster-manifests
This command updates the cluster manifests folder to include a
mirrorfolder that contains your mirror configuration.
14.4.3. Preparing an agent-based cluster deployment for the multicluster engine for Kubernetes Operator while connected
Create the required manifests for the multicluster engine for Kubernetes Operator, the Local Storage Operator (LSO), and to deploy an agent-based OpenShift Container Platform cluster as a hub cluster.
Procedure
Create a sub-folder named
openshiftin the<assets_directory>folder. This sub-folder is used to store the extra manifests that will be applied during the installation to further customize the deployed cluster. The<assets_directory>folder contains all the assets including theinstall-config.yamlandagent-config.yamlfiles.NoteThe installer does not validate extra manifests.
For the multicluster engine, create the following manifests and save them in the
<assets_directory>/openshiftfolder:Example
mce_namespace.yamlapiVersion: v1 kind: Namespace metadata: labels: openshift.io/cluster-monitoring: "true" name: multicluster-engineExample
mce_operatorgroup.yamlapiVersion: operators.coreos.com/v1 kind: OperatorGroup metadata: name: multicluster-engine-operatorgroup namespace: multicluster-engine spec: targetNamespaces: - multicluster-engineExample
mce_subscription.yamlapiVersion: operators.coreos.com/v1alpha1 kind: Subscription metadata: name: multicluster-engine namespace: multicluster-engine spec: channel: "stable-2.1" name: multicluster-engine source: redhat-operators sourceNamespace: openshift-marketplaceNoteYou can install a distributed unit (DU) at scale with the Red Hat Advanced Cluster Management (RHACM) using the assisted installer (AI). These distributed units must be enabled in the hub cluster. The AI service requires persistent volumes (PVs), which are manually created.
For the AI service, create the following manifests and save them in the
<assets_directory>/openshiftfolder:Example
lso_namespace.yamlapiVersion: v1 kind: Namespace metadata: annotations: openshift.io/cluster-monitoring: "true" name: openshift-local-storageExample
lso_operatorgroup.yamlapiVersion: operators.coreos.com/v1 kind: OperatorGroup metadata: name: local-operator-group namespace: openshift-local-storage spec: targetNamespaces: - openshift-local-storageExample
lso_subscription.yamlapiVersion: operators.coreos.com/v1alpha1 kind: Subscription metadata: name: local-storage-operator namespace: openshift-local-storage spec: installPlanApproval: Automatic name: local-storage-operator source: redhat-operators sourceNamespace: openshift-marketplaceNoteAfter creating all the manifests, your filesystem must display as follows:
Example Filesystem
<assets_directory>
    ├─ install-config.yaml
    ├─ agent-config.yaml
    └─ /openshift
        ├─ mce_namespace.yaml
        ├─ mce_operatorgroup.yaml
        ├─ mce_subscription.yaml
        ├─ lso_namespace.yaml
        ├─ lso_operatorgroup.yaml
        └─ lso_subscription.yaml
Create the agent ISO image by running the following command:
$ openshift-install agent create image --dir <assets_directory>
- When the image is ready, boot the target machine and wait for the installation to complete.
To monitor the installation, run the following command:
$ openshift-install agent wait-for install-complete --dir <assets_directory>
NoteTo configure a fully functional hub cluster, you must create the following manifests and manually apply them by running the command
$ oc apply -f <manifest-name>. The order of the manifest creation is important and where required, the waiting condition is displayed.For the PVs that are required by the AI service, create the following manifests:
  apiVersion: local.storage.openshift.io/v1
  kind: LocalVolume
  metadata:
   name: assisted-service
   namespace: openshift-local-storage
  spec:
   logLevel: Normal
   managementState: Managed
   storageClassDevices:
     - devicePaths:
         - /dev/vda
         - /dev/vdb
       storageClassName: assisted-service
       volumeMode: Filesystem
Use the following command to wait for the availability of the PVs, before applying the subsequent manifests:
$ oc wait localvolume -n openshift-local-storage assisted-service --for condition=Available --timeout 10m
NoteThe `devicePath` is an example and may vary depending on the actual hardware configuration used.
Create a manifest for a multicluster engine instance.
Example
MultiClusterEngine.yamlapiVersion: multicluster.openshift.io/v1 kind: MultiClusterEngine metadata: name: multiclusterengine spec: {}Create a manifest to enable the AI service.
Example
agentserviceconfig.yamlapiVersion: agent-install.openshift.io/v1beta1 kind: AgentServiceConfig metadata: name: agent namespace: assisted-installer spec: databaseStorage: storageClassName: assisted-service accessModes: - ReadWriteOnce resources: requests: storage: 10Gi filesystemStorage: storageClassName: assisted-service accessModes: - ReadWriteOnce resources: requests: storage: 10GiCreate a manifest to deploy subsequently spoke clusters.
Example
clusterimageset.yamlapiVersion: hive.openshift.io/v1 kind: ClusterImageSet metadata: name: "4.12" spec: releaseImage: quay.io/openshift-release-dev/ocp-release:4.12.0-x86_64Create a manifest to import the agent installed cluster (that hosts the multicluster engine and the Assisted Service) as the hub cluster.
Example
autoimport.yamlapiVersion: cluster.open-cluster-management.io/v1 kind: ManagedCluster metadata: labels: local-cluster: "true" cloud: auto-detect vendor: auto-detect name: local-cluster spec: hubAcceptsClient: trueWait for the managed cluster to be created.
$ oc wait -n multicluster-engine managedclusters local-cluster --for condition=ManagedClusterJoined=True --timeout 10m
Verification
To confirm that the managed cluster installation is successful, run the following command:
$ oc get managedcluster
NAME            HUB ACCEPTED   MANAGED CLUSTER URLS             JOINED   AVAILABLE  AGE
local-cluster   true           https://<your cluster url>:6443   True     True       77m
Additional resources