
Updating clusters
Updating OpenShift Container Platform clusters
Abstract
Chapter 1. Updating clusters overview
You can update an OpenShift Container Platform 4 cluster with a single operation by using the web console or the OpenShift CLI (oc).
1.1. Understanding OpenShift Container Platform updates
About the OpenShift Update Service: For clusters with internet access, Red Hat provides over-the-air updates by using an OpenShift Container Platform update service as a hosted service located behind public APIs.
1.2. Understanding update channels and releases
Update channels and releases: With update channels, you can choose an update strategy. Update channels are specific to a minor version of OpenShift Container Platform. Update channels only control release selection and do not impact the version of the cluster that you install. The openshift-install binary file for a specific version of the OpenShift Container Platform always installs that minor version. For more information, see the following:
1.3. Understanding cluster Operator condition types
The status of cluster Operators includes their condition type, which informs you of the current state of your Operator’s health. The following definitions cover a list of some common ClusterOperator condition types. Operators that have additional condition types and use Operator-specific language have been omitted.
The Cluster Version Operator (CVO) is responsible for collecting the status conditions from cluster Operators so that cluster administrators can better understand the state of the OpenShift Container Platform cluster.
-
Available: The condition type
Availableindicates that an Operator is functional and available in the cluster. If the status isFalse, at least one part of the operand is non-functional and the condition requires an administrator to intervene. Progressing: The condition type
Progressingindicates that an Operator is actively rolling out new code, propagating configuration changes, or otherwise moving from one steady state to another.Operators do not report the condition type
ProgressingasTruewhen they are reconciling a previous known state. If the observed cluster state has changed and the Operator is reacting to it, then the status reports back asTrue, since it is moving from one steady state to another.Degraded: The condition type
Degradedindicates that an Operator has a current state that does not match its required state over a period of time. The period of time can vary by component, but aDegradedstatus represents persistent observation of an Operator’s condition. As a result, an Operator does not fluctuate in and out of theDegradedstate.There might be a different condition type if the transition from one state to another does not persist over a long enough period to report
Degraded. An Operator does not reportDegradedduring the course of a normal update. An Operator may reportDegradedin response to a persistent infrastructure failure that requires eventual administrator intervention.NoteThis condition type is only an indication that something may need investigation and adjustment. As long as the Operator is available, the
Degradedcondition does not cause user workload failure or application downtime.Upgradeable: The condition type
Upgradeableindicates whether the Operator is safe to update based on the current cluster state. The message field contains a human-readable description of what the administrator needs to do for the cluster to successfully update. The CVO allows updates when this condition isTrue,Unknownor missing.When the
Upgradeablestatus isFalse, only minor updates are impacted, and the CVO prevents the cluster from performing impacted updates unless forced.
1.4. Understanding cluster version condition types
The Cluster Version Operator (CVO) monitors cluster Operators and other components, and is responsible for collecting the status of both the cluster version and its Operators. This status includes the condition type, which informs you of the health and current state of the OpenShift Container Platform cluster.
In addition to Available, Progressing, and Upgradeable, there are condition types that affect cluster versions and Operators.
-
Failing: The cluster version condition type
Failingindicates that a cluster cannot reach its desired state, is unhealthy, and requires an administrator to intervene. -
Invalid: The cluster version condition type
Invalidindicates that the cluster version has an error that prevents the server from taking action. The CVO only reconciles the current state as long as this condition is set. -
RetrievedUpdates: The cluster version condition type
RetrievedUpdatesindicates whether or not available updates have been retrieved from the upstream update server. The condition isUnknownbefore retrieval,Falseif the updates either recently failed or could not be retrieved, orTrueif theavailableUpdatesfield is both recent and accurate. -
ReleaseAccepted: The cluster version condition type
ReleaseAcceptedwith aTruestatus indicates that the requested release payload was successfully loaded without failure during image verification and precondition checking. -
ImplicitlyEnabledCapabilities: The cluster version condition type
ImplicitlyEnabledCapabilitieswith aTruestatus indicates that there are enabled capabilities that the user is not currently requesting throughspec.capabilities. The CVO does not support disabling capabilities if any associated resources were previously managed by the CVO.
1.5. Preparing to perform an EUS-to-EUS update
Preparing to perform an EUS-to-EUS update: Due to fundamental Kubernetes design, all OpenShift Container Platform updates between minor versions must be serialized. You must update from OpenShift Container Platform 4.10 to 4.11, and then to 4.12. You cannot update from OpenShift Container Platform 4.10 to 4.12 directly. However, if you want to update between two Extended Update Support (EUS) versions, you can do so by incurring only a single reboot of non-control plane hosts. For more information, see the following:
1.6. Updating a cluster using the web console
Updating a cluster using the web console: You can update an OpenShift Container Platform cluster by using the web console. The following steps update a cluster within a minor version. You can use the same instructions for updating a cluster between minor versions.
1.7. Updating a cluster using the CLI
Updating a cluster using the CLI: You can update an OpenShift Container Platform cluster within a minor version by using the OpenShift CLI (oc). The following steps update a cluster within a minor version. You can use the same instructions for updating a cluster between minor versions.
1.8. Performing a canary rollout update
Performing a canary rollout update: By controlling the rollout of an update to the worker nodes, you can ensure that mission-critical applications stay available during the whole update, even if the update process causes your applications to fail. Depending on your organizational needs, you might want to update a small subset of worker nodes, evaluate cluster and workload health over a period of time, and then update the remaining nodes. This is referred to as a canary update. Alternatively, you might also want to fit worker node updates, which often requires a host reboot, into smaller defined maintenance windows when it is not possible to take a large maintenance window to update the entire cluster at one time. You can perform the following procedures:
1.9. Updating a cluster that includes RHEL compute machines
Updating a cluster that includes RHEL compute machines: If your cluster contains Red Hat Enterprise Linux (RHEL) machines, you must perform additional steps to update those machines. You can perform the following procedures:
1.10. Updating a cluster in a disconnected environment
About cluster updates in a disconnected environment: If your mirror host cannot access both the internet and the cluster, you can mirror the images to a file system that is disconnected from that environment. You can then bring that host or removable media across that gap. If the local container registry and the cluster are connected to the mirror host of a registry, you can directly push the release images to the local registry.
- Preparing your mirror host
- Configuring credentials that allow images to be mirrored
- Mirroring the OpenShift Container Platform image repository
- Updating the disconnected cluster
- Configuring image registry repository mirroring
- Widening the scope of the mirror image catalog to reduce the frequency of cluster node reboots
- Installing the OpenShift Update Service Operator
- Creating an OpenShift Update Service application
- Deleting an OpenShift Update Service application
- Uninstalling the OpenShift Update Service Operator
1.11. Updating hardware on nodes running in vSphere
Updating hardware on vSphere: You must ensure that your nodes running in vSphere are running on the hardware version supported by OpenShift Container Platform. Currently, hardware version 15 or later is supported for vSphere virtual machines in a cluster. For more information, see the following:
Version 4.12 of OpenShift Container Platform requires VMware virtual hardware version 15 or later.
Chapter 2. Understanding OpenShift updates
2.1. Introduction to OpenShift updates
With OpenShift Container Platform 4, you can update an OpenShift Container Platform cluster with a single operation by using the web console or the OpenShift CLI (oc). Platform administrators can view new update options either by going to Administration → Cluster Settings in the web console or by looking at the output of the oc adm upgrade command.
Red Hat hosts a public OpenShift Update Service (OSUS), which serves a graph of update possibilities based on the OpenShift Container Platform release images in the official registry. The graph contains update information for any public OCP release. OpenShift Container Platform clusters are configured to connect to the OSUS by default, and the OSUS responds to clusters with information about known update targets.
An update begins when either a cluster administrator or an automatic update controller edits the custom resource (CR) of the Cluster Version Operator (CVO) with a new version. To reconcile the cluster with the newly specified version, the CVO retrieves the target release image from an image registry and begins to apply changes to the cluster.
Operators previously installed through Operator Lifecycle Manager (OLM) follow a different process for updates. See Updating installed Operators for more information.
The target release image contains manifest files for all cluster components that form a specific OCP version. When updating the cluster to a new version, the CVO applies manifests in separate stages called Runlevels. Most, but not all, manifests support one of the cluster Operators. As the CVO applies a manifest to a cluster Operator, the Operator might perform update tasks to reconcile itself with its new specified version.
The CVO monitors the state of each applied resource and the states reported by all cluster Operators. The CVO only proceeds with the update when all manifests and cluster Operators in the active Runlevel reach a stable condition. After the CVO updates the entire control plane through this process, the Machine Config Operator (MCO) updates the operating system and configuration of every node in the cluster.
2.1.1. Common questions about update availability
There are several factors that affect if and when an update is made available to an OpenShift Container Platform cluster. The following list provides common questions regarding the availability of an update:
What are the differences between each of the update channels?
-
A new release is initially added to the
candidatechannel. -
After successful final testing, a release on the
candidatechannel is promoted to thefastchannel, an errata is published, and the release is now fully supported. After a delay, a release on the
fastchannel is finally promoted to thestablechannel. This delay represents the only difference between thefastandstablechannels.NoteFor the latest z-stream releases, this delay may generally be a week or two. However, the delay for initial updates to the latest minor version may take much longer, generally 45-90 days.
-
Releases promoted to the
stablechannel are simultaneously promoted to theeuschannel. The primary purpose of theeuschannel is to serve as a convenience for clusters performing an EUS-to-EUS update.
Is a release on the stable channel safer or more supported than a release on the fast channel?
-
If a regression is identified for a release on a
fastchannel, it will be resolved and managed to the same extent as if that regression was identified for a release on thestablechannel. -
The only difference between releases on the
fastandstablechannels is that a release only appears on thestablechannel after it has been on thefastchannel for some time, which provides more time for new update risks to be discovered. -
A release that is available on the
fastchannel always becomes available on thestablechannel after this delay.
What does it mean if an update is supported but not recommended?
- Red Hat continuously evaluates data from multiple sources to determine whether updates from one version to another lead to issues. If an issue is identified, an update path may no longer be recommended to users. However, even if the update path is not recommended, customers are still supported if they perform the update.
Red Hat does not block users from updating to a certain version. Red Hat may declare conditional update risks, which may or may not apply to a particular cluster.
- Declared risks provide cluster administrators more context about a supported update. Cluster administrators can still accept the risk and update to that particular target version. This update is always supported despite not being recommended in the context of the conditional risk.
What if I see that an update to a particular release is no longer recommended?
- If Red Hat removes update recommendations from any supported release due to a regression, a superseding update recommendation will be provided to a future version that corrects the regression. There may be a delay while the defect is corrected, tested, and promoted to your selected channel.
How long until the next z-stream release is made available on the fast and stable channels?
While the specific cadence can vary based on a number of factors, new z-stream releases for the latest minor version are typically made available about every week. Older minor versions, which have become more stable over time, may take much longer for new z-stream releases to be made available.
ImportantThese are only estimates based on past data about z-stream releases. Red Hat reserves the right to change the release frequency as needed. Any number of issues could cause irregularities and delays in this release cadence.
-
Once a z-stream release is published, it also appears in the
fastchannel for that minor version. After a delay, the z-stream release may then appear in that minor version’sstablechannel.
Additional resources
2.1.2. About the OpenShift Update Service
The OpenShift Update Service (OSUS) provides update recommendations to OpenShift Container Platform, including Red Hat Enterprise Linux CoreOS (RHCOS). It provides a graph, or diagram, that contains the vertices of component Operators and the edges that connect them. The edges in the graph show which versions you can safely update to. The vertices are update payloads that specify the intended state of the managed cluster components.
The Cluster Version Operator (CVO) in your cluster checks with the OpenShift Update Service to see the valid updates and update paths based on current component versions and information in the graph. When you request an update, the CVO uses the corresponding release image to update your cluster. The release artifacts are hosted in Quay as container images.
To allow the OpenShift Update Service to provide only compatible updates, a release verification pipeline drives automation. Each release artifact is verified for compatibility with supported cloud platforms and system architectures, as well as other component packages. After the pipeline confirms the suitability of a release, the OpenShift Update Service notifies you that it is available.
The OpenShift Update Service displays all recommended updates for your current cluster. If an update path is not recommended by the OpenShift Update Service, it might be because of a known issue with the update or the target release.
Two controllers run during continuous update mode. The first controller continuously updates the payload manifests, applies the manifests to the cluster, and outputs the controlled rollout status of the Operators to indicate whether they are available, upgrading, or failed. The second controller polls the OpenShift Update Service to determine if updates are available.
Only updating to a newer version is supported. Reverting or rolling back your cluster to a previous version is not supported. If your update fails, contact Red Hat support.
During the update process, the Machine Config Operator (MCO) applies the new configuration to your cluster machines. The MCO cordons the number of nodes specified by the maxUnavailable field on the machine configuration pool and marks them unavailable. By default, this value is set to 1. The MCO updates the affected nodes alphabetically by zone, based on the topology.kubernetes.io/zone label. If a zone has more than one node, the oldest nodes are updated first. For nodes that do not use zones, such as in bare metal deployments, the nodes are updated by age, with the oldest nodes updated first. The MCO updates the number of nodes as specified by the maxUnavailable field on the machine configuration pool at a time. The MCO then applies the new configuration and reboots the machine.
If you use Red Hat Enterprise Linux (RHEL) machines as workers, the MCO does not update the kubelet because you must update the OpenShift API on the machines first.
With the specification for the new version applied to the old kubelet, the RHEL machine cannot return to the Ready state. You cannot complete the update until the machines are available. However, the maximum number of unavailable nodes is set to ensure that normal cluster operations can continue with that number of machines out of service.
The OpenShift Update Service is composed of an Operator and one or more application instances.
2.1.3. Common terms
- Control plane
- The control plane, which is composed of control plane machines, manages the OpenShift Container Platform cluster. The control plane machines manage workloads on the compute machines, which are also known as worker machines.
- Cluster Version Operator
- The Cluster Version Operator (CVO) starts the update process for the cluster. It checks with OSUS based on the current cluster version and retrieves the graph which contains available or possible update paths.
- Machine Config Operator
- The Machine Config Operator (MCO) is a cluster-level Operator that manages the operating system and machine configurations. Through the MCO, platform administrators can configure and update systemd, CRI-O and Kubelet, the kernel, NetworkManager, and other system features on the worker nodes.
- OpenShift Update Service
- The OpenShift Update Service (OSUS) provides over-the-air updates to OpenShift Container Platform, including to Red Hat Enterprise Linux CoreOS (RHCOS). It provides a graph, or diagram, that contains the vertices of component Operators and the edges that connect them.
- Channels
- Channels declare an update strategy tied to minor versions of OpenShift Container Platform. The OSUS uses this configured strategy to recommend update edges consistent with that strategy.
- Recommended update edge
- A recommended update edge is a recommended update between OpenShift Container Platform releases. Whether a given update is recommended can depend on the cluster’s configured channel, current version, known bugs, and other information. OSUS communicates the recommended edges to the CVO, which runs in every cluster.
- Extended Update Support
All post-4.7 even-numbered minor releases are labeled as Extended Update Support (EUS) releases. These releases introduce a verified update path between EUS releases, permitting customers to streamline updates of worker nodes and formulate update strategies of EUS-to-EUS OpenShift Container Platform releases that result in fewer reboots of worker nodes.
For more information, see Red Hat OpenShift Extended Update Support (EUS) Overview.
2.1.4. Additional resources
- For more detailed information about each major aspect of the update process, see How cluster updates work.
2.2. How cluster updates work
The following sections describe each major aspect of the OpenShift Container Platform (OCP) update process in detail. For a general overview of how updates work, see the Introduction to OpenShift updates.
2.2.1. The Cluster Version Operator
The Cluster Version Operator (CVO) is the primary component that orchestrates and facilitates the OpenShift Container Platform update process. During installation and standard cluster operation, the CVO is constantly comparing the manifests of managed cluster Operators to in-cluster resources, and reconciling discrepancies to ensure that the actual state of these resources match their desired state.
2.2.1.1. The ClusterVersion object
One of the resources that the Cluster Version Operator (CVO) monitors is the ClusterVersion resource.
Administrators and OpenShift components can communicate or interact with the CVO through the ClusterVersion object. The desired CVO state is declared through the ClusterVersion object and the current CVO state is reflected in the object’s status.
Do not directly modify the ClusterVersion object. Instead, use interfaces such as the oc CLI or the web console to declare your update target.
The CVO continually reconciles the cluster with the target state declared in the spec property of the ClusterVersion resource. When the desired release differs from the actual release, that reconciliation updates the cluster.
Update availability data
The ClusterVersion resource also contains information about updates that are available to the cluster. This includes updates that are available, but not recommended due to a known risk that applies to the cluster. These updates are known as conditional updates. To learn how the CVO maintains this information about available updates in the ClusterVersion resource, see the "Evaluation of update availability" section.
You can inspect all available updates with the following command:
$ oc adm upgrade --include-not-recommended
NoteThe additional
--include-not-recommendedparameter includes updates that are available but not recommended due to a known risk that applies to the cluster.Example output
Cluster version is 4.10.22

Upstream is unset, so the cluster will use an appropriate default.
Channel: fast-4.11 (available channels: candidate-4.10, candidate-4.11, eus-4.10, fast-4.10, fast-4.11, stable-4.10)

Recommended updates:

  VERSION     IMAGE
  4.10.26     quay.io/openshift-release-dev/ocp-release@sha256:e1fa1f513068082d97d78be643c369398b0e6820afab708d26acda2262940954
  4.10.25     quay.io/openshift-release-dev/ocp-release@sha256:ed84fb3fbe026b3bbb4a2637ddd874452ac49c6ead1e15675f257e28664879cc
  4.10.24     quay.io/openshift-release-dev/ocp-release@sha256:aab51636460b5a9757b736a29bc92ada6e6e6282e46b06e6fd483063d590d62a
  4.10.23     quay.io/openshift-release-dev/ocp-release@sha256:e40e49d722cb36a95fa1c03002942b967ccbd7d68de10e003f0baa69abad457b

Supported but not recommended updates:

  Version: 4.11.0
  Image: quay.io/openshift-release-dev/ocp-release@sha256:300bce8246cf880e792e106607925de0a404484637627edf5f517375517d54a4
  Recommended: False
  Reason: RPMOSTreeTimeout
  Message: Nodes with substantial numbers of containers and CPU contention may not reconcile machine configuration https://bugzilla.redhat.com/show_bug.cgi?id=2111817#c22
The
oc adm upgradecommand queries theClusterVersionresource for information about available updates and presents it in a human-readable format.One way to directly inspect the underlying availability data created by the CVO is by querying the
ClusterVersionresource with the following command:$ oc get clusterversion version -o json | jq '.status.availableUpdates'
Example output
[
  {
    "channels": [
      "candidate-4.11",
      "candidate-4.12",
      "fast-4.11",
      "fast-4.12"
    ],
    "image": "quay.io/openshift-release-dev/ocp-release@sha256:400267c7f4e61c6bfa0a59571467e8bd85c9188e442cbd820cc8263809be3775",
    "url": "https://access.redhat.com/errata/RHBA-2023:3213",
    "version": "4.11.41"
  },
  ...
]
A similar command can be used to check conditional updates:
$ oc get clusterversion version -o json | jq '.status.conditionalUpdates'
Example output
[
  {
    "conditions": [
      {
        "lastTransitionTime": "2023-05-30T16:28:59Z",
        "message": "The 4.11.36 release only resolves an installation issue https://issues.redhat.com//browse/OCPBUGS-11663 , which does not affect already running clusters. 4.11.36 does not include fixes delivered in recent 4.11.z releases and therefore upgrading from these versions would cause fixed bugs to reappear. Red Hat does not recommend upgrading clusters to 4.11.36 version for this reason. https://access.redhat.com/solutions/7007136",
        "reason": "PatchesOlderRelease",
        "status": "False",
        "type": "Recommended"
      }
    ],
    "release": {
      "channels": [...],
      "image": "quay.io/openshift-release-dev/ocp-release@sha256:8c04176b771a62abd801fcda3e952633566c8b5ff177b93592e8e8d2d1f8471d",
      "url": "https://access.redhat.com/errata/RHBA-2023:1733",
      "version": "4.11.36"
    },
    "risks": [...]
  },
  ...
]
2.2.1.2. Evaluation of update availability
The Cluster Version Operator (CVO) periodically queries the OpenShift Update Service (OSUS) for the most recent data about update possibilities. This data is based on the cluster’s subscribed channel. The CVO then saves information about update recommendations into either the availableUpdates or conditionalUpdates field of its ClusterVersion resource.
The CVO periodically checks the conditional updates for update risks. These risks are conveyed through the data served by the OSUS, which contains information for each version about known issues that might affect a cluster updated to that version. Most risks are limited to clusters with specific characteristics, such as clusters with a certain size or clusters that are deployed in a particular cloud platform.
The CVO continuously evaluates its cluster characteristics against the conditional risk information for each conditional update. If the CVO finds that the cluster matches the criteria, the CVO stores this information in the conditionalUpdates field of its ClusterVersion resource. If the CVO finds that the cluster does not match the risks of an update, or that there are no risks associated with the update, it stores the target version in the availableUpdates field of its ClusterVersion resource.
The user interface, either the web console or the OpenShift CLI (oc), presents this information in sectioned headings to the administrator. Each supported but not recommended update recommendation contains a link to further resources about the risk so that the administrator can make an informed decision about the update.
Additional resources
2.2.2. Release images
A release image is the delivery mechanism for a specific OpenShift Container Platform (OCP) version. It contains the release metadata, a Cluster Version Operator (CVO) binary matching the release version, every manifest needed to deploy individual OpenShift cluster Operators, and a list of SHA digest-versioned references to all container images that make up this OpenShift version.
You can inspect the content of a specific release image by running the following command:
$ oc adm release extract <release image>
Example output
$ oc adm release extract quay.io/openshift-release-dev/ocp-release:4.12.6-x86_64
Extracted release payload from digest sha256:800d1e39d145664975a3bb7cbc6e674fbf78e3c45b5dde9ff2c5a11a8690c87b created at 2023-03-01T12:46:29Z

$ ls
0000_03_authorization-openshift_01_rolebindingrestriction.crd.yaml
0000_03_config-operator_01_proxy.crd.yaml
0000_03_marketplace-operator_01_operatorhub.crd.yaml
0000_03_marketplace-operator_02_operatorhub.cr.yaml
0000_03_quota-openshift_01_clusterresourcequota.crd.yaml 1
...
0000_90_service-ca-operator_02_prometheusrolebinding.yaml 2
0000_90_service-ca-operator_03_servicemonitor.yaml
0000_99_machine-api-operator_00_tombstones.yaml
image-references 3
release-metadata
2.2.3. Update process workflow
The following steps represent a detailed workflow of the OpenShift Container Platform (OCP) update process:
-
The target version is stored in the
spec.desiredUpdate.versionfield of theClusterVersionresource, which may be managed through the web console or the CLI. -
The Cluster Version Operator (CVO) detects that the
desiredUpdatein theClusterVersionresource differs from the current cluster version. Using graph data from the OpenShift Update Service, the CVO resolves the desired cluster version to a pull spec for the release image. - The CVO validates the integrity and authenticity of the release image. Red Hat publishes cryptographically-signed statements about published release images at predefined locations by using image SHA digests as unique and immutable release image identifiers. The CVO utilizes a list of built-in public keys to validate the presence and signatures of the statement matching the checked release image.
-
The CVO creates a job named
version-$version-$hashin theopenshift-cluster-versionnamespace. This job uses containers that are executing the release image, so the cluster downloads the image through the container runtime. The job then extracts the manifests and metadata from the release image to a shared volume that is accessible to the CVO. - The CVO validates the extracted manifests and metadata.
- The CVO checks some preconditions to ensure that no problematic condition is detected in the cluster. Certain conditions can prevent updates from proceeding. These conditions are either determined by the CVO itself, or reported by individual cluster Operators that detect some details about the cluster that the Operator considers problematic for the update.
-
The CVO records the accepted release in
status.desiredand creates astatus.historyentry about the new update. - The CVO begins reconciling the manifests from the release image. Cluster Operators are updated in separate stages called Runlevels, and the CVO ensures that all Operators in a Runlevel finish updating before it proceeds to the next level.
- Manifests for the CVO itself are applied early in the process. When the CVO deployment is applied, the current CVO pod stops, and a CVO pod that uses the new version starts. The new CVO proceeds to reconcile the remaining manifests.
-
The update proceeds until the entire control plane is updated to the new version. Individual cluster Operators might perform update tasks on their domain of the cluster, and while they do so, they report their state through the
Progressing=Truecondition. - The Machine Config Operator (MCO) manifests are applied towards the end of the process. The updated MCO then begins updating the system configuration and operating system of every node. Each node might be drained, updated, and rebooted before it starts to accept workloads again.
The cluster reports as updated after the control plane update is finished, usually before all nodes are updated. After the update, the CVO maintains all cluster resources to match the state delivered in the release image.
2.2.4. Understanding how manifests are applied during an update
Some manifests supplied in a release image must be applied in a certain order because of the dependencies between them. For example, the CustomResourceDefinition resource must be created before the matching custom resources. Additionally, there is a logical order in which the individual cluster Operators must be updated to minimize disruption in the cluster. The Cluster Version Operator (CVO) implements this logical order through the concept of Runlevels.
These dependencies are encoded in the filenames of the manifests in the release image:
0000_<runlevel>_<component>_<manifest-name>.yaml
For example:
0000_03_config-operator_01_proxy.crd.yaml
The CVO internally builds a dependency graph for the manifests, where the CVO obeys the following rules:
- During an update, manifests at a lower Runlevel are applied before those at a higher Runlevel.
- Within one Runlevel, manifests for different components can be applied in parallel.
- Within one Runlevel, manifests for a single component are applied in lexicographic order.
The CVO then applies manifests following the generated dependency graph.
For some resource types, the CVO monitors the resource after its manifest is applied, and considers it to be successfully updated only after the resource reaches a stable state. Achieving this state can take some time. This is especially true for ClusterOperator resources, while the CVO waits for a cluster Operator to update itself and then update its ClusterOperator status.
The CVO waits until all cluster Operators in the Runlevel meet the following conditions before it proceeds to the next Runlevel:
-
The cluster Operators have an
Available=Truecondition. -
The cluster Operators have a
Degraded=Falsecondition.
- The cluster Operators declare they have achieved the desired version in their ClusterOperator resource.
Some actions can take significant time to finish. The CVO waits for the actions to complete in order to ensure the subsequent Runlevels can proceed safely. Initially reconciling the new release’s manifests is expected to take 60 to 120 minutes in total; see Understanding OpenShift Container Platform update duration for more information about factors that influence update duration.
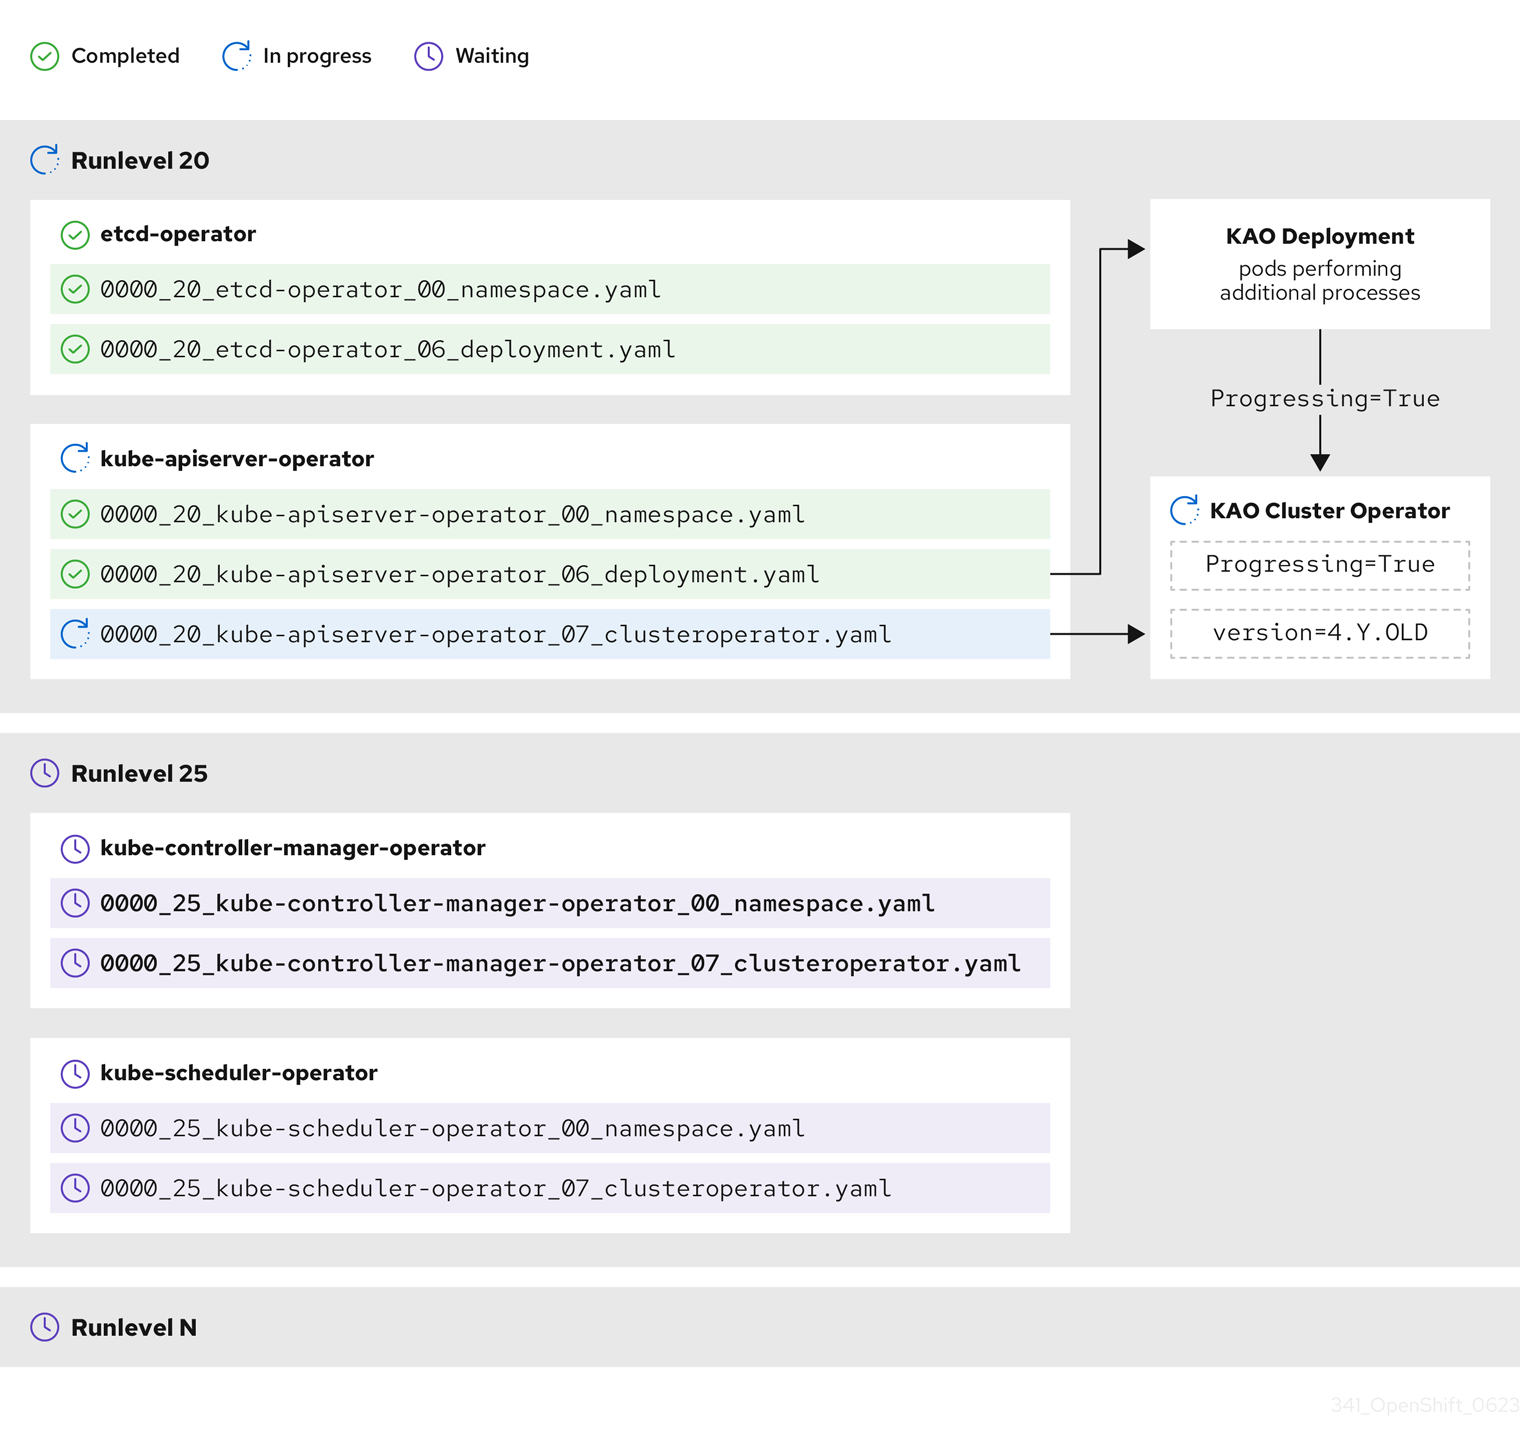
In the previous example diagram, the CVO is waiting until all work is completed at Runlevel 20. The CVO has applied all manifests to the Operators in the Runlevel, but the kube-apiserver-operator ClusterOperator performs some actions after its new version was deployed. The kube-apiserver-operator ClusterOperator declares this progress through the Progressing=True condition and by not declaring the new version as reconciled in its status.versions. The CVO waits until the ClusterOperator reports an acceptable status, and then it will start reconciling manifests at Runlevel 25.
Additional resources
2.2.5. Understanding how the Machine Config Operator updates nodes
The Machine Config Operator (MCO) applies a new machine configuration to each control plane node and compute node. During the machine configuration update, control plane nodes and compute nodes are organized into their own machine config pools, where the pools of machines are updated in parallel. The .spec.maxUnavailable parameter, which has a default value of 1, determines how many nodes in a machine config pool can simultaneously undergo the update process.
When the machine configuration update process begins, the MCO checks the amount of currently unavailable nodes in a pool. If there are fewer unavailable nodes than the value of .spec.maxUnavailable, the MCO initiates the following sequence of actions on available nodes in the pool:
Cordon and drain the node
NoteWhen a node is cordoned, workloads cannot be scheduled to it.
- Update the system configuration and operating system (OS) of the node
- Reboot the node
- Uncordon the node
A node undergoing this process is unavailable until it is uncordoned and workloads can be scheduled to it again. The MCO begins updating nodes until the number of unavailable nodes is equal to the value of .spec.maxUnavailable.
As a node completes its update and becomes available, the number of unavailable nodes in the machine config pool is once again fewer than .spec.maxUnavailable. If there are remaining nodes that need to be updated, the MCO initiates the update process on a node until the .spec.maxUnavailable limit is once again reached. This process repeats until each control plane node and compute node has been updated.
The following example workflow describes how this process might occur in a machine config pool with 5 nodes, where .spec.maxUnavailable is 3 and all nodes are initially available:
- The MCO cordons nodes 1, 2, and 3, and begins to drain them.
- Node 2 finishes draining, reboots, and becomes available again. The MCO cordons node 4 and begins draining it.
- Node 1 finishes draining, reboots, and becomes available again. The MCO cordons node 5 and begins draining it.
- Node 3 finishes draining, reboots, and becomes available again.
- Node 5 finishes draining, reboots, and becomes available again.
- Node 4 finishes draining, reboots, and becomes available again.
Because the update process for each node is independent of other nodes, some nodes in the example above finish their update out of the order in which they were cordoned by the MCO.
You can check the status of the machine configuration update by running the following command:
$ oc get mcp
Example output
NAME         CONFIG                                                 UPDATED   UPDATING   DEGRADED   MACHINECOUNT   READYMACHINECOUNT   UPDATEDMACHINECOUNT   DEGRADEDMACHINECOUNT   AGE
master       rendered-master-acd1358917e9f98cbdb599aea622d78b       True      False      False      3              3                   3                     0                      22h
worker       rendered-worker-1d871ac76e1951d32b2fe92369879826       False     True       False      2              1                   1                     0                      22h
Additional resources
Chapter 3. Understanding update channels and releases
Update channels are the mechanism by which users declare the OpenShift Container Platform minor version they intend to update their clusters to. They also allow users to choose the timing and level of support their updates will have through the fast, stable, candidate, and eus channel options. The Cluster Version Operator uses an update graph based on the channel declaration, along with other conditional information, to provide a list of recommended and conditional updates available to the cluster.
Update channels correspond to a minor version of OpenShift Container Platform. The version number in the channel represents the target minor version that the cluster will eventually be updated to, even if it is higher than the cluster’s current minor version.
For instance, OpenShift Container Platform 4.10 update channels provide the following recommendations:
- Updates within 4.10.
- Updates within 4.9.
- Updates from 4.9 to 4.10, allowing all 4.9 clusters to eventually update to 4.10, even if they do not immediately meet the minimum z-stream version requirements.
-
eus-4.10only: updates within 4.8. -
eus-4.10only: updates from 4.8 to 4.9 to 4.10, allowing all 4.8 clusters to eventually update to 4.10.
4.10 update channels do not recommend updates to 4.11 or later releases. This strategy ensures that administrators must explicitly decide to update to the next minor version of OpenShift Container Platform.
Update channels control only release selection and do not impact the version of the cluster that you install. The openshift-install binary file for a specific version of OpenShift Container Platform always installs that version.
OpenShift Container Platform 4.12 offers the following update channels:
-
stable-4.12 -
eus-4.y(only offered for EUS versions and meant to facilitate updates between EUS versions) -
fast-4.12 -
candidate-4.12
If you do not want the Cluster Version Operator to fetch available updates from the update recommendation service, you can use the oc adm upgrade channel command in the OpenShift CLI to configure an empty channel. This configuration can be helpful if, for example, a cluster has restricted network access and there is no local, reachable update recommendation service.
Red Hat recommends updating to versions suggested by OpenShift Update Service only. For a minor version update, versions must be contiguous. Red Hat does not test updates to noncontiguous versions and cannot guarantee compatibility with earlier versions.
3.1. Update channels
3.1.1. fast-4.12 channel
The fast-4.12 channel is updated with new versions of OpenShift Container Platform 4.12 as soon as Red Hat declares the version as a general availability (GA) release. As such, these releases are fully supported and purposed to be used in production environments.
3.1.2. stable-4.12 channel
While the fast-4.12 channel contains releases as soon as their errata are published, releases are added to the stable-4.12 channel after a delay. During this delay, data is collected from multiple sources and analyzed for indications of product regressions. Once a significant number of data points have been collected, these releases are added to the stable channel.
Since the time required to obtain a significant number of data points varies based on many factors, Service LeveL Objective (SLO) is not offered for the delay duration between fast and stable channels. For more information, please see "Choosing the correct channel for your cluster"
Newly installed clusters default to using stable channels.
3.1.3. eus-4.y channel
In addition to the stable channel, all even-numbered minor versions of OpenShift Container Platform offer Extended Update Support (EUS). Releases promoted to the stable channel are also simultaneously promoted to the EUS channels. The primary purpose of the EUS channels is to serve as a convenience for clusters performing an EUS-to-EUS update.
Both standard and non-EUS subscribers can access all EUS repositories and necessary RPMs (rhel-*-eus-rpms) to be able to support critical purposes such as debugging and building drivers.
3.1.4. candidate-4.12 channel
The candidate-4.12 channel offers unsupported early access to releases as soon as they are built. Releases present only in candidate channels may not contain the full feature set of eventual GA releases or features may be removed prior to GA. Additionally, these releases have not been subject to full Red Hat Quality Assurance and may not offer update paths to later GA releases. Given these caveats, the candidate channel is only suitable for testing purposes where destroying and recreating a cluster is acceptable.
3.1.5. Update recommendations in the channel
OpenShift Container Platform maintains an update recommendation service that knows your installed OpenShift Container Platform version and the path to take within the channel to get you to the next release. Update paths are also limited to versions relevant to your currently selected channel and its promotion characteristics.
You can imagine seeing the following releases in your channel:
- 4.12.0
- 4.12.1
- 4.12.3
- 4.12.4
The service recommends only updates that have been tested and have no known serious regressions. For example, if your cluster is on 4.12.1 and OpenShift Container Platform suggests 4.12.4, then it is recommended to update from 4.12.1 to 4.12.4.
Do not rely on consecutive patch numbers. In this example, 4.12.2 is not and never was available in the channel, therefore updates to 4.12.2 are not recommended or supported.
3.1.6. Update recommendations and Conditional Updates
Red Hat monitors newly released versions and update paths associated with those versions before and after they are added to supported channels.
If Red Hat removes update recommendations from any supported release, a superseding update recommendation will be provided to a future version that corrects the regression. There may however be a delay while the defect is corrected, tested, and promoted to your selected channel.
Beginning in OpenShift Container Platform 4.10, when update risks are confirmed, they are declared as Conditional Update risks for the relevant updates. Each known risk may apply to all clusters or only clusters matching certain conditions. Some examples include having the Platform set to None or the CNI provider set to OpenShiftSDN. The Cluster Version Operator (CVO) continually evaluates known risks against the current cluster state. If no risks match, the update is recommended. If the risk matches, those updates are supported but not recommended, and a reference link is provided. The reference link helps the cluster admin decide if they would like to accept the risk and update anyway.
When Red Hat chooses to declare Conditional Update risks, that action is taken in all relevant channels simultaneously. Declaration of a Conditional Update risk may happen either before or after the update has been promoted to supported channels.
3.1.7. Choosing the correct channel for your cluster
Choosing the appropriate channel involves two decisions.
First, select the minor version you want for your cluster update. Selecting a channel which matches your current version ensures that you only apply z-stream updates and do not receive feature updates. Selecting an available channel which has a version greater than your current version will ensure that after one or more updates your cluster will have updated to that version. Your cluster will only be offered channels which match its current version, the next version, or the next EUS version.
Due to the complexity involved in planning updates between versions many minors apart, channels that assist in planning updates beyond a single EUS-to-EUS update are not offered.
Second, you should choose your desired rollout strategy. You may choose to update as soon as Red Hat declares a release GA by selecting from fast channels or you may want to wait for Red Hat to promote releases to the stable channel. Update recommendations offered in the fast-4.12 and stable-4.12 are both fully supported and benefit equally from ongoing data analysis. The promotion delay before promoting a release to the stable channel represents the only difference between the two channels. Updates to the latest z-streams are generally promoted to the stable channel within a week or two, however the delay when initially rolling out updates to the latest minor is much longer, generally 45-90 days. Please consider the promotion delay when choosing your desired channel, as waiting for promotion to the stable channel may affect your scheduling plans.
Additionally, there are several factors which may lead an organization to move clusters to the fast channel either permanently or temporarily including:
- The desire to apply a specific fix known to affect your environment without delay.
- Application of CVE fixes without delay. CVE fixes may introduce regressions, so promotion delays still apply to z-streams with CVE fixes.
- Internal testing processes. If it takes your organization several weeks to qualify releases it is best test concurrently with our promotion process rather than waiting. This also assures that any telemetry signal provided to Red Hat is a factored into our rollout, so issues relevant to you can be fixed faster.
3.1.8. Restricted network clusters
If you manage the container images for your OpenShift Container Platform clusters yourself, you must consult the Red Hat errata that is associated with product releases and note any comments that impact updates. During an update, the user interface might warn you about switching between these versions, so you must ensure that you selected an appropriate version before you bypass those warnings.
3.1.9. Switching between channels
A channel can be switched from the web console or through the adm upgrade channel command:
$ oc adm upgrade channel <channel>
The web console will display an alert if you switch to a channel that does not include the current release. The web console does not recommend any updates while on a channel without the current release. You can return to the original channel at any point, however.
Changing your channel might impact the supportability of your cluster. The following conditions might apply:
-
Your cluster is still supported if you change from the
stable-4.12channel to thefast-4.12channel. -
You can switch to the
candidate-4.12channel at any time, but some releases for this channel might be unsupported. -
You can switch from the
candidate-4.12channel to thefast-4.12channel if your current release is a general availability release. -
You can always switch from the
fast-4.12channel to thestable-4.12channel. There is a possible delay of up to a day for the release to be promoted tostable-4.12if the current release was recently promoted.
Additional resources
Chapter 4. Understanding OpenShift Container Platform update duration
OpenShift Container Platform update duration varies based on the deployment topology. This page helps you understand the factors that affect update duration and estimate how long the cluster update takes in your environment.
4.1. Prerequisites
- You are familiar with OpenShift Container Platform architecture and OpenShift Container Platform updates.
4.2. Factors affecting update duration
The following factors can affect your cluster update duration:
The reboot of compute nodes to the new machine configuration by Machine Config Operator (MCO)
-
The value of
MaxUnavailablein the machine config pool - The minimum number or percentages of replicas set in pod disruption budget (PDB)
-
The value of
- The number of nodes in the cluster
- The health of the cluster nodes
4.3. Cluster update phases
In OpenShift Container Platform, the cluster update happens in two phases:
- Cluster Version Operator (CVO) target update payload deployment
- Machine Config Operator (MCO) node updates
4.3.1. Cluster Version Operator target update payload deployment
The Cluster Version Operator (CVO) retrieves the target update release image and applies to the cluster. All components which run as pods are updated during this phase, whereas the host components are updated by the Machine Config Operator (MCO). This process might take 60 to 120 minutes.
The CVO phase of the update does not restart the nodes.
Additional resources
4.3.2. Machine Config Operator node updates
The Machine Config Operator (MCO) applies a new machine configuration to each control plane and compute node. During this process, the MCO performs the following sequential actions on each node of the cluster:
- Cordon and drain all the nodes
- Update the operating system (OS)
- Reboot the nodes
- Uncordon all nodes and schedule workloads on the node
When a node is cordoned, workloads cannot be scheduled to it.
The time to complete this process depends on several factors including the node and infrastructure configuration. This process might take 5 or more minutes to complete per node.
In addition to MCO, you should consider the impact of the following parameters:
- The control plane node update duration is predictable and oftentimes shorter than compute nodes, because the control plane workloads are tuned for graceful updates and quick drains.
-
You can update the compute nodes in parallel by setting the
maxUnavailablefield to greater than1in the Machine Config Pool (MCP). The MCO cordons the number of nodes specified inmaxUnavailableand marks them unavailable for update. -
When you increase
maxUnavailableon the MCP, it can help the pool to update more quickly. However, ifmaxUnavailableis set too high, and several nodes are cordoned simultaneously, the pod disruption budget (PDB) guarded workloads could fail to drain because a schedulable node cannot be found to run the replicas. If you increasemaxUnavailablefor the MCP, ensure that you still have sufficient schedulable nodes to allow PDB guarded workloads to drain. Before you begin the update, you must ensure that all the nodes are available. Any unavailable nodes can significantly impact the update duration because the node unavailability affects the
maxUnavailableand pod disruption budgets.To check the status of nodes from the terminal, run the following command:
$ oc get node
Example Output
NAME                                        STATUS                      ROLES   AGE     VERSION
ip-10-0-137-31.us-east-2.compute.internal   Ready,SchedulingDisabled    worker  12d     v1.23.5+3afdacb
ip-10-0-151-208.us-east-2.compute.internal  Ready                       master  12d     v1.23.5+3afdacb
ip-10-0-176-138.us-east-2.compute.internal  Ready                       master  12d     v1.23.5+3afdacb
ip-10-0-183-194.us-east-2.compute.internal  Ready                       worker  12d     v1.23.5+3afdacb
ip-10-0-204-102.us-east-2.compute.internal  Ready                       master  12d     v1.23.5+3afdacb
ip-10-0-207-224.us-east-2.compute.internal  Ready                       worker  12d     v1.23.5+3afdacb
If the status of the node is
NotReadyorSchedulingDisabled, then the node is not available and this impacts the update duration.You can check the status of nodes from the Administrator perspective in the web console by expanding Compute → Node.
Additional resources
4.4. Estimating cluster update time
Historical update duration of similar clusters provides you the best estimate for the future cluster updates. However, if the historical data is not available, you can use the following convention to estimate your cluster update time:
Cluster update time = CVO target update payload deployment time + (# node update iterations x MCO node update time)
A node update iteration consists of one or more nodes updated in parallel. The control plane nodes are always updated in parallel with the compute nodes. In addition, one or more compute nodes can be updated in parallel based on the maxUnavailable value.
For example, to estimate the update time, consider an OpenShift Container Platform cluster with three control plane nodes and six compute nodes and each host takes about 5 minutes to reboot.
The time it takes to reboot a particular node varies significantly. In cloud instances, the reboot might take about 1 to 2 minutes, whereas in physical bare metal hosts the reboot might take more than 15 minutes.
Scenario-1
When you set maxUnavailable to 1 for both the control plane and compute nodes Machine Config Pool (MCP), then all the six compute nodes will update one after another in each iteration:
Cluster update time = 60 + (6 x 5) = 90 minutes
Scenario-2
When you set maxUnavailable to 2 for the compute node MCP, then two compute nodes will update in parallel in each iteration. Therefore it takes total three iterations to update all the nodes.
Cluster update time = 60 + (3 x 5) = 75 minutes
The default setting for maxUnavailable is 1 for all the MCPs in OpenShift Container Platform. It is recommended that you do not change the maxUnavailable in the control plane MCP.
4.5. Red Hat Enterprise Linux (RHEL) compute nodes
Red Hat Enterprise Linux (RHEL) compute nodes require an additional usage of openshift-ansible to update node binary components. The actual time spent updating RHEL compute nodes should not be significantly different from Red Hat Enterprise Linux CoreOS (RHCOS) compute nodes.
Additional resources
Chapter 5. Preparing to update to OpenShift Container Platform 4.12
OpenShift Container Platform 4.12 uses Kubernetes 1.25, which removed several deprecated APIs.
A cluster administrator must provide a manual acknowledgment before the cluster can be updated from OpenShift Container Platform 4.11 to 4.12. This is to help prevent issues after upgrading to OpenShift Container Platform 4.12, where APIs that have been removed are still in use by workloads, tools, or other components running on or interacting with the cluster. Administrators must evaluate their cluster for any APIs in use that will be removed and migrate the affected components to use the appropriate new API version. After this evaluation and migration is complete, the administrator can provide the acknowledgment.
Before you can update your OpenShift Container Platform 4.11 cluster to 4.12, you must provide the administrator acknowledgment.
5.1. Removed Kubernetes APIs
OpenShift Container Platform 4.12 uses Kubernetes 1.25, which removed the following deprecated APIs. You must migrate manifests and API clients to use the appropriate API version. For more information about migrating removed APIs, see the Kubernetes documentation.
Table 5.1. APIs removed from Kubernetes 1.25
| Resource | Removed API | Migrate to | Notable changes |
|---|---|---|---|
|
|
|
| No |
|
|
|
| |
|
|
|
| |
|
|
|
| No |
|
|
|
| |
|
|
| ||
|
|
|
| No |
- For more information about pod security admission in OpenShift Container Platform, see Understanding and managing pod security admission.
Additional resources
5.2. Evaluating your cluster for removed APIs
There are several methods to help administrators identify where APIs that will be removed are in use. However, OpenShift Container Platform cannot identify all instances, especially workloads that are idle or external tools that are used. It is the responsibility of the administrator to properly evaluate all workloads and other integrations for instances of removed APIs.
5.2.1. Reviewing alerts to identify uses of removed APIs
Two alerts fire when an API is in use that will be removed in the next release:
-
APIRemovedInNextReleaseInUse- for APIs that will be removed in the next OpenShift Container Platform release. -
APIRemovedInNextEUSReleaseInUse- for APIs that will be removed in the next OpenShift Container Platform Extended Update Support (EUS) release.
If either of these alerts are firing in your cluster, review the alerts and take action to clear the alerts by migrating manifests and API clients to use the new API version.
Use the APIRequestCount API to get more information about which APIs are in use and which workloads are using removed APIs, because the alerts do not provide this information. Additionally, some APIs might not trigger these alerts but are still captured by APIRequestCount. The alerts are tuned to be less sensitive to avoid alerting fatigue in production systems.
5.2.2. Using APIRequestCount to identify uses of removed APIs
You can use the APIRequestCount API to track API requests and review whether any of them are using one of the removed APIs.
Prerequisites
-
You must have access to the cluster as a user with the
cluster-adminrole.
Procedure
Run the following command and examine the
REMOVEDINRELEASEcolumn of the output to identify the removed APIs that are currently in use:$ oc get apirequestcounts
Example output
NAME                                                                      REMOVEDINRELEASE   REQUESTSINCURRENTHOUR   REQUESTSINLAST24H
...
poddisruptionbudgets.v1.policy                                                               391                     8114
poddisruptionbudgets.v1beta1.policy                                       1.25               2                       23
podmonitors.v1.monitoring.coreos.com                                                         3                       70
podnetworkconnectivitychecks.v1alpha1.controlplane.operator.openshift.io                     612                     11748
pods.v1                                                                                      1531                    38634
podsecuritypolicies.v1beta1.policy                                        1.25               3                       39
podtemplates.v1                                                                              2                       79
preprovisioningimages.v1alpha1.metal3.io                                                     2                       39
priorityclasses.v1.scheduling.k8s.io                                                         12                      248
prioritylevelconfigurations.v1beta1.flowcontrol.apiserver.k8s.io          1.26               3                       86
...
ImportantYou can safely ignore the following entries that appear in the results:
-
The
system:serviceaccount:kube-system:generic-garbage-collectorand thesystem:serviceaccount:kube-system:namespace-controllerusers might appear in the results because these services invoke all registered APIs when searching for resources to remove. -
The
system:kube-controller-managerandsystem:cluster-policy-controllerusers might appear in the results because they walk through all resources while enforcing various policies.
You can also use
-o jsonpathto filter the results:$ oc get apirequestcounts -o jsonpath='{range .items[?(@.status.removedInRelease!="")]}{.status.removedInRelease}{"\t"}{.metadata.name}{"\n"}{end}'Example output
1.26	flowschemas.v1beta1.flowcontrol.apiserver.k8s.io
1.26	horizontalpodautoscalers.v2beta2.autoscaling
1.25	poddisruptionbudgets.v1beta1.policy
1.25	podsecuritypolicies.v1beta1.policy
1.26	prioritylevelconfigurations.v1beta1.flowcontrol.apiserver.k8s.io
-
The
5.2.3. Using APIRequestCount to identify which workloads are using the removed APIs
You can examine the APIRequestCount resource for a given API version to help identify which workloads are using the API.
Prerequisites
-
You must have access to the cluster as a user with the
cluster-adminrole.
Procedure
Run the following command and examine the
usernameanduserAgentfields to help identify the workloads that are using the API:$ oc get apirequestcounts <resource>.<version>.<group> -o yaml
For example:
$ oc get apirequestcounts poddisruptionbudgets.v1beta1.policy -o yaml
You can also use
-o jsonpathto extract theusernameanduserAgentvalues from anAPIRequestCountresource:$ oc get apirequestcounts poddisruptionbudgets.v1beta1.policy \ -o jsonpath='{range .status.currentHour..byUser[*]}{..byVerb[*].verb}{","}{.username}{","}{.userAgent}{"\n"}{end}' \ | sort -k 2 -t, -u | column -t -s, -NVERBS,USERNAME,USERAGENTExample output
VERBS  USERNAME                                                                       USERAGENT
watch  system:serviceaccount:openshift-operators:3scale-operator                      manager/v0.0.0
watch  system:serviceaccount:openshift-operators:datadog-operator-controller-manager  manager/v0.0.0
5.3. Migrating instances of removed APIs
For information about how to migrate removed Kubernetes APIs, see the Deprecated API Migration Guide in the Kubernetes documentation.
5.4. Providing the administrator acknowledgment
After you have evaluated your cluster for any removed APIs and have migrated any removed APIs, you can acknowledge that your cluster is ready to upgrade from OpenShift Container Platform 4.11 to 4.12.
Be aware that all responsibility falls on the administrator to ensure that all uses of removed APIs have been resolved and migrated as necessary before providing this administrator acknowledgment. OpenShift Container Platform can assist with the evaluation, but cannot identify all possible uses of removed APIs, especially idle workloads or external tools.
Prerequisites
-
You must have access to the cluster as a user with the
cluster-adminrole.
Procedure
Run the following command to acknowledge that you have completed the evaluation and your cluster is ready for the Kubernetes API removals in OpenShift Container Platform 4.12:
$ oc -n openshift-config patch cm admin-acks --patch '{"data":{"ack-4.11-kube-1.25-api-removals-in-4.12":"true"}}' --type=merge
Chapter 6. Preparing to perform an EUS-to-EUS update
Due to fundamental Kubernetes design, all OpenShift Container Platform updates between minor versions must be serialized. You must update from OpenShift Container Platform <4.y> to <4.y+1>, and then to <4.y+2>. You cannot update from OpenShift Container Platform <4.y> to <4.y+2> directly. However, administrators who want to update between two Extended Update Support (EUS) versions can do so incurring only a single reboot of non-control plane hosts.
EUS-to-EUS updates are only viable between even-numbered minor versions of OpenShift Container Platform.
There are a number of caveats to consider when attempting an EUS-to-EUS update.
-
EUS-to-EUS updates are only offered after updates between all versions involved have been made available in
stablechannels. - If you encounter issues during or after upgrading to the odd-numbered minor version but before upgrading to the next even-numbered version, then remediation of those issues may require that non-control plane hosts complete the update to the odd-numbered version before moving forward.
- You can do a partial update by updating the worker or custom pool nodes to accommodate the time it takes for maintenance.
- You can complete the update process during multiple maintenance windows by pausing at intermediate steps. However, plan to complete the entire update within 60 days. This is critical to ensure that normal cluster automation processes are completed including those associated with certificate rotation.
- Until the machine config pools are unpaused and the update is complete, some features and bugs fixes in <4.y+1> and <4.y+2> of OpenShift Container Platform are not available.
-
All the clusters might update using EUS channels for a conventional update without pools paused, but only clusters with non control-plane
MachineConfigPoolsobjects can do EUS-to-EUS update with pools paused.
6.1. EUS-to-EUS update
The following procedure pauses all non-master machine config pools and performs updates from OpenShift Container Platform <4.y> to <4.y+1> to <4.y+2>, then unpauses the previously paused machine config pools. Following this procedure reduces the total update duration and the number of times worker nodes are restarted.
Prerequisites
- Review the release notes for OpenShift Container Platform <4.y+1> and <4.y+2>
- Review the release notes and product lifecycles for any layered products and Operator Lifecycle Manager (OLM) Operators. Some may require updates either before or during an EUS-to-EUS update.
- Ensure that you are familiar with version-specific prerequisites, such as the removal of deprecated APIs, that are required prior to updating from OpenShift Container Platform <4.y+1> to <4.y+2>.
6.1.1. EUS-to-EUS update using the web console
Prerequisites
- Verify that machine config pools are unpaused.
-
Have access to the web console as a user with
adminprivileges.
Procedure
- Using the Administrator perspective on the web console, update any Operator Lifecycle Manager (OLM) Operators to the versions that are compatible with your intended updated version. You can find more information on how to perform this action in "Updating installed Operators"; see "Additional resources".
Verify that all machine config pools display a status of
Up to dateand that no machine config pool displays a status ofUPDATING.To view the status of all machine config pools, click Compute → MachineConfigPools and review the contents of the Update status column.
NoteIf your machine config pools have an
Updatingstatus, please wait for this status to change toUp to date. This process could take several minutes.Set your channel to
eus-<4.y+2>.To set your channel, click Administration → Cluster Settings → Channel. You can edit your channel by clicking on the current hyperlinked channel.
- Pause all worker machine pools except for the master pool. You can perform this action on the MachineConfigPools tab under the Compute page. Select the vertical ellipses next to the machine config pool you’d like to pause and click Pause updates.
- Update to version <4.y+1> and complete up to the Save step. You can find more information on how to perform these actions in "Updating a cluster by using the web console"; see "Additional resources".
- Ensure that the <4.y+1> updates are complete by viewing the Last completed version of your cluster. You can find this information on the Cluster Settings page under the Details tab.
- If necessary, update your OLM Operators by using the Administrator perspective on the web console. You can find more information on how to perform these actions in "Updating installed Operators"; see "Additional resources".
- Update to version <4.y+2> and complete up to the Save step. You can find more information on how to perform these actions in "Updating a cluster by using the web console"; see "Additional resources".
- Ensure that the <4.y+2> update is complete by viewing the Last completed version of your cluster. You can find this information on the Cluster Settings page under the Details tab.
Unpause all previously paused machine config pools. You can perform this action on the MachineConfigPools tab under the Compute page. Select the vertical ellipses next to the machine config pool you’d like to unpause and click Unpause updates.
ImportantIf pools are not unpaused, the cluster is not permitted to upgrade to any future minor versions, and maintenance tasks such as certificate rotation are inhibited. This puts the cluster at risk for future degradation.
Verify that your previously paused pools are updated and that your cluster has completed the update to version <4.y+2>.
You can verify that your pools have updated on the MachineConfigPools tab under the Compute page by confirming that the Update status has a value of Up to date.
You can verify that your cluster has completed the update by viewing the Last completed version of your cluster. You can find this information on the Cluster Settings page under the Details tab.
6.1.2. EUS-to-EUS update using the CLI
Prerequisites
- Verify that machine config pools are unpaused.
-
Update the OpenShift CLI (
oc) to the target version before each update.
It is highly discouraged to skip this prerequisite. If the OpenShift CLI (oc) is not updated to the target version before your update, unexpected issues may occur.
Procedure
- Using the Administrator perspective on the web console, update any Operator Lifecycle Manager (OLM) Operators to the versions that are compatible with your intended updated version. You can find more information on how to perform this action in "Updating installed Operators"; see "Additional resources".
Verify that all machine config pools display a status of
UPDATEDand that no machine config pool displays a status ofUPDATING. To view the status of all machine config pools, run the following command:$ oc get mcp
Example output
NAME     CONFIG                                         	UPDATED   UPDATING
master   rendered-master-ecbb9582781c1091e1c9f19d50cf836c       True  	  False
worker   rendered-worker-00a3f0c68ae94e747193156b491553d5       True  	  False
Your current version is <4.y>, and your intended version to update is <4.y+2>. Change to the
eus-<4.y+2>channel by running the following command:$ oc adm upgrade channel eus-<4.y+2>
NoteIf you receive an error message indicating that
eus-<4.y+2>is not one of the available channels, this indicates that Red Hat is still rolling out EUS version updates. This rollout process generally takes 45-90 days starting at the GA date.Pause all worker machine pools except for the master pool by running the following command:
$ oc patch mcp/worker --type merge --patch '{"spec":{"paused":true}}'NoteYou cannot pause the master pool.
Update to the latest version by running the following command:
$ oc adm upgrade --to-latest
Example output
Updating to latest version <4.y+1.z>
Review the cluster version to ensure that the updates are complete by running the following command:
$ oc adm upgrade
Example output
Cluster version is <4.y+1.z>
...
Update to version <4.y+2> by running the following command:
$ oc adm upgrade --to-latest
Retrieve the cluster version to ensure that the <4.y+2> updates are complete by running the following command:
$ oc adm upgrade
Example output
Cluster version is <4.y+2.z>
...
To update your worker nodes to <4.y+2>, unpause all previously paused machine config pools by running the following command:
$ oc patch mcp/worker --type merge --patch '{"spec":{"paused":false}}'ImportantIf pools are not unpaused, the cluster is not permitted to update to any future minor versions, and maintenance tasks such as certificate rotation are inhibited. This puts the cluster at risk for future degradation.
Verify that your previously paused pools are updated and that the update to version <4.y+2> is complete by running the following command:
$ oc get mcp
Example output
NAME 	   CONFIG                                            UPDATED     UPDATING
master   rendered-master-52da4d2760807cb2b96a3402179a9a4c    True  	 False
worker   rendered-worker-4756f60eccae96fb9dcb4c392c69d497    True 	 False
Additional resources
6.1.3. EUS-to-EUS update for layered products and Operators installed through Operator Lifecycle Manager
In addition to the EUS-to-EUS update steps mentioned for the web console and CLI, there are additional steps to consider when performing EUS-to-EUS updates for clusters with the following:
- Layered products
- Operators installed through Operator Lifecycle Manager (OLM)
What is a layered product?
Layered products refer to products that are made of multiple underlying products that are intended to be used together and cannot be broken into individual subscriptions. For examples of layered OpenShift Container Platform products, see Layered Offering On OpenShift.
As you perform an EUS-to-EUS update for the clusters of layered products and those of Operators that have been installed through OLM, you must complete the following:
- Ensure that all of your Operators previously installed through OLM are updated to their latest version in their latest channel. Updating the Operators ensures that they have a valid update path when the default OperatorHub catalogs switch from the current minor version to the next during a cluster update. For information on how to update your Operators, see "Preparing for an Operator update" in "Additional resources".
- Confirm the cluster version compatibility between the current and intended Operator versions. You can verify which versions your OLM Operators are compatible with by using the Red Hat OpenShift Container Platform Operator Update Information Checker.
As an example, here are the steps to perform an EUS-to-EUS update from <4.y> to <4.y+2> for OpenShift Data Foundation (ODF). This can be done through the CLI or web console. For information on how to update clusters through your desired interface, see EUS-to-EUS update using the web console and "EUS-to-EUS update using the CLI" in "Additional resources".
Example workflow
- Pause the worker machine pools.
- Upgrade OpenShift <4.y> → OpenShift <4.y+1>.
- Upgrade ODF <4.y> → ODF <4.y+1>.
- Upgrade OpenShift <4.y+1> → OpenShift <4.y+2>.
- Upgrade to ODF <4.y+2>.
- Unpause the worker machine pools.
The upgrade to ODF <4.y+2> can happen before or after worker machine pools have been unpaused.
Chapter 7. Preparing to update a cluster with manually maintained credentials
The Cloud Credential Operator (CCO) Upgradable status for a cluster with manually maintained credentials is False by default.
-
For minor releases, for example, from 4.12 to 4.13, this status prevents you from updating until you have addressed any updated permissions and annotated the
CloudCredentialresource to indicate that the permissions are updated as needed for the next version. This annotation changes theUpgradablestatus toTrue. - For z-stream releases, for example, from 4.13.0 to 4.13.1, no permissions are added or changed, so the update is not blocked.
Before updating a cluster with manually maintained credentials, you must accommodate any new or changed credentials in the release image for the version of OpenShift Container Platform you are updating to.
7.1. Update requirements for clusters with manually maintained credentials
Before you update a cluster that uses manually maintained credentials with the Cloud Credential Operator (CCO), you must update the cloud provider resources for the new release.
If the cloud credential management for your cluster was configured using the CCO utility (ccoctl), use the ccoctl utility to update the resources. Clusters that were configured to use manual mode without the ccoctl utility require manual updates for the resources.
After updating the cloud provider resources, you must update the upgradeable-to annotation for the cluster to indicate that it is ready to update.
The process to update the cloud provider resources and the upgradeable-to annotation can only be completed by using command line tools.
7.1.1. Cloud credential configuration options and update requirements by platform type
Some platforms only support using the CCO in one mode. For clusters that are installed on those platforms, the platform type determines the credentials update requirements.
For platforms that support using the CCO in multiple modes, you must determine which mode the cluster is configured to use and take the required actions for that configuration.
Figure 7.1. Credentials update requirements by platform type

- Red Hat OpenStack Platform (RHOSP), Red Hat Virtualization (RHV), and VMware vSphere
These platforms do not support using the CCO in manual mode. Clusters on these platforms handle changes in cloud provider resources automatically and do not require an update to the
upgradeable-toannotation.Administrators of clusters on these platforms should skip the manually maintained credentials section of the update process.
- Alibaba Cloud, IBM Cloud, and Nutanix
Clusters installed on these platforms are configured using the
ccoctlutility.Administrators of clusters on these platforms must take the following actions:
-
Configure the
ccoctlutility for the new release. -
Use the
ccoctlutility to update the cloud provider resources. -
Indicate that the cluster is ready to update with the
upgradeable-toannotation.
-
Configure the
- Microsoft Azure Stack Hub
These clusters use manual mode with long-lived credentials and do not use the
ccoctlutility.Administrators of clusters on these platforms must take the following actions:
- Manually update the cloud provider resources for the new release.
-
Indicate that the cluster is ready to update with the
upgradeable-toannotation.
- Amazon Web Services (AWS), global Microsoft Azure, and Google Cloud Platform (GCP)
Clusters installed on these platforms support multiple CCO modes.
The required update process depends on the mode that the cluster is configured to use. If you are not sure what mode the CCO is configured to use on your cluster, you can use the web console or the CLI to determine this information.
Additional resources
- Determining the Cloud Credential Operator mode by using the web console
- Determining the Cloud Credential Operator mode by using the CLI
- Configuring the Cloud Credential Operator utility for a cluster update
- Updating cloud provider resources with manually maintained credentials
- About the Cloud Credential Operator
7.1.2. Determining the Cloud Credential Operator mode by using the web console
You can determine what mode the Cloud Credential Operator (CCO) is configured to use by using the web console.
Only Amazon Web Services (AWS), global Microsoft Azure, and Google Cloud Platform (GCP) clusters support multiple CCO modes.
Prerequisites
- You have access to an OpenShift Container Platform account with cluster administrator permissions.
Procedure
-
Log in to the OpenShift Container Platform web console as a user with the
cluster-adminrole. - Navigate to Administration → Cluster Settings.
- On the Cluster Settings page, select the Configuration tab.
- Under Configuration resource, select CloudCredential.
- On the CloudCredential details page, select the YAML tab.
In the YAML block, check the value of
spec.credentialsMode. The following values are possible, though not all are supported on all platforms:-
'': The CCO is operating in the default mode. In this configuration, the CCO operates in mint or passthrough mode, depending on the credentials provided during installation. -
Mint: The CCO is operating in mint mode. -
Passthrough: The CCO is operating in passthrough mode. -
Manual: The CCO is operating in manual mode.
ImportantTo determine the specific configuration of an AWS or GCP cluster that has a
spec.credentialsModeof'',Mint, orManual, you must investigate further.AWS and GCP clusters support using mint mode with the root secret deleted. If the cluster is specifically configured to use mint mode or uses mint mode by default, you must determine if the root secret is present on the cluster before updating.
An AWS or GCP cluster that uses manual mode might be configured to create and manage cloud credentials from outside of the cluster using the AWS Security Token Service (STS) or GCP Workload Identity. You can determine whether your cluster uses this strategy by examining the cluster
Authenticationobject.-
AWS or GCP clusters that use mint mode only: To determine whether the cluster is operating without the root secret, navigate to Workloads → Secrets and look for the root secret for your cloud provider.
NoteEnsure that the Project dropdown is set to All Projects.
Platform Secret name AWS
aws-credsGCP
gcp-credentials- If you see one of these values, your cluster is using mint or passthrough mode with the root secret present.
- If you do not see these values, your cluster is using the CCO in mint mode with the root secret removed.
AWS or GCP clusters that use manual mode only: To determine whether the cluster is configured to create and manage cloud credentials from outside of the cluster, you must check the cluster
Authenticationobject YAML values.- Navigate to Administration → Cluster Settings.
- On the Cluster Settings page, select the Configuration tab.
- Under Configuration resource, select Authentication.
- On the Authentication details page, select the YAML tab.
In the YAML block, check the value of the
.spec.serviceAccountIssuerparameter.-
A value that contains a URL that is associated with your cloud provider indicates that the CCO is using manual mode with AWS STS or GCP Workload Identity to create and manage cloud credentials from outside of the cluster. These clusters are configured using the
ccoctlutility. -
An empty value (
'') indicates that the cluster is using the CCO in manual mode but was not configured using theccoctlutility.
-
A value that contains a URL that is associated with your cloud provider indicates that the CCO is using manual mode with AWS STS or GCP Workload Identity to create and manage cloud credentials from outside of the cluster. These clusters are configured using the
Next steps
- If you are updating a cluster that has the CCO operating in mint or passthrough mode and the root secret is present, you do not need to update any cloud provider resources and can continue to the next part of the update process.
- If your cluster is using the CCO in mint mode with the root secret removed, you must reinstate the credential secret with the administrator-level credential before continuing to the next part of the update process.
If your cluster was configured using the CCO utility (
ccoctl), you must take the following actions:-
Configure the
ccoctlutility for the new release and use it to update the cloud provider resources. -
Update the
upgradeable-toannotation to indicate that the cluster is ready to update.
-
Configure the
If your cluster is using the CCO in manual mode but was not configured using the
ccoctlutility, you must take the following actions:- Manually update the cloud provider resources for the new release.
-
Update the
upgradeable-toannotation to indicate that the cluster is ready to update.
7.1.3. Determining the Cloud Credential Operator mode by using the CLI
You can determine what mode the Cloud Credential Operator (CCO) is configured to use by using the CLI.
Only Amazon Web Services (AWS), global Microsoft Azure, and Google Cloud Platform (GCP) clusters support multiple CCO modes.
Prerequisites
- You have access to an OpenShift Container Platform account with cluster administrator permissions.
-
You have installed the OpenShift CLI (
oc).
Procedure
-
Log in to
ocon the cluster as a user with thecluster-adminrole. To determine the mode that the CCO is configured to use, enter the following command:
$ oc get cloudcredentials cluster \
  -o=jsonpath={.spec.credentialsMode}
The following output values are possible, though not all are supported on all platforms:
-
'': The CCO is operating in the default mode. In this configuration, the CCO operates in mint or passthrough mode, depending on the credentials provided during installation. -
Mint: The CCO is operating in mint mode. -
Passthrough: The CCO is operating in passthrough mode. -
Manual: The CCO is operating in manual mode.
ImportantTo determine the specific configuration of an AWS or GCP cluster that has a
spec.credentialsModeof'',Mint, orManual, you must investigate further.AWS and GCP clusters support using mint mode with the root secret deleted. If the cluster is specifically configured to use mint mode or uses mint mode by default, you must determine if the root secret is present on the cluster before updating.
An AWS or GCP cluster that uses manual mode might be configured to create and manage cloud credentials from outside of the cluster using the AWS Security Token Service (STS) or GCP Workload Identity. You can determine whether your cluster uses this strategy by examining the cluster
Authenticationobject.-
AWS or GCP clusters that use mint mode only: To determine whether the cluster is operating without the root secret, run the following command:
$ oc get secret <secret_name> \
  -n=kube-system
where
<secret_name>isaws-credsfor AWS orgcp-credentialsfor GCP.If the root secret is present, the output of this command returns information about the secret. An error indicates that the root secret is not present on the cluster.
AWS or GCP clusters that use manual mode only: To determine whether the cluster is configured to create and manage cloud credentials from outside of the cluster, run the following command:
$ oc get authentication cluster \
  -o jsonpath \
  --template='{ .spec.serviceAccountIssuer }'
This command displays the value of the
.spec.serviceAccountIssuerparameter in the clusterAuthenticationobject.-
An output of a URL that is associated with your cloud provider indicates that the CCO is using manual mode with AWS STS or GCP Workload Identity to create and manage cloud credentials from outside of the cluster. These clusters are configured using the
ccoctlutility. -
An empty output indicates that the cluster is using the CCO in manual mode but was not configured using the
ccoctlutility.
-
An output of a URL that is associated with your cloud provider indicates that the CCO is using manual mode with AWS STS or GCP Workload Identity to create and manage cloud credentials from outside of the cluster. These clusters are configured using the
Next steps
- If you are updating a cluster that has the CCO operating in mint or passthrough mode and the root secret is present, you do not need to update any cloud provider resources and can continue to the next part of the update process.
- If your cluster is using the CCO in mint mode with the root secret removed, you must reinstate the credential secret with the administrator-level credential before continuing to the next part of the update process.
If your cluster was configured using the CCO utility (
ccoctl), you must take the following actions:-
Configure the
ccoctlutility for the new release and use it to update the cloud provider resources. -
Update the
upgradeable-toannotation to indicate that the cluster is ready to update.
-
Configure the
If your cluster is using the CCO in manual mode but was not configured using the
ccoctlutility, you must take the following actions:- Manually update the cloud provider resources for the new release.
-
Update the
upgradeable-toannotation to indicate that the cluster is ready to update.
7.2. Configuring the Cloud Credential Operator utility for a cluster update
To upgrade a cluster that uses the Cloud Credential Operator (CCO) in manual mode to create and manage cloud credentials from outside of the cluster, extract and prepare the CCO utility (ccoctl) binary.
The ccoctl utility is a Linux binary that must run in a Linux environment.
Prerequisites
- You have access to an OpenShift Container Platform account with cluster administrator access.
-
You have installed the OpenShift CLI (
oc).
-
Your cluster was configured using the
ccoctlutility to create and manage cloud credentials from outside of the cluster.
Procedure
Obtain the OpenShift Container Platform release image by running the following command:
$ RELEASE_IMAGE=$(./openshift-install version | awk '/release image/ {print $3}')Obtain the CCO container image from the OpenShift Container Platform release image by running the following command:
$ CCO_IMAGE=$(oc adm release info --image-for='cloud-credential-operator' $RELEASE_IMAGE -a ~/.pull-secret)
NoteEnsure that the architecture of the
$RELEASE_IMAGEmatches the architecture of the environment in which you will use theccoctltool.Extract the
ccoctlbinary from the CCO container image within the OpenShift Container Platform release image by running the following command:$ oc image extract $CCO_IMAGE --file="/usr/bin/ccoctl" -a ~/.pull-secret
Change the permissions to make
ccoctlexecutable by running the following command:$ chmod 775 ccoctl
Verification
To verify that
ccoctlis ready to use, display the help file by running the following command:$ ccoctl --help
Output of
ccoctl --helpOpenShift credentials provisioning tool Usage: ccoctl [command] Available Commands: alibabacloud Manage credentials objects for alibaba cloud aws Manage credentials objects for AWS cloud gcp Manage credentials objects for Google cloud help Help about any command ibmcloud Manage credentials objects for IBM Cloud nutanix Manage credentials objects for Nutanix Flags: -h, --help help for ccoctl Use "ccoctl [command] --help" for more information about a command.
7.3. Updating cloud provider resources with the Cloud Credential Operator utility
The process for upgrading an OpenShift Container Platform cluster that was configured using the CCO utility (ccoctl) is similar to creating the cloud provider resources during installation.
By default, ccoctl creates objects in the directory in which the commands are run. To create the objects in a different directory, use the --output-dir flag. This procedure uses <path_to_ccoctl_output_dir> to refer to this directory.
On AWS clusters, some ccoctl commands make AWS API calls to create or modify AWS resources. You can use the --dry-run flag to avoid making API calls. Using this flag creates JSON files on the local file system instead. You can review and modify the JSON files and then apply them with the AWS CLI tool using the --cli-input-json parameters.
Prerequisites
- Obtain the OpenShift Container Platform release image for the version that you are upgrading to.
-
Extract and prepare the
ccoctlbinary from the release image.
Procedure
Extract the list of
CredentialsRequestcustom resources (CRs) from the OpenShift Container Platform release image by running the following command:$ oc adm release extract --credentials-requests \ --cloud=<provider_type> \ --to=<path_to_directory_with_list_of_credentials_requests>/credrequests \ quay.io/<path_to>/ocp-release:<version>
where:
-
<provider_type>is the value for your cloud provider. Valid values arealibabacloud,aws,gcp,ibmcloud, andnutanix. -
credrequestsis the directory where the list ofCredentialsRequestobjects is stored. This command creates the directory if it does not exist.
-
For each
CredentialsRequestCR in the release image, ensure that a namespace that matches the text in thespec.secretRef.namespacefield exists in the cluster. This field is where the generated secrets that hold the credentials configuration are stored.Sample AWS
CredentialsRequestobjectapiVersion: cloudcredential.openshift.io/v1 kind: CredentialsRequest metadata: name: cloud-credential-operator-iam-ro namespace: openshift-cloud-credential-operator spec: providerSpec: apiVersion: cloudcredential.openshift.io/v1 kind: AWSProviderSpec statementEntries: - effect: Allow action: - iam:GetUser - iam:GetUserPolicy - iam:ListAccessKeys resource: "*" secretRef: name: cloud-credential-operator-iam-ro-creds namespace: openshift-cloud-credential-operator 1- 1
- This field indicates the namespace which needs to exist to hold the generated secret.
The
CredentialsRequestCRs for other platforms have a similar format with different platform-specific values.For any
CredentialsRequestCR for which the cluster does not already have a namespace with the name specified inspec.secretRef.namespace, create the namespace by running the following command:$ oc create namespace <component_namespace>
Use the
ccoctltool to process allCredentialsRequestobjects in thecredrequestsdirectory by running the command for your cloud provider. The following commands processCredentialsRequestobjects:-
Alibaba Cloud:
ccoctl alibabacloud create-ram-users -
Amazon Web Services (AWS):
ccoctl aws create-iam-roles -
Google Cloud Platform (GCP):
ccoctl gcp create-all -
IBM Cloud:
ccoctl ibmcloud create-service-id -
Nutanix:
ccoctl nutanix create-shared-secrets
ImportantRefer to the
ccoctlutility instructions in the installation content for your cloud provider for important platform-specific details about the required arguments and special considerations.For each
CredentialsRequestobject,ccoctlcreates the required provider resources and a permissions policy as defined in eachCredentialsRequestobject from the OpenShift Container Platform release image.-
Alibaba Cloud:
Apply the secrets to your cluster by running the following command:
$ ls <path_to_ccoctl_output_dir>/manifests/*-credentials.yaml | xargs -I{} oc apply -f {}
Verification
You can verify that the required provider resources and permissions policies are created by querying the cloud provider. For more information, refer to your cloud provider documentation on listing roles or service accounts.
Next steps
-
Update the
upgradeable-toannotation to indicate that the cluster is ready to upgrade.
Additional resources
-
Creating Alibaba Cloud credentials for OpenShift Container Platform components with the
ccoctltool - Creating AWS resources with the Cloud Credential Operator utility
- Creating GCP resources with the Cloud Credential Operator utility
- Manually creating IAM for IBM Cloud VPC
- Configuring IAM for Nutanix
- Indicating that the cluster is ready to upgrade
7.4. Updating cloud provider resources with manually maintained credentials
Before upgrading a cluster with manually maintained credentials, you must create any new credentials for the release image that you are upgrading to. You must also review the required permissions for existing credentials and accommodate any new permissions requirements in the new release for those components.
Procedure
Extract and examine the
CredentialsRequestcustom resource for the new release.The "Manually creating IAM" section of the installation content for your cloud provider explains how to obtain and use the credentials required for your cloud.
Update the manually maintained credentials on your cluster:
-
Create new secrets for any
CredentialsRequestcustom resources that are added by the new release image. -
If the
CredentialsRequestcustom resources for any existing credentials that are stored in secrets have changed permissions requirements, update the permissions as required.
-
Create new secrets for any
If your cluster uses cluster capabilities to disable one or more optional components, delete the
CredentialsRequestcustom resources for any disabled components.Example
credrequestsdirectory contents for OpenShift Container Platform 4.12 on AWS0000_30_machine-api-operator_00_credentials-request.yaml 1 0000_50_cloud-credential-operator_05-iam-ro-credentialsrequest.yaml 2 0000_50_cluster-image-registry-operator_01-registry-credentials-request.yaml 3 0000_50_cluster-ingress-operator_00-ingress-credentials-request.yaml 4 0000_50_cluster-network-operator_02-cncc-credentials.yaml 5 0000_50_cluster-storage-operator_03_credentials_request_aws.yaml 6
- 1
- The Machine API Operator CR is required.
- 2
- The Cloud Credential Operator CR is required.
- 3
- The Image Registry Operator CR is required.
- 4
- The Ingress Operator CR is required.
- 5
- The Network Operator CR is required.
- 6
- The Storage Operator CR is an optional component and might be disabled in your cluster.
Example
credrequestsdirectory contents for OpenShift Container Platform 4.12 on GCP0000_26_cloud-controller-manager-operator_16_credentialsrequest-gcp.yaml 1 0000_30_machine-api-operator_00_credentials-request.yaml 2 0000_50_cloud-credential-operator_05-gcp-ro-credentialsrequest.yaml 3 0000_50_cluster-image-registry-operator_01-registry-credentials-request-gcs.yaml 4 0000_50_cluster-ingress-operator_00-ingress-credentials-request.yaml 5 0000_50_cluster-network-operator_02-cncc-credentials.yaml 6 0000_50_cluster-storage-operator_03_credentials_request_gcp.yaml 7
- 1
- The Cloud Controller Manager Operator CR is required.
- 2
- The Machine API Operator CR is required.
- 3
- The Cloud Credential Operator CR is required.
- 4
- The Image Registry Operator CR is required.
- 5
- The Ingress Operator CR is required.
- 6
- The Network Operator CR is required.
- 7
- The Storage Operator CR is an optional component and might be disabled in your cluster.
Next steps
-
Update the
upgradeable-toannotation to indicate that the cluster is ready to upgrade.
7.5. Indicating that the cluster is ready to upgrade
The Cloud Credential Operator (CCO) Upgradable status for a cluster with manually maintained credentials is False by default.
Prerequisites
-
For the release image that you are upgrading to, you have processed any new credentials manually or by using the Cloud Credential Operator utility (
ccoctl). -
You have installed the OpenShift CLI (
oc).
Procedure
-
Log in to
ocon the cluster as a user with thecluster-adminrole. Edit the
CloudCredentialresource to add anupgradeable-toannotation within themetadatafield by running the following command:$ oc edit cloudcredential cluster
Text to add
...
  metadata:
    annotations:
      cloudcredential.openshift.io/upgradeable-to: <version_number>
...
Where
<version_number>is the version that you are upgrading to, in the formatx.y.z. For example, use4.12.2for OpenShift Container Platform 4.12.2.It may take several minutes after adding the annotation for the upgradeable status to change.
Verification
- In the Administrator perspective of the web console, navigate to Administration → Cluster Settings.
To view the CCO status details, click cloud-credential in the Cluster Operators list.
-
If the Upgradeable status in the Conditions section is False, verify that the
upgradeable-toannotation is free of typographical errors.
-
If the Upgradeable status in the Conditions section is False, verify that the
- When the Upgradeable status in the Conditions section is True, begin the OpenShift Container Platform upgrade.
Chapter 8. Updating a cluster using the web console
You can perform minor version and patch updates on an OpenShift Container Platform cluster by using the web console.
Use the web console or oc adm upgrade channel <channel> to change the update channel. You can follow the steps in Updating a cluster using the CLI to complete the update after you change to a 4.12 channel.
8.1. Prerequisites
-
Have access to the cluster as a user with
adminprivileges. See Using RBAC to define and apply permissions. - Have a recent etcd backup in case your update fails and you must restore your cluster to a previous state.
- Support for RHEL7 workers is removed in OpenShift Container Platform 4.12. You must replace RHEL7 workers with RHEL8 or RHCOS workers before upgrading to OpenShift Container Platform 4.12. Red Hat does not support in-place RHEL7 to RHEL8 updates for RHEL workers; those hosts must be replaced with a clean operating system install.
- Ensure all Operators previously installed through Operator Lifecycle Manager (OLM) are updated to their latest version in their latest channel. Updating the Operators ensures they have a valid update path when the default OperatorHub catalogs switch from the current minor version to the next during a cluster update. See Updating installed Operators for more information.
- Ensure that all machine config pools (MCPs) are running and not paused. Nodes associated with a paused MCP are skipped during the update process. You can pause the MCPs if you are performing a canary rollout update strategy.
- To accommodate the time it takes to update, you are able to do a partial update by updating the worker or custom pool nodes. You can pause and resume within the progress bar of each pool.
- If your cluster uses manually maintained credentials, update the cloud provider resources for the new release. For more information, including how to determine if this is a requirement for your cluster, see Preparing to update a cluster with manually maintained credentials.
- Review the list of APIs that were removed in Kubernetes 1.25, migrate any affected components to use the new API version, and provide the administrator acknowledgment. For more information, see Preparing to update to OpenShift Container Platform 4.12.
-
If you run an Operator or you have configured any application with the pod disruption budget, you might experience an interruption during the upgrade process. If
minAvailableis set to 1 inPodDisruptionBudget, the nodes are drained to apply pending machine configs which might block the eviction process. If several nodes are rebooted, all the pods might run on only one node, and thePodDisruptionBudgetfield can prevent the node drain.
- When an update is failing to complete, the Cluster Version Operator (CVO) reports the status of any blocking components while attempting to reconcile the update. Rolling your cluster back to a previous version is not supported. If your update is failing to complete, contact Red Hat support.
-
Using the
unsupportedConfigOverridessection to modify the configuration of an Operator is unsupported and might block cluster updates. You must remove this setting before you can update your cluster.
Additional resources
8.2. Performing a canary rollout update
In some specific use cases, you might want a more controlled update process where you do not want specific nodes updated concurrently with the rest of the cluster. These use cases include, but are not limited to:
- You have mission-critical applications that you do not want unavailable during the update. You can slowly test the applications on your nodes in small batches after the update.
- You have a small maintenance window that does not allow the time for all nodes to be updated, or you have multiple maintenance windows.
The rolling update process is not a typical update workflow. With larger clusters, it can be a time-consuming process that requires you execute multiple commands. This complexity can result in errors that can affect the entire cluster. It is recommended that you carefully consider whether your organization wants to use a rolling update and carefully plan the implementation of the process before you start.
The rolling update process described in this topic involves:
- Creating one or more custom machine config pools (MCPs).
- Labeling each node that you do not want to update immediately to move those nodes to the custom MCPs.
- Pausing those custom MCPs, which prevents updates to those nodes.
- Performing the cluster update.
- Unpausing one custom MCP, which triggers the update on those nodes.
- Testing the applications on those nodes to make sure the applications work as expected on those newly-updated nodes.
- Optionally removing the custom labels from the remaining nodes in small batches and testing the applications on those nodes.
Pausing an MCP prevents the Machine Config Operator from applying any configuration changes on the associated nodes. Pausing an MCP also prevents any automatically rotated certificates from being pushed to the associated nodes, including the automatic CA rotation of the kube-apiserver-to-kubelet-signer CA certificate.
If the MCP is paused when the kube-apiserver-to-kubelet-signer CA certificate expires and the MCO attempts to automatically renew the certificate, the new certificate is created but not applied across the nodes in the respective machine config pool. This causes failure in multiple oc commands, including oc debug, oc logs, oc exec, and oc attach. You receive alerts in the Alerting UI of the OpenShift Container Platform web console if an MCP is paused when the certificates are rotated.
Pausing an MCP should be done with careful consideration about the kube-apiserver-to-kubelet-signer CA certificate expiration and for short periods of time only.
If you want to use the canary rollout update process, see Performing a canary rollout update.
8.3. Updating cloud provider resources with manually maintained credentials
Before upgrading a cluster with manually maintained credentials, you must create any new credentials for the release image that you are upgrading to. You must also review the required permissions for existing credentials and accommodate any new permissions requirements in the new release for those components.
Procedure
Extract and examine the
CredentialsRequestcustom resource for the new release.The "Manually creating IAM" section of the installation content for your cloud provider explains how to obtain and use the credentials required for your cloud.
Update the manually maintained credentials on your cluster:
-
Create new secrets for any
CredentialsRequestcustom resources that are added by the new release image. -
If the
CredentialsRequestcustom resources for any existing credentials that are stored in secrets have changed permissions requirements, update the permissions as required.
-
Create new secrets for any
If your cluster uses cluster capabilities to disable one or more optional components, delete the
CredentialsRequestcustom resources for any disabled components.Example
credrequestsdirectory contents for OpenShift Container Platform 4.12 on AWS0000_30_machine-api-operator_00_credentials-request.yaml 1 0000_50_cloud-credential-operator_05-iam-ro-credentialsrequest.yaml 2 0000_50_cluster-image-registry-operator_01-registry-credentials-request.yaml 3 0000_50_cluster-ingress-operator_00-ingress-credentials-request.yaml 4 0000_50_cluster-network-operator_02-cncc-credentials.yaml 5 0000_50_cluster-storage-operator_03_credentials_request_aws.yaml 6
- 1
- The Machine API Operator CR is required.
- 2
- The Cloud Credential Operator CR is required.
- 3
- The Image Registry Operator CR is required.
- 4
- The Ingress Operator CR is required.
- 5
- The Network Operator CR is required.
- 6
- The Storage Operator CR is an optional component and might be disabled in your cluster.
Example
credrequestsdirectory contents for OpenShift Container Platform 4.12 on GCP0000_26_cloud-controller-manager-operator_16_credentialsrequest-gcp.yaml 1 0000_30_machine-api-operator_00_credentials-request.yaml 2 0000_50_cloud-credential-operator_05-gcp-ro-credentialsrequest.yaml 3 0000_50_cluster-image-registry-operator_01-registry-credentials-request-gcs.yaml 4 0000_50_cluster-ingress-operator_00-ingress-credentials-request.yaml 5 0000_50_cluster-network-operator_02-cncc-credentials.yaml 6 0000_50_cluster-storage-operator_03_credentials_request_gcp.yaml 7
- 1
- The Cloud Controller Manager Operator CR is required.
- 2
- The Machine API Operator CR is required.
- 3
- The Cloud Credential Operator CR is required.
- 4
- The Image Registry Operator CR is required.
- 5
- The Ingress Operator CR is required.
- 6
- The Network Operator CR is required.
- 7
- The Storage Operator CR is an optional component and might be disabled in your cluster.
Next steps
-
Update the
upgradeable-toannotation to indicate that the cluster is ready to upgrade.
Additional resources
8.4. Pausing a MachineHealthCheck resource by using the web console
During the upgrade process, nodes in the cluster might become temporarily unavailable. In the case of worker nodes, the machine health check might identify such nodes as unhealthy and reboot them. To avoid rebooting such nodes, pause all the MachineHealthCheck resources before updating the cluster.
Prerequisites
-
You have access to the cluster with
cluster-adminprivileges. - You have access to the OpenShift Container Platform web console.
Procedure
- Log in to the OpenShift Container Platform web console.
- Navigate to Compute → MachineHealthChecks.
To pause the machine health checks, add the
cluster.x-k8s.io/paused=""annotation to eachMachineHealthCheckresource. For example, to add the annotation to themachine-api-termination-handlerresource, complete the following steps:-
Click the Options menu
 next to the
 machine-api-termination-handlerand click Edit annotations. - In the Edit annotations dialog, click Add more.
-
In the Key and Value fields, add
cluster.x-k8s.io/pausedand""values, respectively, and click Save.
-
Click the Options menu
8.5. About updating single node OpenShift Container Platform
You can update, or upgrade, a single-node OpenShift Container Platform cluster by using either the console or CLI.
However, note the following limitations:
-
The prerequisite to pause the
MachineHealthCheckresources is not required because there is no other node to perform the health check. - Restoring a single-node OpenShift Container Platform cluster using an etcd backup is not officially supported. However, it is good practice to perform the etcd backup in case your upgrade fails. If your control plane is healthy, you might be able to restore your cluster to a previous state by using the backup.
Updating a single-node OpenShift Container Platform cluster requires downtime and can include an automatic reboot. The amount of downtime depends on the update payload, as described in the following scenarios:
- If the update payload contains an operating system update, which requires a reboot, the downtime is significant and impacts cluster management and user workloads.
- If the update contains machine configuration changes that do not require a reboot, the downtime is less, and the impact on the cluster management and user workloads is lessened. In this case, the node draining step is skipped with single-node OpenShift Container Platform because there is no other node in the cluster to reschedule the workloads to.
- If the update payload does not contain an operating system update or machine configuration changes, a short API outage occurs and resolves quickly.
There are conditions, such as bugs in an updated package, that can cause the single node to not restart after a reboot. In this case, the update does not rollback automatically.
Additional resources
- For information on which machine configuration changes require a reboot, see the note in Understanding the Machine Config Operator.
8.6. Updating a cluster by using the web console
If updates are available, you can update your cluster from the web console.
You can find information about available OpenShift Container Platform advisories and updates in the errata section of the Customer Portal.
Prerequisites
-
Have access to the web console as a user with
adminprivileges. -
Pause all
MachineHealthCheckresources.
Procedure
- From the web console, click Administration → Cluster Settings and review the contents of the Details tab.
For production clusters, ensure that the Channel is set to the correct channel for the version that you want to update to, such as
stable-4.12.ImportantFor production clusters, you must subscribe to a
stable-*,eus-*orfast-*channel.NoteWhen you are ready to move to the next minor version, choose the channel that corresponds to that minor version. The sooner the update channel is declared, the more effectively the cluster can recommend update paths to your target version. The cluster might take some time to evaluate all the possible updates that are available and offer the best update recommendations to choose from. Update recommendations can change over time, as they are based on what update options are available at the time.
If you cannot see an update path to your target minor version, keep updating your cluster to the latest patch release for your current version until the next minor version is available in the path.
- If the Update status is not Updates available, you cannot update your cluster.
- Select channel indicates the cluster version that your cluster is running or is updating to.
Select a version to update to, and click Save.
The Input channel Update status changes to Update to <product-version> in progress, and you can review the progress of the cluster update by watching the progress bars for the Operators and nodes.
NoteIf you are upgrading your cluster to the next minor version, like version 4.y to 4.(y+1), it is recommended to confirm your nodes are updated before deploying workloads that rely on a new feature. Any pools with worker nodes that are not yet updated are displayed on the Cluster Settings page.
After the update completes and the Cluster Version Operator refreshes the available updates, check if more updates are available in your current channel.
- If updates are available, continue to perform updates in the current channel until you can no longer update.
-
If no updates are available, change the Channel to the
stable-*,eus-*orfast-*channel for the next minor version, and update to the version that you want in that channel.
You might need to perform several intermediate updates until you reach the version that you want.
8.7. Changing the update server by using the web console
Changing the update server is optional. If you have an OpenShift Update Service (OSUS) installed and configured locally, you must set the URL for the server as the upstream to use the local server during updates.
Procedure
- Navigate to Administration → Cluster Settings, click version.
Click the YAML tab and then edit the
upstreamparameter value:Example output
... spec: clusterID: db93436d-7b05-42cc-b856-43e11ad2d31a upstream: '<update-server-url>' 1 ...- 1
- The
<update-server-url>variable specifies the URL for the update server.
The default
upstreamishttps://api.openshift.com/api/upgrades_info/v1/graph.- Click Save.
Additional resources
Chapter 9. Updating a cluster using the CLI
You can perform minor version and patch updates on an OpenShift Container Platform cluster by using the OpenShift CLI (oc).
9.1. Prerequisites
-
Have access to the cluster as a user with
adminprivileges. See Using RBAC to define and apply permissions. - Have a recent etcd backup in case your update fails and you must restore your cluster to a previous state.
- Support for RHEL7 workers is removed in OpenShift Container Platform 4.12. You must replace RHEL7 workers with RHEL8 or RHCOS workers before upgrading to OpenShift Container Platform 4.12. Red Hat does not support in-place RHEL7 to RHEL8 updates for RHEL workers; those hosts must be replaced with a clean operating system install.
- Ensure all Operators previously installed through Operator Lifecycle Manager (OLM) are updated to their latest version in their latest channel. Updating the Operators ensures they have a valid update path when the default OperatorHub catalogs switch from the current minor version to the next during a cluster update. See Updating installed Operators for more information.
- Ensure that all machine config pools (MCPs) are running and not paused. Nodes associated with a paused MCP are skipped during the update process. You can pause the MCPs if you are performing a canary rollout update strategy.
- If your cluster uses manually maintained credentials, update the cloud provider resources for the new release. For more information, including how to determine if this is a requirement for your cluster, see Preparing to update a cluster with manually maintained credentials.
-
Ensure that you address all
Upgradeable=Falseconditions so the cluster allows an update to the next minor version. An alert displays at the top of the Cluster Settings page when you have one or more cluster Operators that cannot be upgraded. You can still update to the next available patch update for the minor release you are currently on. - Review the list of APIs that were removed in Kubernetes 1.25, migrate any affected components to use the new API version, and provide the administrator acknowledgment. For more information, see Preparing to update to OpenShift Container Platform 4.12.
-
If you run an Operator or you have configured any application with the pod disruption budget, you might experience an interruption during the upgrade process. If
minAvailableis set to 1 inPodDisruptionBudget, the nodes are drained to apply pending machine configs which might block the eviction process. If several nodes are rebooted, all the pods might run on only one node, and thePodDisruptionBudgetfield can prevent the node drain.
- When an update is failing to complete, the Cluster Version Operator (CVO) reports the status of any blocking components while attempting to reconcile the update. Rolling your cluster back to a previous version is not supported. If your update is failing to complete, contact Red Hat support.
-
Using the
unsupportedConfigOverridessection to modify the configuration of an Operator is unsupported and might block cluster updates. You must remove this setting before you can update your cluster.
Additional resources
9.2. Pausing a MachineHealthCheck resource
During the upgrade process, nodes in the cluster might become temporarily unavailable. In the case of worker nodes, the machine health check might identify such nodes as unhealthy and reboot them. To avoid rebooting such nodes, pause all the MachineHealthCheck resources before updating the cluster.
Prerequisites
-
Install the OpenShift CLI (
oc).
Procedure
To list all the available
MachineHealthCheckresources that you want to pause, run the following command:$ oc get machinehealthcheck -n openshift-machine-api
To pause the machine health checks, add the
cluster.x-k8s.io/paused=""annotation to theMachineHealthCheckresource. Run the following command:$ oc -n openshift-machine-api annotate mhc <mhc-name> cluster.x-k8s.io/paused=""
The annotated
MachineHealthCheckresource resembles the following YAML file:apiVersion: machine.openshift.io/v1beta1 kind: MachineHealthCheck metadata: name: example namespace: openshift-machine-api annotations: cluster.x-k8s.io/paused: "" spec: selector: matchLabels: role: worker unhealthyConditions: - type: "Ready" status: "Unknown" timeout: "300s" - type: "Ready" status: "False" timeout: "300s" maxUnhealthy: "40%" status: currentHealthy: 5 expectedMachines: 5ImportantResume the machine health checks after updating the cluster. To resume the check, remove the pause annotation from the
MachineHealthCheckresource by running the following command:$ oc -n openshift-machine-api annotate mhc <mhc-name> cluster.x-k8s.io/paused-
9.3. About updating single node OpenShift Container Platform
You can update, or upgrade, a single-node OpenShift Container Platform cluster by using either the console or CLI.
However, note the following limitations:
-
The prerequisite to pause the
MachineHealthCheckresources is not required because there is no other node to perform the health check. - Restoring a single-node OpenShift Container Platform cluster using an etcd backup is not officially supported. However, it is good practice to perform the etcd backup in case your upgrade fails. If your control plane is healthy, you might be able to restore your cluster to a previous state by using the backup.
Updating a single-node OpenShift Container Platform cluster requires downtime and can include an automatic reboot. The amount of downtime depends on the update payload, as described in the following scenarios:
- If the update payload contains an operating system update, which requires a reboot, the downtime is significant and impacts cluster management and user workloads.
- If the update contains machine configuration changes that do not require a reboot, the downtime is less, and the impact on the cluster management and user workloads is lessened. In this case, the node draining step is skipped with single-node OpenShift Container Platform because there is no other node in the cluster to reschedule the workloads to.
- If the update payload does not contain an operating system update or machine configuration changes, a short API outage occurs and resolves quickly.
There are conditions, such as bugs in an updated package, that can cause the single node to not restart after a reboot. In this case, the update does not rollback automatically.
Additional resources
- For information on which machine configuration changes require a reboot, see the note in Understanding the Machine Config Operator.
9.4. Updating a cluster by using the CLI
You can use the OpenShift CLI (oc) to review and request cluster updates.
You can find information about available OpenShift Container Platform advisories and updates in the errata section of the Customer Portal.
Prerequisites
-
Install the OpenShift CLI (
oc) that matches the version for your updated version. -
Log in to the cluster as user with
cluster-adminprivileges. -
Pause all
MachineHealthCheckresources.
Procedure
View the available updates and note the version number of the update that you want to apply:
$ oc adm upgrade
Example output
Cluster version is 4.9.23
Upstream is unset, so the cluster will use an appropriate default.
Channel: stable-4.9 (available channels: candidate-4.10, candidate-4.9, fast-4.10, fast-4.9, stable-4.10, stable-4.9, eus-4.10)
Recommended updates:
VERSION IMAGE
4.9.24  quay.io/openshift-release-dev/ocp-release@sha256:6a899c54dda6b844bb12a247e324a0f6cde367e880b73ba110c056df6d018032
4.9.25  quay.io/openshift-release-dev/ocp-release@sha256:2eafde815e543b92f70839972f585cc52aa7c37aa72d5f3c8bc886b0fd45707a
4.9.26  quay.io/openshift-release-dev/ocp-release@sha256:3ccd09dd08c303f27a543351f787d09b83979cd31cf0b4c6ff56cd68814ef6c8
4.9.27  quay.io/openshift-release-dev/ocp-release@sha256:1c7db78eec0cf05df2cead44f69c0e4b2c3234d5635c88a41e1b922c3bedae16
4.9.28  quay.io/openshift-release-dev/ocp-release@sha256:4084d94969b186e20189649b5affba7da59f7d1943e4e5bc7ef78b981eafb7a8
4.9.29  quay.io/openshift-release-dev/ocp-release@sha256:b04ca01d116f0134a102a57f86c67e5b1a3b5da1c4a580af91d521b8fa0aa6ec
4.9.31  quay.io/openshift-release-dev/ocp-release@sha256:2a28b8ebb53d67dd80594421c39e36d9896b1e65cb54af81fbb86ea9ac3bf2d7
4.9.32  quay.io/openshift-release-dev/ocp-release@sha256:ecdb6d0df547b857eaf0edb5574ddd64ca6d9aff1fa61fd1ac6fb641203bedfa
Note- If there are no available updates, updates that are supported but not recommended might still be available. See Updating along a conditional update path for more information.
-
For details and information on how to perform an
EUS-to-EUSchannel update, please refer to the Preparing to perform an EUS-to-EUS upgrade page, listed in the Additional resources section.
Based on your organization requirements, set the appropriate update channel. For example, you can set your channel to
stable-4.13orfast-4.13. For more information about channels, refer to Understanding update channels and releases listed in the Additional resources section.$ oc adm upgrade channel <channel>
For example, to set the channel to
stable-4.12:$ oc adm upgrade channel stable-4.12
ImportantFor production clusters, you must subscribe to a
stable-*,eus-*, orfast-*channel.NoteWhen you are ready to move to the next minor version, choose the channel that corresponds to that minor version. The sooner the update channel is declared, the more effectively the cluster can recommend update paths to your target version. The cluster might take some time to evaluate all the possible updates that are available and offer the best update recommendations to choose from. Update recommendations can change over time, as they are based on what update options are available at the time.
If you cannot see an update path to your target minor version, keep updating your cluster to the latest patch release for your current version until the next minor version is available in the path.
Apply an update:
Review the status of the Cluster Version Operator:
$ oc adm upgrade
After the update completes, you can confirm that the cluster version has updated to the new version:
$ oc get clusterversion
Example output
Cluster version is <version>

Upstream is unset, so the cluster will use an appropriate default.
Channel: stable-4.10 (available channels: candidate-4.10, candidate-4.11, eus-4.10, fast-4.10, fast-4.11, stable-4.10)

No updates available. You may force an upgrade to a specific release image, but doing so might not be supported and might result in downtime or data loss.
If you are updating your cluster to the next minor version, such as version X.y to X.(y+1), it is recommended to confirm that your nodes are updated before deploying workloads that rely on a new feature:
$ oc get nodes
Example output
NAME                           STATUS   ROLES    AGE   VERSION
ip-10-0-168-251.ec2.internal   Ready    master   82m   v1.25.0
ip-10-0-170-223.ec2.internal   Ready    master   82m   v1.25.0
ip-10-0-179-95.ec2.internal    Ready    worker   70m   v1.25.0
ip-10-0-182-134.ec2.internal   Ready    worker   70m   v1.25.0
ip-10-0-211-16.ec2.internal    Ready    master   82m   v1.25.0
ip-10-0-250-100.ec2.internal   Ready    worker   69m   v1.25.0
9.5. Updating along a conditional upgrade path
You can update along a recommended conditional upgrade path using the web console or the OpenShift CLI (oc). When a conditional update is not recommended for your cluster, you can update along a conditional upgrade path using the OpenShift CLI (oc) 4.10 or later.
Procedure
To view the description of the update when it is not recommended because a risk might apply, run the following command:
$ oc adm upgrade --include-not-recommended
If the cluster administrator evaluates the potential known risks and decides it is acceptable for the current cluster, then the administrator can waive the safety guards and proceed the update by running the following command:
$ oc adm upgrade --allow-not-recommended --to <version> <.>
<.>
<version>is the supported but not recommended update version that you obtained from the output of the previous command.
Additional resources
9.6. Changing the update server by using the CLI
Changing the update server is optional. If you have an OpenShift Update Service (OSUS) installed and configured locally, you must set the URL for the server as the upstream to use the local server during updates. The default value for upstream is https://api.openshift.com/api/upgrades_info/v1/graph.
Procedure
Change the
upstreamparameter value in the cluster version:$ oc patch clusterversion/version --patch '{"spec":{"upstream":"<update-server-url>"}}' --type=mergeThe
<update-server-url>variable specifies the URL for the update server.Example output
clusterversion.config.openshift.io/version patched
Chapter 10. Performing a canary rollout update
A canary update is an update strategy where worker node updates are performed in discrete, sequential stages instead of updating all worker nodes at the same time. This strategy can be useful in the following scenarios:
- You want a more controlled rollout of worker node updates to ensure that mission-critical applications stay available during the whole update, even if the update process causes your applications to fail.
- You want to update a small subset of worker nodes, evaluate cluster and workload health over a period of time, and then update the remaining nodes.
- You want to fit worker node updates, which often require a host reboot, into smaller defined maintenance windows when it is not possible to take a large maintenance window to update the entire cluster at one time.
In these scenarios, you can create multiple custom machine config pools (MCPs) to prevent certain worker nodes from updating when you update the cluster. After the rest of the cluster is updated, you can update those worker nodes in batches at appropriate times.
10.1. Example Canary update strategy
The following example describes a canary update strategy where you have a cluster with 100 nodes with 10% excess capacity, you have maintenance windows that must not exceed 4 hours, and you know that it takes no longer than 8 minutes to drain and reboot a worker node.
The previous values are an example only. The time it takes to drain a node might vary depending on factors such as workloads.
Defining custom machine config pools
In order to organize the worker node updates into separate stages, you can begin by defining the following MCPs:
- workerpool-canary with 10 nodes
- workerpool-A with 30 nodes
- workerpool-B with 30 nodes
- workerpool-C with 30 nodes
Updating the canary worker pool
During your first maintenance window, you pause the MCPs for workerpool-A, workerpool-B, and workerpool-C, and then initiate the cluster update. This updates components that run on top of OpenShift Container Platform and the 10 nodes that are part of the unpaused workerpool-canary MCP. The other three MCPs are not updated because they were paused.
Determining whether to proceed with the remaining worker pool updates
If for some reason you determine that your cluster or workload health was negatively affected by the workerpool-canary update, you then cordon and drain all nodes in that pool while still maintaining sufficient capacity until you have diagnosed and resolved the problem. When everything is working as expected, you evaluate the cluster and workload health before deciding to unpause, and thus update, workerpool-A, workerpool-B, and workerpool-C in succession during each additional maintenance window.
Managing worker node updates using custom MCPs provides flexibility, however it can be a time-consuming process that requires you execute multiple commands. This complexity can result in errors that might affect the entire cluster. It is recommended that you carefully consider your organizational needs and carefully plan the implementation of the process before you start.
Pausing a machine config pool prevents the Machine Config Operator from applying any configuration changes on the associated nodes. Pausing an MCP also prevents any automatically rotated certificates from being pushed to the associated nodes, including the automatic CA rotation of the kube-apiserver-to-kubelet-signer CA certificate.
If the MCP is paused when the kube-apiserver-to-kubelet-signer CA certificate expires and the MCO attempts to automatically renew the certificate, the MCO cannot push the newly rotated certificates to those nodes. This causes failure in multiple oc commands, including oc debug, oc logs, oc exec, and oc attach. You receive alerts in the Alerting UI of the OpenShift Container Platform web console if an MCP is paused when the certificates are rotated.
Pausing an MCP should be done with careful consideration about the kube-apiserver-to-kubelet-signer CA certificate expiration and for short periods of time only.
It is not recommended to update the MCPs to different OpenShift Container Platform versions. For example, do not update one MCP from 4.y.10 to 4.y.11 and another to 4.y.12. This scenario has not been tested and might result in an undefined cluster state.
10.2. About the canary rollout update process and MCPs
In OpenShift Container Platform, nodes are not considered individually. Instead, they are grouped into machine config pools (MCPs). By default, nodes in an OpenShift Container Platform cluster are grouped into two MCPs: one for the control plane nodes and one for the worker nodes. An OpenShift Container Platform update affects all MCPs concurrently.
During the update, the Machine Config Operator (MCO) drains and cordons all nodes within an MCP up to the specified maxUnavailable number of nodes, if a max number is specified. By default, maxUnavailable is set to 1. Draining and cordoning a node deschedules all pods on the node and marks the node as unschedulable.
After the node is drained, the Machine Config Daemon applies a new machine configuration, which can include updating the operating system (OS). Updating the OS requires the host to reboot.
Using custom machine config pools
To prevent specific nodes from being updated, you can create custom MCPs. Because the MCO does not update nodes within paused MCPs, you can pause the MCPs containing nodes that you do not want to update before initiating a cluster update.
Using one or more custom MCPs can give you more control over the sequence in which you update your worker nodes. For example, after you update the nodes in the first MCP, you can verify the application compatibility and then update the rest of the nodes gradually to the new version.
To ensure the stability of the control plane, creating a custom MCP from the control plane nodes is not supported. The Machine Config Operator (MCO) ignores any custom MCP created for the control plane nodes.
Considerations when using custom machine config pools
Give careful consideration to the number of MCPs that you create and the number of nodes in each MCP, based on your workload deployment topology. For example, if you must fit updates into specific maintenance windows, you must know how many nodes OpenShift Container Platform can update within a given window. This number is dependent on your unique cluster and workload characteristics.
You must also consider how much extra capacity is available in your cluster to determine the number of custom MCPs and the amount of nodes within each MCP. In a case where your applications fail to work as expected on newly updated nodes, you can cordon and drain those nodes in the pool, which moves the application pods to other nodes. However, you must determine whether the available nodes in the remaining MCPs can provide sufficient quality-of-service (QoS) for your applications.
You can use this update process with all documented OpenShift Container Platform update processes. However, the process does not work with Red Hat Enterprise Linux (RHEL) machines, which are updated using Ansible playbooks.
10.3. About performing a canary rollout update
The following steps outline the high-level workflow of the canary rollout update process:
Create custom machine config pools (MCP) based on the worker pool.
NoteYou can change the
maxUnavailablesetting in an MCP to specify the percentage or the number of machines that can be updating at any given time. The default is1.Add a node selector to the custom MCPs. For each node that you do not want to update simultaneously with the rest of the cluster, add a matching label to the nodes. This label associates the node to the MCP.
ImportantDo not remove the default worker label from the nodes. The nodes must have a role label to function properly in the cluster.
Pause the MCPs you do not want to update as part of the update process.
NotePausing the MCP also pauses the
kube-apiserver-to-kubelet-signerautomatic CA certificates rotation. New CA certificates are generated at 292 days from the installation date and old certificates are removed 365 days from the installation date. See the Understand CA cert auto renewal in Red Hat OpenShift 4 to find out how much time you have before the next automatic CA certificate rotation.Make sure the pools are unpaused when the CA certificate rotation happens. If the MCPs are paused, the MCO cannot push the newly rotated certificates to those nodes. This causes the cluster to become degraded and causes failure in multiple
occommands, includingoc debug,oc logs,oc exec, andoc attach. You receive alerts in the Alerting UI of the OpenShift Container Platform web console if an MCP is paused when the certificates are rotated.- Perform the cluster update. The update process updates the MCPs that are not paused, including the control plane nodes.
- Test your applications on the updated nodes to ensure they are working as expected.
- Unpause one of the remaining MCPs, wait for the nodes in that pool to finish updating, and test the applications on those nodes. Repeat this process until all worker nodes are updated.
- Optional: Remove the custom label from updated nodes and delete the custom MCPs.
10.4. Creating machine config pools to perform a canary rollout update
To perform a canary rollout update, you must first create one or more custom machine config pools (MCP).
Procedure
List the worker nodes in your cluster by running the following command:
$ oc get -l 'node-role.kubernetes.io/master!=' -o 'jsonpath={range .items[*]}{.metadata.name}{"\n"}{end}' nodesExample output
ci-ln-pwnll6b-f76d1-s8t9n-worker-a-s75z4
ci-ln-pwnll6b-f76d1-s8t9n-worker-b-dglj2
ci-ln-pwnll6b-f76d1-s8t9n-worker-c-lldbm
For each node that you want to delay, add a custom label to the node by running the following command:
$ oc label node <node_name> node-role.kubernetes.io/<custom_label>=
For example:
$ oc label node ci-ln-0qv1yp2-f76d1-kl2tq-worker-a-j2ssz node-role.kubernetes.io/workerpool-canary=
Example output
node/ci-ln-gtrwm8t-f76d1-spbl7-worker-a-xk76k labeled
Create the new MCP:
Create an MCP YAML file:
apiVersion: machineconfiguration.openshift.io/v1
kind: MachineConfigPool
metadata:
  name: workerpool-canary 1
spec:
  machineConfigSelector:
    matchExpressions:
      - {
         key: machineconfiguration.openshift.io/role,
         operator: In,
         values: [worker,workerpool-canary] 2
        }
  nodeSelector:
    matchLabels:
      node-role.kubernetes.io/workerpool-canary: "" 3
Create the
MachineConfigPoolobject by running the following command:$ oc create -f <file_name>
Example output
machineconfigpool.machineconfiguration.openshift.io/workerpool-canary created
View the list of MCPs in the cluster and their current state by running the following command:
$ oc get machineconfigpool
Example output
NAME              CONFIG                                                        UPDATED   UPDATING   DEGRADED   MACHINECOUNT   READYMACHINECOUNT   UPDATEDMACHINECOUNT   DEGRADEDMACHINECOUNT   AGE
master            rendered-master-b0bb90c4921860f2a5d8a2f8137c1867              True      False      False      3              3                   3                     0                      97m
workerpool-canary rendered-workerpool-canary-87ba3dec1ad78cb6aecebf7fbb476a36   True      False      False      1              1                   1                     0                      2m42s
worker            rendered-worker-87ba3dec1ad78cb6aecebf7fbb476a36              True      False      False      2              2                   2                     0                      97m
The new machine config pool,
workerpool-canary, is created and the number of nodes to which you added the custom label are shown in the machine counts. The worker MCP machine counts are reduced by the same number. It can take several minutes to update the machine counts. In this example, one node was moved from theworkerMCP to theworkerpool-canaryMCP.
10.5. Pausing the machine config pools
After you create your custom machine config pools (MCPs), you then pause those MCPs. Pausing an MCP prevents the Machine Config Operator (MCO) from updating the nodes associated with that MCP.
Pausing the MCP also pauses the kube-apiserver-to-kubelet-signer automatic CA certificates rotation. New CA certificates are generated at 292 days from the installation date and old certificates are removed 365 days from the installation date. See the Understand CA cert auto renewal in Red Hat OpenShift 4 to find out how much time you have before the next automatic CA certificate rotation.
Make sure the pools are unpaused when the CA certificate rotation happens. If the MCPs are paused, the MCO cannot push the newly rotated certificates to those nodes. This causes the cluster to become degraded and causes failure in multiple oc commands, including oc debug, oc logs, oc exec, and oc attach. You receive alerts in the Alerting UI of the OpenShift Container Platform web console if an MCP is paused when the certificates are rotated.
Procedure
Patch the MCP that you want paused by running the following command:
$ oc patch mcp/<mcp_name> --patch '{"spec":{"paused":true}}' --type=mergeFor example:
$ oc patch mcp/workerpool-canary --patch '{"spec":{"paused":true}}' --type=mergeExample output
machineconfigpool.machineconfiguration.openshift.io/workerpool-canary patched
10.6. Performing the cluster update
After the machine config pools (MCP) enter a ready state, you can perform the cluster update. See one of the following update methods, as appropriate for your cluster:
After the cluster update is complete, you can begin to unpause the MCPs one at a time.
10.7. Unpausing the machine config pools
After the OpenShift Container Platform update is complete, unpause your custom machine config pools (MCP) one at a time. Unpausing an MCP allows the Machine Config Operator (MCO) to update the nodes associated with that MCP.
Procedure
Patch the MCP that you want to unpause:
$ oc patch mcp/<mcp_name> --patch '{"spec":{"paused":false}}' --type=mergeFor example:
$ oc patch mcp/workerpool-canary --patch '{"spec":{"paused":false}}' --type=mergeExample output
machineconfigpool.machineconfiguration.openshift.io/workerpool-canary patched
Optional: Check the progress of the update by using one of the following options:
- Check the progress from the web console by clicking Administration → Cluster settings.
Check the progress by running the following command:
$ oc get machineconfigpools
- Test your applications on the updated nodes to ensure that they are working as expected.
- Repeat this process for any other paused MCPs, one at a time.
In case of a failure, such as your applications not working on the updated nodes, you can cordon and drain the nodes in the pool, which moves the application pods to other nodes to help maintain the quality-of-service for the applications. This first MCP should be no larger than the excess capacity.
10.8. Moving a node to the original machine config pool
After you update and verify applications on nodes in a custom machine config pool (MCP), move the nodes back to their original MCP by removing the custom label that you added to the nodes.
A node must have a role to be properly functioning in the cluster.
Procedure
For each node in a custom MCP, remove the custom label from the node by running the following command:
$ oc label node <node_name> node-role.kubernetes.io/<custom_label>-
For example:
$ oc label node ci-ln-0qv1yp2-f76d1-kl2tq-worker-a-j2ssz node-role.kubernetes.io/workerpool-canary-
Example output
node/ci-ln-0qv1yp2-f76d1-kl2tq-worker-a-j2ssz labeled
The Machine Config Operator moves the nodes back to the original MCP and reconciles the node to the MCP configuration.
To ensure that node has been removed from the custom MCP, view the list of MCPs in the cluster and their current state by running the following command:
$ oc get mcp
Example output
NAME                CONFIG                                                   UPDATED   UPDATING   DEGRADED   MACHINECOUNT   READYMACHINECOUNT   UPDATEDMACHINECOUNT   DEGRADEDMACHINECOUNT   AGE
master              rendered-master-1203f157d053fd987c7cbd91e3fbc0ed         True      False      False      3              3                   3                     0                      61m
workerpool-canary   rendered-mcp-noupdate-5ad4791166c468f3a35cd16e734c9028   True      False      False      0              0                   0                     0                      21m
worker              rendered-worker-5ad4791166c468f3a35cd16e734c9028         True      False      False      3              3                   3                     0                      61m
When the node is removed from the custom MCP and moved back to the original MCP, it can take several minutes to update the machine counts. In this example, one node was moved from the removed
workerpool-canaryMCP to theworkerMCP.Optional: Delete the custom MCP by running the following command:
$ oc delete mcp <mcp_name>
Chapter 11. Updating the boot loader on RHCOS nodes using bootupd
To update the boot loader on RHCOS nodes using bootupd, you must either run the bootupctl update command on RHCOS machines manually or provide a machine config with a systemd unit.
Unlike grubby or other boot loader tools, bootupd does not manage kernel space configuration such as passing kernel arguments. To configure kernel arguments, see Adding kernel arguments to nodes.
You can use bootupd to update the boot loader to protect against the BootHole vulnerability.
11.1. Updating the boot loader manually
You can manually inspect the status of the system and update the boot loader by using the bootupctl command-line tool.
Inspect the system status:
# bootupctl status
Example output for
x86_64Component EFI Installed: grub2-efi-x64-1:2.04-31.el8_4.1.x86_64,shim-x64-15-8.el8_1.x86_64 Update: At latest version
Example output for
aarch64Component EFI Installed: grub2-efi-aa64-1:2.02-99.el8_4.1.aarch64,shim-aa64-15.4-2.el8_1.aarch64 Update: At latest version
OpenShift Container Platform clusters initially installed on version 4.4 and older require an explicit adoption phase.
If the system status is
Adoptable, perform the adoption:# bootupctl adopt-and-update
Example output
Updated: grub2-efi-x64-1:2.04-31.el8_4.1.x86_64,shim-x64-15-8.el8_1.x86_64
If an update is available, apply the update so that the changes take effect on the next reboot:
# bootupctl update
Example output
Updated: grub2-efi-x64-1:2.04-31.el8_4.1.x86_64,shim-x64-15-8.el8_1.x86_64
11.2. Updating the bootloader automatically via a machine config
Another way to automatically update the boot loader with bootupd is to create a systemd service unit that will update the boot loader as needed on every boot. This unit will run the bootupctl update command during the boot process and will be installed on the nodes via a machine config.
This configuration is not enabled by default as unexpected interruptions of the update operation may lead to unbootable nodes. If you enable this configuration, make sure to avoid interrupting nodes during the boot process while the bootloader update is in progress. The boot loader update operation generally completes quickly thus the risk is low.
Create a Butane config file,
99-worker-bootupctl-update.bu, including the contents of thebootupctl-update.servicesystemd unit.NoteSee "Creating machine configs with Butane" for information about Butane.
Example output
variant: openshift
version: 4.12.0
metadata:
  name: 99-worker-chrony 1
  labels:
    machineconfiguration.openshift.io/role: worker 2
systemd:
  units:
  - name: bootupctl-update.service
    enabled: true
    contents: |
      [Unit]
      Description=Bootupd automatic update

      [Service]
      ExecStart=/usr/bin/bootupctl update
      RemainAfterExit=yes

      [Install]
      WantedBy=multi-user.target
Use Butane to generate a
MachineConfigobject file,99-worker-bootupctl-update.yaml, containing the configuration to be delivered to the nodes:$ butane 99-worker-bootupctl-update.bu -o 99-worker-bootupctl-update.yaml
Apply the configurations in one of two ways:
-
If the cluster is not running yet, after you generate manifest files, add the
MachineConfigobject file to the<installation_directory>/openshiftdirectory, and then continue to create the cluster. If the cluster is already running, apply the file:
$ oc apply -f ./99-worker-bootupctl-update.yaml
-
If the cluster is not running yet, after you generate manifest files, add the
Chapter 12. Updating a cluster that includes RHEL compute machines
You can perform minor version and patch updates on an OpenShift Container Platform cluster. If your cluster contains Red Hat Enterprise Linux (RHEL) machines, you must take additional steps to update those machines.
12.1. Prerequisites
-
Have access to the cluster as a user with
adminprivileges. See Using RBAC to define and apply permissions. - Have a recent etcd backup in case your update fails and you must restore your cluster to a previous state.
- Support for RHEL7 workers is removed in OpenShift Container Platform 4.12. You must replace RHEL7 workers with RHEL8 or RHCOS workers before upgrading to OpenShift Container Platform 4.12. Red Hat does not support in-place RHEL7 to RHEL8 updates for RHEL workers; those hosts must be replaced with a clean operating system install.
- If your cluster uses manually maintained credentials, update the cloud provider resources for the new release. For more information, including how to determine if this is a requirement for your cluster, see Preparing to update a cluster with manually maintained credentials.
-
If you run an Operator or you have configured any application with the pod disruption budget, you might experience an interruption during the upgrade process. If
minAvailableis set to 1 inPodDisruptionBudget, the nodes are drained to apply pending machine configs which might block the eviction process. If several nodes are rebooted, all the pods might run on only one node, and thePodDisruptionBudgetfield can prevent the node drain.
Additional resources
12.2. Updating a cluster by using the web console
If updates are available, you can update your cluster from the web console.
You can find information about available OpenShift Container Platform advisories and updates in the errata section of the Customer Portal.
Prerequisites
-
Have access to the web console as a user with
adminprivileges. -
Pause all
MachineHealthCheckresources.
Procedure
- From the web console, click Administration → Cluster Settings and review the contents of the Details tab.
For production clusters, ensure that the Channel is set to the correct channel for the version that you want to update to, such as
stable-4.12.ImportantFor production clusters, you must subscribe to a
stable-*,eus-*orfast-*channel.NoteWhen you are ready to move to the next minor version, choose the channel that corresponds to that minor version. The sooner the update channel is declared, the more effectively the cluster can recommend update paths to your target version. The cluster might take some time to evaluate all the possible updates that are available and offer the best update recommendations to choose from. Update recommendations can change over time, as they are based on what update options are available at the time.
If you cannot see an update path to your target minor version, keep updating your cluster to the latest patch release for your current version until the next minor version is available in the path.
- If the Update status is not Updates available, you cannot update your cluster.
- Select channel indicates the cluster version that your cluster is running or is updating to.
Select a version to update to, and click Save.
The Input channel Update status changes to Update to <product-version> in progress, and you can review the progress of the cluster update by watching the progress bars for the Operators and nodes.
NoteIf you are upgrading your cluster to the next minor version, like version 4.y to 4.(y+1), it is recommended to confirm your nodes are updated before deploying workloads that rely on a new feature. Any pools with worker nodes that are not yet updated are displayed on the Cluster Settings page.
After the update completes and the Cluster Version Operator refreshes the available updates, check if more updates are available in your current channel.
- If updates are available, continue to perform updates in the current channel until you can no longer update.
-
If no updates are available, change the Channel to the
stable-*,eus-*orfast-*channel for the next minor version, and update to the version that you want in that channel.
You might need to perform several intermediate updates until you reach the version that you want.
NoteWhen you update a cluster that contains Red Hat Enterprise Linux (RHEL) worker machines, those workers temporarily become unavailable during the update process. You must run the upgrade playbook against each RHEL machine as it enters the
NotReadystate for the cluster to finish updating.
12.3. Optional: Adding hooks to perform Ansible tasks on RHEL machines
You can use hooks to run Ansible tasks on the RHEL compute machines during the OpenShift Container Platform update.
12.3.1. About Ansible hooks for upgrades
When you update OpenShift Container Platform, you can run custom tasks on your Red Hat Enterprise Linux (RHEL) nodes during specific operations by using hooks. Hooks allow you to provide files that define tasks to run before or after specific update tasks. You can use hooks to validate or modify custom infrastructure when you update the RHEL compute nodes in you OpenShift Container Platform cluster.
Because when a hook fails, the operation fails, you must design hooks that are idempotent, or can run multiple times and provide the same results.
Hooks have the following important limitations: - Hooks do not have a defined or versioned interface. They can use internal openshift-ansible variables, but it is possible that the variables will be modified or removed in future OpenShift Container Platform releases. - Hooks do not have error handling, so an error in a hook halts the update process. If you get an error, you must address the problem and then start the upgrade again.
12.3.2. Configuring the Ansible inventory file to use hooks
You define the hooks to use when you update the Red Hat Enterprise Linux (RHEL) compute machines, which are also known as worker machines, in the hosts inventory file under the all:vars section.
Prerequisites
-
You have access to the machine that you used to add the RHEL compute machines cluster. You must have access to the
hostsAnsible inventory file that defines your RHEL machines.
Procedure
After you design the hook, create a YAML file that defines the Ansible tasks for it. This file must be a set of tasks and cannot be a playbook, as shown in the following example:
---
# Trivial example forcing an operator to acknowledge the start of an upgrade
# file=/home/user/openshift-ansible/hooks/pre_compute.yml

- name: note the start of a compute machine update
  debug:
      msg: "Compute machine upgrade of {{ inventory_hostname }} is about to start"

- name: require the user agree to start an upgrade
  pause:
      prompt: "Press Enter to start the compute machine update"
Modify the
hostsAnsible inventory file to specify the hook files. The hook files are specified as parameter values in the[all:vars]section, as shown:Example hook definitions in an inventory file
[all:vars]
openshift_node_pre_upgrade_hook=/home/user/openshift-ansible/hooks/pre_node.yml
openshift_node_post_upgrade_hook=/home/user/openshift-ansible/hooks/post_node.yml
To avoid ambiguity in the paths to the hook, use absolute paths instead of a relative paths in their definitions.
12.3.3. Available hooks for RHEL compute machines
You can use the following hooks when you update the Red Hat Enterprise Linux (RHEL) compute machines in your OpenShift Container Platform cluster.
| Hook name | Description |
|---|---|
|
|
|
|
|
|
|
|
|
|
|
|
12.4. Updating RHEL compute machines in your cluster
After you update your cluster, you must update the Red Hat Enterprise Linux (RHEL) compute machines in your cluster.
Red Hat Enterprise Linux (RHEL) versions 8.6 and later are supported for RHEL compute machines.
You can also update your compute machines to another minor version of OpenShift Container Platform if you are using RHEL as the operating system. You do not need to exclude any RPM packages from RHEL when performing a minor version update.
You cannot upgrade RHEL 7 compute machines to RHEL 8. You must deploy new RHEL 8 hosts, and the old RHEL 7 hosts should be removed.
Prerequisites
You updated your cluster.
ImportantBecause the RHEL machines require assets that are generated by the cluster to complete the update process, you must update the cluster before you update the RHEL worker machines in it.
-
You have access to the local machine that you used to add the RHEL compute machines to your cluster. You must have access to the
hostsAnsible inventory file that defines your RHEL machines and theupgradeplaybook. - For updates to a minor version, the RPM repository is using the same version of OpenShift Container Platform that is running on your cluster.
Procedure
Stop and disable firewalld on the host:
# systemctl disable --now firewalld.service
NoteBy default, the base OS RHEL with "Minimal" installation option enables firewalld service. Having the firewalld service enabled on your host prevents you from accessing OpenShift Container Platform logs on the worker. Do not enable firewalld later if you wish to continue accessing OpenShift Container Platform logs on the worker.
Enable the repositories that are required for OpenShift Container Platform 4.12:
On the machine that you run the Ansible playbooks, update the required repositories:
# subscription-manager repos --disable=rhocp-4.11-for-rhel-8-x86_64-rpms \ --disable=ansible-2.9-for-rhel-8-x86_64-rpms \ --enable=rhocp-4.12-for-rhel-8-x86_64-rpmsImportantAs of OpenShift Container Platform 4.11, the Ansible playbooks are provided only for RHEL 8. If a RHEL 7 system was used as a host for the OpenShift Container Platform 4.10 Ansible playbooks, you must either upgrade the Ansible host to RHEL 8, or create a new Ansible host on a RHEL 8 system and copy over the inventories from the old Ansible host.
On the machine that you run the Ansible playbooks, update the Ansible package:
# yum swap ansible ansible-core
On the machine that you run the Ansible playbooks, update the required packages, including
openshift-ansible:# yum update openshift-ansible openshift-clients
On each RHEL compute node, update the required repositories:
# subscription-manager repos --disable=rhocp-4.11-for-rhel-8-x86_64-rpms \
                             --enable=rhocp-4.12-for-rhel-8-x86_64-rpms
Update a RHEL worker machine:
Review your Ansible inventory file at
/<path>/inventory/hostsand update its contents so that the RHEL 8 machines are listed in the[workers]section, as shown in the following example:[all:vars] ansible_user=root #ansible_become=True openshift_kubeconfig_path="~/.kube/config" [workers] mycluster-rhel8-0.example.com mycluster-rhel8-1.example.com mycluster-rhel8-2.example.com mycluster-rhel8-3.example.com
Change to the
openshift-ansibledirectory:$ cd /usr/share/ansible/openshift-ansible
Run the
upgradeplaybook:$ ansible-playbook -i /<path>/inventory/hosts playbooks/upgrade.yml 1- 1
- For
<path>, specify the path to the Ansible inventory file that you created.
NoteThe
upgradeplaybook only upgrades the OpenShift Container Platform packages. It does not update the operating system packages.
After you update all of the workers, confirm that all of your cluster nodes have updated to the new version:
# oc get node
Example output
NAME                        STATUS                        ROLES    AGE    VERSION
mycluster-control-plane-0   Ready                         master   145m   v1.25.0
mycluster-control-plane-1   Ready                         master   145m   v1.25.0
mycluster-control-plane-2   Ready                         master   145m   v1.25.0
mycluster-rhel8-0           Ready                         worker   98m    v1.25.0
mycluster-rhel8-1           Ready                         worker   98m    v1.25.0
mycluster-rhel8-2           Ready                         worker   98m    v1.25.0
mycluster-rhel8-3           Ready                         worker   98m    v1.25.0
Optional: Update the operating system packages that were not updated by the
upgradeplaybook. To update packages that are not on 4.12, use the following command:# yum update
NoteYou do not need to exclude RPM packages if you are using the same RPM repository that you used when you installed 4.12.
Chapter 13. Updating a cluster in a disconnected environment
13.1. About cluster updates in a disconnected environment
A disconnected environment is one in which your cluster nodes cannot access the internet. For this reason, you must populate a registry with the installation images. If your registry host cannot access both the internet and the cluster, you can mirror the images to a file system that is disconnected from that environment and then bring that host or removable media across that gap. If the local container registry and the cluster are connected to the mirror registry’s host, you can directly push the release images to the local registry.
A single container image registry is sufficient to host mirrored images for several clusters in the disconnected network.
13.1.1. Mirroring the OpenShift Container Platform image repository
To update your cluster in a disconnected environment, your cluster environment must have access to a mirror registry that has the necessary images and resources for your targeted update. The following page has instructions for mirroring images onto a repository in your disconnected cluster:
13.1.2. Performing a cluster update in a disconnected environment
You can use one of the following procedures to update a disconnected OpenShift Container Platform cluster:
13.1.3. Uninstalling the OpenShift Update Service from a cluster
You can use the following procedure to uninstall a local copy of the OpenShift Update Service (OSUS) from your cluster:
13.2. Mirroring the OpenShift Container Platform image repository
You must mirror container images onto a mirror registry before you can update a cluster in a disconnected environment. You can also use this procedure in connected environments to ensure your clusters run only approved container images that have satisfied your organizational controls for external content.
Your mirror registry must be running at all times while the cluster is running.
The following steps outline the high-level workflow on how to mirror images to a mirror registry:
-
Install the OpenShift CLI (
oc) on all devices being used to retrieve and push release images. - Download the registry pull secret and add it to your cluster.
If you use the oc-mirror OpenShift CLI (
oc) plugin:- Install the oc-mirror plugin on all devices being used to retrieve and push release images.
- Create an image set configuration file for the plugin to use when determining which release images to mirror. You can edit this configuration file later to change which release images that the plugin mirrors.
- Mirror your targeted release images directly to a mirror registry, or to removable media and then to a mirror registry.
- Configure your cluster to use the resources generated by the oc-mirror plugin.
- Repeat these steps as needed to update your mirror registry.
If you use the
oc adm release mirrorcommand:- Set environment variables that correspond to your environment and the release images you want to mirror.
- Mirror your targeted release images directly to a mirror registry, or to removable media and then to a mirror registry.
- Repeat these steps as needed to update your mirror registry.
Compared to using the oc adm release mirror command, the oc-mirror plugin has the following advantages:
- It can mirror content other than container images.
- After mirroring images for the first time, it is easier to update images in the registry.
- The oc-mirror plugin provides an automated way to mirror the release payload from Quay, and also builds the latest graph data image for the OpenShift Update Service running in the disconnected environment.
13.2.1. Prerequisites
You must have a container image registry that supports Docker v2-2 in the location that will host the OpenShift Container Platform cluster, such as Red Hat Quay.
NoteIf you use Red Hat Quay, you must use version 3.6 or later with the oc-mirror plugin. If you have an entitlement to Red Hat Quay, see the documentation on deploying Red Hat Quay for proof-of-concept purposes or by using the Quay Operator. If you need additional assistance selecting and installing a registry, contact your sales representative or Red Hat Support.
If you do not have an existing solution for a container image registry, the mirror registry for Red Hat OpenShift is included in OpenShift Container Platform subscriptions. The mirror registry for Red Hat OpenShift is a small-scale container registry that you can use to mirror OpenShift Container Platform container images in disconnected installations and updates.
13.2.2. Preparing your mirror host
Before you perform the mirror procedure, you must prepare the host to retrieve content and push it to the remote location.
13.2.2.1. Installing the OpenShift CLI by downloading the binary
You can install the OpenShift CLI (oc) to interact with OpenShift Container Platform from a command-line interface. You can install oc on Linux, Windows, or macOS.
If you installed an earlier version of oc, you cannot use it to complete all of the commands in OpenShift Container Platform 4.12. Download and install the new version of oc. If you are upgrading a cluster in a disconnected environment, install the oc version that you plan to upgrade to.
Installing the OpenShift CLI on Linux
You can install the OpenShift CLI (oc) binary on Linux by using the following procedure.
Procedure
- Navigate to the OpenShift Container Platform downloads page on the Red Hat Customer Portal.
- Select the architecture from the Product Variant drop-down list.
- Select the appropriate version from the Version drop-down list.
- Click Download Now next to the OpenShift v4.12 Linux Client entry and save the file.
Unpack the archive:
$ tar xvf <file>
Place the
ocbinary in a directory that is on yourPATH.To check your
PATH, execute the following command:$ echo $PATH
Verification
After you install the OpenShift CLI, it is available using the
occommand:$ oc <command>
Installing the OpenShift CLI on Windows
You can install the OpenShift CLI (oc) binary on Windows by using the following procedure.
Procedure
- Navigate to the OpenShift Container Platform downloads page on the Red Hat Customer Portal.
- Select the appropriate version from the Version drop-down list.
- Click Download Now next to the OpenShift v4.12 Windows Client entry and save the file.
- Unzip the archive with a ZIP program.
Move the
ocbinary to a directory that is on yourPATH.To check your
PATH, open the command prompt and execute the following command:C:\> path
Verification
After you install the OpenShift CLI, it is available using the
occommand:C:\> oc <command>
Installing the OpenShift CLI on macOS
You can install the OpenShift CLI (oc) binary on macOS by using the following procedure.
Procedure
- Navigate to the OpenShift Container Platform downloads page on the Red Hat Customer Portal.
- Select the appropriate version from the Version drop-down list.
Click Download Now next to the OpenShift v4.12 macOS Client entry and save the file.
NoteFor macOS arm64, choose the OpenShift v4.12 macOS arm64 Client entry.
- Unpack and unzip the archive.
Move the
ocbinary to a directory on your PATH.To check your
PATH, open a terminal and execute the following command:$ echo $PATH
Verification
After you install the OpenShift CLI, it is available using the
occommand:$ oc <command>
Additional resources
13.2.2.2. Configuring credentials that allow images to be mirrored
Create a container image registry credentials file that allows mirroring images from Red Hat to your mirror.
Do not use this image registry credentials file as the pull secret when you install a cluster. If you provide this file when you install cluster, all of the machines in the cluster will have write access to your mirror registry.
This process requires that you have write access to a container image registry on the mirror registry and adds the credentials to a registry pull secret.
Prerequisites
- You configured a mirror registry to use in your disconnected environment.
- You identified an image repository location on your mirror registry to mirror images into.
- You provisioned a mirror registry account that allows images to be uploaded to that image repository.
Procedure
Complete the following steps on the installation host:
-
Download your
registry.redhat.iopull secret from the Red Hat OpenShift Cluster Manager. Make a copy of your pull secret in JSON format:
$ cat ./pull-secret | jq . > <path>/<pull_secret_file_in_json> 1- 1
- Specify the path to the folder to store the pull secret in and a name for the JSON file that you create.
The contents of the file resemble the following example:
{ "auths": { "cloud.openshift.com": { "auth": "b3BlbnNo...", "email": "you@example.com" }, "quay.io": { "auth": "b3BlbnNo...", "email": "you@example.com" }, "registry.connect.redhat.com": { "auth": "NTE3Njg5Nj...", "email": "you@example.com" }, "registry.redhat.io": { "auth": "NTE3Njg5Nj...", "email": "you@example.com" } } }-
Optional: If using the oc-mirror plugin, save the file either as
~/.docker/config.jsonor$XDG_RUNTIME_DIR/containers/auth.json. Generate the base64-encoded user name and password or token for your mirror registry:
$ echo -n '<user_name>:<password>' | base64 -w0 1 BGVtbYk3ZHAtqXs=- 1
- For
<user_name>and<password>, specify the user name and password that you configured for your registry.
Edit the JSON file and add a section that describes your registry to it:
"auths": { "<mirror_registry>": { 1 "auth": "<credentials>", 2 "email": "you@example.com" } },The file resembles the following example:
{
  "auths": {
    "registry.example.com": {
      "auth": "BGVtbYk3ZHAtqXs=",
      "email": "you@example.com"
    },
    "cloud.openshift.com": {
      "auth": "b3BlbnNo...",
      "email": "you@example.com"
    },
    "quay.io": {
      "auth": "b3BlbnNo...",
      "email": "you@example.com"
    },
    "registry.connect.redhat.com": {
      "auth": "NTE3Njg5Nj...",
      "email": "you@example.com"
    },
    "registry.redhat.io": {
      "auth": "NTE3Njg5Nj...",
      "email": "you@example.com"
    }
  }
}
13.2.3. Mirroring resources using the oc-mirror plugin
You can use the oc-mirror OpenShift CLI (oc) plugin to mirror images to a mirror registry in your fully or partially disconnected environments. You must run oc-mirror from a system with internet connectivity to download the required images from the official Red Hat registries.
13.2.3.1. About the oc-mirror plugin
You can use the oc-mirror OpenShift CLI (oc) plugin to mirror all required OpenShift Container Platform content and other images to your mirror registry by using a single tool. It provides the following features:
- Provides a centralized method to mirror OpenShift Container Platform releases, Operators, helm charts, and other images.
- Maintains update paths for OpenShift Container Platform and Operators.
- Uses a declarative image set configuration file to include only the OpenShift Container Platform releases, Operators, and images that your cluster needs.
- Performs incremental mirroring, which reduces the size of future image sets.
- Prunes images from the target mirror registry that were excluded from the image set configuration since the previous execution.
- Optionally generates supporting artifacts for OpenShift Update Service (OSUS) usage.
When using the oc-mirror plugin, you specify which content to mirror in an image set configuration file. In this YAML file, you can fine-tune the configuration to only include the OpenShift Container Platform releases and Operators that your cluster needs. This reduces the amount of data that you need to download and transfer. The oc-mirror plugin can also mirror arbitrary helm charts and additional container images to assist users in seamlessly synchronizing their workloads onto mirror registries.
The first time you run the oc-mirror plugin, it populates your mirror registry with the required content to perform your disconnected cluster installation or update. In order for your disconnected cluster to continue receiving updates, you must keep your mirror registry updated. To update your mirror registry, you run the oc-mirror plugin using the same configuration as the first time you ran it. The oc-mirror plugin references the metadata from the storage backend and only downloads what has been released since the last time you ran the tool. This provides update paths for OpenShift Container Platform and Operators and performs dependency resolution as required.
When using the oc-mirror CLI plugin to populate a mirror registry, any further updates to the mirror registry must be made using the oc-mirror tool.
13.2.3.2. oc-mirror compatibility and support
The oc-mirror plugin supports mirroring OpenShift Container Platform payload images and Operator catalogs for OpenShift Container Platform versions 4.9 and later.
Use the latest available version of the oc-mirror plugin regardless of which versions of OpenShift Container Platform you need to mirror.
13.2.3.3. About the mirror registry
You can mirror the images that are required for OpenShift Container Platform installation and subsequent product updates to a container mirror registry that supports Docker v2-2, such as Red Hat Quay. If you do not have access to a large-scale container registry, you can use the mirror registry for Red Hat OpenShift, which is a small-scale container registry included with OpenShift Container Platform subscriptions.
Regardless of your chosen registry, the procedure to mirror content from Red Hat hosted sites on the internet to an isolated image registry is the same. After you mirror the content, you configure each cluster to retrieve this content from your mirror registry.
The OpenShift image registry cannot be used as the target registry because it does not support pushing without a tag, which is required during the mirroring process.
If choosing a container registry that is not the mirror registry for Red Hat OpenShift, it must be reachable by every machine in the clusters that you provision. If the registry is unreachable, installation, updating, or normal operations such as workload relocation might fail. For that reason, you must run mirror registries in a highly available way, and the mirror registries must at least match the production availability of your OpenShift Container Platform clusters.
When you populate your mirror registry with OpenShift Container Platform images, you can follow two scenarios. If you have a host that can access both the internet and your mirror registry, but not your cluster nodes, you can directly mirror the content from that machine. This process is referred to as connected mirroring. If you have no such host, you must mirror the images to a file system and then bring that host or removable media into your restricted environment. This process is referred to as disconnected mirroring.
For mirrored registries, to view the source of pulled images, you must review the Trying to access log entry in the CRI-O logs. Other methods to view the image pull source, such as using the crictl images command on a node, show the non-mirrored image name, even though the image is pulled from the mirrored location.
Red Hat does not test third party registries with OpenShift Container Platform.
Additional resources
- For information about viewing the CRI-O logs to view the image source, see Viewing the image pull source.
13.2.3.4. Installing the oc-mirror OpenShift CLI plugin
To use the oc-mirror OpenShift CLI plugin to mirror registry images, you must install the plugin. If you are mirroring image sets in a fully disconnected environment, ensure that you install the oc-mirror plugin on the host with internet access and the host in the disconnected environment with access to the mirror registry.
Prerequisites
-
You have installed the OpenShift CLI (
oc).
Procedure
Download the oc-mirror CLI plugin.
- Navigate to the Downloads page of the OpenShift Cluster Manager Hybrid Cloud Console.
- Under the OpenShift disconnected installation tools section, click Download for OpenShift Client (oc) mirror plugin and save the file.
Extract the archive:
$ tar xvzf oc-mirror.tar.gz
If necessary, update the plugin file to be executable:
$ chmod +x oc-mirror
NoteDo not rename the
oc-mirrorfile.Install the oc-mirror CLI plugin by placing the file in your
PATH, for example,/usr/local/bin:$ sudo mv oc-mirror /usr/local/bin/.
Verification
Run
oc mirror helpto verify that the plugin was successfully installed:$ oc mirror help
13.2.3.5. Creating the image set configuration
Before you can use the oc-mirror plugin to mirror image sets, you must create an image set configuration file. This image set configuration file defines which OpenShift Container Platform releases, Operators, and other images to mirror, along with other configuration settings for the oc-mirror plugin.
You must specify a storage backend in the image set configuration file. This storage backend can be a local directory or a registry that supports Docker v2-2. The oc-mirror plugin stores metadata in this storage backend during image set creation.
Do not delete or modify the metadata that is generated by the oc-mirror plugin. You must use the same storage backend every time you run the oc-mirror plugin for the same mirror registry.
Prerequisites
- You have created a container image registry credentials file. For instructions, see Configuring credentials that allow images to be mirrored.
Procedure
Use the
oc mirror initcommand to create a template for the image set configuration and save it to a file calledimageset-config.yaml:$ oc mirror init --registry example.com/mirror/oc-mirror-metadata > imageset-config.yaml 1- 1
- Replace
example.com/mirror/oc-mirror-metadatawith the location of your registry for the storage backend.
Edit the file and adjust the settings as necessary:
kind: ImageSetConfiguration
apiVersion: mirror.openshift.io/v1alpha2
archiveSize: 4                                                      1
storageConfig:                                                      2
  registry:
    imageURL: example.com/mirror/oc-mirror-metadata                 3
    skipTLS: false
mirror:
  platform:
    channels:
    - name: stable-4.12                                             4
      type: ocp
    graph: true                                                     5
  operators:
  - catalog: registry.redhat.io/redhat/redhat-operator-index:v4.12  6
    packages:
    - name: serverless-operator                                     7
      channels:
      - name: stable                                                8
  additionalImages:
  - name: registry.redhat.io/ubi8/ubi:latest                        9
  helm: {}
- 1
- Add
archiveSizeto set the maximum size, in GiB, of each file within the image set. - 2
- Set the back-end location to save the image set metadata to. This location can be a registry or local directory. It is required to specify
storageConfigvalues, unless you are using the Technology Preview OCI feature. - 3
- Set the registry URL for the storage backend.
- 4
- Set the channel to retrieve the OpenShift Container Platform images from.
- 5
- Add
graph: trueto build and push the graph-data image to the mirror registry. The graph-data image is required to create OpenShift Update Service (OSUS). Thegraph: truefield also generates theUpdateServicecustom resource manifest. Theoccommand-line interface (CLI) can use theUpdateServicecustom resource manifest to create OSUS. For more information, see About the OpenShift Update Service. - 6
- Set the Operator catalog to retrieve the OpenShift Container Platform images from.
- 7
- Specify only certain Operator packages to include in the image set. Remove this field to retrieve all packages in the catalog.
- 8
- Specify only certain channels of the Operator packages to include in the image set. You must always include the default channel for the Operator package even if you do not use the bundles in that channel. You can find the default channel by running the following command:
oc mirror list operators --catalog=<catalog_name> --package=<package_name>. - 9
- Specify any additional images to include in image set.
NoteThe
graph: truefield also mirrors theubi-microimage along with other mirrored images.See Image set configuration parameters for the full list of parameters and Image set configuration examples for various mirroring use cases.
Save the updated file.
This image set configuration file is required by the
oc mirrorcommand when mirroring content.
13.2.3.6. Mirroring an image set to a mirror registry
You can use the oc-mirror CLI plugin to mirror images to a mirror registry in a partially disconnected environment or in a fully disconnected environment.
The following procedures assume that you already have your mirror registry set up.
13.2.3.6.1. Mirroring an image set in a partially disconnected environment
In a partially disconnected environment, you can mirror an image set directly to the target mirror registry.
13.2.3.6.1.1. Mirroring from mirror to mirror
You can use the oc-mirror plugin to mirror an image set directly to a target mirror registry that is accessible during image set creation.
You are required to specify a storage backend in the image set configuration file. This storage backend can be a local directory or a Docker v2 registry. The oc-mirror plugin stores metadata in this storage backend during image set creation.
Do not delete or modify the metadata that is generated by the oc-mirror plugin. You must use the same storage backend every time you run the oc-mirror plugin for the same mirror registry.
Prerequisites
- You have access to the internet to obtain the necessary container images.
-
You have installed the OpenShift CLI (
oc). -
You have installed the
oc-mirrorCLI plugin. - You have created the image set configuration file.
Procedure
Run the
oc mirrorcommand to mirror the images from the specified image set configuration to a specified registry:$ oc mirror --config=./imageset-config.yaml \1 docker://registry.example:5000 2
- 1
- Pass in the image set configuration file that was created. This procedure assumes that it is named
imageset-config.yaml. - 2
- Specify the registry to mirror the image set file to. The registry must start with
docker://. If you specify a top-level namespace for the mirror registry, you must also use this same namespace on subsequent executions.
Verification
-
Navigate into the
oc-mirror-workspace/directory that was generated. -
Navigate into the results directory, for example,
results-1639608409/. -
Verify that YAML files are present for the
ImageContentSourcePolicyandCatalogSourceresources.
Next steps
- Configure your cluster to use the resources generated by oc-mirror.
Troubleshooting
13.2.3.6.2. Mirroring an image set in a fully disconnected environment
To mirror an image set in a fully disconnected environment, you must first mirror the image set to disk, then mirror the image set file on disk to a mirror.
13.2.3.6.2.1. Mirroring from mirror to disk
You can use the oc-mirror plugin to generate an image set and save the contents to disk. The generated image set can then be transferred to the disconnected environment and mirrored to the target registry.
Depending on the configuration specified in the image set configuration file, using oc-mirror to mirror images might download several hundreds of gigabytes of data to disk.
The initial image set download when you populate the mirror registry is often the largest. Because you only download the images that changed since the last time you ran the command, when you run the oc-mirror plugin again, the generated image set is often smaller.
You are required to specify a storage backend in the image set configuration file. This storage backend can be a local directory or a docker v2 registry. The oc-mirror plugin stores metadata in this storage backend during image set creation.
Do not delete or modify the metadata that is generated by the oc-mirror plugin. You must use the same storage backend every time you run the oc-mirror plugin for the same mirror registry.
Prerequisites
- You have access to the internet to obtain the necessary container images.
-
You have installed the OpenShift CLI (
oc). -
You have installed the
oc-mirrorCLI plugin. - You have created the image set configuration file.
Procedure
Run the
oc mirrorcommand to mirror the images from the specified image set configuration to disk:$ oc mirror --config=./imageset-config.yaml \1 file://<path_to_output_directory> 2
Verification
Navigate to your output directory:
$ cd <path_to_output_directory>
Verify that an image set
.tarfile was created:$ ls
Example output
mirror_seq1_000000.tar
Next steps
- Transfer the image set .tar file to the disconnected environment.
Troubleshooting
13.2.3.6.2.2. Mirroring from disk to mirror
You can use the oc-mirror plugin to mirror the contents of a generated image set to the target mirror registry.
Prerequisites
-
You have installed the OpenShift CLI (
oc) in the disconnected environment. -
You have installed the
oc-mirrorCLI plugin in the disconnected environment. -
You have generated the image set file by using the
oc mirrorcommand. - You have transferred the image set file to the disconnected environment.
Procedure
Run the
oc mirrorcommand to process the image set file on disk and mirror the contents to a target mirror registry:$ oc mirror --from=./mirror_seq1_000000.tar \1 docker://registry.example:5000 2
- 1
- Pass in the image set .tar file to mirror, named
mirror_seq1_000000.tarin this example. If anarchiveSizevalue was specified in the image set configuration file, the image set might be broken up into multiple .tar files. In this situation, you can pass in a directory that contains the image set .tar files. - 2
- Specify the registry to mirror the image set file to. The registry must start with
docker://. If you specify a top-level namespace for the mirror registry, you must also use this same namespace on subsequent executions.
This command updates the mirror registry with the image set and generates the
ImageContentSourcePolicyandCatalogSourceresources.
Verification
-
Navigate into the
oc-mirror-workspace/directory that was generated. -
Navigate into the results directory, for example,
results-1639608409/. -
Verify that YAML files are present for the
ImageContentSourcePolicyandCatalogSourceresources.
Next steps
- Configure your cluster to use the resources generated by oc-mirror.
Troubleshooting
13.2.3.7. Configuring your cluster to use the resources generated by oc-mirror
After you have mirrored your image set to the mirror registry, you must apply the generated ImageContentSourcePolicy, CatalogSource, and release image signature resources into the cluster.
The ImageContentSourcePolicy resource associates the mirror registry with the source registry and redirects image pull requests from the online registries to the mirror registry. The CatalogSource resource is used by Operator Lifecycle Manager (OLM) to retrieve information about the available Operators in the mirror registry. The release image signatures are used to verify the mirrored release images.
Prerequisites
- You have mirrored the image set to the registry mirror in the disconnected environment.
-
You have access to the cluster as a user with the
cluster-adminrole.
Procedure
-
Log in to the OpenShift CLI as a user with the
cluster-adminrole. Apply the YAML files from the results directory to the cluster by running the following command:
$ oc apply -f ./oc-mirror-workspace/results-1639608409/
If you mirrored release images, apply the release image signatures to the cluster by running the following command:
$ oc apply -f ./oc-mirror-workspace/results-1639608409/release-signatures/
NoteIf you are mirroring Operators instead of clusters, you do not need to run
$ oc apply -f ./oc-mirror-workspace/results-1639608409/release-signatures/. Running that command will return an error, as there are no release image signatures to apply.
Verification
Verify that the
ImageContentSourcePolicyresources were successfully installed by running the following command:$ oc get imagecontentsourcepolicy
Verify that the
CatalogSourceresources were successfully installed by running the following command:$ oc get catalogsource -n openshift-marketplace
13.2.3.8. Keeping your mirror registry content updated
After you populate your target mirror registry with the initial image set, you must update it regularly so that it has the latest content. If possible, you can set up a cron job to update the mirror registry on a regular basis.
Update your image set configuration to add or remove OpenShift Container Platform and Operator releases as necessary. Removed images are pruned from the mirror registry.
13.2.3.8.1. About updating your mirror registry content
When you run the oc-mirror plugin again, it generates an image set that only contains new and updated images since the previous execution. Because it only pulls in the differences since the previous image set was created, the generated image set is often smaller and faster to process than the initial image set.
Generated image sets are sequential and must be pushed to the target mirror registry in order. You can derive the sequence number from the file name of the generated image set archive file.
Adding new and updated images
Depending on the settings in your image set configuration, future executions of oc-mirror can mirror additional new and updated images. Review the settings in your image set configuration to ensure that you are retrieving new versions as necessary. For example, you can set the minimum and maximum versions of Operators to mirror if you want to restrict to specific versions. Alternatively, you can set the minimum version as a starting point to mirror, but keep the version range open so you keep receiving new Operator versions on future executions of oc-mirror. Omitting any minimum or maximum version gives you the full version history of an Operator in a channel. Omitting explicitly named channels gives you all releases in all channels of the specified Operator. Omitting any named Operator gives you the entire catalog of all Operators and all their versions ever released.
All these constraints and conditions are evaluated against the publicly released content by Red Hat on every invocation of oc-mirror. This way, it automatically picks up new releases and entirely new Operators. Constraints can be specified by only listing a desired set of Operators, which will not automatically add other newly released Operators into the mirror set. You can also specify a particular release channel, which limits mirroring to just this channel and not any new channels that have been added. This is important for Operator products, such as Red Hat Quay, that use different release channels for their minor releases. Lastly, you can specify a maximum version of a particular Operator, which causes the tool to only mirror the specified version range so that you do not automatically get any newer releases past the maximum version mirrored. In all these cases, you must update the image set configuration file to broaden the scope of the mirroring of Operators to get other Operators, new channels, and newer versions of Operators to be available in your target registry.
It is recommended to align constraints like channel specification or version ranges with the release strategy that a particular Operator has chosen. For example, when the Operator uses a stable channel, you should restrict mirroring to that channel and potentially a minimum version to find the right balance between download volume and getting stable updates regularly. If the Operator chooses a release version channel scheme, for example stable-3.7, you should mirror all releases in that channel. This allows you to keep receiving patch versions of the Operator, for example 3.7.1. You can also regularly adjust the image set configuration to add channels for new product releases, for example stable-3.8.
Pruning images
Images are pruned automatically from the target mirror registry if they are no longer included in the latest image set that was generated and mirrored. This allows you to easily manage and clean up unneeded content and reclaim storage resources.
If there are OpenShift Container Platform releases or Operator versions that you no longer need, you can modify your image set configuration to exclude them, and they will be pruned from the mirror registry upon mirroring. This can be done by adjusting a minimum or maximum version range setting per Operator in the image set configuration file or by deleting the Operator from the list of Operators to mirror from the catalog. You can also remove entire Operator catalogs or entire OpenShift Container Platform releases from the configuration file.
Images are not automatically pruned from the target mirror registry in the following situations:
- If there are no new or updated images to mirror
- If you are using the Technology Preview OCI feature
Additionally, if an Operator publisher removes an Operator version from a channel, the removed versions are pruned from the target mirror registry.
To disable automatic pruning of images from the target mirror registry, pass the --skip-pruning flag to the oc mirror command.
13.2.3.8.2. Updating your mirror registry content
After you publish the initial image set to the mirror registry, you can use the oc-mirror plugin to keep your disconnected clusters updated.
Depending on your image set configuration, oc-mirror automatically detects newer releases of OpenShift Container Platform and your selected Operators that have been released after you completed the initial mirror. It is recommended to run oc-mirror at regular intervals, for example in a nightly cron job, to receive product and security updates on a timely basis.
Prerequisites
- You have used the oc-mirror plugin to mirror the initial image set to your mirror registry.
You have access to the storage backend that was used for the initial execution of the oc-mirror plugin.
NoteYou must use the same storage backend as the initial execution of oc-mirror for the same mirror registry. Do not delete or modify the metadata image that is generated by the oc-mirror plugin.
Procedure
- If necessary, update your image set configuration file to pick up new OpenShift Container Platform and Operator versions. See Image set configuration examples for example mirroring use cases.
Follow the same steps that you used to mirror your initial image set to the mirror registry. For instructions, see Mirroring an image set in a partially disconnected environment or Mirroring an image set in a fully disconnected environment.
Important- You must provide the same storage backend so that only a differential image set is created and mirrored.
- If you specified a top-level namespace for the mirror registry during the initial image set creation, then you must use this same namespace every time you run the oc-mirror plugin for the same mirror registry.
- Configure your cluster to use the resources generated by oc-mirror.
13.2.3.9. Performing a dry run
You can use oc-mirror to perform a dry run, without actually mirroring any images. This allows you to review the list of images that would be mirrored, as well as any images that would be pruned from the mirror registry. It also allows you to catch any errors with your image set configuration early or use the generated list of images with other tools to carry out the mirroring operation.
Prerequisites
- You have access to the internet to obtain the necessary container images.
-
You have installed the OpenShift CLI (
oc). -
You have installed the
oc-mirrorCLI plugin. - You have created the image set configuration file.
Procedure
Run the
oc mirrorcommand with the--dry-runflag to perform a dry run:$ oc mirror --config=./imageset-config.yaml \1 docker://registry.example:5000 \2 --dry-run 3
- 1
- Pass in the image set configuration file that was created. This procedure assumes that it is named
imageset-config.yaml. - 2
- Specify the mirror registry. Nothing is mirrored to this registry as long as you use the
--dry-runflag. - 3
- Use the
--dry-runflag to generate the dry run artifacts and not an actual image set file.
Example output
Checking push permissions for registry.example:5000
Creating directory: oc-mirror-workspace/src/publish
Creating directory: oc-mirror-workspace/src/v2
Creating directory: oc-mirror-workspace/src/charts
Creating directory: oc-mirror-workspace/src/release-signatures
No metadata detected, creating new workspace
wrote mirroring manifests to oc-mirror-workspace/operators.1658342351/manifests-redhat-operator-index

...

info: Planning completed in 31.48s
info: Dry run complete
Writing image mapping to oc-mirror-workspace/mapping.txt
Navigate into the workspace directory that was generated:
$ cd oc-mirror-workspace/
Review the
mapping.txtfile that was generated.This file contains a list of all images that would be mirrored.
Review the
pruning-plan.jsonfile that was generated.This file contains a list of all images that would be pruned from the mirror registry when the image set is published.
NoteThe
pruning-plan.jsonfile is only generated if your oc-mirror command points to your mirror registry and there are images to be pruned.
13.2.3.10. Mirroring file-based catalog Operator images in OCI format
You can use the oc-mirror plugin to mirror Operators in the Open Container Initiative (OCI) image format, instead of Docker v2 format. You can copy Operator images to a file-based catalog on disk in OCI format. Then you can copy local OCI images to your target mirror registry.
Using the oc-mirror plugin to mirror Operator images in OCI format is a Technology Preview feature only. Technology Preview features are not supported with Red Hat production service level agreements (SLAs) and might not be functionally complete. Red Hat does not recommend using them in production. These features provide early access to upcoming product features, enabling customers to test functionality and provide feedback during the development process.
For more information about the support scope of Red Hat Technology Preview features, see Technology Preview Features Support Scope.
When using the OCI feature, images are not automatically pruned from the target mirror registry.
Prerequisites
- You have access to the internet to obtain the necessary container images.
-
You have installed the OpenShift CLI (
oc). -
You have installed the
oc-mirrorCLI plugin.
Procedure
Optional: Retrieve the catalogs and images that you require and save them to disk. If you already have the catalog image in OCI format on disk, you can skip this step.
Create the image set configuration file:
Example image set configuration file for copying to disk
kind: ImageSetConfiguration
apiVersion: mirror.openshift.io/v1alpha2
mirror:
 operators:
 - catalog: registry.redhat.io/redhat/redhat-operator-index:v4.12
   packages:
   - name: aws-load-balancer-operator
NoteWhen using the OCI feature, only the
mirror.operators.catalogsetting is available for use.The
storageConfigsetting is ignored in favor of the location passed in to theoc mirrorcommand.Run the
oc mirrorcommand to mirror the images from the specified image set configuration to disk:$ oc mirror --config=./imageset-config.yaml \ 1 --use-oci-feature \ 2 --oci-feature-action=copy \ 3 oci://my-oci-catalog 4
- 1
- Pass in the image set configuration file. This procedure assumes that it is named
imageset-config.yaml. - 2
- Use the
--use-oci-featureflag to enable the OCI feature. - 3
- To copy the catalog to disk, set the
--oci-feature-actionflag tocopy. - 4
- Specify a directory on disk where you want to output the catalog. This procedure assumes that it is named
my-oci-catalog. The path must start withoci://. If the specified directory is not a full path, the directory is created in the current working directory where theoc mirrorcommand is run.
NoteYou can optionally use the
--oci-registries-configflag to specify the path to a TOML-formattedregistries.conffile. You can use this to mirror from a different registry, such as a pre-production location for testing, without having to change the image set configuration file.Example registries.conf file
[[registry]]
 location = "registry.redhat.io:5000"
 insecure = false
 blocked = false
 mirror-by-digest-only = true
 prefix = ""
 [[registry.mirror]]
    location = "preprod-registry.example.com"
    insecure = false
Set the
locationfield in theregistry.mirrorsection to an alternative registry location that you want to pull images from. Thelocationfield in theregistrysection must be the same registry location as the one you specify in the image set configuration file.List your directory contents and verify that the following directories were created:
$ ls -l
Example output
my-oci-catalog      1
oc-mirror-workspace 2
olm_artifacts       3
Update the image set configuration file to specify the location of the catalog on disk to mirror to the target mirror registry:
Example image set configuration file for mirroring to mirror registry
kind: ImageSetConfiguration apiVersion: mirror.openshift.io/v1alpha2 mirror: operators: - catalog: oci:///home/user/oc-mirror/my-oci-catalog/redhat-operator-index 1 packages: - name: aws-load-balancer-operator- 1
- Specify the absolute path to the location of the OCI catalog on disk. This procedure assumes that you used
my-oci-catalogas the directory and mirrored theredhat-operator-indexcatalog. The path must start withoci://.
Run the oc mirror command to process the image set file on disk and mirror the contents to a target mirror registry:
$ oc mirror --config=./imageset-config.yaml \ 1
  --use-oci-feature \                         2
  --oci-feature-action=mirror \               3
  docker://registry.example:5000              4
- 1
- Pass in the updated image set configuration file. This procedure assumes that it is named
imageset-config.yaml. - 2
- Use the
--use-oci-featureflag to enable the OCI feature. - 3
- To mirror the catalog to the target mirror registry, set the
--oci-feature-actionflag tomirror. - 4
- Specify the registry to mirror the image set file to. The registry must start with
docker://. If you specify a top-level namespace for the mirror registry, you must also use this same namespace on subsequent executions.
NoteYou can optionally use the
--oci-insecure-signature-policyflag to not push signatures to the target mirror registry.
Next steps
- Configure your cluster to use the resources generated by oc-mirror.
Additional resources
13.2.3.11. Image set configuration parameters
The oc-mirror plugin requires an image set configuration file that defines what images to mirror. The following table lists the available parameters for the ImageSetConfiguration resource.
Table 13.1. ImageSetConfiguration parameters
| Parameter | Description | Values |
|---|---|---|
|
|
The API version for the |
String. For example: |
|
| The maximum size, in GiB, of each archive file within the image set. |
Integer. For example: |
|
| The configuration of the image set. | Object |
|
| The additional images configuration of the image set. | Array of objects. For example: additionalImages: - name: registry.redhat.io/ubi8/ubi:latest |
|
| The tag or digest of the image to mirror. |
String. For example: |
|
| The full tag, digest, or pattern of images to block from mirroring. |
Array of strings. For example: |
|
| The helm configuration of the image set. Note that the oc-mirror plugin supports only helm charts that do not require user input when rendered. | Object |
|
| The local helm charts to mirror. | Array of objects. For example: local:
- name: podinfo
path: /test/podinfo-5.0.0.tar.gz
|
|
| The name of the local helm chart to mirror. |
String. For example: |
|
| The path of the local helm chart to mirror. |
String. For example: |
|
| The remote helm repositories to mirror from. | Array of objects. For example: repositories:
- name: podinfo
url: https://example.github.io/podinfo
charts:
- name: podinfo
version: 5.0.0
|
|
| The name of the helm repository to mirror from. |
String. For example: |
|
| The URL of the helm repository to mirror from. |
String. For example: |
|
| The remote helm charts to mirror. | Array of objects. |
|
| The name of the helm chart to mirror. |
String. For example: |
|
| The version of the named helm chart to mirror. |
String. For example: |
|
| The Operators configuration of the image set. | Array of objects. For example: operators:
- catalog: registry.redhat.io/redhat/redhat-operator-index:v4.12
packages:
- name: elasticsearch-operator
minVersion: '2.4.0'
|
|
| The Operator catalog to include in the image set. |
String. For example: |
|
|
When |
Boolean. The default value is |
|
| The Operator packages configuration. | Array of objects. For example: operators:
- catalog: registry.redhat.io/redhat/redhat-operator-index:v4.12
packages:
- name: elasticsearch-operator
minVersion: '5.2.3-31'
|
|
| The Operator package name to include in the image set |
String. For example: |
|
| The Operator package channel configuration. | Object |
|
| The Operator channel name, unique within a package, to include in the image set. |
String. For example: |
|
| The highest version of the Operator mirror across all channels in which it exists. See the following note for further information. |
String. For example: |
|
| The name of the minimum bundle to include, plus all bundles in the upgrade graph to the channel head. Set this field only if the named bundle has no semantic version metadata. |
String. For example: |
|
| The lowest version of the Operator to mirror across all channels in which it exists. See the following note for further information. |
String. For example: |
|
| The highest version of the Operator to mirror across all channels in which it exists. See the following note for further information. |
String. For example: |
|
| The lowest version of the Operator to mirror across all channels in which it exists. See the following note for further information. |
String. For example: |
|
|
If |
Boolean. The default value is |
|
| Optional alternative name to mirror the referenced catalog as. |
String. For example: |
|
|
Optional alternative tag to append to the |
String. For example: |
|
| The platform configuration of the image set. | Object |
|
| The architecture of the platform release payload to mirror. | Array of strings. For example: architectures: - amd64 - arm64 |
|
| The platform channel configuration of the image set. | Array of objects. For example: channels: - name: stable-4.10 - name: stable-4.12 |
|
|
When |
Boolean. The default value is |
|
| The name of the release channel. |
String. For example: |
|
| The minimum version of the referenced platform to be mirrored. |
String. For example: |
|
| The highest version of the referenced platform to be mirrored. |
String. For example: |
|
| Toggles shortest path mirroring or full range mirroring. |
Boolean. The default value is |
|
| The type of the platform to be mirrored. |
String. For example: |
|
| Indicates whether the OSUS graph is added to the image set and subsequently published to the mirror. |
Boolean. The default value is |
|
| The back-end configuration of the image set. | Object |
|
| The local back-end configuration of the image set. | Object |
|
| The path of the directory to contain the image set metadata. |
String. For example: |
|
| The registry back-end configuration of the image set. | Object |
|
| The back-end registry URI. Can optionally include a namespace reference in the URI. |
String. For example: |
|
| Optionally skip TLS verification of the referenced back-end registry. |
Boolean. The default value is |
Using the the minVersion and maxVersion properties to filter for a specific Operator version range can result in a multiple channel heads error. The error message will state that there are multiple channel heads. This is because when the filter is applied, the update graph of the operator is truncated.
The Operator Lifecycle Manager requires that every operator channel contains versions that form an update graph with exactly one end point, that is, the latest version of the operator. When applying the filter range that graph can turn into two or more separate graphs or a graph that has more than one end point.
To avoid this error, do not filter out the latest version of an operator. If you still run into the error, depending on the operator, either the maxVersion property needs to be increased or the minVersion property needs to be decreased. Because every operator graph can be different, you might need to adjust these values, according to the procedure, until the error is gone.
13.2.3.12. Image set configuration examples
The following ImageSetConfiguration file examples show the configuration for various mirroring use cases.
Use case: Including the shortest OpenShift Container Platform upgrade path
The following ImageSetConfiguration file uses a local storage backend and includes all OpenShift Container Platform versions along the shortest upgrade path from the minimum version of 4.11.37 to the maximum version of 4.12.15.
Example ImageSetConfiguration file
apiVersion: mirror.openshift.io/v1alpha2
kind: ImageSetConfiguration
storageConfig:
  local:
    path: /home/user/metadata
mirror:
  platform:
    channels:
      - name: stable-4.12
        minVersion: 4.11.37
        maxVersion: 4.12.15
        shortestPath: true
Use case: Including all versions of OpenShift Container Platform from a minimum to the latest
The following ImageSetConfiguration file uses a registry storage backend and includes all OpenShift Container Platform versions starting at a minimum version of 4.10.10 to the latest version in the channel.
On every invocation of oc-mirror with this image set configuration, the latest release of the stable-4.10 channel is evaluated, so running oc-mirror at regular intervals ensures that you automatically receive the latest releases of OpenShift Container Platform images.
Example ImageSetConfiguration file
apiVersion: mirror.openshift.io/v1alpha2
kind: ImageSetConfiguration
storageConfig:
  registry:
    imageURL: example.com/mirror/oc-mirror-metadata
    skipTLS: false
mirror:
  platform:
    channels:
      - name: stable-4.10
        minVersion: 4.10.10
Use case: Including Operator versions from a minimum to the latest
The following ImageSetConfiguration file uses a local storage backend and includes only the Red Hat Advanced Cluster Security for Kubernetes Operator, versions starting at 4.0.1 and later in the stable channel.
When you specify a minimum or maximum version range, you might not receive all Operator versions in that range.
By default, oc-mirror excludes any versions that are skipped or replaced by a newer version in the Operator Lifecycle Manager (OLM) specification. Operator versions that are skipped might be affected by a CVE or contain bugs. Use a newer version instead. For more information on skipped and replaced versions, see Creating an update graph with OLM.
To receive all Operator versions in a specified range, you can set the mirror.operators.full field to true.
Example ImageSetConfiguration file
apiVersion: mirror.openshift.io/v1alpha2
kind: ImageSetConfiguration
storageConfig:
  local:
    path: /home/user/metadata
mirror:
  operators:
    - catalog: registry.redhat.io/redhat/redhat-operator-index:v4.12
      packages:
        - name: rhacs-operator
          channels:
          - name: stable
            minVersion: 4.0.1
To specify a maximum version instead of the latest, set the mirror.operators.packages.channels.maxVersion field.
Use case: Including the Nutanix CSI Operator
The following ImageSetConfiguration file uses a local storage backend and includes the Nutanix CSI Operator, the OpenShift Update Service (OSUS) graph image, and an additional Red Hat Universal Base Image (UBI).
Example ImageSetConfiguration file
kind: ImageSetConfiguration
apiVersion: mirror.openshift.io/v1alpha2
storageConfig:
  registry:
    imageURL: mylocalregistry/ocp-mirror/openshift4
    skipTLS: false
mirror:
  platform:
    channels:
    - name: stable-4.12
      type: ocp
    graph: true
  operators:
  - catalog: registry.redhat.io/redhat/certified-operator-index:v4.12
    packages:
    - name: nutanixcsioperator
      channels:
      - name: stable
  additionalImages:
  - name: registry.redhat.io/ubi9/ubi:latest
Use case: Including the default Operator channel
The following ImageSetConfiguration file includes the stable-5.7 and stable channels for the OpenShift Elasticsearch Operator. Even if only the packages from the stable-5.7 channel are needed, the stable channel must also be included in the ImageSetConfiguration file, because it is the default channel for the Operator. You must always include the default channel for the Operator package even if you do not use the bundles in that channel.
You can find the default channel by running the following command: oc mirror list operators --catalog=<catalog_name> --package=<package_name>.
Example ImageSetConfiguration file
apiVersion: mirror.openshift.io/v1alpha2
kind: ImageSetConfiguration
storageConfig:
  registry:
    imageURL: example.com/mirror/oc-mirror-metadata
    skipTLS: false
mirror:
  operators:
  - catalog: registry.redhat.io/redhat/redhat-operator-index:v4.12
    packages:
    - name: elasticsearch-operator
      channels:
      - name: stable-5.7
      - name: stable
Use case: Including an entire catalog (all versions)
The following ImageSetConfiguration file sets the mirror.operators.full field to true to include all versions for an entire Operator catalog.
Example ImageSetConfiguration file
apiVersion: mirror.openshift.io/v1alpha2
kind: ImageSetConfiguration
storageConfig:
  registry:
    imageURL: example.com/mirror/oc-mirror-metadata
    skipTLS: false
mirror:
  operators:
    - catalog: registry.redhat.io/redhat/redhat-operator-index:v4.12
      full: true
Use case: Including an entire catalog (channel heads only)
The following ImageSetConfiguration file includes the channel heads for an entire Operator catalog.
By default, for each Operator in the catalog, oc-mirror includes the latest Operator version (channel head) from the default channel. If you want to mirror all Operator versions, and not just the channel heads, you must set the mirror.operators.full field to true.
Example ImageSetConfiguration file
apiVersion: mirror.openshift.io/v1alpha2
kind: ImageSetConfiguration
storageConfig:
  registry:
    imageURL: example.com/mirror/oc-mirror-metadata
    skipTLS: false
mirror:
  operators:
  - catalog: registry.redhat.io/redhat/redhat-operator-index:v4.12
Use case: Including arbitrary images and helm charts
The following ImageSetConfiguration file uses a registry storage backend and includes helm charts and an additional Red Hat Universal Base Image (UBI).
Example ImageSetConfiguration file
apiVersion: mirror.openshift.io/v1alpha2
kind: ImageSetConfiguration
archiveSize: 4
storageConfig:
  registry:
    imageURL: example.com/mirror/oc-mirror-metadata
    skipTLS: false
mirror:
 platform:
   architectures:
     - "s390x"
   channels:
     - name: stable-4.12
 operators:
   - catalog: registry.redhat.io/redhat/redhat-operator-index:v4.12
 helm:
   repositories:
     - name: redhat-helm-charts
       url: https://raw.githubusercontent.com/redhat-developer/redhat-helm-charts/master
       charts:
         - name: ibm-mongodb-enterprise-helm
           version: 0.2.0
 additionalImages:
   - name: registry.redhat.io/ubi9/ubi:latest
13.2.3.13. Command reference for oc-mirror
The following tables describe the oc mirror subcommands and flags:
Table 13.2. oc mirror subcommands
| Subcommand | Description |
|---|---|
|
| Generate the autocompletion script for the specified shell. |
|
| Output the contents of an image set. |
|
| Show help about any subcommand. |
|
| Output an initial image set configuration template. |
|
| List available platform and Operator content and their version. |
|
| Output the oc-mirror version. |
Table 13.3. oc mirror flags
| Flag | Description |
|---|---|
|
| Specify the path to an image set configuration file. |
|
| If any non image-pull related error occurs, continue and attempt to mirror as much as possible. |
|
| Disable TLS validation for the target registry. |
|
| Use plain HTTP for the target registry. |
|
|
Print actions without mirroring images. Generates |
|
| Specify the path to an image set archive that was generated by an execution of oc-mirror to load into a target registry. |
|
| Show the help. |
|
| Ignore past mirrors when downloading images and packing layers. Disables incremental mirroring and might download more data. |
|
|
Generate manifests for |
|
|
Specify the maximum number of nested paths for destination registries that limit nested paths. The default is |
|
|
Specify the number of concurrent requests allowed per registry. The default is |
|
|
The action to perform when using the Technology Preview OCI feature. The options are |
|
| Do not push signatures when using the Technology Preview OCI feature. |
|
| Provide a registries configuration file to specify an alternative registry location to copy from when using the Technology Preview OCI feature. |
|
| Skip removal of artifact directories. |
|
| Do not replace image tags with digest pins in Operator catalogs. |
|
|
Skip metadata when publishing an image set. This is only recommended when the image set was created with |
|
| If an image is not found, skip it instead of reporting an error and aborting execution. Does not apply to custom images explicitly specified in the image set configuration. |
|
| Disable automatic pruning of images from the target mirror registry. |
|
| Skip digest verification. |
|
| Disable TLS validation for the source registry. |
|
| Use plain HTTP for the source registry. |
|
| Use the Technology Preview OCI feature for copying OCI-formatted images. |
|
|
Specify the number for the log level verbosity. Valid values are |
13.2.4. Mirroring images using the oc adm release mirror command
To avoid excessive memory usage by the OpenShift Update Service application, you must mirror release images to a separate repository as described in the following procedure.
Prerequisites
- You configured a mirror registry to use in your disconnected environment and can access the certificate and credentials that you configured.
- You downloaded the pull secret from the Red Hat OpenShift Cluster Manager and modified it to include authentication to your mirror repository.
- If you use self-signed certificates, you have specified a Subject Alternative Name in the certificates.
Procedure
- Use the Red Hat OpenShift Container Platform Upgrade Graph visualizer and update planner to plan an update from one version to another. The OpenShift Upgrade Graph provides channel graphs and a way to confirm that there is an update path between your current and intended cluster versions.
Set the required environment variables:
Export the release version:
$ export OCP_RELEASE=<release_version>
For
<release_version>, specify the tag that corresponds to the version of OpenShift Container Platform to which you want to update, such as4.5.4.Export the local registry name and host port:
$ LOCAL_REGISTRY='<local_registry_host_name>:<local_registry_host_port>'
For
<local_registry_host_name>, specify the registry domain name for your mirror repository, and for<local_registry_host_port>, specify the port that it serves content on.Export the local repository name:
$ LOCAL_REPOSITORY='<local_repository_name>'
For
<local_repository_name>, specify the name of the repository to create in your registry, such asocp4/openshift4.If you are using the OpenShift Update Service, export an additional local repository name to contain the release images:
$ LOCAL_RELEASE_IMAGES_REPOSITORY='<local_release_images_repository_name>'
For
<local_release_images_repository_name>, specify the name of the repository to create in your registry, such asocp4/openshift4-release-images.Export the name of the repository to mirror:
$ PRODUCT_REPO='openshift-release-dev'
For a production release, you must specify
openshift-release-dev.Export the path to your registry pull secret:
$ LOCAL_SECRET_JSON='<path_to_pull_secret>'
For
<path_to_pull_secret>, specify the absolute path to and file name of the pull secret for your mirror registry that you created.NoteIf your cluster uses an
ImageContentSourcePolicyobject to configure repository mirroring, you can use only global pull secrets for mirrored registries. You cannot add a pull secret to a project.Export the release mirror:
$ RELEASE_NAME="ocp-release"
For a production release, you must specify
ocp-release.Export the type of architecture for your server, such as
x86_64.:$ ARCHITECTURE=<server_architecture>
Export the path to the directory to host the mirrored images:
$ REMOVABLE_MEDIA_PATH=<path> 1- 1
- Specify the full path, including the initial forward slash (/) character.
Review the images and configuration manifests to mirror:
$ oc adm release mirror -a ${LOCAL_SECRET_JSON} --to-dir=${REMOVABLE_MEDIA_PATH}/mirror quay.io/${PRODUCT_REPO}/${RELEASE_NAME}:${OCP_RELEASE}-${ARCHITECTURE} --dry-runMirror the version images to the mirror registry.
If your mirror host does not have internet access, take the following actions:
- Connect the removable media to a system that is connected to the internet.
Mirror the images and configuration manifests to a directory on the removable media:
$ oc adm release mirror -a ${LOCAL_SECRET_JSON} --to-dir=${REMOVABLE_MEDIA_PATH}/mirror quay.io/${PRODUCT_REPO}/${RELEASE_NAME}:${OCP_RELEASE}-${ARCHITECTURE}NoteThis command also generates and saves the mirrored release image signature config map onto the removable media.
Take the media to the disconnected environment and upload the images to the local container registry.
$ oc image mirror -a ${LOCAL_SECRET_JSON} --from-dir=${REMOVABLE_MEDIA_PATH}/mirror "file://openshift/release:${OCP_RELEASE}*" ${LOCAL_REGISTRY}/${LOCAL_REPOSITORY} 1- 1
- For
REMOVABLE_MEDIA_PATH, you must use the same path that you specified when you mirrored the images.
-
Use
occommand-line interface (CLI) to log in to the cluster that you are upgrading. Apply the mirrored release image signature config map to the connected cluster:
$ oc apply -f ${REMOVABLE_MEDIA_PATH}/mirror/config/<image_signature_file> 1- 1
- For
<image_signature_file>, specify the path and name of the file, for example,signature-sha256-81154f5c03294534.yaml.
If you are using the OpenShift Update Service, mirror the release image to a separate repository:
$ oc image mirror -a ${LOCAL_SECRET_JSON} ${LOCAL_REGISTRY}/${LOCAL_REPOSITORY}:${OCP_RELEASE}-${ARCHITECTURE} ${LOCAL_REGISTRY}/${LOCAL_RELEASE_IMAGES_REPOSITORY}:${OCP_RELEASE}-${ARCHITECTURE}
If the local container registry and the cluster are connected to the mirror host, take the following actions:
Directly push the release images to the local registry and apply the config map to the cluster by using following command:
$ oc adm release mirror -a ${LOCAL_SECRET_JSON} --from=quay.io/${PRODUCT_REPO}/${RELEASE_NAME}:${OCP_RELEASE}-${ARCHITECTURE} \ --to=${LOCAL_REGISTRY}/${LOCAL_REPOSITORY} --apply-release-image-signatureNoteIf you include the
--apply-release-image-signatureoption, do not create the config map for image signature verification.If you are using the OpenShift Update Service, mirror the release image to a separate repository:
$ oc image mirror -a ${LOCAL_SECRET_JSON} ${LOCAL_REGISTRY}/${LOCAL_REPOSITORY}:${OCP_RELEASE}-${ARCHITECTURE} ${LOCAL_REGISTRY}/${LOCAL_RELEASE_IMAGES_REPOSITORY}:${OCP_RELEASE}-${ARCHITECTURE}
13.3. Updating a cluster in a disconnected environment using the OpenShift Update Service
To get an update experience similar to connected clusters, you can use the following procedures to install and configure the OpenShift Update Service (OSUS) in a disconnected environment.
The following steps outline the high-level workflow on how to update a cluster in a disconnected environment using OSUS:
- Configure access to a secured registry.
- Update the global cluster pull secret to access your mirror registry.
- Install the OSUS Operator.
- Create a graph data container image for the OpenShift Update Service.
- Install the OSUS application and configure your clusters to use the local OpenShift Update Service.
- Perform a supported update procedure from the documentation as you would with a connected cluster.
13.3.1. Using the OpenShift Update Service in a disconnected environment
The OpenShift Update Service (OSUS) provides update recommendations to OpenShift Container Platform clusters. Red Hat publicly hosts the OpenShift Update Service, and clusters in a connected environment can connect to the service through public APIs to retrieve update recommendations.
However, clusters in a disconnected environment cannot access these public APIs to retrieve update information. To have a similar update experience in a disconnected environment, you can install and configure the OpenShift Update Service locally so that it is available within the disconnected environment.
A single OSUS instance is capable of serving recommendations to thousands of clusters. OSUS can be scaled horizontally to cater to more clusters by changing the replica value. So for most disconnected use cases, one OSUS instance is enough. For example, Red Hat hosts just one OSUS instance for the entire fleet of connected clusters.
If you want to keep update recommendations separate in different environments, you can run one OSUS instance for each environment. For example, in a case where you have separate test and stage environments, you might not want a cluster in a stage environment to receive update recommendations to version A if that version has not been tested in the test environment yet.
The following sections describe how to install a local OSUS instance and configure it to provide update recommendations to a cluster.
Additional resources
13.3.2. Prerequisites
-
You must have the
occommand-line interface (CLI) tool installed. - You must provision a local container image registry with the container images for your update, as described in Mirroring the OpenShift Container Platform image repository.
13.3.3. Configuring access to a secured registry for the OpenShift Update Service
If the release images are contained in a registry whose HTTPS X.509 certificate is signed by a custom certificate authority, complete the steps in Configuring additional trust stores for image registry access along with following changes for the update service.
The OpenShift Update Service Operator needs the config map key name updateservice-registry in the registry CA cert.
Image registry CA config map example for the update service
apiVersion: v1
kind: ConfigMap
metadata:
  name: my-registry-ca
data:
  updateservice-registry: | 1
    -----BEGIN CERTIFICATE-----
    ...
    -----END CERTIFICATE-----
  registry-with-port.example.com..5000: | 2
    -----BEGIN CERTIFICATE-----
    ...
    -----END CERTIFICATE-----
13.3.4. Updating the global cluster pull secret
You can update the global pull secret for your cluster by either replacing the current pull secret or appending a new pull secret.
The procedure is required when users use a separate registry to store images than the registry used during installation.
Prerequisites
-
You have access to the cluster as a user with the
cluster-adminrole.
Procedure
Optional: To append a new pull secret to the existing pull secret, complete the following steps:
Enter the following command to download the pull secret:
$ oc get secret/pull-secret -n openshift-config --template='{{index .data ".dockerconfigjson" | base64decode}}' ><pull_secret_location> 1- 1
- Provide the path to the pull secret file.
Enter the following command to add the new pull secret:
$ oc registry login --registry="<registry>" \ 1
--auth-basic="<username>:<password>" \ 2
--to=<pull_secret_location> 3
Alternatively, you can perform a manual update to the pull secret file.
Enter the following command to update the global pull secret for your cluster:
$ oc set data secret/pull-secret -n openshift-config --from-file=.dockerconfigjson=<pull_secret_location> 1- 1
- Provide the path to the new pull secret file.
This update is rolled out to all nodes, which can take some time depending on the size of your cluster.
NoteAs of OpenShift Container Platform 4.7.4, changes to the global pull secret no longer trigger a node drain or reboot.
13.3.5. Installing the OpenShift Update Service Operator
To install the OpenShift Update Service, you must first install the OpenShift Update Service Operator by using the OpenShift Container Platform web console or CLI.
For clusters that are installed in disconnected environments, also known as disconnected clusters, Operator Lifecycle Manager by default cannot access the Red Hat-provided OperatorHub sources hosted on remote registries because those remote sources require full internet connectivity. For more information, see Using Operator Lifecycle Manager on restricted networks.
13.3.5.1. Installing the OpenShift Update Service Operator by using the web console
You can use the web console to install the OpenShift Update Service Operator.
Procedure
In the web console, click Operators → OperatorHub.
NoteEnter
Update Serviceinto the Filter by keyword… field to find the Operator faster.Choose OpenShift Update Service from the list of available Operators, and click Install.
-
Channel
v1is selected as the Update Channel since it is the only channel available in this release. - Select A specific namespace on the cluster under Installation Mode.
-
Select a namespace for Installed Namespace or accept the recommended namespace
openshift-update-service. Select an Approval Strategy:
- The Automatic strategy allows Operator Lifecycle Manager (OLM) to automatically update the Operator when a new version is available.
- The Manual strategy requires a cluster administrator to approve the Operator update.
- Click Install.
-
Channel
- Verify that the OpenShift Update Service Operator is installed by switching to the Operators → Installed Operators page.
- Ensure that OpenShift Update Service is listed in the selected namespace with a Status of Succeeded.
13.3.5.2. Installing the OpenShift Update Service Operator by using the CLI
You can use the OpenShift CLI (oc) to install the OpenShift Update Service Operator.
Procedure
Create a namespace for the OpenShift Update Service Operator:
Create a
Namespaceobject YAML file, for example,update-service-namespace.yaml, for the OpenShift Update Service Operator:apiVersion: v1 kind: Namespace metadata: name: openshift-update-service annotations: openshift.io/node-selector: "" labels: openshift.io/cluster-monitoring: "true" 1- 1
- Set the
openshift.io/cluster-monitoringlabel to enable Operator-recommended cluster monitoring on this namespace.
Create the namespace:
$ oc create -f <filename>.yaml
For example:
$ oc create -f update-service-namespace.yaml
Install the OpenShift Update Service Operator by creating the following objects:
Create an
OperatorGroupobject YAML file, for example,update-service-operator-group.yaml:apiVersion: operators.coreos.com/v1 kind: OperatorGroup metadata: name: update-service-operator-group spec: targetNamespaces: - openshift-update-service
Create an
OperatorGroupobject:$ oc -n openshift-update-service create -f <filename>.yaml
For example:
$ oc -n openshift-update-service create -f update-service-operator-group.yaml
Create a
Subscriptionobject YAML file, for example,update-service-subscription.yaml:Example Subscription
apiVersion: operators.coreos.com/v1alpha1 kind: Subscription metadata: name: update-service-subscription spec: channel: v1 installPlanApproval: "Automatic" source: "redhat-operators" 1 sourceNamespace: "openshift-marketplace" name: "cincinnati-operator"- 1
- Specify the name of the catalog source that provides the Operator. For clusters that do not use a custom Operator Lifecycle Manager (OLM), specify
redhat-operators. If your OpenShift Container Platform cluster is installed in a disconnected environment, specify the name of theCatalogSourceobject created when you configured Operator Lifecycle Manager (OLM).
Create the
Subscriptionobject:$ oc create -f <filename>.yaml
For example:
$ oc -n openshift-update-service create -f update-service-subscription.yaml
The OpenShift Update Service Operator is installed to the
openshift-update-servicenamespace and targets theopenshift-update-servicenamespace.
Verify the Operator installation:
$ oc -n openshift-update-service get clusterserviceversions
Example output
NAME                             DISPLAY                    VERSION   REPLACES   PHASE
update-service-operator.v4.6.0   OpenShift Update Service   4.6.0                Succeeded
...
If the OpenShift Update Service Operator is listed, the installation was successful. The version number might be different than shown.
Additional resources
13.3.6. Creating the OpenShift Update Service graph data container image
The OpenShift Update Service requires a graph data container image, from which the OpenShift Update Service retrieves information about channel membership and blocked update edges. Graph data is typically fetched directly from the upgrade graph data repository. In environments where an internet connection is unavailable, loading this information from an init container is another way to make the graph data available to the OpenShift Update Service. The role of the init container is to provide a local copy of the graph data, and during pod initialization, the init container copies the data to a volume that is accessible by the service.
The oc-mirror OpenShift CLI (oc) plugin creates this graph data container image in addition to mirroring release images. If you used the oc-mirror plugin to mirror your release images, you can skip this procedure.
Procedure
Create a Dockerfile, for example,
./Dockerfile, containing the following:FROM registry.access.redhat.com/ubi8/ubi:8.1 RUN curl -L -o cincinnati-graph-data.tar.gz https://api.openshift.com/api/upgrades_info/graph-data RUN mkdir -p /var/lib/cincinnati-graph-data && tar xvzf cincinnati-graph-data.tar.gz -C /var/lib/cincinnati-graph-data/ --no-overwrite-dir --no-same-owner CMD ["/bin/bash", "-c" ,"exec cp -rp /var/lib/cincinnati-graph-data/* /var/lib/cincinnati/graph-data"]
Use the docker file created in the above step to build a graph data container image, for example,
registry.example.com/openshift/graph-data:latest:$ podman build -f ./Dockerfile -t registry.example.com/openshift/graph-data:latest
Push the graph data container image created in the previous step to a repository that is accessible to the OpenShift Update Service, for example,
registry.example.com/openshift/graph-data:latest:$ podman push registry.example.com/openshift/graph-data:latest
NoteTo push a graph data image to a local registry in a disconnected environment, copy the graph data container image created in the previous step to a repository that is accessible to the OpenShift Update Service. Run
oc image mirror --helpfor available options.
13.3.7. Creating an OpenShift Update Service application
You can create an OpenShift Update Service application by using the OpenShift Container Platform web console or CLI.
13.3.7.1. Creating an OpenShift Update Service application by using the web console
You can use the OpenShift Container Platform web console to create an OpenShift Update Service application by using the OpenShift Update Service Operator.
Prerequisites
- The OpenShift Update Service Operator has been installed.
- The OpenShift Update Service graph data container image has been created and pushed to a repository that is accessible to the OpenShift Update Service.
- The current release and update target releases have been mirrored to a locally accessible registry.
Procedure
- In the web console, click Operators → Installed Operators.
- Choose OpenShift Update Service from the list of installed Operators.
- Click the Update Service tab.
- Click Create UpdateService.
-
Enter a name in the Name field, for example,
service. -
Enter the local pullspec in the Graph Data Image field to the graph data container image created in "Creating the OpenShift Update Service graph data container image", for example,
registry.example.com/openshift/graph-data:latest. -
In the Releases field, enter the local registry and repository created to contain the release images in "Mirroring the OpenShift Container Platform image repository", for example,
registry.example.com/ocp4/openshift4-release-images. -
Enter
2in the Replicas field. - Click Create to create the OpenShift Update Service application.
Verify the OpenShift Update Service application:
- From the UpdateServices list in the Update Service tab, click the Update Service application just created.
- Click the Resources tab.
- Verify each application resource has a status of Created.
13.3.7.2. Creating an OpenShift Update Service application by using the CLI
You can use the OpenShift CLI (oc) to create an OpenShift Update Service application.
Prerequisites
- The OpenShift Update Service Operator has been installed.
- The OpenShift Update Service graph data container image has been created and pushed to a repository that is accessible to the OpenShift Update Service.
- The current release and update target releases have been mirrored to a locally accessible registry.
Procedure
Configure the OpenShift Update Service target namespace, for example,
openshift-update-service:$ NAMESPACE=openshift-update-service
The namespace must match the
targetNamespacesvalue from the operator group.Configure the name of the OpenShift Update Service application, for example,
service:$ NAME=service
Configure the local registry and repository for the release images as configured in "Mirroring the OpenShift Container Platform image repository", for example,
registry.example.com/ocp4/openshift4-release-images:$ RELEASE_IMAGES=registry.example.com/ocp4/openshift4-release-images
Set the local pullspec for the graph data image to the graph data container image created in "Creating the OpenShift Update Service graph data container image", for example,
registry.example.com/openshift/graph-data:latest:$ GRAPH_DATA_IMAGE=registry.example.com/openshift/graph-data:latest
Create an OpenShift Update Service application object:
$ oc -n "${NAMESPACE}" create -f - <<EOF
apiVersion: updateservice.operator.openshift.io/v1
kind: UpdateService
metadata:
  name: ${NAME}
spec:
  replicas: 2
  releases: ${RELEASE_IMAGES}
  graphDataImage: ${GRAPH_DATA_IMAGE}
EOF
Verify the OpenShift Update Service application:
Use the following command to obtain a policy engine route:
$ while sleep 1; do POLICY_ENGINE_GRAPH_URI="$(oc -n "${NAMESPACE}" get -o jsonpath='{.status.policyEngineURI}/api/upgrades_info/v1/graph{"\n"}' updateservice "${NAME}")"; SCHEME="${POLICY_ENGINE_GRAPH_URI%%:*}"; if test "${SCHEME}" = http -o "${SCHEME}" = https; then break; fi; doneYou might need to poll until the command succeeds.
Retrieve a graph from the policy engine. Be sure to specify a valid version for
channel. For example, if running in OpenShift Container Platform 4.12, usestable-4.12:$ while sleep 10; do HTTP_CODE="$(curl --header Accept:application/json --output /dev/stderr --write-out "%{http_code}" "${POLICY_ENGINE_GRAPH_URI}?channel=stable-4.6")"; if test "${HTTP_CODE}" -eq 200; then break; fi; echo "${HTTP_CODE}"; doneThis polls until the graph request succeeds; however, the resulting graph might be empty depending on which release images you have mirrored.
The policy engine route name must not be more than 63 characters based on RFC-1123. If you see ReconcileCompleted status as false with the reason CreateRouteFailed caused by host must conform to DNS 1123 naming convention and must be no more than 63 characters, try creating the Update Service with a shorter name.
13.3.7.2.1. Configuring the Cluster Version Operator (CVO)
After the OpenShift Update Service Operator has been installed and the OpenShift Update Service application has been created, the Cluster Version Operator (CVO) can be updated to pull graph data from the locally installed OpenShift Update Service.
Prerequisites
- The OpenShift Update Service Operator has been installed.
- The OpenShift Update Service graph data container image has been created and pushed to a repository that is accessible to the OpenShift Update Service.
- The current release and update target releases have been mirrored to a locally accessible registry.
- The OpenShift Update Service application has been created.
Procedure
Set the OpenShift Update Service target namespace, for example,
openshift-update-service:$ NAMESPACE=openshift-update-service
Set the name of the OpenShift Update Service application, for example,
service:$ NAME=service
Obtain the policy engine route:
$ POLICY_ENGINE_GRAPH_URI="$(oc -n "${NAMESPACE}" get -o jsonpath='{.status.policyEngineURI}/api/upgrades_info/v1/graph{"\n"}' updateservice "${NAME}")"Set the patch for the pull graph data:
$ PATCH="{\"spec\":{\"upstream\":\"${POLICY_ENGINE_GRAPH_URI}\"}}"Patch the CVO to use the local OpenShift Update Service:
$ oc patch clusterversion version -p $PATCH --type merge
See Enabling the cluster-wide proxy to configure the CA to trust the update server.
13.3.8. Next steps
Before updating your cluster, confirm that the following conditions are met:
- The Cluster Version Operator (CVO) is configured to use your locally-installed OpenShift Update Service application.
The release image signature config map for the new release is applied to your cluster.
NoteThe release image signature config map allows the Cluster Version Operator (CVO) to ensure the integrity of release images by verifying that the actual image signatures match the expected signatures.
- The current release and update target release images are mirrored to a locally accessible registry.
- A recent graph data container image has been mirrored to your local registry.
A recent version of the OpenShift Update Service Operator is installed.
NoteIf you have not recently installed or updated the OpenShift Update Service Operator, there might be a more recent version available. See Using Operator Lifecycle Manager on restricted networks for more information about how to update your OLM catalog in a disconnected environment.
After you configure your cluster to use the locally-installed OpenShift Update Service and local mirror registry, you can use any of the following update methods:
13.4. Updating a cluster in a disconnected environment without the OpenShift Update Service
Use the following procedures to update a cluster in a disconnected environment without access to the OpenShift Update Service.
13.4.1. Prerequisites
-
You must have the
occommand-line interface (CLI) tool installed. - You must provision a local container image registry with the container images for your update, as described in Mirroring the OpenShift Container Platform image repository.
-
You must have access to the cluster as a user with
adminprivileges. See Using RBAC to define and apply permissions. - You must have a recent etcd backup in case your update fails and you must restore your cluster to a previous state.
- You must ensure that all machine config pools (MCPs) are running and not paused. Nodes associated with a paused MCP are skipped during the update process. You can pause the MCPs if you are performing a canary rollout update strategy.
- If your cluster uses manually maintained credentials, update the cloud provider resources for the new release. For more information, including how to determine if this is a requirement for your cluster, see Preparing to update a cluster with manually maintained credentials.
-
If you run an Operator or you have configured any application with the pod disruption budget, you might experience an interruption during the upgrade process. If
minAvailableis set to 1 inPodDisruptionBudget, the nodes are drained to apply pending machine configs which might block the eviction process. If several nodes are rebooted, all the pods might run on only one node, and thePodDisruptionBudgetfield can prevent the node drain.
If you run an Operator or you have configured any application with the pod disruption budget, you might experience an interruption during the upgrade process. If minAvailable is set to 1 in PodDisruptionBudget, the nodes are drained to apply pending machine configs which might block the eviction process. If several nodes are rebooted, all the pods might run on only one node, and the PodDisruptionBudget field can prevent the node drain.
13.4.2. Pausing a MachineHealthCheck resource
During the upgrade process, nodes in the cluster might become temporarily unavailable. In the case of worker nodes, the machine health check might identify such nodes as unhealthy and reboot them. To avoid rebooting such nodes, pause all the MachineHealthCheck resources before updating the cluster.
Prerequisites
-
Install the OpenShift CLI (
oc).
Procedure
To list all the available
MachineHealthCheckresources that you want to pause, run the following command:$ oc get machinehealthcheck -n openshift-machine-api
To pause the machine health checks, add the
cluster.x-k8s.io/paused=""annotation to theMachineHealthCheckresource. Run the following command:$ oc -n openshift-machine-api annotate mhc <mhc-name> cluster.x-k8s.io/paused=""
The annotated
MachineHealthCheckresource resembles the following YAML file:apiVersion: machine.openshift.io/v1beta1 kind: MachineHealthCheck metadata: name: example namespace: openshift-machine-api annotations: cluster.x-k8s.io/paused: "" spec: selector: matchLabels: role: worker unhealthyConditions: - type: "Ready" status: "Unknown" timeout: "300s" - type: "Ready" status: "False" timeout: "300s" maxUnhealthy: "40%" status: currentHealthy: 5 expectedMachines: 5ImportantResume the machine health checks after updating the cluster. To resume the check, remove the pause annotation from the
MachineHealthCheckresource by running the following command:$ oc -n openshift-machine-api annotate mhc <mhc-name> cluster.x-k8s.io/paused-
13.4.3. Retrieving a release image digest
In order to update a cluster in a disconnected environment using the oc adm upgrade command with the --to-image option, you must reference the sha256 digest that corresponds to your targeted release image.
Procedure
Run the following command on a device that is connected to the internet:
$ oc adm release info -o 'jsonpath={.digest}{"\n"}' quay.io/openshift-release-dev/ocp-release:${OCP_RELEASE_VERSION}-${ARCHITECTURE}For
{OCP_RELEASE_VERSION}, specify the version of OpenShift Container Platform to which you want to update, such as4.10.16.For
{ARCHITECTURE}, specify the architecture of the cluster, such asx86_64,aarch64,s390x, orppc64le.Example output
sha256:a8bfba3b6dddd1a2fbbead7dac65fe4fb8335089e4e7cae327f3bad334add31d
- Copy the sha256 digest for use when updating your cluster.
13.4.4. Updating the disconnected cluster
Update the disconnected cluster to the OpenShift Container Platform version that you downloaded the release images for.
If you have a local OpenShift Update Service, you can update by using the connected web console or CLI instructions instead of this procedure.
Prerequisites
- You mirrored the images for the new release to your registry.
You applied the release image signature ConfigMap for the new release to your cluster.
NoteThe release image signature config map allows the Cluster Version Operator (CVO) to ensure the integrity of release images by verifying that the actual image signatures match the expected signatures.
- You obtained the sha256 digest for your targeted release image.
-
You installed the OpenShift CLI (
oc). -
You paused all
MachineHealthCheckresources.
Procedure
Update the cluster:
$ oc adm upgrade --allow-explicit-upgrade --to-image <defined_registry>/<defined_repository>@<digest>
Where:
<defined_registry>- Specifies the name of the mirror registry you mirrored your images to.
<defined_repository>- Specifies the name of the image repository you want to use on the mirror registry.
<digest>-
Specifies the sha256 digest for the targeted release image, for example,
sha256:81154f5c03294534e1eaf0319bef7a601134f891689ccede5d705ef659aa8c92.
Note- See "Mirroring OpenShift Container Platform images" to review how your mirror registry and repository names are defined.
-
If you used an
ImageContentSourcePolicyorImageDigestMirrorSet, you can use the canonical registry and repository names instead of the names you defined. The canonical registry name isquay.ioand the canonical repository name isopenshift-release-dev/ocp-release. -
You can only configure global pull secrets for clusters that have an
ImageContentSourcePolicyobject. You cannot add a pull secret to a project.
Additional resources
13.4.5. Configuring image registry repository mirroring
Setting up container registry repository mirroring enables you to do the following:
- Configure your OpenShift Container Platform cluster to redirect requests to pull images from a repository on a source image registry and have it resolved by a repository on a mirrored image registry.
- Identify multiple mirrored repositories for each target repository, to make sure that if one mirror is down, another can be used.
The attributes of repository mirroring in OpenShift Container Platform include:
- Image pulls are resilient to registry downtimes.
- Clusters in disconnected environments can pull images from critical locations, such as quay.io, and have registries behind a company firewall provide the requested images.
- A particular order of registries is tried when an image pull request is made, with the permanent registry typically being the last one tried.
-
The mirror information you enter is added to the
/etc/containers/registries.conffile on every node in the OpenShift Container Platform cluster. - When a node makes a request for an image from the source repository, it tries each mirrored repository in turn until it finds the requested content. If all mirrors fail, the cluster tries the source repository. If successful, the image is pulled to the node.
Setting up repository mirroring can be done in the following ways:
At OpenShift Container Platform installation:
By pulling container images needed by OpenShift Container Platform and then bringing those images behind your company’s firewall, you can install OpenShift Container Platform into a datacenter that is in a disconnected environment.
After OpenShift Container Platform installation:
Even if you don’t configure mirroring during OpenShift Container Platform installation, you can do so later using the
ImageContentSourcePolicyobject.
The following procedure provides a postinstallation mirror configuration, where you create an ImageContentSourcePolicy object that identifies:
- The source of the container image repository you want to mirror.
- A separate entry for each mirror repository you want to offer the content requested from the source repository.
You can only configure global pull secrets for clusters that have an ImageContentSourcePolicy object. You cannot add a pull secret to a project.
Prerequisites
-
Access to the cluster as a user with the
cluster-adminrole.
Procedure
Configure mirrored repositories, by either:
- Setting up a mirrored repository with Red Hat Quay, as described in Red Hat Quay Repository Mirroring. Using Red Hat Quay allows you to copy images from one repository to another and also automatically sync those repositories repeatedly over time.
Using a tool such as
skopeoto copy images manually from the source directory to the mirrored repository.For example, after installing the skopeo RPM package on a Red Hat Enterprise Linux (RHEL) 7 or RHEL 8 system, use the
skopeocommand as shown in this example:$ skopeo copy \ docker://registry.access.redhat.com/ubi8/ubi-minimal@sha256:5cfbaf45ca96806917830c183e9f37df2e913b187adb32e89fd83fa455ebaa6 \ docker://example.io/example/ubi-minimal
In this example, you have a container image registry that is named
example.iowith an image repository namedexampleto which you want to copy theubi8/ubi-minimalimage fromregistry.access.redhat.com. After you create the registry, you can configure your OpenShift Container Platform cluster to redirect requests made of the source repository to the mirrored repository.
- Log in to your OpenShift Container Platform cluster.
Create an
ImageContentSourcePolicyfile (for example,registryrepomirror.yaml), replacing the source and mirrors with your own registry and repository pairs and images:apiVersion: operator.openshift.io/v1alpha1 kind: ImageContentSourcePolicy metadata: name: ubi8repo spec: repositoryDigestMirrors: - mirrors: - example.io/example/ubi-minimal 1 - example.com/example/ubi-minimal 2 source: registry.access.redhat.com/ubi8/ubi-minimal 3 - mirrors: - mirror.example.com/redhat source: registry.redhat.io/openshift4 4 - mirrors: - mirror.example.com source: registry.redhat.io 5 - mirrors: - mirror.example.net/image source: registry.example.com/example/myimage 6 - mirrors: - mirror.example.net source: registry.example.com/example 7 - mirrors: - mirror.example.net/registry-example-com source: registry.example.com 8- 1
- Indicates the name of the image registry and repository.
- 2
- Indicates multiple mirror repositories for each target repository. If one mirror is down, the target repository can use another mirror.
- 3
- Indicates the registry and repository containing the content that is mirrored.
- 4
- You can configure a namespace inside a registry to use any image in that namespace. If you use a registry domain as a source, the
ImageContentSourcePolicyresource is applied to all repositories from the registry. - 5
- If you configure the registry name, the
ImageContentSourcePolicyresource is applied to all repositories from a source registry to a mirror registry. - 6
- Pulls the image
mirror.example.net/image@sha256:…. - 7
- Pulls the image
myimagein the source registry namespace from the mirrormirror.example.net/myimage@sha256:…. - 8
- Pulls the image
registry.example.com/example/myimagefrom the mirror registrymirror.example.net/registry-example-com/example/myimage@sha256:…. TheImageContentSourcePolicyresource is applied to all repositories from a source registry to a mirror registrymirror.example.net/registry-example-com.
Create the new
ImageContentSourcePolicyobject:$ oc create -f registryrepomirror.yaml
After the
ImageContentSourcePolicyobject is created, the new settings are deployed to each node and the cluster starts using the mirrored repository for requests to the source repository.To check that the mirrored configuration settings, are applied, do the following on one of the nodes.
List your nodes:
$ oc get node
Example output
NAME                           STATUS                     ROLES    AGE  VERSION
ip-10-0-137-44.ec2.internal    Ready                      worker   7m   v1.25.0
ip-10-0-138-148.ec2.internal   Ready                      master   11m  v1.25.0
ip-10-0-139-122.ec2.internal   Ready                      master   11m  v1.25.0
ip-10-0-147-35.ec2.internal    Ready                      worker   7m   v1.25.0
ip-10-0-153-12.ec2.internal    Ready                      worker   7m   v1.25.0
ip-10-0-154-10.ec2.internal    Ready                      master   11m  v1.25.0
The
Imagecontentsourcepolicyresource does not restart the nodes.Start the debugging process to access the node:
$ oc debug node/ip-10-0-147-35.ec2.internal
Example output
Starting pod/ip-10-0-147-35ec2internal-debug ...
To use host binaries, run `chroot /host`
Change your root directory to
/host:sh-4.2# chroot /host
Check the
/etc/containers/registries.conffile to make sure the changes were made:sh-4.2# cat /etc/containers/registries.conf
Example output
unqualified-search-registries = ["registry.access.redhat.com", "docker.io"]
short-name-mode = ""

[[registry]]
  prefix = ""
  location = "registry.access.redhat.com/ubi8/ubi-minimal"
  mirror-by-digest-only = true

  [[registry.mirror]]
    location = "example.io/example/ubi-minimal"

  [[registry.mirror]]
    location = "example.com/example/ubi-minimal"

[[registry]]
  prefix = ""
  location = "registry.example.com"
  mirror-by-digest-only = true

  [[registry.mirror]]
    location = "mirror.example.net/registry-example-com"

[[registry]]
  prefix = ""
  location = "registry.example.com/example"
  mirror-by-digest-only = true

  [[registry.mirror]]
    location = "mirror.example.net"

[[registry]]
  prefix = ""
  location = "registry.example.com/example/myimage"
  mirror-by-digest-only = true

  [[registry.mirror]]
    location = "mirror.example.net/image"

[[registry]]
  prefix = ""
  location = "registry.redhat.io"
  mirror-by-digest-only = true

  [[registry.mirror]]
    location = "mirror.example.com"

[[registry]]
  prefix = ""
  location = "registry.redhat.io/openshift4"
  mirror-by-digest-only = true

  [[registry.mirror]]
    location = "mirror.example.com/redhat"
Pull an image digest to the node from the source and check if it is resolved by the mirror.
ImageContentSourcePolicyobjects support image digests only, not image tags.sh-4.2# podman pull --log-level=debug registry.access.redhat.com/ubi8/ubi-minimal@sha256:5cfbaf45ca96806917830c183e9f37df2e913b187adb32e89fd83fa455ebaa6
Troubleshooting repository mirroring
If the repository mirroring procedure does not work as described, use the following information about how repository mirroring works to help troubleshoot the problem.
- The first working mirror is used to supply the pulled image.
- The main registry is only used if no other mirror works.
-
From the system context, the
Insecureflags are used as fallback. -
The format of the
/etc/containers/registries.conffile has changed recently. It is now version 2 and in TOML format.
13.4.6. Widening the scope of the mirror image catalog to reduce the frequency of cluster node reboots
You can scope the mirrored image catalog at the repository level or the wider registry level. A widely scoped ImageContentSourcePolicy resource reduces the number of times the nodes need to reboot in response to changes to the resource.
To widen the scope of the mirror image catalog in the ImageContentSourcePolicy resource, perform the following procedure.
Prerequisites
-
Install the OpenShift Container Platform CLI
oc. -
Log in as a user with
cluster-adminprivileges. - Configure a mirrored image catalog for use in your disconnected cluster.
Procedure
Run the following command, specifying values for
<local_registry>,<pull_spec>, and<pull_secret_file>:$ oc adm catalog mirror <local_registry>/<pull_spec> <local_registry> -a <pull_secret_file> --icsp-scope=registry
where:
- <local_registry>
-
is the local registry you have configured for your disconnected cluster, for example,
local.registry:5000. - <pull_spec>
-
is the pull specification as configured in your disconnected registry, for example,
redhat/redhat-operator-index:v4.12 - <pull_secret_file>
-
is the
registry.redhat.iopull secret in.jsonfile format. You can download the pull secret from the Red Hat OpenShift Cluster Manager.
The
oc adm catalog mirrorcommand creates a/redhat-operator-index-manifestsdirectory and generatesimageContentSourcePolicy.yaml,catalogSource.yaml, andmapping.txtfiles.Apply the new
ImageContentSourcePolicyresource to the cluster:$ oc apply -f imageContentSourcePolicy.yaml
Verification
Verify that
oc applysuccessfully applied the change toImageContentSourcePolicy:$ oc get ImageContentSourcePolicy -o yaml
Example output
apiVersion: v1
items:
- apiVersion: operator.openshift.io/v1alpha1
  kind: ImageContentSourcePolicy
  metadata:
    annotations:
      kubectl.kubernetes.io/last-applied-configuration: |
        {"apiVersion":"operator.openshift.io/v1alpha1","kind":"ImageContentSourcePolicy","metadata":{"annotations":{},"name":"redhat-operator-index"},"spec":{"repositoryDigestMirrors":[{"mirrors":["local.registry:5000"],"source":"registry.redhat.io"}]}}
...
After you update the ImageContentSourcePolicy resource, OpenShift Container Platform deploys the new settings to each node and the cluster starts using the mirrored repository for requests to the source repository.
13.4.7. Additional resources
13.5. Uninstalling the OpenShift Update Service from a cluster
To remove a local copy of the OpenShift Update Service (OSUS) from your cluster, you must first delete the OSUS application and then uninstall the OSUS Operator.
13.5.1. Deleting an OpenShift Update Service application
You can delete an OpenShift Update Service application by using the OpenShift Container Platform web console or CLI.
13.5.1.1. Deleting an OpenShift Update Service application by using the web console
You can use the OpenShift Container Platform web console to delete an OpenShift Update Service application by using the OpenShift Update Service Operator.
Prerequisites
- The OpenShift Update Service Operator has been installed.
Procedure
- In the web console, click Operators → Installed Operators.
- Choose OpenShift Update Service from the list of installed Operators.
- Click the Update Service tab.
- From the list of installed OpenShift Update Service applications, select the application to be deleted and then click Delete UpdateService.
- From the Delete UpdateService? confirmation dialog, click Delete to confirm the deletion.
13.5.1.2. Deleting an OpenShift Update Service application by using the CLI
You can use the OpenShift CLI (oc) to delete an OpenShift Update Service application.
Procedure
Get the OpenShift Update Service application name using the namespace the OpenShift Update Service application was created in, for example,
openshift-update-service:$ oc get updateservice -n openshift-update-service
Example output
NAME      AGE
service   6s
Delete the OpenShift Update Service application using the
NAMEvalue from the previous step and the namespace the OpenShift Update Service application was created in, for example,openshift-update-service:$ oc delete updateservice service -n openshift-update-service
Example output
updateservice.updateservice.operator.openshift.io "service" deleted
13.5.2. Uninstalling the OpenShift Update Service Operator
You can uninstall the OpenShift Update Service Operator by using the OpenShift Container Platform web console or CLI.
13.5.2.1. Uninstalling the OpenShift Update Service Operator by using the web console
You can use the OpenShift Container Platform web console to uninstall the OpenShift Update Service Operator.
Prerequisites
- All OpenShift Update Service applications have been deleted.
Procedure
- In the web console, click Operators → Installed Operators.
- Select OpenShift Update Service from the list of installed Operators and click Uninstall Operator.
- From the Uninstall Operator? confirmation dialog, click Uninstall to confirm the uninstallation.
13.5.2.2. Uninstalling the OpenShift Update Service Operator by using the CLI
You can use the OpenShift CLI (oc) to uninstall the OpenShift Update Service Operator.
Prerequisites
- All OpenShift Update Service applications have been deleted.
Procedure
Change to the project containing the OpenShift Update Service Operator, for example,
openshift-update-service:$ oc project openshift-update-service
Example output
Now using project "openshift-update-service" on server "https://example.com:6443".
Get the name of the OpenShift Update Service Operator operator group:
$ oc get operatorgroup
Example output
NAME                             AGE
openshift-update-service-fprx2   4m41s
Delete the operator group, for example,
openshift-update-service-fprx2:$ oc delete operatorgroup openshift-update-service-fprx2
Example output
operatorgroup.operators.coreos.com "openshift-update-service-fprx2" deleted
Get the name of the OpenShift Update Service Operator subscription:
$ oc get subscription
Example output
NAME                      PACKAGE                   SOURCE                        CHANNEL
update-service-operator   update-service-operator   updateservice-index-catalog   v1
Using the
Namevalue from the previous step, check the current version of the subscribed OpenShift Update Service Operator in thecurrentCSVfield:$ oc get subscription update-service-operator -o yaml | grep " currentCSV"
Example output
currentCSV: update-service-operator.v0.0.1
Delete the subscription, for example,
update-service-operator:$ oc delete subscription update-service-operator
Example output
subscription.operators.coreos.com "update-service-operator" deleted
Delete the CSV for the OpenShift Update Service Operator using the
currentCSVvalue from the previous step:$ oc delete clusterserviceversion update-service-operator.v0.0.1
Example output
clusterserviceversion.operators.coreos.com "update-service-operator.v0.0.1" deleted
Chapter 14. Updating hardware on nodes running on vSphere
You must ensure that your nodes running in vSphere are running on the hardware version supported by OpenShift Container Platform. Currently, hardware version 15 or later is supported for vSphere virtual machines in a cluster.
You can update your virtual hardware immediately or schedule an update in vCenter.
Version 4.12 of OpenShift Container Platform requires VMware virtual hardware version 15 or later.
14.1. Updating virtual hardware on vSphere
To update the hardware of your virtual machines (VMs) on VMware vSphere, update your virtual machines separately to reduce the risk of downtime for your cluster.
14.1.1. Updating the virtual hardware for control plane nodes on vSphere
To reduce the risk of downtime, it is recommended that control plane nodes be updated serially. This ensures that the Kubernetes API remains available and etcd retains quorum.
Prerequisites
- You have cluster administrator permissions to execute the required permissions in the vCenter instance hosting your OpenShift Container Platform cluster.
- Your vSphere ESXi hosts are version 7.0U2 or later.
Procedure
List the control plane nodes in your cluster.
$ oc get nodes -l node-role.kubernetes.io/master
Example output
NAME                    STATUS   ROLES    AGE   VERSION
control-plane-node-0    Ready    master   75m   v1.25.0
control-plane-node-1    Ready    master   75m   v1.25.0
control-plane-node-2    Ready    master   75m   v1.25.0
Note the names of your control plane nodes.
Mark the control plane node as unschedulable.
$ oc adm cordon <control_plane_node>
- Shut down the virtual machine (VM) associated with the control plane node. Do this in the vSphere client by right-clicking the VM and selecting Power → Shut Down Guest OS. Do not shut down the VM using Power Off because it might not shut down safely.
- Update the VM in the vSphere client. Follow Upgrade the Compatibility of a Virtual Machine Manually in the VMware documentation for more information.
- Power on the VM associated with the control plane node. Do this in the vSphere client by right-clicking the VM and selecting Power On.
Wait for the node to report as
Ready:$ oc wait --for=condition=Ready node/<control_plane_node>
Mark the control plane node as schedulable again:
$ oc adm uncordon <control_plane_node>
- Repeat this procedure for each control plane node in your cluster.
14.1.2. Updating the virtual hardware for compute nodes on vSphere
To reduce the risk of downtime, it is recommended that compute nodes be updated serially.
Multiple compute nodes can be updated in parallel given workloads are tolerant of having multiple nodes in a NotReady state. It is the responsibility of the administrator to ensure that the required compute nodes are available.
Prerequisites
- You have cluster administrator permissions to execute the required permissions in the vCenter instance hosting your OpenShift Container Platform cluster.
- Your vSphere ESXi hosts are version 7.0U2 or later.
Procedure
List the compute nodes in your cluster.
$ oc get nodes -l node-role.kubernetes.io/worker
Example output
NAME              STATUS   ROLES    AGE   VERSION
compute-node-0    Ready    worker   30m   v1.25.0
compute-node-1    Ready    worker   30m   v1.25.0
compute-node-2    Ready    worker   30m   v1.25.0
Note the names of your compute nodes.
Mark the compute node as unschedulable:
$ oc adm cordon <compute_node>
Evacuate the pods from the compute node. There are several ways to do this. For example, you can evacuate all or selected pods on a node:
$ oc adm drain <compute_node> [--pod-selector=<pod_selector>]
See the "Understanding how to evacuate pods on nodes" section for other options to evacuate pods from a node.
- Shut down the virtual machine (VM) associated with the compute node. Do this in the vSphere client by right-clicking the VM and selecting Power → Shut Down Guest OS. Do not shut down the VM using Power Off because it might not shut down safely.
- Update the VM in the vSphere client. Follow Upgrade the Compatibility of a Virtual Machine Manually in the VMware documentation for more information.
- Power on the VM associated with the compute node. Do this in the vSphere client by right-clicking the VM and selecting Power On.
Wait for the node to report as
Ready:$ oc wait --for=condition=Ready node/<compute_node>
Mark the compute node as schedulable again:
$ oc adm uncordon <compute_node>
- Repeat this procedure for each compute node in your cluster.
14.1.3. Updating the virtual hardware for template on vSphere
Prerequisites
- You have cluster administrator permissions to execute the required permissions in the vCenter instance hosting your OpenShift Container Platform cluster.
- Your vSphere ESXi hosts are version 7.0U2 or later.
Procedure
If the RHCOS template is configured as a vSphere template follow Convert a Template to a Virtual Machine in the VMware documentation prior to the next step.
NoteOnce converted from a template, do not power on the virtual machine.
- Update the VM in the vSphere client. Follow Upgrade the Compatibility of a Virtual Machine Manually in the VMware documentation for more information.
- Convert the VM in the vSphere client from a VM to template. Follow Convert a Virtual Machine to a Template in the vSphere Client in the VMware documentation for more information.
Additional resources
14.2. Scheduling an update for virtual hardware on vSphere
Virtual hardware updates can be scheduled to occur when a virtual machine is powered on or rebooted. You can schedule your virtual hardware updates exclusively in vCenter by following Schedule a Compatibility Upgrade for a Virtual Machine in the VMware documentation.
When scheduling an upgrade prior to performing an upgrade of OpenShift Container Platform, the virtual hardware update occurs when the nodes are rebooted during the course of the OpenShift Container Platform upgrade.
Chapter 15. Preflight validation for Kernel Module Management (KMM) Modules
Before performing an upgrade on the cluster with applied KMM modules, the administrator must verify that kernel modules installed using KMM are able to be installed on the nodes after the cluster upgrade and possible kernel upgrade. Preflight attempts to validate every Module loaded in the cluster, in parallel. Preflight does not wait for validation of one Module to complete before starting validation of another Module.
15.1. Validation kickoff
Preflight validation is triggered by creating a PreflightValidationOCP resource in the cluster. This spec contains two fields:
type PreflightValidationOCPSpec struct {
	// releaseImage describes the OCP release image that all Modules need to be checked against.
	// +kubebuilder:validation:Required
	ReleaseImage string `json:"releaseImage"` 1
	// Boolean flag that determines whether images build during preflight must also
	// be pushed to a defined repository
	// +optional
	PushBuiltImage bool `json:"pushBuiltImage"` 2
}15.2. Validation lifecycle
Preflight validation attempts to validate every module loaded in the cluster. Preflight will stop running validation on a Module resource after the validation is successful. In case module validation has failed, you can change the module definitions and Preflight will try to validate the module again in the next loop.
If you want to run Preflight validation for an additional kernel, then you should create another PreflightValidationOCP resource for that kernel. After all the modules have been validated, it is recommended to delete the PreflightValidationOCP resource.
15.3. Validation status
Preflight reports the status and progress of each module in the cluster that it attempts to validate.
type CRStatus struct {
	// Status of Module CR verification: true (verified), false (verification failed),
	// error (error during verification process), unknown (verification has not started yet)
	// +required
	// +kubebuilder:validation:Required
	// +kubebuilder:validation:Enum=True;False
	VerificationStatus string `json:"verificationStatus"` 1
	// StatusReason contains a string describing the status source.
	// +optional
	StatusReason string `json:"statusReason,omitempty"` 2
	// Current stage of the verification process:
	// image (image existence verification), build(build process verification)
	// +required
	// +kubebuilder:validation:Required
	// +kubebuilder:validation:Enum=Image;Build;Sign;Requeued;Done
	VerificationStage string `json:"verificationStage"` 3
	// LastTransitionTime is the last time the CR status transitioned from one status to another.
	// This should be when the underlying status changed.  If that is not known, then using the time when the API field changed is acceptable.
	// +required
	// +kubebuilder:validation:Required
	// +kubebuilder:validation:Type=string
	// +kubebuilder:validation:Format=date-time
	LastTransitionTime metav1.Time `json:"lastTransitionTime" protobuf:"bytes,4,opt,name=lastTransitionTime"` 4
}
The following fields apply to each module:
15.4. Preflight validation stages per Module
Preflight runs the following validations on every KMM Module present in the cluster:
- Image validation stage
- Build validation stage
- Sign validation stage
15.4.1. Image validation stage
Image validation is always the first stage of the preflight validation to be executed. If image validation is successful, no other validations are run on that specific module.
Image validation consists of two stages:
- Image existence and accessibility. The code tries to access the image defined for the upgraded kernel in the module and get its manifests.
-
Verify the presence of the kernel module defined in the
Modulein the correct path for futuremodprobeexecution. The correct path is<dirname>/lib/modules/<upgraded_kernel>/.
If this validation is successful, it probably means that the kernel module was compiled with the correct Linux headers.
15.4.2. Build validation stage
Build validation is executed only when image validation has failed and there is a build section in the Module that is relevant for the upgraded kernel. Build validation attempts to run the build job and validate that it finishes successfully.
You must specify the kernel version when running depmod, as shown here:
$ RUN depmod -b /opt ${KERNEL_VERSION}
If the PushBuiltImage flag is defined in the PreflightValidationOCP custom resource (CR), it will also try to push the resulting image into its repository. The resulting image name is taken from the definition of the containerImage field of the Module CR.
If the sign section is defined for the upgraded kernel, then the resulting image will not be the containerImage field of the Module CR, but a temporary image name, because the resulting image should be the product of Sign flow.
15.4.3. Sign validation stage
Sign validation is executed only when image validation has failed, there is a sign section in the Module that is relevant for the upgrade kernel, and build validation finished successfully in the event there was a build section in the Module relevant for the upgraded kernel. Sign validation will try to run the sign job and validate that it finishes successfully.
If the PushBuiltImage flag is defined in the PreflightValidationOCP CR, sign validation will also try to push the resulting image to its registry.
The resulting image is always the image defined in the containerImage field of the Module. The input image is either the output of the Build stage, or an image defined in the UnsignedImage field.
If a build section exists, the sign section input image is the build section’s output image. Therefore, in order for the input image to be available for the sign section, the PushBuiltImage flag must be defined in the PreflightValidationOCP CR.
15.5. Example PreflightValidationOCP resource
This section shows an example of the PreflightValidationOCP resource in the YAML format.
The example verifies all the currently present modules against the upcoming kernel version included in the OpenShift Container Platform release 4.11.18, which the following release image points to:
quay.io/openshift-release-dev/ocp-release@sha256:22e149142517dfccb47be828f012659b1ccf71d26620e6f62468c264a7ce7863
Because .spec.pushBuiltImage is set to true, KMM pushes the resulting images of Build/Sign into the defined repositories.
apiVersion: kmm.sigs.x-k8s.io/v1beta1
kind: PreflightValidationOCP
metadata:
 name: preflight
spec:
 releaseImage: quay.io/openshift-release-dev/ocp-release@sha256:22e149142517dfccb47be828f012659b1ccf71d26620e6f62468c264a7ce7863
 pushBuiltImage: true