
Chapter 22. Clusters at the network far edge
22.1. Challenges of the network far edge
Edge computing presents complex challenges when managing many sites in geographically displaced locations. Use zero touch provisioning (ZTP) and GitOps to provision and manage sites at the far edge of the network.
22.1.1. Overcoming the challenges of the network far edge
Today, service providers want to deploy their infrastructure at the edge of the network. This presents significant challenges:
- How do you handle deployments of many edge sites in parallel?
- What happens when you need to deploy sites in disconnected environments?
- How do you manage the lifecycle of large fleets of clusters?
Zero touch provisioning (ZTP) and GitOps meets these challenges by allowing you to provision remote edge sites at scale with declarative site definitions and configurations for bare-metal equipment. Template or overlay configurations install OpenShift Container Platform features that are required for CNF workloads. The full lifecycle of installation and upgrades is handled through the ZTP pipeline.
ZTP uses GitOps for infrastructure deployments. With GitOps, you use declarative YAML files and other defined patterns stored in Git repositories. Red Hat Advanced Cluster Management (RHACM) uses your Git repositories to drive the deployment of your infrastructure.
GitOps provides traceability, role-based access control (RBAC), and a single source of truth for the desired state of each site. Scalability issues are addressed by Git methodologies and event driven operations through webhooks.
You start the ZTP workflow by creating declarative site definition and configuration custom resources (CRs) that the ZTP pipeline delivers to the edge nodes.
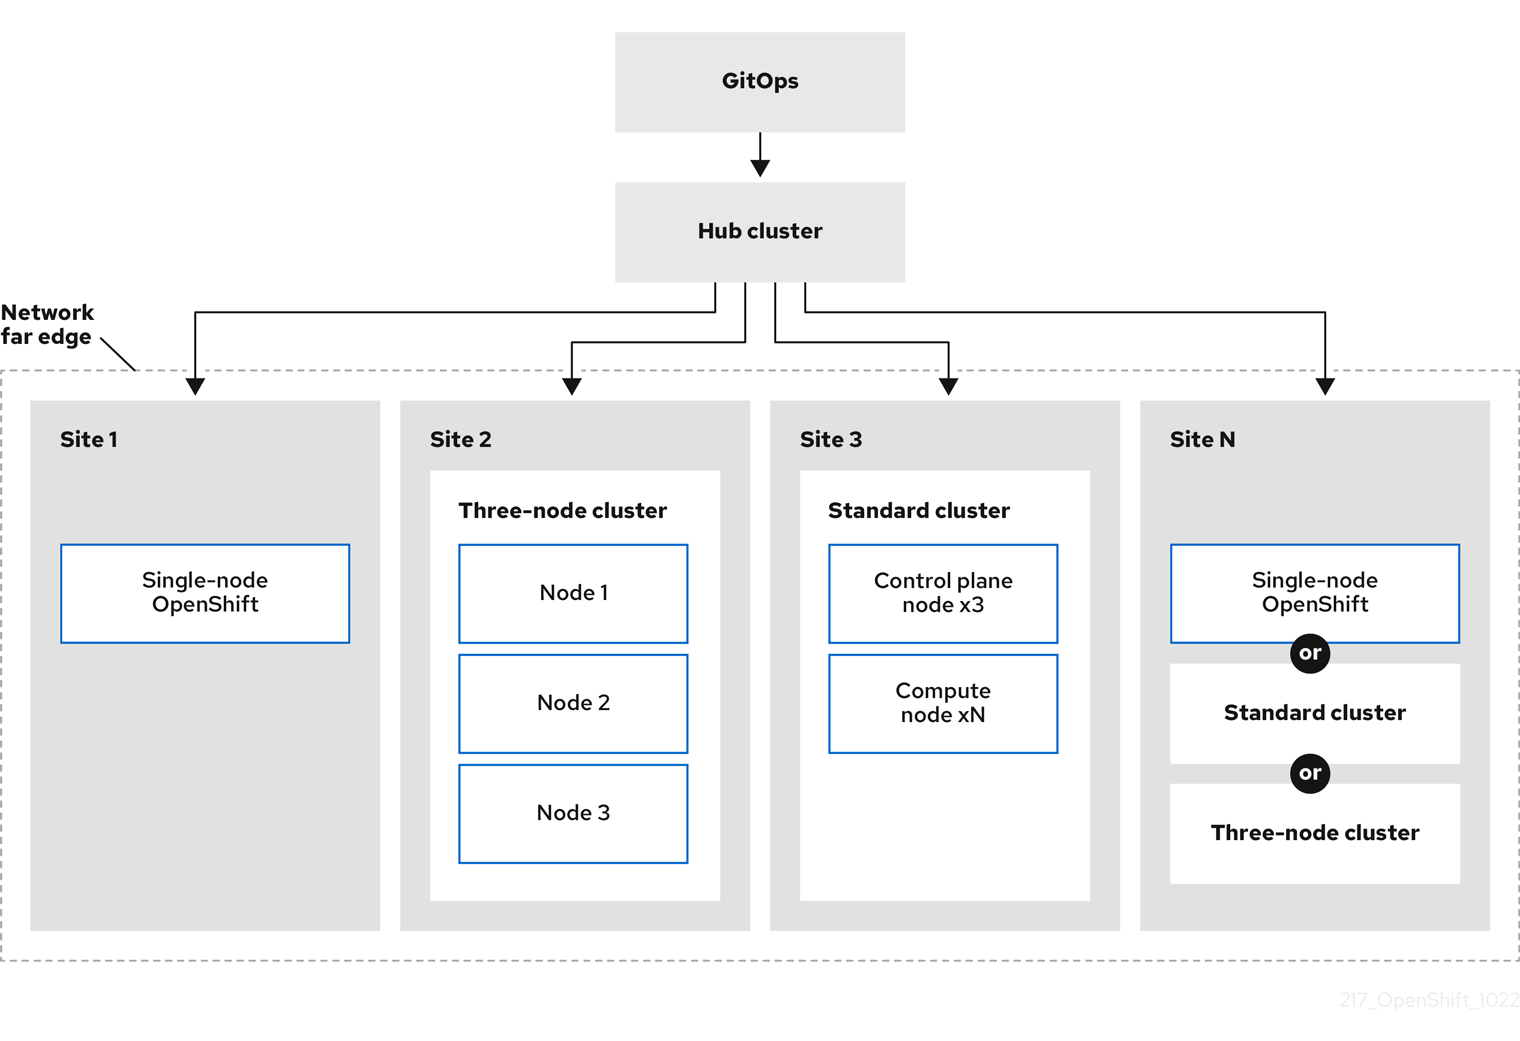
The following diagram shows how ZTP works within the far edge framework.
22.1.2. Using ZTP to provision clusters at the network far edge
Red Hat Advanced Cluster Management (RHACM) manages clusters in a hub-and-spoke architecture, where a single hub cluster manages many spoke clusters. Hub clusters running RHACM provision and deploy the managed clusters by using zero touch provisioning (ZTP) and the assisted service that is deployed when you install RHACM.
The assisted service handles provisioning of OpenShift Container Platform on single node clusters, three-node clusters, or standard clusters running on bare metal.
A high-level overview of using ZTP to provision and maintain bare-metal hosts with OpenShift Container Platform is as follows:
- A hub cluster running RHACM manages an OpenShift image registry that mirrors the OpenShift Container Platform release images. RHACM uses the OpenShift image registry to provision the managed clusters.
- You manage the bare-metal hosts in a YAML format inventory file, versioned in a Git repository.
- You make the hosts ready for provisioning as managed clusters, and use RHACM and the assisted service to install the bare-metal hosts on site.
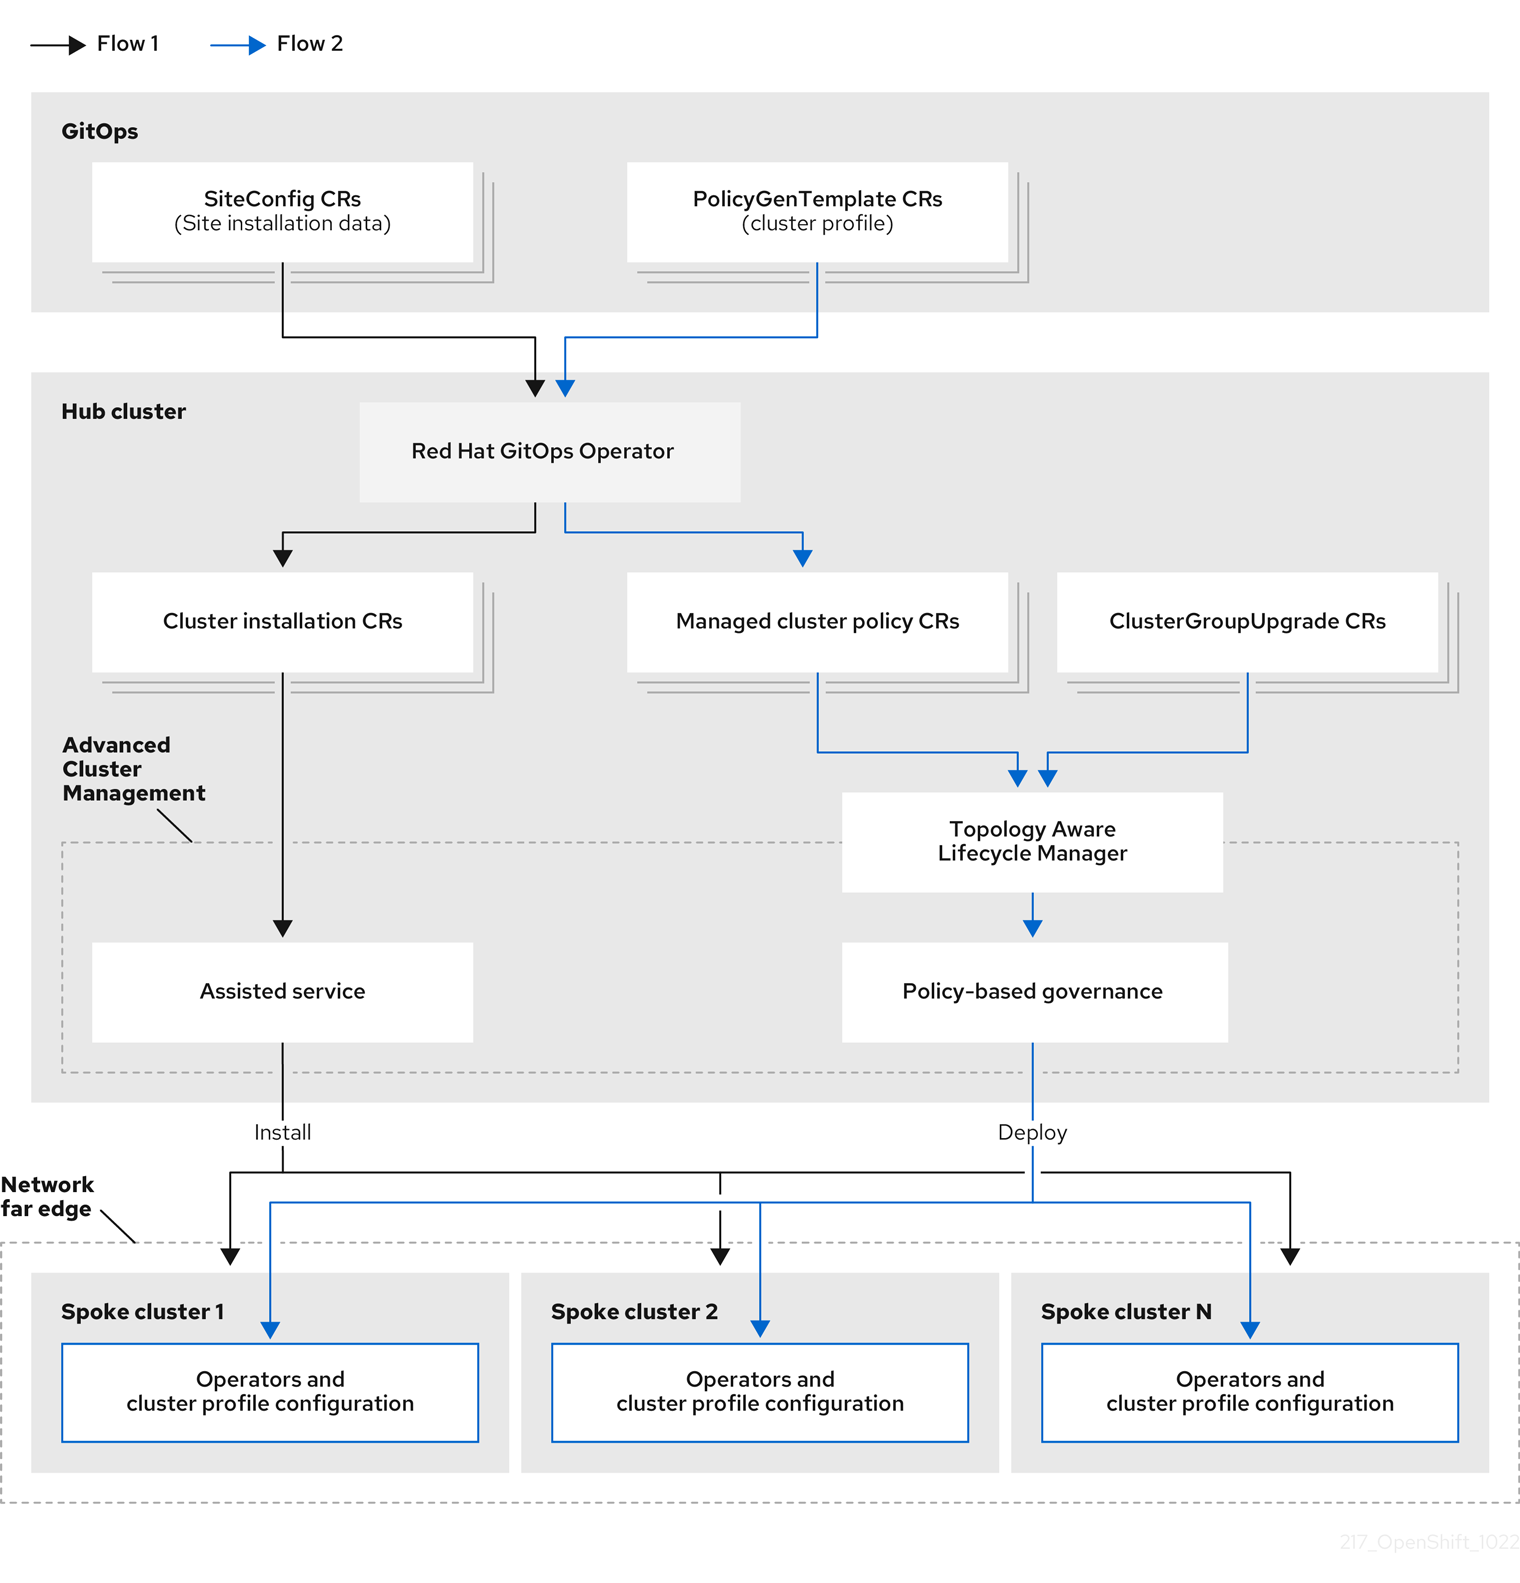
Installing and deploying the clusters is a two-stage process, involving an initial installation phase, and a subsequent configuration phase. The following diagram illustrates this workflow:
22.1.3. Installing managed clusters with SiteConfig resources and RHACM
GitOps ZTP uses SiteConfig custom resources (CRs) in a Git repository to manage the processes that install OpenShift Container Platform clusters. The SiteConfig CR contains cluster-specific parameters required for installation. It has options for applying select configuration CRs during installation including user defined extra manifests.
The ZTP GitOps plugin processes SiteConfig CRs to generate a collection of CRs on the hub cluster. This triggers the assisted service in Red Hat Advanced Cluster Management (RHACM) to install OpenShift Container Platform on the bare-metal host. You can find installation status and error messages in these CRs on the hub cluster.
You can provision single clusters manually or in batches with ZTP:
- Provisioning a single cluster
-
Create a single
SiteConfigCR and related installation and configuration CRs for the cluster, and apply them in the hub cluster to begin cluster provisioning. This is a good way to test your CRs before deploying on a larger scale. - Provisioning many clusters
-
Install managed clusters in batches of up to 400 by defining
SiteConfigand related CRs in a Git repository. ArgoCD uses theSiteConfigCRs to deploy the sites. The RHACM policy generator creates the manifests and applies them to the hub cluster. This starts the cluster provisioning process.
22.1.4. Configuring managed clusters with policies and PolicyGenTemplate resources
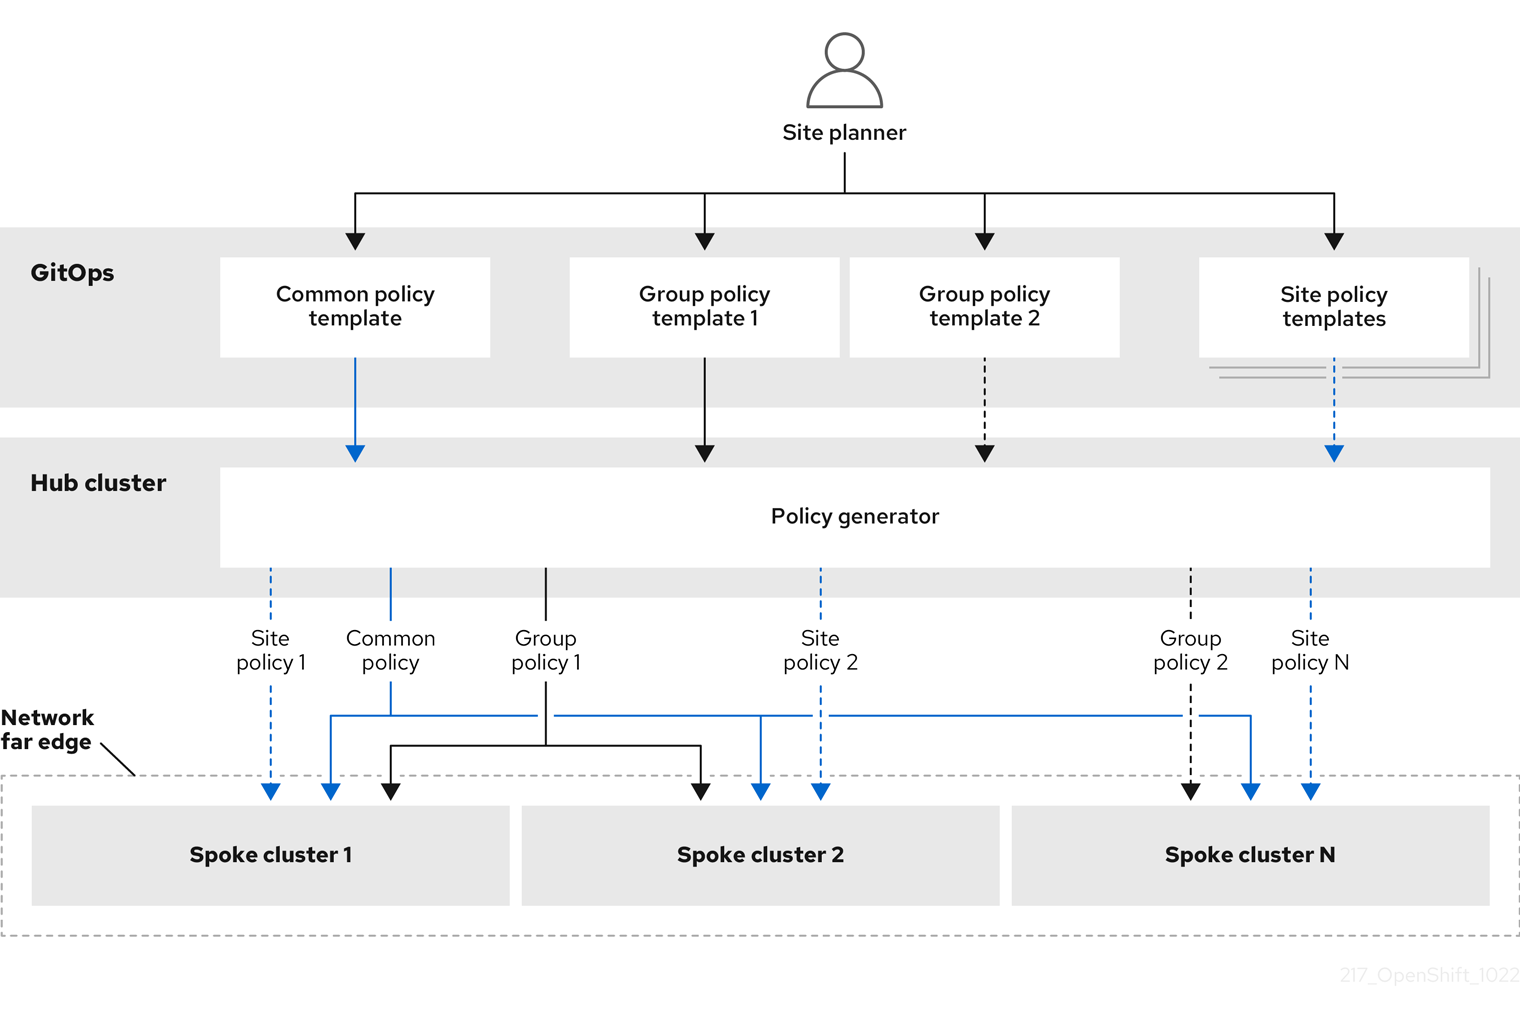
Zero touch provisioning (ZTP) uses Red Hat Advanced Cluster Management (RHACM) to configure clusters by using a policy-based governance approach to applying the configuration.
The policy generator or PolicyGen is a plugin for the GitOps Operator that enables the creation of RHACM policies from a concise template. The tool can combine multiple CRs into a single policy, and you can generate multiple policies that apply to various subsets of clusters in your fleet.
For scalability and to reduce the complexity of managing configurations across the fleet of clusters, use configuration CRs with as much commonality as possible.
- Where possible, apply configuration CRs using a fleet-wide common policy.
- The next preference is to create logical groupings of clusters to manage as much of the remaining configurations as possible under a group policy.
- When a configuration is unique to an individual site, use RHACM templating on the hub cluster to inject the site-specific data into a common or group policy. Alternatively, apply an individual site policy for the site.
The following diagram shows how the policy generator interacts with GitOps and RHACM in the configuration phase of cluster deployment.
For large fleets of clusters, it is typical for there to be a high-level of consistency in the configuration of those clusters.
The following recommended structuring of policies combines configuration CRs to meet several goals:
- Describe common configurations once and apply to the fleet.
- Minimize the number of maintained and managed policies.
- Support flexibility in common configurations for cluster variants.
Table 22.1. Recommended PolicyGenTemplate policy categories
| Policy category | Description |
|---|---|
| Common |
A policy that exists in the common category is applied to all clusters in the fleet. Use common |
| Groups |
A policy that exists in the groups category is applied to a group of clusters in the fleet. Use group |
| Sites | A policy that exists in the sites category is applied to a specific cluster site. Any cluster can have its own specific policies maintained. |
Additional resources
-
For more information about extracting the reference
SiteConfigandPolicyGenTemplateCRs from theztp-site-generatecontainer image, see Preparing the ZTP Git repository.
22.2. Preparing the hub cluster for ZTP
To use RHACM in a disconnected environment, create a mirror registry that mirrors the OpenShift Container Platform release images and Operator Lifecycle Manager (OLM) catalog that contains the required Operator images. OLM manages, installs, and upgrades Operators and their dependencies in the cluster. You can also use a disconnected mirror host to serve the RHCOS ISO and RootFS disk images that are used to provision the bare-metal hosts.
22.2.1. Telco RAN 4.11 validated solution software versions
The Red Hat Telco Radio Access Network (RAN) version 4.11 solution has been validated using the following Red Hat software products versions.
Table 22.2. Telco RAN 4.11 validated solution software
| Product | Software version |
|---|---|
| Hub cluster OpenShift Container Platform version | 4.11 |
| GitOps ZTP plugin | 4.9, 4.10, or 4.11 |
| Red Hat Advanced Cluster Management (RHACM) | 2.5 or 2.6 |
| Red Hat OpenShift GitOps | 1.5 |
| Topology Aware Lifecycle Manager (TALM) | 4.10 or 4.11 |
22.2.2. Installing GitOps ZTP in a disconnected environment
Use Red Hat Advanced Cluster Management (RHACM), Red Hat OpenShift GitOps, and Topology Aware Lifecycle Manager (TALM) on the hub cluster in the disconnected environment to manage the deployment of multiple managed clusters.
Prerequisites
-
You have installed the OpenShift Container Platform CLI (
oc). -
You have logged in as a user with
cluster-adminprivileges. You have configured a disconnected mirror registry for use in the cluster.
NoteThe disconnected mirror registry that you create must contain a version of TALM backup and pre-cache images that matches the version of TALM running in the hub cluster. The spoke cluster must be able to resolve these images in the disconnected mirror registry.
Procedure
- Install RHACM in the hub cluster. See Installing RHACM in a disconnected environment.
- Install GitOps and TALM in the hub cluster.
Additional resources
22.2.3. Adding RHCOS ISO and RootFS images to the disconnected mirror host
Before you begin installing clusters in the disconnected environment with Red Hat Advanced Cluster Management (RHACM), you must first host Red Hat Enterprise Linux CoreOS (RHCOS) images for it to use. Use a disconnected mirror to host the RHCOS images.
Prerequisites
- Deploy and configure an HTTP server to host the RHCOS image resources on the network. You must be able to access the HTTP server from your computer, and from the machines that you create.
The RHCOS images might not change with every release of OpenShift Container Platform. You must download images with the highest version that is less than or equal to the version that you install. Use the image versions that match your OpenShift Container Platform version if they are available. You require ISO and RootFS images to install RHCOS on the hosts. RHCOS QCOW2 images are not supported for this installation type.
Procedure
- Log in to the mirror host.
Obtain the RHCOS ISO and RootFS images from mirror.openshift.com, for example:
Export the required image names and OpenShift Container Platform version as environment variables:
$ export ISO_IMAGE_NAME=<iso_image_name> 1$ export ROOTFS_IMAGE_NAME=<rootfs_image_name> 1$ export OCP_VERSION=<ocp_version> 1Download the required images:
$ sudo wget https://mirror.openshift.com/pub/openshift-v4/dependencies/rhcos/4.11/${OCP_VERSION}/${ISO_IMAGE_NAME} -O /var/www/html/${ISO_IMAGE_NAME}$ sudo wget https://mirror.openshift.com/pub/openshift-v4/dependencies/rhcos/4.11/${OCP_VERSION}/${ROOTFS_IMAGE_NAME} -O /var/www/html/${ROOTFS_IMAGE_NAME}
Verification steps
Verify that the images downloaded successfully and are being served on the disconnected mirror host, for example:
$ wget http://$(hostname)/${ISO_IMAGE_NAME}Example output
Saving to: rhcos-4.11.1-x86_64-live.x86_64.iso
rhcos-4.11.1-x86_64-live.x86_64.iso-  11%[====>    ]  10.01M  4.71MB/s
Additional resources
22.2.4. Enabling the assisted service and updating AgentServiceConfig on the hub cluster
Red Hat Advanced Cluster Management (RHACM) uses the assisted service to deploy OpenShift Container Platform clusters. The assisted service is deployed automatically when you enable the MultiClusterHub Operator with Central Infrastructure Management (CIM). When you have enabled CIM on the hub cluster, you then need to update the AgentServiceConfig custom resource (CR) with references to the ISO and RootFS images that are hosted on the mirror registry HTTP server.
Prerequisites
-
You have installed the OpenShift CLI (
oc). -
You have logged in to the hub cluster as a user with
cluster-adminprivileges. - You have enabled the assisted service on the hub cluster. For more information, see Enabling CIM.
Procedure
Update the
AgentServiceConfigCR by running the following command:$ oc edit AgentServiceConfig
Add the following entry to the
items.spec.osImagesfield in the CR:- cpuArchitecture: x86_64 openshiftVersion: "4.11" rootFSUrl: https://<host>/<path>/rhcos-live-rootfs.x86_64.img url: https://<mirror-registry>/<path>/rhcos-live.x86_64.isowhere:
- <host>
- Is the fully qualified domain name (FQDN) for the target mirror registry HTTP server.
- <path>
- Is the path to the image on the target mirror registry.
Save and quit the editor to apply the changes.
22.2.5. Configuring the hub cluster to use a disconnected mirror registry
You can configure the hub cluster to use a disconnected mirror registry for a disconnected environment.
Prerequisites
- You have a disconnected hub cluster installation with Red Hat Advanced Cluster Management (RHACM) 2.6 installed.
-
You have hosted the
rootfsandisoimages on an HTTP server.
If you enable TLS for the HTTP server, you must confirm the root certificate is signed by an authority trusted by the client and verify the trusted certificate chain between your OpenShift Container Platform hub and managed clusters and the HTTP server. Using a server configured with an untrusted certificate prevents the images from being downloaded to the image creation service. Using untrusted HTTPS servers is not supported.
Procedure
Create a
ConfigMapcontaining the mirror registry config:apiVersion: v1 kind: ConfigMap metadata: name: assisted-installer-mirror-config namespace: assisted-installer labels: app: assisted-service data: ca-bundle.crt: <certificate> 1 registries.conf: | 2 unqualified-search-registries = ["registry.access.redhat.com", "docker.io"] [[registry]] location = <mirror_registry_url> 3 insecure = false mirror-by-digest-only = trueThis updates
mirrorRegistryRefin theAgentServiceConfigcustom resource, as shown below:Example output
apiVersion: agent-install.openshift.io/v1beta1
kind: AgentServiceConfig
metadata:
  name: agent
spec:
  databaseStorage:
    volumeName: <db_pv_name>
    accessModes:
    - ReadWriteOnce
    resources:
      requests:
        storage: <db_storage_size>
  filesystemStorage:
    volumeName: <fs_pv_name>
    accessModes:
    - ReadWriteOnce
    resources:
      requests:
        storage: <fs_storage_size>
  mirrorRegistryRef:
    name: 'assisted-installer-mirror-config'
  osImages:
    - openshiftVersion: <ocp_version>
      rootfs: <rootfs_url> 1
      url: <iso_url> 2
A valid NTP server is required during cluster installation. Ensure that a suitable NTP server is available and can be reached from the installed clusters through the disconnected network.
22.2.6. Configuring the hub cluster with ArgoCD
You can configure your hub cluster with a set of ArgoCD applications that generate the required installation and policy custom resources (CR) for each site based on a zero touch provisioning (ZTP) GitOps flow.
Prerequisites
- You have a OpenShift Container Platform hub cluster with Red Hat Advanced Cluster Management (RHACM) and Red Hat OpenShift GitOps installed.
-
You have extracted the reference deployment from the ZTP GitOps plugin container as described in the "Preparing the GitOps ZTP site configuration repository" section. Extracting the reference deployment creates the
out/argocd/deploymentdirectory referenced in the following procedure.
Procedure
Prepare the ArgoCD pipeline configuration:
- Create a Git repository with the directory structure similar to the example directory. For more information, see "Preparing the GitOps ZTP site configuration repository".
Configure access to the repository using the ArgoCD UI. Under Settings configure the following:
-
Repositories - Add the connection information. The URL must end in
.git, for example,https://repo.example.com/repo.gitand credentials. - Certificates - Add the public certificate for the repository, if needed.
-
Repositories - Add the connection information. The URL must end in
Modify the two ArgoCD applications,
out/argocd/deployment/clusters-app.yamlandout/argocd/deployment/policies-app.yaml, based on your Git repository:-
Update the URL to point to the Git repository. The URL ends with
.git, for example,https://repo.example.com/repo.git. -
The
targetRevisionindicates which Git repository branch to monitor. -
pathspecifies the path to theSiteConfigandPolicyGenTemplateCRs, respectively.
-
Update the URL to point to the Git repository. The URL ends with
To install the ZTP GitOps plugin you must patch the ArgoCD instance in the hub cluster by using the patch file previously extracted into the
out/argocd/deployment/directory. Run the following command:$ oc patch argocd openshift-gitops \ -n openshift-gitops --type=merge \ --patch-file out/argocd/deployment/argocd-openshift-gitops-patch.json
Apply the pipeline configuration to your hub cluster by using the following command:
$ oc apply -k out/argocd/deployment
Additional resources
22.2.7. Preparing the GitOps ZTP site configuration repository
Before you can use the ZTP GitOps pipeline, you need to prepare the Git repository to host the site configuration data.
Prerequisites
- You have configured the hub cluster GitOps applications for generating the required installation and policy custom resources (CRs).
- You have deployed the managed clusters using zero touch provisioning (ZTP).
Procedure
-
Create a directory structure with separate paths for the
SiteConfigandPolicyGenTemplateCRs. Export the
argocddirectory from theztp-site-generatecontainer image using the following commands:$ podman pull registry.redhat.io/openshift4/ztp-site-generate-rhel8:v4.11
$ mkdir -p ./out
$ podman run --log-driver=none --rm registry.redhat.io/openshift4/ztp-site-generate-rhel8:v4.11 extract /home/ztp --tar | tar x -C ./out
Check that the
outdirectory contains the following subdirectories:-
out/extra-manifestcontains the source CR files thatSiteConfiguses to generate extra manifestconfigMap. -
out/source-crscontains the source CR files thatPolicyGenTemplateuses to generate the Red Hat Advanced Cluster Management (RHACM) policies. -
out/argocd/deploymentcontains patches and YAML files to apply on the hub cluster for use in the next step of this procedure. -
out/argocd/examplecontains the examples forSiteConfigandPolicyGenTemplatefiles that represent the recommended configuration.
-
The directory structure under out/argocd/example serves as a reference for the structure and content of your Git repository. The example includes SiteConfig and PolicyGenTemplate reference CRs for single-node, three-node, and standard clusters. Remove references to cluster types that you are not using. The following example describes a set of CRs for a network of single-node clusters:
example
├── policygentemplates
│   ├── common-ranGen.yaml
│   ├── example-sno-site.yaml
│   ├── group-du-sno-ranGen.yaml
│   ├── group-du-sno-validator-ranGen.yaml
│   ├── kustomization.yaml
│   └── ns.yaml
└── siteconfig
    ├── example-sno.yaml
    ├── KlusterletAddonConfigOverride.yaml
    └── kustomization.yaml
Keep SiteConfig and PolicyGenTemplate CRs in separate directories. Both the SiteConfig and PolicyGenTemplate directories must contain a kustomization.yaml file that explicitly includes the files in that directory.
This directory structure and the kustomization.yaml files must be committed and pushed to your Git repository. The initial push to Git should include the kustomization.yaml files. The SiteConfig (example-sno.yaml) and PolicyGenTemplate (common-ranGen.yaml, group-du-sno*.yaml, and example-sno-site.yaml) files can be omitted and pushed at a later time as required when deploying a site.
The KlusterletAddonConfigOverride.yaml file is only required if one or more SiteConfig CRs which make reference to it are committed and pushed to Git. See example-sno.yaml for an example of how this is used.
22.3. Installing managed clusters with RHACM and SiteConfig resources
You can provision OpenShift Container Platform clusters at scale with Red Hat Advanced Cluster Management (RHACM) using the assisted service and the GitOps plugin policy generator with core-reduction technology enabled. The zero touch priovisioning (ZTP) pipeline performs the cluster installations. ZTP can be used in a disconnected environment.
22.3.1. GitOps ZTP and Topology Aware Lifecycle Manager
GitOps zero touch provisioning (ZTP) generates installation and configuration CRs from manifests stored in Git. These artifacts are applied to a centralized hub cluster where Red Hat Advanced Cluster Management (RHACM), the assisted service, and the Topology Aware Lifecycle Manager (TALM) use the CRs to install and configure the managed cluster. The configuration phase of the ZTP pipeline uses the TALM to orchestrate the application of the configuration CRs to the cluster. There are several key integration points between GitOps ZTP and the TALM.
- Inform policies
-
By default, GitOps ZTP creates all policies with a remediation action of
inform. These policies cause RHACM to report on compliance status of clusters relevant to the policies but does not apply the desired configuration. During the ZTP process, after OpenShift installation, the TALM steps through the createdinformpolicies and enforces them on the target managed cluster(s). This applies the configuration to the managed cluster. Outside of the ZTP phase of the cluster lifecycle, this allows you to change policies without the risk of immediately rolling those changes out to affected managed clusters. You can control the timing and the set of remediated clusters by using TALM. - Automatic creation of ClusterGroupUpgrade CRs
To automate the initial configuration of newly deployed clusters, TALM monitors the state of all
ManagedClusterCRs on the hub cluster. AnyManagedClusterCR that does not have aztp-donelabel applied, including newly createdManagedClusterCRs, causes the TALM to automatically create aClusterGroupUpgradeCR with the following characteristics:-
The
ClusterGroupUpgradeCR is created and enabled in theztp-installnamespace. -
ClusterGroupUpgradeCR has the same name as theManagedClusterCR. -
The cluster selector includes only the cluster associated with that
ManagedClusterCR. -
The set of managed policies includes all policies that RHACM has bound to the cluster at the time the
ClusterGroupUpgradeis created. - Pre-caching is disabled.
- Timeout set to 4 hours (240 minutes).
The automatic creation of an enabled
ClusterGroupUpgradeensures that initial zero-touch deployment of clusters proceeds without the need for user intervention. Additionally, the automatic creation of aClusterGroupUpgradeCR for anyManagedClusterwithout theztp-donelabel allows a failed ZTP installation to be restarted by simply deleting theClusterGroupUpgradeCR for the cluster.-
The
- Waves
Each policy generated from a
PolicyGenTemplateCR includes aztp-deploy-waveannotation. This annotation is based on the same annotation from each CR which is included in that policy. The wave annotation is used to order the policies in the auto-generatedClusterGroupUpgradeCR. The wave annotation is not used other than for the auto-generatedClusterGroupUpgradeCR.NoteAll CRs in the same policy must have the same setting for the
ztp-deploy-waveannotation. The default value of this annotation for each CR can be overridden in thePolicyGenTemplate. The wave annotation in the source CR is used for determining and setting the policy wave annotation. This annotation is removed from each built CR which is included in the generated policy at runtime.The TALM applies the configuration policies in the order specified by the wave annotations. The TALM waits for each policy to be compliant before moving to the next policy. It is important to ensure that the wave annotation for each CR takes into account any prerequisites for those CRs to be applied to the cluster. For example, an Operator must be installed before or concurrently with the configuration for the Operator. Similarly, the
CatalogSourcefor an Operator must be installed in a wave before or concurrently with the Operator Subscription. The default wave value for each CR takes these prerequisites into account.Multiple CRs and policies can share the same wave number. Having fewer policies can result in faster deployments and lower CPU usage. It is a best practice to group many CRs into relatively few waves.
To check the default wave value in each source CR, run the following command against the out/source-crs directory that is extracted from the ztp-site-generate container image:
$ grep -r "ztp-deploy-wave" out/source-crs
- Phase labels
The
ClusterGroupUpgradeCR is automatically created and includes directives to annotate theManagedClusterCR with labels at the start and end of the ZTP process.When ZTP configuration postinstallation commences, the
ManagedClusterhas theztp-runninglabel applied. When all policies are remediated to the cluster and are fully compliant, these directives cause the TALM to remove theztp-runninglabel and apply theztp-donelabel.For deployments that make use of the
informDuValidatorpolicy, theztp-donelabel is applied when the cluster is fully ready for deployment of applications. This includes all reconciliation and resulting effects of the ZTP applied configuration CRs. Theztp-donelabel affects automaticClusterGroupUpgradeCR creation by TALM. Do not manipulate this label after the initial ZTP installation of the cluster.- Linked CRs
-
The automatically created
ClusterGroupUpgradeCR has the owner reference set as theManagedClusterfrom which it was derived. This reference ensures that deleting theManagedClusterCR causes the instance of theClusterGroupUpgradeto be deleted along with any supporting resources.
22.3.2. Overview of deploying managed clusters with ZTP
Red Hat Advanced Cluster Management (RHACM) uses zero touch provisioning (ZTP) to deploy single-node OpenShift Container Platform clusters, three-node clusters, and standard clusters. You manage site configuration data as OpenShift Container Platform custom resources (CRs) in a Git repository. ZTP uses a declarative GitOps approach for a develop once, deploy anywhere model to deploy the managed clusters.
The deployment of the clusters includes:
- Installing the host operating system (RHCOS) on a blank server
- Deploying OpenShift Container Platform
- Creating cluster policies and site subscriptions
- Making the necessary network configurations to the server operating system
- Deploying profile Operators and performing any needed software-related configuration, such as performance profile, PTP, and SR-IOV
Overview of the managed site installation process
After you apply the managed site custom resources (CRs) on the hub cluster, the following actions happen automatically:
- A Discovery image ISO file is generated and booted on the target host.
- When the ISO file successfully boots on the target host it reports the host hardware information to RHACM.
- After all hosts are discovered, OpenShift Container Platform is installed.
-
When OpenShift Container Platform finishes installing, the hub installs the
klusterletservice on the target cluster. - The requested add-on services are installed on the target cluster.
The Discovery image ISO process is complete when the Agent CR for the managed cluster is created on the hub cluster.
The target bare-metal host must meet the networking, firmware, and hardware requirements listed in Recommended single-node OpenShift cluster configuration for vDU application workloads.
22.3.3. Creating the managed bare-metal host secrets
Add the required Secret custom resources (CRs) for the managed bare-metal host to the hub cluster. You need a secret for the ZTP pipeline to access the Baseboard Management Controller (BMC) and a secret for the assisted installer service to pull cluster installation images from the registry.
The secrets are referenced from the SiteConfig CR by name. The namespace must match the SiteConfig namespace.
Procedure
Create a YAML secret file containing credentials for the host Baseboard Management Controller (BMC) and a pull secret required for installing OpenShift and all add-on cluster Operators:
Save the following YAML as the file
example-sno-secret.yaml:apiVersion: v1 kind: Secret metadata: name: example-sno-bmc-secret namespace: example-sno 1 data: 2 password: <base64_password> username: <base64_username> type: Opaque --- apiVersion: v1 kind: Secret metadata: name: pull-secret namespace: example-sno 3 data: .dockerconfigjson: <pull_secret> 4 type: kubernetes.io/dockerconfigjson
-
Add the relative path to
example-sno-secret.yamlto thekustomization.yamlfile that you use to install the cluster.
22.3.4. Deploying a managed cluster with SiteConfig and ZTP
Use the following procedure to create a SiteConfig custom resource (CR) and related files and initiate the zero touch provisioning (ZTP) cluster deployment.
Prerequisites
-
You have installed the OpenShift CLI (
oc). -
You have logged in to the hub cluster as a user with
cluster-adminprivileges. - You configured the hub cluster for generating the required installation and policy CRs.
You created a Git repository where you manage your custom site configuration data. The repository must be accessible from the hub cluster and you must configure it as a source repository for the ArgoCD application. See "Preparing the GitOps ZTP site configuration repository" for more information.
NoteWhen you create the source repository, ensure that you patch the ArgoCD application with the
argocd/deployment/argocd-openshift-gitops-patch.jsonpatch-file that you extract from theztp-site-generatecontainer. See "Configuring the hub cluster with ArgoCD".To be ready for provisioning managed clusters, you require the following for each bare-metal host:
- Network connectivity
- Your network requires DNS. Managed cluster hosts should be reachable from the hub cluster. Ensure that Layer 3 connectivity exists between the hub cluster and the managed cluster host.
- Baseboard Management Controller (BMC) details
-
ZTP uses BMC username and password details to connect to the BMC during cluster installation. The GitOps ZTP plugin manages the
ManagedClusterCRs on the hub cluster based on theSiteConfigCR in your site Git repo. You create individualBMCSecretCRs for each host manually.
Procedure
Create the required managed cluster secrets on the hub cluster. These resources must be in a namespace with a name matching the cluster name. For example, in
out/argocd/example/siteconfig/example-sno.yaml, the cluster name and namespace isexample-sno.Export the cluster namespace by running the following command:
$ export CLUSTERNS=example-sno
Create the namespace:
$ oc create namespace $CLUSTERNS
Create pull secret and BMC
SecretCRs for the managed cluster. The pull secret must contain all the credentials necessary for installing OpenShift Container Platform and all required Operators. See "Creating the managed bare-metal host secrets" for more information.NoteThe secrets are referenced from the
SiteConfigcustom resource (CR) by name. The namespace must match theSiteConfignamespace.Create a
SiteConfigCR for your cluster in your local clone of the Git repository:Choose the appropriate example for your CR from the
out/argocd/example/siteconfig/folder. The folder includes example files for single node, three-node, and standard clusters:-
example-sno.yaml -
example-3node.yaml -
example-standard.yaml
-
Change the cluster and host details in the example file to match the type of cluster you want. For example:
Example single-node OpenShift cluster SiteConfig CR
apiVersion: ran.openshift.io/v1 kind: SiteConfig metadata: name: "<site_name>" namespace: "<site_name>" spec: baseDomain: "example.com" pullSecretRef: name: "assisted-deployment-pull-secret" 1 clusterImageSetNameRef: "openshift-4.11" 2 sshPublicKey: "ssh-rsa AAAA..." 3 clusters: - clusterName: "<site_name>" networkType: "OVNKubernetes" clusterLabels: 4 common: true group-du-sno: "" sites : "<site_name>" clusterNetwork: - cidr: 1001:1::/48 hostPrefix: 64 machineNetwork: - cidr: 1111:2222:3333:4444::/64 serviceNetwork: - 1001:2::/112 additionalNTPSources: - 1111:2222:3333:4444::2 #crTemplates: # KlusterletAddonConfig: "KlusterletAddonConfigOverride.yaml" 5 nodes: - hostName: "example-node.example.com" 6 role: "master" bmcAddress: idrac-virtualmedia://<out_of_band_ip>/<system_id>/ 7 bmcCredentialsName: name: "bmh-secret" 8 bootMACAddress: "AA:BB:CC:DD:EE:11" bootMode: "UEFI" 9 rootDeviceHints: wwn: "0x11111000000asd123" cpuset: "0-1,52-53" 10 nodeNetwork: 11 interfaces: - name: eno1 macAddress: "AA:BB:CC:DD:EE:11" config: interfaces: - name: eno1 type: ethernet state: up ipv4: enabled: false ipv6: 12 enabled: true address: - ip: 1111:2222:3333:4444::aaaa:1 prefix-length: 64 dns-resolver: config: search: - example.com server: - 1111:2222:3333:4444::2 routes: config: - destination: ::/0 next-hop-interface: eno1 next-hop-address: 1111:2222:3333:4444::1 table-id: 254- 1
- Create the
assisted-deployment-pull-secretCR with the same namespace as theSiteConfigCR. - 2
clusterImageSetNameRefdefines an image set available on the hub cluster. To see the list of supported versions on your hub cluster, runoc get clusterimagesets.- 3
- Configure the SSH public key used to access the cluster.
- 4
- Cluster labels must correspond to the
bindingRulesfield in thePolicyGenTemplateCRs that you define. For example,policygentemplates/common-ranGen.yamlapplies to all clusters withcommon: trueset,policygentemplates/group-du-sno-ranGen.yamlapplies to all clusters withgroup-du-sno: ""set. - 5
- Optional. The CR specifed under
KlusterletAddonConfigis used to override the defaultKlusterletAddonConfigthat is created for the cluster. - 6
- For single-node deployments, define a single host. For three-node deployments, define three hosts. For standard deployments, define three hosts with
role: masterand two or more hosts defined withrole: worker. - 7
- BMC address that you use to access the host. Applies to all cluster types.
- 8
- Name of the
bmh-secretCR that you separately create with the host BMC credentials. When creating thebmh-secretCR, use the same namespace as theSiteConfigCR that provisions the host. - 9
- Configures the boot mode for the host. The default value is
UEFI. UseUEFISecureBootto enable secure boot on the host. - 10
cpusetmust match the value set in the clusterPerformanceProfileCRspec.cpu.reservedfield for workload partitioning.- 11
- Specifies the network settings for the node.
- 12
- Configures the IPv6 address for the host. For single-node OpenShift clusters with static IP addresses, the node-specific API and Ingress IPs should be the same.
NoteFor more information about BMC addressing, see the "Additional resources" section.
-
You can inspect the default set of extra-manifest
MachineConfigCRs inout/argocd/extra-manifest. It is automatically applied to the cluster when it is installed. -
Optional: To provision additional install-time manifests on the provisioned cluster, create a directory in your Git repository, for example,
sno-extra-manifest/, and add your custom manifest CRs to this directory. If yourSiteConfig.yamlrefers to this directory in theextraManifestPathfield, any CRs in this referenced directory are appended to the default set of extra manifests.
-
Add the
SiteConfigCR to thekustomization.yamlfile in thegeneratorssection, similar to the example shown inout/argocd/example/siteconfig/kustomization.yaml. Commit the
SiteConfigCR and associatedkustomization.yamlchanges in your Git repository and push the changes.The ArgoCD pipeline detects the changes and begins the managed cluster deployment.
22.3.5. Monitoring managed cluster installation progress
The ArgoCD pipeline uses the SiteConfig CR to generate the cluster configuration CRs and syncs it with the hub cluster. You can monitor the progress of the synchronization in the ArgoCD dashboard.
Prerequisites
-
You have installed the OpenShift CLI (
oc). -
You have logged in to the hub cluster as a user with
cluster-adminprivileges.
Procedure
When the synchronization is complete, the installation generally proceeds as follows:
The Assisted Service Operator installs OpenShift Container Platform on the cluster. You can monitor the progress of cluster installation from the RHACM dashboard or from the command line by running the following commands:
Export the cluster name:
$ export CLUSTER=<clusterName>
Query the
AgentClusterInstallCR for the managed cluster:$ oc get agentclusterinstall -n $CLUSTER $CLUSTER -o jsonpath='{.status.conditions[?(@.type=="Completed")]}' | jqGet the installation events for the cluster:
$ curl -sk $(oc get agentclusterinstall -n $CLUSTER $CLUSTER -o jsonpath='{.status.debugInfo.eventsURL}') | jq '.[-2,-1]'
22.3.6. Troubleshooting GitOps ZTP by validating the installation CRs
The ArgoCD pipeline uses the SiteConfig and PolicyGenTemplate custom resources (CRs) to generate the cluster configuration CRs and Red Hat Advanced Cluster Management (RHACM) policies. Use the following steps to troubleshoot issues that might occur during this process.
Prerequisites
-
You have installed the OpenShift CLI (
oc). -
You have logged in to the hub cluster as a user with
cluster-adminprivileges.
Procedure
Check that the installation CRs were created by using the following command:
$ oc get AgentClusterInstall -n <cluster_name>
If no object is returned, use the following steps to troubleshoot the ArgoCD pipeline flow from
SiteConfigfiles to the installation CRs.Verify that the
ManagedClusterCR was generated using theSiteConfigCR on the hub cluster:$ oc get managedcluster
If the
ManagedClusteris missing, check if theclustersapplication failed to synchronize the files from the Git repository to the hub cluster:$ oc describe -n openshift-gitops application clusters
Check for the
Status.Conditionsfield to view the error logs for the managed cluster. For example, setting an invalid value forextraManifestPath:in theSiteConfigCR raises the following error:Status: Conditions: Last Transition Time: 2021-11-26T17:21:39Z Message: rpc error: code = Unknown desc = `kustomize build /tmp/https___git.com/ran-sites/siteconfigs/ --enable-alpha-plugins` failed exit status 1: 2021/11/26 17:21:40 Error could not create extra-manifest ranSite1.extra-manifest3 stat extra-manifest3: no such file or directory 2021/11/26 17:21:40 Error: could not build the entire SiteConfig defined by /tmp/kust-plugin-config-913473579: stat extra-manifest3: no such file or directory Error: failure in plugin configured via /tmp/kust-plugin-config-913473579; exit status 1: exit status 1 Type: ComparisonErrorCheck the
Status.Syncfield. If there are log errors, theStatus.Syncfield could indicate anUnknownerror:Status: Sync: Compared To: Destination: Namespace: clusters-sub Server: https://kubernetes.default.svc Source: Path: sites-config Repo URL: https://git.com/ran-sites/siteconfigs/.git Target Revision: master Status: Unknown
22.3.7. Troubleshooting {ztp} virtual media booting on Supermicro servers
SuperMicro X11 servers do not support virtual media installations when the image is served using the https protocol. As a result, single-node OpenShift deployments for this environment fail to boot on the target node. To avoid this issue, log in to the hub cluster and disable Transport Layer Security (TLS) in the Provisioning resource. This ensures the image is not served with TLS even though the image address uses the https scheme.
Prerequisites
-
You have installed the OpenShift CLI (
oc). -
You have logged in to the hub cluster as a user with
cluster-adminprivileges.
Procedure
Disable TLS in the
Provisioningresource by running the following command:$ oc patch provisioning provisioning-configuration --type merge -p '{"spec":{"disableVirtualMediaTLS": true}}'- Continue the steps to deploy your single-node OpenShift cluster.
22.3.8. Removing a managed cluster site from the ZTP pipeline
You can remove a managed site and the associated installation and configuration policy CRs from the ZTP pipeline.
Prerequisites
-
You have installed the OpenShift CLI (
oc). -
You have logged in to the hub cluster as a user with
cluster-adminprivileges.
Procedure
Remove a site and the associated CRs by removing the associated
SiteConfigandPolicyGenTemplatefiles from thekustomization.yamlfile.When you run the ZTP pipeline again, the generated CRs are removed.
-
Optional: If you want to permanently remove a site, you should also remove the
SiteConfigand site-specificPolicyGenTemplatefiles from the Git repository. -
Optional: If you want to remove a site temporarily, for example when redeploying a site, you can leave the
SiteConfigand site-specificPolicyGenTemplateCRs in the Git repository.
After removing the SiteConfig file from the Git repository, if the corresponding clusters get stuck in the detach process, check Red Hat Advanced Cluster Management (RHACM) on the hub cluster for information about cleaning up the detached cluster.
Additional resources
- For information about removing a cluster, see Removing a cluster from management.
22.3.9. Removing obsolete content from the ZTP pipeline
If a change to the PolicyGenTemplate configuration results in obsolete policies, for example, if you rename policies, use the following procedure to remove the obsolete policies.
Prerequisites
-
You have installed the OpenShift CLI (
oc). -
You have logged in to the hub cluster as a user with
cluster-adminprivileges.
Procedure
-
Remove the affected
PolicyGenTemplatefiles from the Git repository, commit and push to the remote repository. - Wait for the changes to synchronize through the application and the affected policies to be removed from the hub cluster.
Add the updated
PolicyGenTemplatefiles back to the Git repository, and then commit and push to the remote repository.NoteRemoving zero touch provisioning (ZTP) policies from the Git repository, and as a result also removing them from the hub cluster, does not affect the configuration of the managed cluster. The policy and CRs managed by that policy remains in place on the managed cluster.
Optional: As an alternative, after making changes to
PolicyGenTemplateCRs that result in obsolete policies, you can remove these policies from the hub cluster manually. You can delete policies from the RHACM console using the Governance tab or by running the following command:$ oc delete policy -n <namespace> <policy_name>
22.3.10. Tearing down the ZTP pipeline
You can remove the ArgoCD pipeline and all generated ZTP artifacts.
Prerequisites
-
You have installed the OpenShift CLI (
oc). -
You have logged in to the hub cluster as a user with
cluster-adminprivileges.
Procedure
- Detach all clusters from Red Hat Advanced Cluster Management (RHACM) on the hub cluster.
Delete the
kustomization.yamlfile in thedeploymentdirectory using the following command:$ oc delete -k out/argocd/deployment
- Commit and push your changes to the site repository.
22.4. Configuring managed clusters with policies and PolicyGenTemplate resources
Applied policy custom resources (CRs) configure the managed clusters that you provision. You can customize how Red Hat Advanced Cluster Management (RHACM) uses PolicyGenTemplate CRs to generate the applied policy CRs.
22.4.1. About the PolicyGenTemplate CRD
The PolicyGenTemplate custom resource definition (CRD) tells the PolicyGen policy generator what custom resources (CRs) to include in the cluster configuration, how to combine the CRs into the generated policies, and what items in those CRs need to be updated with overlay content.
The following example shows a PolicyGenTemplate CR (common-du-ranGen.yaml) extracted from the ztp-site-generate reference container. The common-du-ranGen.yaml file defines two Red Hat Advanced Cluster Management (RHACM) policies. The polices manage a collection of configuration CRs, one for each unique value of policyName in the CR. common-du-ranGen.yaml creates a single placement binding and a placement rule to bind the policies to clusters based on the labels listed in the bindingRules section.
Example PolicyGenTemplate CR - common-du-ranGen.yaml
---
apiVersion: ran.openshift.io/v1
kind: PolicyGenTemplate
metadata:
  name: "common"
  namespace: "ztp-common"
spec:
  bindingRules:
    common: "true" 1
  sourceFiles: 2
    - fileName: SriovSubscription.yaml
      policyName: "subscriptions-policy"
    - fileName: SriovSubscriptionNS.yaml
      policyName: "subscriptions-policy"
    - fileName: SriovSubscriptionOperGroup.yaml
      policyName: "subscriptions-policy"
    - fileName: SriovOperatorStatus.yaml
      policyName: "subscriptions-policy"
    - fileName: PtpSubscription.yaml
      policyName: "subscriptions-policy"
    - fileName: PtpSubscriptionNS.yaml
      policyName: "subscriptions-policy"
    - fileName: PtpSubscriptionOperGroup.yaml
      policyName: "subscriptions-policy"
    - fileName: PtpOperatorStatus.yaml
      policyName: "subscriptions-policy"
    - fileName: ClusterLogNS.yaml
      policyName: "subscriptions-policy"
    - fileName: ClusterLogOperGroup.yaml
      policyName: "subscriptions-policy"
    - fileName: ClusterLogSubscription.yaml
      policyName: "subscriptions-policy"
    - fileName: ClusterLogOperatorStatus.yaml
      policyName: "subscriptions-policy"
    - fileName: StorageNS.yaml
      policyName: "subscriptions-policy"
    - fileName: StorageOperGroup.yaml
      policyName: "subscriptions-policy"
    - fileName: StorageSubscription.yaml
      policyName: "subscriptions-policy"
    - fileName: StorageOperatorStatus.yaml
      policyName: "subscriptions-policy"
    - fileName: ReduceMonitoringFootprint.yaml
      policyName: "config-policy"
    - fileName: OperatorHub.yaml 3
      policyName: "config-policy"
    - fileName: DefaultCatsrc.yaml 4
      policyName: "config-policy" 5
      metadata:
        name: redhat-operators
      spec:
        displayName: disconnected-redhat-operators
        image: registry.example.com:5000/disconnected-redhat-operators/disconnected-redhat-operator-index:v4.9
    - fileName: DisconnectedICSP.yaml
      policyName: "config-policy"
      spec:
        repositoryDigestMirrors:
        - mirrors:
          - registry.example.com:5000
          source: registry.redhat.io
- 1
common: "true"applies the policies to all clusters with this label.- 2
- Files listed under
sourceFilescreate the Operator policies for installed clusters. - 3
OperatorHub.yamlconfigures the OperatorHub for the disconnected registry.- 4
DefaultCatsrc.yamlconfigures the catalog source for the disconnected registry.- 5
policyName: "config-policy"configures Operator subscriptions. TheOperatorHubCR disables the default and this CR replacesredhat-operatorswith aCatalogSourceCR that points to the disconnected registry.
A PolicyGenTemplate CR can be constructed with any number of included CRs. Apply the following example CR in the hub cluster to generate a policy containing a single CR:
apiVersion: ran.openshift.io/v1
kind: PolicyGenTemplate
metadata:
  name: "group-du-sno"
  namespace: "ztp-group"
spec:
  bindingRules:
    group-du-sno: ""
  mcp: "master"
  sourceFiles:
    - fileName: PtpConfigSlave.yaml
      policyName: "config-policy"
      metadata:
        name: "du-ptp-slave"
      spec:
        profile:
        - name: "slave"
          interface: "ens5f0"
          ptp4lOpts: "-2 -s --summary_interval -4"
          phc2sysOpts: "-a -r -n 24"
Using the source file PtpConfigSlave.yaml as an example, the file defines a PtpConfig CR. The generated policy for the PtpConfigSlave example is named group-du-sno-config-policy. The PtpConfig CR defined in the generated group-du-sno-config-policy is named du-ptp-slave. The spec defined in PtpConfigSlave.yaml is placed under du-ptp-slave along with the other spec items defined under the source file.
The following example shows the group-du-sno-config-policy CR:
apiVersion: policy.open-cluster-management.io/v1
kind: Policy
metadata:
  name: group-du-ptp-config-policy
  namespace: groups-sub
  annotations:
    policy.open-cluster-management.io/categories: CM Configuration Management
    policy.open-cluster-management.io/controls: CM-2 Baseline Configuration
    policy.open-cluster-management.io/standards: NIST SP 800-53
spec:
    remediationAction: inform
    disabled: false
    policy-templates:
        - objectDefinition:
            apiVersion: policy.open-cluster-management.io/v1
            kind: ConfigurationPolicy
            metadata:
                name: group-du-ptp-config-policy-config
            spec:
                remediationAction: inform
                severity: low
                namespaceselector:
                    exclude:
                        - kube-*
                    include:
                        - '*'
                object-templates:
                    - complianceType: musthave
                      objectDefinition:
                        apiVersion: ptp.openshift.io/v1
                        kind: PtpConfig
                        metadata:
                            name: du-ptp-slave
                            namespace: openshift-ptp
                        spec:
                            recommend:
                                - match:
                                - nodeLabel: node-role.kubernetes.io/worker-du
                                  priority: 4
                                  profile: slave
                            profile:
                                - interface: ens5f0
                                  name: slave
                                  phc2sysOpts: -a -r -n 24
                                  ptp4lConf: |
                                    [global]
                                    #
                                    # Default Data Set
                                    #
                                    twoStepFlag 1
                                    slaveOnly 0
                                    priority1 128
                                    priority2 128
                                    domainNumber 24
                                    .....
22.4.2. Recommendations when customizing PolicyGenTemplate CRs
Consider the following best practices when customizing site configuration PolicyGenTemplate custom resources (CRs):
-
Use as few policies as are necessary. Using fewer policies requires less resources. Each additional policy creates overhead for the hub cluster and the deployed managed cluster. CRs are combined into policies based on the
policyNamefield in thePolicyGenTemplateCR. CRs in the samePolicyGenTemplatewhich have the same value forpolicyNameare managed under a single policy. -
In disconnected environments, use a single catalog source for all Operators by configuring the registry as a single index containing all Operators. Each additional
CatalogSourceCR on the managed clusters increases CPU usage. -
MachineConfigCRs should be included asextraManifestsin theSiteConfigCR so that they are applied during installation. This can reduce the overall time taken until the cluster is ready to deploy applications. -
PolicyGenTemplatesshould override the channel field to explicitly identify the desired version. This ensures that changes in the source CR during upgrades does not update the generated subscription.
Additional resources
- For recommendations about scaling clusters with RHACM, see Performance and scalability.
When managing large numbers of spoke clusters on the hub cluster, minimize the number of policies to reduce resource consumption.
Grouping multiple configuration CRs into a single or limited number of policies is one way to reduce the overall number of policies on the hub cluster. When using the common, group, and site hierarchy of policies for managing site configuration, it is especially important to combine site-specific configuration into a single policy.
22.4.3. PolicyGenTemplate CRs for RAN deployments
Use PolicyGenTemplate (PGT) custom resources (CRs) to customize the configuration applied to the cluster by using the GitOps zero touch provisioning (ZTP) pipeline. The PGT CR allows you to generate one or more policies to manage the set of configuration CRs on your fleet of clusters. The PGT identifies the set of managed CRs, bundles them into policies, builds the policy wrapping around those CRs, and associates the policies with clusters by using label binding rules.
The reference configuration, obtained from the GitOps ZTP container, is designed to provide a set of critical features and node tuning settings that ensure the cluster can support the stringent performance and resource utilization constraints typical of RAN (Radio Access Network) Distributed Unit (DU) applications. Changes or omissions from the baseline configuration can affect feature availability, performance, and resource utilization. Use the reference PolicyGenTemplate CRs as the basis to create a hierarchy of configuration files tailored to your specific site requirements.
The baseline PolicyGenTemplate CRs that are defined for RAN DU cluster configuration can be extracted from the GitOps ZTP ztp-site-generate container. See "Preparing the GitOps ZTP site configuration repository" for further details.
The PolicyGenTemplate CRs can be found in the ./out/argocd/example/policygentemplates folder. The reference architecture has common, group, and site-specific configuration CRs. Each PolicyGenTemplate CR refers to other CRs that can be found in the ./out/source-crs folder.
The PolicyGenTemplate CRs relevant to RAN cluster configuration are described below. Variants are provided for the group PolicyGenTemplate CRs to account for differences in single-node, three-node compact, and standard cluster configurations. Similarly, site-specific configuration variants are provided for single-node clusters and multi-node (compact or standard) clusters. Use the group and site-specific configuration variants that are relevant for your deployment.
Table 22.3. PolicyGenTemplate CRs for RAN deployments
| PolicyGenTemplate CR | Description |
|---|---|
|
| Contains a set of CRs that get applied to multi-node clusters. These CRs configure SR-IOV features typical for RAN installations. |
|
| Contains a set of CRs that get applied to single-node OpenShift clusters. These CRs configure SR-IOV features typical for RAN installations. |
|
| Contains a set of common RAN CRs that get applied to all clusters. These CRs subscribe to a set of operators providing cluster features typical for RAN as well as baseline cluster tuning. |
|
| Contains the RAN policies for three-node clusters only. |
|
| Contains the RAN policies for single-node clusters only. |
|
| Contains the RAN policies for standard three control-plane clusters. |
|
|
|
|
|
|
|
|
|
Additional resources
22.4.4. Customizing a managed cluster with PolicyGenTemplate CRs
Use the following procedure to customize the policies that get applied to the managed cluster that you provision using the zero touch provisioning (ZTP) pipeline.
Prerequisites
-
You have installed the OpenShift CLI (
oc). -
You have logged in to the hub cluster as a user with
cluster-adminprivileges. - You configured the hub cluster for generating the required installation and policy CRs.
- You created a Git repository where you manage your custom site configuration data. The repository must be accessible from the hub cluster and be defined as a source repository for the Argo CD application.
Procedure
Create a
PolicyGenTemplateCR for site-specific configuration CRs.-
Choose the appropriate example for your CR from the
out/argocd/example/policygentemplatesfolder, for example,example-sno-site.yamlorexample-multinode-site.yaml. Change the
bindingRulesfield in the example file to match the site-specific label included in theSiteConfigCR. In the exampleSiteConfigfile, the site-specific label issites: example-sno.NoteEnsure that the labels defined in your
PolicyGenTemplatebindingRulesfield correspond to the labels that are defined in the related managed clustersSiteConfigCR.- Change the content in the example file to match the desired configuration.
-
Choose the appropriate example for your CR from the
Optional: Create a
PolicyGenTemplateCR for any common configuration CRs that apply to the entire fleet of clusters.-
Select the appropriate example for your CR from the
out/argocd/example/policygentemplatesfolder, for example,common-ranGen.yaml. - Change the content in the example file to match the desired configuration.
-
Select the appropriate example for your CR from the
Optional: Create a
PolicyGenTemplateCR for any group configuration CRs that apply to the certain groups of clusters in the fleet.Ensure that the content of the overlaid spec files matches your desired end state. As a reference, the out/source-crs directory contains the full list of source-crs available to be included and overlaid by your PolicyGenTemplate templates.
NoteDepending on the specific requirements of your clusters, you might need more than a single group policy per cluster type, especially considering that the example group policies each have a single PerformancePolicy.yaml file that can only be shared across a set of clusters if those clusters consist of identical hardware configurations.
-
Select the appropriate example for your CR from the
out/argocd/example/policygentemplatesfolder, for example,group-du-sno-ranGen.yaml. - Change the content in the example file to match the desired configuration.
-
Select the appropriate example for your CR from the
-
Optional. Create a validator inform policy
PolicyGenTemplateCR to signal when the ZTP installation and configuration of the deployed cluster is complete. For more information, see "Creating a validator inform policy". Define all the policy namespaces in a YAML file similar to the example
out/argocd/example/policygentemplates/ns.yamlfile.ImportantDo not include the
NamespaceCR in the same file with thePolicyGenTemplateCR.-
Add the
PolicyGenTemplateCRs andNamespaceCR to thekustomization.yamlfile in the generators section, similar to the example shown inout/argocd/example/policygentemplates/kustomization.yaml. Commit the
PolicyGenTemplateCRs,NamespaceCR, and associatedkustomization.yamlfile in your Git repository and push the changes.The ArgoCD pipeline detects the changes and begins the managed cluster deployment. You can push the changes to the
SiteConfigCR and thePolicyGenTemplateCR simultaneously.
Additional resources
22.4.5. Monitoring managed cluster policy deployment progress
The ArgoCD pipeline uses PolicyGenTemplate CRs in Git to generate the RHACM policies and then sync them to the hub cluster. You can monitor the progress of the managed cluster policy synchronization after the assisted service installs OpenShift Container Platform on the managed cluster.
Prerequisites
-
You have installed the OpenShift CLI (
oc). -
You have logged in to the hub cluster as a user with
cluster-adminprivileges.
Procedure
The Topology Aware Lifecycle Manager (TALM) applies the configuration policies that are bound to the cluster.
After the cluster installation is complete and the cluster becomes
Ready, aClusterGroupUpgradeCR corresponding to this cluster, with a list of ordered policies defined by theran.openshift.io/ztp-deploy-wave annotations, is automatically created by the TALM. The cluster’s policies are applied in the order listed inClusterGroupUpgradeCR.You can monitor the high-level progress of configuration policy reconciliation by using the following commands:
$ export CLUSTER=<clusterName>
$ oc get clustergroupupgrades -n ztp-install $CLUSTER -o jsonpath='{.status.conditions[-1:]}' | jqExample output
{
  "lastTransitionTime": "2022-11-09T07:28:09Z",
  "message": "The ClusterGroupUpgrade CR has upgrade policies that are still non compliant",
  "reason": "UpgradeNotCompleted",
  "status": "False",
  "type": "Ready"
}
You can monitor the detailed cluster policy compliance status by using the RHACM dashboard or the command line.
To check policy compliance by using
oc, run the following command:$ oc get policies -n $CLUSTER
Example output
NAME                                                     REMEDIATION ACTION   COMPLIANCE STATE   AGE
ztp-common.common-config-policy                          inform               Compliant          3h42m
ztp-common.common-subscriptions-policy                   inform               NonCompliant       3h42m
ztp-group.group-du-sno-config-policy                     inform               NonCompliant       3h42m
ztp-group.group-du-sno-validator-du-policy               inform               NonCompliant       3h42m
ztp-install.example1-common-config-policy-pjz9s          enforce              Compliant          167m
ztp-install.example1-common-subscriptions-policy-zzd9k   enforce              NonCompliant       164m
ztp-site.example1-config-policy                          inform               NonCompliant       3h42m
ztp-site.example1-perf-policy                            inform               NonCompliant       3h42m
To check policy status from the RHACM web console, perform the following actions:
- Click Governance → Find policies.
- Click on a cluster policy to check it’s status.
When all of the cluster policies become compliant, ZTP installation and configuration for the cluster is complete. The ztp-done label is added to the cluster.
In the reference configuration, the final policy that becomes compliant is the one defined in the *-du-validator-policy policy. This policy, when compliant on a cluster, ensures that all cluster configuration, Operator installation, and Operator configuration is complete.
22.4.6. Validating the generation of configuration policy CRs
Policy custom resources (CRs) are generated in the same namespace as the PolicyGenTemplate from which they are created. The same troubleshooting flow applies to all policy CRs generated from a PolicyGenTemplate regardless of whether they are ztp-common, ztp-group, or ztp-site based, as shown using the following commands:
$ export NS=<namespace>
$ oc get policy -n $NS
The expected set of policy-wrapped CRs should be displayed.
If the policies failed synchronization, use the following troubleshooting steps.
Procedure
To display detailed information about the policies, run the following command:
$ oc describe -n openshift-gitops application policies
Check for
Status: Conditions:to show the error logs. For example, setting an invalidsourceFile→fileName:generates the error shown below:Status: Conditions: Last Transition Time: 2021-11-26T17:21:39Z Message: rpc error: code = Unknown desc = `kustomize build /tmp/https___git.com/ran-sites/policies/ --enable-alpha-plugins` failed exit status 1: 2021/11/26 17:21:40 Error could not find test.yaml under source-crs/: no such file or directory Error: failure in plugin configured via /tmp/kust-plugin-config-52463179; exit status 1: exit status 1 Type: ComparisonErrorCheck for
Status: Sync:. If there are log errors atStatus: Conditions:, theStatus: Sync:showsUnknownorError:Status: Sync: Compared To: Destination: Namespace: policies-sub Server: https://kubernetes.default.svc Source: Path: policies Repo URL: https://git.com/ran-sites/policies/.git Target Revision: master Status: ErrorWhen Red Hat Advanced Cluster Management (RHACM) recognizes that policies apply to a
ManagedClusterobject, the policy CR objects are applied to the cluster namespace. Check to see if the policies were copied to the cluster namespace:$ oc get policy -n $CLUSTER
Example output:
NAME                                         REMEDIATION ACTION   COMPLIANCE STATE   AGE
ztp-common.common-config-policy              inform               Compliant          13d
ztp-common.common-subscriptions-policy       inform               Compliant          13d
ztp-group.group-du-sno-config-policy         inform               Compliant          13d
Ztp-group.group-du-sno-validator-du-policy   inform               Compliant          13d
ztp-site.example-sno-config-policy           inform               Compliant          13d
RHACM copies all applicable policies into the cluster namespace. The copied policy names have the format:
<policyGenTemplate.Namespace>.<policyGenTemplate.Name>-<policyName>.Check the placement rule for any policies not copied to the cluster namespace. The
matchSelectorin thePlacementRulefor those policies should match labels on theManagedClusterobject:$ oc get placementrule -n $NS
Note the
PlacementRulename appropriate for the missing policy, common, group, or site, using the following command:$ oc get placementrule -n $NS <placementRuleName> -o yaml
- The status-decisions should include your cluster name.
-
The key-value pair of the
matchSelectorin the spec must match the labels on your managed cluster.
Check the labels on the
ManagedClusterobject using the following command:$ oc get ManagedCluster $CLUSTER -o jsonpath='{.metadata.labels}' | jqCheck to see which policies are compliant using the following command:
$ oc get policy -n $CLUSTER
If the
Namespace,OperatorGroup, andSubscriptionpolicies are compliant but the Operator configuration policies are not, it is likely that the Operators did not install on the managed cluster. This causes the Operator configuration policies to fail to apply because the CRD is not yet applied to the spoke.
22.4.7. Restarting policy reconciliation
You can restart policy reconciliation when unexpected compliance issues occur, for example, when the ClusterGroupUpgrade custom resource (CR) has timed out.
Procedure
A
ClusterGroupUpgradeCR is generated in the namespaceztp-installby the Topology Aware Lifecycle Manager after the managed cluster becomesReady:$ export CLUSTER=<clusterName>
$ oc get clustergroupupgrades -n ztp-install $CLUSTER
If there are unexpected issues and the policies fail to become complaint within the configured timeout (the default is 4 hours), the status of the
ClusterGroupUpgradeCR showsUpgradeTimedOut:$ oc get clustergroupupgrades -n ztp-install $CLUSTER -o jsonpath='{.status.conditions[?(@.type=="Ready")]}'A
ClusterGroupUpgradeCR in theUpgradeTimedOutstate automatically restarts its policy reconciliation every hour. If you have changed your policies, you can start a retry immediately by deleting the existingClusterGroupUpgradeCR. This triggers the automatic creation of a newClusterGroupUpgradeCR that begins reconciling the policies immediately:$ oc delete clustergroupupgrades -n ztp-install $CLUSTER
Note that when the ClusterGroupUpgrade CR completes with status UpgradeCompleted and the managed cluster has the label ztp-done applied, you can make additional configuration changes using PolicyGenTemplate. Deleting the existing ClusterGroupUpgrade CR will not make the TALM generate a new CR.
At this point, ZTP has completed its interaction with the cluster and any further interactions should be treated as an update and a new ClusterGroupUpgrade CR created for remediation of the policies.
Additional resources
-
For information about using Topology Aware Lifecycle Manager (TALM) to construct your own
ClusterGroupUpgradeCR, see About the ClusterGroupUpgrade CR.
22.4.8. Changing applied managed cluster CRs using policies
You can remove content from a custom resource (CR) that is deployed in a managed cluster through a policy.
By default, all Policy CRs created from a PolicyGenTemplate CR have the complianceType field set to musthave. A musthave policy without the removed content is still compliant because the CR on the managed cluster has all the specified content. With this configuration, when you remove content from a CR, TALM removes the content from the policy but the content is not removed from the CR on the managed cluster.
With the complianceType field to mustonlyhave, the policy ensures that the CR on the cluster is an exact match of what is specified in the policy.
Prerequisites
-
You have installed the OpenShift CLI (
oc). -
You have logged in to the hub cluster as a user with
cluster-adminprivileges. - You have deployed a managed cluster from a hub cluster running RHACM.
- You have installed Topology Aware Lifecycle Manager on the hub cluster.
Procedure
Remove the content that you no longer need from the affected CRs. In this example, the
disableDrain: falseline was removed from theSriovOperatorConfigCR.Example CR
apiVersion: sriovnetwork.openshift.io/v1
kind: SriovOperatorConfig
metadata:
  name: default
  namespace: openshift-sriov-network-operator
spec:
  configDaemonNodeSelector:
    "node-role.kubernetes.io/$mcp": ""
  disableDrain: true
  enableInjector: true
  enableOperatorWebhook: true
Change the
complianceTypeof the affected policies tomustonlyhavein thegroup-du-sno-ranGen.yamlfile.Example YAML
# ...
- fileName: SriovOperatorConfig.yaml
  policyName: "config-policy"
  complianceType: mustonlyhave
# ...
Create a
ClusterGroupUpdatesCR and specify the clusters that must receive the CR changes::Example ClusterGroupUpdates CR
apiVersion: ran.openshift.io/v1alpha1
kind: ClusterGroupUpgrade
metadata:
  name: cgu-remove
  namespace: default
spec:
  managedPolicies:
    - ztp-group.group-du-sno-config-policy
  enable: false
  clusters:
  - spoke1
  - spoke2
  remediationStrategy:
    maxConcurrency: 2
    timeout: 240
  batchTimeoutAction:
Create the
ClusterGroupUpgradeCR by running the following command:$ oc create -f cgu-remove.yaml
When you are ready to apply the changes, for example, during an appropriate maintenance window, change the value of the
spec.enablefield totrueby running the following command:$ oc --namespace=default patch clustergroupupgrade.ran.openshift.io/cgu-remove \ --patch '{"spec":{"enable":true}}' --type=merge
Verification
Check the status of the policies by running the following command:
$ oc get <kind> <changed_cr_name>
Example output
NAMESPACE   NAME                                                   REMEDIATION ACTION   COMPLIANCE STATE   AGE
default     cgu-ztp-group.group-du-sno-config-policy               enforce                                 17m
default     ztp-group.group-du-sno-config-policy                   inform               NonCompliant       15h
When the
COMPLIANCE STATEof the policy isCompliant, it means that the CR is updated and the unwanted content is removed.Check that the policies are removed from the targeted clusters by running the following command on the managed clusters:
$ oc get <kind> <changed_cr_name>
If there are no results, the CR is removed from the managed cluster.
22.4.9. Indication of done for ZTP installations
Zero touch provisioning (ZTP) simplifies the process of checking the ZTP installation status for a cluster. The ZTP status moves through three phases: cluster installation, cluster configuration, and ZTP done.
- Cluster installation phase
-
The cluster installation phase is shown by the
ManagedClusterJoinedandManagedClusterAvailableconditions in theManagedClusterCR . If theManagedClusterCR does not have these conditions, or the condition is set toFalse, the cluster is still in the installation phase. Additional details about installation are available from theAgentClusterInstallandClusterDeploymentCRs. For more information, see "Troubleshooting GitOps ZTP". - Cluster configuration phase
-
The cluster configuration phase is shown by a
ztp-runninglabel applied theManagedClusterCR for the cluster. - ZTP done
Cluster installation and configuration is complete in the ZTP done phase. This is shown by the removal of the
ztp-runninglabel and addition of theztp-donelabel to theManagedClusterCR. Theztp-donelabel shows that the configuration has been applied and the baseline DU configuration has completed cluster tuning.The transition to the ZTP done state is conditional on the compliant state of a Red Hat Advanced Cluster Management (RHACM) validator inform policy. This policy captures the existing criteria for a completed installation and validates that it moves to a compliant state only when ZTP provisioning of the managed cluster is complete.
The validator inform policy ensures the configuration of the cluster is fully applied and Operators have completed their initialization. The policy validates the following:
-
The target
MachineConfigPoolcontains the expected entries and has finished updating. All nodes are available and not degraded. -
The SR-IOV Operator has completed initialization as indicated by at least one
SriovNetworkNodeStatewithsyncStatus: Succeeded. - The PTP Operator daemon set exists.
-
The target
22.5. Manually installing a single-node OpenShift cluster with ZTP
You can deploy a managed single-node OpenShift cluster by using Red Hat Advanced Cluster Management (RHACM) and the assisted service.
If you are creating multiple managed clusters, use the SiteConfig method described in Deploying far edge sites with ZTP.
The target bare-metal host must meet the networking, firmware, and hardware requirements listed in Recommended cluster configuration for vDU application workloads.
22.5.1. Generating ZTP installation and configuration CRs manually
Use the generator entrypoint for the ztp-site-generate container to generate the site installation and configuration custom resource (CRs) for a cluster based on SiteConfig and PolicyGenTemplate CRs.
Prerequisites
-
You have installed the OpenShift CLI (
oc). -
You have logged in to the hub cluster as a user with
cluster-adminprivileges.
Procedure
Create an output folder by running the following command:
$ mkdir -p ./out
Export the
argocddirectory from theztp-site-generatecontainer image:$ podman run --log-driver=none --rm registry.redhat.io/openshift4/ztp-site-generate-rhel8:v4.11 extract /home/ztp --tar | tar x -C ./out
The
./outdirectory has the referencePolicyGenTemplateandSiteConfigCRs in theout/argocd/example/folder.Example output
out
 └── argocd
      └── example
           ├── policygentemplates
           │     ├── common-ranGen.yaml
           │     ├── example-sno-site.yaml
           │     ├── group-du-sno-ranGen.yaml
           │     ├── group-du-sno-validator-ranGen.yaml
           │     ├── kustomization.yaml
           │     └── ns.yaml
           └── siteconfig
                  ├── example-sno.yaml
                  ├── KlusterletAddonConfigOverride.yaml
                  └── kustomization.yaml
Create an output folder for the site installation CRs:
$ mkdir -p ./site-install
Modify the example
SiteConfigCR for the cluster type that you want to install. Copyexample-sno.yamltosite-1-sno.yamland modify the CR to match the details of the site and bare-metal host that you want to install, for example:Example single-node OpenShift cluster SiteConfig CR
apiVersion: ran.openshift.io/v1 kind: SiteConfig metadata: name: "<site_name>" namespace: "<site_name>" spec: baseDomain: "example.com" pullSecretRef: name: "assisted-deployment-pull-secret" 1 clusterImageSetNameRef: "openshift-4.11" 2 sshPublicKey: "ssh-rsa AAAA..." 3 clusters: - clusterName: "<site_name>" networkType: "OVNKubernetes" clusterLabels: 4 common: true group-du-sno: "" sites : "<site_name>" clusterNetwork: - cidr: 1001:1::/48 hostPrefix: 64 machineNetwork: - cidr: 1111:2222:3333:4444::/64 serviceNetwork: - 1001:2::/112 additionalNTPSources: - 1111:2222:3333:4444::2 #crTemplates: # KlusterletAddonConfig: "KlusterletAddonConfigOverride.yaml" 5 nodes: - hostName: "example-node.example.com" 6 role: "master" bmcAddress: idrac-virtualmedia://<out_of_band_ip>/<system_id>/ 7 bmcCredentialsName: name: "bmh-secret" 8 bootMACAddress: "AA:BB:CC:DD:EE:11" bootMode: "UEFI" 9 rootDeviceHints: wwn: "0x11111000000asd123" cpuset: "0-1,52-53" 10 nodeNetwork: 11 interfaces: - name: eno1 macAddress: "AA:BB:CC:DD:EE:11" config: interfaces: - name: eno1 type: ethernet state: up ipv4: enabled: false ipv6: 12 enabled: true address: - ip: 1111:2222:3333:4444::aaaa:1 prefix-length: 64 dns-resolver: config: search: - example.com server: - 1111:2222:3333:4444::2 routes: config: - destination: ::/0 next-hop-interface: eno1 next-hop-address: 1111:2222:3333:4444::1 table-id: 254- 1
- Create the
assisted-deployment-pull-secretCR with the same namespace as theSiteConfigCR. - 2
clusterImageSetNameRefdefines an image set available on the hub cluster. To see the list of supported versions on your hub cluster, runoc get clusterimagesets.- 3
- Configure the SSH public key used to access the cluster.
- 4
- Cluster labels must correspond to the
bindingRulesfield in thePolicyGenTemplateCRs that you define. For example,policygentemplates/common-ranGen.yamlapplies to all clusters withcommon: trueset,policygentemplates/group-du-sno-ranGen.yamlapplies to all clusters withgroup-du-sno: ""set. - 5
- Optional. The CR specifed under
KlusterletAddonConfigis used to override the defaultKlusterletAddonConfigthat is created for the cluster. - 6
- For single-node deployments, define a single host. For three-node deployments, define three hosts. For standard deployments, define three hosts with
role: masterand two or more hosts defined withrole: worker. - 7
- BMC address that you use to access the host. Applies to all cluster types.
- 8
- Name of the
bmh-secretCR that you separately create with the host BMC credentials. When creating thebmh-secretCR, use the same namespace as theSiteConfigCR that provisions the host. - 9
- Configures the boot mode for the host. The default value is
UEFI. UseUEFISecureBootto enable secure boot on the host. - 10
cpusetmust match the value set in the clusterPerformanceProfileCRspec.cpu.reservedfield for workload partitioning.- 11
- Specifies the network settings for the node.
- 12
- Configures the IPv6 address for the host. For single-node OpenShift clusters with static IP addresses, the node-specific API and Ingress IPs should be the same.
Generate the day-0 installation CRs by processing the modified
SiteConfigCRsite-1-sno.yamlby running the following command:$ podman run -it --rm -v `pwd`/out/argocd/example/siteconfig:/resources:Z -v `pwd`/site-install:/output:Z,U registry.redhat.io/openshift4/ztp-site-generate-rhel8:v4.11.1 generator install site-1-sno.yaml /output
Example output
site-install
└── site-1-sno
    ├── site-1_agentclusterinstall_example-sno.yaml
    ├── site-1-sno_baremetalhost_example-node1.example.com.yaml
    ├── site-1-sno_clusterdeployment_example-sno.yaml
    ├── site-1-sno_configmap_example-sno.yaml
    ├── site-1-sno_infraenv_example-sno.yaml
    ├── site-1-sno_klusterletaddonconfig_example-sno.yaml
    ├── site-1-sno_machineconfig_02-master-workload-partitioning.yaml
    ├── site-1-sno_machineconfig_predefined-extra-manifests-master.yaml
    ├── site-1-sno_machineconfig_predefined-extra-manifests-worker.yaml
    ├── site-1-sno_managedcluster_example-sno.yaml
    ├── site-1-sno_namespace_example-sno.yaml
    └── site-1-sno_nmstateconfig_example-node1.example.com.yaml
Optional: Generate just the day-0
MachineConfiginstallation CRs for a particular cluster type by processing the referenceSiteConfigCR with the-Eoption. For example, run the following commands:Create an output folder for the
MachineConfigCRs:$ mkdir -p ./site-machineconfig
Generate the
MachineConfiginstallation CRs:$ podman run -it --rm -v `pwd`/out/argocd/example/siteconfig:/resources:Z -v `pwd`/site-machineconfig:/output:Z,U registry.redhat.io/openshift4/ztp-site-generate-rhel8:v4.11.1 generator install -E site-1-sno.yaml /output
Example output
site-machineconfig
└── site-1-sno
    ├── site-1-sno_machineconfig_02-master-workload-partitioning.yaml
    ├── site-1-sno_machineconfig_predefined-extra-manifests-master.yaml
    └── site-1-sno_machineconfig_predefined-extra-manifests-worker.yaml
Generate and export the day-2 configuration CRs using the reference
PolicyGenTemplateCRs from the previous step. Run the following commands:Create an output folder for the day-2 CRs:
$ mkdir -p ./ref
Generate and export the day-2 configuration CRs:
$ podman run -it --rm -v `pwd`/out/argocd/example/policygentemplates:/resources:Z -v `pwd`/ref:/output:Z,U registry.redhat.io/openshift4/ztp-site-generate-rhel8:v4.11.1 generator config -N . /output
The command generates example group and site-specific
PolicyGenTemplateCRs for single-node OpenShift, three-node clusters, and standard clusters in the./reffolder.Example output
ref
 └── customResource
      ├── common
      ├── example-multinode-site
      ├── example-sno
      ├── group-du-3node
      ├── group-du-3node-validator
      │    └── Multiple-validatorCRs
      ├── group-du-sno
      ├── group-du-sno-validator
      ├── group-du-standard
      └── group-du-standard-validator
           └── Multiple-validatorCRs
- Use the generated CRs as the basis for the CRs that you use to install the cluster. You apply the installation CRs to the hub cluster as described in "Installing a single managed cluster". The configuration CRs can be applied to the cluster after cluster installation is complete.
Additional resources
22.5.2. Creating the managed bare-metal host secrets
Add the required Secret custom resources (CRs) for the managed bare-metal host to the hub cluster. You need a secret for the ZTP pipeline to access the Baseboard Management Controller (BMC) and a secret for the assisted installer service to pull cluster installation images from the registry.
The secrets are referenced from the SiteConfig CR by name. The namespace must match the SiteConfig namespace.
Procedure
Create a YAML secret file containing credentials for the host Baseboard Management Controller (BMC) and a pull secret required for installing OpenShift and all add-on cluster Operators:
Save the following YAML as the file
example-sno-secret.yaml:apiVersion: v1 kind: Secret metadata: name: example-sno-bmc-secret namespace: example-sno 1 data: 2 password: <base64_password> username: <base64_username> type: Opaque --- apiVersion: v1 kind: Secret metadata: name: pull-secret namespace: example-sno 3 data: .dockerconfigjson: <pull_secret> 4 type: kubernetes.io/dockerconfigjson
-
Add the relative path to
example-sno-secret.yamlto thekustomization.yamlfile that you use to install the cluster.
22.5.3. Installing a single managed cluster
You can manually deploy a single managed cluster using the assisted service and Red Hat Advanced Cluster Management (RHACM).
Prerequisites
-
You have installed the OpenShift CLI (
oc). -
You have logged in to the hub cluster as a user with
cluster-adminprivileges. -
You have created the baseboard management controller (BMC)
Secretand the image pull-secretSecretcustom resources (CRs). See "Creating the managed bare-metal host secrets" for details. - Your target bare-metal host meets the networking and hardware requirements for managed clusters.
Procedure
Create a
ClusterImageSetfor each specific cluster version to be deployed, for exampleclusterImageSet-4.11.yaml. AClusterImageSethas the following format:apiVersion: hive.openshift.io/v1 kind: ClusterImageSet metadata: name: openshift-4.11.0 1 spec: releaseImage: quay.io/openshift-release-dev/ocp-release:4.11.0-x86_64 2
Apply the
clusterImageSetCR:$ oc apply -f clusterImageSet-4.11.yaml
Create the
NamespaceCR in thecluster-namespace.yamlfile:apiVersion: v1 kind: Namespace metadata: name: <cluster_name> 1 labels: name: <cluster_name> 2Apply the
NamespaceCR by running the following command:$ oc apply -f cluster-namespace.yaml
Apply the generated day-0 CRs that you extracted from the
ztp-site-generatecontainer and customized to meet your requirements:$ oc apply -R ./site-install/site-sno-1
Additional resources
22.5.4. Monitoring the managed cluster installation status
Ensure that cluster provisioning was successful by checking the cluster status.
Prerequisites
-
All of the custom resources have been configured and provisioned, and the
Agentcustom resource is created on the hub for the managed cluster.
Procedure
Check the status of the managed cluster:
$ oc get managedcluster
Trueindicates the managed cluster is ready.Check the agent status:
$ oc get agent -n <cluster_name>
Use the
describecommand to provide an in-depth description of the agent’s condition. Statuses to be aware of includeBackendError,InputError,ValidationsFailing,InstallationFailed, andAgentIsConnected. These statuses are relevant to theAgentandAgentClusterInstallcustom resources.$ oc describe agent -n <cluster_name>
Check the cluster provisioning status:
$ oc get agentclusterinstall -n <cluster_name>
Use the
describecommand to provide an in-depth description of the cluster provisioning status:$ oc describe agentclusterinstall -n <cluster_name>
Check the status of the managed cluster’s add-on services:
$ oc get managedclusteraddon -n <cluster_name>
Retrieve the authentication information of the
kubeconfigfile for the managed cluster:$ oc get secret -n <cluster_name> <cluster_name>-admin-kubeconfig -o jsonpath={.data.kubeconfig} | base64 -d > <directory>/<cluster_name>-kubeconfig
22.5.5. Troubleshooting the managed cluster
Use this procedure to diagnose any installation issues that might occur with the managed cluster.
Procedure
Check the status of the managed cluster:
$ oc get managedcluster
Example output
NAME            HUB ACCEPTED   MANAGED CLUSTER URLS   JOINED   AVAILABLE   AGE
SNO-cluster     true                                   True     True      2d19h
If the status in the
AVAILABLEcolumn isTrue, the managed cluster is being managed by the hub.If the status in the
AVAILABLEcolumn isUnknown, the managed cluster is not being managed by the hub. Use the following steps to continue checking to get more information.Check the
AgentClusterInstallinstall status:$ oc get clusterdeployment -n <cluster_name>
Example output
NAME        PLATFORM            REGION   CLUSTERTYPE   INSTALLED    INFRAID    VERSION  POWERSTATE AGE
Sno0026    agent-baremetal                               false                          Initialized
2d14h
If the status in the
INSTALLEDcolumn isfalse, the installation was unsuccessful.If the installation failed, enter the following command to review the status of the
AgentClusterInstallresource:$ oc describe agentclusterinstall -n <cluster_name> <cluster_name>
Resolve the errors and reset the cluster:
Remove the cluster’s managed cluster resource:
$ oc delete managedcluster <cluster_name>
Remove the cluster’s namespace:
$ oc delete namespace <cluster_name>
This deletes all of the namespace-scoped custom resources created for this cluster. You must wait for the
ManagedClusterCR deletion to complete before proceeding.- Recreate the custom resources for the managed cluster.
22.5.6. RHACM generated cluster installation CRs reference
Red Hat Advanced Cluster Management (RHACM) supports deploying OpenShift Container Platform on single-node clusters, three-node clusters, and standard clusters with a specific set of installation custom resources (CRs) that you generate using SiteConfig CRs for each site.
Every managed cluster has its own namespace, and all of the installation CRs except for ManagedCluster and ClusterImageSet are under that namespace. ManagedCluster and ClusterImageSet are cluster-scoped, not namespace-scoped. The namespace and the CR names match the cluster name.
The following table lists the installation CRs that are automatically applied by the RHACM assisted service when it installs clusters using the SiteConfig CRs that you configure.
Table 22.4. Cluster installation CRs generated by RHACM
| CR | Description | Usage |
|---|---|---|
|
| Contains the connection information for the Baseboard Management Controller (BMC) of the target bare-metal host. | Provides access to the BMC to load and boot the discovery image on the target server by using the Redfish protocol. |
|
| Contains information for installing OpenShift Container Platform on the target bare-metal host. |
Used with |
|
|
Specifies details of the managed cluster configuration such as networking and the number of control plane nodes. Displays the cluster | Specifies the managed cluster configuration information and provides status during the installation of the cluster. |
|
|
References the |
Used with |
|
|
Provides network configuration information such as | Sets up a static IP address for the managed cluster’s Kube API server. |
|
| Contains hardware information about the target bare-metal host. | Created automatically on the hub when the target machine’s discovery image boots. |
|
| When a cluster is managed by the hub, it must be imported and known. This Kubernetes object provides that interface. | The hub uses this resource to manage and show the status of managed clusters. |
|
|
Contains the list of services provided by the hub to be deployed to the |
Tells the hub which addon services to deploy to the |
|
|
Logical space for |
Propagates resources to the |
|
|
Two CRs are created: |
|
|
| Contains OpenShift Container Platform image information such as the repository and image name. | Passed into resources to provide OpenShift Container Platform images. |
22.6. Recommended single-node OpenShift cluster configuration for vDU application workloads
Use the following reference information to understand the single-node OpenShift configurations required to deploy virtual distributed unit (vDU) applications in the cluster. Configurations include cluster optimizations for high performance workloads, enabling workload partitioning, and minimizing the number of reboots required postinstallation.
Additional resources
- To deploy a single cluster by hand, see Manually installing a single-node OpenShift cluster with ZTP.
- To deploy a fleet of clusters using GitOps zero touch provisioning (ZTP), see Deploying far edge sites with ZTP.
22.6.1. Running low latency applications on OpenShift Container Platform
OpenShift Container Platform enables low latency processing for applications running on commercial off-the-shelf (COTS) hardware by using several technologies and specialized hardware devices:
- Real-time kernel for RHCOS
- Ensures workloads are handled with a high degree of process determinism.
- CPU isolation
- Avoids CPU scheduling delays and ensures CPU capacity is available consistently.
- NUMA-aware topology management
- Aligns memory and huge pages with CPU and PCI devices to pin guaranteed container memory and huge pages to the non-uniform memory access (NUMA) node. Pod resources for all Quality of Service (QoS) classes stay on the same NUMA node. This decreases latency and improves performance of the node.
- Huge pages memory management
- Using huge page sizes improves system performance by reducing the amount of system resources required to access page tables.
- Precision timing synchronization using PTP
- Allows synchronization between nodes in the network with sub-microsecond accuracy.
22.6.2. Recommended cluster host requirements for vDU application workloads
Running vDU application workloads requires a bare-metal host with sufficient resources to run OpenShift Container Platform services and production workloads.
Table 22.5. Minimum resource requirements
| Profile | vCPU | Memory | Storage |
|---|---|---|---|
| Minimum | 4 to 8 vCPU cores | 32GB of RAM | 120GB |
One vCPU is equivalent to one physical core when simultaneous multithreading (SMT), or Hyper-Threading, is not enabled. When enabled, use the following formula to calculate the corresponding ratio:
- (threads per core × cores) × sockets = vCPUs
The server must have a Baseboard Management Controller (BMC) when booting with virtual media.
22.6.3. Configuring host firmware for low latency and high performance
Bare-metal hosts require the firmware to be configured before the host can be provisioned. The firmware configuration is dependent on the specific hardware and the particular requirements of your installation.
Procedure
-
Set the UEFI/BIOS Boot Mode to
UEFI. - In the host boot sequence order, set Hard drive first.
Apply the specific firmware configuration for your hardware. The following table describes a representative firmware configuration for an Intel Xeon Skylake or Intel Cascade Lake server, based on the Intel FlexRAN 4G and 5G baseband PHY reference design.
ImportantThe exact firmware configuration depends on your specific hardware and network requirements. The following sample configuration is for illustrative purposes only.
Table 22.6. Sample firmware configuration for an Intel Xeon Skylake or Cascade Lake server
Firmware setting Configuration CPU Power and Performance Policy
Performance
Uncore Frequency Scaling
Disabled
Performance P-limit
Disabled
Enhanced Intel SpeedStep ® Tech
Enabled
Intel Configurable TDP
Enabled
Configurable TDP Level
Level 2
Intel® Turbo Boost Technology
Enabled
Energy Efficient Turbo
Disabled
Hardware P-States
Disabled
Package C-State
C0/C1 state
C1E
Disabled
Processor C6
Disabled
Enable global SR-IOV and VT-d settings in the firmware for the host. These settings are relevant to bare-metal environments.
22.6.4. Connectivity prerequisites for managed cluster networks
Before you can install and provision a managed cluster with the zero touch provisioning (ZTP) GitOps pipeline, the managed cluster host must meet the following networking prerequisites:
- There must be bi-directional connectivity between the ZTP GitOps container in the hub cluster and the Baseboard Management Controller (BMC) of the target bare-metal host.
The managed cluster must be able to resolve and reach the API hostname of the hub hostname and
*.appshostname. Here is an example of the API hostname of the hub and*.appshostname:-
api.hub-cluster.internal.domain.com -
console-openshift-console.apps.hub-cluster.internal.domain.com
-
The hub cluster must be able to resolve and reach the API and
*.appshostname of the managed cluster. Here is an example of the API hostname of the managed cluster and*.appshostname:-
api.sno-managed-cluster-1.internal.domain.com -
console-openshift-console.apps.sno-managed-cluster-1.internal.domain.com
-
22.6.5. Workload partitioning in single-node OpenShift with GitOps ZTP
Workload partitioning configures OpenShift Container Platform services, cluster management workloads, and infrastructure pods to run on a reserved number of host CPUs.
To configure workload partitioning with GitOps ZTP, you specify cluster management CPU resources with the cpuset field of the SiteConfig custom resource (CR) and the reserved field of the group PolicyGenTemplate CR. The GitOps ZTP pipeline uses these values to populate the required fields in the workload partitioning MachineConfig CR (cpuset) and the PerformanceProfile CR (reserved) that configure the single-node OpenShift cluster.
For maximum performance, ensure that the reserved and isolated CPU sets do not share CPU cores across NUMA zones.
-
The workload partitioning
MachineConfigCR pins the OpenShift Container Platform infrastructure pods to a definedcpusetconfiguration. -
The
PerformanceProfileCR pins the systemd services to the reserved CPUs.
The value for the reserved field specified in the PerformanceProfile CR must match the cpuset field in the workload partitioning MachineConfig CR.
Additional resources
- For the recommended single-node OpenShift workload partitioning configuration, see Workload partitioning.
22.6.6. Recommended installation-time cluster configurations
The ZTP pipeline applies the following custom resources (CRs) during cluster installation. These configuration CRs ensure that the cluster meets the feature and performance requirements necessary for running a vDU application.
When using the ZTP GitOps plugin and SiteConfig CRs for cluster deployment, the following MachineConfig CRs are included by default.
Use the SiteConfig extraManifests filter to alter the CRs that are included by default. For more information, see Advanced managed cluster configuration with SiteConfig CRs.
22.6.6.1. Workload partitioning
Single-node OpenShift clusters that run DU workloads require workload partitioning. This limits the cores allowed to run platform services, maximizing the CPU core for application payloads.
Workload partitioning can only be enabled during cluster installation. You cannot disable workload partitioning postinstallation. However, you can reconfigure workload partitioning by updating the cpu value that you define in the performance profile, and in the related MachineConfig custom resource (CR).
The base64-encoded CR that enables workload partitioning contains the CPU set that the management workloads are constrained to. Encode host-specific values for
crio.confandkubelet.confin base64. Adjust the content to match the CPU set that is specified in the cluster performance profile. It must match the number of cores in the cluster host.Recommended workload partitioning configuration
apiVersion: machineconfiguration.openshift.io/v1
kind: MachineConfig
metadata:
  labels:
    machineconfiguration.openshift.io/role: master
  name: 02-master-workload-partitioning
spec:
  config:
    ignition:
      version: 3.2.0
    storage:
      files:
      - contents:
          source: data:text/plain;charset=utf-8;base64,W2NyaW8ucnVudGltZS53b3JrbG9hZHMubWFuYWdlbWVudF0KYWN0aXZhdGlvbl9hbm5vdGF0aW9uID0gInRhcmdldC53b3JrbG9hZC5vcGVuc2hpZnQuaW8vbWFuYWdlbWVudCIKYW5ub3RhdGlvbl9wcmVmaXggPSAicmVzb3VyY2VzLndvcmtsb2FkLm9wZW5zaGlmdC5pbyIKcmVzb3VyY2VzID0geyAiY3B1c2hhcmVzIiA9IDAsICJjcHVzZXQiID0gIjAtMSw1Mi01MyIgfQo=
        mode: 420
        overwrite: true
        path: /etc/crio/crio.conf.d/01-workload-partitioning
        user:
          name: root
      - contents:
          source: data:text/plain;charset=utf-8;base64,ewogICJtYW5hZ2VtZW50IjogewogICAgImNwdXNldCI6ICIwLTEsNTItNTMiCiAgfQp9Cg==
        mode: 420
        overwrite: true
        path: /etc/kubernetes/openshift-workload-pinning
        user:
          name: root
When configured in the cluster host, the contents of
/etc/crio/crio.conf.d/01-workload-partitioningshould look like this:[crio.runtime.workloads.management] activation_annotation = "target.workload.openshift.io/management" annotation_prefix = "resources.workload.openshift.io" resources = { "cpushares" = 0, "cpuset" = "0-1,52-53" } 1- 1
- The
cpusetvalue varies based on the installation. If Hyper-Threading is enabled, specify both threads for each core. Thecpusetvalue must match the reserved CPUs that you define in thespec.cpu.reservedfield in the performance profile.
When configured in the cluster, the contents of
/etc/kubernetes/openshift-workload-pinningshould look like this:{ "management": { "cpuset": "0-1,52-53" 1 } }- 1
- The
cpusetmust match thecpusetvalue in/etc/crio/crio.conf.d/01-workload-partitioning.
Verification
Check that the applications and cluster system CPU pinning is correct. Run the following commands:
Open a remote shell connection to the managed cluster:
$ oc debug node/example-sno-1
Check that the OpenShift infrastructure applications CPU pinning is correct:
sh-4.4# pgrep ovn | while read i; do taskset -cp $i; done
Example output
pid 8481's current affinity list: 0-1,52-53
pid 8726's current affinity list: 0-1,52-53
pid 9088's current affinity list: 0-1,52-53
pid 9945's current affinity list: 0-1,52-53
pid 10387's current affinity list: 0-1,52-53
pid 12123's current affinity list: 0-1,52-53
pid 13313's current affinity list: 0-1,52-53
Check that the system applications CPU pinning is correct:
sh-4.4# pgrep systemd | while read i; do taskset -cp $i; done
Example output
pid 1's current affinity list: 0-1,52-53
pid 938's current affinity list: 0-1,52-53
pid 962's current affinity list: 0-1,52-53
pid 1197's current affinity list: 0-1,52-53
22.6.6.2. Reduced platform management footprint
To reduce the overall management footprint of the platform, a MachineConfig custom resource (CR) is required that places all Kubernetes-specific mount points in a new namespace separate from the host operating system. The following base64-encoded example MachineConfig CR illustrates this configuration.
Recommended container mount namespace configuration
apiVersion: machineconfiguration.openshift.io/v1
kind: MachineConfig
metadata:
  labels:
    machineconfiguration.openshift.io/role: master
  name: container-mount-namespace-and-kubelet-conf-master
spec:
  config:
    ignition:
      version: 3.2.0
    storage:
      files:
      - contents:
          source: data:text/plain;charset=utf-8;base64,IyEvYmluL2Jhc2gKCmRlYnVnKCkgewogIGVjaG8gJEAgPiYyCn0KCnVzYWdlKCkgewogIGVjaG8gVXNhZ2U6ICQoYmFzZW5hbWUgJDApIFVOSVQgW2VudmZpbGUgW3Zhcm5hbWVdXQogIGVjaG8KICBlY2hvIEV4dHJhY3QgdGhlIGNvbnRlbnRzIG9mIHRoZSBmaXJzdCBFeGVjU3RhcnQgc3RhbnphIGZyb20gdGhlIGdpdmVuIHN5c3RlbWQgdW5pdCBhbmQgcmV0dXJuIGl0IHRvIHN0ZG91dAogIGVjaG8KICBlY2hvICJJZiAnZW52ZmlsZScgaXMgcHJvdmlkZWQsIHB1dCBpdCBpbiB0aGVyZSBpbnN0ZWFkLCBhcyBhbiBlbnZpcm9ubWVudCB2YXJpYWJsZSBuYW1lZCAndmFybmFtZSciCiAgZWNobyAiRGVmYXVsdCAndmFybmFtZScgaXMgRVhFQ1NUQVJUIGlmIG5vdCBzcGVjaWZpZWQiCiAgZXhpdCAxCn0KClVOSVQ9JDEKRU5WRklMRT0kMgpWQVJOQU1FPSQzCmlmIFtbIC16ICRVTklUIHx8ICRVTklUID09ICItLWhlbHAiIHx8ICRVTklUID09ICItaCIgXV07IHRoZW4KICB1c2FnZQpmaQpkZWJ1ZyAiRXh0cmFjdGluZyBFeGVjU3RhcnQgZnJvbSAkVU5JVCIKRklMRT0kKHN5c3RlbWN0bCBjYXQgJFVOSVQgfCBoZWFkIC1uIDEpCkZJTEU9JHtGSUxFI1wjIH0KaWYgW1sgISAtZiAkRklMRSBdXTsgdGhlbgogIGRlYnVnICJGYWlsZWQgdG8gZmluZCByb290IGZpbGUgZm9yIHVuaXQgJFVOSVQgKCRGSUxFKSIKICBleGl0CmZpCmRlYnVnICJTZXJ2aWNlIGRlZmluaXRpb24gaXMgaW4gJEZJTEUiCkVYRUNTVEFSVD0kKHNlZCAtbiAtZSAnL15FeGVjU3RhcnQ9LipcXCQvLC9bXlxcXSQvIHsgcy9eRXhlY1N0YXJ0PS8vOyBwIH0nIC1lICcvXkV4ZWNTdGFydD0uKlteXFxdJC8geyBzL15FeGVjU3RhcnQ9Ly87IHAgfScgJEZJTEUpCgppZiBbWyAkRU5WRklMRSBdXTsgdGhlbgogIFZBUk5BTUU9JHtWQVJOQU1FOi1FWEVDU1RBUlR9CiAgZWNobyAiJHtWQVJOQU1FfT0ke0VYRUNTVEFSVH0iID4gJEVOVkZJTEUKZWxzZQogIGVjaG8gJEVYRUNTVEFSVApmaQo=
        mode: 493
        path: /usr/local/bin/extractExecStart
      - contents:
          source: data:text/plain;charset=utf-8;base64,IyEvYmluL2Jhc2gKbnNlbnRlciAtLW1vdW50PS9ydW4vY29udGFpbmVyLW1vdW50LW5hbWVzcGFjZS9tbnQgIiRAIgo=
        mode: 493
        path: /usr/local/bin/nsenterCmns
    systemd:
      units:
      - contents: |
          [Unit]
          Description=Manages a mount namespace that both kubelet and crio can use to share their container-specific mounts

          [Service]
          Type=oneshot
          RemainAfterExit=yes
          RuntimeDirectory=container-mount-namespace
          Environment=RUNTIME_DIRECTORY=%t/container-mount-namespace
          Environment=BIND_POINT=%t/container-mount-namespace/mnt
          ExecStartPre=bash -c "findmnt ${RUNTIME_DIRECTORY} || mount --make-unbindable --bind ${RUNTIME_DIRECTORY} ${RUNTIME_DIRECTORY}"
          ExecStartPre=touch ${BIND_POINT}
          ExecStart=unshare --mount=${BIND_POINT} --propagation slave mount --make-rshared /
          ExecStop=umount -R ${RUNTIME_DIRECTORY}
        enabled: true
        name: container-mount-namespace.service
      - dropins:
        - contents: |
            [Unit]
            Wants=container-mount-namespace.service
            After=container-mount-namespace.service

            [Service]
            ExecStartPre=/usr/local/bin/extractExecStart %n /%t/%N-execstart.env ORIG_EXECSTART
            EnvironmentFile=-/%t/%N-execstart.env
            ExecStart=
            ExecStart=bash -c "nsenter --mount=%t/container-mount-namespace/mnt \
                ${ORIG_EXECSTART}"
          name: 90-container-mount-namespace.conf
        name: crio.service
      - dropins:
        - contents: |
            [Unit]
            Wants=container-mount-namespace.service
            After=container-mount-namespace.service

            [Service]
            ExecStartPre=/usr/local/bin/extractExecStart %n /%t/%N-execstart.env ORIG_EXECSTART
            EnvironmentFile=-/%t/%N-execstart.env
            ExecStart=
            ExecStart=bash -c "nsenter --mount=%t/container-mount-namespace/mnt \
                ${ORIG_EXECSTART} --housekeeping-interval=30s"
          name: 90-container-mount-namespace.conf
        - contents: |
            [Service]
            Environment="OPENSHIFT_MAX_HOUSEKEEPING_INTERVAL_DURATION=60s"
            Environment="OPENSHIFT_EVICTION_MONITORING_PERIOD_DURATION=30s"
          name: 30-kubelet-interval-tuning.conf
        name: kubelet.service
22.6.6.3. SCTP
Stream Control Transmission Protocol (SCTP) is a key protocol used in RAN applications. This MachineConfig object adds the SCTP kernel module to the node to enable this protocol.
Recommended SCTP configuration
apiVersion: machineconfiguration.openshift.io/v1
kind: MachineConfig
metadata:
  labels:
    machineconfiguration.openshift.io/role: master
  name: load-sctp-module
spec:
  config:
    ignition:
      version: 2.2.0
    storage:
      files:
        - contents:
            source: data:,
            verification: {}
          filesystem: root
            mode: 420
            path: /etc/modprobe.d/sctp-blacklist.conf
        - contents:
            source: data:text/plain;charset=utf-8,sctp
          filesystem: root
            mode: 420
            path: /etc/modules-load.d/sctp-load.conf
22.6.6.4. Accelerated container startup
The following MachineConfig CR configures core OpenShift processes and containers to use all available CPU cores during system startup and shutdown. This accelerates the system recovery during initial boot and reboots.
Recommended accelerated container startup configuration
apiVersion: machineconfiguration.openshift.io/v1
kind: MachineConfig
metadata:
  labels:
    machineconfiguration.openshift.io/role: master
  name: 04-accelerated-container-startup-master
spec:
  config:
    ignition:
      version: 3.2.0
    storage:
      files:
      - contents:
          source: data:text/plain;charset=utf-8;base64,IyEvYmluL2Jhc2gKIwojIFRlbXBvcmFyaWx5IHJlc2V0IHRoZSBjb3JlIHN5c3RlbSBwcm9jZXNzZXMncyBDUFUgYWZmaW5pdHkgdG8gYmUgdW5yZXN0cmljdGVkIHRvIGFjY2VsZXJhdGUgc3RhcnR1cCBhbmQgc2h1dGRvd24KIwojIFRoZSBkZWZhdWx0cyBiZWxvdyBjYW4gYmUgb3ZlcnJpZGRlbiB2aWEgZW52aXJvbm1lbnQgdmFyaWFibGVzCiMKCiMgVGhlIGRlZmF1bHQgc2V0IG9mIGNyaXRpY2FsIHByb2Nlc3NlcyB3aG9zZSBhZmZpbml0eSBzaG91bGQgYmUgdGVtcG9yYXJpbHkgdW5ib3VuZDoKQ1JJVElDQUxfUFJPQ0VTU0VTPSR7Q1JJVElDQUxfUFJPQ0VTU0VTOi0ic3lzdGVtZCBvdnMgY3JpbyBrdWJlbGV0IE5ldHdvcmtNYW5hZ2VyIGNvbm1vbiBkYnVzIn0KCiMgRGVmYXVsdCB3YWl0IHRpbWUgaXMgNjAwcyA9IDEwbToKTUFYSU1VTV9XQUlUX1RJTUU9JHtNQVhJTVVNX1dBSVRfVElNRTotNjAwfQoKIyBEZWZhdWx0IHN0ZWFkeS1zdGF0ZSB0aHJlc2hvbGQgPSAyJQojIEFsbG93ZWQgdmFsdWVzOgojICA0ICAtIGFic29sdXRlIHBvZCBjb3VudCAoKy8tKQojICA0JSAtIHBlcmNlbnQgY2hhbmdlICgrLy0pCiMgIC0xIC0gZGlzYWJsZSB0aGUgc3RlYWR5LXN0YXRlIGNoZWNrClNURUFEWV9TVEFURV9USFJFU0hPTEQ9JHtTVEVBRFlfU1RBVEVfVEhSRVNIT0xEOi0yJX0KCiMgRGVmYXVsdCBzdGVhZHktc3RhdGUgd2luZG93ID0gNjBzCiMgSWYgdGhlIHJ1bm5pbmcgcG9kIGNvdW50IHN0YXlzIHdpdGhpbiB0aGUgZ2l2ZW4gdGhyZXNob2xkIGZvciB0aGlzIHRpbWUKIyBwZXJpb2QsIHJldHVybiBDUFUgdXRpbGl6YXRpb24gdG8gbm9ybWFsIGJlZm9yZSB0aGUgbWF4aW11bSB3YWl0IHRpbWUgaGFzCiMgZXhwaXJlcwpTVEVBRFlfU1RBVEVfV0lORE9XPSR7U1RFQURZX1NUQVRFX1dJTkRPVzotNjB9CgojIERlZmF1bHQgc3RlYWR5LXN0YXRlIGFsbG93cyBhbnkgcG9kIGNvdW50IHRvIGJlICJzdGVhZHkgc3RhdGUiCiMgSW5jcmVhc2luZyB0aGlzIHdpbGwgc2tpcCBhbnkgc3RlYWR5LXN0YXRlIGNoZWNrcyB1bnRpbCB0aGUgY291bnQgcmlzZXMgYWJvdmUKIyB0aGlzIG51bWJlciB0byBhdm9pZCBmYWxzZSBwb3NpdGl2ZXMgaWYgdGhlcmUgYXJlIHNvbWUgcGVyaW9kcyB3aGVyZSB0aGUKIyBjb3VudCBkb2Vzbid0IGluY3JlYXNlIGJ1dCB3ZSBrbm93IHdlIGNhbid0IGJlIGF0IHN0ZWFkeS1zdGF0ZSB5ZXQuClNURUFEWV9TVEFURV9NSU5JTVVNPSR7U1RFQURZX1NUQVRFX01JTklNVU06LTB9CgojIyMjIyMjIyMjIyMjIyMjIyMjIyMjIyMjIyMjIyMjIyMjIyMjIyMjIyMjIyMjIyMjIyMjIyMjCgpLVUJFTEVUX0NQVV9TVEFURT0vdmFyL2xpYi9rdWJlbGV0L2NwdV9tYW5hZ2VyX3N0YXRlCkZVTExfQ1BVX1NUQVRFPS9zeXMvZnMvY2dyb3VwL2NwdXNldC9jcHVzZXQuY3B1cwp1bnJlc3RyaWN0ZWRDcHVzZXQoKSB7CiAgbG9jYWwgY3B1cwogIGlmIFtbIC1lICRLVUJFTEVUX0NQVV9TVEFURSBdXTsgdGhlbgogICAgICBjcHVzPSQoanEgLXIgJy5kZWZhdWx0Q3B1U2V0JyA8JEtVQkVMRVRfQ1BVX1NUQVRFKQogIGZpCiAgaWYgW1sgLXogJGNwdXMgXV07IHRoZW4KICAgICMgZmFsbCBiYWNrIHRvIHVzaW5nIGFsbCBjcHVzIGlmIHRoZSBrdWJlbGV0IHN0YXRlIGlzIG5vdCBjb25maWd1cmVkIHlldAogICAgW1sgLWUgJEZVTExfQ1BVX1NUQVRFIF1dIHx8IHJldHVybiAxCiAgICBjcHVzPSQoPCRGVUxMX0NQVV9TVEFURSkKICBmaQogIGVjaG8gJGNwdXMKfQoKcmVzdHJpY3RlZENwdXNldCgpIHsKICBmb3IgYXJnIGluICQoPC9wcm9jL2NtZGxpbmUpOyBkbwogICAgaWYgW1sgJGFyZyA9fiBec3lzdGVtZC5jcHVfYWZmaW5pdHk9IF1dOyB0aGVuCiAgICAgIGVjaG8gJHthcmcjKj19CiAgICAgIHJldHVybiAwCiAgICBmaQogIGRvbmUKICByZXR1cm4gMQp9CgpnZXRDUFVDb3VudCAoKSB7CiAgbG9jYWwgY3B1c2V0PSIkMSIKICBsb2NhbCBjcHVsaXN0PSgpCiAgbG9jYWwgY3B1cz0wCiAgbG9jYWwgbWluY3B1cz0yCgogIGlmIFtbIC16ICRjcHVzZXQgfHwgJGNwdXNldCA9fiBbXjAtOSwtXSBdXTsgdGhlbgogICAgZWNobyAkbWluY3B1cwogICAgcmV0dXJuIDEKICBmaQoKICBJRlM9JywnIHJlYWQgLXJhIGNwdWxpc3QgPDw8ICRjcHVzZXQKCiAgZm9yIGVsbSBpbiAiJHtjcHVsaXN0W0BdfSI7IGRvCiAgICBpZiBbWyAkZWxtID1+IF5bMC05XSskIF1dOyB0aGVuCiAgICAgICgoIGNwdXMrKyApKQogICAgZWxpZiBbWyAkZWxtID1+IF5bMC05XSstWzAtOV0rJCBdXTsgdGhlbgogICAgICBsb2NhbCBsb3c9MCBoaWdoPTAKICAgICAgSUZTPSctJyByZWFkIGxvdyBoaWdoIDw8PCAkZWxtCiAgICAgICgoIGNwdXMgKz0gaGlnaCAtIGxvdyArIDEgKSkKICAgIGVsc2UKICAgICAgZWNobyAkbWluY3B1cwogICAgICByZXR1cm4gMQogICAgZmkKICBkb25lCgogICMgUmV0dXJuIGEgbWluaW11bSBvZiAyIGNwdXMKICBlY2hvICQoKCBjcHVzID4gJG1pbmNwdXMgPyBjcHVzIDogJG1pbmNwdXMgKSkKICByZXR1cm4gMAp9CgpyZXNldE9WU3RocmVhZHMgKCkgewogIGxvY2FsIGNwdWNvdW50PSIkMSIKICBsb2NhbCBjdXJSZXZhbGlkYXRvcnM9MAogIGxvY2FsIGN1ckhhbmRsZXJzPTAKICBsb2NhbCBkZXNpcmVkUmV2YWxpZGF0b3JzPTAKICBsb2NhbCBkZXNpcmVkSGFuZGxlcnM9MAogIGxvY2FsIHJjPTAKCiAgY3VyUmV2YWxpZGF0b3JzPSQocHMgLVRlbyBwaWQsdGlkLGNvbW0sY21kIHwgZ3JlcCAtZSByZXZhbGlkYXRvciB8IGdyZXAgLWMgb3ZzLXZzd2l0Y2hkKQogIGN1ckhhbmRsZXJzPSQocHMgLVRlbyBwaWQsdGlkLGNvbW0sY21kIHwgZ3JlcCAtZSBoYW5kbGVyIHwgZ3JlcCAtYyBvdnMtdnN3aXRjaGQpCgogICMgQ2FsY3VsYXRlIHRoZSBkZXNpcmVkIG51bWJlciBvZiB0aHJlYWRzIHRoZSBzYW1lIHdheSBPVlMgZG9lcy4KICAjIE9WUyB3aWxsIHNldCB0aGVzZSB0aHJlYWQgY291bnQgYXMgYSBvbmUgc2hvdCBwcm9jZXNzIG9uIHN0YXJ0dXAsIHNvIHdlCiAgIyBoYXZlIHRvIGFkanVzdCB1cCBvciBkb3duIGR1cmluZyB0aGUgYm9vdCB1cCBwcm9jZXNzLiBUaGUgZGVzaXJlZCBvdXRjb21lIGlzCiAgIyB0byBub3QgcmVzdHJpY3QgdGhlIG51bWJlciBvZiB0aHJlYWQgYXQgc3RhcnR1cCB1bnRpbCB3ZSByZWFjaCBhIHN0ZWFkeQogICMgc3RhdGUuICBBdCB3aGljaCBwb2ludCB3ZSBuZWVkIHRvIHJlc2V0IHRoZXNlIGJhc2VkIG9uIG91ciByZXN0cmljdGVkICBzZXQKICAjIG9mIGNvcmVzLgogICMgU2VlIE9WUyBmdW5jdGlvbiB0aGF0IGNhbGN1bGF0ZXMgdGhlc2UgdGhyZWFkIGNvdW50czoKICAjIGh0dHBzOi8vZ2l0aHViLmNvbS9vcGVudnN3aXRjaC9vdnMvYmxvYi9tYXN0ZXIvb2Zwcm90by9vZnByb3RvLWRwaWYtdXBjYWxsLmMjTDYzNQogICgoIGRlc2lyZWRSZXZhbGlkYXRvcnM9JGNwdWNvdW50IC8gNCArIDEgKSkKICAoKCBkZXNpcmVkSGFuZGxlcnM9JGNwdWNvdW50IC0gJGRlc2lyZWRSZXZhbGlkYXRvcnMgKSkKCgogIGlmIFtbICRjdXJSZXZhbGlkYXRvcnMgLW5lICRkZXNpcmVkUmV2YWxpZGF0b3JzIHx8ICRjdXJIYW5kbGVycyAtbmUgJGRlc2lyZWRIYW5kbGVycyBdXTsgdGhlbgoKICAgIGxvZ2dlciAiUmVjb3Zlcnk6IFJlLXNldHRpbmcgT1ZTIHJldmFsaWRhdG9yIHRocmVhZHM6ICR7Y3VyUmV2YWxpZGF0b3JzfSAtPiAke2Rlc2lyZWRSZXZhbGlkYXRvcnN9IgogICAgbG9nZ2VyICJSZWNvdmVyeTogUmUtc2V0dGluZyBPVlMgaGFuZGxlciB0aHJlYWRzOiAke2N1ckhhbmRsZXJzfSAtPiAke2Rlc2lyZWRIYW5kbGVyc30iCgogICAgb3ZzLXZzY3RsIHNldCBcCiAgICAgIE9wZW5fdlN3aXRjaCAuIFwKICAgICAgb3RoZXItY29uZmlnOm4taGFuZGxlci10aHJlYWRzPSR7ZGVzaXJlZEhhbmRsZXJzfSBcCiAgICAgIG90aGVyLWNvbmZpZzpuLXJldmFsaWRhdG9yLXRocmVhZHM9JHtkZXNpcmVkUmV2YWxpZGF0b3JzfQogICAgcmM9JD8KICBmaQoKICByZXR1cm4gJHJjCn0KCnJlc2V0QWZmaW5pdHkoKSB7CiAgbG9jYWwgY3B1c2V0PSIkMSIKICBsb2NhbCBmYWlsY291bnQ9MAogIGxvY2FsIHN1Y2Nlc3Njb3VudD0wCiAgbG9nZ2VyICJSZWNvdmVyeTogU2V0dGluZyBDUFUgYWZmaW5pdHkgZm9yIGNyaXRpY2FsIHByb2Nlc3NlcyBcIiRDUklUSUNBTF9QUk9DRVNTRVNcIiB0byAkY3B1c2V0IgogIGZvciBwcm9jIGluICRDUklUSUNBTF9QUk9DRVNTRVM7IGRvCiAgICBsb2NhbCBwaWRzPSIkKHBncmVwICRwcm9jKSIKICAgIGZvciBwaWQgaW4gJHBpZHM7IGRvCiAgICAgIGxvY2FsIHRhc2tzZXRPdXRwdXQKICAgICAgdGFza3NldE91dHB1dD0iJCh0YXNrc2V0IC1hcGMgIiRjcHVzZXQiICRwaWQgMj4mMSkiCiAgICAgIGlmIFtbICQ/IC1uZSAwIF1dOyB0aGVuCiAgICAgICAgZWNobyAiRVJST1I6ICR0YXNrc2V0T3V0cHV0IgogICAgICAgICgoZmFpbGNvdW50KyspKQogICAgICBlbHNlCiAgICAgICAgKChzdWNjZXNzY291bnQrKykpCiAgICAgIGZpCiAgICBkb25lCiAgZG9uZQoKICByZXNldE9WU3RocmVhZHMgIiQoZ2V0Q1BVQ291bnQgJHtjcHVzZXR9KSIKICBpZiBbWyAkPyAtbmUgMCBdXTsgdGhlbgogICAgKChmYWlsY291bnQrKykpCiAgZWxzZQogICAgKChzdWNjZXNzY291bnQrKykpCiAgZmkKCiAgbG9nZ2VyICJSZWNvdmVyeTogUmUtYWZmaW5lZCAkc3VjY2Vzc2NvdW50IHBpZHMgc3VjY2Vzc2Z1bGx5IgogIGlmIFtbICRmYWlsY291bnQgLWd0IDAgXV07IHRoZW4KICAgIGxvZ2dlciAiUmVjb3Zlcnk6IEZhaWxlZCB0byByZS1hZmZpbmUgJGZhaWxjb3VudCBwcm9jZXNzZXMiCiAgICByZXR1cm4gMQogIGZpCn0KCnNldFVucmVzdHJpY3RlZCgpIHsKICBsb2dnZXIgIlJlY292ZXJ5OiBTZXR0aW5nIGNyaXRpY2FsIHN5c3RlbSBwcm9jZXNzZXMgdG8gaGF2ZSB1bnJlc3RyaWN0ZWQgQ1BVIGFjY2VzcyIKICByZXNldEFmZmluaXR5ICIkKHVucmVzdHJpY3RlZENwdXNldCkiCn0KCnNldFJlc3RyaWN0ZWQoKSB7CiAgbG9nZ2VyICJSZWNvdmVyeTogUmVzZXR0aW5nIGNyaXRpY2FsIHN5c3RlbSBwcm9jZXNzZXMgYmFjayB0byBub3JtYWxseSByZXN0cmljdGVkIGFjY2VzcyIKICByZXNldEFmZmluaXR5ICIkKHJlc3RyaWN0ZWRDcHVzZXQpIgp9CgpjdXJyZW50QWZmaW5pdHkoKSB7CiAgbG9jYWwgcGlkPSIkMSIKICB0YXNrc2V0IC1wYyAkcGlkIHwgYXdrIC1GJzogJyAne3ByaW50ICQyfScKfQoKd2l0aGluKCkgewogIGxvY2FsIGxhc3Q9JDEgY3VycmVudD0kMiB0aHJlc2hvbGQ9JDMKICBsb2NhbCBkZWx0YT0wIHBjaGFuZ2UKICBkZWx0YT0kKCggY3VycmVudCAtIGxhc3QgKSkKICBpZiBbWyAkY3VycmVudCAtZXEgJGxhc3QgXV07IHRoZW4KICAgIHBjaGFuZ2U9MAogIGVsaWYgW1sgJGxhc3QgLWVxIDAgXV07IHRoZW4KICAgIHBjaGFuZ2U9MTAwMDAwMAogIGVsc2UKICAgIHBjaGFuZ2U9JCgoICggJGRlbHRhICogMTAwKSAvIGxhc3QgKSkKICBmaQogIGVjaG8gLW4gImxhc3Q6JGxhc3QgY3VycmVudDokY3VycmVudCBkZWx0YTokZGVsdGEgcGNoYW5nZToke3BjaGFuZ2V9JTogIgogIGxvY2FsIGFic29sdXRlIGxpbWl0CiAgY2FzZSAkdGhyZXNob2xkIGluCiAgICAqJSkKICAgICAgYWJzb2x1dGU9JHtwY2hhbmdlIyMtfSAjIGFic29sdXRlIHZhbHVlCiAgICAgIGxpbWl0PSR7dGhyZXNob2xkJSUlfQogICAgICA7OwogICAgKikKICAgICAgYWJzb2x1dGU9JHtkZWx0YSMjLX0gIyBhYnNvbHV0ZSB2YWx1ZQogICAgICBsaW1pdD0kdGhyZXNob2xkCiAgICAgIDs7CiAgZXNhYwogIGlmIFtbICRhYnNvbHV0ZSAtbGUgJGxpbWl0IF1dOyB0aGVuCiAgICBlY2hvICJ3aXRoaW4gKCsvLSkkdGhyZXNob2xkIgogICAgcmV0dXJuIDAKICBlbHNlCiAgICBlY2hvICJvdXRzaWRlICgrLy0pJHRocmVzaG9sZCIKICAgIHJldHVybiAxCiAgZmkKfQoKc3RlYWR5c3RhdGUoKSB7CiAgbG9jYWwgbGFzdD0kMSBjdXJyZW50PSQyCiAgaWYgW1sgJGxhc3QgLWx0ICRTVEVBRFlfU1RBVEVfTUlOSU1VTSBdXTsgdGhlbgogICAgZWNobyAibGFzdDokbGFzdCBjdXJyZW50OiRjdXJyZW50IFdhaXRpbmcgdG8gcmVhY2ggJFNURUFEWV9TVEFURV9NSU5JTVVNIGJlZm9yZSBjaGVja2luZyBmb3Igc3RlYWR5LXN0YXRlIgogICAgcmV0dXJuIDEKICBmaQogIHdpdGhpbiAkbGFzdCAkY3VycmVudCAkU1RFQURZX1NUQVRFX1RIUkVTSE9MRAp9Cgp3YWl0Rm9yUmVhZHkoKSB7CiAgbG9nZ2VyICJSZWNvdmVyeTogV2FpdGluZyAke01BWElNVU1fV0FJVF9USU1FfXMgZm9yIHRoZSBpbml0aWFsaXphdGlvbiB0byBjb21wbGV0ZSIKICBsb2NhbCBsYXN0U3lzdGVtZENwdXNldD0iJChjdXJyZW50QWZmaW5pdHkgMSkiCiAgbG9jYWwgbGFzdERlc2lyZWRDcHVzZXQ9IiQodW5yZXN0cmljdGVkQ3B1c2V0KSIKICBsb2NhbCB0PTAgcz0xMAogIGxvY2FsIGxhc3RDY291bnQ9MCBjY291bnQ9MCBzdGVhZHlTdGF0ZVRpbWU9MAogIHdoaWxlIFtbICR0IC1sdCAkTUFYSU1VTV9XQUlUX1RJTUUgXV07IGRvCiAgICBzbGVlcCAkcwogICAgKCh0ICs9IHMpKQogICAgIyBSZS1jaGVjayB0aGUgY3VycmVudCBhZmZpbml0eSBvZiBzeXN0ZW1kLCBpbiBjYXNlIHNvbWUgb3RoZXIgcHJvY2VzcyBoYXMgY2hhbmdlZCBpdAogICAgbG9jYWwgc3lzdGVtZENwdXNldD0iJChjdXJyZW50QWZmaW5pdHkgMSkiCiAgICAjIFJlLWNoZWNrIHRoZSB1bnJlc3RyaWN0ZWQgQ3B1c2V0LCBhcyB0aGUgYWxsb3dlZCBzZXQgb2YgdW5yZXNlcnZlZCBjb3JlcyBtYXkgY2hhbmdlIGFzIHBvZHMgYXJlIGFzc2lnbmVkIHRvIGNvcmVzCiAgICBsb2NhbCBkZXNpcmVkQ3B1c2V0PSIkKHVucmVzdHJpY3RlZENwdXNldCkiCiAgICBpZiBbWyAkc3lzdGVtZENwdXNldCAhPSAkbGFzdFN5c3RlbWRDcHVzZXQgfHwgJGxhc3REZXNpcmVkQ3B1c2V0ICE9ICRkZXNpcmVkQ3B1c2V0IF1dOyB0aGVuCiAgICAgIHJlc2V0QWZmaW5pdHkgIiRkZXNpcmVkQ3B1c2V0IgogICAgICBsYXN0U3lzdGVtZENwdXNldD0iJChjdXJyZW50QWZmaW5pdHkgMSkiCiAgICAgIGxhc3REZXNpcmVkQ3B1c2V0PSIkZGVzaXJlZENwdXNldCIKICAgIGZpCgogICAgIyBEZXRlY3Qgc3RlYWR5LXN0YXRlIHBvZCBjb3VudAogICAgY2NvdW50PSQoY3JpY3RsIHBzIHwgd2MgLWwpCiAgICBpZiBzdGVhZHlzdGF0ZSAkbGFzdENjb3VudCAkY2NvdW50OyB0aGVuCiAgICAgICgoc3RlYWR5U3RhdGVUaW1lICs9IHMpKQogICAgICBlY2hvICJTdGVhZHktc3RhdGUgZm9yICR7c3RlYWR5U3RhdGVUaW1lfXMvJHtTVEVBRFlfU1RBVEVfV0lORE9XfXMiCiAgICAgIGlmIFtbICRzdGVhZHlTdGF0ZVRpbWUgLWdlICRTVEVBRFlfU1RBVEVfV0lORE9XIF1dOyB0aGVuCiAgICAgICAgbG9nZ2VyICJSZWNvdmVyeTogU3RlYWR5LXN0YXRlICgrLy0gJFNURUFEWV9TVEFURV9USFJFU0hPTEQpIGZvciAke1NURUFEWV9TVEFURV9XSU5ET1d9czogRG9uZSIKICAgICAgICByZXR1cm4gMAogICAgICBmaQogICAgZWxzZQogICAgICBpZiBbWyAkc3RlYWR5U3RhdGVUaW1lIC1ndCAwIF1dOyB0aGVuCiAgICAgICAgZWNobyAiUmVzZXR0aW5nIHN0ZWFkeS1zdGF0ZSB0aW1lciIKICAgICAgICBzdGVhZHlTdGF0ZVRpbWU9MAogICAgICBmaQogICAgZmkKICAgIGxhc3RDY291bnQ9JGNjb3VudAogIGRvbmUKICBsb2dnZXIgIlJlY292ZXJ5OiBSZWNvdmVyeSBDb21wbGV0ZSBUaW1lb3V0Igp9CgptYWluKCkgewogIGlmICEgdW5yZXN0cmljdGVkQ3B1c2V0ID4mL2Rldi9udWxsOyB0aGVuCiAgICBsb2dnZXIgIlJlY292ZXJ5OiBObyB1bnJlc3RyaWN0ZWQgQ3B1c2V0IGNvdWxkIGJlIGRldGVjdGVkIgogICAgcmV0dXJuIDEKICBmaQoKICBpZiAhIHJlc3RyaWN0ZWRDcHVzZXQgPiYvZGV2L251bGw7IHRoZW4KICAgIGxvZ2dlciAiUmVjb3Zlcnk6IE5vIHJlc3RyaWN0ZWQgQ3B1c2V0IGhhcyBiZWVuIGNvbmZpZ3VyZWQuICBXZSBhcmUgYWxyZWFkeSBydW5uaW5nIHVucmVzdHJpY3RlZC4iCiAgICByZXR1cm4gMAogIGZpCgogICMgRW5zdXJlIHdlIHJlc2V0IHRoZSBDUFUgYWZmaW5pdHkgd2hlbiB3ZSBleGl0IHRoaXMgc2NyaXB0IGZvciBhbnkgcmVhc29uCiAgIyBUaGlzIHdheSBlaXRoZXIgYWZ0ZXIgdGhlIHRpbWVyIGV4cGlyZXMgb3IgYWZ0ZXIgdGhlIHByb2Nlc3MgaXMgaW50ZXJydXB0ZWQKICAjIHZpYSBeQyBvciBTSUdURVJNLCB3ZSByZXR1cm4gdGhpbmdzIGJhY2sgdG8gdGhlIHdheSB0aGV5IHNob3VsZCBiZS4KICB0cmFwIHNldFJlc3RyaWN0ZWQgRVhJVAoKICBsb2dnZXIgIlJlY292ZXJ5OiBSZWNvdmVyeSBNb2RlIFN0YXJ0aW5nIgogIHNldFVucmVzdHJpY3RlZAogIHdhaXRGb3JSZWFkeQp9CgppZiBbWyAiJHtCQVNIX1NPVVJDRVswXX0iID0gIiR7MH0iIF1dOyB0aGVuCiAgbWFpbiAiJHtAfSIKICBleGl0ICQ/CmZpCg==
        mode: 493
        path: /usr/local/bin/accelerated-container-startup.sh
    systemd:
      units:
      - contents: |
          [Unit]
          Description=Unlocks more CPUs for critical system processes during container startup

          [Service]
          Type=simple
          ExecStart=/usr/local/bin/accelerated-container-startup.sh

          # Maximum wait time is 600s = 10m:
          Environment=MAXIMUM_WAIT_TIME=600

          # Steady-state threshold = 2%
          # Allowed values:
          #  4  - absolute pod count (+/-)
          #  4% - percent change (+/-)
          #  -1 - disable the steady-state check
          # Note: '%' must be escaped as '%%' in systemd unit files
          Environment=STEADY_STATE_THRESHOLD=2%%

          # Steady-state window = 120s
          # If the running pod count stays within the given threshold for this time
          # period, return CPU utilization to normal before the maximum wait time has
          # expires
          Environment=STEADY_STATE_WINDOW=120

          # Steady-state minimum = 40
          # Increasing this will skip any steady-state checks until the count rises above
          # this number to avoid false positives if there are some periods where the
          # count doesn't increase but we know we can't be at steady-state yet.
          Environment=STEADY_STATE_MINIMUM=40

          [Install]
          WantedBy=multi-user.target
        enabled: true
        name: accelerated-container-startup.service
      - contents: |
          [Unit]
          Description=Unlocks more CPUs for critical system processes during container shutdown
          DefaultDependencies=no

          [Service]
          Type=simple
          ExecStart=/usr/local/bin/accelerated-container-startup.sh

          # Maximum wait time is 600s = 10m:
          Environment=MAXIMUM_WAIT_TIME=600

          # Steady-state threshold
          # Allowed values:
          #  4  - absolute pod count (+/-)
          #  4% - percent change (+/-)
          #  -1 - disable the steady-state check
          # Note: '%' must be escaped as '%%' in systemd unit files
          Environment=STEADY_STATE_THRESHOLD=-1

          # Steady-state window = 60s
          # If the running pod count stays within the given threshold for this time
          # period, return CPU utilization to normal before the maximum wait time has
          # expires
          Environment=STEADY_STATE_WINDOW=60

          [Install]
          WantedBy=shutdown.target reboot.target halt.target
        enabled: true
        name: accelerated-container-shutdown.service
22.6.6.5. Automatic kernel crash dumps with kdump
kdump is a Linux kernel feature that creates a kernel crash dump when the kernel crashes. kdump is enabled with the following MachineConfig CR:
Recommended kdump configuration
apiVersion: machineconfiguration.openshift.io/v1
kind: MachineConfig
metadata:
  labels:
    machineconfiguration.openshift.io/role: master
  name: 06-kdump-enable-master
spec:
  config:
    ignition:
      version: 3.2.0
    systemd:
      units:
      - enabled: true
        name: kdump.service
  kernelArguments:
    - crashkernel=512M
22.6.7. Recommended postinstallation cluster configurations
When the cluster installation is complete, the ZTP pipeline applies the following custom resources (CRs) that are required to run DU workloads.
In {ztp} v4.10 and earlier, you configure UEFI secure boot with a MachineConfig CR. This is no longer required in {ztp} v4.11 and later. In v4.11, you configure UEFI secure boot for single-node OpenShift clusters by updating the spec.clusters.nodes.bootMode field in the SiteConfig CR that you use to install the cluster. For more information, see Deploying a managed cluster with SiteConfig and {ztp}.
22.6.7.1. Operator namespaces and Operator groups
Single-node OpenShift clusters that run DU workloads require the following OperatorGroup and Namespace custom resources (CRs):
- Local Storage Operator
- Logging Operator
- PTP Operator
- SR-IOV Network Operator
The following YAML summarizes these CRs:
Recommended Operator Namespace and OperatorGroup configuration
apiVersion: v1
kind: Namespace
metadata:
  annotations:
    workload.openshift.io/allowed: management
  name: openshift-local-storage
---
apiVersion: operators.coreos.com/v1
kind: OperatorGroup
metadata:
  name: openshift-local-storage
  namespace: openshift-local-storage
spec:
  targetNamespaces:
    - openshift-local-storage
---
apiVersion: v1
kind: Namespace
metadata:
  annotations:
    workload.openshift.io/allowed: management
  name: openshift-logging
---
apiVersion: operators.coreos.com/v1
kind: OperatorGroup
metadata:
  name: cluster-logging
  namespace: openshift-logging
spec:
  targetNamespaces:
    - openshift-logging
---
apiVersion: v1
kind: Namespace
metadata:
  annotations:
    workload.openshift.io/allowed: management
  labels:
    openshift.io/cluster-monitoring: "true"
  name: openshift-ptp
---
apiVersion: operators.coreos.com/v1
kind: OperatorGroup
metadata:
  name: ptp-operators
  namespace: openshift-ptp
spec:
  targetNamespaces:
    - openshift-ptp
---
apiVersion: v1
kind: Namespace
metadata:
  annotations:
    workload.openshift.io/allowed: management
    name: openshift-sriov-network-operator
---
apiVersion: operators.coreos.com/v1
kind: OperatorGroup
metadata:
  name: sriov-network-operators
  namespace: openshift-sriov-network-operator
spec:
  targetNamespaces:
    - openshift-sriov-network-operator
22.6.7.2. Operator subscriptions
Single-node OpenShift clusters that run DU workloads require the following Subscription CRs. The subscription provides the location to download the following Operators:
- Local Storage Operator
- Logging Operator
- PTP Operator
- SR-IOV Network Operator
Recommended Operator subscriptions
apiVersion: operators.coreos.com/v1alpha1
kind: Subscription
metadata:
  name: cluster-logging
  namespace: openshift-logging
spec:
  channel: "stable" 1
  name: cluster-logging
  source: redhat-operators
  sourceNamespace: openshift-marketplace
  installPlanApproval: Manual 2
---
apiVersion: operators.coreos.com/v1alpha1
kind: Subscription
metadata:
  name: local-storage-operator
  namespace: openshift-local-storage
spec:
  channel: "stable"
  installPlanApproval: Automatic
  name: local-storage-operator
  source: redhat-operators
  sourceNamespace: openshift-marketplace
  installPlanApproval: Manual
---
apiVersion: operators.coreos.com/v1alpha1
kind: Subscription
metadata:
    name: ptp-operator-subscription
    namespace: openshift-ptp
spec:
  channel: "stable"
  name: ptp-operator
  source: redhat-operators
  sourceNamespace: openshift-marketplace
  installPlanApproval: Manual
---
apiVersion: operators.coreos.com/v1alpha1
kind: Subscription
metadata:
  name: sriov-network-operator-subscription
  namespace: openshift-sriov-network-operator
spec:
  channel: "stable"
  name: sriov-network-operator
  source: redhat-operators
  sourceNamespace: openshift-marketplace
  installPlanApproval: Manual
- 1
- Specify the channel to get the Operator from.
stableis the recommended channel. - 2
- Specify
ManualorAutomatic. InAutomaticmode, the Operator automatically updates to the latest versions in the channel as they become available in the registry. InManualmode, new Operator versions are installed only after they are explicitly approved.
22.6.7.3. Cluster logging and log forwarding
Single-node OpenShift clusters that run DU workloads require logging and log forwarding for debugging. The following example YAML illustrates the required ClusterLogging and ClusterLogForwarder CRs.
Recommended cluster logging and log forwarding configuration
apiVersion: logging.openshift.io/v1
kind: ClusterLogging 1
metadata:
  name: instance
  namespace: openshift-logging
spec:
  collection:
    logs:
      fluentd: {}
      type: fluentd
  curation:
    type: "curator"
    curator:
      schedule: "30 3 * * *"
  managementState: Managed
---
apiVersion: logging.openshift.io/v1
kind: ClusterLogForwarder 2
metadata:
  name: instance
  namespace: openshift-logging
spec:
  inputs:
    - infrastructure: {}
      name: infra-logs
  outputs:
    - name: kafka-open
      type: kafka
      url: tcp://10.46.55.190:9092/test    3
  pipelines:
    - inputRefs:
      - audit
      name: audit-logs
      outputRefs:
      - kafka-open
    - inputRefs:
      - infrastructure
      name: infrastructure-logs
      outputRefs:
      - kafka-open
22.6.7.4. Performance profile
Single-node OpenShift clusters that run DU workloads require a Node Tuning Operator performance profile to use real-time host capabilities and services.
In earlier versions of OpenShift Container Platform, the Performance Addon Operator was used to implement automatic tuning to achieve low latency performance for OpenShift applications. In OpenShift Container Platform 4.11 and later, this functionality is part of the Node Tuning Operator.
The following example PerformanceProfile CR illustrates the required cluster configuration.
Recommended performance profile configuration
apiVersion: performance.openshift.io/v2
kind: PerformanceProfile
metadata:
  name: openshift-node-performance-profile 1
spec:
  additionalKernelArgs:
  - "rcupdate.rcu_normal_after_boot=0"
  - "efi=runtime" 2
  cpu:
    isolated: 2-51,54-103 3
    reserved: 0-1,52-53   4
  hugepages:
    defaultHugepagesSize: 1G
    pages:
      - count: 32 5
        size: 1G  6
        node: 0 7
  machineConfigPoolSelector:
    pools.operator.machineconfiguration.openshift.io/master: ""
  nodeSelector:
    node-role.kubernetes.io/master: ""
  numa:
    topologyPolicy: "restricted"
  realTimeKernel:
    enabled: true    8
- 1
- Ensure that the value for
namematches that specified in thespec.profile.datafield ofTunedPerformancePatch.yamland thestatus.configuration.source.namefield ofvalidatorCRs/informDuValidator.yaml. - 2
- Configures UEFI secure boot for the cluster host.
- 3
- Set the isolated CPUs. Ensure all of the Hyper-Threading pairs match.Important
The reserved and isolated CPU pools must not overlap and together must span all available cores. CPU cores that are not accounted for cause an undefined behaviour in the system.
- 4
- Set the reserved CPUs. When workload partitioning is enabled, system processes, kernel threads, and system container threads are restricted to these CPUs. All CPUs that are not isolated should be reserved.
- 5
- Set the number of huge pages.
- 6
- Set the huge page size.
- 7
- Set
nodeto the NUMA node where thehugepagesare allocated. - 8
- Set
enabledtotrueto install the real-time Linux kernel.
22.6.7.5. PTP
Single-node OpenShift clusters use Precision Time Protocol (PTP) for network time synchronization. The following example PtpConfig CR illustrates the required PTP slave configuration.
Recommended PTP configuration
apiVersion: ptp.openshift.io/v1
kind: PtpConfig
metadata:
  name: du-ptp-slave
  namespace: openshift-ptp
spec:
  profile:
    - interface: ens5f0     1
      name: slave
      phc2sysOpts: -a -r -n 24
      ptp4lConf: |
        [global]
        #
        # Default Data Set
        #
        twoStepFlag 1
        slaveOnly 0
        priority1 128
        priority2 128
        domainNumber 24
        #utc_offset 37
        clockClass 248
        clockAccuracy 0xFE
        offsetScaledLogVariance 0xFFFF
        free_running 0
        freq_est_interval 1
        dscp_event 0
        dscp_general 0
        dataset_comparison ieee1588
        G.8275.defaultDS.localPriority 128
        #
        # Port Data Set
        #
        logAnnounceInterval -3
        logSyncInterval -4
        logMinDelayReqInterval -4
        logMinPdelayReqInterval -4
        announceReceiptTimeout 3
        syncReceiptTimeout 0
        delayAsymmetry 0
        fault_reset_interval 4
        neighborPropDelayThresh 20000000
        masterOnly 0
        G.8275.portDS.localPriority 128
        #
        # Run time options
        #
        assume_two_step 0
        logging_level 6
        path_trace_enabled 0
        follow_up_info 0
        hybrid_e2e 0
        inhibit_multicast_service 0
        net_sync_monitor 0
        tc_spanning_tree 0
        tx_timestamp_timeout 1
        unicast_listen 0
        unicast_master_table 0
        unicast_req_duration 3600
        use_syslog 1
        verbose 0
        summary_interval 0
        kernel_leap 1
        check_fup_sync 0
        #
        # Servo Options
        #
        pi_proportional_const 0.0
        pi_integral_const 0.0
        pi_proportional_scale 0.0
        pi_proportional_exponent -0.3
        pi_proportional_norm_max 0.7
        pi_integral_scale 0.0
        pi_integral_exponent 0.4
        pi_integral_norm_max 0.3
        step_threshold 2.0
        first_step_threshold 0.00002
        max_frequency 900000000
        clock_servo pi
        sanity_freq_limit 200000000
        ntpshm_segment 0
        #
        # Transport options
        #
        transportSpecific 0x0
        ptp_dst_mac 01:1B:19:00:00:00
        p2p_dst_mac 01:80:C2:00:00:0E
        udp_ttl 1
        udp6_scope 0x0E
        uds_address /var/run/ptp4l
        #
        # Default interface options
        #
        clock_type OC
        network_transport L2
        delay_mechanism E2E
        time_stamping hardware
        tsproc_mode filter
        delay_filter moving_median
        delay_filter_length 10
        egressLatency 0
        ingressLatency 0
        boundary_clock_jbod 0
        #
        # Clock description
        #
        productDescription ;;
        revisionData ;;
        manufacturerIdentity 00:00:00
        userDescription ;
        timeSource 0xA0
      ptp4lOpts: -2 -s --summary_interval -4
recommend:
  - match:
      - nodeLabel: node-role.kubernetes.io/master
    priority: 4
    profile: slave
- 1
- Sets the interface used to receive the PTP clock signal.
22.6.7.6. Extended Tuned profile
Single-node OpenShift clusters that run DU workloads require additional performance tuning configurations necessary for high-performance workloads. The following example Tuned CR extends the Tuned profile:
Recommended extended Tuned profile configuration
apiVersion: tuned.openshift.io/v1
kind: Tuned
metadata:
  name: performance-patch
  namespace: openshift-cluster-node-tuning-operator
spec:
  profile:
    - data: |
        [main]
        summary=Configuration changes profile inherited from performance created tuned
        include=openshift-node-performance-openshift-node-performance-profile
        [bootloader]
        cmdline_crash=nohz_full=2-51,54-103
        [sysctl]
        kernel.timer_migration=1
        [scheduler]
        group.ice-ptp=0:f:10:*:ice-ptp.*
        [service]
        service.stalld=start,enable
        service.chronyd=stop,disable
      name: performance-patch
  recommend:
    - machineConfigLabels:
        machineconfiguration.openshift.io/role: master
      priority: 19
      profile: performance-patch
22.6.7.7. SR-IOV
Single root I/O virtualization (SR-IOV) is commonly used to enable the fronthaul and the midhaul networks. The following YAML example configures SR-IOV for a single-node OpenShift cluster.
Recommended SR-IOV configuration
apiVersion: sriovnetwork.openshift.io/v1
kind: SriovOperatorConfig
metadata:
  name: default
  namespace: openshift-sriov-network-operator
spec:
  configDaemonNodeSelector:
    node-role.kubernetes.io/master: ""
  disableDrain: true
  enableInjector: true
  enableOperatorWebhook: true
---
apiVersion: sriovnetwork.openshift.io/v1
kind: SriovNetwork
metadata:
  name: sriov-nw-du-mh
  namespace: openshift-sriov-network-operator
spec:
  networkNamespace: openshift-sriov-network-operator
  resourceName: du_mh
  vlan: 150 1
---
apiVersion: sriovnetwork.openshift.io/v1
kind: SriovNetworkNodePolicy
metadata:
  name: sriov-nnp-du-mh
  namespace: openshift-sriov-network-operator
spec:
  deviceType: vfio-pci 2
  isRdma: false
  nicSelector:
    pfNames:
      - ens7f0 3
  nodeSelector:
    node-role.kubernetes.io/master: ""
  numVfs: 8 4
  priority: 10
  resourceName: du_mh
---
apiVersion: sriovnetwork.openshift.io/v1
kind: SriovNetwork
metadata:
  name: sriov-nw-du-fh
  namespace: openshift-sriov-network-operator
spec:
  networkNamespace: openshift-sriov-network-operator
  resourceName: du_fh
  vlan: 140 5
---
apiVersion: sriovnetwork.openshift.io/v1
kind: SriovNetworkNodePolicy
metadata:
  name: sriov-nnp-du-fh
  namespace: openshift-sriov-network-operator
spec:
  deviceType: netdevice 6
  isRdma: true
  nicSelector:
    pfNames:
      - ens5f0 7
  nodeSelector:
    node-role.kubernetes.io/master: ""
  numVfs: 8 8
  priority: 10
  resourceName: du_fh
- 1
- Specifies the VLAN for the midhaul network.
- 2
- Select either
vfio-pciornetdevice, as needed. - 3
- Specifies the interface connected to the midhaul network.
- 4
- Specifies the number of VFs for the midhaul network.
- 5
- The VLAN for the fronthaul network.
- 6
- Select either
vfio-pciornetdevice, as needed. - 7
- Specifies the interface connected to the fronthaul network.
- 8
- Specifies the number of VFs for the fronthaul network.
22.6.7.8. Console Operator
The console-operator installs and maintains the web console on a cluster. When the node is centrally managed the Operator is not needed and makes space for application workloads. The following Console custom resource (CR) example disables the console.
Recommended console configuration
apiVersion: operator.openshift.io/v1
kind: Console
metadata:
  annotations:
    include.release.openshift.io/ibm-cloud-managed: "false"
    include.release.openshift.io/self-managed-high-availability: "false"
    include.release.openshift.io/single-node-developer: "false"
    release.openshift.io/create-only: "true"
  name: cluster
spec:
  logLevel: Normal
  managementState: Removed
  operatorLogLevel: Normal
22.6.7.9. Alertmanager
Single-node OpenShift clusters that run DU workloads require reduced CPU resources consumed by the OpenShift Container Platform monitoring components. The following ConfigMap custom resource (CR) disables Alertmanager.
Recommended cluster monitoring configuration
apiVersion: v1
kind: ConfigMap
metadata:
  name: cluster-monitoring-config
  namespace: openshift-monitoring
data:
  config.yaml: |
    alertmanagerMain:
      enabled: false
    prometheusK8s:
       retention: 24h
22.6.7.10. Operator Lifecycle Manager
Single-node OpenShift clusters that run distributed unit workloads require consistent access to CPU resources. Operator Lifecycle Manager (OLM) collects performance data from Operators at regular intervals, resulting in an increase in CPU utilisation. The following ConfigMap custom resource (CR) disables the collection of Operator performance data by OLM.
Recommended cluster OLM configuration (ReduceOLMFootprint.yaml)
apiVersion: v1
kind: ConfigMap
metadata:
  name: collect-profiles-config
  namespace: openshift-operator-lifecycle-manager
data:
  pprof-config.yaml: |
    disabled: True
22.6.7.11. Network diagnostics
Single-node OpenShift clusters that run DU workloads require less inter-pod network connectivity checks to reduce the additional load created by these pods. The following custom resource (CR) disables these checks.
Recommended network diagnostics configuration
apiVersion: operator.openshift.io/v1
kind: Network
metadata:
  name: cluster
spec:
  disableNetworkDiagnostics: true
Additional resources
22.7. Validating single-node OpenShift cluster tuning for vDU application workloads
Before you can deploy virtual distributed unit (vDU) applications, you need to tune and configure the cluster host firmware and various other cluster configuration settings. Use the following information to validate the cluster configuration to support vDU workloads.
Additional resources
- For more information about single-node OpenShift clusters tuned for vDU application deployments, see Reference configuration for deploying vDUs on single-node OpenShift.
22.7.1. Recommended firmware configuration for vDU cluster hosts
Use the following table as the basis to configure the cluster host firmware for vDU applications running on OpenShift Container Platform 4.11.
The following table is a general recommendation for vDU cluster host firmware configuration. Exact firmware settings will depend on your requirements and specific hardware platform. Automatic setting of firmware is not handled by the zero touch provisioning pipeline.
Table 22.7. Recommended cluster host firmware settings
| Firmware setting | Configuration | Description |
|---|---|---|
| HyperTransport (HT) | Enabled | HyperTransport (HT) bus is a bus technology developed by AMD. HT provides a high-speed link between the components in the host memory and other system peripherals. |
| UEFI | Enabled | Enable booting from UEFI for the vDU host. |
| CPU Power and Performance Policy | Performance | Set CPU Power and Performance Policy to optimize the system for performance over energy efficiency. |
| Uncore Frequency Scaling | Disabled | Disable Uncore Frequency Scaling to prevent the voltage and frequency of non-core parts of the CPU from being set independently. |
| Uncore Frequency | Maximum | Sets the non-core parts of the CPU such as cache and memory controller to their maximum possible frequency of operation. |
| Performance P-limit | Disabled | Disable Performance P-limit to prevent the Uncore frequency coordination of processors. |
| Enhanced Intel® SpeedStep Tech | Enabled | Enable Enhanced Intel SpeedStep to allow the system to dynamically adjust processor voltage and core frequency that decreases power consumption and heat production in the host. |
| Intel® Turbo Boost Technology | Enabled | Enable Turbo Boost Technology for Intel-based CPUs to automatically allow processor cores to run faster than the rated operating frequency if they are operating below power, current, and temperature specification limits. |
| Intel Configurable TDP | Enabled | Enables Thermal Design Power (TDP) for the CPU. |
| Configurable TDP Level | Level 2 | TDP level sets the CPU power consumption required for a particular performance rating. TDP level 2 sets the CPU to the most stable performance level at the cost of power consumption. |
| Energy Efficient Turbo | Disabled | Disable Energy Efficient Turbo to prevent the processor from using an energy-efficiency based policy. |
| Hardware P-States | Disabled |
Disable |
| Package C-State | C0/C1 state | Use C0 or C1 states to set the processor to a fully active state (C0) or to stop CPU internal clocks running in software (C1). |
| C1E | Disabled | CPU Enhanced Halt (C1E) is a power saving feature in Intel chips. Disabling C1E prevents the operating system from sending a halt command to the CPU when inactive. |
| Processor C6 | Disabled | C6 power-saving is a CPU feature that automatically disables idle CPU cores and cache. Disabling C6 improves system performance. |
| Sub-NUMA Clustering | Disabled | Sub-NUMA clustering divides the processor cores, cache, and memory into multiple NUMA domains. Disabling this option can increase performance for latency-sensitive workloads. |
Enable global SR-IOV and VT-d settings in the firmware for the host. These settings are relevant to bare-metal environments.
22.7.2. Recommended cluster configurations to run vDU applications
Clusters running virtualized distributed unit (vDU) applications require a highly tuned and optimized configuration. The following information describes the various elements that you require to support vDU workloads in OpenShift Container Platform 4.11 clusters.
22.7.2.1. Recommended cluster MachineConfig CRs
Check that the MachineConfig custom resources (CRs) that you extract from the ztp-site-generate container are applied in the cluster. The CRs can be found in the extracted out/source-crs/extra-manifest/ folder.
The following MachineConfig CRs from the ztp-site-generate container configure the cluster host:
Table 22.8. Recommended MachineConfig CRs
| CR filename | Description |
|---|---|
|
|
Configures workload partitioning for the cluster. Apply this |
|
|
Loads the SCTP kernel module. These |
|
| Configures the container mount namespace and Kubelet configuration. |
|
| Configures accelerated startup for the cluster. |
|
|
Configures |
Additional resources
22.7.2.2. Recommended cluster Operators
The following Operators are required for clusters running virtualized distributed unit (vDU) applications and are a part of the baseline reference configuration:
- Node Tuning Operator (NTO). NTO packages functionality that was previously delivered with the Performance Addon Operator, which is now a part of NTO.
- PTP Operator
- SR-IOV Network Operator
- Red Hat OpenShift Logging Operator
- Local Storage Operator
22.7.2.3. Recommended cluster kernel configuration
Always use the latest supported real-time kernel version in your cluster. Ensure that you apply the following configurations in the cluster:
Ensure that the following
additionalKernelArgsare set in the cluster performance profile:spec: additionalKernelArgs: - "rcupdate.rcu_normal_after_boot=0" - "efi=runtime"
Ensure that the
performance-patchprofile in theTunedCR configures the correct CPU isolation set that matches theisolatedCPU set in the relatedPerformanceProfileCR, for example:spec: profile: - name: performance-patch # The 'include' line must match the associated PerformanceProfile name # And the cmdline_crash CPU set must match the 'isolated' set in the associated PerformanceProfile data: | [main] summary=Configuration changes profile inherited from performance created tuned include=openshift-node-performance-openshift-node-performance-profile [bootloader] cmdline_crash=nohz_full=2-51,54-103 1 [sysctl] kernel.timer_migration=1 [scheduler] group.ice-ptp=0:f:10:*:ice-ptp.* [service] service.stalld=start,enable service.chronyd=stop,disable- 1
- Listed CPUs depend on the host hardware configuration, specifically the number of available CPUs in the system and the CPU topology.
22.7.2.4. Checking the realtime kernel version
Always use the latest version of the realtime kernel in your OpenShift Container Platform clusters. If you are unsure about the kernel version that is in use in the cluster, you can compare the current realtime kernel version to the release version with the following procedure.
Prerequisites
-
You have installed the OpenShift CLI (
oc). -
You are logged in as a user with
cluster-adminprivileges. -
You have installed
podman.
Procedure
Run the following command to get the cluster version:
$ OCP_VERSION=$(oc get clusterversion version -o jsonpath='{.status.desired.version}{"\n"}')Get the release image SHA number:
$ DTK_IMAGE=$(oc adm release info --image-for=driver-toolkit quay.io/openshift-release-dev/ocp-release:$OCP_VERSION-x86_64)
Run the release image container and extract the kernel version that is packaged with cluster’s current release:
$ podman run --rm $DTK_IMAGE rpm -qa | grep 'kernel-rt-core-' | sed 's#kernel-rt-core-##'
Example output
4.18.0-305.49.1.rt7.121.el8_4.x86_64
This is the default realtime kernel version that ships with the release.
NoteThe realtime kernel is denoted by the string
.rtin the kernel version.
Verification
Check that the kernel version listed for the cluster’s current release matches actual realtime kernel that is running in the cluster. Run the following commands to check the running realtime kernel version:
Open a remote shell connection to the cluster node:
$ oc debug node/<node_name>
Check the realtime kernel version:
sh-4.4# uname -r
Example output
4.18.0-305.49.1.rt7.121.el8_4.x86_64
22.7.3. Checking that the recommended cluster configurations are applied
You can check that clusters are running the correct configuration. The following procedure describes how to check the various configurations that you require to deploy a DU application in OpenShift Container Platform 4.11 clusters.
Prerequisites
- You have deployed a cluster and tuned it for vDU workloads.
-
You have installed the OpenShift CLI (
oc). -
You have logged in as a user with
cluster-adminprivileges.
Procedure
Check that the default OperatorHub sources are disabled. Run the following command:
$ oc get operatorhub cluster -o yaml
Example output
spec:
    disableAllDefaultSources: true
Check that all required
CatalogSourceresources are annotated for workload partitioning (PreferredDuringScheduling) by running the following command:$ oc get catalogsource -A -o jsonpath='{range .items[*]}{.metadata.name}{" -- "}{.metadata.annotations.target\.workload\.openshift\.io/management}{"\n"}{end}'Example output
certified-operators -- {"effect": "PreferredDuringScheduling"} community-operators -- {"effect": "PreferredDuringScheduling"} ran-operators 1 redhat-marketplace -- {"effect": "PreferredDuringScheduling"} redhat-operators -- {"effect": "PreferredDuringScheduling"}- 1
CatalogSourceresources that are not annotated are also returned. In this example, theran-operatorsCatalogSourceresource is not annotated and does not have thePreferredDuringSchedulingannotation.
NoteIn a properly configured vDU cluster, only a single annotated catalog source is listed.
Check that all applicable OpenShift Container Platform Operator namespaces are annotated for workload partitioning. This includes all Operators installed with core OpenShift Container Platform and the set of additional Operators included in the reference DU tuning configuration. Run the following command:
$ oc get namespaces -A -o jsonpath='{range .items[*]}{.metadata.name}{" -- "}{.metadata.annotations.workload\.openshift\.io/allowed}{"\n"}{end}'Example output
default --
openshift-apiserver -- management
openshift-apiserver-operator -- management
openshift-authentication -- management
openshift-authentication-operator -- management
ImportantAdditional Operators must not be annotated for workload partitioning. In the output from the previous command, additional Operators should be listed without any value on the right side of the
--separator.Check that the
ClusterLoggingconfiguration is correct. Run the following commands:Validate that the appropriate input and output logs are configured:
$ oc get -n openshift-logging ClusterLogForwarder instance -o yaml
Example output
apiVersion: logging.openshift.io/v1
kind: ClusterLogForwarder
metadata:
  creationTimestamp: "2022-07-19T21:51:41Z"
  generation: 1
  name: instance
  namespace: openshift-logging
  resourceVersion: "1030342"
  uid: 8c1a842d-80c5-447a-9150-40350bdf40f0
spec:
  inputs:
  - infrastructure: {}
    name: infra-logs
  outputs:
  - name: kafka-open
    type: kafka
    url: tcp://10.46.55.190:9092/test
  pipelines:
  - inputRefs:
    - audit
    name: audit-logs
    outputRefs:
    - kafka-open
  - inputRefs:
    - infrastructure
    name: infrastructure-logs
    outputRefs:
    - kafka-open
...
Check that the curation schedule is appropriate for your application:
$ oc get -n openshift-logging clusterloggings.logging.openshift.io instance -o yaml
Example output
apiVersion: logging.openshift.io/v1
kind: ClusterLogging
metadata:
  creationTimestamp: "2022-07-07T18:22:56Z"
  generation: 1
  name: instance
  namespace: openshift-logging
  resourceVersion: "235796"
  uid: ef67b9b8-0e65-4a10-88ff-ec06922ea796
spec:
  collection:
    logs:
      fluentd: {}
      type: fluentd
  curation:
    curator:
      schedule: 30 3 * * *
    type: curator
  managementState: Managed
...
Check that the web console is disabled (
managementState: Removed) by running the following command:$ oc get consoles.operator.openshift.io cluster -o jsonpath="{ .spec.managementState }"Example output
Removed
Check that
chronydis disabled on the cluster node by running the following commands:$ oc debug node/<node_name>
Check the status of
chronydon the node:sh-4.4# chroot /host
sh-4.4# systemctl status chronyd
Example output
● chronyd.service - NTP client/server
    Loaded: loaded (/usr/lib/systemd/system/chronyd.service; disabled; vendor preset: enabled)
    Active: inactive (dead)
      Docs: man:chronyd(8)
            man:chrony.conf(5)
Check that the PTP interface is successfully synchronized to the primary clock using a remote shell connection to the
linuxptp-daemoncontainer and the PTP Management Client (pmc) tool:Set the
$PTP_POD_NAMEvariable with the name of thelinuxptp-daemonpod by running the following command:$ PTP_POD_NAME=$(oc get pods -n openshift-ptp -l app=linuxptp-daemon -o name)
Run the following command to check the sync status of the PTP device:
$ oc -n openshift-ptp rsh -c linuxptp-daemon-container ${PTP_POD_NAME} pmc -u -f /var/run/ptp4l.0.config -b 0 'GET PORT_DATA_SET'Example output
sending: GET PORT_DATA_SET
  3cecef.fffe.7a7020-1 seq 0 RESPONSE MANAGEMENT PORT_DATA_SET
    portIdentity            3cecef.fffe.7a7020-1
    portState               SLAVE
    logMinDelayReqInterval  -4
    peerMeanPathDelay       0
    logAnnounceInterval     1
    announceReceiptTimeout  3
    logSyncInterval         0
    delayMechanism          1
    logMinPdelayReqInterval 0
    versionNumber           2
  3cecef.fffe.7a7020-2 seq 0 RESPONSE MANAGEMENT PORT_DATA_SET
    portIdentity            3cecef.fffe.7a7020-2
    portState               LISTENING
    logMinDelayReqInterval  0
    peerMeanPathDelay       0
    logAnnounceInterval     1
    announceReceiptTimeout  3
    logSyncInterval         0
    delayMechanism          1
    logMinPdelayReqInterval 0
    versionNumber           2
Run the following
pmccommand to check the PTP clock status:$ oc -n openshift-ptp rsh -c linuxptp-daemon-container ${PTP_POD_NAME} pmc -u -f /var/run/ptp4l.0.config -b 0 'GET TIME_STATUS_NP'Example output
sending: GET TIME_STATUS_NP 3cecef.fffe.7a7020-0 seq 0 RESPONSE MANAGEMENT TIME_STATUS_NP master_offset 10 1 ingress_time 1657275432697400530 cumulativeScaledRateOffset +0.000000000 scaledLastGmPhaseChange 0 gmTimeBaseIndicator 0 lastGmPhaseChange 0x0000'0000000000000000.0000 gmPresent true 2 gmIdentity 3c2c30.ffff.670e00Check that the expected
master offsetvalue corresponding to the value in/var/run/ptp4l.0.configis found in thelinuxptp-daemon-containerlog:$ oc logs $PTP_POD_NAME -n openshift-ptp -c linuxptp-daemon-container
Example output
phc2sys[56020.341]: [ptp4l.1.config] CLOCK_REALTIME phc offset  -1731092 s2 freq -1546242 delay    497
ptp4l[56020.390]: [ptp4l.1.config] master offset         -2 s2 freq   -5863 path delay       541
ptp4l[56020.390]: [ptp4l.0.config] master offset         -8 s2 freq  -10699 path delay       533
Check that the SR-IOV configuration is correct by running the following commands:
Check that the
disableDrainvalue in theSriovOperatorConfigresource is set totrue:$ oc get sriovoperatorconfig -n openshift-sriov-network-operator default -o jsonpath="{.spec.disableDrain}{'\n'}"Example output
true
Check that the
SriovNetworkNodeStatesync status isSucceededby running the following command:$ oc get SriovNetworkNodeStates -n openshift-sriov-network-operator -o jsonpath="{.items[*].status.syncStatus}{'\n'}"Example output
Succeeded
Verify that the expected number and configuration of virtual functions (
Vfs) under each interface configured for SR-IOV is present and correct in the.status.interfacesfield. For example:$ oc get SriovNetworkNodeStates -n openshift-sriov-network-operator -o yaml
Example output
apiVersion: v1
items:
- apiVersion: sriovnetwork.openshift.io/v1
  kind: SriovNetworkNodeState
...
  status:
    interfaces:
    ...
    - Vfs:
      - deviceID: 154c
        driver: vfio-pci
        pciAddress: 0000:3b:0a.0
        vendor: "8086"
        vfID: 0
      - deviceID: 154c
        driver: vfio-pci
        pciAddress: 0000:3b:0a.1
        vendor: "8086"
        vfID: 1
      - deviceID: 154c
        driver: vfio-pci
        pciAddress: 0000:3b:0a.2
        vendor: "8086"
        vfID: 2
      - deviceID: 154c
        driver: vfio-pci
        pciAddress: 0000:3b:0a.3
        vendor: "8086"
        vfID: 3
      - deviceID: 154c
        driver: vfio-pci
        pciAddress: 0000:3b:0a.4
        vendor: "8086"
        vfID: 4
      - deviceID: 154c
        driver: vfio-pci
        pciAddress: 0000:3b:0a.5
        vendor: "8086"
        vfID: 5
      - deviceID: 154c
        driver: vfio-pci
        pciAddress: 0000:3b:0a.6
        vendor: "8086"
        vfID: 6
      - deviceID: 154c
        driver: vfio-pci
        pciAddress: 0000:3b:0a.7
        vendor: "8086"
        vfID: 7
Check that the cluster performance profile is correct. The
cpuandhugepagessections will vary depending on your hardware configuration. Run the following command:$ oc get PerformanceProfile openshift-node-performance-profile -o yaml
Example output
apiVersion: performance.openshift.io/v2 kind: PerformanceProfile metadata: creationTimestamp: "2022-07-19T21:51:31Z" finalizers: - foreground-deletion generation: 1 name: openshift-node-performance-profile resourceVersion: "33558" uid: 217958c0-9122-4c62-9d4d-fdc27c31118c spec: additionalKernelArgs: - idle=poll - rcupdate.rcu_normal_after_boot=0 - efi=runtime cpu: isolated: 2-51,54-103 reserved: 0-1,52-53 hugepages: defaultHugepagesSize: 1G pages: - count: 32 size: 1G machineConfigPoolSelector: pools.operator.machineconfiguration.openshift.io/master: "" net: userLevelNetworking: true nodeSelector: node-role.kubernetes.io/master: "" numa: topologyPolicy: restricted realTimeKernel: enabled: true status: conditions: - lastHeartbeatTime: "2022-07-19T21:51:31Z" lastTransitionTime: "2022-07-19T21:51:31Z" status: "True" type: Available - lastHeartbeatTime: "2022-07-19T21:51:31Z" lastTransitionTime: "2022-07-19T21:51:31Z" status: "True" type: Upgradeable - lastHeartbeatTime: "2022-07-19T21:51:31Z" lastTransitionTime: "2022-07-19T21:51:31Z" status: "False" type: Progressing - lastHeartbeatTime: "2022-07-19T21:51:31Z" lastTransitionTime: "2022-07-19T21:51:31Z" status: "False" type: Degraded runtimeClass: performance-openshift-node-performance-profile tuned: openshift-cluster-node-tuning-operator/openshift-node-performance-openshift-node-performance-profileNoteCPU settings are dependent on the number of cores available on the server and should align with workload partitioning settings.
hugepagesconfiguration is server and application dependent.Check that the
PerformanceProfilewas successfully applied to the cluster by running the following command:$ oc get performanceprofile openshift-node-performance-profile -o jsonpath="{range .status.conditions[*]}{ @.type }{' -- '}{@.status}{'\n'}{end}"Example output
Available -- True
Upgradeable -- True
Progressing -- False
Degraded -- False
Check the
Tunedperformance patch settings by running the following command:$ oc get tuneds.tuned.openshift.io -n openshift-cluster-node-tuning-operator performance-patch -o yaml
Example output
apiVersion: tuned.openshift.io/v1 kind: Tuned metadata: creationTimestamp: "2022-07-18T10:33:52Z" generation: 1 name: performance-patch namespace: openshift-cluster-node-tuning-operator resourceVersion: "34024" uid: f9799811-f744-4179-bf00-32d4436c08fd spec: profile: - data: | [main] summary=Configuration changes profile inherited from performance created tuned include=openshift-node-performance-openshift-node-performance-profile [bootloader] cmdline_crash=nohz_full=2-23,26-47 1 [sysctl] kernel.timer_migration=1 [scheduler] group.ice-ptp=0:f:10:*:ice-ptp.* [service] service.stalld=start,enable service.chronyd=stop,disable name: performance-patch recommend: - machineConfigLabels: machineconfiguration.openshift.io/role: master priority: 19 profile: performance-patch- 1
- The cpu list in
cmdline=nohz_full=will vary based on your hardware configuration.
Check that cluster networking diagnostics are disabled by running the following command:
$ oc get networks.operator.openshift.io cluster -o jsonpath='{.spec.disableNetworkDiagnostics}'Example output
true
Check that the
Kubelethousekeeping interval is tuned to slower rate. This is set in thecontainerMountNSmachine config. Run the following command:$ oc describe machineconfig container-mount-namespace-and-kubelet-conf-master | grep OPENSHIFT_MAX_HOUSEKEEPING_INTERVAL_DURATION
Example output
Environment="OPENSHIFT_MAX_HOUSEKEEPING_INTERVAL_DURATION=60s"
Check that Grafana and
alertManagerMainare disabled and that the Prometheus retention period is set to 24h by running the following command:$ oc get configmap cluster-monitoring-config -n openshift-monitoring -o jsonpath="{ .data.config\.yaml }"Example output
grafana:
  enabled: false
alertmanagerMain:
  enabled: false
prometheusK8s:
   retention: 24h
Use the following commands to verify that Grafana and
alertManagerMainroutes are not found in the cluster:$ oc get route -n openshift-monitoring alertmanager-main
$ oc get route -n openshift-monitoring grafana
Both queries should return
Error from server (NotFound)messages.
Check that there is a minimum of 4 CPUs allocated as
reservedfor each of thePerformanceProfile,Tunedperformance-patch, workload partitioning, and kernel command line arguments by running the following command:$ oc get performanceprofile -o jsonpath="{ .items[0].spec.cpu.reserved }"Example output
0-3
NoteDepending on your workload requirements, you might require additional reserved CPUs to be allocated.
22.8. Advanced managed cluster configuration with SiteConfig resources
You can use SiteConfig custom resources (CRs) to deploy custom functionality and configurations in your managed clusters at installation time.
22.8.1. Customizing extra installation manifests in the ZTP GitOps pipeline
You can define a set of extra manifests for inclusion in the installation phase of the zero touch provisioning (ZTP) GitOps pipeline. These manifests are linked to the SiteConfig custom resources (CRs) and are applied to the cluster during installation. Including MachineConfig CRs at install time makes the installation process more efficient.
Prerequisites
- Create a Git repository where you manage your custom site configuration data. The repository must be accessible from the hub cluster and be defined as a source repository for the Argo CD application.
Procedure
- Create a set of extra manifest CRs that the ZTP pipeline uses to customize the cluster installs.
In your custom
/siteconfigdirectory, create an/extra-manifestfolder for your extra manifests. The following example illustrates a sample/siteconfigwith/extra-manifestfolder:siteconfig ├── site1-sno-du.yaml ├── site2-standard-du.yaml └── extra-manifest └── 01-example-machine-config.yaml-
Add your custom extra manifest CRs to the
siteconfig/extra-manifestdirectory. In your
SiteConfigCR, enter the directory name in theextraManifestPathfield, for example:clusters: - clusterName: "example-sno" networkType: "OVNKubernetes" extraManifestPath: extra-manifest
-
Save the
SiteConfigCRs and/extra-manifestCRs and push them to the site configuration repo.
The ZTP pipeline appends the CRs in the /extra-manifest directory to the default set of extra manifests during cluster provisioning.
22.8.2. Filtering custom resources using SiteConfig filters
By using filters, you can easily customize SiteConfig custom resources (CRs) to include or exclude other CRs for use in the installation phase of the zero touch provisioning (ZTP) GitOps pipeline.
You can specify an inclusionDefault value of include or exclude for the SiteConfig CR, along with a list of the specific extraManifest RAN CRs that you want to include or exclude. Setting inclusionDefault to include makes the ZTP pipeline apply all the files in /source-crs/extra-manifest during installation. Setting inclusionDefault to exclude does the opposite.
You can exclude individual CRs from the /source-crs/extra-manifest folder that are otherwise included by default. The following example configures a custom single-node OpenShift SiteConfig CR to exclude the /source-crs/extra-manifest/03-sctp-machine-config-worker.yaml CR at installation time.
Some additional optional filtering scenarios are also described.
Prerequisites
- You configured the hub cluster for generating the required installation and policy CRs.
- You created a Git repository where you manage your custom site configuration data. The repository must be accessible from the hub cluster and be defined as a source repository for the Argo CD application.
Procedure
To prevent the ZTP pipeline from applying the
03-sctp-machine-config-worker.yamlCR file, apply the following YAML in theSiteConfigCR:apiVersion: ran.openshift.io/v1 kind: SiteConfig metadata: name: "site1-sno-du" namespace: "site1-sno-du" spec: baseDomain: "example.com" pullSecretRef: name: "assisted-deployment-pull-secret" clusterImageSetNameRef: "openshift-4.11" sshPublicKey: "<ssh_public_key>" clusters: - clusterName: "site1-sno-du" extraManifests: filter: exclude: - 03-sctp-machine-config-worker.yamlThe ZTP pipeline skips the
03-sctp-machine-config-worker.yamlCR during installation. All other CRs in/source-crs/extra-manifestare applied.Save the
SiteConfigCR and push the changes to the site configuration repository.The ZTP pipeline monitors and adjusts what CRs it applies based on the
SiteConfigfilter instructions.Optional: To prevent the ZTP pipeline from applying all the
/source-crs/extra-manifestCRs during cluster installation, apply the following YAML in theSiteConfigCR:- clusterName: "site1-sno-du" extraManifests: filter: inclusionDefault: excludeOptional: To exclude all the
/source-crs/extra-manifestRAN CRs and instead include a custom CR file during installation, edit the customSiteConfigCR to set the custom manifests folder and theincludefile, for example:clusters: - clusterName: "site1-sno-du" extraManifestPath: "<custom_manifest_folder>" 1 extraManifests: filter: inclusionDefault: exclude 2 include: - custom-sctp-machine-config-worker.yaml
The following example illustrates the custom folder structure:
siteconfig
  ├── site1-sno-du.yaml
  └── user-custom-manifest
        └── custom-sctp-machine-config-worker.yaml
22.9. Advanced managed cluster configuration with PolicyGenTemplate resources
You can use PolicyGenTemplate CRs to deploy custom functionality in your managed clusters.
22.9.1. Deploying additional changes to clusters
If you require cluster configuration changes outside of the base GitOps ZTP pipeline configuration, there are three options:
- Apply the additional configuration after the ZTP pipeline is complete
- When the GitOps ZTP pipeline deployment is complete, the deployed cluster is ready for application workloads. At this point, you can install additional Operators and apply configurations specific to your requirements. Ensure that additional configurations do not negatively affect the performance of the platform or allocated CPU budget.
- Add content to the ZTP library
- The base source custom resources (CRs) that you deploy with the GitOps ZTP pipeline can be augmented with custom content as required.
- Create extra manifests for the cluster installation
- Extra manifests are applied during installation and make the installation process more efficient.
Providing additional source CRs or modifying existing source CRs can significantly impact the performance or CPU profile of OpenShift Container Platform.
Additional resources
- See Customizing extra installation manifests in the ZTP GitOps pipeline for information about adding extra manifests.
22.9.2. Using PolicyGenTemplate CRs to override source CRs content
PolicyGenTemplate custom resources (CRs) allow you to overlay additional configuration details on top of the base source CRs provided with the GitOps plugin in the ztp-site-generate container. You can think of PolicyGenTemplate CRs as a logical merge or patch to the base CR. Use PolicyGenTemplate CRs to update a single field of the base CR, or overlay the entire contents of the base CR. You can update values and insert fields that are not in the base CR.
The following example procedure describes how to update fields in the generated PerformanceProfile CR for the reference configuration based on the PolicyGenTemplate CR in the group-du-sno-ranGen.yaml file. Use the procedure as a basis for modifying other parts of the PolicyGenTemplate based on your requirements.
Prerequisites
- Create a Git repository where you manage your custom site configuration data. The repository must be accessible from the hub cluster and be defined as a source repository for Argo CD.
Procedure
Review the baseline source CR for existing content. You can review the source CRs listed in the reference
PolicyGenTemplateCRs by extracting them from the zero touch provisioning (ZTP) container.Create an
/outfolder:$ mkdir -p ./out
Extract the source CRs:
$ podman run --log-driver=none --rm registry.redhat.io/openshift4/ztp-site-generate-rhel8:v4.11.1 extract /home/ztp --tar | tar x -C ./out
Review the baseline
PerformanceProfileCR in./out/source-crs/PerformanceProfile.yaml:apiVersion: performance.openshift.io/v2 kind: PerformanceProfile metadata: name: $name annotations: ran.openshift.io/ztp-deploy-wave: "10" spec: additionalKernelArgs: - "idle=poll" - "rcupdate.rcu_normal_after_boot=0" cpu: isolated: $isolated reserved: $reserved hugepages: defaultHugepagesSize: $defaultHugepagesSize pages: - size: $size count: $count node: $node machineConfigPoolSelector: pools.operator.machineconfiguration.openshift.io/$mcp: "" net: userLevelNetworking: true nodeSelector: node-role.kubernetes.io/$mcp: '' numa: topologyPolicy: "restricted" realTimeKernel: enabled: trueNoteAny fields in the source CR which contain
$…are removed from the generated CR if they are not provided in thePolicyGenTemplateCR.Update the
PolicyGenTemplateentry forPerformanceProfilein thegroup-du-sno-ranGen.yamlreference file. The following examplePolicyGenTemplateCR stanza supplies appropriate CPU specifications, sets thehugepagesconfiguration, and adds a new field that setsgloballyDisableIrqLoadBalancingto false.- fileName: PerformanceProfile.yaml policyName: "config-policy" metadata: name: openshift-node-performance-profile spec: cpu: # These must be tailored for the specific hardware platform isolated: "2-19,22-39" reserved: "0-1,20-21" hugepages: defaultHugepagesSize: 1G pages: - size: 1G count: 10 globallyDisableIrqLoadBalancing: false-
Commit the
PolicyGenTemplatechange in Git, and then push to the Git repository being monitored by the GitOps ZTP argo CD application.
Example output
The ZTP application generates an RHACM policy that contains the generated PerformanceProfile CR. The contents of that CR are derived by merging the metadata and spec contents from the PerformanceProfile entry in the PolicyGenTemplate onto the source CR. The resulting CR has the following content:
---
apiVersion: performance.openshift.io/v2
kind: PerformanceProfile
metadata:
    name: openshift-node-performance-profile
spec:
    additionalKernelArgs:
        - idle=poll
        - rcupdate.rcu_normal_after_boot=0
    cpu:
        isolated: 2-19,22-39
        reserved: 0-1,20-21
    globallyDisableIrqLoadBalancing: false
    hugepages:
        defaultHugepagesSize: 1G
        pages:
            - count: 10
              size: 1G
    machineConfigPoolSelector:
        pools.operator.machineconfiguration.openshift.io/master: ""
    net:
        userLevelNetworking: true
    nodeSelector:
        node-role.kubernetes.io/master: ""
    numa:
        topologyPolicy: restricted
    realTimeKernel:
        enabled: true
In the /source-crs folder that you extract from the ztp-site-generate container, the $ syntax is not used for template substitution as implied by the syntax. Rather, if the policyGen tool sees the $ prefix for a string and you do not specify a value for that field in the related PolicyGenTemplate CR, the field is omitted from the output CR entirely.
An exception to this is the $mcp variable in /source-crs YAML files that is substituted with the specified value for mcp from the PolicyGenTemplate CR. For example, in example/policygentemplates/group-du-standard-ranGen.yaml, the value for mcp is worker:
spec:
  bindingRules:
    group-du-standard: ""
  mcp: "worker"
The policyGen tool replace instances of $mcp with worker in the output CRs.
22.9.3. Adding new content to the GitOps ZTP pipeline
The source CRs in the GitOps ZTP site generator container provide a set of critical features and node tuning settings for RAN Distributed Unit (DU) applications. These are applied to the clusters that you deploy with ZTP. To add or modify existing source CRs in the ztp-site-generate container, rebuild the ztp-site-generate container and make it available to the hub cluster, typically from the disconnected registry associated with the hub cluster. Any valid OpenShift Container Platform CR can be added.
Perform the following procedure to add new content to the ZTP pipeline.
Procedure
Create a directory containing a Containerfile and the source CR YAML files that you want to include in the updated
ztp-site-generatecontainer, for example:ztp-update/ ├── example-cr1.yaml ├── example-cr2.yaml └── ztp-update.in
Add the following content to the
ztp-update.inContainerfile:FROM registry.redhat.io/openshift4/ztp-site-generate-rhel8:v4.11 ADD example-cr2.yaml /kustomize/plugin/ran.openshift.io/v1/policygentemplate/source-crs/ ADD example-cr1.yaml /kustomize/plugin/ran.openshift.io/v1/policygentemplate/source-crs/
Open a terminal at the
ztp-update/folder and rebuild the container:$ podman build -t ztp-site-generate-rhel8-custom:v4.11-custom-1
Push the built container image to your disconnected registry, for example:
$ podman push localhost/ztp-site-generate-rhel8-custom:v4.11-custom-1 registry.example.com:5000/ztp-site-generate-rhel8-custom:v4.11-custom-1
Patch the Argo CD instance on the hub cluster to point to the newly built container image:
$ oc patch -n openshift-gitops argocd openshift-gitops --type=json -p '[{"op": "replace", "path":"/spec/repo/initContainers/0/image", "value": "registry.example.com:5000/ztp-site-generate-rhel8-custom:v4.11-custom-1"} ]'When the Argo CD instance is patched, the
openshift-gitops-repo-serverpod automatically restarts.
Verification
Verify that the new
openshift-gitops-repo-serverpod has completed initialization and that the previous repo pod is terminated:$ oc get pods -n openshift-gitops | grep openshift-gitops-repo-server
Example output
openshift-gitops-server-7df86f9774-db682 1/1 Running 1 28s
You must wait until the new
openshift-gitops-repo-serverpod has completed initialization and the previous pod is terminated before the newly added container image content is available.
Additional resources
-
Alternatively, you can patch the ArgoCD instance as described in Configuring the hub cluster with ArgoCD by modifying
argocd-openshift-gitops-patch.jsonwith an updatedinitContainerimage before applying the patch file.
22.9.4. Configuring policy compliance evaluation timeouts for PolicyGenTemplate CRs
Use Red Hat Advanced Cluster Management (RHACM) installed on a hub cluster to monitor and report on whether your managed clusters are compliant with applied policies. RHACM uses policy templates to apply predefined policy controllers and policies. Policy controllers are Kubernetes custom resource definition (CRD) instances.
You can override the default policy evaluation intervals with PolicyGenTemplate custom resources (CRs). You configure duration settings that define how long a ConfigurationPolicy CR can be in a state of policy compliance or non-compliance before RHACM re-evaluates the applied cluster policies.
The zero touch provisioning (ZTP) policy generator generates ConfigurationPolicy CR policies with pre-defined policy evaluation intervals. The default value for the noncompliant state is 10 seconds. The default value for the compliant state is 10 minutes. To disable the evaluation interval, set the value to never.
Prerequisites
-
You have installed the OpenShift CLI (
oc). -
You have logged in to the hub cluster as a user with
cluster-adminprivileges. - You have created a Git repository where you manage your custom site configuration data.
Procedure
To configure the evaluation interval for all policies in a
PolicyGenTemplateCR, addevaluationIntervalto thespecfield, and then set the appropriatecompliantandnoncompliantvalues. For example:spec: evaluationInterval: compliant: 30m noncompliant: 20sTo configure the evaluation interval for the
spec.sourceFilesobject in aPolicyGenTemplateCR, addevaluationIntervalto thesourceFilesfield, for example:spec: sourceFiles: - fileName: SriovSubscription.yaml policyName: "sriov-sub-policy" evaluationInterval: compliant: never noncompliant: 10s-
Commit the
PolicyGenTemplateCRs files in the Git repository and push your changes.
Verification
Check that the managed spoke cluster policies are monitored at the expected intervals.
-
Log in as a user with
cluster-adminprivileges on the managed cluster. Get the pods that are running in the
open-cluster-management-agent-addonnamespace. Run the following command:$ oc get pods -n open-cluster-management-agent-addon
Example output
NAME                                         READY   STATUS    RESTARTS        AGE
config-policy-controller-858b894c68-v4xdb    1/1     Running   22 (5d8h ago)   10d
Check the applied policies are being evaluated at the expected interval in the logs for the
config-policy-controllerpod:$ oc logs -n open-cluster-management-agent-addon config-policy-controller-858b894c68-v4xdb
Example output
2022-05-10T15:10:25.280Z       info   configuration-policy-controller controllers/configurationpolicy_controller.go:166      Skipping the policy evaluation due to the policy not reaching the evaluation interval  {"policy": "compute-1-config-policy-config"}
2022-05-10T15:10:25.280Z       info   configuration-policy-controller controllers/configurationpolicy_controller.go:166      Skipping the policy evaluation due to the policy not reaching the evaluation interval  {"policy": "compute-1-common-compute-1-catalog-policy-config"}
22.9.5. Signalling ZTP cluster deployment completion with validator inform policies
Create a validator inform policy that signals when the zero touch provisioning (ZTP) installation and configuration of the deployed cluster is complete. This policy can be used for deployments of single-node OpenShift clusters, three-node clusters, and standard clusters.
Procedure
Create a standalone
PolicyGenTemplatecustom resource (CR) that contains the source filevalidatorCRs/informDuValidator.yaml. You only need one standalonePolicyGenTemplateCR for each cluster type. For example, this CR applies a validator inform policy for single-node OpenShift clusters:Example single-node cluster validator inform policy CR (group-du-sno-validator-ranGen.yaml)
apiVersion: ran.openshift.io/v1
kind: PolicyGenTemplate
metadata:
  name: "group-du-sno-validator" 1
  namespace: "ztp-group" 2
spec:
  bindingRules:
    group-du-sno: "" 3
  bindingExcludedRules:
    ztp-done: "" 4
  mcp: "master" 5
  sourceFiles:
    - fileName: validatorCRs/informDuValidator.yaml
      remediationAction: inform 6
      policyName: "du-policy" 7
- 1
- The name of
PolicyGenTemplatesobject. This name is also used as part of the names for theplacementBinding,placementRule, andpolicythat are created in the requestednamespace. - 2
- This value should match the
namespaceused in the groupPolicyGenTemplates. - 3
- The
group-du-*label defined inbindingRulesmust exist in theSiteConfigfiles. - 4
- The label defined in
bindingExcludedRulesmust be`ztp-done:`. Theztp-donelabel is used in coordination with the Topology Aware Lifecycle Manager. - 5
mcpdefines theMachineConfigPoolobject that is used in the source filevalidatorCRs/informDuValidator.yaml. It should bemasterfor single node and three-node cluster deployments andworkerfor standard cluster deployments.- 6
- Optional. The default value is
inform. - 7
- This value is used as part of the name for the generated RHACM policy. The generated validator policy for the single node example is
group-du-sno-validator-du-policy.
-
Commit the
PolicyGenTemplateCR file in your Git repository and push the changes.
Additional resources
22.9.6. Configuring PTP fast events using PolicyGenTemplate CRs
You can configure PTP fast events for vRAN clusters that are deployed using the GitOps Zero Touch Provisioning (ZTP) pipeline. Use PolicyGenTemplate custom resources (CRs) as the basis to create a hierarchy of configuration files tailored to your specific site requirements.
Prerequisites
- Create a Git repository where you manage your custom site configuration data.
Procedure
Add the following YAML into
.spec.sourceFilesin thecommon-ranGen.yamlfile to configure the AMQP Operator:#AMQ interconnect operator for fast events - fileName: AmqSubscriptionNS.yaml policyName: "subscriptions-policy" - fileName: AmqSubscriptionOperGroup.yaml policyName: "subscriptions-policy" - fileName: AmqSubscription.yaml policyName: "subscriptions-policy"
Apply the following
PolicyGenTemplatechanges togroup-du-3node-ranGen.yaml,group-du-sno-ranGen.yaml, orgroup-du-standard-ranGen.yamlfiles according to your requirements:In
.sourceFiles, add thePtpOperatorConfigCR file that configures the AMQ transport host to theconfig-policy:- fileName: PtpOperatorConfigForEvent.yaml policyName: "config-policy"
Configure the
linuxptpandphc2sysfor the PTP clock type and interface. For example, add the following stanza into.sourceFiles:- fileName: PtpConfigSlave.yaml 1 policyName: "config-policy" metadata: name: "du-ptp-slave" spec: profile: - name: "slave" interface: "ens5f1" 2 ptp4lOpts: "-2 -s --summary_interval -4" 3 phc2sysOpts: "-a -r -m -n 24 -N 8 -R 16" 4 ptpClockThreshold: 5 holdOverTimeout: 30 #secs maxOffsetThreshold: 100 #nano secs minOffsetThreshold: -100 #nano secs
- 1
- Can be one
PtpConfigMaster.yaml,PtpConfigSlave.yaml, orPtpConfigSlaveCvl.yamldepending on your requirements.PtpConfigSlaveCvl.yamlconfigureslinuxptpservices for an Intel E810 Columbiaville NIC. For configurations based ongroup-du-sno-ranGen.yamlorgroup-du-3node-ranGen.yaml, usePtpConfigSlave.yaml. - 2
- Device specific interface name.
- 3
- You must append the
--summary_interval -4value toptp4lOptsin.spec.sourceFiles.spec.profileto enable PTP fast events. - 4
- Required
phc2sysOptsvalues.-mprints messages tostdout. Thelinuxptp-daemonDaemonSetparses the logs and generates Prometheus metrics. - 5
- Optional. If the
ptpClockThresholdstanza is not present, default values are used for theptpClockThresholdfields. The stanza shows defaultptpClockThresholdvalues. TheptpClockThresholdvalues configure how long after the PTP master clock is disconnected before PTP events are triggered.holdOverTimeoutis the time value in seconds before the PTP clock event state changes toFREERUNwhen the PTP master clock is disconnected. ThemaxOffsetThresholdandminOffsetThresholdsettings configure offset values in nanoseconds that compare against the values forCLOCK_REALTIME(phc2sys) or master offset (ptp4l). When theptp4lorphc2sysoffset value is outside this range, the PTP clock state is set toFREERUN. When the offset value is within this range, the PTP clock state is set toLOCKED.
Apply the following
PolicyGenTemplatechanges to your specific site YAML files, for example,example-sno-site.yaml:In
.sourceFiles, add theInterconnectCR file that configures the AMQ router to theconfig-policy:- fileName: AmqInstance.yaml policyName: "config-policy"
- Merge any other required changes and files with your custom site repository.
- Push the changes to your site configuration repository to deploy PTP fast events to new sites using GitOps ZTP.
Additional resources
- For more information about how to install the AMQ Interconnect Operator, see Installing the AMQ messaging bus.
22.9.7. Configuring bare-metal event monitoring using PolicyGenTemplate CRs
You can configure bare-metal hardware events for vRAN clusters that are deployed using the GitOps Zero Touch Provisioning (ZTP) pipeline.
Prerequisites
-
Install the OpenShift CLI (
oc). -
Log in as a user with
cluster-adminprivileges. - Create a Git repository where you manage your custom site configuration data.
Procedure
To configure the AMQ Interconnect Operator and the Bare Metal Event Relay Operator, add the following YAML to
spec.sourceFilesin thecommon-ranGen.yamlfile:# AMQ interconnect operator for fast events - fileName: AmqSubscriptionNS.yaml policyName: "subscriptions-policy" - fileName: AmqSubscriptionOperGroup.yaml policyName: "subscriptions-policy" - fileName: AmqSubscription.yaml policyName: "subscriptions-policy" # Bare Metal Event Rely operator - fileName: BareMetalEventRelaySubscriptionNS.yaml policyName: "subscriptions-policy" - fileName: BareMetalEventRelaySubscriptionOperGroup.yaml policyName: "subscriptions-policy" - fileName: BareMetalEventRelaySubscription.yaml policyName: "subscriptions-policy"
Add the
InterconnectCR to.spec.sourceFilesin the site configuration file, for example, theexample-sno-site.yamlfile:- fileName: AmqInstance.yaml policyName: "config-policy"
Add the
HardwareEventCR tospec.sourceFilesin your specific group configuration file, for example, in thegroup-du-sno-ranGen.yamlfile:- fileName: HardwareEvent.yaml policyName: "config-policy" spec: nodeSelector: {} transportHost: "amqp://<amq_interconnect_name>.<amq_interconnect_namespace>.svc.cluster.local" 1 logLevel: "info"- 1
- The
transportHostURL is composed of the existing AMQ Interconnect CRnameandnamespace. For example, intransportHost: "amqp://amq-router.amq-router.svc.cluster.local", the AMQ Interconnectnameandnamespaceare both set toamq-router.
NoteEach baseboard management controller (BMC) requires a single
HardwareEventresource only.-
Commit the
PolicyGenTemplatechange in Git, and then push the changes to your site configuration repository to deploy bare-metal events monitoring to new sites using GitOps ZTP. Create the Redfish Secret by running the following command:
$ oc -n openshift-bare-metal-events create secret generic redfish-basic-auth \
--from-literal=username=<bmc_username> --from-literal=password=<bmc_password> \
--from-literal=hostaddr="<bmc_host_ip_addr>"
Additional resources
- For more information about how to install the Bare Metal Event Relay, see Installing the Bare Metal Event Relay using the CLI.
Additional resources
- For more information about how to create the username, password, and host IP address for the BMC secret, see Creating the bare-metal event and Secret CRs.
22.10. Updating managed clusters with the Topology Aware Lifecycle Manager
You can use the Topology Aware Lifecycle Manager (TALM) to manage the software lifecycle of OpenShift Container Platform managed clusters. TALM uses Red Hat Advanced Cluster Management (RHACM) policies to perform changes on the target clusters.
The Topology Aware Lifecycle Manager is a Technology Preview feature only. Technology Preview features are not supported with Red Hat production service level agreements (SLAs) and might not be functionally complete. Red Hat does not recommend using them in production. These features provide early access to upcoming product features, enabling customers to test functionality and provide feedback during the development process.
For more information about the support scope of Red Hat Technology Preview features, see Technology Preview Features Support Scope.
Additional resources
- For more information about the Topology Aware Lifecycle Manager, see About the Topology Aware Lifecycle Manager.
22.10.1. Updating clusters in a disconnected environment
You can upgrade managed clusters and Operators for managed clusters that you have deployed using GitOps ZTP and Topology Aware Lifecycle Manager (TALM).
22.10.1.1. Setting up the environment
TALM can perform both platform and Operator updates.
You must mirror both the platform image and Operator images that you want to update to in your mirror registry before you can use TALM to update your disconnected clusters. Complete the following steps to mirror the images:
For platform updates, you must perform the following steps:
Mirror the desired OpenShift Container Platform image repository. Ensure that the desired platform image is mirrored by following the "Mirroring the OpenShift Container Platform image repository" procedure linked in the Additional Resources. Save the contents of the
imageContentSourcessection in theimageContentSources.yamlfile:Example output
imageContentSources:
 - mirrors:
   - mirror-ocp-registry.ibmcloud.io.cpak:5000/openshift-release-dev/openshift4
   source: quay.io/openshift-release-dev/ocp-release
 - mirrors:
   - mirror-ocp-registry.ibmcloud.io.cpak:5000/openshift-release-dev/openshift4
   source: quay.io/openshift-release-dev/ocp-v4.0-art-dev
Save the image signature of the desired platform image that was mirrored. You must add the image signature to the
PolicyGenTemplateCR for platform updates. To get the image signature, perform the following steps:Specify the desired OpenShift Container Platform tag by running the following command:
$ OCP_RELEASE_NUMBER=<release_version>
Specify the architecture of the server by running the following command:
$ ARCHITECTURE=<server_architecture>
Get the release image digest from Quay by running the following command
$ DIGEST="$(oc adm release info quay.io/openshift-release-dev/ocp-release:${OCP_RELEASE_NUMBER}-${ARCHITECTURE} | sed -n 's/Pull From: .*@//p')"Set the digest algorithm by running the following command:
$ DIGEST_ALGO="${DIGEST%%:*}"Set the digest signature by running the following command:
$ DIGEST_ENCODED="${DIGEST#*:}"Get the image signature from the mirror.openshift.com website by running the following command:
$ SIGNATURE_BASE64=$(curl -s "https://mirror.openshift.com/pub/openshift-v4/signatures/openshift/release/${DIGEST_ALGO}=${DIGEST_ENCODED}/signature-1" | base64 -w0 && echo)Save the image signature to the
checksum-<OCP_RELEASE_NUMBER>.yamlfile by running the following commands:$ cat >checksum-${OCP_RELEASE_NUMBER}.yaml <<EOF ${DIGEST_ALGO}-${DIGEST_ENCODED}: ${SIGNATURE_BASE64} EOF
Prepare the update graph. You have two options to prepare the update graph:
Use the OpenShift Update Service.
For more information about how to set up the graph on the hub cluster, see Deploy the operator for OpenShift Update Service and Build the graph data init container.
Make a local copy of the upstream graph. Host the update graph on an
httporhttpsserver in the disconnected environment that has access to the managed cluster. To download the update graph, use the following command:$ curl -s https://api.openshift.com/api/upgrades_info/v1/graph?channel=stable-4.11 -o ~/upgrade-graph_stable-4.11
For Operator updates, you must perform the following task:
- Mirror the Operator catalogs. Ensure that the desired operator images are mirrored by following the procedure in the "Mirroring Operator catalogs for use with disconnected clusters" section.
Additional resources
- For more information about how to update ZTP, see Upgrading GitOps ZTP.
- For more information about how to mirror an OpenShift Container Platform image repository, see Mirroring the OpenShift Container Platform image repository.
- For more information about how to mirror Operator catalogs for disconnected clusters, see Mirroring Operator catalogs for use with disconnected clusters.
- For more information about how to prepare the disconnected environment and mirroring the desired image repository, see Preparing the disconnected environment.
- For more information about update channels and releases, see Understanding update channels and releases.
22.10.1.2. Performing a platform update
You can perform a platform update with the TALM.
Prerequisites
- Install the Topology Aware Lifecycle Manager (TALM).
- Update ZTP to the latest version.
- Provision one or more managed clusters with ZTP.
- Mirror the desired image repository.
-
Log in as a user with
cluster-adminprivileges. - Create RHACM policies in the hub cluster.
Procedure
Create a
PolicyGenTemplateCR for the platform update:Save the following contents of the
PolicyGenTemplateCR in thedu-upgrade.yamlfile.Example of
PolicyGenTemplatefor platform updateapiVersion: ran.openshift.io/v1 kind: PolicyGenTemplate metadata: name: "du-upgrade" namespace: "ztp-group-du-sno" spec: bindingRules: group-du-sno: "" mcp: "master" remediationAction: inform sourceFiles: - fileName: ImageSignature.yaml 1 policyName: "platform-upgrade-prep" binaryData: ${DIGEST_ALGO}-${DIGEST_ENCODED}: ${SIGNATURE_BASE64} 2 - fileName: DisconnectedICSP.yaml policyName: "platform-upgrade-prep" metadata: name: disconnected-internal-icsp-for-ocp spec: repositoryDigestMirrors: 3 - mirrors: - quay-intern.example.com/ocp4/openshift-release-dev source: quay.io/openshift-release-dev/ocp-release - mirrors: - quay-intern.example.com/ocp4/openshift-release-dev source: quay.io/openshift-release-dev/ocp-v4.0-art-dev - fileName: ClusterVersion.yaml 4 policyName: "platform-upgrade-prep" metadata: name: version annotations: ran.openshift.io/ztp-deploy-wave: "1" spec: channel: "stable-4.11" upstream: http://upgrade.example.com/images/upgrade-graph_stable-4.11 - fileName: ClusterVersion.yaml 5 policyName: "platform-upgrade" metadata: name: version spec: channel: "stable-4.11" upstream: http://upgrade.example.com/images/upgrade-graph_stable-4.11 desiredUpdate: version: 4.11.4 status: history: - version: 4.11.4 state: "Completed"- 1
- The
ConfigMapCR contains the signature of the desired release image to update to. - 2
- Shows the image signature of the desired OpenShift Container Platform release. Get the signature from the
checksum-${OCP_RELASE_NUMBER}.yamlfile you saved when following the procedures in the "Setting up the environment" section. - 3
- Shows the mirror repository that contains the desired OpenShift Container Platform image. Get the mirrors from the
imageContentSources.yamlfile that you saved when following the procedures in the "Setting up the environment" section. - 4
- Shows the
ClusterVersionCR to update upstream. - 5
- Shows the
ClusterVersionCR to trigger the update. Thechannel,upstream, anddesiredVersionfields are all required for image pre-caching.
The
PolicyGenTemplateCR generates two policies:-
The
du-upgrade-platform-upgrade-preppolicy does the preparation work for the platform update. It creates theConfigMapCR for the desired release image signature, creates the image content source of the mirrored release image repository, and updates the cluster version with the desired update channel and the update graph reachable by the managed cluster in the disconnected environment. -
The
du-upgrade-platform-upgradepolicy is used to perform platform upgrade.
Add the
du-upgrade.yamlfile contents to thekustomization.yamlfile located in the ZTP Git repository for thePolicyGenTemplateCRs and push the changes to the Git repository.ArgoCD pulls the changes from the Git repository and generates the policies on the hub cluster.
Check the created policies by running the following command:
$ oc get policies -A | grep platform-upgrade
Apply the required update resources before starting the platform update with the TALM.
Save the content of the
platform-upgrade-prepClusterUpgradeGroupCR with thedu-upgrade-platform-upgrade-preppolicy and the target managed clusters to thecgu-platform-upgrade-prep.ymlfile, as shown in the following example:apiVersion: ran.openshift.io/v1alpha1 kind: ClusterGroupUpgrade metadata: name: cgu-platform-upgrade-prep namespace: default spec: managedPolicies: - du-upgrade-platform-upgrade-prep clusters: - spoke1 remediationStrategy: maxConcurrency: 1 enable: trueApply the policy to the hub cluster by running the following command:
$ oc apply -f cgu-platform-upgrade-prep.yml
Monitor the update process. Upon completion, ensure that the policy is compliant by running the following command:
$ oc get policies --all-namespaces
Create the
ClusterGroupUpdateCR for the platform update with thespec.enablefield set tofalse.Save the content of the platform update
ClusterGroupUpdateCR with thedu-upgrade-platform-upgradepolicy and the target clusters to thecgu-platform-upgrade.ymlfile, as shown in the following example:apiVersion: ran.openshift.io/v1alpha1 kind: ClusterGroupUpgrade metadata: name: cgu-platform-upgrade namespace: default spec: managedPolicies: - du-upgrade-platform-upgrade preCaching: false clusters: - spoke1 remediationStrategy: maxConcurrency: 1 enable: falseApply the
ClusterGroupUpdateCR to the hub cluster by running the following command:$ oc apply -f cgu-platform-upgrade.yml
Optional: Pre-cache the images for the platform update.
Enable pre-caching in the
ClusterGroupUpdateCR by running the following command:$ oc --namespace=default patch clustergroupupgrade.ran.openshift.io/cgu-platform-upgrade \ --patch '{"spec":{"preCaching": true}}' --type=mergeMonitor the update process and wait for the pre-caching to complete. Check the status of pre-caching by running the following command on the hub cluster:
$ oc get cgu cgu-platform-upgrade -o jsonpath='{.status.precaching.status}'
Start the platform update:
Enable the
cgu-platform-upgradepolicy and disable pre-caching by running the following command:$ oc --namespace=default patch clustergroupupgrade.ran.openshift.io/cgu-platform-upgrade \ --patch '{"spec":{"enable":true, "preCaching": false}}' --type=mergeMonitor the process. Upon completion, ensure that the policy is compliant by running the following command:
$ oc get policies --all-namespaces
Additional resources
- For more information about mirroring the images in a disconnected environment, see Preparing the disconnected environment
22.10.1.3. Performing an Operator update
You can perform an Operator update with the TALM.
Prerequisites
- Install the Topology Aware Lifecycle Manager (TALM).
- Update ZTP to the latest version.
- Provision one or more managed clusters with ZTP.
- Mirror the desired index image, bundle images, and all Operator images referenced in the bundle images.
-
Log in as a user with
cluster-adminprivileges. - Create RHACM policies in the hub cluster.
Procedure
Update the
PolicyGenTemplateCR for the Operator update.Update the
du-upgradePolicyGenTemplateCR with the following additional contents in thedu-upgrade.yamlfile:apiVersion: ran.openshift.io/v1 kind: PolicyGenTemplate metadata: name: "du-upgrade" namespace: "ztp-group-du-sno" spec: bindingRules: group-du-sno: "" mcp: "master" remediationAction: inform sourceFiles: - fileName: DefaultCatsrc.yaml remediationAction: inform policyName: "operator-catsrc-policy" metadata: name: redhat-operators spec: displayName: Red Hat Operators Catalog image: registry.example.com:5000/olm/redhat-operators:v4.11 1 updateStrategy: 2 registryPoll: interval: 1h- 1
- The index image URL contains the desired Operator images. If the index images are always pushed to the same image name and tag, this change is not needed.
- 2
- Set how frequently the Operator Lifecycle Manager (OLM) polls the index image for new Operator versions with the
registryPoll.intervalfield. This change is not needed if a new index image tag is always pushed for y-stream and z-stream Operator updates. TheregistryPoll.intervalfield can be set to a shorter interval to expedite the update, however shorter intervals increase computational load. To counteract this, you can restoreregistryPoll.intervalto the default value once the update is complete.
This update generates one policy,
du-upgrade-operator-catsrc-policy, to update theredhat-operatorscatalog source with the new index images that contain the desired Operators images.NoteIf you want to use the image pre-caching for Operators and there are Operators from a different catalog source other than
redhat-operators, you must perform the following tasks:- Prepare a separate catalog source policy with the new index image or registry poll interval update for the different catalog source.
- Prepare a separate subscription policy for the desired Operators that are from the different catalog source.
For example, the desired SRIOV-FEC Operator is available in the
certified-operatorscatalog source. To update the catalog source and the Operator subscription, add the following contents to generate two policies,du-upgrade-fec-catsrc-policyanddu-upgrade-subscriptions-fec-policy:apiVersion: ran.openshift.io/v1 kind: PolicyGenTemplate metadata: name: "du-upgrade" namespace: "ztp-group-du-sno" spec: bindingRules: group-du-sno: "" mcp: "master" remediationAction: inform sourceFiles: … - fileName: DefaultCatsrc.yaml remediationAction: inform policyName: "fec-catsrc-policy" metadata: name: certified-operators spec: displayName: Intel SRIOV-FEC Operator image: registry.example.com:5000/olm/far-edge-sriov-fec:v4.10 updateStrategy: registryPoll: interval: 10m - fileName: AcceleratorsSubscription.yaml policyName: "subscriptions-fec-policy" spec: channel: "stable" source: certified-operatorsRemove the specified subscriptions channels in the common
PolicyGenTemplateCR, if they exist. The default subscriptions channels from the ZTP image are used for the update.NoteThe default channel for the Operators applied through ZTP 4.11 is
stable, except for theperformance-addon-operator. As of OpenShift Container Platform 4.11, theperformance-addon-operatorfunctionality was moved to thenode-tuning-operator. For the 4.10 release, the default channel for PAO isv4.10. You can also specify the default channels in the commonPolicyGenTemplateCR.Push the
PolicyGenTemplateCRs updates to the ZTP Git repository.ArgoCD pulls the changes from the Git repository and generates the policies on the hub cluster.
Check the created policies by running the following command:
$ oc get policies -A | grep -E "catsrc-policy|subscription"
Apply the required catalog source updates before starting the Operator update.
Save the content of the
ClusterGroupUpgradeCR namedoperator-upgrade-prepwith the catalog source policies and the target managed clusters to thecgu-operator-upgrade-prep.ymlfile:apiVersion: ran.openshift.io/v1alpha1 kind: ClusterGroupUpgrade metadata: name: cgu-operator-upgrade-prep namespace: default spec: clusters: - spoke1 enable: true managedPolicies: - du-upgrade-operator-catsrc-policy remediationStrategy: maxConcurrency: 1Apply the policy to the hub cluster by running the following command:
$ oc apply -f cgu-operator-upgrade-prep.yml
Monitor the update process. Upon completion, ensure that the policy is compliant by running the following command:
$ oc get policies -A | grep -E "catsrc-policy"
Create the
ClusterGroupUpgradeCR for the Operator update with thespec.enablefield set tofalse.Save the content of the Operator update
ClusterGroupUpgradeCR with thedu-upgrade-operator-catsrc-policypolicy and the subscription policies created from the commonPolicyGenTemplateand the target clusters to thecgu-operator-upgrade.ymlfile, as shown in the following example:apiVersion: ran.openshift.io/v1alpha1 kind: ClusterGroupUpgrade metadata: name: cgu-operator-upgrade namespace: default spec: managedPolicies: - du-upgrade-operator-catsrc-policy 1 - common-subscriptions-policy 2 preCaching: false clusters: - spoke1 remediationStrategy: maxConcurrency: 1 enable: false
- 1
- The policy is needed by the image pre-caching feature to retrieve the operator images from the catalog source.
- 2
- The policy contains Operator subscriptions. If you have followed the structure and content of the reference
PolicyGenTemplates, all Operator subscriptions are grouped into thecommon-subscriptions-policypolicy.
NoteOne
ClusterGroupUpgradeCR can only pre-cache the images of the desired Operators defined in the subscription policy from one catalog source included in theClusterGroupUpgradeCR. If the desired Operators are from different catalog sources, such as in the example of the SRIOV-FEC Operator, anotherClusterGroupUpgradeCR must be created withdu-upgrade-fec-catsrc-policyanddu-upgrade-subscriptions-fec-policypolicies for the SRIOV-FEC Operator images pre-caching and update.Apply the
ClusterGroupUpgradeCR to the hub cluster by running the following command:$ oc apply -f cgu-operator-upgrade.yml
Optional: Pre-cache the images for the Operator update.
Before starting image pre-caching, verify the subscription policy is
NonCompliantat this point by running the following command:$ oc get policy common-subscriptions-policy -n <policy_namespace>
Example output
NAME                          REMEDIATION ACTION   COMPLIANCE STATE     AGE
common-subscriptions-policy   inform               NonCompliant         27d
Enable pre-caching in the
ClusterGroupUpgradeCR by running the following command:$ oc --namespace=default patch clustergroupupgrade.ran.openshift.io/cgu-operator-upgrade \ --patch '{"spec":{"preCaching": true}}' --type=mergeMonitor the process and wait for the pre-caching to complete. Check the status of pre-caching by running the following command on the managed cluster:
$ oc get cgu cgu-operator-upgrade -o jsonpath='{.status.precaching.status}'Check if the pre-caching is completed before starting the update by running the following command:
$ oc get cgu -n default cgu-operator-upgrade -ojsonpath='{.status.conditions}' | jqExample output
[
    {
      "lastTransitionTime": "2022-03-08T20:49:08.000Z",
      "message": "The ClusterGroupUpgrade CR is not enabled",
      "reason": "UpgradeNotStarted",
      "status": "False",
      "type": "Ready"
    },
    {
      "lastTransitionTime": "2022-03-08T20:55:30.000Z",
      "message": "Precaching is completed",
      "reason": "PrecachingCompleted",
      "status": "True",
      "type": "PrecachingDone"
    }
]
Start the Operator update.
Enable the
cgu-operator-upgradeClusterGroupUpgradeCR and disable pre-caching to start the Operator update by running the following command:$ oc --namespace=default patch clustergroupupgrade.ran.openshift.io/cgu-operator-upgrade \ --patch '{"spec":{"enable":true, "preCaching": false}}' --type=mergeMonitor the process. Upon completion, ensure that the policy is compliant by running the following command:
$ oc get policies --all-namespaces
Additional resources
- For more information about updating GitOps ZTP, see Upgrading GitOps ZTP.
- Troubleshooting missed Operator updates due to out-of-date policy compliance states.
22.10.1.3.1. Troubleshooting missed Operator updates due to out-of-date policy compliance states
In some scenarios, Topology Aware Lifecycle Manager (TALM) might miss Operator updates due to an out-of-date policy compliance state.
After a catalog source update, it takes time for the Operator Lifecycle Manager (OLM) to update the subscription status. The status of the subscription policy might continue to show as compliant while TALM decides whether remediation is needed. As a result, the Operator specified in the subscription policy does not get upgraded.
To avoid this scenario, add another catalog source configuration to the PolicyGenTemplate and specify this configuration in the subscription for any Operators that require an update.
Procedure
Add a catalog source configuration in the
PolicyGenTemplateresource:- fileName: DefaultCatsrc.yaml remediationAction: inform policyName: "operator-catsrc-policy" metadata: name: redhat-operators spec: displayName: Red Hat Operators Catalog image: registry.example.com:5000/olm/redhat-operators:v{product-version} updateStrategy: registryPoll: interval: 1h status: connectionState: lastObservedState: READY - fileName: DefaultCatsrc.yaml remediationAction: inform policyName: "operator-catsrc-policy" metadata: name: redhat-operators-v2 1 spec: displayName: Red Hat Operators Catalog v2 2 image: registry.example.com:5000/olredhat-operators:<version> 3 updateStrategy: registryPoll: interval: 1h status: connectionState: lastObservedState: READYUpdate the
Subscriptionresource to point to the new configuration for Operators that require an update:apiVersion: operators.coreos.com/v1alpha1 kind: Subscription metadata: name: operator-subscription namespace: operator-namspace # ... spec: source: redhat-operators-v2 1 # ...- 1
- Enter the name of the additional catalog source configuration that you defined in the
PolicyGenTemplateresource.
22.10.1.4. Performing a platform and an Operator update together
You can perform a platform and an Operator update at the same time.
Prerequisites
- Install the Topology Aware Lifecycle Manager (TALM).
- Update ZTP to the latest version.
- Provision one or more managed clusters with ZTP.
-
Log in as a user with
cluster-adminprivileges. - Create RHACM policies in the hub cluster.
Procedure
-
Create the
PolicyGenTemplateCR for the updates by following the steps described in the "Performing a platform update" and "Performing an Operator update" sections. Apply the prep work for the platform and the Operator update.
Save the content of the
ClusterGroupUpgradeCR with the policies for platform update preparation work, catalog source updates, and target clusters to thecgu-platform-operator-upgrade-prep.ymlfile, for example:apiVersion: ran.openshift.io/v1alpha1 kind: ClusterGroupUpgrade metadata: name: cgu-platform-operator-upgrade-prep namespace: default spec: managedPolicies: - du-upgrade-platform-upgrade-prep - du-upgrade-operator-catsrc-policy clusterSelector: - group-du-sno remediationStrategy: maxConcurrency: 10 enable: trueApply the
cgu-platform-operator-upgrade-prep.ymlfile to the hub cluster by running the following command:$ oc apply -f cgu-platform-operator-upgrade-prep.yml
Monitor the process. Upon completion, ensure that the policy is compliant by running the following command:
$ oc get policies --all-namespaces
Create the
ClusterGroupUpdateCR for the platform and the Operator update with thespec.enablefield set tofalse.Save the contents of the platform and Operator update
ClusterGroupUpdateCR with the policies and the target clusters to thecgu-platform-operator-upgrade.ymlfile, as shown in the following example:apiVersion: ran.openshift.io/v1alpha1 kind: ClusterGroupUpgrade metadata: name: cgu-du-upgrade namespace: default spec: managedPolicies: - du-upgrade-platform-upgrade 1 - du-upgrade-operator-catsrc-policy 2 - common-subscriptions-policy 3 preCaching: true clusterSelector: - group-du-sno remediationStrategy: maxConcurrency: 1 enable: false
Apply the
cgu-platform-operator-upgrade.ymlfile to the hub cluster by running the following command:$ oc apply -f cgu-platform-operator-upgrade.yml
Optional: Pre-cache the images for the platform and the Operator update.
Enable pre-caching in the
ClusterGroupUpgradeCR by running the following command:$ oc --namespace=default patch clustergroupupgrade.ran.openshift.io/cgu-du-upgrade \ --patch '{"spec":{"preCaching": true}}' --type=mergeMonitor the update process and wait for the pre-caching to complete. Check the status of pre-caching by running the following command on the managed cluster:
$ oc get jobs,pods -n openshift-talm-pre-cache
Check if the pre-caching is completed before starting the update by running the following command:
$ oc get cgu cgu-du-upgrade -ojsonpath='{.status.conditions}'
Start the platform and Operator update.
Enable the
cgu-du-upgradeClusterGroupUpgradeCR to start the platform and the Operator update by running the following command:$ oc --namespace=default patch clustergroupupgrade.ran.openshift.io/cgu-du-upgrade \ --patch '{"spec":{"enable":true, "preCaching": false}}' --type=mergeMonitor the process. Upon completion, ensure that the policy is compliant by running the following command:
$ oc get policies --all-namespaces
NoteThe CRs for the platform and Operator updates can be created from the beginning by configuring the setting to
spec.enable: true. In this case, the update starts immediately after pre-caching completes and there is no need to manually enable the CR.Both pre-caching and the update create extra resources, such as policies, placement bindings, placement rules, managed cluster actions, and managed cluster view, to help complete the procedures. Setting the
afterCompletion.deleteObjectsfield totruedeletes all these resources after the updates complete.
22.10.1.5. Removing Performance Addon Operator subscriptions from deployed clusters
In earlier versions of OpenShift Container Platform, the Performance Addon Operator provided automatic, low latency performance tuning for applications. In OpenShift Container Platform 4.11 or later, these functions are part of the Node Tuning Operator.
Do not install the Performance Addon Operator on clusters running OpenShift Container Platform 4.11 or later. If you upgrade to OpenShift Container Platform 4.11 or later, the Node Tuning Operator automatically removes the Performance Addon Operator.
You need to remove any policies that create Performance Addon Operator subscriptions to prevent a re-installation of the Operator.
The reference DU profile includes the Performance Addon Operator in the PolicyGenTemplate CR common-ranGen.yaml. To remove the subscription from deployed managed clusters, you must update common-ranGen.yaml.
If you install Performance Addon Operator 4.10.3-5 or later on OpenShift Container Platform 4.11 or later, the Performance Addon Operator detects the cluster version and automatically hibernates to avoid interfering with the Node Tuning Operator functions. However, to ensure best performance, remove the Performance Addon Operator from your OpenShift Container Platform 4.11 clusters.
Prerequisites
- Create a Git repository where you manage your custom site configuration data. The repository must be accessible from the hub cluster and be defined as a source repository for ArgoCD.
- Update to OpenShift Container Platform 4.11 or later.
-
Log in as a user with
cluster-adminprivileges.
Procedure
Change the
complianceTypetomustnothavefor the Performance Addon Operator namespace, Operator group, and subscription in thecommon-ranGen.yamlfile.- fileName: PaoSubscriptionNS.yaml policyName: "subscriptions-policy" complianceType: mustnothave - fileName: PaoSubscriptionOperGroup.yaml policyName: "subscriptions-policy" complianceType: mustnothave - fileName: PaoSubscription.yaml policyName: "subscriptions-policy" complianceType: mustnothave-
Merge the changes with your custom site repository and wait for the ArgoCD application to synchronize the change to the hub cluster. The status of the
common-subscriptions-policypolicy changes toNon-Compliant. - Apply the change to your target clusters by using the Topology Aware Lifecycle Manager. For more information about rolling out configuration changes, see the "Additional resources" section.
Monitor the process. When the status of the
common-subscriptions-policypolicy for a target cluster isCompliant, the Performance Addon Operator has been removed from the cluster. Get the status of thecommon-subscriptions-policyby running the following command:$ oc get policy -n ztp-common common-subscriptions-policy
-
Delete the Performance Addon Operator namespace, Operator group and subscription CRs from
.spec.sourceFilesin thecommon-ranGen.yamlfile. - Merge the changes with your custom site repository and wait for the ArgoCD application to synchronize the change to the hub cluster. The policy remains compliant.
22.10.2. About the auto-created ClusterGroupUpgrade CR for ZTP
TALM has a controller called ManagedClusterForCGU that monitors the Ready state of the ManagedCluster CRs on the hub cluster and creates the ClusterGroupUpgrade CRs for ZTP (zero touch provisioning).
For any managed cluster in the Ready state without a "ztp-done" label applied, the ManagedClusterForCGU controller automatically creates a ClusterGroupUpgrade CR in the ztp-install namespace with its associated RHACM policies that are created during the ZTP process. TALM then remediates the set of configuration policies that are listed in the auto-created ClusterGroupUpgrade CR to push the configuration CRs to the managed cluster.
If the managed cluster has no bound policies when the cluster becomes Ready, no ClusterGroupUpgrade CR is created.
Example of an auto-created ClusterGroupUpgrade CR for ZTP
apiVersion: ran.openshift.io/v1alpha1
kind: ClusterGroupUpgrade
metadata:
  generation: 1
  name: spoke1
  namespace: ztp-install
  ownerReferences:
  - apiVersion: cluster.open-cluster-management.io/v1
    blockOwnerDeletion: true
    controller: true
    kind: ManagedCluster
    name: spoke1
    uid: 98fdb9b2-51ee-4ee7-8f57-a84f7f35b9d5
  resourceVersion: "46666836"
  uid: b8be9cd2-764f-4a62-87d6-6b767852c7da
spec:
  actions:
    afterCompletion:
      addClusterLabels:
        ztp-done: "" 1
      deleteClusterLabels:
        ztp-running: ""
      deleteObjects: true
    beforeEnable:
      addClusterLabels:
        ztp-running: "" 2
  clusters:
  - spoke1
  enable: true
  managedPolicies:
  - common-spoke1-config-policy
  - common-spoke1-subscriptions-policy
  - group-spoke1-config-policy
  - spoke1-config-policy
  - group-spoke1-validator-du-policy
  preCaching: false
  remediationStrategy:
    maxConcurrency: 1
    timeout: 240
22.11. Updating GitOps ZTP
You can update the Gitops zero touch provisioning (ZTP) infrastructure independently from the hub cluster, Red Hat Advanced Cluster Management (RHACM), and the managed OpenShift Container Platform clusters.
You can update the Red Hat OpenShift GitOps Operator when new versions become available. When updating the GitOps ZTP plugin, review the updated files in the reference configuration and ensure that the changes meet your requirements.
22.11.1. Overview of the GitOps ZTP update process
You can update GitOps zero touch provisioning (ZTP) for a fully operational hub cluster running an earlier version of the GitOps ZTP infrastructure. The update process avoids impact on managed clusters.
Any changes to policy settings, including adding recommended content, results in updated polices that must be rolled out to the managed clusters and reconciled.
At a high level, the strategy for updating the GitOps ZTP infrastructure is as follows:
-
Label all existing clusters with the
ztp-donelabel. - Stop the ArgoCD applications.
- Install the new GitOps ZTP tools.
- Update required content and optional changes in the Git repository.
- Update and restart the application configuration.
22.11.2. Preparing for the upgrade
Use the following procedure to prepare your site for the GitOps zero touch provisioning (ZTP) upgrade.
Procedure
- Get the latest version of the GitOps ZTP container that has the custom resources (CRs) used to configure Red Hat OpenShift GitOps for use with GitOps ZTP.
Extract the
argocd/deploymentdirectory by using the following commands:$ mkdir -p ./update
$ podman run --log-driver=none --rm registry.redhat.io/openshift4/ztp-site-generate-rhel8:v4.11 extract /home/ztp --tar | tar x -C ./update
The
/updatedirectory contains the following subdirectories:-
update/extra-manifest: contains the source CR files that theSiteConfigCR uses to generate the extra manifestconfigMap. -
update/source-crs: contains the source CR files that thePolicyGenTemplateCR uses to generate the Red Hat Advanced Cluster Management (RHACM) policies. -
update/argocd/deployment: contains patches and YAML files to apply on the hub cluster for use in the next step of this procedure. -
update/argocd/example: contains exampleSiteConfigandPolicyGenTemplatefiles that represent the recommended configuration.
-
Update the
clusters-app.yamlandpolicies-app.yamlfiles to reflect the name of your applications and the URL, branch, and path for your Git repository.If the upgrade includes changes that results in obsolete policies, the obsolete policies should be removed prior to performing the upgrade.
Diff the changes between the configuration and deployment source CRs in the
/updatefolder and Git repo where you manage your fleet site CRs. Apply and push the required changes to your site repository.ImportantWhen you update GitOps ZTP to the latest version, you must apply the changes from the
update/argocd/deploymentdirectory to your site repository. Do not use older versions of theargocd/deployment/files.
22.11.3. Labeling the existing clusters
To ensure that existing clusters remain untouched by the tool updates, label all existing managed clusters with the ztp-done label.
This procedure only applies when updating clusters that were not provisioned with Topology Aware Lifecycle Manager (TALM). Clusters that you provision with TALM are automatically labeled with ztp-done.
Procedure
Find a label selector that lists the managed clusters that were deployed with zero touch provisioning (ZTP), such as
local-cluster!=true:$ oc get managedcluster -l 'local-cluster!=true'
Ensure that the resulting list contains all the managed clusters that were deployed with ZTP, and then use that selector to add the
ztp-donelabel:$ oc label managedcluster -l 'local-cluster!=true' ztp-done=
22.11.4. Stopping the existing GitOps ZTP applications
Removing the existing applications ensures that any changes to existing content in the Git repository are not rolled out until the new version of the tools is available.
Use the application files from the deployment directory. If you used custom names for the applications, update the names in these files first.
Procedure
Perform a non-cascaded delete on the
clustersapplication to leave all generated resources in place:$ oc delete -f update/argocd/deployment/clusters-app.yaml
Perform a cascaded delete on the
policiesapplication to remove all previous policies:$ oc patch -f policies-app.yaml -p '{"metadata": {"finalizers": ["resources-finalizer.argocd.argoproj.io"]}}' --type merge$ oc delete -f update/argocd/deployment/policies-app.yaml
22.11.5. Required changes to the Git repository
When upgrading the ztp-site-generate container from an earlier release of GitOps ZTP to v4.10 or later, there are additional requirements for the contents of the Git repository. Existing content in the repository must be updated to reflect these changes.
Make required changes to
PolicyGenTemplatefiles:All
PolicyGenTemplatefiles must be created in aNamespaceprefixed withztp. This ensures that the GitOps zero touch provisioning (ZTP) application is able to manage the policy CRs generated by GitOps ZTP without conflicting with the way Red Hat Advanced Cluster Management (RHACM) manages the policies internally.Add the
kustomization.yamlfile to the repository:All
SiteConfigandPolicyGenTemplateCRs must be included in akustomization.yamlfile under their respective directory trees. For example:├── policygentemplates │ ├── site1-ns.yaml │ ├── site1.yaml │ ├── site2-ns.yaml │ ├── site2.yaml │ ├── common-ns.yaml │ ├── common-ranGen.yaml │ ├── group-du-sno-ranGen-ns.yaml │ ├── group-du-sno-ranGen.yaml │ └── kustomization.yaml └── siteconfig ├── site1.yaml ├── site2.yaml └── kustomization.yamlNoteThe files listed in the
generatorsections must contain eitherSiteConfigorPolicyGenTemplateCRs only. If your existing YAML files contain other CRs, for example,Namespace, these other CRs must be pulled out into separate files and listed in theresourcessection.The
PolicyGenTemplatekustomization file must contain allPolicyGenTemplateYAML files in thegeneratorsection andNamespaceCRs in theresourcessection. For example:apiVersion: kustomize.config.k8s.io/v1beta1 kind: Kustomization generators: - common-ranGen.yaml - group-du-sno-ranGen.yaml - site1.yaml - site2.yaml resources: - common-ns.yaml - group-du-sno-ranGen-ns.yaml - site1-ns.yaml - site2-ns.yaml
The
SiteConfigkustomization file must contain allSiteConfigYAML files in thegeneratorsection and any other CRs in the resources:apiVersion: kustomize.config.k8s.io/v1beta1 kind: Kustomization generators: - site1.yaml - site2.yaml
Remove the
pre-sync.yamlandpost-sync.yamlfiles.In OpenShift Container Platform 4.10 and later, the
pre-sync.yamlandpost-sync.yamlfiles are no longer required. Theupdate/deployment/kustomization.yamlCR manages the policies deployment on the hub cluster.NoteThere is a set of
pre-sync.yamlandpost-sync.yamlfiles under both theSiteConfigandPolicyGenTemplatetrees.Review and incorporate recommended changes
Each release may include additional recommended changes to the configuration applied to deployed clusters. Typically these changes result in lower CPU use by the OpenShift platform, additional features, or improved tuning of the platform.
Review the reference
SiteConfigandPolicyGenTemplateCRs applicable to the types of cluster in your network. These examples can be found in theargocd/exampledirectory extracted from the GitOps ZTP container.
22.11.6. Installing the new GitOps ZTP applications
Using the extracted argocd/deployment directory, and after ensuring that the applications point to your site Git repository, apply the full contents of the deployment directory. Applying the full contents of the directory ensures that all necessary resources for the applications are correctly configured.
Procedure
To patch the ArgoCD instance in the hub cluster by using the patch file that you previously extracted into the
update/argocd/deployment/directory, enter the following command:$ oc patch argocd openshift-gitops \ -n openshift-gitops --type=merge \ --patch-file update/argocd/deployment/argocd-openshift-gitops-patch.json
To apply the contents of the
argocd/deploymentdirectory, enter the following command:$ oc apply -k update/argocd/deployment
22.11.7. Rolling out the GitOps ZTP configuration changes
If any configuration changes were included in the upgrade due to implementing recommended changes, the upgrade process results in a set of policy CRs on the hub cluster in the Non-Compliant state. With the ZTP GitOps v4.10 and later ztp-site-generate container, these policies are set to inform mode and are not pushed to the managed clusters without an additional step by the user. This ensures that potentially disruptive changes to the clusters can be managed in terms of when the changes are made, for example, during a maintenance window, and how many clusters are updated concurrently.
To roll out the changes, create one or more ClusterGroupUpgrade CRs as detailed in the TALM documentation. The CR must contain the list of Non-Compliant policies that you want to push out to the managed clusters as well as a list or selector of which clusters should be included in the update.
Additional resources
- For information about the Topology Aware Lifecycle Manager (TALM), see About the Topology Aware Lifecycle Manager configuration.
-
For information about creating
ClusterGroupUpgradeCRs, see About the auto-created ClusterGroupUpgrade CR for ZTP.