
Red Hat Training
A Red Hat training course is available for OpenShift Container Platform
Builds
Performing and interacting with builds in OpenShift Container Platform 4.1
Abstract
Chapter 1. Understanding image builds
1.1. Builds
A build is the process of transforming input parameters into a resulting object. Most often, the process is used to transform input parameters or source code into a runnable image. A BuildConfig object is the definition of the entire build process.
OpenShift Container Platform uses Kubernetes by creating containers from build images and pushing them to a container image registry.
Build objects share common characteristics including inputs for a build, the requirement to complete a build process, logging the build process, publishing resources from successful builds, and publishing the final status of the build. Builds take advantage of resource restrictions, specifying limitations on resources such as CPU usage, memory usage, and build or pod execution time.
The OpenShift Container Platform build system provides extensible support for build strategies that are based on selectable types specified in the build API. There are three primary build strategies available:
- Docker build
- Source-to-Image (S2I) build
- Custom build
By default, Docker builds and S2I builds are supported.
The resulting object of a build depends on the builder used to create it. For Docker and S2I builds, the resulting objects are runnable images. For Custom builds, the resulting objects are whatever the builder image author has specified.
Additionally, the Pipeline build strategy can be used to implement sophisticated workflows:
- Continuous integration
- Continuous deployment
1.1.1. Docker build
The Docker build strategy invokes the docker build command, and it expects a repository with a Dockerfile and all required artifacts in it to produce a runnable image.
1.1.2. Source-to-Image (S2I) build
Source-to-Image (S2I) is a tool for building reproducible, Docker-formatted container images. It produces ready-to-run images by injecting application source into a container image and assembling a new image. The new image incorporates the base image (the builder) and built source and is ready to use with the buildah run command. S2I supports incremental builds, which re-use previously downloaded dependencies, previously built artifacts, etc.
The advantages of S2I include the following:
| Image flexibility |
S2I scripts can be written to inject application code into almost any existing Docker-formatted container image, taking advantage of the existing ecosystem. Note that, currently, S2I relies on |
| Speed | With S2I, the assemble process can perform a large number of complex operations without creating a new layer at each step, resulting in a fast process. In addition, S2I scripts can be written to re-use artifacts stored in a previous version of the application image, rather than having to download or build them each time the build is run. |
| Patchability | S2I allows you to rebuild the application consistently if an underlying image needs a patch due to a security issue. |
| Operational efficiency | By restricting build operations instead of allowing arbitrary actions, as a Dockerfile would allow, the PaaS operator can avoid accidental or intentional abuses of the build system. |
| Operational security | Building an arbitrary Dockerfile exposes the host system to root privilege escalation. This can be exploited by a malicious user because the entire Docker build process is run as a user with Docker privileges. S2I restricts the operations performed as a root user and can run the scripts as a non-root user. |
| User efficiency |
S2I prevents developers from performing arbitrary |
| Ecosystem | S2I encourages a shared ecosystem of images where you can leverage best practices for your applications. |
| Reproducibility | Produced images can include all inputs including specific versions of build tools and dependencies. This ensures that the image can be reproduced precisely. |
1.1.3. Custom build
The Custom build strategy allows developers to define a specific builder image responsible for the entire build process. Using your own builder image allows you to customize your build process.
A Custom builder image is a plain Docker-formatted container image embedded with build process logic, for example for building RPMs or base images.
Custom builds run with a very high level of privilege and are not available to users by default. Only users who can be trusted with cluster administration permissions should be granted access to run custom builds.
1.1.4. Pipeline build
The Pipeline build strategy allows developers to define a Jenkins pipeline for execution by the Jenkins pipeline plugin. The build can be started, monitored, and managed by OpenShift Container Platform in the same way as any other build type.
Pipeline workflows are defined in a Jenkinsfile, either embedded directly in the build configuration, or supplied in a Git repository and referenced by the build configuration.
Chapter 2. Understanding build configurations
The following sections define the concept of a build, BuildConfig, and outline the primary build strategies available.
2.1. BuildConfigs
A build configuration describes a single build definition and a set of triggers for when a new build is created. Build configurations are defined by a BuildConfig, which is a REST object that can be used in a POST to the API server to create a new instance.
A build configuration, or BuildConfig, is characterized by a build strategy and one or more sources. The strategy determines the process, while the sources provide its input.
Depending on how you choose to create your application using OpenShift Container Platform, a BuildConfig is typically generated automatically for you if you use the web console or CLI, and it can be edited at any time. Understanding the parts that make up a BuildConfig and their available options can help if you choose to manually change your configuration later.
The following example BuildConfig results in a new build every time a container image tag or the source code changes:
BuildConfig object definition
kind: BuildConfig
apiVersion: build.openshift.io/v1
metadata:
  name: "ruby-sample-build" 1
spec:
  runPolicy: "Serial" 2
  triggers: 3
    -
      type: "GitHub"
      github:
        secret: "secret101"
    - type: "Generic"
      generic:
        secret: "secret101"
    -
      type: "ImageChange"
  source: 4
    git:
      uri: "https://github.com/openshift/ruby-hello-world"
  strategy: 5
    sourceStrategy:
      from:
        kind: "ImageStreamTag"
        name: "ruby-20-centos7:latest"
  output: 6
    to:
      kind: "ImageStreamTag"
      name: "origin-ruby-sample:latest"
  postCommit: 7
      script: "bundle exec rake test"
- 1
- This specification creates a new
BuildConfignamed ruby-sample-build. - 2
- The
runPolicyfield controls whether builds created from this build configuration can be run simultaneously. The default value isSerial, which means new builds run sequentially, not simultaneously. - 3
- You can specify a list of triggers, which cause a new build to be created.
- 4
- The
sourcesection defines the source of the build. The source type determines the primary source of input, and can be eitherGit, to point to a code repository location,Dockerfile, to build from an inline Dockerfile, orBinary, to accept binary payloads. It is possible to have multiple sources at once. Refer to the documentation for each source type for details. - 5
- The
strategysection describes the build strategy used to execute the build. You can specify aSource,Docker, orCustomstrategy here. This example uses theruby-20-centos7container image that Source-To-Image uses for the application build. - 6
- After the container image is successfully built, it is pushed into the repository described in the
outputsection. - 7
- The
postCommitsection defines an optional build hook.
Chapter 3. Creating build inputs
Use the following sections for an overview of build inputs, instructions on how to use inputs to provide source content for builds to operate on, and how to use build environments and create secrets.
3.1. Build inputs
A build input provides source content for builds to operate on. You can use the following build inputs to provide sources in OpenShift Container Platform, listed in order of precedence:
- Inline Dockerfile definitions
- Content extracted from existing images
- Git repositories
- Binary (Local) inputs
- Input secrets
- External artifacts
You can combine multiple inputs in a single build. However, as the inline Dockerfile takes precedence, it can overwrite any other file named Dockerfile provided by another input. Binary (local) input and Git repositories are mutually exclusive inputs.
You can use input secrets when you do not want certain resources or credentials used during a build to be available in the final application image produced by the build, or want to consume a value that is defined in a Secret resource. External artifacts can be used to pull in additional files that are not available as one of the other build input types.
When you run a build:
- A working directory is constructed and all input content is placed in the working directory. For example, the input Git repository is cloned into the working directory, and files specified from input images are copied into the working directory using the target path.
-
The build process changes directories into the
contextDir, if one is defined. - The inline Dockerfile, if any, is written to the current directory.
-
The content from the current directory is provided to the build process for reference by the Dockerfile, custom builder logic, or assemble script. This means any input content that resides outside the
contextDirwill be ignored by the build.
The following example of a source definition includes multiple input types and an explanation of how they are combined. For more details on how each input type is defined, see the specific sections for each input type.
source:
  git:
    uri: https://github.com/openshift/ruby-hello-world.git 1
  images:
  - from:
      kind: ImageStreamTag
      name: myinputimage:latest
      namespace: mynamespace
    paths:
    - destinationDir: app/dir/injected/dir 2
      sourcePath: /usr/lib/somefile.jar
  contextDir: "app/dir" 3
dockerfile: "FROM centos:7\nRUN yum install -y httpd" 4- 1
- The repository to be cloned into the working directory for the build.
- 2
- /usr/lib/somefile.jar from
myinputimagewill be stored in <workingdir>/app/dir/injected/dir. - 3
- The working directory for the build will become <original_workingdir>/app/dir.
- 4
- A Dockerfile with this content will be created in <original_workingdir>/app/dir, overwriting any existing file with that name.
3.2. Dockerfile source
When you supply a dockerfile value, the content of this field is written to disk as a file named Dockerfile. This is done after other input sources are processed, so if the input source repository contains a Dockerfile in the root directory, it will be overwritten with this content.
The source definition is part of the spec section in the BuildConfig:
source:
dockerfile: "FROM centos:7\nRUN yum install -y httpd" 1- 1
- The
dockerfilefield contains an inline Dockerfile that will be built.
Additional resources
-
The typical use for this field is to provide a
Dockerfileto a Docker strategy build.
3.3. Image source
You can add additional files to the build process with images. Input images are referenced in the same way the From and To image targets are defined. This means both container images and imagestreamtags can be referenced. In conjunction with the image, you must provide one or more path pairs to indicate the path of the files or directories to copy the image and the destination to place them in the build context.
The source path can be any absolute path within the image specified. The destination must be a relative directory path. At build time, the image will be loaded and the indicated files and directories will be copied into the context directory of the build process. This is the same directory into which the source repository content (if any) is cloned. If the source path ends in /. then the content of the directory will be copied, but the directory itself will not be created at the destination.
Image inputs are specified in the source definition of the BuildConfig:
source:
  git:
    uri: https://github.com/openshift/ruby-hello-world.git
  images: 1
  - from: 2
      kind: ImageStreamTag
      name: myinputimage:latest
      namespace: mynamespace
    paths: 3
    - destinationDir: injected/dir 4
      sourcePath: /usr/lib/somefile.jar 5
  - from:
      kind: ImageStreamTag
      name: myotherinputimage:latest
      namespace: myothernamespace
    pullSecret: mysecret 6
    paths:
    - destinationDir: injected/dir
sourcePath: /usr/lib/somefile.jar- 1
- An array of one or more input images and files.
- 2
- A reference to the image containing the files to be copied.
- 3
- An array of source/destination paths.
- 4
- The directory relative to the build root where the build process can access the file.
- 5
- The location of the file to be copied out of the referenced image.
- 6
- An optional secret provided if credentials are needed to access the input image.
This feature is not supported for builds using the Custom Strategy.
3.4. Git source
When specified, source code is fetched from the supplied location.
If you supply an inline Dockerfile, it overwrites the Dockerfile (if any) in the contextDir of the Git repository.
The source definition is part of the spec section in the BuildConfig:
source:
  git: 1
    uri: "https://github.com/openshift/ruby-hello-world"
    ref: "master"
  contextDir: "app/dir" 2
  dockerfile: "FROM openshift/ruby-22-centos7\nUSER example" 3
- 1
- The
gitfield contains the URI to the remote Git repository of the source code. Optionally, specify thereffield to check out a specific Git reference. A validrefcan be a SHA1 tag or a branch name. - 2
- The
contextDirfield allows you to override the default location inside the source code repository where the build looks for the application source code. If your application exists inside a sub-directory, you can override the default location (the root folder) using this field. - 3
- If the optional
dockerfilefield is provided, it should be a string containing a Dockerfile that overwrites any Dockerfile that may exist in the source repository.
If the ref field denotes a pull request, the system will use a git fetch operation and then checkout FETCH_HEAD.
When no ref value is provided, OpenShift Container Platform performs a shallow clone (--depth=1). In this case, only the files associated with the most recent commit on the default branch (typically master) are downloaded. This results in repositories downloading faster, but without the full commit history. To perform a full git clone of the default branch of a specified repository, set ref to the name of the default branch (for example master).
3.4.1. Using a Proxy
If your Git repository can only be accessed using a proxy, you can define the proxy to use in the source section of the BuildConfig. You can configure both a HTTP and HTTPS proxy to use. Both fields are optional. Domains for which no proxying should be performed can also be specified in the NoProxy field.
Your source URI must use the HTTP or HTTPS protocol for this to work.
source:
  git:
    uri: "https://github.com/openshift/ruby-hello-world"
    httpProxy: http://proxy.example.com
    httpsProxy: https://proxy.example.com
    noProxy: somedomain.com, otherdomain.com
For Pipeline strategy builds, given the current restrictions with the Git plug-in for Jenkins, any Git operations through the Git plug-in will not leverage the HTTP or HTTPS proxy defined in the BuildConfig. The Git plug-in only will use the proxy configured in the Jenkins UI at the Plugin Manager panel. This proxy will then be used for all git interactions within Jenkins, across all jobs.
Additional resources
- You can find instructions on how to configure proxies through the Jenkins UI at JenkinsBehindProxy.
3.4.2. Adding Source Clone Secrets
Builder Pods require access to any Git repositories defined as source for a build. Source clone secrets are used to provide the builder Pod with access it would not normally have access to, such as private repositories or repositories with self-signed or untrusted SSL certificates.
Prerequisites
The following source clone secret configurations are supported.
- .gitconfig File
- Basic Authentication
- SSH Key Authentication
- Trusted Certificate Authorities
You can also use combinations of these configurations to meet your specific needs.
Procedure
Builds are run with the builder service account, which must have access to any source clone secrets used.
- Run the following command to grant access:
$ oc secrets link builder mysecret
Limiting secrets to only the service accounts that reference them is disabled by default. This means that if serviceAccountConfig.limitSecretReferences is set to false (the default setting) in the master configuration file, linking secrets to a service is not required.
3.4.2.1. Automatically Adding a Source Clone Secret to a Build Configuration
When a BuildConfig is created, OpenShift Container Platform can automatically populate its source clone secret reference. This behavior allows the resulting Builds to automatically use the credentials stored in the referenced Secret to authenticate to a remote Git repository, without requiring further configuration.
To use this functionality, a Secret containing the Git repository credentials must exist in the namespace in which the BuildConfig is later created. This Secret must additionally include one or more annotations prefixed with build.openshift.io/source-secret-match-uri-. The value of each of these annotations is a URI pattern, defined as follows. When a BuildConfig is created without a source clone secret reference and its Git source URI matches a URI pattern in a Secret annotation, OpenShift Container Platform will automatically insert a reference to that Secret in the BuildConfig.
Prerequisites
A URI pattern must consist of:
-
a valid scheme (
*://,git://,http://,https://orssh://). -
a host (
*or a valid hostname or IP address optionally preceded by*.). -
a path (
/*or/followed by any characters optionally including*characters).
In all of the above, a * character is interpreted as a wildcard.
URI patterns must match Git source URIs which are conformant to RFC3986. Do not include a username (or password) component in a URI pattern.
For example, if you use ssh://git@bitbucket.atlassian.com:7999/ATLASSIAN/jira.git for a git repository URL, the source secret must be specified as ssh://bitbucket.atlassian.com:7999/* (and not ssh://git@bitbucket.atlassian.com:7999/*).
$ oc annotate secret mysecret \
    'build.openshift.io/source-secret-match-uri-1=ssh://bitbucket.atlassian.com:7999/*'
Procedure
If multiple Secrets match the Git URI of a particular BuildConfig, OpenShift Container Platform will select the secret with the longest match. This allows for basic overriding, as in the following example.
The following fragment shows two partial source clone secrets, the first matching any server in the domain mycorp.com accessed by HTTPS, and the second overriding access to servers mydev1.mycorp.com and mydev2.mycorp.com:
kind: Secret
apiVersion: v1
metadata:
  name: matches-all-corporate-servers-https-only
  annotations:
    build.openshift.io/source-secret-match-uri-1: https://*.mycorp.com/*
data:
  ...

kind: Secret
apiVersion: v1
metadata:
  name: override-for-my-dev-servers-https-only
  annotations:
    build.openshift.io/source-secret-match-uri-1: https://mydev1.mycorp.com/*
    build.openshift.io/source-secret-match-uri-2: https://mydev2.mycorp.com/*
data:
...-
Add a
build.openshift.io/source-secret-match-uri-annotation to a pre-existing secret using:
$ oc annotate secret mysecret \
    'build.openshift.io/source-secret-match-uri-1=https://*.mycorp.com/*'
3.4.2.2. Manually Adding a Source Clone Secrets
Source clone secrets can be added manually to a build configuration by adding a sourceSecret field to the source section inside the BuildConfig and setting it to the name of the secret that you created (basicsecret, in this example).
apiVersion: "v1"
kind: "BuildConfig"
metadata:
  name: "sample-build"
spec:
  output:
    to:
      kind: "ImageStreamTag"
      name: "sample-image:latest"
  source:
    git:
      uri: "https://github.com/user/app.git"
    sourceSecret:
      name: "basicsecret"
  strategy:
    sourceStrategy:
      from:
        kind: "ImageStreamTag"
        name: "python-33-centos7:latest"
Procedure
You can also use the oc set build-secret command to set the source clone secret on an existing build configuration.
- To set the source clone secret on an existing build configuration, run:
$ oc set build-secret --source bc/sample-build basicsecret
Additional resources
-
Defining Secrets in the
BuildConfigprovides more information on this topic.
3.4.2.3. Creating a secret from a .gitconfig file
If the cloning of your application is dependent on a .gitconfig file, then you can create a secret that contains it. Add it to the builder service account and then your BuildConfig.
Procedure
- To create a secret from a .gitconfig file:
$ oc create secret generic <secret_name> --from-file=<path/to/.gitconfig>
SSL verification can be turned off if sslVerify=false is set for the http section in your .gitconfig file:
[http]
        sslVerify=false
3.4.2.4. Creating a secret from a .gitconfig file for secured Git
If your Git server is secured with two-way SSL and user name with password, you must add the certificate files to your source build and add references to the certificate files in the .gitconfig file.
Prerequisites
- Git credentials
Procedure
Add the certificate files to your source build and add references to the certificate files in the .gitconfig file.
- Add the client.crt, cacert.crt, and client.key files to the /var/run/secrets/openshift.io/source/ folder in the application source code.
In the .gitconfig file for the server, add the
[http]section shown in the following example:# cat .gitconfig [user] name = <name> email = <email> [http] sslVerify = false sslCert = /var/run/secrets/openshift.io/source/client.crt sslKey = /var/run/secrets/openshift.io/source/client.key sslCaInfo = /var/run/secrets/openshift.io/source/cacert.crtCreate the secret:
$ oc create secret generic <secret_name> \
--from-literal=username=<user_name> \ 1
--from-literal=password=<password> \ 2
--from-file=.gitconfig=.gitconfig \
--from-file=client.crt=/var/run/secrets/openshift.io/source/client.crt \
--from-file=cacert.crt=/var/run/secrets/openshift.io/source/cacert.crt \
--from-file=client.key=/var/run/secrets/openshift.io/source/client.key
To avoid having to enter your password again, be sure to specify the S2I image in your builds. However, if you cannot clone the repository, you still must specify your user name and password to promote the build.
Additional resources
- /var/run/secrets/openshift.io/source/ folder in the application source code.
3.4.2.5. Creating a secret from source code basic authentication
Basic authentication requires either a combination of --username and --password, or a token to authenticate against the SCM server.
Prerequisites
- User name and password to access the private repository.
Procedure
Create the
secretfirst before using the user name and password to access the private repository:$ oc create secret generic <secret_name> \ --from-literal=username=<user_name> \ --from-literal=password=<password> \ --type=kubernetes.io/basic-authCreate a basic authentication secret with a token:
$ oc create secret generic <secret_name> \
    --from-literal=password=<token> \
    --type=kubernetes.io/basic-auth
3.4.2.6. Creating a secret from source code SSH key authentication
SSH key based authentication requires a private SSH key.
The repository keys are usually located in the $HOME/.ssh/ directory, and are named id_dsa.pub, id_ecdsa.pub, id_ed25519.pub, or id_rsa.pub by default.
Procedure
Generate SSH key credentials:
$ ssh-keygen -t rsa -C "your_email@example.com"
NoteCreating a passphrase for the SSH key prevents OpenShift Container Platform from building. When prompted for a passphrase, leave it blank.
Two files are created: the public key and a corresponding private key (one of
id_dsa,id_ecdsa,id_ed25519, orid_rsa). With both of these in place, consult your source control management (SCM) system’s manual on how to upload the public key. The private key is used to access your private repository.Before using the SSH key to access the private repository, create the secret:
$ oc create secret generic <secret_name> \
    --from-file=ssh-privatekey=<path/to/ssh/private/key> \
    --type=kubernetes.io/ssh-auth
3.4.2.7. Creating a secret from source code trusted certificate authorities
The set of TLS certificate authorities (CA) that are trusted during a git clone operation are built into the OpenShift Container Platform infrastructure images. If your Git server uses a self-signed certificate or one signed by an authority not trusted by the image, you can create a secret that contains the certificate or disable TLS verification.
If you create a secret for the CA certificate, OpenShift Container Platform uses it to access your Git server during the git clone operation. Using this method is significantly more secure than disabling Git’s SSL verification, which accepts any TLS certificate that is presented.
Procedure
Create a secret with a CA certificate file.
If your CA uses Intermediate Certificate Authorities, combine the certificates for all CAs in a ca.crt file. Run the following command:
$ cat intermediateCA.crt intermediateCA.crt rootCA.crt > ca.crt
Create the secret:
$ oc create secret generic mycert --from-file=ca.crt=</path/to/file> 1- 1
- You must use the key name ca.crt.
3.4.2.8. Source secret combinations
You can combine the different methods for creating source clone secrets for your specific needs.
3.4.2.8.1. Creating a SSH-based authentication secret with a .gitconfig file
You can combine the different methods for creating source clone secrets for your specific needs, such as a SSH-based authentication secret with a .gitconfig file.
Prerequisites
- SSH authentication
- .gitconfig file
Procedure
- Create a SSH-based authentication secret with a .gitconfig file
$ oc create secret generic <secret_name> \
    --from-file=ssh-privatekey=<path/to/ssh/private/key> \
    --from-file=<path/to/.gitconfig> \
    --type=kubernetes.io/ssh-auth
3.4.2.8.2. Creating a secret that combines a .gitconfig file and CA certificate
You can combine the different methods for creating source clone secrets for your specific needs, such as a secret that combines a .gitconfig file and CA certificate.
Prerequisites
- .gitconfig file
- CA certificate
Procedure
- Create a secret that combines a .gitconfig file and CA certificate
$ oc create secret generic <secret_name> \
    --from-file=ca.crt=<path/to/certificate> \
    --from-file=<path/to/.gitconfig>
3.4.2.8.3. Creating a basic authentication secret with a CA certificate
You can combine the different methods for creating source clone secrets for your specific needs, such as a secret that combines a basic authentication and CA certificate.
Prerequisites
- Basic authentication credentials
- CA certificate
Procedure
- Create a basic authentication secret with a CA certificate
$ oc create secret generic <secret_name> \
    --from-literal=username=<user_name> \
    --from-literal=password=<password> \
    --from-file=ca-cert=</path/to/file> \
    --type=kubernetes.io/basic-auth
3.4.2.8.4. Creating a basic authentication secret with a .gitconfig file
You can combine the different methods for creating source clone secrets for your specific needs, such as a secret that combines a basic authentication and .gitconfig file.
Prerequisites
- Basic authentication credentials
- .gitconfig file
Procedure
- Create a basic authentication secret with a .gitconfig file
$ oc create secret generic <secret_name> \
    --from-literal=username=<user_name> \
    --from-literal=password=<password> \
    --from-file=</path/to/.gitconfig> \
    --type=kubernetes.io/basic-auth
3.4.2.8.5. Creating a basic authentication secret with a .gitconfig file and CA certificate
You can combine the different methods for creating source clone secrets for your specific needs, such as a secret that combines a basic authentication, .gitconfig file, and CA certificate.
Prerequisites
- Basic authentication credentials
- .gitconfig file
- CA certificate
Procedure
- Create a basic authentication secret with a .gitconfig file and CA certificate
$ oc create secret generic <secret_name> \
    --from-literal=username=<user_name> \
    --from-literal=password=<password> \
    --from-file=</path/to/.gitconfig> \
    --from-file=ca-cert=</path/to/file> \
    --type=kubernetes.io/basic-auth
3.5. Binary (local) source
Streaming content from a local file system to the builder is called a Binary type build. The corresponding value of BuildConfig.spec.source.type is Binary for such builds.
This source type is unique in that it is leveraged solely based on your use of the oc start-build.
Binary type builds require content to be streamed from the local file system, so automatically triggering a binary type build (e.g. via an image change trigger) is not possible, because the binary files cannot be provided. Similarly, you cannot launch binary type builds from the web console.
To utilize binary builds, invoke oc start-build with one of these options:
-
--from-file: The contents of the file you specify are sent as a binary stream to the builder. You can also specify a URL to a file. Then, the builder stores the data in a file with the same name at the top of the build context. -
--from-dirand--from-repo: The contents are archived and sent as a binary stream to the builder. Then, the builder extracts the contents of the archive within the build context directory. With--from-dir, you can also specify a URL to an archive, which will be extracted. -
--from-archive: The archive you specify is sent to the builder, where it is extracted within the build context directory. This option behaves the same as--from-dir; an archive is created on your host first, whenever the argument to these options is a directory.
In each of the previously listed cases:
-
If your
BuildConfigalready has aBinarysource type defined, it will effectively be ignored and replaced by what the client sends. -
If your
BuildConfighas aGitsource type defined, it is dynamically disabled, sinceBinaryandGitare mutually exclusive, and the data in the binary stream provided to the builder takes precedence.
Instead of a file name, you can pass a URL with HTTP or HTTPS schema to --from-file and --from-archive. When using --from-file with a URL, the name of the file in the builder image is determined by the Content-Disposition header sent by the web server, or the last component of the URL path if the header is not present. No form of authentication is supported and it is not possible to use custom TLS certificate or disable certificate validation.
When using oc new-build --binary=true, the command ensures that the restrictions associated with binary builds are enforced. The resulting BuildConfig will have a source type of Binary, meaning that the only valid way to run a build for this BuildConfig is to use oc start-build with one of the --from options to provide the requisite binary data.
The dockerfile and contextDir source options have special meaning with binary builds.
dockerfile can be used with any binary build source. If dockerfile is used and the binary stream is an archive, its contents serve as a replacement Dockerfile to any Dockerfile in the archive. If dockerfile is used with the --from-file argument, and the file argument is named dockerfile, the value from dockerfile replaces the value from the binary stream.
In the case of the binary stream encapsulating extracted archive content, the value of the contextDir field is interpreted as a subdirectory within the archive, and, if valid, the builder changes into that subdirectory before executing the build.
3.6. Input Secrets and ConfigMaps
In some scenarios, build operations require credentials or other configuration data to access dependent resources, but it is undesirable for that information to be placed in source control. You can define input secrets and input ConfigMaps for this purpose.
For example, when building a Java application with Maven, you can set up a private mirror of Maven Central or JCenter that is accessed by private keys. In order to download libraries from that private mirror, you have to supply the following:
- A settings.xml file configured with the mirror’s URL and connection settings.
- A private key referenced in the settings file, such as ~/.ssh/id_rsa.
For security reasons, you do not want to expose your credentials in the application image.
This example describes a Java application, but you can use the same approach for adding SSL certificates into the /etc/ssl/certs directory, API keys or tokens, license files, and more.
3.6.1. Adding input secrets and ConfigMaps
In some scenarios, build operations require credentials or other configuration data to access dependent resources, but it is undesirable for that information to be placed in source control. You can define input secrets and input ConfigMaps for this purpose.
Procedure
To add an input secret and/or ConfigMap to an existing BuildConfig:
Create the ConfigMap, if it does not exist:
$ oc create configmap settings-mvn \
    --from-file=settings.xml=<path/to/settings.xml>
This creates a new ConfigMap named settings-mvn, which contains the plain text content of the settings.xml file.
Create the secret, if it does not exist:
$ oc create secret generic secret-mvn \
    --from-file=id_rsa=<path/to/.ssh/id_rsa>
This creates a new secret named secret-mvn, which contains the base64 encoded content of the id_rsa private key.
Add the ConfigMap and secret to the
sourcesection in the existingBuildConfig:source: git: uri: https://github.com/wildfly/quickstart.git contextDir: helloworld configMaps: - configMap: name: settings-mvn secrets: - secret: name: secret-mvn
To include the secret and ConfigMap in a new BuildConfig, run the following command:
$ oc new-build \
    openshift/wildfly-101-centos7~https://github.com/wildfly/quickstart.git \
    --context-dir helloworld --build-secret “secret-mvn” \
    --build-config-map "settings-mvn"
During the build, the settings.xml and id_rsa files are copied into the directory where the source code is located. In OpenShift Container Platform S2I builder images, this is the image working directory, which is set using the WORKDIR instruction in the Dockerfile. If you want to specify another directory, add a destinationDir to the definition:
source:
  git:
    uri: https://github.com/wildfly/quickstart.git
  contextDir: helloworld
  configMaps:
    - configMap:
        name: settings-mvn
      destinationDir: ".m2"
  secrets:
    - secret:
        name: secret-mvn
      destinationDir: ".ssh"
You can also specify the destination directory when creating a new BuildConfig:
$ oc new-build \
    openshift/wildfly-101-centos7~https://github.com/wildfly/quickstart.git \
    --context-dir helloworld --build-secret “secret-mvn:.ssh” \
    --build-config-map "settings-mvn:.m2"
In both cases, the settings.xml file is added to the ./.m2 directory of the build environment, and the id_rsa key is added to the ./.ssh directory.
3.6.2. Source-to-image strategy
When using a Source strategy, all defined input secrets are copied to their respective destinationDir. If you left destinationDir empty, then the secrets are placed in the working directory of the builder image.
The same rule is used when a destinationDir is a relative path; the secrets are placed in the paths that are relative to the image’s working directory. The final directory in the destinationDir path is created if it does not exist in the builder image. All preceding directories in the destinationDir must exist, or an error will occur.
Input secrets are added as world-writable (have 0666 permissions) and will be truncated to size zero after executing the assemble script. This means that the secret files will exist in the resulting image, but they will be empty for security reasons.
Input ConfigMaps are not truncated after the assemble script completes.
3.6.3. Docker strategy
When using a Docker strategy, you can add all defined input secrets into your container image using the ADD and COPY instructions in your Dockerfile.
If you do not specify the destinationDir for a secret, then the files will be copied into the same directory in which the Dockerfile is located. If you specify a relative path as destinationDir, then the secrets will be copied into that directory, relative to your Dockerfile location. This makes the secret files available to the Docker build operation as part of the context directory used during the build.
Example of a Dockerfile referencing secret and ConfigMap data
FROM centos/ruby-22-centos7

USER root
COPY ./secret-dir /secrets
COPY ./config /

# Create a shell script that will output secrets and ConfigMaps when the image is run
RUN echo '#!/bin/sh' > /input_report.sh
RUN echo '(test -f /secrets/secret1 && echo -n "secret1=" && cat /secrets/secret1)' >> /input_report.sh
RUN echo '(test -f /config && echo -n "relative-configMap=" && cat /config)' >> /input_report.sh
RUN chmod 755 /input_report.sh

CMD ["/bin/sh", "-c", "/input_report.sh"]
Users should normally remove their input secrets from the final application image so that the secrets are not present in the container running from that image. However, the secrets will still exist in the image itself in the layer where they were added. This removal should be part of the Dockerfile itself.
3.6.4. Custom strategy
When using a Custom strategy, all the defined input secrets and ConfigMaps are available inside the builder container in the /var/run/secrets/openshift.io/build directory. The custom build image is responsible for using these secrets and ConfigMaps appropriately. The Custom strategy also allows secrets to be defined as described in Custom Strategy Options.
There is no technical difference between existing strategy secrets and the input secrets. However, your builder image might distinguish between them and use them differently, based on your build use case.
The input secrets are always mounted into the /var/run/secrets/openshift.io/build directory or your builder can parse the $BUILD environment variable, which includes the full build object.
3.7. External artifacts
It is not recommended to store binary files in a source repository. Therefore, you may find it necessary to define a build which pulls additional files (such as Java .jar dependencies) during the build process. How this is done depends on the build strategy you are using.
For a Source build strategy, you must put appropriate shell commands into the assemble script:
.s2i/bin/assemble File
#!/bin/sh
APP_VERSION=1.0
wget http://repository.example.com/app/app-$APP_VERSION.jar -O app.jar
.s2i/bin/run File
#!/bin/sh
exec java -jar app.jar
For a Docker build strategy, you must modify the Dockerfile and invoke shell commands with the RUN instruction:
Excerpt of Dockerfile
FROM jboss/base-jdk:8

ENV APP_VERSION 1.0
RUN wget http://repository.example.com/app/app-$APP_VERSION.jar -O app.jar

EXPOSE 8080
CMD [ "java", "-jar", "app.jar" ]
In practice, you may want to use an environment variable for the file location so that the specific file to be downloaded can be customized using an environment variable defined on the BuildConfig, rather than updating the Dockerfile or assemble script.
You can choose between different methods of defining environment variables:
- Using the .s2i/environment file] (only for a Source build strategy)
-
Setting in
BuildConfig -
Providing explicitly using
oc start-build --env(only for builds that are triggered manually)
3.8. Using Docker credentials for private registries
You can supply builds with a .docker/config.json file with valid credentials for private container registries. This allows you to push the output image into a private container image registry or pull a builder image from the private container image registry that requires authentication.
For the OpenShift Container Platform container image registry, this is not required because secrets are generated automatically for you by OpenShift Container Platform.
The .docker/config.json file is found in your home directory by default and has the following format:
auths:
  https://index.docker.io/v1/: 1
    auth: "YWRfbGzhcGU6R2labnRib21ifTE=" 2
    email: "user@example.com" 3
You can define multiple container image registry entries in this file. Alternatively, you can also add authentication entries to this file by running the docker login command. The file will be created if it does not exist.
Kubernetes provides Secret objects, which can be used to store configuration and passwords.
Prerequisites
- .docker/config.json file
Procedure
Create the secret from your local .docker/config.json file:
$ oc create secret generic dockerhub \
    --from-file=.dockerconfigjson=<path/to/.docker/config.json> \
    --type=kubernetes.io/dockerconfigjson
This generates a JSON specification of the secret named
dockerhuband creates the object.Once the secret is created, add it to the builder service account. Each build is run with the
builderrole, so you must give it access your secret with the following command:$ oc secrets link builder dockerhub
Add a
pushSecretfield into theoutputsection of theBuildConfigand set it to the name of thesecretthat you created, which in the above example isdockerhub:spec: output: to: kind: "DockerImage" name: "private.registry.com/org/private-image:latest" pushSecret: name: "dockerhub"You can use the
oc set build-secretcommand to set the push secret on the build configuration:$ oc set build-secret --push bc/sample-build dockerhub
Pull the builder container image from a private container image registry by specifying the
pullSecretfield, which is part of the build strategy definition:strategy: sourceStrategy: from: kind: "DockerImage" name: "docker.io/user/private_repository" pullSecret: name: "dockerhub"You can use the
oc set build-secretcommand to set the pull secret on the build configuration:$ oc set build-secret --pull bc/sample-build dockerhub
This example uses pullSecret in a Source build, but it is also applicable in Docker and Custom builds.
3.9. Build environments
As with pod environment variables, build environment variables can be defined in terms of references to other resources or variables using the Downward API. There are some exceptions, which are noted.
You can also manage environment variables defined in the BuildConfig with the oc set env command.
Referencing container resources using valueFrom in build environment variables is not supported as the references are resolved before the container is created.
3.9.1. Using build fields as environment variables
You can inject information about the build object by setting the fieldPath environment variable source to the JsonPath of the field from which you are interested in obtaining the value.
Jenkins Pipeline strategy does not support valueFrom syntax for environment variables.
Procedure
Set the
fieldPathenvironment variable source to theJsonPathof the field from which you are interested in obtaining the value:env: - name: FIELDREF_ENV valueFrom: fieldRef: fieldPath: metadata.name
3.9.2. Using secrets as environment variables
You can make key values from Secrets available as environment variables using the valueFrom syntax.
Procedure
To use a secret as an environment variable, set the
valueFromsyntax:apiVersion: v1 kind: BuildConfig metadata: name: secret-example-bc spec: strategy: sourceStrategy: env: - name: MYVAL valueFrom: secretKeyRef: key: myval name: mysecret
3.10. What is a secret?
The Secret object type provides a mechanism to hold sensitive information such as passwords, OpenShift Container Platform client configuration files, dockercfg files, private source repository credentials, and so on. Secrets decouple sensitive content from the pods. You can mount secrets into containers using a volume plug-in or the system can use secrets to perform actions on behalf of a pod.
YAML Secret Object Definition
apiVersion: v1
kind: Secret
metadata:
  name: test-secret
  namespace: my-namespace
type: Opaque 1
data: 2
  username: dmFsdWUtMQ0K 3
  password: dmFsdWUtMg0KDQo=
stringData: 4
  hostname: myapp.mydomain.com 5
- 1
- Indicates the structure of the secret’s key names and values.
- 2
- The allowable format for the keys in the
datafield must meet the guidelines in theDNS_SUBDOMAINvalue in the Kubernetes identifiers glossary. - 3
- The value associated with keys in the
datamap must be base64 encoded. - 4
- Entries in the
stringDatamap are converted to base64 and the entry will then be moved to thedatamap automatically. This field is write-only; the value will only be returned via thedatafield. - 5
- The value associated with keys in the
stringDatamap is made up of plain text strings.
3.10.1. Properties of secrets
Key properties include:
- Secret data can be referenced independently from its definition.
- Secret data volumes are backed by temporary file-storage facilities (tmpfs) and never come to rest on a node.
- Secret data can be shared within a namespace.
3.10.2. Types of Secrets
The value in the type field indicates the structure of the secret’s key names and values. The type can be used to enforce the presence of user names and keys in the secret object. If you do not want validation, use the opaque type, which is the default.
Specify one of the following types to trigger minimal server-side validation to ensure the presence of specific key names in the secret data:
-
kubernetes.io/service-account-token. Uses a service account token. -
kubernetes.io/dockercfg. Uses the .dockercfg file for required Docker credentials. -
kubernetes.io/dockerconfigjson. Uses the .docker/config.json file for required Docker credentials. -
kubernetes.io/basic-auth. Use with Basic Authentication. -
kubernetes.io/ssh-auth. Use with SSH Key Authentication. -
kubernetes.io/tls. Use with TLS certificate authorities.
Specify type= Opaque if you do not want validation, which means the secret does not claim to conform to any convention for key names or values. An opaque secret, allows for unstructured key:value pairs that can contain arbitrary values.
You can specify other arbitrary types, such as example.com/my-secret-type. These types are not enforced server-side, but indicate that the creator of the secret intended to conform to the key/value requirements of that type.
3.10.3. Updates to secrets
When you modify the value of a secret, the value (used by an already running pod) will not dynamically change. To change a secret, you must delete the original pod and create a new pod (perhaps with an identical PodSpec).
Updating a secret follows the same workflow as deploying a new container image. You can use the kubectl rolling-update command.
The resourceVersion value in a secret is not specified when it is referenced. Therefore, if a secret is updated at the same time as pods are starting, then the version of the secret will be used for the pod will not be defined.
Currently, it is not possible to check the resource version of a secret object that was used when a pod was created. It is planned that pods will report this information, so that a controller could restart ones using a old resourceVersion. In the interim, do not update the data of existing secrets, but create new ones with distinct names.
3.10.4. Creating secrets
You must create a secret before creating the pods that depend on that secret.
When creating secrets:
- Create a secret object with secret data.
- Update the pod’s service account to allow the reference to the secret.
-
Create a pod, which consumes the secret as an environment variable or as a file (using a
secretvolume).
Procedure
Use the create command to create a secret object from a JSON or YAML file:
$ oc create -f <filename>
For example, you can create a secret from your local .docker/config.json file:
$ oc create secret generic dockerhub \
    --from-file=.dockerconfigjson=<path/to/.docker/config.json> \
    --type=kubernetes.io/dockerconfigjson
This command generates a JSON specification of the secret named
dockerhuband creates the object.YAML Opaque Secret Object Definition
apiVersion: v1 kind: Secret metadata: name: mysecret type: Opaque 1 data: username: dXNlci1uYW1l password: cGFzc3dvcmQ=- 1
- Specifies an opaque secret.
Docker Configuration JSON File Secret Object Definition
apiVersion: v1
kind: Secret
metadata:
  name: aregistrykey
  namespace: myapps
type: kubernetes.io/dockerconfigjson 1
data:
  .dockerconfigjson:bm5ubm5ubm5ubm5ubm5ubm5ubm5ubmdnZ2dnZ2dnZ2dnZ2dnZ2dnZ2cgYXV0aCBrZXlzCg== 2
3.10.4.1. Using secrets
After creating secrets, you can create a pod to reference your secret, get logs, and delete the pod.
Procedure
Create the pod to reference your secret:
$ oc create -f <your_yaml_file>.yaml
Get the logs:
$ oc logs secret-example-pod
Delete the pod:
$ oc delete pod secret-example-pod
Additional resources
Example YAML files with secret data:
YAML Secret That Will Create Four Files
apiVersion: v1
kind: Secret
metadata:
  name: test-secret
data:
  username: dmFsdWUtMQ0K     1
  password: dmFsdWUtMQ0KDQo= 2
stringData:
  hostname: myapp.mydomain.com 3
  secret.properties: |-     4
    property1=valueA
    property2=valueB
YAML of a Pod Populating Files in a Volume with Secret Data
apiVersion: v1
kind: Pod
metadata:
  name: secret-example-pod
spec:
  containers:
    - name: secret-test-container
      image: busybox
      command: [ "/bin/sh", "-c", "cat /etc/secret-volume/*" ]
      volumeMounts:
          # name must match the volume name below
          - name: secret-volume
            mountPath: /etc/secret-volume
            readOnly: true
  volumes:
    - name: secret-volume
      secret:
        secretName: test-secret
  restartPolicy: Never
YAML of a Pod Populating Environment Variables with Secret Data
apiVersion: v1
kind: Pod
metadata:
  name: secret-example-pod
spec:
  containers:
    - name: secret-test-container
      image: busybox
      command: [ "/bin/sh", "-c", "export" ]
      env:
        - name: TEST_SECRET_USERNAME_ENV_VAR
          valueFrom:
            secretKeyRef:
              name: test-secret
              key: username
  restartPolicy: Never
YAML of a Build Config Populating Environment Variables with Secret Data
apiVersion: v1
kind: BuildConfig
metadata:
  name: secret-example-bc
spec:
  strategy:
    sourceStrategy:
      env:
      - name: TEST_SECRET_USERNAME_ENV_VAR
        valueFrom:
          secretKeyRef:
            name: test-secret
            key: username
3.11. Service serving certificate secrets
Service serving certificate secrets are intended to support complex middleware applications that need out-of-the-box certificates. It has the same settings as the server certificates generated by the administrator tooling for nodes and masters.
Procedure
To secure communication to your service, have the cluster generate a signed serving certificate/key pair into a secret in your namespace.
Set the
service.alpha.openshift.io/serving-cert-secret-nameannotation on your service with the value set to the name you want to use for your secret.Then, your
PodSpeccan mount that secret. When it is available, your pod will run. The certificate will be good for the internal service DNS name,<service.name>.<service.namespace>.svc.The certificate and key are in PEM format, stored in
tls.crtandtls.keyrespectively. The certificate/key pair is automatically replaced when it gets close to expiration. View the expiration date in theservice.alpha.openshift.io/expiryannotation on the secret, which is in RFC3339 format.
In most cases, the service DNS name <service.name>.<service.namespace>.svc is not externally routable. The primary use of <service.name>.<service.namespace>.svc is for intracluster or intraservice communication, and with re-encrypt routes.
Other pods can trust cluster-created certificates (which are only signed for internal DNS names), by using the CA bundle in the /var/run/secrets/kubernetes.io/serviceaccount/service-ca.crt file that is automatically mounted in their pod.
The signature algorithm for this feature is x509.SHA256WithRSA. To manually rotate, delete the generated secret. A new certificate is created.
3.12. Secrets restrictions
To use a secret, a pod needs to reference the secret. A secret can be used with a pod in three ways:
- To populate environment variables for containers.
- As files in a volume mounted on one or more of its containers.
- By kubelet when pulling images for the pod.
Volume type secrets write data into the container as a file using the volume mechanism. imagePullSecrets use service accounts for the automatic injection of the secret into all pods in a namespaces.
When a template contains a secret definition, the only way for the template to use the provided secret is to ensure that the secret volume sources are validated and that the specified object reference actually points to an object of type Secret. Therefore, a secret needs to be created before any pods that depend on it. The most effective way to ensure this is to have it get injected automatically through the use of a service account.
Secret API objects reside in a namespace. They can only be referenced by pods in that same namespace.
Individual secrets are limited to 1MB in size. This is to discourage the creation of large secrets that would exhaust apiserver and kubelet memory. However, creation of a number of smaller secrets could also exhaust memory.
Chapter 4. Managing build output
Use the following sections for an overview of and instructions for managing build output.
4.1. Build output
Builds that use the Docker or Source-to-Image (S2I) strategy result in the creation of a new container image. The image is then pushed to the container image registry specified in the output section of the Build specification.
If the output kind is ImageStreamTag, then the image will be pushed to the integrated OpenShift Container Platform registry and tagged in the specified imagestream. If the output is of type DockerImage, then the name of the output reference will be used as a Docker push specification. The specification may contain a registry or will default to DockerHub if no registry is specified. If the output section of the build specification is empty, then the image will not be pushed at the end of the build.
Output to an ImageStreamTag
spec:
  output:
    to:
      kind: "ImageStreamTag"
      name: "sample-image:latest"
Output to a Docker Push Specification
spec:
  output:
    to:
      kind: "DockerImage"
      name: "my-registry.mycompany.com:5000/myimages/myimage:tag"
4.2. Output image environment variables
Docker and Source-to-Image (S2I) strategy builds set the following environment variables on output images:
| Variable | Description |
|---|---|
|
| Name of the build |
|
| Namespace of the build |
|
| The source URL of the build |
|
| The Git reference used in the build |
|
| Source commit used in the build |
Additionally, any user-defined environment variable, for example those configured with S2I] or Docker strategy options, will also be part of the output image environment variable list.
4.3. Output image labels
Docker and Source-to-Image (S2I) builds set the following labels on output images:
| Label | Description |
|---|---|
|
| Author of the source commit used in the build |
|
| Date of the source commit used in the build |
|
| Hash of the source commit used in the build |
|
| Message of the source commit used in the build |
|
| Branch or reference specified in the source |
|
| Source URL for the build |
You can also use the BuildConfig.spec.output.imageLabels field to specify a list of custom labels that will be applied to each image built from the BuildConfig.
Custom Labels to be Applied to Built Images
spec:
  output:
    to:
      kind: "ImageStreamTag"
      name: "my-image:latest"
    imageLabels:
    - name: "vendor"
      value: "MyCompany"
    - name: "authoritative-source-url"
      value: "registry.mycompany.com"
Chapter 5. Using build strategies
The following sections define the primary supported build strategies, and how to use them.
5.1. Docker build
The Docker build strategy invokes the docker build command, and it expects a repository with a Dockerfile and all required artifacts in it to produce a runnable image.
5.1.1. Replacing Dockerfile FROM image
You can replace the FROM instruction of the Dockerfile with the from of the BuildConfig. If the Dockerfile uses multi-stage builds, the image in the last FROM instruction will be replaced.
Procedure
To replace the FROM instruction of the Dockerfile with the from of the BuildConfig.
strategy:
  dockerStrategy:
    from:
      kind: "ImageStreamTag"
      name: "debian:latest"
5.1.2. Using Dockerfile path
By default, Docker builds use a Dockerfile (named Dockerfile) located at the root of the context specified in the BuildConfig.spec.source.contextDir field.
The dockerfilePath field allows the build to use a different path to locate your Dockerfile, relative to the BuildConfig.spec.source.contextDir field. It can be a different file name than the default Dockerfile (for example, MyDockerfile), or a path to a Dockerfile in a subdirectory (for example, dockerfiles/app1/Dockerfile).
Procedure
To use the dockerfilePath field for the build to use a different path to locate your Dockerfile, set:
strategy:
  dockerStrategy:
    dockerfilePath: dockerfiles/app1/Dockerfile
5.1.3. Using Docker environment variables
To make environment variables available to the Docker build process and resulting image, you can add environment variables to the dockerStrategy definition of the BuildConfig.
The environment variables defined there are inserted as a single ENV Dockerfile instruction right after the FROM instruction, so that it can be referenced later on within the Dockerfile.
Procedure
The variables are defined during build and stay in the output image, therefore they will be present in any container that runs that image as well.
For example, defining a custom HTTP proxy to be used during build and runtime:
dockerStrategy:
...
  env:
    - name: "HTTP_PROXY"
      value: "http://myproxy.net:5187/"
Cluster administrators can also configure global build settings using Ansible.
You can also manage environment variables defined in the BuildConfig with the oc set env command.
5.1.4. Adding Docker build arguments
You can set Docker build arguments using the BuildArgs array. The build arguments will be passed to Docker when a build is started.
Procedure
To set Docker build arguments, add entries to the BuildArgs array, which is located in the dockerStrategy definition of the BuildConfig. For example:
dockerStrategy:
...
  buildArgs:
    - name: "foo"
      value: "bar"
5.2. Source-to-Image (S2I) build
Source-to-Image (S2I) is a tool for building reproducible, Docker-formatted container images. It produces ready-to-run images by injecting application source into a container image and assembling a new image. The new image incorporates the base image (the builder) and built source and is ready to use with the buildah run command. S2I supports incremental builds, which re-use previously downloaded dependencies, previously built artifacts, etc.
The advantages of S2I include the following:
| Image flexibility |
S2I scripts can be written to inject application code into almost any existing Docker-formatted container image, taking advantage of the existing ecosystem. Note that, currently, S2I relies on |
| Speed | With S2I, the assemble process can perform a large number of complex operations without creating a new layer at each step, resulting in a fast process. In addition, S2I scripts can be written to re-use artifacts stored in a previous version of the application image, rather than having to download or build them each time the build is run. |
| Patchability | S2I allows you to rebuild the application consistently if an underlying image needs a patch due to a security issue. |
| Operational efficiency | By restricting build operations instead of allowing arbitrary actions, as a Dockerfile would allow, the PaaS operator can avoid accidental or intentional abuses of the build system. |
| Operational security | Building an arbitrary Dockerfile exposes the host system to root privilege escalation. This can be exploited by a malicious user because the entire Docker build process is run as a user with Docker privileges. S2I restricts the operations performed as a root user and can run the scripts as a non-root user. |
| User efficiency |
S2I prevents developers from performing arbitrary |
| Ecosystem | S2I encourages a shared ecosystem of images where you can leverage best practices for your applications. |
| Reproducibility | Produced images can include all inputs including specific versions of build tools and dependencies. This ensures that the image can be reproduced precisely. |
5.2.1. Performing Source-to-Image (S2I) incremental builds
S2I can perform incremental builds, which means it reuses artifacts from previously-built images.
Procedure
To create an incremental build, create a BuildConfig with the following modification to the strategy definition:
strategy:
  sourceStrategy:
    from:
      kind: "ImageStreamTag"
      name: "incremental-image:latest" 1
incremental: true 2- 1
- Specify an image that supports incremental builds. Consult the documentation of the builder image to determine if it supports this behavior.
- 2
- This flag controls whether an incremental build is attempted. If the builder image does not support incremental builds, the build will still succeed, but you will get a log message stating the incremental build was not successful because of a missing save-artifacts script.
Additional resources
- See S2I Requirements for information on how to create a builder image supporting incremental builds.
5.2.2. Overriding Source-to-Image (S2I) builder image scripts
You can override the assemble, run, and save-artifacts S2I scripts provided by the builder image.
Procedure
To override the assemble, run, and save-artifacts S2I scripts provided by the builder image, either:
- Provide an assemble, run, or save-artifacts script in the .s2i/bin directory of your application source repository, or
- Provide a URL of a directory containing the scripts as part of the strategy definition. For example:
strategy:
  sourceStrategy:
    from:
      kind: "ImageStreamTag"
      name: "builder-image:latest"
scripts: "http://somehost.com/scripts_directory" 1- 1
- This path will have run, assemble, and save-artifacts appended to it. If any or all scripts are found they will be used in place of the same named script(s) provided in the image.
Files located at the scripts URL take precedence over files located in .s2i/bin of the source repository.
5.2.3. Source-to-Image (S2I) environment variables
There are two ways to make environment variables available to the source build process and resulting image. Environment files and BuildConfig environment values. Variables provided will be present during the build process and in the output image.
5.2.3.1. Using Source-to-Image (S2I) environment files
Source build enables you to set environment values (one per line) inside your application, by specifying them in a .s2i/environment file in the source repository. The environment variables specified in this file are present during the build process and in the output image.
If you provide a .s2i/environment file in your source repository, S2I reads this file during the build. This allows customization of the build behavior as the assemble script may use these variables.
Procedure
For example, to disable assets compilation for your Rails application during the build:
-
Add
DISABLE_ASSET_COMPILATION=truein the .s2i/environment file.
In addition to builds, the specified environment variables are also available in the running application itself. For example, to cause the Rails application to start in development mode instead of production:
-
Add
RAILS_ENV=developmentto the .s2i/environment file.
Additional resources
- The complete list of supported environment variables is available in the using images section for each image.
5.2.3.2. Using Source-to-Image (S2I) BuildConfig environment
You can add environment variables to the sourceStrategy definition of the BuildConfig. The environment variables defined there are visible during the assemble script execution and will be defined in the output image, making them also available to the run script and application code.
Procedure
- For example, to disable assets compilation for your Rails application:
sourceStrategy:
...
  env:
    - name: "DISABLE_ASSET_COMPILATION"
      value: "true"
Additional resources
- The Build environment section provides more advanced instructions.
-
You can also manage environment variables defined in the
BuildConfigwith theoc set envcommand.
5.2.4. Ignoring Source-to-Image (S2I) source files
Source to image supports a .s2iignore file, which contains a list of file patterns that should be ignored. Files in the build working directory, as provided by the various input sources, that match a pattern found in the .s2iignore file will not be made available to the assemble script.
For more details on the format of the .s2iignore file, see the source-to-image documentation.
5.2.5. Creating images from source code with s2i
Source-to-Image (S2I) is a framework that makes it easy to write images that take application source code as an input and produce a new image that runs the assembled application as output.
The main advantage of using S2I for building reproducible container images is the ease of use for developers. As a builder image author, you must understand two basic concepts in order for your images to provide the best possible S2I performance: the build process and S2I scripts.
5.2.5.1. Understanding the s2i build process
The build process consists of the following three fundamental elements, which are combined into a final container image:
- sources
- S2I scripts
- builder image
During the build process, S2I must place sources and scripts inside the builder image. To do so, S2I creates a tar file that contains the sources and scripts, then streams that file into the builder image. Before executing the assemble script, S2I un-tars that file and places its contents into the location specified by the io.openshift.s2i.destination label from the builder image, with the default location being the /tmp directory.
For this process to happen, your image must supply the tar archiving utility (the tar command available in $PATH) and the command line interpreter (the /bin/sh command); this allows your image to use the fastest possible build path. If the tar or /bin/sh command is not available, the s2i build process is forced to automatically perform an additional container build to put both the sources and the scripts inside the image, and only then run the usual build.
See the following diagram for the basic S2I build workflow:
Figure 5.1. Build Workflow
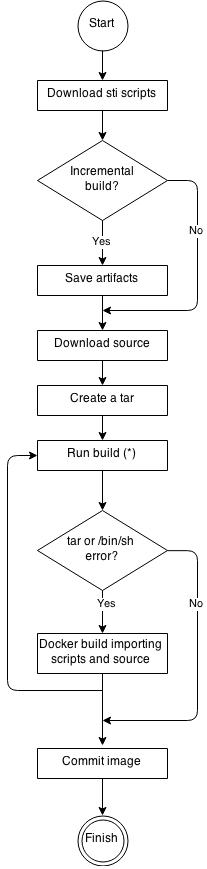
Run build’s responsibility is to un-tar the sources, scripts and artifacts (if such exist) and invoke the assemble script. If this is the second run (after catching tar or /bin/sh not found error) it is responsible only for invoking assemble script, since both scripts and sources are already there.
5.2.5.2. Writing s2i scripts
You can write S2I scripts in any programming language, as long as the scripts are executable inside the builder image. S2I supports multiple options providing assemble/run/save-artifacts scripts. All of these locations are checked on each build in the following order:
- A script specified in the BuildConfig
-
A script found in the application source
.s2i/bindirectory -
A script found at the default image URL (
io.openshift.s2i.scripts-urllabel)
Both the io.openshift.s2i.scripts-url label specified in the image and the script specified in a BuildConfig can take one of the following forms:
-
image:///path_to_scripts_dir- absolute path inside the image to a directory where the S2I scripts are located -
file:///path_to_scripts_dir- relative or absolute path to a directory on the host where the S2I scripts are located -
http(s)://path_to_scripts_dir- URL to a directory where the S2I scripts are located
Table 5.1. S2I Scripts
| Script | Description |
|---|---|
| assemble (required) | The assemble script builds the application artifacts from a source and places them into appropriate directories inside the image. The workflow for this script is:
|
| run (required) | The run script executes your application. |
| save-artifacts (optional) | The save-artifacts script gathers all dependencies that can speed up the build processes that follow. For example:
These dependencies are gathered into a tar file and streamed to the standard output. |
| usage (optional) | The usage script allows you to inform the user how to properly use your image. |
| test/run (optional) | The test/run script allows you to create a simple process to check if the image is working correctly. The proposed flow of that process is:
Note The suggested location to put the test application built by your test/run script is the test/test-app directory in your image repository. See the S2I documentation for more information. |
5.2.5.2.1. Example S2I Scripts
The following example S2I scripts are written in Bash. Each example assumes its tar contents are unpacked into the /tmp/s2i directory.
Example 5.1. assemble script:
#!/bin/bash

# restore build artifacts
if [ "$(ls /tmp/s2i/artifacts/ 2>/dev/null)" ]; then
    mv /tmp/s2i/artifacts/* $HOME/.
fi

# move the application source
mv /tmp/s2i/src $HOME/src

# build application artifacts
pushd ${HOME}
make all

# install the artifacts
make install
popd
Example 5.2. run script:
#!/bin/bash

# run the application
/opt/application/run.sh
Example 5.3. save-artifacts script:
#!/bin/bash

pushd ${HOME}
if [ -d deps ]; then
    # all deps contents to tar stream
    tar cf - deps
fi
popd
Example 5.4. usage script:
#!/bin/bash

# inform the user how to use the image
cat <<EOF
This is a S2I sample builder image, to use it, install
https://github.com/openshift/source-to-image
EOF
5.3. Custom build
The Custom build strategy allows developers to define a specific builder image responsible for the entire build process. Using your own builder image allows you to customize your build process.
A Custom builder image is a plain Docker-formatted container image embedded with build process logic, for example for building RPMs or base images.
Custom builds run with a very high level of privilege and are not available to users by default. Only users who can be trusted with cluster administration permissions should be granted access to run custom builds.
5.3.1. Using FROM image for custom builds
You can use the customStrategy.from section to indicate the image to use for the custom build
Procedure
To set the customStrategy.from section:
strategy:
  customStrategy:
    from:
      kind: "DockerImage"
      name: "openshift/sti-image-builder"
5.3.2. Using secrets in custom builds
In addition to secrets for source and images that can be added to all build types, custom strategies allow adding an arbitrary list of secrets to the builder pod.
Procedure
To mount each secret at a specific location:
strategy:
  customStrategy:
    secrets:
      - secretSource: 1
          name: "secret1"
        mountPath: "/tmp/secret1" 2
      - secretSource:
          name: "secret2"
mountPath: "/tmp/secret2"5.3.3. Using environment variables for custom builds
To make environment variables available to the Custom build process, you can add environment variables to the customStrategy definition of the BuildConfig.
The environment variables defined there are passed to the pod that runs the custom build.
Procedure
To define a custom HTTP proxy to be used during build:
customStrategy:
...
  env:
    - name: "HTTP_PROXY"
      value: "http://myproxy.net:5187/"
Cluster administrators can also configure global build settings using Ansible.
You can also manage environment variables defined in the BuildConfig with the oc set env command.
5.3.4. Using custom builder images
By allowing you to define a specific builder image responsible for the entire build process, OpenShift Container Platform’s Custom build strategy was designed to fill a gap created with the increased popularity of creating container images. When there is a requirement for a build to still produce individual artifacts (packages, JARs, WARs, installable ZIPs, and base images, for example), a Custom builder image using the Custom build strategy is the perfect match to fill that gap.
A Custom builder image is a plain container image embedded with build process logic, for example for building RPMs or base container images.
Additionally, the Custom builder allows implementing any extended build process, for example a CI/CD flow that runs unit or integration tests.
To fully leverage the benefits of the Custom build strategy, you must understand how to create a Custom builder image that will be capable of building desired objects.
5.3.4.1. Custom builder image
Upon invocation, a custom builder image will receive the following environment variables with the information needed to proceed with the build:
Table 5.2. Custom Builder Environment Variables
| Variable Name | Description |
|---|---|
|
|
The entire serialized JSON of the |
|
| The URL of a Git repository with source to be built. |
|
|
Uses the same value as |
|
| Specifies the subdirectory of the Git repository to be used when building. Only present if defined. |
|
| The Git reference to be built. |
|
| The version of the OpenShift Container Platform master that created this build object. |
|
| The container image registry to push the image to. |
|
| The container image tag name for the image being built. |
|
|
The path to the container registry credentials for running a |
5.3.4.2. Custom builder workflow
Although custom builder image authors have great flexibility in defining the build process, your builder image must still adhere to the following required steps necessary for seamlessly running a build inside of OpenShift Container Platform:
-
The
Buildobject definition contains all the necessary information about input parameters for the build. - Run the build process.
- If your build produces an image, push it to the build’s output location if it is defined. Other output locations can be passed with environment variables.
5.4. Pipeline build
The Pipeline build strategy allows developers to define a Jenkins pipeline for execution by the Jenkins pipeline plugin. The build can be started, monitored, and managed by OpenShift Container Platform in the same way as any other build type.
Pipeline workflows are defined in a Jenkinsfile, either embedded directly in the build configuration, or supplied in a Git repository and referenced by the build configuration.
5.4.1. Understanding OpenShift Container Platform pipelines
Pipelines give you control over building, deploying, and promoting your applications on OpenShift Container Platform. Using a combination of the Jenkins Pipeline Build Strategy, Jenkinsfiles, and the OpenShift Container Platform Domain Specific Language (DSL) (provided by the Jenkins Client Plug-in), you can create advanced build, test, deploy, and promote pipelines for any scenario.
OpenShift Container Platform Jenkins Sync Plugin
The OpenShift Container Platform Jenkins Sync Plugin keeps BuildConfig and Build objects in sync with Jenkins Jobs and Builds, and provides the following:
- Dynamic job/run creation in Jenkins.
- Dynamic creation of slave pod templates from ImageStreams, ImageStreamTags, or ConfigMaps.
- Injecting of environment variables.
- Pipeline visualization in the OpenShift web console.
- Integration with the Jenkins git plugin, which passes commit information from
- Synchronizing secrets into Jenkins credential entries OpenShift builds to the Jenkins git plugin.
OpenShift Container Platform Jenkins Client Plugin
The OpenShift Container Platform Jenkins Client Plugin is a Jenkins plugin which aims to provide a readable, concise, comprehensive, and fluent Jenkins Pipeline syntax for rich interactions with an OpenShift Container Platform API Server. The plugin leverages the OpenShift command line tool (oc) which must be available on the nodes executing the script.
The Jenkins Client Plug-in must be installed on your Jenkins master so the OpenShift Container Platform DSL will be available to use within the JenkinsFile for your application. This plug-in is installed and enabled by default when using the OpenShift Container Platform Jenkins image.
For OpenShift Container Platform Pipelines within your project, you will must use the Jenkins Pipeline Build Strategy. This strategy defaults to using a jenkinsfile at the root of your source repository, but also provides the following configuration options:
-
An inline
jenkinsfilefield within yourBuildConfig. -
A
jenkinsfilePathfield within yourBuildConfigthat references the location of thejenkinsfileto use relative to the sourcecontextDir.
The optional jenkinsfilePath field specifies the name of the file to use, relative to the source contextDir. If contextDir is omitted, it defaults to the root of the repository. If jenkinsfilePath is omitted, it defaults to jenkinsfile.
5.4.2. Providing the Jenkinsfile for pipeline builds
The jenkinsfile uses the standard groovy language syntax to allow fine grained control over the configuration, build, and deployment of your application.
You can supply the jenkinsfile in one of the following ways:
- A file located within your source code repository.
-
Embedded as part of your build configuration using the
jenkinsfilefield.
When using the first option, the jenkinsfile must be included in your applications source code repository at one of the following locations:
-
A file named
jenkinsfileat the root of your repository. -
A file named
jenkinsfileat the root of the sourcecontextDirof your repository. -
A file name specified via the
jenkinsfilePathfield of theJenkinsPipelineStrategysection of your BuildConfig, which is relative to the sourcecontextDirif supplied, otherwise it defaults to the root of the repository.
The jenkinsfile is executed on the Jenkins slave pod, which must have the OpenShift Client binaries available if you intend to use the OpenShift DSL.
Procedure
To provide the Jenkinsfile, you can either:
- Embed the Jenkinsfile in the build configuration.
- Include in the build configuration a reference to the Git repository that contains the Jenkinsfile.
Embedded Definition
kind: "BuildConfig"
apiVersion: "v1"
metadata:
  name: "sample-pipeline"
spec:
  strategy:
    jenkinsPipelineStrategy:
      jenkinsfile: |-
        node('agent') {
          stage 'build'
          openshiftBuild(buildConfig: 'ruby-sample-build', showBuildLogs: 'true')
          stage 'deploy'
          openshiftDeploy(deploymentConfig: 'frontend')
        }
Reference to Git Repository
kind: "BuildConfig"
apiVersion: "v1"
metadata:
  name: "sample-pipeline"
spec:
  source:
    git:
      uri: "https://github.com/openshift/ruby-hello-world"
  strategy:
    jenkinsPipelineStrategy:
      jenkinsfilePath: some/repo/dir/filename 1
- 1
- The optional
jenkinsfilePathfield specifies the name of the file to use, relative to the sourcecontextDir. IfcontextDiris omitted, it defaults to the root of the repository. IfjenkinsfilePathis omitted, it defaults to Jenkinsfile.
5.4.3. Using environment variables for pipeline builds
To make environment variables available to the Pipeline build process, you can add environment variables to the jenkinsPipelineStrategy definition of the BuildConfig.
Once defined, the environment variables will be set as parameters for any Jenkins job associated with the BuildConfig
Procedure
To define environment variables to be used during build:
jenkinsPipelineStrategy:
...
  env:
    - name: "FOO"
      value: "BAR"
You can also manage environment variables defined in the BuildConfig with the oc set env command.
5.4.3.1. Mapping Between BuildConfig Environment Variables and Jenkins Job Parameters
When a Jenkins job is created or updated based on changes to a Pipeline strategy BuildConfig, any environment variables in the BuildConfig are mapped to Jenkins job parameters definitions, where the default values for the Jenkins job parameters definitions are the current values of the associated environment variables.
After the Jenkins job’s initial creation, you can still add additional parameters to the job from the Jenkins console. The parameter names differ from the names of the environment variables in the BuildConfig. The parameters are honored when builds are started for those Jenkins jobs.
How you start builds for the Jenkins job dictates how the parameters are set.
-
If you start with
oc start-build, the values of the environment variables in theBuildConfigare the parameters set for the corresponding job instance. Any changes you make to the parameters' default values from the Jenkins console are ignored. TheBuildConfigvalues take precedence. If you start with
oc start-build -e, the values for the environment variables specified in the-eoption take precedence.-
If you specify an environment variable not listed in the
BuildConfig, they will be added as a Jenkins job parameter definitions. -
Any changes you make from the Jenkins console to the parameters corresponding to the environment variables are ignored. The
BuildConfigand what you specify withoc start-build -etakes precedence.
-
If you specify an environment variable not listed in the
- If you start the Jenkins job with the Jenkins console, then you can control the setting of the parameters with the Jenkins console as part of starting a build for the job.
It is recommended that you specify in the BuildConfig all possible environment variables to be associated with job parameters. Doing so reduces disk I/O and improves performance during Jenkins processing.
5.4.4. Pipeline build tutorial
This example demonstrates how to create an OpenShift Pipeline that will build, deploy, and verify a Node.js/MongoDB application using the nodejs-mongodb.json template.
Procedure
Create the Jenkins master:
  $ oc project <project_name> 1
  $ oc new-app jenkins-ephemeral 2
Create a file named nodejs-sample-pipeline.yaml with the following content:
NoteThis creates a
BuildConfigthat employs the Jenkins pipeline strategy to build, deploy, and scale theNode.js/MongoDBexample application.kind: "BuildConfig" apiVersion: "v1" metadata: name: "nodejs-sample-pipeline" spec: strategy: jenkinsPipelineStrategy: jenkinsfile: <pipeline content from below> type: JenkinsPipelineOnce you create a
BuildConfigwith ajenkinsPipelineStrategy, tell the pipeline what to do by using an inlinejenkinsfile:NoteThis example does not set up a Git repository for the application.
The following
jenkinsfilecontent is written in Groovy using the OpenShift DSL. For this example, include inline content in theBuildConfigusing the YAML Literal Style, though including ajenkinsfilein your source repository is the preferred method.def templatePath = 'https://raw.githubusercontent.com/openshift/nodejs-ex/master/openshift/templates/nodejs-mongodb.json' 1 def templateName = 'nodejs-mongodb-example' 2 pipeline { agent { node { label 'nodejs' 3 } } options { timeout(time: 20, unit: 'MINUTES') 4 } stages { stage('preamble') { steps { script { openshift.withCluster() { openshift.withProject() { echo "Using project: ${openshift.project()}" } } } } } stage('cleanup') { steps { script { openshift.withCluster() { openshift.withProject() { openshift.selector("all", [ template : templateName ]).delete() 5 if (openshift.selector("secrets", templateName).exists()) { 6 openshift.selector("secrets", templateName).delete() } } } } } } stage('create') { steps { script { openshift.withCluster() { openshift.withProject() { openshift.newApp(templatePath) 7 } } } } } stage('build') { steps { script { openshift.withCluster() { openshift.withProject() { def builds = openshift.selector("bc", templateName).related('builds') timeout(5) { 8 builds.untilEach(1) { return (it.object().status.phase == "Complete") } } } } } } } stage('deploy') { steps { script { openshift.withCluster() { openshift.withProject() { def rm = openshift.selector("dc", templateName).rollout() timeout(5) { 9 openshift.selector("dc", templateName).related('pods').untilEach(1) { return (it.object().status.phase == "Running") } } } } } } } stage('tag') { steps { script { openshift.withCluster() { openshift.withProject() { openshift.tag("${templateName}:latest", "${templateName}-staging:latest") 10 } } } } } } }
- 1
- Path of the template to use.
- 2
- Name of the template that will be created.
- 3
- Spin up a
node.jsslave pod on which to run this build. - 4
- Set a timeout of 20 minutes for this pipeline.
- 5
- Delete everything with this template label.
- 6
- Delete any secrets with this template label.
- 7
- Create a new application from the
templatePath. - 8
- Wait up to five minutes for the build to complete.
- 9
- Wait up to five minutes for the deployment to complete.
- 10
- If everything else succeeded, tag the
$ {templateName}:latestimage as$ {templateName}-staging:latest. A pipelineBuildConfigfor the staging environment can watch for the$ {templateName}-staging:latestimage to change and then deploy it to the staging environment.
NoteThe previous example was written using the declarative pipeline style, but the older scripted pipeline style is also supported.
Create the Pipeline
BuildConfigin your OpenShift cluster:$ oc create -f nodejs-sample-pipeline.yaml
If you do not want to create your own file, you can use the sample from the Origin repository by running:
$ oc create -f https://raw.githubusercontent.com/openshift/origin/master/examples/jenkins/pipeline/nodejs-sample-pipeline.yaml
Start the Pipeline:
$ oc start-build nodejs-sample-pipeline
NoteAlternatively, you can start your pipeline with the OpenShift Web Console by navigating to the Builds → Pipeline section and clicking Start Pipeline, or by visiting the Jenkins Console, navigating to the Pipeline that you created, and clicking Build Now.
Once the pipeline is started, you should see the following actions performed within your project:
- A job instance is created on the Jenkins server.
- A slave pod is launched, if your pipeline requires one.
The pipeline runs on the slave pod, or the master if no slave is required.
-
Any previously created resources with the
template=nodejs-mongodb-examplelabel will be deleted. -
A new application, and all of its associated resources, will be created from the
nodejs-mongodb-exampletemplate. A build will be started using the
nodejs-mongodb-exampleBuildConfig.- The pipeline will wait until the build has completed to trigger the next stage.
A deployment will be started using the
nodejs-mongodb-exampledeployment configuration.- The pipeline will wait until the deployment has completed to trigger the next stage.
-
If the build and deploy are successful, the
nodejs-mongodb-example:latestimage will be tagged asnodejs-mongodb-example:stage.
-
Any previously created resources with the
The slave pod is deleted, if one was required for the pipeline.
NoteThe best way to visualize the pipeline execution is by viewing it in the OpenShift Web Console. You can view your pipelines by logging in to the web console and navigating to Builds → Pipelines.
5.5. Adding secrets with web console
You can add a secret to your build configuration so that it can access a private repository.
Procedure
To add a secret to your build configuration so that it can access a private repository:
- Create a new OpenShift Container Platform project.
- Create a secret that contains credentials for accessing a private source code repository.
- Create a build configuration.
-
On the build configuration editor page or in the
create app from builder imagepage of the web console, set the Source Secret. - Click the Save button.
5.6. Enabling pulling and pushing
You can enable pulling to a private registry by setting the Pull Secret and pushing by setting the Push Secret in the build configuration.
Procedure
To enable pulling to a private registry:
-
Set the
Pull Secretin the build configuration.
To enable pushing:
-
Set the
Push Secretin the build configuration.
Chapter 6. Custom image builds with Buildah
With OpenShift Container Platform 4.1, a Docker socket will not be present on the host nodes. This means the mount docker socket option of a custom build is not guaranteed to provide an accessible Docker socket for use within a custom build image.
If you require this capability in order to build and push images, add the Buildah tool your custom build image and use it to build and push the image within your custom build logic. The following is an example of how to run custom builds with Buildah.
Using the custom build strategy requires permissions that normal users do not have by default because it allows the user to execute arbitrary code inside a privileged container running on the cluster. This level of access can be used to compromise the cluster and therefore should be granted only to users who are trusted with administrative privileges on the cluster.
Prerequisites
- Review how to grant custom build permissions.
6.1. Creating custom build artifacts
You must create the image you want to use as your custom build image.
Procedure
Starting with an empty directory, create a file named
Dockerfilewith the following content:FROM docker.io/centos:7 RUN yum install -y buildah # For simplicity, /tmp/build contains the inputs we’ll be building when we # run this custom builder image. Normally the custom builder image would # fetch this content from some location at build time. (e.g. via git clone). ADD Dockerfile.sample /tmp/input/Dockerfile ADD build.sh /usr/bin RUN chmod a+x /usr/bin/build.sh # /usr/bin/build.sh contains the actual custom build logic that will be executed when # this custom builder image is executed. ENTRYPOINT ["/usr/bin/build.sh"]
In the same directory, create a file named
Dockerfile.sample. This file will be included in the custom build image and defines the image that will be produced by the custom build:FROM docker.io/centos:7 RUN touch /tmp/built
In the same directory, create a file named
build.sh. This file contains the logic that will be executed when the custom build runs:#!/bin/sh # Note that in this case the build inputs are part of the custom builder image, but normally this # would be retrieved from an external source. cd /tmp/input # OUTPUT_REGISTRY and OUTPUT_IMAGE are env variables provided by the custom # build framework TAG="${OUTPUT_REGISTRY}/${OUTPUT_IMAGE}" # performs the build of the new image defined by Dockerfile.sample buildah --storage-driver vfs bud --isolation chroot -t ${TAG} . # buildah requires a slight modification to the push secret provided by the service # account in order to use it for pushing the image cp /var/run/secrets/openshift.io/push/.dockercfg /tmp (echo "{ \"auths\": " ; cat /var/run/secrets/openshift.io/push/.dockercfg ; echo "}") > /tmp/.dockercfg # push the new image to the target for the build buildah --storage-driver vfs push --tls-verify=false --authfile /tmp/.dockercfg ${TAG}
6.2. Build custom builder image
You can use OpenShift Container Platform to build and push custom builder images to use in a custom strategy.
Prerequisites
- Define all the inputs that will go into creating your new custom builder image.
Procedure
Define a
BuildConfigthat will build your custom builder image:$ oc new-build --binary --strategy=docker --name custom-builder-image
From the directory in which you created your custom build image, run the build:
$ oc start-build custom-builder-image --from-dir . -F
After the build completes, your new custom builder image is available in your project in an imagestreamtag that is named
custom-builder-image:latest.
6.3. Use custom builder image
You can define a BuildConfig that uses the custom strategy in conjunction with your custom builder image to execute your custom build logic.
Prerequisites
- Define all the required inputs for new custom builder image.
- Build your custom builder image.
Procedure
Create a file named
buildconfig.yaml. This file defines theBuildConfigthat is created in your project and executed:kind: BuildConfig apiVersion: v1 metadata: name: sample-custom-build labels: name: sample-custom-build annotations: template.alpha.openshift.io/wait-for-ready: 'true' spec: strategy: type: Custom customStrategy: forcePull: true from: kind: ImageStreamTag name: custom-builder-image:latest namespace: <yourproject> 1 output: to: kind: ImageStreamTag name: sample-custom:latest- 1
- Specify your project name.
Create the BuildConfig:
$ oc create -f buildconfig.yaml
Create a file named
imagestream.yaml. This file defines the imagestream to which the build will push the image:kind: ImageStream apiVersion: v1 metadata: name: sample-custom spec: {}Create the imagestream:
$ oc create -f imagestream.yaml
Run your custom build:
$ oc start-build sample-custom-build -F
When the build runs, it launches a pod running the custom builder image that was built earlier. The pod runs the
build.shlogic that is defined as the entrypoint for the custom builder image. Thebuild.shlogic invokes Buildah to build theDockerfile.samplethat was embedded in the custom builder image, and then uses Buildah to push the new image to thesample-custom imagestream.
Chapter 7. Performing basic builds
The following sections provide instructions for basic build operations including starting and canceling builds, deleting BuildConfigs, viewing build details, and accessing build logs.
7.1. Starting a build
You can manually start a new build from an existing build configuration in your current project.
Procedure
To manually start a build, run:
$ oc start-build <buildconfig_name>
7.1.1. Re-running a build
You can manually re-run a build using the --from-build flag.
Procedure
To manually re-run a build, run:
$ oc start-build --from-build=<build_name>
7.1.2. Streaming build logs
You can specify the --follow flag to stream the build’s logs in stdout.
Procedure
To manually stream a build’s logs in stdout, run:
$ oc start-build <buildconfig_name> --follow
7.1.3. Setting environment variables when starting a build
You can specify the --env flag to set any desired environment variable for the build.
Procedure
To specify a desired environment variable, run:
$ oc start-build <buildconfig_name> --env=<key>=<value>
7.1.4. Starting a build with source
Rather than relying on a Git source pull or a Dockerfile for a build, you can can also start a build by directly pushing your source, which could be the contents of a Git or SVN working directory, a set of prebuilt binary artifacts you want to deploy, or a single file. This can be done by specifying one of the following options for the start-build command:
| Option | Description |
|---|---|
|
| Specifies a directory that will be archived and used as a binary input for the build. |
|
| Specifies a single file that will be the only file in the build source. The file is placed in the root of an empty directory with the same file name as the original file provided. |
|
|
Specifies a path to a local repository to use as the binary input for a build. Add the |
When passing any of these options directly to the build, the contents are streamed to the build and override the current build source settings.
Builds triggered from binary input will not preserve the source on the server, so rebuilds triggered by base image changes will use the source specified in the build configuration.
Procedure
For example, the following command sends the contents of a local Git repository as an archive from the tag v2 and starts a build:
$ oc start-build hello-world --from-repo=../hello-world --commit=v2
7.2. Canceling a build
You can cancel a build using the web console, or with the following CLI command.
Procedure
To manually cancel a build, run:
$ oc cancel-build <build_name>
7.2.1. Canceling multiple builds
You can cancel multiple builds with the following CLI command.
Procedure
To manually cancel multiple builds, run:
$ oc cancel-build <build1_name> <build2_name> <build3_name>
7.2.2. Canceling all builds
You can cancel all builds from the build configuration with the following CLI command.
Procedure
To cancel all builds, run:
$ oc cancel-build bc/<buildconfig_name>
7.2.3. Canceling all builds in a given state
You can cancel all builds in a given state (for example, new or pending), ignoring the builds in other states.
Procedure
To cancel all in a given state, run:
$ oc cancel-build bc/<buildconfig_name>
7.3. Deleting a BuildConfig
You can delete a BuildConfig using the following command.
Procedure
To delete a BuildConfig, run:
$ oc delete bc <BuildConfigName>
This also deletes all builds that were instantiated from this BuildConfig. Specify the --cascade=false flag if you do not want to delete the builds:
$ oc delete --cascade=false bc <BuildConfigName>
7.4. Viewing build details
You can view build details with the web console or by using the oc describe CLI command.
This displays information such as:
- The build source
- The build strategy
- The output destination
- Digest of the image in the destination registry
- How the build was created
If the build uses the Docker or Source strategy, the oc describe output also includes information about the source revision used for the build, including the commit ID, author, committer, and message.
Procedure
To view build details, run:
$ oc describe build <build_name>
7.5. Accessing build logs
You can access build logs using the web console or the CLI.
Procedure
To stream the logs using the build directly, run:
$ oc describe build <build_name>
7.5.1. Accessing BuildConfig logs
You can access BuildConfig logs using the web console or the CLI.
Procedure
To stream the logs of the latest build for a BuildConfig, run:
$ oc logs -f bc/<buildconfig_name>
7.5.2. Accessing BuildConfig logs for a given version build
You can access logs for a given version build for a BuildConfig using the web console or the CLI.
Procedure
To stream the logs for a given version build for a BuildConfig, run:
$ oc logs --version=<number> bc/<buildconfig_name>
7.5.3. Enabling log verbosity
You can enable a more verbose output by passing the BUILD_LOGLEVEL environment variable as part of the sourceStrategy or dockerStrategy in a BuildConfig.
An administrator can set the default build verbosity for the entire OpenShift Container Platform instance by configuring env/BUILD_LOGLEVEL. This default can be overridden by specifying BUILD_LOGLEVEL in a given BuildConfig. You can specify a higher priority override on the command line for non-binary builds by passing --build-loglevel to oc start-build.
Available log levels for Source builds are as follows:
| Level 0 | Produces output from containers running the assemble script and all encountered errors. This is the default. |
| Level 1 | Produces basic information about the executed process. |
| Level 2 | Produces very detailed information about the executed process. |
| Level 3 | Produces very detailed information about the executed process, and a listing of the archive contents. |
| Level 4 | Currently produces the same information as level 3. |
| Level 5 | Produces everything mentioned on previous levels and additionally provides docker push messages. |
Procedure
To enable more verbose output, pass the BUILD_LOGLEVEL environment variable as part of the sourceStrategy or dockerStrategy in a BuildConfig:
sourceStrategy:
...
  env:
    - name: "BUILD_LOGLEVEL"
value: "2" 1- 1
- Adjust this value to the desired log level.
Chapter 8. Triggering and modifying builds
The following sections outline how to trigger builds and modify builds using build hooks.
8.1. Build triggers
When defining a BuildConfig, you can define triggers to control the circumstances in which the BuildConfig should be run. The following build triggers are available:
- Webhook
- Image change
- Configuration change
8.1.1. Webhook triggers
Webhook triggers allow you to trigger a new build by sending a request to the OpenShift Container Platform API endpoint. You can define these triggers using GitHub, GitLab, Bitbucket, or Generic webhooks.
Currently, OpenShift Container Platform webhooks only support the analogous versions of the push event for each of the Git-based source code management systems (SCMs). All other event types are ignored.
When the push events are processed, the OpenShift Container Platform master host confirms if the branch reference inside the event matches the branch reference in the corresponding BuildConfig. If so, it then checks out the exact commit reference noted in the webhook event on the OpenShift Container Platform build. If they do not match, no build is triggered.
oc new-app and oc new-build will create GitHub and Generic webhook triggers automatically, but any other needed webhook triggers must be added manually (see Setting Triggers).
For all webhooks, you must define a Secret with a key named WebHookSecretKey and the value being the value to be supplied when invoking the webhook. The webhook definition must then reference the secret. The secret ensures the uniqueness of the URL, preventing others from triggering the build. The value of the key will be compared to the secret provided during the webhook invocation.
For example here is a GitHub webhook with a reference to a secret named mysecret:
type: "GitHub"
github:
  secretReference:
    name: "mysecret"
The secret is then defined as follows. Note that the value of the secret is base64 encoded as is required for any data field of a Secret object.
- kind: Secret
  apiVersion: v1
  metadata:
    name: mysecret
    creationTimestamp:
  data:
WebHookSecretKey: c2VjcmV0dmFsdWUx8.1.1.1. Using GitHub webhooks
GitHub webhooks handle the call made by GitHub when a repository is updated. When defining the trigger, you must specify a secret, which will be part of the URL you supply to GitHub when configuring the webhook.
Example GitHub webhook definition:
type: "GitHub"
github:
  secretReference:
    name: "mysecret"
The secret used in the webhook trigger configuration is not the same as secret field you encounter when configuring webhook in GitHub UI. The former is to make the webhook URL unique and hard to predict, the latter is an optional string field used to create HMAC hex digest of the body, which is sent as an X-Hub-Signatureheader.
The payload URL is returned as the GitHub Webhook URL by the oc describe command (see Displaying Webhook URLs), and is structured as follows:
http://<openshift_api_host:port>/oapi/v1/namespaces/<namespace>/buildconfigs/<name>/webhooks/<secret>/github
Prerequisites
-
Create a
BuildConfigfrom a GitHub repository.
Procedure
To configure a GitHub Webhook:
After creating a
BuildConfigfrom a GitHub repository, run:$ oc describe bc/<name-of-your-BuildConfig>
This generates a webhook GitHub URL that looks like:
<https://api.starter-us-east-1.openshift.com:443/oapi/v1/namespaces/nsname/buildconfigs/bcname/webhooks/<secret>/github>.
- Cut and paste this URL into GitHub, from the GitHub web console.
- In your GitHub repository, select Add Webhook from Settings → Webhooks & Services.
- Paste the URL output (similar to above) into the Payload URL field.
-
Change the Content Type from GitHub’s default
application/x-www-form-urlencodedtoapplication/json. Click Add webhook.
You should see a message from GitHub stating that your webhook was successfully configured.
Now, whenever you push a change to your GitHub repository, a new build will automatically start, and upon a successful build a new deployment will start.
NoteGogs supports the same webhook payload format as GitHub. Therefore, if you are using a Gogs server, you can define a GitHub webhook trigger on your
BuildConfigand trigger it by your Gogs server as well.
Given a file containing a valid JSON payload, such as
payload.json, you can manually trigger the webhook withcurl:$ curl -H "X-GitHub-Event: push" -H "Content-Type: application/json" -k -X POST --data-binary @payload.json https://<openshift_api_host:port>/oapi/v1/namespaces/<namespace>/buildconfigs/<name>/webhooks/<secret>/github
The
-kargument is only necessary if your API server does not have a properly signed certificate.
8.1.1.2. Using GitLab webhooks
GitLab webhooks handle the call made by GitLab when a repository is updated. As with the GitHub triggers, you must specify a secret. The following example is a trigger definition YAML within the BuildConfig:
type: "GitLab"
gitlab:
  secretReference:
    name: "mysecret"
The payload URL is returned as the GitLab Webhook URL by the oc describe command (see Displaying Webhook URLs), and is structured as follows:
http://<openshift_api_host:port>/oapi/v1/namespaces/<namespace>/buildconfigs/<name>/webhooks/<secret>/gitlab
Procedure
To configure a GitLab Webhook:
Describe the
BuildConfigto get the webhook URL:$ oc describe bc <name>
-
Copy the webhook URL, replacing
<secret>with your secret value. - Follow the GitLab setup instructions to paste the webhook URL into your GitLab repository settings.
Given a file containing a valid JSON payload, such as
payload.json, you can manually trigger the webhook withcurl:$ curl -H "X-GitLab-Event: Push Hook" -H "Content-Type: application/json" -k -X POST --data-binary @payload.json https://<openshift_api_host:port>/oapi/v1/namespaces/<namespace>/buildconfigs/<name>/webhooks/<secret>/gitlab
The
-kargument is only necessary if your API server does not have a properly signed certificate.
Additional resources
8.1.1.3. Using Bitbucket webhooks
Bitbucket webhooks handle the call made by Bitbucket when a repository is updated. Similar to the previous triggers, you must specify a secret. The following example is a trigger definition YAML within the BuildConfig:
type: "Bitbucket"
bitbucket:
  secretReference:
    name: "mysecret"
The payload URL is returned as the Bitbucket Webhook URL by the oc describe command (see Displaying Webhook URLs), and is structured as follows:
http://<openshift_api_host:port>/oapi/v1/namespaces/<namespace>/buildconfigs/<name>/webhooks/<secret>/bitbucket
Procedure
To configure a Bitbucket Webhook:
Describe the 'BuildConfig' to get the webhook URL:
$ oc describe bc <name>
-
Copy the webhook URL, replacing
<secret>with your secret value. - Follow the Bitbucket setup instructions to paste the webhook URL into your Bitbucket repository settings.
Given a file containing a valid JSON payload, such as
payload.json, you can manually trigger the webhook withcurl:$ curl -H "X-Event-Key: repo:push" -H "Content-Type: application/json" -k -X POST --data-binary @payload.json https://<openshift_api_host:port>/oapi/v1/namespaces/<namespace>/buildconfigs/<name>/webhooks/<secret>/bitbucket
The
-kargument is only necessary if your API server does not have a properly signed certificate.
Additional resources
8.1.1.4. Using generic webhooks
Generic webhooks are invoked from any system capable of making a web request. As with the other webhooks, you must specify a secret, which will be part of the URL that the caller must use to trigger the build. The secret ensures the uniqueness of the URL, preventing others from triggering the build. The following is an example trigger definition YAML within the BuildConfig:
type: "Generic"
generic:
  secretReference:
    name: "mysecret"
allowEnv: true 1- 1
- Set to
trueto allow a generic webhook to pass in environment variables.
Procedure
To set up the caller, supply the calling system with the URL of the generic webhook endpoint for your build:
http://<openshift_api_host:port>/oapi/v1/namespaces/<namespace>/buildconfigs/<name>/webhooks/<secret>/generic
The caller must invoke the webhook as a
POSToperation.To invoke the webhook manually you can use
curl:$ curl -X POST -k https://<openshift_api_host:port>/oapi/v1/namespaces/<namespace>/buildconfigs/<name>/webhooks/<secret>/generic
The HTTP verb must be set to
POST. The insecure-kflag is specified to ignore certificate validation. This second flag is not necessary if your cluster has properly signed certificates.The endpoint can accept an optional payload with the following format:
git: uri: "<url to git repository>" ref: "<optional git reference>" commit: "<commit hash identifying a specific git commit>" author: name: "<author name>" email: "<author e-mail>" committer: name: "<committer name>" email: "<committer e-mail>" message: "<commit message>" env: 1 - name: "<variable name>" value: "<variable value>"- 1
- Similar to the
BuildConfigenvironment variables, the environment variables defined here are made available to your build. If these variables collide with theBuildConfigenvironment variables, these variables take precedence. By default, environment variables passed by webhook are ignored. Set theallowEnvfield totrueon the webhook definition to enable this behavior.
To pass this payload using
curl, define it in a file named payload_file.yaml and run:$ curl -H "Content-Type: application/yaml" --data-binary @payload_file.yaml -X POST -k https://<openshift_api_host:port>/oapi/v1/namespaces/<namespace>/buildconfigs/<name>/webhooks/<secret>/generic
The arguments are the same as the previous example with the addition of a header and a payload. The
-Hargument sets theContent-Typeheader toapplication/yamlorapplication/jsondepending on your payload format. The--data-binaryargument is used to send a binary payload with newlines intact with thePOSTrequest.
OpenShift Container Platform permits builds to be triggered by the generic webhook even if an invalid request payload is presented (for example, invalid content type, unparsable or invalid content, and so on). This behavior is maintained for backwards compatibility. If an invalid request payload is presented, OpenShift Container Platform returns a warning in JSON format as part of its HTTP 200 OK response.
8.1.1.5. Displaying webhook URLs
You can use the following command to display webhook URLs associated with a BuildConfig. If the command does not display any webhook URLs, then no webhook trigger is defined for that build configuration. See Setting Triggers to manually add triggers.
Procedure
-
To display any webhook URLs associated with a
BuildConfig
$ oc describe bc <name>
8.1.2. Using image change triggers
Image change triggers allow your build to be automatically invoked when a new version of an upstream image is available. For example, if a build is based on top of a RHEL image, then you can trigger that build to run any time the RHEL image changes. As a result, the application image is always running on the latest RHEL base image.
Imagestreams that point to container images in v1 container registries only trigger a build once when the imagestreamtag becomes available and not on subsequent image updates. This is due to the lack of uniquely identifiable images in v1 container registries.
Procedure
Configuring an image change trigger requires the following actions:
Define an
ImageStreamthat points to the upstream image you want to trigger on:kind: "ImageStream" apiVersion: "v1" metadata: name: "ruby-20-centos7"
This defines the imagestream that is tied to a container image repository located at <system-registry>/<namespace>/ruby-20-centos7. The <system-registry> is defined as a service with the name
docker-registryrunning in OpenShift Container Platform.If an imagestream is the base image for the build, set the from field in the build strategy to point to the imagestream:
strategy:
  sourceStrategy:
    from:
      kind: "ImageStreamTag"
      name: "ruby-20-centos7:latest"
In this case, the
sourceStrategydefinition is consuming thelatesttag of the imagestream namedruby-20-centos7located within this namespace.Define a build with one or more triggers that point to imagestreams:
type: "imageChange" 1
imageChange: {}
type: "imageChange" 2
imageChange:
  from:
    kind: "ImageStreamTag"
    name: "custom-image:latest"
- 1
- An image change trigger that monitors the
ImageStreamandTagas defined by the build strategy’sfromfield. TheimageChangeobject here must be empty. - 2
- An image change trigger that monitors an arbitrary imagestream. The
imageChangepart in this case must include afromfield that references theImageStreamTagto monitor.
When using an image change trigger for the strategy imagestream, the generated build is supplied with an immutable Docker tag that points to the latest image corresponding to that tag. This new image reference will be used by the strategy when it executes for the build.
For other image change triggers that do not reference the strategy imagestream, a new build will be started, but the build strategy will not be updated with a unique image reference.
Since this example has an image change trigger for the strategy, the resulting build will be:
strategy:
  sourceStrategy:
    from:
      kind: "DockerImage"
      name: "172.30.17.3:5001/mynamespace/ruby-20-centos7:<immutableid>"
This ensures that the triggered build uses the new image that was just pushed to the repository, and the build can be re-run any time with the same inputs.
You can pause an image change trigger to allow multiple changes on the referenced imagestream before a build is started. You can also set the paused attribute to true when initially adding an ImageChangeTrigger to a BuildConfig to prevent a build from being immediately triggered.
type: "ImageChange"
imageChange:
  from:
    kind: "ImageStreamTag"
    name: "custom-image:latest"
  paused: true
In addition to setting the image field for all Strategy types, for custom builds, the OPENSHIFT_CUSTOM_BUILD_BASE_IMAGE environment variable is checked. If it does not exist, then it is created with the immutable image reference. If it does exist then it is updated with the immutable image reference.
If a build is triggered due to a webhook trigger or manual request, the build that is created uses the <immutableid> resolved from the ImageStream referenced by the Strategy. This ensures that builds are performed using consistent image tags for ease of reproduction.
Additional resources
8.1.3. Configuration change triggers
A configuration change trigger allows a build to be automatically invoked as soon as a new BuildConfig is created.
The following is an example trigger definition YAML within the BuildConfig:
type: "ConfigChange"
Configuration change triggers currently only work when creating a new BuildConfig. In a future release, configuration change triggers will also be able to launch a build whenever a BuildConfig is updated.
8.1.3.1. Setting triggers manually
Triggers can be added to and removed from build configurations with oc set triggers.
Procedure
To set a GitHub webhook trigger on a build configuration, use:
$ oc set triggers bc <name> --from-github
To set an imagechange trigger, use
$ oc set triggers bc <name> --from-image='<image>'
To remove a trigger, add
--remove:$ oc set triggers bc <name> --from-bitbucket --remove
When a webhook trigger already exists, adding it again regenerates the webhook secret.
For more information, consult the help documentation with oc set triggers --help
8.2. Build hooks
Build hooks allow behavior to be injected into the build process.
The postCommit field of a BuildConfig object executes commands inside a temporary container that is running the build output image. The hook is executed immediately after the last layer of the image has been committed and before the image is pushed to a registry.
The current working directory is set to the image’s WORKDIR, which is the default working directory of the container image. For most images, this is where the source code is located.
The hook fails if the script or command returns a non-zero exit code or if starting the temporary container fails. When the hook fails it marks the build as failed and the image is not pushed to a registry. The reason for failing can be inspected by looking at the build logs.
Build hooks can be used to run unit tests to verify the image before the build is marked complete and the image is made available in a registry. If all tests pass and the test runner returns with exit code 0, the build is marked successful. In case of any test failure, the build is marked as failed. In all cases, the build log will contain the output of the test runner, which can be used to identify failed tests.
The postCommit hook is not only limited to running tests, but can be used for other commands as well. Since it runs in a temporary container, changes made by the hook do not persist, meaning that the hook execution cannot affect the final image. This behavior allows for, among other uses, the installation and usage of test dependencies that are automatically discarded and will be not present in the final image.
8.2.1. Configuring post commit build hooks
There are different ways to configure the post build hook. All forms in the following examples are equivalent and execute bundle exec rake test --verbose.
Procedure
Shell script:
postCommit:
  script: "bundle exec rake test --verbose"
The
scriptvalue is a shell script to be run with/bin/sh -ic. Use this when a shell script is appropriate to execute the build hook. For example, for running unit tests as above. To control the image entry point, or if the image does not have/bin/sh, usecommandand/orargs.NoteThe additional
-iflag was introduced to improve the experience working with CentOS and RHEL images, and may be removed in a future release.Command as the image entry point:
postCommit:
  command: ["/bin/bash", "-c", "bundle exec rake test --verbose"]
In this form,
commandis the command to run, which overrides the image entry point in the exec form, as documented in the Dockerfile reference. This is needed if the image does not have/bin/sh, or if you do not want to use a shell. In all other cases, usingscriptmight be more convenient.Command with arguments:
postCommit:
  command: ["bundle", "exec", "rake", "test"]
  args: ["--verbose"]
This form is equivalent to appending the arguments to
command.
Providing both script and command simultaneously creates an invalid build hook.
8.2.2. Using the CLI to set post commit build hooks
The oc set build-hook command can be used to set the build hook for a build configuration.
Procedure
To set a command as the post-commit build hook:
$ oc set build-hook bc/mybc \
    --post-commit \
    --command \
    -- bundle exec rake test --verbose
To set a script as the post-commit build hook:
$ oc set build-hook bc/mybc --post-commit --script="bundle exec rake test --verbose"
Chapter 9. Performing advanced builds
The following sections provide instructions for advanced build operations including setting build resources and maximum duration, assigning builds to nodes, chaining builds, build pruning, and build run policies.
9.1. Setting build resources
By default, builds are completed by pods using unbound resources, such as memory and CPU. These resources can be limited.
Procedure
- Limit resources by specifying resource limits in a project’s default container limits.
Or limit resource use by specifying resource limits as part of the build configuration. In the following example, each of the
resources,cpu, andmemoryparameters are optional:apiVersion: "v1" kind: "BuildConfig" metadata: name: "sample-build" spec: resources: limits: cpu: "100m" 1 memory: "256Mi" 2However, if a quota has been defined for your project, one of the following two items is required:
A
resourcessection set with an explicitrequests:resources: requests: 1 cpu: "100m" memory: "256Mi"- 1
- The
requestsobject contains the list of resources that correspond to the list of resources in the quota.
A limit range defined in your project, where the defaults from the
LimitRangeobject apply to pods created during the build process.Otherwise, build pod creation will fail, citing a failure to satisfy quota.
9.2. Setting maximum duration
When defining a BuildConfig, you can define its maximum duration by setting the completionDeadlineSeconds field. It is specified in seconds and is not set by default. When not set, there is no maximum duration enforced.
The maximum duration is counted from the time when a build pod gets scheduled in the system, and defines how long it can be active, including the time needed to pull the builder image. After reaching the specified timeout, the build is terminated by OpenShift Container Platform.
Procedure
-
To set maximum duration, specify
completionDeadlineSecondsin yourBuildConfig. The following example shows the part of aBuildConfigspecifyingcompletionDeadlineSecondsfield for 30 minutes: *
spec:
  completionDeadlineSeconds: 1800
This setting is not supported with the Pipeline Strategy option.
9.3. Assigning builds to specific nodes
Builds can be targeted to run on specific nodes by specifying labels in the nodeSelector field of a build configuration. The nodeSelector value is a set of key/value pairs that are matched to node labels when scheduling the build pod.
The nodeSelector value can also be controlled by cluster-wide default and override values. Defaults will only be applied if the build configuration does not define any key/value pairs for the nodeSelector and also does not define an explicitly empty map value of nodeSelector:{}. Override values will replace values in the build configuration on a key by key basis.
If the specified NodeSelector cannot be matched to a node with those labels, the build still stay in the Pending state indefinitely.
Procedure
Assign builds to run on specific nodes by assigning labels in the
nodeSelectorfield of theBuildConfig, for example:apiVersion: "v1" kind: "BuildConfig" metadata: name: "sample-build" spec: nodeSelector:1 key1: value1 key2: value2- 1
- Builds associated with this build configuration will run only on nodes with the
key1=value2andkey2=value2labels.
9.4. Chained builds
For compiled languages (such as Go, C, C++, and Java), including the dependencies necessary for compilation in the application image might increase the size of the image or introduce vulnerabilities that can be exploited.
To avoid these problems, two builds can be chained together: one that produces the compiled artifact, and a second build that places that artifact in a separate image that runs the artifact.
In the following example, a Source-to-Image build is combined with a Docker build to compile an artifact that is then placed in a separate runtime image.
Although this example chains a Source-to-Image build and a Docker build, the first build can use any strategy that will produce an image containing the desired artifacts, and the second build can use any strategy that can consume input content from an image.
The first build takes the application source and produces an image containing a WAR file. The image is pushed to the artifact-image imagestream. The path of the output artifact will depend on the assemble script of the Source-to-Image builder used. In this case, it will be output to /wildfly/standalone/deployments/ROOT.war.
apiVersion: v1
kind: BuildConfig
metadata:
  name: artifact-build
spec:
  output:
    to:
      kind: ImageStreamTag
      name: artifact-image:latest
  source:
    git:
      uri: https://github.com/openshift/openshift-jee-sample.git
  strategy:
    sourceStrategy:
      from:
        kind: ImageStreamTag
        name: wildfly:10.1
        namespace: openshift
The second build uses Image Source with a path to the WAR file inside the output image from the first build. An inline Dockerfile copies that WAR file into a runtime image.
apiVersion: v1
kind: BuildConfig
metadata:
  name: image-build
spec:
  output:
    to:
      kind: ImageStreamTag
      name: image-build:latest
  source:
    dockerfile: |-
      FROM jee-runtime:latest
      COPY ROOT.war /deployments/ROOT.war
    images:
    - from: 1
        kind: ImageStreamTag
        name: artifact-image:latest
      paths: 2
      - sourcePath: /wildfly/standalone/deployments/ROOT.war
        destinationDir: "."
  strategy:
    dockerStrategy:
      from: 3
        kind: ImageStreamTag
        name: jee-runtime:latest
  triggers:
  - imageChange: {}
type: ImageChange- 1
fromspecifies that the Docker build should include the output of the image from theartifact-imageimagestream, which was the target of the previous build.- 2
pathsspecifies which paths from the target image to include in the current Docker build.- 3
- The runtime image is used as the source image for the Docker build.
The result of this setup is that the output image of the second build does not have to contain any of the build tools that are needed to create the WAR file. Also, because the second build contains an image change trigger, whenever the first build is run and produces a new image with the binary artifact, the second build is automatically triggered to produce a runtime image that contains that artifact. Therefore, both builds behave as a single build with two stages.
9.5. Pruning builds
By default, builds that have completed their lifecycle are persisted indefinitely. You can limit the number of previous builds that are retained.
Procedure
Limit the number of previous builds that are retained by supplying a positive integer value for
successfulBuildsHistoryLimitorfailedBuildsHistoryLimitin yourBuildConfig, for example:apiVersion: "v1" kind: "BuildConfig" metadata: name: "sample-build" spec: successfulBuildsHistoryLimit: 2 1 failedBuildsHistoryLimit: 2 2
Trigger build pruning by one of the following actions:
- Updating a build configuration.
- Waiting for a build to complete its lifecycle.
Builds are sorted by their creation timestamp with the oldest builds being pruned first.
Administrators can manually prune builds using the 'oc adm' object pruning command.
9.6. Build run policy
The build run policy describes the order in which the builds created from the build configuration should run. This can be done by changing the value of the runPolicy field in the spec section of the Build specification.
It is also possible to change the runPolicy value for existing build configurations.
-
Changing
ParalleltoSerialorSerialLatestOnlyand triggering a new build from this configuration will cause the new build to wait until all parallel builds complete as the serial build can only run alone. -
Changing
SerialtoSerialLatestOnlyand triggering a new build will cause cancellation of all existing builds in queue, except the currently running build and the most recently created build. The newest build will execute next.
Chapter 10. Using Red Hat subscriptions in builds
Use the following sections to run entitled builds on OpenShift Container Platform.
10.1. Creating an ImageStreamTag to the Red Hat Universal Base Image
To use Red Hat subscriptions within a build, you should create an ImageStream to reference the universal base image (UBI).
Builds that reference the UBI directly from registry.redhat.io will require a pull secret.
Prerequisites
- You must create a pull secret for registry.redhat.io, and link it to a user project.
Procedure
To create an
imagestreamtagin a single project:$ oc tag --source=docker registry.redhat.io/ubi7/ubi:latest ubi:latest
To create an
imagestreamtagin the OpenShift Container Platform namespace, making it available to developers in all projects:$ oc tag --source=docker registry.redhat.io/ubi7/ubi:latest ubi:latest -n openshift
10.2. Adding subscription entitlements as a build secret
Builds that use Red Hat subscriptions to install content must include the entitlement keys as a build secret.
Prerequisites
You must have access to Red Hat entitlements through your subscription, and the entitlements must have separate public and private key files.
Procedure
Create a secret containing your entitlements, ensuring that there are separate files containing the public and private keys:
$  oc create secret generic etc-pki-entitlement --from-file /path/to/entitlement/{ID}.pem \
> --from-file /path/to/entitlement/{ID}-key.pem ...
Add the secret as a build input in the build configuration:
source:
  secrets:
  - secret:
      name: etc-pki-entitlement
    destinationDir: etc-pki-entitlement
There are two paths to pulling in the base RHEL image:
- Add the pull secret to registry.redhat.io to your project.
- Create an imagestream in the OpenShift namespace for the RHEL-based image. This makes the imagestream available across the cluster.
10.3. Running builds with Subscription Manager
10.3.1. Adding Subscription Manager configurations to builds
Builds that use the Subscription Manager to install content must provide appropriate configuration files and certificate authorities for subscribed repositories.
Prerequisites
You must have access to the Subscription Manager’s configuration and certificate authority files.
Procedure
Create a ConfigMap for the Subscription Manager configuration:
$ oc create configmap rhsm-conf --from-file /path/to/rhsm/rhsm.conf
Create a ConfigMap for the certificate authority:
$ oc create configmap rhsm-ca --from-file /path/to/rhsm/ca/redhat-uep.pem
Add the Subscription Manager configuration and certificate authority to the BuildConfig:
source:
    configMaps:
    - configMap:
        name: rhsm-conf
      destinationDir: rhsm-conf
    - configMap:
        name: rhsm-ca
      destinationDir: rhsm-ca
10.3.2. Docker builds using Subscription Manager
Docker strategy builds can use the Subscription Manager to install subscription content.
Prerequisites
The entitlement keys, subscription manager configuration, and subscription manager certificate authority must be added as build inputs.
Procedure
Use the following as an example Dockerfile to install content with the Subscription Manager:
FROM registry.redhat.io/rhel7:latest
USER root
# Copy entitlements
COPY ./etc-pki-entitlement /etc/pki/entitlement
# Copy subscription manager configurations
COPY ./rhsm-conf /etc/rhsm
COPY ./rhsm-ca /etc/rhsm/ca
# Delete /etc/rhsm-host to use entitlements from the build container
RUN rm /etc/rhsm-host && \
    # Initialize /etc/yum.repos.d/redhat.repo
    # See https://access.redhat.com/solutions/1443553
    yum repolist --disablerepo=* && \
    subscription-manager repos --enable <enabled-repo> && \
    yum -y update && \
    yum -y install <rpms> && \
    # Remove entitlements and Subscription Manager configs
    rm -rf /etc/pki/entitlement && \
    rm -rf /etc/rhsm
# OpenShift requires images to run as non-root by default
USER 1001
ENTRYPOINT ["/bin/bash"]
10.4. Running builds with Satellite subscriptions
10.4.1. Adding Satellite configurations to builds
Builds which use Satellite to install content must provide appropriate configurations to obtain content from Satellite repositories.
Prerequisites
You must provide or create a yum-compatible repository configuration file, that downloads content from your Satellite instance.
Procedure
Create a ConfigMap containing the Satellite repository configuration file:
$ oc create configmap yum-repos-d --from-file /path/to/satellite.repo
Add the Satellite repository configuration to the BuildConfig:
source:
    configMaps:
    - configMap:
        name: yum-repos-d
      destinationDir: yum.repos.d
10.4.2. Docker builds using Satellite subscriptions
Docker strategy builds can use Satellite repositories to install subscription content.
Prerequisites
The entitlement keys and Satellite repository configurations must be added as build inputs.
Procedure
Use the following as an example Dockerfile to install content with Satellite:
FROM registry.redhat.io/rhel7:latest
USER root
# Copy entitlements
COPY ./etc-pki-entitlement /etc/pki/entitlement
# Copy repository configuration
COPY ./yum.repos.d /etc/yum.repos.d
# Delete /etc/rhsm-host to use entitlements from the build container
RUN rm /etc/rhsm-host && \
    # yum repository info provided by Satellite
    yum -y update && \
    yum -y install <rpms> && \
    # Remove entitlements
    rm -rf /etc/pki/entitlement
# OpenShift requires images to run as non-root by default
USER 1001
ENTRYPOINT ["/bin/bash"]
10.5. Squash layers with docker builds
Docker builds normally create a layer representing each instruction in a Dockerfile. Setting the imageOptimizationPolicy to SkipLayers will merge all instructions into a single layer on top of the base image.
Procedure
-
Set the
imageOptimizationPolicytoSkipLayers:
strategy:
  dockerStrategy:
imageOptimizationPolicy: SkipLayers 1- 1
- Layers are always squashed in OpenShift Container Platform 4.1.
10.6. Additional resources
- See Managing imagestreams for more information.
Chapter 11. Securing builds by strategy
Builds in OpenShift Container Platform are run in privileged containers. Depending on the build strategy used, this allows a user who can run builds to escalate their permissions on the cluster and host nodes. As a security measure, limit who can run builds and the strategy that is used for those builds. Custom builds are inherently less safe than Source builds, because they can execute any code within a privileged container, and are disabled by default. Grant Docker build permissions with caution, because a vulnerability in the Dockerfile processing logic could result in a privileges being granted on the host node.
By default, all users that can create builds are granted permission to use the Docker and Source-to-Image (S2I) build strategies. Users with cluster-admin privileges can enable the Custom build strategy, as referenced in the restricting build strategies to a user globally section.
You can control who can build and which build strategies they can use by using an authorization policy. Each build strategy has a corresponding build subresource. A user must have permission to create a build and permission to create on the build strategy subresource in order to create builds using that strategy. Default roles are provided which grant the create permission on the build strategy subresource.
Table 11.1. Build Strategy Subresources and Roles
| Strategy | Subresource | Role |
|---|---|---|
| Docker | builds/docker | system:build-strategy-docker |
| Source-to-Image | builds/source | system:build-strategy-source |
| Custom | builds/custom | system:build-strategy-custom |
| JenkinsPipeline | builds/jenkinspipeline | system:build-strategy-jenkinspipeline |
11.1. Disabling access to a build strategy globally
To prevent access to a particular build strategy globally, log in as a user with cluster-admin privileges, remove the corresponding role from the system:authenticated group, and apply the annotation rbac.authorization.kubernetes.io/autoupdate: "false" to protect them from changes between the API restarts. The following example shows disabling the docker build strategy.
Procedure
Apply the
rbac.authorization.kubernetes.io/autoupdateannotation:$ oc edit clusterrolebinding system:build-strategy-docker-binding apiVersion: v1 groupNames: - system:authenticated kind: ClusterRoleBinding metadata: annotations: rbac.authorization.kubernetes.io/autoupdate: "false" 1 creationTimestamp: 2018-08-10T01:24:14Z name: system:build-strategy-docker-binding resourceVersion: "225" selfLink: /oapi/v1/clusterrolebindings/system%3Abuild-strategy-docker-binding uid: 17b1f3d4-9c3c-11e8-be62-0800277d20bf roleRef: name: system:build-strategy-docker subjects: - kind: SystemGroup name: system:authenticated userNames: - system:serviceaccount:management-infra:management-admin- 1
- Change the
rbac.authorization.kubernetes.io/autoupdateannotation’s value to"false".
Remove the role:
$ oc adm policy remove-cluster-role-from-group system:build-strategy-docker system:authenticated
Ensure the build strategy subresources are also removed from these roles:
$ oc edit clusterrole admin
$ oc edit clusterrole edit
For each role, remove the line that corresponds to the resource of the strategy to disable.
Disable the Docker Build Strategy for admin:
kind: ClusterRole metadata: name: admin ... rules: - resources: - builds/custom - builds/docker 1 - builds/source ... ...- 1
- Delete this line to disable Docker builds globally for users with the admin role.
11.2. Restricting build strategies to users globally
You can allow a set of specific users to create builds with a particular strategy.
Prerequisites
- Disable global access to the build strategy.
Procedure
Assign the role that corresponds to the build strategy to a specific user. For example, to add the system:build-strategy-docker cluster role to the user devuser:
$ oc adm policy add-cluster-role-to-user system:build-strategy-docker devuser
WarningGranting a user access at the cluster level to the builds/docker subresource means that the user can create builds with the Docker strategy in any project in which they can create builds.
11.3. Restricting build strategies to a user within a project
Similar to granting the build strategy role to a user globally, you can allow only a set of specific users within a project to create builds with a particular strategy.
Prerequisites
- Disable global access to the build strategy.
Procedure
Assign the role that corresponds to the build strategy to a specific user within a project. For example, to add the system:build-strategy-docker role within the project devproject to the user devuser:
$ oc adm policy add-role-to-user system:build-strategy-docker devuser -n devproject
Chapter 12. Build configuration resources
Use the following procedure to configure build settings.
12.1. Build controller configuration parameters
The build.config.openshift.io/cluster resource offers the following configuration parameters.
| Parameter | Description |
|---|---|
|
|
Holds cluster-wide information on how to handle builds. The canonical, and only valid name is
|
|
| Controls the default information for builds.
You can override values by setting the
Values that are not set here are inherited from DefaultProxy.
|
|
|
|
|
| Controls override settings for builds.
|
|
|
|
12.2. Configuring build settings
You can configure build settings by editing the build.config.openshift.io/cluster resource.
Procedure
Edit the
build.config.openshift.io/clusterresource:$ oc edit build.config.openshift.io/cluster
The following is an example
build.config.openshift.io/clusterresource:apiVersion: config.openshift.io/v1 kind: Build1 metadata: annotations: release.openshift.io/create-only: "true" creationTimestamp: "2019-05-17T13:44:26Z" generation: 2 name: cluster resourceVersion: "107233" selfLink: /apis/config.openshift.io/v1/builds/cluster uid: e2e9cc14-78a9-11e9-b92b-06d6c7da38dc spec: buildDefaults:2 defaultProxy:3 httpProxy: http://proxy.com httpsProxy: https://proxy.com noProxy: internal.com env:4 - name: envkey value: envvalue gitProxy:5 httpProxy: http://gitproxy.com httpsProxy: https://gitproxy.com noProxy: internalgit.com imageLabels:6 - name: labelkey value: labelvalue resources:7 limits: cpu: 100m memory: 50Mi requests: cpu: 10m memory: 10Mi buildOverrides:8 imageLabels:9 - name: labelkey value: labelvalue nodeSelector:10 selectorkey: selectorvalue tolerations:11 - effect: NoSchedule key: node-role.kubernetes.io/builds operator: Exists
- 1
Build: Holds cluster-wide information on how to handle builds. The canonical, and only valid name iscluster.- 2
buildDefaults: Controls the default information for builds.- 3
defaultProxy: Contains the default proxy settings for all build operations, including image pull or push and source download.- 4
env: A set of default environment variables that are applied to the build if the specified variables do not exist on the build.- 5
gitProxy: Contains the proxy settings for Git operations only. If set, this overrides any Proxy settings for all Git commands, such asgit clone.- 6
imageLabels: A list of labels that are applied to the resulting image. You can override a default label by providing a label with the same name in theBuildConfig.- 7
resources: Defines resource requirements to execute the build.- 8
buildOverrides: Controls override settings for builds.- 9
imageLabels: A list of labels that are applied to the resulting image. If you provided a label in theBuildConfigwith the same name as one in this table, your label will be overwritten.- 10
nodeSelector: A selector which must be true for the build pod to fit on a node.- 11
tolerations: A list of tolerations that overrides any existing tolerations set on a build pod.
Chapter 13. Troubleshooting builds
Use the following to troubleshoot build issues.
13.1. Resolving denial for access to resources
If your request for access to resources is denied:
- Issue
- A build fails with:
requested access to the resource is denied
- Resolution
- You have exceeded one of the image quotas set on your project. Check your current quota and verify the limits applied and storage in use:
$ oc describe quota
13.2. Service certificate generation failure
If your request for access to resources is denied:
- Issue
-
If a service certificate generation fails with (service’s
service.alpha.openshift.io/serving-cert-generation-errorannotation contains):
secret/ssl-key references serviceUID 62ad25ca-d703-11e6-9d6f-0e9c0057b608, which does not match 77b6dd80-d716-11e6-9d6f-0e9c0057b60
- Resolution
-
The service that generated the certificate no longer exists, or has a different
serviceUID. You must force certificates regeneration by removing the old secret, and clearing the following annotations on the serviceservice.alpha.openshift.io/serving-cert-generation-error,service.alpha.openshift.io/serving-cert-generation-error-num:
$ oc delete secret <secret_name>
$ oc annotate service <service_name> service.alpha.openshift.io/serving-cert-generation-error-
$ oc annotate service <service_name> service.alpha.openshift.io/serving-cert-generation-error-num-
The command removing annotation has a - after the annotation name to be removed.
Chapter 14. Setting up additional trusted certificate authorities for builds
Use the following sections to set up additional certificate authorities (CA) to be trusted by builds when pulling images from an image registry.
The procedure requires a cluster administrator to create a ConfigMap and add additional CAs as keys in the configmap.
-
The ConfigMap must be created in the
openshift-confignamespace. domainis the key in the ConfigMap;valueis the PEM-encoded certificate.-
Each CA must be associated with a domain. The domain format is
hostname[..port].
-
Each CA must be associated with a domain. The domain format is
-
The ConfigMap name must be set in the
image.config.openshift.io/clustercluster scoped configuration resource’sspec.additionalTrustedCAfield.
14.1. Adding certificate authorities to the cluster
You can add certificate authorities (CAs) to the cluster for use when pushing and pulling images via the following procedure.
Prerequisites
- You must have cluster administrator privileges.
-
You must have access to the registry’s public certificates, usually a
hostname/ca.crtfile located in the/etc/docker/certs.d/directory.
Procedure
Create a ConfigMap in the
openshift-confignamespace containing the trusted certificates for the registries that use self-signed certificates. For each CA file, ensure the key in the ConfigMap is the registry’s hostname in thehostname[..port]format:$ oc create configmap registry-cas -n openshift-config \ --from-file=myregistry.corp.com..5000=/etc/docker/certs.d/myregistry.corp.com:5000/ca.crt \ --from-file=otherregistry.com=/etc/docker/certs.d/otherregistry.com/ca.crt
Update the cluster image configuration:
$ oc patch image.config.openshift.io/cluster --patch '{"spec":{"additionalTrustedCA":{"name":"registry-cas"}}}' --type=merge