
Red Hat Training
A Red Hat training course is available for OpenShift Container Platform
Upgrading Clusters
OpenShift Container Platform 3.10 Upgrading Clusters
Abstract
Chapter 1. Upgrade Methods and Strategies
1.1. Introduction to Upgrading Clusters
When new versions of OpenShift Container Platform are released, you can upgrade your existing cluster to apply the latest enhancements and bug fixes. This includes upgrading from previous minor versions, such as release 3.7 to 3.9, and applying asynchronous errata updates within a minor version (3.9.z releases). See the OpenShift Container Platform 3.10 Release Notes to review the latest changes.
Due to the core architectural changes between the major versions, OpenShift Enterprise 2 environments cannot be upgraded to OpenShift Container Platform 3 and require a fresh installation.
The OpenShift Container Platform upgrade process uses Ansible playbooks to automate the tasks needed to upgrade your cluster. You must use the inventory file that you used during initial installation or during the last time that the upgrade was successful to run the upgrade playbook. Using this method allows you to choose between either upgrade strategy: in-place upgrades or blue-green deployments.
Unless noted otherwise, node and masters within a major version are forward and backward compatible across one minor version, so upgrading your cluster should go smoothly. However, you should not run mismatched versions longer than necessary to upgrade the entire cluster.
Before upgrading, ensure that all OpenShift Container Platform services are running well. In the event of a control plane upgrade failure, check the versions of your masters to ensure that all versions are the same. If your masters are all the same version, re-run the upgrade. If they differ, downgrade the masters to match the lower versioned master, then re-run the upgrade.
1.2. Upgrade Strategies
There are two strategies you can take for performing the OpenShift Container Platform cluster upgrade: in-place upgrades or blue-green deployments.
1.2.1. In-place Upgrades
With in-place upgrades, the cluster upgrade is performed on all hosts in a single, running cluster: first masters and then nodes. Pods are evacuated off of nodes and recreated on other running nodes before a node upgrade begins; this helps reduce downtime of user applications.
1.2.2. Blue-green Deployments
The blue-green deployment upgrade method follows a similar flow to the in-place method: masters and etcd servers are still upgraded first, however a parallel environment is created for new nodes instead of upgrading them in-place.
This method allows administrators to switch traffic from the old set of nodes (e.g., the "blue" deployment) to the new set (e.g., the "green" deployment) after the new deployment has been verified. If a problem is detected, it is also then easy to rollback to the old deployment quickly.
Chapter 2. Performing Automated In-place Cluster Upgrades
2.1. About This Upgrade
If you installed using the standard cluster installation process, and the inventory file that was used is available, you can use upgrade playbooks to automate the OpenShift cluster upgrade process.
OpenShift Container Platform 3.10 involves significant changes to the architecture of the cluster, which are discussed further in the OpenShift Container Platform 3.10 Release Notes. The following sections detail how these notable technical changes affect the upgrade process from OpenShift Container Platform 3.9.
Running Ansible playbooks with the --tags or --check options is not supported by Red Hat.
2.1.1. Defining Node Groups and Host Mappings
Starting in OpenShift Container Platform 3.10, node configurations are now bootstrapped from the master. When node services are started, the node checks if a kubeconfig and other node configuration files exist before joining the cluster. If they do not, the node pulls the configuration from the master, then joins the cluster.
This process replaces administrators having to manually maintain the node configuration uniquely on each node host. Instead, the contents of a node host’s /etc/origin/node/node-config.yaml file are now provided by ConfigMaps sourced from the master.
To map which ConfigMap to use for which node host, node groups must be defined and then set for each host in the inventory file. These procedures are handled during the Preparing for an Automated Upgrade section.
2.1.2. Updating Host Name Parameters
In OpenShift Container Platform version 3.10, the openshift_hostname parameter was removed. If you used the openshift_hostname parameter in your inventory file in OpenShift Container Platform version 3.9, you must remove that parameter from your inventory file. Before you upgrade, you must set the openshift_kubelet_name_override parameter to the openshift_hostname that you used in previous versions.
You must not remove the openshift_kubelet_name_override parameter from your inventory file after you upgrade.
Node ConfigMaps
The Configmaps for defining the node configurations must be available in the openshift-node project. ConfigMaps are also now the authoritative definition for node labels; the old openshift_node_labels value is effectively ignored.
The installer provides a playbook for creating the following default ConfigMaps:
-
node-config-master -
node-config-infra -
node-config-compute
The following ConfigMaps are also created, which label nodes into multiple roles:
-
node-config-all-in-one -
node-config-master-infra
Changes should not be made to a node host’s /etc/origin/node/node-config.yaml file. They will be overwritten by the configuration defined in the ConfigMap used by the node.
Node Group Definitions
After updating the openshift-ansible package, you can view what the default set of node group definitions looks like in YAML format in the /usr/share/ansible/openshift-ansible/roles/openshift_facts/defaults/main.yml file:
openshift_node_groups:
  - name: node-config-master 1
    labels:
      - 'node-role.kubernetes.io/master=true' 2
    edits: [] 3
  - name: node-config-infra
    labels:
      - 'node-role.kubernetes.io/infra=true'
    edits: []
  - name: node-config-compute
    labels:
      - 'node-role.kubernetes.io/compute=true'
    edits: []
  - name: node-config-master-infra
    labels:
      - 'node-role.kubernetes.io/infra=true,node-role.kubernetes.io/master=true'
    edits: []
  - name: node-config-all-in-one
    labels:
      - 'node-role.kubernetes.io/infra=true,node-role.kubernetes.io/master=true,node-role.kubernetes.io/compute=true'
    edits: []
If you do not set the openshift_node_groups variable in your inventory file’s [OSEv3:vars] group, the defaults defined above will be used. However, if you want to deviate from these defaults, you must define the entire openshift_node_groups structure (including all desired node groups) in your inventory file.
The openshift_node_groups value is not merged with the defaults, and the YAML definition must first be translated into a Python dictionary. You can then use the edits field to modify any node configuration variables as desired by specifying the key-value pairs.
See Master and Node Configuration Files for reference on configurable node variables.
For example, the following entry in an inventory file defines groups named node-config-master, node-config-infra, and node-config-compute, and edits the ConfigMap for node-config-compute to set kubeletArguments.pods-per-core to 20:
openshift_node_groups=[{'name': 'node-config-master', 'labels': ['node-role.kubernetes.io/master=true']}, {'name': 'node-config-infra', 'labels': ['node-role.kubernetes.io/infra=true',]}, {'name': 'node-config-compute', 'labels': ['node-role.kubernetes.io/compute=true'], 'edits': [{ 'key': 'kubeletArguments.pods-per-core','value': ['20']}]}]
Whenever the openshift_node_group.yml playbook is run, the changes defined in the edits field will update the related ConfigMap (node-config-compute in this example), which will ultimately affect the node’s configuration file on the host.
2.1.3. Upgrade Workflow
The 3.9 to 3.10 control plane upgrade performs the following steps for you:
- A backup of all etcd data is taken for recovery purposes.
- The API and controllers are updated from 3.9 to 3.10.
- Internal data structures are updated to 3.10.
- The default router, if one exists, is updated from 3.9 to 3.10.
- The default registry, if one exists, is updated from 3.9 to 3.10.
- The default image streams and InstantApp templates are updated.
The 3.9 to 3.10 node upgrade performs a rolling update of nodes, which:
- Marks a subset of nodes unschedulable and drains them of pods.
- Updates node components from 3.9 to 3.10.
- Converts from local configuration to bootstrapped TLS and Config.
- Converts SDN components from systemd services to DaemonSets.
- Returns those nodes to service.
- Ensure that you have met all prerequisites before proceeding with an upgrade. Failure to do so can result in a failed upgrade.
- If you are using GlusterFS, see Special Considerations When Using Containerized GlusterFS before proceeding.
- If you are using GCE Persistent Disk (gcePD), see Special Considerations When Using gcePD before proceeding.
The day before the upgrade, validate OpenShift Container Platform storage migration to ensure potential issues are resolved prior to the outage window:
$ oc adm migrate storage --include=* --loglevel=2 --confirm --config /etc/origin/master/admin.kubeconfig
Automated upgrade playbooks are run via Ansible directly using the ansible-playbook command with an inventory file, similar to the advanced installation method. The same v3_10 upgrade playbooks can be used for either of the following scenarios:
- Upgrading existing OpenShift Container Platform 3.9 clusters to 3.10
- Upgrading existing OpenShift Container Platform 3.10 clusters to the latest asynchronous errata updates
2.2. Preparing for an Automated Upgrade
Before upgrading your cluster to OpenShift Container Platform 3.10, the cluster must be already upgraded to the latest asynchronous release of version 3.9. If your cluster is at a version earlier than 3.9, you must first upgrade incrementally. For example, upgrade from 3.6 to 3.7, then 3.7 to 3.9 (the 3.8 version was skipped).
Before attempting the upgrade, follow the guidance in Environment health checks to verify the cluster’s health. This will confirm that nodes are in the Ready state, running the expected starting version, and will ensure that there are no diagnostic errors or warnings.
If you are completing a large-scale upgrade, which involves at least 10 worker nodes and thousands of projects and pods, review Special considerations for large-scale upgrades to prevent upgrade failures.
To prepare for an automated upgrade:
Pull the latest subscription data from RHSM:
# subscription-manager refresh
If you are upgrading from OpenShift Container Platform 3.9 to 3.10:
Back up the following files that would be required should you later need to downgrade back to OpenShift Container Platform 3.9:
On master hosts, back up the following files:
/usr/lib/systemd/system/atomic-openshift-master-api.service
/usr/lib/systemd/system/atomic-openshift-master-controllers.service
/etc/sysconfig/atomic-openshift-master-api
/etc/sysconfig/atomic-openshift-master-controllers
/etc/origin/master/master-config.yaml
/etc/origin/master/scheduler.json
The systemd files are removed during the upgrade due to the changes to the control plane static pod architecture.
On node hosts (including masters, which have the node component on them), back up the following files:
/usr/lib/systemd/system/atomic-openshift-*.service
/etc/origin/node/node-config.yaml
On etcd hosts (including masters that have etcd co-located on them), back up the following files:
/etc/etcd/etcd.conf
The upgrade process will create a backup of all etcd data for recovery purposes, but ensure that you have a recent etcd backup at /backup/etcd-xxxxxx/backup.db before continuing. Manual etcd backup steps are described in the Day Two Operations Guide.
NoteWhen you upgrade OpenShift Container Platform, your etcd configuration does not change. Whether you run etcd as static pods on master hosts or as a separate service on master hosts or separate hosts does not change after you upgrade.
Manually disable the 3.9 repository and enable the 3.10 repository on each master and node host. You must also enable the rhel-7-server-ansible-2.4-rpms repository, if it is not already:
# subscription-manager repos --disable="rhel-7-server-ose-3.9-rpms" \
    --enable="rhel-7-server-ose-3.10-rpms" \
    --enable="rhel-7-server-rpms" \
    --enable="rhel-7-server-extras-rpms" \
    --enable="rhel-7-server-ansible-2.4-rpms" \
# yum clean all
Ensure that you have the latest version of the openshift-ansible package on the host you run the upgrade playbooks on:
# yum update -y openshift-ansible
NoteIn previous OpenShift Container Platform releases, the atomic-openshift-utils package was installed for this step. However, starting with OpenShift Container Platform 3.10, that package is removed, and the openshift-ansible package provides all requirements.
If you do not set the
openshift_node_groupsvariable in the inventory file’s[OSEv3:vars]group, the default set of node groups and ConfigMaps will be created when the openshift_node_group.yml playbook is run. If you want to deviate from the defaults, define the entire node group set using a Python dictionary format as outlined in Defining Node Groups and Host Mappings, specifying theirname,labels, and anyeditsto modify the ConfigMaps. For example:[OSEv3:vars] openshift_node_groups=[{'name': 'node-config-master', 'labels': ['node-role.kubernetes.io/master=true']}, {'name': 'node-config-infra', 'labels': ['node-role.kubernetes.io/infra=true',]}, {'name': 'node-config-compute', 'labels': ['node-role.kubernetes.io/compute=true'], 'edits': [{ 'key': 'kubeletArguments.pods-per-core','value': ['20']}]}]In order to convert a OpenShift Container Platform 3.9 cluster to using the new node group definitions and mappings, all hosts previously defined in the
[nodes]inventory group must be assigned anopenshift_node_group_name. This value is used to select the ConfigMap that configures each node.For example:
[nodes]
master[1:3].example.com openshift_node_group_name='node-config-master'
infra-node1.example.com openshift_node_group_name='node-config-infra'
infra-node2.example.com openshift_node_group_name='node-config-infra'
node1.example.com openshift_node_group_name='node-config-compute'
node2.example.com openshift_node_group_name='node-config-compute'
In addition, remove the
openshift_node_labelssetting from any existing host entries[nodes]group if they are set. Node labels should now be defined in the ConfigMap associated with the host’sopenshift_node_group_nameinstead.The upgrade process will be blocked until you have the newly required ConfigMaps for bootstrapping nodes in the openshift-node project. Run the following playbook to have the defaults created (or if you defined the
openshift_node_groupsstructure in the previous step, your custom sets will be created):# ansible-playbook -i </path/to/inventory/file> \ /usr/share/ansible/openshift-ansible/playbooks/openshift-master/openshift_node_group.ymlCarefully verify that each ConfigMap has created and defined as expected. Get your list of all ConfigMaps in the openshift-node project:
$ oc get configmaps -n openshift-node
Then use
oc describeto inspect them individually:$ oc describe configmaps -n openshift-node <configmap_name>
If you have applied manual configuration changes to your master or node configuration files since your last Ansible playbook run (whether that was initial installation or your most recent cluster upgrade), and you have not yet made the equivalent changes to your inventory file, review Configuring Your Inventory File. For any variables that are relevant to the manual changes you made, apply the equivalent appropriate changes to your inventory files before running the upgrade. Otherwise, your manual changes may be overwritten by default values during the upgrade, which could cause pods to not run properly or other cluster stability issues.
Additionally, verify the following settings:
-
If you made any changes to
admissionConfigsettings in your master configuration files, review theopenshift_master_admission_plugin_configvariable in Configuring Your Inventory File. Failure to do so could cause pods to get stuck inPendingstate if you hadClusterResourceOverridesettings manually configured previously (as described in Configuring Masters for Overcommitment). -
If you manually manage the cluster’s /etc/origin/master/htpasswd file, add
openshift_master_manage_htpasswd=falseto your inventory file to prevent the upgrade process from overwriting the htpasswd file.
-
If you made any changes to
After satisfying these steps, you can review the following sections for more information on how the upgrade process works and make decisions on additional upgrade customization options if you so choose. When you are prepared to run the upgrade, you can continue to Upgrading to the Latest OpenShift Container Platform 3.10 Release.
2.2.1. Updating Policy Definitions
During a cluster upgrade, and on every restart of any master, the default cluster roles are automatically reconciled to restore any missing permissions.
If you customized default cluster roles and want to ensure a role reconciliation does not modify them, protect each role from reconciliation:
$ oc annotate clusterrole.rbac <role_name> --overwrite rbac.authorization.kubernetes.io/autoupdate=false
WarningYou must manually update the roles that contain this setting to include any new or required permissions after upgrading.
Generate a default bootstrap policy template file:
$ oc adm create-bootstrap-policy-file --filename=policy.json
NoteThe contents of the file vary based on the OpenShift Container Platform version, but the file contains only the default policies.
- Update the policy.json file to include any cluster role customizations.
Use the policy file to automatically reconcile roles and role bindings that are not reconcile protected:
$ oc auth reconcile -f policy.json
Reconcile security context constraints:
# oc adm policy reconcile-sccs \
    --additive-only=true \
    --confirm
2.2.2. Upgrading the Control Plane and Nodes in Separate Phases
An OpenShift Container Platform cluster can be upgraded in one or more phases. You can choose whether to upgrade all hosts in one phase by running a single Ansible playbook, or upgrade the control plane (master components) and nodes in multiple phases using separate playbooks.
Instructions on the full upgrade process and when to call these playbooks are described in Upgrading to the Latest OpenShift Container Platform 3.10 Release.
If your OpenShift Container Platform cluster uses GlusterFS pods, you must perform the upgrade in multiple phases. See Special Considerations When Using Containerized GlusterFS for details on how to upgrade with GlusterFS.
When upgrading in separate phases, the control plane phase includes upgrading:
- master components
- node services running on masters
- Docker or CRI-O running on masters
- Docker or CRI-O running on any stand-alone etcd hosts
When upgrading only the nodes, the control plane must already be upgraded. The node phase includes upgrading:
- node services running on stand-alone nodes
- Docker or CRI-O running on stand-alone nodes
Nodes running master components are not included during the node upgrade phase, even though they have node services and Docker running on them. Instead, they are upgraded as part of the control plane upgrade phase. This ensures node services and Docker on masters are not upgraded twice (once during the control plane phase and again during the node phase).
2.2.3. Customizing Node Upgrades
Whether upgrading in a single or multiple phases, you can customize how the node portion of the upgrade progresses by passing certain Ansible variables to an upgrade playbook using the -e option.
Instructions on the full upgrade process and when to call these playbooks are described in Upgrading to the Latest OpenShift Container Platform 3.10 Release.
The openshift_upgrade_nodes_serial variable can be set to an integer or percentage to control how many node hosts are upgraded at the same time. The default is 1, upgrading nodes one at a time.
For example, to upgrade 20 percent of the total number of detected nodes at a time:
$ ansible-playbook -i <path/to/inventory/file> \
    </path/to/upgrade/playbook> \
    -e openshift_upgrade_nodes_serial="20%"
The openshift_upgrade_nodes_label variable allows you to specify that only nodes with a certain label are upgraded. This can also be combined with the openshift_upgrade_nodes_serial variable.
For example, to only upgrade nodes in the group1 region, two at a time:
$ ansible-playbook -i <path/to/inventory/file> \
    </path/to/upgrade/playbook> \
    -e openshift_upgrade_nodes_serial="2" \
-e openshift_upgrade_nodes_label="region=group1"See Managing Nodes for more on node labels.
The openshift_upgrade_nodes_max_fail_percentage variable allows you to specify how many nodes may fail in each batch. The percentage of failure must exceed your value before the playbook aborts the upgrade.
The openshift_upgrade_nodes_drain_timeout variable allows you to specify the length of time to wait before giving up.
In this example, 10 nodes are upgraded at a time, the upgrade will abort if more than 20 percent of the nodes fail, and there is a 600-second wait to drain the node:
$ ansible-playbook -i <path/to/inventory/file> \
    </path/to/upgrade/playbook> \
    -e openshift_upgrade_nodes_serial=10 \
    -e openshift_upgrade_nodes_max_fail_percentage=20 \
    -e openshift_upgrade_nodes_drain_timeout=600
2.2.4. Customizing Upgrades With Ansible Hooks
When upgrading OpenShift Container Platform, you can execute custom tasks during specific operations through a system called hooks. Hooks allow cluster administrators to provide files defining tasks to execute before and/or after specific areas during upgrades. This can be very helpful to validate or modify custom infrastructure when upgrading OpenShift Container Platform.
It is important to remember that when a hook fails, the operation fails. This means a good hook can run multiple times and provide the same results. A great hook is idempotent.
2.2.4.1. Limitations
- Hooks have no defined or versioned interface. They can use internal openshift-ansible variables, but there is no guarantee these will remain in future releases. In the future, hooks may be versioned, giving you advance warning that your hook needs to be updated to work with the latest openshift-ansible.
- Hooks have no error handling, so an error in a hook will halt the upgrade process. The problem will need to be addressed and the upgrade re-run.
2.2.4.2. Using Hooks
Hooks are defined in the hosts inventory file under the OSEv3:vars section.
Each hook must point to a YAML file which defines Ansible tasks. This file will be used as an include, meaning that the file cannot be a playbook, but a set of tasks. Best practice suggests using absolute paths to the hook file to avoid any ambiguity.
Example Hook Definitions in an Inventory File
[OSEv3:vars]
openshift_master_upgrade_pre_hook=/usr/share/custom/pre_master.yml
openshift_master_upgrade_hook=/usr/share/custom/master.yml
openshift_master_upgrade_post_hook=/usr/share/custom/post_master.yml

openshift_node_upgrade_pre_hook=/usr/share/custom/pre_node.yml
openshift_node_upgrade_hook=/usr/share/custom/node.yml
openshift_node_upgrade_post_hook=/usr/share/custom/post_node.yml
Example pre_master.yml Task
---
# Trivial example forcing an operator to ack the start of an upgrade
# file=/usr/share/custom/pre_master.yml

- name: note the start of a master upgrade
  debug:
      msg: "Master upgrade of {{ inventory_hostname }} is about to start"

- name: require an operator agree to start an upgrade
  pause:
      prompt: "Hit enter to start the master upgrade"
2.2.4.3. Available Upgrade Hooks
Table 2.1. Master Upgrade Hooks
| Hook Name | Description |
|---|---|
|
|
|
|
|
|
|
|
|
Table 2.2. Node Upgrade Hooks
| Hook Name | Description |
|---|---|
|
|
|
|
|
|
|
|
|
2.3. Upgrading to the Latest OpenShift Container Platform 3.10 Release
To upgrade an existing OpenShift Container Platform 3.9 or 3.10 cluster to the latest 3.10 release:
- Satisfy the steps in Preparing for an Automated Upgrade to ensure you are using the latest upgrade playbooks.
-
Ensure the
openshift_deployment_typeparameter in your inventory file is set toopenshift-enterprise. -
If you want to enable rolling, full system restarts of the hosts, you can set the
openshift_rolling_restart_modeparameter in your inventory file tosystem. Otherwise, the default valueservicesperforms rolling service restarts on HA masters, but does not reboot the systems. See Configuring Cluster Variables for details. At this point, you can choose to run the upgrade in a single or multiple phases. See Upgrading the Control Plane and Nodes in Separate Phases for more details which components are upgraded in each phase.
If your inventory file is located somewhere other than the default /etc/ansible/hosts, add the
-iflag to specify its location. If you previously used theatomic-openshift-installercommand to run your installation, you can check ~/.config/openshift/hosts for the last inventory file that was used, if needed.Option A) Upgrade control plane and nodes in a single phase.
Run the upgrade.yml playbook to upgrade the cluster in a single phase using one playbook; the control plane is still upgraded first, then nodes in-place:
# ansible-playbook -i </path/to/inventory/file> \
    /usr/share/ansible/openshift-ansible/playbooks/byo/openshift-cluster/upgrades/v3_10/upgrade.yml
Option B) Upgrade the control plane and nodes in separate phases.
To upgrade only the control plane, run the upgrade_control_plane.yaml playbook:
# ansible-playbook -i </path/to/inventory/file> \
    /usr/share/ansible/openshift-ansible/playbooks/byo/openshift-cluster/upgrades/v3_10/upgrade_control_plane.yml
To upgrade only the nodes, run the upgrade_nodes.yaml playbook:
# ansible-playbook -i </path/to/inventory/file> \ /usr/share/ansible/openshift-ansible/playbooks/byo/openshift-cluster/upgrades/v3_10/upgrade_nodes.yml \ [-e <customized_node_upgrade_variables>] 1- 1
- See Customizing Node Upgrades for any desired
<customized_node_upgrade_variables>.
If you are upgrading the nodes in groups as described in Customizing Node Upgrades, continue invoking the upgrade_nodes.yml playbook until all nodes have been successfully upgraded.
After all master and node upgrades have completed, reboot all hosts. After rebooting, if there are no additional features enabled, you can verify the upgrade. Otherwise, the next step depends on what additional features you have previously enabled.
Feature Next Step Aggregated Logging
Cluster Metrics
2.4. Upgrading the EFK Logging Stack
To upgrade an existing EFK logging stack deployment, you must use the provided /usr/share/ansible/openshift-ansible/playbooks/openshift-logging/config.yml Ansible playbook. This is the playbook to use if you were deploying logging for the first time on an existing cluster, but is also used to upgrade existing logging deployments.
If you have not already done so, see Specifying Logging Ansible Variables in the Aggregating Container Logs topic and update your Ansible inventory file to at least set the following required variable within the
[OSEv3:vars]section:[OSEv3:vars] openshift_logging_install_logging=true 1- 1
- Enables the ability to upgrade the logging stack.
-
Add any other
openshift_logging_*variables that you want to specify to override the defaults, as described in Specifying Logging Ansible Variables. - When you have finished updating your inventory file, follow the instructions in Deploying the EFK Stack to run the openshift-logging/config.yml playbook and complete the logging deployment upgrade.
If your Fluentd DeploymentConfig and DaemonSet for the EFK components are already set with:
        image: <image_name>:<vX.Y>
        imagePullPolicy: IfNotPresent
The latest version <image_name> might not be pulled if there is already one with the same <image_name:vX.Y> stored locally on the node where the pod is being re-deployed. If so, manually change the DeploymentConfig and DaemonSet to imagePullPolicy: Always to make sure it is re-pulled.
2.5. Upgrading Cluster Metrics
To upgrade an existing cluster metrics deployment, you must use the provided /usr/share/ansible/openshift-ansible/playbooks/openshift-metrics/config.yml Ansible playbook. This is the playbook to use if you were deploying metrics for the first time on an existing cluster, but is also used to upgrade existing metrics deployments.
If you have not already done so, see Specifying Metrics Ansible Variables in the Enabling Cluster Metrics topic and update your Ansible inventory file to at least set the following required variables within the
[OSEv3:vars]section:[OSEv3:vars] openshift_metrics_install_metrics=true 1 openshift_metrics_hawkular_hostname=<fqdn> 2 openshift_metrics_cassandra_storage_type=(emptydir|pv|dynamic) 3
-
Add any other
openshift_metrics_*variables that you want to specify to override the defaults, as described in Specifying Metrics Ansible Variables. - When you have finished updating your inventory file, follow the instructions in Deploying the Metrics Deployment to run the openshift-metrics/config.yml playbook and complete the metrics deployment upgrade.
2.6. Special Considerations for Large-scale Upgrades
For large-scale cluster upgrades, which involve at least 10 worker nodes and thousands of projects and pods, the API object storage migration should be performed prior to running the upgrade playbooks, and then again after the upgrade has successfully completed. Otherwise, the upgrade process will fail.
Refer to the Running the pre- and post- API server model object migration outside of the upgrade window section of the Recommendations for large-scale OpenShift upgrades for further guidance.
2.7. Special Considerations for Mixed Environments
If your OpenShift Container Platform cluster uses a mixed environment or gcePD storage, you need to take more steps before you upgrade it.
Before you upgrade a mixed environment, such as one with Red Hat Enterprise Linux (RHEL) and RHEL Atomic Host, set values in the inventory file for both the openshift_pkg_version and openshift_image_tag parameters. Setting these values ensures that all nodes in your cluster run the same version of OpenShift Container Platform. While this is a best practice for major updates, such as from OpenShift Container Platform 2 to OpenShift Container Platform 3, setting these values are mandatory for minor version upgrades.
For example, to upgrade from OpenShift Container Platform 3.9 to OpenShift Container Platform 3.10, set the following parameters and values:
openshift_pkg_version=-3.10.16
openshift_image_tag=v3.10.16
These parameters can also be present in other, non-mixed, environments.
2.8. Special Considerations When Using Containerized GlusterFS
When upgrading OpenShift Container Platform, you must upgrade the set of nodes where GlusterFS pods are running.
Special consideration must be taken when upgrading these nodes, as drain and unschedule will not terminate and evacuate the GlusterFS pods because they are running as part of a daemonset.
There is also the potential for someone to run an upgrade on multiple nodes at the same time, which would lead to data availability issues if more than one was hosting GlusterFS pods.
Even if a serial upgrade is running, there is no guarantee sufficient time will be given for GlusterFS to complete all of its healing operations before GlusterFS on the next node is terminated. This could leave the cluster in a bad or unknown state. Therefore, the following procedure is recommended.
- Upgrade the control plane (the master nodes and etcd nodes).
Upgrade standard
infranodes (router, registry, logging, and metrics).NoteIf any of the nodes in those groups are running GlusterFS, perform step 4 of this procedure at the same time. GlusterFS nodes must be upgraded along with other nodes in their class (
appversusinfra), one at a time.Upgrade standard nodes running application containers.
NoteIf any of the nodes in those groups are running GlusterFS, perform step 4 of this procedure at the same time. GlusterFS nodes must be upgraded along with other nodes in their class (
appversusinfra), one at a time.Upgrade the OpenShift Container Platform nodes running GlusterFS one at a time.
Add a label to the node you want to upgrade:
$ oc label node <node_name> type=upgrade
-
To run the upgrade playbook on a single node, use
-e openshift_upgrade_nodes_label="type=upgrade". - Wait for the GlusterFS pod to respawn and appear.
oc rshinto the pod and verify all volumes are healed:$ oc rsh <GlusterFS_pod_name> $ for vol in `gluster volume list`; do gluster volume heal $vol info; done
Ensure all of the volumes are healed and there are no outstanding tasks. The
heal infocommand lists all pending entries for a given volume’s heal process. A volume is considered healed whenNumber of entriesfor that volume is0.Remove the upgrade label and go to the next GlusterFS node.
$ oc label node <node_name> type-
2.9. Special Considerations When Using gcePD
Because the default gcePD storage provider uses an RWO (Read-Write Only) access mode, you cannot perform a rolling upgrade on the registry or scale the registry to multiple pods. Therefore, when upgrading OpenShift Container Platform, you must specify the following environment variables in your Ansible inventory file:
[OSEv3:vars]

openshift_hosted_registry_storage_provider=gcs
openshift_hosted_registry_storage_gcs_bucket=bucket01
openshift_hosted_registry_storage_gcs_keyfile=test.key
openshift_hosted_registry_storage_gcs_rootdirectory=/registry
2.10. Verifying the Upgrade
Ensure that the:
- cluster is healthy,
- master, node, and etcd services or static pods are running well,
-
the OpenShift Container Platform,
docker-registry, and router versions are correct, - the original applications are still available and the new application can be created, and
-
running
oc adm diagnosticsproduces no errors.
To verify the upgrade:
Check that all nodes are marked as Ready:
# oc get nodes
NAME                     STATUS    ROLES        AGE       VERSION
master1.example.com      Ready     master       47d       v1.10.0+b81c8f8
master2.example.com      Ready     master       47d       v1.10.0+b81c8f8
master3.example.com      Ready     master       47d       v1.10.0+b81c8f8
infra-node1.example.com  Ready     infra        47d       v1.10.0+b81c8f8
infra-node2.example.com  Ready     infra        47d       v1.10.0+b81c8f8
node1.example.com        Ready     compute      47d       v1.10.0+b81c8f8
node2.example.com        Ready     compute      47d       v1.10.0+b81c8f8
Verify the static pods for the control plane are running:
# oc get pods -n kube-system
NAME                                 READY     STATUS    RESTARTS   AGE
master-api-master1.example.com           1/1       Running   4          1h
master-controllers-master1.example.com   1/1       Running   3          1h
master-etcd-master1.example.com          1/1       Running   6          5d
[...]
Verify that you are running the expected versions of the docker-registry and router images, if deployed.
# oc get -n default dc/docker-registry -o json | grep \"image\"
    "image": "openshift3/ose-docker-registry:v3.10",
# oc get -n default dc/router -o json | grep \"image\"
    "image": "openshift3/ose-haproxy-router:v3.10",
Use the diagnostics tool on the master to look for common issues:
# oc adm diagnostics
...
[Note] Summary of diagnostics execution:
[Note] Completed with no errors or warnings seen.
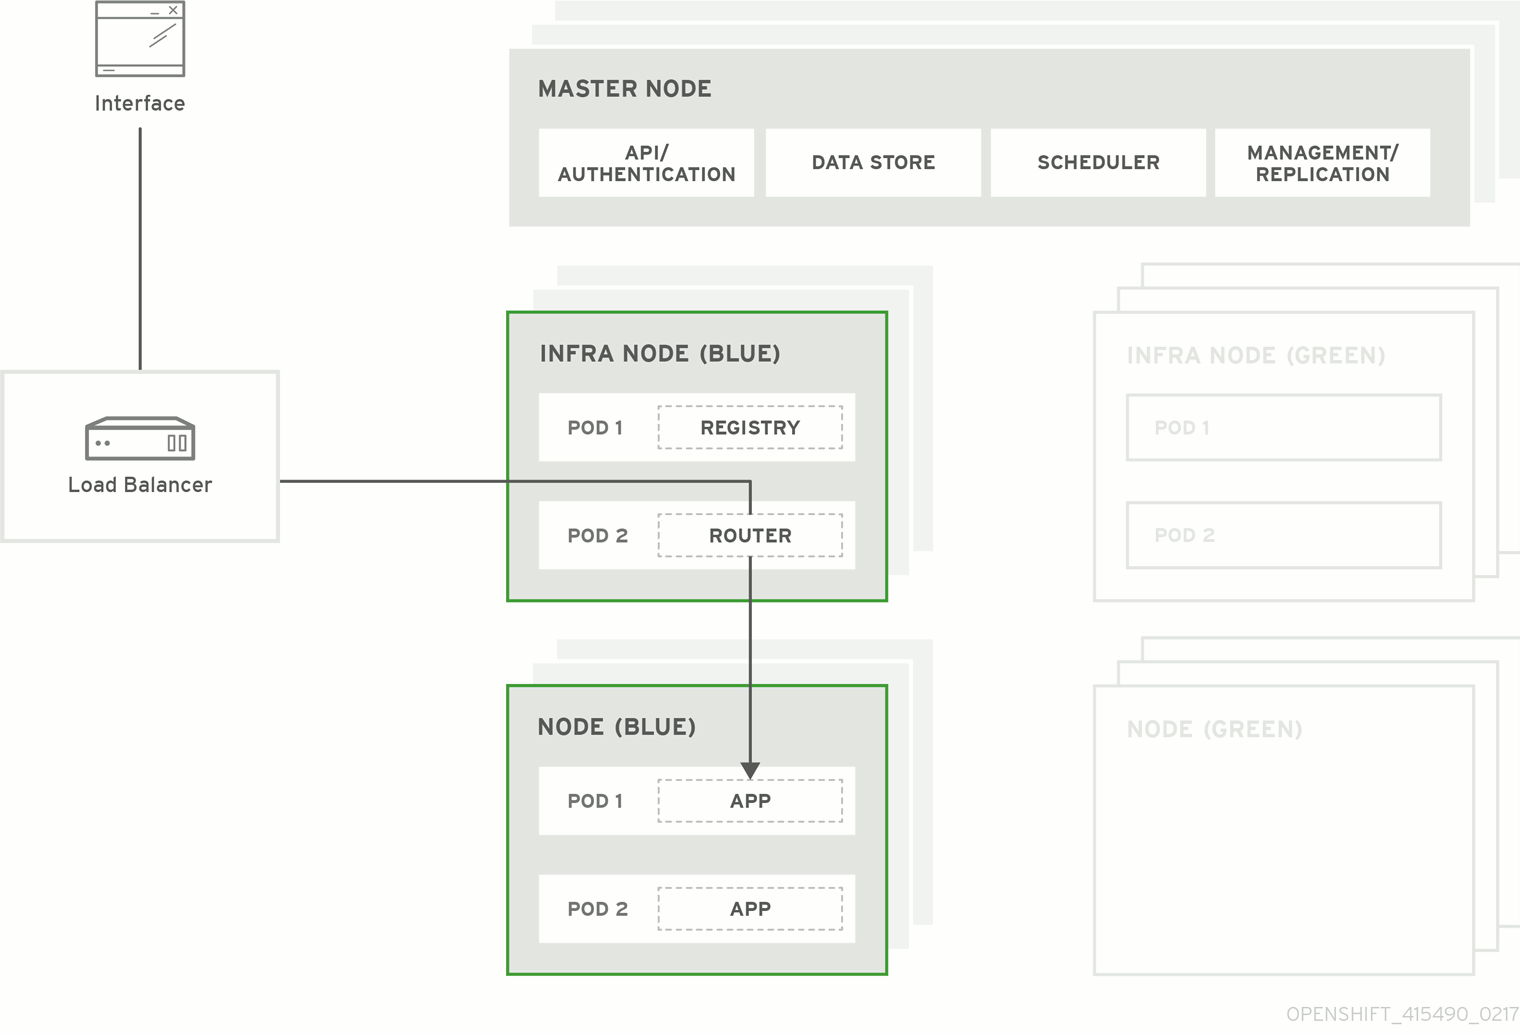
Chapter 3. Blue-Green Deployments
3.1. Overview
This topic serves as an alternative approach for node host upgrades to the in-place upgrade method.
The blue-green deployment upgrade method follows a similar flow to the in-place method: masters and etcd servers are still upgraded first, however a parallel environment is created for new node hosts instead of upgrading them in-place.
This method allows administrators to switch traffic from the old set of node hosts (e.g., the blue deployment) to the new set (e.g., the green deployment) after the new deployment has been verified. If a problem is detected, it is also then easy to rollback to the old deployment quickly.
While blue-green is a proven and valid strategy for deploying just about any software, there are always trade-offs. Not all environments have the same uptime requirements or the resources to properly perform blue-green deployments.
In an OpenShift Container Platform environment, the most suitable candidate for blue-green deployments are the node hosts. All user processes run on these systems and even critical pieces of OpenShift Container Platform infrastructure are self-hosted on these resources. Uptime is most important for these workloads and the additional complexity of blue-green deployments can be justified.
The exact implementation of this approach varies based on your requirements. Often the main challenge is having the excess capacity to facilitate such an approach.
Figure 3.1. Blue-Green Deployment
3.2. Preparing for a Blue-Green Upgrade
After you have upgraded your master and etcd hosts using method described for In-place Upgrades, use the following sections to prepare your environment for a blue-green upgrade of the remaining node hosts.
3.2.1. Sharing Software Entitlements
Administrators must temporarily share the Red Hat software entitlements between the blue-green deployments or provide access to the installation content by means of a system such as Red Hat Satellite. This can be accomplished by sharing the consumer ID from the previous node host:
On each old node host that will be upgraded, note its
system identityvalue, which is the consumer ID:# subscription-manager identity | grep system system identity: 6699375b-06db-48c4-941e-689efd6ce3aa
On each new RHEL 7 or RHEL Atomic Host 7 system that will replace an old node host, register using the respective consumer ID from the previous step:
# subscription-manager register --consumerid=6699375b-06db-48c4-941e-689efd6ce3aa
3.2.2. Labeling Blue Nodes
You must ensure that your current node hosts in production are labeled either blue or green. In this example, the current production environment is blue, and the new environment is green.
Get the current list of node names known to the cluster:
$ oc get nodes
Label all non-master node hosts (compute nodes) and dedicated infrastructure nodes in your current production environment with
color=blue:$ oc label node --selector=node-role.kubernetes.io/compute=true color=blue $ oc label node --selector=node-role.kubernetes.io/infra=true color=blue
In the previous command, the
--selectorflag is used to match a subset of the cluster using the relevant node labels, and all matches are labeled withcolor=blue.
3.2.3. Creating and Labeling Green Nodes
Create the green environment by adding an equal number of new node hosts to the existing cluster:
Add the new node hosts using the procedure as described in Adding Hosts to an Existing Cluster. When updating your inventory file with the
[new_nodes]group in that procedure, ensure these variables are set:-
In order to delay workload scheduling until the nodes are deemed healthy, which you verify in later steps, set the
openshift_schedulable=falsevariable for each new node host to ensure they are unschedulable initially. -
Because the new hosts run OpenShift Container Platform version 3.10, they must now use the
openshift_node_group_namevariable to set a node group per host entry. See Defining Node Groups and Host Mappings for details.
The new node host group resembles the following example:
Example [new_nodes] Host Group
[new_nodes]
node4.example.com openshift_node_group_name='node-config-compute' openshift_schedulable=false
node5.example.com openshift_node_group_name='node-config-compute' openshift_schedulable=false
node6.example.com openshift_node_group_name='node-config-compute' openshift_schedulable=false
infra-node3.example.com openshift_node_group_name='node-config-infra' openshift_schedulable=false
infra-node4.example.com openshift_node_group_name='node-config-infra' openshift_schedulable=false
NoteDo not remove or modify your existing node groups.
-
In order to delay workload scheduling until the nodes are deemed healthy, which you verify in later steps, set the
After the new nodes deploy, apply the
color=greenlabel to each new node:$ oc label node <node_name> color=green
3.2.4. Verifying Green Nodes
Verify that your new green nodes are in a healthy state:
Verify that new nodes are detected in the cluster and are in Ready,SchedulingDisabled state:
$ oc get nodes

NAME                STATUS                       ROLES       AGE
node4.example.com   Ready,SchedulingDisabled     compute     1d
Verify that the green nodes have proper labels:
$ oc get nodes --show-labels

NAME                STATUS                       ROLES       AGE   LABELS
node4.example.com   Ready,SchedulingDisabled     compute     1d    beta.kubernetes.io/arch=amd64,beta.kubernetes.io/os=linux,color=green,kubernetes.io/hostname=m01.example.com,node-role.kubernetes.io/compute=true
Perform a diagnostic check for the cluster:
$ oc adm diagnostics

[Note] Determining if client configuration exists for client/cluster diagnostics
Info:  Successfully read a client config file at '/root/.kube/config'
Info:  Using context for cluster-admin access: 'default/m01-example-com:8443/system:admin'
[Note] Performing systemd discovery

[Note] Running diagnostic: ConfigContexts[default/m01-example-com:8443/system:admin]
       Description: Validate client config context is complete and has connectivity
...
         [Note] Running diagnostic: CheckExternalNetwork
              Description: Check that external network is accessible within a pod

       [Note] Running diagnostic: CheckNodeNetwork
              Description: Check that pods in the cluster can access its own node.

       [Note] Running diagnostic: CheckPodNetwork
              Description: Check pod to pod communication in the cluster. In case of ovs-subnet network plugin, all pods
should be able to communicate with each other and in case of multitenant network plugin, pods in non-global projects
should be isolated and pods in global projects should be able to access any pod in the cluster and vice versa.

       [Note] Running diagnostic: CheckServiceNetwork
              Description: Check pod to service communication in the cluster. In case of ovs-subnet network plugin, all
pods should be able to communicate with all services and in case of multitenant network plugin, services in non-global
projects should be isolated and pods in global projects should be able to access any service in the cluster.
...
3.3. Preparing the Green Nodes
To migrate pods from the blue environment to the green, you must pull the required container images.
Network latency and load on the registry can cause delays if the environment does not have sufficient capacity. You can minimize impact to the running system by importing new image streams to trigger new pod deployments to the new nodes.
Major releases of OpenShift Container Platform, and sometimes asynchronous errata updates, introduce new image streams for builder images for users of Source-to-Image (S2I). Upon import, any builds or deployments configured with image change triggers are automatically created.
Another benefit of triggering the builds is that it fetches the majority of the ancillary images to all node hosts, such as the various builder images, the pod infrastructure image, and deployers. The green nodes are then prepared for the expected load increase, and the remaining images more quickly migrated during node evacuation.
When you are ready to continue with the upgrade process, follow these steps to warm the green nodes:
Set the green nodes to schedulable so that new pods are deployed to them:
$ oc adm manage-node --schedulable=true --selector=color=green
Set the blue nodes to unschedulable so that no new pods run on them:
$ oc adm manage-node --schedulable=false --selector=color=blue
Update the node selectors for the registry and router deployment configurations to use the
node-role.kubernetes.io/infra=truelabel. This change starts new deployments that place the registry and router pods on your new infrastructure nodes.Edit the docker-registry deployment configuration:
$ oc edit -n default dc/docker-registry
Update the
nodeSelectorparameter to use the following value, with"true"in quotation marks, and save your changes:nodeSelector: node-role.kubernetes.io/infra: "true"Edit the router deployment configuration:
$ oc edit -n default dc/router
Update the
nodeSelectorparameter to use the following value, with"true"in quotation marks, and save your changes:nodeSelector: node-role.kubernetes.io/infra: "true"Verify that the docker-registry and router pods are running and in ready state on the new infrastructure nodes:
$ oc get pods -n default -o wide

NAME                       READY     STATUS    RESTARTS   AGE       IP                NODE
docker-registry-2-b7xbn    1/1       Running   0          18m       10.128.0.188      infra-node3.example.com
router-2-mvq6p             1/1       Running   0          6m        192.168.122.184   infra-node4.example.com
- Update the default image streams and templates.
- Import the latest images. This process can trigger a large number of builds, but the builds are performed on the green nodes and, therefore, do not impact any traffic on the blue deployment.
To monitor build progress across all namespaces (projects) in the cluster:
$ oc get events -w --all-namespaces
In large environments, builds rarely completely stop. However, you should see a large increase and decrease caused by the administrative image import.
3.4. Evacuating and Decommissioning Blue Nodes
For larger deployments, it is possible to have other labels that help determine how evacuation can be coordinated. The most conservative approach for avoiding downtime is to evacuate one node host at a time.
If services are composed of pods using zone anti-affinity, you can evacuate an entire zone at one time. You must ensure that the storage volumes used are available in the new zone. Follow the directions in your cloud provider’s documentation.
In OpenShift Container Platform 3.2 and later, a node host evacuation is triggered whenever the node service is stopped. Node labeling is very important and can cause issues if nodes are mislabled or commands are run on nodes with generalized labels. Exercise caution if master hosts are also labeled with color=blue.
When you are ready to continue with the upgrade process, follow these steps.
Evacuate and delete all blue nodes with the following commands:
$ oc adm manage-node --selector=color=blue --evacuate
$ oc delete node --selector=color=blue
After the blue node hosts no longer contain pods and have been removed from OpenShift Container Platform, they are safe to power off. As a safety precaution, confirm that there are no issues with the upgrade before you power off the hosts.
Unregister each old host:
# subscription-manager clean
- Back up any useful scripts or required files that are stored on the hosts.
- After you are comfortable that the upgrade succeeded, remove these hosts.
Chapter 4. Updating operating systems
Updating the operating system (OS) on a host, by either upgrading across major releases or updating the system software for a minor release, can impact the OpenShift Container Platform software running on those machines. In particular, these updates can affect the iptables rules or ovs flows that OpenShift Container Platform requires to operate.
4.1. Updating the operating system on a host
To safely upgrade the OS on a host:
Drain the node in preparation for maintenance:
$ oc adm drain <node_name> --force --delete-local-data --ignore-daemonsets
In order to protect sensitive packages that do not need to be updated, apply the exclude rules to the host:
# atomic-openshift-docker-excluder exclude
# atomic-openshift-excluder exclude
Update the host packages and reboot the host. A reboot ensures that the host is running the newest versions and means that the
dockerand OpenShift Container Platform processes have been restarted, which forces them to check that all of the rules in other services are correct.# yum update # reboot
However, instead of rebooting a node host, you can restart the services that are affected or preserve the
iptablesstate. Both processes are described in the OpenShift Container Platform iptables topic. Theovsflow rules do not need to be saved, but restarting the OpenShift Container Platform node software fixes the flow rules.Configure the host to be schedulable again:
$ oc adm uncordon <node_name>
4.1.1. Upgrading Nodes Running OpenShift Container Storage
If using OpenShift Container Storage, upgrade the OpenShift Container Platform nodes running OpenShift Container Storage one at a time.
-
Run
oc get daemonset -n <project_name>to verify the label found underNODE-SELECTOR. The default value isglusterfs=storage-host. To determine what the pod is, runoc get pods -n <project_name> --selectors=glusterfs=. Remove the daemonset label from the node:
$ oc label node <node_name> <daemonset_label> -n <project_name>
This will cause the OpenShift Container Storage pod to terminate on that node. To overwrite the existing label, use the
--overwriteflag.-
To run the upgrade playbook on the single node where you terminated OpenShift Container Storage , use
-e openshift_upgrade_nodes_label="type=upgrade". When the upgrade completes, relabel the node with the daemonset label:
$ oc label node <node_name> <daemonset_label> -n <project_name>
- Wait for the OpenShift Container Storage pod to respawn and appear.
oc rshinto the gluster pod to check the volume heal:$ oc rsh <pod_name> $ for vol in `gluster volume list`; do gluster volume heal $vol info; done $ exit
Ensure all of the volumes are healed and there are no outstanding tasks. The
heal infocommand lists all pending entries for a given volume’s heal process. A volume is considered healed whenNumber of entriesfor that volume is0. Usegluster volume status <volume_name>for additional details about the volume. TheOnlinestate should be markedYfor all bricks.
Chapter 5. Downgrading OpenShift
5.1. Overview
Following an OpenShift Container Platform upgrade, it may be desirable in extreme cases to downgrade your cluster to a previous version. The following sections outline the required steps for each system in a cluster to perform such a downgrade for the OpenShift Container Platform 3.10 to 3.9 downgrade path.
These steps are currently only supported for RPM-based installations of OpenShift Container Platform and assumes downtime of the entire cluster.
5.2. Verifying Backups
The Ansible playbook used during the upgrade process should have created a backup of the master-config.yaml file. Ensure this and the scheduler.json file exist on your masters:
/etc/origin/master/master-config.yaml.<timestamp>
/etc/origin/master/scheduler.json
The procedure in Preparing for an Automated Upgrade instructed you to back up the following files before proceeding with an upgrade from OpenShift Container Platform 3.9 to 3.10; ensure that you still have these files available.
On master hosts:
/usr/lib/systemd/system/atomic-openshift-master-api.service
/usr/lib/systemd/system/atomic-openshift-master-controllers.service
/etc/sysconfig/atomic-openshift-master-api
/etc/sysconfig/atomic-openshift-master-controllers
On node and master hosts:
/usr/lib/systemd/system/atomic-openshift-*.service
/etc/origin/node/node-config.yaml
On etcd hosts, including masters that have etcd co-located on them:
/etc/etcd/etcd.conf
/backup/etcd-xxxxxx/backup.db
5.3. Shutting Down the Cluster
On all master and node hosts, stop the master and node services by removing the pod definition and rebooting the host:
# mkdir -p /etc/origin/node/pods-stopped
# mv /etc/origin/node/pods/* /etc/origin/node/pods-stopped/
# reboot
5.4. Removing RPMs and Static Pods
The *-excluder packages add entries to the exclude directive in the host’s /etc/yum.conf file when installed.
On all masters, nodes, and etcd members (if using a dedicated etcd cluster), remove the following packages:
# yum remove atomic-openshift \
    atomic-openshift-clients \
    atomic-openshift-node \
    atomic-openshift-master \
    atomic-openshift-sdn-ovs \
    atomic-openshift-excluder \
    atomic-openshift-docker-excluder \
    atomic-openshift-hyperkube
Verify the packages were removed successfully:
# rpm -qa | grep atomic-openshift
On control plane hosts (master and etcd hosts), move the static pod definitions:
# mkdir /etc/origin/node/pods-backup
# mv /etc/origin/node/pods/* /etc/origin/node/pods-backup/
Reboot each host:
# reboot
5.5. Downgrading Docker
Both OpenShift Container Platform 3.9 and 3.10 require Docker 1.13, so Docker does not need to be downgraded.
5.6. Reinstalling RPMs
Disable the OpenShift Container Platform 3.10 repositories, and re-enable the 3.9 repositories:
# subscription-manager repos \
    --disable=rhel-7-server-ose-3.10-rpms \
    --enable=rhel-7-server-ose-3.9-rpms
On each master, install the following packages:
# yum install atomic-openshift \
    atomic-openshift-clients \
    atomic-openshift-node \
    atomic-openshift-master \
    openvswitch \
    atomic-openshift-sdn-ovs \
    tuned-profiles-atomic-openshift-node \
    atomic-openshift-excluder \
    atomic-openshift-docker-excluder
On each node, install the following packages:
# yum install atomic-openshift \
    atomic-openshift-node \
    openvswitch \
    atomic-openshift-sdn-ovs \
    tuned-profiles-atomic-openshift-node \
    atomic-openshift-excluder \
    atomic-openshift-docker-excluder
On each host, verify the packages were installed successfully:
# rpm -qa | grep atomic-openshift
# rpm -q openvswitch
5.7. Restoring etcd
The restore procedure for etcd configuration files replaces the appropriate files, then restarts the service or static pod.
If an etcd host has become corrupted and the /etc/etcd/etcd.conf file is lost, restore it using:
$ ssh master-0
# cp /backup/yesterday/master-0-files/etcd.conf /etc/etcd/etcd.conf
# restorecon -Rv /etc/etcd/etcd.conf
In this example, the backup file is stored in the /backup/yesterday/master-0-files/etcd.conf path where it can be used as an external NFS share, S3 bucket, or other storage solution.
If you run etcd as a static pod, follow only the steps in that section. If you run etcd as a separate service on either master or standalone nodes, follow the steps to restore v2 or v3 data as required.
5.7.1. Restoring etcd v3 snapshot
Snapshot integrity may be optionally verified at restore time. If the snapshot is taken with etcdctl snapshot save, it will have an integrity hash that is checked by etcdctl snapshot restore. If the snapshot is copied from the data directory, there is no integrity hash and it will only restore by using --skip-hash-check.
The procedure to restore the data must be performed on a single etcd host. You can then add the rest of the nodes to the cluster.
Procedure
Unmask the etcd service:
# systemctl unmask etcd
Stop all etcd services by removing the etcd pod definition and rebooting the host:
# mkdir -p /etc/origin/node/pods-stopped
# mv /etc/origin/node/pods/* /etc/origin/node/pods-stopped/
# reboot
Clear all old data, because
etcdctlrecreates it in the node where the restore procedure is going to be performed:# rm -Rf /var/lib/etcd
Run the
snapshot restorecommand, substituting the values from the/etc/etcd/etcd.conffile:# etcdctl3 snapshot restore /backup/etcd-xxxxxx/backup.db \ --data-dir /var/lib/etcd \ --name master-0.example.com \ --initial-cluster "master-0.example.com=https://192.168.55.8:2380" \ --initial-cluster-token "etcd-cluster-1" \ --initial-advertise-peer-urls https://192.168.55.8:2380 \ --skip-hash-check=true 2017-10-03 08:55:32.440779 I | mvcc: restore compact to 1041269 2017-10-03 08:55:32.468244 I | etcdserver/membership: added member 40bef1f6c79b3163 [https://192.168.55.8:2380] to cluster 26841ebcf610583c
Restore permissions and
selinuxcontext to the restored files:# restorecon -Rv /var/lib/etcd
Start the etcd service:
# systemctl start etcd
Check for any error messages:
# journalctl -fu etcd.service
5.7.2. Restoring etcd on a static pod
Before restoring etcd on a static pod:
etcdctlbinaries must be available or, in containerized installations, therhel7/etcdcontainer must be available.You can obtain etcd by running the following commands:
$ git clone https://github.com/coreos/etcd.git
$ cd etcd
$ ./build
To restore etcd on a static pod:
If the pod is running, stop the etcd pod by moving the pod manifest YAML file to another directory:
$ mv /etc/origin/node/pods/etcd.yaml .
Clear all old data:
$ rm -rf /var/lib/etcd
You use the etcdctl to recreate the data in the node where you restore the pod.
Restore the etcd snapshot to the mount path for the etcd pod:
$ export ETCDCTL_API=3
$ etcdctl snapshot restore /etc/etcd/backup/etcd/snapshot.db
	 --data-dir /var/lib/etcd/
	 --name ip-172-18-3-48.ec2.internal
	 --initial-cluster "ip-172-18-3-48.ec2.internal=https://172.18.3.48:2380"
	 --initial-cluster-token "etcd-cluster-1"
	 --initial-advertise-peer-urls https://172.18.3.48:2380
	 --skip-hash-check=true
Obtain the values for your cluster from the $/backup_files/etcd.conf file.
Set required permissions and selinux context on the data directory:
$ restorecon -Rv /var/lib/etcd/
Restart the etcd pod by moving the pod manifest YAML file to the required directory:
$ mv etcd.yaml /etc/origin/node/pods/.
5.7.3. Adding etcd nodes after restoring
After the first instance is running, you can add multiple etcd servers to your cluster.
Procedure
Get the etcd name for the instance in the
ETCD_NAMEvariable:# grep ETCD_NAME /etc/etcd/etcd.conf
Get the IP address where etcd listens for peer communication:
# grep ETCD_INITIAL_ADVERTISE_PEER_URLS /etc/etcd/etcd.conf
If the node was previously part of a etcd cluster, delete the previous etcd data:
# rm -Rf /var/lib/etcd/*
On the etcd host where etcd is properly running, add the new member:
# etcdctl3 member add *<name>* \
  --peer-urls="*<advertise_peer_urls>*"
The command outputs some variables. For example:
ETCD_NAME="master2"
ETCD_INITIAL_CLUSTER="master-0.example.com=https://192.168.55.8:2380"
ETCD_INITIAL_CLUSTER_STATE="existing"
Add the values from the previous command to the
/etc/etcd/etcd.conffile of the new host:# vi /etc/etcd/etcd.conf
Start the etcd service in the node joining the cluster:
# systemctl start etcd.service
Check for error messages:
# journalctl -fu etcd.service
- Repeat the previous steps for every etcd node to be added.
Once you add all the nodes, verify the cluster status and cluster health:
# etcdctl3 endpoint health --endpoints="https://<etcd_host1>:2379,https://<etcd_host2>:2379,https://<etcd_host3>:2379"
https://master-0.example.com:2379 is healthy: successfully committed proposal: took = 1.423459ms
https://master-1.example.com:2379 is healthy: successfully committed proposal: took = 1.767481ms
https://master-2.example.com:2379 is healthy: successfully committed proposal: took = 1.599694ms

# etcdctl3 endpoint status --endpoints="https://<etcd_host1>:2379,https://<etcd_host2>:2379,https://<etcd_host3>:2379"
https://master-0.example.com:2379, 40bef1f6c79b3163, 3.2.5, 28 MB, true, 9, 2878
https://master-1.example.com:2379, 1ea57201a3ff620a, 3.2.5, 28 MB, false, 9, 2878
https://master-2.example.com:2379, 59229711e4bc65c8, 3.2.5, 28 MB, false, 9, 2878
5.8. Bringing OpenShift Container Platform services back online
After you finish your changes, bring OpenShift Container Platform back online.
Procedure
On each OpenShift Container Platform master, restore your master and node configuration from backup and enable and restart all relevant services:
# cp ${MYBACKUPDIR}/etc/origin/node/pods/* /etc/origin/node/pods/
# cp ${MYBACKUPDIR}/etc/origin/master/master.env /etc/origin/master/master.env
# cp ${MYBACKUPDIR}/etc/origin/master/master-config.yaml.<timestamp> /etc/origin/master/master-config.yaml
# cp ${MYBACKUPDIR}/etc/origin/node/node-config.yaml.<timestamp> /etc/origin/node/node-config.yaml
# cp ${MYBACKUPDIR}/etc/origin/master/scheduler.json.<timestamp> /etc/origin/master/scheduler.json
# cp ${MYBACKUPDIR}/usr/lib/systemd/system/atomic-openshift-master-api.service /usr/lib/systemd/system/atomic-openshift-master-api.service
# cp ${MYBACKUPDIR}/usr/lib/systemd/system/atomic-openshift-master-controllers.service /usr/lib/systemd/system/atomic-openshift-master-controllers.service
# rm /etc/systemd/system/atomic-openshift-node.service
# systemctl daemon-reload
# master-restart api
# master-restart controllers
On each OpenShift Container Platform node, update the node configuration maps as needed, and enable and restart the atomic-openshift-node service:
# cp /etc/origin/node/node-config.yaml.<timestamp> /etc/origin/node/node-config.yaml
# rm /etc/systemd/system/atomic-openshift-node.service
# systemctl daemon-reload
# systemctl enable atomic-openshift-node
# systemctl start atomic-openshift-node
5.9. Verifying the Downgrade
To verify the downgrade, first check that all nodes are marked as Ready:
# oc get nodes
NAME                        STATUS                     AGE
master.example.com          Ready,SchedulingDisabled   165d
node1.example.com           Ready                      165d
node2.example.com           Ready                      165d
Verify the successful downgrade of the registry and router, if deployed:
Verify you are running the
v3.9versions of the docker-registry and router images:# oc get -n default dc/docker-registry -o json | grep \"image\" "image": "openshift3/ose-docker-registry:v3.9", # oc get -n default dc/router -o json | grep \"image\" "image": "openshift3/ose-haproxy-router:v3.9",Verify that docker-registry and router pods are running and in ready state:
# oc get pods -n default

NAME                       READY     STATUS    RESTARTS   AGE
docker-registry-2-b7xbn    1/1       Running   0          18m
router-2-mvq6p             1/1       Running   0          6m
Use the diagnostics tool on the master to look for common issues and provide suggestions:
# oc adm diagnostics
...
[Note] Summary of diagnostics execution:
[Note] Completed with no errors or warnings seen.