
Chapter 2. Getting started with rules
You can get started creating custom MTA rules by creating a rule or by reviewing the quickstarts.
2.1. Creating your first XML rule
This section guides you through the process of creating and testing your first MTA XML-based rule. This assumes that you have already installed MTA. See the CLI Guide for installation instructions.
In this example, you will write a rule to discover instances where an application defines a jboss-web.xml file containing a <class-loading> element and provide a link to the documentation that describes how to migrate the code.
Creating the directory structure for the rule
Create a directory structure to contain your first rule and the data file to use for testing.
$ mkdir -p /home/<USER_NAME>/migration-rules/rules
$ mkdir -p /home/<USER_NAME>/migration-rules/data
This directory structure will also be used to hold the generated MTA reports.
Creating data to test the rule
-
Create a
jboss-web.xmlfile in the/home/<USER_NAME>/migration-rules/data/subdirectory. Copy in the following content.
<!DOCTYPE jboss-web PUBLIC "-//JBoss//DTD Web Application 4.2//EN" "http://www.jboss.org/j2ee/dtd/jboss-web_4_2.dtd">
<jboss-web>
    <class-loading java2ClassLoadingCompliance="false">
        <loader-repository>
            seam.jboss.org:loader=@projectName@
            <loader-repository-config>java2ParentDelegation=false</loader-repository-config>
        </loader-repository>
    </class-loading>
</jboss-web>
Creating the rule
MTA XML-based rules use the following rule pattern:
when(condition)
  perform(action)
otherwise(action)
Procedure
In the
/home/<USER_NAME>/migration-rules/rules/directory, create a file namedJBoss5-web-class-loading.windup.xmlthat contains the following content:<?xml version="1.0"?> <ruleset id="<UNIQUE_RULESET_ID>" xmlns="http://windup.jboss.org/schema/jboss-ruleset" xmlns:xsi="http://www.w3.org/2001/XMLSchema-instance" xsi:schemaLocation="http://windup.jboss.org/schema/jboss-ruleset http://windup.jboss.org/schema/jboss-ruleset/windup-jboss-ruleset.xsd"> <metadata> <description> <!-- Ruleset Description --> </description> <dependencies> <!-- Ruleset Dependencies --> </dependencies> <sourceTechnology id="<SOURCE_ID>" versionRange="<SOURCE_VERSION_RANGE>"/> <targetTechnology id="<TARGET_ID>" versionRange="<TARGET_VERSION_RANGE>"/> <tag>Reviewed-2015-05-01</tag> </metadata> <rules> <rule id="<UNIQUE_RULE_ID>"> <when> <!-- Test for a condition here --> </when> <perform> <!-- Perform an action --> </perform> </rule> </rules> </ruleset>NoteThe XML file name must include the
.windup.xmlor.mta.xmlextension. Otherwise, MTA does not evaluate the new rule.Add a unique identifier for the ruleset and rule:
-
Replace
<UNIQUE_RULESET_ID>with an appropriate ruleset ID, for example,JBoss5-web-class-loading. -
Replace
<UNIQUE_RULE_ID>with an appropriate rule ID, for example,JBoss5-web-class-loading_001.
-
Replace
Add the following ruleset add-on dependencies:
<dependencies>
  <addon id="org.jboss.windup.rules,windup-rules-javaee,3.0.0.Final"/>
  <addon id="org.jboss.windup.rules,windup-rules-java,3.0.0.Final"/>
</dependencies>
Add the source and target technologies:
-
Replace
<SOURCE_ID>witheap. -
Replace
<TARGET_ID>witheap.
-
Replace
Set the source and target technology versions.
-
Replace
<SOURCE_VERSION_RANGE>with(4,5). -
Replace
<TARGET_VERSION_RANGE>with(6,).
See the Apache Maven version range specification for more information.
-
Replace
Complete the
whencondition. Because this rule tests for a match in an XML file,xmlfileis used to evaluate the files.To match on the
class-loadingelement that is a child ofjboss-web, use the xpath expressionjboss-web/class-loading.<when> <xmlfile matches="jboss-web/class-loading" /> </when>Complete the
performaction for this rule.-
Add a classification with a descriptive title and a level of effort of
1. Provide a hint with an informative message and a link to documentation that describes the migration details.
<perform> <iteration> <classification title="JBoss Web Application Descriptor" effort="1"/> <hint title="JBoss Web XML class-loading element is no longer valid"> <message> The class-loading element is no longer valid in the jboss-web.xml file. </message> <link href="https://access.redhat.com/documentation/en-US/JBoss_Enterprise_Application_Platform/6.4/html-single/Migration_Guide/index.html#Create_or_Modify_Files_That_Control_Class_Loading_in_JBoss_Enterprise_Application_Platform_6" title="Create or Modify Files That Control Class Loading in JBoss EAP 6"/> </hint> </iteration> </perform>
-
Add a classification with a descriptive title and a level of effort of
The rule is now complete and should look like the following example.
<?xml version="1.0"?>
<ruleset id="JBoss5-web-class-loading"
xmlns="http://windup.jboss.org/schema/jboss-ruleset"
xmlns:xsi="http://www.w3.org/2001/XMLSchema-instance"
xsi:schemaLocation="http://windup.jboss.org/schema/jboss-ruleset http://windup.jboss.org/schema/jboss-ruleset/windup-jboss-ruleset.xsd">
<metadata>
<description>
This ruleset looks for the class-loading element in a jboss-web.xml file, which is no longer valid in JBoss EAP 6
</description>
<dependencies>
<addon id="org.jboss.windup.rules,windup-rules-javaee,3.0.0.Final"/>
<addon id="org.jboss.windup.rules,windup-rules-java,3.0.0.Final"/>
</dependencies>
<sourceTechnology id="eap" versionRange="(4,5)"/>
<targetTechnology id="eap" versionRange="[6,)"/>
</metadata>
<rules>
<rule id="JBoss5-web-class-loading_001">
<when>
    <xmlfile matches="jboss-web/class-loading" />
</when>
<perform>
<iteration>
<classification title="JBoss Web Application Descriptor" effort="1"/>
<hint title="JBoss Web XML class-loading element is no longer valid">
<message>
The class-loading element is no longer valid in the jboss-web.xml file.
</message>
<link href="https://access.redhat.com/documentation/en-US/JBoss_Enterprise_Application_Platform/6.4/html-single/Migration_Guide/index.html#Create_or_Modify_Files_That_Control_Class_Loading_in_JBoss_Enterprise_Application_Platform_6" title="Create or modify files that control class loading in JBoss EAP 6"/>
</hint>
</iteration>
</perform>
</rule>
</rules>
</ruleset>Installing the rule
An MTA rule is installed by placing the rule into the appropriate directory.
Copy the JBoss5-web-class-loading.windup.xml file to the <MTA_HOME>/rules/ directory.
$ cp /home/<USER_NAME>/migration-rules/rules/JBoss5-web-class-loading.windup.xml <MTA_HOME>/rules/
Testing the rule
Open a terminal and execute the following command, passing the test file as an input argument and a directory for the output report.
$ <MTA_HOME>/bin/mta-cli --sourceMode --input /home/<USER_NAME>/migration-rules/data --output /home/<USER_NAME>/migration-rules/reports --target eap:6
You should see the following result.
Report created: /home/<USER_NAME>/migration-rules/reports/index.html
              Access it at this URL: file:///home/<USER_NAME>/migration-rules/reports/index.html
Reviewing the reports
Review the report to be sure that it provides the expected results. For a more detailed walkthrough of MTA reports, see the Review the reports section of the MTA CLI Guide.
-
Open
/home/<USER_NAME>/migration-rules/reports/index.htmlin a web browser. Verify that the rule executed.
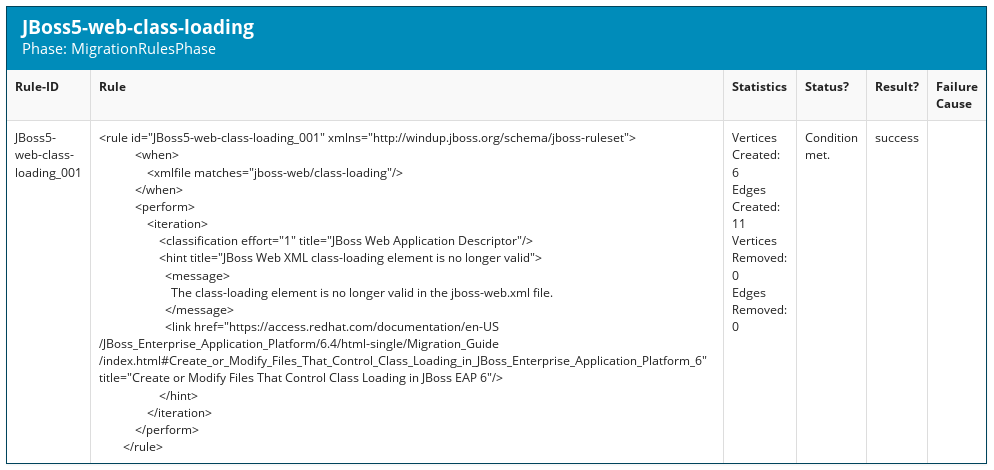
- From the main landing page, click the Rule providers execution overview link to open the Rule Providers Execution Overview.
Find the
JBoss5-web-class-loading_001rule and verify that its Status? isCondition metand its Result? issuccess.Figure 2.1. Test rule execution
Verify that the rule matches the test data:
-
From the main landing page, click the name of the application or input folder, which is
datain this example. - Click the Application Details report link.
Click the jboss-web.xml link to view the Source Report.
You can see that the
<class-loading>line is highlighted, and the hint from the custom rule is shown inline.Figure 2.2. Rule match
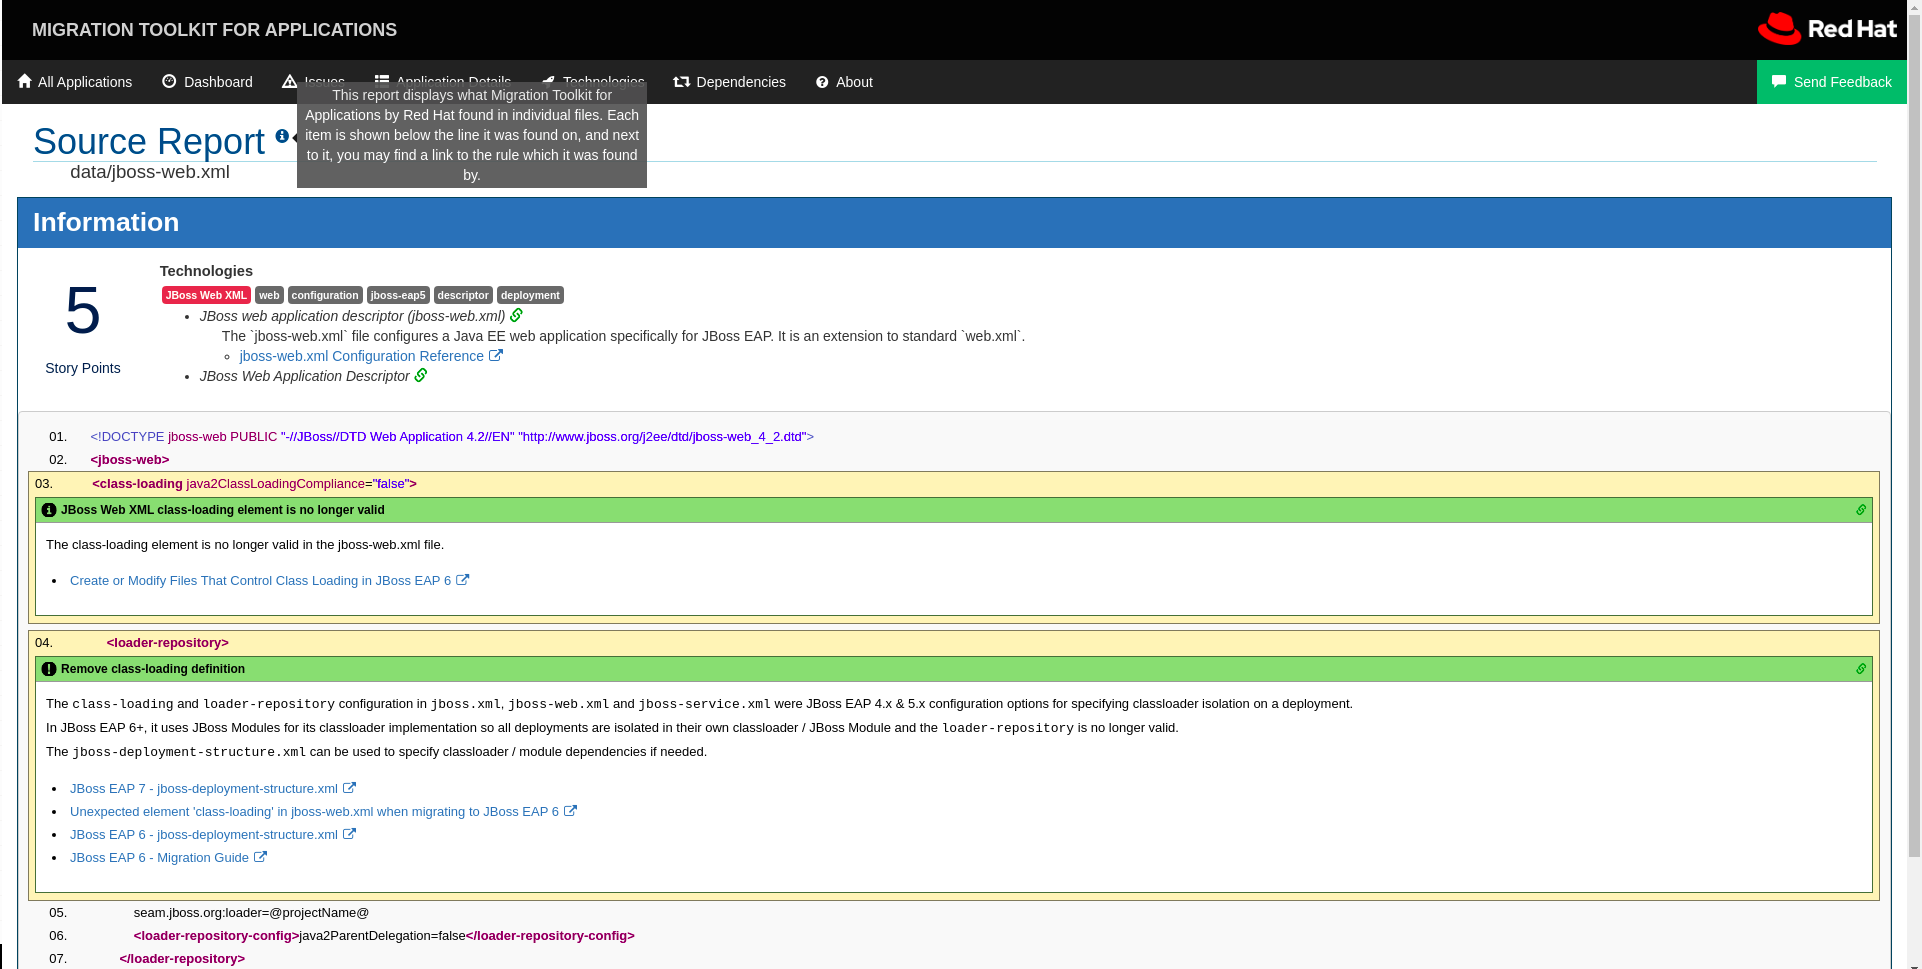
The top of the file lists the classifications for matching rules. You can use the link icon to view the details for that rule. Notice that in this example, the
jboss-web.xmlfile matched on another rule (JBoss web application descriptor (jboss-web.xml)) that produced1story point. This, combined with the1story point from our custom rule, brings the total story points for this file to2.
-
From the main landing page, click the name of the application or input folder, which is
2.2. Reviewing the Migration Toolkit for Applications quickstarts
The Migration Toolkit for Applications quickstarts provide working examples of how to create custom Java-based rule add-ons and XML rules. You can use them as a starting point for creating your own custom rules.
Each quickstart has a README.adoc file that contains instructions for that quickstart.
You can download a Zip archive file of the latest version of the quickstarts. If you prefer to work with the source code, you can fork and clone the windup-quickstarts project repository.
Downloading the latest quickstart
You can download the latest release of a quickstart.
Procedure
- Launch a browser and navigate to https://github.com/windup/windup-quickstarts/releases.
- Click the latest release to download the Zip archive file to your local file system.
Extract the archive files to a local directory.
You can review the quickstart
README.adocfile.
Forking and cloning the quickstart GitHub project
You can fork and clone the Quickstart Github project on your local machine.
Prerequisites
-
You must have
gitclient installed.
Procedure
-
Click Fork on the Migration Toolkit for Applications quickstart GitHub page to create the project in your own Git. The forked GitHub repository URL should look like this:
https://github.com/<YOUR_USER_NAME>/windup-quickstarts.git. Clone the Migration Toolkit for Applications quickstart repository to your local file system:
$ git clone https://github.com/<YOUR_USER_NAME>/windup-quickstarts.git
This creates a
windup-quickstartsdirectory on your local file system.Navigate to the newly created directory:
$ cd windup-quickstarts/
To retrieve the latest code updates, add the remote
upstreamrepository so that you can fetch changes to the original forked repository:$ git remote add upstream https://github.com/windup/windup-quickstarts.git
Download the latest files from the
upstreamrepository:$ git fetch upstream