
Installation Guide
For use with Red Hat JBoss Enterprise Application Platform 6
Abstract
Chapter 1. Product Overview
1.1. About Red Hat JBoss Enterprise Application Platform 6
1.2. Features of JBoss EAP 6
Table 1.1. JBoss EAP 6.3.0 Features
| Feature | Description |
|---|---|
| Java Certification | Java Enterprise Edition 6 Full Profile and Web Profile certified. |
| Managed Domain |
|
| Management Console and Management CLI | New domain or standalone server management interfaces. XML configuration file editing is no longer required. The Management CLI also includes a batch mode that can script and automate management tasks. |
| Simplified directory layout | The modules directory now contains all application server modules. The common and server-specific lib directories are deprecated. The domain and standalone directories contain the artifacts and configuration files for domain and standalone deployments respectively. |
| Modular classloading mechanism | Modules are loaded and unloaded on demand. This improves performance, has security benefits and reduces start-up and restart times. |
| Streamlined Data source management | Database drivers are deployed just like other services. In addition, datasources are created and managed directly in the Management Console or Management CLI. |
| Reduced and more efficient resource use. | JBoss EAP 6 uses fewer system resources and uses them more efficiently than previous versions. Among other benefits, JBoss EAP 6 starts and stops faster than JBoss EAP 5. |
Chapter 2. Introduction
2.1. About the Red Hat Customer Portal
- Manage and maintain Red Hat entitlements and support contracts.
- Download officially-supported software.
- Access product documentation and the Red Hat Knowledgebase.
- Contact Global Support Services.
- File bugs against Red Hat products.
Chapter 3. System Requirements
3.1. JBoss EAP 6 Installation Prerequisites
Common Prerequisites
- Set up an account on the Red Hat Customer Portal at https://access.redhat.com. For more information, refer here: Section 2.1, “About the Red Hat Customer Portal”.
- Review the supported configurations and ensure your system is supportable: https://access.redhat.com/site/articles/111663.
- Ensure that your system is up to date with Red Hat issued updates and errata.
ZIP/Installer Prerequisites
- Administration privileges for the installation directory.
- Ensure that the chosen JDK has been extracted (or installed). Refer to the JDK's documentation for information on how to do this.
- On Microsoft Windows Server, ensure that the JAVA_HOME and PATH environment variables have been set, otherwise shortcuts will not work.
- On Hewlett-Packard HP-UX, ensure that an
unziputility has been installed.
RPM Prerequisites
- Register the server on the Red Hat Network.
- Subscribe to the
Red Hat Enterprise Linux Serverbase software channel appropriate to your Red Hat Enterprise Linux version. - Subscribe to the
JBoss Application Platform for Serversub-channel, in theJBoss Enterprise Platformgroup. - On Red Hat Enterprise Linux 5, JDK 6 must be installed, even if JDK 7 only is to be used. On Red Hat Enterprise Linux 6 and higher, only a JDK 7 is required. This can be obtained by subscribing to the
supplementarysoftware channel for your Red Hat Enterprise Linux installation. For example; the channel for Red Hat Enterprise Linux version 6 installed on i386 architecture isrhel-i386-server-supplementary-6.
ppc64 Prerequisites
- On Red Hat Enterprise Linux 6, subscribe to the
rhel-ppc64-server-optional-6channel. - On Red Hat Enterprise Linux 7, subscribe to the
rhel-7-server-optional-rpms-7Serverrepository.
Chapter 4. Install Instructions
4.1. JBoss EAP 6 Installation Methods
Table 4.1. Installation Methods
|
Method
|
Description
|
Instructions
|
|---|---|---|
|
Zip Installation
|
The Zip archive is suitable for installation on all supported operating systems. This process should be used if you wish to extract the instance manually.
| |
|
JAR Installer
|
The JAR installer can be run in a console, or as a graphical wizard. Both options provide step-by-step instructions for installing and configuring the server instance. Additional setup, including the Quickstarts and Maven Repository, is also possible with the installer. This is the preferred way to install JBoss EAP 6 on all supported platforms.
| |
|
RPM Installation
|
JBoss EAP 6 can be installed with the supported RPM package graphical installer, or with a command-line interface. This method is suitable for supported installations of Red Hat Enterprise Linux 5 and 6.
|
4.2. Zip Installation
4.2.1. Download JBoss EAP 6 (Zip Installation)
Prerequisites:
The JBoss EAP 6 ZIP file is available from the Red Hat Customer Portal. The ZIP file installation is platform-independent. This topic covers the steps to download the archive.
Procedure 4.1. Download the ZIP file
- Open a browser and log into the Customer Portal at https://access.redhat.com.
- Click .
- Click Red Hat JBoss Enterprise Application Platform in the Product Downloads list.
- Select the correct JBoss EAP version from the Version drop-down menu.
- Find Red Hat JBoss Enterprise Application Platform 6.x.x in the list and click the option.
JBoss EAP 6 is now downloaded to your target machine, ready for installation.
4.2.2. Install JBoss EAP 6 (ZIP Installation)
Previous Step in Zip Installation
This topic covers the steps to install JBoss EAP 6 using the downloaded ZIP file.
Procedure 4.2. ZIP File Installation
Move the ZIP archive to the desired location.
Move the ZIP file to the server and directory where you plan to install JBoss EAP 6. The user who will start and stop the server must have read and write access to this directory.Use an appropriate application to extract the ZIP archive to the desired location.
In a Red Hat Enterprise Linux environment, use theunziputility to extract the contents of the ZIP archive.In a Microsoft Windows environment, right-click the file and select Extract All.In a Hewlett-Packard HP-UX environment, use theunziputility to extract the contents of the ZIP archive.
JBoss EAP 6 has been installed successfully. The directory created by extracting the ZIP archive is the top-level directory for the server. This is referred to as EAP_HOME.
4.2.3. Uninstall JBoss EAP 6 (Zip Installation)
Previous Step in Zip Installation
Backup any modified configuration files and deployments that may be reused in a later instance.
This section covers the steps required to uninstall a Zip installation of JBoss EAP 6.
Procedure 4.3. Uninstall JBoss EAP 6 (Zip installation)
- Go to the directory where you had extracted the JBoss EAP 6 folder from the Zip file.
Delete the installation directory.
JBoss EAP 6 installs in a single directory when you use the Zip installation method. Delete the installation directory to uninstall JBoss EAP 6.Optional: Delete any initialization scripts you created.
If you created initialization scripts or other scripts which depended upon JBoss EAP 6 being installed on your computer, delete them.
JBoss EAP 6 is uninstalled from the server.
4.3. Installer
4.3.1. Download JBoss EAP 6 (Installer)
Prerequisites:
The JBoss EAP 6 installer archive is available from the Red Hat Customer Portal. The .jar archive can be used to run either the graphical or text-based installers. The installer is the preferred way to install JBoss EAP 6 on all supported platforms. This topic covers the steps to download the archive.
Procedure 4.4. Download the Installer
- Open a browser and log into the Customer Portal at https://access.redhat.com.
- Click .
- Click Red Hat JBoss Enterprise Application Platform in the Product Downloads list.
- Select the correct JBoss EAP version from the Version drop-down menu.
- Find Red Hat JBoss Enterprise Application Platform 6.x.x Installer in the list and click the option.
JBoss EAP 6 is now downloaded to your target machine, ready for installation.
4.3.2. Run the JBoss EAP Installation Program
Procedure 4.5. Run the JBoss EAP Installation Program
- Open a terminal and navigate to the directory containing the downloaded installation program JAR.
- Type the following command:
java -jar jboss-eap-6.3.0-installer.jar
- Follow the instructions in the table below.
Table 4.2. JBoss EAP Installation Program Screens
|
Screen name
|
When it Appears
|
Description
|
|---|---|---|
|
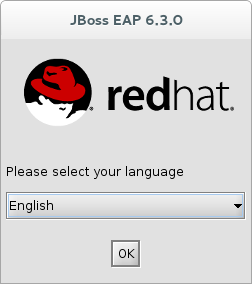
Always
|
Choose the desired language for the installation program and click .
| |
|
Always
|
The EULA for RED HAT JBOSS MIDDLEWARE.
Select "I accept the terms of this license agreement", and click .
| |
|
Always
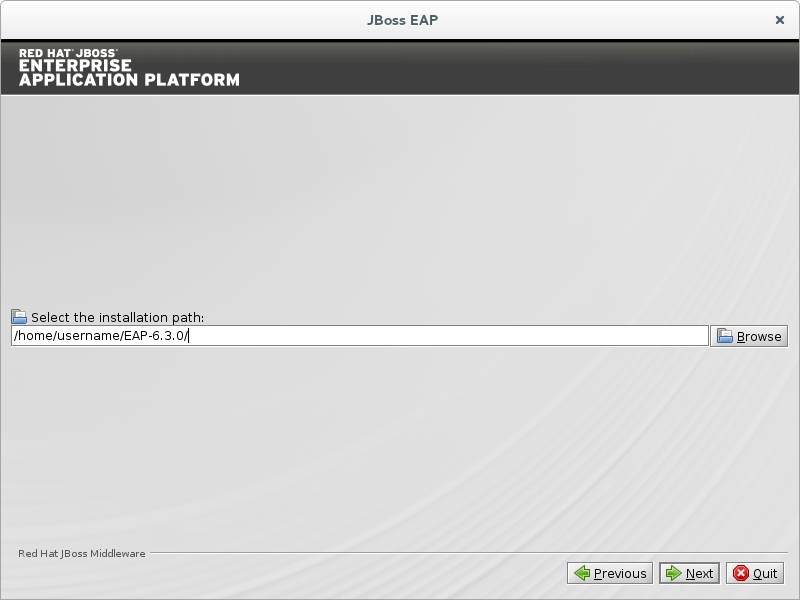
|
Select the installation path for JBoss EAP and click . You are prompted to create the new directory, or, if it exists, to replace the named directory.
| |
|
Always
|
Select the packs to install. Required packs are disabled for deselection.
| |
|
Always
|
Create an administrative user and assign a password. The password must be at least eight characters long, with one alphabetic character, one digit, and one non-alphanumeric character. Then click .
| |
|
Always
|
Install the quickstart examples. If you would like to install them, choose and select the installation path. If you do not wish to install them, choose . Then click .
| |
|
If you choose to install the quickstart examples
|
A publicly hosted Maven repository is available for use with the quickstarts. The default selections automatically configure your installation to use this repository. This is the easiest way to run the quickstarts. If you prefer, specify the path to a locally installed repository, Specify a path if your Maven settings file is not in the default location.
| |
|
Always
|
Determine whether the installation will use the default port bindings, configure custom port bindings, or configure port offsets for all default bindings. If you select custom bindings, select whether to configure the ports for standalone mode, domain mode, or both. If you choose to configure port offsets, choose the offset. Then click .
| |
|
If you choose to configure the custom port bindings for standalone mode
|
Configure the ports and system properties for the various standalone modes, then click .
| |
|
If you choose to configure the custom port bindings for domain mode.
|
Configure the ports and system properties for the various domain modes, then click .
| |
|
Always
|
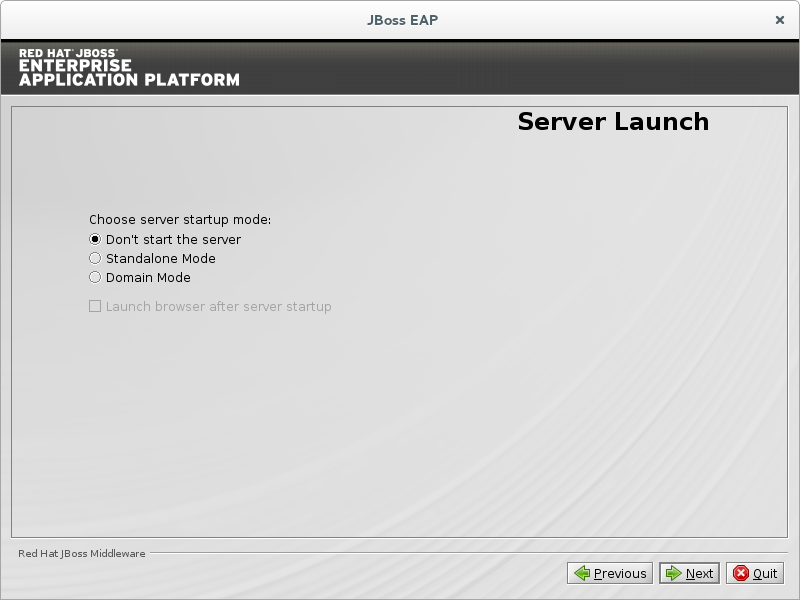
Select the startup option required on completion of the installation process. Then click .
| |
|
Always
|
Choose to configure log levels, or to skip this configuration. Then click .
| |
|
Always
|
Choose to install the default configuration. Choose to choose from a list of advanced configuration options. Advanced options can also be configured after installation. Then click .
| |
|
If you choose to install password vault in advanced configuration of runtime environment
|
Configure a password vault to store all your sensitive passwords in an encrypted keystore and click . For more information see: Administration and Configuration Guide, "Mask the Keystore Password and Initialize the Password Vault"
| |
|
If you choose to enable SSL security in advanced configuration of runtime environment
|
Configure an SSL keystore for securing EAP management interfaces. Then click . For more information see: Security Guide, "Generate a SSL Encryption Key and Certificate"
Warning
Red Hat recommends that you explicitly disable SSL in favor of TLSv1.1 or TLSv1.2 in all affected packages.
| |
|
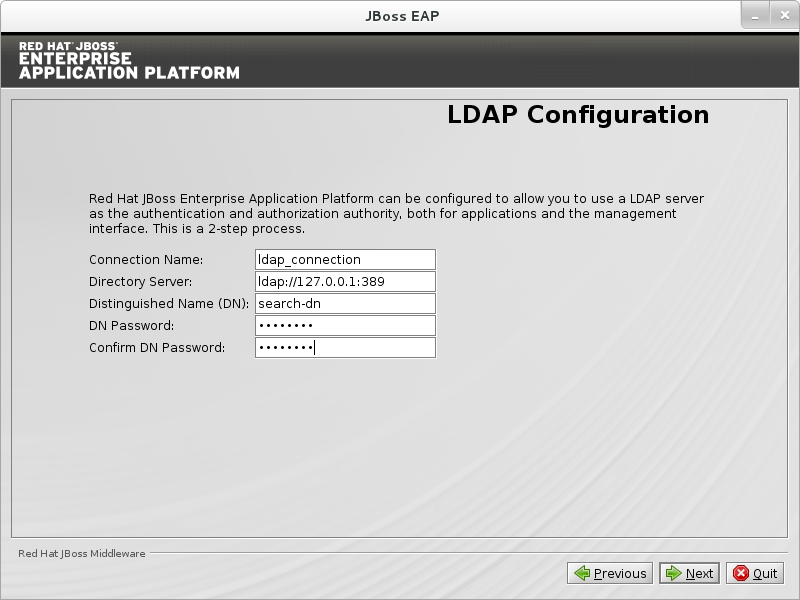
If you choose to enable LDAP Configuration in advanced configuration of runtime environment
|
Enable LDAP authentication to use an LDAP directory server as the authentication source for the Management Console, Management CLI or Management API. When you are done click . For more information see: Administration and Configuration Guide, "Use LDAP to Authenticate to the Management Interfaces"
| |
|
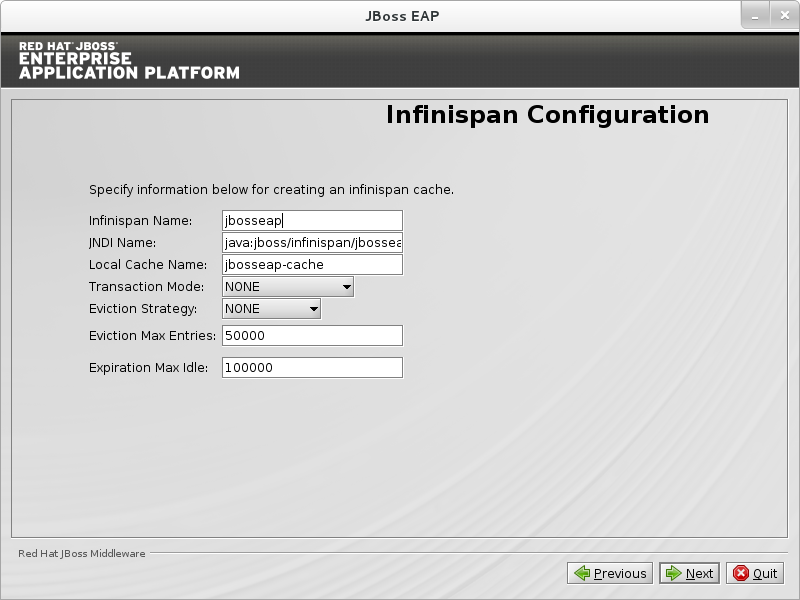
If you choose to install Infinispan cache in advanced configuration of runtime environment
|
Create an Infinispan cache for managing cached data. Give an Infinispan name, configure the other fields and click . For more information see: Administration and Configuration Guide, "Chapter 14 Infinispan"
| |
|
If you choose to add a security domain in advanced configuration of runtime environment
|
Configure a security domain to incorporate the services provided by PicketBox to a JBoss EAP server instance. Most of the fields are already populated with default values and do not need modifications. When you are done click . For more information see: Administration and Configuration Guide, "Security Domains"
| |
|
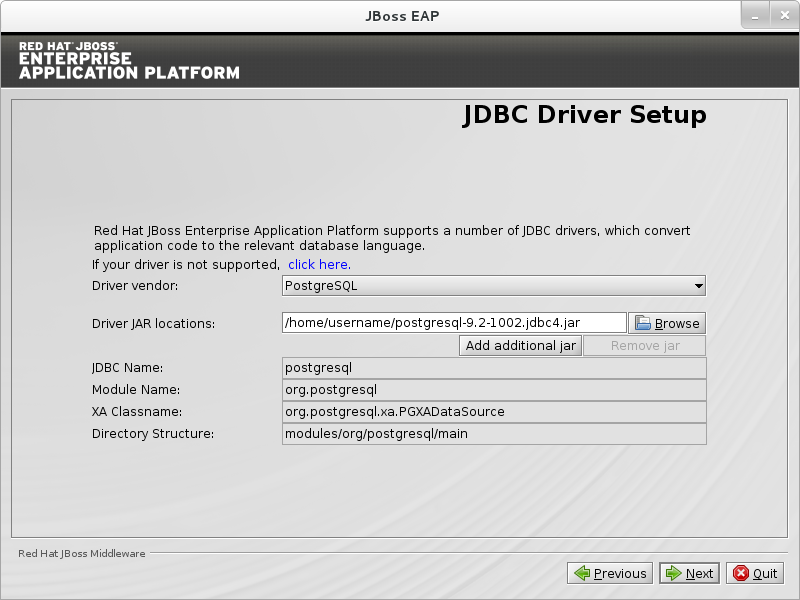
If you choose to install a JDBC driver in advanced configuration of runtime environment
|
Install and setup a JDBC driver to convert your application code to the relevant database language. Choose an appropriate driver from the supported list of drivers which appears in "Driver Vendor" drop down list. For more information see: Administration and Configuration Guide, "Chapter 6 Datasource Management"
| |
|
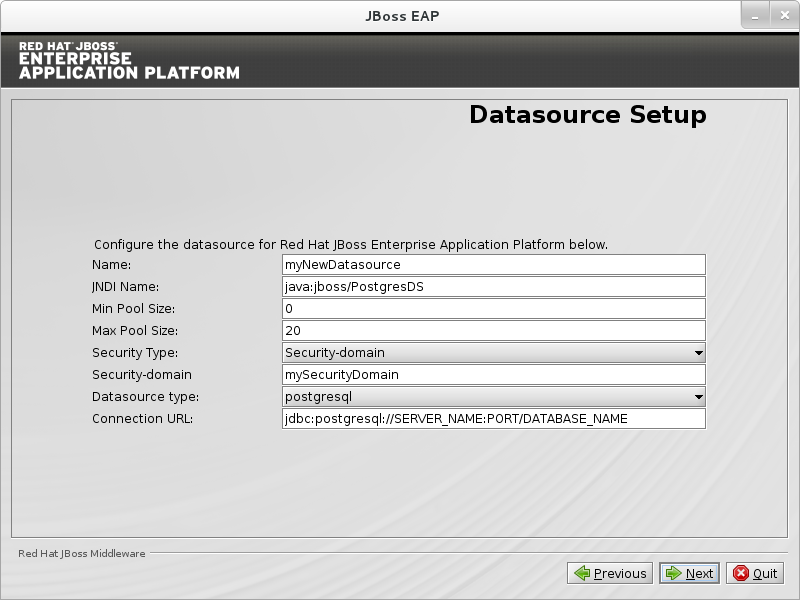
If you choose to install a datasource in advanced configuration of runtime environment
|
Configure a datasource which can be used by applications. Give a datasource name, configure the other fields and click . For more information see: Administration and Configuration Guide, "Datasource Configuration"
| |
|
Always
|
Review your selections and click .
| |
|
Always
|
When installation progress completes, click .
| |
|
Always
|
When processing finishes, click .
| |
|
Always
|
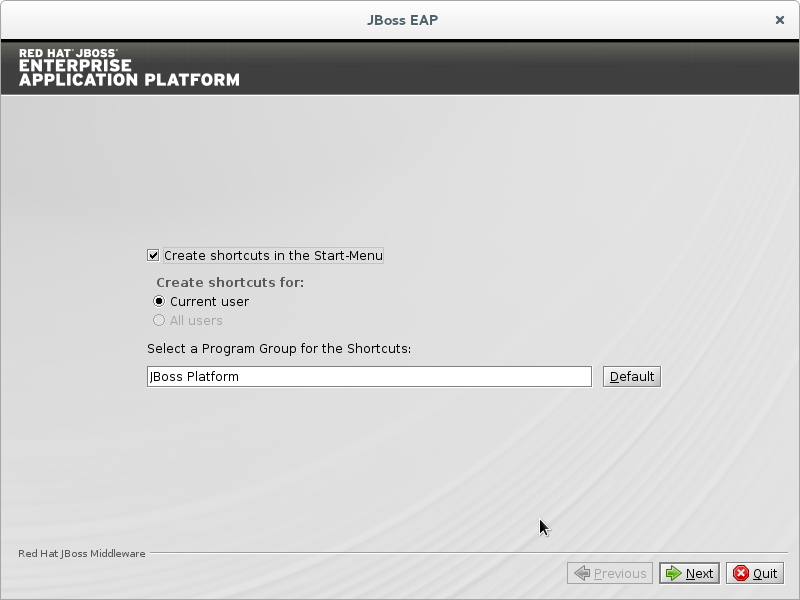
Choose whether to create shortcuts and how to configure them. Then click .
| |
|
Always
|
Click if you want to capture the selected installation options. Then click .
Installation is now complete.
|
The installation is complete and JBoss EAP 6 is installed on your target machine.
4.3.3. Uninstall JBoss EAP 6 (Installer)
Previous Step in Installer
This section details the steps required to uninstall an instance of JBoss EAP 6 that was installed using either the graphical or text-based installer.
Procedure 4.6. Uninstall JBoss EAP 6 (Graphical Installation)
- During the installation of JBoss EAP 6 on the target machine, a directory called
Uninstallerwas created in the directory where you had installed JBoss EAP 6. This directory contains a file calleduninstaller.jar. Navigate to this directory in a terminal window. - Launch the GUI uninstaller by executing the following command:
java -jar uninstaller.jar - The execution of the command will launch the graphical uninstaller as shown in the following figure. Select the check box if you want to delete the JBoss EAP 6 installation directory.
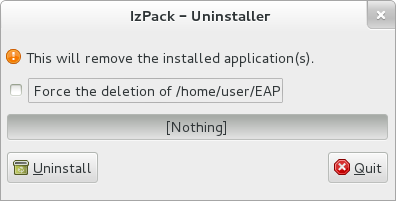
Figure 4.1. Uninstall JBoss EAP 6 using the graphical installer
- Press the button to start the uninstall process.
- When the uninstall process is finished, press the button to exit the uninstaller.
- After a successful uninstall, you may want to manually remove the
Uninstallerdirectory from where you launched the uninstaller.
Procedure 4.7. Text-based Uninstall Process
- In a console, navigate to the
Uninstallerdirectory created during the installation process. This can be found one level above EAP_HOME. - Launch the Text-based uninstaller by executing the following command:
java -jar uninstaller.jar -console - Follow the steps to uninstall JBoss EAP 6.
JBoss EAP 6 is uninstalled from your server.
4.4. Graphical RPM Installation
4.4.1. Install JBoss EAP 6 (Graphical RPM Installation)
Prerequisites:
The Graphical RPM package method of installing JBoss EAP 6 is available for Red Hat Enterprise Linux 5 and Red Hat Enterprise Linux 6. This topic covers the steps required to complete the installation.
Procedure 4.8. Install JBoss EAP 6 (Graphical RPM Installation)
Launch PackageKit
PackageKit is an open source package management software installed as part of Red Hat Enterprise Linux. On the target machine launch PackageKit by selecting → → .- Type
jboss-eap6
in the search box and then press the button. You will be presented with the JBoss EAP 6 package in the result box. - Select the JBoss EAP 6 package and press the button. See figure below.
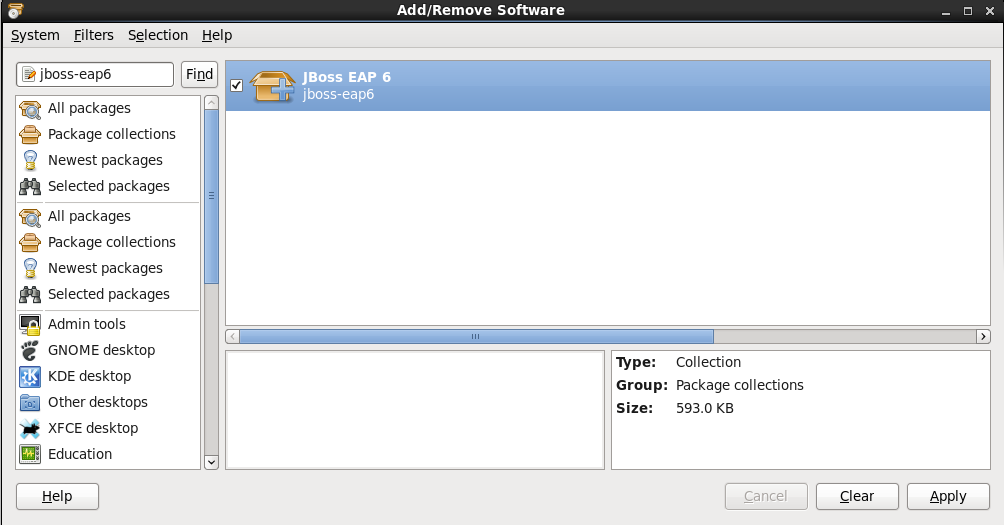
Figure 4.2. JBoss EAP 6 PackageKit Install
- Follow the rest of the steps to install JBoss EAP 6 on your target machine.
The installation is complete and JBoss EAP 6 is installed in your target machine.
4.5. Text-based RPM Installation
4.5.1. Install JBoss EAP 6 (Text-based RPM Installation)
Prerequisites:
The RPM package method of installing JBoss EAP 6 is appropriate for Red Hat Enterprise Linux 5, Red Hat Enterprise Linux 6, and Red Hat Enterprise Linux 7. This topic covers the steps required to install an instance using the command line.
Procedure 4.9. Text-based Installation Steps
Install the RPM package by using YUM and the Red Hat Network
Use YUM to install the default JBoss EAP 6 group package by using thegroupinstallcommand.[user@host ~]$ yum groupinstall jboss-eap6
Configure init options.
The RPM install contains init scripts for launching the server. The configuration for the init scripts are contained in several additional files. Refer to Section A.4, “RPM Installation Configuration Files for JBoss EAP 6” for details about these files and the options contained within.
The installation is complete. The default EAP_HOME path for the RPM installation is /usr/share/jbossas. Refer to Section A.3, “RPM Package List for JBoss EAP 6” for a complete list of all the packages installed.
4.6. Automated Installation
4.6.1. Install Multiple Instances of JBoss EAP 6 (Installer)
Prerequisites
- Generate an automatic installation script using the Graphical or Text-based Installer:
Multiple identical instances of JBoss EAP 6 can be installed using an automatic installation script, generated during the installation process, using either the Graphical or Text-based installer. This topic covers the steps required to install JBoss EAP 6 using a generated script.
Procedure 4.10. Automated Installation
- In a terminal, run the following command to install JBoss EAP 6 using the automatic installation script:
java -jar jboss-eap-6.3.0-installer.jarauto.xmlNote
When you use the automatic installation script (auto.xml) for automated installation the installer by default will generate a prompt for entering all passwords.
An identical instance of JBoss EAP 6 has been installed, based on the automatic installation script.
4.6.2. Use Automatic Installation Script (auto.xml) from Different Sources for Installing JBoss EAP 6
auto.xml) from any of the network locations irrespective of where it is being run. Thus the installer (jboss-eap-6.3.0-installer.jar) and the automatic installation script (auto.xml) can be located on different machines. This topic covers the steps to install JBoss EAP 6.3 automatically from a different network location.
- In a terminal type either of the following commands to specify the automatic installation script (present at a different network location) to your current network location:
java -jar
jboss-eap-6.3.0-installer.jarhttp://network-host/auto.xml (For HTTP)java -jar
jboss-eap-6.3.0-installer.jarftp://network-host/auto.xml (For FTP)
JBoss EAP 6 is installed on your machine.
4.7. Automated Installation Approaches
4.7.1. About Automated Installation Approaches
Run the installer and generate an automatic installation script using Graphical or Text-based installer: Section 4.3.2, “Run the JBoss EAP Installation Program”
You may use two approaches to install JBoss EAP 6 automatically using the automatic installation script generated by the installer:
- The first approach is to specify all the key/password values needed for automatic installation in the automatic installation variable file
- The second approach is to specify the key/password values during install time
4.7.2. Install JBoss EAP 6 by Pre-setting the Key/Password Values in the Automatic Installation Variable File
Procedure 4.11.
Enter key values in variable file
JBoss EAP 6 installer creates an automatic installation script and an automatic installation variable file. The automatic installation variable file contains a list of keys/password parameters needed for automatic installation. To enter key values open the automatic installation variable file. Fill in a valid key/password value against each key parameter. For example:adminPassword = password#2 vault.keystorepwd = vaultkeystorepw ssl.password = user12345
Run the installer with the variablefile filename argument to begin automated installation
You can begin fully automated EAP installation by running the installer with variablefileauto.xml.variablefileargument. This argument supplies the variable file key/password values (step 1) to the installer.To begin fully automated installation open a terminal and enter the following command with relevant filenames:java -jar
jboss-eap-6.3.0-installer.jarauto.xml-variablefileauto.xml.variablefile
JBoss EAP 6 is installed on your machine.
4.7.3. Install JBoss EAP 6 automatically by Specifying the Key Values/Passwords During Install Time
Procedure 4.12.
Run the installer with variables argument
You can initiate automated installation by running the installer with variables argument and then specifying a variable list. This variables argument will help you define variables along with the key/password values during install time. To initiate the installation process open a terminal and enter the following command with relevant filenames:java -jar
jboss-eap-6.3.0-installer.jarauto.xml-variables adminPassword=password#2,vault.keystorepwd=vaultkeystorepw,ssl.password=user12345Note
It is important to specify the variable names (adminPassword, keystorepwd and ssl.password) without any empty space for successful installation.
4.8. Installing Native Components and Utilities
4.8.1. Install Native Components and Native Utilities (Zip, Installer)
Prerequisites
- Install JBoss EAP 6 using the Zip installation, Graphical Installer, or Text-based Installer:
- Access to the Management CLI or the Management Console for the JBoss EAP 6 server. Refer to Launch the Management CLI or Log in to the Management Console in the Administration and Configuration Guide.
- For Native Components:
- In Red Hat Enterprise Linux 6 and 7 environments, ensure that the Apache Portability Runtime (APR) and OpenSSL libraries are installed. If you intend to use the Tomcat Native Library which is part of the JBoss EAP Native Components, the operating system package
tomcatjssmust be removed before installation. - In a HP-UX environment, OpenSSL must be installed.
Procedure 4.13. Download and Install Native Components
- Download the Native Components package for your operating system and architecture from the Red Hat Customer Portal. You can download the packages from the same location specified in Section 4.2.1, “Download JBoss EAP 6 (Zip Installation)”.
- Extract the downloaded Native Components zip archive over your JBoss EAP 6 installation.You can verify a successful extraction by checking if there is a new folder for your operating system and architecture in
EAP_HOME/modules/system/layers/base/org/jboss/as/web/main/lib/. - Using the Management CLI, activate the native components for the web subsystem with the following command:
[standalone@localhost:9999 /]
/subsystem=web:write-attribute(name=native,value=true) - Restart the JBoss EAP 6 server to apply the changes.
Procedure 4.14. Download and Install Native Utilities
- Download the Native Utilities package for your operating system and architecture from the Red Hat Customer Portal. You can download the packages from the same location specified in Section 4.2.1, “Download JBoss EAP 6 (Zip Installation)”.
- Extract the downloaded Native Components zip archive over your JBoss EAP 6 installation.You can verify a successful extraction by checking if there is
nativedirectory inEAP_HOME/modules/system/layers/base/. - Refer to procedures in the JBoss EAP documentation suite and on the Red Hat Customer Portal to configure specific native utilities features.
4.8.2. Install Native Components and Native Utilities (RPM Installation)
Prerequisites
Procedure 4.15. Install Native Components and Native Utilities
Install native components and utilities
To install native components and utilities in Red Hat Enterprise Linux 5, 6 and 7 (with their dependencies) run the following command using your administration account replacingpackage_namewith name of the native component which you need to install:yum install
You can install these native components:package_namemod_cluster-native,mod_jk,mod_rt,mod_snmp,apache-commons-daemon-jsvc-eap6,httpd,httpd-devel,jbossas-hornetq-native,jbossas-jbossweb-native.Important
The native componentsjbossas-hornetq-nativeandjbossas-jbossweb-nativeare installed by default when you run theyum groupinstall jboss-eap6command to install JBoss EAP 6 group package. If you have used Section 4.4.1, “Install JBoss EAP 6 (Graphical RPM Installation)” or Section 4.5.1, “Install JBoss EAP 6 (Text-based RPM Installation)” for JBoss EAP 6 installation you need not installjbossas-hornetq-nativeandjbossas-jbossweb-native.Note
It is important to give the correct package name in order to install a specific native component. Package names are case sensitive. In Red Hat Enterprise Linux 7 the name of thehttpdpackage ishttpd22. Therefore the packagehttpdmust be replaced withhttpd22when you runyum installcommand for installing Apache HTTP server in Red Hat Enterprise Linux 7.package_nameRestart the server
Restart the JBoss EAP 6 server to apply the changes
4.9. Service Configuration
4.9.1. Configure JBoss EAP 6 as a Service in Red Hat Enterprise Linux (RPM Method)
Prerequisites
- Install JBoss EAP 6 using the RPM Method (Graphical or Text Based).
- Administrator privileges on the server are required.
Use the following procedure to install JBoss EAP 6 as a service on Red Hat Enterprise Linux when the installation has been done using the RHN (RPM) method.
Procedure 4.16. Configure JBoss EAP 6 as a Service using the RPM Method in Red Hat Enterprise Linux
Install JBoss EAP 6
Install JBoss EAP 6 via the RPM method using one of the steps listed in the prerequisite sections listed above.Enable the service
The RPM install method for JBoss EAP 6 installs the requisite service files in their correct locations. All you need to do to set it up as service is issue the following command:chkconfig jbossas on
To set it up as a service in domain mode, issue the following command:chkconfig jbossas-domain on
JBoss EAP 6 starts automatically when the Red Hat Enterprise Linux reaches its default run-level, and stops automatically when the operating system goes through its shutdown routine.
4.9.2. Configure JBoss EAP 6 as a Service in Red Hat Enterprise Linux (Zip, Installer)
Prerequisites
- Install JBoss EAP 6 using the Zip installation, Graphical Installer, or Text-based Installer:
- Administrator privileges on the server are required.
Use the following procedure to install JBoss EAP 6 as a service on Red Hat Enterprise Linux when the installation has been done with either the zip, text, or graphical methods. This process does not apply when the installation has been done using the RHN (RPM) method.
Procedure 4.17. Set Up the Service
Note
jboss-as-standalone.sh with jboss-as-domain.sh.
Locate the start-up script and configuration file
The start-up script and an associated configuration file are located in theEAP_HOME/bin/init.d/directory. Open the configuration filejboss-as.confto edit it.Customize the start-up options in the
jboss-as.conffileThere are several options within thejboss-as.conffile. At the minimum, specify the correct values forJBOSS_HOMEand theJBOSS_USERvariables. If these variables are absent, add them.Copy files into system directories
- Copy the modified configuration file to the
/etc/jboss-asdirectory.[user@host init.d]$sudo mkdir /etc/jboss-as[user@host init.d]$sudo cp jboss-as.conf /etc/jboss-as/ - Copy the start-up script to the
/etc/init.ddirectory.[user@host init.d]$sudo cp jboss-as-standalone.sh /etc/init.d
Add the start-up script as a service.
Add the newjboss-as-standalone.shservice to list of automatically started services, using thechkconfigservice management command.[user@host init.d]$sudo chkconfig --add jboss-as-standalone.shStart the service.
Test that the service has been installed correctly by using one of the following commands for Red Hat Enterprise Linux.- For Red Hat Enterprise Linux 5 and 6:
[user@host bin]$sudo service jboss-as-standalone.sh start - For Red Hat Enterprise Linux 7:
[user@host bin]$sudo service jboss-as-standalone start
If everything has gone correctly, you should get a green [OK]. If you get an error, check the error logs and make sure your paths are correct in the configuration file.Note
The green [OK] does not appear for Red Hat Enterprise Linux 7.Make the service start automatically when you restart your server.
To add the service to the list of services which start automatically when your server restarts, issue the following command.[user@host init.d]$sudo chkconfig jboss-as-standalone.sh on
JBoss EAP 6 starts automatically when the Red Hat Enterprise Linux reaches its default run-level, and stops automatically when the operating system goes through its shutdown routine.
Procedure 4.18. Uninstall the JBoss EAP 6 service from Red Hat Enterprise Linux
Note
jboss-as-standalone.sh with jboss-as-domain.sh.
- If the service is running, first open a terminal and stop the service by executing the
stopcommand with the name of the service:sudo service jboss-as-standalone.sh stop - Remove JBoss EAP from the list of services:
sudo chkconfig --del jboss-as-standalone.sh - Remove the system directory files.
- Remove the service start-up script:
sudo rm /etc/init.d/jboss-as-standalone.sh - Remove the service configuration file:
sudo rm /etc/jboss-as/jboss-as.confImportant
/etc/jboss-asis not a standard system directory. Only if there are no other files being used there, also remove the directory itself:sudo rm -rf /etc/jboss-as/
JBoss EAP 6 service is uninstalled from the server.
4.9.3. Configure JBoss EAP 6 as a Service in Microsoft Windows Server (Zip, Installer)
Prerequisites
- Install JBoss EAP 6 using the Zip installation, Graphical Installer, or Text-based Installer:
- Administrator privileges on the server are required.
- The
JAVA_HOMEsystem environment variable must be set. - The JBoss EAP 6 server instance must not be running.
Important
set command at a Windows Server command prompt will not permanently set the environment variable. You must use either the setx command, or the System interface in the Control Panel.
Use the following procedures to configure JBoss EAP 6 as a service on Microsoft Windows Server.
Procedure 4.19. Configure a Service for JBoss EAP 6 in Microsoft Windows Server
Create system environment variables
Create two system environment variables:JBOSS_HOMEpointing to the JBoss EAP 6 installation directory.NOPAUSE=1
If not already configured, download and extract the Native Utilities package for your architecture
If the Native Utilities for Windows Server package has not been installed as part of the JBoss EAP 6 installation, download the relevant 32-bit or 64-bit package from the Red Hat Customer Portal at https://access.redhat.com. Extract the Native Utilities zip archive over the JBoss EAP 6 installation.This will result in anativedirectory in the following location in the JBoss EAP 6 installation:EAP_HOME\modules\system\layers\base\Install the service
Open a terminal, and change directories toEAP_HOME\modules\system\layers\base\native\sbinA new service can be created with theservice installcommand, with the available options shown in the following table.Table 4.3.
service installoptionsArgument or Switch Description /controller HOST:PORT The host and port of the management interface. If omitted, the default islocalhost:9999./host [DOMAIN_HOST] Indicates that domain mode is to be used, optionally specifying the name of the domain controller. If the domain controller name is omitted, the default name ismaster./loglevel LEVEL The log level for the service, either:ERROR,INFO,WARNorDEBUG. If omitted, the default isINFO/name SERVICE_NAME The name of the service to be created, must not contain spaces. If omitted, the default isJBossEAP6/desc "DESCRIPTION" The description of the service. If omitted, the default is"JBoss Enterprise Application Platform 6"/serviceuser DOMAIN\USERNAME Specifies the name of the account under which the service will run. Use an account name in the format of DOMAIN\USERNAME. If omitted, the service runs as the Local System account./servicepass PASSWORD Password for /serviceuser account./jbossuser USERNAME Optional, the JBoss EAP 6 username to use for the shutdown command./jbosspass PASSWORD Password for /jbossuser account, required if /jbossuser is specified.Below are basic examples of aninstallcommand to create a new service in either standalone or domain mode. Execute the following command, adjusting the log level for the service as required:- Standalone mode:
service.bat install /loglevel INFO - Domain mode:If you are not using the default master for your JBoss EAP 6 domain controller, replace master with the correct host name or alias of the JBoss EAP 6 domain controller.
service.bat install /host master /loglevel INFO
A new Windows service will be created with nameJBossEAP6.Verify the new service in the Services console
Execute the following command in a terminal to open the Windows Services console:services.mscIf the default service name was used, in the list of Windows services, the new service will have the display name:JBoss Enterprise Application Platform 6. From the Services console you can start and stop the service, as well change its settings on how and when it starts.Starting and stopping the JBoss EAP 6 service from a terminal
To start the service from a terminal, use the following command, changing the service name if necessary:net start JBossEAP6To stop the service from a terminal, use the following command, changing the service name if necessary:net stop JBossEAP6
A JBoss EAP 6 service is configured in Microsoft Windows Server.
Procedure 4.20. Uninstall the JBoss EAP 6 service from Microsoft Windows Server
- If the service is running, first open a terminal and stop the service by executing the
net stopcommand with the name of the service:net stop JBossEAP6In a terminal, change directories toEAP_HOME\modules\system\layers\base\native\sbinand execute the following command:service uninstall
The JBoss EAP 6 service has been removed from Microsoft Windows Server.
Chapter 5. Patching and Upgrading JBoss EAP 6
5.1. About Patches and Upgrades
5.2. Patching JBoss EAP 6
5.2.1. About Patching Mechanisms
Important
- Asynchronous updates: individual patches which are released outside the normal update cycle of the existing product. These may include security patches, as well as other individual patches provided by Red Hat Global Support Services (GSS) to fix specific issues.
- Planned updates: These include cumulative patches, as well as micro, minor or major upgrades of an existing product. Cumulative patches include all previously developed updates for that version of the product.
Important
EAP_HOME/modules/system/layers/base/.overlays/$PATCH_ID/$MODULE directory. The original files are left in EAP_HOME/modules/system/layers/base/$MODULE. The patching mechanism cripples the original jar files for security reasons. This means that if you apply a patch which updates a module, the original module's jar files are altered to be unusable. If the patch is rolled back, the original files will be reverted back to a usable state. This also means that the proper rollback procedure must be used to rollback any applied patch. See Section 5.2.2.3, “Rollback the Application of a Patch in Zip Form Using the Patch Management System” for the proper rollback procedure.
5.2.2. Patching a Zip/Installer Installation
5.2.2.1. The Patch Management System
patch command, or through the Management Console. The patch management system cannot be used to automatically patch JBoss EAP 6 server instances across a managed domain, but individual server instances in a managed domain can be patched independently.
Important
Note
patch command.
Table 5.1. patch Command Arguments and Switches
| Argument or Switch | Description |
|---|---|
apply | Applies a patch. |
--override-all | If there is a conflict, the patch operation overrides any user modifications. |
--override-modules | If there is a conflict as a result of any modified modules, this switch overrides those modifications with the contents of the patch operation. |
--override=path(,path) | For specified miscellaneous files only, this will override the conflicting modified files with the files in the patch operation. |
--preserve=path(,path) | For specified miscellaneous files only, this will preserve the conflicting modified files. |
--host=HOST_NAME | Available in domain mode, this specifies the host that the patch operation will be performed on. |
info | Returns information on currently installed patches. |
history | Returns information on the patching history. |
rollback | Rollsback the application of a patch. |
--patch-id=PATCH_ID | Required for rollback, the ID of the patch to rollback. |
--reset-configuration=TRUE|FALSE | Required for rollback, this specifies whether to restore the server configuration files as part of the rollback operation. |
--rollback-to | If the patch to rollback is an individual (one-off) patch, using this argument specifies that the rollback operation will also rollback all other one-off patches that have been applied on top of the specified patch. |
5.2.2.2. Installing Patches in Zip Form Using the Patch Management System
Prerequisites:
Patches that are in the zip format can be installed using the JBoss EAP 6 patch management system via either the Management CLI or the Management Console.
Important
Prerequisites
- Valid access and subscription to the Red Hat Customer Portal.
- A current subscription to a JBoss product installed in zip format.
- Access to the Management CLI or the Management Console for the JBoss EAP 6 server to be updated. Refer to Launch the Management CLI or Log in to the Management Console in the Administration and Configuration Guide.
Warning
Procedure 5.1. Apply a zip patch to a JBoss EAP 6 server instance using the Management CLI
- Download the patch zip file from the Customer Portal at https://access.redhat.com/downloads/
- From the Management CLI, apply the patch with the following command including the appropriate path to the patch file:
[standalone@localhost:9999 /]
patch apply /path/to/downloaded-patch.zipThepatchtool will warn if there are any conflicts in attempting the apply the patch. Refer to Section 5.2.2.1, “The Patch Management System” for availablepatchcommand switches to re-run the command to resolve any conflicts. - Restart the JBoss EAP 6 server for the patch to take effect:
[standalone@localhost:9999 /]
shutdown --restart=true
Procedure 5.2. Apply a zip patch to a JBoss EAP 6 server instance using the Management Console
- Download the patch zip file from the Customer Portal at https://access.redhat.com/downloads/
- In the Management Console:
- For a standalone server: click on the Runtime tab at the top of the screen, then click Patch Management.
- For a managed domain: click on the Domain tab at the top of the screen, select the host you want to patch from the Host drop-down menu, then click Patch Management.
- Click .
- If you are patching a managed domain host, on the next screen select whether to shutdown the servers on the host, and click .
- Click the button, select the downloaded patch you want to apply, and then click .
- If there are any conflicts in attempting to apply the patch, a warning will be displayed. Click View error details to see the detail of the conflicts. If there is a conflict, you can either cancel the operation, or select the Override all conflicts check box and click . Overriding conflicts will result in the content of the patch overriding any user modifications.
- After the patch has been successfully applied, select whether to restart the JBoss EAP 6 server now for the patch to take effect, and click .
The JBoss EAP 6 server instance is patched with the latest update.
5.2.2.3. Rollback the Application of a Patch in Zip Form Using the Patch Management System
The JBoss EAP 6 patch management system can be used to rollback the application of a previously applied zip patch, via either the Management CLI or the Management Console.
Warning
Important
Prerequisites
- A patch that was previously applied using the JBoss EAP 6 patch management system.
- Access to the Management CLI or the Management Console for the JBoss EAP 6 server. Refer to Launch the Management CLI or Log in to the Management Console in the Administration and Configuration Guide.
Warning
Reset Configuration option:
TRUE, the patch rollback process will also rollback the JBoss EAP 6 server configuration files to their pre-patch state. Any changes that were made to the JBoss EAP 6 server configuration files after the patch was applied will be lost.
FALSE, the server configuration files will not be rolled back. In this situation, it is possible that the server will not start after the rollback, as the patch may have altered configurations, such as namespaces, which may no longer be valid and have to be fixed manually.
Procedure 5.3. Rollback a patch from a JBoss EAP 6 server instance using the Management CLI
- From the Management CLI, use the
patch infocommand to find the ID of the patch that is to be rolled back.- For cumulative patches, the patch ID is the value of the first
cumulative-patch-idshown in thepatch infooutput. - Individual security or bug fix patch IDs are listed as the value of the first
patchesshown in thepatch infooutput, with the most recently applied individual patch listed first.
- From the Management CLI, rollback the patch with the appropriate patch ID from the previous step.
[standalone@localhost:9999 /]
patch rollback --patch-id=PATCH_ID --reset-configuration=TRUEThepatchtool will warn if there are any conflicts in attempting the rollback the patch. Refer to Section 5.2.2.1, “The Patch Management System” for availablepatchcommand switches to re-run the command to resolve any conflicts. - Restart the JBoss EAP 6 server for the patch rollback to take effect:
[standalone@localhost:9999 /]
shutdown --restart=true
Procedure 5.4. Rollback a patch from a JBoss EAP 6 server instance using the Management Console
- In the Management Console:
- For a standalone server: click on the Runtime tab at the top of the screen, then click Patch Management.
- For a managed domain: click on the Domain tab at the top of the screen, select the relevant host from the Host drop-down menu, then click Patch Management.
- In the Recent Patch History table, select the patch that you want to rollback, then click .
- For a managed domain host, on the next screen select whether to shutdown the servers on the host, and click .
- Choose your options for the rollback process, then click .
- Confirm the options and the patch to be rolled back, then click .
- If the Override all option was not selected and there are any conflicts in attempting to rollback the patch, a warning will be displayed. Click View error details to see the detail of the conflicts. If there is a conflict, you can either cancel the operation, or click and try the operation again with the Override all check box selected. Overriding conflicts will result in the rollback operation overriding any user modifications.
- After the patch has been successfully rolled back, select whether to restart the JBoss EAP 6 server now for the changes to take effect, and click .
The patch, and optionally also the server configuration files, are rolled back on the JBoss EAP 6 server instance.
5.2.3. Patching an RPM Installation
Prerequisites:
JBoss patches are distributed in two forms: ZIP (for all products) and RPM (for a subset of products). This task describes the steps you need to take to install the patches via the RPM format.
Prerequisites
- A valid subscription to the Red Hat Network.
- A current subscription to a JBoss product installed via an RPM package.
Procedure 5.5. Apply a patch to a JBoss product via the RPM method
yum.
Warning
- Get notified about the security patch either via being a subscriber to the JBoss watch mailing list or by browsing the JBoss watch mailing list archives.
- Read the errata for the security patch and confirm that it applies to a JBoss product in your environment.
- If the security patch applies to a JBoss product in your environment, then follow the link to download the updated RPM package which is included in the errata.
- Use
to install the patch.yum updateImportant
When updating an RPM installation, your JBoss product is updated cumulatively with all RPM-released fixes.
The JBoss product is patched with the latest update using the RPM format.
5.2.4. Subscribe to Patch Mailing Lists
The JBoss team at Red Hat maintains a mailing list for security announcements for Red Hat JBoss Middleware products. This section covers what you need to do to subscribe to this list.
Prerequisites
- None
Procedure 5.6. Subscribe to the JBoss Watch List
- Click the following link to go to the JBoss Watch mailing list page: JBoss Watch Mailing List.
- Enter your email address in the Subscribing to Jboss-watch-list section.
- [You may also wish to enter your name and select a password. Doing so is optional but recommended.]
- Press the button to start the subscription process.
- You can browse the archives of the mailing list by going to: JBoss Watch Mailing List Archives.
After confirmation of your email address, you will be subscribed to receive security related announcements from the JBoss patch mailing list.
5.2.5. Severity and Impact Rating of JBoss Security Patches
Table 5.2. Severity Ratings of JBoss Security Patches
| Severity | Description |
|---|---|
| Critical |
This rating is given to flaws that could be easily exploited by a remote unauthenticated attacker and lead to system compromise (arbitrary code execution) without requiring user interaction. These are the types of vulnerabilities that can be exploited by worms. Flaws that require an authenticated remote user, a local user, or an unlikely configuration are not classed as critical impact.
|
| Important |
This rating is given to flaws that can easily compromise the confidentiality, integrity, or availability of resources. These are the types of vulnerabilities that allow local users to gain privileges, allow unauthenticated remote users to view resources that should otherwise be protected by authentication, allow authenticated remote users to execute arbitrary code, or allow local or remote users to cause a denial of service.
|
| Moderate |
This rating is given to flaws that may be more difficult to exploit but could still lead to some compromise of the confidentiality, integrity, or availability of resources, under certain circumstances. These are the types of vulnerabilities that could have had a critical impact or important impact but are less easily exploited based on a technical evaluation of the flaw, or affect unlikely configurations.
|
| Low |
This rating is given to all other issues that have a security impact. These are the types of vulnerabilities that are believed to require unlikely circumstances to be able to be exploited, or where a successful exploit would give minimal consequences.
|
Example 5.1. CVSS v2 Impact Score
C:N/I:P/A:C5.3. Upgrading JBoss EAP 6
5.3.1. Upgrade the JBoss EAP 6 ZIP Installation
Prerequisites
- Ensure that the base operating system is up to date.
- Determine which files have been modified since JBoss EAP 6 was installed.
- Back up any modified configuration files, deployments, and all user data.
This procedure covers upgrading a JBoss EAP 6 ZIP installation between minor versions (for example, from JBoss EAP 6.1 to 6.2). For installing patches for a specific minor version, refer to the Patch Installation section. Upgrading to the latest release of JBoss EAP 6 requires some initial work to back up the existing installation.
Warning
Procedure 5.7. Upgrade to the latest JBoss EAP 6 version
- Move the downloaded ZIP archive to the desired location. It is recommended that this is a different location to the existing JBoss EAP 6 installation.
Important
If you wish to install the latest version of JBoss EAP 6 to the same directory location as the existing installation, you will need to move the existing installation to a different location before proceeding. This is to prevent modified configuration files, deployments, and upgrades from being lost. - Unzip the archive. This step installs a clean instance of the latest JBoss EAP 6 release.
- Copy the EAP_HOME/domain/ and EAP_HOME/standalone/ directories from the previous installation over the new installation directories.
Note
New features in the new release, such as new subsystems, may not be activated if configuration files are copied from an older JBoss EAP 6 installation. To use these new features, it is necessary to compare and update the old configuration files with the ones from the new version. - Review the changes made to the
bindirectory of the previous installation, and make the equivalent modifications to the new directory.Warning
Files in thebindirectory should not be overwritten by the files from previous versions. Changes should be made manually. - Review the remaining modified files from the previous installation, and move these changes into the new installation. These files may include:
- The
welcome-contentdirectory. - Custom modules in the
modulesdirectory. - Custom bundles in the
bundlesdirectory.
- Optional: If JBoss EAP 6 was previously configured to run as a service, remove the existing service and configure a new service for the upgraded installation.
The JBoss EAP 6 ZIP installation has been successfully upgraded to the latest release.
5.3.2. Upgrade the JBoss EAP 6 RPM Installation
Prerequisites
- Ensure that the base operating system is up to date and that the system is subscribed and enabled to get updates for the Base OS channel.
- Ensure that the correct JBoss EAP 6 RHN channel is enabled. For example, on a x86, 64 bit architecture, this will be the JBoss Application Platform (v 6) for 6Server x86_64 channel (
jbappplatform-6-x86_64-server-6-rpm). - Back up any modified configuration files, deployments, and all user data.
Upgrading to the latest release of JBoss EAP 6 requires some initial work to back up the existing installation. This topic covers upgrading the RPM installation via the Red Hat Network (RHN).
Warning
Procedure 5.8. Upgrade to the latest JBoss EAP 6 release
- Run the following command in a terminal to upgrade the installation:
[user@host] yum update
- Manually merge each created
*.rpmnewfile that contains changes into the production configuration files.
JBoss EAP 6 has been successfully upgraded.
5.3.3. Upgrade JBoss EAP Cluster from 6.2 to 6.3
Prerequisites
- None
JBoss EAP 6.3 does not support the creation of clusters where the different nodes are made up of different versions of JBoss EAP servers. Thus, a mixed cluster based on different versions is not supported and all nodes within a cluster must be the same version - 6.3.
Warning
Procedure 5.9. Setup a JBoss EAP Cluster in 6.3
- Refer to the HTTP Clustering and Load Balancing chapter of the JBoss EAP 6.3 Administration and Configuration Guide for instructions on how to setup a JBoss EAP cluster in 6.3.
- Migrate all traffic to this new cluster using the steps outlined in the Migrate Traffic between Clusters chapter of the JBoss EAP 6.3 Administration and Configuration Guide
Your JBoss EAP 6.2 cluster has been migrated to a cluster based on JBoss EAP 6.3.
Appendix A. Reference Material
A.1. Available Downloads for JBoss EAP 6
Table A.1. Available Downloads
| Name | Description | Operating Systems |
|---|---|---|
| Apache HTTP Server |
A standalone Apache HTTP server instance for each supported operating system and architecture. This HTTP server has been tested and verified to work with JBoss EAP 6.
|
Red Hat Enterprise Linux 5, Red Hat Enterprise Linux 6, Microsoft Windows Server 2008, Solaris 10 and 11
|
| Native Components |
Components which have been compiled to be optimized for a specific platform. For instance, DLLs are provided for Microsoft Windows Server environments. In some cases, the native components may provide performance improvements.
|
Red Hat Enterprise Linux 5, Red Hat Enterprise Linux 6, Microsoft Windows Server 2008, Solaris 10 and 11, Hewlett-Packard HP-UX
|
| Native Utilities |
Utilities specific to each supported operating system and architecture, such as scripts and utilities for installing JBoss EAP 6 as a service in your operating system and generating SSL encryption keys and certificates.
|
Red Hat Enterprise Linux 5, Red Hat Enterprise Linux 6, Microsoft Windows Server 2008, Solaris 10 and 11, Hewlett-Packard HP-UX
|
| Webserver Connector Natives |
Pre-compiled modules for Apache, Microsoft, and Oracle iPlanet web servers, for HTTP load balancing and high-availability capabilities. These binaries are extensively tested and known to work well with JBoss EAP 6.
|
Red Hat Enterprise Linux 5, Red Hat Enterprise Linux 6, Microsoft Windows Server 2008, Solaris 10 and 11, Hewlett-Packard HP-UX
|
| Javadocs |
Documentation for all public APIs exposed by JBoss EAP 6. You can install these into your local HTTP server or IDE, or can view them on your local machine.
|
Platform-independent
|
| Installer |
Java installer for JBoss EAP 6. Includes steps to install the Quickstarts and Maven Repository.
|
Platform-independent
|
| Maven Repository |
A Maven repository which you can download and make available in your local development environment, and which contains artifacts common to applications built upon JBoss EAP 6. The Maven repository is also available through the JBoss EAP 6 Installer.
|
Platform-independent
|
| Quickstarts |
Example applications to help you get started developing Java EE 6 applications with APIs supplied with JBoss EAP 6. The Quickstarts are also available through the JBoss EAP 6 Installer.
|
Platform-independent
|
| Source Code |
The Java source code for JBoss EAP 6, provided so that you can recompile it in your own environment or audit it yourself.
|
Platform-independent
|
| Application Platform |
The Zip installation package, which can be installed and run on every supported platform. This is the most common way to install JBoss EAP 6.
|
Platform-independent
|
Important
A.2. Directory Structure of JBoss EAP 6
JBoss EAP 6 includes a simplified directory structure, compared to previous versions. This topic contains a listing of the directories, and a description of what each directory contains.
standalone/ and domain/ folders.
Table A.2. Top-level directories and files
| Name | Purpose |
|---|---|
| appclient/ | Contains configuration details for the application client container. |
| bin/ | Contains start-up scripts for JBoss EAP 6 on Red Hat Enterprise Linux and Microsoft Windows. |
| bundles/ | Contains OSGi bundles which pertain to JBoss EAP 6 internal functionality. |
| docs/ | License files, schemas, and examples. |
| domain/ | Configuration files, deployment content, and writable areas used when JBoss EAP 6 runs as a managed domain. |
| modules/ | Modules which are dynamically loaded by JBoss EAP 6 when services request them. |
| standalone/ | Configuration files, deployment content, and writable areas used when JBoss EAP 6 runs as a standalone server. |
| welcome-content/ | Contains content used by the Welcome web application which is available on port 8080 of a default installation. |
| .installation/ | Contains metadata for the patching mechanism. No modifications are required for the contents of this directory. |
jboss-modules.jar
| The bootstrapping mechanism which loads modules. |
JBossEULA.txt
| Contains license agreement details. |
LICENSE.txt
| Contains license details. |
version.txt
| Contains version details. |
Table A.3. Directories within the domain/ directory
| Name | Purpose |
|---|---|
| configuration/ | Configuration files for the managed domain. These files are modified by the Management Console and Management CLI, and are not meant to be edited directly. |
| data/ | Information about deployed services. Services are deployed using the Management Console and Management CLI, rather than by a deployment scanner. Therefore, do not place files in this directory manually. |
| log/ | Contains the run-time log files for the host and process controllers which run on the local instance. |
| servers/ | Contains the equivalent data/, log/, and tmp/ directories for each server instance in a domain, which contain similar data to the same directories within the top-level domain/ directory. |
| tmp/ | Contains temporary data such as files pertaining to the shared-key mechanism used by the Management CLI to authenticate local users to the managed domain. |
Table A.4. Directories within the standalone/ directory
| Name | Purpose |
|---|---|
| configuration/ | Configuration files for the standalone server. These files are modified by the Management Console and Management CLI, and are not meant to be edited directly. |
| data/ | Information about deployed services. Services are deployed using the Management Console and Management CLI, rather than by a deployment scanner. Therefore, do not place files in this directory manually. |
| deployments/ | Information about deployed services. The standalone server does include a deployment scanner, so you can place archives in this directory to be deployed. However, the recommended approach is to manage deployments using the Management Console or Management CLI. |
| lib/ | External libraries which pertain to a standalone server mode. Empty by default. |
| log/ | Contains the run-time log files for the host and process controllers which run on the local instance. |
| tmp/ | Contains temporary data such as files pertaining to the shared-key mechanism used by the Management CLI to authenticate local users to the server. |
A.3. RPM Package List for JBoss EAP 6
JBoss EAP 6 is installed on Red Hat Enterprise Linux 6 using the YUM package group JBoss EAP 6. That group is made up of the following packages.
Table A.5. Package List
| Package | Description |
|---|---|
| jbossas-appclient | JEE Application Client Container |
| jbossas-bundles | OSGi bundles |
| jbossas-core | Core components. This is required for all configurations. |
| jbossas-domain | Domain configuration |
| jbossas-hornetq-native | Container for the JBoss AS HornetQ files |
| jbossas-jbossweb-native | JBoss Enterprise Web Platform |
| jbossas-modules-eap | JBoss EAP modules |
| jbossas-product-eap | Product configuration components. This customizes product execution. |
| jbossas-standalone | Standalone configuration |
| jbossas-welcome-content-eap | Welcome content used in startup messages and console pages |
Important
jbossas-hornetq-native package is included for high availability in JBoss EAP 6 but it is not activated by default.
A.4. RPM Installation Configuration Files for JBoss EAP 6
The RPM installation of JBoss EAP 6 includes three additional configuration files to the ZIP installation. These files are used by the service init script to specify the application server's launch environment. One of these files applies to all JBoss EAP 6 instances, while the other two provide overrides for standalone and domain mode servers.
Table A.6. Additional RPM Configuration Files
| File | Description |
|---|---|
/etc/jbossas/jbossas.conf | This file is read first and applies to all JBoss EAP 6 instances. |
/etc/sysconfig/jbossas | Settings specific to standalone servers. Values specified here will override those in jbossas.conf when running as a standalone server. |
/etc/sysconfig/jbossas-domain | Settings specific to domain-mode servers. Values specified here will override those in jbossas.conf when running as a domain-mode server. |
Table A.7. RPM Installation Configuration Properties
| Property | Description |
|---|---|
JBOSS_USER |
The system user account that the JBoss EAP 6 runs as. This user also has ownership of the files.
Default value:
jboss
|
JBOSS_GROUP |
The system user group that the JBoss EAP 6 files belong to.
Default value:
jboss
|
JBOSS_STARTUP_WAIT |
The number of seconds that the init script will wait until confirming that the server has launched successfully after receiving a
start or restart command.
Default value:
60
|
JBOSS_SHUTDOWN_WAIT |
The number of seconds that the init script will wait for the server to shutdown before continuing when it receives a
stop or restart command.
Default value:
20
|
JBOSS_CONSOLE_LOG |
The file that the CONSOLE log handler will be redirected to.
Default value:
/var/log/jbossas/$JBOSSCONF/console.log
|
JAVA_HOME |
The directory where your Java Runtime Environment is installed.
Default value:
/usr/lib/jvm/jre
|
JBOSS_HOME |
The directory where the application server files are installed.
Default value:
/usr/share/jbossas
|
JAVAPTH |
The path where the Java executable files are installed.
Default value:
$JAVA_HOME/bin
|
JBOSSCONF |
The server mode to launch this server in,
standalone or domain.
Default value:
standalone or domain depending on server mode.
|
JBOSSSH |
The script which is used to launch to server.
Default value:
$JBOSS_HOME/bin/$JBOSSCONF.sh
|
JBOSS_SERVER_CONFIG |
The server configuration file to use.
There is no default for this property. Either
standalone.xml or domain.xml can be defined at start.
|
JBOSS_HOST_CONFIG | This property allows a user to specify the host configuration (such as host.xml). It has no value set as the default. |
Appendix B. Installer Screenshots
B.2. End User License Agreement
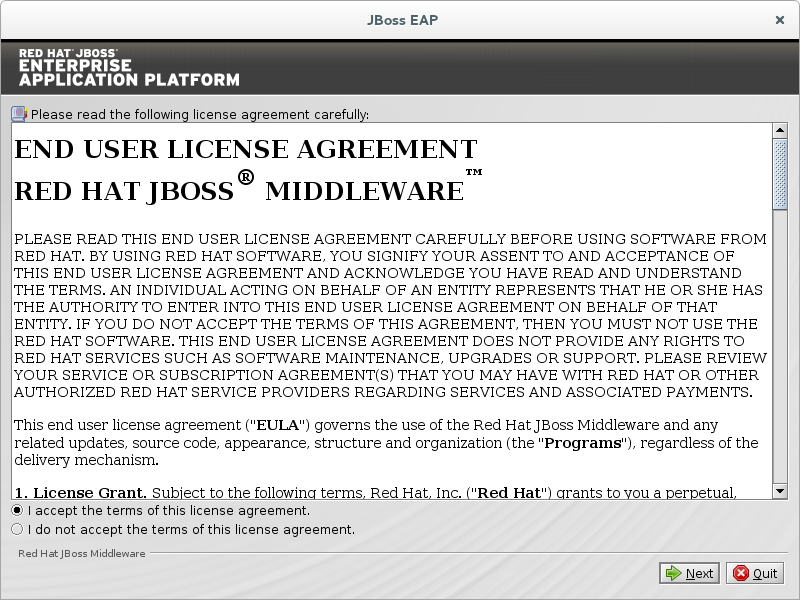
Figure B.2. JBoss EAP Installation Program End User License Agreement
B.4. Select the Packs to Install
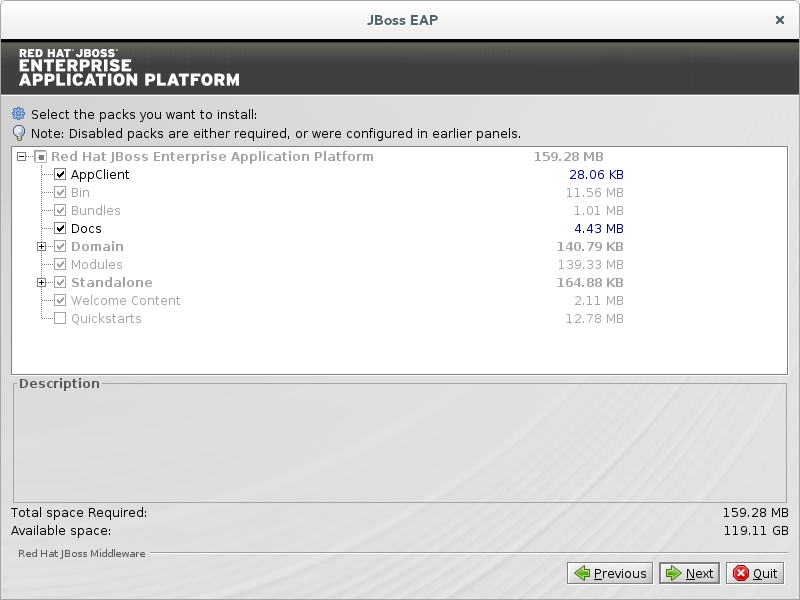
Figure B.4. JBoss EAP Installation Program Select Packs to Install
B.5. Administrative User Creation
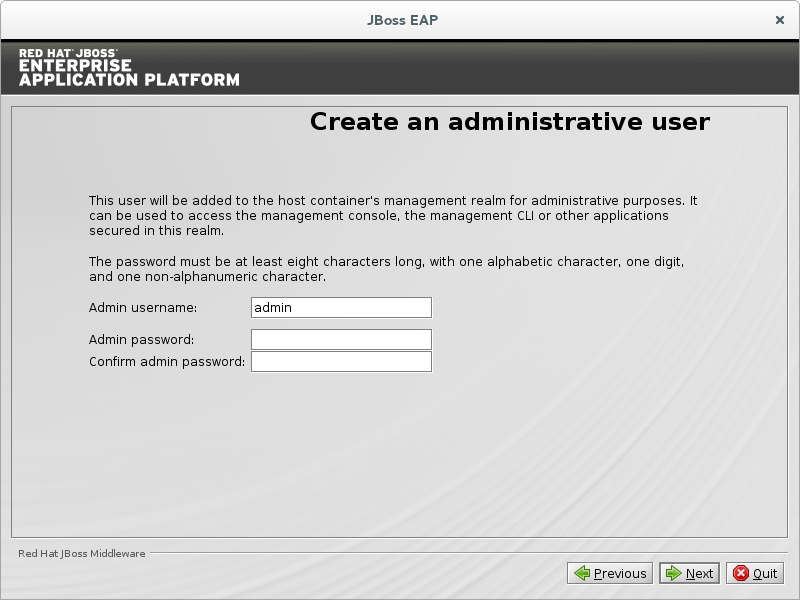
Figure B.5. JBoss EAP Installation Program Administrative User Creation
B.6. Quickstart Installation
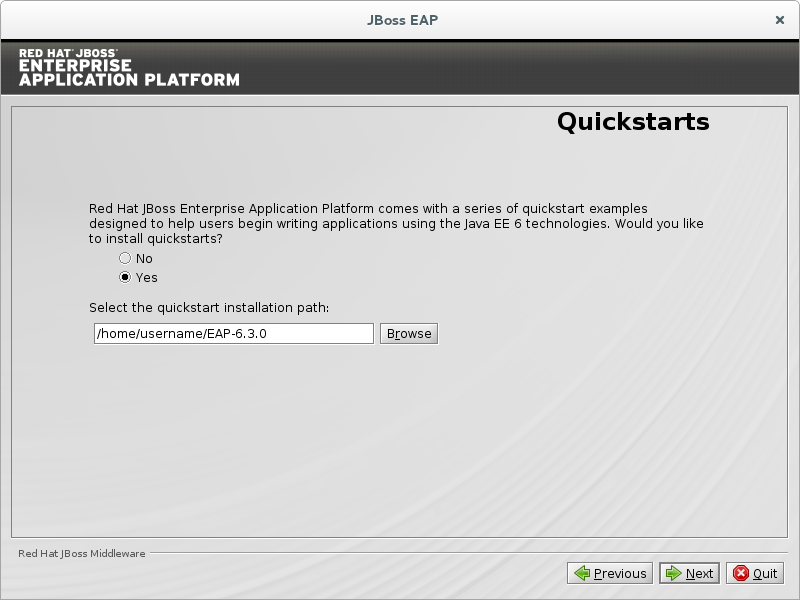
Figure B.6. JBoss EAP Installation Program Quickstart Setup
B.7. Maven Repository Setup
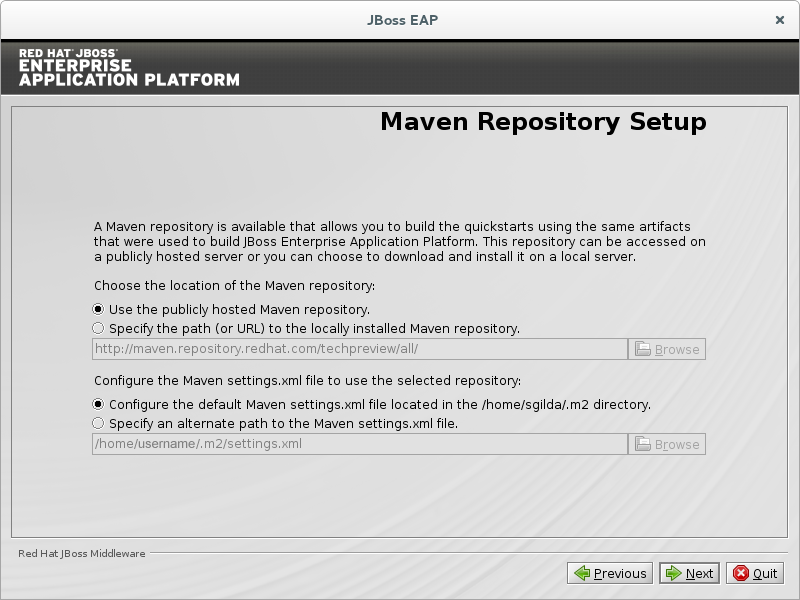
Figure B.7. JBoss EAP Installation Program Maven Repository Setup
B.8. Socket Binding Setup
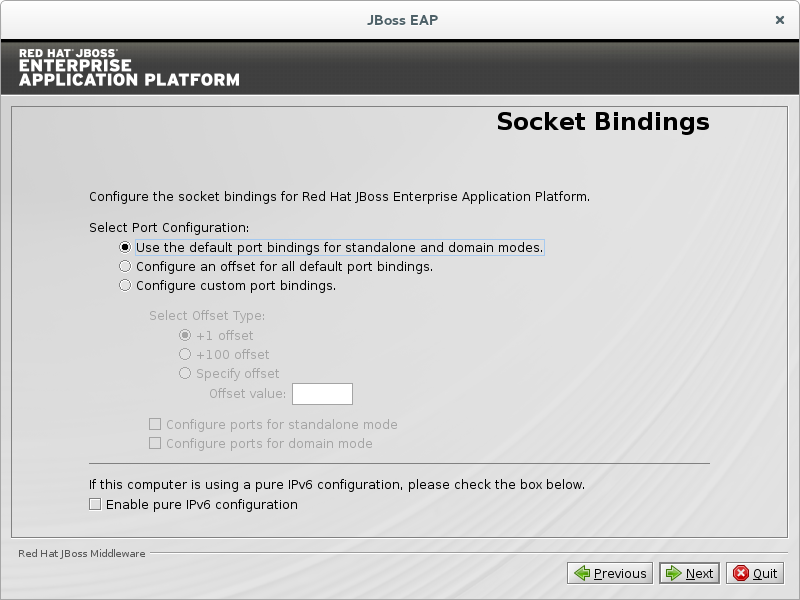
Figure B.8. JBoss EAP Installation Program Default Socket Bindings
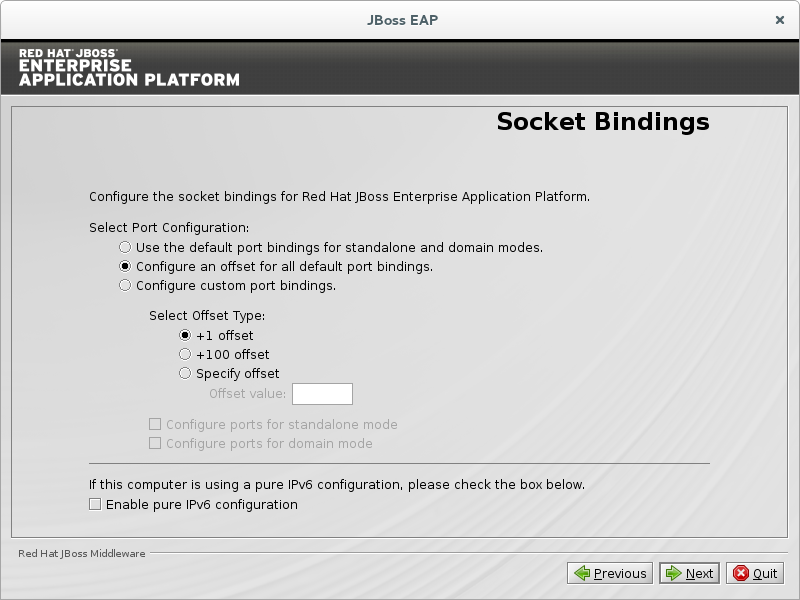
Figure B.9. JBoss EAP Installation Program Custom Port Socket Bindings
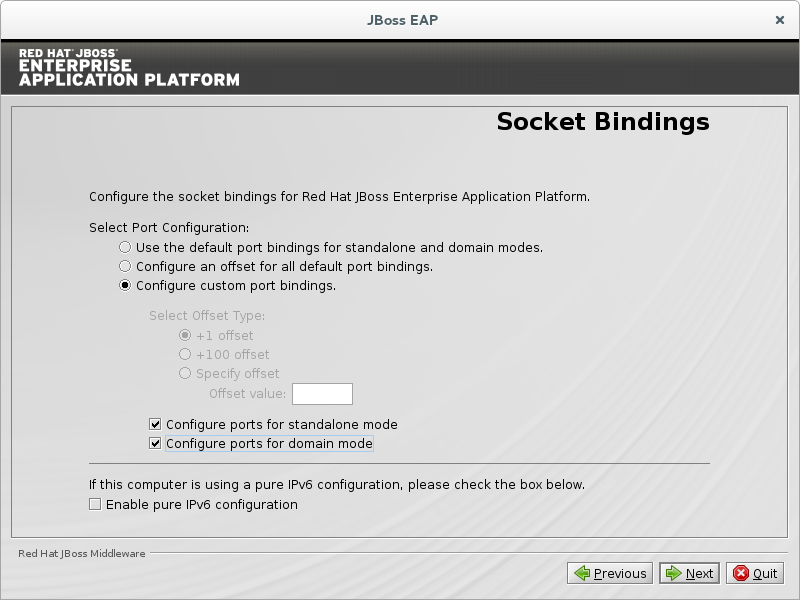
Figure B.10. JBoss EAP Installation Program Configure Offset for Default Socket Bindings
B.9. Custom Socket Bindings for Standalone Configurations
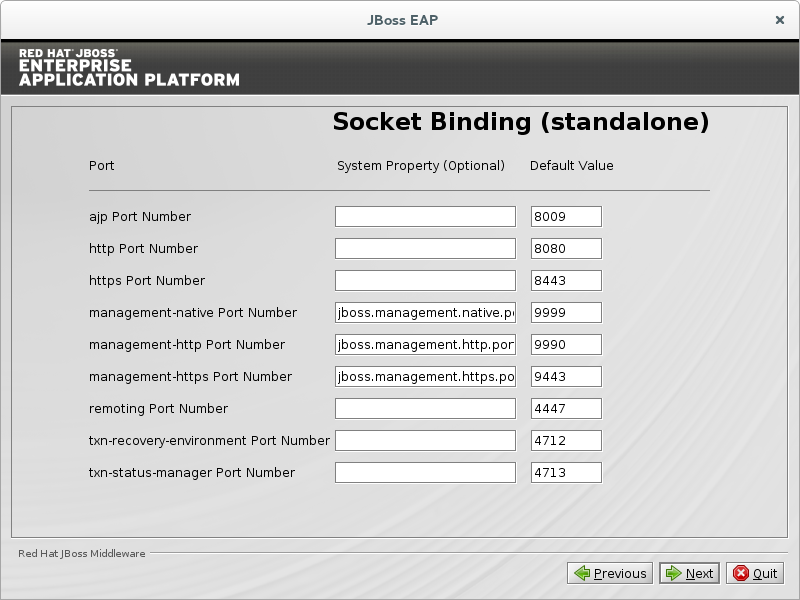
Figure B.11. JBoss EAP Installer Standalone Socket Binding Configuration

Figure B.12. JBoss EAP Installer Standalone HA Socket Binding Configuration
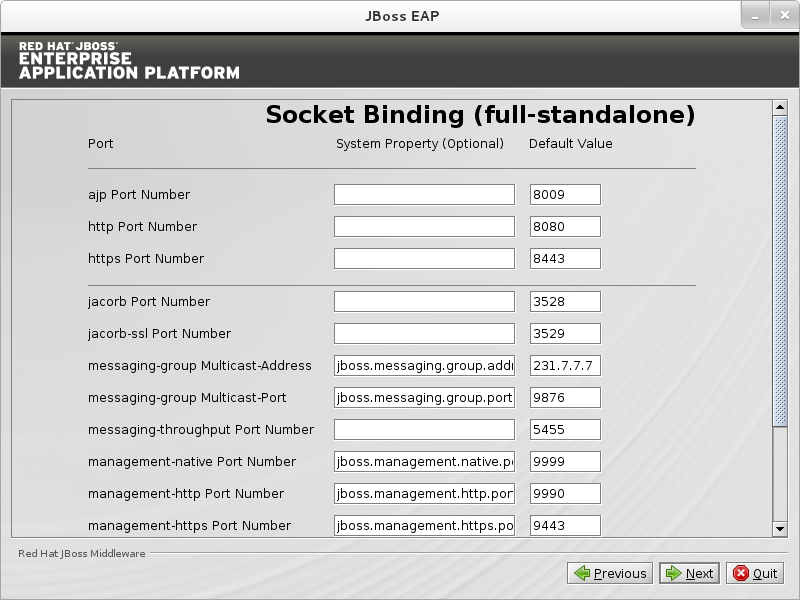
Figure B.13. JBoss EAP Installer Standalone Full Standalone Socket Binding Configuration
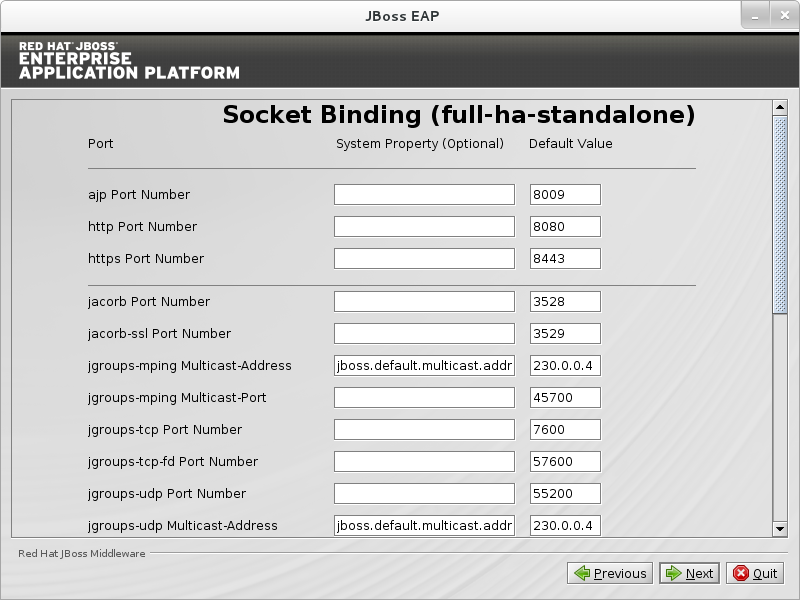
Figure B.14. JBoss EAP Installer Standalone Full HA Standalone Socket Binding Configuration
B.10. Custom Socket Bindings for Domain Configurations
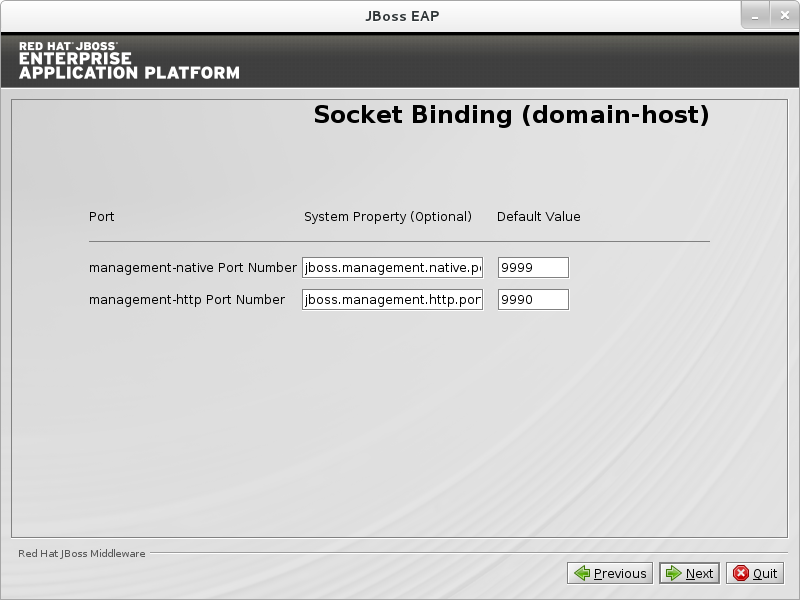
Figure B.15. JBoss EAP Installer Domain Host Socket Binding Configuration
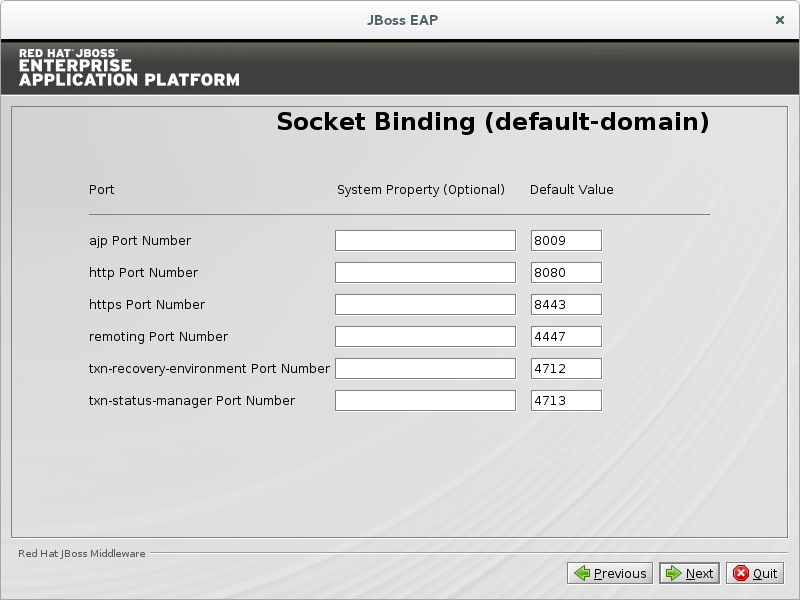
Figure B.16. JBoss EAP Installer Default Domain Socket Binding Configuration
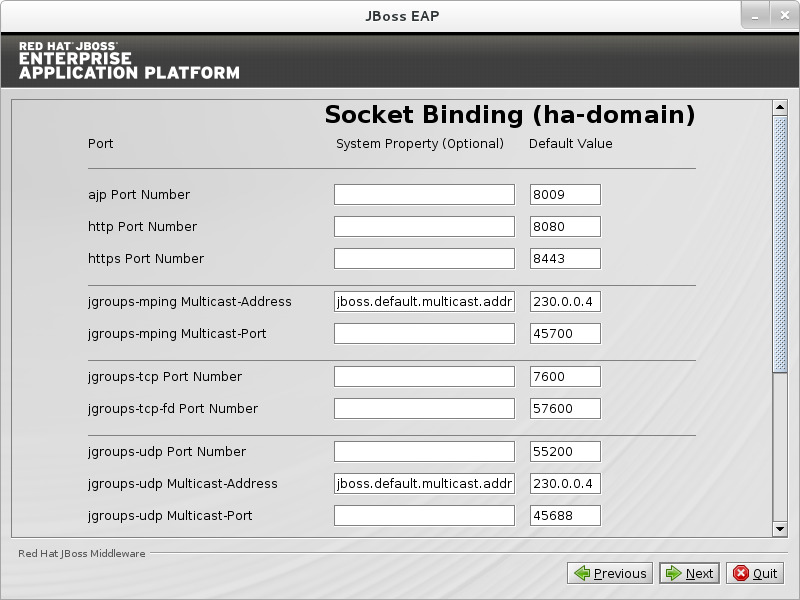
Figure B.17. JBoss EAP Installer HA Domain Socket Binding Configuration
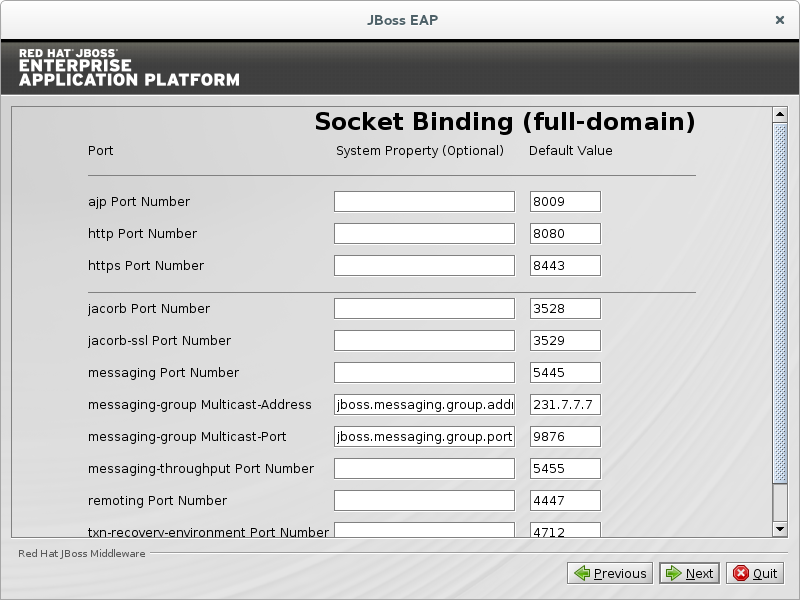
Figure B.18. JBoss EAP Installer Full Domain Socket Binding Configuration
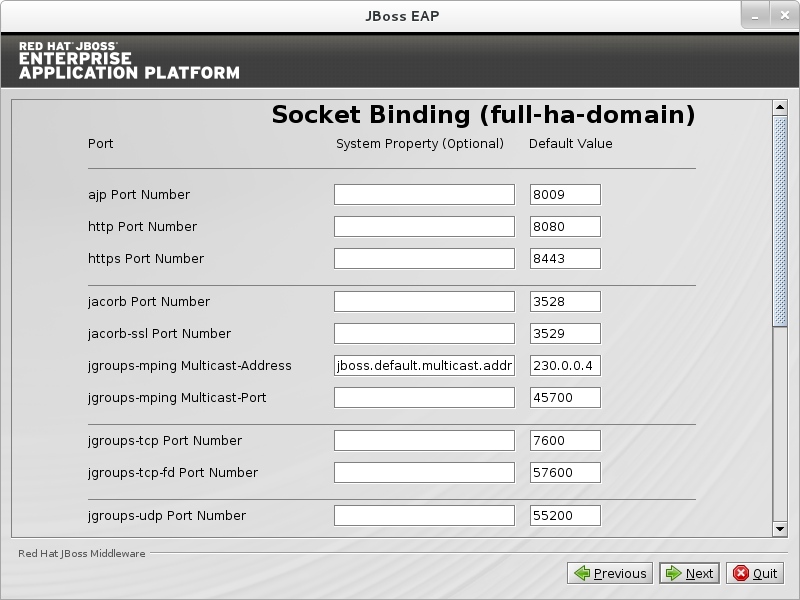
Figure B.19. JBoss EAP Installer Full HA Domain Socket Binding Configuration
B.12. Configure Logging Levels
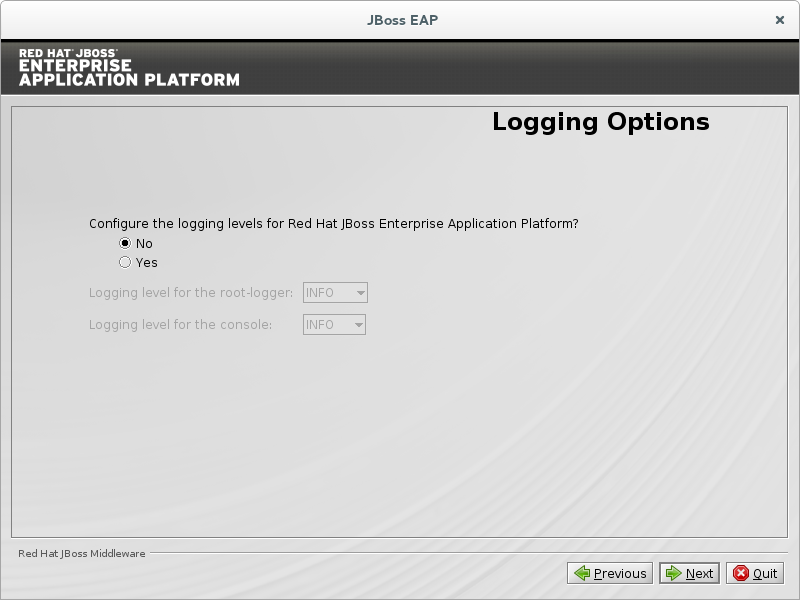
Figure B.21. JBoss EAP Installation Program Configure Logging Levels
B.13. Configure Runtime Environment
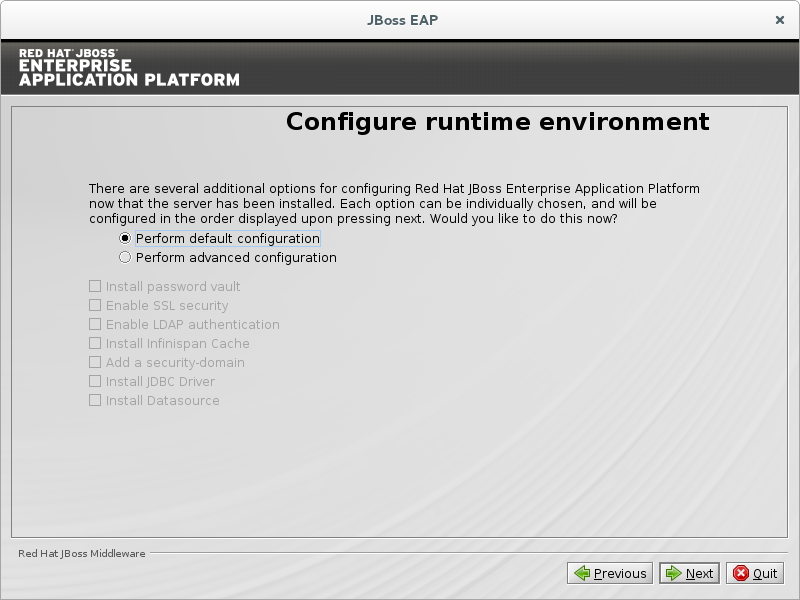
Figure B.22. JBoss EAP Installation Program Configure Runtime Environment - Default
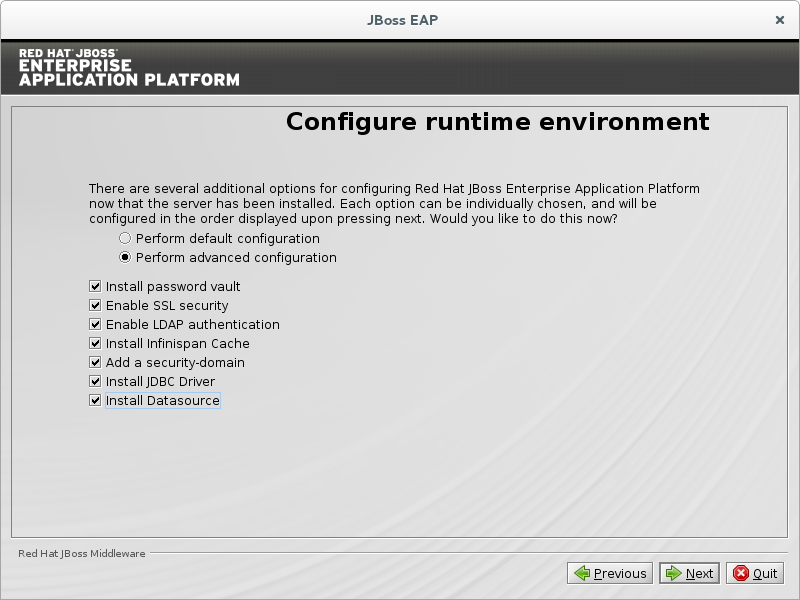
Figure B.23. JBoss EAP Installation Program Configure Runtime Environment - Advanced
B.14. Password Vault Configuration
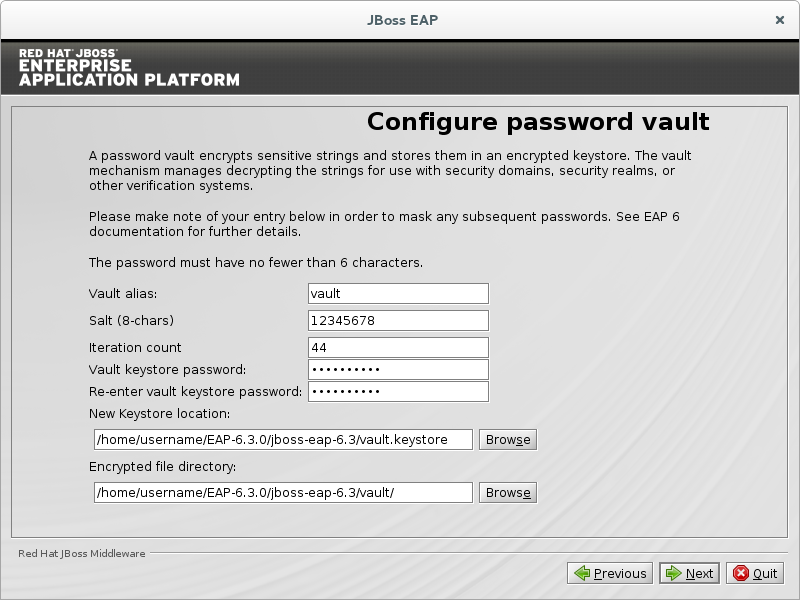
Figure B.24. JBoss EAP Install Password Vault Configuration

B.18. Security Domain Configuration
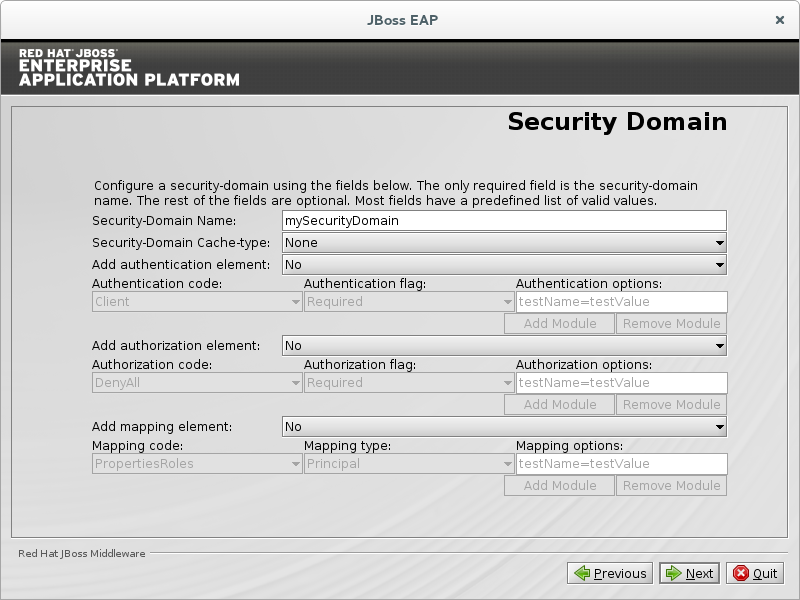
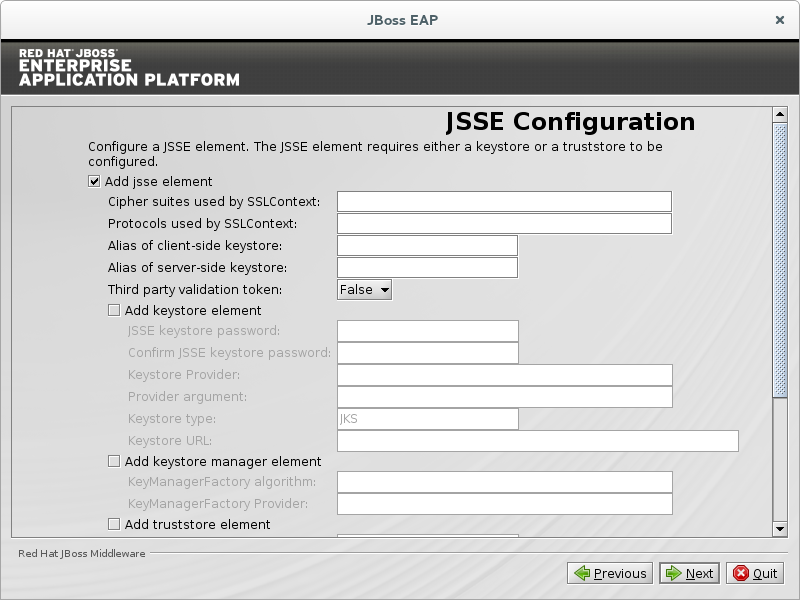
Figure B.28. JBoss EAP Install Security Domain Configuration
B.21. Review Installation Components
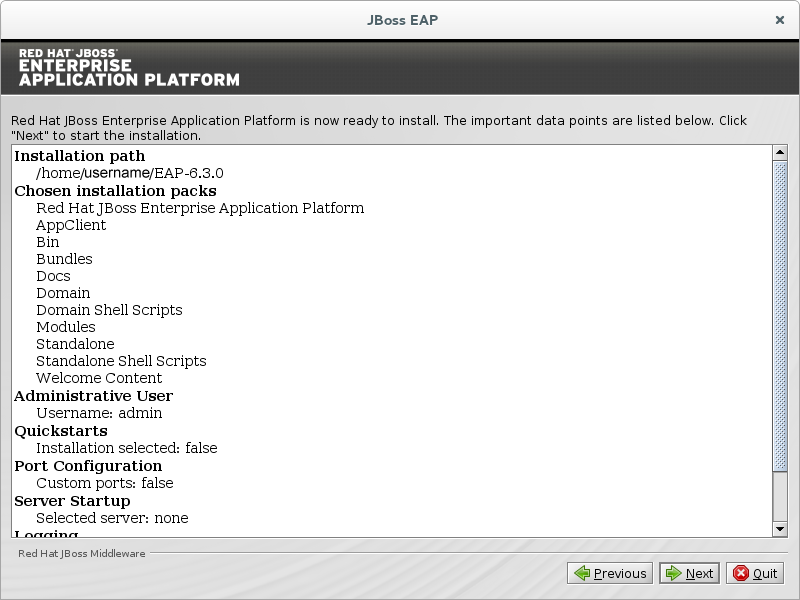
Figure B.31. JBoss EAP Installation Program Review Selected Components
B.22. Installation Progress
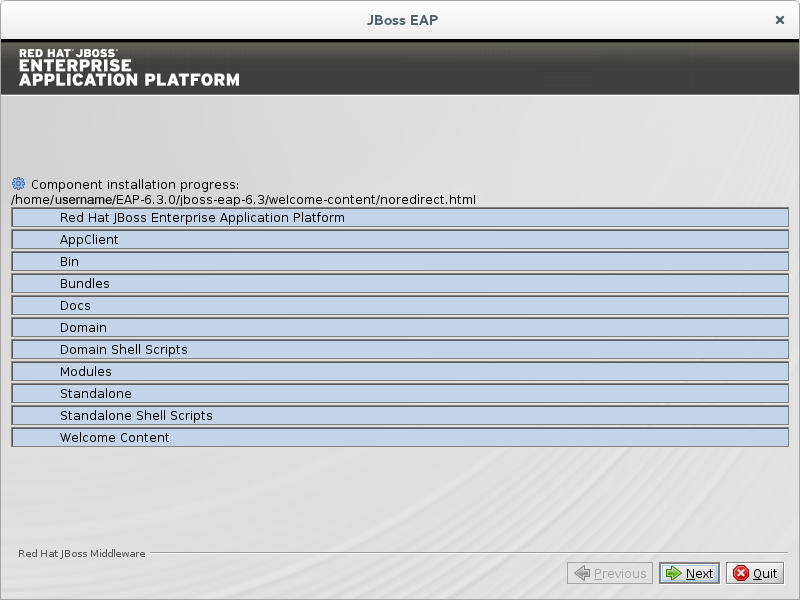
Figure B.32. JBoss EAP Installation Program Component Installation Progress
B.23. Installation Processing Finished
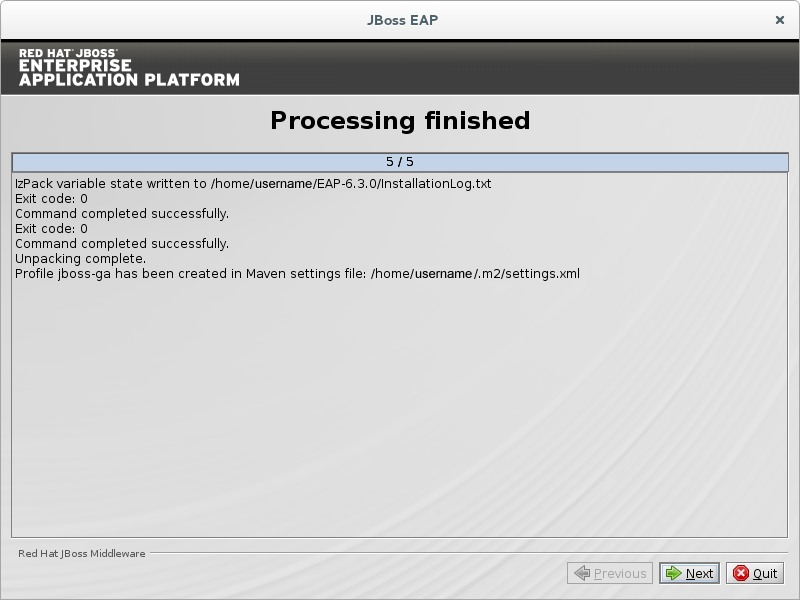
Figure B.33. JBoss EAP Installation Program Processing Finished
B.25. Generate Install Script
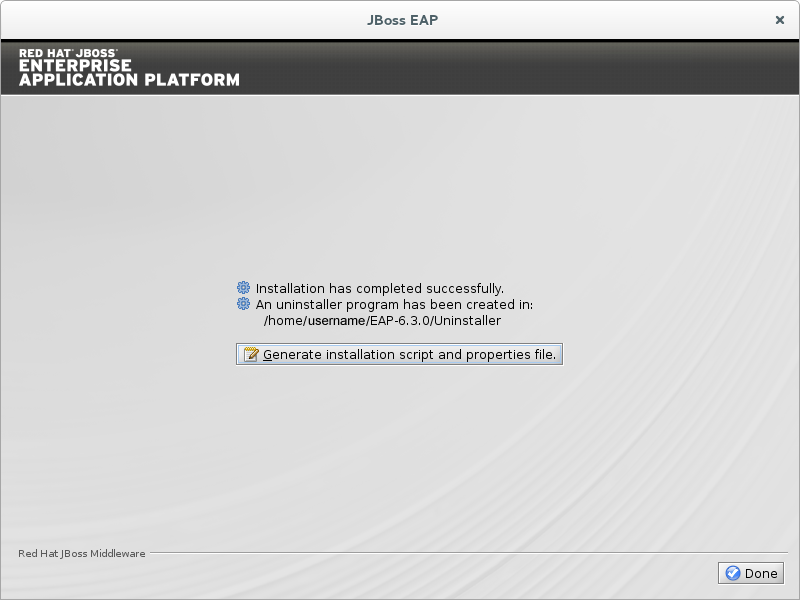
Figure B.35. JBoss EAP Installation Program Generate Install Script
Appendix C. Revision History
| Revision History | |||
|---|---|---|---|
| Revision 6.3.0-50 | Tuesday November 18 2014 | ||
| |||
| Revision 6.3.0-32 | Friday August 8 2014 | ||
| |||
| Revision 6.3.0-30 | Monday August 4 2014 | ||
| |||