
RichFaces Developer Guide
for use with JBoss Enterprise Application Platform 5
Edition 5.2.0
Abstract
Chapter 1. Introduction
- Experience the benefits of JSF while working with AJAX. RichFaces is fully integrated into the JSF life cycle. Where other frameworks only allow access to the managed bean facility, RichFaces lets you access the action and value change listeners, and invokes server-side validators and converters during the AJAX request-response cycle.
- Add AJAX capabilities to existing JSF applications. The RichFaces framework provides two component libraries (Core AJAX and UI). The Core library adds AJAX functionality to existing pages, so you need not write any JavaScript or replace existing components with new AJAX components manually. RichFaces enables page-wide rather than component-wide AJAX support, giving you the opportunity to define events on the page.
- Quickly and easily create different views with a variety of components, available out-of-the-box. The RichFaces UI library contains components for adding rich user interface (UI) features to JSF applications, providing you with a broad variety of AJAX-enabled components with extensive skins support. RichFaces components are designed to integrate seamlessly with other third-party component libraries, so you have more options when you develop applications.
- Write your own rich components with built-in AJAX support. The Component Development Kit (CDK) is constantly being expanded. It includes both code generation and templating facilities and a simple JSP-like (JavaServer Pages) syntax, letting you create first-class rich components with built-in AJAX functionality.
- Package resources with application Java classes. RichFaces provides advanced support for managing different resource types, including images, JavaScript code, and CSS stylesheets. The resource framework makes it easier to include these resources in JAR files with your custom component code.
- Quickly and easily generate binary resources. The resource framework can generate images, sounds, Excel spreadsheets, etc. in real time, so you can, for example, create images with the Java Graphics 2D library and other similar resources.
- Customize the look and feel of your user interface with skins-based technology. RichFaces lets you easily define and manage different color schemes and other user interface parameters by using named skin parameters. This means you can access UI parameters from JSP and Java code to adjust your UI in real time. RichFaces includes a number of predefined skins to kick-start your application's development, but it is easy to create your own custom skins.
- Simultaneously create and test your components, actions, listeners, and pages. RichFaces will soon include an automated testing facility to generate test cases for your component as you develop it. The testing framework tests not only the components, but also any other server-side or client-side functionality, including JavaScript code — and it will do so without deploying the test application into the Servlet container.
Chapter 2. Getting Started with RichFaces
2.1. Simple JSF application with RichFaces
Greeter. Include all required libraries, and continue with the instructions that follow.
2.1.1. Adding RichFaces libraries into the project
RichFaces folder where you unzipped the RichFaces binary files, open the lib. This folder contains three *.jar files with API, UI, and implementation libraries. Copy these JARs from lib to the WEB-INF/lib directory of your Greeter JSF application.
Important
commons-beanutils-1.7.0.jarcommons-collections-3.2.jarcommons-digester-1.8.jarcommons-logging-1.0.4.jarjhighlight-1.0.jar
2.1.2. Registering RichFaces in web.xml
web.xml file. Add the following to web.xml:
...
<!-- Plugging the "Blue Sky" skin into the project -->
<context-param>
   <param-name>org.richfaces.SKIN</param-name>
   <param-value>blueSky</param-value>
</context-param>

<!-- Making the RichFaces skin spread to standard HTML controls -->
<context-param>
      <param-name>org.richfaces.CONTROL_SKINNING</param-name>
      <param-value>enable</param-value>
</context-param>

<!-- Defining and mapping the RichFaces filter -->
<filter>
   <display-name>RichFaces Filter</display-name>
   <filter-name>richfaces</filter-name>
   <filter-class>org.ajax4jsf.Filter</filter-class>
</filter>

<filter-mapping>
   <filter-name>richfaces</filter-name>
   <servlet-name>Faces Servlet</servlet-name>
   <dispatcher>REQUEST</dispatcher>
   <dispatcher>FORWARD</dispatcher>
   <dispatcher>INCLUDE</dispatcher>
</filter-mapping>
...
web.xml should look like this:
<?xml version="1.0"?>
<web-app version="2.5"
                xmlns="http://java.sun.com/xml/ns/javaee"
                xmlns:xsi="http://www.w3.org/2001/XMLSchema-instance"
                xsi:schemaLocation="http://java.sun.com/xml/ns/javaee http://java.sun.com/xml/ns/javaee/web-app_2_5.xsd">
<display-name>Greeter</display-name>

<context-param>
   <param-name>javax.faces.STATE_SAVING_METHOD</param-name>
   <param-value>server</param-value>
</context-param>

<context-param>
   <param-name>org.richfaces.SKIN</param-name>
   <param-value>blueSky</param-value>
</context-param>

<context-param>
      <param-name>org.richfaces.CONTROL_SKINNING</param-name>
      <param-value>enable</param-value>
</context-param>

<filter>
   <display-name>RichFaces Filter</display-name>
   <filter-name>richfaces</filter-name>
   <filter-class>org.ajax4jsf.Filter</filter-class>
</filter>

<filter-mapping>
   <filter-name>richfaces</filter-name>
   <servlet-name>Faces Servlet</servlet-name>
   <dispatcher>REQUEST</dispatcher>
   <dispatcher>FORWARD</dispatcher>
   <dispatcher>INCLUDE</dispatcher>
</filter-mapping>

<listener>
   <listener-class>com.sun.faces.config.ConfigureListener</listener-class>
</listener>

<!-- Faces Servlet -->
<servlet>
   <servlet-name>Faces Servlet</servlet-name>
   <servlet-class>javax.faces.webapp.FacesServlet</servlet-class>
   <load-on-startup>1</load-on-startup>
</servlet>

<!-- Faces Servlet Mapping -->
<servlet-mapping>
   <servlet-name>Faces Servlet</servlet-name>
   <url-pattern>*.jsf</url-pattern>
</servlet-mapping>

<login-config>
   <auth-method>BASIC</auth-method>
   </login-config>
</web-app>
2.1.3. Managed bean
JavaSource directory, create a new managed bean named user in the demo package. Place the following code in user:
package demo;

public class user {
   private String name="";
   public String getName() {
      return name;
   }
   public void setName(String name) {
      this.name = name;
   }
}
2.1.4. Registering the bean in faces-config.xml
user bean, add the following to the faces-config.xml file:
<?xml version="1.0" encoding="UTF-8"?>
<faces-config version="1.2"
                    xmlns="http://java.sun.com/xml/ns/javaee"
                    xmlns:xi="http://www.w3.org/2001/XInclude"
                    xmlns:xsi="http://www.w3.org/2001/XMLSchema-instance"
                    xsi:schemaLocation="http://java.sun.com/xml/ns/javaee http://java.sun.com/xml/ns/javaee/web-facesconfig_1_2.xsd">
   <managed-bean>
      <description>UsernName Bean</description>
      <managed-bean-name>user</managed-bean-name>
      <managed-bean-class>demo.user</managed-bean-class>
      <managed-bean-scope>request</managed-bean-scope>
      <managed-property>
         <property-name>name</property-name>
         <property-class>java.lang.String</property-class>
         <value/>
      </managed-property>
   </managed-bean>
</faces-config>
2.1.5. RichFaces Greeter index.jsp
index.jsp in the root of WEB CONTENT folder and add the following to the JSP file:
<!doctype html public "-//w3c//dtd html 4.0 transitional//en">
<%@ taglib uri="http://java.sun.com/jsf/core" prefix="f" %>
<%@ taglib uri="http://java.sun.com/jsf/html" prefix="h" %>
<!-- RichFaces tag library declaration -->
<%@ taglib uri="http://richfaces.org/a4j" prefix="a4j"%>
<%@ taglib uri="http://richfaces.org/rich" prefix="rich"%>

<html>
      <head>
            <title>RichFaces Greeter</title>
      </head>
      <body>
            <f:view>
                  <a4j:form>
                        <rich:panel header="RichFaces Greeter" style="width: 315px">
                              <h:outputText value="Your name: " />
                              <h:inputText value="#{user.name}" >
                                    <f:validateLength minimum="1" maximum="30" />
                              </h:inputText>

                              <a4j:commandButton value="Get greeting" reRender="greeting" />

                              <h:panelGroup id="greeting" >
                                    <h:outputText value="Hello, " rendered="#{not empty user.name}" />
                                    <h:outputText value="#{user.name}" />
                                    <h:outputText value="!" rendered="#{not empty user.name}" />
                              </h:panelGroup>
                        </rich:panel>
                  </a4j:form>
            </f:view>
      </body>
</html>
Note
<xmlns:a4j="http://richfaces.org/a4j">
<xmlns:rich="http://richfaces.org/rich">
index.jsp page: http://localhost:8080/Greeter/index.jsf
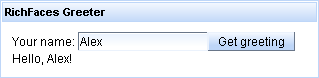
Figure 2.1. "RichFaces Greeter" application
2.2. Relevant Resources Links
Chapter 3. Settings for different environments
lib directory of the project, and add filter mapping. The behavior of the existing project does not change when you add RichFaces.
3.1. Web Application Descriptor Parameters
web.xml, but the RichFaces parameters listed below will help you during the development process and increase the flexibility of your RichFaces applications.
Table 3.1. Initialization Parameters
| Name | Default | Description |
|---|---|---|
| org.richfaces.SKIN | DEFAULT | The name of a skin that is used in an application. Can be a literal string with a skin name or the EL expression (#{...}) associated with a String property (skin name) of a property of a org.richfaces.framework.skin type. In the latter case, that instance is used as the current skin. |
| org.richfaces.LoadScriptStrategy | DEFAULT | Defines how the RichFaces script files are loaded to the application. Possible values are ALL, DEFAULT and NONE. |
| org.richfaces.LoadStyleStrategy | DEFAULT | Defines how the RichFaces style files are loaded into the application. Possible values are: ALL, DEFAULT, or NONE. |
| org.ajax4jsf.LOGFILE | none | The URL of an application or a container log file (if applicable). If this parameter is set, content from the given URL is shown on a Debug page in the iframe window. |
| org.ajax4jsf.VIEW_HANDLERS | none | A comma-separated list of ViewHandler instances for inserting in a view handler chain. These handlers are inserted before the RichFaces viewhandlers, in the order they are listed. In a Facelets application, you would declare com.sun.facelets.FaceletViewHandler here instead of in the faces-config.xml file. |
| org.ajax4jsf.CONTROL_COMPONENTS | none | A comma-separated list of special control case components, such as the messages bundle loader or an alias bean component. These handlers are provided via a reflection from the static field COMPONENT_TYPE. Encoding methods for these components are always called while rendering AJAX responses, even if a component has not been updated. |
| org.ajax4jsf.ENCRYPT_RESOURCE_DATA | false | For generated resources (such as encrypt generation data), this is encoded in the resource URL. For example, the URL of an image generated by the mediaOutput component contains the name of a generation method. Since malicious code can exploit this to create a request for any JSF bean or attribute, this parameter should be set to true in critical applications. (This fix works with Java Runtime Environment 1.4.) |
| org.ajax4jsf.ENCRYPT_PASSWORD | random | A password used to encrypt resource data. If this is not set, a random password is used. |
| org.ajax4jsf.COMPRESS_SCRIPT | true | When defined, does not allow the frameword to reformat JavaScript files. This means that the debug feature cannot be used. |
| org.ajax4jsf.RESOURCE_URI_PREFIX | a4j | Defines the prefix to be added to the URLs of all generated resources. This is designed to handle RichFaces generated resource requests. |
| org.ajax4jsf.GLOBAL_RESOURCE_URI_PREFIX | a4j/g | Defines the prefix to be added to the URI of all global resources. This prefix is designed to handle RichFaces generated resource requests. |
| org.ajax4jsf.SESSION_RESOURCE_URI_PREFIX | a4j/s | Defines the prefix to be used to track the sessions of generated resources. This prefix is designed to handle RichFaces generated resource requests. |
| org.ajax4jsf.DEFAULT_EXPIRE | 86400 | Defines the period (in seconds) for which resources are cached when they are streamed back to the browser. |
| org.ajax4jsf.SERIALIZE_SERVER_STATE | false | If set to true, the component state (not the tree) will be serialized before it is stored in the session. This can be useful in applications with view state that is sensitive to model changes. Alternatively, use com.sun.faces.serializeServerState and org.apache.myfaces.SERIALIZE_STATE_IN_SESSION parameters in their respective environments. |
Note
org.richfaces.SKIN is used in the same way as org.ajax4jsf.SKIN.
Table 3.2. org.ajax4jsf.Filter Initialization Parameters
| Name | Default | Description |
|---|---|---|
| log4j-init-file | - | A path (relative to the web application's context) to the log4j.xml configuration file. This can be used to set up per-application custom logging. |
| enable-cache | true | Enables caching of framework-generated resources (JavaScript, CSS, images, etc.). However, your cached resources will not be used when attempting to debug custom JavaScript or Styles. |
| forcenotrf | true | Forces all JSF pages to be parsed by a HTML syntax check filter. If set to false, only AJAX responses will be parsed and converted to well-formed XML. Setting this to false can improve performance, but may also cause unexpected information to be rendered during AJAX updates. |
3.2. Sun JSF RI
3.3. Facelets Support
ViewHandler be listed first in the ViewHandler chain. RichFaces also requires that its AjaxViewHandler be listed first, but because it is installed first, no settings will need to be altered. Where multiple frameworks are used without RichFaces, you can use the VIEW_HANDLERS parameter to define the order in which the ViewHandlers are used. For example:
...
<context-param>
     <param-name>org.ajax4jsf.VIEW_HANDLERS</param-name>
     <param-value>com.sun.facelets.FaceletViewHandler</param-value>
</context-param>
...
Facelets will officially be first, AjaxViewHandler will briefly be ahead of it to perform some small, important task.
Note
FaceletViewHandler in WEB-INF/faces-config.xml.
3.4. JBoss Seam Support
web.xml must be as follows:
<?xml version="1.0" ?>
<web-app xmlns="http://java.sun.com/xml/ns/j2ee"
                   xmlns:xsi="http://www.w3.org/2001/XMLSchema-instance"
                   xsi:schemaLocation="http://java.sun.com/xml/ns/j2ee http://java.sun.com/xml/ns/j2ee/web-app_2_4.xsd"
                   version="2.4">

     <!-- richfaces -->

     <filter>
          <display-name>RichFaces Filter</display-name>
          <filter-name>richfaces</filter-name>
          <filter-class>org.ajax4jsf.Filter</filter-class>
     </filter>

     <filter-mapping>
          <filter-name>richfaces</filter-name>
          <url-pattern>*.seam</url-pattern>
     </filter-mapping>

     <!-- Seam -->

     <listener>
          <listener-class>org.jboss.seam.servlet.SeamListener</listener-class>
     </listener>

     <servlet>
          <servlet-name>Seam Resource Servlet</servlet-name>
          <servlet-class>org.jboss.seam.servlet.ResourceServlet</servlet-class>
     </servlet>

     <servlet-mapping>
          <servlet-name>Seam Resource Servlet</servlet-name>
          <url-pattern>/seam/resource/*</url-pattern>
     </servlet-mapping>

     <filter>
          <filter-name>Seam Filter</filter-name>
          <filter-class>org.jboss.seam.web.SeamFilter</filter-class>
     </filter>

     <filter-mapping>
          <filter-name>Seam Filter</filter-name>
          <url-pattern>/*</url-pattern>
     </filter-mapping>

     <!-- MyFaces -->

     <listener>
          <listener-class>org.apache.myfaces.webapp.StartupServletContextListener</listener-class>
     </listener>

     <!-- JSF -->

     <context-param>
          <param-name>javax.faces.STATE_SAVING_METHOD</param-name>
          <param-value>client</param-value>
     </context-param>

     <context-param>
          <param-name>javax.faces.DEFAULT_SUFFIX</param-name>
         <param-value>.xhtml</param-value>
     </context-param>

     <servlet>
          <servlet-name>Faces Servlet</servlet-name>
          <servlet-class>javax.faces.webapp.FacesServlet</servlet-class>
          <load-on-startup>1</load-on-startup>
     </servlet>

     <servlet-mapping>
          <servlet-name>Faces Servlet</servlet-name>
          <url-pattern>*.seam</url-pattern>
     </servlet-mapping>
</web-app>
web.xml must look like this:
<?xml version="1.0" encoding="UTF-8"?>
<web-app version="2.5"
                   xmlns="http://java.sun.com/xml/ns/javaee"
                   xmlns:xsi="http://www.w3.org/2001/XMLSchema-instance"
                   xsi:schemaLocation="http://java.sun.com/xml/ns/javaee http://java.sun.com/xml/ns/javaee/web-app_2_5.xsd">

     <context-param>
          <param-name>org.ajax4jsf.VIEW_HANDLERS</param-name>
          <param-value>com.sun.facelets.FaceletViewHandler</param-value>
     </context-param>

     <!-- Seam -->

     <listener>
          <listener-class>org.jboss.seam.servlet.SeamListener</listener-class>
     </listener>

     <servlet>
          <servlet-name>Seam Resource Servlet</servlet-name>
          <servlet-class>org.jboss.seam.servlet.SeamResourceServlet</servlet-class>
     </servlet>

     <servlet-mapping>
          <servlet-name>Seam Resource Servlet</servlet-name>
          <url-pattern>/seam/resource/*</url-pattern>
     </servlet-mapping>

     <filter>
          <filter-name>Seam Filter</filter-name>
          <filter-class>org.jboss.seam.servlet.SeamFilter</filter-class>
     </filter>

     <filter-mapping>
          <filter-name>Seam Filter</filter-name>
          <url-pattern>/*</url-pattern>
     </filter-mapping>

     <!-- JSF -->

     <context-param>
          <param-name>javax.faces.DEFAULT_SUFFIX</param-name>
          <param-value>.xhtml</param-value>
     </context-param>

     <context-param>
          <param-name>facelets.DEVELOPMENT</param-name>
          <param-value>true</param-value>
     </context-param>

     <servlet>
          <servlet-name>Faces Servlet</servlet-name>
          <servlet-class>javax.faces.webapp.FacesServlet</servlet-class>
          <load-on-startup>1</load-on-startup>
     </servlet>

     <servlet-mapping>
          <servlet-name>Faces Servlet</servlet-name>
          <url-pattern>*.seam</url-pattern>
     </servlet-mapping>
</web-app>
Chapter 4. Basic concepts of the RichFaces Framework
4.1. Introduction
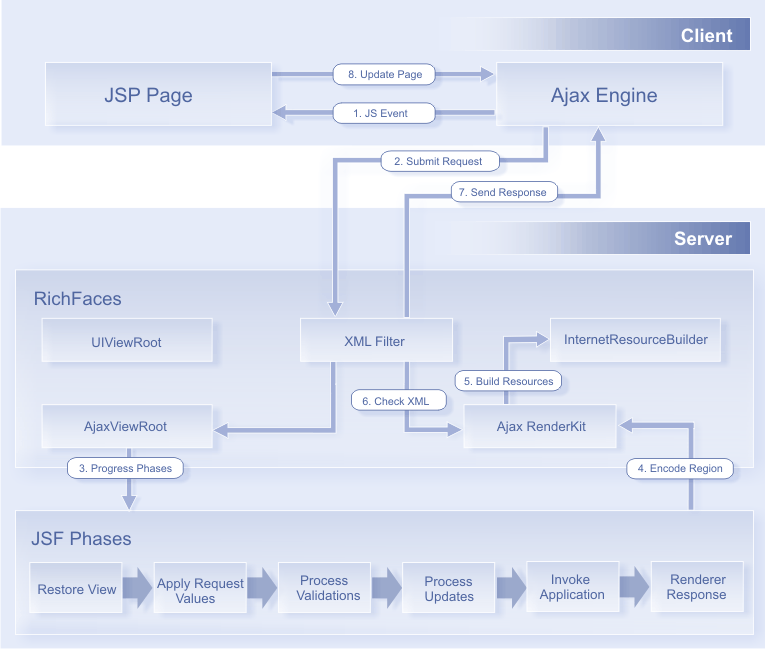
Figure 4.1. Request Processing flow
XMLHTTPRequest objects by hand — everything is done automatically.
4.2. RichFaces Architecture Overview

Figure 4.2. Core AJAX component structure
To make the most of RichFaces, you should register a Filter in your application's web.xml. The Filter recognizes multiple request types. The sequence diagram in Figure 5.3 shows the differences in processing between a regular JSF request and an AJAX request.
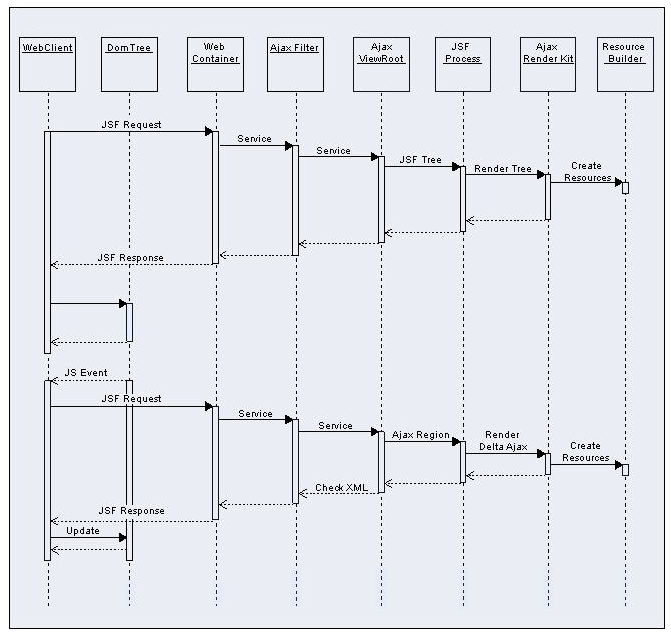
Figure 4.3. Request processing sequence diagram
ResourceBuilder class.
Resource Cache for this resource. If it is present, the resource is returned to the client. Otherwise, the filter searches for the resource among those registered in the ResourceBuilder. If the resource is registered, the RichFaces filter requests that the ResourceBuilder creates (delivers) the resource.
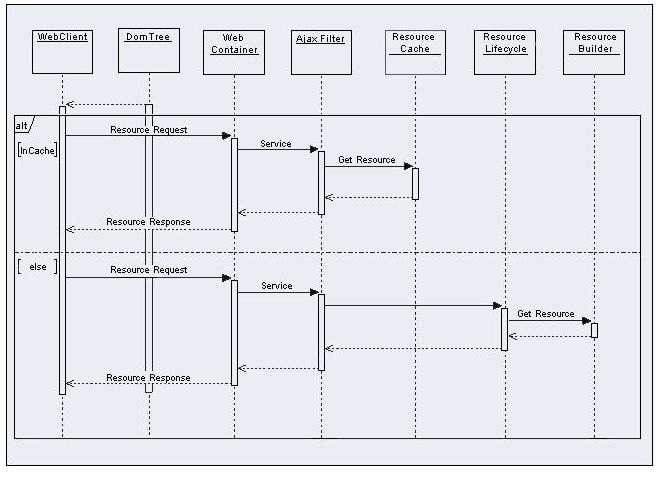
Figure 4.4. Resource request sequence diagram
AJAX Action components are used to send AJAX requests from the client side. There are a number of AJAX Action components, including <a4j:commandButton>, <a4j:commandLink>, <a4j:poll>, and <a4j:support>.
AjaxContainer is an interface that defines an area on your JSF page that should be decoded during an AJAX request. AjaxViewRoot and AjaxRegion are both implementations of this interface.
The RichFaces JavaScript Engine runs on the client side, and updates different areas of your JSF page based on information from the AJAX response. This JavaScript code operates automatically, so there is no need to use it directly.
4.3. Request Errors and Session Expiration Handling
web.xml:
<context-param>
	<param-name>org.ajax4jsf.handleViewExpiredOnClient</param-name>
	<param-value>true</param-value>
</context-param>
4.3.1. Request Errors Handling
A4J.AJAX.onError method like so:
 A4J.AJAX.onError = function(req, status, message){
    window.alert("Custom onError handler "+message);
}req- a parameter string of a request that calls an error
status- the number of an error returned by the server
message- a default message for the given error
4.3.2. Session Expired Handling
onExpired framework method that is called on the SessionExpiration event.
A4J.AJAX.onExpired = function(loc, expiredMsg){
    if(window.confirm("Custom onExpired handler "+expiredMsg+" for a location: "+loc)){
      return loc;
    } else {
     return false;
    }
}loc- the URL of the current page (can be updated on demand)
expiredMsg- a default message for display in the event of
SessionExpiration.
Note
onExpire handlers do not work under MyFaces. MyFaces handles exceptions by internally generating a debug page. To prevent this behavior, use the following:
...
<context-param>
	<param-name>org.apache.myfaces.ERROR_HANDLING</param-name>
	<param-value>false</param-value>
</context-param>
...
4.4. Skinnability
4.4.1. Why Skinnability
skinnability feature cannot completely replace standard CSS, and does not eliminate its usage. Instead, it is a high-level extension of standard CSS that can be used in combination with regular CSS declarations. You can also refer to skin parameters in CSS through the JSF Expression Language. This lets you completely synchronize the appearance of all elements in your pages.
4.4.2. Using Skinnability
- skin parameters defined in the RichFaces framework,
- predefined CSS classes for components, and
- user style classes.
- A default style class inserted into the framework
This contains style parameters that are linked to some constants from a skin. It is defined for every component and specifies a default level of representation. You can modify an application interface by changing the values of the skin parameters.
- A style class of skin extension
This class name is defined for every component element, and inserted into the framework to let you define a class with the same name in your CSS files. This lets you easily extend the appearance of all components that use this class.
- User style class
You can use one of the
styleClassparameters to define your own class for component elements. As a result, the appearance of one particular component is changed according to a CSS style parameter specified in the class.
4.4.3. Example
<rich:panel> ... </rich:panel>
<div> element and a <div> element for the panel body with the specified style properties. The wrapper <div> element will look like this:
<div class="dr-pnl rich-panel">
     ...
</div>
dr-pnl is a CSS class that is specified in the framework via skin parameters:
background-coloris defined withgeneralBackgroundColorborder-coloris defined withpanelBorderColor
<rich:panel> class on the page, its parameters are also acquired by all panels on this page.
<rich:panel styleClass="customClass" />
customClass to one particular panel. As a result, we will get three styles:
<div class="dr_pnl rich-panel customClass">
	...
</div>
4.4.4. Skin Parameters Tables in RichFaces
- DEFAULT
- plain
- emeraldTown
- blueSky
- wine
- japanCherry
- ruby
- classic
- deepMarine
org.richfaces.SKIN context parameter.
blueSky skin:
Table 4.1. Colors
| Parameter name | Default value |
|---|---|
| headerBackgroundColor | #BED6F8 |
| headerGradientColor | #F2F7FF |
| headTextColor | #000000 |
| headerWeightFont | bold |
| generalBackgroundColor | #FFFFFF |
| generalTextColor | #000000 |
| generalSizeFont | 11px |
| generalFamilyFont | Arial, Verdana, sans-serif |
| controlTextColor | #000000 |
| controlBackgroundColor | #FFFFFF |
| additionalBackgroundColor | #ECF4FE |
| shadowBackgroundColor | #000000 |
| shadowOpacity | 1 |
| panelBorderColor | #BED6F8 |
| subBorderColor | #FFFFFF |
| tabBackgroundColor | #C6DEFF |
| tabDisabledTextColor | #8DB7F3 |
| trimColor | #D6E6FB |
| tipBackgroundColor | #FAE6B0 |
| tipBorderColor | #E5973E |
| selectControlColor | #E79A00 |
| generalLinkColor | #0078D0 |
| hoverLinkColor | #0090FF |
| visitedLinkColor | #0090FF |
Table 4.2. Fonts
| Parameter name | Default value |
|---|---|
| headerSizeFont | 11px |
| headerFamilyFont | Arial, Verdana, sans-serif |
| tabSizeFont | 11px |
| tabFamilyFont | Arial, Verdana, sans-serif |
| buttonSizeFont | 11px |
| buttonFamilyFont | Arial, Verdana, sans-serif |
| tableBackgroundColor | #FFFFFF |
| tableFooterBackgroundColor | #cccccc |
| tableSubfooterBackgroundColor | #f1f1f1 |
| tableBorderColor | #C0C0C0 |
plain skin was added in version 3.0.2. It has no parameters, and is important when embedding RichFaces components into existing projects with their own styles.
4.4.5. Creating and Using Your Own Skin File
- Create a file. In it, define skin constants to be used by style classes (see Section 4.4.4, “Skin Parameters Tables in RichFaces”). The name of the skin file should follow this format:
<name>.skin.properties. (For examples of this file, see the RichFaces predefined skin parameters:blueSky,classic,deepMarine, etc. These files are located in therichfaces-impl-xxxxx.jararchive in the/META-INF/skinsfolder. - Add the skin definition
<contex-param>to theweb.xmlof your application, like so:... <context-param> <param-name>org.richfaces.SKIN</param-name> <param-value>name</param-value> </context-param> ... - Place your
<name>.skin.propertiesfile in either your/META-INF/skinsor/WEB-INF/classesdirectory.
4.4.6. Built-in Skinnability in RichFaces
- Create a custom render kit and register it in the
faces-config.xmllike so:<render-kit> <render-kit-id>NEW_SKIN</render-kit-id> <render-kit-class>org.ajax4jsf.framework.renderer.ChameleonRenderKitImpl</render-kit-class> </render-kit> - Next, create and register custom renderers for the component based on the look-and-feel predefined variables:
<renderer> <component-family>javax.faces.Command</component-family> <renderer-type>javax.faces.Link</renderer-type> <renderer-class>newskin.HtmlCommandLinkRenderer</renderer-class> </renderer> - Finally, place a properties file with skin parameters into the class path root. There are two requirements for the properties file:
- The file must be named
skinName.skin.properties. In this case, we would call itnewskin.skin.properties. - The first line in this file should be
render.kit=render-kit-id. In this case, we would userender.kit=NEW_SKIN.
4.4.7. Changing skin in runtime
web.xml.
<context-param>
	<param-name>org.richfaces.SKIN</param-name>
	<param-value>#{skinBean.skin}</param-value>
</context-param>
skinBean code looks like this:
public class SkinBean {

	private String skin;

	public String getSkin() {
		return skin;
	}
	public void setSkin(String skin) {
		this.skin = skin;
	}
}skin property's initial value in the configuration file. To set classic:
<managed-bean>
	<managed-bean-name>skinBean</managed-bean-name>
	<managed-bean-class>SkinBean</managed-bean-class>
	<managed-bean-scope>session</managed-bean-scope>
	<managed-property>
		<property-name>skin</property-name>
		<value>classic</value>
  	</managed-property>
</managed-bean>
<h:form>
     <div style="display: block; float: left">
          <h:selectOneRadio value="#{skinBean.skin}" border="0" layout="pageDirection" title="Changing skin" style="font-size: 8; font-family: comic" onchange="submit()">
               	<f:selectItem itemLabel="plain" itemValue="plain" />
		<f:selectItem itemLabel="emeraldTown" itemValue="emeraldTown" />
		<f:selectItem itemLabel="blueSky" itemValue="blueSky" />
		<f:selectItem itemLabel="wine" itemValue="wine" />
		<f:selectItem itemLabel="japanCherry" itemValue="japanCherry" />
		<f:selectItem itemLabel="ruby" itemValue="ruby" />
		<f:selectItem itemLabel="classic" itemValue="classic" />
		<f:selectItem itemLabel="laguna" itemValue="laguna" />
		<f:selectItem itemLabel="deepMarine" itemValue="deepMarine" />
		<f:selectItem itemLabel="blueSky Modified" itemValue="blueSkyModify" />
          </h:selectOneRadio>
     </div>
     <div style="display: block; float: left">
          <rich:panelBar height="100" width="200">
               <rich:panelBarItem label="Item 1" style="font-family: monospace; font-size: 12;">
	     Changing skin in runtime
	</rich:panelBarItem>

	<rich:panelBarItem label="Item 2" style="font-family: monospace; font-size: 12;">
	     This is a result of the modification "blueSky" skin
	</rich:panelBarItem>
          </rich:panelBar>
     </div>
</h:form>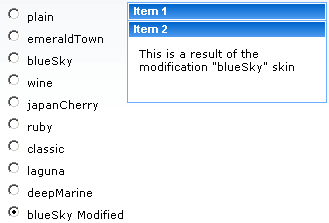
Figure 4.5. Changing skin in runtime
4.4.8. Standard Controls Skinning
rich-* classes to particular elements, or to a container of elements that nests controls.
Extended is used. However, if you want to explicitly specify the level to be applied, add a org.richfaces.CONTROL_SKINNING_LEVEL context parameter to your web.xml and set the value to either basic or extended.
- The Basic level provides customization for only basic style properties. Basic skinning is applied to the following browsers:
- Internet Explorer 6
- Internet Explorer 7 in BackCompat mode (see document.compatMode property in MSDN)
- Opera
- Safari
- The Extended level introduces a broader number of style properties on top of basic skinning, and is applied to browsers with rich visual styling control capabilities. The following browsers support Extended skinning:
- Mozilla Firefox
- Internet Explorer 7 in Standards-compliant mode (CSS1Compat mode)
inputselecttextareakeygenisindexlegendfieldsethra(together with thea:hover,a:visitedpseudo-elements)
- add the
org.richfaces.CONTROL_SKINNINGparameter toweb.xml.org.richfaces.CONTROL_SKINNINGtakesenableanddisableas parameters. This method implies that skinning style properties are applied per-element and attribute type (where applicable). No additional steps are required. See the Section 4.4.8.1, “Standard Level” and Section 4.4.8.2, “Extended level” tables for elements to which skinning can be applied. - add the
org.richfaces.CONTROL_SKINNING_CLASSESparameter toweb.xml.org.richfaces.CONTROL_SKINNING_CLASSEStakesenableanddisableas parameters. When enabled, you are provided with a set of predefined CSS classes to apply skins to your HTML components.
org.richfaces.CONTROL_SKINNING_CLASSES provides you style classes that can be applied to:
- basic elements nested within elements with a rich-container class. For example:
... .rich-container select { //class content } ... - Elements with a class name that corresponds to one of the basic element names or types are mapped with the
rich-<elementName>[-<elementType>]scheme, as in the following example:... .rich-select { //class content } .rich-input-text { //class content } ...Note
Elements are given classes depending upon theirlinktype and pseudo-class name, for example,rich-link,rich-link-hover,rich-link-visited
...
<u:selector name=".rich-box-bgcolor-header">
     <u:style name="background-color" skin="headerBackgroundColor" />
</u:selector>
<u:selector name=".rich-box-bgcolor-general">
     <u:style name="background-color" skin="generalBackgroundColor" />
</u:selector>
...
//gradient elements
...
<u:selector name=".rich-gradient-menu">
     <u:style name="background-image">
          <f:resource f:key="org.richfaces.renderkit.html.gradientimages.MenuGradientImage"/>
     </u:style>
     <u:style name="background-repeat" value="repeat-x" />
</u:selector>
<u:selector name=".rich-gradient-tab">
     <u:style name="background-image">
          <f:resource f:key="org.richfaces.renderkit.html.gradientimages.TabGradientImage"/>
     </u:style>
     <u:style name="background-repeat" value="repeat-x" />
</u:selector>
...ui/core/src/main/resources/org/richfaces/ directory of the RichFaces SVN repository.
4.4.8.1. Standard Level
Table 4.3. HTML Element Skin Bindings for input, select, textarea, button, keygen, isindex and legend
| CSS Properties | Skin Parameters |
|---|---|
| font-size | generalSizeFont |
| font-family | generalFamilyFont |
| color | controlTextColor |
Table 4.4. HTML Element Skin Bindings for fieldset
| CSS Properties | Skin Parameters |
|---|---|
| border-color | panelBorderColor |
Table 4.5. HTML Element Skin Bindings for hr
| CSS Properties | Skin Parameters |
|---|---|
| border-color | panelBorderColor |
Table 4.6. HTML Element Skin Bindings for a
| CSS Properties | Skin Parameters |
|---|---|
| color | generalLinkColor |
Table 4.7. HTML Element Skin Bindings for a:hover
| CSS Properties | Skin Parameters |
|---|---|
| color | hoverLinkColorgeneralLinkColor |
Table 4.8. HTML Element Skin Bindings for a:visited
| CSS Properties | Skin Parameters |
|---|---|
| color | visitedLinkColor |
Table 4.9. Rich Elements Skin Bindings for .rich-input, .rich-select, .rich-textarea, .rich-keygen, .rich-isindex, .rich-link
| CSS Properties | Skin Parameters |
|---|---|
| font-size | generalSizeFont |
| font-family | generalFamilyFont |
| color | controlTextColor |
Table 4.10. Rich Element Skin Bindings for .rich-fieldset
| CSS Properties | Skin Parameters |
|---|---|
| border-color | panelBorderColor |
Table 4.11. Rich Element Skin Bindings for .rich-hr
| CSS Properties | Skin Parameters |
|---|---|
| border-color | panelBorderColor |
| border-width | 1px |
| border-style | solid |
Table 4.12. Rich Element Skin Bindings for .rich-link
| CSS Properties | Skin Parameters |
|---|---|
| color | generalLinkColor |
Table 4.13. Rich Element Skin Bindings for .rich-link:hover
| CSS Properties | Skin Parameters |
|---|---|
| color | hoverLinkColor |
Table 4.14. Rich Element Skin Bindings for .rich-link:visited
| CSS Properties | Skin Parameters |
|---|---|
| color | visitedLinkColor |
Table 4.15. Rich Element Skin Bindings for .rich-field
| CSS Properties | Skin parameters/Value |
|---|---|
| border-width | 1px |
| border-style | inset |
| border-color | panelBorderColor |
| background-color | controlBackgroundColor |
| background-repeat | no-repeat |
| background-position | 1px 1px |
Table 4.16. Rich Element Skin Bindings for .rich-field-edit
| CSS Properties | Skin Parameters |
|---|---|
| border-width | 1px |
| border-style | inset |
| border-color | panelBorderColor |
| background-color | editBackgroundColor |
Table 4.17. Rich Element Skin Bindings for .rich-field-error
| CSS Properties | Skin Parameters |
|---|---|
| border-width | 1px |
| border-style | inset |
| border-color | panelBorderColor |
| background-color | warningBackgroundColor |
| background-repeat | no-repeat |
| background-position | center left |
| padding-left | 7px |
Table 4.18. Rich Element Skin Bindings for .rich-button, .rich-button-disabled, .rich-button-over
| CSS Properties | Skin Parameters |
|---|---|
| border-width | 1px |
| border-style | solid |
| border-color | panelBorderColor |
| background-color | trimColor |
| padding | 2px 10px 2px 10px |
| text-align | center |
| cursor | pointer |
| background-repeat | repeat-x |
| background-position | top left |
Table 4.19. Rich Element Skin Bindings for .rich-button-press
| CSS Properties | Skin Parameters |
|---|---|
| background-position | bottom left |
Table 4.20. Rich Element Skin Bindings for .rich-container fieldset, .rich-fieldset
| CSS Properties | Skin Parameters |
|---|---|
| border-color | panelBorderColor |
| border-width | 1px |
| border-style | solid |
| padding | 10px |
| padding | 10px |
Table 4.21. Rich Element Skin Bindings for .rich-legend
| CSS Properties | Skin Parameters |
|---|---|
| font-size | generalSizeFont |
| font-family | generalFamilyFont |
| color | controlTextColor |
| font-weight | bold |
Table 4.22. Rich Element Skin Bindings for .rich-form
| CSS Properties | Skin Parameters |
|---|---|
| padding | 0px |
| margin | 0px |
4.4.8.2. Extended level
Table 4.23. HTML Element Skin Bindings for input, select, textarea, button, keygen, isindex
| CSS Properties | Skin Parameters |
|---|---|
| border-width | 1px |
| border-color | panelBorderColor |
| color | controlTextColor |
Table 4.24. HTML Element Skin Bindings for *|button
| CSS Properties | Skin Parameters |
|---|---|
| border-color | panelBorderColor |
| font-size | generalSizeFont |
| font-family | generalFamilyFont |
| color | headerTextColor |
| background-color | headerBackgroundColor |
| background-image | org.richfaces.renderkit.html.images.ButtonBackgroundImage |
Table 4.25. HTML Element Skin Bindings for button[type=button], button[type=reset], button[type=submit], input[type=reset], input[type=submit], input[type=button]
| CSS Properties | Skin Parameters |
|---|---|
| border-color | panelBorderColor |
| font-size | generalSizeFont |
| font-family | generalFamilyFont |
| color | headerTextColor |
| background-color | headerBackgroundColor |
| background-image | org.richfaces.renderkit.html.images.ButtonBackgroundImage |
Table 4.26. HTML Element Skin Bindings for *|button[disabled], .rich-container *|button[disabled], .rich-button-disabled
| CSS Properties | Skin Parameters |
|---|---|
| color | tabDisabledTextColor |
| border-color | tableFooterBackgroundColor |
| background-color | tableFooterBackgroundColor |
| background-image | org.richfaces.renderkit.html.images.ButtonDisabledBackgroundImage |
Table 4.27. HTML Element Skin Bindings for .rich-button-disabled, .rich-container button[type="button"][disabled], .rich-button-button-disabled, .rich-container button[type="reset"][disabled], .rich-button-reset-disabled, .rich-container button[type="submit"][disabled], .rich-button-submit-disabled, .rich-container input[type="reset"][disabled], .rich-input-reset-disabled, .rich-container input[type="submit"][disabled], .rich-input-submit-disabled, .rich-container input[type="button"][disabled], .rich-input-button-disabled
| CSS Properties | Skin Parameters |
|---|---|
| color | tabDisabledTextColor |
| background-color | tableFooterBackgroundColor |
| border-color | tableFooterBackgroundColor |
| background-image | org.richfaces.renderkit.html.images.ButtonDisabledBackgroundImage |
Table 4.28. HTML Element Skin Bindings for *button[type="button"][disabled], button[type="reset"][disabled], button[type="submit"][disabled], input[type="reset"][disabled], input[type="submit"][disabled], input[type="button"][disabled]
| CSS Properties | Skin Parameters |
|---|---|
| color | tabDisabledTextColor |
| border-color | tableFooterBackgroundColor |
| background-color | tableFooterBackgroundColor |
Table 4.29. HTML Element Skin Bindings for *|textarea
| CSS Properties | Skin Parameters |
|---|---|
| border-color | panelBorderColor |
| font-size | generalSizeFont |
| font-family | generalFamilyFont |
| color | controlTextColor |
| background-color | controlBackgroundColor |
| background-image | org.richfaces.renderkit.html.images.InputBackgroundImage |
Table 4.30. HTML Element Skin Bindings for textarea[type=textarea], input[type=text], input[type=password], select
| CSS Properties | Skin Parameters |
|---|---|
| border-color | panelBorderColor |
| font-size | generalSizeFont |
| font-family | generalFamilyFont |
| color | controlTextColor |
| background-color | controlBackgroundColor |
| background-image | org.richfaces.renderkit.html.images.InputBackgroundImage |
Table 4.31. HTML Element Skin Bindings for *|textarea[disabled], .rich-container *|textarea[disabled]
| CSS Properties | Skin Parameters |
|---|---|
| color | tableBorderColor |
Table 4.32. textarea[type="textarea"][disabled], input[type="text"][disabled], input[type="password"][disabled]
| CSS Properties | Skin Parameters |
|---|---|
| color | tableBorderColor |
Table 4.33. textarea[type="textarea"][disabled], input[type="text"][disabled], input[type="password"][disabled]
| CSS Properties | Skin Parameters |
|---|---|
| color | tableBorderColor |
Note
ajaxPortlet is configured as follows:
...
<portlet>
   <portlet-name>ajaxPortlet</portlet-name>
   <header-content>
      <script src="/faces/rfRes/org/ajax4jsf/framework.pack.js" type="text/javascript" />
      <script src="/faces/rfRes/org/richfaces/ui.pack.js" type="text/javascript" />
      <link rel="stylesheet" type="text/css" href="/faces/rfRes/org/richfaces/skin.xcss" />
   </header-content>
</portlet>
...
4.4.9. Client-side Script for Extended Skinning Support
org.richfaces.LoadStyleStrategy parameter to NONE in your web.xml file, like so:
...
<context-param>
	<param-name>org.richfaces.LoadStyleStrategy</param-name>
	<param-value>NONE</param-value>
</context-param>
...
skinning.js client script is added to the RichFaces library. This detects the browser type and enables extended skinning only for browsers that fully support it.
<script type="text/javascript">
	window.RICH_FACES_EXTENDED_SKINNING_ON = true;
</script>
media attribute in the link tag. This adds the extended_both.xcss style sheet to rich-extended-skinning.
<link href='/YOUR_PROJECT_NAME/a4j_3_2_2-SNAPSHOTorg/richfaces/renderkit/html/css/basic_both.xcss/DATB/eAF7sqpgb-jyGdIAFrMEaw__.jsf' type='text/css' rel='stylesheet' class='component' />
<link media='rich-extended-skinning' href='/ YOUR_PROJECT_NAME /a4j_3_2_2-SNAPSHOTorg/richfaces/renderkit/html/css/extended_both.xcss/DATB/eAF7sqpgb-jyGdIAFrMEaw__.jsf' type='text/css' rel='stylesheet' class='component' />
<link href='/ YOUR_PROJECT_NAME /a4j_3_2_2-SNAPSHOT/org/richfaces/skin.xcss/DATB/eAF7sqpgb-jyGdIAFrMEaw__.jsf' type='text/css' rel='stylesheet' class='component' />
Note
! instead of ., so remember to use the a4j/versionXXX resources prefix instead of a4j_versionXXX.
4.4.10. XCSS File Format
< u:selector > and < u:style> XML tags, which define the mapping structure, as in the following example:
...
<u:selector name=".rich-component-name">
	<u:style name="background-color" skin="additionalBackgroundColor" />
	<u:style name="border-color" skin="tableBorderColor" />
	<u:style name="border-width" skin="tableBorderWidth" />
	<u:style name="border-style" value="solid" />
</u:selector>
...
...
.rich-component-name {
     background-color: additionalBackgroundColor; /*the value of the constant defined by your skin*/
     border-color: tableBorderColor; /*the value of the constant defined by your skin*/
     border-width: tableBorderWidth; /*the value of the constant defined by your skin*/
     border-style: solid;
}
...name attribute of <u:selector> defines the CSS selector, while the name attribute of the <u:style> tag defines the skin constant that is mapped to a CSS property. You can also use the value attribute of the <u:style> tag to assign a value to a CSS property.
...
<u:selector name=".rich-ordering-control-disabled, .rich-ordering-control-top, .rich-ordering-control-bottom, .rich-ordering-control-up, .rich-ordering-control-down">
	<u:style name="border-color" skin="tableBorderColor" />
</u:selector>
...
4.4.11. Plug-n-Skin
...
mvn archetype:create
-DarchetypeGroupId=org.richfaces.cdk
-DarchetypeArtifactId=maven-archetype-plug-n-skin
-DarchetypeVersion=RF-VERSION
-DartifactId=ARTIFACT-ID
-DgroupId=GROUP-ID
-Dversion=VERSION
...
archetypeVersion— indicates the RichFaces version; for example,3.3.1.GAartifactId— the artifact ID of the projectgroupId— the group ID of the projectversion— the version of the project you create. By default, this is set to1.0.-SNAPSHOT
ARTIFACT-ID. The directory contains a template of the Maven project.
pom.xml file.)
...
mvn cdk:add-skin -Dname=SKIN-NAME -Dpackage=SKIN-PACKAGE
...
name— defines the name of the new skinpackage— the base package of the skin. By default, the project'sgroupIdis used.
baseSkin— defines the name of the base skin.createExt— if set totrue, extended CSS classes are added. For more information, please, see Section 4.4.8, “Standard Controls Skinning”.
mvn cdk:add-skin -Dname=SKIN-NAME -Dpackage=SKIN-PACKAGE Command” for which files are created by the command.
Table 4.34. Files and Folders Created By the mvn cdk:add-skin -Dname=SKIN-NAME -Dpackage=SKIN-PACKAGE Command
|
File Name
|
Location
|
Description
|
|---|---|---|
BaseImage.java
| \src\main\java\SKIN-PACKAGE\SKIN-NAME\images\
|
the base class used to store images.
|
|
BaseImageTest.java
| \src\test\java\SKIN-PACKAGE\SKIN-NAME\images\
|
a test version of a class that stores images.
|
|
XCSS files
| \src\main\resources\SKIN-PACKAGE\SKIN-NAME\css\
|
define the new look of RichFaces components affected by the new skin.
|
SKIN-NAME.properties
| \src\main\resources\SKIN-PACKAGE\SKIN-NAME\css\
|
a file that contains the new skin's properties.
The following properties are used to configure the
SKIN-NAME.properties file:
|
SKIN-NAME.xcss
| src\main\resources\META-INF\skins
|
an XCSS file that imports the component's XCSS files to be modified by the new skin.
|
|
XCSS files
| \src\main\resources\SKIN-PACKAGE\SKIN-NAME\css\
|
determine styles for standard controls (
extended_classes.xcss and extended.xcss), if the createExt key is set to true.
|
SKIN-NAME-ext.xcss
| src\main\resources\META-INF\skins.
|
imports defining styles for standard controls if
createExt is set to true.
|
SKIN-NAME-resources.xml
| src\main\config\resources.
|
contains descriptions of all files listed previously.
|
\src\main\resources\SKIN-PACKAGE\SKIN-NAME\css\. Assign new style properties to your selectors (listed in the XCSS files) in either of the following ways:
- Standard CSS coding approach (that is, add CSS properties to the selectors). Remember that the selectors must be within
<f:verbatim> </f:verbatim>tags. For example:... .rich-calendar-cell { background: #537df8; } ... - XCSS coding approach (the usual method of creating XCSS files in RichFaces). XCSS tags must be placed outside
<f:verbatim> </f:verbatim>tags.... <u:selector name=".rich-calendar-cell"> <u:style name="border-bottom-color" skin="panelBorderColor"/> <u:style name="border-right-color" skin="panelBorderColor"/> <u:style name="background-color" skin="tableBackgroundColor"/> <u:style name="font-size" skin="generalSizeFont"/> <u:style name="font-family" skin="generalFamilyFont"/> </u:selector> ...
pom.xml file):
...
mvn clean install
...
...
<u:selector name=".rich-combobox-item-selected">
	<u:style name="border-width" value="1px" />
	<u:style name="border-style" value="solid" />
	<u:style name="border-color" skin="newBorder" />
	<u:style name="background-position" value="0% 50%" />
	<u:style name="background-image">
		<f:resource f:key="org.richfaces.renderkit.html.CustomizeableGradient">
			<f:attribute name="valign" value="middle" />
			<f:attribute name="gradientHeight" value="17px" />
			<f:attribute name="baseColor" skin="headerBackgroundColor" />
		 </f:resource>
	</u:style>
</u:selector>
...
background-image CSS property is defined with <f:resource f:key="org.richfaces.renderkit.html.CustomizeableGradient">, which sets the gradient. The gradient type can be specified in the SKIN-NAME.properties with the gradientType property, which can be set to glass, plastic, or plain. The gradient can then be adjusted with the baseColor, gradientColor, gradientHeight, valign attributes, as seen in the previous code snippet.
web.xml file, and placing the JAR file containing your skin (located in the target directory of your skin project) in the \WebContent\WEB-INF\lib\.
...
<context-param>
    <param-name>org.ajax4jsf.SKIN</param-name>
    <param-value>SKIN-NAME</param-value>
</context-param>
...
4.4.11.1. Details of Usage
mvn archetype:create
-DarchetypeGroupId=org.richfaces.cdk
-DarchetypeArtifactId=maven-archetype-plug-n-skin
-DarchetypeVersion=3.3.1.GA
-DartifactId=P-n-S
-DgroupId=GROUPID
-Dversion=1.0.-SNAPSHOT
P-n-S directory to view the files and folders created.
mvn cdk:add-skin -DbaseSkin=blueSky -DcreateExt=true -Dname=PlugnSkinDemo -Dpackage=SKINPACKAGE
-DbaseSkin defines the RichFaces built-in skin to use as a base, and -DcreateExt=true, which determines that the new skin will include XCSS files that unify the appearance of the rich components and the standard HTML controls.
<rich:calendar> style attributes and some basic HTML controls. We will show you how to:
- Recolor the background of the current day in the
<rich:calendar>; - Recolor a standard HTML submit button;
<rich:properties>'s style properties, you must open the calendar.xcss file, located in P-n-S\src\main\resources\skinpackage\plugnskindemo\css\.
calendar.xcss file, find the .rich-calendar-today selector and amend it as follows:background-color: #075ad1;. This will change the background color of the current day.
extended.xcss file from the P-n-S\src\main\resources\skinpackage\plugnskindemo\css\ directory and insert font-weight: bold; between the curly braces of these selectors, like so:
button[type="button"], button[type="reset"], button[type="submit"], input[type="reset"], input[type="submit"], input[type="button"] {
	font-weight: bold;
}PlugnSkinDemo skin and importing it into the project.
mvn clean install from the P-n-S directory. This creates a target directory containing a JAR file with a newly-compiled skin. In our case, the file is named P-n-S-1.0.-SNAPSHOT.jar.
PlugnSkinDemo skin into your project:
- Copy the
P-n-S-1.0.-SNAPSHOT.jarfile to the\WebContent\WEB-INF\lib\directory. - Add the name of the new skin to the
web.xmlfile, like so:<context-param> <param-name>org.ajax4jsf.SKIN</param-name> <param-value>PlugnSkinDemo</param-value> </context-param>
web.xml. Add the following to enable standard controls skinning:
<context-param>
	<param-name>org.richfaces.CONTROL_SKINNING</param-name>
	<param-value>enable</param-value>
</context-param>
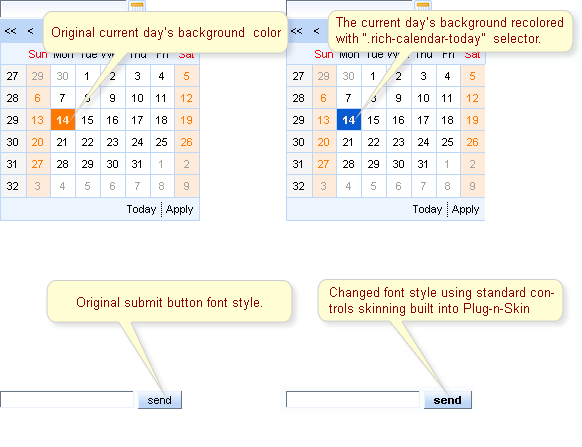
Figure 4.6. Plug-n-Skin feature in action.
4.5. State Manager API
Confirm) is displayed, and button labels and methods are changed when the user clicks the To register link:
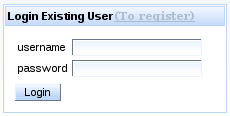
Figure 4.7. Login Dialog
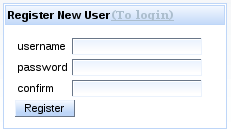
Figure 4.8. Register Dialog
States class interfaces with a map, where the keySet defines the State name and the entrySet is a State map. The State map defines the properties, method bindings, or constant state variables of a key or object, where these values may change depending on the active State.
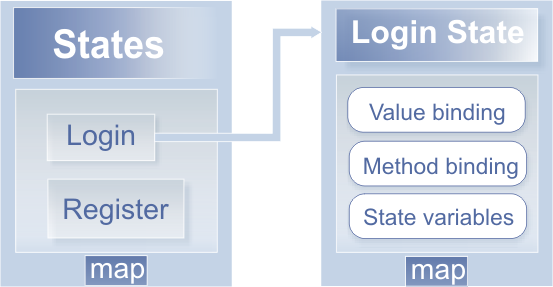
Figure 4.9. RichFaces State API
States. The API implements changes in State through standard JSF navigation. When the action component returns an outcome, the JSF navigation handler (extended through the RichFaces State API) checks whether the outcome is registered as a State change outcome. If true, the corresponding State is activated. If false, standard navigation handling is called.
- Register the State Navigation Handler and the EL Resolver in your
faces-config.xmlfile:... <application> <navigation-handler>org.richfaces.ui.application.StateNavigationHandler</navigation-handler> <el-resolver>org.richfaces.el.StateELResolver</el-resolver> </application> ...
- Register an additional application factory in the
faces-config.xml:... <factory> <application-factory>org.richfaces.ui.application.StateApplicationFactory</application-factory> </factory> ...
- Register two managed beans in the
faces-config.xml:... <managed-bean> <managed-bean-name>state</managed-bean-name> <managed-bean-class>org.richfaces.ui.model.States</managed-bean-class> <managed-bean-scope>request</managed-bean-scope> <managed-property> <property-name>states</property-name> <property-class>org.richfaces.ui.model.States</property-class> <value>#{config.states}</value> </managed-property> </managed-bean> <managed-bean> <managed-bean-name>config</managed-bean-name> <managed-bean-class>org.richfaces.demo.stateApi.Config</managed-bean-class> <managed-bean-scope>none</managed-bean-scope> </managed-bean> ...One bean (config) defines and storesStateas seen in the following example:... public class Config { /** * @return States */ public States getStates() { FacesContext facesContext = FacesContext.getCurrentInstance(); States states = new States(); // Registering new User State definition states.setCurrentState("register"); // Name of the new state // Text labels, properties and Labels for controls in "register" state states.put("showConfirm", Boolean.TRUE); // confirm field rendering states.put("link", "(To login)"); // Switch State link label states.put("okBtn", "Register"); // Login/Register button label states.put("stateTitle", "Register New User"); // Panel title ExpressionFactory expressionFactory = facesContext.getApplication() .getExpressionFactory(); // Define "registerbean" available under "bean" EL binding on the page ValueExpression beanExpression = expressionFactory .createValueExpression(facesContext.getELContext(), "#{registerbean}", Bean.class); states.put("bean", beanExpression); // Define "registeraction" available under "action" EL binding on the // page beanExpression = expressionFactory.createValueExpression(facesContext .getELContext(), "#{registeraction}", RegisterAction.class); states.put("action", beanExpression); // Define method expression inside registeraction binding for this state MethodExpression methodExpression = expressionFactory.createMethodExpression( facesContext.getELContext(), "#{registeraction.ok}", String.class, new Class[] {}); states.put("ok", methodExpression); // Outcome for switching to login state definition states.setNavigation("switch", "login"); // Login Existent User State analogous definition states.setCurrentState("login"); states.put("showConfirm", Boolean.FALSE); states.put("link", "(To register)"); states.put("okBtn", "Login"); states.put("stateTitle", "Login Existing User"); beanExpression = expressionFactory.createValueExpression(facesContext .getELContext(), "#{loginbean}", Bean.class); states.put("bean", beanExpression); beanExpression = expressionFactory.createValueExpression(facesContext .getELContext(), "#{loginaction}", LoginAction.class); states.put("action", beanExpression); methodExpression = expressionFactory.createMethodExpression( facesContext.getELContext(), "#{loginaction.ok}", String.class, new Class[] {}); states.put("ok", methodExpression); states.setNavigation("switch", "register"); return states; } } ...The second bean, with theorg.richfaces.ui.model.Statestype (state), contains the managed property states, which is bound to the firstconfigbean. - Next, use state bindings on the page, as in the following example:
...
<h:panelGrid columns="3">
	<h:outputText value="username" />
	<h:inputText value="#{state.bean.name}" id="name" required="true" />
	<h:outputText value="password" />
	<h:inputSecret value="#{state.bean.password}" id="password" required="true" />
	<h:outputText value="confirm" rendered="#{state.showConfirm}" />
	<h:inputSecret value="#{state.bean.confirmPassword}" rendered="#{state.showConfirm}" id="confirm" required="true" />
</h:panelGrid>
<a4j:commandButton actionListener="#{state.action.listener}" action="#{state.ok}" value="#{state.okBtn}" id="action"/>
...
4.6. Identifying User Roles
rich:isUserInRole(Object) function. This function takes a String or a comma-delineated list of Strings, a Collection, etc. as arguments and returns a Boolean value.
admin) in your web.xml file. Then implement authorization that assigns the admin role to the user that has logged in as an administrator. Once this has been done, you can use the rich:isUserInRole(Object) function with the rendered attribute of any component. For example:
...
<rich:editor value="#{bean.text}"  rendered="#{rich:isUserInRole('admin')}" />
...admin role can see the text editor, which will not be rendered for users with other roles.
Appendix A. Revision History
| Revision History | |||
|---|---|---|---|
| Revision 5.2.0-100.400 | 2013-10-31 | ||
| |||
| Revision 5.2.0-100 | Wed 23 Jan 2013 | ||
| |||
| Revision 5.1.2-100 | Thu 8 December 2011 | ||
| |||