
Red Hat Training
A Red Hat training course is available for Red Hat Enterprise Linux
Chapter 27. Relax-and-Recover (ReaR)
When a software or hardware failure breaks the system, the system administrator faces three tasks to restore it to the fully functioning state on a new hardware environment:
- booting a rescue system on the new hardware
- replicating the original storage layout
- restoring user and system files
Most backup software solves only the third problem. To solve the first and second problems, use Relax-and-Recover (ReaR), a disaster recovery and system migration utility.
Backup software creates backups. ReaR complements backup software by creating a rescue system. Booting the rescue system on a new hardware allows you to issue the rear recover command, which starts the recovery process. During this process, ReaR replicates the partition layout and filesystems, prompts for restoring user and system files from the backup created by backup software, and finally installs the boot loader. By default, the rescue system created by ReaR only restores the storage layout and the boot loader, but not the actual user and system files.
This chapter describes how to use ReaR.
27.1. Basic ReaR Usage
27.1.1. Installing ReaR
Install the rear package by running the following command as root:
~]# yum install rear
27.1.2. Configuring ReaR
ReaR is configured in the /etc/rear/local.conf file. Specify the rescue system configuration by adding these lines:
OUTPUT=output format
OUTPUT_URL=output location
Substitute output format with rescue system format, for example, ISO for an ISO disk image or USB for a bootable USB.
Substitute output location with where it will be put, for example, file:///mnt/rescue_system/ for a local filesystem directory or sftp://backup:password@192.168.0.0/ for an SFTP directory.
Example 27.1. Configuring Rescue System Format and Location
To configure ReaR to output the rescue system as an ISO image into the /mnt/rescue_system/ directory, add these lines to the /etc/rear/local.conf file:
OUTPUT=ISO
OUTPUT_URL=file:///mnt/rescue_system/
See section "Rescue Image Configuration" of the rear(8) man page for a list of all options.
ISO-specific Configuration
Using the configuration in Example 27.1, “Configuring Rescue System Format and Location” results into two equivalent output files in two locations:
-
/var/lib/rear/output/-rear's default output location -
/mnt/rescue_system/HOSTNAME/rear-localhost.iso- output location specified inOUTPUT_URL
However, usually you need only one ISO image. To make ReaR create an ISO image only in the directory specified by a user, add these lines to /etc/rear/local.conf:
OUTPUT=ISO
BACKUP=NETFS
OUTPUT_URL=null
BACKUP_URL="iso:///backup"
ISO_DIR="output location"
Substitute output location with the desired location for the output.
27.1.3. Creating a Rescue System
The following example shows how to create a rescue system with verbose output:
~]# rear -v mkrescue
Relax-and-Recover 1.17.2 / Git
Using log file: /var/log/rear/rear-rhel7.log
mkdir: created directory '/var/lib/rear/output'
Creating disk layout
Creating root filesystem layout
TIP: To login as root via ssh you need to set up /root/.ssh/authorized_keys or SSH_ROOT_PASSWORD in your configuration file
Copying files and directories
Copying binaries and libraries
Copying kernel modules
Creating initramfs
Making ISO image
Wrote ISO image: /var/lib/rear/output/rear-rhel7.iso (124M)
Copying resulting files to file location
With the configuration from Example 27.1, “Configuring Rescue System Format and Location”, ReaR prints the above output. The last two lines confirm that the rescue system has been successfully created and copied to the configured backup location /mnt/rescue_system/. Because the system’s host name is rhel7, the backup location now contains directory rhel7/ with the rescue system and auxiliary files:
~]# ls -lh /mnt/rescue_system/rhel7/
total 124M
-rw-------. 1 root root 202 Jun 10 15:27 README
-rw-------. 1 root root 166K Jun 10 15:27 rear.log
-rw-------. 1 root root 124M Jun 10 15:27 rear-rhel7.iso
-rw-------. 1 root root 274 Jun 10 15:27 VERSION
Transfer the rescue system to an external medium to not lose it in case of a disaster.
27.1.4. Scheduling ReaR
To schedule ReaR to regularly create a rescue system using the cron job scheduler, add the following line to the /etc/crontab file:
minute hour day_of_month month day_of_week root /usr/sbin/rear mkrescueSubstitute the above command with the cron time specification (described in detail in Section 24.1.2, “Scheduling a Cron Job”).
Example 27.2. Scheduling ReaR
To make ReaR create a rescue system at 22:00 every weekday, add this line to the /etc/crontab file:
0 22 * * 1-5 root /usr/sbin/rear mkrescue
27.1.5. Performing a System Rescue
To perform a restore or migration:
- Boot the rescue system on the new hardware. For example, burn the ISO image to a DVD and boot from the DVD.
In the console interface, select the "Recover" option:
Figure 27.1. Rescue system: menu

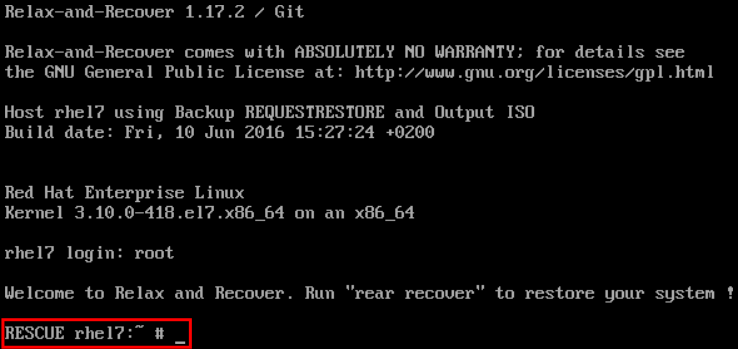
You are taken to the prompt:
Figure 27.2. Rescue system: prompt
 Warning
Once you have started recovery in the next step, it probably cannot be undone and you may lose anything stored on the physical disks of the system.
Run the
rear recovercommand to perform the restore or migration. The rescue system then recreates the partition layout and filesystems:Figure 27.3. Rescue system: running "rear recover"
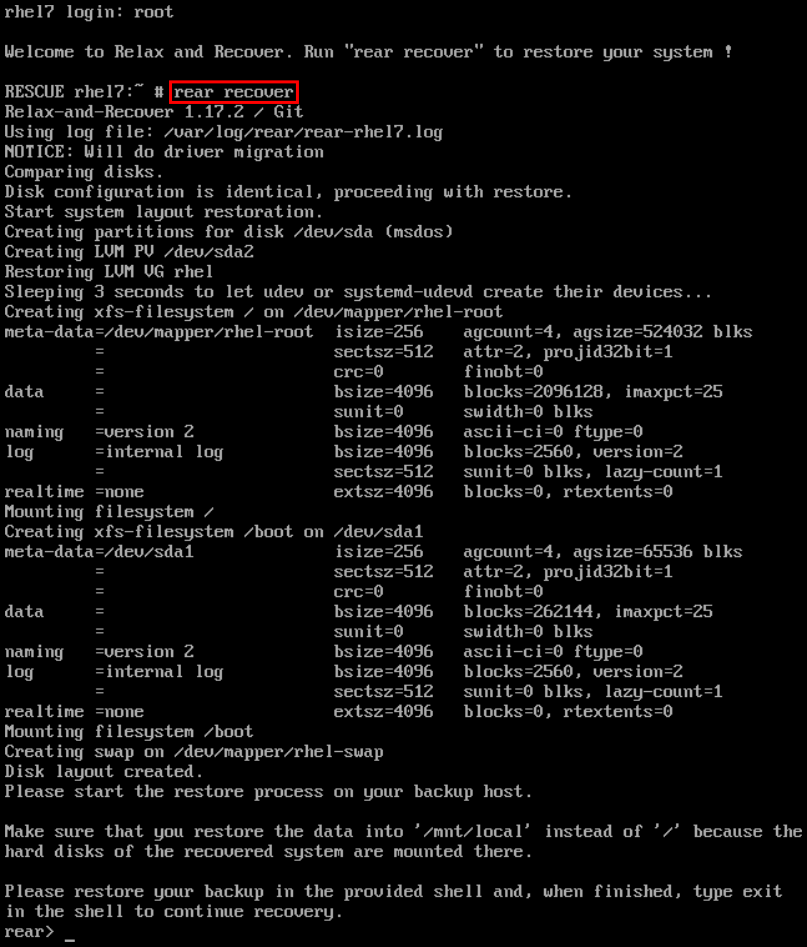
Restore user and system files from the backup into the
/mnt/local/directory.Example 27.3. Restoring User and System Files
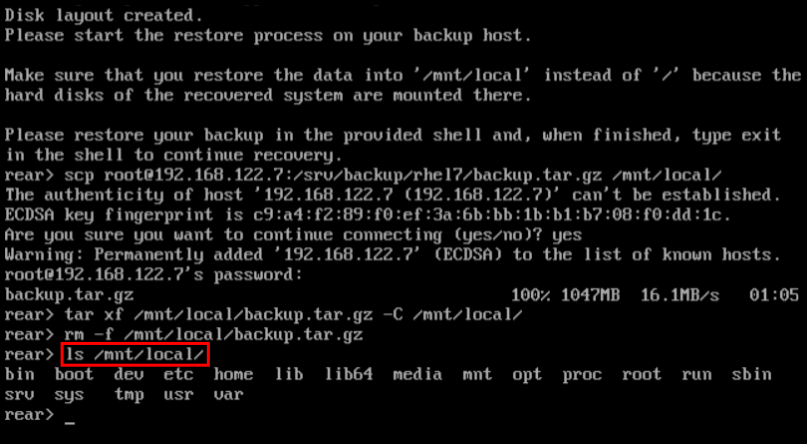
In this example, the backup file is a tar archive created per instructions in Section 27.2.1.1, “Configuring the Internal Backup Method”. First, copy the archive from its storage, then unpack the files into
/mnt/local/, then delete the archive:~]# scp root@192.168.122.7:/srv/backup/rhel7/backup.tar.gz /mnt/local/ ~]# tar xf /mnt/local/backup.tar.gz -C /mnt/local/ ~]# rm -f /mnt/local/backup.tar.gz
The new storage has to have enough space both for the archive and the extracted files.
Verify that the files have been restored:
~]# ls /mnt/local/
Figure 27.4. Rescue system: restoring user and system files from the backup
Ensure that SELinux relabels the files on the next boot:
~]# touch /mnt/local/.autorelabel
Otherwise you may be unable to log in the system, because the
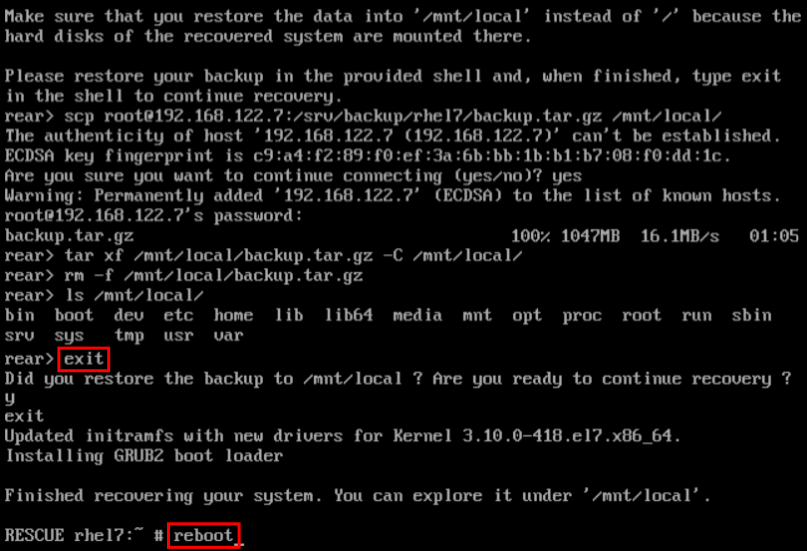
/etc/passwdfile may have the incorrect SELinux context.Finish the recovery by entering
exit. ReaR will then reinstall the boot loader. After that, reboot the system:Figure 27.5. Rescue system: finishing recovery
Upon reboot, SELinux will relabel the whole filesystem. Then you will be able to log in to the recovered system.
27.2. Integrating ReaR with Backup Software
The main purpose of ReaR is to produce a rescue system, but it can also be integrated with backup software. What integration means is different for the built-in, supported, and unsupported backup methods.
27.2.1. The Built-in Backup Method
ReaR includes a built-in, or internal, backup method. This method is fully integrated with ReaR, which has these advantages:
-
a rescue system and a full-system backup can be created using a single
rear mkbackupcommand - the rescue system restores files from the backup automatically
As a result, ReaR can cover the whole process of creating both the rescue system and the full-system backup.
27.2.1.1. Configuring the Internal Backup Method
To make ReaR use its internal backup method, add these lines to /etc/rear/local.conf:
BACKUP=NETFS
BACKUP_URL=backup location
These lines configure ReaR to create an archive with a full-system backup using the tar command. Substitute backup location with one of the options from the "Backup Software Integration" section of the rear(8) man page. Make sure that the backup location has enough space.
Example 27.4. Adding tar Backups
To expand the example in Section 27.1, “Basic ReaR Usage”, configure ReaR to also output a tar full-system backup into the /srv/backup/ directory:
OUTPUT=ISO
OUTPUT_URL=file:///mnt/rescue_system/
BACKUP=NETFS
BACKUP_URL=file:///srv/backup/
The internal backup method allows further configuration.
To keep old backup archives when new ones are created, add this line:
NETFS_KEEP_OLD_BACKUP_COPY=y
By default, ReaR creates a full backup on each run. To make the backups incremental, meaning that only the changed files are backed up on each run, add this line:
BACKUP_TYPE=incremental
This automatically sets
NETFS_KEEP_OLD_BACKUP_COPYtoy.To ensure that a full backup is done regularly in addition to incremental backups, add this line:
FULLBACKUPDAY="Day"Substitute "Day" with one of the "Mon", "Tue", "Wed", "Thu". "Fri", "Sat", "Sun".
ReaR can also include both the rescue system and the backup in the ISO image. To achieve this, set the
BACKUP_URLdirective toiso:///backup/:BACKUP_URL=iso:///backup/
This is the simplest method of full-system backup, because the rescue system does not need the user to fetch the backup during recovery. However, it needs more storage. Also, single-ISO backups cannot be incremental.
Example 27.5. Configuring Single-ISO Rescue System and Backups
This configuration creates a rescue system and a backup file as a single ISO image and puts it into the
/srv/backup/directory:OUTPUT=ISO OUTPUT_URL=file:///srv/backup/ BACKUP=NETFS BACKUP_URL=iso:///backup/
NoteThe ISO image might be large in this scenario. Therefore, Red Hat recommends creating only one ISO image, not two. For details, see the section called “ISO-specific Configuration”.
To use
rsyncinstead oftar, add this line:BACKUP_PROG=rsync
Note that incremental backups are only supported when using
tar.
27.2.1.2. Creating a Backup Using the Internal Backup Method
With BACKUP=NETFS set, ReaR can create either a rescue system, a backup file, or both.
To create a rescue system only, run:
rear mkrescue
To create a backup only, run:
rear mkbackuponly
To create a rescue system and a backup, run:
rear mkbackup
Note that triggering backup with ReaR is only possible if using the NETFS method. ReaR cannot trigger other backup methods.
When restoring, the rescue system created with the BACKUP=NETFS setting expects the backup to be present before executing rear recover. Hence, once the rescue system boots, copy the backup file into the directory specified in BACKUP_URL, unless using a single ISO image. Only then run rear recover.
To avoid recreating the rescue system unnecessarily, you can check whether storage layout has changed since the last rescue system was created using these commands:
~]# rear checklayout
~]# echo $?
Non-zero status indicates a change in disk layout. Non-zero status is also returned if ReaR configuration has changed.
The rear checklayout command does not check whether a rescue system is currently present in the output location, and can return 0 even if it is not there. So it does not guarantee that a rescue system is available, only that the layout has not changed since the last rescue system has been created.
Example 27.6. Using rear checklayout
To create a rescue system, but only if the layout has changed, use this command:
~]# rear checklayout || rear mkrescue
27.2.2. Supported Backup Methods
In addition to the NETFS internal backup method, ReaR supports several external backup methods. This means that the rescue system restores files from the backup automatically, but the backup creation cannot be triggered using ReaR.
For a list and configuration options of the supported external backup methods, see the "Backup Software Integration" section of the rear(8) man page.
27.2.3. Unsupported Backup Methods
With unsupported backup methods, there are two options:
- The rescue system prompts the user to manually restore the files. This scenario is the one described in "Basic ReaR Usage", except for the backup file format, which may take a different form than a tar archive.
-
ReaR executes the custom commands provided by the user. To configure this, set the
BACKUPdirective toEXTERNAL. Then specify the commands to be run during backing up and restoration using theEXTERNAL_BACKUPandEXTERNAL_RESTOREdirectives. Optionally, also specify theEXTERNAL_IGNORE_ERRORSandEXTERNAL_CHECKdirectives. See/usr/share/rear/conf/default.conffor an example configuration.
27.2.4. Creating Multiple Backups
With the version 2.00, ReaR supports creation of multiple backups. Backup methods that support this feature are:
-
BACKUP=NETFS(internal method) -
BACKUP=BORG(external method)
You can specify individual backups with the -C option of the rear command. The argument is a basename of the additional backup configuration file in the /etc/rear/ directory. The method, destination, and the options for each specific backup are defined in the specific configuration file, not in the main configuration file.
To perform the basic recovery of the system:
Basic recovery of the system
Create the ReaR recovery system ISO image together with a backup of the files of the basic system:
~]# rear -C basic_system mkbackup
Back the files up in the
/homedirectories:~]# rear -C home_backup mkbackuponly
Note that the specified configuration file should contain the directories needed for a basic recovery of the system, such as /boot, /root, and /usr.
Recovery of the system in the rear recovery shell
To recover the system in the rear recovery shell, use the following sequence of commands:
~]# rear -C basic_system recover
~]# rear -C home_backup restoreonly