
Red Hat Training
A Red Hat training course is available for Red Hat Fuse
Chapter 1. Design Time Tooling
1.1. The route editor
Overview
You access the tooling by opening the JBoss Perspective, and then selecting → → on the menu bar.
Creating a new Fuse project provides access to the route editor, the main design time tooling, shown in Figure 1.1.
Figure 1.1. route editor
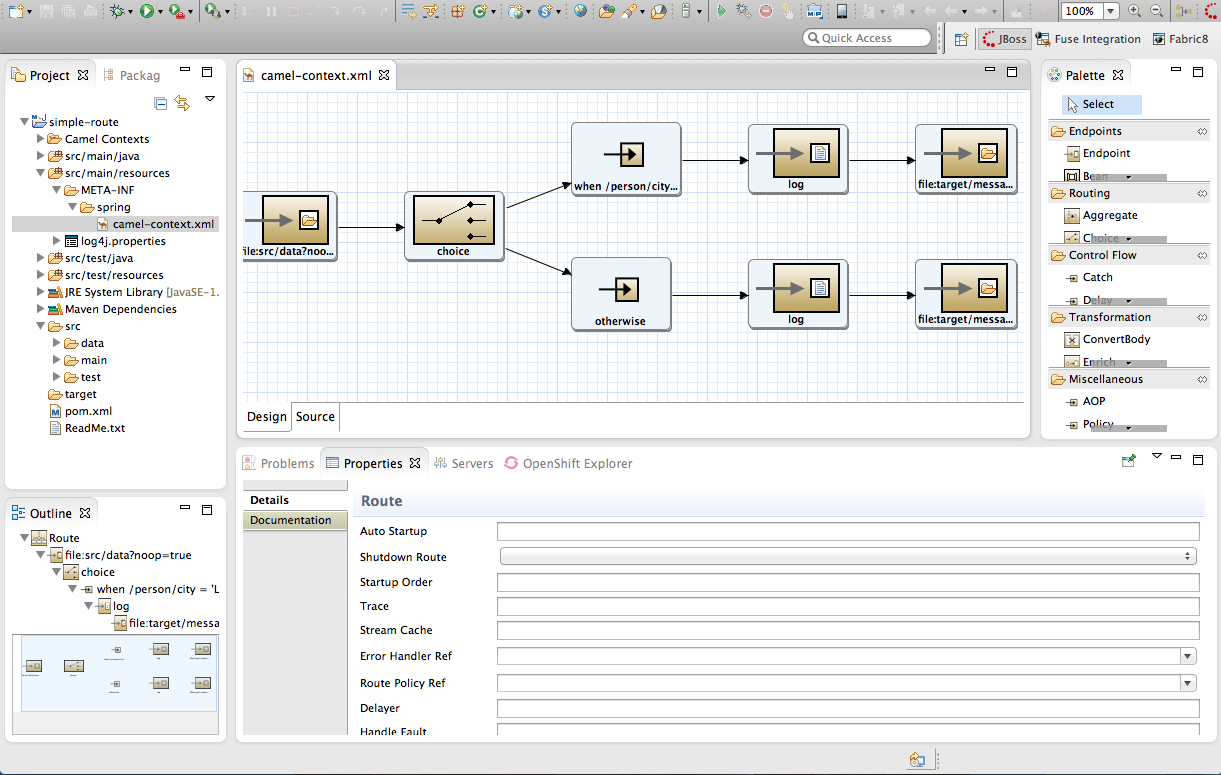
It consists of four main areas:
- Canvas—the large grid area on which routes are constructed
- Palette—the pane to the right of the canvas from which Enterprise Integration Patterns (EIPs) are selected
- Project view—the pane on the left side of the canvas, which can display multiple views of the active project. The pane defaults to Project Explorer, which displays the project's folders and files in an hierarchical tree format.NoteWe recommend that you drag Outline view from the upper right side of the workspace to the lower left side, beneath Project Explorer, to provide optimal space for the route editor. Outline view displays, in an outline of EIP icons, the contents of the current
<camelContext>element in the routing context file. - Properties editor—the editor in which you configure the selected node's properties. It opens in a tab in the pane below the canvas.
Canvas
The canvas is route editor's workbench and where you do most of your work. It displays a graphical representation of a route, which is made up of one or more connected EIP patterns (called nodes once they are placed on the canvas). Because the canvas displays only one route at a time, it delineates one route from another. You can add additional routes to your project, but each is displayed separately on its own slice of canvas.
Patterns are typically placed on the canvas by dragging them from the palette. Once on the canvas, a node's properties can be edited in the Properties editor. To do so, you need only select a node to open and populate the Properties editor with the properties that apply to that node. You can also edit a route's properties by clicking the canvas, which opens and populates the Properties editor with the properties that correspond to a single route in the routing context file.
Note
Clicking the Source tab at the lower, left of the canvas displays the XML code generated for the route, which you can then edit. The edits you make in Source view appear on the canvas when you switch back to Design View.
Palette
The Palette contains all of the patterns needed to construct a route. The Palette groups the patterns into categories according to function:
- Endpoints—patterns that start or end a route
- Routing—patterns that direct the flow of messages based on specified criteria
- Control Flow—patterns that behave like control functions in a programming language. For example, some define loops, some handle error conditions, some handle transactions, and so on.
- Transformation—patterns that change the contents of a message as it passes through a route
- Miscellaneous—patterns that control the environment in which a route executes. For example, the Threads pattern specifies the number of threads available.
Project Explorer
Project Explorer provides access to all of the components that make up a project. It provides the tools for managing, configuring, running, and debugging your project.
Outline view
Outline view provides a graphical outline of your route components. It enables you to switch easily between routes in a multiroute project. Clicking on a route in Outline view displays it on the route editor's canvas.
Outline view also provides a viewing portal when the route extends beyond the viewable area on the canvas. Sliding the view portal in Outline view over outlier nodes moves the canvas accordingly to bring those nodes into view.
Properties editor
You use the Properties editor to configure the route and each node in it. Each type of node has a set of properties that can or must be set. The Properties editor opens populated with fields that apply to the selected node.
The Properties editor makes it clear which fields are required.
 marks any required property that is not set, and the Properties editor displays an error message stating the number of required properties that still must be set, as shown in Figure 1.2.
Figure 1.2. Properties editor's error reporting

The Properties editor's Documentation tab displays information about how to configure the selected node.