
Red Hat Training
A Red Hat training course is available for Red Hat Fuse
23.3. Creating a new container on a cloud
Overview
To create a container on a cloud, you need to specify the cloud's connection details and then create the container.
Procedure
To create a new container on a cloud:
- In Fabric Explorer, right-click anywhere, except on Clouds or Fabrics, to open the context menu.
- Select to open the Create Container in a Cloud wizard.
Figure 23.3. Create Container in a Cloud/Choose the Cloud page
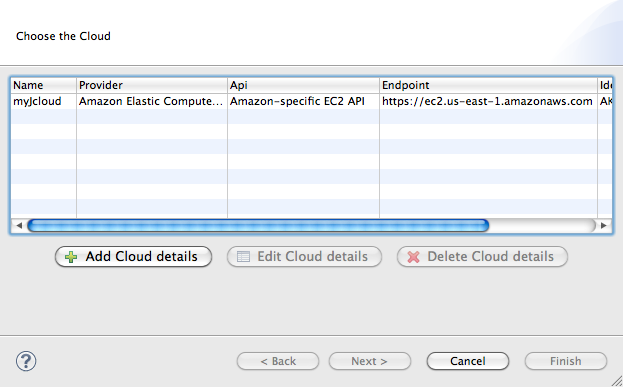 NoteUnless the connection details for a cloud have already been added to the tooling, this dialog opens devoid of selections. You can add a cloud's connection details now by clicking Add Cloud details and following the procedure in Section 26.1, “Adding cloud details”.
 - Select a cloud from the list, and click to open the New Containers Details page.
Figure 23.4. New Containers Details page
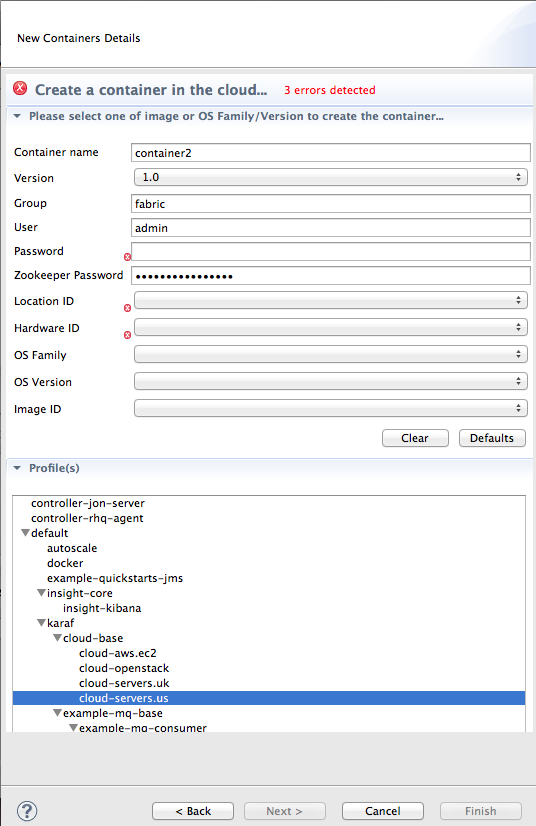 NoteAn error icon (
 ) marks required fields that lack a valid value, and the dialog banner displays the number of errors detected.
- In Container name, enter a name for the new container.We recommend that you replace the default name with a meaningful name that identifies the container's role or function.
- If multiple versions exist, you can select one from the Version drop-down list. Otherwise, accept the default version.
- In Group, accept the default (fabric), or enter the group in which to start up the new container.
- In User, accept the default (admin), or enter the name of another user who is authorized to log into the new cloud container.This is the user that was either specified when the fabric was created or is defined in the Red Hat JBoss Fuse installDir
/etc/users.propertiesfile (see Section 22.1, “Adding fabric details”). - In Password, enter the pasword required for User to log into the new cloud container.This is the password that was specified for User when the fabric was created or is defined for the user in the Red Hat JBoss Fuse installDir
/etc/users.propertiesfile. - In Zookeeper Password, accept the default generated password for logging into the cloud container's zookeeper registry, or enter the zookeeper password that was used when the fabric was created.You can discover the zookeeper password by issuing the commmand
JBossFuse:karaf@root>fabric:ensemble-password. - In Hardware ID, select from the drop-down list the ID of the hardware archetype to use.Hardware archetypes specify the amount of memory and compute power available for running applications on machine images.ImportantThe next three fields provide two methods for specifying the software configuration (operating system, application server, and applications) you want to use. Either select an OS Family (and optionally a version), or select an Image ID.
- In OS Family, select from the drop-down list the family name of the operating system you want to use.If you select an OS Family, do not also select an Image ID.
- In OS Version, optionally select from the drop-down list the version for the operating system you selected.
- If you selected an OS Family, skip this step. Otherwise, in Image ID, select from the drop-down list the ID of the image template to use for the software configuration.NoteThe tooling starts an instance of the image in the cloud, and then installs a fabric agent and provisions the new agent with the selected profiles. Depending on the cloud provider, instantiation and provisioning could take some time.
- Under Profiles, select the profile or profiles you want to assign to the container.Profiles determine the function of containers—what applications they run. You can assign a container multiple profiles, as long as the applications they install do not conflict with one another.ImportantDo not assign a base profile (one ending in
-base) to a container. - Click OK.The new container appears in Fabric Explorer as a container node under ContainersNoteSelecting the new container in Fabric Explorer populates its Profiles and Profile Details pages in Properties viewer.
Related topics
| Chapter 26, Creating a Fabric in the Cloud |
| Section 24.1, “Creating a new profile” |
| Section 25.1, “Creating a new version of a profile” |