
Red Hat Training
A Red Hat training course is available for Red Hat Fuse
Chapter 1. To Create a New Route
Abstract
This tutorial walks you through the process of creating a new Fuse project, adding a route to it, and adding two endpoints to the route. It assumes that you have already set up your workspace and that Red Hat JBoss Fuse Tooling is running inside Red Hat JBoss Developer Studio.
Goals
In this tutorial you will:
- create a routing project
- add endpoints to a route
- connect two endpoints
- configure the endpoints
Creating the Fuse project
To create a Fuse project:
- Open the JBoss perspective.This is the default perspective when you start up JBoss Developer Studio for the first time.
- On the Toolbar, select → → to open the New Fuse project wizard, as shown in Figure 1.1, “New Fuse project location page”.
Figure 1.1. New Fuse project location page
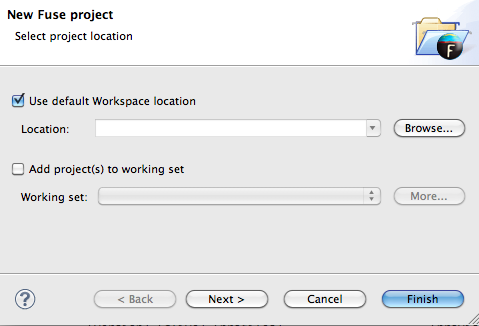
- Click to open the New Fuse Project details page, as shown in Figure 1.2, “New Fuse project details page”.
Figure 1.2. New Fuse project details page
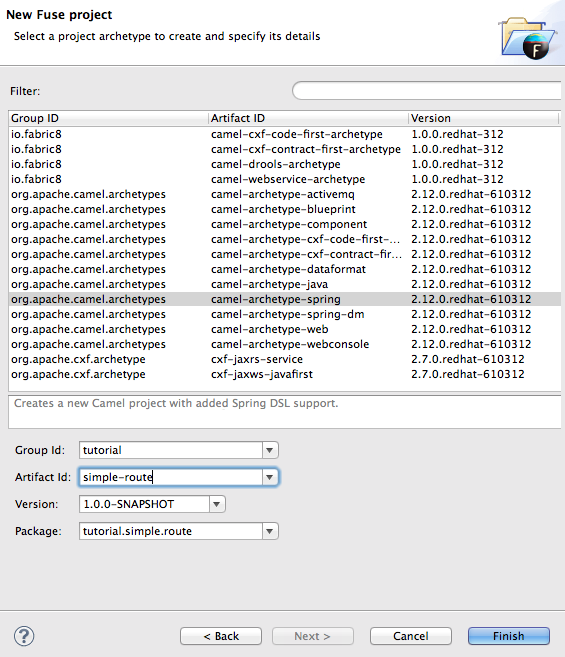
- Select
camel-archetype-spring. - Enter
tutorialin the Group Id: field. - Enter
simple-routein the Artifact Id: field. - The Version: field defaults to
1.0.0-SNAPSHOT. To change it, enter a different version identifier. - The Package: field defaults to
tutorial.simple.route, the name of the package that containscamel-archetype-spring. To include the route in a different package, enter the name of that package. - Click .This procedure creates a Fuse project,
simple-route, in Project Explorer that contains everything needed to create and run routes. As shown in Figure 1.3, the files generated forsimple-routeinclude:simple-route/pom.xml(Maven project file)simple-route/src/main/resources/META-INF/spring/camel-context.xml(Spring XML file containing the routing rules)Figure 1.3. Generated project files

Creating the route
To create the new route:
- In Project Explorer, locate
simple-route/src/main/resources/META-INF/spring/camel-context.xml. - Right-click it to open the context menu, then select Delete.You're going to replace the old
camel-context.xmlfile with your own to create a new route. - In the Delete dialog, click OK to confirm the operation.
- In Project Explorer, select
simple-route/src/main/resources/META-INF/spring. - Right-click it to open the context menu.
- Select → to open the Camel XML File wizard, as shown in Figure 1.4.
Figure 1.4. Camel XML File wizard
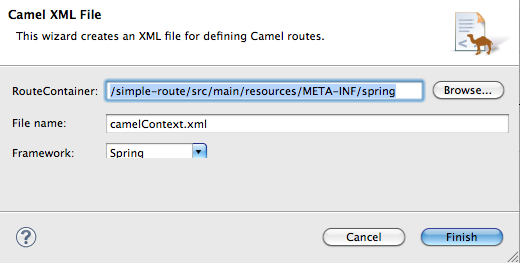
- Check that
/simple-route/src/main/resources/META-INF/springappears in the Container: field. Otherwise enter it manually, or select it using the button.
NoteThe
button opens a dialog that displays the folders of all active projects, which you can browse to find and select the files you need.
button.
NoteThe
button opens a dialog that displays the folders of all active projects, which you can browse to find and select the files you need.
- Check that
camelContext.xmlappears in the File Name: field. Otherwise enter it manually. - Check that appears in the Framework field, or select it from the field's drop-down list.
- Click .NoteBy default, Outline view is located in the upper, right corner of the JBoss perspective. To provide more room for Design view to display the graphical representation of your route, drag Outline view to the lower, left corner of the workspace, below Project Explorer.
- Click the Source tab at the bottom, left of the canvas to open the new
camelContext.xmlfile in the route editor's Source view, as shown in Figure 1.5, “New camelContext file in the route editor's source view”.Figure 1.5. New camelContext file in the route editor's source view
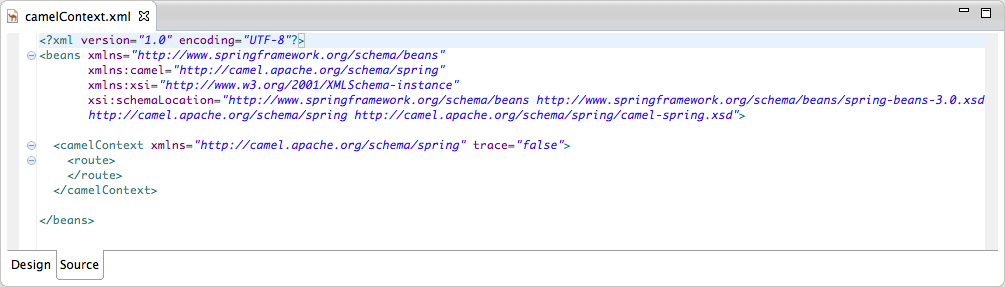
- Click the Design tab at the bottom, left of the canvas to return to the route editor's Design view.
- Drag an Endpoint element (
 ) from the Palette to the canvas.
- Drag a second Endpoint element from the Palette to the canvas.
- Select the first endpoint you dragged onto the canvas.The Properties editor, located below the canvas, displays the endpoint's property fields for editing, as shown in Figure 1.6, “Endpoint property editor”.
Figure 1.6. Endpoint property editor
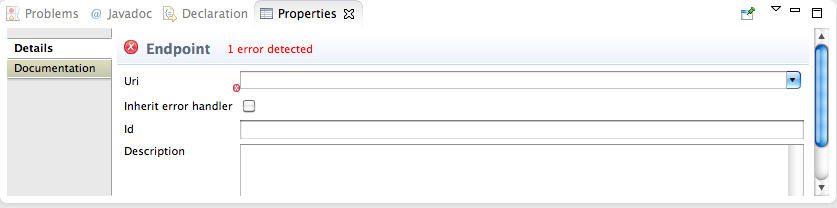
- Enter
file:src/data?noop=truein the Uri field. Leave the other fields blank. - Select the second endpoint you dragged onto the canvas.
- Enter
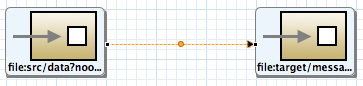
file:target/messages/othersin the Uri field. Leave the other fields blank. - On the canvas, select the first endpoint (
file:src/data?noop=true), and drag it's connector arrow ( ) to the second endpoint (
file:target/messages/others), then release it.A segmented line connects the two endpoints, as shown in Figure 1.7.Figure 1.7. Completed route, diagram view
 NoteYou can drag the line's bendpoint (orange dot) to change the angle of the line's segments. Doing so creates two new bendpoints, one on either side of the original. This behavior enables you to easily adjust your diagram to accommodate increasingly complex routes.
 - To quickly align the connected endpoints, right-click the canvas to open the context menu, and then select .
- Select → to save the route.
- Click the Source tab at bottom, left of the canvas.
Example 1.1. XML for simple route
<?xml version="1.0" encoding="UTF-8"?>
<beans xmlns="http://www.springframework.org/schema/beans"
       xmlns:camel="http://camel.apache.org/schema/spring"
       xmlns:xsi="http://www.w3.org/2001/XMLSchema-instance"
       xsi:schemaLocation="http://www.springframework.org/schema/beans
        http://www.springframework.org/schema/beans/spring-beans-3.0.xsd
        http://camel.apache.org/schema/spring
        http://camel.apache.org/schema/spring/camel-spring.xsd">

  <camelContext trace="false" xmlns="http://camel.apache.org/schema/spring">
    <route>
        <from uri="file:src/data?noop=true"/>
        <to uri="file:target/messages/others"/>
    </route>
</camelContext>

</beans>
Next steps
After you have created and designed your route, you can run it by deploying it into your Apache Camel runtime, as described in Chapter 2, To Run a Route.
Further reading
To learn more about:
- using the editor, see Red Hat JBoss Fuse Tooling: JBoss Fuse Tooling User Guide at https://access.redhat.com/site/documentation/JBoss_Fuse/
- Apache Camel endpoints, see Red Hat JBoss Fuse: Component Reference that comes with Red Hat JBoss Fuse.