
Red Hat Training
A Red Hat training course is available for Red Hat Fuse
Chapter 6. To Deploy a Camel Project to Red Hat JBoss Fuse
Abstract
This tutorial walks you through the process of deploying a camel project into Red Hat JBoss Fuse. It assumes that you have an instance of Red Hat JBoss Fuse installed on the same machine on which you are running the Red Hat JBoss Fuse Tooling.
Goals
In this tutorial you will:
- start up Red Hat JBoss Fuse 6.x Server
- deploy your project into Red Hat JBoss Fuse 6.x Server
- check whether your project was successfully built and deployed
- uninstall your deployed bundle
Prerequisites
To complete this tutorial you will need
- access to a Red Hat JBoss Fuse instance
- the simple-route project you updated in Chapter 3, To Add a Content-Based Router
Starting up Red Hat JBoss Fuse 6.x Server
To start up the server:
- In Fuse Integration perspective, click the Servers tab in the lower, right pane to open the Servers view.
- Click the link No servers are available. Click this link to create a new server... to open the Define a New Server page.
- Expand the
JBoss Fusenode to expose the available server options as shown in Figure 6.1.Figure 6.1. Define a New Server page
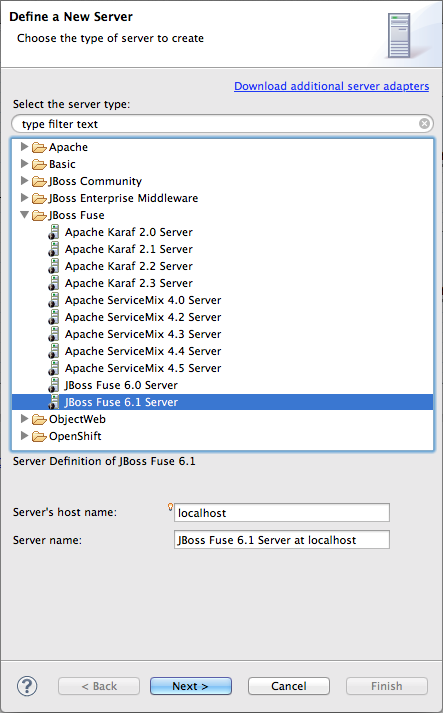
- Click
JBoss Fuse 6.1 Server. - Accept the defaults for Server's host name (localhost) and Server name (JBoss Fuse 6.1 Server at localhost), and then click to open the JBoss Fuse Runtime page.
- In Installation directory, enter the path where the JBoss Fuse 6.1 installation is located, or click the to search for it, and then click to open the New Server> JBoss Fuse server configuration details page.
Figure 6.2. New server configuration
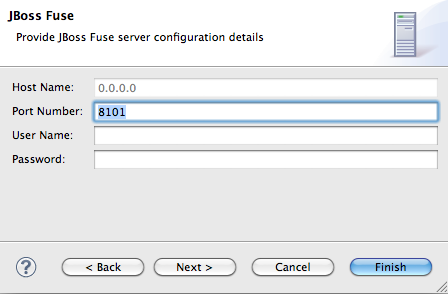
- Accept the defaults for Host Name (0.0.0.0) and Port Number (8101).
- In User name, enter the name used to log into the server.This is a user name stored in Red Hat JBoss Fuse's installDir
/etc/users.propertiesfile.If one has not been set, you can either add one to that file using the formatuser=password,role(for example,admin=admin,admin), or you can set one using the karafjaascommand set:jaas:realms—to list the realmsjaas:manage --index 1—to edit the first (server) realmjaas:useradd <username> <password>—to add a user and associated passwordjaas:roleadd <username> admin—to specify the new user's rolejaas:update—to update the realm with the new user information
If a jaas realm has already been selected for the server, you can discover the user name by issuing the commandJBossFuse:karaf@root>jaas:users. - In Password, enter the password required for User name to log into the server.This is the password set either in Red Hat JBoss Fuse's installDir
/etc/users.propertiesfile or by the karafjaascommands. - Click , and then click .
jboss-fuse-6.1.0.redhat-xxx [stopped]appears in Servers view. - In Servers view, right-click
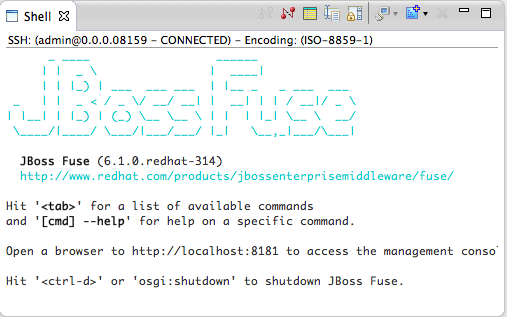
jboss-fuse-6.1.0.redhat-xxxto open the context menu, and then click .ImportantIf the warning that the remote host identification has changed appears, click to delete the old key and insert the new key, only if the JBoss Fuse 6.1 server runtime is installed on the same machine where the Red Hat JBoss Fuse Tooling is running! Otherwise click and contact your system administrator.Wait a few seconds for JBoss Fuse 6.1 Server to start up. When it does,JBoss Fuse [xxx]is added to the Fuse JMX Navigator tree under the Local Processes node, but you need to expand the Local Processes node to see it.The JBoss Fuse console also starts up in Shell view, as shown in Figure 6.3:Figure 6.3. JBoss Fuse console
- In Fuse JMX Navigator, right-click
JBoss Fuse [xxx]to open the context menu, and then click . - In Fuse JMX Navigator, expand the
JBoss Fuse [xxx]node to see its tree structure.Now you're ready to deploy your project.
Deploying a project to Red Hat JBoss Fuse
To deploy a camel project to JBoss Fuse:
- From Project Explorer, drag the
simple-routeroot project over to Fuse JMX Navigator and drop it onJBoss Fuse [xxx].NoteThe tool provides an alternative to the drag and drop method of deployment. For details, see Deploying Projects to a Container in the Red Hat JBoss Fuse Tooling: JBoss Fuse Tooling User Guide.Console view chronicles the process as the tooling builds thesimple-routeproject, runs the tests, and then installs the project as a bundle insideJBoss Fuse [xxx]. - In Fuse JMX Navigator, right-click
JBoss Fuse [xxx]to open the context menu, and then click .NoteYou may have to repeat the operation before your project appears in Fuse JMX Navigator under → as<bundleIdentifier>-camel-#. (Camel generates and appends an ID number to the end of the node name to ensure that every camel context is uniquely identified.)In the mean time, you can verify whether your project's bundle was installed by clicking the node underJBoss Fuse [xxx]to display, in view, all installed bundles. Start typing tutorial in view's Search tool to quickly determine whether your project'stutorial.simple-routebundle is included in the list.Once your project appears in Fuse JMX Navigator, you can start tracing on it, as described in Chapter 4, To Trace a Message Through a Route.
Uninstalling your project's bundle
To uninstall your project from JBoss Fuse 6.1 server:
- Switch to the JBoss Fuse console in Shell view.
- At the JBoss Fuse console command line, type
uninstall<bundleIdentifier>
Further reading
To learn more about deploying applications to external containers, see:
- Deploying Projects to a Container in the Red Hat JBoss Fuse Tooling: JBoss Fuse Tooling User Guide