
Red Hat Training
A Red Hat training course is available for Red Hat Fuse
3.2. Deploying to a Fabric
3.2.1. Create a Fabric
Overview
Figure 3.2 shows an overview of a sample fabric that you will create. The Fabric Ensemble consists of just one Fabric Server (making this fabric suitable only for experimental use) and two managed child containers.
Figure 3.2. A Sample Fabric with Child Containers
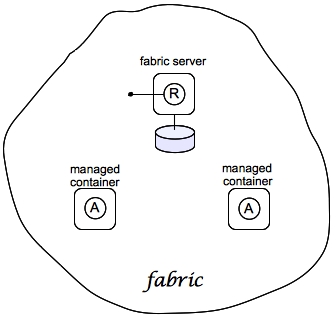
Fabric server
A Fabric Server (or servers) forms the backbone of a fabric. It hosts a registry service, which maintains a replicable database of information about the state of the fabric. Initially, when you create the fabric, there is just a single Fabric Server.
Child containers
Creating one or more child containers is the simplest way to extend a fabric. As shown in Figure 3.2, “A Sample Fabric with Child Containers”, the first container in the fabric is a root container, and both child containers are descended from it.
Each child container is an independent Red Hat JBoss Fuse container instance, which runs in its own JVM instance. The data files for the child containers are stored under the
InstallDir/instances directory.
Steps to create the fabric
To create the simple fabric shown in Figure 3.2, “A Sample Fabric with Child Containers”, follow these steps:
- (Optional) Customise the name of the root container by editing the
InstallDir/etc/system.propertiesfile and specifying a different name for this property:karaf.name=root
NoteFor the first container in your fabric, this step is optional. But at some later stage, if you want to join a root container to the fabric, you must customise the new container's name to prevent it from clashing with any existing root containers in the fabric. - To create the first fabric container, which acts as the seed for the new fabric, enter this console command:
JBossFuse:karaf@root> fabric:create --new-user AdminUser --new-user-password AdminPass
  --zookeeper-password ZooPass --wait-for-provisioning
The current container, namedrootby default, becomes a Fabric Server with a registry service installed. Initially, this is the only container in the fabric. The--new-userand--new-user-passwordoptions specify the credentials for a new administrator user. The Zookeeper password is used to protect sensitive data in the Fabric registry service (all of the nodes under/fabric).NoteMost of the time, you are not prompted to enter the Zookeeper password when accessing the registry service, because it is cached in the current session. When you join a container to a fabric, however, you must provide the fabric's Zookeeper password.NoteIf you use a VPN (virtual private network) on your local machine, it is advisable to log off VPN before you create the fabric and to stay logged off while you are using the local container. A local Fabric Server is permanently associated with a fixed IP address or hostname. If VPN is enabled when you create the fabric, the underlying Java runtime is liable to detect and use the VPN hostname instead of your permanent local hostname. This can also be an issue with multi-homed machines. To be absolutely sure about the hostname, you could specify the IP address explicitly—see chapter "Creating a New Fabric" in "Fabric Guide". - Create two child containers. Assuming that your root container is named
root, enter this console command:JBossFuse:karaf@root> fabric:container-create-child root child 2 Jmx Login for root: admin Jmx Password for root: The following containers have been created successfully: Container: child1. Container: child2.
You are prompted to enter a JMX username and password (the JMX port is integrated with the JAAS authentication service). Enter one of the username/password combinations that you defined in step 2. - Invoke the
fabric:container-listcommand to see a list of all containers in your new fabric. You should see a listing something like this:JBossFuse:karaf@root> fabric:container-list [id] [version] [alive] [profiles] [provision status] root 1.0 true fabric, fabric-ensemble-0000-1, fuse-esb-full success child1 1.0 true default success child2 1.0 true default success
Shutting down the containers
Because the child containers run in their own JVMs, they do not automatically stop when you shut down the root container. To shut down a container and its children, first stop its children using the
fabric:container-stop command. For example, to shut down the current fabric completely, enter these console commands:
JBossFuse:karaf@root> fabric:container-stop child1
JBossFuse:karaf@root> fabric:container-stop child2
JBossFuse:karaf@root> shutdown -f
After you restart the root container, you must explicitly restart the children using the
fabric:container-start console command.
3.2.2. Create Fabric Profiles
Overview
A profile is the basic unit of deployment in a fabric. You can deploy one or more profiles to a container, and the content of those deployed profiles determines what is installed in the container.
Contents of a profile
A profile encapsulates the following kinds of information:
- The URL locations of features repositories
- A list of features to install
- A list of bundles to install (or, more generally, any suitable JAR package—including OSGi bundles, Fuse Application Bundles, and WAR files)
- A collection of configuration settings for the OSGi Config Admin service
- Java system properties that affect the Apache Karaf container (analogous to editing
etc/config.properties) - Java system properties that affect installed bundles (analogous to editing
etc/system.properties)
Base profile
Profiles support inheritance. This can be useful in cases where you want to deploy a cluster of similar servers—for example, where the servers differ only in the choice of IP port number. For this, you would typically define a base profile, which includes all of the deployment data that the servers have in common. Each individual server profile would inherit from the common base profile, but add configuration settings specific to its server instance.
Create a base profile
To create the
gs-cxf-base profile, follow these steps:
- Create the
gs-cxf-baseprofile by entering this console command:JBossFuse:karaf@root> fabric:profile-create --parents feature-cxf gs-cxf-base
- Add the
get-startedfeatures repository (see Define a Feature for the Application) to thegs-cxf-baseprofile by entering this console command:JBossFuse:karaf@root> profile-edit -r mvn:org.fusesource.example/get-started/1.0-SNAPSHOT/xml/features gs-cxf-base
- Now add the get-started-cxf feature (which provides the Web service example server) to the
gs-cxf-baseprofile. Enter the following console command:JBossFuse:karaf@root> profile-edit --features get-started-cxf gs-cxf-base
Create the derived profiles
You create two derived profiles,
gs-cxf-01 and gs-cxf-02, which configure different IP ports for the Web service. To do so, follow these steps:
- Create the
gs-cxf-01profile—which derives fromgs-cxf-base—by entering this console command:JBossFuse:karaf@root> profile-create --parents gs-cxf-base gs-cxf-01
- Create the
gs-cxf-02profile—which derives fromgs-cxf-base—by entering this console command:JBossFuse:karaf@root> profile-create --parents gs-cxf-base gs-cxf-02
- In the
gs-cxf-01profile, set theportNumberconfiguration property to 8185, by entering this console command:JBossFuse:karaf@root> profile-edit -p org.fusesource.example.get.started/portNumber=8185 gs-cxf-01
- In the
gs-cxf-02profile, set theportNumberconfiguration property to 8186, by entering this console command:JBossFuse:karaf@root> profile-edit -p org.fusesource.example.get.started/portNumber=8186 gs-cxf-02
3.2.3. Deploy the Profiles
Deploy profiles to the child containers
Having created the child containers, as described in Section 3.2.1, “Create a Fabric”, and the profiles, as described in Section 3.2.2, “Create Fabric Profiles”, you can now deploy the profiles. To do so, follow these steps:
- Deploy the
gs-cxf-01profile into thechild1container by entering this console command:JBossFuse:karaf@root> fabric:container-change-profile child1 gs-cxf-01
- Deploy the
gs-cxf-02profile into thechild2container by entering this console command:JBossFuse:karaf@root> fabric:container-change-profile child2 gs-cxf-02
Test the deployed profiles
You can test the deployed profiles using the WS client from the
cxf-basic Maven project described in Create a Web Services Project. To do so, follow these steps:
- Open a new command prompt and
cdtoget-started/cxf-basic. - Test the
gs-cxf-01profile (which deploys a Web service listening on port 8185) by entering this command:mvn -Pclient -Dexec.args="http://localhost:8185/PersonServiceCF"
- Test the
gs-cxf-02profile (which deploys a Web service listening on port 8186) by entering this command:mvn -Pclient -Dexec.args="http://localhost:8186/PersonServiceCF"
3.2.4. Update a Profile
Atomic container upgrades
Normally, when you edit a profile that is already deployed in a container, the modification takes effect immediately. This is so because the Fabric Agent in the affected container (or containers) actively monitors the fabric registry in real time.
In practice, however, immediate propagation of profile modifications is often undesirable. In a production system, you typically want to roll out changes incrementally: for example, initially trying out the change on just one container to check for problems, before you make changes globally to all containers. Moreover, sometimes several edits must be made together to reconfigure an application in a consistent way.
Profile versioning
For quality assurance and consistency, it is typically best to modify profiles atomically, where several modifications are applied simultaneously. To support atomic updates, fabric implements profile versioning. Initially, the container points at version 1.0 of a profile. When you create a new profile version (for example, version 1.1), the changes are invisible to the container until you upgrade it. After you are finished editing the new profile, you can apply all of the modifications simultaneously by upgrading the container to use the new version 1.1 of the profile.
Upgrade to a new profile
For example, to modify the
gs-cxf-01 profile, when it is deployed and running in a container, follow the recommended procedure:
- Create a new version, 1.1, to hold the pending changes by entering this console command:
JBossFuse:karaf@root> fabric:version-create
Created version: 1.1 as copy of: 1.0
The new version is initialised with a copy of all of the profiles from version 1.0. - Use the
fabric:profile-editcommand to change theportNumberofgs-cxf-01to the value 8187 by entering this console command:JBossFuse:karaf@root> fabric:profile-edit -p org.fusesource.example.get.started/portNumber=8187 gs-cxf-01 1.1
Remember to specify version1.1to thefabric:profile-editcommand, so that the modifications are applied to version 1.1 of thegs-cxf-01profile. - Upgrade the
child1container to version 1.1 by entering this console command:JBossFuse:karaf@root> fabric:container-upgrade 1.1 child1
Roll back to an old profile
You can easily roll back to the old version of the
gs-cxf-01 profile, using the fabric:container-rollback command like this:
JBossFuse:karaf@root> fabric:container-rollback 1.0 child1