
Red Hat Training
A Red Hat training course is available for Red Hat JBoss Data Virtualization
12.4. Web Services Modeling
12.4.1. Create Web Service Action
- Select any combination of relational models, tables and/or procedures in the Model Explorer view tree.
Note
It is recommended that the user selects single source models, which enables auto-naming of input/output schema and Web service models in Step 3. - Right-click select Modeling > Create Web Service action. .
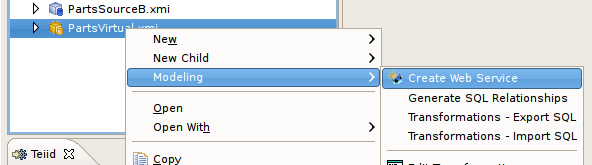
Figure 12.24. Create Web Service Action
- In the Create Web Service dialog, specify file names for the generated Input Schema file, Output Schema file and Web service model. Change options as desired. Click Finish when done.

Figure 12.25. Create Web Service Dialog
- When model generation is complete, a confirmation dialog appears. Click OK.
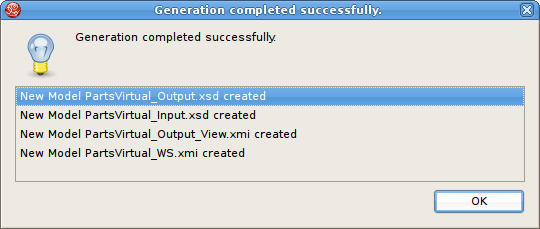
Figure 12.26. Generation Completed Dialog
12.4.2. Web Services War Generation
12.4.2.1. Web Services War Generation
12.4.2.2. Generating a JBossWS-CXF War
- Right-click on the VDB containing your web service model(s) and select the Modeling > Generate JBossWS-CXF War action.

Figure 12.27.
- Fill in missing properties in Web Service War Generation Wizard shown below.
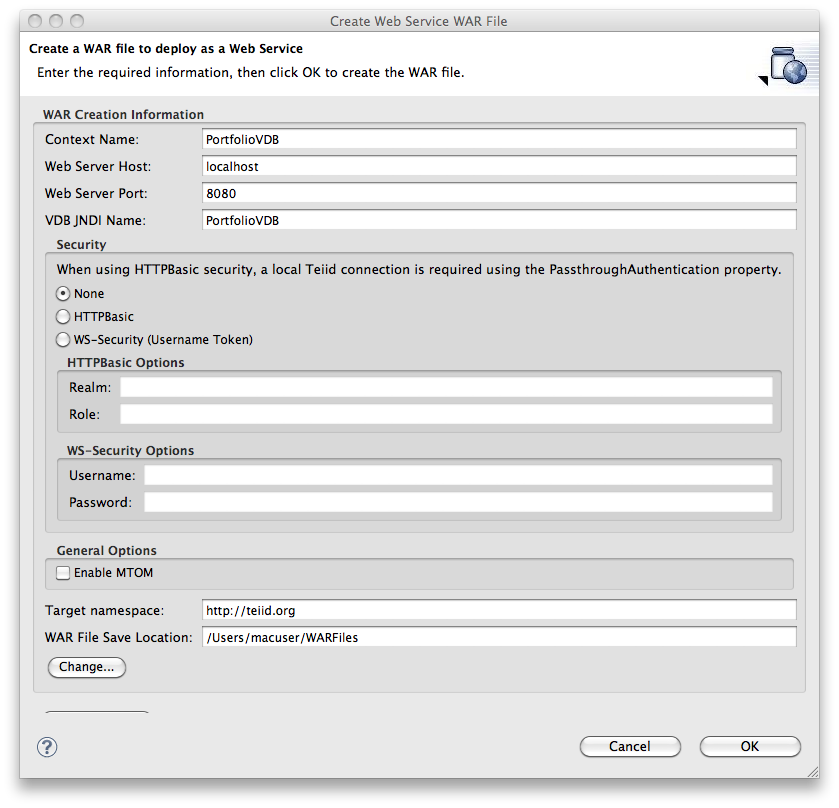
Figure 12.28. Generate a JBossWS-CXF War Web Service Dialog
Table 12.1. Field Descriptions
Field Name Description Name The name of the generated war file. Host The server host name (or IP). Port The server port. VDB JNDI Name The JNDI connection name to the deployed Teiid source VDB. Security options- None - no username/password required to connect to the VDB through the generated web service.
- HTTP Basic - the specified security realm and role will be used. The default realm value is the realm that comes out of the box with JBoss Data Virtualization (teiid-security). The role needs to be defined in the appropriate security mechanism. In the case of Teiid, use the
teiid-security-roles.propertiesfile. When using HTTPBasic, a local Teiid connection using the PassthroughAuthentication property is required. - WS-Security - a password callback class will be generated for you which will validate that the username/password values you specified in the war generator dialog are passed in. This is meant to be a testing mechanism for your WS-Security enabled web service and your own security mechanism should be implemented in this class. All source code is included in the generated war along with the compiled class files.
Target namespace This is the target namespace that will be used in the generated WSDL and subsequent generated web service classes. MTOM (Message Transmission Optimization Mechanism) If selected, MTOM will be enabled for the web service endpoint(s). You will also need to update your output schema accordingly by adding the xmlns:xmime="http://www.w3.org/2005/05/xmlmim" schema and adding type="xs:base64Binary"xmime:expectedContentTypes="application/octet-stream" to the output element you wish to optimize. War File Save Location The folder where the generated WAR file should be saved. - Click OK to generate the web service war. When war generation is complete, a confirmation dialog should appear. Click OK.

Figure 12.29. Generation Completed Dialog
- Click OK to create relational tables corresponding to your selected view tables and automatically set the Materialized property to TRUE and the Materialized Table reference value to your newly generated table.
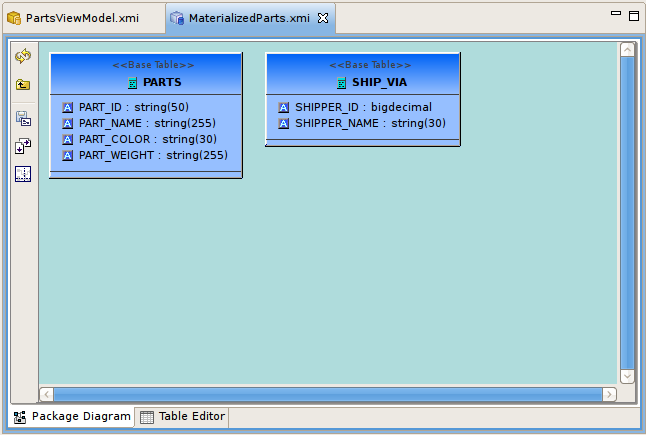
Figure 12.30. Materialized Table Properties
12.4.2.3. Generating a RESTEasy War
http://{host}:{port}/{war_context}/{model_name}/resource will accept URI path parameters and/or XML while http://{host}:{port}/{war_context}/{model_name}/json/resource will accept URI path parameters and/or JSON. You can specify query parameters in the target REST procedure's URI property using & as a delimiter. For example, REST:URI = authors&parm1&parm2.
- In a virtual model, add a procedure(s) that returns an XMLLiteral object. The target of your procedure can be any models in your VDB. Here is an example procedure that selects from a virtual table (VirtualBooks) and returns the results as an XMLLiteral:

Figure 12.31.
Notice the syntax used to convert the relation table result of the select from VirtualBooks, to an XMLLiteral.Here is an example of an update procedure that will insert a row and return an XMLLiteral object:
Figure 12.32.
The input format for the REST procedure could be URI parameters, an XML/JSON document, or some combination of both. When using an XML document your root node must be <input> and the XML nodes must correspond to order of the procedure's input parameters. For example, here is the input for the above insert procedure: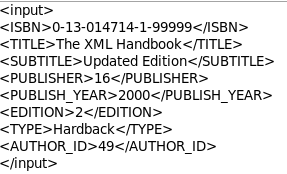
Figure 12.33. Sample XML Input
When using a JSON document, ensure your values match the order of your procedure input parameters as well. Here is the input for the above insert procedure: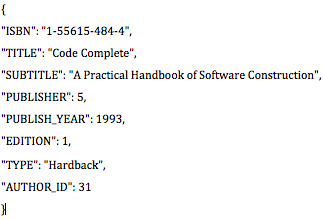
Figure 12.34. Sample JSON Input
- Now we need to identify our procedure as REST eligible. To do this we add enable REST properties for the procedure(s) via the Modeling > Enable context menu option.

Figure 12.35.
This will enable two new properties in the property tab for all procedures defined in the model. The two required properties are defined in the table below:Table 12.2. Required Extended Properties for RESTful Procedures
Property Name Description Rest Method The HTTP method that will determine the REST mapping of this procedure. Supported methods are: GET, PUT, POST and DELETE URI The resource path to the procedure. For example, if you use books/{isbn} as your URI value for a procedure, http://{host}:{port}/{war_context}/{model_name}/books/123 would execute this procedure and pass 123 in as a parameter. Here is what the above example would look like in the Property tab:
Figure 12.36.
Note that the generated URI will have the model name included as part of the path, so full URL would look like this: http://{host}:{port}/{war_context}/{model_name}/books/123. If you wanted a REST service to return all books, you would write your procedure just as it is above, but remove the input parameter. The URI property would then just be 'books' (or whatever you want) and the URL would be http://{host}:{port}/{war_context}/{model_name}/books.Once you have added all of your procedures along with the required extended properties, be sure and add the model to your VDB or synchronize if it's already included in the VDB. You will then need to redeploy the VDB.Important
If you redeploy your VDB during development, you may receive an "Invalid Session Exception"due to a stale connection obtained for the pool. This can be corrected by flushing the data source or, alternatively, you could add a test query to your VDB connection's -ds.xml file. This will insure you get a valid connection after redeploying your VDB. The syntax for the test query is as follows: <check-valid-connection-sql>some arbitrary sql</check-valid-connection-sql>" - If you have not already done so, you will need to create a data source for your VDB. This can be done in the Server view of Designer. Right-click on your deployed VDB and select Create Data Source. The Generate REST WAR dialog will ask you for the JNDI name for your created source so that it can connect to your VDB.
- Right-click on the VDB containing your virtual model(s) with REST eligible procedures and select the Modeling > Generate RESTEasy War action. If there are no procedures that are REST eligible, the "Generate RESTEasy War" option will not be enabled.

Figure 12.37.
- Fill in missing properties in the REST War Generation Wizard shown below.
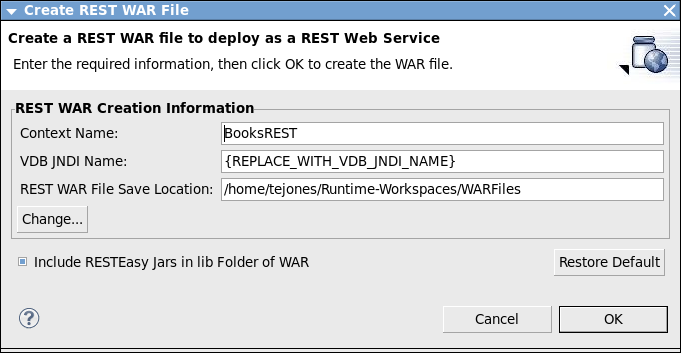
Figure 12.38. Generate a REST WAR War File Dialog
Table 12.3. Field Descriptions
Field Name Description Name The name of the generated war file. Connection JNDI Name The JNDI connection name to the deployed Teiid source VDB. War File Save Location The folder where the generated WAR file should be saved. Include RESTEasy Jars in lib Folder of WAR If selected, the RESTEasy jars and there dependent jars will be included in the lib folder of the generated WAR. If not selected, the jars will not be included. This should be cleared in environments where RESTEasy is installed in the classpath of the server installation to avoid conflicts. - Click OK to generate the REST war. When war generation is complete, a confirmation dialog appears. Click OK.

Figure 12.39. Generation Completed Dialog
12.4.2.4. Deploying Your Generated WAR File
From JBDS or JBoss Tools
- Insure target JBossAS is configured and running.
- Select your WAR file in the Model Explorer view. If you did not generate your war to that location, you can copy and paste it there.
- Right-click on the WAR file and select Mark as Deployable. This will cause you WAR file to be automatically deployed the JBoss AS instance you have defined.
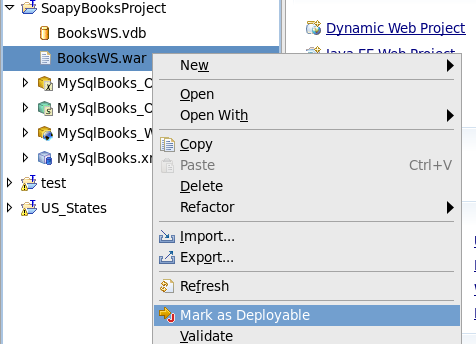
Figure 12.40.
Using the JBoss AS Administration Console
- Using the administration console that comes with JBoss AS, you can deploy WAR files. The administration console is available at http://{host:port}/admin-console. Once logged on, use the Add a New Resource button of the Web Application (WAR) resource folder.
Manual Deployment to JBossAS
- It is possible to deploy the generated WAR by manually copying the file to the deploy folder of the target JBoss AS. If the server is running, the WAR will deploy automatically via hot deploy. Otherwise, the WAR will deploy at the next start of the server.
12.4.2.5. Testing Your Generated WAR Files
SOAP WAR Testing
- Determining Your WSDL URL
- You can get your WSDL URL at http://{server:port}/jbossws/services. This is where all the deployed web services for the target JBossAS server will be listed. Find your service and click the Endpoint Address link. This will retrieve your web service's WSDL and the WSDL URL address will appear in the browser's address bar.

Figure 12.41.
Now that you have your WSDL URL, you can use any SOAP testing tool such as the Web Service Tester that comes with JBDS and JBoss Tools or an external tool like soapUI. - Using the JBoss AS Administration Console
- Using the administration console that comes with JBoss AS, you can deploy WAR files. The administration console is available at http://{host:port}/admin-console. Once logged on, simply use the "Add a New Resource" button of the "Web Application (WAR)" resource folder.
REST WAR Testing
- What is my URI?
- When you modeled your REST procedures, you assigned a URI for each HTTP Operation you defined along with the corresponding operation (GET, PUT, POST or DELETE). The full path of each URI is defined as /{war_context}/{model_name}/{resource} for XML input/output and /{war_context}/{model_name}/json/{resource} for JSON input/output.Using your REST URL, you can use any testing tool with REST support such as the Web Service Tester included with JBDS and JBoss Tools or an external tool like soapUI or cURL.