
Red Hat Training
A Red Hat training course is available for Red Hat JBoss Data Virtualization
Installation Guide
This guide is for installation teams.
Abstract
Chapter 1. Read Me
1.1. Back Up Your Data
Warning
1.2. Variable Name: EAP_HOME
EAP_HOME refers to the root directory of the Red Hat JBoss Enterprise Application Platform installation on which JBoss Data Virtualization has been deployed.
1.3. Variable Name: MODE
MODE will either be standalone or domain depending on whether JBoss Data Virtualization is running in standalone or domain mode. Substitute one of these whenever you see MODE in a file path in this documentation. (You need to set this variable yourself, based on where the product has been installed in your directory structure.)
1.4. Red Hat Documentation Site
Chapter 2. Some Key Terms Used Throughout this Document
2.1. Data Federation
Note
EAP_HOME/quickstarts/dynamicvdb-datafederation/README.md for directions to run the quickstart.
- Account information, stored in H2 database
- Market Data (stock prices) stored in CSV text file
2.2. Data Roles
Note
EAP_HOME/quickstarts/dynamicvdb-dataroles/README.md for directions to run the quickstart.
portfolio-vdb.xml) is defined with the two different data access roles:
- read-onlyThe read-only role restricts access of the VDB to read only access (that is, select). This role is assigned to all the users who have a login credential (you can use the user called 'user' with password 'user').
- read-writeThe read-write role grants read and write access (i.e., insert/update/delete). This role is assigned only to the users with 'superuser' JAAS role (you can use the 'portfolio' user with password 'portfolio').
portfolio-vdb.xml:
<data-role name="ReadWrite">
	<description>Allow Reads and Writes to tables and procedures</description>

	<permission>
		<resource-name>Accounts</resource-name>
		<allow-create>false</allow-create>
		<allow-read>true</allow-read>
		<allow-update>true</allow-update>
	</permission>

	<permission>
		<resource-name>MarketData</resource-name>
		<allow-create>false</allow-create>
		<allow-read>true</allow-read>
		<allow-update>true</allow-update>
	</permission>

	<!--
		This role must defined in the JAAS security domain, the sample UserRolesLoginModules based roles file is provided in this sample directory. Copy these teiid-security-roles.properties and teiid-security-users.proeprties into EAP_HOME/modules/system/layers/dv/org/jboss/teiid/conf directory and replace the old ones.
	-->

	<mapped-role-name>supervisor</mapped-role-name>
</data-role>
EAP_HOME/quickstarts/src/dynamicvdb-dataroles/security/teiid-security-roles.properties and EAP_HOME/quickstarts/src/dynamicvdb-dataroles/security/teiid-security-users.properties files. The teiid-security-users.properties file is used by JAAS to determine user credentials (that is, login ID and Password) and the teiid-security-roles.properties file maps the username to the <mapped-role-name> element.
2.3. About Maven
http:// when located on an HTTP server, or file:// when located on a file server. The default repository is the public remote Maven 2 Central Repository.
settings.xml file. You can either configure global Maven settings in the M2_HOME/conf/settings.xml file, or user-level settings in the USER_HOME/.m2/settings.xml file.
Note
2.4. Checksum Validation
2.5. Virtual Databases
2.6. Data Sources
2.7. Teiid Designer
- resolve semantic differences.
- create virtual data structures at a physical or logical level.
- use declarative interfaces to integrate, aggregate, and transform the data from source to a target format for application compatability.
2.8. Connector Framework
2.9. Translators
2.10. Service
- Virtual Database
- A virtual database (VDB) provides a unified view of data residing in multiple physical repositories. A VDB is composed of various data models and configuration information that describes which data sources are to be integrated and how. In particular, source models are used to represent the structure and characteristics of the physical data sources, and view models represent the structure and characteristics of the integrated data exposed to applications.
- Access Layer
- The access layer is the interface through which applications submit queries (relational, XML, XQuery and procedural) to the VDB via JDBC, ODBC or Web services.
- Query Engine
- When applications submit queries to a VDB via the access layer, the query engine produces an optimized query plan to provide efficient access to the required physical data sources as determined by the SQL criteria and the mappings between source and view models in the VDB. This query plan dictates processing order to ensure physical data sources are accessed in the most efficient manner.
- Connector Framework
- Translators and resource adapters are used to provide transparent connectivity between the query engine and the physical data sources. A translator is used to convert queries into source-specific commands, and a resource adapter provides communication with the source.
2.11. Open Database Connectivity (ODBC)
2.12. Role of the Database Tool
Chapter 3. Platform requirements
3.1. Evaluating your architecture and your needs
- 2 GB RAM will get you started, but more is needed for large models
- Modern Processor
- 500 MB disk space for installed product files
- 2+GB for model projects and related artifacts
- 16 GB JVM memory size
- Modern multi-core (dual or better) processor or multi-socket system with modern multi-core processors
- 20+ GB Disk Space that's needed for JBoss server product and DV components:
- 1 GB disk for installed product files
- 5+ GB for log files and deployed artifacts
- 15 GB (default) for BufferManager maxBufferSpace
- If Modeshape (repository) will be used, will need to bump up the file space by a minimum 5GB more.
- Concurrency – this takes into account max sessions, the transport thread pool, the engine thread pool / engine (especially max active) settings and connection pool sizes.
- Data Volume – this considers the amount of data read from the data source(s) based on the batch sizes. The default processor batch size is 256 with a target of ~2k bytes per row, flowing thru the system at the size of ~512kb. However, it is recommended on machines with more memory to increase the batch size to 512, making it ~1mb per batch in size.
- Plan Processing – this considers the additional processing on the data that will be done based on the query plan. This will generally require additional memory (i.e., sorting).
- the server is tuned (i.e., thread pools, connection pools, etc) so that each query will execute without waiting or maximum through-put.
- there will be 1 source query per datasource in the plan (more complex queries will increase the need for more memory)
- no other apps are running in the same JVM as Teiid (if other apps will be running in the same JVM, then the additional memory requirements will need to be accounted for)
- executing straight reads, non-transactional (Teiid does a proactive batch fetch which increases memory requirement, this is why batch types is doubled)
- The default processor batch size is configured at 512 (changed from default of 256), which is recommended on machines with more memory to reduce batch overhead.
(concurrent queries) * (4 * batch bytes) + (2 * (#source queries per plan * approximate source bytes))) + overhead where:
- concurrent queries
- batch bytes - represent the batches flowing thru the system, and using the default of 256 batch size, the byte size of that is ~512kb. However, using the recommended batch size of 512 would mean ~1mb per batch. The doubling of the batch bytes is to account for the effect of storing a batch on the work item in case a partial batch is retrieved while another batch is in process.
- 4 – represents 1) the doubling of batch bytes and 2) plan operations – where this is the number additional copies of the batches that are needed to fulfill plan operations (i.e., sort, joining, etc.). 2 will be used.
- source queries per plan – number of data sources in the query, but limited based on the assumptions.
- approximate source bytes –
( ( (32bit?5:7) + (4 * avg raw bytes per column) ) * #columns), using 10 as an average raw bytes per column and using a 64-bit machine - overhead – this would include the adjustment for AS (~300mb), additional Teiid overhead (caching, plans, etc.), connection pool overhead. But only ~300mb will be used, because the others are harder to figure, but know your server will need to take this into account for better performance.
- (concurrent queries) * (4 * batched bytes) + (2 * source bytes) * #source queries + 300mb
- (concurrent queries) * (4 * 1mb) + (2 * 512kb) * #source queries + 300mb
- (concurrent queries) * (4mb) + (1mb) * #source queries + 300mb
- #concurrency * (5mb) * #source queries + 300mb
Table 3.1. Table
|
concurrency # source queries
|
100
|
200
|
|---|---|---|
|
2
|
1.3 gb
|
2.3 gb
|
|
5
|
2.8 gb
|
5.3 gb
|
|
10
|
5.3 gb
|
10.3 gb
|
- set maxActivePlans to the max concurrent queries
- set maxThreads = maxActivePlans * 2 (if transactions will be used, then * 3)
- set each datasource max pool size = max conncurrent source queries (minimum would be max conncurrent queries, but if majority of queries are complex in which there are subqueries that cause multiple source queries to be spawned, then max pool size should be increased accordingly),
- After the above adjustments are done and the server has memory room, then consider increasing the processBatchSize and connectorBatchSize (i.e., 512, 1024, respectfully) to increase through-put from the data sourse and thru the engine. If you're out of memory, then increase the JVM size. A machines that has less than 6GB memory, stick with 512, larger machines use higher sizes.
Important
Chapter 4. Download the Product
4.1. Red Hat Customer Portal
4.2. Download JBoss Data Virtualization Installer
.jar archive to run the graphical installer. This topic covers the steps to download the archive.
- Set up an account on the Red Hat Customer Portal at https://access.redhat.com/.
- Ensure your Red Hat subscriptions are up to date.
- Review the supported configurations and ensure your system is supportable.
- Ensure that you have administration privileges for the installation directory.
- Ensure that JAVA_HOME and PATH have been set in the Environment properties for shortcuts to work on Microsoft Windows servers.
- A Java 6 or 7 JDK is required.
Procedure 4.1. Download JBoss Data Virtualization Installer
Login to the Red Hat Customer Portal.
- Enter https://access.redhat.com/ into the address bar of a browser.
- Click Log in and enter your Red Hat Login and Password to access the Customer Portal. You will need to register for an account if you do not yet have one.
Download JBoss Data Virtualization Installer.
- Click Downloads -> Red Hat JBoss Data Virtualization.
- Click Download next to the Red Hat JBoss Data Virtualization [Version] Installer option.
- Save the file.
4.3. Verify Downloaded Files
Procedure 4.2. Verify File Checksums on Red Hat Enterprise Linux
Obtain checksum values for the downloaded file
- Navigate to https://access.redhat.com/jbossnetwork/. Login if required.
- Select your Product and Version.
- Select the package you want to verify to navigate to the Software Details page.
- Take note of the MD5 and SHA-256 checksum values.
Run a checksum tool on the file
- Navigate to the directory containing the downloaded file in a terminal window.
- Run
md5 downloaded_file. - Run
shasum downloaded_file.
Example output:[localhost]$ md5 jboss-dv-installer-6.0.0.GA-redhat-4.jar MD5 (jboss-dv-installer-6.0.0.GA-redhat-4.jar) = 0d1e72a6b038d8bd27ed22b196e5887f [localhost]$ shasum jboss-dv-installer-6.0.0.GA-redhat-4.jar a74841391bd243d2ca29f31cd9f190f3f1bdc02d jboss-dv-installer-6.0.0.GA-redhat-4.jar
Compare the checksum values
- Compare the checksum values returned by the
md5andshasumcommands with the corresponding values displayed on the Software Details page. - Download the file again if the two checksum values are not identical. A difference between the checksum values indicates that the file has either been corrupted during download or has been modified since it was uploaded to the server. Contact Red Hat Support for assistance if after several downloads the checksum does not successfully validate.
- The downloaded file is safe to use if the two checksum values are identical.
The integrity of the downloaded file is verified.
Note
Chapter 5. Maven Repositories
5.1. About The Provided Maven Repositories
settings.xml file during installation, Maven is already configured to use the online repositories.
Important
5.2. Configure Maven to Use the File System Repositories
The Red Hat JBoss DV Maven repository is available online, so it is not necessary to download and install it locally. However, if you prefer to install the JBoss EAP Maven repository locally, there are three ways to do it: on your local file system, on Apache Web Server, or with a Maven repository manager. This example covers the steps to download the JBoss EAP 6 Maven Repository to the local file system. This option can help you become familiar with using Maven for development but is not recommended for team production environments.
Procedure 5.1.
- Download the repository from this address: https://access.redhat.com/jbossnetwork/restricted/listSoftware.html?product=data.services.platform
- Click the button to download a
.zipfile containing the repository. - Unzip the file on the local file system into a directory of your choosing.
- Add entries for the unzipped repositories to Maven's
settings.xmlfile. The following code sample contains a profile with the repositories and an activation entry for the profile:<?xml version="1.0" encoding="UTF-8" standalone="no"?> <settings xmlns="http://maven.apache.org/SETTINGS/1.0.0" xmlns:xsi="http://www.w3.org/2001/XMLSchema-instance" xsi:schemaLocation="http://maven.apache.org/xsd/settings-1.0.0.xsd"> <localRepository/> <profiles> <!-- Profile with local repositories required by Data Virtualization --> <profile> <id>dv-local-repos</id> <repositories> <repository> <id>dv-6.1.0.GA-redhat-2-repository</id> <name>DV 6.1.0 GA Repository</name> <url>file://<!-- path to the repository -->/jboss-dv-6.1.0.redhat-3-maven-repository/maven-repository</url> <layout>default</layout> <releases> <enabled>true</enabled> <updatePolicy>never</updatePolicy> </releases> <snapshots> <enabled>false</enabled> <updatePolicy>never</updatePolicy> </snapshots> </repository> </repositories> <pluginRepositories> <pluginRepository> <id>dv-6.1.0.GA-redhat-2-repository</id> <name>DV 6.1.0 GA Repository</name> <url>file://<!-- path to the repository -->/jboss-dv-6.1.0.redhat-3-maven-repository/maven-repository</url> <layout>default</layout> <releases> <enabled>true</enabled> <updatePolicy>never</updatePolicy> </releases> <snapshots> <enabled>false</enabled> <updatePolicy>never</updatePolicy> </snapshots> </pluginRepository> </pluginRepositories> </profile> </profiles> <activeProfiles> <!-- Activation of the Data Virtualization profile --> <activeProfile>dv-local-repos</activeProfile> </activeProfiles> </settings>
The Maven repositories are downloaded, unzipped in a local file system, registered in Maven's settings.xml file, and ready to be used when performing Maven builds.
- Q: Why do I still see errors when building or deploying my applications?
- Q: Why is JBoss Developer Studio using my old Maven configuration?
When you build or deploy a project, it fails with one or both of the following errors:
[ERROR] Failed to execute goal on project PROJECT_NAMECould not find artifact ARTIFACT_NAME
Your cached local Maven repository might contain outdated artifacts.
To resolve the issue, delete the cached local repository – the ~/.m2/repository/ directory on Linux or the %SystemDrive%\Users\USERNAME\.m2\repository\ directory on Windows – and run mvn clean install -U. This will force Maven to download correct versions of required artifacts when performing the next build.
You have updated your Maven configuration, but this configuration is not reflected in JBoss Developer Studio.
If JBoss Developer Studio is running when you modify your Maven settings.xml file, this configuration will not be reflected in JBoss Developer Studio.
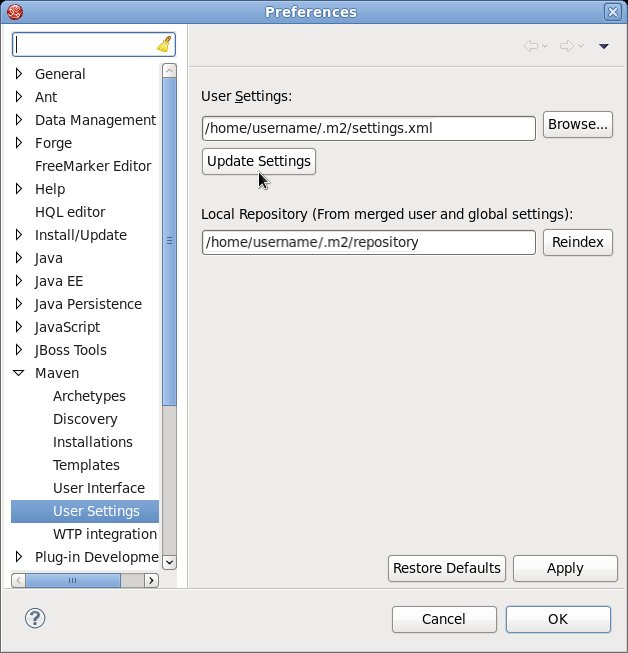
Figure 5.1. Update Maven User Settings
5.3. Configure Maven to Use the Online Repositories
settings.xml file during installation, Maven is already configured to use the online repositories.
Procedure 5.2. Configuring Maven to Use the Online Repositories
- Add entries for the online repositories to Maven's
settings.xmlfile as in the code sample below:<settings xmlns="http://maven.apache.org/SETTINGS/1.0.0" xmlns:xsi="http://www.w3.org/2001/XMLSchema-instance" xsi:schemaLocation="http://maven.apache.org/SETTINGS/1.0.0 http://maven.apache.org/xsd/settings-1.0.0.xsd"> <profiles> <!-- Profile with online repositories required by Data Virtualization --> <profile> <id>dv-online-profile</id> <repositories> <repository> <id>jboss-ga-repository</id> <url>http://maven.repository.redhat.com/techpreview/all</url> <releases> <enabled>true</enabled> </releases> <snapshots> <enabled>false</enabled> </snapshots> </repository> </repositories> <pluginRepositories> <pluginRepository> <id>jboss-ga-plugin-repository</id> <url>http://maven.repository.redhat.com/techpreview/all</url> <releases> <enabled>true</enabled> </releases> <snapshots> <enabled>false</enabled> </snapshots> </pluginRepository> </pluginRepositories> </profile> </profiles> <activeProfiles> <!-- Activation of the Data Virtualization profile --> <activeProfile>dv-online-profile</activeProfile> </activeProfiles> </settings> - If you modified the
settings.xmlfile while JBoss Developer Studio was running, you must refresh Maven settings in the IDE. From the menu, choose → . In the Preferences Window, expand Maven and choose User Settings. Click the button to refresh the Maven user settings in JBoss Developer Studio.Figure 5.2. Update Maven User Settings
Maven has been configured to use the online repositories provided for your Red Hat JBoss product.
Important
- Missing artifact ARTIFACT_NAME
- [ERROR] Failed to execute goal on project PROJECT_NAME; Could not resolve dependencies for PROJECT_NAME
~/.m2/repository/ directory on Linux or the %SystemDrive%\Users\USERNAME\.m2\repository\ directory on Windows. This will force Maven to download correct versions of required artifacts during the next build.
5.4. Dependency Management
pom.xml file. Adding the BOM and parent POM files ensures that the correct versions of plug-ins and transitive dependencies from the provided Maven repositories are included in the project.
org.jboss.dv.component.management:dv-parent-2.2.0.redhat-7.pom
org.jboss.dv.component.management:dv-dependency-management-all-2.2.0.redhat-7.pom.
5.5. Using Maven Dependencies for Red Hat JBoss Data Virtualization
<?xml version="1.0" encoding="UTF-8"?>
<project xmlns="http://maven.apache.org/POM/4.0.0" xmlns:xsi="http://www.w3.org/2001/XMLSchema-instance" xsi:schemaLocation="http://maven.apache.org/POM/4.0.0 http://maven.apache.org/maven-v4_0_0.xsd">
<modelVersion>4.0.0</modelVersion>
<!-- Example POM file using the DV 6.2.0 and EAP 6.4 component versions.
- Parent is set to the DV 6.2.0 parent management POM, which will
- bring in the correct toolchain (plugin) versions.
- DependencyManagement dependencies include the DV 6.2.0 and EAP 6.4
- BOMs - which will bring in the correct compile-time (and other
- scoped) versions.
-->
<name>Example POM for DV 6.1.0</name>
<groupId>org.jboss.dv</groupId>
<artifactId>dv-example</artifactId>
<version>0.0.1</version>
<packaging>pom</packaging>
<parent>
<!-- DV version (parent) -->
<groupId>org.jboss.dv.component.management</groupId>
<artifactId>dv-parent</artifactId>
<version>2.2.0.redhat-7</version>
</parent>
<dependencyManagement>
<dependencies>
<!-- DV BOM -->
<dependency>
<groupId>org.jboss.dv.component.management</groupId>
<artifactId>dv-dependency-management-all</artifactId>
<version>2.2.0.redhat-7</version>
<type>pom</type>
<scope>import</scope>
</dependency>
</dependencies>
</dependencyManagement>
</project>
5.6. Offline mode
5.6.1. Use case for a custom offline repository
features-maven-plugin plug-in.
5.6.2. Download repository for Maven project
pom.xml file), you should be able to run the following Maven command:
mvn org.apache.maven.plugins:maven-dependency-plugin:2.8:go-offline -Dmaven.repo.local=/tmp/cheese
/tmp/cheese directory.
5.6.3. Generate the offline repository
ProjectDir/custom-repo, and enter the following Maven command:
mvn generate-resources
ProjectDir/custom-repo/target/features-repo
Chapter 6. Installing Prerequisite Components
6.1. Install Open JDK on Red Hat Enterprise Linux
Procedure 6.1. Install Open JDK on Red Hat Enterprise Linux
Subscribe to the Base Channel
Obtain the OpenJDK from the RHN base channel. (Your installation of Red Hat Enterprise Linux is subscribed to this channel by default.)Install the Package
Use the yum utility to install OpenJDK:yum install java-1.7.0-openjdk-develVerify that OpenJDK is Now Your System Default
You can ensure the correct JDK is set as the system default by following the steps below.- As root, run the alternatives command for
java:/usr/sbin/alternatives --config java
- Select
/usr/lib/jvm/jre-1.7.0-openjdk/bin/java. - Then do the same for
javac:/usr/sbin/alternatives --config javac
- Select
/usr/lib/jvm/java-1.7.0-openjdk/bin/javac.
6.2. Install Maven
The following software must be installed:
- An archiving tool for extracting the contents of compressed files.
- Open JDK.
Procedure 6.2. Install Maven
Download Maven.
- Enter http://maven.apache.org/download.cgi in the address bar of a browser.
- Download
apache-maven-[latest-version]ZIP file and save it to your hard drive.
Install and configure Maven.
On Red Hat Enterprise Linux
- Extract the ZIP archive to the directory where you wish to install Maven.
- Open your .bash_profile file in a terminal:
vi ~/.bash_profile. - Add the M2_HOME environment variable to the file:
export M2_HOME=/path/to/your/maven
- Also add the M2 environment variable to the file:
export M2=$M2_HOME/bin
- Add the M2 environment variable to the file:
export PATH=$M2:$PATH
- Make sure that JAVA_HOME is set to the location of your JDK. For example:
export JAVA_HOME=/usr/lib/jvm/java-1.7.0-openjdk.x86_64
- Make sure that $JAVA_HOME/bin is in your PATH environment variable.
- Save the file and exit your text editor.
- Run this command to ensure the changes take effect:
source ~/.bash_profile - Run the following command to verify that Maven is installed successfully on your machine:
mvn --version
On Microsoft Windows
- Extract the ZIP archive to the directory where you wish to install Maven. The subdirectory
apache-maven-[latest-version]is created from the archive. - Press Start+Pause|Break. The System Properties dialog box is displayed.
- Click the Advanced tab and click Environment Variables.
- Under System Variables, select Path.
- Click Edit and add the two Maven paths using a semicolon to separate each entry.
- Add the M2_HOME variable and set the path to
C:\path\to\your\Maven. - Add the M2 variable and set the value to %M2_HOME%\bin.
- Update or create the Path environment variable:
- Add the %M2% variable to allow Maven to be executed from the command line.
- Add the variable %JAVA_HOME%\bin to set the path to the correct Java installation.
- Click OK to close all the dialog boxes including the System Properties dialog box.
- Open Windows command prompt and run the following command to verify that Maven is installed successfully on your machine:
mvn --version
Maven is successfully installed and configured on your machine.
Chapter 7. Installing the Product
7.1. Red Hat JBoss Data Virtualization Installation Methods
- Graphical mode: Graphical mode launches a graphical wizard which provides step-by-step instructions for installing and configuring the Red Hat JBoss Data Virtualization. Additional setup, including the Quickstarts and Maven Repository, is also possible with the installer.
- Text mode: You can launch the installer in the text mode as well. Text mode provides step-by-step instructions for installing and configuring the Red Hat JBoss Data Virtualization.
- Automated script mode: You can install multiple identical instances of Red Hat JBoss Data Virtualization using the automated script. This automated script is generated after the first installation instance.
7.2. Installing JBoss Data Virtualization: Basic Installation
Prerequisites
- You must have a Red Hat JBoss EAP 6.4 instance ready. Download the installer version (not the Zip) from the Red Hat website and follow the defaults. The EAP Getting Started Guide can be found here: https://access.redhat.com/site/documentation/en-US/JBoss_Enterprise_Application_Platform/6.4/html/Getting_Started_Guide/index.html. Once installed, you must patch it to 6.4.3 or greater.
- You must have already downloaded the Red Hat JBoss Data Virtualization jar file from the Customer Portal.
- You must have a JVM installed, such as OpenJDK or the non-open source Azul Zing.
Procedure 7.1. Install JBoss Data Virtualization
- Open a terminal window and navigate to the location where the GUI installer was downloaded.
- Enter the following command to launch the GUI installer:
java -jar jboss-dv-installer-VERSION.jar
- A dialogue box will open followed by the End User License Agreement. If you accept the terms of the agreement, click and then click .
- Tell Red Hat JBoss Data Virtualization where Red Hat JBoss EAP is installed on your server. Add the filepath and click .
- Ensure Teiid Installation and Modeshape Installation are ticked. Click .
- You will be prompted to create a new EAP Admin, Dashboard Admin, Teiid data access user and ModeShape user and whether you want to enable OData access. Once created, EAP Admin is added to the ManagementRealm and can be used to access the Management Console. The other users are added to the ApplicationRealm and can be used to access specific components of JBoss Data Virtualization. Enter the new username and password in the appropriate fields and click .You must ensure that you remember all of these passwords. They give you access to different parts of the system. The EAP account and password allows you to administer the EAP Server, the Dashboard password is for administrative functions related to the web interface, and the Teiid data access user and ModeShape user are for standard user access.Note that the username and password are not allowed to match and the password must have at least eight characters, with one alphabetical character, one numeric character and one non-numeric character.
- You can install Red Hat JBoss Data Virtualization either with default configuration or with additional configuration options. For this exercise, we will be using the defaults only, so select Perform default configuration to install Red Hat JBoss Data Virtualization with default options. Click .
- The Configure password vault screen appears. Input your desired password, which must have no fewer than six characters. Click .
Note
The default H2 database is not suitable for production databases. Use it in testing and evaluation environments only. - A summary of the installation is displayed. Click Next for the installation to commence. This may take a few moments. Once all the components are installed, click .
- Click if you wish to generate automatic script. This allows you to quickly reinstall or mass-deploy the product using the settings you have configured during the initial installation, without having to step through the wizard each time.
Note
Note that an automatic installation script created for Red Hat JBoss Data Virtualization 6.0 will not work with Red Hat JBoss Data Virtualization 6.1. - Click to exit the installer.
Red Hat JBoss Data Virtualization is successfully installed and configured.
Note
Warning
7.3. Installing JBoss Data Virtualization Using Text Based Installer
You must have already downloaded the Red Hat JBoss Data Virtualization jar file from the Customer Portal.
Procedure 7.2. Install JBoss Data Virtualization
- Open a terminal window and navigate to the location where the GUI installer was downloaded.
- Enter the following command to start the installation process:
java -jar jboss-dv-installer-VERSION.jar -console
- Follow the installation prompts displayed on the terminal. You can either install with default configuration or you can complete additional configuration steps.
- The final step involving generating automatic installation script. You can use this script to perform headless installation or identical installations across multiple instances.
The Red Hat JBoss Data Virtualization is successfully installed and configured.
7.4. Installing JBoss Data Virtualization Development Tools
The following software must be installed:
- Red Hat JBoss Developer Studio (See Red Hat JBoss Developer Studio Installation Guide)
- An archiving tool for extracting the contents of compressed files
- Open JDK (See Red Hat JBoss Data Virtualization Installation Guide) or another supported Java Virtual Machine
Procedure 7.3. Install JBoss Developer Studio Integration Stack
- Start your Red Hat JBoss Developer Studio.
- In Red Hat JBoss Developer Studio, click Help > Install New Software... action from the main menu.
- On the Available Software page, click the Add ... button.
- On the Add Repository dialog, enter following details:Enter JBDSIS (or another unique name) in the Name field. Enter https://devstudio.jboss.com/updates/8.0/integration-stack/ in the Location field. (For users of JBDS version 7, leave the URL as https://devstudio.jboss.com/updates/7.0/integration-stack/ and use the Check for Updates feature).
- Click OK.
- In the update site tree view, select the JBoss Data Virtualization Development folder and all its children.
Note
If JBDSIS is already installed then proceed to next step. You can confirm that JBDSIS is installed on your machine by clicking What is already installed link. - Click Next.
- Accept any additional dependencies and license agreements, then click Finish to complete.
Teiid Designer and ModeShape Tools are installed successfully.
Chapter 8. Starting and Stopping the Product
8.1. Starting JBoss Data Virtualization
The following software must be installed:
- Red Hat JBoss Data Virtualization
Procedure 8.1. Starting JBoss Data Virtualization
Start the JBoss EAP Server
You can run JBoss Data Virtualization by starting the JBoss EAP server. To start the JBoss EAP server:Red Hat Enterprise Linux
Open a terminal and enter the command:$ EAP_HOME/bin/standalone.shMicrosoft Windows
Open a terminal and enter the command:$ EAP_HOME\bin\standalone.bat
Note
EAP_HOME/MODE/log/server.log. You can also verify this by opening the Management Console and logging in using the username and password of a registered JBoss EAP Management User. For more information about using the Management Console, see the Red Hat JBoss Enterprise Application Platform Administration and Configuration Guide.
Note
8.2. Start JBoss EAP 6 as a Managed Domain
The domain controller must be started before any slave servers in any server groups in the domain. Use this procedure first on the domain controller, and then on each associated host controller and each other host associated with the domain.
Procedure 8.2. Start the Platform Service as a Managed Domain
For Red Hat Enterprise Linux.
Run the command:EAP_HOME/bin/domain.shFor Microsoft Windows Server.
Run the command:EAP_HOME\bin\domain.batOptional: Pass additional parameters to the start-up script.
To list all available parameters for the start-up scripts, use the-hparameter.
The JBoss EAP 6 Managed Domain instance starts.
8.3. Stopping JBoss Data Virtualization
Note
The server will shut down. Note that this process will take a few minutes.
Chapter 9. Installing JBoss Data Grid Caching
9.1. Configure JBoss Data Grid Adaptors
- Navigate to the
docs/teiid/datasources/infinispan/directory. - Execute the appropriate script:
add-infinispan-cache-translator.clioradd-infinispan-cache-dsl-translator.cli.
Chapter 10. ODBC Support
10.1. Introduction
10.1.1. JBoss Data Virtualization and ODBC
Warning
10.2. Install the ODBC Driver on Red Hat Enterprise Linux
10.2.1. Install the ODBC Driver on Red Hat Enterprise Linux
Prerequisites
- Administrative permissions are required.
Procedure 10.1. Install the ODBC Driver on Red Hat Enterprise Linux
Download the driver
Download the correct ODBC driver package (jboss-dv-psqlodbc-[version]-X.rpm) from https://access.redhat.com/jbossnetwork/.Install the package
Runsudo yum localinstall.jboss-dv-psqlodbc-[version]-X.rpm
Note
10.2.2. Configure the ODBC Environment
Configure the Environment
Run the/opt/redhat/jboss-dv/v6/psqlodbc/etc/setenv.shscript:[localhost etc]$ ./setenv.sh
This script adds the required directories to theLD_LIBRARY_PATHandPATHenvironment variables. This script has to be run every time you want to use the driver.
10.2.3. Configure the DSN for Linux Installation
- Edit the
/opt/redhat/jboss-dv/v6/psqlodbc/etc/odbc.inifile and update it with the correct username, password, and database. The database name is the VDB name.ODBC is enabled in JBoss Data Virtualization on port35432by default.
10.3. Install the ODBC Driver on Microsoft Windows
10.3.1. Install the ODBC Driver on Microsoft Windows
Prerequisites
- Administrative permissions are required.
Procedure 10.2. Install the ODBC Driver on Microsoft Windows
- Download the correct ODBC driver package (
jboss-dv-psqlodbc-[version]-X.zip) from https://access.redhat.com/jbossnetwork/. - Unzip the installation package.
- Double-click the
jboss-dv-psqlodbc-[version]-X.msifile to start the installer. - The installer wizard is displayed. Click .
- The End-User License Agreement will be displayed. Click the if you accept the licensing terms and then click .
- If you want to install in a different directory other than the default directory shown, click the button and select a directory. Click .
- You are presented with a confirmation screen. Review the choices you have made and, when you are happy, Click to begin installation.
- When it has finished, a screen will appear to inform you the installation process has ended. Click to exit the wizard.
Note
10.3.2. Configure the DSN for Windows Installation
Procedure 10.3. Configure the DSN for Windows Installation
- Set the ODBC driver basic options.
- Set the ODBC driver datasource options.
- Set the ODBC driver global options.
10.4. Install the ODBC Driver on Solaris
10.4.1. Install the ODBC Driver on Solaris
Prerequisites
- Administrative permissions are required.
Procedure 10.4. Install the ODBC Driver on Solaris
Download the driver
Download the correct ODBC driver package (jboss-dv-psqlodbc-6.0.0-X.zip) from https://access.redhat.com/jbossnetwork/.Unzip the installation package
Unzip the installation package to/optdirectory.Set the PATH Property
Set PATH property so that the ODBC binaries are used from the directory where you have unzipped the driver.$ export PATH = $PATH:/opt/redhat/jboss-dv/v6/psqlodbc/binSet environmental variable
Set ODBCINI environmental variable to existing odbc.ini.$ export ODBCINI=/opt/redhat/jboss-dv/v6/psqlodbc/etc/odbc.iniNote
If you are using the Bourne Shell as your Solaris terminal, you can add the two export commands above to your ~/.profile file, you will not need to run them every time. Likewise, if you are using Bash, save them in your ~/.bash_profile file instead.
10.4.2. Configure the DSN for Solaris Installation
- Edit the
/opt/redhat/jboss-dv/v6/psqlodbc/etc/odbc.inifile and update it with the correct username, password, and database. The database name is the VDB name.ODBC is enabled in JBoss Data Virtualization on port35432by default.
10.5. ODBC Setup
10.5.1. Configure ODBC Options on Microsoft Windows
Prerequisites
- You must have logged into the workstation with administrative rights.
- You need to have used the Control Panel’s Data Sources (ODBC) applet to add a new data source name.Each data source name you configure can only access one VDB within a Teiid System. To make more than one VDB available, you need to configure more than one data source name.
Procedure 10.5. Configure the Data Source Name (DSN) on Microsoft Windows
- From the menu, select - .
- The Control Panel displays. Double-click Administrative Tools.
- Double-click Data Sources (ODBC).
- The ODBC Data Source Administrator applet displays. Click the tab associated with the type of DSN you want to add.
- The Create New Data Source dialog box displays. In the Select a driver for which you want to set up a data source table, select .
- Click .
- In the Data Source Name edit box, type the name you want to assign to this data source.
- In the Database edit box, type the name of the virtual database you want to access through this data source.
- In the Server edit box, type the host name or IP address of your Teiid runtime.
Note
If you are connecting via a firewall or NAT address, you must enter either the firewall address or the NAT address. - In the Port edit box, type the port number to which the system listens for ODBC requests. (By default, Red Hat JBoss Data Virtualization listens for ODBC requests on port 35432.)
- In the User Name and Password edit boxes, supply the user name and password for the Teiid runtime access.
- Leave SSL Mode to disabled. (SSL connections are unsupported at present.)
- Provide any description about the data source in the Description field.
- Click on the button and configure the options. Tick Parse Statements, Recognize Unique Indexes, Maximum, Text as LongVarChar and Bool as Char and set MaxVarChar to 255, Max LongVarChar to 8190, Cache Size to 100 and SysTable Prefixes to dd_:.On the second page, click LF, Updatable Cursors, bytea as LO, default, 7.4+ and set the Extra Opts to 0x0.
- Click .You can optionally click to validate your connection if Red Hat JBoss Data Virtualization is running.
You can now use applications such as Excel, Access to query the data in the VDB
10.5.2. Configure ODBC Options on Red Hat Enterprise Linux
Procedure 10.6. Configure ODBC Options on Red Hat Enterprise Linux
- Run this command to install the driver manager:
yum install unixODBC. - Run this command to verify that your PostGreSQLdriver has installed correctly:
odbcinst -q -d. - To create the DSN, open the configuration file in a text editor:
sudo vi /opt/redhat/odbc.iniNote
You must either use sudo or be logged in as root to open this file. - Add the following configuration settings to the file:
 [<DSN name>] Driver = /usr/lib/psqlodbc.so
 Description = PostgreSQL Data Source
 Servername = <Teiid Host name or ip>
 Port = 35432 Protocol = 7.4
 UserName = <user-name>
 Password = <password>
 Database = <vdb-name>
 ReadOnly = no
 ServerType = Postgres
 ConnSettings = UseServerSidePrepare=1
 ByteaAsLongVarBinary=1
 Optimizer=0
 Ksqo=0 Trace =
 No TraceFile = /var/log/trace.log
 Debug = No DebugFile = /var/log/debug.log
- Save the file and exit the text editor.
- Run this command to test the DSN:
isql <DSN-name> [<user-name> <password>] < commands.sql
Note
To connect without DSN, use this DSN-less connection string:ODBC;DRIVER={PostgreSQL};DATABASE=<vdb-name>;SERVER=<host-name>;PORT=<port>;Uid=<username>;Pwd=<password>
10.6. DSN Less Connection
ODBC;DRIVER={PostgreSQL Unicode};DATABASE=<vdb-name>;SERVER=<host-name>;PORT=<port>;Uid=<username>;Pwd=<password>ODBC;DRIVER={PostgreSQL};DATABASE=<vdb-name>;SERVER=<host-name>;PORT=<port>;Uid=<username>;Pwd=<password>Chapter 11. Automated Installation
11.1. Automated Installation
- You must have downloaded the relevant installer JAR file from https://access.redhat.com/jbossnetwork/
- You must have generated the script and saved it as an XML file during a previous installation using the installer (in graphical or text mode).
Procedure 11.1. Installing with a Script
java -jar jboss-PRODUCT-installer-VERSION.jar SCRIPT.xml
The product is successfully installed and configured as specified by the script.
Chapter 12. Running in Cloud Environments
12.1. Run Red Hat JBoss Data Virtualization in an Amazon AWS Cloud Instance
Procedure 12.1. Run Red Hat JBoss Data Virtualization in an Amazon AWS Cloud Instance
- Open ports by updating the security group. (At a minimum, you will need to open the TCP, HTTP and SSH ports.)
- To start the server, add the following parameters to bind the management and host ports
-Djboss.bind.address.management=0.0.0.0and-b 0.0.0.0 example ./standalone.sh -Djboss.bind.address.management=0.0.0.0 -b 0.0.0.0 - To access the AWS instance from Teiid Designer, go to the JBDS preferences and select General, Network Connections SSH2Next, under the Key Management tab, use Load Existing Key to add the key generated by Amazon.
- To create a server connection, on the Server Configuration Overview Panel, under Server Behavior, select Remote System Deployment. Also ensure you check Server is externally managed...Click the New Host button, select the SSH Only option and click Next.Set the Host Name to match the Amazon public IP address and make the connection name the same.Click Finish
- Open the Remote Systems tab.Right mouse click the new connection and click connect. Fill in the User ID. (You do not need to provide a password if your SSH key is configured.)
- Go back to the server configuration overview panel and confirm that the Host drop-down has selected the new host that you have created.
- Start the server. (This switches the state of the server you already started.)
12.2. Run Red Hat JBoss Data Virtualization in a Google Compute Instance
Procedure 12.2. Run Red Hat JBoss Data Virtualization in a Google Compute Instance
- Open the necessary ports: - - - - - .
- Upload your public SSH key:: - - - - - .
- Bind the management ports (jboss.bind.address.management) to an external interface. (The default value for management ports is
localhost.
Chapter 13. Running Red Hat JBoss Data Virtualization Cartridge on OpenShift
13.1. Cartridge Installation
- Create an OpenShift user account.
- Launch the OpenShift Web Console and go to the Applications page at https://openshift.redhat.com/app/console/applications
- Go to the Applications tab and select Add Application...
- Go to the xPaaS section and select the JBoss Data Virtualization cartridge.
- Enter the name of the application (for example, "jbossdv").
- If your account allows it, select a medium gear.
- Click the Create Application button.
- The Red hat JBoss Data Virtualization Cartridge will now deploy.
Important
Copy and save the username and password information somewhere secure for future use. - Click on Continue to the application overview page to see the Data Virtualization cartridge overview.Verify that the status is Started.
- If you click on the application link you will see the Data Virtualization Welcome page. This page contains cartridge information and some helpful links.
- After the cartridge has deployed, go to this address to check its status: http://[MYAPP]-[MYDOMAIN].rhcloud.comA user has been automatically generated with user, odata and rest roles.
- Access ModeShape at http://[MYAPP]-[MYDOMAIN].rhcloud.com/modeshape-webdav and http://[MYAPP]-[MYDOMAIN].rhcloud.com/modeshape-restTwo ModeShape users, msuser and msadmin, are generated with the installation.
- Access the Dashboard Builder at http://[MYAPP]-[MYDOMAIN].rhcloud.com/dashboardA dashboard administrator, dbadmin, is generated with the installation. (The Teiid 'user' is allowed dashboard read-only user access).
Important
13.2. Use the Data Virtualization Web Interface on OpenShift
Procedure 13.1. Install a Box Grinder plug-in
- Firstly, assign a MySQL database to your OpenShift Data Virtualization instance. Go to the overview page for your Data Virtualization application Click on the Add MySQL 5.5 link (found under the Databases section.)The MySQL cartridge will deploy. When complete, you will see a success screen
Important
Ensure that you save the credentials information for later reference. - Under Tools and Support, click on the Add phpMyAdmin 4.0 link. This adds the web interface for easy management of your MySQL database.The MySQL database and management interface deployments are now complete.
- Load some data into the database using the phpMyAdmin interface. Use the link that was displayed when you installed the phpMyAdmin cartridge at https://myApp-myDomain.rhcloud.com/phpmyadminUse the Root User and Root Password you received when the cartridge was installed.In the left tree panel, click on the database that matches the name of your DV application (for instance, jbossdv1). Select the SQL tab. On the SQL tab, copy this DDL and paste it into the text area:
CREATE TABLE PricesTable
(
  ProdCode    CHAR(40) NOT NULL,
  SalePrice   DECIMAL,
  PRIMARY KEY (ProdCode)
);

INSERT INTO PricesTable VALUES
('GC1020', 3499.0),
('GC1040', 19990.0),
('GC1060', 75000.0),
('GC3020', 10200.0),
('GC3040', 38000.0),
('GC3060', 95000.0),
('GC5020', 28000.0),
('GC5040', 59900.0),
('GC5060', 110000.0),
('IN7020', 4000.0),
('IN7040', 16000.0),
('IN7060', 42000.0),
('IN7080', 69000.0),
('SL9020', 4999.0),
('SL9040', 9999.0),
('SL9060', 14999.0),
('SL9080', 19999.0);
Finally, click the button on the far right of the management interface.The PricesTable table has now been created and populated. You can verify the contents by clicking on it. - Restart the Data Virtualization cartridge. This is required to initialize the MySQL datasource. Click the Restart application icon on the application overview page
- Go to http://www.developerforce.com/events/regular/registration.php?d=70130000000EjHb , to register for a Salesforce account. (You will receive an email with a link to login into your account.)
- Log in to Salesforce interface with your user name an dpassword, then go to Personal Setup - Reset My Security Token. Reset the security token. You will get another email with the security token.
- When you establish connectivity to the Salesforce instance in the example below, use the Salesforce username. (The password is the combination of Salesforce password and security token.)
- go to the deployed Web interface on OpenShift at http://APP-NAME-DOMAIN-NAME.rhcloud.com/dv-ui. (APP-NAME is the name you gave the application and DOMAIN-NAME is your OpenShift domain name).
- From the Data Library screen, click the Create Data Services link. You will be directed to the Create Data Service page.
- Click on the button. You will be directed to the Manage Data Sources page
- Click on the MySQLDS source: it is configured, but inactive. Select the mysql5 translator for the source and click the button. Upon deployment, the source should become active (a green check mark will appear).
- Click the Add Source button. This will create a default H2 source called MyNewSource.
- Click on MyNewSource.In the displayed properties, enter SalesforceDS for the Name, Under Source Type, click on the salesforce button. Click the Ok button as this will change the source to salesforce type and set the translator to salesforce. Under Connection Properties, enter the user name for your salesforce account. Enter the password and token combination for the password.
- Click on the Save Changes button. Click Ok for each dialog box. The salesforce source will deploy (it will take a couple of minutes to finish).
- Click the back link to go back to the Create Data Service page
- The next phase is to carete a data service which accesses the MySQL database table. Enter MySQLService for the service name. Enter a description for the service.
- Click on MySQLDS on the Service Helpers Active Sources tab.
- Click on the dv61.PricesTable under Tables, then select both columns via the checkboxes.
- To create the Service View Definition, click the Create Service View button. This will populate the Service View Definition text area.
- Click the Test Service button to test the service.
- Click Create Data Service. This will accept your entries and create the service. You will be redirected to the Data Service Details page.
- The steps to create a salesforce-only service follow the same pattern. Go back to the Data Library then click the Create Data Service button to create a new service.
- Enter SalesforceProductService for the service name. Enter a description for the service.
- Click on SalesforceDS on the Service Helpers Active Sources tab
- Click on Product2 under Tables, then select the Name and ProductCode columns via the checkboxes.
- To create the Service view definition, click the Create Service View button. This will populate the Service View Definition text area.
- Test the service as before to see sample data, the click Create Service to create the service.
- The steps to create a mashup service once more follow the same pattern. Go back to the Data Library then click the Create Data Service button to create a new service.
- Enter MashupService for the service name. Enter a description for the service.
- In the Service Helpers section, click on the Join Definition tab. (It is here that you define the join.)
- Select MySQLDS in the Available Sources drop-down. Under Source Tables, click the PricesTable. Then click the left-hand button to specify it as the Left table.
- Select SalesforceDS in the Available Sources drop-down. Under Source Tables, click the Product2 table. Then click the right-hand button to specify it as the Right table.
- In the left-hand side Prices table, check the ProdCode and SalePrice columns. In the right-hand side Product2 table, check the Name column.
- Leave the JoinType selection on Inner Join.
- Select ProdCode for the left-hand side Join Criteria column.
- Select ProductCode for the right-hand side Join Criteria column.
- Click the Apply button to generate the Service Definition DDL.
- Click the Test Service button to see example data.
- Click the Create Service button to create the Mashup service. You will be redirected to the Data Service Details page. The Data Service Details page shows a sample of data and also provides connection instructions and URLs for the different connection options.
- Click the Back to Library link to go back to your Data Library. On the Data Library page you will see the three services that you just created.
Note
Notice that for each service, there are more actions available to you:- Edit Service - redirects to the Edit Data Service page.
- Duplicate Service - makes a copy of the selected service.
- Test Service - redirects to the Data Service Details page.
- Delete Service - delete the selected service.
- Save to File - A service is backed by a teiid 'Dynamic VDB'. This action saves the dynamic VDB xml to a file.
Appendix A. Installing Prerequisite Components
A.1. Install Open JDK on Red Hat Enterprise Linux
Procedure A.1. Install Open JDK on Red Hat Enterprise Linux
Subscribe to the Base Channel
Obtain the OpenJDK from the RHN base channel. (Your installation of Red Hat Enterprise Linux is subscribed to this channel by default.)Install the Package
Use the yum utility to install OpenJDK:yum install java-1.7.0-openjdk-develVerify that OpenJDK is Now Your System Default
You can ensure the correct JDK is set as the system default by following the steps below.- As root, run the alternatives command for
java:/usr/sbin/alternatives --config java
- Select
/usr/lib/jvm/jre-1.7.0-openjdk/bin/java. - Then do the same for
javac:/usr/sbin/alternatives --config javac
- Select
/usr/lib/jvm/java-1.7.0-openjdk/bin/javac.
Appendix B. Configuration Information
B.1. Supported Data Sources and Translators
Table B.1. Supported Data Sources and Translators
| Data Source | Translator | Supported DV Version | Driver |
|---|---|---|---|
|
Apache Hive 12
|
-
|
6.0+
|
-
|
|
Apache Solr
|
solr
|
6.1+
|
-
|
|
Cloudera Hadoop
|
-
|
6.1+
|
-
|
|
EDS 5.x
|
teiid
|
6.0+
|
-
|
|
Files – delimited, fixed length
|
file
|
6.0+
|
-
|
|
Generic Datasource-JDBC ansi
|
jdbc-ansi
|
6.0+
|
-
|
|
Generic Datasource-JDBC simple
|
jdbc-simple
|
6.0+
|
-
|
|
Google Spreadsheet
|
-
|
6.0+
|
-
|
|
Greenplum 4.x
|
postgresql
|
6.0+
|
-
|
|
Hortonworks Hadoop
|
-
|
6.1.+
|
-
|
|
HSQL (for test/examples only)
|
-
|
-
|
-
|
|
IBM DB2 10
|
db2
|
6.1+
|
Universal Driver v4.x
|
|
IBM DB2 9.7
|
db2
|
6.0+
|
Universal Driver v4.x
|
|
Ingres 10
|
ingres
|
6.0+
|
-
|
|
Intel Hadoop
|
-
|
6.1+
|
-
|
|
JBoss Data Grid 6.4 (remote client - hotrod)
|
infinispan-cache-dsl
|
6.2+
|
-
|
|
JBoss Data Grid 6.4 (library mode)
|
infinispan-cache
|
6.0 - post GA, 6.1+
|
-
|
|
LDAP/ActiveDirectory v3
|
ldap
|
6.0+
|
-
|
|
Mainframe (CICS,IMS,VSAM)
|
-
|
6.0+
|
-
|
|
MariaDB
|
mysql5
|
6.1+
|
-
|
|
ModeShape/JCR 3.1
|
-
|
6.0+
|
-
|
|
MongoDB 2.2
|
mongodb
|
6.0
|
post GA, 6.1+ -
|
|
MS Access 2010
|
-
|
6.0+
|
-
|
|
MS Access 2013
|
-
|
6.0+
|
-
|
|
MS Excel 2010
|
excel
|
6.0+
|
-
|
|
MS Excel 2013
|
excel
|
6.0+
|
-
|
|
MS SQL Server 2008
|
sqlserver
|
6.0+
|
Microsoft SQL Server JDBC Driver 4
|
|
MS SQL Server 2012
|
sqlserver
|
6.0+
|
Microsoft SQL Server JDBC Driver 4
|
|
MySQL 5.1
|
mysql5
|
6.0+
|
V5.1
|
|
MySQL 5.5
|
mysql5
|
6.0+
|
V5.5
|
|
Netezza 6.0.2
|
netezza
|
6.0+
|
-
|
|
Oracle 10g R2
|
oracle
|
6.0+
|
Oracle JDBC Driver v10
|
|
Oracle 11g RAC
|
oracle
|
6.0+
|
Oracle JDBC Driver v11
|
|
Oracle 12c
|
oracle
|
6.0 - post GA, 6.1+
|
Oracle JDBC Driver v12
|
|
PostgreSQL 8.4
|
postgresql
|
6.0+
|
-
|
|
PostgreSQL 9.2
|
postgresql
|
6.0+
|
-
|
|
REST/JSON over HTTP
|
ws
|
-
|
-
|
|
RHEL 5.5/6 PostgreSQL config
|
-
|
6.0+
|
-
|
|
Salesforce.com API 22
|
salesforce
|
6.0+
|
-
|
|
SAP Netweaver Gateway (OData)
|
sap-nw-gateway
|
6.1+
|
-
|
|
Support SAP Service Registry as a Data Source
|
-
|
6.2+
|
-
|
|
Sybase ASE 15
|
sybase
|
6.0+
|
jConnect JDBC3.0 v7
|
|
Teradata Express 12
|
teradata
|
6.0+
|
-
|
|
Webservices
|
ws
|
6.0+
|
-
|
|
XML Files
|
FILE
|
6.0+
|
-
|
Note
Appendix C. Revision History
| Revision History | |||
|---|---|---|---|
| Revision 6.2.0-033 | Thu Dec 10 2015 | ||
| |||