
Installation Guide
For Red Hat JBoss Administrators
Abstract
Chapter 1. Introduction
1.1. About Red Hat JBoss BPM Suite
1.2. Supported Platforms
- Red Hat JBoss Enterprise Application Platform 6.4
- Red Hat JBoss Web Server 2.1 (Tomcat 7) on JDK 1.7
- IBM WebSphere Application Server 8.5.5.0
- Oracle WebLogic Server 12.1.3 (12c)
1.3. Use Case: Process-based solutions in the loan industry

Figure 1.1. High-level loan application process flow
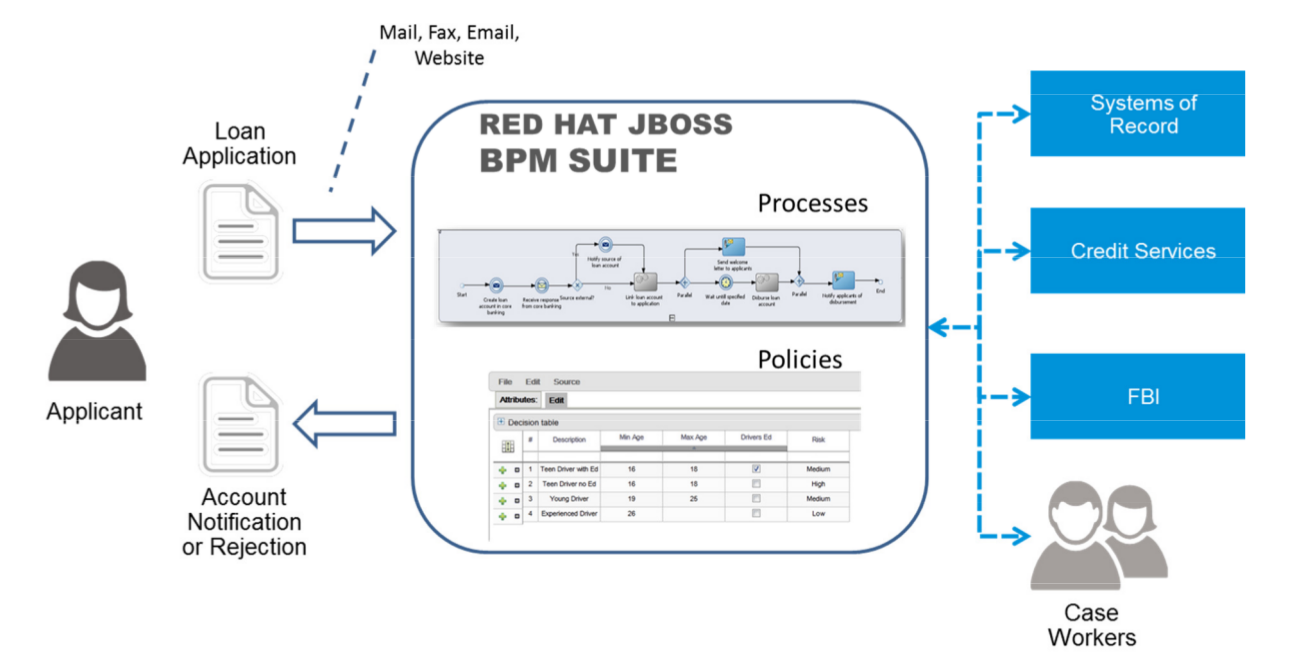
Figure 1.2. Loan Application Process Automation
Part I. Red Hat JBoss BPM Suite installation
Chapter 2. Installation options
- Executable jar installer for installation on Red Hat JBoss Enterprise Application Platform (EAP) 6.4.
- Zip file install which itself comes in two versions:
jboss-bpmsuite-6.MINOR_VERSION-deployable-eap6.x.zip: version adapted for deployment on Red Hat JBoss Enterprise Application Platform (EAP 6.4).jboss-bpmsuite-6.MINOR_VERSION-deployable-generic.zip: the deployable version with additional libraries adapted for deployment on Red Hat JBoss Web Server (EWS), Apache Tomcat 6, and Apache Tomcat 7.
Note
"-Dfile.encoding=UTF-8".
Important
Warning
org.kie.tx.lock.enabled to false in order to prevent unresponsiveness or deadlock issues. You can either start your server with the option -Dorg.kie.tx.lock.enabled=false or edit the standalone.xml file:
<system-properties>
	<property name="org.kie.tx.lock.enabled" value="false"/>
	...
</system-properties>
2.1. The Red Hat JBoss BPM Suite Installer installation
Note
2.1.1. Downloading Red Hat JBoss BPM Suite for JBoss EAP
- Go to the Red Hat Customer Portal and log in.
- Click → .
- In the Product Downloads page that opens, click Red Hat JBoss BPM Suite.
- From the Version drop-down menu, select version 6.1.
- Select Red Hat JBoss BPM Suite 6.1 Deployable for EAP 6.4 and then click Download.
2.1.2. Installing Red Hat JBoss BPM Suite Using the Installer
Note
non-root user.
Before attempting to install JBoss BPM Suite, ensure you have already installed Red Hat JBoss EAP 6.4 or better.
Setup Location and Users
Navigate to the folder where you downloaded the installer file in a command prompt and execute the following command.java -jar jboss-bpmsuite-6.1.0.GA-installer.jarNote
When running the installer on Windows, you may be prompted to provide administrator credentials during the installation. To prevent this, add theizpack.mode=privilegedoption to the installation command:java -Dizpack.mode=privileged -jar jboss-bpmsuite-6.1.0.GA-installer.jar- The graphical installer will execute and display a splash screen and a license agreement page. Accept the license to proceed.
- In the next screen, provide the parent location of an existing JBoss EAP where JBoss BPM Suite must be installed. The screenshot below depicts an example directory path:
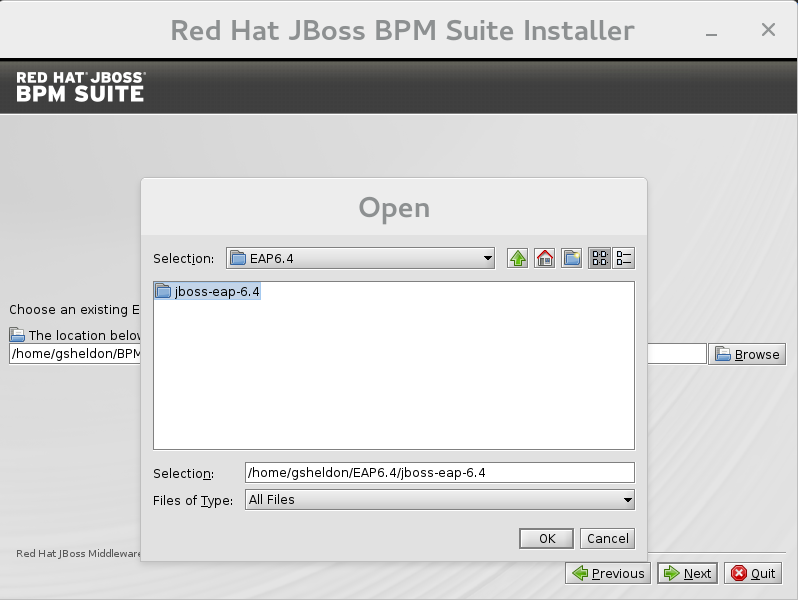
Figure 2.1. Red Hat JBoss BPM Suite for JBoss EAP Directory Path
- In the next two screens, create two users: the first one for the management console of the EAP (ManagementRealm) and the second one for managing JBoss BPM Suite itself (ApplicationRealm).Creation of the first user for the management console of JBoss EAP is optional and you may skip it if it is not required.Make a note of these usernames and passwords as you will need them to access the JBoss EAP server (if you do decide to create it) and the JBoss BPM Suite application respectively.Unless advanced configuration is performed, the JBoss BPM Suite user password will be used as the default password for both client and server JMS SSL keystores, as well as password vault keystores.
Note
The username that you create should not be the same as any of the pre-defined roles (See Section 4.1, “Defining Roles”).The passwords that you create must have at least 8 characters and must contain at least one number and one non-alphanumeric character (not including the character &).Note
The application role assigned to the second user that you create is theadminrole. You can assign additional roles to this user at this stage. Setup Security Environment
Next, you will setup the security environment of your new JBoss BPM Suite install. Decide to enable or disable the Java Security Manager in this step by clicking on the check box. The Java Security Manager makes your system more secure but may downgrade performance. You need to make a decision based on your environment.- Choose whether you want to setup pure IPv6 configuration on the server that the installation is taking place. This will allow you to setup runtime IPv6 specific configurations later.
Configure Runtime Environment
This step provides the option of using a default configuration or specifying an advanced configuration.Default Configuration
Choose default configuration for the runtime environment in the next step and click to review the installation details. If you are happy with the details, click to start the actual installation or click to go back and make changes.Advanced Configuration
Choose to enable advanced configuration options. Select "Perform advanced configuration" and choose the advanced configuration options you want to enable for your environment via the check boxes.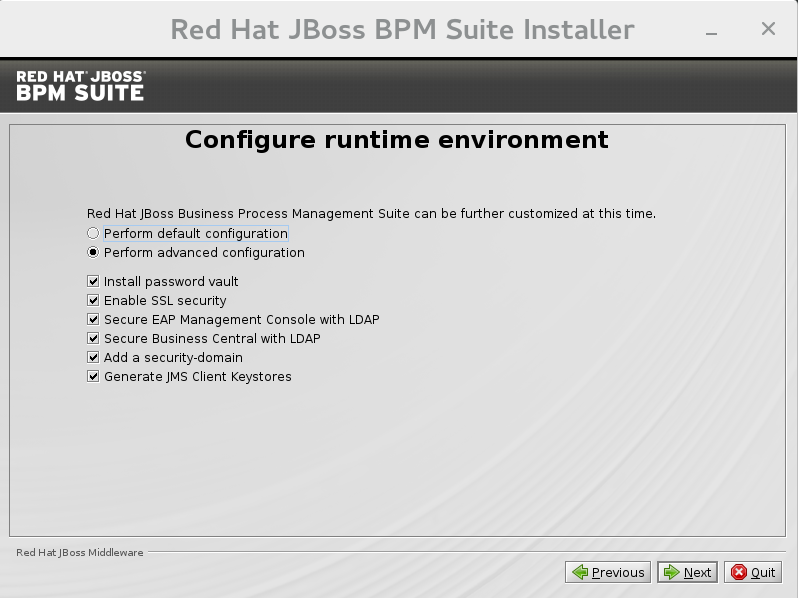
Figure 2.2. Advanced Configuration Options
Configure Vault Password
Vault passwords are used to obfuscate passwords in the various server descriptors using a java secret key generated during the installation process, or manually using the keytool. This prevents passwords from being stored as plain text in the descriptors. Theiteration countandsaltare both parameters to the encryption process.In the case of JBoss BPM Suite, a vault is always installed, even if the user does not choose to install one with their own parameters. When this occurs, default values will be used.For more information about vault passwords, see the Red Hat JBoss EAP Security Guide.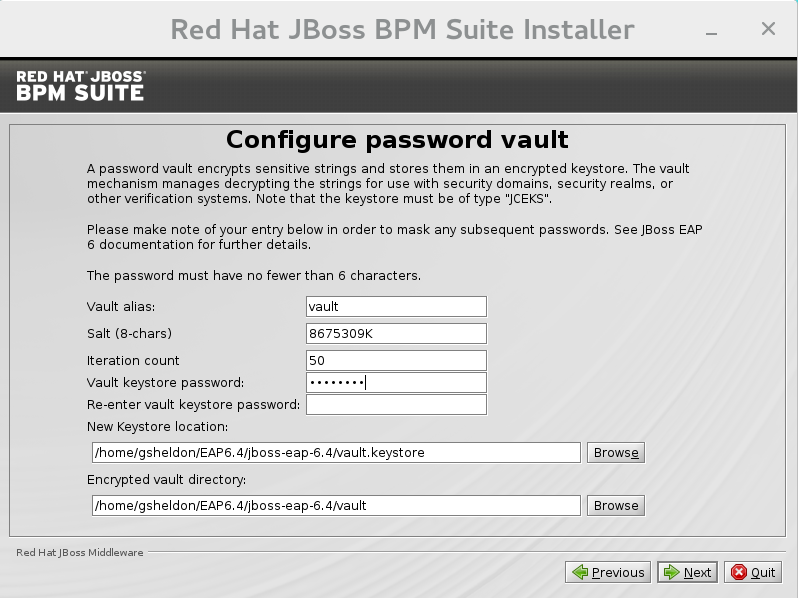
Figure 2.3. Configure vault password
SSL Security
This screen allows you to add the<ssl>and<truststore>elements to the ManagementRealm security-realm using the provided keystore.The end result is an encrypted connection that is secure between the client and the server for the ManagementRealm.- The
<ssl>element causes the server to present the certificate within the keystore as its identity, which allows the user to apply their official certificate. - The
<truststore>element enables "Client-Cert" authentication. This means that, if a remote client attempts to connect to any resource managed by the ManagementRealm, the client can present a certificate, and if an entry in the truststore matches, will be authenticated without needing to provide a username / password.
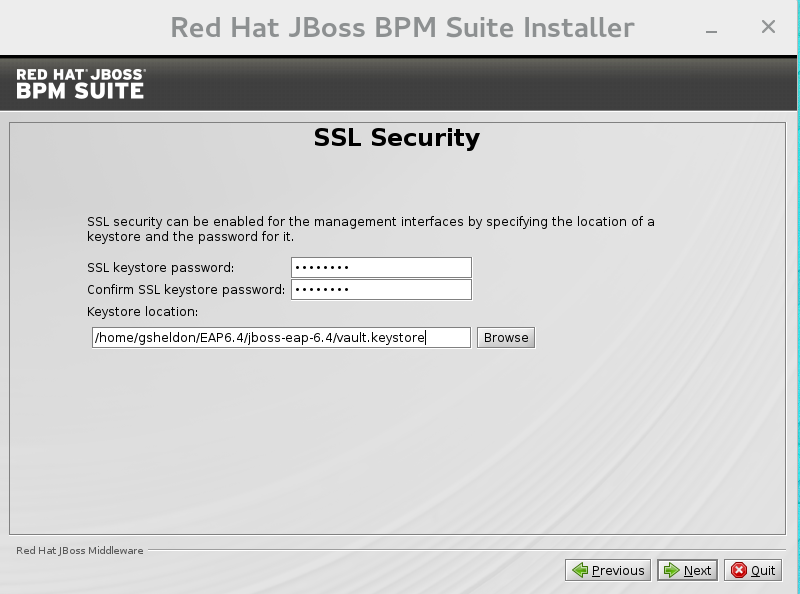
Figure 2.4. SSL Security Configuration
LDAP Security
This step in the installer allows the user to define an LDAP server, which in turn defines users which should be allowed to authenticate with the ManagementRealm. This replaces the default configuration.The screen allows users to define how to connect to the LDAP server.- The Distinguished Name(DN): the user that can connect to the LDAP server. Typically the DN will uniquely define a special user for this purpose.
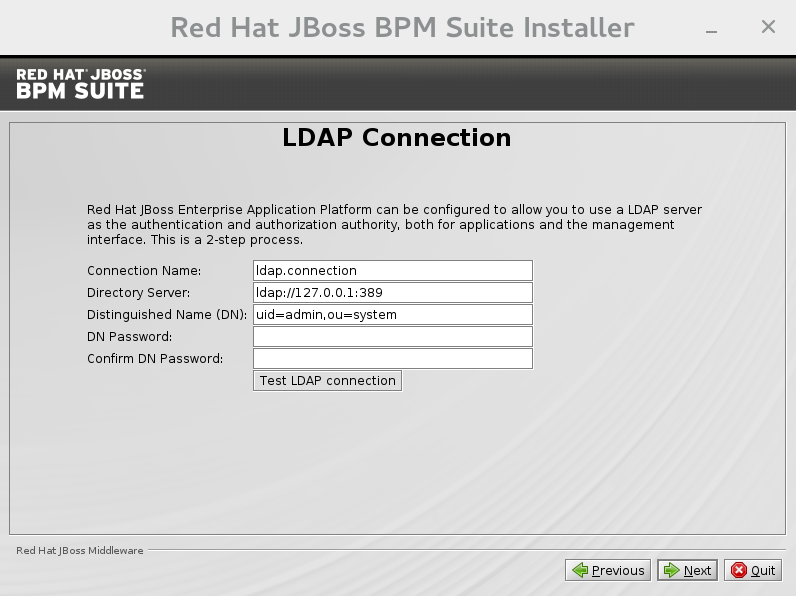
Figure 2.5. LDAP Connection Configuration
LDAP Security (Management Console)
The screen allows you to set up a security realm. This defines the<security-realm>element to be added to the descriptors, and utilizes the connection defined previously.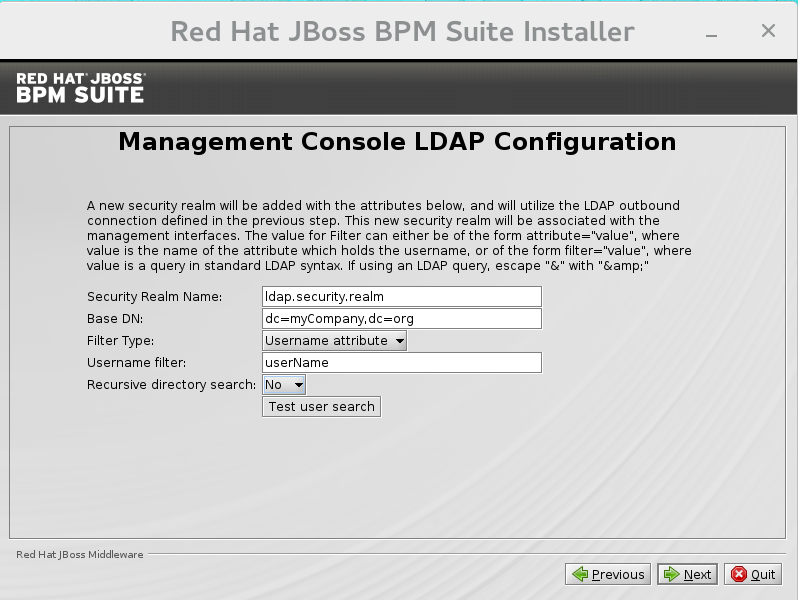
Figure 2.6. Management Console LDAP Configuration
- Base DN: Will typically define a 'base search' or 'root context' to begin searching for users.
- Filter type: Tells JBoss EAP how to find the LDAP attribute that defines a user; it is can be a simple attribute, but can also be a complex "LDAP Filter".
- Username attribute: The LDAP attribute which holds the username values. A username entered in this field is used for search queries as a value of the 'uid' attribute. If a user chooses 'LDAP syntax query' as a filter type, this query must be specified in this field.
- Recursive directory search: If enabled, JBoss EAP will traverse the LDAP tree recursively, starting at Base DN. Otherwise, the search will be limited to Base DN.
LDAP Security (Business Central)
Most of the following fields are similar to the Base DN. Contexts are used to search for roles, which allows it to perform authorization in addition to authentication. Otherwise, thecontextfields are analogous to the Base DN from the previous, andattributefields are analogous to Username attribute. The filters allow fine grained control over which values of the given attribute will be accepted.In JBoss BPM Suite, thejbpm.usergroup.callback.propertiesandjbpm.user.info.propertiesfiles used byLDAPUserGroupInfoandLDAPUserInfocomponents of Task Service, are also filled by values entered on the Business Central LDAP Configuration page.Input values from Business Central LDAP Configuration page are used to configure a new security domain, which make use ofLdapExtendedlogin module. This security domain is set as default for Business Central web application. For more information about security domains and login modules, see the Red Hat JBoss EAP Security Guide.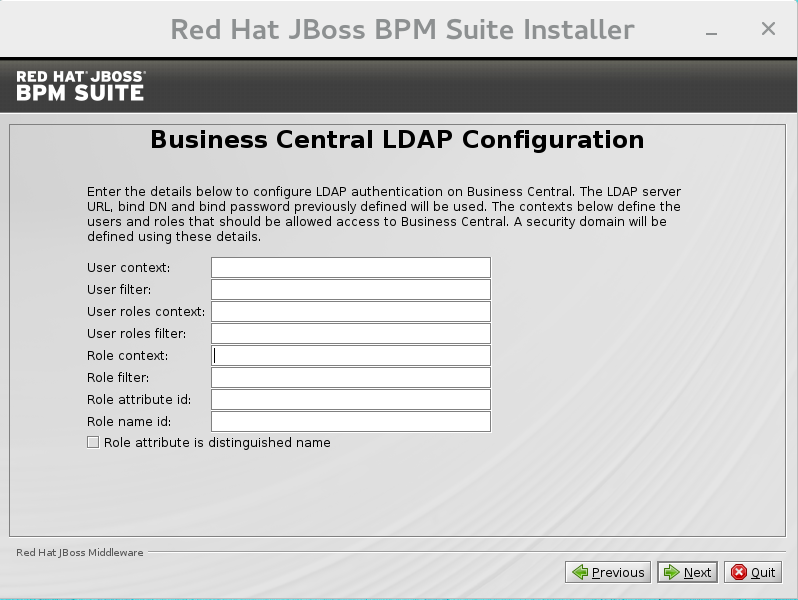
Figure 2.7. Business Central LDAP Configuration
Security Domain and JSSE
The Security Domain screen allows you to configure all of the elements of the<security-domain>security subsystem for managing security information, including JSSE configuration. For more detailed information about configuring security domains, see the Red Hat JBoss EAP Security Guide.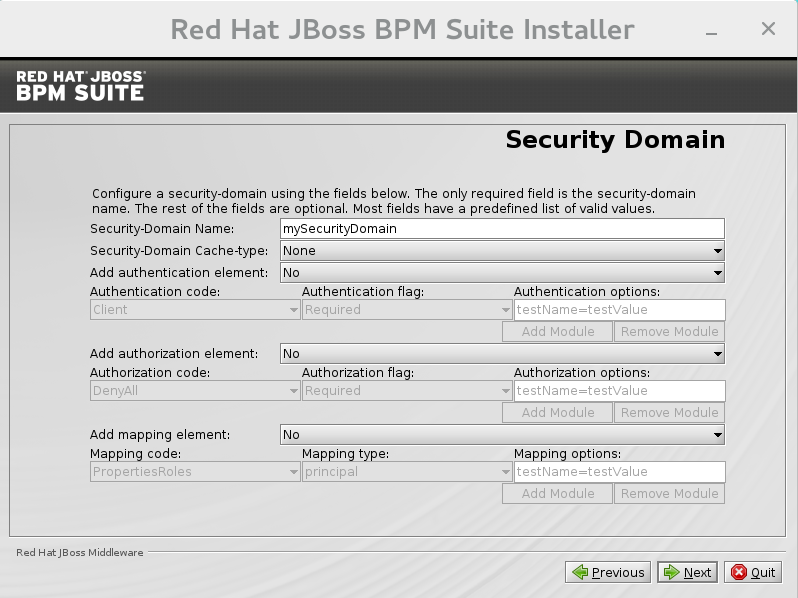
Figure 2.8. Security Domain
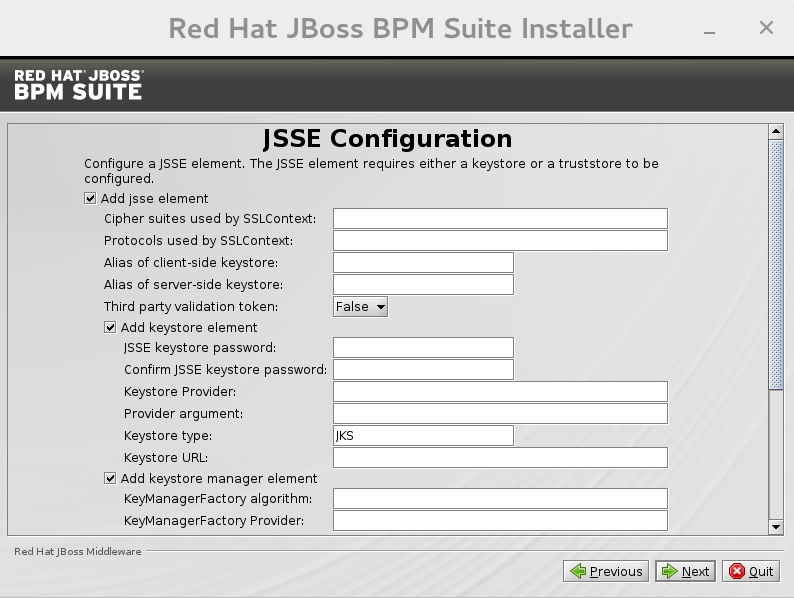
Figure 2.9. JSSE Configuration
Configure JMS SSL Keystores
This screen allows the encryption of JMS messages sent to Business Central. The client keystores are distributed to systems that need to communicate with the server in order to facilitate encrypted communications. Users can use their pre-existing keystores or generate new ones.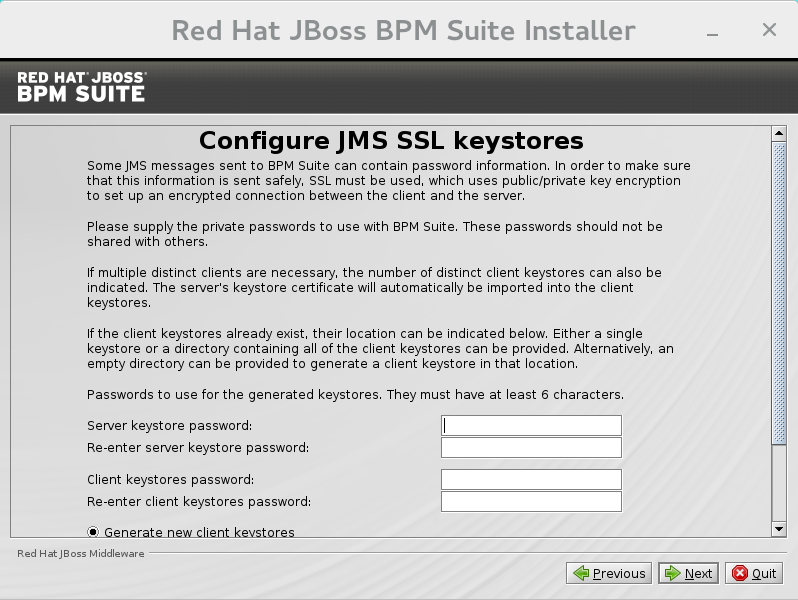
Figure 2.10. Configure JMS SSL Keystores
- The installer will go through the steps to install JBoss BPM Suite and will perform post installation configuration steps when you click . The installer will also start the JBoss BPM Suite server and connect to it to validate the installation. Click to get to the last screen where you can generate the installation script and properties file. Click to quit the installer.
2.1.3. Installing Red Hat JBoss BPM Suite using the Installer in CLI Mode
Before attempting to install JBoss BPM Suite, ensure you have already installed Red Hat JBoss EAP 6.4 or better.
- Navigate to the folder where you downloaded the installer file in a command prompt and execute the following command.
java -jar jboss-bpmsuite-6.1.0.GA-installer.jar -console
- The command-line interactive process will start and display the End-User license agreement. You will be prompted to select an option at the end of this license:
press 1 to continue, 2 to quit, 3 to redisplay.
- Enter 1 to begin the installation and type in the parent directory of an existing EAP installation.
The location below must specify the JBOSS_HOME of an existing EAP installation.

[/home/user/BPMSuite-6.1.0/jboss-eap-6.4]
The installer will verify the location of the JBoss EAP installation at the provided location. Enter 1 to confirm and continue. - Optional: Create a user for the management console of JBoss EAP (Management Realm):
Create an administrative user
This user will be added to the host container's management realm for administrative purposes. It can be used to access the management console, the management CLI or other applications secured in this realm.
Enter 0 to skip creating a new administrative user or 1 to create one. If you do decide to create one, then follow these steps:- Enter a username:
Admin username: [admin]
- Create and confirm a password for the user of the EAP management console:
The password must have at least 8 characters, and contain at least one number and one non-alphanumeric symbol (not including the character &).

Admin password: []

Confirm admin password: [******************************]
After this user has been created successfully, continue to the next step.
- Create a JBoss BPM Suite admin user
Create a Business Process Management Suite Admin User
Create a BPM Suite admin user. The user will be added to the ApplicationRealm, and can be used to access the Business Central Console. The User will be assigned the 'admin' application roles. The BPM Suite username cannot be any of the following: 'admin', 'analyst', 'user', 'manager' or 'developer'.


BPM Suite username: [bpmsAdmin]
- Enter a username for this user and then create and confirm a password.
The password must have at least 8 characters, and contain at least one number and one non-alphanumeric symbol (not including the character &).

BPM Suite password: []

Confirm BPM Suite password: [****************]
- After the passwords have been entered and confirmed, you will be given an optional step to define other roles for this user (besides the
adminrole). Enter these roles in a comma separated list or just press enter to skip this part.(Optional) You can add this user to additional roles that will be used for task management. These roles are custom named and used again when building your processes with human tasks. Add your custom named roles in a comma separated list below. Additional user roles: []
- Configure the Java Security Manager by either pressing 1 to select it or 0 to deselect it.
Configure the Java Security Manager
A Java security manager offers JVM level security beyond what is provided by the application container. It enforces access rules at the JVM runtime based on one or more security policies.

This installer will place two security policies in the installation directory with the filenames 'security.policy' and 'kie.policy' regardless of choice. Those policies will be enabled at runtime if the option below is selected.

Please note that a security manager imposes a significant performance overhead when enabled. It is suggested the included policies be applied in production if user requirements call for a stronger measure than what is already provided by the application container's authentication and authorization mechanism.

Please see the JBoss Business Process Management Suite administrative documentation for further details and consideration.
  [ ] Enable the Java security manager
Input 1 to select, 0 to deselect:
- After the Java Security Manager choice, choose an option from the prompt below:
press 1 to continue, 2 to quit, 3 to redisplay.
- Specify whether or not you are using IPv6.
IPv6 configuration

If this computer is using a pure IPv6 configuration, please check the box below. A pure IPv6 setup requires additional configuration at runtime to ensure the proper bindings of the management and http interfaces.
  [ ] Enable pure IPv6 configuration
Input 1 to select, 0 to deselect:
After selecting or deselecting IPv6 configuration, select one of the following options:press 1 to continue, 2 to quit, 3 to redisplay.
- Configure the runtime environment by either choosing the default configuration or advanced options.
Configure runtime environment
Red Hat JBoss Business Process Management Suite can be further customized at this time.
0  [x] Perform default configuration
1  [ ] Perform advanced configuration
If you select 1, "Perform advanced configuration," complete the following configurations:[ ] Install password vault Input 1 to select, 0 to deselect:
  [ ] Enable SSL security
Input 1 to select, 0 to deselect:
  [ ] Secure EAP Management Console with LDAP
Input 1 to select, 0 to deselect:
  [ ] Secure Business Central with LDAP
Input 1 to select, 0 to deselect:
  [ ] Add a security-domain
Input 1 to select, 0 to deselect:
  [ ] Generate JMS Client Keystores
Input 1 to select, 0 to deselect:
- Next, choose an option from the prompt below:
press 1 to continue, 2 to quit, 3 to redisplay.
- The .jar file will begin to upack and configure.
- After a successful installation, the command-line will ask you if you would like to generate an automatic installation script and properties file.
Installation has completed successfully.
Application installed on /home/user/BPMSuite-6.1.0/jboss-eap-6.4
Would you like to generate an automatic intallation script and properties file?
(y/n) [n]:
- If you select [ y ], provide a path for the automatic installation script:
Select path for the automatic installation script: [/home/user/BPMSuite-6.1.0/jboss-eap-6.4/<auto script filename>]
This generated script will allow the user to run the installer in the following way for future installations:java -jar jboss-bpmsuite-6.1.0.GA-installer.jar <auto script filename>
Note
Running the installer in this way will result in an installation identical to the installation from which the auto script was generated. Note that sensitive values, such as passwords, will need to be provided from an external file or provided at auto installation time. The optional argument below allows the user to provide these values automatically:-variablefile <variable filename>
Sensitive values can also be provided using the following argument:-variables key1=value1,key2=value2
- The command-line will provide the following message upon a successful auto script creation and/or console installation:
XML written successfully.
[ Console installation done ]
[BPMS_Installer]$
- Start JBoss EAP by running
standalone.shin thejboss-eap-6.4/bindirectory../standalone.sh
- Navigate to http://localhost:8080/business-central in a web browser.
- Login with the correct username/password as given to the JBoss BPM Suite user in the "Create and confirm a password for the JBoss BPM Suite user" step.
2.1.4. Installing Red Hat JBoss BPM Suite in the Domain Mode
- Download and extract the Red Hat JBoss BPM Suite 6.1.0 Deployable for EAP 6 ZIP file from Red Hat Customer Portal and copy the following directories into your local installation of EAP 6.4:
bindomain
Skip thestandalonedirectory. - On the command line, move to the
/domaindirectory and start the domain:In a Unix environment, run:./domain.sh
In a Windows environment, run:./domain.bat
- Deploy the archive either via
${jboss-eap-home}/bin/jboss-cli.sh / ${jboss-eap-home}/bin/jboss-cli.bat, or via management web UI (localhost:9990/):Note
The web applications business-central.war and dashbuilder.war supplied in the EAP deployable binaries are directories, but for deployment into the domain, you have to use WAR archives. To create them, simply zip the content of the business-central.war and the dashbuilder.war directories.- To deploy the archive via
${jboss-eap-home}/bin/jboss-cli.shor${jboss-eap-home}/bin/jboss-cli.bat, move into the${jboss-eap-home}/bin directoryand deploy the WAR file:In a Unix environment, run:./jboss-cli.sh
In a Windows environment, run:./jboss-cli.bat
- To deploy the archive via management web UI (localhost:9990/):
- log in using your EAP management account
- select -> -> ->
- select the web archive from the file system, upload the web archive
- select the deployment, click the button
- select the server group
Note
Installing Multiple JBoss BPM Suite Server Instances
org.uberfire.nio.git.dirorg.uberfire.metadata.index.dirorg.uberfire.nio.git.ssh.cert.dir
org.uberfire.nio.git.daemon.host- can be left on default to bind to localhost.org.uberfire.nio.git.daemon.portorg.uberfire.nio.git.ssh.host- can be left on default to bind to localhost.org.uberfire.nio.git.ssh.port
Note
org.uberfire.nio.git.daemon.port and the org.uberfire.nio.git.ssh.port require different port values in order to avoid port conflicts.
$EAP_HOME/domain/configuration/host.xml file as illustrated in the two nodes below:
<system-properties>
    <property name="org.uberfire.nio.git.dir" value="/valid/path/.." boot-time="false"/>
    <property name="org.uberfire.metadata.index.dir" value="/valid/path/.." boot-time="false"/>
    <property name="org.uberfire.nio.git.ssh.cert.dir" value="/valid/path/.." boot-time="false"/>

    <property name="org.uberfire.nio.git.daemon.host" value="10.10.10.10" boot-time="false"/>
    <property name="org.uberfire.nio.git.daemon.port" value="9417" boot-time="false"/>
    <property name="org.uberfire.nio.git.ssh.host" value="10.10.10.10" boot-time="false"/>
    <property name="org.uberfire.nio.git.ssh.port" value="8002" boot-time="false"/>
</system-properties><system-properties>
<property name="org.uberfire.nio.git.dir" value="/valid/path/.." boot-time="false"/>
<property name="org.uberfire.metadata.index.dir" value="/valid/path/.." boot-time="false"/>
<property name="org.uberfire.nio.git.ssh.cert.dir" value="/valid/path/.." boot-time="false"/>
<property name="org.uberfire.nio.git.daemon.host" value="10.10.10.10" boot-time="false"/>
<property name="org.uberfire.nio.git.daemon.port" value="9418" boot-time="false"/>
<property name="org.uberfire.nio.git.ssh.host" value="10.10.10.10" boot-time="false"/>
<property name="org.uberfire.nio.git.ssh.port" value="8003" boot-time="false"/>
</system-properties>.index or .niogit files. These files, which should be used by a respective node, would then be grouped in a particular domain.
2.2. The Generic Deployable Bundle Installation
jboss-bpmsuite-VERSION-deployable-generic.zip: contains thebusiness-central.war,dashbuilder.warandkie-server.warweb applications.jboss-bpmsuite-VERSION-engine.zip: supported execution engine libraries for embeding the engine into your application and other libraries needed for generic deployment.
2.2.1. Downloading the Generic Deployable Package
- Go to the Red Hat Customer Portal and log in.
- Click on .
- From the list of products click on Red Hat JBoss BPM Suite.
- From the Version drop-down menu, select version 6.1 (if not already selected).
- In the Software Downloads section that comes up, navigate to the Red Hat JBoss BPM Suite 6.1 Deployable for All Supported Containers row and then click Download.
- Also navigate to the Red Hat JBoss BPM Suite 6.1 Engine files row and click Download to download the JBoss BPM Suite Engine files.
2.2.2. Installing the Generic Deployable Package
- Set up the database driver and the transaction manager (Bitronix) (refer to Section 2.2.2.1, “Setting up Transaction Manager for Red Hat JBoss Web Server 2.1 (Tomcat 7)”).
- Set up the Business Central application: set up users and roles and set up persistence (refer to Section 2.2.2.2, “Setting up Business Central for Red Hat JBoss Web Server 2.1 (Tomcat 7)”).
- Set up the Dashbuilder application: set up users and roles and set up persistence (refer to Section 2.2.2.3, “Setting up Dashbuilder for Red Hat JBoss Web Server 2.0 (Tomcat 7)”).
2.2.2.1. Setting up Transaction Manager for Red Hat JBoss Web Server 2.1 (Tomcat 7)
- Extract the generic deployable zip package you downloaded from Red Hat Customer Portal to a temporary location. This zip package contains the following three web application archives:
business-central.war,dashbuilder.warandkie-server.warin an exploded format. Rename these folders to remove the.warextension. - Copy these folders directly under the
$TOMCAT_DIR/webappsfolder.You should end up with three folders in an exploded format:$TOMCAT_DIR/webapps/business-central,$TOMCAT_DIR/webapps/dashbuilderand$TOMCAT_DIR/webapps/kie-server.Note
$TOMCAT_DIR stands for the home directory where your web server is located. Replace it with the actual path to your web server home directory, for example:/home/john/jboss-ews-2.1/tomcat7/ - Extract the contents of the JBoss BPM Suite Engine files archive to a temporary location from where you can copy the required libraries. This folder now contains all the core JBoss BPM Suite libraries under the extracted folder and a
libfolder. Install the transaction manager.
Warning
Please note that the following section describes the setup of a transaction manager, Bitronix that is not officially supported by Red Hat.Copy the following transaction manager jar libraries from thelibfolder to$TOMCAT_DIR/lib/directory:- btm-VERSION.jar
- btm-tomcat55-lifecycle-VERSION.jar
- jta-VERSION.jar
- slf4j-api-VERSION.jar
- slf4j-jdk14-VERSION.jar
In addition, download the following library and copy it into the$TOMCAT_DIR/lib/folder as well:Install the Driver to Your Database
Copy the jar file with the relevant database driver to$TOMCAT_DIR/lib/.Note
If using the embedded H2 database, the driver is available inbusiness-central/WEB-INF/lib/.- Create the transaction manager configuration files in
$TOMCAT_DIR/conf/:- btm-config.properties
bitronix.tm.serverId=tomcat-btm-node0 bitronix.tm.journal.disk.logPart1Filename=${btm.root}/work/btm1.tlog bitronix.tm.journal.disk.logPart2Filename=${btm.root}/work/btm2.tlog bitronix.tm.resource.configuration=${btm.root}/conf/resources.properties - resources.properties (the resource.ds1.uniqueName defines the datasource name used in tomcat resource definition later - make a note of this value).Make sure to change the values in the following definitions to match your environment.
Example 2.1. H2 datasource definition
resource.ds1.className=bitronix.tm.resource.jdbc.lrc.LrcXADataSource
resource.ds1.uniqueName=jdbc/jbpm
resource.ds1.minPoolSize=10
resource.ds1.maxPoolSize=20
resource.ds1.driverProperties.driverClassName=org.h2.Driver
resource.ds1.driverProperties.url=jdbc:h2:file:~/jbpm
resource.ds1.driverProperties.user=sa
resource.ds1.driverProperties.password=
resource.ds1.allowLocalTransactions=true
Example 2.2. MySQL 5.5 datasource definition
resource.ds1.className=com.mysql.jdbc.jdbc2.optional.MysqlXADataSource
resource.ds1.uniqueName=jdbc/jbpm
resource.ds1.minPoolSize=0
resource.ds1.maxPoolSize=10
resource.ds1.driverProperties.URL=jdbc:mysql://localhost:3306/sampledb
resource.ds1.driverProperties.user=dbuser
resource.ds1.driverProperties.password=dbpassword
resource.ds1.allowLocalTransactions=true
Example 2.3. DB2 Type 4 datasource definition
resource.ds1.className=com.ibm.db2.jcc.DB2Driver
resource.ds1.uniqueName=jdbc/jbpm
resource.ds1.minPoolSize=0
resource.ds1.maxPoolSize=10
resource.ds1.driverProperties.URL=jdbc:db2://localhost:50000/sampledb
resource.ds1.driverProperties.user=dbuser
resource.ds1.driverProperties.password=dbpassword
resource.ds1.allowLocalTransactions=true
Example 2.4. Oracle datasource definition
resource.ds1.className=oracle.jdbc.xa.client.OracleXADataSource
resource.ds1.uniqueName=jdbc/jbpm
resource.ds1.minPoolSize=0
resource.ds1.maxPoolSize=10
resource.ds1.driverProperties.URL=jdbc:oracle:thin:@//localhost:1521/bpms
resource.ds1.driverProperties.user=dbuser
resource.ds1.driverProperties.password=dbpassword
resource.ds1.allowLocalTransactions=true
Example 2.5. Microsoft SQL Server datasource definition
resource.ds1.className=com.microsoft.sqlserver.jdbc.SQLServerDriver
resource.ds1.uniqueName=jdbc/jbpm
resource.ds1.minPoolSize=0
resource.ds1.maxPoolSize=10
resource.ds1.driverProperties.URL=jdbc:sqlserver://localhost:1433;databaseName=bpms;
resource.ds1.driverProperties.user=dbuser
resource.ds1.driverProperties.password=dbpassword
resource.ds1.allowLocalTransactions=true
- Set up the transaction manager listener in
$TOMCAT_DIR/conf/server.xmlto start and stop Bitronix on container startup and shutdown:Add the following element as the last <Listener> element into the <Server> element:<Listener className="bitronix.tm.integration.tomcat55.BTMLifecycleListener" />
- Define the btm.root system property and location where bitronix config file is placed:In
$TOMCAT_DIR/bin/, create a readablesetenv.shfile with the following content:CATALINA_OPTS="-Xmx512M -XX:MaxPermSize=512m -Djava.security.auth.login.config=$CATALINA_HOME/webapps/business-central/WEB-INF/classes/login.config -Dbtm.root=$CATALINA_HOME -Dbitronix.tm.configuration=$CATALINA_HOME/conf/btm-config.properties -Dorg.jbpm.designer.perspective=RuleFlow -Djbpm.tsr.jndi.lookup=java:comp/env/TransactionSynchronizationRegistry"
The propertyorg.jbpm.designer.perspectiveis set toRuleFlowto allow the default perspective for the designer to beRuleFlowrather thanFull. Grant the file execute permissions if applicable.Thejava.security.auth.login.configproperty must be set in order for the ssh clone of the git repository to work.Important
On Microsoft Windows systems, replace the$CATALINA_HOMEvalue in the content of the file with the equivalent environment variable name or use the absolute path and add the values insetenv.batfile as shown here in the following example:set "CATALINA_OPTS=-Xmx512m -XX:MaxPermSize=512m -Dbtm.root=C:\apache-tomcat -Dbitronix.tm.configuration=C:\apache-tomcat\conf\btm-config.properties"
2.2.2.2. Setting up Business Central for Red Hat JBoss Web Server 2.1 (Tomcat 7)
- Set up a
Valveso that the Business Central web application can load the users set up in Tomcat:- Define users and roles in
$TOMCAT_DIR/conf/tomcat-users.xml. Note that Business Central requires users to have the roles specified asadminand/oranalyst(for more information about user and role definitions, refer to the Tomcat 7 documentation).The program listing below shows an example of how these two roles would be added and how a user namedbpmsadminwill be assigned these roles.Note
Make sure that the usernames don't conflict with any known roles. For example, you should not create a user with the usernameadmin.<role rolename="admin"/> <role rolename="analyst" /> <user username="bpmsadmin" password="P@ssw0rd" roles="admin,analyst"/>
- Move (not copy)
kie-tomcat-integration-VERSION.jarfrom$TOMCAT_DIR/webapps/business-central/WEB-INF/lib/to$TOMCAT_DIR/lib/. - Copy
jboss-jaxb-api-VERSION.jarfrom$TOMCAT_DIR/webapps/business-central/WEB-INF/lib/to$TOMCAT_DIR/lib/. - In
$TOMCAT_DIR/conf/server.xml, add the Tomcat Valve declaration in the relevant <host> element:<Valve className="org.kie.integration.tomcat.JACCValve" />
- If you are using a datasource other than the default provided by the underlying H2 database, you will need to setup persistence. If you are using the default H2 database, then you can ignore the rest of the steps in this procedure.In this procedure, you configure a datasource with the JNDI name
jdbc/myDatasourceas defined in uniqueName=jdbc/jbpm in the bitronixresources.propertiesfile earlier (for the MySQL option).- In
business-central/META-INF/context.xml, replace the datasource JNDI name in the <Resource> element. The uniqueName attribute refers to the resource.ds1.uniqueName property set inresources.properties:<Resource name="jdbc/myDatasource" uniqueName="jdbc/jbpm" auth="Container" removeAbandoned="true" factory="bitronix.tm.resource.ResourceObjectFactory" type="javax.sql.DataSource"/>
- In
business-central/WEB-INF/web.xml, replace the datasource JNDI name in the <res-ref-name> element with your datasource name:<resource-ref> <description>Console DS</description> <res-ref-name>jdbc/myDatasource</res-ref-name> <res-type>javax.sql.DataSource</res-type> <res-auth>Container</res-auth> </resource-ref> - Change
business-central/WEB-INF/classes/META-INF/persistence.xml.In this file, change the name of the hibernate dialect used for your database, if using a different database other than H2. The code below demonstrates the original database information forpersistence.xml:<property name="hibernate.dialect" value="org.hibernate.dialect.H2Dialect"/>
This information can be updated in the following manner (as demonstrated with MySQL database below):<property name="hibernate.dialect" value="org.hibernate.dialect.MySQLDialect"/>
Note
The dialect for DB2 isorg.hibernate.dialect.DB2Dialect, for DB2 on AS/400 isorg.hibernate.dialect.DB2400Dialect, for Oracle isorg.hibernate.dialect.Oracle10gDialectand for Microsoft SQL Server isorg.hibernate.dialect.SQLServerDialect - Change
business-central/WEB-INF/classes/META-INF/persistence.xmlfile so that JBoss BPM Suite process engine can use the new database.The code below demonstrates the original datasource information forpersistence.xml:<jta-data-source>java:comp/env/jdbc/jbpm</jta-data-source>
Change this value to the datasource defined earlier:<jta-data-source>java:comp/env/jdbc/myDatasource</jta-data-source>
- You can now start the JBoss Web Server to login to Business Central.
- Run
startup.shin the $TOMCAT_HOME/bindirectory../startup.sh
- Navigate to http://localhost:8080/business-central in a web browser.
- Login with the username/password you defined earlier in
tomcat-users.xmlfile.
2.2.2.3. Setting up Dashbuilder for Red Hat JBoss Web Server 2.0 (Tomcat 7)
Note
- Define users and roles in
$TOMCAT_DIR/conf/tomcat-users.xml. Note that Dashbuilder requires users to have the role specified asadminand/oranalyst. If you have already defined these users earlier for Business-Central, you don't need to define them again. - Enable single sign-on between Dashbuilder and Business Central by uncommenting the following lines in
$TOMCAT_DIR/conf/server.xmlfile:<Valve className="org.apache.catalina.authenticator.SingleSignOn" />
- As with Business Central setup, if you are using a database other than the default and integrated H2 database, you will need to setup persistence.In this procedure, you configure a datasource with the JNDI name
jdbc/dashbuilderDSas defined in uniqueName=jdbc/jbpm in the bitronixresources.propertiesfile:- In
dashbuilder/META-INF/context.xml, replace the datasource JNDI name in the <Resource> element. The uniqueName attribute refers to the resource.ds1.uniqueName property set inresources.properties:<Resource name="jdbc/dashbuilderDS" uniqueName="jdbc/jbpm" auth="Container" removeAbandoned="true" factory="bitronix.tm.resource.ResourceObjectFactory" type="javax.sql.DataSource"/>
Note
Depending upon your database, you may need to define some other properties here as well. For example, in an Oracle environment, this entry may look like the following listing.<Resource name="jdbc/jbpm" uniqueName="jdbc/jbpm" auth="Container" removeAbandoned="true" factory="bitronix.tm.resource.ResourceObjectFactory" type="javax.sql.DataSource" username="username" password="password" driverClassName="oracle.jdbc.xa.client.OracleXADataSource" url="jdbc:oracle:thin:YOUR-URL:1521:YOUR-DB" maxActive="8" />
- In
dashbuilder/WEB-INF/web.xml, add the datasource JNDI name in the <res-ref-name> element with your datasource name:<resource-ref> <description>Dashboard Builder Datasource</description> <res-ref-name>jdbc/dashbuilderDS</res-ref-name> <res-type>javax.sql.DataSource</res-type> <res-auth>Container</res-auth> </resource-ref> - In
dashbuilder/META-INF/context.xml, define the transaction factory:<Transaction factory="bitronix.tm.BitronixUserTransactionObjectFactory"/>
- Update the datasource JNDI name in
dashbuilder/WEB-INF/etc/hibernate.cfg.xmlin the <session-factory> element:<property name="connection.datasource">java:/comp/env/jdbc/dashbuilderDS</property>
- Restart Java Web server for these changes to take effect. Once restarted, you can navigate to Dashbuilder from within Business Central or directly via:
http://localhost:8080/dashbuilder.
Chapter 3. Special setups
3.1. Setting up Persistence for Business Central
java:jboss/datasources/ExampleDS. For Business Central, this example datasource is located in the file business-central.war/WEB-INF/classes/META-INF/persistence.xml.
business-central.war/WEB-INF/classes/META-INF/persistence.xml:
- Install the respective Java Database Connectivity (JDBC) driver using modular approach for easy subsequent configuration (see EAP 6 documentation).
- Create a new datasource according to the example in EAP 6 documentation, section 6.7.1. Example PostgreSQL Datasource. This is the default used H2 database specific datasource configuration:
<subsystem xmlns="urn:jboss:domain:datasources:1.1"> <datasources> <datasource jndi-name="java:jboss/datasources/ExampleDS" pool-name="ExampleDS" enabled="true" use-java-context="true"> <connection-url>jdbc:h2:mem:test;DB_CLOSE_DELAY=-1</connection-url> <driver>h2</driver> <security> <user-name>sa</user-name> <password>sa</password> </security> </datasource> <drivers> <driver name="h2" module="com.h2database.h2"> <xa-datasource-class>org.h2.jdbcx.JdbcDataSource</xa-datasource-class> </driver> </drivers> </datasources> - Use the JNDI name of the datasource to update the following entry inside the
persistence.xmlfile, which is by default set to this entry.<jta-data-source>java:jboss/datasources/ExampleDS</jta-data-source>
Important
When configuring your datasource, make sure to enable JTA (typically, by addingjta="true"to thedatasourcetag). - Replace the following text with the appropriate database specific hibernate dialect name.
<property name="hibernate.dialect" value="org.hibernate.dialect.H2Dialect" />
For example, for an Oracle Database Express Edition 11g, it would be:<property name="hibernate.dialect" value="org.hibernate.dialect.Oracle10gDialect" />
Note
WARN) messages are produced in the logs, without any corresponding Business Central activity being performed. This is expected behavior. To turn off these messages, set the level of the org.hibernate.loader category of the logger to ERROR in the standalone.xml file:
<logger category="org.hibernate.loader">
  <level name="ERROR"/>
</logger>
3.2. Setting up Persistence for Dashbuilder
java:jboss/datasources/ExampleDS. If you want to make the application work with a database different from H2, for example Oracle, MySQL, Postgres, or MS SQL Server, follow these steps.
Note
[mysqld]
character-set-server=utf8
collation-server=utf8_general_ci
Important
0 (case sensitive) to 1 (case insensitive). The JBoss BPM Suite KPI queries are written in lowercase but the table names are in camelCase. By changing the lower_case_table_names property you will prevent exceptions from occurring later on.
- Install the database driver and create a new datasource according to the example in EAP 6 Documentation in section 6.7.1. Example PostgreSQL Datasource. Use modular approach to the installation of JDBC driver for easy subsequent configuration.
- Create an empty database.
- Modify file
dashbuilder.war/WEB-INF/jboss-web.xmlwhose default entry is:<jboss-web> <context-root>/dashbuilder</context-root> <resource-ref> <res-ref-name>jdbc/dashbuilder</res-ref-name> <res-type>javax.sql.DataSource</res-type> <jndi-name>java:jboss/datasources/ExampleDS</jndi-name> </resource-ref> - Modify also files
WEB-INF/jboss-deployment-structure.xmlfrom both thebusiness-central.waranddashbuilder.warapplications, and add a dependency under the dependencies section on the JBDC driver module created earlier during datasource creation. The following snippet shows a sample configuration wherejdbcDriverModuleNameis the name of the JBoss EAP 6 JDBC driver module.<dependencies> ... <module name="jdbcDriverModuleName" /> ... </dependencies>
3.3. Special Setup for IBM DB2 Database
Example 3.1. Adjusting page size
CREATE DATABASE dashb PAGESIZE 16384
Chapter 4. Roles and Users
4.1. Defining Roles
- admin: The users with admin role are the administrators of the application. Administrators can manage users, manage the repositories (create and clone) and have full access to make the required changes in the application. Admins have access to all areas within the system.
- developer: A developer has access to almost all features and can manage rules, models, process flows, forms and dashboards. They can manage the asset repository, they can create, build and deploy projects and they can even use Red Hat JBoss Developer Studio to view processes. Only certain administrative functions like creating and cloning a new repository are hidden for the developer role.
- analyst: An analyst role has access to all high-level features to model and execute their projects. However, → access is unavailable to users with the analyst role. Certain lower-level features targeted towards developers, like the → view are not accessible for this role. However, the Build & Deploy button is available for the analyst role while using the Project Editor.
- user: User or a business user work on the business task lists that are used to operate a certain process. A user with this role can access the dashboard and manage processes.
- manager: A manager is a viewer of the system and is interested in statistics around the business processes and their performance, business indicators, and other reporting of the system. A user with this role has access to the BAM only.
Note
4.2. Creating users
- Run ./add-user.sh on a Unix system or add-user.bat on a Windows system from the bin directory.
- Enter b to select an Application User at the type of user prompt and press Enter.
- Accept the default Realm (ApplicationRealm): by pressing Enter.
- At the username prompt, enter a user name and confirm. For example:
helloworlduser.Note
Make sure that the usernames don't conflict with any known groups. For example, if there is a group calledadmin, you should not create a user with the usernameadmin. - Create the user's password at the password prompt and reenter the password. For example:
Helloworld@123.Note
The password should be at least 8 characters in length and should contain upper and lower case alphabetic characters (e.g. A-Z, a-z), at least one numerical character (e.g. 0-9) and at least one special character (e.g. ~ ! @ # $ % ^ * ( ) - _ + =). - Enter a comma separate list of roles the user will need at the roles prompt (refer to Section 4.1, “Defining Roles”).Business Central users need to have at least the
analystrole, and dashbuilder users need to have theadminrole. Roles should be entered as a comma-separated list. - Confirm you want to add the user.
- Enter yes at the next prompt (this is to enable clustering in the future if required).
Chapter 5. Testing the installation
5.1. Starting the Server
Warning
org.kie.tx.lock.enabled to false in order to prevent unresponsiveness or deadlock issues. You can either start your server with the option -Dorg.kie.tx.lock.enabled=false or edit the standalone.xml file:
<system-properties>
	<property name="org.kie.tx.lock.enabled" value="false"/>
	...
</system-properties>
Note
standalone.sh that Red Hat JBoss BPM Suite ships with is optimized for performance. To run your server in the performance mode, do the following:
- On the command line, move into the
$SERVER_HOME/bin/directory. - In a Unix environment run:
./standalone.sh
In a Windows environment run:./standalone.bat
standalone-secure.sh that is optimized for security. This script applies a security policy by default that protects against a known security vulnerability.
Note
standalone-secure.sh script.
Warning
- On the command line, move into the
$SERVER_HOME/bin/directory. - In a Unix environment run:
./standalone-secure.sh
In a Windows environment run:./standalone-secure.bat
Note
standalone-secure.sh script.
Note
domain.sh and domain-secure.sh respectively.
5.2. Java Security Manager and Performance Management
- In high load environments where performance is critical it is recommended to only deploy applications that have been developed on other systems and properly reviewed. It is also recommended not to create any users with Analyst role on such systems. If these safeguards are followed, it is safe to leave JSM disabled on these systems so it does not introduce any performance degradation.
- In testing and development environments without high loads, or in environments where rule and process authoring is exposed to external networks, it is recommended to have JSM enabled in order to achieve security benefits of properly sandboxed evaluation of MVEL.
5.3. Logging on to Business Central
- Navigate to http://localhost:8080/business-central in a web browser. If the user interface has been configured to run from a domain name, substitute
localhostfor the domain name. For example http://www.example.com:8080/business-central. - Log in with the user credentials that were created during installation. For example: User =
helloworlduserand password =Helloworld@123.
Chapter 6. Clustering
- GIT repository: virtual-file-system (VFS) repository that holds the business assets so that all cluster nodes use the same repository
- Execution Server and Web applications: the runtime server that resides in the container (such as, Red Hat JBoss EAP) along with BRMS and BPM Suite web applications so that nodes share the same runtime data.For instructions on clustering the application, refer to the container clustering documentation.
- Back-end database: database with the state data, such as, process instances, KIE sessions, history log, etc., for fail-over purposes
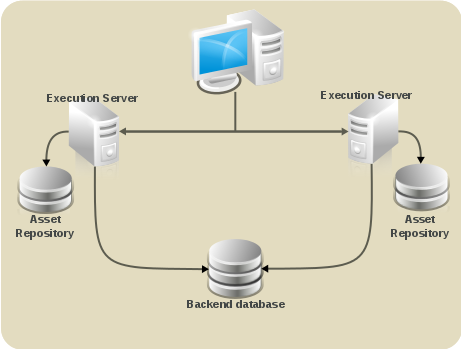
Figure 6.1. Schema of Red Hat JBoss BPM Suite system with individual system components
GIT repository clustering mechanism
- Apache Zookeeper brings all parts together.
- Apache Helix is the cluster management component that registers all cluster details (the cluster itself, nodes, resources).
- uberfire framework which provides the backbone of the web applications
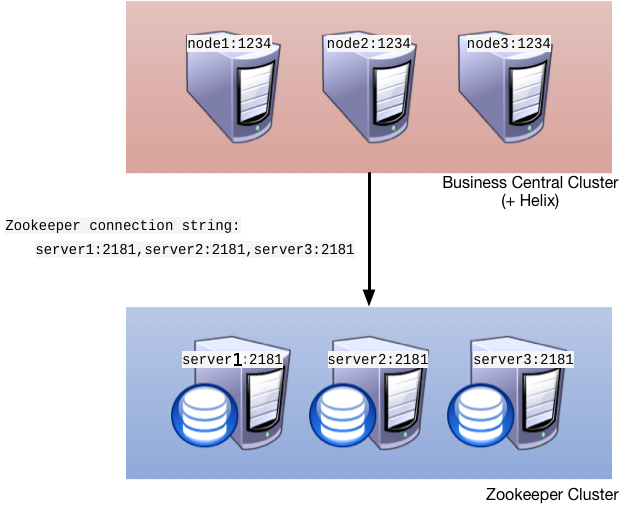
Figure 6.2. Clustering schema with Helix and Zookeeper
- Setting up the cluster itself using Zookeeper and Helix
- Setting up the back-end database with Quartz tables and configuration
- Configuring clustering on your container (this documentation provides only clustering instructions for Red Hat JBoss EAP 6)
Clustering Maven Repositories
rsync.
6.1. Setting up a Cluster
- Download the
jboss-bpmsuite-brms-VERSION-supplementary-tools.zip, which contains Apache Zookeeper, Apache Helix, and quartz DDL scripts. After downloading, unzip the archive: theZookeeperdirectory ($ZOOKEEPER_HOME) and theHelixdirectory ($HELIX_HOME) are created. - Now Configure ZooKeeper:
- In the ZooKeeper directory, go to
confdirectory and do the following:cp zoo_sample.cfg zoo.cfg
- Open
zoo.cfgfor editing and adjust the settings including the following:# the directory where the snapshot is stored. dataDir=$ZOOKEEPER_HOME/data/ # the port at which the clients connects clientPort=2181 server.1=server1:2888:3888 server.2=server2:2888:3888 server.3=server3:2888:3888
Make sure the dataDir location exists and is accessible. - Assign a node ID to each member that will run ZooKeeper. For example, use "1", "2" and "3" respectively for node 1, node 2 and node 3 respectively. ZooKeeper should have an odd number of instances, at least 3 in order to recover from failure.The node ID is specified in a field called
myidunder the data directory of ZooKeeper on each node. For example, on node 1, run:$ echo "1" > /zookeeper/data/myid
- Set up ZooKeeper, so you can use it when creating the cluster with Helix:
- Go to the
$ZOOKEEPER_HOME/bin/directory and start ZooKeeper:./zkServer.sh start
You can check the ZooKeeper log in the$ZOOKEEPER_HOME/bin/zookeeper.outfile. Check this log to ensure that the 'ensemble' (cluster) is formed successfully. One of the nodes should be elected as leader with the other two nodes following it.
- Once the ZooKeeper ensemble is started, the next step is to configure and start Helix. Helix only needs to be configured once and from a single node. The configuration is then stored by the ZooKeeper ensemble and shared as appropriate.Set up the cluster with the ZooKeeper server as the master of the configuration:
- Create the cluster by providing the ZooKeeper Host and port as a comma separated list:
$HELIX_HOME/bin/helix-admin.sh --zkSvr ZOOKEEPER_HOST:ZOOKEEPER_PORT --addCluster CLUSTER_NAME
- Add your nodes to the cluster:
$HELIX_HOME/bin/helix-admin.sh --zkSvr ZOOKEEPER_HOST:ZOOKEEPER_PORT --addNode CLUSTER_NAME NODE_NAMEUNIQUE_ID
Example 6.1. Adding three cluster nodes
./helix-admin.sh --zkSvr server1:2181,server2:2181,server3:2181 --addNode bpms-cluster nodeOne:12345
./helix-admin.sh --zkSvr server1:2181,server2:2181,server3:2181 --addNode bpms-cluster nodeTwo:12346
./helix-admin.sh --zkSvr server1:2181,server2:2181,server3:2181 --addNode bpms-cluster nodeThree:12347
- Add resources to the cluster.
Example 6.2. Adding vfs-repo as resource
./helix-admin.sh --zkSvr server1:2181,server2:2181,server3:2181 --addResource bpms-cluster vfs-repo 1 LeaderStandby AUTO_REBALANCE
- Rebalance the cluster with the three nodes.
Example 6.3. Rebalancing the bpms-cluster
./helix-admin.sh --zkSvr server1:2181,server2:2181,server3:2181 --rebalance bpms-cluster vfs-repo 3
In the above command,3stands for three zookeeper nodes. - Start the Helix controller in all the nodes in the cluster.
Example 6.4. Starting the Helix controller
./run-helix-controller.sh --zkSvr server1:2181,server2:2181,server3:2181 --cluster bpms-cluster 2>&1 > /tmp/controller.log &
Note
Stopping Helix and Zookeeper
Procedure 6.1. Stopping Helix and Zookeeper
- Stop JBoss EAP server processes.
- Stop the Helix process that has been created by
run-helix-controller.sh, for example,kill -15 <pid of HelixControllerMain>. - Stop ZooKeeper server using the
zkServer.sh stopcommand.
6.2. Setting up Quartz
- Set up the database. Make sure to use one of the supported non-JTA data source. Note, that since Quartz need a non-JTA data source, you cannot use the Business Central data source. In the example code, PostgreSQL with the user
bpmsand passwordbpmsis used. This database will need to be connected to your application server, so make sure to keep a note on the database information and credentials. - Create Quartz tables on your database to allow timer events synchronization. To do so, use the DDL script for your database, which is available in the extracted supplementary zip archive in QUARTZ_HOME/docs/dbTables.
- Create the Quartz configuration file
quartz-definition.propertiesin$JBOSS_HOME/PROFILE/configuration/directory and define the Quartz properties.Example 6.5. Quartz configuration file for a PostgreSQL database
 #============================================================================
# Configure Main Scheduler Properties
#============================================================================

org.quartz.scheduler.instanceName = jBPMClusteredScheduler
org.quartz.scheduler.instanceId = AUTO

#============================================================================
# Configure ThreadPool
#============================================================================

org.quartz.threadPool.class = org.quartz.simpl.SimpleThreadPool
org.quartz.threadPool.threadCount = 5
org.quartz.threadPool.threadPriority = 5

#============================================================================
# Configure JobStore
#============================================================================

org.quartz.jobStore.misfireThreshold = 60000

org.quartz.jobStore.class=org.quartz.impl.jdbcjobstore.JobStoreCMT
org.quartz.jobStore.driverDelegateClass=org.quartz.impl.jdbcjobstore.PostgreSQLDelegate
org.quartz.jobStore.useProperties=false
org.quartz.jobStore.dataSource=managedDS
org.quartz.jobStore.nonManagedTXDataSource=notManagedDS
org.quartz.jobStore.tablePrefix=QRTZ_
org.quartz.jobStore.isClustered=true
org.quartz.jobStore.clusterCheckinInterval = 20000

#============================================================================
# Configure Datasources
#============================================================================
org.quartz.dataSource.managedDS.jndiURL=jboss/datasources/psbpmsDS
org.quartz.dataSource.notManagedDS.jndiURL=jboss/datasources/quartzNotManagedDS
Note the configured datasources that will accommodate the two Quartz schemes at the very end of the file.Important
The recommended interval for cluster discovery is 20 seconds and is set in the org.quartz.jobStore.clusterCheckinInterval of thequartz-definition.propertiesfile. Depending on your set up consider the performance impact and modify the setting as necessary.Also note the org.quartz.jobStore.driverDelegateClass property that defines the DB dialect to be used when communicating with the set database (in this example,org.quartz.impl.jdbcjobstore.PostgreSQLDelegate. When using Oracle, useorg.quartz.impl.jdbcjobstore.oracle.OracleDelegate).
6.3. Configuring Clustering on Red Hat JBoss EAP
- Install your JDBC driver as a core module: copy the driver jar to
$EAP_HOME/modules/system/layers/base/and create amodule.xmlfile in the directory. - Edit the
module.xmlfile as of the respective module XSD.Example 6.6. The module.xml file content for a PostgreSQL datasource
<module xmlns="urn:jboss:module:1.0" name="org.postgresql"> <resources> <resource-root path="postgresql-jdbc.jar"/> </resources> <dependencies> <module name="javax.api"/> <module name="javax.transaction.api"/> </dependencies> </module> - Configure individual server nodes in the
main-server-groupelement in the$EAP_HOME/domain/configuration/host.xmlfile with properties defined in Table 6.1, “Cluster node properties”:Note that a when configuring a JBoss EAP cluster with Zookeeper, a different number of JBoss EAP nodes than Zookeeper nodes is possible (keeping in mind that Zookeeper should to have an odd number of nodes). However, having the same node count for both Zookeeper and JBoss EAP is considered best practice.Table 6.1. Cluster node properties
Property name Value Description jboss.node.namenodeOnenode name unique within the clusterorg.quartz.properties/bpms/quartz-definition.propertiesabsolute path to the quartz configuration fileorg.uberfire.cluster.autostarttrueThis value delays VFS clustering until the application is fully initialized to avoid conficts when all cluster members create local clones.org.uberfire.cluster.idbpms-clusterHelix cluster nameorg.uberfire.cluster.local.idnodeOne_12345unique ID of the Helix cluster nodeNote that:is replaced with_.org.uberfire.cluster.vfs.lockvfs-reponame of the resource defined on the Helix clusterorg.uberfire.cluster.zkserver1:2181Zookeeper locationorg.uberfire.metadata.index.dir/home/jbpm/node[N]/indexlocation where the index for search is to be created (maintained by Apache Lucene)org.uberfire.nio.git.daemon.hostnodeOnethe name of the daemon host machine in a physical cluster. org.uberfire.nio.git.daemon.port9418port used by the VFS repo to accept client connectionsThe port must be unique for each cluster member.org.uberfire.nio.git.dir/home/jbpm/node[N]/repoGIT (VFS) repository location on node[N]org.uberfire.nio.git.ssh.hostnodeOnethe name of the SSH host machine in a physical cluster. org.uberfire.nio.git.ssh.port8003the unique port number for ssh access to the GIT repo for a cluster running on physical machines. org.uberfire.nio.git.ssh.hostport and org.uberfire.nio.git.daemon.hostport8003 and 9418In a virtualized environment, the outside port to be used. Example 6.7. Cluster nodeOne configuration
<system-properties>

  <property name="org.uberfire.nio.git.dir" value="/tmp/bpms/nodeone" boot-time="false"/>
  <property name="jboss.node.name" value="nodeOne" boot-time="false"/>

  <property name="org.uberfire.cluster.id" value="bpms-cluster" boot-time="false"/>
  <property name="org.uberfire.cluster.zk" value="server1:2181,server2:2181,server3:2181" boot-time="false"/>
  <property name="org.uberfire.cluster.local.id" value="nodeOne_12345" boot-time="false"/>
  <property name="org.uberfire.cluster.vfs.lock" value="vfs-repo" boot-time="false"/>
  <property name="org.uberfire.cluster.autostart" value="true" boot-time="true"/>

  <property name="org.uberfire.nio.git.daemon.host" value="nodeOne" />
  <property name="org.uberfire.nio.git.daemon.port" value="9418" boot-time="false"/>
  <property name="org.uberfire.nio.git.daemon.hostport" value="9418" boot-time="false"/>

  <property name="org.uberfire.nio.git.ssh.port" value="8003" boot-time="false"/>
  <property name="org.uberfire.nio.git.ssh.hostport" value="8003" boot-time="false"/>
  <property name="org.uberfire.nio.git.ssh.host" value="nodeOne" />

  <property name="org.uberfire.metadata.index.dir" value="/tmp/jbpm/nodeone" boot-time="false"/>
  <property name="org.uberfire.nio.git.ssh.cert.dir" value="/tmp/jbpm/nodeone" boot-time="false"/>

  <property name="org.quartz.properties" value="/tmp/jbpm/quartz/quartz-db-postgres.properties" boot-time="false"/>

</system-properties>
Example 6.8. Cluster nodeTwo configuration
<system-properties>

  <property name="org.uberfire.nio.git.dir" value="/tmp/bpms/nodetwo" boot-time="false"/>
  <property name="jboss.node.name" value="nodeTwo" boot-time="false"/>

  <property name="org.uberfire.cluster.id" value="bpms-cluster" boot-time="false"/>
  <property name="org.uberfire.cluster.zk" value="server1:2181,server2:2181,server3:2181" boot-time="false"/>
  <property name="org.uberfire.cluster.local.id" value="nodeTwo_12346" boot-time="false"/>
  <property name="org.uberfire.cluster.vfs.lock" value="vfs-repo" boot-time="false"/>
  <property name="org.uberfire.cluster.autostart" value="true" boot-time="true"/>

  <property name="org.uberfire.nio.git.daemon.host" value="nodeTwo" />
  <property name="org.uberfire.nio.git.daemon.port" value="9418" boot-time="false"/>
  <property name="org.uberfire.nio.git.daemon.hostport" value="9418" boot-time="false"/>

  <property name="org.uberfire.nio.git.ssh.port" value="8003" boot-time="false"/>
  <property name="org.uberfire.nio.git.ssh.hostport" value="8003" boot-time="false"/>
  <property name="org.uberfire.nio.git.ssh.host" value="nodeTwo" />

  <property name="org.uberfire.metadata.index.dir" value="/tmp/jbpm/nodetwo" boot-time="false"/>
  <property name="org.uberfire.nio.git.ssh.cert.dir" value="/tmp/jbpm/nodetwo" boot-time="false"/>

  <property name="org.quartz.properties" value="/tmp/jbpm/quartz/quartz-db-postgres.properties" boot-time="false"/>


</system-properties>
Example 6.9. Cluster nodeThree configuration
<system-properties>

  <property name="org.uberfire.nio.git.dir" value="/tmp/bpms/nodethree" boot-time="false"/>
  <property name="jboss.node.name" value="nodeThree" boot-time="false"/>

  <property name="org.uberfire.cluster.id" value="bpms-cluster" boot-time="false"/>
  <property name="org.uberfire.cluster.zk" value="server1:2181,server2:2181,server3:2181" boot-time="false"/>
  <property name="org.uberfire.cluster.local.id" value="nodeThree_12347" boot-time="false"/>
  <property name="org.uberfire.cluster.vfs.lock" value="vfs-repo" boot-time="false"/>
  <property name="org.uberfire.cluster.autostart" value="true" boot-time="true"/>

  <property name="org.uberfire.nio.git.daemon.host" value="nodeThree" />
  <property name="org.uberfire.nio.git.daemon.port" value="9418" boot-time="false"/>
  <property name="org.uberfire.nio.git.daemon.hostport" value="9418" boot-time="false"/>

  <property name="org.uberfire.nio.git.ssh.port" value="8003" boot-time="false"/>
  <property name="org.uberfire.nio.git.ssh.hostport" value="8003" boot-time="false"/>
  <property name="org.uberfire.nio.git.ssh.host" value="nodeThree" />

  <property name="org.uberfire.metadata.index.dir" value="/tmp/jbpm/nodethree" boot-time="false"/>
  <property name="org.uberfire.nio.git.ssh.cert.dir" value="/tmp/jbpm/nodethree" boot-time="false"/>

  <property name="org.quartz.properties" value="/tmp/jbpm/quartz/quartz-db-postgres.properties" boot-time="false"/>


</system-properties>
- Add management users as instructed in the Administration and Configuration Guide for Red Hat JBoss EAP and application users as instructed in Red Hat JBoss BPM Suite Administration and Configuration Guide.
- Start the application server:
]$ $JBOSS_HOME/bin/domain.sh
- Check that the nodes are available.
- Change the predefined persistence of the application to the required data base (PostgreSQL): in
persistence.xmlchange the following:- jta-data-source name to the source defined on the application server (
java:jboss/datasources/psbpmsDS) - hibernate dialect to be match the data source dialect (
org.hibernate.dialect.PostgreSQLDialect)
- Log on as the management user to the server Administration console of your domain and add the new deployments using the Runtime view of the console. Once the deployment is added to the domain, assign it to the correct server group (
main-server-group).
Note
deployed. Any request targeting this deployment unit sent to a different cluster member fails with DeploymentNotFoundException.
Chapter 7. Maven Repositories
7.1. About Maven
http:// when located on an HTTP server, or file:// when located on a file server. The default repository is the public remote Maven 2 Central Repository.
settings.xml file. You can either configure global Maven settings in the M2_HOME/conf/settings.xml file, or user-level settings in the USER_HOME/.m2/settings.xml file.
Note
7.2. About The Provided Maven Repositories
settings.xml file during installation, Maven is already configured to use the online repositories.
Important
7.3. Configuring Maven to Use the File System Repositories
In situations where you cannot use the online repositories, you will have to download and configure the required repositories locally.
Procedure 7.1.
- Download the following ZIP archives containing the required repositories:
- Unzip the downloaded ZIP files into an arbitrary location in a local file system.
- Add entries for the unzipped repositories to Maven's
settings.xmlfile. The following code sample contains a profile with the repositories, configuration of authentication for access to the repositories, and an activation entry for the profile:<?xml version="1.0" encoding="UTF-8" standalone="no"?> <settings xmlns="http://maven.apache.org/SETTINGS/1.0.0" xmlns:xsi="http://www.w3.org/2001/XMLSchema-instance" xsi:schemaLocation="http://maven.apache.org/xsd/settings-1.0.0.xsd"> <localRepository/> <profiles> <!-- Profile with local repositories required by JBoss BRMS/JBoss BPM Suite --> <profile> <id>brms-bpms-local-profile</id> <repositories> <repository> <id>jboss-brms-bpmsuite-repository</id> <name>BRMS/BPMS 6.1.0 GA Repository</name> <url>file://<!-- path to the repository -->/jboss-brms-bpmsuite-6.1.0.GA-redhat-2-maven-repository/maven-repository</url> <layout>default</layout> <releases> <enabled>true</enabled> <updatePolicy>never</updatePolicy> </releases> <snapshots> <enabled>false</enabled> <updatePolicy>never</updatePolicy> </snapshots> </repository> </repositories> <pluginRepositories> <pluginRepository> <id>jboss-brms-bpmsuite-repository</id> <name>BRMS/BPMS 6.1.0 GA Repository</name> <url>file://<!-- path to the repository -->/jboss-brms-bpmsuite-6.1.0.GA-redhat-2-maven-repository/maven-repository</url> <layout>default</layout> <releases> <enabled>true</enabled> <updatePolicy>never</updatePolicy> </releases> <snapshots> <enabled>false</enabled> <updatePolicy>never</updatePolicy> </snapshots> </pluginRepository> </pluginRepositories> </profile> </profiles> <!-- Configuring pre-emptive authentication for the repository server --> <server> <id>brms-bpms-m2-repo</id> <username>admin</username> <password>admin</password> <configuration> <wagonProvider>httpclient</wagonProvider> <httpConfiguration> <all> <usePreemptive>true</usePreemptive> </all> </httpConfiguration> </configuration> </server> <!-- Alternative to enabling pre-emptive authentication - configuring the Authorization HTTP header with Base64-encoded credentials <server> <id>brms-bpms-m2-repo</id> <configuration> <httpHeaders> <property> <name>Authorization</name> <value>Basic YWRtaW46YWRtaW4=</value> </property> </httpHeaders> </configuration> </server> --> <activeProfiles> <!-- Activation of the JBoss BRMS/JBoss BPM Suite profile --> <activeProfile>brms-bpms-local-profile</activeProfile> </activeProfiles> </settings>
The Maven repositories are downloaded, unzipped in a local file system, registered in Maven's settings.xml file, and ready to be used when performing Maven builds.
- Q: Why do I still get errors when building or deploying my applications?
- Q: Why is JBoss Developer Studio using my old Maven configuration?
When you build or deploy a project, it fails with one or both of the following errors:
[ERROR] Failed to execute goal on project PROJECT_NAMECould not find artifact ARTIFACT_NAME
Your cached local Maven repository might contain outdated artifacts.
To resolve the issue, delete the cached local repository – the ~/.m2/repository/ directory on Linux or the %SystemDrive%\Users\USERNAME\.m2\repository\ directory on Windows – and run mvn clean install -U. This will force Maven to download correct versions of required artifacts when performing the next build.
You have updated your Maven configuration, but this configuration is not reflected in JBoss Developer Studio.
If JBoss Developer Studio is running when you modify your Maven settings.xml file, this configuration will not be reflected in JBoss Developer Studio.
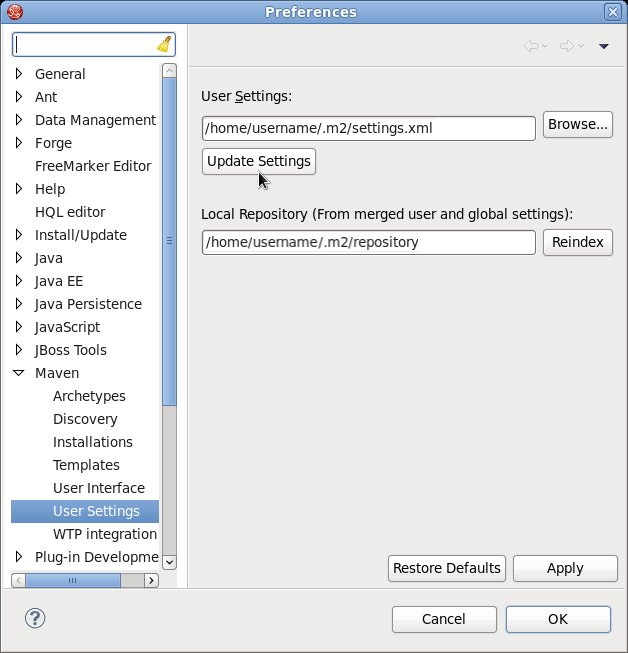
Figure 7.1. Update Maven User Settings
7.4. Configuring Maven to Use the Online Repositories
Procedure 7.2. Configuring Maven to Use the Online Repositories
- Add entries for the online repositories and configuration of authentication for accessing them to Maven's
settings.xmlfile as in the code sample below:<settings xmlns="http://maven.apache.org/SETTINGS/1.0.0" xmlns:xsi="http://www.w3.org/2001/XMLSchema-instance" xsi:schemaLocation="http://maven.apache.org/SETTINGS/1.0.0 http://maven.apache.org/xsd/settings-1.0.0.xsd"> <profiles> <!-- Profile with online repositories required by BRMS/BPMS --> <profile> <id>brms-bpms-online-profile</id> <repositories> <repository> <id>jboss-ga-repository</id> <url>http://maven.repository.redhat.com/techpreview/all</url> <releases> <enabled>true</enabled> </releases> <snapshots> <enabled>false</enabled> </snapshots> </repository> </repositories> <pluginRepositories> <pluginRepository> <id>jboss-ga-plugin-repository</id> <url>http://maven.repository.redhat.com/techpreview/all</url> <releases> <enabled>true</enabled> </releases> <snapshots> <enabled>false</enabled> </snapshots> </pluginRepository> </pluginRepositories> </profile> </profiles> <!-- Configuring pre-emptive authentication for the repository server --> <server> <id>brms-bpms-m2-repo</id> <username>admin</username> <password>admin</password> <configuration> <wagonProvider>httpclient</wagonProvider> <httpConfiguration> <all> <usePreemptive>true</usePreemptive> </all> </httpConfiguration> </configuration> </server> <!-- Alternative to enabling pre-emptive authentication - configuring the Authorization HTTP header with Base64-encoded credentials <server> <id>brms-bpms-m2-repo</id> <configuration> <httpHeaders> <property> <name>Authorization</name> <value>Basic YWRtaW46YWRtaW4=</value> </property> </httpHeaders> </configuration> </server> --> <activeProfiles> <!-- Activation of the BRMS/BPMS profile --> <activeProfile>brms-bpms-online-profile</activeProfile> </activeProfiles> </settings> - If you modified the
settings.xmlfile while JBoss Developer Studio was running, you must refresh Maven settings in the IDE. From the menu, choose → . In the Preferences Window, expand Maven and choose User Settings. Click the button to refresh the Maven user settings in JBoss Developer Studio.Figure 7.2. Update Maven User Settings
Maven has been configured to use the online repositories provided for your Red Hat JBoss product.
Important
- Missing artifact ARTIFACT_NAME
- [ERROR] Failed to execute goal on project PROJECT_NAME; Could not resolve dependencies for PROJECT_NAME
~/.m2/repository/ directory on Linux or the %SystemDrive%\Users\USERNAME\.m2\repository\ directory on Windows. This will force Maven to download correct versions of required artifacts during the next build.
7.5. Dependency Management
pom.xml file. Adding the BOM files ensures that the correct versions of transitive dependencies from the provided Maven repositories are included in the project.
- org.jboss.bom.brms:jboss-brms-bpmsuite-bom:VERSION: This is the basic BOM without any Java EE6 support.
- org.jboss.bom.brms:jboss-javaee-6.0-with-brms-bpmsuite:VERSION: This provides support for Java EE6.
Chapter 8. Red Hat JBoss Developer Studio
8.1. Red Hat JBoss Developer Studio
Warning
UTF-8. You can do this by editing the $JBDS_HOME/studio/jbdevstudio.ini file and adding the following property: "-Dfile.encoding=UTF-8"
8.2. Installing the JBoss Developer Studio Plug-ins
Procedure 8.1. Install the Drools and jBPM JBoss Developer Studio Plug-in
- Start JBoss Developer Studio.
- Select → .
- Click Add to enter the Add Repository menu.
- Give the software site a name next to Name field and add the following url in the Location field: https://devstudio.jboss.com/updates/8.0/integration-stack/
- Click OK.
- Select the JBoss Business Process and Rule Development feature from the available options and click Next and then Next again.
- Read the license and accept it by selecting the appropriate radio button, and click Finish.
- After installation of the plug-ins has completed, restart JBoss Developer Studio.
8.3. Setting the Drools runtime
Procedure 8.2. Configure JBoss BRMS Runtime
- Extract the runtime jar files located in the
jboss-brms-VERSION-engine.ziparchive that you can download from Red Hat Customer Portal. - From the JBoss Developer Studio menu, select Window and click Preferences.
- Select → .
- Click Add...; provide a name for the new runtime, and click Browse to navigate to the directory where you extracted the runtime files in step 1. Click OK to register the selected runtime in JBDS.
- Mark the runtime you have created as the default Drools runtime by clicking on the check box next to it.
- Click OK. If you have existing projects, a dialog box will indicate that you have to restart JBoss Developer Studio to update the Runtime.
8.4. Configuring the JBoss BPM Suite Server
Procedure 8.3. Configure the Server
- Open the jBPM view by selecting → → and select jBPM and click OK.
- Add the server view by selecting → → and select → .
- Open the server menu by right clicking the Servers panel and select → .
- Define the server by selecting → and clicking Next.
- Set the home directory by clicking the Browse button. Navigate to and select the installation directory for JBoss EAP 6.4 which has JBoss BPM Suite installed.
- Provide a name for the server in the Name field, make sure that the configuration file is set, and click Finish.
8.5. Importing Projects from a Git Repository into JBoss Developer Studio
Procedure 8.4. Cloning a Remote Git Repository
- Start the Red Hat JBoss BRMS/BPM Suite server (whichever is applicable) by selecting the server from the server tab and click the start icon.
- Simultaneously, start the Secure Shell server, if not running already, by using the following command. The command is Linux and Mac specific only. On these platforms, if sshd has already been started, this command fails. In that case, you may safely ignore this step.
/sbin/service sshd start
- In JBoss Developer Studio, select → and navigate to the Git folder. Open the Git folder to select and click .
- Select the repository source as and click .
- Enter the details of the Git repository in the next window and click .
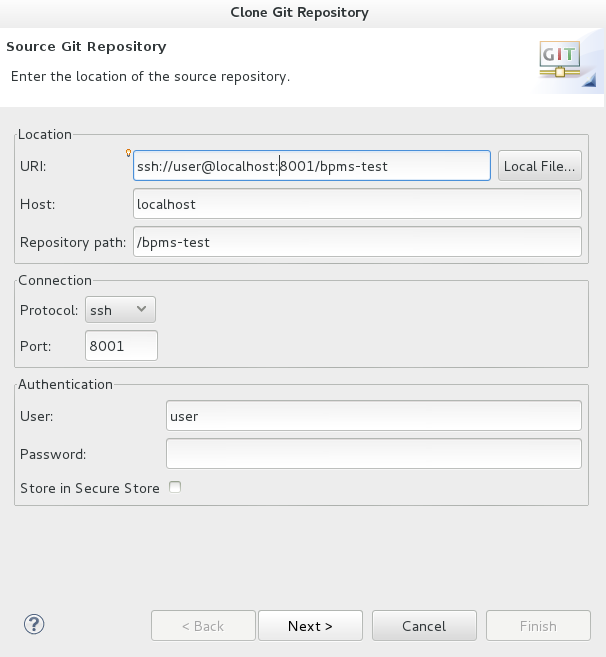
Figure 8.1. Git Repository Details
- Select the branch you wish to import in the following window and click .
- To define the local storage for this project, enter (or select) a non-empty directory, make any configuration changes and click .
- Import the project as a general project in the following window and click . Name the project and click .
Procedure 8.5. Importing a Local Git Repository
- Start the Red Hat JBoss BRMS/BPM Suite server (whichever is applicable) by selecting the server from the server tab and click the start icon.
- In JBoss Developer Studio, select → and navigate to the Git folder. Open the Git folder to select and click .
- Select the repository source as and click .
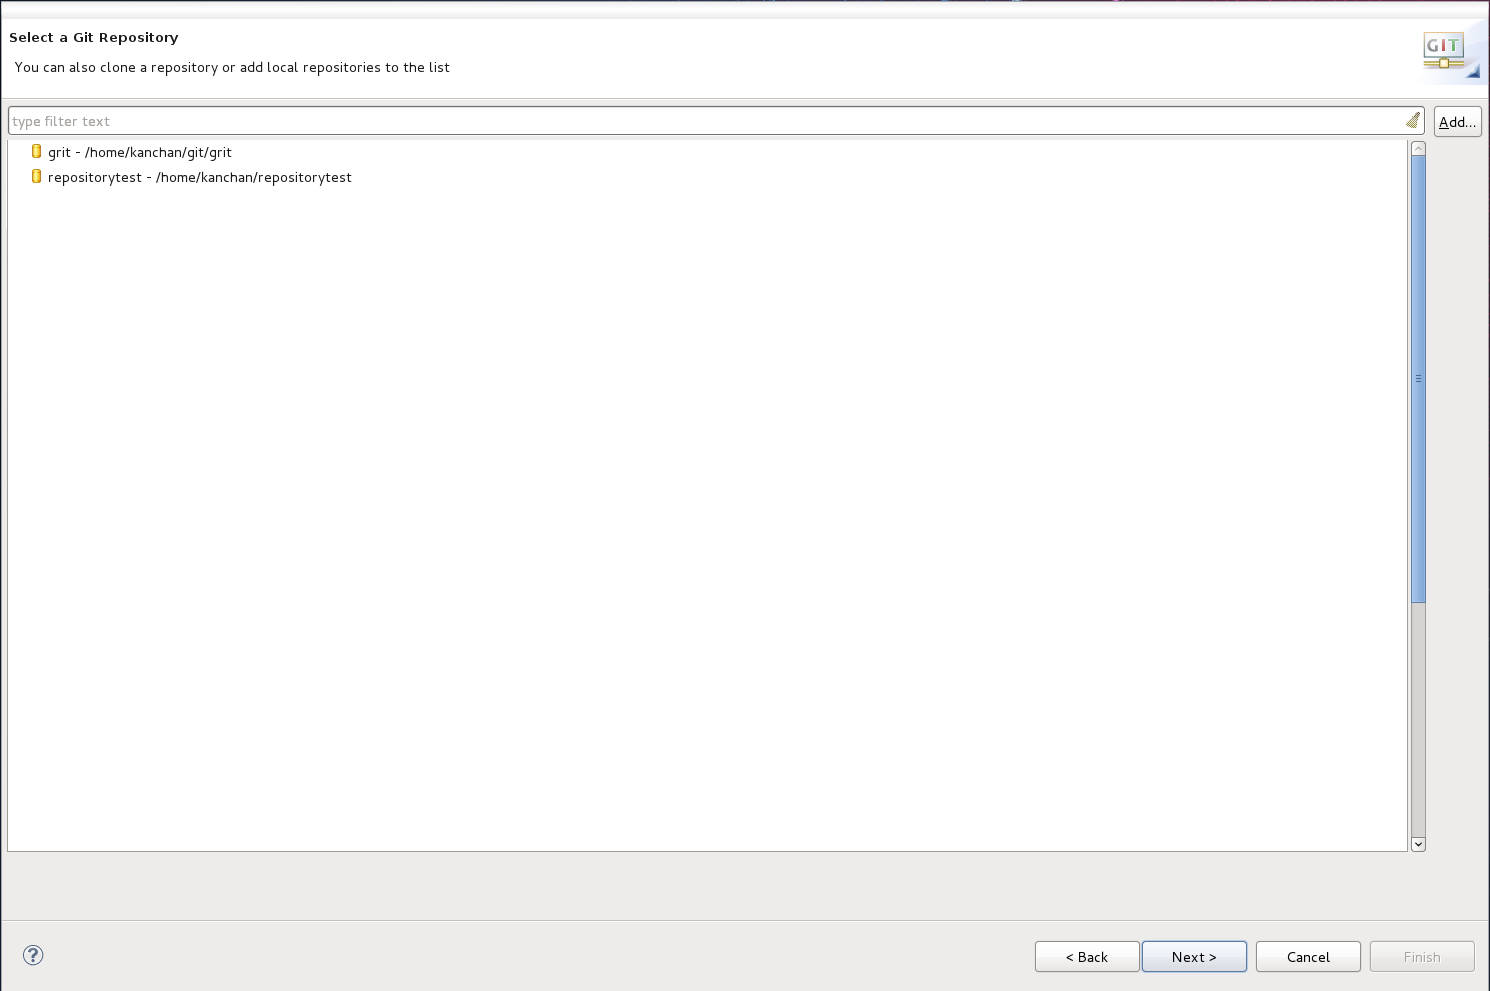
Figure 8.2. Git Repository Details
- Select the repository that is to be configured from the list of available repositories and click .
- In the dialog that opens, select the radio button from the and click . Name the project and click .
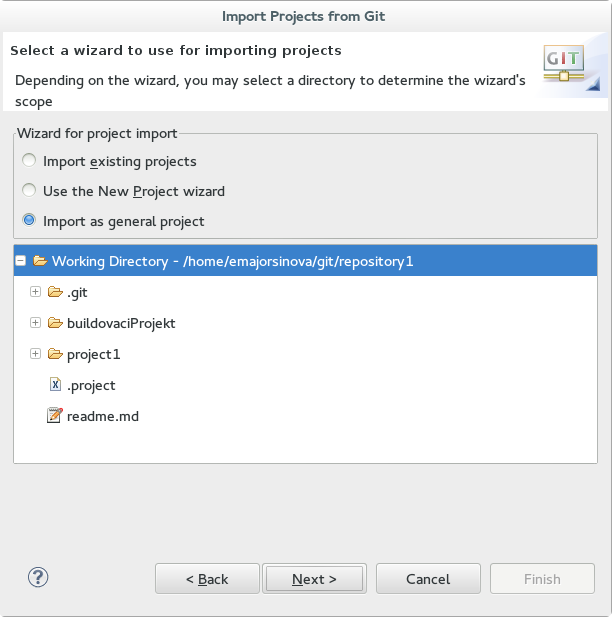
Figure 8.3. Wizard for Project Import
Chapter 9. Patching and Upgrading Red Hat JBoss BPM Suite
9.1. About Patches and Upgrades
- Asynchronous updates: Individual patches which are released outside the normal update cycle of the existing product. These may include security patches, as well as other individual patches provided by Red Hat Global Support Services (GSS) to fix specific issues.
- Planned updates: The cumulative patches of an existing product, which includes all previously developed updates for that version of the product.
- JBoss BRMS customers -
jboss-brms-<version>-patch.zip - JBoss BPM Suite customers -
jboss-bpmsuite-<version>-patch.zip - Maven repo updates (Same for both JBoss BRMS and JBoss BPM Suite customers) -
jboss-brms-bpmsuite-<version>-incremental-maven-repository.zip
9.2. Applying Patches in Red Hat JBoss BPM Suite 6.1
.sh and .bat scripts, allowing for easy and automatic application of updates to an existing JBoss BPM Suite 6.1 (or better) installation.
Important
<path-to-distribution-root> and <type-of-distribution>. For example, the following command applies the updates to the specified JBoss EAP bundle:
Note
$ ./apply-updates.sh ~/EAP_HOME/jboss-eap-6.4 eap6.x
- eap6.x
- eap6.x-bc
- eap6.x-kie-server
- eap6.x-dashbuilder
- generic
- generic-bc
- generic-kie-server
- generic-dashuilder
- was8
- was8-bc
- was8-kie-server
- was8-dashbuilder
- wls12c
- wls12c-bc
- wls12c-kie-server
- wls12c-dashbuilder
- brms-engine
- planner-engine
- supplementary-tools
Note
Backup Feature
backup/<current-timestamp> subdirectory. The top-level backup directory is created at the same filesystem level as the apply-updates script.
Blacklist Feature
blacklist.txt present within the patch distribution. Enter the relative path to the files that must not be updated. Each file must be specified on a line by itself.
# lines with a '#' are comment lines, like this one
# blank lines are ignored

# we have made changes to the web.xml that must be preserved
WEB-INF/web.xml

# this file has custom modifications
styles/base.css
blacklist.txt file that have updated content in the patch, are not touched by the update tool. Instead, the tool copies the new, updated file in the same location and appends the new suffix to it. For example, after running the patch tool, both these files will exist in the styles folder, continuing with the blacklist.txt file in the example above.
$ ls styles
base.css base.css.new
blacklist.txt file as well. The patch update tool will not delete these files, and instead create an empty marker file with the suffix removed. It is then up to you to either keep or delete these files manually.
base.css file was removed and you had this file listed in the blacklist.txt file, then after the patch tool has run, the contents of the styles directory would be similar to:
$ ls styles
base.css base.css.removed
9.3. Patching Other Platforms and Applications
$ ./apply-updates.[sh|bat] <some-path>/jboss-eap-6.4/standalone/deployments/business-central.war eap6.x-bc
$ ./apply-updates.[sh|bat] <some-path-to-tomcat-home>/webapps/kie-server.war generic-kie-server
$ ./apply-updates.[sh|bat] <path-to-unzipped-wls12c-bundle> wls12c
$ ./apply-updates.[sh|bat] <path-to-unzipped-planner-bundle> planner-engine
Appendix A. Revision History
| Revision History | |||
|---|---|---|---|
| Revision 1.0.0-44 | Thu Dec 17 2015 | ||
| |||