
Installation Guide
Installing Red Hat Enterprise Virtualization
Abstract
Part I. Introduction
Chapter 1. Introduction

1.2. Red Hat Enterprise Virtualization Manager Requirements
1.2.1. Red Hat Enterprise Virtualization Hardware Requirements Overview
- one machine to act as the management server,
- one or more machines to act as virtualization hosts - at least two are required to support migration and power management,
- one or more machines to use as clients for accessing the Administration Portal.
- storage infrastructure provided by NFS, POSIX, iSCSI, SAN, or local storage.
1.2.2. Red Hat Enterprise Virtualization Manager Hardware Requirements
Minimum
- A dual core CPU.
- 4 GB of available system RAM that is not being consumed by existing processes.
- 25 GB of locally accessible, writeable, disk space.
- 1 Network Interface Card (NIC) with bandwidth of at least 1 Gbps.
Recommended
- A quad core CPU or multiple dual core CPUs.
- 16 GB of system RAM.
- 50 GB of locally accessible, writeable, disk space.
- 1 Network Interface Card (NIC) with bandwidth of at least 1 Gbps.
1.2.3. Operating System Requirements
Important
1.2.4. Red Hat Enterprise Virtualization Manager Client Requirements
- Mozilla Firefox 17, and later, on Red Hat Enterprise Linux is required to access both portals.
- Internet Explorer 8, and later, on Microsoft Windows is required to access the User Portal. Use the desktop version, not the touchscreen version of Internet Explorer 10.
- Internet Explorer 9, and later, on Microsoft Windows is required to access the Administration Portal. Use the desktop version, not the touchscreen version of Internet Explorer 10.
- Red Hat Enterprise Linux 5.8+ (i386, AMD64 and Intel 64)
- Red Hat Enterprise Linux 6.2+ (i386, AMD64 and Intel 64)
- Red Hat Enterprise Linux 6.5+ (i386, AMD64 and Intel 64)
- Windows XP
- Windows XP Embedded (XPe)
- Windows 7 (x86, AMD64 and Intel 64)
- Windows 8 (x86, AMD64 and Intel 64)
- Windows Embedded Standard 7
- Windows 2008/R2 (x86, AMD64 and Intel 64)
- Windows Embedded Standard 2009
- Red Hat Enterprise Virtualization Certified Linux-based thin clients
Note
yum.
1.2.5. Red Hat Enterprise Virtualization Manager Software Channels
Note
Certificate-based Red Hat Network
- The
Red Hat Enterprise Linux Serverentitlement, provides Red Hat Enterprise Linux. - The
Red Hat Enterprise Virtualizationentitlement, provides Red Hat Enterprise Virtualization Manager. - The
Red Hat JBoss Enterprise Application Platformentitlement, provides the supported release of the application platform on which the Manager runs.
Red Hat Network Classic
- The
Red Hat Enterprise Linux Server (v. 6 for 64-bit x86_64)channel, also referred to asrhel-x86_64-server-6, provides Red Hat Enterprise Linux 6 Server. The Channel Entitlement name for this channel isRed Hat Enterprise Linux Server (v. 6). - The
RHEL Server Supplementary (v. 6 64-bit x86_64)channel, also referred to asrhel-x86_64-server-supplementary-6, provides the virtio-win package. The virtio-win package provides the Windows VirtIO drivers for use in virtual machines. The Channel Entitlement Name for the supplementary channel isRed Hat Enterprise Linux Server Supplementary (v. 6). - The
Red Hat Enterprise Virtualization Manager (v3.4 x86_64)channel, also referred to asrhel-x86_64-server-6-rhevm-3.4, provides Red Hat Enterprise Virtualization Manager. The Channel Entitlement Name for this channel isRed Hat Enterprise Virtualization Manager (v3). - The
Red Hat JBoss EAP (v 6) for 6Server x86_64channel, also referred to asjbappplatform-6-x86_64-server-6-rpm, provides the supported release of the application platform on which the Manager runs. The Channel Entitlement Name for this channel isRed Hat JBoss Enterprise Application Platform (v 4, zip format).
1.3. Hypervisor Requirements
1.3.1. Virtualization Host Hardware Requirements Overview
1.3.2. Virtualization Host CPU Requirements
- AMD Opteron G1
- AMD Opteron G2
- AMD Opteron G3
- AMD Opteron G4
- AMD Opteron G5
- Intel Conroe
- Intel Penryn
- Intel Nehalem
- Intel Westmere
- Intel Sandybridge
- Intel Haswell
No eXecute flag (NX) is also required. To check that your processor supports the required flags, and that they are enabled:
- At the Red Hat Enterprise Linux or Red Hat Enterprise Virtualization Hypervisor boot screen, press any key and select the Boot or Boot with serial console entry from the list.
- Press Tab to edit the kernel parameters for the selected option.
- Ensure there is a Space after the last kernel parameter listed, and append the
rescueparameter. - Press Enter to boot into rescue mode.
- At the prompt which appears, determine that your processor has the required extensions and that they are enabled by running this command:
# grep -E 'svm|vmx' /proc/cpuinfo | grep nx
If any output is shown, then the processor is hardware virtualization capable. If no output is shown, then it is still possible that your processor supports hardware virtualization. In some circumstances manufacturers disable the virtualization extensions in the BIOS. If you believe this to be the case, consult the system's BIOS and the motherboard manual provided by the manufacturer. - As an additional check, verify that the
kvmmodules are loaded in the kernel:# lsmod | grep kvm
If the output includeskvm_intelorkvm_amdthen thekvmhardware virtualization modules are loaded and your system meets requirements.
1.3.3. Virtualization Host RAM Requirements
- guest operating system requirements,
- guest application requirements, and
- memory activity and usage of guests.
1.3.4. Virtualization Host Storage Requirements
- The root partitions require at least 512 MB of storage.
- The configuration partition requires at least 8 MB of storage.
- The recommended minimum size of the logging partition is 2048 MB.
- The data partition requires at least 256 MB of storage. Use of a smaller data partition may prevent future upgrades of the Hypervisor from the Red Hat Enterprise Virtualization Manager. By default all disk space remaining after allocation of swap space will be allocated to the data partition.
- The swap partition requires at least 8 MB of storage. The recommended size of the swap partition varies depending on both the system the Hypervisor is being installed upon and the anticipated level of overcommit for the environment. Overcommit allows the Red Hat Enterprise Virtualization environment to present more RAM to guests than is actually physically present. The default overcommit ratio is
0.5.The recommended size of the swap partition can be determined by:- Multiplying the amount of system RAM by the expected overcommit ratio, and adding
- 2 GB of swap space for systems with 4 GB of RAM or less, or
- 4 GB of swap space for systems with between 4 GB and 16 GB of RAM, or
- 8 GB of swap space for systems with between 16 GB and 64 GB of RAM, or
- 16 GB of swap space for systems with between 64 GB and 256 GB of RAM.
Example 1.1. Calculating Swap Partition Size
For a system with 8 GB of RAM this means the formula for determining the amount of swap space to allocate is:(8 GB x 0.5) + 4 GB = 8 GB
Important
0.5 is used for this calculation. For some systems the result of this calculation may be a swap partition that requires more free disk space than is available at installation. Where this is the case Hypervisor installation will fail.
storage_vol boot parameter.
Example 1.2. Manually Setting Swap Partition Size
storage_vol boot parameter is used to set a swap partition size of 4096 MB. Note that no sizes are specified for the other partitions, allowing the Hypervisor to use the default sizes.
storage_vol=:4096::::
Important
fakeraid devices. Where a fakeraid device is present it must be reconfigured such that it no longer runs in RAID mode.
- Access the RAID controller's BIOS and remove all logical drives from it.
- Change controller mode to be non-RAID. This may be referred to as compatibility or JBOD mode.
1.3.5. Virtualization Host PCI Device Requirements
1.4. User Authentication
1.4.1. About Directory Services
1.4.2. Directory Services Support in Red Hat Enterprise Virtualization
admin. This account is intended for use when initially configuring the environment, and for troubleshooting. To add other users to Red Hat Enterprise Virtualization you must attach a directory server to the Manager using the Domain Management Tool, engine-manage-domains.
user@domain. Attachment of more than one directory server to the Manager is also supported.
- Active Directory
- Identity Management (IdM)
- Red Hat Directory Server 9 (RHDS 9)
- OpenLDAP
- A valid pointer record (PTR) for the directory server's reverse look-up address.
- A valid service record (SRV) for LDAP over TCP port
389. - A valid service record (SRV) for Kerberos over TCP port
88. - A valid service record (SRV) for Kerberos over UDP port
88.
engine-manage-domains.
- Active Directory - http://technet.microsoft.com/en-us/windowsserver/dd448614.
- Identity Management (IdM) - http://docs.redhat.com/docs/en-US/Red_Hat_Enterprise_Linux/6/html/Identity_Management_Guide/index.html
- Red Hat Directory Server (RHDS) - http://docs.redhat.com/docs/en-US/Red_Hat_Directory_Server/index.html
- OpenLDAP - http://www.openldap.org/doc/
Important
Important
Important
sysprep in the creation of Templates and Virtual Machines, then the Red Hat Enterprise Virtualization administrative user must be delegated control over the Domain to:
- Join a computer to the domain
- Modify the membership of a group
Note
- Configure the
memberOfplug-in for RHDS to allow group membership. In particular ensure that the value of thememberofgroupattrattribute of thememberOfplug-in is set touniqueMember. In OpenLDAP, thememberOffunctionality is not called a "plugin". It is called an "overlay" and requires no configuration after installation.Consult the Red Hat Directory Server 9.0 Plug-in Guide for more information on configuring thememberOfplug-in. - Define the directory server as a service of the form
ldap/hostname@REALMNAMEin the Kerberos realm. Replace hostname with the fully qualified domain name associated with the directory server and REALMNAME with the fully qualified Kerberos realm name. The Kerberos realm name must be specified in capital letters. - Generate a
keytabfile for the directory server in the Kerberos realm. Thekeytabfile contains pairs of Kerberos principals and their associated encrypted keys. These keys allow the directory server to authenticate itself with the Kerberos realm.Consult the documentation for your Kerberos principle for more information on generating akeytabfile. - Install the
keytabfile on the directory server. Then configure RHDS to recognize thekeytabfile and accept Kerberos authentication using GSSAPI.Consult the Red Hat Directory Server 9.0 Administration Guide for more information on configuring RHDS to use an externalkeytabfile. - Test the configuration on the directory server by using the
kinitcommand to authenticate as a user defined in the Kerberos realm. Once authenticated run theldapsearchcommand against the directory server. Use the-Y GSSAPIparameters to ensure the use of Kerberos for authentication.
1.5. Firewalls
1.5.1. Red Hat Enterprise Virtualization Manager Firewall Requirements
engine-setup script is able to configure the firewall automatically, but this overwrites any pre-existing firewall configuration.
engine-setup command saves a list of the iptables rules required in the /usr/share/ovirt-engine/conf/iptables.example file.
80 and 443) listed here.
Table 1.1. Red Hat Enterprise Virtualization Manager Firewall Requirements
| Port(s) | Protocol | Source | Destination | Purpose |
|---|---|---|---|---|
| - | ICMP |
|
| When registering to the Red Hat Enterprise Virtualization Manager, virtualization hosts send an ICMP ping request to the Manager to confirm that it is online. |
| 22 | TCP |
|
| SSH (optional) |
| 80, 443 | TCP |
|
|
Provides HTTP and HTTPS access to the Manager.
|
Important
NFSv4
- TCP port
2049for NFS.
NFSv3
- TCP and UDP port
2049for NFS. - TCP and UDP port
111(rpcbind/sunrpc). - TCP and UDP port specified with
MOUNTD_PORT="port" - TCP and UDP port specified with
STATD_PORT="port" - TCP port specified with
LOCKD_TCPPORT="port" - UDP port specified with
LOCKD_UDPPORT="port"
MOUNTD_PORT, STATD_PORT, LOCKD_TCPPORT, and LOCKD_UDPPORT ports are configured in the /etc/sysconfig/nfs file.
1.5.2. Virtualization Host Firewall Requirements
Table 1.2. Virtualization Host Firewall Requirements
| Port(s) | Protocol | Source | Destination | Purpose |
|---|---|---|---|---|
| 22 | TCP |
|
| Secure Shell (SSH) access. |
| 161 | UDP |
|
| Simple network management protocol (SNMP). |
| 5900 - 6923 | TCP |
|
|
Remote guest console access via VNC and SPICE. These ports must be open to facilitate client access to virtual machines.
|
| 5989 | TCP, UDP |
|
|
Used by Common Information Model Object Managers (CIMOM) to monitor virtual machines running on the virtualization host. To use a CIMOM to monitor the virtual machines in your virtualization environment then you must ensure that this port is open.
|
| 16514 | TCP |
|
|
Virtual machine migration using
libvirt.
|
| 49152 - 49216 | TCP |
|
|
Virtual machine migration and fencing using VDSM. These ports must be open facilitate both automated and manually initiated migration of virtual machines.
|
| 54321 | TCP |
|
|
VDSM communications with the Manager and other virtualization hosts.
|
Example 1.3. Option Name: IPTablesConfig
*filter
:INPUT ACCEPT [0:0]
:FORWARD ACCEPT [0:0]
:OUTPUT ACCEPT [0:0]
-A INPUT -m state --state ESTABLISHED,RELATED -j ACCEPT
-A INPUT -p icmp -j ACCEPT
-A INPUT -i lo -j ACCEPT
# vdsm
-A INPUT -p tcp --dport 54321 -j ACCEPT
# libvirt tls
-A INPUT -p tcp --dport 16514 -j ACCEPT
# SSH
-A INPUT -p tcp --dport 22 -j ACCEPT
# guest consoles
-A INPUT -p tcp -m multiport --dports 5900:6923 -j ACCEPT
# migration
-A INPUT -p tcp -m multiport --dports 49152:49216 -j ACCEPT
# snmp
-A INPUT -p udp --dport 161 -j ACCEPT
# Reject any other input traffic
-A INPUT -j REJECT --reject-with icmp-host-prohibited
-A FORWARD -m physdev ! --physdev-is-bridged -j REJECT --reject-with icmp-host-prohibited
COMMIT
1.5.3. Directory Server Firewall Requirements
Table 1.3. Host Firewall Requirements
| Port(s) | Protocol | Source | Destination | Purpose |
|---|---|---|---|---|
| 88, 464 | TCP, UDP |
|
| Kerberos authentication. |
| 389, 636 | TCP |
|
| Lightweight Directory Access Protocol (LDAP) and LDAP over SSL. |
1.5.4. Database Server Firewall Requirements
Table 1.4. Host Firewall Requirements
| Port(s) | Protocol | Source | Destination | Purpose |
|---|---|---|---|---|
| 5432 | TCP, UDP |
|
| Default port for PostgreSQL database connections. |
1.6. System Accounts
1.6.1. Red Hat Enterprise Virtualization Manager User Accounts
- The
vdsmuser (UID36). Required for support tools that mount and access NFS storage domains. - The
ovirtuser (UID108). Owner of theovirt-engineRed Hat JBoss Enterprise Application Platform instance.
1.6.2. Red Hat Enterprise Virtualization Manager Groups
- The
kvmgroup (GID36). Group members include:- The
vdsmuser.
- The
ovirtgroup (GID108). Group members include:- The
ovirtuser.
1.6.3. Virtualization Host User Accounts
- The
vdsmuser (UID36). - The
qemuuser (UID107). - The
sanlockuser (UID179).
admin user (UID 500). This admin user is not created on Red Hat Enterprise Linux virtualization hosts. The admin user is created with the required permissions to run commands as the root user using the sudo command. The vdsm user which is present on both types of virtualization hosts is also given access to the sudo command.
Important
vdsm user however is fixed to a UID of 36 and the kvm group is fixed to a GID of 36.
36 or GID 36 is already used by another account on the system then a conflict will arise during installation of the vdsm and qemu-kvm-rhev packages.
1.6.4. Virtualization Host Groups
- The
kvmgroup (GID36). Group members include:- The
qemuuser. - The
sanlockuser.
- The
qemugroup (GID107). Group members include:- The
vdsmuser. - The
sanlockuser.
Important
vdsm user however is fixed to a UID of 36 and the kvm group is fixed to a GID of 36.
36 or GID 36 is already used by another account on the system then a conflict will arise during installation of the vdsm and qemu-kvm-rhev packages.
Part II. Installing Red Hat Enterprise Virtualization
Chapter 2. Installing Red Hat Enterprise Virtualization

2.2. Installing the Red Hat Enterprise Virtualization Manager
The Red Hat Enterprise Virtualization Manager can be installed under one of two arrangements - a standard setup in which the Manager is installed on an independent physical machine or virtual machine, or a self-hosted engine setup in which the Manager runs on a virtual machine that the Manager itself controls.
Important
Before installing the Red Hat Virtualization Manager, you must ensure that you meet all the prerequisites. To complete installation of the Red Hat Enterprise Virtualization Manager successfully, you must also be able to determine:
- The ports to be used for HTTP and HTTPS communication. The defaults ports are
80and443respectively. - The fully qualified domain name (FQDN) of the system on which the Manager is to be installed.
- The password you use to secure the Red Hat Enterprise Virtualization administration account.
- The location of the database server to be used. You can use the setup script to install and configure a local database server or use an existing remote database server. To use a remote database server you must know:You must also know the user name and password of a user that is known to the remote database server. The user must have permission to create databases in PostgreSQL.
- The host name of the system on which the remote database server exists.
- The port on which the remote database server is listening.
- That the
uuid-osspextension had been loaded by the remote database server.
- The organization name to use when creating the Manager's security certificates.
- The storage type to be used for the initial data center attached to the Manager. The default is NFS.
- The path to use for the ISO share, if the Manager is being configured to provide one. The display name, which will be used to label the domain in the Red Hat Enterprise Virtualization Manager also needs to be provided.
- The firewall rules, if any, present on the system that need to be integrated with the rules required for the Manager to function.
Before installation is completed the values selected are displayed for confirmation. Once the values have been confirmed they are applied and the Red Hat Enterprise Virtualization Manager is ready for use.
Example 2.1. Completed Installation
--== CONFIGURATION PREVIEW ==--

Engine database name                    : engine
Engine database secured connection      : False
Engine database host                    : localhost
Engine database user name               : engine
Engine database host name validation    : False
Engine database port                    : 5432
NFS setup                               : True
PKI organization                        : Your Org
Application mode                        : both
Firewall manager                        : iptables
Update Firewall                         : True
Configure WebSocket Proxy               : True
Host FQDN                               : Your Manager's FQDN
NFS export ACL                          : 0.0.0.0/0.0.0.0(rw)
NFS mount point                         : /var/lib/exports/iso
Datacenter storage type                 : nfs
Configure local Engine database         : True
Set application as default page         : True
Configure Apache SSL                    : True

Please confirm installation settings (OK, Cancel) [OK]:
Note
engine-setup with an answer file. An answer file contains answers to the questions asked by the setup command.
- To create an answer file, use the
--generate-answerparameter to specify a path and file name with which to create the answer file. When this option is specified, theengine-setupcommand records your answers to the questions in the setup process to the answer file.# engine-setup --generate-answer=[ANSWER_FILE]
- To use an answer file for a new installation, use the
--config-appendparameter to specify the path and file name of the answer file to be used. Theengine-setupcommand will use the answers stored in the file to complete the installation.# engine-setup --config-append=[ANSWER_FILE]
engine-setup --help for a full list of parameters.
Note
2.3. Subscribing to the Required Channels
2.3.1. Subscribing to the Red Hat Enterprise Virtualization Manager Channels using Subscription Manager
Before you can install the Red Hat Enterprise Virtualization Manager, you must register the system on which the Red Hat Enterprise Virtualization Manager will be installed with the Red Hat Network and subscribe to the required channels.
Procedure 2.1. Subscribing to the Red Hat Enterprise Virtualization Manager Channels using Subscription Manager
Register the System with Subscription Manager
Run the following command and enter your Red Hat Network user name and password to register the system with the Red Hat Network:# subscription-manager register
Identify Available Entitlement Pools
Run the following commands to find entitlement pools containing the channels required to install the Red Hat Enterprise Virtualization Manager:# subscription-manager list --available | grep -A8 "Red Hat Enterprise Linux Server" # subscription-manager list --available | grep -A8 "Red Hat Enterprise Virtualization"
Attach Entitlement Pools to the System
Use the pool identifiers located in the previous step to attach theRed Hat Enterprise Linux ServerandRed Hat Enterprise Virtualizationentitlements to the system. Run the following command to attach the entitlements:# subscription-manager attach --pool=[POOLID]
Enable the Required Channels
Run the following commands to enable the channels required to install Red Hat Enterprise Virtualization:# yum-config-manager --enable rhel-6-server-rpms # yum-config-manager --enable rhel-6-server-supplementary-rpms # yum-config-manager --enable rhel-6-server-rhevm-3.4-rpms # yum-config-manager --enable jb-eap-6-for-rhel-6-server-rpms
You have registered the system with Red Hat Network and subscribed to the channels required to install the Red Hat Enterprise Virtualization Manager.
2.3.2. Subscribing to the Red Hat Enterprise Virtualization Manager Channels Using RHN Classic
Note
To install Red Hat Enterprise Virtualization Manager you must first register the target system to Red Hat Network and subscribe to the required software channels.
Procedure 2.2. Subscribing to the Red Hat Enterprise Virtualization Manager Channels using RHN Classic
- Run the
rhn_registercommand to register the system with Red Hat Network. To complete registration successfully you must supply your Red Hat Network user name and password. Follow the on-screen prompts to complete registration of the system.# rhn_register
Subscribe to Required Channels
You must subscribe the system to the required channels using either the web interface to Red Hat Network or the command linerhn-channelcommand.Using the
rhn-channelCommandRun therhn-channelcommand to subscribe the system to each of the required channels. Run the following commands:# rhn-channel --add --channel=rhel-x86_64-server-6 # rhn-channel --add --channel=rhel-x86_64-server-supplementary-6 # rhn-channel --add --channel=rhel-x86_64-server-6-rhevm-3.4 # rhn-channel --add --channel=jbappplatform-6-x86_64-server-6-rpm
Important
If you are not the administrator for the machine as defined in Red Hat Network, or the machine is not registered to Red Hat Network, then use of therhn-channelcommand results in an error:Error communicating with server. The message was: Error Class Code: 37 Error Class Info: You are not allowed to perform administrative tasks on this system. Explanation: An error has occurred while processing your request. If this problem persists please enter a bug report at bugzilla.redhat.com. If you choose to submit the bug report, please be sure to include details of what you were trying to do when this error occurred and details on how to reproduce this problem.If you encounter this error when usingrhn-channel, you must use the web user interface to add the channel.Using the Web Interface to Red Hat Network
To add a channel subscription to a system from the web interface:- Log on to Red Hat Network (http://rhn.redhat.com).
- Move the mouse cursor over the Subscriptions link at the top of the screen, and then click the Registered Systems link in the menu that appears.
- Select the system to which you are adding channels from the list presented on the screen, by clicking the name of the system.
- Click Alter Channel Subscriptions in the Subscribed Channels section of the screen.
- Select the channels to be added from the list presented on the screen. Red Hat Enterprise Virtualization Manager requires:
- The Red Hat Enterprise Linux Server (v. 6 for 64-bit x86_64) channel. This channel is located under the Release Channels for Red Hat Enterprise Linux 6 for x86_64 expandable menu.
- The RHEL Server Supplementary (v. 6 64-bit x86_64) channel. This channel is located under the Release Channels for Red Hat Enterprise Linux 6 for x86_64 expandable menu.
- The Red Hat Enterprise Virtualization Manager (v.3.4 x86_64) channel. This channel is located under the Additional Services Channels for Red Hat Enterprise Linux 6 for x86_64 expandable menu.
- The Red Hat JBoss EAP (v 6) for 6Server x86_64 channel. This channel is located under the Additional Services Channels for Red Hat Enterprise Linux 6 for x86_64 expandable menu.
- Click the Change Subscription button to finalize the change.
The system is now registered with Red Hat Network and subscribed to the channels required for Red Hat Enterprise Virtualization Manager installation.
2.4. Installing the Red Hat Enterprise Virtualization Manager
2.4.1. Configuring an Offline Repository for Red Hat Enterprise Virtualization Manager Installation
Install Red Hat Enterprise Linux
Install Red Hat Enterprise Linux 6 Server on a system that has access to Red Hat Network. This system downloads all required packages, and distribute them to your offline system(s).Important
Ensure that the system used has a large amount of free disk space available. This procedure downloads a large number of packages, and requires up to 1.5 GB of free disk space.Register Red Hat Enterprise Linux
Register the system with Red Hat Network (RHN) using either Subscription Manager or RHN Classic.Subscription Manager
Use thesubscription-managercommand asrootwith theregisterparameter.# subscription-manager register
RHN Classic
Use therhn_registercommand asroot.# rhn_register
Add required channel subscriptions
Subscribe the system for all channels listed in the Red Hat Enterprise Virtualization - Installation Guide.Subscription Manager
RHN Classic
Configure File Transfer Protocol (FTP) access
Servers that are not connected to the Internet can access the software repository using File Transfer Protocol (FTP). To create the FTP repository you must install and configure vsftpd, while logged in to the system as therootuser:Install vsftpd
Install the vsftpd package.# yum install vsftpd
Start vsftpd
Start thevsftpddaemon.# chkconfig vsftpd on service vsftpd start
Create sub-directory
Create a sub-directory inside the/var/ftp/pub/directory. This is where the downloaded packages will be made available.# mkdir /var/ftp/pub/rhevrepo
Download packages
Once the FTP server has been configured, you must use thereposynccommand to download the packages to be shared. It downloads all packages from all configured software repositories. This includes repositories for all Red Hat Network channels the system is subscribed to, and any locally configured repositories.- As the
rootuser, change into the/var/ftp/pub/rhevrepodirectory.# cd /var/ftp/pub/rhevrepo
- Run the
reposynccommand.# reposync --plugins .
Create local repository metadata
Use thecreaterepocommand to create repository metadata for each of the sub-directories where packages were downloaded under/var/ftp/pub/rhevrepo.# for DIR in `find /var/ftp/pub/rhevrepo -maxdepth 1 -mindepth 1 -type d`; do createrepo $DIR; done;
Create repository configuration files
Create ayumconfiguration file, and copy it to the/etc/yum.repos.d/directory on client systems that you want to connect to this software repository. Ensure that the system hosting the repository is connected to the same network as the client systems where the packages are to be installed.The configuration file can be created manually, or using a script. If using a script, then before running it you must replaceADDRESSin thebaseurlwith the IP address or Fully Qualified Domain Name (FQDN) of the system hosting the repository. The script must be run on this system and then distributed to the client machines. For example:#!/bin/sh REPOFILE="/etc/yum.repos.d/rhev.repo" for DIR in `find /var/ftp/pub/rhevrepo -maxdepth 1 -mindepth 1 -type d`; do echo -e "[`basename $DIR`]" > $REPOFILE echo -e "name=`basename $DIR`" >> $REPOFILE echo -e "baseurl=ftp://ADDRESS/pub/rhevrepo/`basename $DIR`" >> $REPOFILE echo -e "enabled=1" >> $REPOFILE echo -e "gpgcheck=0" >> $REPOFILE echo -e "\n" >> $REPOFILE done;Copy the repository configuration file to client system
Copy the repository configuration file to the/etc/yum.repos.d/directory on every system that you want to connect to this software repository. For example: Red Hat Enterprise Virtualization Manager system(s), all Red Hat Enterprise Linux virtualization hosts, and all Red Hat Enterprise Linux virtual machines.
Note
- Recursively copy the
/var/ftp/pub/rhevrepodirectory, and all its contents, to the removable media. - Modify the
/etc/yum.repos.d/rhev.repofile, replacing thebaseurlvalues with the path to which the removable media will be mounted on the client systems. For examplefile:///media/disk/rhevrepo/.
Note
--newest-only parameter to the reposync command ensures that it only retrieves the newest version of each available package. Once the repository is updated you must ensure it is available to each of your client systems and then run yum update on it.
2.4.2. Installing the Red Hat Enterprise Virtualization Manager Packages
Before you can configure and use the Red Hat Enterprise Virtualization Manager, you must install the rhevm package and dependencies.
Procedure 2.3. Installing the Red Hat Enterprise Virtualization Manager Packages
- To ensure all packages are up to date, run the following command on the machine where you are installing the Red Hat Enterprise Virtualization Manager:
# yum update
- Run the following command to install the rhevm package and dependencies.
# yum install rhevm
Note
The rhevm-doc package is installed as a dependency of the rhevm package, and provides a local copy of the Red Hat Enterprise Virtualization documentation suite. This documentation is also used to provide context sensitive help links from the Administration and User Portals. You can run the following commands to search for translated versions of the documentation:# yum search rhevm-doc
You have installed the rhevm package and dependencies.
2.4.3. Configuring the Red Hat Enterprise Virtualization Manager
engine-setup command. This command asks you a series of questions and, after you provide the required values for all questions, applies that configuration and starts the ovirt-engine service.
Note
engine-setup command guides you through several distinct configuration stages, each comprising several steps that require user input. Suggested configuration defaults are provided in square brackets; if the suggested value is acceptable for a given step, press Enter to accept that value.
Procedure 2.4. Configuring the Red Hat Enterprise Virtualization Manager
Packages
Theengine-setupcommand checks to see if it is performing an upgrade or an installation, and whether any updates are available for the packages linked to the Manager. No user input is required at this stage.[ INFO ] Checking for product updates... [ INFO ] No product updates found
Network Configuration
A reverse lookup is performed on the host name of the machine on which the Red Hat Enterprise Virtualization Manager is being installed. The host name is detected automatically, but you can correct this host name if it is incorrect or if you are using virtual hosts. There must be forward and reverse lookup records for the provided host name in DNS, especially if you will also install the reports server.Host fully qualified DNS name of this server [autodetected host name]:
Theengine-setupcommand checks your firewall configuration and offers to modify that configuration for you to open the ports used by the Manager for external communication such as TCP ports 80 and 443. If you do not allow theengine-setupcommand to modify your firewall configuration, then you must manually open the ports used by the Red Hat Enterprise Virtualization Manager.Do you want Setup to configure the firewall? (Yes, No) [Yes]:
Database Configuration
You can use either a local or remote PostgreSQL database. Theengine-setupcommand can configure your database automatically (including adding a user and a database), or it can use values that you supply.Where is the database located? (Local, Remote) [Local]: Setup can configure the local postgresql server automatically for the engine to run. This may conflict with existing applications. Would you like Setup to automatically configure postgresql and create Engine database, or prefer to perform that manually? (Automatic, Manual) [Automatic]:
oVirt Engine Configuration
Select Gluster, Virt, or Both:Application mode (Both, Virt, Gluster) [Both]:
Both offers the greatest flexibility.Set a password for the automatically created administrative user of the Red Hat Enterprise Virtualization Manager:Engine admin password: Confirm engine admin password:
PKI Configuration
The Manager uses certificates to communicate securely with its hosts. You provide the organization name for the certificate. This certificate can also optionally be used to secure https communications with the Manager.Organization name for certificate [autodetected domain-based name]:
Apache Configuration
By default, external SSL (HTTPS) communication with the Manager is secured with the self-signed certificate created in the PKI configuration stage to securely communicate with hosts. Another certificate may be chosen for external HTTPS connections, without affecting how the Manager communicates with hosts.Setup can configure apache to use SSL using a certificate issued from the internal CA. Do you wish Setup to configure that, or prefer to perform that manually? (Automatic, Manual) [Automatic]:
The Red Hat Enterprise Virtualization Manager uses the Apache web server to present a landing page to users. Theengine-setupcommand can make the landing page of the Manager the default page presented by Apache.Setup can configure the default page of the web server to present the application home page. This may conflict with existing applications. Do you wish to set the application as the default web page of the server? (Yes, No) [Yes]:
System Configuration
Theengine-setupcommand can create an NFS share on the Manager to use as an ISO storage domain. Hosting the ISO domain locally to the Manager simplifies keeping some elements of your environment up to date.Configure an NFS share on this server to be used as an ISO Domain? (Yes, No) [Yes]: Local ISO domain path [/var/lib/exports/iso]: Local ISO domain ACL [0.0.0.0/0.0.0.0(rw)]: Local ISO domain name [ISO_DOMAIN]:
Websocket Proxy Server Configuration
Theengine-setupcommand can optionally configure a websocket proxy server for allowing users to connect to virtual machines via the noVNC or HTML 5 consoles.Configure WebSocket Proxy on this machine? (Yes, No) [Yes]:
Miscellaneous Configuration
You can use theengine-setupcommand to allow a proxy server to broker transactions from the Red Hat Access plug-in.Would you like transactions from the Red Hat Access Plugin sent from the RHEV Manager to be brokered through a proxy server? (Yes, No) [No]:
[ INFO ] Stage: Setup validation
Configuration Preview
Check the configuration preview to confirm the values you entered before they are applied. If you choose to proceed,engine-setupconfigures the Red Hat Enterprise Virtualization Manager using those values.Engine database name : engine Engine database secured connection : False Engine database host : localhost Engine database user name : engine Engine database host name validation : False Engine database port : 5432 NFS setup : True PKI organization : Your Org Application mode : both Firewall manager : iptables Update Firewall : True Configure WebSocket Proxy : True Host FQDN : Your Manager's FQDN NFS export ACL : 0.0.0.0/0.0.0.0(rw) NFS mount point : /var/lib/exports/iso Datacenter storage type : nfs Configure local Engine database : True Set application as default page : True Configure Apache SSL : True Please confirm installation settings (OK, Cancel) [OK]:When your environment has been configured, theengine-setupcommand displays details about how to access your environment and related security details.Clean Up and Termination
Theengine-setupcommand cleans up any temporary files created during the configuration process, and outputs the location of the log file for the Red Hat Enterprise Virtualization Manager configuration process.[ INFO ] Stage: Clean up Log file is located at /var/log/ovirt-engine/setup/ovirt-engine-setup-installation-date.log [ INFO ] Stage: Pre-termination [ INFO ] Stage: Termination [ INFO ] Execution of setup completed successfully
The Red Hat Enterprise Virtualization Manager has been configured and is running on your server. You can log in to the Administration Portal as the admin@internal user to continue configuring the Manager. Furthermore, the engine-setup command saves your answers to a file that can be used to reconfigure the Manager using the same values.
2.4.4. Preparing a PostgreSQL Database for Use with Red Hat Enterprise Virtualization Manager
You can manually configure a database server to host the database used by the Red Hat Enterprise Virtualization Manager. The database can be hosted either locally on the machine on which the Red Hat Enterprise Virtualization Manager is installed, or remotely on another machine.
Important
engine-setup command.
Procedure 2.5. Preparing a PostgreSQL Database for use with Red Hat Enterprise Virtualization Manager
- Run the following commands to initialize the PostgreSQL database, start the
postgresqlservice and ensure this service starts on boot:# service postgresql initdb # service postgresql start # chkconfig postgresql on
- Create a user for the Red Hat Enterprise Virtualization Manager to use when it writes to and reads from the database, and a database in which to store data about the Red Hat Enterprise Virtualization environment. You must perform this step on both local and remote databases. Use the psql terminal as the
postgresuser.# su - postgres $ psql postgres=# create role [user name] with login encrypted password '[password]'; postgres=# create database [database name] owner [user name] template template0 encoding 'UTF8' lc_collate 'en_US.UTF-8' lc_ctype 'en_US.UTF-8';
- Run the following commands to connect to the new database and add the
plpgsqllanguage:postgres=# \c [database name] CREATE LANGUAGE plpgsql;
- Ensure the database can be accessed remotely by enabling client authentication. Edit the
/var/lib/pgsql/data/pg_hba.conffile, and add the following in accordance with the location of the database:- For local databases, add the two following lines immediately underneath the line starting with
Localat the bottom of the file:host [database name] [user name] 0.0.0.0/0 md5 host [database name] [user name] ::0/0 md5
- For remote databases, add the following line immediately underneath the line starting with
Localat the bottom of the file, replacing X.X.X.X with the IP address of the Manager:host [database name] [user name] X.X.X.X/32 md5
- Allow TCP/IP connections to the database. You must perform this step for remote databases. Edit the
/var/lib/pgsql/data/postgresql.conffile and add the following line:listen_addresses='*'
This example configures thepostgresqlservice to listen for connections on all interfaces. You can specify an interface by giving its IP address. - Restart the
postgresqlservice. This step is required on both local and remote manually configured database servers.# service postgresql restart
You have manually configured a PostgreSQL database to use with the Red Hat Enterprise Virtualization Manager.
2.4.5. Configuring the Manager to Use a Manually Configured Local or Remote PostgreSQL Database
During the database configuration stage of configuring the Red Hat Enterprise Virtualization Manager using the engine-setup script, you can choose to use a manually configured database. You can select to use a locally or remotely installed PostgreSQL database.
Procedure 2.6. Configuring the Manager to use a Manually Configured Local or Remote PostgreSQL Database
- During configuration of the Red Hat Enterprise Virtualization Manager, the
engine-setupcommand prompts you to decide where your database is located:Where is the database located? (Local, Remote) [Local]:
The steps involved in manually configuring the Red Hat Enterprise Virtualization Manger to use local or remotely hosted databases are the same. However, to use a remotely hosted database you must provide the host name of the remote database server and the port on which it is listening. - When prompted, enter
Manualto manually configure the database:Would you like Setup to automatically configure postgresql, or prefer to perform that manually? (Automatic, Manual) [Automatic]: Manual
- If you are using a remotely hosted database, supply the
engine-setupcommand with the host name of your database server and the port on which it is listening:Database host [localhost]: Database port [5432]:
- For both local and remotely hosted databases, you must select whether or not your database uses a secured connection. You must also enter the name of the database you configured, the user the Manager can use to access the database, and the password of that user.
Database secured connection (Yes, No) [No]:
Database name [engine]:
Database user [engine]:
Database password:
Note
Using a secured connection to your database requires you to also have manually configured secured database connections.
You have configured the Red Hat Enterprise Virtualization Manager to use a manually configured database. The engine-setup command continues with the rest of your environment configuration.
2.4.6. Connecting to the Administration Portal
Access the Administration Portal using a web browser.
Procedure 2.7. Connecting to the Administration Portal
- Open a supported web browser.
- Navigate to
https://[your-manager-fqdn]/ovirt-engine, replacing [your-manager-fqdn] with the fully qualified domain name that you provided during installation to open the login screen.Important
The first time that you connect to the Administration Portal, you are prompted to trust the certificate being used to secure communications between your browser and the web server. - Enter your User Name and Password. If you are logging in for the first time, use the user name
adminin conjunction with the administrator password that you specified during installation. - Select the domain against which to authenticate from the Domain drop-down list. If you are logging in using the internal
adminuser name, select theinternaldomain. - You can view the Administration Portal in multiple languages. The default selection will be chosen based on the locale settings of your web browser. If you would like to view the Administration Portal in a language other than the default, select your preferred language from the list.
- Click Login.
You have logged into the Administration Portal.
2.4.7. Removing the Red Hat Enterprise Virtualization Manager
You can use the engine-cleanup command to remove the files associated with the Red Hat Enterprise Virtualization Manager.
Procedure 2.8. Removing Red Hat Enterprise Virtualization Manager
- Run the following command on the machine on which the Red Hat Enterprise Virtualization Manager is installed:
# engine-cleanup
- You are prompted to confirm removal of all Red Hat Enterprise Virtualization Manager components. These components include PKI keys, the locally hosted ISO domain file system layout, PKI configuration, the local NFS exports configuration, and the engine database content.
Do you want to remove all components? (Yes, No) [Yes]:
Note
A backup of the Engine database and a compressed archive of the PKI keys and configuration are always automatically created. These files are saved under/var/lib/ovirt-engine/backups/, and include the date andengine-andengine-pki-in their file names respectively. - You are given another opportunity to change your mind and cancel the removal of the Red Hat Enterprise Virtualization Manager. If you choose to proceed, the
ovirt-engineservice is stopped, and your environment's configuration is removed in accordance with the options you selected.During execution engine service will be stopped (OK, Cancel) [OK]: ovirt-engine is about to be removed, data will be lost (OK, Cancel) [Cancel]:OK
The configuration files of your environment have been removed according to your selections when you ran engine-cleanup.
          --== SUMMARY ==--

A backup of the database is available at /var/lib/ovirt-engine/backups/engine-date-and-extra-characters.sql
Engine setup successfully cleaned up
A backup of PKI configuration and keys is available at /var/lib/ovirt-engine/backups/engine-pki-date-and-extra-characters.tar.gz

          --== END OF SUMMARY ==--

[ INFO  ] Generating answer file '/var/lib/ovirt-engine/setup/answers/20130827181911-cleanup.conf'
[ INFO  ] Stage: Clean up
          Log file is located at /var/log/ovirt-engine/setup/ovirt-engine-remove-date.log
[ INFO  ] Stage: Pre-termination
[ INFO  ] Stage: Termination
[ INFO ] Execution of cleanup completed successfullyyum command.
# yum remove rhevm* vdsm-bootstrap
2.5. SPICE Client
2.5.1. SPICE Features
- SPICE-HTML5 support (Technology Preview), BZ#974060
- Initial support for the SPICE-HTML5 console client is now offered as a technology preview. This feature allows users to connect to a SPICE console from their browser using the SPICE-HTML5 client. The requirements for enabling SPICE-HTML5 are the same as that of the noVNC console, as follows:On the guest:
- The WebSocket proxy must be set up and running in the environment.
- The engine must be aware of the WebSocket proxy - use
engine-configto set theWebSocketProxykey.
On the client:- The client must have a browser with WebSocket and postMessage support.
- If SSL is enabled, the engine's certificate authority must be imported in the client browser.
Table 2.1.
| Client Operating System | Wan Optimizations | Dynamic Console Resizing | SPICE Proxy Support | Full High Definition Display | Multiple Monitor Support |
|---|---|---|---|---|---|
| RHEL 5.8+ | No | No | No | Yes | Yes |
| RHEL 6.2 - 6.4 | No | No | No | Yes | Yes |
| RHEL 6.5 + | Yes | Yes | Yes | Yes | Yes |
| Windows XP (All versions) | Yes | Yes | Yes | Yes | Yes |
| Windows 7 (All versions) | Yes | Yes | Yes | Yes | Yes |
| Windows 8 (All versions) | Yes | Yes | Yes | Yes | Yes |
| Windows Server 2008 | Yes | Yes | Yes | Yes | Yes |
| Windows Server 2012 | Yes | Yes | Yes | Yes | Yes |
Chapter 3. The Self-Hosted Engine
3.1. About the Self-Hosted Engine
3.2. Limitations of the Self-Hosted Engine
- An NFS storage domain is required for the configuration. NFS is the only supported file system for the self-hosted engine.
- The host of the self-hosted engine and all attached hosts must use Red Hat Enterprise Linux 6.5 or 6.6. Red Hat Enterprise Virtualization Hypervisors are not supported.
3.3. Installing the Self-Hosted Engine
Install a Red Hat Enterprise Virtualization environment that takes advantage of the self-hosted engine feature, in which the engine is installed on a virtual machine within the environment itself.
rhel-6-server-rpmsrhel-6-server-supplementary-rpmsrhel-6-server-rhevm-3.4-rpmsjb-eap-6-for-rhel-6-server-rpmsrhel-6-server-rhev-mgmt-agent-rpms
rhel-x86_64-server-6rhel-x86_64-server-supplementary-6rhel-x86_64-server-6-rhevm-3.4jbappplatform-6-x86_64-server-6-rpmrhel-x86_64-rhev-mgmt-agent-6
Important
rhel-6-server-rhev-mgmt-agent-rpms in Subscription Manager and rhel-x86_64-rhev-mgmt-agent-6 in RHN Classic.
root user.
Procedure 3.1. Installing the Self-Hosted Engine
- Run the following command to ensure that the most up-to-date versions of all installed packages are in use:
# yum upgrade
- Run the following command to install the ovirt-hosted-engine-setup package and dependencies:
# yum install ovirt-hosted-engine-setup
You have installed the ovirt-hosted-engine-setup package and are ready to configure the self-hosted engine.
3.4. Configuring the Self-Hosted Engine
When package installation is complete, the Red Hat Enterprise Virtualization Manager must be configured. The hosted-engine deployment script is provided to assist with this task. The script asks you a series of questions, and configures your environment based on your answers. When the required values have been provided, the updated configuration is applied and the Red Hat Enterprise Virtualization Manager services are started.
hosted-engine deployment script guides you through several distinct configuration stages. The script suggests possible configuration defaults in square brackets. Where these default values are acceptable, no additional input is required.
Host-HE1.example.com in this procedure.
hosted-engine deployment script to access this virtual machine multiple times to install an operating system and to configure the engine.
root user for the specified machine.
Procedure 3.2. Configuring the Self-Hosted Engine
Initiating Hosted Engine Deployment
Begin configuration of the self-hosted environment by deploying thehosted-enginecustomization script on Host_HE1. To escape the script at any time, use the CTRL+D keyboard combination to abort deployment.# hosted-engine --deploy
Configuring Storage
Select the version of NFS and specify the full address, using either the FQDN or IP address, and path name of the shared storage domain. Choose the storage domain and storage data center names to be used in the environment.During customization use CTRL-D to abort. Please specify the storage you would like to use (nfs3, nfs4)[nfs3]: Please specify the full shared storage connection path to use (example: host:/path): storage.example.com:/hosted_engine/nfs [ INFO ] Installing on first host Please provide storage domain name. [hosted_storage]: Local storage datacenter name is an internal name and currently will not be shown in engine's admin UI.Please enter local datacenter name [hosted_datacenter]:
Configuring the Network
The script detects possible network interface controllers (NICs) to use as a management bridge for the environment. It then checks your firewall configuration and offers to modify it for console (SPICE or VNC) access HostedEngine-VM. Provide a pingable gateway IP address, to be used by theovirt-ha-agentto help determine a host's suitability for running HostedEngine-VM.Please indicate a nic to set rhevm bridge on: (eth1, eth0) [eth1]: iptables was detected on your computer, do you wish setup to configure it? (Yes, No)[Yes]: Please indicate a pingable gateway IP address [X.X.X.X]:
Configuring the Virtual Machine
The script creates a virtual machine to be configured as the Red Hat Enterprise Virtualization Manager, the hosted engine referred to in this procedure as HostedEngine-VM. Specify the boot device and, if applicable, the path name of the installation media, the CPU type, the number of virtual CPUs, and the disk size. Specify a MAC address for the HostedEngine-VM, or accept a randomly generated one. The MAC address can be used to update your DHCP server prior to installing the operating system on the virtual machine. Specify memory size and console connection type for the creation of HostedEngine-VM.Please specify the device to boot the VM from (cdrom, disk, pxe) [cdrom]: The following CPU types are supported by this host: - model_Penryn: Intel Penryn Family - model_Conroe: Intel Conroe Family Please specify the CPU type to be used by the VM [model_Penryn]: Please specify the number of virtual CPUs for the VM [Defaults to minimum requirement: 2]: Please specify the disk size of the VM in GB [Defaults to minimum requirement: 25]: You may specify a MAC address for the VM or accept a randomly generated default [00:16:3e:77:b2:a4]: Please specify the memory size of the VM in MB [Defaults to minimum requirement: 4096]: Please specify the console type you would like to use to connect to the VM (vnc, spice) [vnc]:Configuring the Hosted Engine
Specify the name for Host-HE1 to be identified in the Red Hat Enterprise Virtualization environment, and the password for theadmin@internaluser to access the Administrator Portal. Provide the FQDN for HostedEngine-VM; this procedure uses the FQDN HostedEngine-VM.example.com. Finally, provide the name and TCP port number of the SMTP server, the email address used to send email notifications, and a comma-separated list of email addresses to receive these notifications.Enter the name which will be used to identify this host inside the Administrator Portal [hosted_engine_1]: Host-HE1 Enter 'admin@internal' user password that will be used for accessing the Administrator Portal: Confirm 'admin@internal' user password: Please provide the FQDN for the engine you would like to use. This needs to match the FQDN that you will use for the engine installation within the VM: HostedEngine-VM.example.com Please provide the name of the SMTP server through which we will send notifications [localhost]: Please provide the TCP port number of the SMTP server [25]: Please provide the email address from which notifications will be sent [root@localhost]: Please provide a comma-separated list of email addresses which will get notifications [root@localhost]:
Configuration Preview
Before proceeding, thehosted-enginescript displays the configuration values you have entered, and prompts for confirmation to proceed with these values.Bridge interface : eth1 Engine FQDN : HostedEngine-VM.example.com Bridge name : rhevm SSH daemon port : 22 Firewall manager : iptables Gateway address : X.X.X.X Host name for web application : Host-HE1 Host ID : 1 Image size GB : 25 Storage connection : storage.example.com:/hosted_engine/nfs Console type : vnc Memory size MB : 4096 MAC address : 00:16:3e:77:b2:a4 Boot type : pxe Number of CPUs : 2 CPU Type : model_Penryn Please confirm installation settings (Yes, No)[No]:
Creating HostedEngine-VM
The script creates a virtual machine to be HostedEngine-VM and provides connection details. You must install an operating system on HostedEngine-VM before thehosted-enginescript can proceed on Host-HE1.[ INFO ] Generating answer file '/etc/ovirt-hosted-engine/answers.conf' [ INFO ] Stage: Transaction setup [ INFO ] Stage: Misc configuration [ INFO ] Stage: Package installation [ INFO ] Stage: Misc configuration [ INFO ] Configuring libvirt [ INFO ] Generating VDSM certificates [ INFO ] Configuring VDSM [ INFO ] Starting vdsmd [ INFO ] Waiting for VDSM hardware info [ INFO ] Creating Storage Domain [ INFO ] Creating Storage Pool [ INFO ] Connecting Storage Pool [ INFO ] Verifying sanlock lockspace initialization [ INFO ] Initializing sanlock lockspace [ INFO ] Initializing sanlock metadata [ INFO ] Creating VM Image [ INFO ] Disconnecting Storage Pool [ INFO ] Start monitoring domain [ INFO ] Configuring VM [ INFO ] Updating hosted-engine configuration [ INFO ] Stage: Transaction commit [ INFO ] Stage: Closing up [ INFO ] Creating VM You can now connect to the VM with the following command: /usr/bin/remote-viewer vnc://localhost:5900 Use temporary password "3042QHpX" to connect to vnc console. Please note that in order to use remote-viewer you need to be able to run graphical applications. This means that if you are using ssh you have to supply the -Y flag (enables trusted X11 forwarding). Otherwise you can run the command from a terminal in your preferred desktop environment. If you cannot run graphical applications you can connect to the graphic console from another host or connect to the console using the following command: virsh -c qemu+tls://Test/system console HostedEngine If you need to reboot the VM you will need to start it manually using the command: hosted-engine --vm-start You can then set a temporary password using the command: hosted-engine --add-console-password The VM has been started. Install the OS and shut down or reboot it. To continue please make a selection: (1) Continue setup - VM installation is complete (2) Reboot the VM and restart installation (3) Abort setup (1, 2, 3)[1]:Using the naming convention of this procedure, connect to the virtual machine using VNC with the following command:/usr/bin/remote-viewer vnc://Host-HE1.example.com:5900
Installing the Virtual Machine Operating System
Connect to HostedEngine-VM, the virtual machine created by the hosted-engine script, and install a Red Hat Enterprise Linux 6.5 or 6.6 operating system. Ensure the machine is rebooted once installation has completed.Synchronizing the Host and the Virtual Machine
Return to Host-HE1 and continue thehosted-enginedeployment script by selecting option 1:(1) Continue setup - VM installation is complete
 Waiting for VM to shut down...
[ INFO  ] Creating VM
You can now connect to the VM with the following command:
	/usr/bin/remote-viewer vnc://localhost:5900
Use temporary password "3042QHpX" to connect to vnc console.
Please note that in order to use remote-viewer you need to be able to run graphical applications.
This means that if you are using ssh you have to supply the -Y flag (enables trusted X11 forwarding).
Otherwise you can run the command from a terminal in your preferred desktop environment.
If you cannot run graphical applications you can connect to the graphic console from another host or connect to the console using the following command:
virsh -c qemu+tls://Test/system console HostedEngine
If you need to reboot the VM you will need to start it manually using the command:
hosted-engine --vm-start
You can then set a temporary password using the command:
hosted-engine --add-console-password
Please install and setup the engine in the VM.
You may also be interested in subscribing to "agent" RHN/Satellite channel and installing rhevm-guest-agent-common package in the VM.
To continue make a selection from the options below:
          (1) Continue setup - engine installation is complete
          (2) Power off and restart the VM
          (3) Abort setup
Installing the Manager
Connect to HostedEngine-VM, subscribe to the appropriate Red Hat Enterprise Virtualization Manager channels, ensure that the most up-to-date versions of all installed packages are in use, and install the rhevm packages.# yum upgrade
# yum install rhevm
Configuring the Manager
Configure the engine on HostedEngine-VM:# engine-setup
Synchronizing the Host and the Manager
Return to Host-HE1 and continue thehosted-enginedeployment script by selecting option 1:(1) Continue setup - engine installation is complete
[ INFO  ] Engine replied: DB Up!Welcome to Health Status!
[ INFO  ] Waiting for the host to become operational in the engine. This may take several minutes...
[ INFO  ] Still waiting for VDSM host to become operational...
[ INFO  ] The VDSM Host is now operational
          Please shutdown the VM allowing the system to launch it as a monitored service.
          The system will wait until the VM is down.
Shutting Down HostedEngine-VM
Shutdown HostedEngine-VM.# shutdown now
Setup Confirmation
Return to Host-HE1 to confirm it has detected that HostedEngine-VM is down.[ INFO ] Enabling and starting HA services Hosted Engine successfully set up [ INFO ] Stage: Clean up [ INFO ] Stage: Pre-termination [ INFO ] Stage: Termination
When the hosted-engine deployment script completes successfully, the Red Hat Enterprise Virtualization Manager is configured and running on your server. In contrast to a bare-metal Manager installation, the hosted engine Manager has already configured the data center, cluster, host (Host-HE1), storage domain, and virtual machine of the hosted engine (HostedEngine-VM). You can log in as the admin@internal user to continue configuring the Manager and add further resources.
engine-manage-domains command.
ovirt-host-engine-setup script also saves the answers you gave during configuration to a file, to help with disaster recovery. If a destination is not specified using the --generate-answer=<file> argument, the answer file is generated at /etc/ovirt-hosted-engine/answers.conf.
3.5. Installing Additional Hosts to a Self-Hosted Environment
Adding additional nodes to a self-hosted environment is very similar to deploying the original host, though heavily truncated as the script detects the environment.
root user.
Procedure 3.3. Adding the host
- Install the ovirt-hosted-engine-setup package.
# yum install ovirt-hosted-engine-setup
- Configure the host with the deployment command.
# hosted-engine --deploy
Configuring Storage
Specify the storage type and the full address, using either the Fully Qualified Domain Name (FQDN) or IP address, and path name of the shared storage domain used in the self-hosted environment.Please specify the storage you would like to use (nfs3, nfs4)[nfs3]: Please specify the full shared storage connection path to use (example: host:/path): storage.example.com:/hosted_engine/nfs
Detecting the Self-Hosted Engine
Thehosted-enginescript detects that the shared storage is being used and asks if this is an additional host setup. You are then prompted for the host ID, which must be an integer not already assigned to an additional host in the environment.The specified storage location already contains a data domain. Is this an additional host setup (Yes, No)[Yes]? [ INFO ] Installing on additional host Please specify the Host ID [Must be integer, default: 2]:
Configuring the System
Thehosted-enginescript uses the answer file generated by the original hosted-engine setup. To achieve this, the script requires the FQDN or IP address and the password of therootuser of that host so as to access and secure-copy the answer file to the additional host.[WARNING] A configuration file must be supplied to deploy Hosted Engine on an additional host. The answer file may be fetched from the first host using scp. If you do not want to download it automatically you can abort the setup answering no to the following question. Do you want to scp the answer file from the first host? (Yes, No)[Yes]: Please provide the FQDN or IP of the first host: Enter 'root' user password for host Host-HE1.example.com: [ INFO ] Answer file successfully downloaded
Configuring the Hosted Engine
Specify the name for the additional host to be identified in the Red Hat Enterprise Virtualization environment, and the password for theadmin@internaluser.Enter the name which will be used to identify this host inside the Administrator Portal [hosted_engine_2]: Enter 'admin@internal' user password that will be used for accessing the Administrator Portal: Confirm 'admin@internal' user password:
Configuration Preview
Before proceeding, thehosted-enginescript displays the configuration values you have entered, and prompts for confirmation to proceed with these values.Bridge interface : eth1 Engine FQDN : HostedEngine-VM.example.com Bridge name : rhevm SSH daemon port : 22 Firewall manager : iptables Gateway address : X.X.X.X Host name for web application : hosted_engine_2 Host ID : 2 Image size GB : 25 Storage connection : storage.example.com:/hosted_engine/nfs Console type : vnc Memory size MB : 4096 MAC address : 00:16:3e:05:95:50 Boot type : disk Number of CPUs : 2 CPU Type : model_Penryn Please confirm installation settings (Yes, No)[Yes]:
After confirmation, the script completes installation of the host and adds it to the environment.
3.6. Maintaining the Self-Hosted Engine
global- All high-availability agents in the cluster are disabled from monitoring the state of the engine virtual machine. Theglobalmaintenance mode must be applied for any setup or upgrade operations that require the engine to be stopped. Examples of this include upgrading to a later version of Red Hat Enterprise Virtualization, and installation of the rhevm-dwh and rhevm-reports packages necessary for the Reports Portal.local- The high-availability agent on the host issuing the command is disabled from monitoring the state of the engine virtual machine. The host is exempt from hosting the engine virtual machine while inlocalmaintenance mode; if hosting the engine virtual machine when placed into this mode, the engine will be migrated to another host, provided there is a suitable contender. Thelocalmaintenance mode is recommended when applying system changes or updates to the host.none- Disables maintenance mode, ensuring that the high-availability agents are operating.
# hosted-engine --set-maintenance --mode=mode
root user.
3.7. Upgrading the Self-Hosted Engine
Upgrade your Red Hat Enterprise Virtualization hosted-engine environment from version 3.3 to 3.4.
root user.
Procedure 3.4. Upgrading the Self-Hosted Engine
- Log into either host and set the maintenance mode to
globalto disable the high-availability agents.# hosted-engine --set-maintenance --mode=global
- Access the Red Hat Enterprise Virtualization Manager Administration Portal. Select Host A and put it into maintenance mode by clicking the button.
Important
The host that you put into maintenance mode and upgrade must not be the host currently hosting the Manager virtual machine. - Log into and update Host A.
# yum update
- Restart VDSM on Host A.
# service vdsmd restart
- Restart
ovirt-ha-brokerandovirt-ha-agenton Host A.# service ovirt-ha-broker restart
# service ovirt-ha-agent restart
- Log into either host and turn off the hosted-engine maintenance mode so that the Manager virtual machine can migrate to the other host.
# hosted-engine --set-maintenance --mode=none
- Access the Red Hat Enterprise Virtualization Manager Administration Portal. Select Host A and activate it by clicking the button.
- Log into Host B and set the maintenance mode to
globalto disable the high-availability agents.# hosted-engine --set-maintenance --mode=global
- Update Host B.
# yum update
- Restart VDSM on Host B.
# service vdsmd restart
- Restart
ovirt-ha-brokerandovirt-ha-agenton Host B.# service ovirt-ha-broker restart
# service ovirt-ha-agent restart
- Turn off the hosted-engine maintenance mode on Host B.
# hosted-engine --set-maintenance --mode=none
- Access the Red Hat Enterprise Virtualization Manager Administration Portal. Select Host B and activate it by clicking the button.
- Log into the Manager virtual machine and update the engine as per the instructions in Section 5.2.4, “Upgrading to Red Hat Enterprise Virtualization Manager 3.4”.
- Access the Red Hat Enterprise Virtualization Manager Administration Portal.
- Select the Default cluster and click to open the Edit Cluster window.
- Use the Compatibility Version drop-down menu to select 3.4. Click to save the change and close the window.
You have upgraded both the hosts and the Manager in your hosted-engine setup to Red Hat Enterprise Virtualization 3.4.
3.8. Upgrading Additional Hosts in a Self-Hosted Environment
It is recommended that all hosts in your self-hosted environment are upgraded at the same time. This prevents version 3.3 hosts from going into a Non Operational state. If this is not practical in your environment, follow this procedure to upgrade any additional hosts.
root user.
Procedure 3.5. Upgrading Additional Hosts
- Log into the host and set the maintenance mode to
local.# hosted-engine --set-maintenance --mode=local
- Access the Red Hat Enterprise Virtualization Manager Administration Portal. Select the host and put it into maintenance mode by clicking the button.
- Log into and update the host.
# yum update
- Restart VDSM on the host.
# service vdsmd restart
- Restart
ovirt-ha-brokerandovirt-ha-agenton the host.# service ovirt-ha-broker restart
# service ovirt-ha-agent restart
- Turn off the hosted-engine maintenance mode on the host.
# hosted-engine --set-maintenance --mode=none
- Access the Red Hat Enterprise Virtualization Manager Administration Portal. Select the host and activate it by clicking the button.
You have updated an additional host in your self-hosted environment to Red Hat Enterprise Virtualization 3.4.
3.9. Backing up and Restoring a Self-Hosted Environment
engine-backup tool, and only allows you to back up the Red Hat Enterprise Virtualization Manager virtual machine but not the host that contains the Manager virtual machine.
- Back up the original Red Hat Enterprise Virtualization Manager configuration settings and database content.
- Create a freshly installed Red Hat Enterprise Linux host and run the hosted-engine deployment script.
- Restore the Red Hat Enterprise Virtualization Manager configuration settings and database content in the new Manager virtual machine.
- Removing hosted-engine hosts in a Non Operational state and re-installing them into the restored self-hosted engine environment.
Prerequisites
- To restore a self-hosted engine environment, you must prepare a freshly installed Red Hat Enterprise Linux system on a physical host.
- The operating system version of the new host and Manager must be the same as that of the original host and Manager.
- You must have entitlements to subscribe your new environment. For a list of the required repositories, see Subscribing to the Required Entitlements.
- The fully qualified domain name of the new Manager must be the same fully qualified domain name as that of the original Manager. Forward and reverse lookup records must both be set in DNS.
- The new Manager database must have the same database user name as the original Manager database.
3.9.1. Backing up the Self-Hosted Engine Manager Virtual Machine
engine-backup tool and can be performed without interrupting the ovirt-engine service. The engine-backup tool only allows you to back up the Red Hat Enterprise Virtualization Manager virtual machine, but not the host that contains the Manager virtual machine.
Procedure 3.6. Backing up the Original Red Hat Enterprise Virtualization Manager
Preparing the Failover Host
A failover host, one of the hosted-engine hosts in the environment, must be placed into maintenance mode so that it has no virtual load at the time of the backup. This host can then later be used to deploy the restored self-hosted engine environment. Any of the hosted-engine hosts can be used as the failover host for this backup scenario, however the restore process is more straightforward ifHost 1is used. The default name for theHost 1host ishosted_engine_1; this was set when the hosted-engine deployment script was initially run.- Log in to one of the hosted-engine hosts.
- Confirm that the
hosted_engine_1host isHost 1:# hosted-engine --vm-status
- Log in to the Administration Portal.
- Select the Hosts tab.
- Select the
hosted_engine_1host in the results list, and click . - Click .
Disabling the High-Availability Agents
Disable the high-availability agents on the hosted-engine hosts to prevent migration of the Red Hat Enterprise Virtualization Manager virtual machine during the backup process. Connect to any of the hosted-engine hosts and place the high-availability agents on all hosts into global maintenance mode.# hosted-engine --set-maintenance --mode=global
Creating a Backup of the Manager
On the Manager virtual machine, back up the configuration settings and database content, replacing [EngineBackupFile] with the file name for the backup file, and [LogFILE] with the file name for the backup log.# engine-backup --mode=backup --file=[EngineBackupFile] --log=[LogFILE]
Copying the Backup Files to an External Server
Secure copy the backup files to an external server. In the following example, [Storage.example.com] is the fully qualified domain name of a network storage server that will store the backup until it is needed, and /backup/ is any designated folder or path. This step is not mandatory, but the backup files must be accessible to restore the configuration settings and database content.# scp -p [EngineBackupFiles] [Storage.example.com:/backup/EngineBackupFiles]
Enabling the High-Availability Agents
Connect to any of the hosted-engine hosts and turn off global maintenance mode. This enables the high-availability agents.# hosted-engine --set-maintenance --none
Activating the Failover Host
Bring thehosted_engine_1host out of maintenance mode.- Log in to the Administration Portal.
- Select the Hosts tab.
- Select
hosted_engine_1from the results list. - Click .
3.9.2. Creating a New Self-Hosted Engine Environment to be Used as the Restored Environment
Host 1, used in Section 3.9.1, “Backing up the Self-Hosted Engine Manager Virtual Machine” uses the default hostname of hosted_engine_1 which is also used in this procedure. Due to the nature of the restore process for the self-hosted engine, before the final synchronization of the restored engine can take place, this failover host will need to be removed, and this can only be achieved if the host had no virtual load when the backup was taken. You can also restore the backup on a separate hardware which was not used in the backed up environment and this is not a concern.
Important
Procedure 3.7. Creating a New Self-Hosted Environment to be Used as the Restored Environment
Updating DNS
Update your DNS so that the fully qualified domain name of the Red Hat Enterprise Virtualization environment correlates to the IP address of the new Manager. In this procedure, fully qualified domain name was set as Manager.example.com. The fully qualified domain name provided for the engine must be identical to that given in the engine setup of the original engine that was backed up.Initiating Hosted Engine Deployment
On the newly installed Red Hat Enterprise Linux host, run thehosted-enginedeployment script. To escape the script at any time, use the CTRL+D keyboard combination to abort deployment.# hosted-engine --deploy
If running thehosted-enginedeployment script over a network, it is recommended to use thescreenwindow manager to avoid losing the session in case of network or terminal disruption. Install the screen package first if not installed.# screen hosted-engine --deploy
Configuring Storage
Select the type of storage to use.During customization use CTRL-D to abort. Please specify the storage you would like to use (iscsi, nfs3, nfs4)[nfs3]:
Choose the storage domain and storage data center names to be used in the environment.- For NFS storage types, specify the full address, using either the fully qualified domain name or IP address, and path name of the shared storage domain.
Please specify the full shared storage connection path to use (example: host:/path): storage.example.com:/hosted_engine/nfs
- For iSCSI, specify the iSCSI portal IP address, port, user name and password, and select a target name from the auto-detected list:
Please specify the iSCSI portal IP address:
Please specify the iSCSI portal port [3260]:
Please specify the iSCSI portal user:
Please specify the iSCSI portal password:
Please specify the target name (auto-detected values) [default]:
[ INFO  ] Installing on first host
Please provide storage domain name. [hosted_storage]:
Local storage datacenter name is an internal name and currently will not be shown in engine's admin UI.Please enter local datacenter name [hosted_datacenter]:
Configuring the Network
The script detects possible network interface controllers (NICs) to use as a management bridge for the environment. It then checks your firewall configuration and offers to modify it for console (SPICE or VNC) access the Manager virtual machine. Provide a pingable gateway IP address, to be used by theovirt-ha-agent, to help determine a host's suitability for running a Manager virtual machine.Please indicate a nic to set rhevm bridge on: (eth1, eth0) [eth1]: iptables was detected on your computer, do you wish setup to configure it? (Yes, No)[Yes]: Please indicate a pingable gateway IP address [X.X.X.X]:
Configuring the New Manager Virtual Machine
The script creates a virtual machine to be configured as the new Manager virtual machine. Specify the boot device and, if applicable, the path name of the installation media, the CPU type, the number of virtual CPUs, and the disk size. Specify a MAC address for the Manager virtual machine, or accept a randomly generated one. The MAC address can be used to update your DHCP server prior to installing the operating system on the Manager virtual machine. Specify memory size and console connection type for the creation of Manager virtual machine.Please specify the device to boot the VM from (cdrom, disk, pxe) [cdrom]: The following CPU types are supported by this host: - model_Penryn: Intel Penryn Family - model_Conroe: Intel Conroe Family Please specify the CPU type to be used by the VM [model_Penryn]: Please specify the number of virtual CPUs for the VM [Defaults to minimum requirement: 2]: Please specify the disk size of the VM in GB [Defaults to minimum requirement: 25]: You may specify a MAC address for the VM or accept a randomly generated default [00:16:3e:77:b2:a4]: Please specify the memory size of the VM in MB [Defaults to minimum requirement: 4096]: Please specify the console type you want to use to connect to the VM (vnc, spice) [vnc]:Identifying the Name of the Host
A unique name must be provided for the name of the host, to ensure that it does not conflict with other resources that will be present when the engine has been restored from the backup. The namehosted_engine_1can be used in this procedure because this host was placed into maintenance mode before the environment was backed up, enabling removal of this host between the restoring of the engine and the final synchronization of the host and the engine.Enter the name which will be used to identify this host inside the Administrator Portal [hosted_engine_1]:
Configuring the Hosted Engine
Specify a name for the self-hosted engine environment, and the password for theadmin@internaluser to access the Administrator Portal. Provide the fully qualified domain name for the new Manager virtual machine. This procedure uses the fully qualified domain name Manager.example.com. Provide the name and TCP port number of the SMTP server, the email address used to send email notifications, and a comma-separated list of email addresses to receive these notifications.Important
The fully qualified domain name provided for the engine (Manager.example.com) must be the same fully qualified domain name provided when original Manager was initially set up.Enter 'admin@internal' user password that will be used for accessing the Administrator Portal: Confirm 'admin@internal' user password: Please provide the FQDN for the engine you want to use. This needs to match the FQDN that you will use for the engine installation within the VM: Manager.example.com Please provide the name of the SMTP server through which we will send notifications [localhost]: Please provide the TCP port number of the SMTP server [25]: Please provide the email address from which notifications will be sent [root@localhost]: Please provide a comma-separated list of email addresses which will get notifications [root@localhost]:
Configuration Preview
Before proceeding, thehosted-enginedeployment script displays the configuration values you have entered, and prompts for confirmation to proceed with these values.Bridge interface : eth1 Engine FQDN : Manager.example.com Bridge name : rhevm SSH daemon port : 22 Firewall manager : iptables Gateway address : X.X.X.X Host name for web application : hosted_engine_1 Host ID : 1 Image size GB : 25 Storage connection : storage.example.com:/hosted_engine/nfs Console type : vnc Memory size MB : 4096 MAC address : 00:16:3e:77:b2:a4 Boot type : pxe Number of CPUs : 2 CPU Type : model_Penryn Please confirm installation settings (Yes, No)[No]:
Creating the New Manager Virtual Machine
The script creates the virtual machine to be configured as the Manager virtual machine and provides connection details. You must install an operating system on it before thehosted-enginedeployment script can proceed on Hosted Engine configuration.[ INFO ] Generating answer file '/etc/ovirt-hosted-engine/answers.conf' [ INFO ] Stage: Transaction setup [ INFO ] Stage: Misc configuration [ INFO ] Stage: Package installation [ INFO ] Stage: Misc configuration [ INFO ] Configuring libvirt [ INFO ] Generating VDSM certificates [ INFO ] Configuring VDSM [ INFO ] Starting vdsmd [ INFO ] Waiting for VDSM hardware info [ INFO ] Creating Storage Domain [ INFO ] Creating Storage Pool [ INFO ] Connecting Storage Pool [ INFO ] Verifying sanlock lockspace initialization [ INFO ] Initializing sanlock lockspace [ INFO ] Initializing sanlock metadata [ INFO ] Creating VM Image [ INFO ] Disconnecting Storage Pool [ INFO ] Start monitoring domain [ INFO ] Configuring VM [ INFO ] Updating hosted-engine configuration [ INFO ] Stage: Transaction commit [ INFO ] Stage: Closing up [ INFO ] Creating VM You can now connect to the VM with the following command: /usr/bin/remote-viewer vnc://localhost:5900 Use temporary password "5379skAb" to connect to vnc console. Please note that in order to use remote-viewer you need to be able to run graphical applications. This means that if you are using ssh you have to supply the -Y flag (enables trusted X11 forwarding). Otherwise you can run the command from a terminal in your preferred desktop environment. If you cannot run graphical applications you can connect to the graphic console from another host or connect to the console using the following command: virsh -c qemu+tls://Test/system console HostedEngine If you need to reboot the VM you will need to start it manually using the command: hosted-engine --vm-start You can then set a temporary password using the command: hosted-engine --add-console-password The VM has been started. Install the OS and shut down or reboot it. To continue please make a selection: (1) Continue setup - VM installation is complete (2) Reboot the VM and restart installation (3) Abort setup (1, 2, 3)[1]:Using the naming convention of this procedure, connect to the virtual machine using VNC with the following command:/usr/bin/remote-viewer vnc://hosted_engine_1.example.com:5900
Installing the Virtual Machine Operating System
Connect to Manager virtual machine and install a Red Hat Enterprise Linux 6.5 or 6.6 operating system.Synchronizing the Host and the Manager
Return to the host and continue thehosted-enginedeployment script by selecting option 1:(1) Continue setup - VM installation is complete
 Waiting for VM to shut down...
[ INFO  ] Creating VM
You can now connect to the VM with the following command:
	/usr/bin/remote-viewer vnc://localhost:5900
Use temporary password "5379skAb" to connect to vnc console.
Please note that in order to use remote-viewer you need to be able to run graphical applications.
This means that if you are using ssh you have to supply the -Y flag (enables trusted X11 forwarding).
Otherwise you can run the command from a terminal in your preferred desktop environment.
If you cannot run graphical applications you can connect to the graphic console from another host or connect to the console using the following command:
virsh -c qemu+tls://Test/system console HostedEngine
If you need to reboot the VM you will need to start it manually using the command:
hosted-engine --vm-start
You can then set a temporary password using the command:
hosted-engine --add-console-password
Please install and setup the engine in the VM.
You may also be interested in subscribing to "agent" RHN/Satellite channel and installing rhevm-guest-agent-common package in the VM.
To continue make a selection from the options below:
          (1) Continue setup - engine installation is complete
          (2) Power off and restart the VM
          (3) Abort setup
Installing the Manager
Connect to new Manager virtual machine, ensure the latest versions of all installed packages are in use, and install the rhevm packages.# yum upgrade
# yum install rhevm
Install Reports and the Data Warehouse
If you are also restoring Reports and the Data Warehouse, install the rhevm-reports-setup and rhevm-dwh-setup packages.# yum install rhevm-reports-setup rhevm-dwh-setup
3.9.3. Restoring the Self-Hosted Engine Manager
Procedure 3.8. Restoring the Self-Hosted Engine Manager
- Manually create an empty database to which the database content in the backup can be restored. The following steps must be performed on the machine where the database is to be hosted.
- If the database is to be hosted on a machine other than the Manager virtual machine, install the postgresql-server package. This step is not required if the database is to be hosted on the Manager virtual machine because this package is included with the rhevm package.
# yum install postgesql-server
- Initialize the
postgresqldatabase, start thepostgresqlservice, and ensure this service starts on boot:# service postgresql initdb # service postgresql start # chkconfig postgresql on
- Enter the postgresql command line:
# su postgres
$ psql
- Create the
engineuser:postgres=# create role engine with login encrypted password 'password';
If you are also restoring the Reports and Data Warehouse, create theovirt_engine_reportsandovirt_engine_historyusers on the relevant host:postgres=# create role ovirt_engine_reports with login encrypted password 'password';
postgres=# create role ovirt_engine_history with login encrypted password 'password';
- Create the new database:
postgres=# create database database_name owner engine template template0 encoding 'UTF8' lc_collate 'en_US.UTF-8' lc_ctype 'en_US.UTF-8';
If you are also restoring the Reports and Data Warehouse, create the databases on the relevant host:postgres=# create database database_name owner ovirt_engine_reports template template0 encoding 'UTF8' lc_collate 'en_US.UTF-8' lc_ctype 'en_US.UTF-8';
postgres=# create database database_name owner ovirt_engine_history template template0 encoding 'UTF8' lc_collate 'en_US.UTF-8' lc_ctype 'en_US.UTF-8';
- Exit the postgresql command line and log out of the postgres user:
postgres=# \q
$ exit
- Edit the
/var/lib/pgsql/data/pg_hba.conffile as follows:- For each local database, replace the existing directives in the section starting with
localat the bottom of the file with the following directives:host database_name user_name 0.0.0.0/0 md5 host database_name user_name ::0/0 md5
- For each remote database:
- Add the following line immediately underneath the line starting with
Localat the bottom of the file, replacing X.X.X.X with the IP address of the Manager:host database_name user_name X.X.X.X/32 md5
- Allow TCP/IP connections to the database. Edit the
/var/lib/pgsql/data/postgresql.conffile and add the following line:listen_addresses='*'
This example configures thepostgresqlservice to listen for connections on all interfaces. You can specify an interface by giving its IP address. - Open the default port used for PostgreSQL database connections, and save the updated firewall rules:
# iptables -I INPUT 5 -p tcp -s Manager_IP_Address --dport 5432 -j ACCEPT
# service iptables save
- Restart the
postgresqlservice:# service postgresql restart
Copying the Backup Files to the New Manager
Secure copy the backup files to the new Manager virtual machine. This example copies the files from an network storage server to which the files were copied as in Section 3.9.1, “Backing up the Self-Hosted Engine Manager Virtual Machine”. In this example, [Storage.example.com] is the fully qualified domain name of the storage server, [/backup/EngineBackupFiles] is the designated file path for the backup files on the storage server, and [/backup/] is the file path for the files to which the files will be copied on the new Manager.# scp -p [Storage.example.com:/backup/EngineBackupFiles] [/backup/]
- Restore a complete backup or a database-only backup with the
--change-db-credentialsparameter to pass the credentials of the new database. The database_location for a database local to the Manager islocalhost.Note
The following examples use a--*passwordoption for each database without specifying a password, which will prompt for a password for each database. Passwords can be supplied for these options in the command itself, however this is not recommended as the password will then be stored in the shell history. Alternatively,--*passfile=password_file options can be used for each database to securely pass the passwords to theengine-backuptool without the need for interactive prompts.- Restore a complete backup:
# engine-backup --mode=restore --file=file_name --log=log_file_name --change-db-credentials --db-host=database_location --db-name=database_name --db-user=engine --db-password
If Reports and Data Warehouse are also being restored as part of the complete backup, include the revised credentials for the two additional databases:engine-backup --mode=restore --file=file_name --log=log_file_name --change-db-credentials --db-host=database_location --db-name=database_name --db-user=engine --db-password --change-reports-db-credentials --reports-db-host=database_location --reports-db-name=database_name --reports-db-user=ovirt_engine_reports --reports-db-password --change-dwh-db-credentials --dwh-db-host=database_location --dwh-db-name=database_name --dwh-db-user=ovirt_engine_history --dwh-db-password
- Restore a database-only backup by first restoring the configuration files backup and then restoring the database backup:
# engine-backup --mode=restore --scope=files --file=file_name --log=log_file_name
# engine-backup --mode=restore --scope=db --file=file_name --log=file_name --change-db-credentials --db-host=database_location --db-name=database_name --db-user=engine --db-password
The example above restores a backup of the Manager database.# engine-backup --mode=restore --scope=reportsdb --file=file_name --log=file_name --change-reports-db-credentials --reports-db-host=database_location --reports-db-name=database_name --reports-db-user=ovirt_engine_reports --reports-db-password
The example above restores a backup of the Reports database.# engine-backup --mode=restore --scope=dwhdb --file=file_name --log=file_name --change-dwh-db-credentials --dwh-db-host=database_location --dwh-db-name=database_name --dwh-db-user=ovirt_engine_history --dwh-db-password
The example above restores a backup of the Data Warehouse database.
If successful, the following output displays:You should now run engine-setup. Done.
Configuring the Manager
Configure the restored Manager virtual machine. This process identifies the existing configuration settings and database content. Confirm the settings. Upon completion, the setup provides an SSH fingerprint and an internal Certificate Authority hash.# engine-setup
[ INFO  ] Stage: Initializing
[ INFO  ] Stage: Environment setup
Configuration files: ['/etc/ovirt-engine-setup.conf.d/10-packaging.conf', '/etc/ovirt-engine-setup.conf.d/20-setup-ovirt-post.conf']
Log file: /var/log/ovirt-engine/setup/ovirt-engine-setup-20140304075238.log
Version: otopi-1.1.2 (otopi-1.1.2-1.el6ev)
[ INFO  ] Stage: Environment packages setup
[ INFO  ] Yum Downloading: rhel-65-zstream/primary_db 2.8 M(70%)
[ INFO  ] Stage: Programs detection
[ INFO  ] Stage: Environment setup
[ INFO  ] Stage: Environment customization

          --== PACKAGES ==--

[ INFO  ] Checking for product updates...
[ INFO  ] No product updates found

          --== NETWORK CONFIGURATION ==--

Setup can automatically configure the firewall on this system.
Note: automatic configuration of the firewall may overwrite current settings.
Do you want Setup to configure the firewall? (Yes, No) [Yes]:
[ INFO  ] iptables will be configured as firewall manager.

          --== DATABASE CONFIGURATION ==--


          --== OVIRT ENGINE CONFIGURATION ==--

          Skipping storing options as database already prepared

          --== PKI CONFIGURATION ==--

          PKI is already configured

          --== APACHE CONFIGURATION ==--


          --== SYSTEM CONFIGURATION ==--


          --== END OF CONFIGURATION ==--

[ INFO  ] Stage: Setup validation
[WARNING] Less than 16384MB of memory is available
[ INFO  ] Cleaning stale zombie tasks

          --== CONFIGURATION PREVIEW ==--

          Database name                      : engine
          Database secured connection        : False
          Database host                      : X.X.X.X
          Database user name                 : engine
          Database host name validation      : False
          Database port                      : 5432
          NFS setup                          : True
          Firewall manager                   : iptables
          Update Firewall                    : True
          Configure WebSocket Proxy          : True
          Host FQDN                          : Manager.example.com
          NFS mount point                    : /var/lib/exports/iso
          Set application as default page    : True
          Configure Apache SSL               : True

          Please confirm installation settings (OK, Cancel) [OK]:
Removing the Host from the Restored Environment
If the deployment of the restored self-hosted engine is on new hardware that has a unique name not present in the backed-up engine, skip this step. This step is only applicable to deployments occurring on the failover host,hosted_engine_1. Because this host was present in the environment at time the backup was created, it maintains a presence in the restored engine and must first be removed from the environment before final synchronization can take place.- Log in to the Administration Portal.
- Click the Hosts tab. The failover host,
hosted_engine_1, will be in maintenance mode and without a virtual load, as this was how it was prepared for the backup. - Click .
- Click .
Synchronizing the Host and the Manager
Return to the host and continue thehosted-enginedeployment script by selecting option 1:(1) Continue setup - engine installation is complete
[ INFO  ] Engine replied: DB Up!Welcome to Health Status!
[ INFO  ] Waiting for the host to become operational in the engine. This may take several minutes...
[ INFO  ] Still waiting for VDSM host to become operational...
At this point,hosted_engine_1will become visible in the Administration Portal with Installing and Initializing states before entering a Non Operational state. The host will continue to wait for VDSM host to become operational until it eventually times out. This happens because another host in the environment maintains the Storage Pool Manager (SPM) role andhosted_engine_1cannot interact with the storage domain because the host with SPM is in a Non Responsive state. When this process times out, you are prompted to shut down the virtual machine to complete the deployment. When deployment is complete, the host can be manually placed into maintenance mode and activated through the Administration Portal.[ INFO ] Still waiting for VDSM host to become operational... [ ERROR ] Timed out while waiting for host to start. Please check the logs. [ ERROR ] Unable to add hosted_engine_2 to the manager Please shutdown the VM allowing the system to launch it as a monitored service. The system will wait until the VM is down.Shutting Down the Manager
Shutdown the new Manager virtual machine.# shutdown -h now
Setup Confirmation
Return to the host to confirm it has detected that the Manager virtual machine is down.[ INFO ] Enabling and starting HA services Hosted Engine successfully set up [ INFO ] Stage: Clean up [ INFO ] Stage: Pre-termination [ INFO ] Stage: TerminationActivating the Host
- Log in to the Administration Portal.
- Click the Hosts tab.
- Select
hosted_engine_1and click the Maintenance button. The host may take several maintenance before it enters maintenance mode. - Click the button.
Once active,hosted_engine_1immediately contends for SPM, and the storage domain and data center become active.Migrating Virtual Machines to the Active Host
Migrate virtual machines to the active host by manually fencing the Non Responsive hosts. In the Administration Portal, right-click the hosts and select Confirm 'Host has been Rebooted'.Any virtual machines that were running on that host at the time of the backup will now be removed from that host, and move from an Unknown state to a Down state. These virtual machines can now be run onhosted_engine_1. The host that was fenced can now be forcefully removed using the REST API.
hosted_engine_1 is active and is able to run virtual machines in the restored environment. The remaining hosted-engine hosts in Non Operational state can now be removed and re-installed into the environment.
3.9.4. Removing Non-Operational Hosts from a Restored Self-Hosted Engine Environment
Fencing the Non-Operational Host
In the Administration Portal, right-click the hosts and select Confirm 'Host has been Rebooted'.Any virtual machines that were running on that host at the time of the backup will now be removed from that host, and move from an Unknown state to a Down state. The host that was fenced can now be forcefully removed using the REST API.Retrieving the Manager Certificate Authority
Connect to the Manager virtual machine and use the command line to perform the following requests with cURL.Use aGETrequest to retrieve the Manager Certificate Authority (CA) certificate for use in all future API requests. In the following example, the--outputoption is used to designate the file hosted-engine.ca as the output for the Manager CA certificate. The--insecureoption means that this initial request will be without a certificate.# curl --output hosted-engine.ca --insecure https://[Manager.example.com]/ca.crt
Retrieving the GUID of the Host to be Removed
Use aGETrequest on the hosts collection to retrieve the Global Unique Identifier (GUID) for the host to be removed. The following example specifies this as aGETrequest, and includes the Manager CA certificate file. Theadmin@internaluser is used for authentication, the password for which will be prompted once the command is executed.# curl --request GET --cacert hosted-engine.ca --user admin@internal https://[Manager.example.com]/api/hosts
This request will return information for all of the hosts in the environment. The host GUID is a hexidecimal string associated with the host name. For more information on the Red Hat Enterprise Virtualization REST API, see the Red Hat Enterprise Virtualization Technical Guide.Removing the Fenced Host
Use aDELETErequest using the GUID of the fenced host to remove the host from the environment. In addition to the previously used options this example specifies headers to specify that the request is to be sent and returned using eXtensible Markup Language (XML), and the body in XML that sets theforceaction to betrue.curl --request DELETE --cacert hosted-engine.ca --user admin@internal --header "Content-Type: application/xml" --header "Accept: application/xml" --data "<action><force>true</force></action>" https://[Manager.example.com]/api/hosts/ecde42b0-de2f-48fe-aa23-1ebd5196b4a5
ThisDELETErequest can be used to removed every fenced host in the self-hosted engine environment, as long as the appropriate GUID is specified.
3.9.5. Installing Additional Hosts to a Restored Self-Hosted Engine Environment
root user.
Procedure 3.9. Adding the host
- Install the ovirt-hosted-engine-setup package.
# yum install ovirt-hosted-engine-setup
- Configure the host with the deployment command.
# hosted-engine --deploy
If running thehosted-enginedeployment script over a network, it is recommended to use thescreenwindow manager to avoid losing the session in case of network or terminal disruption. Install the screen package first if not installed.# screen hosted-engine --deploy
Configuring Storage
Select the type of storage to use.During customization use CTRL-D to abort. Please specify the storage you would like to use (iscsi, nfs3, nfs4)[nfs3]:
- For NFS storage types, specify the full address, using either the FQDN or IP address, and path name of the shared storage domain.
Please specify the full shared storage connection path to use (example: host:/path): storage.example.com:/hosted_engine/nfs
- For iSCSI, specify the iSCSI portal IP address, port, user name and password, and select a target name from the auto-detected list:
Please specify the iSCSI portal IP address:
Please specify the iSCSI portal port [3260]:
Please specify the iSCSI portal user:
Please specify the iSCSI portal password:
Please specify the target name (auto-detected values) [default]:
Detecting the Self-Hosted Engine
Thehosted-enginescript detects that the shared storage is being used and asks if this is an additional host setup. You are then prompted for the host ID, which must be an integer not already assigned to a host in the environment.The specified storage location already contains a data domain. Is this an additional host setup (Yes, No)[Yes]? [ INFO ] Installing on additional host Please specify the Host ID [Must be integer, default: 2]:
Configuring the System
Thehosted-enginescript uses the answer file generated by the original hosted-engine setup. To achieve this, the script requires the FQDN or IP address and the password of therootuser of that host so as to access and secure-copy the answer file to the additional host.[WARNING] A configuration file must be supplied to deploy Hosted Engine on an additional host. The answer file may be fetched from the first host using scp. If you do not want to download it automatically you can abort the setup answering no to the following question. Do you want to scp the answer file from the first host? (Yes, No)[Yes]: Please provide the FQDN or IP of the first host: Enter 'root' user password for host [hosted_engine_1.example.com]: [ INFO ] Answer file successfully downloaded
Configuring the Hosted Engine
Specify the name for the additional host to be identified in the Red Hat Enterprise Virtualization environment, and the password for theadmin@internaluser. The name must not already be in use by a host in the environment.Enter the name which will be used to identify this host inside the Administrator Portal [hosted_engine_2]: Enter 'admin@internal' user password that will be used for accessing the Administrator Portal: Confirm 'admin@internal' user password:
Configuration Preview
Before proceeding, thehosted-enginescript displays the configuration values you have entered, and prompts for confirmation to proceed with these values.Bridge interface : eth1 Engine FQDN : HostedEngine-VM.example.com Bridge name : rhevm SSH daemon port : 22 Firewall manager : iptables Gateway address : X.X.X.X Host name for web application : hosted_engine_2 Host ID : 2 Image size GB : 25 Storage connection : storage.example.com:/hosted_engine/nfs Console type : vnc Memory size MB : 4096 MAC address : 00:16:3e:05:95:50 Boot type : disk Number of CPUs : 2 CPU Type : model_Penryn Please confirm installation settings (Yes, No)[Yes]:Confirming Engine Installation Complete
The additional host will contact the Manager andhosted_engine_1, after which the script will prompt for a selection. Continue by selection option 1.[ INFO ] Stage: Closing up To continue make a selection from the options below: (1) Continue setup - engine installation is complete (2) Power off and restart the VM (3) Abort setup (1, 2, 3)[1]:[ INFO ] Engine replied: DB Up!Welcome to Health Status! [ INFO ] Waiting for the host to become operational in the engine. This may take several minutes...
At this point, the host will become visible in the Administration Portal with Installing and Initializing states before entering a Non Operational state. The host will continue to wait for VDSM host to become operational until it eventually times out.[ INFO ] Still waiting for VDSM host to become operational... [ INFO ] Still waiting for VDSM host to become operational... [ ERROR ] Timed out while waiting for host to start. Please check the logs. [ ERROR ] Unable to add hosted_engine_1 to the manager [ INFO ] Enabling and starting HA services Hosted Engine successfully set up [ INFO ] Stage: Clean up [ INFO ] Generating answer file '/etc/ovirt-hosted-engine/answers.conf' [ INFO ] Stage: Pre-termination [ INFO ] Stage: TerminationActivating the Host
- Log in to the Administration Portal.
- Click the Hosts tab and select the host to activate.
- Click the button.
3.10. Migrating to a Self-Hosted Environment
Deploy a hosted-engine environment and migrate an existing instance of Red Hat Enterprise Virtualization. The hosted-engine deployment script is provided to assist with this task. The script asks you a series of questions, and configures your environment based on your answers. When the required values have been provided, the updated configuration is applied and the Red Hat Enterprise Virtualization Manager services are started.
hosted-engine deployment script guides you through several distinct configuration stages. The script suggests possible configuration defaults in square brackets. Where these default values are acceptable, no additional input is required.
Host-HE1.example.com in this procedure.
Manager.example.com, in this procedure. You are required to access and make changes on BareMetal-Manager during this procedure.
hosted-engine deployment script prompts you to access this virtual machine multiple times to install an operating system and to configure the engine.
root user for the specified machine.
Important
engine-backup command.
Procedure 3.10. Migrating to a Self-Hosted Environment
Initiating Hosted Engine Deployment
Begin configuration of the self-hosted environment by deploying thehosted-enginecustomization script on Host_HE1. To escape the script at any time, use the CTRL+D keyboard combination to abort deployment.# hosted-engine --deploy
Configuring Storage
Select the version of NFS and specify the full address, using either the FQDN or IP address, and path name of the shared storage domain. Choose the storage domain and storage data center names to be used in the environment.During customization use CTRL-D to abort. Please specify the storage you would like to use (nfs3, nfs4)[nfs3]: Please specify the full shared storage connection path to use (example: host:/path): storage.example.com:/hosted_engine/nfs [ INFO ] Installing on first host Please provide storage domain name. [hosted_storage]: Local storage datacenter name is an internal name and currently will not be shown in engine's admin UI.Please enter local datacenter name [hosted_datacenter]:
Configuring the Network
The script detects possible network interface controllers (NICs) to use as a management bridge for the environment. It then checks your firewall configuration and offers to modify it for console (SPICE or VNC) access HostedEngine-VM. Provide a pingable gateway IP address, to be used by theovirt-ha-agentto help determine a host's suitability for running HostedEngine-VM.Please indicate a nic to set rhevm bridge on: (eth1, eth0) [eth1]: iptables was detected on your computer, do you wish setup to configure it? (Yes, No)[Yes]: Please indicate a pingable gateway IP address [X.X.X.X]:
Configuring the Virtual Machine
The script creates a virtual machine to be configured as the Red Hat Enterprise Virtualization Manager, the hosted engine referred to in this procedure as HostedEngine-VM. Specify the boot device and, if applicable, the path name of the installation media, the CPU type, the number of virtual CPUs, and the disk size. Specify a MAC address for the HostedEngine-VM, or accept a randomly generated one. The MAC address can be used to update your DHCP server prior to installing the operating system on the virtual machine. Specify memory size and console connection type for the creation of HostedEngine-VM.Please specify the device to boot the VM from (cdrom, disk, pxe) [cdrom]: The following CPU types are supported by this host: - model_Penryn: Intel Penryn Family - model_Conroe: Intel Conroe Family Please specify the CPU type to be used by the VM [model_Penryn]: Please specify the number of virtual CPUs for the VM [Defaults to minimum requirement: 2]: Please specify the disk size of the VM in GB [Defaults to minimum requirement: 25]: You may specify a MAC address for the VM or accept a randomly generated default [00:16:3e:77:b2:a4]: Please specify the memory size of the VM in MB [Defaults to minimum requirement: 4096]: Please specify the console type you want to use to connect to the VM (vnc, spice) [vnc]:Configuring the Hosted Engine
Specify the name for Host-HE1 to be identified in the Red Hat Enterprise Virtualization environment, and the password for theadmin@internaluser to access the Administrator Portal. Provide the FQDN for HostedEngine-VM; this procedure uses the FQDN Manager.example.com. Finally, provide the name and TCP port number of the SMTP server, the email address used to send email notifications, and a comma-separated list of email addresses to receive these notifications.Important
The FQDN provided for the engine (Manager.example.com) must be the same FQDN provided when BareMetal-Manager was initially set up.Enter the name which will be used to identify this host inside the Administrator Portal [hosted_engine_1]: Host-HE1 Enter 'admin@internal' user password that will be used for accessing the Administrator Portal: Confirm 'admin@internal' user password: Please provide the FQDN for the engine you want to use. This needs to match the FQDN that you will use for the engine installation within the VM: Manager.example.com Please provide the name of the SMTP server through which we will send notifications [localhost]: Please provide the TCP port number of the SMTP server [25]: Please provide the email address from which notifications will be sent [root@localhost]: Please provide a comma-separated list of email addresses which will get notifications [root@localhost]:
Configuration Preview
Before proceeding, thehosted-enginescript displays the configuration values you have entered, and prompts for confirmation to proceed with these values.Bridge interface : eth1 Engine FQDN : Manager.example.com Bridge name : rhevm SSH daemon port : 22 Firewall manager : iptables Gateway address : X.X.X.X Host name for web application : Host-HE1 Host ID : 1 Image size GB : 25 Storage connection : storage.example.com:/hosted_engine/nfs Console type : vnc Memory size MB : 4096 MAC address : 00:16:3e:77:b2:a4 Boot type : pxe Number of CPUs : 2 CPU Type : model_Penryn Please confirm installation settings (Yes, No)[No]:
Creating HostedEngine-VM
The script creates the virtual machine to be configured as HostedEngine-VM and provides connection details. You must install an operating system on HostedEngine-VM before thehosted-enginescript can proceed on Host-HE1.[ INFO ] Generating answer file '/etc/ovirt-hosted-engine/answers.conf' [ INFO ] Stage: Transaction setup [ INFO ] Stage: Misc configuration [ INFO ] Stage: Package installation [ INFO ] Stage: Misc configuration [ INFO ] Configuring libvirt [ INFO ] Generating VDSM certificates [ INFO ] Configuring VDSM [ INFO ] Starting vdsmd [ INFO ] Waiting for VDSM hardware info [ INFO ] Creating Storage Domain [ INFO ] Creating Storage Pool [ INFO ] Connecting Storage Pool [ INFO ] Verifying sanlock lockspace initialization [ INFO ] Initializing sanlock lockspace [ INFO ] Initializing sanlock metadata [ INFO ] Creating VM Image [ INFO ] Disconnecting Storage Pool [ INFO ] Start monitoring domain [ INFO ] Configuring VM [ INFO ] Updating hosted-engine configuration [ INFO ] Stage: Transaction commit [ INFO ] Stage: Closing up [ INFO ] Creating VM You can now connect to the VM with the following command: /usr/bin/remote-viewer vnc://localhost:5900 Use temporary password "5379skAb" to connect to vnc console. Please note that in order to use remote-viewer you need to be able to run graphical applications. This means that if you are using ssh you have to supply the -Y flag (enables trusted X11 forwarding). Otherwise you can run the command from a terminal in your preferred desktop environment. If you cannot run graphical applications you can connect to the graphic console from another host or connect to the console using the following command: virsh -c qemu+tls://Test/system console HostedEngine If you need to reboot the VM you will need to start it manually using the command: hosted-engine --vm-start You can then set a temporary password using the command: hosted-engine --add-console-password The VM has been started. Install the OS and shut down or reboot it. To continue please make a selection: (1) Continue setup - VM installation is complete (2) Reboot the VM and restart installation (3) Abort setup (1, 2, 3)[1]:Using the naming convention of this procedure, connect to the virtual machine using VNC with the following command:/usr/bin/remote-viewer vnc://Host-HE1.example.com:5900
Installing the Virtual Machine Operating System
Connect to HostedEngine-VM, the virtual machine created by the hosted-engine script, and install a Red Hat Enterprise Linux 6.5 or 6.6 operating system.Synchronizing the Host and the Virtual Machine
Return to Host-HE1 and continue thehosted-enginedeployment script by selecting option 1:(1) Continue setup - VM installation is complete
Waiting for VM to shut down... [ INFO ] Creating VM You can now connect to the VM with the following command: /usr/bin/remote-viewer vnc://localhost:5900 Use temporary password "5379skAb" to connect to vnc console. Please note that in order to use remote-viewer you need to be able to run graphical applications. This means that if you are using ssh you have to supply the -Y flag (enables trusted X11 forwarding). Otherwise you can run the command from a terminal in your preferred desktop environment. If you cannot run graphical applications you can connect to the graphic console from another host or connect to the console using the following command: virsh -c qemu+tls://Test/system console HostedEngine If you need to reboot the VM you will need to start it manually using the command: hosted-engine --vm-start You can then set a temporary password using the command: hosted-engine --add-console-password Please install and setup the engine in the VM. You may also be interested in subscribing to "agent" RHN/Satellite channel and installing rhevm-guest-agent-common package in the VM. To continue make a selection from the options below: (1) Continue setup - engine installation is complete (2) Power off and restart the VM (3) Abort setupInstalling the Manager
Connect to HostedEngine-VM, subscribe to the appropriate Red Hat Enterprise Virtualization Manager channels, ensure that the most up-to-date versions of all installed packages are in use, and install the rhevm packages.# yum upgrade
# yum install rhevm
Disabling BareMetal-Manager
Connect to BareMetal-Manager, the Manager of your established Red Hat Enterprise Virtualization environment, and stop the engine and prevent it from running.# service ovirt-engine stop # service ovirt-engine disable # chkconfig ovirt-engine off
Note
Though stopping BareMetal-Manager from running is not obligatory, it is recommended as it ensures no changes will be made to the environment after the backup has been created. Additionally, it prevents BareMetal-Manager and HostedEngine-VM from simultaneously managing existing resources.Updating DNS
Update your DNS so that the FQDN of the Red Hat Enterprise Virtualization environment correlates to the IP address of HostedEngine-VM and the FQDN previously provided when configuring thehosted-enginedeployment script on Host-HE1. In this procedure, FQDN was set as Manager.example.com because in a migrated hosted-engine setup, the FQDN provided for the engine must be identical to that given in the engine setup of the original engine.Creating a Backup of BareMetal-Manager
Connect to BareMetal-Manager and run theengine-backupcommand with the--mode=backup,--file=[FILE], and--log=[LogFILE]parameters to specify the backup mode, the name of the backup file created and used for the backup, and the name of the log file to be created to store the backup log.# engine-backup --mode=backup --file=[FILE] --log=[LogFILE]
Copying the Backup File to HostedEngine-VM
On BareMetal-Manager, secure copy the backup file to HostedEngine-VM. In the following example, [Manager.example.com] is the FQDN for HostedEngine-VM, and /backup/ is any designated folder or path. If the designated folder or path does not exist, you must connect to HostedEngine-VM and create it before secure copying the backup from BareMetal-Manager.# scp -p backup1 [Manager.example.com:/backup/]
Restoring the Backup File on HostedEngine-VM
Theengine-backup --mode=restorecommand does not create a database; you are required to create one on HostedEngine-VM before restoring the backup you created on BareMetal-Manager. Connect to HostedEngine-VM and create the database, as detailed in Section 2.4.4, “Preparing a PostgreSQL Database for Use with Red Hat Enterprise Virtualization Manager”.Note
The procedure in Section 2.4.4, “Preparing a PostgreSQL Database for Use with Red Hat Enterprise Virtualization Manager” creates a database that is not empty, which will result in the following error when you attempt to restore the backup:FATAL: Database is not empty
Create an empty database using the following command in psql:postgres=# create database [database name] owner [user name]
After the empty database has been created, restore the BareMetal-Manager backup using theengine-backupcommand with the--mode=restore--file=[FILE]--log=[Restore.log]parameters to specify the restore mode, the name of the file to be used to restore the database, and the name of the logfile to store the restore log. This restores the files and the database but does not start the service.To specify a different database configuration, use the--change-db-credentialsparameter to activate alternate credentials. Use theengine-backup --helpcommand on the Manager for a list of credential parameters.# engine-backup --mode=restore --file=[FILE] --log=[Restore.log] --change-db-credentials --db-host=[X.X.X.X] --db-user=[engine] --db-password=[password] --db-name=[engine]
Configuring HostedEngine-VM
Configure the engine on HostedEngine-VM. This identifies the existing files and database.# engine-setup
[ INFO ] Stage: Initializing [ INFO ] Stage: Environment setup Configuration files: ['/etc/ovirt-engine-setup.conf.d/10-packaging.conf', '/etc/ovirt-engine-setup.conf.d/20-setup-ovirt-post.conf'] Log file: /var/log/ovirt-engine/setup/ovirt-engine-setup-20140304075238.log Version: otopi-1.1.2 (otopi-1.1.2-1.el6ev) [ INFO ] Stage: Environment packages setup [ INFO ] Yum Downloading: rhel-65-zstream/primary_db 2.8 M(70%) [ INFO ] Stage: Programs detection [ INFO ] Stage: Environment setup [ INFO ] Stage: Environment customization --== PACKAGES ==-- [ INFO ] Checking for product updates... [ INFO ] No product updates found --== NETWORK CONFIGURATION ==-- Setup can automatically configure the firewall on this system. Note: automatic configuration of the firewall may overwrite current settings. Do you want Setup to configure the firewall? (Yes, No) [Yes]: [ INFO ] iptables will be configured as firewall manager. --== DATABASE CONFIGURATION ==-- --== OVIRT ENGINE CONFIGURATION ==-- Skipping storing options as database already prepared --== PKI CONFIGURATION ==-- PKI is already configured --== APACHE CONFIGURATION ==-- --== SYSTEM CONFIGURATION ==-- --== END OF CONFIGURATION ==-- [ INFO ] Stage: Setup validation [WARNING] Less than 16384MB of memory is available [ INFO ] Cleaning stale zombie tasks --== CONFIGURATION PREVIEW ==-- Database name : engine Database secured connection : False Database host : X.X.X.X Database user name : engine Database host name validation : False Database port : 5432 NFS setup : True Firewall manager : iptables Update Firewall : True Configure WebSocket Proxy : True Host FQDN : Manager.example.com NFS mount point : /var/lib/exports/iso Set application as default page : True Configure Apache SSL : True Please confirm installation settings (OK, Cancel) [OK]:Confirm the settings. Upon completion, the setup provides an SSH fingerprint and an internal Certificate Authority hash.Synchronizing the Host and the Manager
Return to Host-HE1 and continue thehosted-enginedeployment script by selecting option 1:(1) Continue setup - engine installation is complete
[ INFO ] Engine replied: DB Up!Welcome to Health Status! [ INFO ] Waiting for the host to become operational in the engine. This may take several minutes... [ INFO ] Still waiting for VDSM host to become operational... [ INFO ] The VDSM Host is now operational Please shutdown the VM allowing the system to launch it as a monitored service. The system will wait until the VM is down.Shutting Down HostedEngine-VM
Shutdown HostedEngine-VM.# shutdown now
Setup Confirmation
Return to Host-HE1 to confirm it has detected that HostedEngine-VM is down.[ INFO ] Enabling and starting HA services Hosted Engine successfully set up [ INFO ] Stage: Clean up [ INFO ] Stage: Pre-termination [ INFO ] Stage: Termination
Your Red Hat Enterprise Virtualization engine has been migrated to a hosted-engine setup. The Manager is now operating on a virtual machine on Host-HE1, called HostedEngine-VM in the environment. As HostedEngine-VM is highly available, it is migrated to other hosts in the environment when applicable.
Chapter 4. History and Reports

4.2. Data Collection Setup and Reports Installation Overview
SELECT statement. The result set of the SELECT statement populates the virtual table returned by the view. If the optional comprehensive management history database has been enabled, the history tables and their associated views are stored in the ovirt_engine_history database.
Note
/usr/share/jasperreports-server-pro/docs/
4.3. Installing and Configuring the History Database and Red Hat Enterprise Virtualization Manager Reports
Use of the history database and reports is optional. To use the reporting capabilities of Red Hat Enterprise Virtualization Manager, you must install and configure rhevm-dwh and rhevm-reports.
Important
# hosted-engine --set-maintenance --mode=global
Procedure 4.1. Installing and Configuring the History Database and Red Hat Enterprise Virtualization Manager Reports
- Install the rhevm-dwh package. This package must be installed on the system on which the Red Hat Enterprise Virtualization Manager is installed.
# yum install rhevm-dwh
- Install the rhevm-reports package. This package must be installed on the system on which the Red Hat Enterprise Virtualization Manager is installed.
# yum install rhevm-reports
- Run the
engine-setupcommand on the system hosting the Red Hat Enterprise Virtualization Manager and follow the prompts to configure Data Warehouse and Reports:--== PRODUCT OPTIONS ==-- Configure Data Warehouse on this host (Yes, No) [Yes]: Configure Reports on this host (Yes, No) [Yes]: - The command will prompt you to answer the following questions about the DWH database:
--== DATABASE CONFIGURATION ==--

Where is the DWH database located? (Local, Remote) [Local]:
Setup can configure the local postgresql server automatically for the DWH to run. This may conflict with existing applications.
Would you like Setup to automatically configure postgresql and create DWH database, or prefer to perform that manually? (Automatic, Manual) [Automatic]:
Where is the Reports database located? (Local, Remote) [Local]:
Setup can configure the local postgresql server automatically for the Reports to run. This may conflict with existing applications.
Would you like Setup to automatically configure postgresql and create Reports database, or prefer to perform that manually? (Automatic, Manual) [Automatic]:
Press Enter to choose the highlighted defaults, or type your alternative preference then press Enter. - The command will then prompt you to set the password for the Red Hat Enterprise Virtualization Manager Reports administrative users (
adminandsuperuser). Note that the reports system maintains its own set of credentials which are separate to those used for Red Hat Enterprise Virtualization Manager.Reports power users password:
You will be prompted to enter the password a second time to confirm it. - For the Red Hat Enterprise Virtualization Manager Reports installation to take effect, the
ovirt-engineservice must be restarted. Theengine-setupcommand prompts you:During execution engine service will be stopped (OK, Cancel) [OK]:
Type OK and then press Enter to proceed. Theovirt-engineservice will restart automatically later in the command.
The ovirt_engine_history database has been created. Red Hat Enterprise Virtualization Manager is configured to log information to this database for reporting purposes. Red Hat Enterprise Virtualization Manager Reports has been installed successfully. Access Red Hat Enterprise Virtualization Manager Reports at http://[demo.redhat.com]/ovirt-engine-reports, replacing [demo.redhat.com] with the fully-qualified domain name of the Red Hat Enterprise Virtualization Manager. If during Red Hat Enterprise Virtualization Manager installation you selected a non-default HTTP port then append :[port] to the URL, replacing [port] with the port that you chose.
admin and the password you set during reports installation to log in for the first time. Note that the first time you log into Red Hat Enterprise Virtualization Manager Reports, a number of web pages are generated, and as a result your initial attempt to login may take some time to complete.
Note
admin user name was rhevm-admin. If you are performing a clean installation, the user name is now admin. In you are performing an upgrade, the user name will remain rhevm-admin.
Chapter 5. Updating the Red Hat Enterprise Virtualization Environment
5.1. Upgrades between Minor Releases
5.1.1. Checking for Red Hat Enterprise Virtualization Manager Updates
Important
Check for updates to the Red Hat Enterprise Virtualization Manager.
Procedure 5.1. Checking for Red Hat Enterprise Virtualization Manager Updates
- Run the following command on the machine on which the Red Hat Enterprise Virtualization Manager is installed:
# engine-upgrade-check
- If there are no updates are available, the command will output the text
No upgrade:# engine-upgrade-check VERB: queue package rhevm-setup for update VERB: package rhevm-setup queued VERB: Building transaction VERB: Empty transaction VERB: Transaction Summary: No upgrade
- If updates are available, the command will list the packages to be updated:
# engine-upgrade-check
VERB: queue package rhevm-setup for update
VERB: package rhevm-setup queued
VERB: Building transaction
VERB: Transaction built
VERB: Transaction Summary:
VERB:     updated    - rhevm-lib-3.3.2-0.50.el6ev.noarch
VERB:     update     - rhevm-lib-3.4.0-0.13.el6ev.noarch
VERB:     updated    - rhevm-setup-3.3.2-0.50.el6ev.noarch
VERB:     update     - rhevm-setup-3.4.0-0.13.el6ev.noarch
VERB:     install    - rhevm-setup-base-3.4.0-0.13.el6ev.noarch
VERB:     install    - rhevm-setup-plugin-ovirt-engine-3.4.0-0.13.el6ev.noarch
VERB:     updated    - rhevm-setup-plugins-3.3.1-1.el6ev.noarch
VERB:     update     - rhevm-setup-plugins-3.4.0-0.5.el6ev.noarch
Upgrade available

Upgrade available
You have checked for updates to the Red Hat Enterprise Virtualization Manager.
5.1.2. Updating the Red Hat Enterprise Virtualization Manager
Updates to the Red Hat Enterprise Virtualization Manager are released via Red Hat Network. Before installing an update from Red Hat Network, ensure you read the advisory text associated with it and the latest version of the Red Hat Enterprise Virtualization Release Notes and Red Hat Enterprise Virtualization Technical Notes. A number of actions must be performed to complete an upgrade, including:
- Stopping the
ovirt-engineservice. - Downloading and installing the updated packages.
- Backing up and updating the database.
- Performing post-installation configuration.
- Starting the
ovirt-engineservice.
Procedure 5.2. Updating Red Hat Enterprise Virtualization Manager
- Run the following command to update the rhevm-setup package:
# yum update rhevm-setup
- Run the following command to update the Red Hat Enterprise Virtualization Manager:
# engine-setup
Important
Important
You have successfully updated the Red Hat Enterprise Virtualization Manager.
5.1.3. Updating Red Hat Enterprise Virtualization Hypervisors
Updating Red Hat Enterprise Virtualization Hypervisors involves reinstalling the Hypervisor with a newer version of the Hypervisor ISO image. This includes stopping and restarting the Hypervisor. Virtual machines are automatically migrated to a different host, as a result it is recommended that Hypervisor updates are performed at a time when the host's usage is relatively low.
Warning
Important
Procedure 5.3. Updating Red Hat Enterprise Virtualization Hypervisors
- Log in to the system hosting Red Hat Enterprise Virtualization Manager as the
rootuser. - Enable the
Red Hat Enterprise Virtualization Hypervisor (v.6 x86_64)repository:- With RHN Classic:
# rhn-channel --add --channel=rhel-x86_64-server-6-rhevh
- With Subscription Manager, attach a
Red Hat Enterprise Virtualizationentitlement and run the following command:# subscription-manager repos --enable=rhel-6-server-rhevh-rpms
- Run the
yumcommand with theupdaterhev-hypervisor6parameters to ensure that you have the most recent version of the rhev-hypervisor6 package installed.# yum update rhev-hypervisor6
- Use your web browser to log in to the Administration Portal as a Red Hat Enterprise Virtualization administrative user.
- Click the Hosts tab, and then select the host that you intend to upgrade. If the host is not displayed, or the list of hosts is too long to filter visually, perform a search to locate the host.
- With the host selected, click the General tab in the details pane.
- If the host requires updating, an alert message indicates that a new version of the Red Hat Enterprise Virtualization Hypervisor is available.
- If the host does not require updating, no alert message is displayed and no further action is required.
- Ensure the host remains selected and click the button, if the host is not already in maintenance mode. This will cause any virtual machines running on the host to be migrated to other hosts. If the host is the SPM, this function will be moved to another host. The status of the host changes as it enters maintenance mode. When the host status is Maintenance, the message in the general tab changes, providing you with a link which when clicked will reinstall or upgrade the host.
- Ensure that the host remains selected, and that you are on the General tab of the details pane. Click the Upgrade link to open the Install Host window.
- Select
rhev-hypervisor.iso, which is symbolically linked to the most recent hypervisor image. - Click to update and reinstall the host. The dialog closes, the details of the host are updated in the Hosts tab, and the status changes.The host status will transition through these stages:These are all expected, and each stage will take some time.
- Installing
- Reboot
- Non Responsive
- Up.
- Once successfully updated, the host displays a status of Up. Any virtual machines that were migrated off the host, are at this point able to be migrated back to it.
Important
After a Red Hat Enterprise Virtualization Hypervisor is successfully registered to the Red Hat Enterprise Virtualization Manager and then upgraded, it may erroneously appear in the Administration Portal with the status of Install Failed. Click on the button, and the hypervisor will change to an Up status and be ready for use.
You have successfully updated a Red Hat Enterprise Virtualization Hypervisor. Repeat these steps for each Hypervisor in the Red Hat Enterprise Virtualization environment.
5.1.4. Updating Red Hat Enterprise Linux Virtualization Hosts
Red Hat Enterprise Linux hosts are using the yum in the same way as regular Red Hat Enterprise Linux systems. It is highly recommended that you use yum to update your systems regularly, to ensure timely application of security and bug fixes.
Procedure 5.4. Updating Red Hat Enterprise Linux Hosts
- From the Administration Portal, click the Hosts tab and select the host to be updated. Click to place it into maintenance mode.
- On the Red Hat Enterprise Linux host, run the following command:
# yum update
- Restart the host to ensure all updates are correctly applied.
You have successfully updated the Red Hat Enterprise Linux host. Repeat this process for each Red Hat Enterprise Linux host in the Red Hat Enterprise Virtualization environment.
5.1.5. Updating the Red Hat Enterprise Virtualization Guest Tools
The guest tools comprise software that allows Red Hat Enterprise Virtualization Manager to communicate with the virtual machines it manages, providing information such as the IP addresses, memory usage, and applications installed on those virtual machines. The guest tools are distributed as an ISO file that can be attached to guests. This ISO file is packaged as an RPM file that can be installed and upgraded from the machine on which the Red Hat Enterprise Virtualization Manager is installed.
Procedure 5.5. Updating the Red Hat Enterprise Virtualization Guest Tools
- Run the following command on the machine on which the Red Hat Enterprise Virtualization Manager is installed:
# yum update -y rhev-guest-tools-iso*
- Run the following command to upload the ISO file to your ISO domain, replacing [ISODomain] with the name of your ISO domain:
engine-iso-uploader --iso-domain=[ISODomain] upload /usr/share/rhev-guest-tools-iso/rhev-tools-setup.iso
Note
Therhev-tools-setup.isofile is a symbolic link to the most recently updated ISO file. The link is automatically changed to point to the newest ISO file every time you update the rhev-guest-tools-iso package. - Use the Administration Portal, User Portal, or REST API to attach the
rhev-tools-setup.isofile to each of your virtual machines and upgrade the tools installed on each guest using the installation program on the ISO.
You have updated the rhev-tools-setup.iso file, uploaded the updated ISO file to your ISO domain, and attached it to your virtual machines.
5.2. Upgrading to Red Hat Enterprise Virtualization 3.4
5.2.1. Red Hat Enterprise Virtualization Manager 3.4 Upgrade Overview
Important
- Configuring channels and entitlements.
- Updating the required packages.
- Performing the upgrade.
engine-setup, which provides an interactive interface. While the upgrade is in process, virtualization hosts and the virtual machines running on those virtualization hosts continue to operate independently. When the upgrade is complete, you can then upgrade your hosts to the latest versions of Red Hat Enterprise Linux or Red Hat Enterprise Virtualization Hypervisor.
5.2.2. Features Requiring a Compatibility Upgrade to Red Hat Enterprise Virtualization 3.4
Table 5.1. Features Requiring a Compatibility Upgrade to Red Hat Enterprise Virtualization 3.4
| Feature | Description |
|---|---|
|
Abort migration on error
|
This feature adds support for handling errors encountered during the migration of virtual machines.
|
|
Forced Gluster volume creation
|
This feature adds support for allowing the creation of Gluster bricks on root partitions. With this feature, you can choose to override warnings against creating bricks on root partitions.
|
|
Management of asynchronous Gluster volume tasks
|
This feature provides support for managing asynchronous tasks on Gluster volumes, such as rebalancing volumes or removing bricks. To use this feature, you must use GlusterFS version 3.5 or above.
|
|
Import Glance images as templates
|
This feature provides support for importing images from an OpenStack image service as templates.
|
|
File statistic retrieval for non-NFS ISO domains
|
This feature adds support for retrieving statistics on files stored in ISO domains that use a storage format other than NFS, such as a local ISO domain.
|
|
Default route support
|
This feature adds support for ensuring that the default route of the management network is registered in the main routing table and that registration of the default route for all other networks is disallowed. This ensures the management network gateway is set as the default gateway for hosts.
|
|
Virtual machine reboot
|
This feature adds support for rebooting virtual machines from the User Portal or Administration Portal via a new button. To use this action on a virtual machine, you must install the guest tools on that virtual machine.
|
5.2.3. Red Hat Enterprise Virtualization 3.4 Upgrade Considerations
Important
- Upgrading to version 3.4 can only be performed from version 3.3
- To upgrade a previous version of Red Hat Enterprise Virtualization earlier than Red Hat Enterprise Virtualization 3.3 to Red Hat Enterprise Virtualization 3.4, you must sequentially upgrade to any newer versions of Red Hat Enterprise Virtualization before upgrading to the latest version. For example, if you are using Red Hat Enterprise Virtualization 3.2, you must upgrade to Red Hat Enterprise Virtualization 3.3 before you can upgrade to Red Hat Enterprise Virtualization 3.4.
- Red Hat Enterprise Virtualization Manager cannot be installed on the same machine as IPA
- An error message displays if the ipa-server package is installed. Red Hat Enterprise Virtualization Manager 3.4 does not support installation on the same machine as Identity Management (IdM). To resolve this issue, you must migrate the IdM configuration to another system before re-attempting the upgrade.
- Upgrading to JBoss Enterprise Application Platform 6.2 is recommended
- Although Red Hat Enterprise Virtualization Manager 3.4 supports Enterprise Application Platform 6.1.0, upgrading to the latest supported version of JBoss is recommended.
5.2.4. Upgrading to Red Hat Enterprise Virtualization Manager 3.4
The following procedure outlines the process for upgrading Red Hat Enterprise Virtualization Manager 3.3 to Red Hat Enterprise Virtualization Manager 3.4. This procedure assumes that the system on which the Manager is installed is subscribed to the channels and entitlements for receiving Red Hat Enterprise Virtualization 3.3 packages at the start of the procedure.
Important
engine-setup command will attempt to roll your Red Hat Enterprise Virtualization Manager installation back to its previous state. For this reason, the channels required by Red Hat Enterprise Virtualization 3.3 must not be removed until after the upgrade is complete as outlined below. If the upgrade fails, detailed instructions display that explain how to restore your installation.
Procedure 5.6. Upgrading to Red Hat Enterprise Virtualization Manager 3.4
- Subscribe the system on which the Red Hat Enterprise Virtualization Manager is installed to the required channels and entitlements for receiving Red Hat Enterprise Virtualization Manager 3.4 packages.
- With RHN Classic:
# rhn-channel --add --channel=rhel-x86_64-server-6-rhevm-3.4
- With Subscription Manager:
# yum-config-manager --enable rhel-6-server-rhevm-3.4-rpms
- Run the following command to ensure you have the most recent version of engine-setup by updating the rhevm-setup package.
# yum update rhevm-setup
- If you have installed Reports and the Data Warehouse, run the following command to ensure you have the most recent version of the rhevm-reports-setup and rhevm-dwh-setup packages:
# yum install rhevm-reports-setup rhevm-dwh-setup
- Run the following command and follow the prompts to upgrade the Red Hat Enterprise Virtualization Manager:
# engine-setup
- Remove or disable the Red Hat Enterprise Virtualization Manager 3.3 channel to ensure the system does not use any Red Hat Enterprise Virtualization Manager 3.3 packages.
- With RHN Classic:
# rhn-channel --remove --channel=rhel-x86_64-server-6-rhevm-3.3
- With Subscription Manager:
# yum-config-manager --disable rhel-6-server-rhevm-3.3-rpms
- Run the following command to ensure all packages are up to date:
# yum update
You have upgraded the Red Hat Enterprise Virtualization Manager.
5.3. Upgrading to Red Hat Enterprise Virtualization 3.3
5.3.1. Red Hat Enterprise Virtualization Manager 3.3 Upgrade Overview
- Configuring channels and entitlements.
- Updating the required packages.
- Performing the upgrade.
engine-setup, which provides an interactive interface. While the upgrade is in process, virtualization hosts and the virtual machines running on those virtualization hosts continue to operate independently. When the upgrade is complete, you can then upgrade your hosts to the latest versions of Red Hat Enterprise Linux or Red Hat Enterprise Virtualization Hypervisor.
5.3.2. Features Requiring a Compatibility Upgrade to Red Hat Enterprise Virtualization 3.3
Table 5.2. Features Requiring a Compatibility Upgrade to Red Hat Enterprise Virtualization 3.3
| Feature | Description |
|---|---|
|
Libvirt-to-libvirt virtual machine migration
|
Perform virtual machine migration using libvirt-to-libvirt communication. This is safer, more secure, and has less host configuration requirements than native KVM migration, but has a higher overhead on the host CPU.
|
|
Isolated network to carry virtual machine migration traffic
|
Separates virtual machine migration traffic from other traffic types, like management and display traffic. Reduces chances of migrations causing a network flood that disrupts other important traffic types.
|
|
Define a gateway per logical network
|
Each logical network can have a gateway defined as separate from the management network gateway. This allows more customizable network topologies.
|
|
Snapshots including RAM
|
Snapshots now include the state of a virtual machine's memory as well as disk.
|
|
Optimized iSCSI device driver for virtual machines
|
Virtual machines can now consume iSCSI storage as virtual hard disks using an optimized device driver.
|
|
Host support for MOM management of memory overcommitment
|
MOM is a policy-driven tool that can be used to manage overcommitment on hosts. Currently MOM supports control of memory ballooning and KSM.
|
|
GlusterFS data domains.
|
Native support for the GlusterFS protocol was added as a way to create storage domains, allowing Gluster data centers to be created.
|
|
Custom device property support
|
In addition to defining custom properties of virtual machines, you can also define custom properties of virtual machine devices.
|
|
Multiple monitors using a single virtual PCI device
|
Drive multiple monitors using a single virtual PCI device, rather than one PCI device per monitor.
|
|
Updatable storage server connections
|
It is now possible to edit the storage server connection details of a storage domain.
|
|
Check virtual hard disk alignment
|
Check if a virtual disk, the filesystem installed on it, and its underlying storage are aligned. If it is not aligned, there may be a performance penalty.
|
|
Extendable virtual machine disk images
|
You can now grow your virtual machine disk image when it fills up.
|
|
OpenStack Image Service integration
|
Red Hat Enterprise Virtualization supports the OpenStack Image Service. You can import images from and export images to an Image Service repository.
|
|
Gluster hook support
|
You can manage Gluster hooks, which extend volume life cycle events, from Red Hat Enterprise Virtualization Manager.
|
|
Gluster host UUID support
|
This feature allows a Gluster host to be identified by the Gluster server UUID generated by Gluster in addition to identifying a Gluster host by IP address.
|
|
Network quality of service (QoS) support
|
Limit the inbound and outbound network traffic at the virtual NIC level.
|
|
Cloud-Init support
|
Cloud-Init allows you to automate early configuration tasks in your virtual machines, including setting hostnames, authorized keys, and more.
|
5.3.3. Red Hat Enterprise Virtualization 3.3 Upgrade Considerations
Important
- Upgrading to version 3.3 can only be performed from version 3.2
- Users of Red Hat Enterprise Virtualization 3.1 must migrate to Red Hat Enterprise Virtualization 3.2 before attempting to upgrade to Red Hat Enterprise Virtualization 3.3.
- Red Hat Enterprise Virtualization Manager cannot be installed on the same machine as IPA
- An error message displays if the ipa-server package is installed. Red Hat Enterprise Virtualization Manager 3.3 does not support installation on the same machine as Identity Management (IdM). To resolve this issue, you must migrate the IdM configuration to another system before re-attempting the upgrade. For further information, see https://access.redhat.com/knowledge/articles/233143.
Error: IPA was found to be installed on this machine. Red Hat Enterprise Virtualization Manager 3.3 does not support installing IPA on the same machine. Please remove ipa packages before you continue.
- Upgrading to JBoss Enterprise Application Platform 6.1.0 is recommended
- Although Red Hat Enterprise Virtualization Manager 3.3 supports Enterprise Application Platform 6.0.1, upgrading to the latest supported version of JBoss is recommended. For more information on upgrading to JBoss Enterprise Application Platform 6.1.0, see Upgrade the JBoss EAP 6 RPM Installation.
- The rhevm-upgrade command has been replaced by engine-setup
- From Version 3.3, installation of Red Hat Enterprise Virtualization Manager supports
otopi, a standalone, plug-in-based installation framework for setting up system components. Under this framework, therhevm-upgradecommand used during the installation process has been updated toengine-setupand is now obsolete.
5.3.4. Upgrading to Red Hat Enterprise Virtualization Manager 3.3
The following procedure outlines the process for upgrading Red Hat Enterprise Virtualization Manager 3.2 to Red Hat Enterprise Virtualization Manager 3.3. This procedure assumes that the system on which the Manager is hosted is subscribed to the channels and entitlements for receiving Red Hat Enterprise Virtualization 3.2 packages.
engine-setup command will attempt to roll your Red Hat Enterprise Virtualization Manager installation back to its previous state. For this reason, the channels required by Red Hat Enterprise Virtualization 3.2 must not be removed until after the upgrade is complete as outlined below. If the upgrade fails, detailed instructions display that explain how to restore your installation.
Procedure 5.7. Upgrading to Red Hat Enterprise Virtualization Manager 3.3
- Subscribe the system to the required channels and entitlements for receiving Red Hat Enterprise Virtualization Manager 3.3 packages.Subscription Manager
Red Hat Enterprise Virtualization 3.3 packages are provided by the
rhel-6-server-rhevm-3.3-rpmsrepository associated with theRed Hat Enterprise Virtualizationentitlement. Use theyum-config-managercommand to enable the repository in youryumconfiguration.# yum-config-manager --enable rhel-6-server-rhevm-3.3-rpms
Red Hat Network ClassicThe Red Hat Enterprise Virtualization 3.3 packages are provided by the
Red Hat Enterprise Virtualization Manager (v.3.3 x86_64)channel, also referred to asrhel-x86_64-server-6-rhevm-3.3in Red Hat Network Classic. Use therhn-channelcommand or the Red Hat Network web interface to subscribe to theRed Hat Enterprise Virtualization Manager (v.3.3 x86_64)channel:# rhn-channel --add --channel=rhel-x86_64-server-6-rhevm-3.3
- Update the rhevm-setup package to ensure you have the most recent version of
engine-setup.# yum update rhevm-setup
- Run the
engine-setupcommand and follow the prompts to upgrade Red Hat Enterprise Virtualization Manager.# engine-setup [ INFO ] Stage: Initializing Welcome to the RHEV 3.3.0 upgrade. Please read the following knowledge article for known issues and updated instructions before proceeding with the upgrade. RHEV 3.3.0 Upgrade Guide: Tips, Considerations and Roll-back Issues https://access.redhat.com/site/articles/408623 Would you like to continue with the upgrade? (Yes, No) [Yes]: - Remove Red Hat Enterprise Virtualization Manager 3.2 channels and entitlements to ensure the system does not use any Red Hat Enterprise Virtualization Manager 3.2 packages.Subscription Manager
Use the
yum-config-managercommand to disable the Red Hat Enterprise Virtualization 3.2 repository in youryumconfiguration.# yum-config-manager --disable rhel-6-server-rhevm-3.2-rpms
Red Hat Network ClassicUse the
rhn-channelcommand or the Red Hat Network web interface to remove theRed Hat Enterprise Virtualization Manager (v.3.2 x86_64)channels.# rhn-channel --remove --channel=rhel-x86_64-server-6-rhevm-3.2
- Run the following command to ensure all packages related to Red Hat Enterprise Virtualization are up to date:
# yum update
In particular, if you are using the JBoss Application Server from JBoss Enterprise Application Platform 6.0.1, you must run the above command to upgrade to Enterprise Application Platform 6.1.
Red Hat Enterprise Virtualization Manager has been upgraded. To take full advantage of all Red Hat Enterprise Virtualization 3.3 features you must also:
- Ensure all of your virtualization hosts are up to date and running the most recent Red Hat Enterprise Linux packages or Hypervisor images.
- Change all of your clusters to use compatibility version 3.3.
- Change all of your data centers to use compatibility version 3.3.
5.4. Upgrading to Red Hat Enterprise Virtualization Manager 3.2
5.4.1. Upgrading to Red Hat Enterprise Virtualization Manager 3.2
Upgrading Red Hat Enterprise Virtualization Manager to version 3.2 is performed using the rhevm-upgrade command. Virtualization hosts, and the virtual machines running upon them, will continue to operate independently while the Manager is being upgraded. Once the Manager upgrade is complete you will be able to upgrade your hosts, if you haven't already, to the latest versions of Red Hat Enterprise Linux and Red Hat Enterprise Virtualization Hypervisor.
Important
Note
rhevm-upgrade command will attempt to roll your Red Hat Enterprise Virtualization Manager installation back to its previous state. Where this also fails detailed instructions for manually restoring the installation are displayed.
Procedure 5.8. Upgrading to Red Hat Enterprise Virtualization Manager 3.2
Add Red Hat Enterprise Virtualization 3.2 Subscription
Ensure that the system is subscribed to the required channels and entitlements to receive Red Hat Enterprise Virtualization Manager 3.2 packages. This procedure assumes that the system is already subscribed to required channels and entitlements to receive Red Hat Enterprise Virtualization 3.1 packages. These must also be available to complete the upgrade process.Certificate-based Red Hat NetworkThe Red Hat Enterprise Virtualization 3.2 packages are provided by the
rhel-6-server-rhevm-3.2-rpmsrepository associated with theRed Hat Enterprise Virtualizationentitlement. Use theyum-config-managercommand to enable the repository in youryumconfiguration. Theyum-config-managercommand must be run while logged in as therootuser.# yum-config-manager --enable rhel-6-server-rhevm-3.2-rpms
Red Hat Network ClassicThe Red Hat Enterprise Virtualization 3.2 packages are provided by the
Red Hat Enterprise Virtualization Manager (v.3.2 x86_64)channel, also referred to asrhel-x86_64-server-6-rhevm-3.2in Red Hat Network Classic.rhn-channel --add --channel=rhel-x86_64-server-6-rhevm-3.2
Use therhn-channelcommand, or the Red Hat Network Web Interface, to subscribe to theRed Hat Enterprise Virtualization Manager (v.3.2 x86_64)channel.Remove Enterprise Virtualization 3.1 Subscription
Ensure that the system does not use any Red Hat Enterprise Virtualization Manager 3.1 packages by removing the Red Hat Enterprise Vitulization Manager 3.1 channels and entitlements.Certificate-based Red Hat NetworkUse the
yum-config-managercommand to disable the Red Hat Enterprise Virtualization 3.1 repository in youryumconfiguration. Theyum-config-managercommand must be run while logged in as therootuser.# yum-config-manager --disablerepo=rhel-6-server-rhevm-3.1-rpms
Red Hat Network ClassicUse the
rhn-channelcommand, or the Red Hat Network Web Interface, to remove theRed Hat Enterprise Virtualization Manager (v.3.1 x86_64)channels.# rhn-channel --remove --channel=rhel-6-server-rhevm-3.1
Update the rhevm-setup Package
To ensure that you have the most recent version of therhevm-upgradecommand installed you must update the rhevm-setup package. Log in as therootuser and useyumto update the rhevm-setup package.# yum update rhevm-setup
Run the
rhevm-upgradeCommandTo upgrade Red Hat Enterprise Virtualization Manager run therhevm-upgradecommand. You must be logged in as therootuser to run this command.# rhevm-upgrade Loaded plugins: product-id, rhnplugin Info: RHEV Manager 3.1 to 3.2 upgrade detected Checking pre-upgrade conditions...(This may take several minutes)
- If the ipa-server package is installed then an error message is displayed. Red Hat Enterprise Virtualization Manager 3.2 does not support installation on the same machine as Identity Management (IdM).
Error: IPA was found to be installed on this machine. Red Hat Enterprise Virtualization Manager 3.2 does not support installing IPA on the same machine. Please remove ipa packages before you continue.
To resolve this issue you must migrate the IdM configuration to another system before re-attempting the upgrade. For further information see https://access.redhat.com/knowledge/articles/233143.
Your Red Hat Enterprise Virtualization Manager installation has now been upgraded. To take full advantage of all Red Hat Enterprise Virtualization 3.2 features you must also:
- Ensure that all of your virtualization hosts are up to date and running the most recent Red Hat Enterprise Linux packages or Hypervisor images.
- Change all of your clusters to use compatibility version 3.2.
- Change all of your data centers to use compatibility version 3.2.
5.5. Upgrading to Red Hat Enterprise Virtualization Manager 3.1
5.5.1. Upgrading to Red Hat Enterprise Virtualization Manager 3.1
Upgrading Red Hat Enterprise Virtualization Manager to version 3.1 is performed using the rhevm-upgrade command. Virtualization hosts, and the virtual machines running upon them, will continue to operate independently while the Manager is being upgraded. Once the Manager upgrade is complete you will be able to upgrade your hosts, if you haven't already, to the latest versions of Red Hat Enterprise Linux and Red Hat Enterprise Virtualization Hypervisor.
Important
Important
Note
rhevm-upgrade command will attempt to roll your Red Hat Enterprise Virtualization Manager installation back to its previous state. Where this also fails detailed instructions for manually restoring the installation are displayed.
Procedure 5.9. Upgrading to Red Hat Enterprise Virtualization Manager 3.1
Red Hat JBoss Enterprise Application Platform 6 Subscription
Ensure that the system is subscribed to the required channels and entitlements to receive Red Hat JBoss Enterprise Application Platform 6 packages. Red Hat JBoss Enterprise Application Platform 6 is a required dependency of Red Hat Enterprise Virtualization Manager 3.1.Certificate-based Red Hat NetworkThe Red Hat JBoss Enterprise Application Platform 6 packages are provided by the
Red Hat JBoss Enterprise Application Platformentitlement in certificate-based Red Hat Network.Use thesubscription-managercommand to ensure that the system is subscribed to theRed Hat JBoss Enterprise Application Platformentitlement.# subscription-manager list
Red Hat Network ClassicThe Red Hat JBoss Enterprise Application Platform 6 packages are provided by the
Red Hat JBoss Application Platform (v 6) for 6Server x86_64channel, also referred to asjbappplatform-6-x86_64-server-6-rpm, in Red Hat Network Classic. The Channel Entitlement Name for this channel isRed Hat JBoss Enterprise Application Platform (v 4, zip format).Use therhn-channelcommand, or the Red Hat Network Web Interface, to subscribe to theRed Hat JBoss Application Platform (v 6) for 6Server x86_64channel.Add Red Hat Enterprise Virtualization 3.1 Subscription
Ensure that the system is subscribed to the required channels and entitlements to receive Red Hat Enterprise Virtualization Manager 3.1 packages.Certificate-based Red Hat NetworkThe Red Hat Enterprise Virtualization 3.1 packages are provided by the
rhel-6-server-rhevm-3.1-rpmsrepository associated with theRed Hat Enterprise Virtualizationentitlement. Use theyum-config-managercommand to enable the repository in youryumconfiguration. Theyum-config-managercommand must be run while logged in as therootuser.# yum-config-manager --enable rhel-6-server-rhevm-3.1-rpms
Red Hat Network ClassicThe Red Hat Enterprise Virtualization 3.1 packages are provided by the
Red Hat Enterprise Virtualization Manager (v.3.1 x86_64)channel, also referred to asrhel-x86_64-server-6-rhevm-3.1in Red Hat Network Classic.Use therhn-channelcommand, or the Red Hat Network Web Interface, to subscribe to theRed Hat Enterprise Virtualization Manager (v.3.1 x86_64)channel.Remove Red Hat Enterprise Virtualization 3.0 Subscription
Ensure that the system does not use any Red Hat Enterprise Virtualization Manager 3.0 packages by removing the Red Hat Enterprise Virtualization Manager 3.0 channels and entitlements.Certificate-based Red Hat NetworkUse the
yum-config-managercommand to disable the Red Hat Enterprise Virtualization 3.0 repositories in youryumconfiguration. Theyum-config-managercommand must be run while logged in as therootuser.# yum-config-manager --disablerepo=rhel-6-server-rhevm-3-rpms
# yum-config-manager --disablerepo=jb-eap-5-for-rhel-6-server-rpms
Red Hat Network ClassicUse the
rhn-channelcommand, or the Red Hat Network Web Interface, to remove theRed Hat Enterprise Virtualization Manager (v.3.0 x86_64)channels.# rhn-channel --remove --channel=rhel-6-server-rhevm-3
# rhn-channel --remove --channel=jbappplatform-5-x86_64-server-6-rpm
Update the rhevm-setup Package
To ensure that you have the most recent version of therhevm-upgradecommand installed you must update the rhevm-setup package. Log in as therootuser and useyumto update the rhevm-setup package.# yum update rhevm-setup
Run the
rhevm-upgradeCommandTo upgrade Red Hat Enterprise Virtualization Manager run therhevm-upgradecommand. You must be logged in as therootuser to run this command.# rhevm-upgrade Loaded plugins: product-id, rhnplugin Info: RHEV Manager 3.0 to 3.1 upgrade detected Checking pre-upgrade conditions...(This may take several minutes)
- If the ipa-server package is installed then an error message is displayed. Red Hat Enterprise Virtualization Manager 3.1 does not support installation on the same machine as Identity Management (IdM).
Error: IPA was found to be installed on this machine. Red Hat Enterprise Virtualization Manager 3.1 does not support installing IPA on the same machine. Please remove ipa packages before you continue.
To resolve this issue you must migrate the IdM configuration to another system before re-attempting the upgrade. For further information see https://access.redhat.com/knowledge/articles/233143. - A list of packages that depend on Red Hat JBoss Enterprise Application Platform 5 is displayed. These packages must be removed to install Red Hat JBoss Enterprise Application Platform 6, required by Red Hat Enterprise Virtualization Manager 3.1.
 Warning: the following packages will be removed if you proceed with the upgrade:

    * objectweb-asm

 Would you like to proceed? (yes|no):
You must enteryesto proceed with the upgrade, removing the listed packages.
Your Red Hat Enterprise Virtualization Manager installation has now been upgraded. To take full advantage of all Red Hat Enterprise Virtualization 3.1 features you must also:
- Ensure that all of your virtualization hosts are up to date and running the most recent Red Hat Enterprise Linux packages or Hypervisor images.
- Change all of your clusters to use compatibility version 3.1.
- Change all of your data centers to use compatibility version 3.1.
5.6. Post-Upgrade Tasks
5.6.1. Changing the Cluster Compatibility Version
Red Hat Enterprise Virtualization clusters have a compatibility version. The cluster compatibility version indicates the features of Red Hat Enterprise Virtualization supported by all of the hosts in the cluster. The cluster compatibility is set according to the version of the least capable host operating system in the cluster.
Note
Procedure 5.10. Changing the Cluster Compatibility Version
- Log in to the Administration Portal as the administrative user. By default this is the
adminuser. - Click the Clusters tab.
- Select the cluster to change from the list displayed. If the list of clusters is too long to filter visually then perform a search to locate the desired cluster.
- Click the button.
- Change the Compatibility Version to the desired value.
- Click to open the Change Cluster Compatibility Version confirmation window.
- Click to confirm.
You have updated the compatibility version of the cluster. Once you have updated the compatibility version of all clusters in a data center, then you are also able to change the compatibility version of the data center itself.
Warning
5.6.2. Changing the Data Center Compatibility Version
Red Hat Enterprise Virtualization data centers have a compatibility version. The compatibility version indicates the version of Red Hat Enterprise Virtualization that the data center is intended to be compatible with. All clusters in the data center must support the desired compatibility level.
Note
Procedure 5.11. Changing the Data Center Compatibility Version
- Log in to the Administration Portal as the administrative user. By default this is the
adminuser. - Click the Data Centers tab.
- Select the data center to change from the list displayed. If the list of data centers is too long to filter visually then perform a search to locate the desired data center.
- Click the button.
- Change the Compatibility Version to the desired value.
- Click .
You have updated the compatibility version of the data center.
Warning
Part III. Installing Hosts
Chapter 6. Introduction to Hosts

6.2. Introduction to Virtualization Hosts
- all virtualization hosts meet the hardware requirements, and
- you have successfully completed installation of the Red Hat Enterprise Virtualization Manager.
Important
Important
Chapter 7. Red Hat Enterprise Virtualization Hypervisor Hosts
7.1. Red Hat Enterprise Virtualization Hypervisor Installation Overview
- The Red Hat Enterprise Virtualization Hypervisor must be installed on a physical server. It must not be installed in a Virtual Machine.
- The installation process will reconfigure the selected storage device and destroy all data. Therefore, ensure that any data to be retained is successfully backed up before proceeding.
- All Hypervisors in an environment must have unique hostnames and IP addresses, in order to avoid network conflicts.
- Instructions for using Network (PXE) Boot to install the Hypervisor are contained in the Red Hat Enterprise Linux - Installation Guide, available at https://access.redhat.com/documentation/en-US/Red_Hat_Enterprise_Linux.
- Red Hat Enterprise Virtualization Hypervisors can use Storage Attached Networks (SANs) and other network storage for storing virtualized guest images. However, a local storage device is required for installing and booting the Hypervisor.
Note
7.2. Installing the Red Hat Enterprise Virtualization Hypervisor Disk Image
Before you can set up a Red Hat Enterprise Virtualization Hypervisor, you must download the packages containing the Red Hat Enterprise Virtualization Hypervisor disk image and tools for writing that disk image to USB storage devices or preparing that disk image for deployment via PXE.
Procedure 7.1. Installing the Red Hat Enterprise Virtualization Hypervisor Disk Image
- Enable the
Red Hat Enterprise Virtualization Hypervisor (v.6 x86_64)repository:- With RHN Classic:
# rhn-channel --add --channel=rhel-x86_64-server-6-rhevh
- With Subscription Manager, attach a
Red Hat Enterprise Virtualizationentitlement and run the following command:# subscription-manager repos --enable=rhel-6-server-rhevh-rpms
- Run the following command to install the rhev-hypervisor6 package:
# yum install rhev-hypervisor6
- Run the following command to install the livecd-tools package:
# yum install livecd-tools
You have installed the Red Hat Enterprise Virtualization Hypervisor disk image and the livecd-iso-to-disk and livecd-iso-to-pxeboot utilities. By default, the Red Hat Enterprise Virtualization Hypervisor disk image is located in the /usr/share/rhev-hypervisor/ directory.
Note
/usr/share/rhev-hypervisor/rhev-hypervisor.iso is now a symbolic link to a uniquely-named version of the Hypervisor ISO image, such as /usr/share/rhev-hypervisor/rhev-hypervisor-6.4-20130321.0.el6ev.iso. Different versions of the image can now be installed alongside each other, allowing administrators to run and maintain a cluster on a previous version of the Hypervisor while upgrading another cluster for testing. Additionally, the symbolic link /usr/share/rhev-hypervisor/rhevh-latest-6.iso, is created. This links also targets the most recently installed version of the Red Hat Enterprise Virtualization ISO image.
7.3. Preparing Installation Media
7.3.1. Preparing a USB Storage Device
Note
7.3.2. Preparing USB Installation Media Using livecd-iso-to-disk
You can use the livecd-iso-to-disk utility included in the livecd-tools package to write a hypervisor or other disk image to a USB storage device. You can then use that USB storage device to start systems that support booting via USB and install the Red Hat Enterprise Virtualization Hypervisor.
# livecd-iso-to-disk [image] [device]
/usr/share/rhev-hypervisor/rhev-hypervisor.iso on the machine on which the Red Hat Enterprise Virtualization Manager is installed. The livecd-iso-to-disk utility requires devices to be formatted with the FAT or EXT3 file system.
Note
/dev/sdb. When a USB storage device is formatted with a partition table, use the path name to the device, such as /dev/sdb1.
Procedure 7.2. Preparing USB Installation Media Using livecd-iso-to-disk
- Run the following command to ensure you have the latest version of the Red Hat Enterprise Virtualization Hypervisor disk image:
# yum update rhev-hypervisor6
- Use the livecd-iso-to-disk utility to write the disk image to a USB storage device.
Example 7.1. Use of livecd-iso-to-disk
This example demonstrates the use of livecd-iso-to-disk to write a Red Hat Enterprise Virtualization Hypervisor disk image to a USB storage device named/dev/sdcand make that USB storage device bootable.# livecd-iso-to-disk --format --reset-mbr /usr/share/rhev-hypervisor/rhev-hypervisor.iso /dev/sdc Verifying image... /usr/share/rhev-hypervisor/rhev-hypervisor.iso: eccc12a0530b9f22e5ba62b848922309 Fragment sums: 8688f5473e9c176a73f7a37499358557e6c397c9ce2dafb5eca5498fb586 Fragment count: 20 Press [Esc] to abort check. Checking: 100.0% The media check is complete, the result is: PASS. It is OK to use this media. WARNING: THIS WILL DESTROY ANY DATA ON /dev/sdc!!! Press Enter to continue or ctrl-c to abort /dev/sdc: 2 bytes were erased at offset 0x000001fe (dos): 55 aa Waiting for devices to settle... mke2fs 1.42.7 (21-Jan-2013) Filesystem label=LIVE OS type: Linux Block size=4096 (log=2) Fragment size=4096 (log=2) Stride=0 blocks, Stripe width=0 blocks 488640 inodes, 1953280 blocks 97664 blocks (5.00%) reserved for the super user First data block=0 Maximum filesystem blocks=2000683008 60 block groups 32768 blocks per group, 32768 fragments per group 8144 inodes per group Superblock backups stored on blocks: 32768, 98304, 163840, 229376, 294912, 819200, 884736, 1605632 Allocating group tables: done Writing inode tables: done Creating journal (32768 blocks): done Writing superblocks and filesystem accounting information: done Copying live image to target device. squashfs.img 163360768 100% 184.33MB/s 0:00:00 (xfer#1, to-check=0/1) sent 163380785 bytes received 31 bytes 108920544.00 bytes/sec total size is 163360768 speedup is 1.00 osmin.img 4096 100% 0.00kB/s 0:00:00 (xfer#1, to-check=0/1) sent 4169 bytes received 31 bytes 8400.00 bytes/sec total size is 4096 speedup is 0.98 Updating boot config file Installing boot loader /media/tgttmp.q6aZdS/syslinux is device /dev/sdc Target device is now set up with a Live image!
You have written a Red Hat Enterprise Virtualization Hypervisor disk image to a USB storage device. You can now use that USB storage device to start a system and install the Red Hat Enterprise Virtualization Hypervisor operating system.
7.3.3. Preparing USB Installation Media Using dd
# dd if=[image] of=[device]
/usr/share/rhev-hypervisor/rhev-hypervisor.iso on the machine on which the rhev-hypervisor6 package is installed. The dd command does not make assumptions as to the format of the device because it performs a low-level copy of the raw data in the selected image.
7.3.4. Preparing USB Installation Media Using dd on Linux Systems
You can use the dd utility to write a Red Hat Enterprise Virtualization Hypervisor disk image to a USB storage device.
Procedure 7.3. Preparing USB Installation Media using dd on Linux Systems
- Run the following command to ensure you have the latest version of the Red Hat Enterprise Virtualization Hypervisor disk image:
# yum update rhev-hypervisor6
- Use the dd utility to write the disk image to a USB storage device.
Example 7.2. Use of dd
This example uses a USB storage device named/dev/sdc.# dd if=/usr/share/rhev-hypervisor/rhev-hypervisor.iso of=/dev/sdc 243712+0 records in 243712+0 records out 124780544 bytes (125 MB) copied, 56.3009 s, 2.2 MB/s
Warning
The dd utility will overwrite all data on the device specified by theofparameter. Ensure you have specified the correct device and that the device contains no valuable data before using the dd utility.
You have written a Red Hat Enterprise Virtualization Hypervisor disk image to a USB storage device.
7.3.5. Preparing USB Installation Media Using dd on Windows Systems
You can use the dd utility to write a Red Hat Enterprise Virtualization Hypervisor disk image to a USB storage device. To use this utility in Windows, you must download and install Red Hat Cygwin.
Procedure 7.4. Preparing USB Installation Media using dd on Windows Systems
- Open http://www.redhat.com/services/custom/cygwin/ in a web browser and click
32-bit Cygwinto download the 32-bit version of Red Hat Cygwin, or64-bit Cygwinto download the 64-bit version of Red Hat Cygwin. - Run the downloaded executable as a user with administrator privileges to open the Red Hat Cygwin installation program.
- Follow the prompts to install Red Hat Cygwin. The Coreutils package in the Base package group provides the dd utility. This package is automatically selected for installation.
- Copy the
rhev-hypervisor.isofile downloaded from the Red Hat Network toC:\rhev-hypervisor.iso. - Run the Red Hat Cygwin application from the desktop as a user with administrative privileges.
Important
On the Windows 7 and Windows Server 2008, you must right-click the Red Hat Cygwin icon and select the Run as Administrator option to ensure the application runs with the correct permissions. - In the terminal, run the following command to view the drives and partitions currently visible to the system:
$ cat /proc/partitions
Example 7.3. View of Disk Partitions Attached to System
Administrator@test / $ cat /proc/partitions major minor #blocks name 8 0 15728640 sda 8 1 102400 sda1 8 2 15624192 sda2 - Attach the USB storage device to which the Red Hat Enterprise Virtualization Hypervisor disk image will be written to the system. Run the
cat /proc/partitionscommand again and compare the output to that of the previous output. A new entry will appear that designates the USB storage device.Example 7.4. View of Disk Partitions Attached to System
Administrator@test / $ cat /proc/partitions major minor #blocks name 8 0 15728640 sda 8 1 102400 sda1 8 2 15624192 sda2 8 16 524288 sdb - Use the dd utility to write the
rhev-hypervisor.isofile to the USB storage device. The following example uses a USB storage device named/dev/sdb. Replace sdb with the correct device name for the USB storage device to be used.Example 7.5. Use of dd Utility Under Red Hat Cygwin
Administrator@test /
$ dd if=/cygdrive/c/rhev-hypervisor.iso of=/dev/sdb& pid=$!
Warning
The dd utility will overwrite all data on the device specified by theofparameter. Ensure you have specified the correct device and that the device contains no valuable data before using the dd utility.Note
Writing disk images to USB storage devices with the version of the dd utility included with Red Hat Cygwin can take significantly longer than the equivalent on other platforms. You can run the following command to view the progress of the operation:$ kill -USR1 $pid
You have written a Red Hat Enterprise Virtualization Hypervisor disk image to a USB storage device.
7.3.6. Preparing Optical Hypervisor Installation Media
You can write a Red Hat Enterprise Virtualization Hypervisor disk image to a CD-ROM or DVD with the wodim utility. The wodim utility is provided by the wodim package.
Procedure 7.5. Preparing Optical Hypervisor Installation Media
- Run the following command to install the wodim package and dependencies:
# yum install wodim
- Insert a blank CD-ROM or DVD into your CD or DVD writer.
- Run the following command to write the Red Hat Enterprise Virtualization Hypervisor disk image to the disc:
wodim dev=[device] [image]
Example 7.6. Use of the wodim Utility
This example uses the first CD-RW (/dev/cdrw) device available and the default hypervisor image location.# wodim dev=/dev/cdrw /usr/share/rhev-hypervisor/rhev-hypervisor.iso
Important
You have written a Red Hat Enterprise Virtualization Hypervisor disk image to a CD-ROM or DVD.
7.4. Installation
7.4.1. Booting the Hypervisor from USB Installation Media
Booting a hypervisor from a USB storage device is similar to booting other live USB operating systems. Follow this procedure to boot a machine using USB installation media.
Procedure 7.6. Booting the Hypervisor from USB Installation Media
- Enter the BIOS menu to enable USB storage device booting if not already enabled.
- Enable USB booting if this feature is disabled.
- Set booting USB storage devices to be first boot device.
- Shut down the system.
- Insert the USB storage device that contains the hypervisor boot image.
- Restart the system.
The hypervisor boot process commences automatically.
7.4.2. Booting the Hypervisor from Optical Installation Media
Booting the Hypervisor from optical installation media requires the system to have a correctly defined BIOS boot configuration.
Procedure 7.7. Booting the Hypervisor from Optical Installation Media
- Ensure that the system's BIOS is configured to boot from the CD-ROM or DVD-ROM drive first. For many systems this the default.
Note
Refer to your manufacturer's manuals for further information on modifying the system's BIOS boot configuration. - Insert the Hypervisor CD-ROM in the CD-ROM or DVD-ROM drive.
- Reboot the system.
The Hypervisor boot screen will be displayed.
7.4.3. Starting the Installation Program
When you start a system using the prepared boot media, the first screen that displays is the boot menu. From here, you can start the installation program for installing the hypervisor.
Procedure 7.8. Starting the Installation Program
- From the boot splash screen, press any key to open the boot menu.
Figure 7.1. The boot splash screen
- From the boot menu, use the directional keys to select Install or Upgrade, Install (Basic Video), or Install or Upgrade with Serial Console.
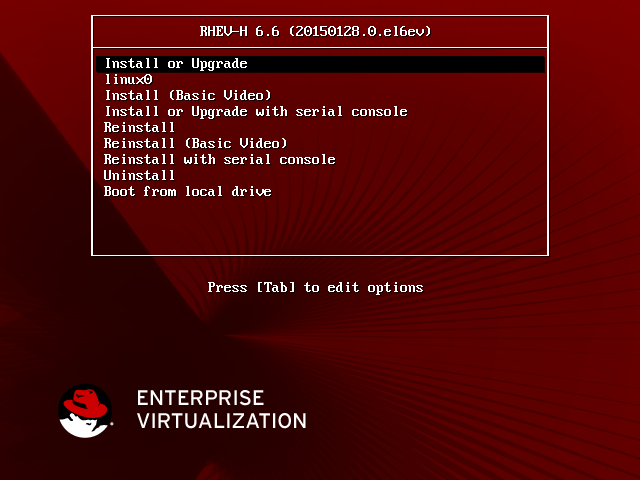
Figure 7.2. The boot menu
The full list of options in the boot menu is as follows:- Install or Upgrade
- Install or upgrade the hypervisor.
- Install (Basic Video)
- Install or upgrade the Hypervisor in basic video mode.
- Install or Upgrade with Serial Console
- Install or upgrade the hypervisor while redirecting the console to a serial device attached to
/dev/ttyS0. - Reinstall
- Reinstall the hypervisor.
- Reinstall (Basic Video)
- Reinstall the hypervisor in basic video mode.
- Reinstall with Serial Console
- Reinstall the hypervisor while redirecting the console to a serial device attached to
/dev/ttyS0. - Uninstall
- Uninstall the hypervisor.
- Boot from Local Drive
- Boot the operating system installed on the first local drive.
- Press the Enter key.
Note
You have started the hypervisor installation program.
7.4.4. Hypervisor Menu Actions
- The directional keys (Up, Down, Left, Right) are used to select different controls on the screen. Alternatively the Tab key cycles through the controls on the screen which are enabled.
- Text fields are represented by a series of underscores (_). To enter data in a text field select it and begin entering data.
- Buttons are represented by labels which are enclosed within a pair of angle brackets (< and >). To activate a button ensure it is selected and press Enter or Space.
- Boolean options are represented by an asterisk (*) or a space character enclosed within a pair of square brackets ([ and ]). When the value contained within the brackets is an asterisk then the option is set, otherwise it is not. To toggle a Boolean option on or off press Space while it is selected.
7.4.5. Installing the Hypervisor
There are two methods for installing Red Hat Enterprise Virtualization Hypervisors:
- Interactive installation.
- Unattended installation.
Procedure 7.9. Installing the Hypervisor Interactively
- Use the prepared boot media to boot the machine on which the Hypervisor is to be installed.
- Select Install Hypervisor and press Enter to begin the installation process.
- The first screen that appears allows you to configure the appropriate keyboard layout for your locale. Use the arrow keys to highlight the appropriate option and press Enter to save your selection.
Example 7.7. Keyboard Layout Configuration
Keyboard Layout Selection
Available Keyboard LayoutsSwiss German (latin1) Turkish U.S. English U.S. International ... (Hit enter to select a layout) <Quit> <Back> <Continue> - The installation script automatically detects all disks attached to the system. This information is used to assist with selection of the boot and installation disks that the Hypervisor will use. Each entry displayed on these screens indicates the Location, Device Name, and Size of the disks.
Boot Disk
The first disk selection screen is used to select the disk from which the Hypervisor will boot. The Hypervisor's boot loader will be installed to the Master Boot Record (MBR) of the disk that is selected on this screen. The Hypervisor attempts to automatically detect the disks attached to the system and presents the list from which to choose the boot device. Alternatively, you can manually select a device by specifying a block device name using the Other Device option.Important
The selected disk must be identified as a boot device and appear in the boot order either in the system's BIOS or in a pre-existing boot loader.Automatically Detected Device Selection
- Select the entry for the disk the Hypervisor is to boot from in the list and press Enter.
- Select the disk and press Enter. This action saves the boot device selection and starts the next step of installation.
Manual Device Selection
- Select Other device and press Enter.
- When prompted to Please select the disk to use for booting RHEV-H, enter the name of the block device from which the Hypervisor should boot.
Example 7.8. Other Device Selection
Please select the disk to use for booting RHEV-H
/dev/sda
- Press Enter. This action saves the boot device selection and starts the next step of installation.
- The disk or disks selected for installation will be those to which the Hypervisor itself is installed. The Hypervisor attempts to automatically detect the disks attached to the system and presents the list from which installation devices are chosen.
Warning
All data on the selected storage devices will be destroyed.- Select each disk on which the Hypervisor is to be installed and press Space to toggle it to enabled. Where other devices are to be used for installation, either solely or in addition to those which are listed automatically, use Other Device.
- Select the button and press Enter to continue.
- Where the Other Device option was specified, a further prompt will appear. Enter the name of each additional block device to use for Hypervisor installation, separated by a comma. Once all required disks have been selected, select the button and press Enter.
Example 7.9. Other Device Selection
Please enter one or more disks to use for installing RHEV-H. Multiple devices can be separated by comma.
Device path:   /dev/mmcblk0,/dev/mmcblk1______________
Once the installation disks have been selected, the next stage of the installation starts.
- The next screen allows you to configure storage for the Hypervisor.
- Select or clear the Fill disk with Data partition check box. Clearing this text box displays a field showing the remaining space on the drive and allows you to specify the amount of space to be allocated to data storage.
- Enter the preferred values for Swap, Config, and Logging.
- If you selected the Fill disk with Data partition check box, the Data field is automatically set to
0. If the check box was cleared, you can enter a whole number up to the value of the Remaining Space field. Entering a value of-1fills all remaining space.
- The Hypervisor requires a password be set to protect local console access to the
adminuser. The installation script prompts you to enter the preferred password in both the Password and Confirm Password fields.Use a strong password. Strong passwords comprise a mix of uppercase, lowercase, numeric, and punctuation characters. They are six or more characters long and do not contain dictionary words.Once a strong password has been entered, select and press Enter to install the Hypervisor on the selected disks.
Once installation is complete, the message RHEV Hypervisor Installation Finished Successfully will be displayed. Select the button and press Enter to reboot the system.
Note
Note
Note
scsi_id functions with multipath. Devices where this is not the case include USB storage and some older ATA disks.
7.5. Configuration
7.5.1. Logging Into the Hypervisor
You can log into the hypervisor console locally to configure the hypervisor.
Procedure 7.10. Logging Into the Hypervisor
- Start the machine on which the Red Hat Enterprise Virtualization Hypervisor operating system is installed.
- Enter the user name
adminand press Enter. - Enter the password you set during installation and press Enter.
You have successfully logged into the hypervisor console as the admin user.
7.5.2. The Status Screen
- : Displays the RSA host key fingerprint and host key of the Hypervisor.
- : Displays details on the CPU used by the Hypervisor such as the CPU name and type.
- : Locks the Hypervisor. The user name and password must be entered to unlock the Hypervisor.
- : Logs off the current user.
- : Restarts the Hypervisor.
- : Turns the Hypervisor off.
7.5.3. The Network Screen
7.5.3.1. The Network Screen
- : Allows you to ping a given IP address by specifying the address to ping and the number of times to ping that address.
- : Allows you to create bonds between network interfaces.
7.5.3.2. Configuring the Host Name
You can change the host name used to identify the hypervisor.
Procedure 7.11. Configuring the Host Name
- Select the Hostname field on the Network screen and enter the new host name.
- Select and press Enter to save the changes.
You have changed the host name used to identify the hypervisor.
7.5.3.3. Configuring Domain Name Servers
You can specify up to two domain name servers that the hypervisor will use to resolve network addresses.
Procedure 7.12. Configuring Domain Name Servers
- To set or change the primary DNS server, select the DNS Server 1 field and enter the IP address of the new primary DNS server.
- To set or change the secondary DNS server, select the DNS Server 2 field and enter the IP address of the new secondary DNS server.
- Select and press Enter to save the changes.
You have specified the primary and secondary domain name servers that the hypervisor will use to resolve network addresses.
7.5.3.4. Configuring Network Time Protocol Servers
You can specify up to two network time protocol servers that the hypervisor will use to synchronize its system clock.
Important
Procedure 7.13. Configuring Network Time Protocol Servers
- To set or change the primary NTP server, select the NTP Server 1 field and enter the IP address or host name of the new primary NTP server.
- To set or change the secondary NTP server, select the NTP Server 2 field and enter the IP address or host name of the new secondary NTP server.
- Select and press Enter to save changes to the NTP configuration.
You have specified the primary and secondary NTP servers that the hypervisor will use to synchronize its system clock.
7.5.3.5. Configuring Network Interfaces
After you have installed the Red Hat Enterprise Virtualization Hypervisor operating system, all network interface cards attached to the hypervisor are initially in an unconfigured state. You must configure at least one network interface to connect the hypervisor with the Red Hat Enterprise Virtualization Manager.
Procedure 7.14. Configuring Network Interfaces
- Select a network interfaces from the list beneath Available System NICs and press Enter to configure that network interface.
Note
To identify the physical network interface card associated with the selected network interface, select and press Enter. - Configure a dynamic or static IP address:
Configuring a Dynamic IP Address
Select DHCP under IPv4 Settings and press the space bar to enable this option.Configuring a Static IP Address
- Select Static under IPv4 Settings and press the space bar to enable this option.
- Specify the IP Address, Netmask, and Gateway that the hypervisor will use.
Example 7.10. Static IPv4 Networking Configuration
IPv4 Settings
( ) Disabled     ( ) DHCP     (*) Static
IP Address: 192.168.122.100_  Netmask: 255.255.255.0___
Gateway     192.168.1.1_____
Note
The Red Hat Enterprise Virtualization Manager does not currently support IPv6 networking. IPv6 networking must remain set to Disabled. - Enter a VLAN identifer in the VLAN ID field to configure a VLAN for the device.
- Select the Use Bridge option and press the space bar to enable this option.
- Select the button and press Enter to save the network configuration.
The progress of configuration is displayed on screen. When configuration is complete, press the Enter key to close the progress window and return to the Network screen. The network interface is now listed as Configured.
7.5.4. The Security Screen
You can configure security-related options for the hypervisor such as SSH password authentication, AES-NI encryption, and the password of the admin user.
Procedure 7.15. Configuring Security
- Select the Enable SSH password authentication option and press the space bar to enable SSH authentication.
- Select the Disable AES-NI option and press the space bar to disable the use of AES-NI for encryption.
- Optionally, enter the number of bytes by which to pad blocks in AES-NI encryption if AES-NI encryption is enabled.
- Enter a new password for the
adminuser in the Password field and Confirm Password to change the password used to log into the hypervisor console. - Select and press Enter.
You have updated the security-related options for the hypervisor.
7.5.5. The Keyboard Screen
The Keyboard screen allows you to configure the keyboard layout used inside the hypervisor console.
Procedure 7.16. Configuring the Hypervisor Keyboard Layout
- Select a keyboard layout from the list provided.
Keyboard Layout Selection Choose the Keyboard Layout you would like to apply to this system. Current Active Keyboard Layout: U.S. English
Available Keyboard LayoutsSwiss German (latin1) Turkish U.S. English U.S. International Ukranian ... <Save> - Select and press Enter to save the selection.
You have successfully configured the keyboard layout.
7.5.6. The SNMP Screen
The SNMP screen allows you to enable and configure a password for simple network management protocol.
Enable SNMP       [ ]

SNMP Password
Password:          _______________
Confirm Password:  _______________


<Save>     <Reset>
Procedure 7.17. Configuring Simple Network Management Protocol
- Select the Enable SNMP option and press the space bar to enable SNMP.
- Enter a password in the Password and Confirm Password fields.
- Select <Save> and press Enter.
You have enabled SNMP and configured a password that the hypervisor will use in SNMP communication.
7.5.7. The CIM Screen
The CIM screen allows you to configure a common information model for attaching the hypervisor to a pre-existing CIM management infrastructure and monitor virtual machines that are running on the hypervisor.
Procedure 7.18. Configuring Hypervisor Common Information Model
- Select the Enable CIM option and press the space bar to enable CIM.
Enable CIM [ ]
- Enter a password in the Password field and Confirm Password field.
- Select and press Enter.
You have configured the Hypervisor to accept CIM connections authenticated using a password. Use this password when adding the Hypervisor to your common information model object manager.
7.5.8. The Logging Screen
The Logging screen allows you to configure logging-related options such as a daemon for automatically exporting log files generated by the hypervisor to a remote server.
Procedure 7.19. Configuring Logging
- In the Logrotate Max Log Size field, enter the maximum size in kilobytes that log files can reach before they are rotated by logrotate. The default value is
1024. - Optionally, configure rsyslog to transmit log files to a remote
syslogdaemon:- Enter the remote rsyslog server address in the Server Address field.
- Enter the remote rsyslog server port in the Server Port field. The default port is
514.
- Optionally, configure netconsole to transmit kernel messages to a remote destination:
- Enter the Server Address.
- Enter the Server Port. The default port is
6666.
- Select and press Enter.
You have configured logging for the hypervisor.
7.5.9. The Kdump Screen
The Kdump screen allows you to specify a location in which kernel dumps will be stored in the event of a system failure. There are four options - Disable, which disables kernel dumping, Local, which stores kernel dumps on the local system, and SSH and NFS, which allow you to export kernel dumps to a remote location.
Procedure 7.20. Configuring Kernel Dumps
- Select an option for storing kernel dumps:
Local
- Select the Local option and press the space bar to store kernel dumps on the local system.
SSH
- Select the SSH option and press the space bar to export kernel dumps via SSH.
- Enter the location in which kernel dumps will be stored in the SSH Location (root@example.com) field.
NFS
- Select the NFS option and press the space bar to export kernel dumps to an NFS share.
- Enter the location in which kernel dumps will be stored in the NFS Location (example.com:/var/crash) field.
- Select and press Enter.
You have configured a location in which kernel dumps will be stored in the event of a system failure.
7.5.10. The Remote Storage Screen
You can use the Remote Storage screen to specify a remote iSCSI initiator or NFS share to use as storage.
Procedure 7.21. Configuring Remote Storage
- Enter an initiator name in the iSCSI Initiator Name field or the path to the NFS share in the NFSv4 Domain (example.redhat.com) field.
Example 7.11. iSCSI Initiator Name
iSCSI Initiator Name:
iqn.1994-05.com.redhat:5189835eeb40_____
Example 7.12. NFS Path
NFSv4 Domain (example.redhat.com):
example.redhat.com_____________________
- Select and press Enter.
You have configured remote storage.
7.5.11. The Diagnostics Screen
- : Shows the current multipath topology from all available information.
- : Lists the partition tables.
- : Lists partition layout on all block devices.
- : Lists information on all block devices.
7.5.12. The Performance Screen
virtual-host profile is used by default.
Table 7.1. Tuned Profiles available in Red Hat Enterprise Virtualization
| Tuned Profile | Description |
|---|---|
| |
The system is disabled from using any tuned profile.
|
| |
Based on the enterprise-storage profile, virtual-host decreases the swappiness of virtual memory and enables more aggressive writeback of dirty pages.
|
| |
A profile optimized for virtual machines.
|
| |
A server profile for typical throughput performance tuning.
|
| |
A strong power-saving profile directed at machines with classic hard disks.
|
| |
A power-saving profile directed at server systems.
|
| |
A server profile for typical latency performance tuning.
|
| |
A high-impact power-saving profile directed at laptops running on battery.
|
| |
A medium-impact power-saving profile directed at laptops running on AC.
|
| |
A server profile to improve throughput performance for enterprise-sized server configurations.
|
| |
A power-saving profile directed at desktop systems.
|
| |
The default power-saving profile. This is the most basic power-saving profile. It only enables the disk and CPU plug-ins.
|
7.5.13. The RHEV-M Screen
Important
root password on the Hypervisor and enables SSH password authentication. Once the Hypervisor has successfully been added to the Manager, disabling SSH password authentication is recommended.
Important
Procedure 7.22. Configuring a Hypervisor Management Server
- Configure the Hypervisor Management Server using the address of the Manager.
- Enter the IP address or fully qualified domain name of the Manager in the Management Server field.
- Enter the management server port in the Management Server Port field. The default value is
443. If a different port was selected during Red Hat Enterprise Virtualization Manager installation, specify it here, replacing the default value. - Leave the Password and Confirm Password fields blank. These fields are not required if the address of the management server is known.
- Select and press Enter.
- In the RHEV-M Fingerprint screen, review the SSL fingerprint retrieved from the Manager, select , and press Enter. The Certificate Status in the RHEV-M screen changes from
N/AtoVerified.
- Configure the Hypervisor Management Server using a password.
- Enter a password in the Password field. Although the Hypervisor will accept a weak password, it is recommended that you use a strong password. Strong passwords contain a mix of uppercase, lowercase, numeric and punctuation characters. They are six or more characters long and do not contain dictionary words.
- Re-enter the password in the Confirm Password field.
- Leave the Management Server and Management Server Port fields blank. As long as a password is set, allowing the Hypervisor to be added to the Manager later, these fields are not required.
- Select and press Enter.
7.5.14. The Plugins Screen
- : Allows you to view RPM differences.
- : Allows you to view SRPM differences.
- : Allows you to view file differences.
7.5.15. The RHN Registration Screen
Guests running on the Hypervisor may need to consume Red Hat Enterprise Linux virtualization entitlements. In this case, the Hypervisor must be registered to Red Hat Network, a Satellite server, or Subscription Asset Manager. The Hypervisor can also connect to these services via a proxy server.
Note
Procedure 7.23. Registering the Hypervisor with the Red Hat Network
- Enter your Red Hat Network user name in the Login field.
- Enter your Red Hat Network password in the Password field.
- Enter a profile name to be used for the system in the Profile Name (optional) field. This is the name under which the system will appear when viewed in Red Hat Network.
- Select the method by which to register the hypervisor:
The Red Hat Network
Select the RHN option and press the space bar to register the hypervisor directly with the Red Hat Network. You do not need to enter values in the URL and CA URL fields.Example 7.13. Red Hat Network Configuration
(X) RHN     ( ) Satellite     ( ) SAM
URL:      _______________________________________________________________
CA URL:   _______________________________________________________________
Satellite
- Select the Satellite option and press the space bar to register the hypervisor with a Satellite server.
- Enter the URL of the Satellite server in the URL field.
- Enter the URL of the certificate authority for the Satellite server in the CA URL field.
Example 7.14. Satellite Configuration
( ) RHN     (X) Satellite     ( ) SAM
RHN URL:   https://your-satellite.example.com_____________________________
CA URL:    https://your-satellite.example.com/pub/RHN-ORG-TRUSTED-SSL-CERT
Subscription Asset Manager
- Select the Subscription Asset Manager option and press Space to register the hypervisor via Subscription Asset Manager.
- Enter the URL of the Subscription Asset Manager server in the URL field.
- Enter the URL of the certificate authority for the Subscription Asset Manager server in the CA URL field.
Example 7.15. Subscription Asset Manager Configuration
( ) RHN     ( ) Satellite     (X) SAM
URL:  https://subscription-asset-manager.example.com_____________________________
CA :  https://subscription-asset-manager.example.com/pub/RHN-ORG-TRUSTED-SSL-CERT
- If you are using a proxy server, you must also specify the details of that server:
- Enter the IP address or fully qualified domain name of the proxy server in the Server field.
- Enter the port by which to attempt a connection to the proxy server in the Port field.
- Enter the user name by which to attempt a connection to the proxy server in the Username field.
- Enter the password by which to authenticate the user name specified above in the Password field.
- Select and press Enter.
You have registered the hypervisor directly with the Red Hat Network, via a Satellite server or via SubScription Asset Manager.
7.6. Adding Hypervisors to Red Hat Enterprise Virtualization Manager
7.6.1. Using the Hypervisor
7.6.2. Approving a Hypervisor
It is not possible to run virtual machines on a Hypervisor until the addition of it to the environment has been approved in Red Hat Enterprise Virtualization Manager.
Procedure 7.24. Approving a Hypervisor
- Log in to the Red Hat Enterprise Virtualization Manager Administration Portal.
- From the Hosts tab, click on the host to be approved. The host should currently be listed with the status of Pending Approval.
- Click the Approve button. The Edit and Approve Hosts dialog displays. You can use the dialog to set a name for the host, fetch its SSH fingerprint before approving it, and configure power management, where the host has a supported power management card. For information on power management configuration, refer to Section 9.8.2, “Host Power Management Settings Explained”.
- Click . If you have not configured power management you will be prompted to confirm that you wish to proceed without doing so, click .
The status in the Hosts tab changes to Installing, after a brief delay the host status changes to Up.
7.7. Modifying the Red Hat Enterprise Virtualization Hypervisor ISO
7.7.1. Introduction to Modifying the Red Hat Enterprise Virtualization Hypervisor ISO
Important
Warning
7.7.2. Installing the edit-node Tool
The edit-node tool is included in the ovirt-node-tools package provided by the Red Hat Enterprise Virtualization Hypervisor channel.
Procedure 7.25. Installing the edit-node Tool
- Log in to the system on which to modify the Red Hat Enterprise Virtualization Hypervisor ISO file.
- Enable the
Red Hat Enterprise Virtualization Hypervisor (v.6 x86_64)repository:- With RHN Classic:
# rhn-channel --add --channel=rhel-x86_64-server-6-rhevh
- With Subscription Manager, attach a
Red Hat Enterprise Virtualizationentitlement and run the following command:# subscription-manager repos --enable=rhel-6-server-rhevh-rpms
- Install the ovirt-node-tools package:
# yum install ovirt-node-tools
You have installed the edit-node tool required for modifying the Red Hat Enterprise Virtualization Hypervisor ISO file.
7.7.3. Syntax of the edit-node Tool
Options for the edit-node Tool
--name=image_name- Specifies the name of the modified image.
--output=directory- Specifies the directory to which the edited ISO is saved.
--kickstart=kickstart_file- Specifies the path or URL to and name of a kickstart configuration file.
--script=script- Specifies the path to and name of a script to run in the image.
--shell- Opens an interactive shell with which to edit the image.
--passwd=user,encrypted_password- Defines a password for the specified user. This option accepts MD5-encrypted password values. The
--passwordparameter can be specified multiple times to modify multiple users. If no user is specified, the default user isadmin. --sshkey=user,public_key_file- Specifies the public key for the specified user. This option can be specified multiple times to specify keys for multiple users. If no user is specified, the default user is
admin. --uidmod=user,uid- Specifies the user ID for the specified user. This option can be specified multiple times to specify IDs for multiple users.
--gidmod=group,gid- Specifies the group ID for the specified group. This option can be specified multiple times to specify IDs for multiple groups.
--tmpdir=temporary_directory- Specifies the temporary directory on the local file system to use. By default, this value is set to
/var/tmp --releasefile=release_file- Specifies the path to and name of a release file to use for branding.
--builder=builder- Specifies the builder of a remix.
--install-plugin=plugin- Specifies a list of plug-ins to install in the image. You can specify multiple plug-ins by separating the plug-in names using a comma.
--install=package- Specifies a list of packages to install in the image. You can specify multiple packages by separating the package names using a comma.
--install-kmod=package_name- Installs the specified driver update package from a yum repository or specified
.rpmfile. Specified.rpmfiles are valid only if in whitelisted locations (kmod-specific areas). --repo=repository- Specifies the yum repository to be used in conjunction with the
--install-*options. The value specified can be a local directory, a yum repository file (.repo), or a driver disk.isofile. --nogpgcheck- Skips GPG key verification during the
yum installstage. This option allows you to install unsigned packages.
Manifest Options for the edit-node Tool
--list-plugins- Prints a list of plug-ins added to the image.
--print-version- Prints current version information from
/etc/system-release. --print-manifests- Prints a list of manifest files in the ISO file.
--print-manifest=manifest- Prints the specified manifest file.
--get-manifests=manifest- Creates a
.tarfile of manifest files in the ISO file. --print-file-manifest- Prints the contents of
rootfson the ISO file. --print-rpm-manifest- Prints a list of installed packages in
rootfson the ISO file.
Debugging Options for the edit-node Tool
--debug- Prints debugging information when the edit-node command is run.
--verbose- Prints verbose information regarding the progress of the edit-node command.
--logfile=logfile- Specifies the path to and name of a file in which to print debugging information.
7.7.4. Adding and Updating Packages
Note
http://localhost/myrepo/ or ftp://localhost/myrepo/.
Important
7.7.4.1. Creating a Local Repository
To add packages to the Red Hat Enterprise Virtualization Hypervisor ISO file, you must set up a directory to act as a repository for installing those packages using the createrepo tool provided by the base Red Hat Enterprise Linux Workstation and Red Hat Enterprise Linux Server channels.
Procedure 7.26. Creating a Local Repository
- Install the createrepo package and dependencies on the system on which to modify the Red Hat Enterprise Virtualization Hypervisor ISO file:
# yum install createrepo
- Create a directory to serve as the repository.
- Copy all required packages and their dependencies into the newly created directory.
- Set up the metadata files for that directory to act as a repository:
# createrepo [directory_name]
You have created a local repository for installing the required packages and their dependencies in the Red Hat Enterprise Virtualization Hypervisor ISO file.
7.7.4.2. Example: Adding Packages to the Red Hat Enterprise Virtualization Hypervisor ISO File
Example 7.16. Adding a Single Package to the Red Hat Enterprise Virtualization Hypervisor ISO File
# edit-node --nogpgcheck --install package1 --repo ./local_repo /usr/share/rhev-hypervisor/rhevh-latest-6.iso
Example 7.17. Adding Multiple Packages to the Red Hat Enterprise Virtualization Hypervisor ISO File
# edit-node --nogpgcheck --install "package1,package2" --repo ./local_repo /usr/share/rhev-hypervisor/rhevh-latest-6.iso
7.7.4.3. Example: Updating Packages in the Red Hat Enterprise Virtualization Hypervisor ISO File
Example 7.18. Updating a Single Package in the Red Hat Enterprise Virtualization Hypervisor ISO File
# edit-node --nogpgcheck --install vdsm --repo /etc/yum.repos.d/rhevh.repo /usr/share/rhev-hypervisor/rhevh-latest-6.iso
Example 7.19. Updating Multiple Packages in the Red Hat Enterprise Virtualization Hypervisor ISO File
# edit-node --nogpgcheck --install "vdsm,libvirt" --repo /etc/yum.repos.d/rhevh.repo /usr/share/rhev-hypervisor/rhevh-latest-6.iso
7.7.5. Modifying the Default ID of Users and Groups
7.7.5.1. Example: Modifying the Default ID of a User
user1 to 60:
Example 7.20. Modifying the Default ID of a Single User
# edit-node --uidmod=user1,60
--uidmod option multiple times in the same command. The following example changes the default ID of the user user1 to 60 and the default ID of the user user2 to 70.
Example 7.21. Modifying the Default ID of Multiple Users
# edit-node --uidmod=user1,60 --uidmod=user2,70
7.7.5.2. Example: Modifying the Default ID of a Group
group1 to 60:
Example 7.22. Modifying the Default ID of a Single Group
# edit-node --gidmod=group1,60
--gidmod option multiple times in the same command. The following example changes the default ID of the group group1 to 60 and the default ID of the group group2 to 70.
Example 7.23. Modifying the Default ID of Multiple Groups
# edit-node --gidmod=group1,60 --gidmod=group2,70
Chapter 8. Red Hat Enterprise Linux Hosts
8.1. Red Hat Enterprise Linux Hosts
8.2. Host Compatibility Matrix
| Red Hat Enterprise Linux Version | Red Hat Enterprise Virtualization 3.4 clusters with 3.0 compatibility level | Red Hat Enterprise Virtualization 3.4 clusters with 3.1 compatibility level | Red Hat Enterprise Virtualization 3.4 clusters with 3.2 compatibility level | Red Hat Enterprise Virtualization 3.4 clusters with 3.3 compatibility level | Red Hat Enterprise Virtualization 3.4 clusters |
|---|---|---|---|---|---|
| 6.2 | Supported | Unsupported | Unsupported | Unsupported | Unsupported |
| 6.3 | Supported | Supported | Unsupported | Unsupported | Unsupported |
| 6.4 | Supported | Supported | Supported | Unsupported | Unsupported |
| 6.5 | Supported | Supported | Supported | Supported | Supported |
Part IV. Basic Setup
Chapter 9. Configuring Hosts
9.1. Installing Red Hat Enterprise Linux
You must install Red Hat Enterprise Linux Server 6.5 or 6.6 on a system to use it as a virtualization host in a Red Hat Enterprise Virtualization 3.4 environment.
Procedure 9.1. Installing Red Hat Enterprise Linux
Download and Install Red Hat Enterprise Linux
Download and Install Red Hat Enterprise Linux Server 6.5 or 6.6 on the target virtualization host, referring to the Red Hat Enterprise Linux Installation Guide for detailed instructions. Only the Base package group is required to use the virtualization host in a Red Hat Enterprise Virtualization environment, though the host must be registered and subscribed to a number of entitlements before it can be added to the Manager.Important
If you intend to use directory services for authentication on the Red Hat Enterprise Linux host then you must ensure that the authentication files required by theuseraddcommand are locally accessible. The vdsm package, which provides software that is required for successful connection to Red Hat Enterprise Virtualization Manager, will not install correctly if these files are not locally accessible.Ensure Network Connectivity
Following successful installation of Red Hat Enterprise Linux Server 6.5 or 6.6, ensure that there is network connectivity between your new Red Hat Enterprise Linux host and the system on which your Red Hat Enterprise Virtualization Manager is installed.- Attempt to ping the Manager:
# ping address of manager
- If the Manager can successfully be contacted, this displays:
ping manager.example.com
PING manager.example.redhat.com (192.168.0.1) 56(84) bytes of data.
64 bytes from 192.168.0.1: icmp_seq=1 ttl=64 time=0.415 ms
64 bytes from 192.168.0.1: icmp_seq=2 ttl=64 time=0.419 ms
64 bytes from 192.168.0.1: icmp_seq=3 ttl=64 time=1.41 ms
64 bytes from 192.168.0.1: icmp_seq=4 ttl=64 time=0.487 ms
64 bytes from 192.168.0.1: icmp_seq=5 ttl=64 time=0.409 ms
64 bytes from 192.168.0.1: icmp_seq=6 ttl=64 time=0.372 ms
64 bytes from 192.168.0.1: icmp_seq=7 ttl=64 time=0.464 ms

--- manager.example.redhat.com ping statistics ---
7 packets transmitted, 7 received, 0% packet loss, time 6267ms
- If the Manager cannot be contacted, this displays:
ping: unknown host manager.example.com
You must configure the network so that the host can contact the Manager. First, disable NetworkManager. Then configure the networking scripts so that the host will acquire an ip address on boot.- Disable NetworkManager.
# service NetworkManager stop
# chkconfig NetworkManager disable
- Edit
/etc/sysconfig/network-scripts/ifcfg-eth0. Find this line:ONBOOT=no
Change that line to this:ONBOOT=yes
- Reboot the host machine.
- Ping the Manager again:
# ping address of manager
If the host still cannot contact the Manager, it is possible that your host machine is not acquiring an IP address from DHCP. Confirm that DHCP is properly configured and that your host machine is properly configured to acquire an IP address from DHCP.If the Manager can successfully be contacted, this displays:ping manager.examplecom PING manager.example.redhat.com (192.168.0.1) 56(84) bytes of data. 64 bytes from 192.168.0.1: icmp_seq=1 ttl=64 time=0.415 ms 64 bytes from 192.168.0.1: icmp_seq=2 ttl=64 time=0.419 ms 64 bytes from 192.168.0.1: icmp_seq=3 ttl=64 time=1.41 ms 64 bytes from 192.168.0.1: icmp_seq=4 ttl=64 time=0.487 ms 64 bytes from 192.168.0.1: icmp_seq=5 ttl=64 time=0.409 ms 64 bytes from 192.168.0.1: icmp_seq=6 ttl=64 time=0.372 ms 64 bytes from 192.168.0.1: icmp_seq=7 ttl=64 time=0.464 ms --- manager.example.com ping statistics --- 7 packets transmitted, 7 received, 0% packet loss, time 6267ms
You have installed Red Hat Enterprise Linux Server 6.5 or 6.6. You must complete additional configuration tasks before adding the virtualization host to your Red Hat Enterprise Virtualization environment.
9.2. Subscribing to Required Channels Using Subscription Manager
To be used as a virtualization host, a Red Hat Enterprise Linux host must be registered and subscribed to a number of entitlements using either Subscription Manager or RHN Classic. You must follow the steps in this procedure to register and subscribe using Subscription Manager. Completion of this procedure will mean that you have:
- Registered the virtualization host to Red Hat Network using Subscription Manager.
- Attached the
Red Hat Enterprise Linux Serverentitlement to the virtualization host. - Attached the
Red Hat Enterprise Virtualizationentitlement to the virtualization host.
Procedure 9.2. Subscribing to Required Channels using Subscription Manager
Register
Run thesubscription-managercommand with theregisterparameter to register the system with Red Hat Network. To complete registration successfully, you must supply your Red Hat Network Username and Password when prompted.# subscription-manager register
Identify Available Entitlement Pools
To attach the correct entitlements to the system, you must first locate the identifiers for the required entitlement pools. Use thelistaction of thesubscription-managerto find these.To identify available subscription pools forRed Hat Enterprise Linux Server, use the command:# subscription-manager list --available | grep -A8 "Red Hat Enterprise Linux Server"
To identify available subscription pools forRed Hat Enterprise Virtualization, use the command:# subscription-manager list --available | grep -A8 "Red Hat Enterprise Virtualization"
Attach Entitlements to the System
Using the pool identifiers you located in the previous step, attach theRed Hat Enterprise Linux ServerandRed Hat Enterprise Virtualizationentitlements to the system. Use theattachparameter of thesubscription-managercommand, replacing[POOLID]with each of the pool identifiers:# subscription-manager attach --pool=
[POOLID]Enable the Red Hat Enterprise Virtualization Management Agents Repository
Run the following command to enable the Red Hat Enterprise Virtualization Management Agents (RPMs) repository:# subscription-manager repos --enable=rhel-6-server-rhev-mgmt-agent-rpms
You have registered the virtualization host to Red Hat Network and attached the required entitlements using Subscription Manager.
9.3. Subscribing to Required Channels Using RHN Classic
To be used as a virtualization host, a Red Hat Enterprise Linux host must be registered and subscribed to a number of entitlements using either Subscription Manager or RHN Classic. You must follow the steps in this procedure to register and subscribe using RHN Classic. Completion of this procedure will mean that you have:
- Registered the virtualization host to Red Hat Network using RHN Classic.
- Subscribed the virtualization host to the
Red Hat Enterprise Linux Server (v. 6 for 64-bit AMD64 / Intel64)channel. - Subscribed the virtualization host to the
Red Hat Enterprise Virt Management Agent (v 6 x86_64)channel.
Procedure 9.3. Subscribing to Required Channels using RHN Classic
Register
If the machine is not already registered with Red Hat Network, run therhn_registercommand asrootto register it. To complete registration successfully, you must supply your Red Hat Network Username and Password. Follow the prompts displayed byrhn_registerto complete registration of the system.# rhn_register
Subscribe to channels
You must subscribe the system to the required channels using either the web interface to Red Hat Network or the command linerhn-channelcommand.Using the Web Interface to Red Hat Network
To add a channel subscription to a system from the web interface:- Log on to Red Hat Network (http://rhn.redhat.com).
- Move the mouse cursor over the Subscriptions link at the top of the screen, and then click the Registered Systems link in the menu that appears.
- Select the system to which you are adding channels from the list presented on the screen, by clicking the name of the system.
- Click Alter Channel Subscriptions in the Subscribed Channels section of the screen.
- Select the channels to be added from the list presented on the screen. To use the virtualization host in a Red Hat Enterprise Virtualization environment you must select:
- Red Hat Enterprise Linux Server (v. 6 for 64-bit x86_64); and
- Red Hat Enterprise Virt Management Agent (v 6 x86_64).
- Click the Change Subscription button to finalize the change.
Using the rhn-channel command
Run therhn-channelcommand to subscribe the virtualization host to each of the required channels. Use the commands:# rhn-channel --add --channel=rhel-x86_64-server-6 # rhn-channel --add --channel=rhel-x86_64-rhev-mgmt-agent-6
Important
If you are not the administrator for the machine as defined in Red Hat Network, or the machine is not registered to Red Hat Network, then use of therhn-channelcommand will result in an error:Error communicating with server. The message was:Error Class Code: 37 Error Class Info: You are not allowed to perform administrative tasks on this system. Explanation: An error has occurred while processing your request. If this problem persists please enter a bug report at bugzilla.redhat.com. If you choose to submit the bug report, please be sure to include details of what you were trying to do when this error occurred and details on how to reproduce this problem.If you encounter this error when usingrhn-channel, you must instead use the web interface to add the channel to the system.
You have registered the virtualization host to Red Hat Network and subscribed to the required entitlements using RHN Classic.
9.4. Configuring Virtualization Host Firewall
Red Hat Enterprise Virtualization requires that a number of network ports be open to support virtual machines and remote management of the virtualization host from the Red Hat Enterprise Virtualization Manager. You must follow this procedure to open the required network ports before attempting to add the virtualization host to the Manager.
Procedure 9.4. Configuring Virtualization Host Firewall
iptables, to allow traffic on the required network ports. This procedure replaces the host's existing firewall configuration with one that contains only the ports required by Red Hat Enterprise Virtualization. If you have existing firewall rules with which this configuration must be merged, then you must do so by manually editing the rules defined in the iptables configuration file, /etc/sysconfig/iptables.
root user.
Remove existing firewall rules from configuration
Remove any existing firewall rules using the--flushparameter to theiptablescommand.# iptables --flush
Add new firewall rules to configuration
Add the new firewall rules, required by Red Hat Enterprise Virtualization, using the--appendparameter to theiptablescommand. The prompt character (#) has been intentionally omitted from this list of commands to allow easy copying of the content to a script file or command prompt.iptables --append INPUT -m state --state ESTABLISHED,RELATED -j ACCEPT iptables --append INPUT -p icmp -j ACCEPT iptables --append INPUT -i lo -j ACCEPT iptables --append INPUT -p tcp --dport 22 -j ACCEPT iptables --append INPUT -p tcp --dport 16514 -j ACCEPT iptables --append INPUT -p tcp --dport 54321 -j ACCEPT iptables --append INPUT -p tcp -m multiport --dports 5634:6166 -j ACCEPT iptables --append INPUT -p tcp -m multiport --dports 49152:49216 -j ACCEPT iptables --append INPUT -j REJECT --reject-with icmp-host-prohibited iptables --append FORWARD -m physdev ! --physdev-is-bridged -j REJECT \ --reject-with icmp-host-prohibited
Note
The providediptablescommands add firewall rules to accept network traffic on a number of ports. These include:- port
22for SSH, - ports
5634to6166for guest console connections, - port
16514for libvirt virtual machine migration traffic, - ports
49152to49216for VDSM virtual machine migration traffic, and - port
54321for the Red Hat Enterprise Virtualization Manager.
Save the updated firewall configuration
Save the updated firewall configuration script using thesaveto theiptablesinitialization script.# service iptables save
Enable iptables service
Ensure that theiptablesservice is configured to start on boot and has been restarted, or started for the first time if it was not already running.# chkconfig iptables on # service iptables restart
You have configured the virtualization host's firewall to allow the network traffic required by Red Hat Enterprise Virtualization.
9.5. Configuring Virtualization Host sudo
The Red Hat Enterprise Virtualization Manager uses sudo to perform operations as the root on the host. The default Red Hat Enterprise Linux configuration, stored in /etc/sudoers, contains values that allow this. If this file has been modified since Red Hat Enterprise Linux installation, then these values may have been removed. This procedure verifies that the required entry still exists in the configuration, and adds the required entry if it is not present.
Procedure 9.5. Configuring Virtualization Host sudo
Log in
Log in to the virtualization host as therootuser.Run visudo
Run thevisudocommand to open the/etc/sudoersfile.# visudo
Edit sudoers file
Read the configuration file, and verify that it contains these lines:# Allow root to run any commands anywhere root ALL=(ALL) ALL
If the file does not contain these lines, add them and save the file using the VIM:wcommand.Exit editor
Exitvisudousing the VIM:qcommand.
You have configured sudo to allow use by the root user.
9.6. Configuring Virtualization Host SSH
The Red Hat Enterprise Virtualization Manager accesses virtualization hosts via SSH. To do this it logs in as the root user using an encrypted key for authentication. You must follow this procedure to ensure that SSH is configured to allow this.
Warning
/root/.ssh/authorized_keys file.
Procedure 9.6. Configuring virtualization host SSH
root user.
Install the SSH server (openssh-server)
Install the openssh-server package usingyum.# yum install openssh-server
Edit SSH server configuration
Open the SSH server configuration,/etc/ssh/sshd_config, in a text editor. Search for thePermitRootLogin.- If
PermitRootLoginis set toyes, or is not set at all, no further action is required. - If
PermitRootLoginis set tono, then you must change it toyes.
Save any changes that you have made to the file, and exit the text editor.Enable the SSH server
Configure the SSH server to start at system boot using thechkconfigcommand.# chkconfig --level 345 sshd on
Start the SSH server
Start the SSH, or restart it if it is already running, using theservicecommand.# service sshd restart
You have configured the virtualization host to allow root access over SSH.
9.7. Adding a Red Hat Enterprise Linux Host
A Red Hat Enterprise Linux host is based on a standard "basic" installation of Red Hat Enterprise Linux. The physical host must be set up before you can add it to the Red Hat Enterprise Virtualization environment.
Procedure 9.7. Adding a Red Hat Enterprise Linux Host
- Click the Hosts resource tab to list the hosts in the results list.
- Click to open the New Host window.
- Use the drop-down menus to select the Data Center and Host Cluster for the new host.
- Enter the Name, Address, and SSH Port of the new host.
- Select an authentication method to use with the host.
- Enter the root user's password to use password authentication.
- Copy the key displayed in the SSH PublicKey field to
/root/.ssh/authorized_keyson the host to use public key authentication.
- You have now completed the mandatory steps to add a Red Hat Enterprise Linux host. Click the button to expand the advanced host settings.
- Optionally disable automatic firewall configuration.
- Optionally add a host SSH fingerprint to increase security. You can add it manually, or fetch it automatically.
- You can configure the Power Management and SPM using the applicable tabs now; however, as these are not fundamental to adding a Red Hat Enterprise Linux host, they are not covered in this procedure.
- Click to add the host and close the window.
The new host displays in the list of hosts with a status of Installing. When installation is complete, the status updates to Reboot. The host must be activated for the status to change to Up.
Note
9.8. Explanation of Settings and Controls in the New Host and Edit Host Windows
9.8.1. Host General Settings Explained
Table 9.1. General settings
|
Field Name
|
Description
|
|---|---|
|
Data Center
|
The data center to which the host belongs. Red Hat Enterprise Virtualization Hypervisor hosts cannot be added to Gluster-enabled clusters.
|
|
Host Cluster
|
The cluster to which the host belongs.
|
|
Use External Providers
|
Select or clear this check box to view or hide options for adding hosts provided by external providers. Upon selection, a drop-down list of external providers that have been added to the Manager displays. The following options are also available:
|
|
Name
|
The name of the cluster. This text field has a 40-character limit and must be a unique name with any combination of uppercase and lowercase letters, numbers, hyphens, and underscores.
|
|
Comment
|
A field for adding plain text, human-readable comments regarding the host.
|
|
Address
|
The IP address, or resolvable hostname of the host.
|
|
Password
|
The password of the host's root user. This can only be given when you add the host; it cannot be edited afterwards.
|
|
SSH PublicKey
|
Copy the contents in the text box to the
/root/.known_hosts file on the host to use the Manager's ssh key instead of using a password to authenticate with the host.
|
|
Automatically configure host firewall
|
When adding a new host, the Manager can open the required ports on the host's firewall. This is enabled by default. This is an Advanced Parameter.
|
|
SSH Fingerprint
|
You can the host's SSH fingerprint, and compare it with the fingerprint you expect the host to return, ensuring that they match. This is an Advanced Parameter.
|
9.8.2. Host Power Management Settings Explained
Table 9.2. Power Management Settings
|
Field Name
|
Description
|
|---|---|
|
Primary/ Secondary
|
Prior to Red Hat Enterprise Virtualization 3.2, a host with power management configured only recognized one fencing agent. Fencing agents configured on version 3.1 and earlier, and single agents, are treated as primary agents. The secondary option is valid when a second agent is defined.
|
|
Concurrent
|
Valid when there are two fencing agents, for example for dual power hosts in which each power switch has two agents connected to the same power switch.
|
|
Address
|
The address to access your host's power management device. Either a resolvable hostname or an IP address.
|
|
User Name
|
User account with which to access the power management device. You can set up a user on the device, or use the default user.
|
|
Password
|
Password for the user accessing the power management device.
|
|
Type
|
The type of power management device in your host.
Choose one of the following:
|
|
Port
|
The port number used by the power management device to communicate with the host.
|
|
Options
|
Power management device specific options. Enter these as 'key=value' or 'key'. See the documentation of your host's power management device for the options available.
|
|
Secure
|
Tick this check box to allow the power management device to connect securely to the host. This can be done via ssh, ssl, or other authentication protocols depending on and supported by the power management agent.
|
|
Source
|
Specifies whether the host will search within its cluster or data center for a fencing proxy. Use the and buttons to change the sequence in which the resources are used.
|
|
Disable policy control of power management
|
Power management is controlled by the Cluster Policy of the host's cluster. If power management is enabled and the defined low utilization value is reached, the Manager will power down the host machine, and restart it again when load balancing requires or there are not enough free hosts in the cluster. Tick this check box to disable policy control.
|
9.8.3. SPM Priority Settings Explained
Table 9.3. SPM settings
|
Field Name
|
Description
|
|---|---|
|
SPM Priority
|
Defines the likelihood that the host will be given the role of Storage Pool Manager(SPM). The options are Low, Normal, and High priority. Low priority means that there is a reduced likelihood of the host being assigned the role of SPM, and High priority means there is an increased likelihood. The default setting is Normal.
|
9.8.4. Host Console Settings Explained
Table 9.4. Console settings
|
Field Name
|
Description
|
|---|---|
|
Override display address
|
Select this check box to override the display addresses of the host. This feature is useful in a case where the hosts are defined by internal IP and are behind a NAT firewall. When a user connects to a virtual machine from outside of the internal network, instead of returning the private address of the host on which the virtual machine is running, the machine returns a public IP or FQDN (which is resolved in the external network to the public IP).
|
|
Display address
|
The display address specified here will be used for all virtual machines running on this host. The address must be in the format of a fully qualified domain name or IP.
|
Chapter 10. Configuring Data Centers
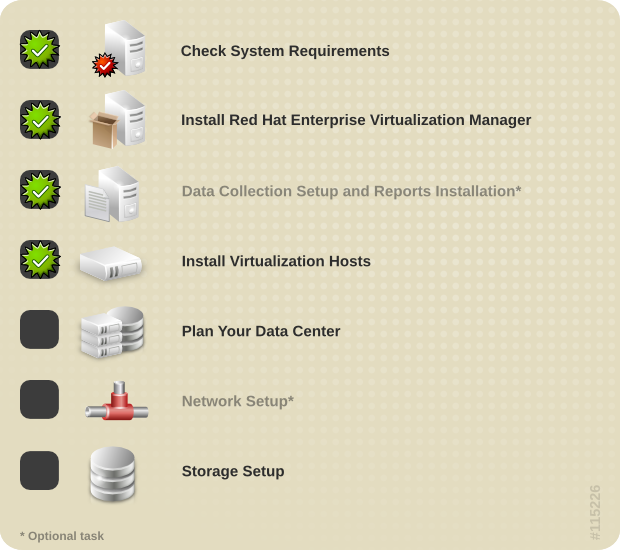
10.2. Planning Your Data Center
Virtual Machines must be distributed across hosts so that enough capacity is available to handle higher than average loads during peak processing. Average target utilization will be 50% of available CPU.
The Red Hat Enterprise Virtualization page sharing process overcommits up to 150% of physical memory for virtual machines. Therefore, allow for an approximately 30% overcommit.
When designing the network, it is important to ensure that the volume of traffic produced by storage, remote connections and virtual machines is taken into account. As a general rule, allow approximately 50 MBps per virtual machine.
Note
The system requires at least two hosts to achieve high availability. This redundancy is useful when performing maintenance or repairs.
10.3. Data Centers in Red Hat Enterprise Virtualization
Default data center at installation. You can create new data centers that will also be managed from the single Administration Portal. For example, you may choose to have different data centers for different physical locations, business units, or for reasons of security. It is recommended that you do not remove the Default data center; instead, set up new appropriately named data centers.
10.4. Creating a New Data Center
This procedure creates a data center in your virtualization environment. The data center requires a functioning cluster, host, and storage domain to operate.
Note
Procedure 10.1. Creating a New Data Center
- Select the Data Centers resource tab to list all data centers in the results list.
- Click to open the New Data Center window.
- Enter the Name and Description of the data center.
- Select the storage Type, Compatibility Version, and Quota Mode of the data center from the drop-down menus.
- Click to create the data center and open the New Data Center - Guide Me window.
- The Guide Me window lists the entities that need to be configured for the data center. Configure these entities or postpone configuration by clicking the button; configuration can be resumed by selecting the data center and clicking the button.
The new data center is added to the virtualization environment. It will remain Uninitialized until a cluster, host, and storage domain are configured for it; use Guide Me to configure these entities.
10.5. Changing the Data Center Compatibility Version
Red Hat Enterprise Virtualization data centers have a compatibility version. The compatibility version indicates the version of Red Hat Enterprise Virtualization that the data center is intended to be compatible with. All clusters in the data center must support the desired compatibility level.
Note
Procedure 10.2. Changing the Data Center Compatibility Version
- Log in to the Administration Portal as the administrative user. By default this is the
adminuser. - Click the Data Centers tab.
- Select the data center to change from the list displayed. If the list of data centers is too long to filter visually then perform a search to locate the desired data center.
- Click the button.
- Change the Compatibility Version to the desired value.
- Click .
You have updated the compatibility version of the data center.
Warning
Chapter 11. Configuring Clusters
11.1. Clusters in Red Hat Enterprise Virtualization
Default cluster in the Default data center at installation time.
Note
Note
11.2. Creating a New Cluster
A data center can contain multiple clusters, and a cluster can contain multiple hosts. All hosts in a cluster must be of the same CPU type (Intel or AMD). It is recommended that you create your hosts before you create your cluster to ensure CPU type optimization. However, you can configure the hosts at a later time using the button.
Procedure 11.1. Creating a New Cluster
- Select the Clusters resource tab.
- Click to open the New Cluster window.
- Select the Data Center the cluster will belong to from the drop-down list.
- Enter the Name and Description of the cluster.
- Select the CPU Name and Compatibility Version from the drop-down lists. It is important to match the CPU processor family with the minimum CPU processor type of the hosts you intend to attach to the cluster, otherwise the host will be non-operational.
- Select either the Enable Virt Service or Enable Gluster Service radio button to define whether the cluster will be populated with virtual machine hosts or with Gluster-enabled nodes. Note that you cannot add Red Hat Enterprise Virtualization Hypervisor hosts to a Gluster-enabled cluster.
- Click the Optimization tab to select the memory page sharing threshold for the cluster, and optionally enable CPU thread handling and memory ballooning on the hosts in the cluster.
- Click the Cluster Policy tab to optionally configure a cluster policy, scheduler optimization settings, enable trusted service for hosts in the cluster, and enable HA Reservation.
- Click the Resilience Policy tab to select the virtual machine migration policy.
- Click the Console tab to optionally override the global SPICE proxy, if any, and specify the address of a SPICE proxy for hosts in the cluster.
- Click to create the cluster and open the New Cluster - Guide Me window.
- The Guide Me window lists the entities that need to be configured for the cluster. Configure these entities or postpone configuration by clicking the button; configuration can be resumed by selecting the cluster and clicking the button.
The new cluster is added to the virtualization environment.
11.3. Changing the Cluster Compatibility Version
Red Hat Enterprise Virtualization clusters have a compatibility version. The cluster compatibility version indicates the features of Red Hat Enterprise Virtualization supported by all of the hosts in the cluster. The cluster compatibility is set according to the version of the least capable host operating system in the cluster.
Note
Procedure 11.2. Changing the Cluster Compatibility Version
- Log in to the Administration Portal as the administrative user. By default this is the
adminuser. - Click the Clusters tab.
- Select the cluster to change from the list displayed. If the list of clusters is too long to filter visually then perform a search to locate the desired cluster.
- Click the button.
- Change the Compatibility Version to the desired value.
- Click to open the Change Cluster Compatibility Version confirmation window.
- Click to confirm.
You have updated the compatibility version of the cluster. Once you have updated the compatibility version of all clusters in a data center, then you are also able to change the compatibility version of the data center itself.
Warning
Chapter 12. Configuring Networking

12.2. Networking in Red Hat Enterprise Virtualization
rhevm logical network is created by default and labeled as the Management. The rhevm logical network is intended for management traffic between the Red Hat Enterprise Virtualization Manager and virtualization hosts. You are able to define additional logical networks to segregate:
- Display related network traffic.
- General virtual machine network traffic.
- Storage related network traffic.
- The number of logical networks attached to a host is limited to the number of available network devices combined with the maximum number of Virtual LANs (VLANs) which is 4096.
- The number of logical networks in a cluster is limited to the number of logical networks that can be attached to a host as networking must be the same for all hosts in a cluster.
- The number of logical networks in a data center is limited only by the number of clusters it contains in combination with the number of logical networks permitted per cluster.
Note
Note
Important
rhevm network. Incorrect changes to the properties of the rhevm network may cause hosts to become temporarily unreachable.
Important
- Directory Services
- DNS
- Storage
12.3. Creating Logical Networks
12.3.1. Creating a New Logical Network in a Data Center or Cluster
Create a logical network and define its use in a data center, or in clusters in a data center.
Procedure 12.1. Creating a New Logical Network in a Data Center or Cluster
- Use the Data Centers or Clusters resource tabs, tree mode, or the search function to find and select a data center or cluster in the results list.
- Click the Logical Networks tab of the details pane to list the existing logical networks.
- From the Data Centers details pane, click to open the New Logical Network window.From the Clusters details pane, click to open the New Logical Network window.
- Enter a Name, Description and Comment for the logical network.
- In the Export section, select the Create on external provider check box to create the logical network on an external provider. Select the external provider from the External Provider drop-down menu.
- In the Network Parameters section, select the Enable VLAN tagging, VM network and Override MTU to enable these options.
- Enter a new label or select an existing label for the logical network in the Network Label text field.
- From the Cluster tab, select the clusters to which the network will be assigned. You can also specify whether the logical network will be a required network.
- From the Subnet tab, enter a Name, CIDR and select an IP Version for the subnet that the logical network will provide.
- From the Profiles tab, add vNIC profiles to the logical network as required.
- Click OK.
You have defined a logical network as a resource required by a cluster or clusters in the data center. If you entered a label for the logical network, it will be automatically added to all host network interfaces with that label.
Note
12.4. Editing Logical Networks
12.4.1. Editing Host Network Interfaces and Assigning Logical Networks to Hosts
You can change the settings of physical host network interfaces, move the management network from one physical host network interface to another, and assign logical networks to physical host network interfaces.
Important
Procedure 12.2. Editing Host Network Interfaces and Assigning Logical Networks to Hosts
- Use the Hosts resource tab, tree mode, or the search function to find and select the host in the results.
- Click the Network Interfaces tab in the details pane.
- Click the button to open the Setup Host Networks window.
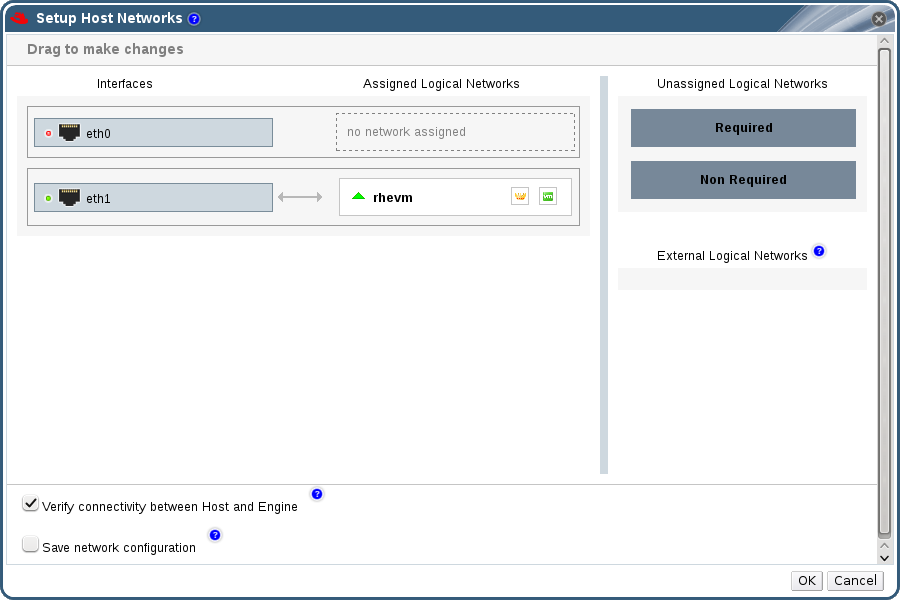
Figure 12.1. The Setup Host Networks window
- Attach a logical network to a physical host network interface by selecting and dragging the logical network into the Assigned Logical Networks area next to the physical host network interface.Alternatively, right-click the logical network and select a network interface from the drop-down menu.
- Configure the logical network:
- Hover your cursor over an assigned logical network and click the pencil icon to open the Edit Management Network window.
- Select a Boot Protocol from:
- None,
- DHCP, or
- Static.If you selected Static, enter the IP, Subnet Mask, and the Gateway.
- Click OK.
- If your logical network definition is not synchronized with the network configuration on the host, select the Sync network check box.
- Select the Verify connectivity between Host and Engine check box to check network connectivity; this action will only work if the host is in maintenance mode.
- Select the Save network configuration check box to make the changes persistent when the environment is rebooted.
- Click .
You have assigned logical networks to and configured a physical host network interface.
Note
12.4.2. Logical Network General Settings Explained
Table 12.1. New Logical Network and Edit Logical Network Settings
|
Field Name
|
Description
|
|---|---|
|
Name
|
The name of the logical network. This text field has a 15-character limit and must be a unique name with any combination of uppercase and lowercase letters, numbers, hyphens, and underscores.
|
|
Description
|
The description of the logical network. This text field has a 40-character limit.
|
|
Comment
|
A field for adding plain text, human-readable comments regarding the logical network.
|
|
Create on external provider
|
Allows you to create the logical network to an OpenStack network service that has been added to the Manager as an external provider.
External Provider - Allows you to select the external provider on which the logical network will be created.
|
|
Enable VLAN tagging
|
VLAN tagging is a security feature that gives all network traffic carried on the logical network a special characteristic. VLAN-tagged traffic cannot be read by interfaces that do not also have that characteristic. Use of VLANs on logical networks also allows a single network interface to be associated with multiple, differently VLAN-tagged logical networks. Enter a numeric value in the text entry field if VLAN tagging is enabled.
|
|
VM Network
|
Select this option if only virtual machines use this network. If the network is used for traffic that does not involve virtual machines, such as storage communications, do not select this check box.
|
|
Override MTU
|
Set a custom maximum transmission unit for the logical network. You can use this to match the maximum transmission unit supported by your new logical network to the maximum transmission unit supported by the hardware it interfaces with. Enter a numeric value in the text entry field if Override MTU is selected.
|
|
Network Label
|
Allows you to specify a new label for the network or select from a existing labels already attached to host network interfaces. If you select an existing label, the logical network will be automatically assigned to all host network interfaces with that label.
|
12.4.3. Editing a Logical Network
Edit the settings of a logical network.
Procedure 12.3. Editing a Logical Network
- Use the Data Centers resource tab, tree mode, or the search function to find and select the data center of the logical network in the results list.
- Click the Logical Networks tab in the details pane to list the logical networks in the data center.
- Select a logical network and click to open the Edit Logical Network window.
- Edit the necessary settings.
- Click OK to save the changes.
You have updated the settings of your logical network.
Note
12.4.4. Explanation of Settings in the Manage Networks Window
Table 12.2. Manage Networks Settings
|
Field
|
Description/Action
|
|---|---|
|
Assign
|
Assigns the logical network to all hosts in the cluster.
|
|
Required
|
A Network marked "required" must remain operational in order for the hosts associated with it to function properly. If a required network ceases to function, any hosts associated with it become non-operational.
|
|
VM Network
| A logical network marked "VM Network" carries network traffic relevant to the virtual machine network. |
|
Display Network
| A logical network marked "Display Network" carries network traffic relevant to SPICE and to the virtual network controller. |
|
Migration Network
| A logical network marked "Migration Network" carries virtual machine traffic and storage migration traffic. |
12.4.5. Adding Multiple VLANs to a Single Network Interface Using Logical Networks
Multiple VLANs can be added to a single network interface to separate traffic on the one host.
Important
Procedure 12.4. Adding Multiple VLANs to a Network Interface using Logical Networks
- Use the Hosts resource tab, tree mode, or the search function to find and select in the results list a host associated with the cluster to which your VLAN-tagged logical networks are assigned.
- Click the Network Interfaces tab in the details pane to list the physical network interfaces attached to the data center.
- Click to open the Setup Host Networks window.
- Drag your VLAN-tagged logical networks into the Assigned Logical Networks area next to the physical network interface. The physical network interface can have multiple logical networks assigned due to the VLAN tagging.
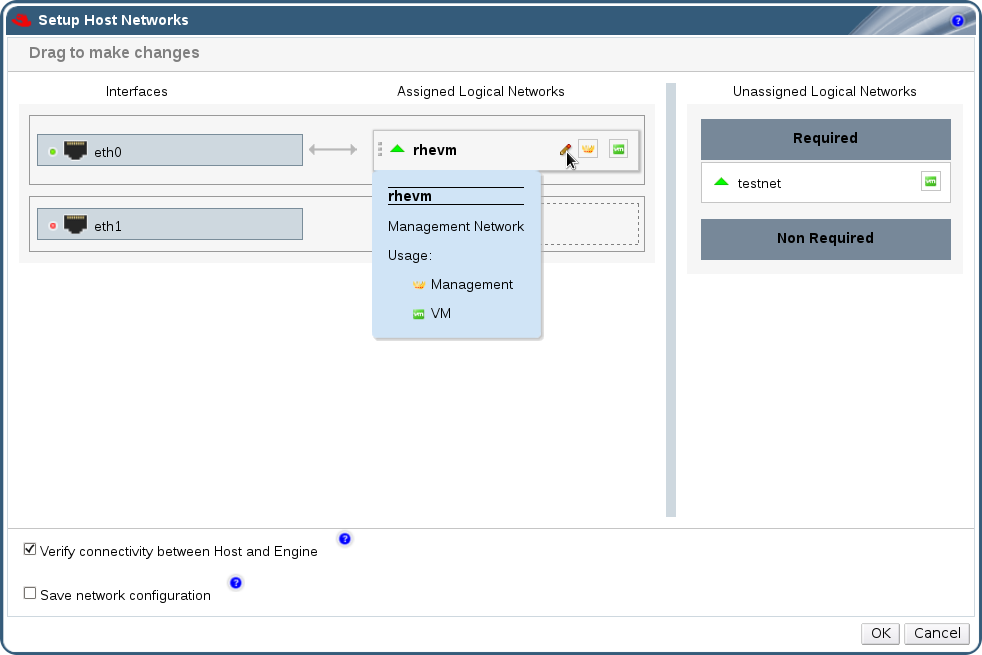
Figure 12.2. Setup Host Networks
- Edit the logical networks by hovering your cursor over an assigned logical network and clicking the pencil icon to open the Edit Network window.If your logical network definition is not synchronized with the network configuration on the host, select the Sync network check box.Select a Boot Protocol from:Click OK.
- None,
- DHCP, or
- Static,Provide the IP and Subnet Mask.
- Select the Verify connectivity between Host and Engine check box to run a network check; this will only work if the host is in maintenance mode.
- Select the Save network configuration check box
- Click .
You have added multiple VLAN-tagged logical networks to a single interface. This process can be repeated multiple times, selecting and editing the same network interface each time on each host to add logical networks with different VLAN tags to a single network interface.
12.4.6. Multiple Gateways
Users can define the gateway, along with the IP address and subnet mask, for a logical network. This is necessary when multiple networks exist on a host and traffic should be routed through the specified network, rather than the default gateway.
Procedure 12.5. Viewing or Editing the Gateway for a Logical Network
- Use the Hosts resource tab, tree mode, or the search function to find and select the host in the results list.
- Click the Network Interfaces tab in the details pane to list the network interfaces attached to the host and their configurations.
- Click the button to open the Setup Host Networks window.
- Hover your cursor over an assigned logical network and click the pencil icon to open the Edit Management Network window.
The Edit Management Network window displays the network name, the boot protocol, and the IP, subnet mask, and gateway addresses. The address information can be manually edited by selecting a Static boot protocol.
12.4.7. Using the Networks Tab
- Attaching or detaching the networks to clusters and hosts
- Removing network interfaces from virtual machines and templates
- Adding and removing permissions for users to access and manage networks
12.5. External Provider Networks
12.5.1. Importing Networks From External Providers
If an external provider offering networking services has been registered in the Manager, the networks provided by that provider can be imported into the Manager and used by virtual machines.
Procedure 12.6. Importing a Network From an External Provider
- Click the Networks tab.
- Click the button to open the Import Networks window.

Figure 12.3. The Import Networks Window
- From the Network Provider drop-down list, select an external provider. The networks offered by that provider are automatically discovered and listed in the Provider Networks list.
- Using the check boxes, select the networks to import in the Provider Networks list and click the down arrow to move those networks into the Networks to Import list.
- From the Data Center drop-down list, select the data center into which the networks will be imported.
- Optionally, clear the Allow All check box for a network in the Networks to Import list to prevent that network from being available to all users.
- Click the button.
The selected networks are imported into the target data center and can now be used in the Manager.
Important
12.5.2. Limitations to Using External Provider Networks
- Logical networks offered by external providers must be used as virtual machine networks, and cannot be used as display networks.
- The same logical network can be imported more than once, but only to different data centers.
- You cannot edit logical networks offered by external providers in the Manager. To edit the details of a logical network offered by an external provider, you must edit the logical network directly from the OpenStack network service that provides that logical network.
- Port mirroring is not available for virtual network interface cards connected to logical networks offered by external providers.
- If a virtual machine uses a logical network offered by an external provider, that provider cannot be deleted from the Manager while the logical network is still in use by the virtual machine.
- Networks offered by external providers are non-required. As such, scheduling for clusters in which such logical networks have been imported will not take those logical networks into account during host selection. Moreover, it is the responsibility of the user to ensure the availability of the logical network on hosts in clusters in which such logical networks have been imported.
Important
Important
12.5.3. Configuring Subnets on External Provider Logical Networks
12.5.3.1. Configuring Subnets on External Provider Logical Networks
12.5.3.2. Adding Subnets to External Provider Logical Networks
Create a subnet on a logical network provided by an external provider
Procedure 12.7. Adding Subnets to External Provider Logical Networks
- Click the Networks tab.
- Click the logical network provided by an external provider to which the subnet will be added.
- Click the Subnets tab in the details pane.
- Click the button to open the New External Subnet window.
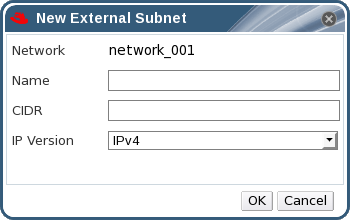
Figure 12.4. The New External Subnet Window
- Enter a Name and CIDR for the new subnet.
- From the IP Version drop-down menu, select either IPv4 or IPv6.
- Click .
A new subnet is created on the logical network.
12.5.3.3. Removing Subnets from External Provider Logical Networks
Remove a subnet from a logical network provided by an external provider
Procedure 12.8. Removing Subnets from External Provider Logical Networks
- Click the Networks tab.
- Click the logical network provided by an external provider from which the subnet will be removed.
- Click the Subnets tab in the details pane.
- Click the subnet to remove.
- Click the button and click when prompted.
The subnet is removed from the logical network.
12.6. Bonding
12.6.1. Bonding Logic in Red Hat Enterprise Virtualization
- Are either of the devices already carrying logical networks?
- Are the devices carrying compatible logical networks? A single device cannot carry both VLAN tagged and non-VLAN tagged logical networks.
Table 12.3. Bonding Scenarios and Their Results
| Bonding Scenario | Result |
|---|---|
|
NIC + NIC
|
The Create New Bond window is displayed, and you can configure a new bond device.
If the network interfaces carry incompatible logical networks, the bonding operation fails until you detach incompatible logical networks from the devices forming your new bond.
|
|
NIC + Bond
|
The NIC is added to the bond device. Logical networks carried by the NIC and the bond are all added to the resultant bond device if they are compatible.
If the bond devices carry incompatible logical networks, the bonding operation fails until you detach incompatible logical networks from the devices forming your new bond.
|
|
Bond + Bond
|
If the bond devices are not attached to logical networks, or are attached to compatible logical networks, a new bond device is created. It contains all of the network interfaces, and carries all logical networks, of the component bond devices. The Create New Bond window is displayed, allowing you to configure your new bond.
If the bond devices carry incompatible logical networks, the bonding operation fails until you detach incompatible logical networks from the devices forming your new bond.
|
12.6.2. Bonding Modes
- Mode 1 (active-backup policy) sets all interfaces to the backup state while one remains active. Upon failure on the active interface, a backup interface replaces it as the only active interface in the bond. The MAC address of the bond in mode 1 is visible on only one port (the network adapter), to prevent confusion for the switch. Mode 1 provides fault tolerance and is supported in Red Hat Enterprise Virtualization.
- Mode 2 (XOR policy) selects an interface to transmit packages to based on the result of an XOR operation on the source and destination MAC addresses modulo NIC slave count. This calculation ensures that the same interface is selected for each destination MAC address used. Mode 2 provides fault tolerance and load balancing and is supported in Red Hat Enterprise Virtualization.
- Mode 4 (IEEE 802.3ad policy) creates aggregation groups for which included interfaces share the speed and duplex settings. Mode 4 uses all interfaces in the active aggregation group in accordance with the IEEE 802.3ad specification and is supported in Red Hat Enterprise Virtualization.
- Mode 5 (adaptive transmit load balancing policy) ensures the outgoing traffic distribution is according to the load on each interface and that the current interface receives all incoming traffic. If the interface assigned to receive traffic fails, another interface is assigned the receiving role instead. Mode 5 is supported in Red Hat Enterprise Virtualization.
12.6.3. Creating a Bond Device Using the Administration Portal
You can bond compatible network devices together. This type of configuration can increase available bandwidth and reliability. You can bond multiple network interfaces, pre-existing bond devices, and combinations of the two.
Procedure 12.9. Creating a Bond Device using the Administration Portal
- Use the Hosts resource tab, tree mode, or the search function to find and select the host in the results list.
- Click the Network Interfaces tab in the details pane to list the physical network interfaces attached to the host.
- Click to open the Setup Host Networks window.
- Select and drag one of the devices over the top of another device and drop it to open the Create New Bond window. Alternatively, right-click the device and select another device from the drop-down menu.If the devices are incompatible, for example one is vlan tagged and the other is not, the bond operation fails with a suggestion on how to correct the compatibility issue.
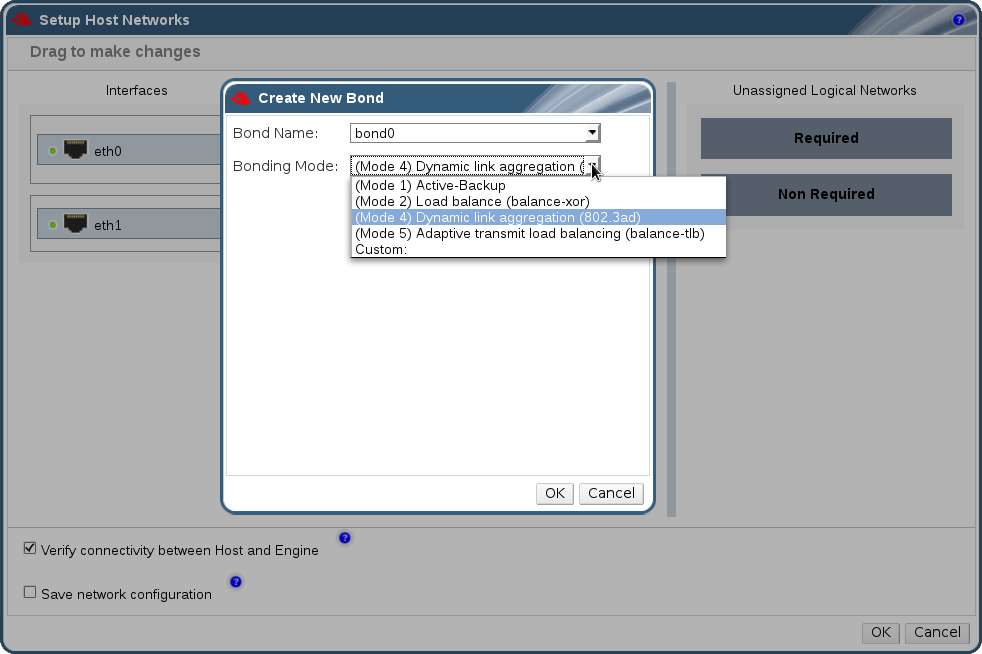
Figure 12.5. Bond Devices Window
- Select the Bond Name and Bonding Mode from the drop-down menus.Bonding modes 1, 2, 4, and 5 can be selected. Any other mode can be configured using the Custom option.
- Click to create the bond and close the Create New Bond window.
- Assign a logical network to the newly created bond device.
- Optionally choose to Verify connectivity between Host and Engine and Save network configuration.
- Click accept the changes and close the Setup Host Networks window.
Your network devices are linked into a bond device and can be edited as a single interface. The bond device is listed in the Network Interfaces tab of the details pane for the selected host.
12.6.4. Example Uses of Custom Bonding Options with Host Interfaces
Example 12.1. xmit_hash_policy
mode=4 xmit_hash_policy=layer2+3
Example 12.2. ARP Monitoring
arp_interval on the bond device of the host by selecting a Custom bonding mode, and entering the following into the text field:
mode=1 arp_interval=1 arp_ip_target=192.168.0.2
Example 12.3. Primary
mode=1 primary=eth0
12.7. Removing Logical Networks
12.7.1. Removing a Logical Network
Remove a logical network from the Manager.
Procedure 12.10. Removing Logical Networks
- Use the Data Centers resource tab, tree mode, or the search function to find and select the data center of the logical network in the results list.
- Click the Logical Networks tab in the details pane to list the logical networks in the data center.
- Select a logical network and click to open the Remove Logical Network(s) window.
- Optionally, select the Remove external network(s) from the provider(s) as well check box to remove the logical network both from the Manager and from the external provider if the network is provided by an external provider.
- Click OK.
The logical network is removed from the Manager and is no longer available. If the logical network was provided by an external provider and you elected to remove the logical network from that external provider, it is removed from the external provider and is no longer available on that external provider as well.
Chapter 13. Configuring Storage

13.2. Introduction to Storage in Red Hat Enterprise Virtualization
- Network File System (NFS)
- GlusterFS exports
- Other POSIX compliant file systems
- Internet Small Computer System Interface (iSCSI)
- Local storage attached directly to the virtualization hosts
- Fibre Channel Protocol (FCP)
- Parallel NFS (pNFS)
- Data Domain: A data domain holds the virtual hard disks and OVF files of all the virtual machines and templates in a data center. In addition, snapshots of the virtual machines are also stored in the data domain.The data domain cannot be shared across data centers. Storage domains of multiple types (iSCSI, NFS, FC, POSIX, and Gluster) can be added to the same data center, provided they are all shared, rather than local, domains.You must attach a data domain to a data center before you can attach domains of other types to it.
- ISO Domain: ISO domains store ISO files (or logical CDs) used to install and boot operating systems and applications for the virtual machines. An ISO domain removes the data center's need for physical media. An ISO domain can be shared across different data centers.
- Export Domain: Export domains are temporary storage repositories that are used to copy and move images between data centers and Red Hat Enterprise Virtualization environments. Export domains can be used to backup virtual machines. An export domain can be moved between data centers, however, it can only be active in one data center at a time.
Important
Support for export storage domains backed by storage on anything other than NFS is being deprecated. While existing export storage domains imported from Red Hat Enterprise Virtualization 2.2 environments remain supported new export storage domains must be created on NFS storage.
Important
13.3. Preparing NFS Storage
These steps must be taken to prepare an NFS file share on a server running Red Hat Enterprise Linux 6 for use with Red Hat Enterprise Virtualization.
Procedure 13.1. Preparing NFS Storage
Install nfs-utils
NFS functionality is provided by the nfs-utils package. Before file shares can be created, check that the package is installed by querying the RPM database for the system:$
rpm -qi nfs-utilsIf the nfs-utils package is installed then the package information will be displayed. If no output is displayed then the package is not currently installed. Install it usingyumwhile logged in as therootuser:#
yum install nfs-utilsConfigure Boot Scripts
To ensure that NFS shares are always available when the system is operational both thenfsandrpcbindservices must start at boot time. Use thechkconfigcommand while logged in asrootto modify the boot scripts.#
chkconfig --add rpcbind#chkconfig --add nfs#chkconfig rpcbind on#chkconfig nfs onOnce the boot script configuration has been done, start the services for the first time.#
service rpcbind start#service nfs startCreate Directory
Create the directory you wish to share using NFS.#
mkdir /exports/isoReplace /exports/iso with the name, and path of the directory you wish to use.Export Directory
To be accessible over the network using NFS the directory must be exported. NFS exports are controlled using the/etc/exportsconfiguration file. Each export path appears on a separate line followed by a tab character and any additional NFS options. Exports to be attached to the Red Hat Enterprise Virtualization Manager must have the read, and write, options set.To grant read, and write access to/exports/isousing NFS for example you add the following line to the/etc/exportsfile./exports/iso *(rw)
Again, replace /exports/iso with the name, and path of the directory you wish to use.Reload NFS Configuration
For the changes to the/etc/exportsfile to take effect the service must be told to reload the configuration. To force the service to reload the configuration run the following command asroot:#
service nfs reloadSet Permissions
The NFS export directory must be configured for read write access and must be owned by vdsm:kvm. If these users do not exist on your external NFS server use the following command, assuming that/exports/isois the directory to be used as an NFS share.#
chown -R 36:36 /exports/isoThe permissions on the directory must be set to allow read and write access to both the owner and the group. The owner should also have execute access to the directory. The permissions are set using thechmodcommand. The following command arguments set the required permissions on the/exports/isodirectory.#
chmod 0755 /exports/iso
The NFS file share has been created, and is ready to be attached by the Red Hat Enterprise Virtualization Manager.
13.4. Attaching NFS Storage
An NFS type Storage Domain is a mounted NFS share that is attached to a data center. It is used to provide storage for virtualized guest images and ISO boot media. Once NFS storage has been exported it must be attached to the Red Hat Enterprise Virtualization Manager using the Administration Portal.
Procedure 13.2. Attaching NFS Storage
- Click the resource tab to list the existing storage domains.
- Click to open the New Domain window.
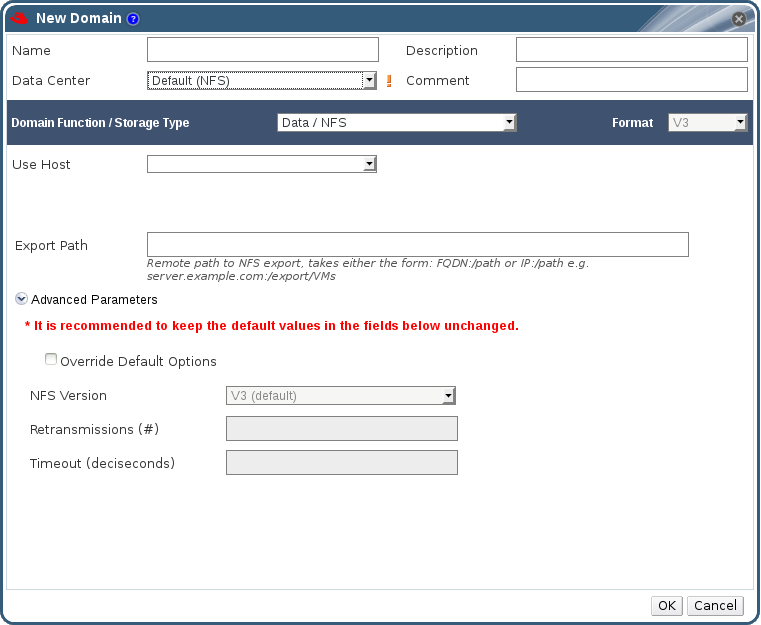
Figure 13.1. NFS Storage
- Enter the Name of the storage domain.
- Select the Data Center, Domain Function / Storage Type, and Use Host from the drop-down menus.If applicable, select the Format from the drop-down menu.
- Enter the Export Path to be used for the storage domain.The export path should be in the format of
192.168.0.10:/data or domain.example.com:/data - Click to enable further configurable settings. It is recommended that the values of these parameters not be modified.
Important
All communication to the storage domain is from the selected host and not directly from the Red Hat Enterprise Virtualization Manager. At least one active host must be attached to the chosen Data Center before the storage is configured. - Click OK to create the storage domain and close the window.
The new NFS data domain is displayed on the Storage tab with a status of Locked while the disk prepares. It is automatically attached to the data center upon completion.
13.5. Preparing pNFS Storage
-o minorversion=1
-o v4.1
# chown 36:36 [path to pNFS resource]
$lsmod | grep nfs_layout_nfsv41_files
13.6. Attaching pNFS Storage
A pNFS type Storage Domain is a mounted pNFS share attached to a data center. It provides storage for virtualized guest images and ISO boot media. After you have exported pNFS storage, it must be attached to the Red Hat Enterprise Virtualization Manager using the Administration Portal.
Procedure 13.3. Attaching pNFS Storage
- Click the resource tab to list the existing storage domains.
- Click to open the New Domain window.
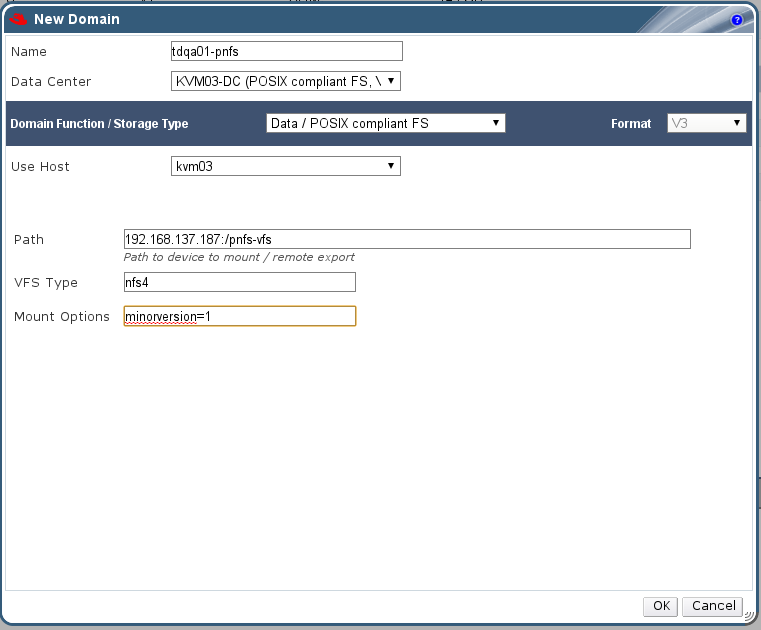
Figure 13.2. NFS Storage
- Enter the Name of the storage domain.
- Select the Data Center, Domain Function / Storage Type, and Use Host from the drop-down menus.If applicable, select the Format from the drop-down menu.
- Enter the Export Path to be used for the storage domain.The export path should be in the format of
192.168.0.10:/dataordomain.example.com:/data - In the VFS Type field, enter
nfs4. - In the Mount Options field, enter
minorversion=1.Important
All communication to the storage domain comes from the selected host and not from the Red Hat Enterprise Virtualization Manager. At least one active host must be attached to the chosen Data Center before the storage is configured. - Click OK to create the storage domain and close the window.
The new pNFS data domain is displayed on the Storage tab with a status of Locked while the disk prepares. It is automatically attached to the data center upon completion.
13.7. Adding iSCSI Storage
Red Hat Enterprise Virtualization platform supports iSCSI storage by creating a storage domain from a volume group made of pre-existing LUNs. Neither volume groups nor LUNs can be attached to more than one storage domain at a time.
Note
Procedure 13.4. Adding iSCSI Storage
- Click the Storage resource tab to list the existing storage domains in the results list.
- Click the button to open the New Domain window.
- Enter the Name of the new storage domain.
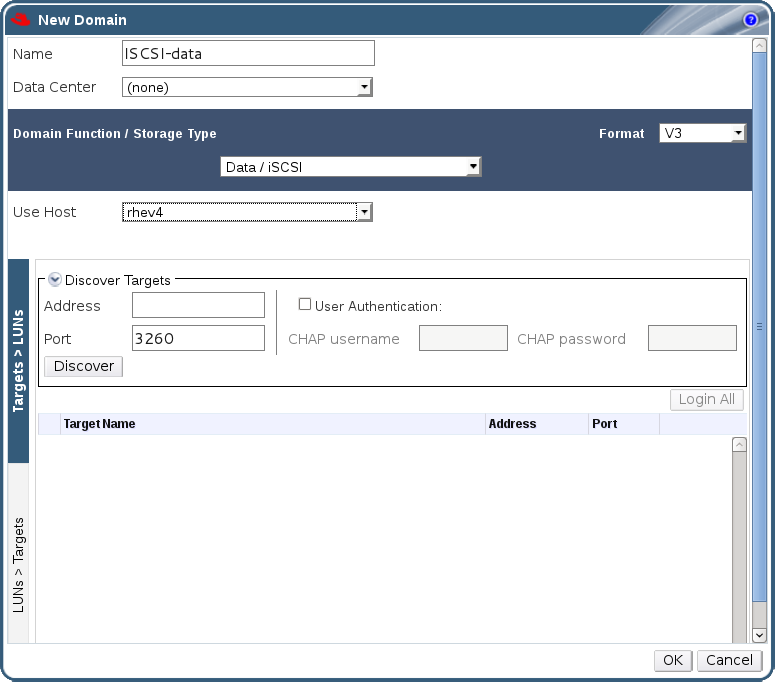
Figure 13.3. New iSCSI Domain
- Use the Data Center drop-down menu to select an iSCSI data center.If you do not yet have an appropriate iSCSI data center, select
(none). - Use the drop-down menus to select the Domain Function / Storage Type and the Format. The storage domain types that are not compatible with the chosen data center are not available.
- Select an active host in the Use Host field. If this is not the first data domain in a data center, you must select the data center's SPM host.
Important
All communication to the storage domain is via the selected host and not directly from the Red Hat Enterprise Virtualization Manager. At least one active host must exist in the system, and be attached to the chosen data center, before the storage is configured. - The Red Hat Enterprise Virtualization Manager is able to map either iSCSI targets to LUNs, or LUNs to iSCSI targets. The New Domain window automatically displays known targets with unused LUNs when iSCSI is selected as the storage type. If the target that you are adding storage from is not listed then you can use target discovery to find it, otherwise proceed to the next step.
iSCSI Target Discovery
- Click Discover Targets to enable target discovery options. When targets have been discovered and logged in to, the New Domain window automatically displays targets with LUNs unused by the environment.
Note
LUNs used externally to the environment are also displayed.You can use the Discover Targets options to add LUNs on many targets, or multiple paths to the same LUNs. - Enter the fully qualified domain name or IP address of the iSCSI host in the Address field.
- Enter the port to connect to the host on when browsing for targets in the Port field. The default is
3260. - If the Challenge Handshake Authentication Protocol (CHAP) is being used to secure the storage, select the User Authentication check box. Enter the CHAP user name and CHAP password.
- Click the button.
- Select the target to use from the discovery results and click the button.Alternatively, click the to log in to all of the discovered targets.
- Click the + button next to the desired target. This will expand the entry and display all unused LUNs attached to the target.
- Select the check box for each LUN that you are using to create the storage domain.
- Click to create the storage domain and close the window.
The new iSCSI storage domain displays on the storage tab. This can take up to 5 minutes.
13.8. Adding FCP Storage
Red Hat Enterprise Virtualization platform supports SAN storage by creating a storage domain from a volume group made of pre-existing LUNs. Neither volume groups nor LUNs can be attached to more than one storage domain at a time.
Note
Procedure 13.5. Adding FCP Storage
- Click the resource tab to list all storage domains in the virtualized environment.
- Click to open the New Domain window.
- Enter the Name of the storage domain
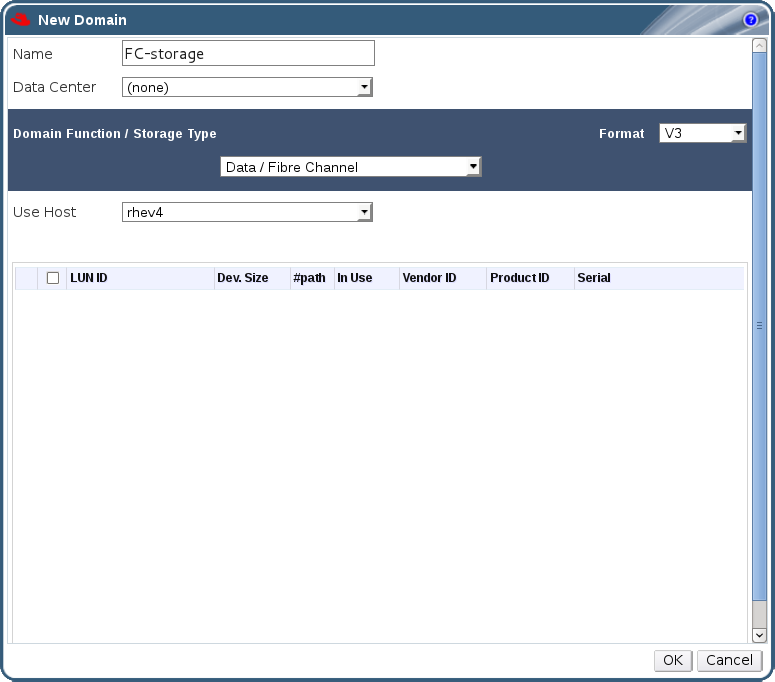
Figure 13.4. Adding FCP Storage
- Use the Data Center drop-down menu to select an FCP data center.If you do not yet have an appropriate FCP data center, select
(none). - Use the drop-down menus to select the Domain Function / Storage Type and the Format. The storage domain types that are not compatible with the chosen data center are not available.
- Select an active host in the Use Host field. If this is not the first data domain in a data center, you must select the data center's SPM host.
Important
All communication to the storage domain is via the selected host and not directly from the Red Hat Enterprise Virtualization Manager. At least one active host must exist in the system, and be attached to the chosen data center, before the storage is configured. - The New Domain window automatically displays known targets with unused LUNs when Data / Fibre Channel is selected as the storage type. Select the LUN ID check box to select all of the available LUNs.
- Click OK to create the storage domain and close the window.
The new FCP data domain displays on the tab. It will remain with a Locked status while it is being prepared for use. When ready, it is automatically attached to the data center.
13.9. Preparing Local Storage
A local storage domain can be set up on a host. When you set up host to use local storage, the host automatically gets added to a new data center and cluster that no other hosts can be added to. Multiple host clusters require that all hosts have access to all storage domains, which is not possible with local storage. Virtual machines created in a single host cluster cannot be migrated, fenced or scheduled.
Important
/data/images. This directory already exists with the correct permissions on Hypervisor installations. The steps in this procedure are only required when preparing local storage on Red Hat Enterprise Linux virtualization hosts.
Procedure 13.6. Preparing Local Storage
- On the virtualization host, create the directory to be used for the local storage.
# mkdir -p /data/images
- Ensure that the directory has permissions allowing read/write access to the
vdsmuser (UID 36) andkvmgroup (GID 36).# chown 36:36 /data /data/images
# chmod 0755 /data /data/images
Your local storage is ready to be added to the Red Hat Enterprise Virtualization environment.
13.10. Adding Local Storage
Storage local to your host has been prepared. Now use the Manager to add it to the host.
Procedure 13.7. Adding Local Storage
- Use the Hosts resource tab, tree mode, or the search function to find and select the host in the results list.
- Click Maintenance to open the Maintenance Host(s) confirmation window.
- Click to initiate maintenance mode.
- Click to open the Configure Local Storage window.
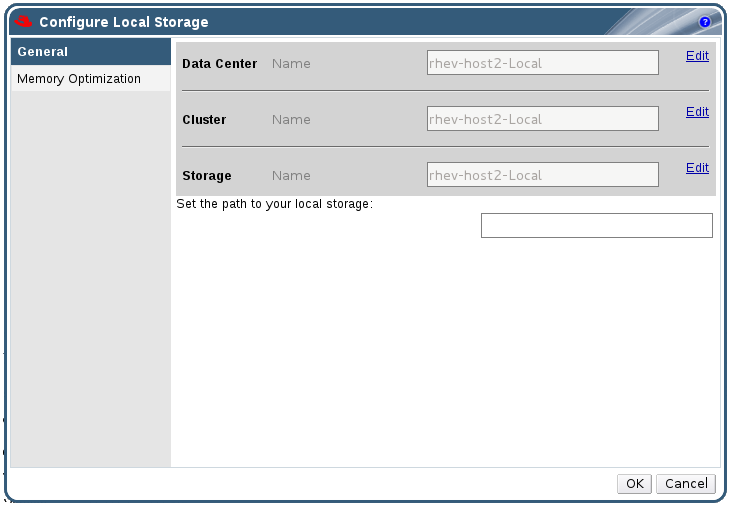
Figure 13.5. Configure Local Storage Window
- Click the buttons next to the Data Center, Cluster, and Storage fields to configure and name the local storage domain.
- Set the path to your local storage in the text entry field.
- If applicable, select the Memory Optimization tab to configure the memory optimization policy for the new local storage cluster.
- Click to save the settings and close the window.
Your host comes online in a data center of its own.
13.11. POSIX Compliant File System Storage in Red Hat Enterprise Virtualization
Important
13.12. Attaching POSIX Compliant File System Storage
You want to use a POSIX compliant file system that is not exposed using NFS, iSCSI, or FCP as a storage domain.
Procedure 13.8. Attaching POSIX Compliant File System Storage
- Click the Storage resource tab to list the existing storage domains in the results list.
- Click New Domain to open the New Domain window.
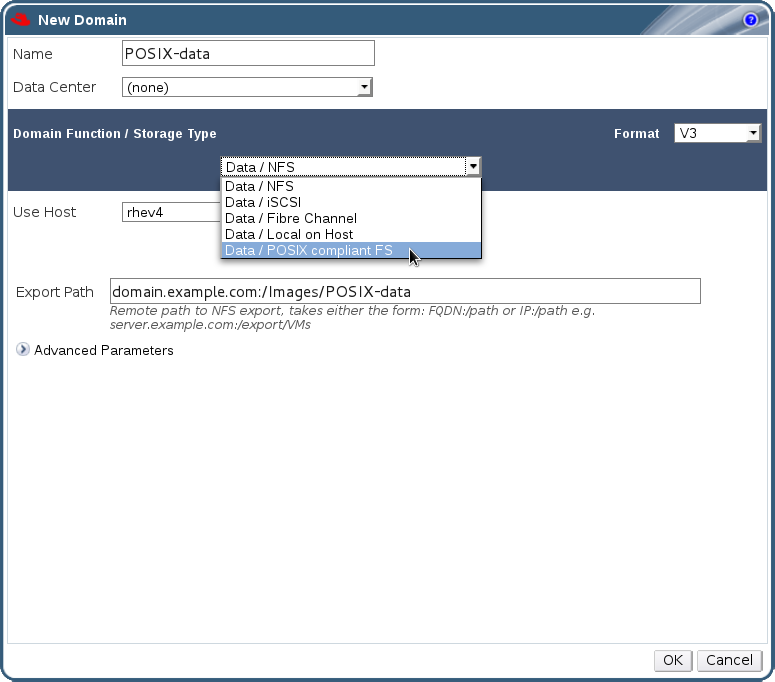
Figure 13.6. POSIX Storage
- Enter the Name for the storage domain.
- Select the Data Center to be associated with the storage domain. The Data Center selected must be of type POSIX (POSIX compliant FS). Alternatively, select
(none). - Select
Data / POSIX compliant FSfrom the Domain Function / Storage Type drop-down menu.If applicable, select the Format from the drop-down menu. - Select a host from the Use Host drop-down menu. Only hosts within the selected data center will be listed. The host that you select will be used to connect the storage domain.
- Enter the Path to the POSIX file system, as you would normally provide it to the
mountcommand. - Enter the VFS Type, as you would normally provide it to the
mountcommand using the-targument. Seeman mountfor a list of valid VFS types. - Enter additional Mount Options, as you would normally provide them to the
mountcommand using the-oargument. The mount options should be provided in a comma-separated list. Seeman mountfor a list of valid mount options. - Click OK to attach the new Storage Domain and close the window.
You have used a supported mechanism to attach an unsupported file system as a storage domain.
13.13. Enabling Gluster Processes on Red Hat Storage Nodes
This procedure explains how to allow Gluster processes on Red Hat Storage Nodes.
- In the Navigation Pane, select the Clusters tab.
- Select .
- Select the "Enable Gluster Service" radio button. Provide the address, SSH fingerprint, and password as necessary. The address and password fields can be filled in only when the Import existing Gluster configuration check box is selected.
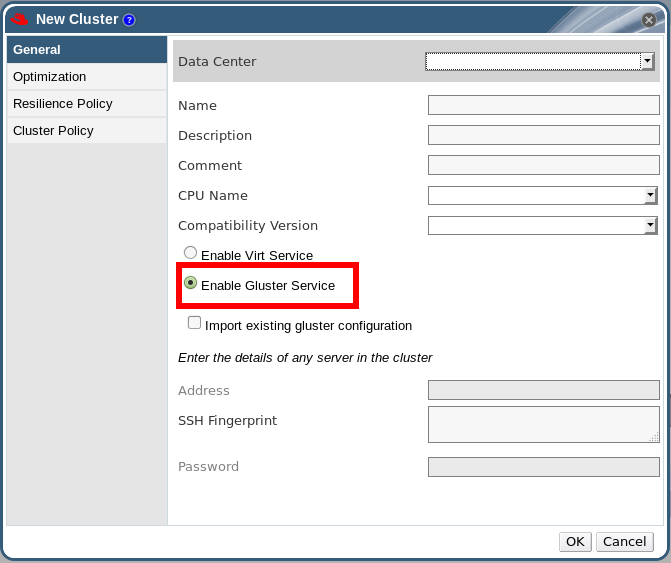
Figure 13.7. Selecting the "Enable Gluster Service" Radio Button
- Click .
It is now possible to add Red Hat Storage nodes to the Gluster cluster, and to mount Gluster volumes as storage domains. iptables rules no longer block storage domains from being added to the cluster.
13.14. Populating the ISO Storage Domain
An ISO storage domain is attached to a data center, ISO images must be uploaded to it. Red Hat Enterprise Virtualization provides an ISO uploader tool that ensures that the images are uploaded into the correct directory path, with the correct user permissions.
Procedure 13.9. Populating the ISO Storage Domain
- Copy the required ISO image to a temporary directory on the system running Red Hat Enterprise Virtualization Manager.
- Log in to the system running Red Hat Enterprise Virtualization Manager as the
rootuser. - Use the
engine-iso-uploadercommand to upload the ISO image. This action will take some time, the amount of time varies depending on the size of the image being uploaded and available network bandwidth.Example 13.1. ISO Uploader Usage
In this example the ISO imageRHEL6.isois uploaded to the ISO domain calledISODomainusing NFS. The command will prompt for an administrative user name and password. The user name must be provided in the form user name@domain.#
engine-iso-uploader--iso-domain=ISODomainuploadRHEL6.iso
The ISO image is uploaded and appears in the ISO storage domain specified. It is also available in the list of available boot media when creating virtual machines in the data center which the storage domain is attached to.
13.15. VirtIO and Guest Tool Image Files
/usr/share/virtio-win/virtio-win.iso/usr/share/virtio-win/virtio-win_x86.vfd/usr/share/virtio-win/virtio-win_amd64.vfd/usr/share/rhev-guest-tools-iso/rhev-tools-setup.iso
engine-iso-uploader command to upload these images to your ISO storage domain. Once uploaded, the image files can be attached to and used by virtual machines.
13.16. Uploading the VirtIO and Guest Tool Image Files to an ISO Storage Domain
virtio-win.iso, virtio-win_x86.vfd, virtio-win_amd64.vfd, and rhev-tools-setup.iso image files to the ISODomain.
Example 13.2. Uploading the VirtIO and Guest Tool Image Files
# engine-iso-uploader --iso-domain=[ISODomain] upload /usr/share/virtio-win/virtio-win.iso /usr/share/virtio-win/virtio-win_x86.vfd /usr/share/virtio-win/virtio-win_amd64.vfd /usr/share/rhev-guest-tools-iso/rhev-tools-setup.isoChapter 14. Configuring Logs
14.1. Red Hat Enterprise Virtualization Manager Installation Log Files
Table 14.1. Installation
| Log File | Description |
|---|---|
/var/log/ovirt-engine/engine-cleanup_yyyy_mm_dd_hh_mm_ss.log | Log from the engine-cleanup command. This is the command used to reset a Red Hat Enterprise Virtualization Manager installation. A log is generated each time the command is run. The date and time of the run is used in the filename to allow multiple logs to exist. |
/var/log/ovirt-engine/engine-db-install-yyyy_mm_dd_hh_mm_ss.log | Log from the engine-setup command detailing the creation and configuration of the rhevm database. |
/var/log/ovirt-engine/rhevm-dwh-setup-yyyy_mm_dd_hh_mm_ss.log | Log from the rhevm-dwh-setup command. This is the command used to create the ovirt_engine_history database for reporting. A log is generated each time the command is run. The date and time of the run is used in the filename to allow multiple logs to exist concurrently. |
/var/log/ovirt-engine/ovirt-engine-reports-setup-yyyy_mm_dd_hh_mm_ss.log | Log from the rhevm-reports-setup command. This is the command used to install the Red Hat Enterprise Virtualization Manager Reports modules. A log is generated each time the command is run. The date and time of the run is used in the filename to allow multiple logs to exist concurrently. |
/var/log/ovirt-engine/setup/ovirt-engine-setup-yyyymmddhhmmss.log | Log from the engine-setup command. A log is generated each time the command is run. The date and time of the run is used in the filename to allow multiple logs to exist concurrently. |
14.2. Red Hat Enterprise Virtualization Manager Log Files
Table 14.2. Service Activity
| Log File | Description |
|---|---|
/var/log/ovirt-engine/engine.log | Reflects all Red Hat Enterprise Virtualization Manager GUI crashes, Active Directory look-ups, Database issues, and other events. |
/var/log/ovirt-engine/host-deploy | Log files from hosts deployed from the Red Hat Enterprise Virtualization Manager. |
/var/lib/ovirt-engine/setup-history.txt | Tracks the installation and upgrade of packages associated with the Red Hat Enterprise Virtualization Manager. |
14.3. Red Hat Enterprise Virtualization Host Log Files
Table 14.3.
| Log File | Description |
|---|---|
/var/log/vdsm/libvirt.log | Log file for libvirt. |
/var/log/vdsm/spm-lock.log | Log file detailing the host's ability to obtain a lease on the Storage Pool Manager role. The log details when the host has acquired, released, renewed, or failed to renew the lease. |
/var/log/vdsm/vdsm.log | Log file for VDSM, the Manager's agent on the virtualization host(s). |
/tmp/ovirt-host-deploy-@DATE@.log | Host deployment log, copied to engine as /var/log/ovirt-engine/host-deploy/ovirt-@DATE@-@HOST@-@CORRELATION_ID@.log after the host has been successfully deployed. |
14.4. Setting Up a Virtualization Host Logging Server
Red Hat Enterprise Virtualization hosts generate and update log files, recording their actions and problems. Collecting these log files centrally simplifies debugging.
Procedure 14.1. Setting up a Virtualization Host Logging Server
- Configure SELinux to allow rsyslog traffic.
# semanage port -a -t syslogd_port_t -p udp 514
- Edit
/etc/rsyslog.confand add below lines:$template TmplAuth, "/var/log/%fromhost%/secure" $template TmplMsg, "/var/log/%fromhost%/messages" $RuleSet remote authpriv.* ?TmplAuth *.info,mail.none;authpriv.none,cron.none ?TmplMsg $RuleSet RSYSLOG_DefaultRuleset $InputUDPServerBindRuleset remote
Uncomment the following:#$ModLoad imudp #$UDPServerRun 514
- Restart the rsyslog service:
# service rsyslog restart
Your centralized log server is now configured to receive and store the messages and secure logs from your virtualization hosts.
14.5. The Logging Screen
The Logging screen allows you to configure logging-related options such as a daemon for automatically exporting log files generated by the hypervisor to a remote server.
Procedure 14.2. Configuring Logging
- In the Logrotate Max Log Size field, enter the maximum size in kilobytes that log files can reach before they are rotated by logrotate. The default value is
1024. - Optionally, configure rsyslog to transmit log files to a remote
syslogdaemon:- Enter the remote rsyslog server address in the Server Address field.
- Enter the remote rsyslog server port in the Server Port field. The default port is
514.
- Optionally, configure netconsole to transmit kernel messages to a remote destination:
- Enter the Server Address.
- Enter the Server Port. The default port is
6666.
- Select and press Enter.
You have configured logging for the hypervisor.
Part V. Advanced Setup
Chapter 15. Proxies
15.1. SPICE Proxy
15.1.1. SPICE Proxy Overview
SpiceProxyDefault to a value consisting of the name and port of the proxy.
SpiceProxyDefault has been set to.
15.1.2. SPICE Proxy Machine Setup
This procedure explains how to set up a machine as a SPICE Proxy. A SPICE Proxy makes it possible to connect to the Red Hat Enterprise Virtualization network from outside the network. We use Squid in this procedure to provide proxy services.
Procedure 15.1. Installing Squid on Red Hat Enterprise Linux
- Install Squid on the Proxy machine:
#yum install squid - Open
/etc/squid/squid.conf. Change:http_access deny CONNECT !SSL_ports
to:http_access deny CONNECT !Safe_ports
- Restart the proxy:
#service squid restart - Open the default squid port:
#iptables -A INPUT -p tcp --dport 3128 -j ACCEPT - Make this iptables rule persistent:
#service iptables save
You have now set up a machine as a SPICE proxy. Before connecting to the Red Hat Enterprise Virtualization network from outside the network, activate the SPICE proxy.
15.1.3. Turning on SPICE Proxy
This procedure explains how to activate (or turn on) the SPICE proxy.
Procedure 15.2. Activating SPICE Proxy
- On the Manager, use the engine-config tool to set a proxy:
#
engine-config -s SpiceProxyDefault=someProxy - Restart the ovirt-engine service:
#
service ovirt-engine restartThe proxy must have this form:protocol://[host]:[port]
Note
Only the http protocol is supported by SPICE clients. If https is specified, the client will ignore the proxy setting and attempt a direct connection to the hypervisor.
SPICE Proxy is now activated (turned on). It is now possible to connect to the Red Hat Enterprise Virtualization network through the SPICE proxy.
15.1.4. Turning Off a SPICE Proxy
This procedure explains how to turn off (deactivate) a SPICE proxy.
Procedure 15.3. Turning Off a SPICE Proxy
- Log in to the Manager:
$
ssh root@[IP of Manager] - Run the following command to clear the SPICE proxy:
#
engine-config -s SpiceProxyDefault="" - Restart the Manager:
#
service ovirt-engine restart
SPICE proxy is now deactivated (turned off). It is no longer possible to connect to the Red Hat Enterprise Virtualization network through the SPICE proxy.
15.2. Squid Proxy
15.2.1. Installing and Configuring a Squid Proxy
This section explains how to install and configure a Squid Proxy to the User Portal.
Procedure 15.4. Configuring a Squid Proxy
Obtaining a Keypair
Obtain a keypair and certificate for the HTTPS port of the Squid proxy server.You can obtain this keypair the same way that you would obtain a keypair for another SSL/TLS service. The keypair is in the form of two PEM files which contain the private key and the signed certificate. In this document we assume that they are namedproxy.keyandproxy.cer.The keypair and certificate can also be generated using the certificate authority of the oVirt engine. If you already have the private key and certificate for the proxy and do not want to generate it with the oVirt engine certificate authority, skip to the next step.Generating a Keypair
Decide on a host name for the proxy. In this procedure, the proxy is calledproxy.example.com.Decide on the rest of the distinguished name of the certificate for the proxy. The important part here is the "common name", which contains the host name of the proxy. Users' browsers use the common name to validate the connection. It is good practice to use the same country and same organization name used by the oVirt engine itself. Find this information by logging in to the oVirt engine machine and running the following command:[root@engine ~]# openssl x509 -in /etc/pki/ovirt-engine/ca.pem -noout -subject
This command will output something like this:subject= /C=US/O=Example Inc./CN=engine.example.com.81108
The relevant part here is/C=us/O=Example Inc.. Use this to build the complete distinguished name for the certificate for the proxy:/C=US/O=Example Inc./CN=proxy.example.com
Log in to the proxy machine and generate a certificate signing request:[root@proxy ~]# openssl req -newkey rsa:2048 -subj '/C=US/O=Example Inc./CN=proxy.example.com' -nodes -keyout proxy.key -out proxy.req
Note
The quotes around the distinguished name for the certificate are very important. Do not leave them out.The command will generate the key pair. It is very important that the private key is not encrypted (that is the effect of the -nodes option) because otherwise you would need to type the password to start the proxy server.The output of the command looks like this:Generating a 2048 bit RSA private key ......................................................+++ .................................................................................+++ writing new private key to 'proxy.key' -----
The command will generate two files:proxy.keyandproxy.req.proxy.keyis the private key. Keep this file safe.proxy.reqis the certificate signing request.proxy.reqdoes not require any special protection.To generate the signed certificate, copy theprivate.csrfile to the oVirt engine machine, using the scp command:[root@proxy ~]# scp proxy.req engine.example.com:/etc/pki/ovirt-engine/requests/.
Log in to the oVirt engine machine and run the following command to sign the certificate:[root@engine ~]# /usr/share/ovirt-engine/bin/pki-enroll-request.sh --name=proxy --days=3650 --subject='/C=US/O=Example Inc./CN=proxy.example.com'
This will sign the certificate and make it valid for 10 years (3650 days). Set the certificate to expire earlier, if you prefer.The output of the command looks like this:Using configuration from openssl.conf Check that the request matches the signature Signature ok The Subject's Distinguished Name is as follows countryName :PRINTABLE:'US' organizationName :PRINTABLE:'Example Inc.' commonName :PRINTABLE:'proxy.example.com' Certificate is to be certified until Jul 10 10:05:24 2023 GMT (3650 days) Write out database with 1 new entries Data Base Updated
The generated certificate file is available in the directory/etc/pki/ovirt-engine/certsand should be namedproxy.cer. Copy this file to the proxy machine:[root@proxy ~]# scp engine.example.com:/etc/pki/ovirt-engine/certs/proxy.cer .
Make sure that both theproxy.keyandproxy.cerfiles are present on the proxy machine:[root@proxy ~]# ls -l proxy.key proxy.cer
The output of this command will look like this:-rw-r--r--. 1 root root 4902 Jul 12 12:11 proxy.cer -rw-r--r--. 1 root root 1834 Jul 12 11:58 proxy.key
You are now ready to install and configure the proxy server.Install the Squid proxy server package
Install this system as follows:[root@proxy ~]# yum -y install squid
Configure the Squid proxy server
Move the private key and signed certificate to a place where the proxy can access them, for example to the/etc/squiddirectory:[root@proxy ~]# cp proxy.key proxy.cer /etc/squid/.
Set permissions so that the "squid" user can read these files:[root@proxy ~]# chgrp squid /etc/squid/proxy.* [root@proxy ~]# chmod 640 /etc/squid/proxy.*
The Squid proxy will connect to the oVirt engine web server using the SSL protocol, and must verify the certificate used by the engine. Copy the certificate of the CA that signed the certificate of the oVirt engine web server to a place where the proxy can access it, for example/etc/squid. The default CA certificate is located in the/etc/pki/ovirt-engine/ca.pemfile in the oVirt engine machine. Copy it with the following command:[root@proxy ~]# scp engine.example.com:/etc/pki/ovirt-engine/ca.pem /etc/squid/.
Ensure thesquiduser can read that file:[root@proxy ~]# chgrp squid /etc/squid/ca.pem [root@proxy ~]# chmod 640 /etc/squid/ca.pem
If SELinux is in enforcing mode, change the context of port 443 using the semanage tool. This permits Squid to use port 443.[root@proxy ~]# yum install -y policycoreutils-python [root@proxy ~]# semanage port -m -p tcp -t http_cache_port_t 443
Replace the existing squid configuration file with the following:https_port 443 key=/etc/squid/proxy.key cert=/etc/squid/proxy.cer ssl-bump defaultsite=engine.example.com cache_peer engine.example.com parent 443 0 no-query originserver ssl sslcafile=/etc/squid/ca.pem name=engine cache_peer_access engine allow all ssl_bump allow all http_access allow all
Restart the Squid Proxy Server
Run the following command in the proxy machine:[root@proxy ~]# service squid restart
Configure the websockets proxy
Note
This step is optional. Do this step only to use the noVNC console or the SPICE HTML 5 console.To use the noVNC or SPICE HTML 5 consoles to connect to the console of virtual machines, the websocket proxy server must be configured on the machine on which the engine is installed. If you selected to configure the websocket proxy server when prompted during installing or upgrading the engine with theengine-setupcommand, the websocket proxy server will already be configured. If you did not select to configure the websocket proxy server at this time, you can configure it later by running theengine-setupcommand with the following option:engine-setup --otopi-environment="OVESETUP_CONFIG/websocketProxyConfig=bool:True"
You must also ensure the ovirt-websocket-proxy service is started and will start automatically on boot:[root@engine ~]# service ovirt-websocket-proxy status [root@engine ~]# chkconfig ovirt-websocket-proxy on
Both the noVNC and the SPICE HTML 5 consoles use the websocket protocol to connect to the virtual machines, but squid proxy server does not support the websockets protocol, so this communication cannot be proxied with Squid. Tell the system to connect directly to the websockets proxy running in the machine where the engine is running. To do this, update theWebSocketProxyconfiguration parameter using the "engine-config" tool:[root@engine ~]# engine-config \ -s WebSocketProxy=engine.example.com:6100 [root@engine ~]# service ovirt-engine restart
Important
If you skip this step the clients will assume that the websockets proxy is running in the proxy machine, and thus will fail to connect.Connect to the user portal using the complete URL
Connect to the User Portal using the complete URL, for instance:https://proxy.example.com/UserPortal/org.ovirt.engine.ui.userportal.UserPortal/UserPortal.html
Note
Shorter URLs, for examplehttps://proxy.example.com/UserPortal, will not work. These shorter URLs are redirected to the long URL by the application server, using the 302 response code and the Location header. The version of Squid in Red Hat Enterprise Linux and Fedora (Squid version 3.1) does not support rewriting these headers.
You have installed and configured a Squid proxy to the User Portal.
Appendix A. Revision History
| Revision History | ||||||||
|---|---|---|---|---|---|---|---|---|
| Revision 3.4-36 | Fri 03 Jul 2015 | |||||||
| ||||||||
| Revision 3.4-35 | Wed 13 May 2015 | |||||||
| ||||||||
| Revision 3.4-34 | Tue 14 Apr 2015 | |||||||
| ||||||||
| Revision 3.4-33 | Fri 20 Mar 2015 | |||||||
| ||||||||
| Revision 3.4-32 | Thu 05 Mar 2015 | |||||||
| ||||||||
| Revision 3.4-31 | Thu 05 Feb 2015 | |||||||
| ||||||||
| Revision 3.4-30 | Thurs 11 Dec 2014 | |||||||
| ||||||||
| Revision 3.4-29 | Tues 28 Oct 2014 | |||||||
| ||||||||
| Revision 3.4-28 | Tue 28 Oct 2014 | |||||||
| ||||||||
| Revision 3.4-27 | Tue 07 Oct 2014 | |||||||
| ||||||||
| Revision 3.4-26 | Thu 28 Aug 2014 | |||||||
| ||||||||
| Revision 3.4-25 | Mon 25 Aug 2014 | |||||||
| ||||||||
| Revision 3.4-24 | Tue 15 Jul 2014 | |||||||
| ||||||||
| Revision 3.4-23 | Fri 13 Jun 2014 | |||||||
| ||||||||
| Revision 3.4-22 | Wed 11 Jun 2014 | |||||||
| ||||||||
| Revision 3.4-21 | Tue 10 Jun 2014 | |||||||
| ||||||||
| Revision 3.4-20 | Wed 30 Apr 2014 | |||||||
| ||||||||
| Revision 3.4-19 | Tue 29 Apr 2014 | |||||||
| ||||||||
| Revision 3.4-18 | Mon 28 Apr 2014 | |||||||
| ||||||||
| Revision 3.4-17 | Sun 27 Apr 2014 | |||||||
| ||||||||
| Revision 3.4-16 | Wed 23 Apr 2014 | |||||||
| ||||||||
| Revision 3.4-16 | Wed 23 Apr 2014 | |||||||
| ||||||||
| Revision 3.4-15 | Tue 22 Apr 2014 | |||||||
| ||||||||
| Revision 3.4-14 | Thu 17 Apr 2014 | |||||||
| ||||||||
| Revision 3.4-13 | Thu 17 Apr 2014 | |||||||
| ||||||||
| Revision 3.4-12 | Thu 10 Apr 2014 | |||||||
| ||||||||
| Revision 3.4-11 | Fri 04 Apr 2014 | |||||||
| ||||||||
| Revision 3.4-10 | Wed 02 Apr 2014 | |||||||
| ||||||||
| Revision 3.4-6 | Fri 28 Mar 2014 | |||||||
| ||||||||
| Revision 3.4-5 | Thu 27 Mar 2014 | |||||||
| ||||||||
| Revision 3.4-4 | Thu 27 Mar 2014 | |||||||
| ||||||||
| Revision 3.4-3 | Tue 25 Mar 2014 | |||||||
| ||||||||
| Revision 3.4-2 | Wed 19 Mar 2014 | |||||||
| ||||||||
| Revision 3.4-1 | Mon 17 Mar 2014 | |||||||
| ||||||||