
Red Hat Training
A Red Hat training course is available for Red Hat Enterprise Linux
Chapter 3. Installation and Booting
3.1. Installer
The Red Hat Enterprise Linux installer, Anaconda, has been enhanced in order to improve the installation process for Red Hat Enterprise Linux 7.1.
Interface
- The graphical installer interface now contains one additional screen which enables configuring the Kdump kernel crash dumping mechanism during the installation. Previously, this was configured after the installation using the firstboot utility, which was not accessible without a graphical interface. Now, you can configure Kdump as part of the installation process on systems without a graphical environment. The new screen is accessible from the main installer menu (Installation Summary).

Figure 3.1. The new Kdump screen
- The manual partitioning screen has been redesigned to improve user experience. Some of the controls have been moved to different locations on the screen.
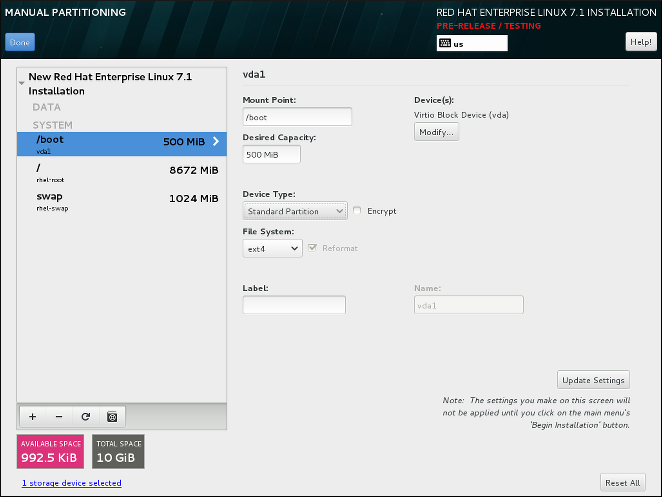
Figure 3.2. The redesigned Manual Partitioning screen
- You can now configure a network bridge in the Network & Hostname screen of the installer. To do so, click the + button at the bottom of the interface list, select Bridge from the menu, and configure the bridge in the Editing bridge connection dialog window which appears afterwards. This dialog is provided by NetworkManager and is fully documented in the Red Hat Enterprise Linux 7.1 Networking Guide.Several new Kickstart options have also been added for bridge configuration. See below for details.
- The installer no longer uses multiple consoles to display logs. Instead, all logs are in tmux panes in virtual console 1 (
tty1). To access logs during the installation, press Ctrl+Alt+F1 to switch to tmux, and then use Ctrl+b X to switch between different windows (replace X with the number of a particular window as displayed at the bottom of the screen).To switch back to the graphical interface, press Ctrl+Alt+F6. - The command-line interface for Anaconda now includes full help. To view it, use the
anaconda -hcommand on a system with the anaconda package installed. The command-line interface allows you to run the installer on an installed system, which is useful for disk image installations.
Kickstart Commands and Options
- The
logvolcommand has a new option,--profile=. This option enables the user to specify the configuration profile name to use with thin logical volumes. If used, the name will also be included in the metadata for the logical volume.By default, the available profiles aredefaultandthin-performanceand are defined in the/etc/lvm/profiledirectory. See thelvm(8)man page for additional information. - The behavior of the
--size=and--percent=options of thelogvolcommand has changed. Previously, the--percent=option was used together with--growand--size=to specify how much a logical volume should expand after all statically-sized volumes have been created.Since Red Hat Enterprise Linux 7.1,--size=and--percent=can not be used on the samelogvolcommand. - The
--autoscreenshotoption of theautostepKickstart command has been fixed, and now correctly saves a screenshot of each screen into the/tmp/anaconda-screenshotsdirectory upon exiting the screen. After the installation completes, these screenshots are moved into/root/anaconda-screenshots. - The
liveimgcommand now supports installation from tar files as well as disk images. The tar archive must contain the installation media root file system, and the file name must end with.tar,.tbz,.tgz,.txz,.tar.bz2,.tar.gz, or.tar.xz. - Several new options have been added to the
networkcommand for configuring network bridges:- When the
--bridgeslaves=option is used, the network bridge with device name specified using the--device=option will be created and devices defined in the--bridgeslaves=option will be added to the bridge. For example:network --device=bridge0 --bridgeslaves=em1 - The
--bridgeopts=option requires an optional comma-separated list of parameters for the bridged interface. Available values arestp,priority,forward-delay,hello-time,max-age, andageing-time. For information about these parameters, see thenm-settings(5)man page.
- The
autopartcommand has a new option,--fstype. This option allows you to change the default file system type (xfs) when using automatic partitioning in a Kickstart file. - Several new features have been added to Kickstart for better container support. These features include:
- The new
--installoption for therepocommand saves the provided repository configuration on the installed system in the/etc/yum.repos.d/directory. Without using this option, a repository configured in a Kickstart file will only be available during the installation process, not on the installed system. - The
--disabledoption for thebootloadercommand prevents the boot loader from being installed. - The new
--nocoreoption for the%packagessection of a Kickstart file prevents the system from installing the@corepackage group. This enables installing extremely minimal systems for use with containers.
Note
Please note that the described options are useful only when combined with containers. Using these options in a general-purpose installation could result in an unusable system.
Entropy Gathering for LUKS Encryption
- If you choose to encrypt one or more partitions or logical volumes during the installation (either during an interactive installation or in a Kickstart file), Anaconda will attempt to gather 256 bits of entropy (random data) to ensure the encryption is secure. The installation will continue after 256 bits of entropy are gathered or after 10 minutes. The attempt to gather entropy happens at the beginning of the actual installation phase when encrypted partitions or volumes are being created. A dialog window will open in the graphical interface, showing progress and remaining time.The entropy gathering process can not be skipped or disabled. However, there are several ways to speed the process up:
- If you can access the system during the installation, you can supply additional entropy by pressing random keys on the keyboard and moving the mouse.
- If the system being installed is a virtual machine, you can attach a virtio-rng device (a virtual random number generator) as described in the Red Hat Enterprise Linux 7.1 Virtualization Deployment and Administration Guide.

Figure 3.3. Gathering Entropy for Encryption
Built-in Help in the Graphical Installer
Each screen in the installer's graphical interface and in the Initial Setup utility now has a Help button in the top right corner. Clicking this button opens the section of the Installation Guide relevant to the current screen using the Yelp help browser.
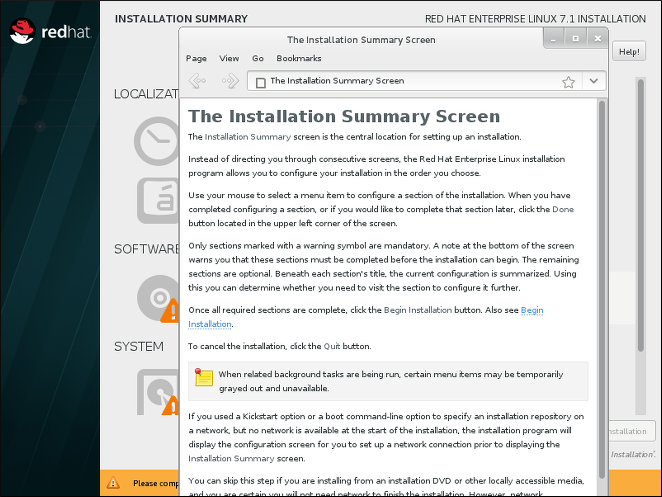
Figure 3.4. Anaconda built-in help