
Red Hat Training
A Red Hat training course is available for Red Hat Enterprise Linux
9.11. Managing User Groups
User groups are a way of centralizing control over important management tasks, particularly access control and password policies. Four groups are created during the installation, specifically for use by IdM operations:
- ipausers, which contains all users.
- admins, which contains administrative users. The initial
adminuser belongs to this group. - trusted admins, which contains administrative users used to manage Active Directory trusts.
- editors, which is a special group for users working through the web UI. This group allows users to edit other users' entries, though without all of the rights of the admin user.
Note
Some operating systems limit the number of groups that can be assigned to system users. For example, Solaris and AIX systems both limit users to 16 groups per user. This can be an issue when using nested groups, when a user may be automatically added to multiple groups.
9.11.1. Types of Groups in IdM
All groups in Identity Management are essentially static groups, meaning that the members of the group are manually and explicitly added to the group. Tangentially, IdM allows nested groups, where a group is a member of another group. In that case, all of the group members of the member group automatically belong to the parent group, as well.
Automembership rules allow new users to be added to groups automatically, using attributes in the user entry to determine what groups the user should belong to. Automembership rules are covered in Chapter 25, Policy: Defining Automatic Group Membership for Users and Hosts.
The way groups are defined in IdM is simple, but there are different configuration options for groups which can change what kinds of members can be added.
Some types of groups in IdM are based not on how members are added, but rather where the member entries originate:
- Internal groups (the default), where all members belong to the IdM domain.
- External groups, where some or all of the members exist in an identity store outside of the IdM domain. This can be a local system, an Active Directory domain, or a directory service.
Another difference is whether groups are created with POSIX attributes. Most Linux users require some kind of POSIX attributes, but groups which interact with Active Directory or Samba must be non-POSIX. By default, IdM creates non-POSIX groups, but there is an explicit option to create a POSIX group (adding the
posixgroup object class).
Because groups are easy to create, it is possible to be very flexible in what groups to create and how they are organized. Groups can be defined around organizational divisions like departments, physical locations, or IdM or infrastructure usage guidelines for access controls.
9.11.2. Group Object Classes
When a group entry is created, it is automatically assigned certain LDAP object classes. (LDAP object classes and attributes are discussed in detail in the Directory Server Deployment Guide and the Directory Server Schema Reference.) For groups, only two attributes truly matter: the name and the description.
Table 9.4. Default Identity Management Group Object Classes
| Description | Object Classes | |||
|---|---|---|---|---|
| IdM object classes |
| |||
| Group object classes | groupofnames |
9.11.2.1. Creating User Groups
9.11.2.1.1. With the Web UI
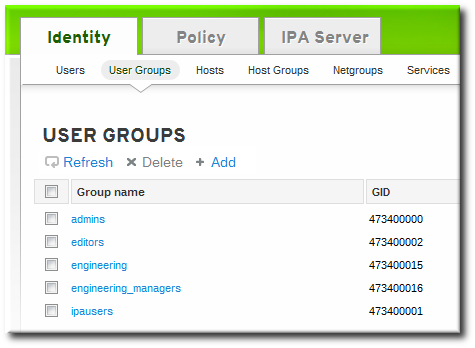
- Open the Identity tab, and select the User Groups subtab.
- Click the Add link at the top of the groups list.
- Enter all of the information for the group.
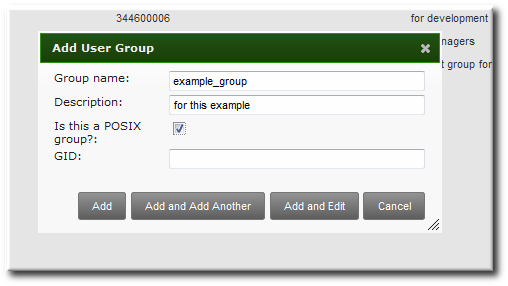
- A unique name. This is the identifier used for the group in the IdM domain, and it cannot be changed after it is created. The name cannot contain spaces, but other separators like an underscore (_) are allowed.
- A text description of the group.
- Whether the group is a POSIX group, which adds Linux-specific information to the entry. By default, all groups are POSIX groups unless they are explicitly configured not to be. Non-POSIX groups can be created for interoperability with Windows or Samba.
- Optionally, the GID number for the group. All POSIX groups require a GID number, but IdM automatically assigns the GID number.Setting a GID number is not necessary because of the risk of collisions. If a GID number is given manually, IdM will not override the specified GID number, even if it is not unique.
- Click the button to go immediately to the member selection page.
- Select the members, as described in Section 9.11.2.2.1, “With the Web UI (Group Page)”.
9.11.2.1.2. With the Command Line
New groups are created using the
group-add command. (This adds only the group; members are added separately.)
Two attributes are always required: the group name and the group description. If those attributes are not given as arguments, then the script prompts for them.
[bjensen@server ~]$ ipa group-add groupName --desc="description" [--nonposix]
Additionally, there is one other configuration option,
--nonposix. (By default, all groups are created as POSIX groups.) To enable interoperability with Windows users and groups and programs like Samba, it is possible to create non-POSIX groups by using the --nonposix option. This option tells the script not to add the posixGroup object class to the entry.
For example:
[bjensen@server ~]$ ipa group-add examplegroup --desc="for examples" --nonposix

----------------------
Added group "examplegroup"
----------------------
  Group name: examplegroup
  Description: for examples
  GID: 855800010
When no arguments are used, the command prompts for the required group account information:
[bjensen@server ~]$ ipa group-add
Group name: engineering
Description: for engineers
-------------------------
Added group "engineering"
-------------------------
  Group name: engineering
  Description: for engineers
  GID: 387115842
Important
When a group is created without specifying a GID number, then the group entry is assigned the ID number that is next available in the server or replica range. (Number ranges are described more in Section 9.9, “Managing Unique UID and GID Number Assignments”.) This means that a group always has a unique number for its GID number.
If a number is manually assigned to a group entry, the server does not validate that the
gidNumber is unique. It will allow duplicate IDs; this is expected (though discouraged) behavior for POSIX entries.
If two entries are assigned the same ID number, only the first entry is returned in a search for that ID number. However, both entries will be returned in searches for other attributes or with
ipa group-find --all.
Note
You cannot edit the group name. The group name is the primary key, so changing it is the equivalent of deleting the group and creating a new one.
9.11.2.2. Adding Group Members
9.11.2.2.1. With the Web UI (Group Page)
Note
This procedure adds a user to a group. User groups can contain other user groups as their members. These are nested groups.
It can take up to several minutes for the members of the child group to show up as members of the parent group. This is especially true on virtual machines where the nested groups have more than 500 members.
When creating nested groups, be careful not to create recursive groups. For example, if GroupA is a member of GroupB, do not add GroupB as a member of GroupA. Recursive groups are not supported and can cause unpredictable behavior.
- Open the Identity tab, and select the User Groups subtab.
- Click the name of the group to which to add members.
- Click the Add link at the top of the task area.
- Click the checkbox by the names of the users to add, and click the right arrows button, , to move the names to the selection box.

- Click the button.
Group members can be users or other user groups. It can take up to several minutes for the members of the child group to show up as members of the parent group. This is especially true on virtual machines where the nested groups have more than 500 members.
9.11.2.2.2. With the Web UI (User's Page)
Users can also be added to a group through the user's page.
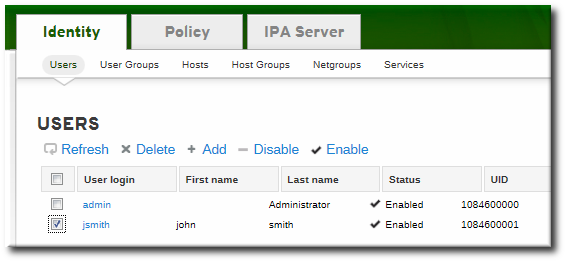
- Open the Identity tab, and select the Users subtab.
- Click the name of the user to edit.
- Open the User Groups tab on the user entry page.
- Click the Add link at the top of the task area.

- Click the checkbox by the names of the groups for the user to join, and click the right arrows button, , to move the groups to the selection box.

- Click the button.
9.11.2.2.3. With the Command Line
Members are added to a group using the
group-add-member command. This command can add both users as group members and other groups as group members.
The syntax of the
group-add-member command requires only the group name and a comma-separated list of users to add:
[bjensen@server ~]$ ipa group-add-member groupName [--users=list] [--groups=list]
For example, this adds three users to the
engineering group:
[bjensen@server ~]$ ipa group-add-member engineering --users=jsmith,bjensen,mreynolds
  Group name: engineering
  Description: for engineers
  GID: 387115842
  Member users: jsmith,bjensen,mreynolds
-------------------------
Number of members added 3
-------------------------
Likewise, other groups can be added as members, which creates nested groups:
[bjensen@server ~]$ ipa group-add-member engineering --groups=dev,qe1,dev2
  Group name: engineering
  Description: for engineers
  GID: 387115842
  Member groups: dev,qe1,dev2
  -------------------------
  Number of members added 3
  -------------------------
When displaying nested groups, members are listed as members and the members of any member groups are listed as indirect members. For example:
[bjensen@server ~]$ ipa group-show examplegroup
  Group name: examplegroup
  Description: for examples
  GID: 93200002
  Member users: jsmith,bjensen,mreynolds
  Member groups: californiausers
  Indirect Member users: sbeckett,acalavicci
It can take up to several minutes for the members of the child group to show up as members of the parent group. This is especially true on virtual machines where the nested groups have more than 500 members.
Note
When creating nested groups, be careful not to create recursive groups. For example, if GroupA is a member of GroupB, do not add GroupB as a member of GroupA. Recursive groups are not supported and can cause unpredictable behavior.
A group member is removed using the
group-remove-member command.
[bjensen@server ~]$ ipa group-remove-member engineering --users=jsmith

  Group name: engineering
  Description: for engineers
  GID: 855800009
  Member users: bjensen,mreynolds
---------------------------
Number of members removed 1
---------------------------
9.11.2.2.4. Viewing Direct and Indirect Members of a Group
User groups can contain other user groups as members. This is called a nested group. This also means that a group has two types of members:
- Direct members, which are added explicitly to the group
- Indirect members, which are members of the group because they are members of another user group which is a member of the group
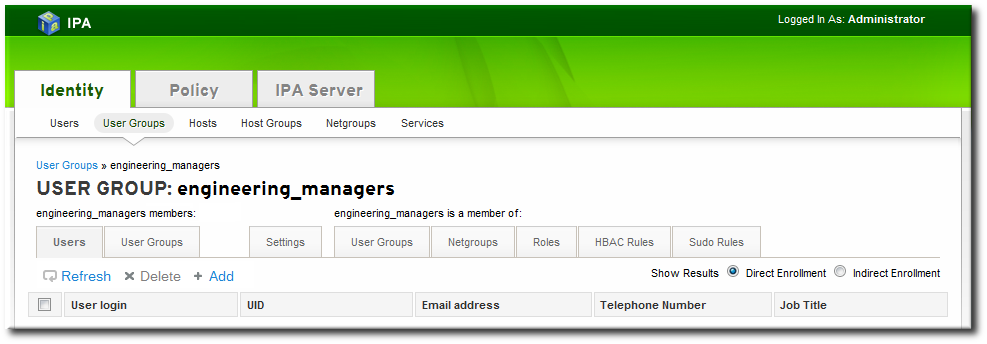
The IdM web UI has an easy way to view direct and indirect members of a group. The members list is filtered by member type, and this can be toggled by selecting the Direct and Indirect radio buttons at the top right corner of the members list.
Figure 9.4. Indirect and Direct Members
Being able to track indirect members makes it easier to assign group membership properly, without duplicating membership.
9.11.2.3. Deleting User Groups
When a user group is deleted, only the group is removed. The user accounts of group members (including nested groups) are not affected. Additionally, any access control delegations that apply to that group are removed.
Warning
Deleting a group is immediate and permanent. If any group configuration (such as delegations) is required, it must be assigned to another group or a new group created.
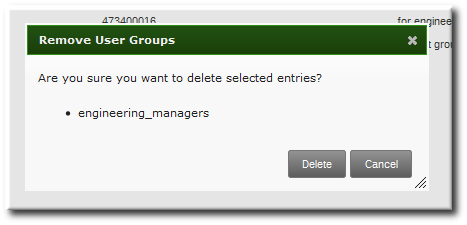
9.11.2.3.1. With the Web UI
- Open the Identity tab, and select the User Groups subtab.
- Select the checkbox by the name of the group to delete.
- Click the Delete link at the top of the task area.
- When prompted, confirm the delete action.
9.11.2.3.2. With the Command Line
The
group-del command to deletes the specified group. For example:
[bjensen@server ~]$ ipa group-del examplegroup
9.11.3. Searching for Users and Groups
The user searches in IdM can be run against simple (full word) or partial search strings. The range of attributes that are searched is configured as part of the default IdM configuration, as in Section 9.10.4, “Specifying Default User and Group Attributes”.
9.11.3.1. Setting Search Limits
9.11.3.1.1. Types of Search Limits and Where They Apply
Some searches can result in a large number of entries being returned, possibly even all entries. Search limits improve overall server performance by limiting how long the server spends in a search and how many entries are returned.
Search limits have a dual purpose to improve server performance by reducing the search load and to improve usability by returning a smaller — and therefore easier to browse — set of entries.
The IdM server has several different limits imposed on searches:
- The search limit configuration for the IdM server. This is a setting for the IdM server itself, which is applied to all requests sent to the server from all IdM clients, the IdM CLI tools, and the IdM web UI for normal page display.By default, this limit is 100 entries.
- The time limit configuration for the IdM server. Much like the search size limit, the time limit sets a maximum amount of time that the IdM server, itself, waits for searches to run. Once it reaches that limit, the server stops the search and returns whatever entries were returned in that time.By default, this limit is two seconds.
- The page size limit. Although not strictly a search limit, the page size limit does limit how many entries are returned per page. The server returns the set of entries, up to the search limit, and then sorts and displays 20 entries per page. Paging results makes the results more understandable and more viewable.This is hard-coded to 20 for all searches.
- The LDAP search limit (--pkey option). All searches performed in the UI, and CLI searches which use the
--pkeyoption, override the search limit set in the IdM server configuration and use the search limit set in the underlying LDAP directory.By default, this limit is 2000 entries. It can be edited by editing the 389 Directory Server configuration.
9.11.3.1.2. Setting IdM Search Limits
Search limits set caps on the number of records returned or the time spent searching when querying the database for user or group entries. There are two types of search limits: time limits and size (number) limits.
With the default settings, users are limited to two-second searches and no more than 100 records returned per search.
Important
Setting search size or time limits too high can negatively affect IdM server performance.
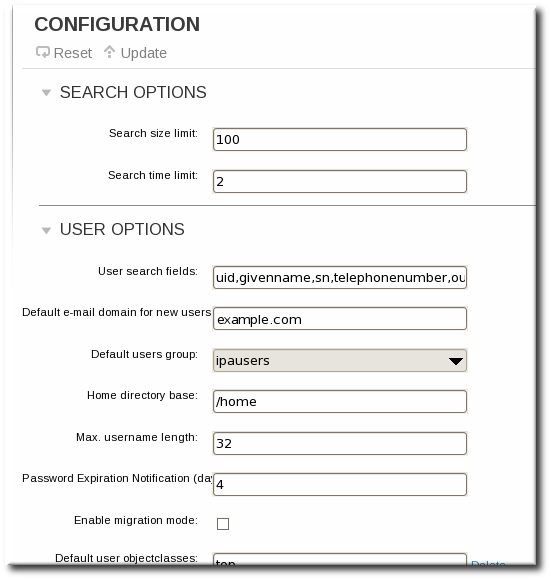
9.11.3.1.2.1. With the Web UI
- Open the IPA Server tab.
- Select the Configuration subtab.
- Scroll to the Search Options area.

- Change the search limit settings.
- Search size limit, the maximum number of records to return in a search.
- Search time limit, the maximum amount of time, in seconds, to spend on a search before the server returns results.
Note
Setting the time limit or size limit value to -1 means that there are no limits on searches. - When the changes are complete, click the Update link at the top of the Configuration page.
9.11.3.1.2.2. With the Command Line
The search limits can be changed using the
config-mod command.
[bjensen@server ~]$ ipa config-mod --searchtimelimit=5 --searchrecordslimit=500

  Max. username length: 32
  Home directory base: /home
  Default shell: /bin/sh
  Default users group: ipausers
  Default e-mail domain for new users: example.com
  Search time limit: 5
  Search size limit: 50
  User search fields: uid,givenname,sn,telephonenumber,ou,title
  Group search fields: cn,description
  Enable migration mode: FALSE
  Certificate Subject base: O=EXAMPLE.COM
  Password Expiration Notification (days): 4
Note
Setting the time limit or size limit value to -1 means that there are no limits on searches.
9.11.3.1.3. Overriding the Search Defaults
Part of the server configuration is setting global defaults for size and time limits on searches. While these limits are always enforced in the web UI, they can be overridden with any
*-find command run through the command line.
The
--sizelimit and --timelimit options set alternative size and time limits, respectively, for that specific command run. The limits can be higher or lower, depending on the kinds of results you need.
For example, if the default time limit is 60 seconds and a search is going to take longer, the time limit can be increased to 120 seconds:
[jsmith@ipaserver ~]$ ipa user-find smith --timelimit=120
9.11.3.2. Setting Search Attributes
A search for users or groups does not automatically search every possible attribute for that attribute. Rather, it searches a specific subset of attributes, and that list is configurable.
When adding attributes to the user or group search fields, make sure that there is a corresponding index within the LDAP directory for that attribute. Searches are performed based on indexes. Most standard LDAP attributes have indexes, but any custom attributes must have indexes created for them. Creating indexes is described in the indexes chapter in the Directory Server Administrator's Guide.
9.11.3.2.1. Default Attributes Checked by Searches
By default, there are six attributes that are indexed for user searches and two that are indexed for group searches. These are listed in Table 9.5, “Default Search Attributes”. All search attributes are searched in a user/group search.
Table 9.5. Default Search Attributes
| User Search Attributes | |
| First name | Last name |
| Login ID | Job title |
| Organizational unit | Phone number |
| Group Search Attributes | |
| Name | Description |
The attributes which are searched in user and group searches can be changed, as described in Section 9.11.3.2, “Setting Search Attributes” and Section 9.11.3.2.3, “Changing Group Search Attributes”.
9.11.3.2.2. Changing User Search Attributes
9.11.3.2.2.1. From the Web UI
- Open the IPA Server tab.
- Select the Configuration subtab.
- Scroll to the User Options area.
- Add any additional search attributes, in a comma-separated list, in the User search fields field.
- When the changes are complete, click the Update link at the top of the Configuration page.
9.11.3.2.2.2. From the Command Line
To change the search attributes, use the
--usersearch option to set the attributes for user searches.
[bjensen@server ~]$ ipa config-mod --usersearch=uid,givenname,sn,telephonenumber,ou,title
Note
Always give the complete list of search attributes. Whatever values are passed with the configuration argument overwrite the previous settings.
9.11.3.2.3. Changing Group Search Attributes
A search for users or groups does not automatically search every possible attribute for that attribute. Rather, it searches a specific subset of attributes, and that list is configurable.
When adding attributes to the user or group search fields, make sure that there is a corresponding index within the LDAP directory for that attribute. Searches are performed based on indexes. Most standard LDAP attributes have indexes, but any custom attributes must have indexes created for them. Creating indexes is described in the indexes chapter in the Directory Server Administrator's Guide.
9.11.3.2.3.1. From the Web UI
- Open the IPA Server tab.
- Select the Configuration subtab.
- Scroll to the Group Options area.
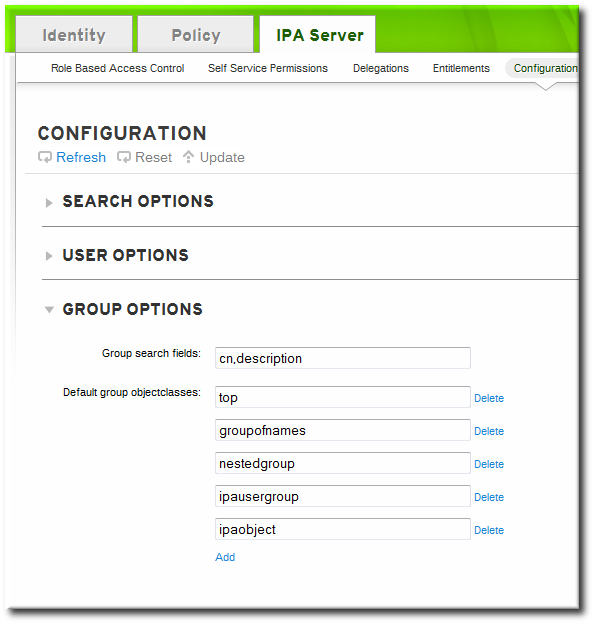
- Add any additional search attributes, in a comma-separated list, in the Group search fields field.
- When the changes are complete, click the Update link at the top of the Configuration page.
9.11.3.2.3.2. From the Command Line
To change the search attributes, use the
--groupsearch options to set the attributes for group searches.
[bjensen@server ~]$ ipa config-mod --groupsearch=cn,description
Note
Always give the complete list of search attributes. Whatever values are passed with the configuration argument overwrite the previous settings.
9.11.3.2.4. Limits on Attributes Returned in Search Results
Searches can be performed on attributes that are not displayed in the UI. This means that entries can be returned in a search that do not appear to match the given filter. This is especially common if the search information is very short, which increases the likelihood of a match.
9.11.3.3. Searching for Groups Based on Type
Group definitions are simple, but because it is possible to create automember rules which automatically assign entries to groups, nested groups which include members implicitly, and groups based on member attributes such as POSIX, the reality of the group definitions can be very complex.
There are numerous different options with the group-find command which allow groups to be searched based on who the members are and are not and other attributes of the group definition.
For example, user private groups are never displayed in the IdM UI and are not returned in a regular search. Using the
--private option, however, limits the search results to only private groups.
[root@server ~]# ipa group-find --private
---------------
1 group matched
---------------
  Group name: jsmith
  Description: User private group for jsmith
  GID: 1084600001
----------------------------
Number of entries returned 1
----------------------------
Group searches can also be based on who does or does not belong to a group. This can mean single users, other groups, or even other configuration entries like roles and host-based access control definitions. For example, the first search shows what groups the user
jsmith belongs to:
[root@server ~]# ipa group-find --user=jsmith
---------------
1 group matched
---------------
  Group name: ipausers
  Description: Default group for all users
  Member users: jsmith
----------------------------
Number of entries returned 1
----------------------------
The other search shows all the groups that
jsmith does not belong to:
[root@server ~]# ipa group-find --no-user=jsmith
----------------
3 groups matched
----------------
  Group name: admins
  Description: Account administrators group
  GID: 1084600000
  Member users: admin

  Group name: editors
  Description: Limited admins who can edit other users
  GID: 1084600002

  Group name: trust admins
  Description: Trusts administrators group
  Member users: admin
----------------------------
Number of entries returned 3
----------------------------
Some useful group search options are listed in Table 9.6, “Common Group Search Options”.
Table 9.6. Common Group Search Options
| Option | Criteria Description |
|---|---|
| --private | Displays only private groups. |
| --gid | Displays only the group which matches the complete, specified GID. |
| --group-name | Displays only groups with that name or part of their name. |
| --users, --no-users | Displays only groups which have the given users as members (or which do not include the given user). |
| --in-hbacrules, --not-inhbac-rules | Displays only groups which belong to a given host-based access control rule (or which do not belong to the rule, for the --not-in option). There are similar options to display (or not) groups which belong to a specified sudo rule and role. |
| --in-groups, --not-in-groups | Displays only groups which belong to another, specified group (or which do not belong to the group, for the --not-in option). There are similar options to display (or not) groups which belong to a specified netgroup. |