
Red Hat Training
A Red Hat training course is available for Red Hat Enterprise Linux
V2V Guide
Importing Virtual Machines with virt-v2v
Abstract
Warning
Chapter 1. Introducing V2V
Warning
virt-v2v command.
1.1. What is virt-v2v?
virt-v2v command converts virtual machines from a foreign hypervisor to run on KVM, managed by Red Hat Enterprise Virtualization or libvirt. virt-v2v can currently convert virtual machines running Red Hat Enterprise Linux and Windows on Xen, KVM and VMware ESX / ESX(i) hypervisors. virt-v2v enables paravirtualized (virtio) drivers in the converted virtual machine if possible.
virt-v2v:
Supported guest operating systems:
- Red Hat Enterprise Linux 3.9
- Red Hat Enterprise Linux 4
- Red Hat Enterprise Linux 5
- Red Hat Enterprise Linux 6
- Windows XP
- Windows Vista
- Windows 7
- Windows Server 2003
- Windows Server 2008
virt-v2v.
virt-v2v:
Supported source hypervisors:
virt-v2v:
- Xen — all versions released by Red Hat
- KVM — all versions released by Red Hat
- VMware ESX / ESX(i) — versions 3.5, 4.0, 4.1, 5.0, 5.1
1.2. About this guide
1.2.1. Audience
1.2.2. Red Hat Enterprise Virtualization
1.3. Further reading
- Red Hat Enterprise Linux — Virtualization Getting Started Guide: This guide provides an introduction to virtualization concepts, advantages, and tools, and an overview of Red Hat virtualization documentation and products.
- Red Hat Enterprise Linux — Virtualization Host Configuration and Guest Installation Guide: This guide covers the installation of virtualization software and configuration of guest machines on a virtualization host.
- Red Hat Enterprise Linux — Virtualization Administration Guide: This guide covers administration of hosts, networking, storage, and device and guest management using either virt-manager or virsh as primary configuration tools. This guide also includes a libvirt and QEMU reference, as well as troubleshooting information.
- Red Hat Enterprise Linux — Virtualization Security Guide: This guide provides an overview of virtualization security technologies provided by Red Hat. Also included are recommendations for securing hosts, guests, and shared infrastructure and resources in virtualized environments.
- Red Hat Enterprise Linux — Virtualization Tuning and Optimization Guide: This guide provides tips, tricks and suggestions for making full use of virtualization performance features and options for your systems and guest virtual machines.
- Red Hat Enterprise Linux — V2V Guide: This guide describes importing virtual machines from KVM, Xen and VMware ESX/ESX(i) hypervisors to Red Hat Enterprise Virtualization and KVM managed by libvirt.
- Red Hat Enterprise Virtualization — Installation Guide: This guide describes how to prepare for and set up a Red Hat Enterprise Virtualization environment, and how to upgrade a Red Hat Enterprise Virtualization environment to the latest release. It also outlines how to set up hypervisors and perform initial configuration of a Red Hat Enterprise Virtualization environment.
- Red Hat Enterprise Virtualization — Administration Guide: This guide describes how to configure and administer a Red Hat Enterprise Virtualization environment after that environment has been set up for the first time, including how to add hypervisors, storage domains, and external providers to the environment, how to manage resources such as virtual machines, virtual disks, and templates, and how to take and restore backups.
- Red Hat Enterprise Virtualization — User Guide: This guide describes how to use the User Portal of a Red Hat Enterprise Virtualization environment, including the functionality provided by the Basic and Extended tabs, how to create and work with virtual machines and templates, and how to monitor resource usage.
- Red Hat Enterprise Virtualization — Technical Guide: This guide describes how to use the REST API, the Python and Java software development kits, and command-line tools specific to Red Hat Enterprise Virtualization. It also outlines the underlying technical concepts behind Red Hat Enterprise Virtualization.
- Red Hat Enterprise Virtualization — Manager Release Notes: This guide contains information on the Red Hat Enterprise Virtualization Manager specific to the current release.
- Red Hat Enterprise Virtualization — Technical Notes: This guide describes the changes that have been made between the current release and the previous release.
Note
Chapter 2. Installing virt-v2v
virt-v2v is run from a Red Hat Enterprise Linux 64-bit host system. virt-v2v must be installed on the host.
Procedure 2.1. Installing virt-v2v
Subscribe to the virt-v2v channel on the Red Hat Customer Portal
virt-v2vis available on the Red Hat Customer Portal in the Red Hat Enterprise Linux Server (v.6 for 64-bit x86_64) or Red Hat Enterprise Linux Workstation (v.6 for x86_64) channel. Ensure the system is subscribed to the appropriate channel before installingvirt-v2v.Note
Red Hat Network Classic (RHN) has now been deprecated. Red Hat Subscription Manager should now be used for registration tasks. For more information, see https://access.redhat.com/rhn-to-rhsm.Install the prerequisites
- If you are converting Windows virtual machines, you must install the libguestfs-winsupport and virtio-win packages. These packages provide support for NTFS and Windows paravirtualized block and network drivers.
- If you attempt to convert a virtual machine using NTFS without the libguestfs-winsupport package installed, the conversion will fail.
- If you attempt to convert a virtual machine running Windows without the virtio-win package installed, the conversion will fail giving an error message concerning missing files.
The libguestfs-winsupport is available for Red Hat Enterprise Linux Server 6 in the Red Hat Enterprise Linux Server V2V Tools for Windows (v. 6) channel, while the virtio-win package is available in the Red Hat Enterprise Linux Server Supplementary (v. 6) channel. To install these packages, ensure that your system has the required permissions to subscribe to both channels and run the following command as root:# subscription-manager repos --enable rhel-6-server-v2vwin-1-rpms --enable rhel-6-server-supplementary-rpmsInstall virt-v2v package
As root, run the command:yum install virt-v2vvirt-v2v is now installed and ready to use on on your system.
Chapter 3. Converting virtual machines to run on KVM managed by libvirt
Warning
virt-v2v can convert virtual machines to run on Red Hat Enterprise Linux, using KVM managed by libvirt. Virtual machines can be converted from Xen, KVM, VMware ESX / ESX(i), and Hyper-V environments. The libvirt and virsh commands are documented in the Red Hat Enterprise Linux Virtualization Administration Guide. You may also use the command man virsh for more information.
3.1. Introduction
virt-v2v command converts virtual machines from a foreign hypervisor to run on KVM, managed by libvirt. The following guest operating systems are supported by virt-v2v:
- Red Hat Enterprise Linux 3.9
- Red Hat Enterprise Linux 4
- Red Hat Enterprise Linux 5
- Red Hat Enterprise Linux 6
- Windows XP
- Windows Vista
- Windows 7
- Windows Server 2003
- Windows Server 2008
- KVM
- libvirt-managed Xen
- VMware ESX / ESX(i) - versions 3.5, 4.0, 4.1, 5.0, 5.1
virt-v2v command enables paravirtualized (virtio) drivers in the converted guest, if possible.
virt-v2v is available on Red Hat Customer Portal in the Red Hat Enterprise Linux Server (v.6 for 64-bit x86_64) or Red Hat Enterprise Linux Workstation (v.6 for x86_64) channel.
virt-v2v tool requires root access to the host system.
virt-v2v starting with Red Hat Enterprise Linux 6 are:
- The
-opand-osdcommand line options continue to be supported, but are deprecated in favor of-os. There is no deprecation warning when they are used. - The
-ofcommand line option allows specification of the file format to be used for target storage: raw or qcow2. This feature allows for the conversion of a virtual machine with raw storage to qcow2 and vice versa. - The
-oacommand line option allows the allocation policy of the target storage to be specified: sparse or preallocated. This can be used to convert between sparse and preallocated. Underlying this change, sparse volumes are now supported. - The configuration file can now contain target profiles, which specify the storage location, output format and allocation policy for a target. This allows the user to specify
--profile<foo>rather than-os<a> -op<b> -oa<oc>. - The conversion of Windows virtual machines to libvirt targets is supported.
virt-v2v man page for further details on these and other features.
virt-v2v from the Red Hat Customer Portal, ensure the system is subscribed to the appropriate channel, then run:
# yum install virt-v2v3.2. Preparing to convert a virtual machine
virt-v2v converts virtual machines from a foreign hypervisor to run on Red Hat Enterprise Linux, using KVM managed by libvirt. It automatically creates a libvirt domain for the converted virtual machines.
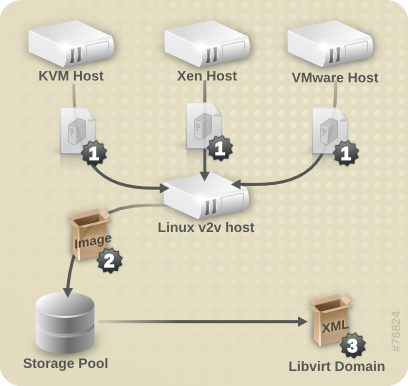
Figure 3.1. Converting a virtual machine
Procedure 3.1. Preparing a virtual machine for conversion
- Create a local storage domain for transferred storage.
virt-v2vcopies the guest virtual machine storage to a locally defined libvirt storage pool during import. This pool can be defined using any libvirt tool, and can be of any type. The simplest way to create a new pool is withvirt-manager. Refer to the Red Hat Enterprise Linux Virtualization Administration Guide for complete instructions on creating storage pools with eithervirt-managerorvirsh. - Create local network interfaces.The local machine must have an appropriate network to which the converted virtual machine can connect. This is likely to be a bridge interface. A bridge interface can be created using standard tools on the host. From libvirt version 0.8.3 and onward,
virt-managercan also create and manage bridges. For more information on bridged networking with libvirt, see the Red Hat Enterprise Linux Virtualization Host Configuration and Guest Installation Guide or the Red Hat Enterprise Linux Virtualization Administration Guide. - Specify network mappings in
virt-v2v.conf. This step is optional, and is not required for most use cases.If your virtual machine has multiple network interfaces,/etc/virt-v2v.confmust be edited to specify the network mapping for all interfaces. You can specify an alternativevirt-v2v.conffile with the-fparameter.If your virtual machine only has a single network interface, it is simpler to use the--networkor--bridgeparameters, rather than modifyingvirt-v2v.conf. - Create a profile for the conversion in
virt-v2v.conf.This step is optional. Profiles specify a conversion method, storage location, output format and allocation policy. When a profile is defined, it can be called using--profilerather than individually providing the-o,-os,-ofand-oaparameters. See virt-v2v.conf(5) for details.
3.2.1. Preparing to convert a virtual machine running Linux
Procedure 3.2. Preparing to convert a virtual machine running Linux
- Obtain the software.As part of the conversion process,
virt-v2vmay install a new kernel and drivers on the virtual machine. If the virtual machine being converted is registered to Red Hat Subscription Management (RHSM), the required packages will be automatically downloaded. For environments where Red Hat Subscription Management (RHSM) is not available, thevirt-v2v.conffile references a list of RPMs used for this purpose. The RPMs relevant to your virtual machine must be downloaded manually from the Red Hat Customer Portal and made available in the directory specified by thepath-rootconfiguration element, which by default is/var/lib/virt-v2v/software/.virt-v2vwill display an error similar to Example 3.1, “Missing Package error” if the software it depends upon for a particular conversion is not available.Example 3.1. Missing Package error
virt-v2v: Installation failed because the following files referenced in the configuration file are required, but missing:
rhel/6/kernel-2.6.32-128.el6.x86_64.rpm
rhel/6/ecryptfs-utils-82-6.el6.x86_64.rpm
rhel/6/ecryptfs-utils-82-6.el6.i686.rpm
- To obtain the relevant RPMs for your environment, repeat these steps for each missing package:
- Log in to the Red Hat Customer Portal: https://access.redhat.com/.
- In the Red Hat Customer Portal, select Downloads > Product Downloads > Red Hat Enterprise Linux.
- Select the desired Product Variant, Version, and select the Packages tab. In the Filter field, type the package name exactly matching the one shown in the error message. For the example shown in Example 3.1, “Missing Package error”, the first package is kernel-2.6.32-128.el6.x86_64
- A list of packages displays. Select the package name identical to the one in the error message. This opens the details page, which contains a detailed description of the package. Alternatively, to download the most recent version of a package, select Download Latest next to the desired package.
- Save the downloaded package to the appropriate directory in
/var/lib/virt-v2v/software. For Red Hat Enterprise Linux 6, the directory is/var/lib/virt-v2v/software/rhel/6.
3.2.2. Preparing to convert a local Xen virtual machine
Procedure 3.3. Preparing to convert a local Xen virtual machine
- Obtain the XML for the virtual machine.
virt-v2vuses a libvirt domain description to determine the current configuration of the virtual machine, including the location of its storage. Before starting the conversion, obtain the XML from the host running the virtual machine with the following command:virsh dumpxml guest_name > guest_name.xml
This will require booting into a Xen kernel to obtain the XML, as libvirt needs to connect to a running Xen hypervisor to obtain its metadata. The conversion process is optimized for KVM, so obtaining domain data while running a Xen kernel, then performing the conversion using a KVM kernel will be more efficient than running the conversion on a Xen kernel.
3.2.3. Preparing to convert a virtual machine running Windows
Important
virt-v2v does not support conversion of the Windows Recovery Console. If a virtual machine has a recovery console installed and VirtIO was enabled during conversion, attempting to boot the recovery console will result in a stop error.
- Install the libguestfs-winsupport package on the host running
virt-v2v. This package provides support for NTFS, which is used by many Windows systems. The libguestfs-winsupport package is provided by the RHEL V2VWIN (v. 6 for 64-bit x86_64) channel. Ensure your system is subscribed to this channel, then run the following command as root:yum install libguestfs-winsupportIf you attempt to convert a virtual machine using NTFS without the libguestfs-winsupport package installed, the conversion will fail. An error message similar to Example 3.2, “Error message when converting a Windows virtual machine without libguestfs-winsupport installed” will be shown.Example 3.2. Error message when converting a Windows virtual machine without libguestfs-winsupport installed
No operating system could be detected inside this disk image.

This may be because the file is not a disk image, or is not a virtual machine
image, or because the OS type is not understood by virt-inspector.

If you feel this is an error, please file a bug report including as much
information about the disk image as possible.
- Install the virtio-win package on the host running
virt-v2v. This package provides paravirtualized block and network drivers for Windows guests. The virtio-win package is provided by the RHEL Server Supplementary (v. 6 64-bit x86_64) channel. Ensure your system is subscribed to this channel, then run the following command as root:yum install virtio-winIf you attempt to convert a virtual machine running Windows without the virtio-win package installed, the conversion will fail. An error message similar to Example 3.3, “Error message when converting a Windows virtual machine without virtio-win installed” will be shown.Example 3.3. Error message when converting a Windows virtual machine without virtio-win installed
virt-v2v: Installation failed because the following files referenced in the configuration file are required, but missing: /usr/share/virtio-win/drivers/i386/Win2008
Note
3.3. Converting a virtual machine
virt-v2v to perform the actual conversions. This section provides the steps to convert the virtual machines, and the command syntax for virt-v2v.
Example 3.4. Typical virt-v2v conversion time
win2k3r2-pv-32.img: 100% [===========================================]D
0h02m57s
virt-v2v: win2k3r2-pv-32 configured with virtio drivers.
3.3.1. Converting a local virtual machine using virt-v2v
virt-v2v converts virtual machines from a foreign hypervisor to run on KVM, managed by libvirt. The general command syntax for converting machines to run on KVM, managed by libvirt is:
virt-v2v -i libvirtxml -op pool --bridge bridge_name guest_name.xml
virt-v2v -op pool --network netname guest_name
virt-v2v -ic esx://esx.example.com/?no_verify=1 -op pool --bridge bridge_name guest_name
virt-v2v parameters, refer to Chapter 7, References.
3.3.2. Converting a remote KVM virtual machine
virt-v2v -ic qemu+ssh://root@vmhost.example.com/system -op pool --bridge bridge_name guest_name
vmhost.example.com is the host running the virtual machine, pool is the local storage pool to hold the image, bridge_name is the name of a local network bridge to connect the converted virtual machine's network to, and guest_name is the name of the Xen virtual machine.
--network parameter to connect to a locally managed network if your virtual machine only has a single network interface. If your virtual machine has multiple network interfaces, edit /etc/virt-v2v.conf to specify the network mapping for all interfaces.
Note
virt-v2v requires that the image of the source virtual machine exists within a storage pool. If the image is not currently in a storage pool, you must create one.
3.3.3. Converting a local Xen virtual machine
virt-v2v -i libvirtxml -op pool --bridge bridge_name guest_name.xml
pool is the local storage pool to hold the image, bridge_name is the name of a local network bridge to connect the converted virtual machine's network to, and guest_name.xml is the path to the virtual machine's exported XML.
--network parameter to connect to a locally managed network if your virtual machine only has a single network interface. If your virtual machine has multiple network interfaces, edit /etc/virt-v2v.conf to specify the network mapping for all interfaces.
kernel-xen or kernel-xenU), virt-v2v will attempt to install a new kernel during the conversion process. You can avoid this requirement by installing a regular kernel, which will not reference a hypervisor in its name, alongside the Xen kernel prior to conversion. You should not make this newly installed kernel your default kernel, because Xen will not boot it. virt-v2v will make it the default during conversion.
Note
virt-v2v requires that the image of the source virtual machine exists in a storage pool. If the image is not currently in a storage pool, you must create one. Contact Red Hat Support for assistance creating an appropriate storage pool.
Note
3.3.4. Converting a remote Xen virtual machine
virt-v2v -ic qemu+ssh://root@vmhost.example.com/system -op pool --bridge bridge_name guest_name
vmhost.example.com is the host running the virtual machine, pool is the local storage pool to hold the image, bridge_name is the name of a local network bridge to connect the converted virtual machine's network to, and guest_name is the name of the Xen virtual machine.
--network parameter to connect to a locally managed network if your virtual machine only has a single network interface. If your virtual machine has multiple network interfaces, edit /etc/virt-v2v.conf to specify the network mapping for all interfaces.
kernel-xen or kernel-xenU) virt-v2v will attempt to install a new kernel during the conversion process. You can avoid this requirement by installing a regular kernel, which will not reference a hypervisor in its name, alongside the Xen kernel prior to conversion. You should not make this newly installed kernel your default kernel, because Xen will not boot it. virt-v2v will make it the default during conversion.
Note
virt-v2v requires that the image of the source virtual machine exists in a storage pool. If the image is not currently in a storage pool, you must create one. Contact Red Hat Support for assistance creating an appropriate storage pool.
3.3.5. Converting a VMware ESX / ESX(i) virtual machine
Important
virt-v2v -ic esx://esx.example.com/ -op pool --bridge bridge_name guest_name
esx.example.com is the VMware ESX / ESX(i) server, pool is the local storage pool to hold the image, bridge_name is the name of a local network bridge to connect the converted virtual machine's network to, and guest_name is the name of the virtual machine.
--network parameter to connect to a locally managed network if your virtual machine only has a single network interface. If your virtual machine has multiple network interfaces, edit /etc/virt-v2v.conf to specify the network mapping for all interfaces.
3.3.5.1. Authenticating to the ESX / ESX(i) server
virt-v2v supports password authentication when connecting to ESX / ESX(i). It reads passwords from $HOME/.netrc. The format of this file is described in the netrc(5) man page. An example entry is:
machine esx.example.com login root password s3cr3t
Note
.netrc file must have a permission mask of 0600 to be read correctly by virt-v2v.
3.3.5.2. Connecting to an ESX / ESX(i) server with an invalid certificate
'?no_verify=1' to the connection URI as shown below:
... -ic esx://esx.example.com/?no_verify=1 ...
3.3.6. Converting a virtual machine running Windows
virt-v2v -i libvirtxml -o rhev -osd storage.example.com:/exportdomain --network rhevm guest_name.xml
storage.example.com:/exportdomain is the export storage domain.
--network parameter to connect to a locally managed network if your virtual machine only has a single network interface. If your virtual machine has multiple network interfaces, edit /etc/virt-v2v.conf to specify the network mapping for all interfaces.
kernel-xen or kernel-xenU), virt-v2v will attempt to install a new kernel during the conversion process. You can avoid this requirement by installing a regular kernel, which will not reference a hypervisor in its name, alongside the Xen kernel prior to conversion. You should not make this newly installed kernel your default kernel, because Xen will not boot it. virt-v2v will make it the default during conversion.
3.4. Running converted virtual machines
virt-v2v will create a new libvirt domain for the converted virtual machine with the same name as the original virtual machine. It can be started as usual using libvirt tools, for example virt-manager.
Note
virt-v2v cannot currently reconfigure a virtual machine's network configuration. If the converted virtual machine is not connected to the same subnet as the source, the virtual machine's network configuration may have to be updated manually.
Chapter 4. Converting virtual machines to run on Red Hat Enterprise Virtualization
Warning
virt-v2v can convert virtual machines to run on Red Hat Enterprise Virtualization. Virtual machines can be converted from Xen, KVM and VMware ESX / ESX(i) environments. Before converting virtual machines to run on Red Hat Enterprise Virtualization, you must attach an export storage domain to the Red Hat Enterprise Virtualization data center being used. Section 4.2, “Attaching an export storage domain” explains the process of attaching an export storage domain. For more information on export storage domains, see the Red Hat Enterprise Virtualization Administration Guide.
4.1. Acceptable converted storage output formats
virt-v2v writes to an export storage domain, and this is always required to be NFS.
Note
virt-v2v is unable to detect the data center type, so this check must be applied manually by the user.
Table 4.1. Allocation Policy: Preallocated
| Data Domain Type | Storage Format | Supported |
|---|---|---|
| NFS | raw | Yes |
| qcow2 | No | |
| FC/iSCSI | raw | Yes |
| qcow2 | No |
Table 4.2. Allocation Policy: Sparse
| Data Domain Type | Storage Format | Supported |
|---|---|---|
| NFS | raw | Yes |
| qcow2 | Yes | |
| FC/iSCSI | raw | No |
| qcow2 | Yes |
virt-v2v will be preserved unless the output data format and allocation policy are specified using the -of and -oa parameters respectively. To import virtual machines using sparse allocation into an FC or iSCSI data center, the storage format must be converted to qcow2. This is achieved by passing the parameters -of qcow2 -oa sparse to virt-v2v. Note that converting between raw and qcow2 formats is a resource intensive operation, and roughly doubles the length of time taken for the conversion process.
Important
virt-v2v is able to write it. Import to Red Hat Enterprise Virtualization will fail.
4.2. Attaching an export storage domain
Note
Procedure 4.1. Attaching an export storage domain
- Log in to the Red Hat Enterprise Virtualization Administration Portal. Click the Data Centers tab.Select the data center to which the export storage domain is to be attached.
- The details pane displays. Select the Storage tab.
- Click to add the storage location where the images are stored.
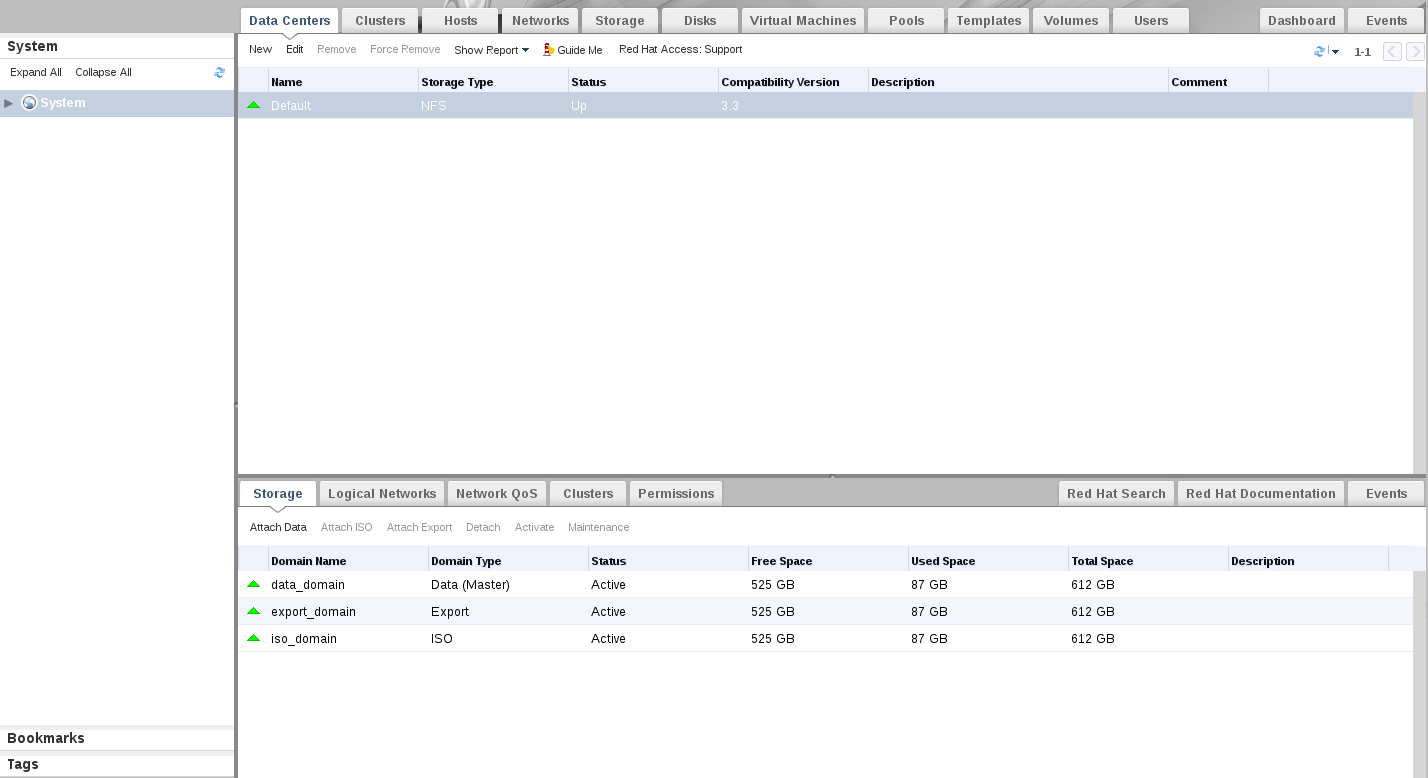
Figure 4.1. Attaching an Export Domain
- The Attach Export Domain dialog box displays if there are export domains available. Select the export domain from the list.
- Click the button. The new export storage domain displays on the Storage tab of the details pane with a status of Locked, followed by Inactive.
- Select the new export storage domain on the Storage tab of the details pane, and click the Activate button.
- The export domain will be activated in a few moments and display an Active status.
4.3. Converting a virtual machine
virt-v2v converts virtual machines from a foreign hypervisor to run on Red Hat Enterprise Virtualization. It automatically packages the virtual machine images and metadata, then uploads them to a Red Hat Enterprise Virtualization export storage domain. For more information on export storage domains, see Section 4.2, “Attaching an export storage domain”. virt-v2v always makes a copy of storage before conversion.
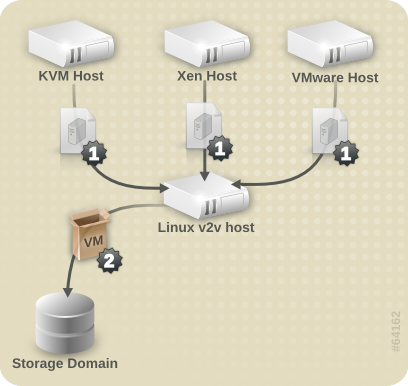
Figure 4.2. Converting a virtual machine

Figure 4.3. Importing a virtual machine
4.3.1. Preparing to convert a virtual machine
Procedure 4.2. Preparing to convert a virtual machine
- Create an NFS export domain.
virt-v2vcan transfer the converted virtual machine directly to an NFS export storage domain. From the export storage domain, the virtual machine can be imported into a Red Hat Enterprise Virtualization data center. The storage domain must be mountable by the machine runningvirt-v2v. When exporting to a Red Hat Enterprise Virtualization export domain,virt-v2vmust run as root.Note
The export storage domain is accessed as an NFS share. By default, Red Hat Enterprise Linux 6 uses NFSv4, which does not require further configuration. However, for NFSv2 and NFSv3 clients, therpcbindandnfslockservices must be running on the host used to runvirt-v2v. The network must also be configured to allow NFS access to the storage server. For more details refer to the Red Hat Enterprise Linux Storage Administration Guide. - Specify network mappings in
virt-v2v.conf. This step is optional, and is not required for most use cases.If your virtual machine has multiple network interfaces,/etc/virt-v2v.confmust be edited to specify the network mapping for all interfaces. You can specify an alternativevirt-v2v.conffile with the-fparameter. If you are converting to a virtual machine for output to both libvirt and Red Hat Enterprise Virtualization, separatevirt-v2v.conffiles should be used for each conversion. This is because a converted bridge will require different configuration depending on the output type (libvirt or Red Hat Enterprise Virtualization).If your virtual machine only has a single network interface, it is simpler to use the--networkor--bridgeparameters, rather than modifyingvirt-v2v.conf. - Create a profile for the conversion in
virt-v2v.conf. This step is optional. Profiles specify a conversion method, storage location, output format and allocation policy. When a profile is defined, it can be called using--profilerather than individually providing the-o,-os,-ofand-oaparameters. See virt-v2v.conf(5) for details.
4.3.1.1. Preparing to convert a virtual machine running Linux
Procedure 4.3. Preparing to convert a virtual machine running Linux
- Obtain the software.As part of the conversion process,
virt-v2vmay install a new kernel and drivers on the virtual machine. If the virtual machine being converted is registered to Red Hat Subscription Management (RHSM), the required packages will be automatically downloaded. For environments where Red Hat Subscription Management (RHSM) is not available, thevirt-v2v.conffile references a list of RPMs used for this purpose. The RPMs relevant to your virtual machine must be downloaded manually from the Red Hat Customer Portal and made available in the directory specified by thepath-rootconfiguration element, which by default is/var/lib/virt-v2v/software/.virt-v2vwill display an error similar to Example 3.1, “Missing Package error” if the software it depends upon for a particular conversion is not available. - To obtain the relevant RPMs for your environment, repeat these steps for each missing package:
- Log in to the Red Hat Customer Portal: https://access.redhat.com/.
- In the Red Hat Customer Portal, select Downloads > Product Downloads > Red Hat Enterprise Linux.
- Select the desired Product Variant, Version, and select the Packages tab. In the Filter field, type the package name exactly matching the one shown in the error message. For the example shown in Example 3.1, “Missing Package error”, the first package is kernel-2.6.32-128.el6.x86_64
- A list of packages displays. Select the package name identical to the one in the error message. This opens the details page, which contains a detailed description of the package. Alternatively, to download the most recent version of a package, select Download Latest next to the desired package.
- Save the downloaded package to the appropriate directory in
/var/lib/virt-v2v/software. For Red Hat Enterprise Linux 6, the directory is/var/lib/virt-v2v/software/rhel/6.
4.3.1.2. Preparing to convert a virtual machine running Windows
Important
virt-v2v does not support conversion of the Windows Recovery Console. If a virtual machine has a recovery console installed and VirtIO was enabled during conversion, attempting to boot the recovery console will result in a stop error.
Important
Procedure 4.4. Preparing to convert a virtual machine running Windows
- Install the libguestfs-winsupport package on the host running
virt-v2v.This package provides support for NTFS, which is used by many Windows systems. The libguestfs-winsupport package is provided by the RHEL V2VWIN (v. 6 for 64-bit x86_64) channel. Ensure your system is subscribed to this channel, then run the following command as root:yum install libguestfs-winsupportIf you attempt to convert a virtual machine using NTFS without the libguestfs-winsupport package installed, the conversion will fail. An error message similar to Example 4.1, “Error message when converting a Windows virtual machine without libguestfs-winsupport installed” will be shown:Example 4.1. Error message when converting a Windows virtual machine without libguestfs-winsupport installed
No operating system could be detected inside this disk image.

This may be because the file is not a disk image, or is not a virtual machine image, or because the OS type is not understood by virt-inspector.

If you feel this is an error, please file a bug report including as much
information about the disk image as possible.
- Install the virtio-win package on the host running
virt-v2v.This package provides paravirtualized block and network drivers for Windows guests. The virtio-win package is provided by the RHEL Server Supplementary (v. 6 64-bit x86_64) channel. Ensure your system is subscribed to this channel, then run the following command as root:yum install virtio-winIf you attempt to convert a virtual machine running Windows without the virtio-win package installed, the conversion will fail. An error message similar to Example 3.3, “Error message when converting a Windows virtual machine without virtio-win installed” will be shown. - Upload the guest tools ISO to the ISO Storage Domain.Note that the guest tools ISO is not required for the conversion process to succeed. However, it is recommended for all Windows virtual machines running on Red Hat Enterprise Virtualization. The Red Hat Enterprise Virtualization Manager installs Red Hat's Windows drivers on the guest virtual machine using the guest tools ISO after the virtual machines have been converted. See Section 7.2.2, “Configuration changes for Windows virtual machines” for details.Locate and upload the guest tools ISO as follows:
- Locate the guest tools ISO.The guest tools ISO is distributed using the Red Hat Customer Portal as
rhev-guest-tools-iso.rpm, an RPM file installed on the Red Hat Enterprise Virtualization Manager. After installing the Red Hat Enterprise Virtualization Manager, the guest tools ISO can be found at/usr/share/rhev-guest-tools-iso/rhev-tools-setup.iso. - Upload the guest tools ISO.Upload the guest tools ISO to the ISO Storage Domain using the ISO uploader.Refer to the Red Hat Enterprise Virtualization Administration Guide for more information on uploading ISO files, and installing guest agents and drivers.
4.3.1.3. Preparing to convert a local Xen virtual machine
Procedure 4.5. Preparing to convert a local Xen virtual machine
- Obtain the XML for the virtual machine.
virt-v2vuses a libvirt domain description to determine the current configuration of the virtual machine, including the location of its storage. Before starting the conversion, obtain this from the host running the virtual machine with the following command:virsh dumpxml guest_name > guest_name.xml
This will require booting into a Xen kernel to obtain the XML, as libvirt needs to connect to a running Xen hypervisor to obtain its metadata. The conversion process is optimized for KVM, so obtaining domain data while running a Xen kernel, then performing the conversion using a KVM kernel will be more efficient than running the conversion on a Xen kernel.
4.3.2. Converting a virtual machine
virt-v2v to perform the actual conversions. This section provides the steps to convert the virtual machines, and the command syntax for virt-v2v.
Example 4.2. Typical virt-v2v conversion time
win2k3r2-pv-32.img: 100% [===========================================]D
0h02m57s
virt-v2v: win2k3r2-pv-32 configured with virtio drivers.
4.3.2.1. virt-v2v
virt-v2v converts virtual machines from a foreign hypervisor to run on Red Hat Enterprise Virtualization. The general command syntax for converting machines to run on Red Hat Enterprise Virtualization is:
virt-v2v -i libvirtxml -o rhev -os storage.example.com:/exportdomain --network rhevm guest_name.xml
virt-v2v -o rhev -os storage.example.com:/exportdomain --network rhevm guest_name
virt-v2v -ic esx://esx.example.com/?no_verify=1 -o rhev -os storage.example.com:/exportdomain --network rhevm guest_name
virt-v2v is available in Section 7.1, “virt-v2v Parameters”.
Important
virt-v2v does not support converting a virtual machine with more than four IDE disks to Red Hat Enterprise Virtualization. Attempting to convert a virtual machine with five or more disks will fail.
4.3.2.2. Converting a local Xen virtual machine
virt-v2v -i libvirtxml -o rhev -os storage.example.com:/exportdomain --network rhevm guest_name.xml
storage.example.com:/exportdomain is the export storage domain, rhevm is the locally managed network to connect the converted virtual machine's network to, and guest_name.xml is the path to the virtual machine's exported xml.
--bridge parameter to connect to a locally managed network if your virtual machine only has a single network interface. If your virtual machine has multiple network interfaces, edit /etc/virt-v2v.conf to specify the network mapping for all interfaces.
virt-v2v -ic xen:/// -o rhev -os storage.example.com:/exportdomain --network rhevm guest_name
storage.example.com:/exportdomain is the export storage domain, rhevm is the locally managed network to connect the converted virtual machine's network to, and guest_name is the name of the Xen virtual machine.
--bridge parameter to connect to a locally managed network if your virtual machine only has a single network interface. If your virtual machine has multiple network interfaces, edit /etc/virt-v2v.conf to specify the network mapping for all interfaces.
kernel-xen or kernel-xenU), virt-v2v will attempt to install a new kernel during the conversion process. You can avoid this requirement by installing a regular kernel, which will not reference a hypervisor in its name, alongside the Xen kernel prior to conversion. You should not make this newly installed kernel your default kernel, because Xen will not boot it. virt-v2v will make it the default during conversion.
4.3.2.3. Converting a remote Xen virtual machine
Important
virt-v2v to fail. This is especially important for large disks, as the disk transfer can take an unspecified length of time.
virt-v2v -o rhev -ic xen+ssh://root@vmhost.example.com -os storage.example.com:/exportdomain --network rhevm guest_name
vmhost.example.com is the host running the virtual machine, storage.example.com:/exportdomain is the export storage domain, rhevm is the locally managed network to connect the converted virtual machine's network to, and guest_name is the name of the Xen virtual machine.
--bridge parameter to connect to a locally managed network if your virtual machine only has a single network interface. If your virtual machine has multiple network interfaces, edit /etc/virt-v2v.conf to specify the network mapping for all interfaces.
kernel-xen or kernel-xenU), virt-v2v will attempt to install a new kernel during the conversion process. You can avoid this requirement by installing a regular kernel, which will not reference a hypervisor in its name, alongside the Xen kernel prior to conversion. You should not make this newly installed kernel your default kernel, because Xen will not boot it. virt-v2v will make it the default during conversion.
4.3.2.4. Converting a local KVM virtual machine
Procedure 4.6. Converting a local KVM virtual machine
Stop the virtual machine.
- Ensure that the virtual machine is stopped prior to running the v2v process. If the virtual machine is in a clustered Red Hat Enterprise Linux HA virtual machine environment, stop and disable the virtual machine resource in cluster node using the command:
clusvcadm -d vm:<guest> - After stopping the virtual machine, run
virsh define <path-to-guest.xml>to place the stopped virtual machine under the control of libvirt. This command allowsvirt-v2vto recognize the virtual machine and enable it to be converted.
Convert the virtual machine.
To convert the virtual machine, run:virt-v2v -o rhev -os storage.example.com:/exportdomain --network rhevm guest_name
Wherestorage.example.com:/exportdomainis the export storage domain,rhevmis the locally managed network to connect the converted virtual machine's network to, and guest_name is the name of the KVM virtual machine.You may also use the--bridgeparameter to connect to a locally managed network if your virtual machine only has a single network interface. If your virtual machine has multiple network interfaces, edit/etc/virt-v2v.confto specify the network mapping for all interfaces.
4.3.2.5. Converting a remote KVM virtual machine
Important
virt-v2v to fail. This is especially important for large disks, as the disk transfer can take an unspecified length of time.
virt-v2v -ic qemu+ssh://root@kvmhost.example.com/system -o rhev -os storage.example.com:/exportdomain --network rhevm guest_name
kvmhost.example.com is the host running the virtual machine, storage.example.com:/exportdomain is the export storage domain, rhevm is the locally managed network to connect the converted virtual machine's network to, and guest_name is the name of the KVM virtual machine.
--bridge parameter to connect to a locally managed network if your virtual machine only has a single network interface. If your virtual machine has multiple network interfaces, edit /etc/virt-v2v.conf to specify the network mapping for all interfaces.
4.3.2.6. Converting a VMware ESX / ESX(i) virtual machine
Important
virt-v2v -ic esx://esx.example.com/ -o rhev -os storage.example.com:/exportdomain --network rhevm guest_name
storage.example.com:/exportdomain is the export storage domain, rhevm is the locally managed network to connect the converted virtual machine's network to, and guest_name is the name of the virtual machine.
--bridge parameter to connect to a locally managed network if your virtual machine only has a single network interface. If your virtual machine has multiple network interfaces, edit /etc/virt-v2v.conf to specify the network mapping for all interfaces.
Connecting to the ESX / ESX(i) server will require authentication. virt-v2v supports password authentication when connecting to ESX / ESX(i). It reads passwords from $HOME/.netrc. The format of this file is described in netrc(5). An example entry is:
machine esx.example.com login root password s3cr3t
Note
.netrc file must have a permission mask of 0600 to be read correctly by virt-v2v.
In non-production environments, the ESX / ESX(i) server may have a non-valid certificate, for example a self-signed certificate. In this case, certificate checking can be explicitly disabled by adding ?no_verify=1 to the connection URI as shown below:
... -ic esx://esx.example.com/?no_verify=1 ...
4.3.3. Importing and running the converted virtual machine
virt-v2v will upload the exported virtual machine to the specified export domain. To import and run the converted virtual machine:
Procedure 4.7. Importing and running the converted virtual machine
- In the Red Hat Enterprise Virtualization Administration Portal, select the export domain from the Storage tab. The export domain must have a status of Active.
- Select the VM Import tab in the details pane to list the available virtual machines to import.
- Select one or more virtual machines and click . The Import Virtual Machine(s) window will open.
- In the drop-down menus, select the select the Default Storage Domain, Cluster, and Cluster Quota in the data center.
- Select the Collapse Snapshots check box to remove snapshot restore points and include templates in template-based virtual machines. Click to import the virtual machines.
virt-v2v cannot currently reconfigure a guest's network configuration. If the converted guest is not connected to the same subnet as the source, the guest's network configuration may have to be updated manually.
4.3.4. Scripting the v2v process
Procedure 4.8. Scripting the v2v process
- Use
virt-v2vto convert the virtual machines and copy them to the export storage domain. This step must be run on a Linux host. The process is detailed in Section 4.3.2, “Converting a virtual machine”. - Once the conversion is complete, use the Red Hat Enterprise Virtualization Administration Portal to import the virtual machines from the export storage domain. This step must be run on the Red Hat Enterprise Virtualization Manager server.For more information on importing a virtual machine with the Red Hat Enterprise Virtualization Administration Portal, see the Red Hat Enterprise Virtualization Administration Guide.

Figure 4.4. Importing a virtual machine with the Red Hat Enterprise Virtualization Administration Portal
Alternatively, the Python SDK or the command line can also be used to import the virtual machines from the export storage domain:To import the virtual machines using the SDK, use the following:Example 4.3. Importing virtual machines from the export storage domain using the SDK
api = API(url="http(s)://...:.../api",
          username="...",
          password="...",
          filter=False,
          debug=True)


sd = api.storagedomains.get(id="from-sd-id")
import_candidate = sd.vms.get(id="vm-to-import")
import_candidate.import_vm(action=params.Action(
cluster=api.clusters.get(id="to-cluster-id"),
storage_domain=api.storagedomains.get(id="to-sd-id")))
Note
When using the SDK method, entities can also be fetched and passed usingname=.To import the virtual machines using the command line, connect to the Red Hat Enterprise Virtualization Manager shell and use the following command:Example 4.4. Importing virtual machines from the export storage domain using the command line
action vm "vm-to-import" import_vm --storagedomain-identifier "from-sd-id" --cluster-id "to-cluster-id" --storage_domain-id "to-sd-id"
Note
When using the command line method, entities can also be fetched and passed using-name.
4.3.5. Scripted bulk v2v process

Figure 4.5. Scripted bulk v2v process
- The virtual machine image is retrieved from the source hypervisor.
- The virtual machine image is packaged and copied to the export storage domain.
- A remote procedure call is made to the Red Hat Enterprise Virtualization Manager, telling it to import the virtual machine.
- The Manager imports the virtual machine from the export storage domain.
Procedure 4.9. Configuring and running the scripted bulk v2v process
- Ensure the REST API is enabled on the Red Hat Enterprise Virtualization Manager, and it is accessible from the Linux host running the v2v process. For more information about the REST API, see the Red Hat Enterprise Virtualization REST API Guide Guide.
- On the Linux host, create the file
v2v.shwith the following contents. Ensure you edit the script to contain appropriate values for your environment.Example 4.5. Single host v2v script
#!/bin/sh
# Declare all VMs to import
XENDOMAINS=("rhelxen" "rhel5")
KVMDOMAINS=("rhelkvm")
VMWAREVMS=("rhel54vmware")

# Iterate through each Xen domain, performing the conversion
for domain in ${XENDOMAINS[@]}
do
        virt-v2v -ic xen:///localhost -o rhev -os storage.example.com:/exportdomain --network rhevm $domain
done

# Iterate through each KVM domain, performing the conversion
for domain in ${KVMDOMAINS[@]}
do
        virt-v2v -o rhev -os storage.example.com:/exportdomain --network rhevm $domain
done

# Iterate through each VMware VM, performing the conversion
for vm in ${VMWAREVMS[@]}
do
        virt-v2v -ic esx://esx.example.com/?no_verify=1 -o rhev -os storage.example.com:/exportdomain --network rhevm $vm
done


# Call the import VM procedure remotely on the RHEV Manager

export BASE_URL='https://[rhevm-host]'
export HTTP_USER='user@internal'
export HTTP_PASSWORD='password'

curl -o rhevm.cer http://[rhevm-host]/ca.crt

# Get the export storage domains

curl -X GET -H "Accept: application/xml" -u "${HTTP_USER}:${HTTP_PASSWORD}" --cacert rhevm.cer ${BASE_URL}/api/storagedomains?search=nfs_export -o exportdomain
EXPORT_DOMAIN=`xpath exportdomain '/storage_domains/storage_domain/@id' | sed -e 's/ id=//' | sed -e 's/"//g'`

# Get the datacenter

curl -X GET -H "Accept: application/xml" -u "${HTTP_USER}:${HTTP_PASSWORD}" --cacert rhevm.cer ${BASE_URL}/api/datacenters?search=NFS -o dc
DC=`xpath dc '/data_centers/data_center/@id' | sed -e 's/ id=//' | sed -e 's/"//g'`

# Get the cluster

curl -X GET -H "Accept: application/xml" -u "${HTTP_USER}:${HTTP_PASSWORD}" --cacert rhevm.cer ${BASE_URL}/api/clusters?search=NFS -o cluster
CLUSTER_ELEMENT=`xpath cluster '/clusters/cluster/@id' | sed -e 's/ id=//' | sed -e 's/"//g'`

# List contents of export storage domain

curl -X GET -H "Accept: application/xml" -u "${HTTP_USER}:${HTTP_PASSWORD}" --cacert rhevm.cer ${BASE_URL}/api/storagedomains/${EXPORT_DOMAIN}/vms -o vms

# For each vm, export
VMS=`xpath vms '/vms/vm/actions/link[@rel="import"]/@href' | sed -e 's/ href="//g' | sed -e 's/"/ /g'`

for vms in $VMS
do
        curl -v -u "${HTTP_USER}:${HTTP_PASSWORD}" -H "Content-type: application/xml" -d '<action><cluster><name>cluster_name</name></cluster><storage_domain><name>data_domain</name></storage_domain><overwrite>true</overwrite><discard_snapshots>true</discard_snapshots></action>' --cacert rhevm.cer ${BASE_URL}$vms
done
Note
Use thePOSTmethod to export virtual machines with the REST API. For more information about using the REST API, see the Red Hat Enterprise Virtualization REST API Guide. - Run the
v2v.shscript. It can take several hours to convert and import a large number of virtual machines.
Chapter 5. Converting physical machines to virtual machines
Warning
rhel-6.x-p2v.iso. rhel-6.x-p2v.iso is a bootable disk image based on a customized Red Hat Enterprise Linux 6 image. Booting a machine from rhel-6.x-p2v.iso and connecting to a V2V conversion server that has virt-v2v installed allows data from the physical machine to be uploaded to the conversion server and converted for use with either Red Hat Enterprise Virtualization, or KVM managed by libvirt.
Important
- The Physical to Virtual (P2V) feature requires a Red Hat Enterprise Linux 6 virtualization host with virt-v2v version 0.8.7 or later. You can check your version of virt-v2v by running
$ rpm -q virt-v2v. - Note that you cannot convert to a Red Hat Enterprise Linux 5 conversion server, or with a virt-v2v package previous to version 0.8.7-6.el6.
- A number of operating systems can be converted from physical machines to virtual machines, but be aware that there are known issues converting physical machines using software RAID. Red Hat Enterprise Linux 6 machines with a filesystem root on a software RAID md device may be converted to guest virtual machines. Red Hat Enterprise Linux 4 and Red Hat Enterprise Linux 5 physical machines with their filesystem root on a software RAID md device cannot be converted to virtual machines. There is currently no workaround available.
5.1. Prerequisites
- Must be bootable from PXE, Optical Media (CD, DVD), or USB.
- At least 512 MB of RAM.
- An ethernet connection.
- Console access (keyboard, video, mouse).
- An operating system supported by
virt-v2v:- Red Hat Enterprise Linux 3.9
- Red Hat Enterprise Linux 4
- Red Hat Enterprise Linux 5
- Red Hat Enterprise Linux 6
- Windows XP
- Windows Vista
- Windows 7
- Windows Server 2003
- Windows Server 2008
5.2. Preparing to convert a physical machine
5.2.1. Install virt-v2v on a conversion server
5.2.2. Enable root login over SSH
- As root, edit the sshd_config file in
/etc/ssh/sshd_config:nano /etc/ssh/sshd_config
- Add a line in the Authentication section of the file that says
PermitRootLogin yes. This line may already exist and be commented out with a "#". In this case, remove the "#".# Authentication: #LoginGraceTime 2m PermitRootLogin yes #StrictModes yes #MaxAuthTries 6 #MaxSessions 10
- Save the updated
/etc/ssh/sshd_configfile. - Restart the SSH server:
service sshd restart
5.2.3. Define a target profile in virt-v2v.conf
/etc/virt-v2v.conf file on the conversion server.
virt-v2v.conf:
- As root, edit
/etc/virt-v2v.conf:nano /etc/virt-v2v.conf
- Scroll to the end of the file. Before the final
</virt-v2v>, add the following:<profile name="myrhev"> <method>rhev</method> <storage format="raw" allocation="preallocated"> nfs.share.com:/export1 </storage> <network type="default"> <network type="network" name="rhevm"/> </network> </profile>
Where:Profile Nameis an arbitrary, descriptive target profile name.Methodis the destination hypervisor type (rhev or libvirt).Storage Formatis the output storage format, either raw or qcow2.Allocationis the output allocation policy, either preallocated or sparse.Network typespecifies the network to which a network interface should be connected when imported into Red Hat Enterprise Virtualization. The first network type entry contains details about network configuration before conversion, the second network type entry maps to an after conversion configuration. In the given example, any detected network card is to be mapped to the managed network called rhevm.
Important
The value associated with the<storage format>tag (in the above example "nfs.share.com:/export1") must match the value associated with the<method>tag. In this example, since the output method is "rhev", the value associated with storage must be an initialized NFS share. For the libvirt method, the storage format value must be an initialized storage domain that exists locally on the conversion server, for example "default".
5.2.4. Create the bootable media
/usr/share/virt-p2v/.
The rhel-6.x-p2v.iso file can be used three ways: as a bootable disk, a PXE boot image, and as a bootable USB device.
- Burn the ISO to a blank CD-ROM or DVD-ROM, and insert it into the disk drive of the physical machine that is to be converted. To boot properly from this boot media, some changes to BIOS settings may be required to ensure that the optical disk drive is first in the boot order.
- Use the ISO to create a bootable USB media. To boot properly from this boot media, some changes to BIOS settings may be required to ensure that the USB device is first in the boot order. In addition, some BIOSes do not support booting from USB media. The P2V client disk image is approximately 100 MB, so the USB device must be large enough to hold the disk image.
- Prepare a PXE Boot image for your existing PXE server. To boot from PXE, some changes to BIOS settings may be required to ensure that the PXE boot is first in the boot order.
5.3. Converting physical machines to virtual machines
Procedure 5.1. Converting a physical machine to a virtual machine
Boot the P2V client boot media on the conversion server.
Boot the P2V client boot media on the conversion server that you created in preparation for your conversion. Because the P2V client is built on a Red Hat Enterprise Linux 6 live image, the Red Hat Enterprise Linux 6 splash image is displayed while the tool is booting.Configure networking if necessary.
Generally, the P2V client configures networking automatically using DHCP. If it is unable to configure networking automatically, you will need to configure it manually. IP Address, Gateway, and Prefix are required fields. Enter values that are appropriate for your network, and click Use these network settings.Note, the P2V client does not support NIC teaming configurations for converting physical machines to virtual machines.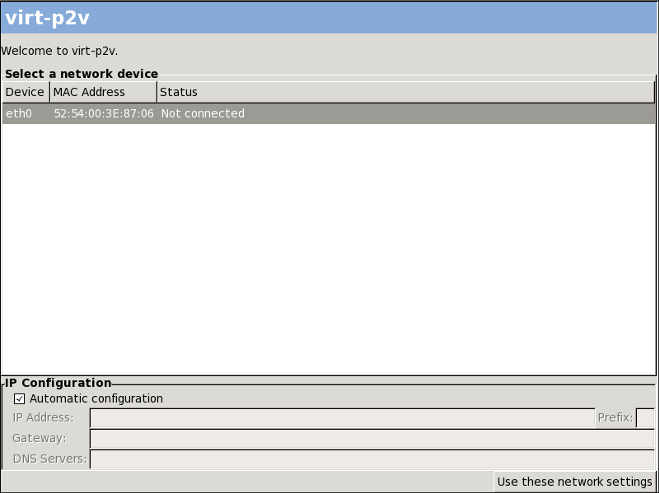
Figure 5.1. Network configuration on the P2V client
Note
To prevent automatic network configuration and configure your network manually, disconnect the physical machine from the network before booting.Connect to the conversion server.
When networking is configured, you are prompted for connection details for the conversion server. These include Hostname (either host name or IP address), Username (this must be root), and Password. Enter these details and click Connect.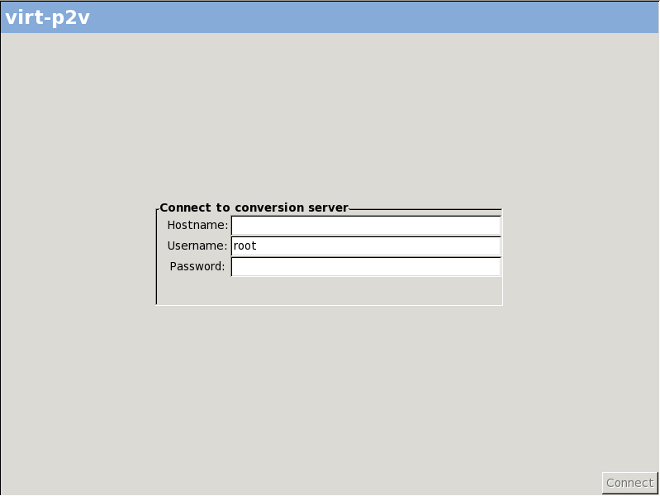
Figure 5.2. Connecting to the conversion server
Configure the target virtual machine and select hardware to convert.
After connecting to your conversion server, configure the virtual hardware that will be attached to the converted physical machine, and select the physical hardware to be converted.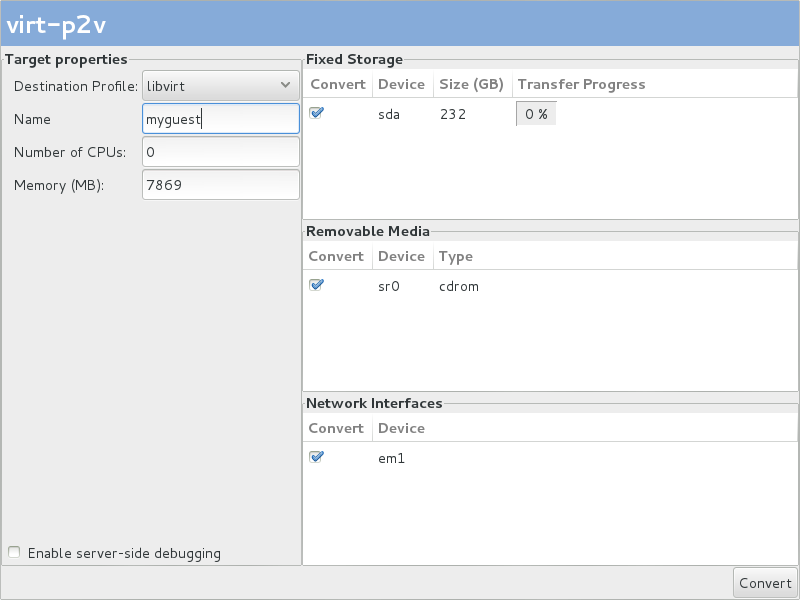
Figure 5.3. Configuring the virtual machine
- Configure the following under Target Properties:
- Select a Destination Profile from the drop down menu. These reflect the target profiles included in the
/etc/virt-v2v.conffile on the conversion server. - Enter a Name in Target Properties for the virtual machine that will result from the conversion.
- The Number of CPUs and Memory(MB) in Target Properties are automatically detected and completed. Change these values if more CPUs or memory, or both, are desired on the outputted virtual machine.
- Under Fixed Storage, select one or more devices to convert. At least one Fixed Storage device must be converted, including the device containing the operating system installation.
- Under Removable Media, select one or more devices to convert.
- Under Network Interfaces, select one or more network interfaces to convert.
- Optional: If you wish to print debugging messages to a file, select the Enable server-side debugging check box. This instructs the server to write
LIBGUESTFS_TRACEandLIBGUESTFS_DEBUGoutput during the conversion process.Note, the Enable server-side debugging check box is available only in Red Hat Enterprise Linux 6.5 and above. See Refer to Section 6.2, “Debugging P2V conversions” for more information on debugging P2V conversions. - Click Convert.
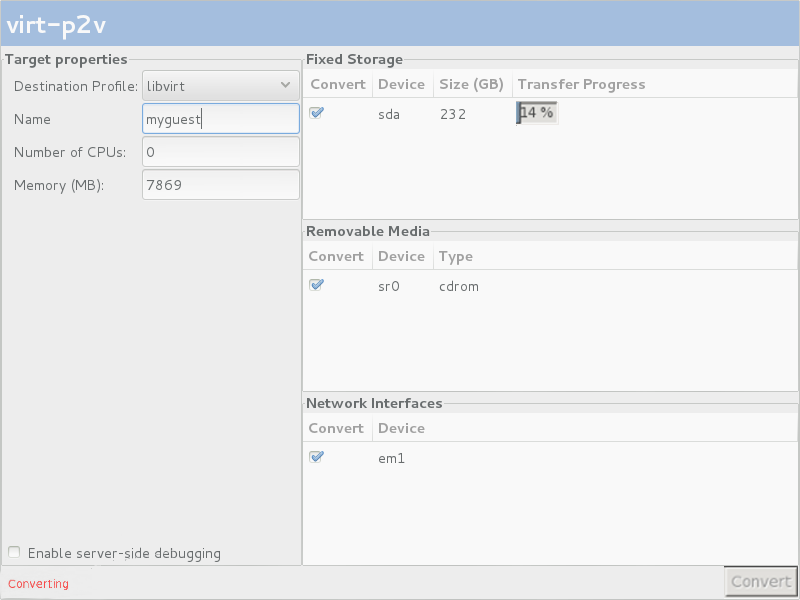
Figure 5.4. Conversion in process
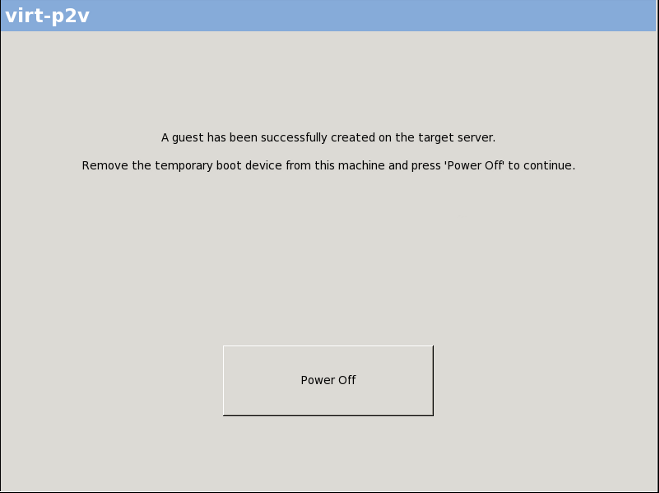
Figure 5.5. Conversion successfully completed
5.4. Importing and running converted virtual machines on target hypervisors
Chapter 6. Debugging and troubleshooting
6.1. Debugging V2V conversions
virt-v2v to print out messages as it runs. These messages will be displayed in the terminal from which virt-v2v is run.
virt-v2v debug messages to a file. The conversion runs normally like this:
virt-v2v -i libvirtxml -os pool --bridge bridge_name guest_name.xml
virt-v2v.log file. To do this, prefix the above command with the environment variables LIBGUESTFS_TRACE=1 LIBGUESTFS_DEBUG=1, and redirect the output to the virt-v2v.log file by adding ... 2>&1 | tee virt-v2v.log to the end of the command.
LIBGUESTFS_TRACE=1 LIBGUESTFS_DEBUG=1 virt-v2v -i libvirtxml -os pool --bridge bridge_name guest_name.xml ... 2>&1 | tee virt-v2v.log
6.2. Debugging P2V conversions
virt-p2v.
virt-p2v client before clicking the button.
LIBGUESTFS_TRACE and LIBGUESTFS_DEBUG output during the virt-p2v conversion process.
virt-p2v.
6.3. Known issue with iscsi/mpath/scsi storage volumes
virt-v2v to convert a guest with a storage volume in a pool of any of the following types:
- iscsi
- mpath
- scsi
Chapter 7. References
virt-v2v.
7.1. virt-v2v Parameters
virt-v2v:
-i input
|
Specifies the input method to obtain the guest for conversion. The default is libvirt. Supported options are:
|
-ic URI
|
Specifies the connection to use with the libvirt input method. If omitted, this defaults to
qemu:///system. Note, this only works when virt-v2v is run as root.
virt-v2v can currently automatically obtain guest storage from local libvirt connections, ESX / ESX(i) connections, and connections over SSH. Other types of connection are not supported.
|
-o method
|
Specifies the output method. If no output method is specified, the default is libvirt. Supported output methods are:
|
-oc URI
|
Specifies the libvirt connection to use to create the converted guest. If omitted, this defaults to
qemu:///system if virt-v2v is run as root. Note that virt-v2v must be able to write directly to storage described by this libvirt connection. This makes writing to a remote connection impractical at present.
|
-os storage
|
Specifies the location where new storage will be created for the converted guest. This is dependent on the output method, specified by the
-o parameter.
For the
libvirt output method, this must be the name of a storage pool. For the rhev output method, this specifies the NFS path to a Red Hat Enterprise Virtualization export storage domain. Note that the storage domain must have been previously initialized by the Red Hat Enterprise Virtualization Manager. The domain must be in the format <host>:<path>, for example, rhev-storage.example.com:/rhev/export.
The NFS export must be mountable and writable by the host running virt-v2v.
|
-op pool (deprecated)
|
This parameter is still supported, but is deprecated in favor of
-os.
|
-osd domain (deprecated)
|
This parameter is still supported, but is deprecated in favor of
-os.
|
-of format
|
Specifies the on-disk format which will be used for the converted guest. Currently supported options are
raw and qcow2. The output format does not need to be the same as the source format - virt-v2v can convert from raw to qcow2 and vice versa. If not specified, the converted guest will use the same format as the source guest.
|
-oa allocation
|
Specifies whether the converted guest should use
sparse or preallocated storage. The allocation scheme does not need to be the same as the source scheme: virt-v2v can convert from sparse to preallocated and vice versa. If not specified, the converted guest will use the same allocation scheme as the source.
|
-on outputname
|
Renames the guest. If this option is not used, then the output name is the same as the input name.
|
-f file | --config file
|
Load a virt-v2v configuration from file. Multiple configuration files can be specified; these will be searched in the order in which they are specified. If no configuration is specified, the defaults are
/etc/virt-v2v.conf and /var/lib/virt-v2v/virt-v2v.db in that order.
Important
When overriding the default configuration details, we recommend also specifying /var/lib/virt-v2v/virt-v2v.db, as it contains default configuration data required for conversions.
|
-n network | --network network
|
Map all guest bridges or networks which do not have a mapping in the configuration file to the specified network.
This option cannot be used in conjunction with
--bridge.
|
-b bridge | --bridge bridge
|
Map all guest bridges or networks which do not have a mapping in the configuration file to the specified bridge.
This option cannot be used in conjunction with
--network.
|
-p profile | --profile profile
|
Use the default values for output method, output storage and network mappings from profile in the configuration file.
|
--root=filesystem
|
In a multi-boot virtual machine, select the root file system to be converted. The default value for this option is
--root=ask. When this option is selected, virt-v2v lists the possible root file systems and asks the user which file system should be used.
Warning
In versions of Red Hat Enterprise Linux earlier than version 6.3, the default value was --root=single, which could cause virt-v2v to fail when a multi-boot virtual machine was detected.
Other available options include:
|
--list-profiles
|
Display a list of target profile names specified in the configuration file.
|
--help
| Display brief help. |
--version
| Display version number and exit. |
7.2. Configuration changes
virt-v2v will make certain changes to a virtual machine to enable it to run on a KVM hypervisor either with or without virtIO drivers. These changes are specific to the guest operating system. The details specified here apply to supported Red Hat Enterprise Linux versions and Windows.
7.2.1. Configuration changes for Linux virtual machines
Table 7.1. virt-v2v changes to Linux virtual machines
| Change | Description |
|---|---|
| Kernel | Unbootable kernels (such as Xen paravirtualized kernels) will be uninstalled. No new kernel will be installed if there is a remaining kernel which supports VirtIO. If no remaining kernel supports VirtIO and the configuration file specifies a new kernel it will be installed and configured as the default. |
| X reconfiguration | If the guest has X configured, its display driver will be updated. See Table 7.2, “Configured drivers in a Linux guest” for which driver will be used. |
| Rename block devices | If reconfiguration has caused block devices to change name, these changes will be reflected in /etc/fstab. |
| Configure device drivers | Whether VirtIO or non-VirtIO drivers are configured, virt-v2v will ensure that the correct network and block drivers are specified in the modprobe configuration. |
| initrd | virt-v2v will ensure that the initrd for the default kernel supports booting the root device, whether it is using VirtIO or not. |
| SELinux | virt-v2v will initiate a relabel of the guest on the next boot. This ensures that any changes it has made are correctly labeled according to the guest's local policy. |
virt-v2v will configure the following drivers in a Linux guest:
Table 7.2. Configured drivers in a Linux guest
| Paravirtualized driver type | Driver module |
|---|---|
| Display | cirrus |
| Storage | virtio_blk |
| Network | virtio_net |
| In addition, initrd will preload the virtio_pci driver |
| Other drivers | |
|---|---|
| Display | cirrus |
| Block | Virtualized IDE |
| Network | Virtualized e1000 |
7.2.2. Configuration changes for Windows virtual machines
Warning
virt-v2v. These packages provide support for NTFS and Windows paravirtualized block and network drivers. If you attempt to convert a virtual machine using NTFS without the libguestfs-winsupport package installed, the conversion will fail. If you attempt to convert a virtual machine running Windows without the virtio-win package installed, the conversion will fail giving an error message concerning missing files. See Section 4.3.1.2, “Preparing to convert a virtual machine running Windows” for details.
- virt-v2v installs VirtIO block drivers.
- virt-v2v installs the CDUpgrader utility.
- virt-v2v copies VirtIO block and network drivers to
%SystemRoot%\Drivers\VirtIO. The virtio-win package does not include network drivers for Windows 7 and Windows XP. For those operating systems, the rtl8139 network drivers are used. rtl8139 support must be already available in the guest virtual machine. - virt-v2v adds
%SystemRoot%\Drivers\VirtIOtoDevicePath, meaning this directory is automatically searched for drivers when a new device is detected. - virt-v2v makes registry changes to include the VirtIO block drivers in the
CriticalDeviceDatabasesection of the registry, and ensure the CDUpgrader service is started at the next boot.
- The virtual machine is imported and run on the Manager. See the Red Hat Enterprise Virtualization Administration Guide for details.
Important
The first boot stage can take several minutes to run, and must not be interrupted. It will run automatically without any administrator intervention other than starting the virtual machine. To ensure the process is not interrupted, no user should log in to the virtual machine until it has quiesced. You can check for this in the Manager GUI. - If the guest tools ISO has been uploaded to the Manager, as detailed in Section 4.3.1.2, “Preparing to convert a virtual machine running Windows”, the Manager attaches the guest tools CD to the virtual machine.
- CDUpgrader detects the guest tools ISO and installs all the VirtIO drivers from it, including additional tools that are not included in virtio-win. The VirtIO drivers are reinstalled if the drivers in the guest tools ISO are newer than the ones previously installed from virtio-win. This ensures that the tools are kept up to date.
Appendix A. Additional procedures
A.1. Creating bootable media
A.1.1. Create a P2V client boot CD
- Insert a blank, writable CD into your computer's CD or DVD burner.
- Open the Applications menu, choose the sub-menu, and click .
- Click the button.
- Click the button.
- Browse to the rhel-6.x-p2v.iso and select it for burning.
- Click .
A.1.2. Create a bootable P2V USB media
- As root, mount the rhel-6.x-p2v.iso:
mkdir /mnt/p2vmount
mount -o loop rhel-6.x-p2v.iso /mnt/p2vmount
- Attach your USB device to the computer. For the livecd-iso-to-disk script to function, the USB filesystem must be formatted vfat, ext[234] or btrfs.
- From a terminal as root run the livecd-iso-to-disk script:
bash /mnt/p2vmount/LiveOS/livecd-iso-to-disk /PATH/TO/rhel-6.x-p2v.iso /dev/YOURUSBDEVICE
- When the script finishes successfully, eject the USB device.
A.1.3. Create a PXE boot image
- As root, mount the rhel-6.x-p2v.iso
mkdir /mnt/p2vmount
mount -o loop rhel-6.x-p2v.iso /mnt/p2vmount
- From a terminal as root run the livecd-iso-to-pxeboot script:
bash /mnt/p2vboot/LiveOS/livecd-iso-to-pxeboot /PATH/TO/rhel-6.x-p2v.iso
When the command successfully completes, there is a tftpboot directory in the directory from which the command was run. - Rename the newly created tftpboot directory to a more descriptive name:
mv tftpboot/ p2vboot/
- Copy the p2vboot/ sub-directory to the /tftpboot directory:
cp -R p2vboot/ /tftpboot/
Set up your DHCP, TFTP and PXE server to serve/tftpboot/p2vboot/pxeboot.0.Note
The initrd image contains the whole CD ISO. You will notice when pxebooting that initrd can take a long time to download. This is normal behavior.
Appendix B. Revision History
| Revision History | |||
|---|---|---|---|
| Revision 11-85 | Fri Mar 10 2017 | ||
| |||
| Revision 11-83 | Mon Jan 02 2017 | ||
| |||
| Revision 11-82 | Mon May 02 2016 | ||
| |||
| Revision 11-81 | Tue Mar 01 2016 | ||
| |||
| Revision 11-80 | Thu Oct 08 2015 | ||
| |||
| Revision 11-79 | Wed July 15 2015 | ||
| |||