
Red Hat Training
A Red Hat training course is available for Red Hat Enterprise Linux
Fence Configuration Guide
Configuring and Managing Fence Devices for the High Availability Add-On
Abstract
Chapter 1. Fencing Pre-Configuration
1.1. Configuring ACPI For Use with Integrated Fence Devices
shutdown -h now). Otherwise, if ACPI Soft-Off is enabled, an integrated fence device can take four or more seconds to turn off a node (refer to note that follows). In addition, if ACPI Soft-Off is enabled and a node panics or freezes during shutdown, an integrated fence device may not be able to turn off the node. Under those circumstances, fencing is delayed or unsuccessful. Consequently, when a node is fenced with an integrated fence device and ACPI Soft-Off is enabled, a cluster recovers slowly or requires administrative intervention to recover.
Note
chkconfig management and verify that the node turns off immediately when fenced. The preferred way to disable ACPI Soft-Off is with chkconfig management: however, if that method is not satisfactory for your cluster, you can disable ACPI Soft-Off with one of the following alternate methods:
- Changing the BIOS setting to "instant-off" or an equivalent setting that turns off the node without delay
Note
Disabling ACPI Soft-Off with the BIOS may not be possible with some computers. - Appending
acpi=offto the kernel boot command line of the/boot/grub/grub.conffileImportant
This method completely disables ACPI; some computers do not boot correctly if ACPI is completely disabled. Use this method only if the other methods are not effective for your cluster.
- Section 1.1.1, “Disabling ACPI Soft-Off with
chkconfigManagement” — Preferred method - Section 1.1.2, “Disabling ACPI Soft-Off with the BIOS” — First alternate method
- Section 1.1.3, “Disabling ACPI Completely in the
grub.confFile” — Second alternate method
1.1.1. Disabling ACPI Soft-Off with chkconfig Management
chkconfig management to disable ACPI Soft-Off either by removing the ACPI daemon (acpid) from chkconfig management or by turning off acpid.
Note
chkconfig management at each cluster node as follows:
- Run either of the following commands:
chkconfig --del acpid— This command removesacpidfromchkconfigmanagement.— OR —chkconfig --level 2345 acpid off— This command turns offacpid.
- Reboot the node.
- When the cluster is configured and running, verify that the node turns off immediately when fenced.
Note
You can fence the node with thefence_nodecommand or Conga.
1.1.2. Disabling ACPI Soft-Off with the BIOS
chkconfig management (Section 1.1.1, “Disabling ACPI Soft-Off with chkconfig Management”). However, if the preferred method is not effective for your cluster, follow the procedure in this section.
Note
- Reboot the node and start the
BIOS CMOS Setup Utilityprogram. - Navigate to the menu (or equivalent power management menu).
- At the menu, set the function (or equivalent) to (or the equivalent setting that turns off the node by means of the power button without delay). Example 1.1, “
BIOS CMOS Setup Utility: set to ” shows a menu with set to and set to .Note
The equivalents to , , and may vary among computers. However, the objective of this procedure is to configure the BIOS so that the computer is turned off by means of the power button without delay. - Exit the
BIOS CMOS Setup Utilityprogram, saving the BIOS configuration. - When the cluster is configured and running, verify that the node turns off immediately when fenced.
Note
You can fence the node with thefence_nodecommand or Conga.
Example 1.1. BIOS CMOS Setup Utility: set to
+------------------------------------------|-----------------+
|   ACPI Function             [Enabled]    |  Item Help      |
|   ACPI Suspend Type         [S1(POS)]    |-----------------|
| x Run VGABIOS if S3 Resume  [Auto]       | Menu Level   *  |
|   Suspend Mode              [Disabled]   |                 |
|   HDD Power Down            [Disabled]   |                 |
|   Soft-Off by PWR-BTTN      [Instant-Off]|                 |
|   CPU THRM-Throttling       [50.0%]      |                 |
|   Wake-Up by PCI card       [Enabled]    |                 |
|   Power On by Ring          [Enabled]    |                 |
|   Wake Up On LAN            [Enabled]    |                 |
| x USB KB Wake-Up From S3    [Disabled]   |                 |
|   Resume by Alarm           [Disabled]   |                 |
| x  Date(of Month) Alarm       0          |                 |
| x  Time(hh:mm:ss) Alarm       0 :  0 :   |                 |
|   POWER ON Function         [BUTTON ONLY]|                 |
| x KB Power ON Password       Enter       |                 |
| x Hot Key Power ON           Ctrl-F1     |                 |
+------------------------------------------|-----------------+
1.1.3. Disabling ACPI Completely in the grub.conf File
chkconfig management (Section 1.1.1, “Disabling ACPI Soft-Off with chkconfig Management”). If the preferred method is not effective for your cluster, you can disable ACPI Soft-Off with the BIOS power management (Section 1.1.2, “Disabling ACPI Soft-Off with the BIOS”). If neither of those methods is effective for your cluster, you can disable ACPI completely by appending acpi=off to the kernel boot command line in the grub.conf file.
Important
grub.conf file of each cluster node as follows:
- Open
/boot/grub/grub.confwith a text editor. - Append
acpi=offto the kernel boot command line in/boot/grub/grub.conf(see Example 1.2, “Kernel Boot Command Line withacpi=offAppended to It”). - Reboot the node.
- When the cluster is configured and running, verify that the node turns off immediately when fenced.
Note
You can fence the node with thefence_nodecommand or Conga.
Example 1.2. Kernel Boot Command Line with acpi=off Appended to It
# grub.conf generated by anaconda
#
# Note that you do not have to rerun grub after making changes to this file
# NOTICE:  You have a /boot partition.  This means that
#          all kernel and initrd paths are relative to /boot/, eg.
#          root (hd0,0)
#          kernel /vmlinuz-version ro root=/dev/mapper/vg_doc01-lv_root
#          initrd /initrd-[generic-]version.img
#boot=/dev/hda
default=0
timeout=5
serial --unit=0 --speed=115200
terminal --timeout=5 serial console
title Red Hat Enterprise Linux Server (2.6.32-193.el6.x86_64)
        root (hd0,0)
        kernel /vmlinuz-2.6.32-193.el6.x86_64 ro root=/dev/mapper/vg_doc01-lv_root console=ttyS0,115200n8 acpi=off
        initrd /initramrs-2.6.32-131.0.15.el6.x86_64.img
acpi=off has been appended to the kernel boot command line — the line starting with "kernel /vmlinuz-2.6.32-193.el6.x86_64.img".
1.2. SELinux
enforcing state with the SELinux policy type set to targeted.
Note
fenced_can_network_connect is persistently set to on. This allows the fence_xvm fencing agent to work properly, enabling the system to fence virtual machines.
Chapter 2. Configuring Fencing with the ccs Command
ccs cluster configuration command. The ccs command allows an administrator to create, modify and view the cluster.conf cluster configuration file. You can use the ccs command to configure a cluster configuration file on a local file system or on a remote node. Using the ccs command, an administrator can also start and stop the cluster services on one or all of the nodes in a configured cluster.
ccs command.
Note
Note
cluster.conf elements and attributes. For a comprehensive list and description of cluster.conf elements and attributes, see the cluster schema at /usr/share/cluster/cluster.rng, and the annotated schema at /usr/share/doc/cman-X.Y.ZZ/cluster_conf.html (for example /usr/share/doc/cman-3.0.12/cluster_conf.html).
2.1. Configuring Fence Devices
- The
post_fail_delayattribute is the number of seconds the fence daemon (fenced) waits before fencing a node (a member of the fence domain) after the node has failed. Thepost_fail_delaydefault value is0. Its value may be varied to suit cluster and network performance. - The
post-join_delayattribute is the number of seconds the fence daemon (fenced) waits before fencing a node after the node joins the fence domain. Thepost_join_delaydefault value is6. A typical setting forpost_join_delayis between 20 and 30 seconds, but can vary according to cluster and network performance.
post_fail_delay and post_join_delay attributes with the --setfencedaemon option of the ccs command. Note, however, that executing the ccs --setfencedaemon command overwrites all existing fence daemon properties.
post_fail_delay attribute, execute the following command. This command will overwrite the values of all other existing fence daemon properties that you can set with this command.
ccs -h host --setfencedaemon post_fail_delay=value
post_join_delay attribute, execute the following command. This command will overwrite the values of all other existing fence daemon properties that you can set with this command.
ccs -h host --setfencedaemon post_join_delay=value
post_join_delay attribute and the post_fail_delay attribute, execute the following command:
ccs -h host --setfencedaemon post_fail_delay=value post_join_delay=value
Note
post_join_delay and post_fail_delay attributes as well as the additional fence daemon properties you can modify, see the fenced(8) man page and see the cluster schema at /usr/share/cluster/cluster.rng, and the annotated schema at /usr/share/doc/cman-X.Y.ZZ/cluster_conf.html.
ccs -h host --addfencedev
devicename
[fencedeviceoptions]
node-01 named myfence with an IP address of apc_ip_example, a login of login_example, and a password of password_example, execute the following command:
ccs -h node-01 --addfencedev myfence agent=fence_apc ipaddr=apc_ip_example login=login_example passwd=password_example
fencedevices section of the cluster.conf configuration file after you have added this APC fence device:
<fencedevices>
      <fencedevice agent="fence_apc" ipaddr="apc_ip_example" login="login_example" name="myfence" passwd="password_example"/>
</fencedevices>
ccs command to print a list of available fence devices and options or to print a list of fence devices currently configured for your cluster, see Section 2.2, “Listing Fence Devices and Fence Device Options”.
ccs -h host --rmfencedev fence_device_name
myfence from the cluster configuration file on cluster node node-01, execute the following command:
ccs -h node-01 --rmfencedev myfence
2.2. Listing Fence Devices and Fence Device Options
ccs command to print a list of available fence devices and to print a list of options for each available fence type. You can also use the ccs command to print a list of fence devices currently configured for your cluster.
ccs -h host --lsfenceopts
node-01, showing sample output.
[root@ask-03 ~]# ccs -h node-01 --lsfenceopts
fence_apc - Fence agent for APC over telnet/ssh
fence_apc_snmp - Fence agent for APC, Tripplite PDU over SNMP
fence_bladecenter - Fence agent for IBM BladeCenter
fence_bladecenter_snmp - Fence agent for IBM BladeCenter over SNMP
fence_brocade - Fence agent for HP Brocade over telnet/ssh
fence_cisco_mds - Fence agent for Cisco MDS
fence_cisco_ucs - Fence agent for Cisco UCS
fence_drac - fencing agent for Dell Remote Access Card
fence_drac5 - Fence agent for Dell DRAC CMC/5
fence_eaton_snmp - Fence agent for Eaton over SNMP
fence_egenera - I/O Fencing agent for the Egenera BladeFrame
fence_emerson - Fence agent for Emerson over SNMP
fence_eps - Fence agent for ePowerSwitch
fence_hpblade - Fence agent for HP BladeSystem
fence_ibmblade - Fence agent for IBM BladeCenter over SNMP
fence_idrac - Fence agent for IPMI
fence_ifmib - Fence agent for IF MIB
fence_ilo - Fence agent for HP iLO
fence_ilo2 - Fence agent for HP iLO
fence_ilo3 - Fence agent for IPMI
fence_ilo3_ssh - Fence agent for HP iLO over SSH
fence_ilo4 - Fence agent for IPMI
fence_ilo4_ssh - Fence agent for HP iLO over SSH
fence_ilo_moonshot - Fence agent for HP Moonshot iLO
fence_ilo_mp - Fence agent for HP iLO MP
fence_ilo_ssh - Fence agent for HP iLO over SSH
fence_imm - Fence agent for IPMI
fence_intelmodular - Fence agent for Intel Modular
fence_ipdu - Fence agent for iPDU over SNMP
fence_ipmilan - Fence agent for IPMI
fence_kdump - Fence agent for use with kdump
fence_mpath - Fence agent for multipath persistent reservation
fence_pcmk - Helper that presents a RHCS-style interface to stonith-ng for CMAN based clusters
fence_rhevm - Fence agent for RHEV-M REST API
fence_rsa - Fence agent for IBM RSA
fence_rsb - I/O Fencing agent for Fujitsu-Siemens RSB
fence_sanbox2 - Fence agent for QLogic SANBox2 FC switches
fence_sanlock - Fence agent for watchdog and shared storage
fence_scsi - fence agent for SCSI-3 persistent reservations
fence_tripplite_snmp - Fence agent for APC, Tripplite PDU over SNMP
fence_virsh - Fence agent for virsh
fence_virt - Fence agent for virtual machines
fence_vmware - Fence agent for VMWare
fence_vmware_soap - Fence agent for VMWare over SOAP API
fence_wti - Fence agent for WTI
fence_xvm - Fence agent for virtual machines
[root@host-138 ~]# ccs -h host-138 --lsfenceopts
fence_apc - Fence agent for APC over telnet/ssh
fence_apc_snmp - Fence agent for APC, Tripplite PDU over SNMP
fence_bladecenter - Fence agent for IBM BladeCenter
fence_bladecenter_snmp - Fence agent for IBM BladeCenter over SNMP
fence_brocade - Fence agent for HP Brocade over telnet/ssh
fence_cisco_mds - Fence agent for Cisco MDS
fence_cisco_ucs - Fence agent for Cisco UCS
fence_drac - fencing agent for Dell Remote Access Card
fence_drac5 - Fence agent for Dell DRAC CMC/5
fence_eaton_snmp - Fence agent for Eaton over SNMP
fence_egenera - I/O Fencing agent for the Egenera BladeFrame
fence_emerson - Fence agent for Emerson over SNMP
fence_eps - Fence agent for ePowerSwitch
fence_hpblade - Fence agent for HP BladeSystem
fence_ibmblade - Fence agent for IBM BladeCenter over SNMP
fence_idrac - Fence agent for IPMI
fence_ifmib - Fence agent for IF MIB
fence_ilo - Fence agent for HP iLO
fence_ilo2 - Fence agent for HP iLO
fence_ilo3 - Fence agent for IPMI
fence_ilo3_ssh - Fence agent for HP iLO over SSH
fence_ilo4 - Fence agent for IPMI
fence_ilo4_ssh - Fence agent for HP iLO over SSH
fence_ilo_moonshot - Fence agent for HP Moonshot iLO
fence_ilo_mp - Fence agent for HP iLO MP
fence_ilo_ssh - Fence agent for HP iLO over SSH
fence_imm - Fence agent for IPMI
fence_intelmodular - Fence agent for Intel Modular
fence_ipdu - Fence agent for iPDU over SNMP
fence_ipmilan - Fence agent for IPMI
fence_kdump - Fence agent for use with kdump
fence_mpath - Fence agent for multipath persistent reservation
fence_pcmk - Helper that presents a RHCS-style interface to stonith-ng for CMAN based clusters
fence_rhevm - Fence agent for RHEV-M REST API
fence_rsa - Fence agent for IBM RSA
fence_rsb - I/O Fencing agent for Fujitsu-Siemens RSB
fence_sanbox2 - Fence agent for QLogic SANBox2 FC switches
fence_sanlock - Fence agent for watchdog and shared storage
fence_scsi - fence agent for SCSI-3 persistent reservations
fence_tripplite_snmp - Fence agent for APC, Tripplite PDU over SNMP
fence_virsh - Fence agent for virsh
fence_virt - Fence agent for virtual machines
fence_vmware - Fence agent for VMWare
fence_vmware_soap - Fence agent for VMWare over SOAP API
fence_wti - Fence agent for WTI
fence_xvm - Fence agent for virtual machines
ccs -h host --lsfenceopts fence_type
fence_wti fence agent.
[root@ask-03 ~]# ccs -h node-01 --lsfenceopts fence_wti
fence_wti - Fence agent for WTI
  Required Options:
  Optional Options:
    option: No description available
    action: Fencing Action
    ipaddr: IP Address or Hostname
    login: Login Name
    passwd: Login password or passphrase
    passwd_script: Script to retrieve password
    cmd_prompt: Force command prompt
    secure: SSH connection
    identity_file: Identity file for ssh
    port: Physical plug number or name of virtual machine
    inet4_only: Forces agent to use IPv4 addresses only
    inet6_only: Forces agent to use IPv6 addresses only
    ipport: TCP port to use for connection with device
    verbose: Verbose mode
    debug: Write debug information to given file
    version: Display version information and exit
    help: Display help and exit
    separator: Separator for CSV created by operation list
    power_timeout: Test X seconds for status change after ON/OFF
    shell_timeout: Wait X seconds for cmd prompt after issuing command
    login_timeout: Wait X seconds for cmd prompt after login
    power_wait: Wait X seconds after issuing ON/OFF
    delay: Wait X seconds before fencing is started
    retry_on: Count of attempts to retry power on
ccs -h host --lsfencedev
2.3. Configuring Fencing for Cluster Members
2.3.1. Configuring a Single Power-Based Fence Device for a Node
apc, which uses the fence_apc fencing agent.
- Add a fence method for the node, providing a name for the fence method.
ccs -h host --addmethod method node
For example, to configure a fence method namedAPCfor the nodenode-01.example.comin the configuration file on the cluster nodenode-01.example.com, execute the following command:ccs -h node01.example.com --addmethod APC node01.example.com
- Add a fence instance for the method. You must specify the fence device to use for the node, the node this instance applies to, the name of the method, and any options for this method that are specific to this node:
ccs -h host --addfenceinst fencedevicename node method [options]
For example, to configure a fence instance in the configuration file on the cluster nodenode-01.example.comthat uses the APC switch power port 1 on the fence device namedapcto fence cluster nodenode-01.example.comusing the method namedAPC, execute the following command:ccs -h node01.example.com --addfenceinst apc node01.example.com APC port=1
APC. The device for the fence method specifies apc as the device name, which is a device previously configured with the --addfencedev option, as described in Section 2.1, “Configuring Fence Devices”. Each node is configured with a unique APC switch power port number: The port number for node-01.example.com is 1, the port number for node-02.example.com is 2, and the port number for node-03.example.com is 3.
ccs -h node01.example.com --addmethod APC node01.example.com
ccs -h node01.example.com --addmethod APC node02.example.com
ccs -h node01.example.com --addmethod APC node03.example.com
ccs -h node01.example.com --addfenceinst apc node01.example.com APC port=1
ccs -h node01.example.com --addfenceinst apc node02.example.com APC port=2
ccs -h node01.example.com --addfenceinst apc node03.example.com APC port=3
cluster.conf After Adding Power-Based Fence Methods ” shows a cluster.conf configuration file after you have added these fencing methods and instances to each node in the cluster.
Example 2.1. cluster.conf After Adding Power-Based Fence Methods
<cluster name="mycluster" config_version="3">
   <clusternodes>
     <clusternode name="node-01.example.com" nodeid="1">
         <fence>
            <method name="APC">
              <device name="apc" port="1"/>
             </method>
         </fence>
     </clusternode>
     <clusternode name="node-02.example.com" nodeid="2">
         <fence>
            <method name="APC">
              <device name="apc" port="2"/>
            </method>
         </fence>
     </clusternode>
     <clusternode name="node-03.example.com" nodeid="3">
         <fence>
            <method name="APC">
              <device name="apc" port="3"/>
            </method>
         </fence>
     </clusternode>
   </clusternodes>
   <fencedevices>
         <fencedevice agent="fence_apc" ipaddr="apc_ip_example" login="login_example" name="apc" passwd="password_example"/>
   </fencedevices>
   <rm>
   </rm>
</cluster>
2.3.2. Configuring a Single Storage-Based Fence Device for a Node
on or enable.
fence_node(8) man page.
sanswitch1, which uses the fence_sanbox2 fencing agent.
- Add a fence method for the node, providing a name for the fence method.
ccs -h host --addmethod method node
For example, to configure a fence method namedSANfor the nodenode-01.example.comin the configuration file on the cluster nodenode-01.example.com, execute the following command:ccs -h node01.example.com --addmethod SAN node01.example.com
- Add a fence instance for the method. You must specify the fence device to use for the node, the node this instance applies to, the name of the method, and any options for this method that are specific to this node:
ccs -h host --addfenceinst fencedevicename node method [options]
For example, to configure a fence instance in the configuration file on the cluster nodenode-01.example.comthat uses the SAN switch power port 11 on the fence device namedsanswitch1to fence cluster nodenode-01.example.comusing the method namedSAN, execute the following command:ccs -h node01.example.com --addfenceinst sanswitch1 node01.example.com SAN port=11
- To configure unfencing for the storage based fence device on this node, execute the following command:
ccs -h host --addunfence fencedevicename node action=on|off
SAN. The device for the fence method specifies sanswitch as the device name, which is a device previously configured with the --addfencedev option, as described in Section 2.1, “Configuring Fence Devices”. Each node is configured with a unique SAN physical port number: The port number for node-01.example.com is 11, the port number for node-02.example.com is 12, and the port number for node-03.example.com is 13.
ccs -h node01.example.com --addmethod SAN node01.example.com
ccs -h node01.example.com --addmethod SAN node02.example.com
ccs -h node01.example.com --addmethod SAN node03.example.com
ccs -h node01.example.com --addfenceinst sanswitch1 node01.example.com SAN port=11
ccs -h node01.example.com --addfenceinst sanswitch1 node02.example.com SAN port=12
ccs -h node01.example.com --addfenceinst sanswitch1 node03.example.com SAN port=13
ccs -h node01.example.com --addunfence sanswitch1 node01.example.com port=11 action=on
ccs -h node01.example.com --addunfence sanswitch1 node02.example.com port=12 action=on
ccs -h node01.example.com --addunfence sanswitch1 node03.example.com port=13 action=on
cluster.conf After Adding Storage-Based Fence Methods ” shows a cluster.conf configuration file after you have added fencing methods, fencing instances, and unfencing to each node in the cluster.
Example 2.2. cluster.conf After Adding Storage-Based Fence Methods
<cluster name="mycluster" config_version="3">
   <clusternodes>
     <clusternode name="node-01.example.com" nodeid="1">
         <fence>
            <method name="SAN">
	      <device name="sanswitch1" port="11"/>
             </method>
         </fence>
         <unfence>
             <device name="sanswitch1" port="11" action="on"/>
         </unfence>
     </clusternode>
     <clusternode name="node-02.example.com" nodeid="2">
         <fence>
            <method name="SAN">
	      <device name="sanswitch1" port="12"/>
             </method>
         </fence>
         <unfence>
             <device name="sanswitch1" port="12" action="on"/>
         </unfence>
     </clusternode>
     <clusternode name="node-03.example.com" nodeid="3">
         <fence>
            <method name="SAN">
	      <device name="sanswitch1" port="13"/>
             </method>
         </fence>
         <unfence>
             <device name="sanswitch1" port="13" action="on"/>
         </unfence>
     </clusternode>
   </clusternodes>
   <fencedevices>
        <fencedevice agent="fence_sanbox2" ipaddr="san_ip_example"
login="login_example" name="sanswitch1" passwd="password_example"/>
   </fencedevices>
   <rm>
   </rm>
</cluster>
2.3.3. Configuring a Backup Fence Device
Note
ccs command is the primary fencing method, and the second method you configure is the backup fencing method. To change the order, you can remove the primary fencing method from the configuration file, then add that method back.
ccs -h host --lsfenceinst [node]
apc, which uses the fence_apc fencing agent, and a backup fencing device that uses a fence device named sanswitch1, which uses the fence_sanbox2 fencing agent. Since the sanswitch1 device is a storage-based fencing agent, you will need to configure unfencing for that device as well.
- Add a primary fence method for the node, providing a name for the fence method.
ccs -h host --addmethod method node
For example, to configure a fence method namedAPCas the primary method for the nodenode-01.example.comin the configuration file on the cluster nodenode-01.example.com, execute the following command:ccs -h node01.example.com --addmethod APC node01.example.com
- Add a fence instance for the primary method. You must specify the fence device to use for the node, the node this instance applies to, the name of the method, and any options for this method that are specific to this node:
ccs -h host --addfenceinst fencedevicename node method [options]
For example, to configure a fence instance in the configuration file on the cluster nodenode-01.example.comthat uses the APC switch power port 1 on the fence device namedapcto fence cluster nodenode-01.example.comusing the method namedAPC, execute the following command:ccs -h node01.example.com --addfenceinst apc node01.example.com APC port=1
- Add a backup fence method for the node, providing a name for the fence method.
ccs -h host --addmethod method node
For example, to configure a backup fence method namedSANfor the nodenode-01.example.comin the configuration file on the cluster nodenode-01.example.com, execute the following command:ccs -h node01.example.com --addmethod SAN node01.example.com
- Add a fence instance for the backup method. You must specify the fence device to use for the node, the node this instance applies to, the name of the method, and any options for this method that are specific to this node:
ccs -h host --addfenceinst fencedevicename node method [options]
For example, to configure a fence instance in the configuration file on the cluster nodenode-01.example.comthat uses the SAN switch power port 11 on the fence device namedsanswitch1to fence cluster nodenode-01.example.comusing the method namedSAN, execute the following command:ccs -h node01.example.com --addfenceinst sanswitch1 node01.example.com SAN port=11
- Since the
sanswitch1device is a storage-based device, you must configure unfencing for this device.ccs -h node01.example.com --addunfence sanswitch1 node01.example.com port=11 action=on
cluster.conf After Adding Backup Fence Methods ” shows a cluster.conf configuration file after you have added a power-based primary fencing method and a storage-based backup fencing method to each node in the cluster.
Example 2.3. cluster.conf After Adding Backup Fence Methods
<cluster name="mycluster" config_version="3">
   <clusternodes>
     <clusternode name="node-01.example.com" nodeid="1">
         <fence>
            <method name="APC">
              <device name="apc" port="1"/>
             </method>
            <method name="SAN">
	      <device name="sanswitch1" port="11"/>
             </method>
         </fence>
         <unfence>
             <device name="sanswitch1" port="11" action="on"/>
         </unfence
     </clusternode>
     <clusternode name="node-02.example.com" nodeid="2">
         <fence>
            <method name="APC">
              <device name="apc" port="2"/>
            </method>
            <method name="SAN">
	      <device name="sanswitch1" port="12"/>
             </method>
         </fence>
         <unfence>
             <device name="sanswitch1" port="12" action="on"/>
         </unfence
     </clusternode>
     <clusternode name="node-03.example.com" nodeid="3">
         <fence>
            <method name="APC">
              <device name="apc" port="3"/>
            </method>
            <method name="SAN">
	      <device name="sanswitch1" port="13"/>
             </method>
         </fence>
         <unfence>
             <device name="sanswitch1" port="13" action="on"/>
         </unfence
     </clusternode>
   </clusternodes>
   <fencedevices>
        <fencedevice agent="fence_apc" ipaddr="apc_ip_example" login="login_example" name="apc" passwd="password_example"/>
        <fencedevice agent="fence_sanbox2" ipaddr="san_ip_example" login="login_example" name="sanswitch1" passwd="password_example"/>
   </fencedevices>
   <rm>
   </rm>
</cluster>
Note
2.3.4. Configuring a Node with Redundant Power
action attribute of off before configuring each of the devices with an action attribute of on.
- Before you can configure fencing for a node with redundant power, you must configure each of the power switches as a fence device for the cluster. For information on configuring fence devices, see Section 2.1, “Configuring Fence Devices”.To print a list of fence devices currently configured for your cluster, execute the following command:
ccs -h host --lsfencedev
- Add a fence method for the node, providing a name for the fence method.
ccs -h host --addmethod method node
For example, to configure a fence method namedAPC-dualfor the nodenode-01.example.comin the configuration file on the cluster nodenode-01.example.com, execute the following command:ccs -h node01.example.com --addmethod APC-dual node01.example.com
- Add a fence instance for the first power supply to the fence method. You must specify the fence device to use for the node, the node this instance applies to, the name of the method, and any options for this method that are specific to this node. At this point you configure the
actionattribute asoff.ccs -h host --addfenceinst fencedevicename node method [options] action=off
For example, to configure a fence instance in the configuration file on the cluster nodenode-01.example.comthat uses the APC switch power port 1 on the fence device namedapc1to fence cluster nodenode-01.example.comusing the method namedAPC-dual, and setting theactionattribute tooff, execute the following command:ccs -h node01.example.com --addfenceinst apc1 node01.example.com APC-dual port=1 action=off
- Add a fence instance for the second power supply to the fence method. You must specify the fence device to use for the node, the node this instance applies to, the name of the method, and any options for this method that are specific to this node. At this point you configure the
actionattribute asofffor this instance as well:ccs -h host --addfenceinst fencedevicename node method [options] action=off
For example, to configure a second fence instance in the configuration file on the cluster nodenode-01.example.comthat uses the APC switch power port 1 on the fence device namedapc2to fence cluster nodenode-01.example.comusing the same method as you specified for the first instance namedAPC-dual, and setting theactionattribute tooff, execute the following command:ccs -h node01.example.com --addfenceinst apc2 node01.example.com APC-dual port=1 action=off
- At this point, add another fence instance for the first power supply to the fence method, configuring the
actionattribute ason. You must specify the fence device to use for the node, the node this instance applies to, the name of the method, and any options for this method that are specific to this node, and specifying theactionattribute ason:ccs -h host --addfenceinst fencedevicename node method [options] action=on
For example, to configure a fence instance in the configuration file on the cluster nodenode-01.example.comthat uses the APC switch power port 1 on the fence device namedapc1to fence cluster nodenode-01.example.comusing the method namedAPC-dual, and setting theactionattribute toon, execute the following command:ccs -h node01.example.com --addfenceinst apc1 node01.example.com APC-dual port=1 action=on
- Add another fence instance for second power supply to the fence method, specifying the
actionattribute asonfor this instance. You must specify the fence device to use for the node, the node this instance applies to, the name of the method, and any options for this method that are specific to this node as well as theactionattribute ofon.ccs -h host --addfenceinst fencedevicename node method [options] action=on
For example, to configure a second fence instance in the configuration file on the cluster nodenode-01.example.comthat uses the APC switch power port 1 on the fence device namedapc2to fence cluster nodenode-01.example.comusing the same method as you specified for the first instance namedAPC-dualand setting theactionattribute toon, execute the following command:ccs -h node01.example.com --addfenceinst apc2 node01.example.com APC-dual port=1 action=on
cluster.conf After Adding Dual-Power Fencing ” shows a cluster.conf configuration file after you have added fencing for two power supplies for each node in a cluster.
Example 2.4. cluster.conf After Adding Dual-Power Fencing
<cluster name="mycluster" config_version="3">
   <clusternodes>
     <clusternode name="node-01.example.com" nodeid="1">
         <fence>
            <method name="APC-dual">
              <device name="apc1" port="1"action="off"/>
              <device name="apc2" port="1"action="off"/>
              <device name="apc1" port="1"action="on"/>
              <device name="apc2" port="1"action="on"/>
             </method>
         </fence>
     </clusternode>
     <clusternode name="node-02.example.com" nodeid="2">
         <fence>
            <method name="APC-dual">
              <device name="apc1" port="2"action="off"/>
              <device name="apc2" port="2"action="off"/>
              <device name="apc1" port="2"action="on"/>
              <device name="apc2" port="2"action="on"/>
            </method>
         </fence>
     </clusternode>
     <clusternode name="node-03.example.com" nodeid="3">
         <fence>
            <method name="APC-dual">
              <device name="apc1" port="3"action="off"/>
              <device name="apc2" port="3"action="off"/>
              <device name="apc1" port="3"action="on"/>
              <device name="apc2" port="3"action="on"/>
            </method>
         </fence>
     </clusternode>
   </clusternodes>
   <fencedevices>
       <fencedevice agent="fence_apc" ipaddr="apc_ip_example" login="login_example" name="apc1" passwd="password_example"/>
       <fencedevice agent="fence_apc" ipaddr="apc_ip_example" login="login_example" name="apc2" passwd="password_example"/>
   </fencedevices>
   <rm>
   </rm>
</cluster>
2.3.5. Testing the Fence Configuration
fence_check utility.
[root@host-098 ~]# fence_check
fence_check run at Wed Jul 23 09:13:57 CDT 2014 pid: 4769
Testing host-098 method 1: success
Testing host-099 method 1: success
Testing host-100 method 1: success
fence_check(8) man page.
2.3.6. Removing Fence Methods and Fence Instances
ccs -h host --rmmethod method node
APC that you have configured for node01.example.com from the cluster configuration file on cluster node node01.example.com, execute the following command:
ccs -h node01.example.com --rmmethod APC node01.example.com
ccs -h host --rmfenceinst fencedevicename node method
apc1 from the method named APC-dual configured for node01.example.com from the cluster configuration file on cluster node node01.example.com, execute the following command:
ccs -h node01.example.com --rmfenceinst apc1 node01.example.com APC-dual
Chapter 3. Configuring Fencing with Conga
Note
3.1. Configuring Fence Daemon Properties
- The parameter is the number of seconds the fence daemon (
fenced) waits before fencing a node (a member of the fence domain) after the node has failed. The default value is0. Its value may be varied to suit cluster and network performance. - The parameter is the number of seconds the fence daemon (
fenced) waits before fencing a node after the node joins the fence domain. The default value is6. A typical setting for is between 20 and 30 seconds, but can vary according to cluster and network performance.
Note
3.2. Configuring Fence Devices
- Creating fence devices — Refer to Section 3.2.1, “Creating a Fence Device”. Once you have created and named a fence device, you can configure the fence devices for each node in the cluster, as described in Section 3.3, “Configuring Fencing for Cluster Members”.
- Updating fence devices — Refer to Section 3.2.2, “Modifying a Fence Device”.
- Deleting fence devices — Refer to Section 3.2.3, “Deleting a Fence Device”.
Note
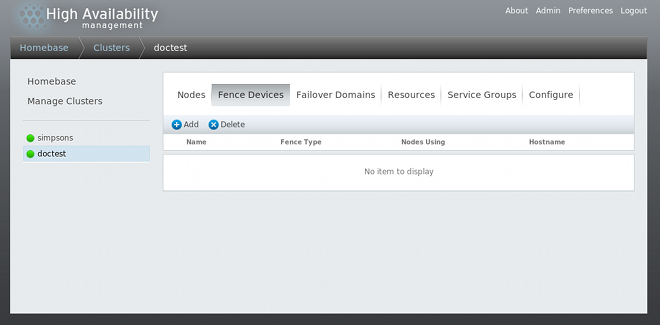
Figure 3.1. luci fence devices configuration page
3.2.1. Creating a Fence Device
- From the configuration page, click . Clicking displays the Add Fence Device (Instance) dialog box. From this dialog box, select the type of fence device to configure.
- Specify the information in the Add Fence Device (Instance) dialog box according to the type of fence device. In some cases you will need to specify additional node-specific parameters for the fence device when you configure fencing for the individual nodes.
- Click .
3.2.2. Modifying a Fence Device
- From the configuration page, click on the name of the fence device to modify. This displays the dialog box for that fence device, with the values that have been configured for the device.
- To modify the fence device, enter changes to the parameters displayed.
- Click and wait for the configuration to be updated.
3.2.3. Deleting a Fence Device
Note
- From the configuration page, check the box to the left of the fence device or devices to select the devices to delete.
- Click and wait for the configuration to be updated. A message appears indicating which devices are being deleted.
3.3. Configuring Fencing for Cluster Members
3.3.1. Configuring a Single Fence Device for a Node
- From the cluster-specific page, you can configure fencing for the nodes in the cluster by clicking on along the top of the cluster display. This displays the nodes that constitute the cluster. This is also the default page that appears when you click on the cluster name beneath from the menu on the left side of the luci page.
- Click on a node name. Clicking a link for a node causes a page to be displayed for that link showing how that node is configured.The node-specific page displays any services that are currently running on the node, as well as any failover domains of which this node is a member. You can modify an existing failover domain by clicking on its name.
- On the node-specific page, under , click . This displays the dialog box.
- Enter a for the fencing method that you are configuring for this node. This is an arbitrary name that will be used by Red Hat High Availability Add-On; it is not the same as the DNS name for the device.
- Click . This displays the node-specific screen that now displays the method you have just added under .
- Configure a fence instance for this method by clicking the button that appears beneath the fence method. This displays the drop-down menu from which you can select a fence device you have previously configured, as described in Section 3.2.1, “Creating a Fence Device”.
- Select a fence device for this method. If this fence device requires that you configure node-specific parameters, the display shows the parameters to configure.
Note
For non-power fence methods (that is, SAN/storage fencing), is selected by default on the node-specific parameters display. This ensures that a fenced node's access to storage is not re-enabled until the node has been rebooted. For information on unfencing a node, see thefence_node(8) man page. - Click . This returns you to the node-specific screen with the fence method and fence instance displayed.
3.3.2. Configuring a Backup Fence Device
- Use the procedure provided in Section 3.3.1, “Configuring a Single Fence Device for a Node” to configure the primary fencing method for a node.
- Beneath the display of the primary method you defined, click .
- Enter a name for the backup fencing method that you are configuring for this node and click . This displays the node-specific screen that now displays the method you have just added, below the primary fence method.
- Configure a fence instance for this method by clicking . This displays a drop-down menu from which you can select a fence device you have previously configured, as described in Section 3.2.1, “Creating a Fence Device”.
- Select a fence device for this method. If this fence device requires that you configure node-specific parameters, the display shows the parameters to configure.
- Click . This returns you to the node-specific screen with the fence method and fence instance displayed.
3.3.3. Configuring a Node with Redundant Power
- Before you can configure fencing for a node with redundant power, you must configure each of the power switches as a fence device for the cluster. For information on configuring fence devices, see Section 3.2, “Configuring Fence Devices”.
- From the cluster-specific page, click on along the top of the cluster display. This displays the nodes that constitute the cluster. This is also the default page that appears when you click on the cluster name beneath from the menu on the left side of the luci page.
- Click on a node name. Clicking a link for a node causes a page to be displayed for that link showing how that node is configured.
- On the node-specific page, click .
- Enter a name for the fencing method that you are configuring for this node.
- Click . This displays the node-specific screen that now displays the method you have just added under .
- Configure the first power supply as a fence instance for this method by clicking . This displays a drop-down menu from which you can select one of the power fencing devices you have previously configured, as described in Section 3.2.1, “Creating a Fence Device”.
- Select one of the power fence devices for this method and enter the appropriate parameters for this device.
- Click . This returns you to the node-specific screen with the fence method and fence instance displayed.
- Under the same fence method for which you have configured the first power fencing device, click . This displays a drop-down menu from which you can select the second power fencing devices you have previously configured, as described in Section 3.2.1, “Creating a Fence Device”.
- Select the second of the power fence devices for this method and enter the appropriate parameters for this device.
- Click . This returns you to the node-specific screen with the fence methods and fence instances displayed, showing that each device will power the system off in sequence and power the system on in sequence. This is shown in Figure 3.2, “Dual-Power Fencing Configuration”.
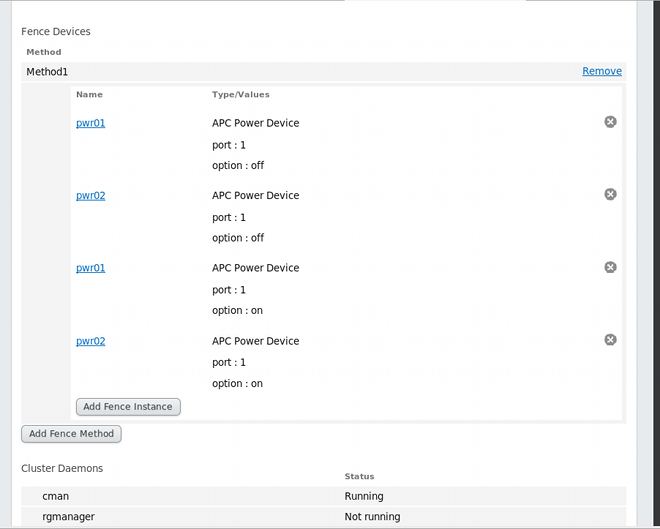
Figure 3.2. Dual-Power Fencing Configuration
3.3.4. Testing the Fence Configuration
fence_check utility.
[root@host-098 ~]# fence_check
fence_check run at Wed Jul 23 09:13:57 CDT 2014 pid: 4769
Testing host-098 method 1: success
Testing host-099 method 1: success
Testing host-100 method 1: success
fence_check(8) man page.
Chapter 4. Fence Devices
Table 4.1. Fence Device Summary
4.1. APC Power Switch over Telnet and SSH
fence_apc, the fence agent for APC over telnet/SSH.
Table 4.2. APC Power Switch (telnet/SSH)
| luci Field | cluster.conf Attribute | Description |
|---|---|---|
| Name | name | A name for the APC device connected to the cluster into which the fence daemon logs by means of telnet/ssh. |
| IP Address or Hostname | ipaddr | The IP address or host name assigned to the device. |
| IP Port (optional) | ipport | The TCP port to use to connect to the device. The default port is 23, or 22 if Use SSH is selected. |
| Login | login | The login name used to access the device. |
| Password | passwd | The password used to authenticate the connection to the device. |
| Password Script (optional) | passwd_script | The script that supplies a password for access to the fence device. Using this supersedes the parameter. |
| Power Wait (seconds) | power_wait | Number of seconds to wait after issuing a power off or power on command. |
| Power Timeout (seconds) | power_timeout | Number of seconds to continue testing for a status change after issuing a power off or power on command. The default value is 20. |
| Shell Timeout (seconds) | shell_timeout | Number of seconds to wait for a command prompt after issuing a command. The default value is 3. |
| Login Timeout (seconds) | login_timeout | Number of seconds to wait for a command prompt after login. The default value is 5. |
| Times to Retry Power On Operation | retry_on | Number of attempts to retry a power on operation. The default value is 1. |
| Port | port | The port. |
| Switch (optional) | switch | The switch number for the APC switch that connects to the node when you have multiple daisy-chained switches. |
| Delay (optional) | delay | The number of seconds to wait before fencing is started. The default value is 0. |
| Use SSH | secure | Indicates that system will use SSH to access the device. When using SSH, you must specify either a password, a password script, or an identity file. |
| SSH Options | ssh_options | SSH options to use. The default value is -1 -c blowfish. |
| Path to SSH Identity File | identity_file | The identity file for SSH. |
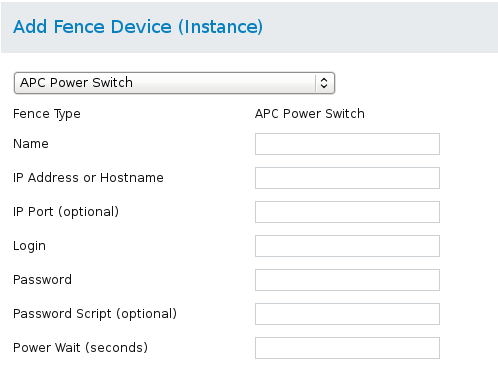
Figure 4.1. APC Power Switch
ccs -f cluster.conf --addfencedev apc agent=fence_apc ipaddr=192.168.0.1 login=root passwd=password123
cluster.conf entry for the fence_apc device:
 <fencedevices>
   <fencedevice agent="fence_apc" name="apc" ipaddr="apc-telnet.example.com" login="root" passwd="password123"/>
 </fencedevices>
4.2. APC Power Switch over SNMP
fence_apc_snmp, the fence agent for APC that logs into the SNP device by means of the SNMP protocol.
Table 4.3. APC Power Switch over SNMP
| luci Field | cluster.conf Attribute | Description |
|---|---|---|
| Name | name | A name for the APC device connected to the cluster into which the fence daemon logs by means of the SNMP protocol. |
| IP Address or Hostname | ipaddr | The IP address or host name assigned to the device. |
| UDP/TCP port | udpport | The UDP/TCP port to use for connection with the device; the default value is 161. |
| Login | login | The login name used to access the device. |
| Password | passwd | The password used to authenticate the connection to the device. |
| Password Script (optional) | passwd_script | The script that supplies a password for access to the fence device. Using this supersedes the parameter. |
| SNMP Version | snmp_version | The SNMP version to use (1, 2c, 3); the default value is 1. |
| SNMP Community | community | The SNMP community string; the default value is private. |
| SNMP Security Level | snmp_sec_level | The SNMP security level (noAuthNoPriv, authNoPriv, authPriv). |
| SNMP Authentication Protocol | snmp_auth_prot | The SNMP authentication protocol (MD5, SHA). |
| SNMP Privacy Protocol | snmp_priv_prot | The SNMP privacy protocol (DES, AES). |
| SNMP Privacy Protocol Password | snmp_priv_passwd | The SNMP privacy protocol password. |
| SNMP Privacy Protocol Script | snmp_priv_passwd_script | The script that supplies a password for SNMP privacy protocol. Using this supersedes the parameter. |
| Power Wait (seconds) | power_wait | Number of seconds to wait after issuing a power off or power on command. |
| Power Timeout (seconds) | power_timeout | Number of seconds to continue testing for a status change after issuing a power off or power on command. The default value is 20. |
| Shell Timeout (seconds) | shell_timeout | Number of seconds to wait for a command prompt after issuing a command. The default value is 3. |
| Login Timeout (seconds) | login_timeout | Number of seconds to wait for a command prompt after login. The default value is 5. |
| Times to Retry Power On Operation | retry_on | Number of attempts to retry a power on operation. The default value is 1. |
| Port (Outlet) Number | port | The port. |
| Delay (optional) | delay | The number of seconds to wait before fencing is started. The default value is 0. |
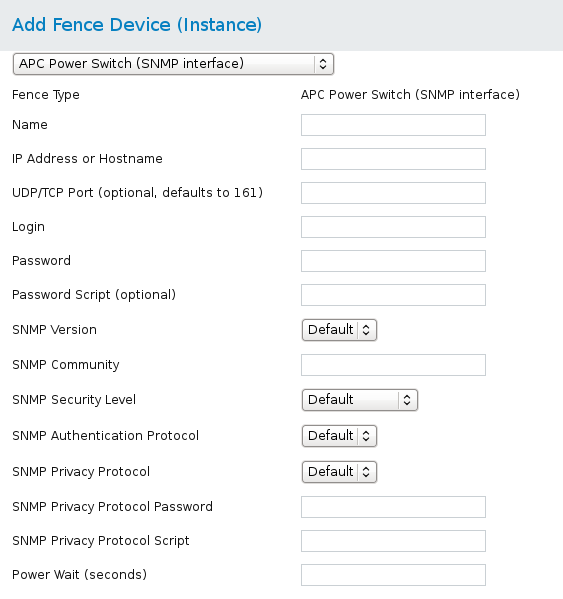
Figure 4.2. APC Power Switch over SNMP
cluster.conf entry for the fence_apc_snmp device:
 <fencedevice>
  <fencedevice agent="fence_apc_snmp" community="private" ipaddr="192.168.0.1" login="root" \
    name="apcpwsnmptst1" passwd="password123" power_wait="60" snmp_priv_passwd="password123"/>
 </fencedevices>
4.3. Brocade Fabric Switch
fence_brocade, the fence agent for Brocade FC switches.
Table 4.4. Brocade Fabric Switch
| luci Field | cluster.conf Attribute | Description |
|---|---|---|
| Name | name | A name for the Brocade device connected to the cluster. |
| IP Address or Hostname | ipaddr | The IP address or host name assigned to the device. |
| Login | login | The login name used to access the device. |
| Password | passwd | The password used to authenticate the connection to the device. |
| Password Script (optional) | passwd_script | The script that supplies a password for access to the fence device. Using this supersedes the parameter. |
| Force IP Family | inet4_only, inet6_only | Force the agent to use IPv4 or IPv6 addresses only |
| Force Command Prompt | cmd_prompt | The command prompt to use. The default value is '\$'. |
| Power Wait (seconds) | power_wait | Number of seconds to wait after issuing a power off or power on command. |
| Power Timeout (seconds) | power_timeout | Number of seconds to continue testing for a status change after issuing a power off or power on command. The default value is 20. |
| Shell Timeout (seconds) | shell_timeout | Number of seconds to wait for a command prompt after issuing a command. The default value is 3. |
| Login Timeout (seconds) | login_timeout | Number of seconds to wait for a command prompt after login. The default value is 5. |
| Times to Retry Power On Operation | retry_on | Number of attempts to retry a power on operation. The default value is 1. |
| Port | port | The switch outlet number. |
| Delay (optional) | delay | The number of seconds to wait before fencing is started. The default value is 0. |
| Use SSH | secure | Indicates that the system will use SSH to access the device. When using SSH, you must specify either a password, a password script, or an identity file. |
| SSH Options | ssh_options | SSH options to use. The default value is -1 -c blowfish. |
| Path to SSH Identity File | identity_file | The identity file for SSH. |
| Unfencing | unfence section of the cluster configuration file | When enabled, this ensures that a fenced node is not re-enabled until the node has been rebooted. This is necessary for non-power fence methods (that is, SAN/storage fencing). When you configure a device that requires unfencing, the cluster must first be stopped and the full configuration including devices and unfencing must be added before the cluster is started. For more information about unfencing a node, see the fence_node(8) man page. |

Figure 4.3. Brocade Fabric Switch
ccs -f cluster.conf --addfencedev brocadetest agent=fence_brocade ipaddr=brocadetest.example.com login=root \
 passwd=password123
cluster.conf entry for the fence_brocade device:
 <fencedevices>
  <fencedevice agent="fence_brocade" ipaddr="brocadetest.example.com" login="brocadetest" \
    name="brocadetest" passwd="brocadetest"/>
 </fencedevices>
4.4. Cisco MDS
fence_cisco_mds, the fence agent for Cisco MDS.
Table 4.5. Cisco MDS
| luci Field | cluster.conf Attribute | Description |
|---|---|---|
| Name | name | A name for the Cisco MDS 9000 series device with SNMP enabled. |
| IP Address or Hostname | ipaddr | The IP address or host name assigned to the device. |
| UDP/TCP port (optional) | udpport | The UDP/TCP port to use for connection with the device; the default value is 161. |
| Login | login | The login name used to access the device. |
| Password | passwd | The password used to authenticate the connection to the device. |
| Password Script (optional) | passwd_script | The script that supplies a password for access to the fence device. Using this supersedes the parameter. |
| SNMP Version | snmp_version | The SNMP version to use (1, 2c, 3). |
| SNMP Community | community | The SNMP community string. |
| SNMP Security Level | snmp_sec_level | The SNMP security level (noAuthNoPriv, authNoPriv, authPriv). |
| SNMP Authentication Protocol | snmp_auth_prot | The SNMP authentication protocol (MD5, SHA). |
| SNMP Privacy Protocol | snmp_priv_prot | The SNMP privacy protocol (DES, AES). |
| SNMP Privacy Protocol Password | snmp_priv_passwd | The SNMP privacy protocol password. |
| SNMP Privacy Protocol Script | snmp_priv_passwd_script | The script that supplies a password for SNMP privacy protocol. Using this supersedes the parameter. |
| Power Wait (seconds) | power_wait | Number of seconds to wait after issuing a power off or power on command. |
| Power Timeout (seconds) | power_timeout | Number of seconds to continue testing for a status change after issuing a power off or power on command. The default value is 20. |
| Shell Timeout (seconds) | shell_timeout | Number of seconds to wait for a command prompt after issuing a command. The default value is 3. |
| Login Timeout (seconds) | login_timeout | Number of seconds to wait for a command prompt after login. The default value is 5. |
| Times to Retry Power On Operation | retry_on | Number of attempts to retry a power on operation. The default value is 1. |
| Port (Outlet) Number | port | The port. |
| Delay (optional) | delay | The number of seconds to wait before fencing is started. The default value is 0. |
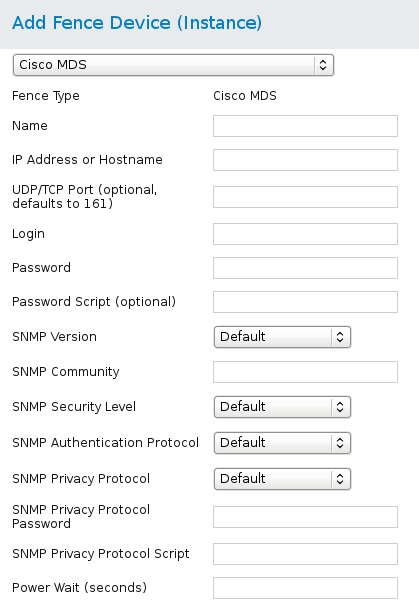
Figure 4.4. Cisco MDS
ccs -f cluster.conf --addfencedev mds agent=fence_cisco_mds ipaddr=192.168.0.1 name=ciscomdstest1 login=root \
 passwd=password123 power_wait=60 snmp_priv_passwd=password123 udpport=161
cluster.conf entry for the fence_cisco_mds device:
 <fencedevices>
   <fencedevice agent="fence_cisco_mds" community="private" ipaddr="192.168.0.1" login="root" \
     name="ciscomdstest1" passwd="password123" power_wait="60" snmp_priv_passwd="password123" \
     udpport="161"/>
 </fencedevices>
4.5. Cisco UCS
fence_cisco_ucs, the fence agent for Cisco UCS.
Table 4.6. Cisco UCS
| luci Field | cluster.conf Attribute | Description |
|---|---|---|
| Name | name | A name for the Cisco UCS device. |
| IP Address or Hostname | ipaddr | The IP address or host name assigned to the device. |
| IP port (optional) | ipport | The TCP port to use to connect to the device. |
| Login | login | The login name used to access the device. |
| Password | passwd | The password used to authenticate the connection to the device. |
| Password Script (optional) | passwd_script | The script that supplies a password for access to the fence device. Using this supersedes the parameter. |
| Use SSL | ssl | Use SSL connections to communicate with the device. |
| Sub-Organization | suborg | Additional path needed to access suborganization. |
| Power Wait (seconds) | power_wait | Number of seconds to wait after issuing a power off or power on command. |
| Power Timeout (seconds) | power_timeout | Number of seconds to continue testing for a status change after issuing a power off or power on command. The default value is 20. |
| Shell Timeout (seconds) | shell_timeout | Number of seconds to wait for a command prompt after issuing a command. The default value is 3. |
| Login Timeout (seconds) | login_timeout | Number of seconds to wait for a command prompt after login. The default value is 5. |
| Times to Retry Power On Operation | retry_on | Number of attempts to retry a power on operation. The default value is 1. |
| Port (Outlet) Number | port | Name of virtual machine. |
| Delay (optional) | delay | The number of seconds to wait before fencing is started. The default value is 0. |
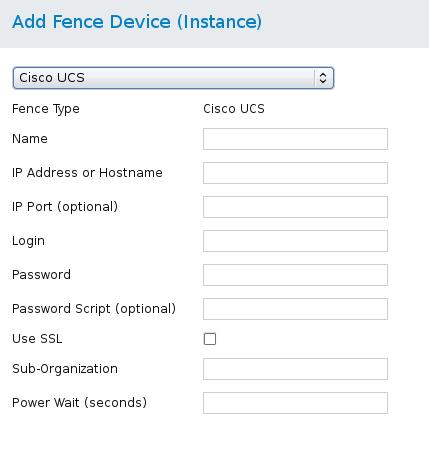
Figure 4.5. Cisco UCS
ccs -f cluster.conf --addfencedev ucs agent=fence_cisco_ucs ipaddr=192.168.0.1 login=root passwd=password123 \
 suborg=/org-RHEL/org-Fence/
cluster.conf entry for the fence_cisco_ucs device as created using either Conga or ccs:
 <fencedevices>
  <fencedevice agent="fence_cisco_ucs" ipaddr="192.168.0.1" login="root" name="ciscoucstest1" \
    passwd="password123" power_wait="60" ssl="on" suborg="/org-RHEL/org-Fence/"/>
 </fencedevices>
4.6. Dell Drac 5
fence_drac5, the fence agent for Dell DRAC 5.
Table 4.7. Dell DRAC 5
| luci Field | cluster.conf Attribute | Description |
|---|---|---|
| Name | name | The name assigned to the DRAC. |
| IP Address or Hostname | ipaddr | The IP address or host name assigned to the DRAC. |
| IP Port (optional) | ipport | The TCP port to use to connect to the device. |
| Login | login | The login name used to access the DRAC. |
| Password | passwd | The password used to authenticate the connection to the DRAC. |
| Password Script (optional) | passwd_script | The script that supplies a password for access to the fence device. Using this supersedes the parameter. |
| Use SSH | secure | Indicates that the system will use SSH to access the device. When using SSH, you must specify either a password, a password script, or an identity file. |
| SSH Options | ssh_options | SSH options to use. The default value is -1 -c blowfish. |
| Path to SSH Identity File | identity_file | The identity file for SSH. |
| Module Name | module_name | (optional) The module name for the DRAC when you have multiple DRAC modules. |
| Force Command Prompt | cmd_prompt | The command prompt to use. The default value is '\$'. |
| Power Wait (seconds) | power_wait | Number of seconds to wait after issuing a power off or power on command. |
| Delay (seconds) | delay | The number of seconds to wait before fencing is started. The default value is 0. |
| Power Timeout (seconds) | power_timeout | Number of seconds to continue testing for a status change after issuing a power off or power on command. The default value is 20. |
| Shell Timeout (seconds) | shell_timeout | Number of seconds to wait for a command prompt after issuing a command. The default value is 3. |
| Login Timeout (seconds) | login_timeout | Number of seconds to wait for a command prompt after login. The default value is 5. |
| Times to Retry Power On Operation | retry_on | Number of attempts to retry a power on operation. The default value is 1. |
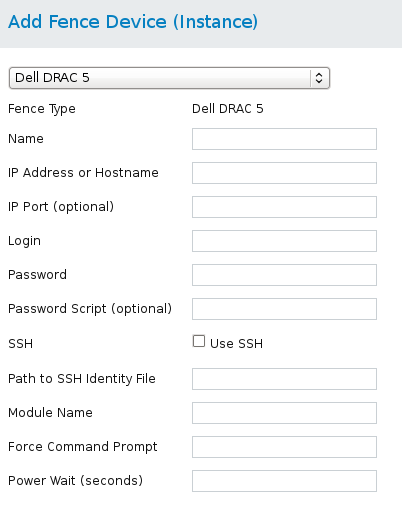
Figure 4.6. Dell Drac 5
ccs -f cluster.conf --addfencedev delldrac5test1 agent=fence_drac5 ipaddr=192.168.0.1 login=root passwd=password123\
 module_name=drac1 power_wait=60
cluster.conf entry for the fence_drac5 device:
 <fencedevices>
   <fencedevice agent="fence_drac5" cmd_prompt="\$" ipaddr="192.168.0.1" login="root" module_name="drac1" \
     name="delldrac5test1" passwd="password123" power_wait="60"/>
 </fencedevices>
4.7. Eaton Network Power Switch
fence_eaton_snmp, the fence agent for the Eaton over SNMP network power switch.
Table 4.8. Eaton Network Power Controller (SNMP Interface) (Red Hat Enterprise Linux 6.4 and later)
| luci Field | cluster.conf Attribute | Description |
|---|---|---|
| Name | name | A name for the Eaton network power switch connected to the cluster. |
| IP Address or Hostname | ipaddr | The IP address or host name assigned to the device. |
| UDP/TCP Port (optional) | udpport | The UDP/TCP port to use for connection with the device; the default value is 161. |
| Login | login | The login name used to access the device. |
| Password | passwd | The password used to authenticate the connection to the device. |
| Password Script (optional) | passwd_script | The script that supplies a password for access to the fence device. Using this supersedes the parameter. |
| SNMP Version | snmp_version | The SNMP version to use (1, 2c, 3); the default value is 1. |
| SNMP Community | community | The SNMP community string; the default value is private. |
| SNMP Security Level | snmp_sec_level | The SNMP security level (noAuthNoPriv, authNoPriv, authPriv). |
| SNMP Authentication Protocol | snmp_auth_prot | The SNMP authentication protocol (MD5, SHA). |
| SNMP Privacy Protocol | snmp_priv_prot | The SNMP privacy protocol (DES, AES). |
| SNMP Privacy Protocol Password | snmp_priv_passwd | The SNMP privacy protocol password. |
| SNMP Privacy Protocol Script | snmp_priv_passwd_script | The script that supplies a password for SNMP privacy protocol. Using this supersedes the parameter. |
| Power wait (seconds) | power_wait | Number of seconds to wait after issuing a power off or power on command. |
| Power Timeout (seconds) | power_timeout | Number of seconds to continue testing for a status change after issuing a power off or power on command. The default value is 20. |
| Shell Timeout (seconds) | shell_timeout | Number of seconds to wait for a command prompt after issuing a command. The default value is 3. |
| Login Timeout (seconds) | login_timeout | Number of seconds to wait for a command prompt after login. The default value is 5. |
| Times to Retry Power On Operation | retry_on | Number of attempts to retry a power on operation. The default value is 1. |
| Port (Outlet) Number | port | Physical plug number or name of virtual machine. This parameter is always required. |
| Delay (optional) | delay | The number of seconds to wait before fencing is started. The default value is 0. |
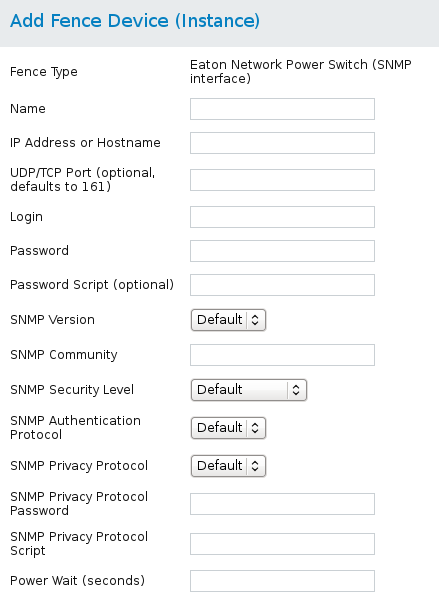
Figure 4.7. Eaton Network Power Switch
ccs -f cluster.conf --addfencedev eatontest agent=fence_eaton_snmp ipaddr=192.168.0.1 login=root \
 passwd=password123 power_wait=60 snmp_priv_passwd=eatonpassword123 udpport=161
cluster.conf entry for the fence_eaton_snmp device:
 <fencedevices>
  <fencedevice agent="fence_eaton_snmp" community="private" ipaddr="eatonhost" login="eatonlogin" \
   name="eatontest" passwd="password123" passwd_script="eatonpwscr" power_wait="3333" \
   snmp_priv_passwd="eatonprivprotpass" snmp_priv_passwd_script="eatonprivprotpwscr" udpport="161"/>
 </fencedevices>
4.8. Egenera BladeFrame
fence_egenera, the fence agent for the Egenera BladeFrame.
Table 4.9. Egenera BladeFrame
| luci Field | cluster.conf Attribute | Description |
|---|---|---|
| Name | name | A name for the Egenera BladeFrame device connected to the cluster. |
| CServer | cserver | The host name (and optionally the user name in the form of username@hostname) assigned to the device. Refer to the fence_egenera(8) man page for more information. |
| ESH Path (optional) | esh | The path to the esh command on the cserver (default is /opt/panmgr/bin/esh) |
| Username | user | The login name. The default value is root. |
| lpan | lpan | The logical process area network (LPAN) of the device. |
| pserver | pserver | The processing blade (pserver) name of the device. |
| Delay (optional) | delay | The number of seconds to wait before fencing is started. The default value is 0. |
| Unfencing | unfence section of the cluster configuration file | When enabled, this ensures that a fenced node is not re-enabled until the node has been rebooted. This is necessary for non-power fence methods (that is, SAN/storage fencing). When you configure a device that requires unfencing, the cluster must first be stopped and the full configuration including devices and unfencing must be added before the cluster is started. For more information about unfencing a node, see the fence_node(8) man page. |

Figure 4.8. Egenera BladeFrame
ccs -f cluster.conf --addfencedev egeneratest agent=fence_egenera user=root cserver=cservertest
cluster.conf entry for the fence_egenera device:
 <fencedevices>
  <fencedevice agent="fence_egenera" cserver="cservertest" name="egeneratest" user="root"/>
 </fencedevices>
4.9. Emerson Network Power Switch (SNMP interface)
fence_emerson, the fence agent for Emerson over SNMP.
Table 4.10. Emerson Network Power Switch (SNMP interface) (Red Hat Enterprise Linux 6.7 and later)
| luci Field | cluster.conf Attribute | Description |
|---|---|---|
| Name | name | A name for the Emerson Network Power Switch device connected to the cluster. |
| IP Address or Hostname | ipaddr | The IP address or host name assigned to the device. |
| UDP/TCP Port (optional) | udpport | UDP/TCP port to use for connections with the device; the default value is 161. |
| Login | login | The login name used to access the device. |
| Password | passwd | The password used to authenticate the connection to the device. |
| Password Script (optional) | passwd_script | The script that supplies a password for access to the fence device. Using this supersedes the parameter. |
| SNMP Version | snmp_version | The SNMP version to use (1, 2c, 3); the default value is 1. |
| SNMP Community | community | The SNMP community string. |
| SNMP Security Level | snmp_sec_level | The SNMP security level (noAuthNoPriv, authNoPriv, authPriv). |
| SNMP Authentication Protocol | snmp_auth_prot | The SNMP authentication protocol (MD5, SHA). |
| SNMP Privacy Protocol | snmp_priv_prot | The SNMP privacy protocol (DES, AES). |
| SNMP privacy protocol password | snmp_priv_passwd | The SNMP Privacy Protocol Password. |
| SNMP Privacy Protocol Script | snmp_priv_passwd_script | The script that supplies a password for SNMP privacy protocol. Using this supersedes the parameter. |
| Power Wait (seconds) | power_wait | Number of seconds to wait after issuing a power off or power on command. |
| Power Timeout (seconds) | power_timeout | Number of seconds to continue testing for a status change after issuing a power off or power on command. The default value is 20. |
| Shell Timeout (seconds) | shell_timeout | Number of seconds to wait for a command prompt after issuing a command. The default value is 3. |
| Login Timeout (seconds) | login_timeout | Number of seconds to wait for a command prompt after login. The default value is 5. |
| Times to Retry Power On Operation | retry_on | Number of attempts to retry a power on operation. The default value is 1. |
| Port (Outlet) Number | port | Physical plug number or name of virtual machine. |
| Delay (optional) | delay | The number of seconds to wait before fencing is started. The default value is 0. |
4.10. ePowerSwitch
fence_eps, the fence agent for ePowerSwitch.
Table 4.11. ePowerSwitch
| luci Field | cluster.conf Attribute | Description |
|---|---|---|
| Name | name | A name for the ePowerSwitch device connected to the cluster. |
| IP Address or Hostname | ipaddr | The IP address or host name assigned to the device. |
| Login | login | The login name used to access the device. |
| Password | passwd | The password used to authenticate the connection to the device. |
| Password Script (optional) | passwd_script | The script that supplies a password for access to the fence device. Using this supersedes the parameter. |
| Name of Hidden Page | hidden_page | The name of the hidden page for the device. |
| Times to Retry Power On Operation | retry_on | Number of attempts to retry a power on operation. The default value is 1. |
| Port (Outlet) Number | port | Physical plug number or name of virtual machine. |
| Delay (optional) | delay | The number of seconds to wait before fencing is started. The default value is 0. |

Figure 4.9. ePowerSwitch
ccs -f cluster.conf --addfencedev epstest1 agent=fence_eps ipaddr=192.168.0.1 login=root passwd=password123 \
 hidden_page=hidden.htm
cluster.conf entry for the fence_eps device:
 <fencedevices>
   <fencedevice agent="fence_eps" hidden_page="hidden.htm" ipaddr="192.168.0.1" login="root" name="epstest1" \
    passwd="password123"/>
 </fencedevices>
4.11. Fence Virt (Serial/VMChannel Mode)
fence_virt, the fence agent for virtual machines using VM channel or serial mode .
Table 4.12. Fence virt (Serial/VMChannel Mode)
| luci Field | cluster.conf Attribute | Description |
|---|---|---|
| Name | name | A name for the Fence virt fence device. |
| Serial Device | serial_device | On the host, the serial device must be mapped in each domain's configuration file. For more information, see the fence_virt man page. If this field is specified, it causes the fence_virt fencing agent to operate in serial mode. Not specifying a value causes the fence_virt fencing agent to operate in VM channel mode. |
| Serial Parameters | serial_params | The serial parameters. The default is 115200, 8N1. |
| VM Channel IP Address | channel_address | The channel IP. The default value is 10.0.2.179. |
| Timeout (optional) | timeout | Fencing timeout, in seconds. The default value is 30. |
| Domain | port (formerly domain) | Virtual machine (domain UUID or name) to fence. |
ipport | The channel port. The default value is 1229, which is the value used when configuring this fence device with luci. | |
| Delay (optional) | delay | Fencing delay, in seconds. The fence agent will wait the specified number of seconds before attempting a fencing operation. The default value is 0. |
ccs -f cluster.conf --addfencedev fencevirt1 agent=fence_virt serial_device=/dev/ttyS1 serial_params=19200, 8N1
cluster.conf entry for the fence_virt device:
 <fencedevices>
   <fencedevice agent="fence_virt" name="fencevirt1" serial_device="/dev/ttyS1" serial_params="19200, 8N1"/>
 </fencedevices>
4.12. Fence Virt (Multicast Mode)
fence_xvm, the fence agent for virtual machines using multicast.
Table 4.13. Fence virt (Multicast Mode)
| luci Field | cluster.conf Attribute | Description |
|---|---|---|
| Name | name | A name for the Fence virt fence device. |
| Timeout | timeout | Fencing timeout, in seconds. The default value is 30. |
| Domain | port (formerly domain) | Virtual machine (domain UUID or name) to fence. |
| Delay (optional) | delay | Fencing delay, in seconds. The fence agent will wait the specified number of seconds before attempting a fencing operation. The default value is 0. |
4.13. Fujitsu-Siemens RemoteView Service Board (RSB)
fence_rsb, the fence agent for Fujitsu-Siemens RemoteView Service Board (RSB).
Table 4.14. Fujitsu Siemens Remoteview Service Board (RSB)
| luci Field | cluster.conf Attribute | Description |
|---|---|---|
| Name | name | A name for the RSB to use as a fence device. |
| IP Address or Hostname | ipaddr | The host name assigned to the device. |
| Login | login | The login name used to access the device. |
| Password | passwd | The password used to authenticate the connection to the device. |
| Password Script (optional) | passwd_script | The script that supplies a password for access to the fence device. Using this supersedes the parameter. |
| TCP Port | ipport | The port number on which the telnet service listens. The default value is 3172. |
| Force Command Prompt | cmd_prompt | The command prompt to use. The default value is '\$'. |
| Power Wait (seconds) | power_wait | Number of seconds to wait after issuing a power off or power on command. |
| Delay (seconds) | delay | The number of seconds to wait before fencing is started. The default value is 0. |
| Power Timeout (seconds) | power_timeout | Number of seconds to continue testing for a status change after issuing a power off or power on command. The default value is 20. |
| Shell Timeout (seconds) | shell_timeout | Number of seconds to wait for a command prompt after issuing a command. The default value is 3. |
| Login Timeout (seconds) | login_timeout | Number of seconds to wait for a command prompt after login. The default value is 5. |
| Times to Retry Power On Operation | retry_on | Number of attempts to retry a power on operation. The default value is 1. |
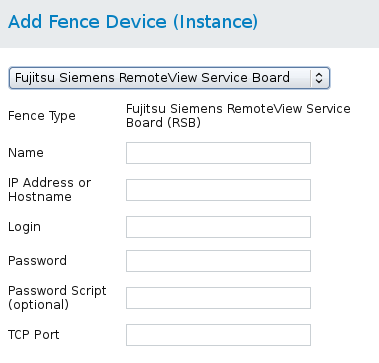
Figure 4.10. Fujitsu-Siemens RSB
ccs -f cluster.conf --addfencedev fsrbtest1 agent=fence_rsb ipaddr=192.168.0.1 login=root passwd=password123 \
 telnet_port=3172
cluster.conf entry for the fence_rsb device:
 <fencedevices>
   <fencedevice agent="fence_rsb" ipaddr="192.168.0.1" login="root" name="fsrsbtest1" passwd="password123" telnet_port="3172"/>
 </fencedevices>
4.14. Hewlett-Packard BladeSystem
fence_hpblade, the fence agent for HP BladeSystem.
Table 4.15. HP BladeSystem (Red Hat Enterprise Linux 6.4 and later)
| luci Field | cluster.conf Attribute | Description |
|---|---|---|
| Name | name | The name assigned to the HP Bladesystem device connected to the cluster. |
| IP Address or Hostname | ipaddr | The IP address or host name assigned to the HP BladeSystem device. |
| IP Port (optional) | ipport | The TCP port to use to connect to the device. |
| Login | login | The login name used to access the HP BladeSystem device. This parameter is required. |
| Password | passwd | The password used to authenticate the connection to the fence device. |
| Password Script (optional) | passwd_script | The script that supplies a password for access to the fence device. Using this supersedes the parameter. |
| Force Command Prompt | cmd_prompt | The command prompt to use. The default value is '\$'. |
| Missing port returns OFF instead of failure | missing_as_off | Missing port returns OFF instead of failure. |
| Power Wait (seconds) | power_wait | Number of seconds to wait after issuing a power off or power on command. |
| Power Timeout (seconds) | power_timeout | Number of seconds to continue testing for a status change after issuing a power off or power on command. The default value is 20. |
| Shell Timeout (seconds) | shell_timeout | Number of seconds to wait for a command prompt after issuing a command. The default value is 3. |
| Login Timeout (seconds) | login_timeout | Number of seconds to wait for a command prompt after login. The default value is 5. |
| Times to Retry Power On Operation | retry_on | Number of attempts to retry a power on operation. The default value is 1. |
| Use SSH | secure | Indicates that the system will use SSH to access the device. When using SSH, you must specify either a password, a password script, or an identity file. |
| SSH Options | ssh_options | SSH options to use. The default value is -1 -c blowfish. |
| Path to SSH Identity File | identity_file | The identity file for SSH. |
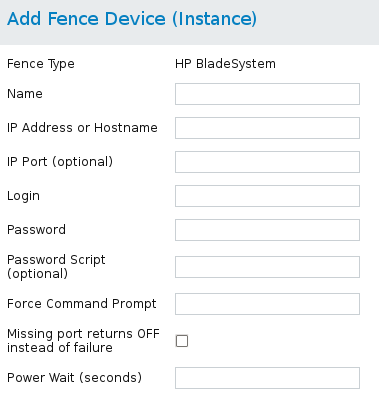
Figure 4.11. HP BladeSystem
ccs -f cluster.conf --addfencedev hpbladetest1 agent=fence_hpblade cmd_prompt=c7000oa> ipaddr=192.168.0.1 \
 login=root passwd=password123 missing_as_off=on power_wait=60
cluster.conf entry for the fence_hpblade device:
 <fencedevices>
  <fencedevice agent="fence_hpblade" cmd_prompt="c7000oa>" ipaddr="hpbladeaddr" ipport="13456" \
   login="root" missing_as_off="on" name="hpbladetest1" passwd="password123" passwd_script="hpbladepwscr" \
   power_wait="60"/>
 </fencedevices>
4.15. Hewlett-Packard iLO
fence_ilo and HP iLO2 devices fence_ilo2. share the same implementation. Table 4.16, “HP iLO (Integrated Lights Out) and HP iLO2” lists the fence device parameters used by these agents.
Table 4.16. HP iLO (Integrated Lights Out) and HP iLO2
| luci Field | cluster.conf Attribute | Description |
|---|---|---|
| Name | name | A name for the server with HP iLO support. |
| IP Address or Hostname | ipaddr | The IP address or host name assigned to the device. |
| IP Port (optional) | ipport | TCP port to use for connection with the device. The default value is 443. |
| Login | login | The login name used to access the device. |
| Password | passwd | The password used to authenticate the connection to the device. |
| Password Script (optional) | passwd_script | The script that supplies a password for access to the fence device. Using this supersedes the parameter. |
| Power Wait (seconds) | power_wait | Number of seconds to wait after issuing a power off or power on command. |
| Delay (seconds) | delay | The number of seconds to wait before fencing is started. The default value is 0. |
| Power Timeout (seconds) | power_timeout | Number of seconds to continue testing for a status change after issuing a power off or power on command. The default value is 20. |
| Shell Timeout (seconds) | shell_timeout | Number of seconds to wait for a command prompt after issuing a command. The default value is 3. |
| Login Timeout (seconds) | login_timeout | Number of seconds to wait for a command prompt after login. The default value is 5. |
| Times to Retry Power On Operation | retry_on | Number of attempts to retry a power on operation. The default value is 1. |
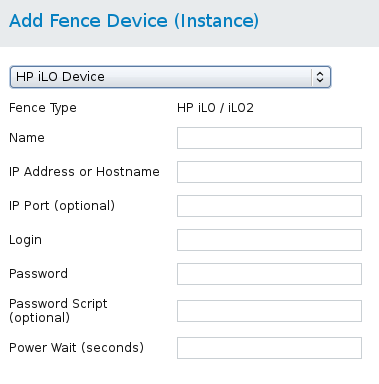
Figure 4.12. HP iLO
ccs -f cluster.conf --addfencedev hpilotest1 agent=fence_hpilo ipaddr=192.168.0.1 login=root passwd=password123 \
 power_wait=60
cluster.conf entry for the fence_ilo device:
 <fencedevices>
  <fencedevice agent="fence_ilo" ipaddr="192.168.0.1" login="root" name="hpilotest1" passwd="password123" \
   power_wait="60"/>
 </fencedevices>
4.16. HP iLO over SSH
fence_ilo_ssh), HP iLO3 devices over SSH (fence_ilo3_ssh), and HP iLO4 devices over SSH (fence_ilo4_ssh) share the same implementation. Table 4.17, “HP iLO over SSH, HP iLO3 over SSH, HPiLO4 over SSH (Red Hat Enterprise Linux 6.7 and later)” lists the fence device parameters used by these agents.
Table 4.17. HP iLO over SSH, HP iLO3 over SSH, HPiLO4 over SSH (Red Hat Enterprise Linux 6.7 and later)
| luci Field | cluster.conf Attribute | Description |
|---|---|---|
| Name | name | A name for the server with HP iLO support. |
| IP Address or Hostname | ipaddr | The IP address or host name assigned to the device. |
| Login | login | The login name used to access the device. |
| Password | passwd | The password used to authenticate the connection to the device. |
| Password Script (optional) | passwd_script | The script that supplies a password for access to the fence device. Using this supersedes the parameter. |
| Use SSH | secure | Indicates that the system will use SSH to access the device. When using SSH, you must specify either a password, a password script, or an identity file. |
| Path to SSH Identity File | identity_file | The Identity file for SSH. |
| TCP Port | ipport | UDP/TCP port to use for connections with the device; the default value is 23. |
| Force Command Prompt | cmd_prompt | The command prompt to use. The default value is 'MP>', 'hpiLO->'. |
| Method to Fence | method | The method to fence: on/off or cycle |
| Power Wait (seconds) | power_wait | Number of seconds to wait after issuing a power off or power on command. |
| Delay (seconds) | delay | The number of seconds to wait before fencing is started. The default value is 0. |
| Power Timeout (seconds) | power_timeout | Number of seconds to continue testing for a status change after issuing a power off or power on command. The default value is 20. |
| Shell Timeout (seconds) | shell_timeout | Number of seconds to wait for a command prompt after issuing a command. The default value is 3. |
| Login Timeout (seconds) | login_timeout | Number of seconds to wait for a command prompt after login. The default value is 5. |
| Times to Retry Power On Operation | retry_on | Number of attempts to retry a power on operation. The default value is 1. |
4.17. Hewlett-Packard iLO MP
fence_ilo_mp, the fence agent for HP iLO MP devices.
Table 4.18. HP iLO (Integrated Lights Out) MP
| luci Field | cluster.conf Attribute | Description |
|---|---|---|
| Name | name | A name for the server with HP iLO support. |
| IP Address or Hostname | ipaddr | The IP address or host name assigned to the device. |
| IP Port (optional) | ipport | TCP port to use for connection with the device. |
| Login | login | The login name used to access the device. |
| Password | passwd | The password used to authenticate the connection to the device. |
| Password Script (optional) | passwd_script | The script that supplies a password for access to the fence device. Using this supersedes the parameter. |
| Use SSH | secure | Indicates that the system will use SSH to access the device. When using SSH, you must specify either a password, a password script, or an identity file. |
| SSH Options | ssh_options | SSH options to use. The default value is -1 -c blowfish. |
| Path to SSH Identity File | identity_file | The Identity file for SSH. |
| Force Command Prompt | cmd_prompt | The command prompt to use. The default value is 'MP>', 'hpiLO->'. |
| Power Wait (seconds) | power_wait | Number of seconds to wait after issuing a power off or power on command. |
| Delay (seconds) | delay | The number of seconds to wait before fencing is started. The default value is 0. |
| Power Timeout (seconds) | power_timeout | Number of seconds to continue testing for a status change after issuing a power off or power on command. The default value is 20. |
| Shell Timeout (seconds) | shell_timeout | Number of seconds to wait for a command prompt after issuing a command. The default value is 3. |
| Login Timeout (seconds) | login_timeout | Number of seconds to wait for a command prompt after login. The default value is 5. |
| Times to Retry Power On Operation | retry_on | Number of attempts to retry a power on operation. The default value is 1. |

Figure 4.13. HP iLO MP
ccs -f cluster.conf --addfencedev hpilomptest1 agent=fence_hpilo cmd_prompt=hpiLO-> ipaddr=192.168.0.1 \
 login=root passwd=password123 power_wait=60
cluster.conf entry for the fence_hpilo_mp device:
<fencedevices> <fencedevice agent="fence_ilo_mp" cmd_prompt="hpiLO->" ipaddr="192.168.0.1" login="root" name="hpilomptest1" passwd="password123" power_wait="60"/> </fencedevices>
4.18. HP Moonshot iLO
fence_ilo_moonshot, the fence agent for HP Moonshot iLO devices.
Table 4.19. HP Moonshot iLO (Red Hat Enterprise Linux 6.7 and later)
| luci Field | cluster.conf Attribute | Description |
|---|---|---|
| Name | name | A name for the server with HP iLO support. |
| IP Address or Hostname | ipaddr | The IP address or host name assigned to the device. |
| Login | login | The login name used to access the device. |
| Password | passwd | The password used to authenticate the connection to the device. |
| Password Script (optional) | passwd_script | The script that supplies a password for access to the fence device. Using this supersedes the parameter. |
| Use SSH | secure | Indicates that the system will use SSH to access the device. When using SSH, you must specify either a password, a password script, or an identity file. |
| Path to SSH Identity File | identity_file | The Identity file for SSH. |
| TCP Port | ipport | UDP/TCP port to use for connections with the device; the default value is 22. |
| Force Command Prompt | cmd_prompt | The command prompt to use. The default value is 'MP>', 'hpiLO->'. |
| Power Wait (seconds) | power_wait | Number of seconds to wait after issuing a power off or power on command. |
| Delay (seconds) | delay | The number of seconds to wait before fencing is started. The default value is 0. |
| Power Timeout (seconds) | power_timeout | Number of seconds to continue testing for a status change after issuing a power off or power on command. The default value is 20. |
| Shell Timeout (seconds) | shell_timeout | Number of seconds to wait for a command prompt after issuing a command. The default value is 3. |
| Login Timeout (seconds) | login_timeout | Number of seconds to wait for a command prompt after login. The default value is 5. |
| Times to Retry Power On Operation | retry_on | Number of attempts to retry a power on operation. The default value is 1. |
4.19. IBM BladeCenter
fence_bladecenter, the fence agent for IBM BladeCenter.
Table 4.20. IBM BladeCenter
| luci Field | cluster.conf Attribute | Description |
|---|---|---|
| Name | name | A name for the IBM BladeCenter device connected to the cluster. |
| IP Address or Hostname | ipaddr | The IP address or host name assigned to the device. |
| IP port (optional) | ipport | TCP port to use for connection with the device. |
| Login | login | The login name used to access the device. |
| Password | passwd | The password used to authenticate the connection to the device. |
| Password Script (optional) | passwd_script | The script that supplies a password for access to the fence device. Using this supersedes the parameter. |
| Power Wait (seconds) | power_wait | Number of seconds to wait after issuing a power off or power on command. |
| Power Timeout (seconds) | power_timeout | Number of seconds to continue testing for a status change after issuing a power off or power on command. The default value is 20. |
| Shell Timeout (seconds) | shell_timeout | Number of seconds to wait for a command prompt after issuing a command. The default value is 3. |
| Login Timeout (seconds) | login_timeout | Number of seconds to wait for a command prompt after login. The default value is 5. |
| Times to Retry Power On Operation | retry_on | Number of attempts to retry a power on operation. The default value is 1. |
| Use SSH | secure | Indicates that system will use SSH to access the device. When using SSH, you must specify either a password, a password script, or an identity file. |
| SSH Options | ssh_options | SSH options to use. The default value is -1 -c blowfish. |
| Path to SSH Identity File | identity_file | The identity file for SSH. |
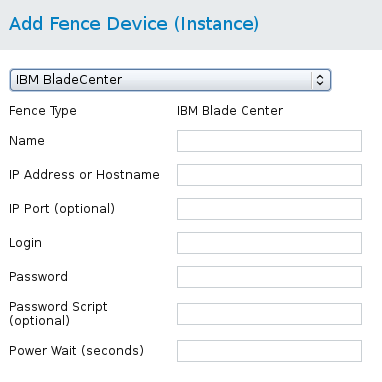
Figure 4.14. IBM BladeCenter
ccs -f cluster.conf --addfencedev bladecentertest1 agent=fence_bladecenter ipaddr=192.168.0.1 login=root \
 passwd=password123 power_wait=60
cluster.conf entry for the fence_bladecenter device:
 <fencedevices>
  <fencedevice agent="fence_bladecenter" ipaddr="192.168.0.1" login="root" name="bladecentertest1" passwd="password123" \
   power_wait="60"/>
 </fencedevices>
4.20. IBM BladeCenter over SNMP
fence_ibmblade, the fence agent for IBM BladeCenter over SNMP.
Table 4.21. IBM BladeCenter SNMP
| luci Field | cluster.conf Attribute | Description |
|---|---|---|
| Name | name | A name for the IBM BladeCenter SNMP device connected to the cluster. |
| IP Address or Hostname | ipaddr | The IP address or host name assigned to the device. |
| UDP/TCP Port (optional) | udpport | UDP/TCP port to use for connections with the device; the default value is 161. |
| Login | login | The login name used to access the device. |
| Password | passwd | The password used to authenticate the connection to the device. |
| Password Script (optional) | passwd_script | The script that supplies a password for access to the fence device. Using this supersedes the parameter. |
| SNMP Version | snmp_version | The SNMP version to use (1, 2c, 3); the default value is 1. |
| SNMP Community | community | The SNMP community string. |
| SNMP Security Level | snmp_sec_level | The SNMP security level (noAuthNoPriv, authNoPriv, authPriv). |
| SNMP Authentication Protocol | snmp_auth_prot | The SNMP authentication protocol (MD5, SHA). |
| SNMP Privacy Protocol | snmp_priv_prot | The SNMP privacy protocol (DES, AES). |
| SNMP privacy protocol password | snmp_priv_passwd | The SNMP Privacy Protocol Password. |
| SNMP Privacy Protocol Script | snmp_priv_passwd_script | The script that supplies a password for SNMP privacy protocol. Using this supersedes the parameter. |
| Power Wait (seconds) | power_wait | Number of seconds to wait after issuing a power off or power on command. |
| Power Timeout (seconds) | power_timeout | Number of seconds to continue testing for a status change after issuing a power off or power on command. The default value is 20. |
| Shell Timeout (seconds) | shell_timeout | Number of seconds to wait for a command prompt after issuing a command. The default value is 3. |
| Login Timeout (seconds) | login_timeout | Number of seconds to wait for a command prompt after login. The default value is 5. |
| Times to Retry Power On Operation | retry_on | Number of attempts to retry a power on operation. The default value is 1. |
| Port (Outlet) Number | port | Physical plug number or name of virtual machine. |
| Delay (optional) | delay | The number of seconds to wait before fencing is started. The default value is 0. |
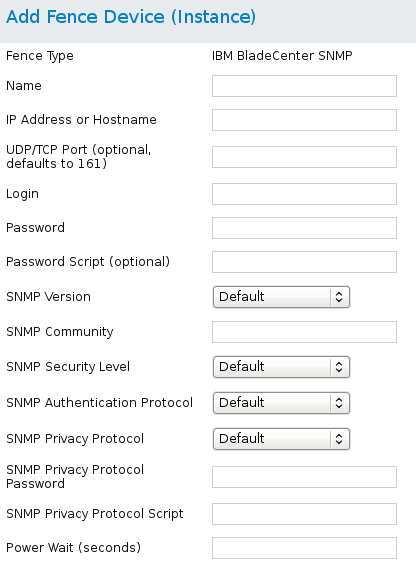
Figure 4.15. IBM BladeCenter SNMP
ccs -f cluster.conf --addfencedev bladesnmp1 agent=fence_ibmblade community=private ipaddr=192.168.0.1 login=root \
 passwd=password123 snmp_priv_passwd=snmpasswd123 power_wait=60
cluster.conf entry for the fence_ibmblade device:
 <fencedevices>
  <fencedevice agent="fence_ibmblade" community="private" ipaddr="192.168.0.1" login="root" name="bladesnmp1" \
   passwd="password123" power_wait="60" snmp_priv_passwd="snmpasswd123" udpport="161"/>
 </fencedevices>
4.21. IBM iPDU
fence_ipdu, the fence agent for iPDU over SNMP devices.
Table 4.22. IBM iPDU (Red Hat Enterprise Linux 6.4 and later)
| luci Field | cluster.conf Attribute | Description |
|---|---|---|
| Name | name | A name for the IBM iPDU device connected to the cluster into which the fence daemon logs by means of the SNMP protocol. |
| IP Address or Hostname | ipaddr | The IP address or host name assigned to the device. |
| UDP/TCP Port | udpport | The UDP/TCP port to use for connection with the device; the default value is 161. |
| Login | login | The login name used to access the device. |
| Password | passwd | The password used to authenticate the connection to the device. |
| Password Script (optional) | passwd_script | The script that supplies a password for access to the fence device. Using this supersedes the parameter. |
| SNMP Version | snmp_version | The SNMP version to use (1, 2c, 3); the default value is 1. |
| SNMP Community | community | The SNMP community string; the default value is private. |
| SNMP Security Level | snmp_sec_level | The SNMP security level (noAuthNoPriv, authNoPriv, authPriv). |
| SNMP Authentication Protocol | snmp_auth_prot | The SNMP Authentication Protocol (MD5, SHA). |
| SNMP Privacy Protocol | snmp_priv_prot | The SNMP privacy protocol (DES, AES). |
| SNMP Privacy Protocol Password | snmp_priv_passwd | The SNMP privacy protocol password. |
| SNMP Privacy Protocol Script | snmp_priv_passwd_script | The script that supplies a password for SNMP privacy protocol. Using this supersedes the parameter. |
| Power Wait (seconds) | power_wait | Number of seconds to wait after issuing a power off or power on command. |
| Power Timeout (seconds) | power_timeout | Number of seconds to continue testing for a status change after issuing a power off or power on command. The default value is 20. |
| Shell Timeout (seconds) | shell_timeout | Number of seconds to wait for a command prompt after issuing a command. The default value is 3. |
| Login Timeout (seconds) | login_timeout | Number of seconds to wait for a command prompt after login. The default value is 5. |
| Times to Retry Power On Operation | retry_on | Number of attempts to retry a power on operation. The default value is 1. |
| Port (Outlet) Number | port | Physical plug number or name of virtual machine. |
| Delay (optional) | delay | The number of seconds to wait before fencing is started. The default value is 0. |
Figure 4.16. IBM iPDU
ccs -f cluster.conf --addfencedev ipdutest1 agent=fence_ipdu community=ipdusnmpcom ipaddr=192.168.0.1 login=root \
 passwd=password123 snmp_priv_passwd=snmpasswd123 power_wait=60 snmp_priv_prot=AES udpport=111
cluster.conf entry for the fence_ipdu device:
 <fencedevices>
  <fencedevice agent="fence_ipdu" community="ipdusnmpcom" ipaddr="ipduhost" login="root" name="ipdutest1" \
   passwd="password123" power_wait="60" snmp_priv_passwd="ipduprivprotpasswd" snmp_priv_prot="AES" \
   udpport="111"/>
 </fencedevices>
4.22. IF-MIB
fence_ifmib, the fence agent for IF-MIB devices.
Table 4.23. IF MIB
| luci Field | cluster.conf Attribute | Description |
|---|---|---|
| Name | name | A name for the IF MIB device connected to the cluster. |
| IP Address or Hostname | ipaddr | The IP address or host name assigned to the device. |
| UDP/TCP Port (optional) | udpport | The UDP/TCP port to use for connection with the device; the default value is 161. |
| Login | login | The login name used to access the device. |
| Password | passwd | The password used to authenticate the connection to the device. |
| Password Script (optional) | passwd_script | The script that supplies a password for access to the fence device. Using this supersedes the parameter. |
| SNMP Version | snmp_version | The SNMP version to use (1, 2c, 3); the default value is 1. |
| SNMP Community | community | The SNMP community string. |
| SNMP Security Level | snmp_sec_level | The SNMP security level (noAuthNoPriv, authNoPriv, authPriv). |
| SNMP Authentication Protocol | snmp_auth_prot | The SNMP authentication protocol (MD5, SHA). |
| SNMP Privacy Protocol | snmp_priv_prot | The SNMP privacy protocol (DES, AES). |
| SNMP Privacy Protocol Password | snmp_priv_passwd | The SNMP privacy protocol password. |
| SNMP Privacy Protocol Script | snmp_priv_passwd_script | The script that supplies a password for SNMP privacy protocol. Using this supersedes the parameter. |
| Power Wait (seconds) | power_wait | Number of seconds to wait after issuing a power off or power on command. |
| Power Timeout (seconds) | power_timeout | Number of seconds to continue testing for a status change after issuing a power off or power on command. The default value is 20. |
| Shell Timeout (seconds) | shell_timeout | Number of seconds to wait for a command prompt after issuing a command. The default value is 3. |
| Login Timeout (seconds) | login_timeout | Number of seconds to wait for a command prompt after login. The default value is 5. |
| Times to Retry Power On Operation | retry_on | Number of attempts to retry a power on operation. The default value is 1. |
| Port (Outlet) Number | port | Physical plug number or name of virtual machine. |
| Delay (optional) | delay | The number of seconds to wait before fencing is started. The default value is 0. |
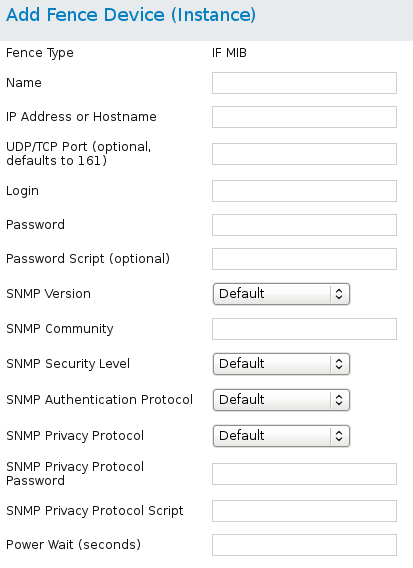
Figure 4.17. IF-MIB
ccs -f cluster.conf --addfencedev ifmib1 agent=fence_ifmib community=private ipaddr=192.168.0.1 login=root \
 passwd=password123 snmp_priv_passwd=snmpasswd123 power_wait=60 udpport=161
cluster.conf entry for the fence_ifmib device:
 <fencedevices>
  <fencedevice agent="fence_ifmib" community="private" ipaddr="192.168.0.1" login="root" name="ifmib1" \
   passwd="password123" power_wait="60" snmp_priv_passwd="snmpasswd123" udpport="161"/>
 </fencedevices>
4.23. Intel Modular
fence_intelmodular, the fence agent for Intel Modular.
Table 4.24. Intel Modular
| luci Field | cluster.conf Attribute | Description |
|---|---|---|
| Name | name | A name for the Intel Modular device connected to the cluster. |
| IP Address or Hostname | ipaddr | The IP address or host name assigned to the device. |
| UDP/TCP Port (optional) | udpport | The UDP/TCP port to use for connection with the device; the default value is 161. |
| Login | login | The login name used to access the device. |
| Password | passwd | The password used to authenticate the connection to the device. |
| Password Script (optional) | passwd_script | The script that supplies a password for access to the fence device. Using this supersedes the parameter. |
| SNMP Version | snmp_version | The SNMP version to use (1, 2c, 3); the default value is 1. |
| SNMP Community | community | The SNMP community string; the default value is private. |
| SNMP Security Level | snmp_sec_level | The SNMP security level (noAuthNoPriv, authNoPriv, authPriv). |
| SNMP Authentication Protocol | snmp_auth_prot | The SNMP authentication protocol (MD5, SHA). |
| SNMP Privacy Protocol | snmp_priv_prot | The SNMP privacy protocol (DES, AES). |
| SNMP Privacy Protocol Password | snmp_priv_passwd | The SNMP privacy protocol password. |
| SNMP Privacy Protocol Script | snmp_priv_passwd_script | The script that supplies a password for SNMP privacy protocol. Using this supersedes the parameter. |
| Power Wait (seconds) | power_wait | Number of seconds to wait after issuing a power off or power on command. |
| Power Timeout (seconds) | power_timeout | Number of seconds to continue testing for a status change after issuing a power off or power on command. The default value is 20. |
| Shell Timeout (seconds) | shell_timeout | Number of seconds to wait for a command prompt after issuing a command. The default value is 3. |
| Login Timeout (seconds) | login_timeout | Number of seconds to wait for a command prompt after login. The default value is 5. |
| Times to Retry Power On Operation | retry_on | Number of attempts to retry a power on operation. The default value is 1. |
| Port (Outlet) Number | port | Physical plug number or name of virtual machine. |
| Delay (optional) | delay | The number of seconds to wait before fencing is started. The default value is 0. |
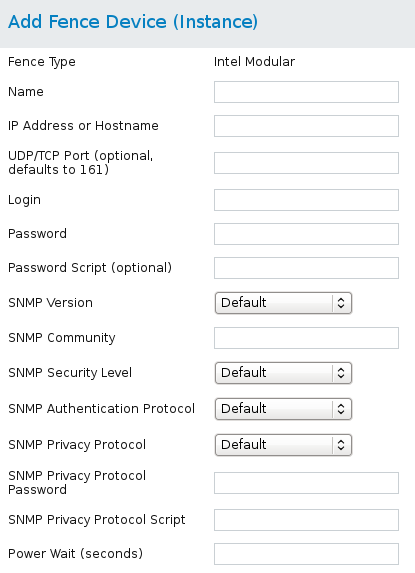
Figure 4.18. Intel Modular
ccs -f cluster.conf --addfencedev intelmodular1 agent=fence_intelmodular community=private ipaddr=192.168.0.1 login=root \
 passwd=password123 snmp_priv_passwd=snmpasswd123 power_wait=60 udpport=161
cluster.conf entry for the fence_intelmodular device:
 <fencedevices>
  <fencedevice agent="fence_intelmodular" community="private" ipaddr="192.168.0.1" login="root" name="intelmodular1" \
   passwd="password123" power_wait="60" snmp_priv_passwd="snmpasswd123" udpport="161"/>
 </fencedevices>
4.24. IPMI over LAN
fence_ipmilan,) Dell iDRAC (fence_idrac), IBM Integrated Management Module (fence_imm), HP iLO3 devices (fence_ilo3), and HP iLO4 devices (fence_ilo4) share the same implementation. Table 4.25, “IPMI (Intelligent Platform Management Interface) LAN, Dell iDrac, IBM Integrated Management Module, HPiLO3, HPiLO4” lists the fence device parameters used by these agents.
Table 4.25. IPMI (Intelligent Platform Management Interface) LAN, Dell iDrac, IBM Integrated Management Module, HPiLO3, HPiLO4
| luci Field | cluster.conf Attribute | Description |
|---|---|---|
| Name | name | A name for the fence device connected to the cluster. |
| IP Address or Hostname | ipaddr | The IP address or host name assigned to the device. |
| Login | login | The login name of a user capable of issuing power on/off commands to the given port. |
| Password | passwd | The password used to authenticate the connection to the port. |
| Password Script (optional) | passwd_script | The script that supplies a password for access to the fence device. Using this supersedes the parameter. |
| Authentication Type | auth | Authentication type: none, password, or MD5. |
| Use Lanplus | lanplus | True or 1. If blank, then value is False. It is recommended that you enable Lanplus to improve the security of your connection if your hardware supports it. |
| Ciphersuite to use | cipher | The remote server authentication, integrity, and encryption algorithms to use for IPMIv2 lanplus connections. |
| Privilege level | privlvl | The privilege level on the device. |
| IPMI Operation Timeout | timeout | Timeout in seconds for IPMI operation. |
| Power Timeout (seconds) | power_timeout | Number of seconds to continue testing for a status change after issuing a power off or power on command. The default value is 20. |
| Shell Timeout (seconds) | shell_timeout | Number of seconds to wait for a command prompt after issuing a command. The default value is 3. |
| Login Timeout (seconds) | login_timeout | Number of seconds to wait for a command prompt after login. The default value is 5. |
| Times to Retry Power On Operation | retry_on | Number of attempts to retry a power on operation. The default value is 1. |
| Power Wait (seconds) | power_wait | Number of seconds to wait after issuing a power off or power on command. The default value is 2 seconds for fence_ipmilan, fence_idrac, fence_imm, and fence_ilo4. The default value is 4 seconds for fence_ilo3. |
| Delay (optional) | delay | The number of seconds to wait before fencing is started. The default value is 0. |
| Method to Fence | method | The method to fence: on/off or cycle |
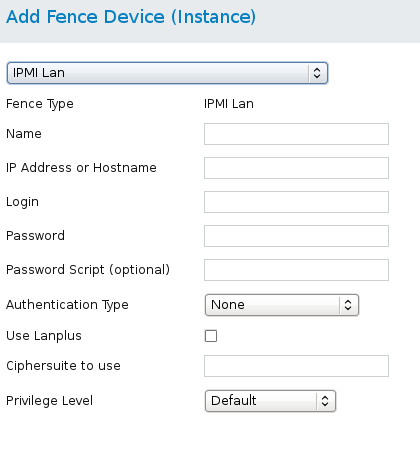
Figure 4.19. IPMI over LAN
ccs -f cluster.conf --addfencedev ipmitest1 agent=fence_ipmilan auth=password cipher=3 ipaddr=192.168.0.1 \
 lanplus=on login=root passwd=password123
cluster.conf entry for the fence_ipmilan device:
 <fencedevices>
  <fencedevice agent="fence_ipmilan" auth="password" cipher="3" ipaddr="192.168.0.1" lanplus="on" login="root" \
   name="ipmitest1" passwd="password123"/>
 </fencedevices>
4.25. Fence kdump
fence_dkump, the fence agent for kdump crash recovery service. Note that fence_kdump is not a replacement for traditional fencing methods; The fence_kdump agent can detect only that a node has entered the kdump crash recovery service. This allows the kdump crash recovery service to complete without being preempted by traditional power fencing methods.
Table 4.26. Fence kdump
| luci Field | cluster.conf Attribute | Description |
|---|---|---|
| Name | name | A name for the fence_kdump device. |
| IP Family | family | IP network family. The default value is auto. |
| IP Port (optional) | ipport | IP port number that the fence_kdump agent will use to listen for messages. The default value is 7410. |
| Operation Timeout (seconds) (optional) | timeout | Number of seconds to wait for message from failed node. |
| Node name | nodename | Name or IP address of the node to be fenced. |
4.26. Multipath Persistent Reservation Fencing (Red Hat Enterprise Linux 6.7 and later)
fence_mpath, the fence agent for multipath persistent reservation fencing.
Table 4.27. Multipath Persistent Reservation Fencing (Red Hat Enterprise Linux 6.7 and later)
| luci Field | cluster.conf Attribute | Description |
|---|---|---|
| Name | name | A name for the fence_mpath device. |
| Devices (Comma delimited list) | devices | Comma-separated list of devices to use for the current operation. Each device must support SCSI-3 persistent reservations. |
| Use sudo when calling third-party software | sudo | Use sudo (without password) when calling 3rd party software. |
| Path to sudo binary (optional) | sudo_path | Path to sudo binary (default value is /usr/bin/sudo. |
| Path to mpathpersist binary (optional) | mpathpersist_path | Path to mpathpersist binary (default value is /sbin/mpathpersist. |
| Path to a directory where the fence agent can store information (optional) | store_path | Path to directory where fence agent can store information (default value is /var/run/cluster. |
| Power Wait (seconds) | power_wait | Number of seconds to wait after issuing a power off or power on command. |
| Power Timeout (seconds) | power_timeout | Number of seconds to continue testing for a status change after issuing a power off or power on command. The default value is 20. |
| Shell Timeout (seconds) | shell_timeout | Number of seconds to wait for a command prompt after issuing a command. The default value is 3. |
| Login Timeout (seconds) | login_timeout | Number of seconds to wait for a command prompt after login. The default value is 5. |
| Times to Retry Power On Operation | retry_on | Number of attempts to retry a power on operation. The default value is 1. |
| Unfencing | unfence section of the cluster configuration file | When enabled, this ensures that a fenced node is not re-enabled until the node has been rebooted. This is necessary for non-power fence methods. When you configure a device that requires unfencing, the cluster must first be stopped and the full configuration including devices and unfencing must be added before the cluster is started. For more information about unfencing a node, see the fence_node(8) man page. |
| Key for current action | key | Key to use for the current operation. This key should be unique to a node and written in /etc/multipath.conf. For the "on" action, the key specifies the key use to register the local node. For the "off" action, this key specifies the key to be removed from the device(s). This parameter is always required. |
| Delay (optional) | delay | The number of seconds to wait before fencing is started. The default value is 0. |
4.27. RHEV-M REST API
fence_rhevm, the fence agent for RHEV-M REST API.
Table 4.28. RHEV-M REST API (RHEL 6.2 and later against RHEV 3.0 and later)
| luci Field | cluster.conf Attribute | Description |
|---|---|---|
| Name | name | Name of the RHEV-M REST API fencing device. |
| IP Address or Hostname | ipaddr | The IP address or host name assigned to the device. |
| IP Port (optional) | ipport | The TCP port to use for connection with the device. |
| Login | login | The login name used to access the device. |
| Password | passwd | The password used to authenticate the connection to the device. |
| Password Script (optional) | passwd_script | The script that supplies a password for access to the fence device. Using this supersedes the parameter. |
| Use SSL | ssl | Use SSL connections to communicate with the device. |
| Power Wait (seconds) | power_wait | Number of seconds to wait after issuing a power off or power on command. |
| Power Timeout (seconds) | power_timeout | Number of seconds to continue testing for a status change after issuing a power off or power on command. The default value is 20. |
| Shell Timeout (seconds) | shell_timeout | Number of seconds to wait for a command prompt after issuing a command. The default value is 3. |
| Login Timeout (seconds) | login_timeout | Number of seconds to wait for a command prompt after login. The default value is 5. |
| Times to Retry Power On Operation | retry_on | Number of attempts to retry a power on operation. The default value is 1. |
| Port (Outlet) Number | port | Physical plug number or name of virtual machine. |
| Delay (optional) | delay | The number of seconds to wait before fencing is started. The default value is 0. |
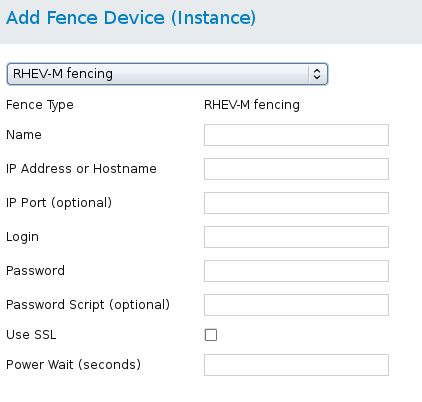
Figure 4.20. RHEV-M REST API
ccs -f cluster.conf --addfencedev rhevmtest1 agent=fence_rhevm ipaddr=192.168.0.1 login=root passwd=password123 \
 power_wait=60 ssl=on
cluster.conf entry for the fence_rhevm device:
 <fencedevices>
  <fencedevice agent="fence_rhevm" ipaddr="192.168.0.1" login="root" name="rhevmtest1" passwd="password123" \
   power_wait="60" ssl="on"/>
 </fencedevices>
4.28. SCSI Persistent Reservations
fence_scsi, the fence agent for SCSI persistent reservations.
Note
- When using SCSI fencing, all nodes in the cluster must register with the same devices so that each node can remove another node's registration key from all the devices it is registered with.
- Devices used for the cluster volumes should be a complete LUN, not partitions. SCSI persistent reservations work on an entire LUN, meaning that access is controlled to each LUN, not individual partitions.
/dev/disk/by-id/xxx where possible. Devices specified in this format are consistent among all nodes and will point to the same disk, unlike devices specified in a format such as /dev/sda which can point to different disks from machine to machine and across reboots.
Table 4.29. SCSI Reservation Fencing
| luci Field | cluster.conf Attribute | Description |
|---|---|---|
| Name | name | A name for the SCSI fence device. |
| Unfencing | unfence section of the cluster configuration file | When enabled, this ensures that a fenced node is not re-enabled until the node has been rebooted. This is necessary for non-power fence methods (that is, SAN/storage fencing). When you configure a device that requires unfencing, the cluster must first be stopped and the full configuration including devices and unfencing must be added before the cluster is started. For more information about unfencing a node, see the fence_node(8) man page. |
| Node name | nodename | The node name is used to generate the key value used for the current operation. |
| Key for current action | key | (overrides node name) Key to use for the current operation. This key should be unique to a node. For the "on" action, the key specifies the key use to register the local node. For the "off" action,this key specifies the key to be removed from the device(s). |
| Delay (optional) | delay | The number of seconds to wait before fencing is started. The default value is 0. |

Figure 4.21. SCSI Fencing
ccs -f cluster.conf --addfencedev scsifencetest1 agent=fence_scsi
cluster.conf entry for the fence_scsi device:
 <fencedevices>
  <<fencedevice agent="fence_scsi" name="scsifencetest1"/>
 </fencedevices>
4.29. VMware over SOAP API
fence_vmware_soap, the fence agent for VMware over SOAP API.
Table 4.30. VMware Fencing (SOAP Interface) (Red Hat Enterprise Linux 6.2 and later)
| luci Field | cluster.conf Attribute | Description |
|---|---|---|
| Name | name | Name of the virtual machine fencing device. |
| IP Address or Hostname | ipaddr | The IP address or host name assigned to the device. |
| IP Port (optional) | ipport | The TCP port to use for connection with the device. The default port is 80, or 443 if Use SSL is selected. |
| Login | login | The login name used to access the device. |
| Password | passwd | The password used to authenticate the connection to the device. |
| Password Script (optional) | passwd_script | The script that supplies a password for access to the fence device. Using this supersedes the parameter. |
| Power Wait (seconds) | power_wait | Number of seconds to wait after issuing a power off or power on command. |
| Power Timeout (seconds) | power_timeout | Number of seconds to continue testing for a status change after issuing a power off or power on command. The default value is 20. |
| Shell Timeout (seconds) | shell_timeout | Number of seconds to wait for a command prompt after issuing a command. The default value is 3. |
| Login Timeout (seconds) | login_timeout | Number of seconds to wait for a command prompt after login. The default value is 5. |
| Times to Retry Power On Operation | retry_on | Number of attempts to retry a power on operation. The default value is 1. |
| VM name | port | Name of virtual machine in inventory path format (for example, /datacenter/vm/Discovered_virtual_machine/myMachine). |
| VM UUID | uuid | The UUID of the virtual machine to fence. |
| Delay (optional) | delay | The number of seconds to wait before fencing is started. The default value is 0. |
| Use SSL | ssl | Use SSL connections to communicate with the device. |

Figure 4.22. VMware over SOAP Fencing
ccs -f cluster.conf --addfencedev vmwaresoaptest1 agent=fence_vmware_soap login=root passwd=password123 power_wait=60 \
 separator=,
cluster.conf entry for the fence_vmware_soap device:
 <fencedevices>
  <fencedevice agent="fence_vmware_soap" ipaddr="192.168.0.1" login="root" name="vmwaresoaptest1" passwd="password123" \
   power_wait="60" separator="."/>
 </fencedevices>
4.30. WTI Power Switch
fence_wti, the fence agent for the WTI network power switch.
Table 4.31. WTI Power Switch
| luci Field | cluster.conf Attribute | Description |
|---|---|---|
| Name | name | A name for the WTI power switch connected to the cluster. |
| IP Address or Hostname | ipaddr | The IP or address or host name assigned to the device. |
| IP Port (optional) | ipport | The TCP port to use to connect to the device. |
| Login | login | The login name used to access the device. |
| Password | passwd | The password used to authenticate the connection to the device. |
| Password Script (optional) | passwd_script | The script that supplies a password for access to the fence device. Using this supersedes the parameter. |
| Force command prompt | cmd_prompt | The command prompt to use. The default value is ['RSM>', '>MPC', 'IPS>', 'TPS>', 'NBB>', 'NPS>', 'VMR>'] |
| Power Wait (seconds) | power_wait | Number of seconds to wait after issuing a power off or power on command. |
| Power Timeout (seconds) | power_timeout | Number of seconds to continue testing for a status change after issuing a power off or power on command. The default value is 20. |
| Shell Timeout (seconds) | shell_timeout | Number of seconds to wait for a command prompt after issuing a command. The default value is 3. |
| Login Timeout (seconds) | login_timeout | Number of seconds to wait for a command prompt after login. The default value is 5. |
| Times to Retry Power On Operation | retry_on | Number of attempts to retry a power on operation. The default value is 1. |
| Use SSH | secure | Indicates that system will use SSH to access the device. When using SSH, you must specify either a password, a password script, or an identity file. |
| SSH Options | ssh_options | SSH options to use. The default value is -1 -c blowfish. |
| Path to SSH Identity File | identity_file | The identity file for SSH. |
| Port | port | Physical plug number or name of virtual machine. |
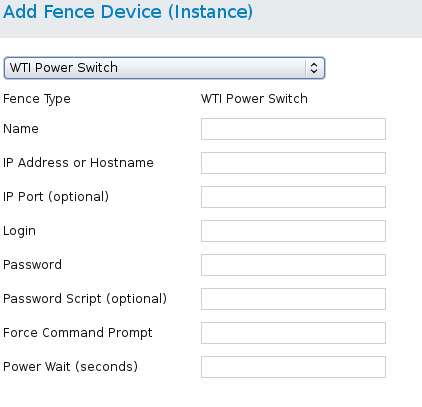
Figure 4.23. WTI Fencing
ccs -f cluster.conf --addfencedev wtipwrsw1 agent=fence_wti cmd_prompt=VMR> login=root passwd=password123 \
 power_wait=60
cluster.conf entry for the fence_wti device:
<fencedevices> <fencedevice agent="fence_wti" cmd_prompt="VMR>" ipaddr="192.168.0.1" login="root" name="wtipwrsw1" \ passwd="password123" power_wait="60"/> </fencedevices>
Appendix A. Revision History
| Revision History | |||
|---|---|---|---|
| Revision 4-2 | Wed Mar 8 2017 | ||
| |||
| Revision 4-1 | Fri Dec 16 2016 | ||
| |||
| Revision 3-5 | Wed Apr 27 2016 | ||
| |||
| Revision 3-4 | Wed Mar 9 2016 | ||
| |||
| Revision 2-2 | Wed Jul 8 2015 | ||
| |||
| Revision 2-1 | Thu Apr 16 2015 | ||
| |||
| Revision 1-13 | Wed Oct 8 2014 | ||
| |||
| Revision 1-11 | Thu Aug 7 2014 | ||
| |||
| Revision 1-9 | Wed Nov 20 2013 | ||
| |||
| Revision 1-4 | Mon Nov 28 2012 | ||
| |||
| Revision 1-2 | Mon Nov 28 2012 | ||
| |||
Index
A
- ACPI
- APC power switch over SNMP fence device , APC Power Switch over SNMP
- APC power switch over telnet/SSH fence device , APC Power Switch over Telnet and SSH
B
- Brocade fabric switch fence device , Brocade Fabric Switch
C
- CISCO MDS fence device , Cisco MDS
- Cisco UCS fence device , Cisco UCS
- cluster administration
- configuring ACPI, Configuring ACPI For Use with Integrated Fence Devices
D
- Dell DRAC 5 fence device , Dell Drac 5
- Dell iDRAC fence device , IPMI over LAN
E
- Eaton network power switch, Eaton Network Power Switch
- Egenera BladeFrame fence device , Egenera BladeFrame
- Emerson network power switch fence device , Emerson Network Power Switch (SNMP interface)
- ePowerSwitch fence device , ePowerSwitch
F
- fence
- configuration, Fencing Pre-Configuration
- devices, Fence Devices
- fence agent
- fence_apc, APC Power Switch over Telnet and SSH
- fence_apc_snmp, APC Power Switch over SNMP
- fence_bladecenter, IBM BladeCenter
- fence_brocade, Brocade Fabric Switch
- fence_cisco_mds, Cisco MDS
- fence_cisco_ucs, Cisco UCS
- fence_drac5, Dell Drac 5
- fence_eaton_snmp, Eaton Network Power Switch
- fence_egenera, Egenera BladeFrame
- fence_emerson, Emerson Network Power Switch (SNMP interface)
- fence_eps, ePowerSwitch
- fence_hpblade, Hewlett-Packard BladeSystem
- fence_ibmblade, IBM BladeCenter over SNMP
- fence_idrac, IPMI over LAN
- fence_ifmib, IF-MIB
- fence_ilo, Hewlett-Packard iLO
- fence_ilo2, Hewlett-Packard iLO
- fence_ilo3, IPMI over LAN
- fence_ilo3_ssh, HP iLO over SSH
- fence_ilo4, IPMI over LAN
- fence_ilo4_ssh, HP iLO over SSH
- fence_ilo_moonshot, HP Moonshot iLO
- fence_ilo_mp, Hewlett-Packard iLO MP
- fence_ilo_ssh, HP iLO over SSH
- fence_imm, IPMI over LAN
- fence_intelmodular, Intel Modular
- fence_ipdu, IBM iPDU
- fence_ipmilan, IPMI over LAN
- fence_kdump, Fence kdump
- fence_mpath, Multipath Persistent Reservation Fencing (Red Hat Enterprise Linux 6.7 and later)
- fence_rhevm, RHEV-M REST API
- fence_rsb, Fujitsu-Siemens RemoteView Service Board (RSB)
- fence_scsi, SCSI Persistent Reservations
- fence_virt, Fence Virt (Serial/VMChannel Mode)
- fence_vmware_soap, VMware over SOAP API
- fence_wti, WTI Power Switch
- fence_xvm, Fence Virt (Multicast Mode)
- fence configuration, Fencing Pre-Configuration, Configuring Fencing with Conga
- SELinux, SELinux
- fence device
- APC power switch over SNMP, APC Power Switch over SNMP
- APC power switch over telnet/SSH, APC Power Switch over Telnet and SSH
- Brocade fabric switch, Brocade Fabric Switch
- Cisco MDS, Cisco MDS
- Cisco UCS, Cisco UCS
- Dell DRAC 5, Dell Drac 5
- Dell iDRAC, IPMI over LAN
- Eaton network power switch, Eaton Network Power Switch
- Egenera BladeFrame, Egenera BladeFrame
- Emerson network power switch, Emerson Network Power Switch (SNMP interface)
- ePowerSwitch, ePowerSwitch
- Fence virt, Fence Virt (Serial/VMChannel Mode)
- Fence virt (Multicast Mode), Fence Virt (Multicast Mode)
- Fujitsu Siemens RemoteView Service Board (RSB), Fujitsu-Siemens RemoteView Service Board (RSB)
- HP BladeSystem, Hewlett-Packard BladeSystem
- HP iLO, Hewlett-Packard iLO
- HP iLO MP, Hewlett-Packard iLO MP
- HP iLO over SSH, HP iLO over SSH
- HP iLO2, Hewlett-Packard iLO
- HP iLO3, IPMI over LAN
- HP iLO3 over SSH, HP iLO over SSH
- HP iLO4, IPMI over LAN
- HP iLO4 over SSH, HP iLO over SSH
- HP Moonshot iLO, HP Moonshot iLO
- IBM BladeCenter, IBM BladeCenter
- IBM BladeCenter SNMP, IBM BladeCenter over SNMP
- IBM Integrated Management Module, IPMI over LAN
- IBM iPDU, IBM iPDU
- IF MIB, IF-MIB
- Intel Modular, Intel Modular
- IPMI LAN, IPMI over LAN
- multipath persistent reservation fencing, Multipath Persistent Reservation Fencing (Red Hat Enterprise Linux 6.7 and later)
- RHEV-M REST API, RHEV-M REST API
- SCSI fencing, SCSI Persistent Reservations
- VMware (SOAP interface), VMware over SOAP API
- WTI power switch, WTI Power Switch
- fence devices, Fence Devices
- Fence virt fence device , Fence Virt (Serial/VMChannel Mode), Fence Virt (Multicast Mode)
- fence_apc fence agent, APC Power Switch over Telnet and SSH
- fence_apc_snmp fence agent, APC Power Switch over SNMP
- fence_bladecenter fence agent, IBM BladeCenter
- fence_brocade fence agent, Brocade Fabric Switch
- fence_cisco_mds fence agent, Cisco MDS
- fence_cisco_ucs fence agent, Cisco UCS
- fence_drac5 fence agent, Dell Drac 5
- fence_eaton_snmp fence agent, Eaton Network Power Switch
- fence_egenera fence agent, Egenera BladeFrame
- fence_emerson fence agent, Emerson Network Power Switch (SNMP interface)
- fence_eps fence agent, ePowerSwitch
- fence_hpblade fence agent, Hewlett-Packard BladeSystem
- fence_ibmblade fence agent, IBM BladeCenter over SNMP
- fence_idrac fence agent, IPMI over LAN
- fence_ifmib fence agent, IF-MIB
- fence_ilo fence agent, Hewlett-Packard iLO
- fence_ilo2 fence agent, Hewlett-Packard iLO
- fence_ilo3 fence agent, IPMI over LAN
- fence_ilo3_ssh fence agent, HP iLO over SSH
- fence_ilo4 fence agent, IPMI over LAN
- fence_ilo4_ssh fence agent, HP iLO over SSH
- fence_ilo_moonshot fence agent, HP Moonshot iLO
- fence_ilo_mp fence agent, Hewlett-Packard iLO MP
- fence_ilo_ssh fence agent, HP iLO over SSH
- fence_imm fence agent, IPMI over LAN
- fence_intelmodular fence agent, Intel Modular
- fence_ipdu fence agent, IBM iPDU
- fence_ipmilan fence agent, IPMI over LAN
- fence_kdump fence agent, Fence kdump
- fence_mpath fence agent, Multipath Persistent Reservation Fencing (Red Hat Enterprise Linux 6.7 and later)
- fence_rhevm fence agent, RHEV-M REST API
- fence_rsb fence agent, Fujitsu-Siemens RemoteView Service Board (RSB)
- fence_scsi fence agent, SCSI Persistent Reservations
- fence_virt fence agent, Fence Virt (Serial/VMChannel Mode)
- fence_vmware_soap fence agent, VMware over SOAP API
- fence_wti fence agent, WTI Power Switch
- fence_xvm fence agent, Fence Virt (Multicast Mode)
- fencing
- fencing configuration, Configuring Fencing with the ccs Command
- Fujitsu Siemens RemoteView Service Board (RSB) fence device, Fujitsu-Siemens RemoteView Service Board (RSB)
H
- HP Bladesystem fence device , Hewlett-Packard BladeSystem
- HP iLO fence device, Hewlett-Packard iLO
- HP iLO MP fence device , Hewlett-Packard iLO MP
- HP iLO over SSH fence device, HP iLO over SSH
- HP iLO2 fence device, Hewlett-Packard iLO
- HP iLO3 fence device, IPMI over LAN
- HP iLO3 over SSH fence device, HP iLO over SSH
- HP iLO4 fence device, IPMI over LAN
- HP iLO4 over SSH fence device, HP iLO over SSH
- HP Moonshot iLO fence device, HP Moonshot iLO
I
- IBM BladeCenter fence device , IBM BladeCenter
- IBM BladeCenter SNMP fence device , IBM BladeCenter over SNMP
- IBM Integrated Management Module fence device , IPMI over LAN
- IBM iPDU fence device , IBM iPDU
- IF MIB fence device , IF-MIB
- integrated fence devices
- configuring ACPI, Configuring ACPI For Use with Integrated Fence Devices
- Intel Modular fence device , Intel Modular
- IPMI LAN fence device , IPMI over LAN
M
- multipath persistent reservation fence device , Multipath Persistent Reservation Fencing (Red Hat Enterprise Linux 6.7 and later)
R
- RHEV-M REST API fence device , RHEV-M REST API
S
- SCSI fencing, SCSI Persistent Reservations
- SELinux
- configuring, SELinux
T
- tables
- fence devices, parameters, Fence Devices
V
- VMware (SOAP interface) fence device , VMware over SOAP API
W
- WTI power switch fence device , WTI Power Switch