
Red Hat Training
A Red Hat training course is available for Red Hat Enterprise Linux
5.5. Adding and Deleting Members
The procedure to add a member to a cluster varies depending on whether the cluster is a newly-configured cluster or a cluster that is already configured and running. To add a member to a new cluster, refer to Section 5.5.1, “Adding a Member to a Cluster”. To add a member to an existing cluster, refer to Section 5.5.2, “Adding a Member to a Running Cluster”. To delete a member from a cluster, refer to Section 5.5.3, “Deleting a Member from a Cluster”.
5.5.1. Adding a Member to a Cluster
To add a member to a new cluster, follow these steps:
- Click .
- At the bottom of the right frame (labeled ), click the button. Clicking that button causes a Node Properties dialog box to be displayed. The Node Properties dialog box presents text boxes for and (refer to Figure 5.5, “Adding a Member to a New Cluster”).
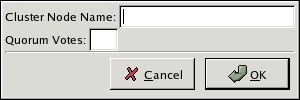
Figure 5.5. Adding a Member to a New Cluster
- At the text box, specify a node name. The entry can be a name or an IP address of the node on the cluster subnet.
Note
Each node must be on the same subnet as the node from which you are running the Cluster Configuration Tool and must be defined either in DNS or in the/etc/hostsfile of each cluster node.Note
The node on which you are running the Cluster Configuration Tool must be explicitly added as a cluster member; the node is not automatically added to the cluster configuration as a result of running the Cluster Configuration Tool. - Optionally, at the text box, you can specify a value; however in most configurations you can leave it blank. Leaving the text box blank causes the quorum votes value for that node to be set to the default value of
1. - Click .
- Configure fencing for the node:
- Click the node that you added in the previous step.
- At the bottom of the right frame (below ), click . Clicking causes the Fence Configuration dialog box to be displayed.
- At the Fence Configuration dialog box, bottom of the right frame (below ), click . Clicking causes a fence-level element (for example, , , and so on) to be displayed below the node in the left frame of the Fence Configuration dialog box.
- Click the fence-level element.
- At the bottom of the right frame (below ), click . Clicking causes the Fence Properties dialog box to be displayed.
- At the Fence Properties dialog box, click the drop-down box and select the fence device for this node. Also, provide additional information required (for example, and for an APC Power Device).
- At the Fence Properties dialog box, click . Clicking causes a fence device element to be displayed below the fence-level element.
- To create additional fence devices at this fence level, return to step 6d. Otherwise, proceed to the next step.
- To create additional fence levels, return to step 6c. Otherwise, proceed to the next step.
- If you have configured all the fence levels and fence devices for this node, click .
- Choose => to save the changes to the cluster configuration.
5.5.2. Adding a Member to a Running Cluster
The procedure for adding a member to a running cluster depends on whether the cluster contains only two nodes or more than two nodes. To add a member to a running cluster, follow the steps in one of the following sections according to the number of nodes in the cluster:
- For clusters with only two nodes —
- For clusters with more than two nodes —
5.5.2.1. Adding a Member to a Running Cluster That Contains Only Two Nodes
To add a member to an existing cluster that is currently in operation, and contains only two nodes, follow these steps:
- Add the node and configure fencing for it as in
- Click to propagate the updated configuration to other running nodes in the cluster.
- Use the
scpcommand to send the updated/etc/cluster/cluster.conffile from one of the existing cluster nodes to the new node. - At the Red Hat Cluster Suite management GUI Cluster Status Tool tab, disable each service listed under .
- Stop the cluster software on the two running nodes by running the following commands at each node in this order:
service rgmanager stopservice gfs stop, if you are using Red Hat GFSservice clvmd stop, if CLVM has been used to create clustered volumesservice cman stop
- Start cluster software on all cluster nodes (including the added one) by running the following commands in this order:
service cman startservice clvmd start, if CLVM has been used to create clustered volumesservice gfs start, if you are using Red Hat GFSservice rgmanager start
- Start the Red Hat Cluster Suite management GUI. At the Cluster Configuration Tool tab, verify that the configuration is correct. At the Cluster Status Tool tab verify that the nodes and services are running as expected.
5.5.2.2. Adding a Member to a Running Cluster That Contains More Than Two Nodes
To add a member to an existing cluster that is currently in operation, and contains more than two nodes, follow these steps:
- Add the node and configure fencing for it as in
- Click to propagate the updated configuration to other running nodes in the cluster.
- Use the
scpcommand to send the updated/etc/cluster/cluster.conffile from one of the existing cluster nodes to the new node. - Start cluster services on the new node by running the following commands in this order:
service cman startservice clvmd start, if CLVM has been used to create clustered volumesservice gfs start, if you are using Red Hat GFSservice rgmanager start
- Start the Red Hat Cluster Suite management GUI. At the Cluster Configuration Tool tab, verify that the configuration is correct. At the Cluster Status Tool tab verify that the nodes and services are running as expected.
5.5.3. Deleting a Member from a Cluster
To delete a member from an existing cluster that is currently in operation, follow these steps:
- At one of the running nodes (not to be removed), run the Red Hat Cluster Suite management GUI. At the Cluster Status Tool tab, under , disable or relocate each service that is running on the node to be deleted.
- Stop the cluster software on the node to be deleted by running the following commands at that node in this order:
service rgmanager stopservice gfs stop, if you are using Red Hat GFSservice clvmd stop, if CLVM has been used to create clustered volumesservice cman stop
- At the Cluster Configuration Tool (on one of the running members), delete the member as follows:
- If necessary, click the triangle icon to expand the property.
- Select the cluster node to be deleted. At the bottom of the right frame (labeled ), click the button.
- Clicking the button causes a warning dialog box to be displayed requesting confirmation of the deletion (Figure 5.6, “Confirm Deleting a Member”).
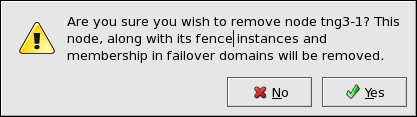
Figure 5.6. Confirm Deleting a Member
- At that dialog box, click to confirm deletion.
- Propagate the updated configuration by clicking the button. (Propagating the updated configuration automatically saves the configuration.)
- Stop the cluster software on the remaining running nodes by running the following commands at each node in this order:
service rgmanager stopservice gfs stop, if you are using Red Hat GFSservice clvmd stop, if CLVM has been used to create clustered volumesservice cman stop
- Start cluster software on all remaining cluster nodes by running the following commands in this order:
service cman startservice clvmd start, if CLVM has been used to create clustered volumesservice gfs start, if you are using Red Hat GFSservice rgmanager start
- Start the Red Hat Cluster Suite management GUI. At the Cluster Configuration Tool tab, verify that the configuration is correct. At the Cluster Status Tool tab verify that the nodes and services are running as expected.
5.5.3.1. Removing a Member from a Cluster at the Command-Line
If desired, you can also manually relocate and remove cluster members by using the
clusvcadm commmand at a shell prompt.
- To prevent service downtime, any services running on the member to be removed must be relocated to another node on the cluster by running the following command:
clusvcadm -r cluster_service_name -m cluster_node_name
Wherecluster_service_nameis the name of the service to be relocated andcluster_member_nameis the name of the member to which the service will be relocated. - Stop the cluster software on the node to be removed by running the following commands at that node in this order:
service rgmanager stopservice gfs stopand/orservice gfs2 stop, if you are usinggfs,gfs2or bothumount -a -t gfsand/orumount -a -t gfs2, if you are using either (or both) in conjunction withrgmanagerservice clvmd stop, if CLVM has been used to create clustered volumesservice cman stop remove
- To ensure that the removed member does not rejoin the cluster after it reboots, run the following set of commands:
chkconfig cman off
chkconfig rgmanager off
chkconfig clvmd off
chkconfig gfs off
chkconfig gfs2 off