
Red Hat Training
A Red Hat training course is available for Red Hat JBoss Enterprise Application Platform
Migration Guide
For Use with Red Hat JBoss Enterprise Application Platform 6
Abstract
Chapter 1. Introduction
1.1. About Red Hat JBoss Enterprise Application Platform 6
1.2. About the Migration Guide
Chapter 2. Prepare for Migration
2.1. Prepare for Migration
Review What's New and Different in JBoss EAP 6
A number of things have changed in this release that may impact deployment of JBoss EAP 5 applications. These include changes to the file directory structure, scripts, deployment configuration, class loading and JNDI lookups. See Section 2.2, “Review What's New and Different in JBoss EAP 6” for details.Review the Get Started documentation
Be sure to review the chapter entitled Get Started Developing Applications in the Development Guide for JBoss EAP 6 on https://access.redhat.com/documentation/en-us/red_hat_jboss_enterprise_application_platform/?version=6.4. It contains important information about the following:- Java EE 6
- The new modular class loading system
- File structure changes
- How to download and install JBoss EAP 6
- How to download and install JBoss Developer Studio
- How to configure Maven for your development environment
- How to download and run the quickstart example applications that ship with the product.
Learn How to Use JBoss EAP 6 Dependencies in your Maven Project
Be sure to review the chapter entitled Maven Guide in the Development Guide for JBoss EAP 6 on https://access.redhat.com/documentation/en-us/red_hat_jboss_enterprise_application_platform/?version=6.4. The Manage Project Dependencies section contains important information on how to configure your project to use JBoss EAP Bill of Material (BOM) artifacts.Analyze and Understand your Application
Each application is unique and you must thoroughly understand the components and architecture of the existing application before you attempt the migration.
Important
2.2. Review What's New and Different in JBoss EAP 6
The following is a list of notable differences in JBoss EAP 6 from the previous release.
- Module based class loading
- In JBoss EAP 5, the class loading architecture was hierarchical. In JBoss EAP 6, class loading is based on JBoss Modules. This offers true application isolation, hides server implementation classes, and only loads the classes your application needs. Class loading is concurrent for better performance. Applications written for JBoss EAP 5 must be modified to specify module dependencies and in some cases, repackage archives. For more information, see Class Loading and Modules in the Development Guide for JBoss EAP 6 on https://access.redhat.com/documentation/en-us/red_hat_jboss_enterprise_application_platform/?version=6.4.
- Domain Management
- In JBoss EAP 6, the server can be run as a standalone server or in a managed domain. In a managed domain, you can configure entire groups of servers at once, keeping configurations synchronized across your entire network of servers. While this should not impact applications built for previous releases, this can simplify management of deployments to multiple servers. For more information, see About Managed Domains in the Administration and Configuration Guide for JBoss EAP 6 on https://access.redhat.com/documentation/en-us/red_hat_jboss_enterprise_application_platform/?version=6.4.
- Deployment Configuration
- Standalone Servers and Managed Domains
- JBoss EAP 5 used profile based deployment configuration. These profiles were located in the
EAP_HOME/server/directory. Applications often contained multiple configuration files for security, database, resource adapter, and other configurations. In JBoss EAP 6, deployment configuration is done using one file. This file is used to configure all the services and subsystems used for the deployment. A standalone server is configured using theEAP_HOME/standalone/configuration/standalone.xmlfile. For servers running in a managed domain, the server is configured using theEAP_HOME/domain/configuration/domain.xmlfile. The information contained in the multiple JBoss EAP 5 configuration files must be migrated to the new single configuration file. - Ordering of deployments
- JBoss EAP 6 uses fast, concurrent initialization for deployment resulting in improved performance and efficiency. In most cases, the application server is able to automatically determine dependencies in advance and choose the most efficient deployment strategy. However, JBoss EAP 5 applications that consist of multiple modules deployed as EARs or that use legacy JNDI lookups instead of CDI injection or resource-ref entries may require configuration changes.
- Directory Structure and Scripts
- As previously mentioned, JBoss EAP 6 no longer uses profile based deployment configuration, so there is no
EAP_HOME/server/directory. Configuration files for standalone servers are now located in theEAP_HOME/standalone/configuration/directory and deployments are located in theEAP_HOME/standalone/deployments/directory. For servers running in a managed domain, configuration files can be found in theEAP_HOME/domain/configuration/directory.In JBoss EAP 5, the Linux scriptEAP_HOME/bin/run.shor Windows scriptEAP_HOME/bin/run.batwas used to start the server. In JBoss EAP 6, the server start script is dependent on how you run your server. The Linux scriptEAP_HOME/bin/standalone.shor Windows scriptEAP_HOME/bin/standalone.batis used to start a standalone server. The Linux scriptEAP_HOME/bin/domain.shor Windows scriptEAP_HOME/bin/domain.batis used to start a managed domain. - JNDI Lookups
- JBoss EAP 6 now uses standardized portable JNDI namespaces. Applications written for JBoss EAP 5 that use JNDI lookups must be changed to follow the new standardized JNDI namespace convention. For more information about JNDI naming syntax, see Section 3.1.8.2, “Portable EJB JNDI Names”.
- Virtual File System
- JBoss EAP 6 replaces VFS2 with VFS3. Some configuration options that were available in JBoss EAP 5, which used VFS2, are no longer needed in JBoss EAP 6. The System properties configurations that were available in VFS2 are no longer used or available in VFS3. The caching system was replaced in VFS3, which resolves the caching issues that existed in VFS2. VFS is used internally by JBoss EAP and should not be accessed directly within application code.
2.3. Review The List of Deprecated and Unsupported Features
- Server Startup -b Command Line Argument
- In previous versions, JBoss EAP automatically used the address specified by the
-bstartup parameter, regardless of the IP address. In JBoss EAP 6, the server<inet-address>configuration looks for a network interface configured with a matching IP address. While this works for127.0.0.1, it no longer works for127.*.*.*IP adresses. If you start the JBoss EAP 6 server with the-bcommand line argument to bind to127.*.*.*IP addresses, you must now first change the interface from<inet-address>to<loopback-address>in the server configuration file.For information about how to configure the server using the Management CLI, see the section entitled Management CLI Operations in the Administration and Configuration Guide for JBoss Enterprise Application Platform located on the Customer Portal at https://access.redhat.com/documentation/en-us/red_hat_jboss_enterprise_application_platform/?version=6.4. - EJB Dependencies
- In previous versions of JBoss EAP, EJB dependencies on a service or services, including other EJBs, could be specified using a
<depends>tag in thejboss.xmldeployment descriptor. For example:<depends>jboss.j2ee:jndiName=com/myorg/app/Foo,service=EJB</depends> <depends>jboss.mq.destination:service=Queue,name=queue/HelloworldQueue</depends>
In JBoss EAP 6, you must use the@EJBannotation to inject EJB references and the@Resourceannotation to access datasources or other resources. For example:@EJB(lookup="java:global/MyApp/FooImpl!com.myorg.app.Foo") @Resource(mappedName = "java:/queue/HelloworldQueue")
JNDI lookups have also changed. See the section entitled JNDI Changes in this guide for details.For more information about EJB references, see the section entitled EJB Reference Resolution in the Development Guide for JBoss Enterprise Application Platform located on the Customer Portal at https://access.redhat.com/documentation/en-us/red_hat_jboss_enterprise_application_platform/?version=6.4. - HTTPInvoker
- In previous versions of JBoss EAP, it was possible to use the HTTPInvoker to configure an EJB, JNDI, or JMS to use the HTTP protocol. This is no longer possible in JBoss EAP 6.
- HA Singleton Deployments and BarrierController Service
- The HA SingletonService guarantees there is only one instance of a service running within the cluster.JBoss EAP 5 provided support for multiple strategies for HA Singleton deployments, including the HASingletonDeployer service, POJO deployments using HASingletonController, and HASingleton deployments using the BarrierController Service. These strategies all relied on the HAPartition to provide notifications when different nodes in the cluster started and stopped and are no longer available.In JBoss EAP 6, HA Singleton deployments have completely changed. The singleton deployer now operates on Modular Service Container (MSC) services only. Using a SingletonService, the target service is installed on every node in the cluster but is only started on one node at any given time. This approach simplifies the deployment requirements and minimizes the time required to relocate the singleton master service between nodes. However, it does require you write custom code to achieve the same functionality. An example of an HA Singleton deployment is included with the JBoss EAP quickstart example applications that ship with the product. For more information about HA Singletons, see Section 3.2.10.2, “Implement an HA Singleton” .
- JAAS Security Manager Service
- JBoss EAP 5 shipped with JAAS Security Manager, which provided data source password encryption services and configured identities with Password Based Encryption (PBE). This service is not included in JBoss EAP 6. JBoss EAP 6 recommends the use of a password vault for encrypting data source passwords. The password encryption algorithm used JBoss EAP 5 with the JAAS Security Manager Service is not compatible with the algorithm used when encrypting passwords using a password vault in JBoss EAP 6. Administrators will have to regenerate any passwords that were encrypted using Password Based Encryption in previous releases.If you used the DynamicLoginConfig service to dynamically deploy credentials in previous versions of JBoss EAP, there is no similar method for dynamically deploying credentials in JBoss EAP 6. The ability to secure the vault password with something other than the globally known masked value is only available in JBoss EAP 6.4 or later.
2.4. About Migrations and Upgrades
A major upgrade or migration is required when an application is moved from one major release to another, for example, from JBoss EAP 5 to JBoss EAP 6. This is the type of migration addressed in this guide. If an application follows the Java EE specifications, does not access deprecated APIs, and does not contain proprietary code, it may be possible to run the application in JBoss EAP 6 without any changes. Otherwise, it could require application code changes. Server configuration has changed in JBoss EAP 6 and any server configuration settings require migration.
JBoss EAP periodically provides point releases, which are minor updates that include bug fixes, security fixes, and new features. If you plan to migrate from one JBoss EAP point release to another, for example, from JBoss EAP 6.3 to JBoss EAP 6.4, see the chapter entitled Patching JBoss EAP 6 in the Installation Guide for JBoss EAP 6 located on the Customer Portal at https://access.redhat.com/documentation/en-us/red_hat_jboss_enterprise_application_platform/?version=6.4 for instructions and potential issues.
JBoss EAP also periodically provides cumulative patches that contain bug and security fixes. Cumulative patches increment the release by the last digit, for example from 6.4.1 to 6.4.2. Patch installation is covered in detail in the chapter entitled Patching JBoss EAP 6 in the Installation Guide for JBoss EAP 6 located on the Customer Portal at https://access.redhat.com/documentation/en-us/red_hat_jboss_enterprise_application_platform/?version=6.4.
Chapter 3. Migrate Your Application
3.1. Changes Required by Most Applications
3.1.1. Review Changes Required by Most Applications
3.1.2. Class Loading Changes
3.1.2.1. Update the Application Due to Class Loading Changes
- First, look at the packaging of your application and its dependencies. For more information, see: Section 3.1.2.3, “Update Application Dependencies Due to Class Loading Changes”
- If your application does logging, you need to specify the correct module dependencies. For more information, see: Section 3.1.4.1, “Modify Logging Dependencies”
- Due to the modular class loading changes, you may have to change the packaging structure of your EAR or WAR. For more information, see: Section 3.1.5.1, “Modify Packaging of EARs and WARs”
3.1.2.2. Understand Module Dependencies
A module is only able to access its own classes and the classes of any module on which it has an explicit or implicit dependency.
The deployers within the server implicitly automatically add some commonly used module dependencies, like the javax.api and sun.jdk. This makes the classes visible to the deployment at runtime and relieves the developer of the task of explicitly adding the dependencies. For details on how and when these implicit dependencies are added, refer to Implicit Module Dependencies in the chapter entitled Class Loading and Modules in the Development Guide for JBoss EAP 6 on https://access.redhat.com/documentation/en-us/red_hat_jboss_enterprise_application_platform/?version=6.4.
For other classes, the modules must be specified explicitly or else the missing dependencies result in deployment or runtime errors. If a dependency is missing, you see ClassNotFoundExceptions or NoClassDefFoundErrors traces in the server log. If more than one module loads the same JAR or a module loads a class that extends a class loaded by a different module, you see ClassCastExceptions traces in the server log. To specify dependencies explicitly, modify the MANIFEST.MF or create a JBoss specific deployment descriptor file jboss-deployment-structure.xml. For more information on module dependencies, see Overview of Class Loading and Modules in the chapter entitled Class Loading and Module in the Development Guide for JBoss EAP 6 on https://access.redhat.com/documentation/en-us/red_hat_jboss_enterprise_application_platform/?version=6.4.
3.1.2.3. Update Application Dependencies Due to Class Loading Changes
Class loading in JBoss EAP 6 is considerably different from previous versions of JBoss EAP. Class loading is now based on the JBoss Modules project. Rather than a single, hierarchical class loader that loads all JARs into a flat class path, each library becomes a module that only links against the exact modules on which it depends. Deployments in JBoss EAP 6 are also modules and do not have access to classes that are defined in JARs in the application server unless an explicit dependency on those classes is defined. Some module dependencies defined by the application server are set up for you automatically. For instance, if you are deploying a Java EE application, a dependency on the Java EE API is added automatically, or implicitly. For the complete list of dependencies automatically added by the server, see Implicit Module Dependencies in the chapter entitled Class Loading and Modules in the Development Guide for JBoss EAP 6 on https://access.redhat.com/documentation/en-us/red_hat_jboss_enterprise_application_platform/?version=6.4.
When you migrate your application to JBoss EAP 6, you might need to perform one or more of the following tasks due to the modular class loading changes:
3.1.3. Configuration File Changes
3.1.3.1. Create or Modify Files That Control Class Loading in JBoss EAP 6
Due to the change in JBoss EAP 6 to use modular class loading, you might need to create or modify one or more files to add dependencies or to prevent automatic dependencies from loading. For more information on class loading and class loading precedence, see the chapter entitled Class Loading and Modules in the Development Guide for JBoss EAP 6 on https://access.redhat.com/documentation/en-us/red_hat_jboss_enterprise_application_platform/?version=6.4.
- jboss-web.xml
- If you have defined a
<class-loading>element in thejboss-web.xmlfile, you need to remove it. The behavior that this evoked in JBoss EAP 5 is now the default class loading behavior in JBoss EAP 6, so it is no longer necessary. If you do not remove this element, you see a ParseError and XMLStreamException in your server log.This is an example of a<class-loading>element in thejboss-web.xmlfile that is commented out.<!DOCTYPE jboss-web PUBLIC "-//JBoss//DTD Web Application 4.2//EN" "http://www.jboss.org/j2ee/dtd/jboss-web_4_2.dtd"> <jboss-web> <!-- <class-loading java2ClassLoadingCompliance="false"> <loader-repository> seam.jboss.org:loader=MyApplication <loader-repository-config>java2ParentDelegation=false</loader-repository-config> </loader-repository> </class-loading> --> </jboss-web> - MANIFEST.MF
- Manually edited
- Depending on which components or modules your application uses, you might need to add one or more dependencies to this file. You can add them as either
DependenciesorClass-Pathentries.The following is an example ofMANIFEST.MFedited by a developer:Manifest-Version: 1.0 Dependencies: org.jboss.logmanager Class-Path: OrderManagerEJB.jar
If you modify this file, be sure to include a newline character at the end of the file. - Generated using Maven
- If you use Maven, you need to modify your
pom.xmlfile to generate the dependencies for theMANIFEST.MFfile. If your application uses EJB 3.0, you might have a section in thepom.xmlfile that looks like the following:<plugin> <groupId>org.apache.maven.plugins</groupId> <artifactId>maven-ejb-plugin</artifactId> <configuration> <ejbVersion>3.0</ejbVersion> </configuration> </plugin>If the EJB 3.0 code usesorg.apache.commons.log, you need that dependency in theMANIFEST.MFfile. To generate that dependency, add the<plugin>element to thepom.xmlfile as follows:<plugin> <groupId>org.apache.maven.plugins</groupId> <artifactId>maven-ejb-plugin</artifactId> <configuration> <ejbVersion>3.0</ejbVersion> <archive> <manifestFile>src/main/resources/META-INF/MANIFEST.MF</manifestFile> </archive> </configuration> </plugin>In the above example, thesrc/main/resources/META-INF/MANIFEST.MFfile only needs to contain the dependency entry:Dependencies: org.apache.commons.logging
Maven will generate the completeMANIFEST.MFfile:Manifest-Version: 1.0 Dependencies: org.apache.commons.logging
- jboss-deployment-structure.xml
- This file is a JBoss specific deployment descriptor that can be used to control class loading in a fine grained manner. Like the
MANIFEST.MF, this file can be used to add dependencies. It can also prevent automatic dependencies from being added, define additional modules, change an EAR deployment's isolated class loading behavior, and add additional resource roots to a module.The following is an example of ajboss-deployment-structure.xmlfile that adds a dependency for JSF 1.2 module and prevents the automatic loading of the JSF 2.0 module.<jboss-deployment-structure xmlns="urn:jboss:deployment-structure:1.0"> <deployment> <dependencies> <module name="javax.faces.api" slot="1.2" export="true"/> <module name="com.sun.jsf-impl" slot="1.2" export="true"/> </dependencies> </deployment> <sub-deployment name="jboss-seam-booking.war"> <exclusions> <module name="javax.faces.api" slot="main"/> <module name="com.sun.jsf-impl" slot="main"/> </exclusions> <dependencies> <module name="javax.faces.api" slot="1.2"/> <module name="com.sun.jsf-impl" slot="1.2"/> </dependencies> </sub-deployment> </jboss-deployment-structure>For additional information about this file, see: Section 3.1.3.2, “jboss-deployment-structure.xml”. - application.xml
- In previous versions of JBoss EAP, you controlled the order of deployments within an EAR using the
jboss-app.xmlfile. This is no longer the case. The Java EE6 spec provides the<initialize-in-order>element in theapplication.xmlwhich allows control of the order in which the Java EE modules within an EAR are deployed.In most cases you do not need to specify deployment order. If your application uses dependency injections and resource-refs to refer to components in external modules, in most cases the<initialize-in-order>element is not required because the application server is able to implicitly determine the correct and optimal way of ordering the components.Let's assume you have an application that contains amyBeans.jarand amyApp.warthat are packaged within amyApp.ear. A servlet in themyApp.waruses an@EJBannotation to inject a bean from themyBeans.jar. In this case, the application server has the appropriate knowledge to be sure that the EJB component is available before the servlet is started and you do not have to use the<initialize-in-order>element.However, if that servlet uses legacy JNDI lookup style remote references like the following to access the bean, you might need to specify module order.init() { Context ctx = new InitialContext(); ctx.lookup("TheBeanInMyBeansModule"); }In this case, the server is not able to determine that the EJB component is in themyBeans.jarand you need to enforce that the components in themyBeans.jarare initialized and started before the components inmyApp.war. To do this, you set the<initialize-in-order>element totrueand specify the order of themyBeans.jarandmyApp.warmodules in theapplication.xmlfile.The following is an example that uses the<initialize-in-order>element to control deployment order. ThemyBeans.jaris deployed before themyApp.warfile.<application xmlns="http://java.sun.com/xml/ns/javaee" xmlns:xsi="http://www.w3.org/2001/XMLSchema-instance" version="6" xsi:schemaLocation="http://java.sun.com/xml/ns/javaee http://java.sun.com/xml/ns/javaee/application_6.xsd"> <application-name>myApp</application-name> <initialize-in-order>true</initialize-in-order> <module> <ejb>myBeans.jar</ejb> </module> <module> <web> <web-uri>myApp.war</web-uri> <context-root>myApp</context-root> </web> </module> </application>The schema for theapplication.xmlfile can be found here at http://java.sun.com/xml/ns/javaee/application_6.xsd.Note
Be aware that setting the<initialize-in-order>element totrueslows down deployment. It is preferable to define proper dependencies using dependency injections or resource-refs because it allows the container more flexibility in optimizing deployments. - jboss-ejb3.xml
- The
jboss-ejb3.xmldeployment descriptor replaces thejboss.xmldeployment descriptor to override and add to the features provided by the Java Enterprise Edition (EE) definedejb-jar.xmldeployment descriptor. The new file is incompatible withjboss.xml, and thejboss.xmlis now ignored in deployments. - login-config.xml
- The
login-config.xmlfile is no longer used for security configuration. Security is now configured in the<security-domain>element in the server configuration file. For a standalone server, this is thestandalone/configuration/standalone.xmlfile. If you are running your server in a managed domain, this is thedomain/configuration/domain.xmlfile.
3.1.3.2. jboss-deployment-structure.xml
jboss-deployment-structure.xml is a new optional deployment descriptor for JBoss EAP 6. This deployment descriptor provides control over class loading in the deployment.
EAP_HOME/docs/schema/jboss-deployment-structure-1_2.xsd
3.1.3.3. Package Resources for the New Modular Class Loading System
In previous versions of JBoss EAP, all resources inside the WEB-INF/ directory were added to the WAR classpath. In JBoss EAP 6, web application artifacts are only loaded from the WEB-INF/classes and WEB-INF/lib directories. Failure to package application artifacts in the specified locations can result in ClassNotFoundException, NoClassDefError, or other runtime errors.
- Modify the Resource Packaging
- To make the resources available only to the application, you must bundle the properties files, JARs, or other artifacts with the WAR by moving them to the
WEB-INF/classes/orWEB-INF/lib/directory. This approach is described in more detail here: Section 3.1.3.4, “Change ResourceBundle Properties Location” - Create a Custom Module
- If you want make custom resources available to all applications running on the JBoss EAP 6 server, you must create a custom module. This approach is described in more detail here: Section 3.1.3.5, “Create a Custom Module”
3.1.3.4. Change ResourceBundle Properties Location
In previous versions of JBoss EAP, the EAP_HOME/server/SERVER_NAME/conf/ directory was in the classpath and available to the application. To make properties available to the classpath of the application in JBoss EAP 6, you must package them within your application.
Procedure 3.1. Change the ResourceBundle Properties Location
- If you are deploying a WAR archive, you must package those properties in the WAR's
WEB-INF/classes/folder. - If you want those properties accessible to all components in an EAR, then you must package them at the root of a JAR and then place the JAR in EAR's
lib/folder.
3.1.3.5. Create a Custom Module
Procedure 3.2. Create a Custom Module
- Create and populate the
module/directory structure.- Create a directory structure under the
EAP_HOME/moduledirectory to contain the files and JARs. For example:$ cd EAP_HOME/modules/$ mkdir -p myorg-conf/main/properties - Move the properties files to the
EAP_HOME/modules/myorg-conf/main/properties/directory you created in the previous step. - Create a
module.xmlfile in theEAP_HOME/modules/myorg-conf/main/directory containing the following XML:<module xmlns="urn:jboss:module:1.1" name="myorg-conf"> <resources> <resource-root path="properties"/> </resources> </module>
- Modify the
eesubsystem in the server configuration file. You can use the Managemet CLI or you can manually edit the file.- Follow these steps to modify the server configuration file using the Management CLI.
- Start the server and connect to the Management CLI.
- For Linux, enter the following at the command line:
EAP_HOME/bin/jboss-cli.sh --connect
- For Windows, enter the following at a command line:
C:\>EAP_HOME\bin\jboss-cli.bat --connect
You should see the following response:Connected to standalone controller at localhost:9999
- To create the
myorg-conf<global-modules> element in theeesubsystem, type the following in the command line:/subsystem=ee:write-attribute(name=global-modules, value=[{"name"=>"myorg-conf","slot"=>"main"}])You should see the following result:{"outcome" => "success"}
- Follow these steps if you prefer to manually edit the server configuration file.
- Stop the server and open the server configuration file in a text editor. If you are running a standalone server, this is the
EAP_HOME/standalone/configuration/standalone.xmlfile, or theEAP_HOME/domain/configuration/domain.xmlfile if you are running a managed domain. - Find the
eesubsystem and add the global module formyorg-conf. The following is an example of theeesubsystem element, modified to include themyorg-confelement:Example 3.1.
myorg-confelement<subsystem xmlns="urn:jboss:domain:ee:1.0" > <global-modules> <module name="myorg-conf" slot="main" /> </global-modules> </subsystem>
- Assuming you copied a file named
my.propertiesinto the correct module location, you are now able to load properties files using code similar to the following:Example 3.2. Load properties file
Thread.currentThread().getContextClassLoader().getResource("my.properties");
3.1.4. Logging Changes
3.1.4.1. Modify Logging Dependencies
JBoss LogManager supports front ends for all logging frameworks, so you can keep your current logging code or move to the new JBoss logging infrastructure. Regardless of your decision, because of the modular class loading changes, you probably need to modify your application to add the required dependencies.
Procedure 3.3. Update application logging code
3.1.4.2. Update Application Code for Third-party Logging Frameworks
In JBoss EAP 6, logging dependencies for common third-party frameworks like Apache Commons Logging, Apache log4j, SLF4J, and Java Logging are added by default. In most cases, it is preferable to use the logging framework provided by the JBoss EAP container. However, if you require specific functionality provided by a third-party framework, you must exclude the corresponding JBoss EAP module from your deployment. Note that although your deployment uses the third-party logging framework, the server logs continue to use the JBoss EAP logging subsystem configuration.
org.apache.log4j module from your deployment. The first procedure works on any release of JBoss EAP 6. The second procedure applies only to JBoss EAP 6.3 or later.
Procedure 3.4. Configure JBoss EAP 6 to use a log4j.properties or log4j.xml file
Note
- Create a
jboss-deployment-structure.xmlwith the following content:<jboss-deployment-structure> <deployment> <!-- Exclusions allow you to prevent the server from automatically adding some dependencies --> <exclusions> <module name="org.apache.log4j" /> </exclusions> </deployment> </jboss-deployment-structure> - Place the
jboss-deployment-structure.xmlfile in either theMETA-INF/directory or theWEB-INF/directory if you are deploying a WAR, or in theMETA-INF/directory if you are deploying an EAR. If your deployment includes dependent child deployments, you must also exclude the module for each subdeployment. - Include the
log4j.propertiesorlog4j.xmlfile in thelib/directory of your EAR, or theWEB-INF/classes/directory of your WAR deployment. If you prefer to place the file inlib/directory of your WAR, you must specify the<resource-root>path in thejboss-deployment-structure.xmlfile.<jboss-deployment-structure> <deployment> <!-- Exclusions allow you to prevent the server from automatically adding some dependencies --> <exclusions> <module name="org.apache.log4j" /> </exclusions> <resources> <resource-root path="lib" /> </resources> </deployment> </jboss-deployment-structure> - Start the JBoss EAP 6 server with the following runtime argument to prevent a
ClassCastExceptionfrom appearing in the console when you deploy the application:-Dorg.jboss.as.logging.per-deployment=false
- Deploy your application.
Procedure 3.5. Configure Logging Dependencies for JBoss EAP 6.3 or later
add-logging-api-dependencies logging system attribute to exclude third party logging framework dependencies. The following steps demonstrate how to modify this logging attribute on a JBoss EAP standalone server.
- Start the JBoss EAP 6 server with the following runtime argument to prevent a
ClassCastExceptionfrom appearing in the console when you deploy the application:-Dorg.jboss.as.logging.per-deployment=false
- Open a terminal and connect to the Management CLI.
- For Linux, enter the following at the command line:
$ EAP_HOME/bin/jboss-cli.sh --connect
- For Windows, enter the following at a command line:
C:\>EAP_HOME\bin\jboss-cli.bat --connect
- Modify the
add-logging-api-dependenciesattribute in the logging subsystem.This attribute controls whether the container adds implicit logging API dependencies to your deployments.- If set to
true, which is the default, all implicit logging API dependencies are added. - If set to
false, the dependencies are not added to your deployments.
To exclude the third-party logging framework dependencies, you must set this attribute tofalseusing the following command:/subsystem=logging:write-attribute(name=add-logging-api-dependencies, value=false)This command adds the<add-logging-api-dependencies>element to theloggingsubsystem of thestandalone.xmlconfiguration file.<subsystem xmlns="urn:jboss:domain:logging:1.4"> <add-logging-api-dependencies value="false"/> .... </subsystem> - Deploy your application.
3.1.4.3. Modify Code to Use the New JBoss Logging Framework
To use the new framework, change your imports and code as described in the following procedure.
Procedure 3.6. Modify Code and Dependencies to Use the JBoss Logging Framework
- Change your imports and logging code.The following is an example of code that uses the new JBoss Logging framework.
import org.jboss.logging.Level; import org.jboss.logging.Logger; private static final Logger logger = Logger.getLogger(MyClass.class.toString()); if(logger.isTraceEnabled()) { logger.tracef("Starting...", subsystem); } - Add the logging dependency.The JAR containing the JBoss Logging classes is located in the module named
org.jboss.logging. YourMANIFEST-MFfile should look like the following.Manifest-Version: 1.0 Dependencies: org.jboss.logging
For more information on how to find the module dependency, refer Section 3.1.2.3, “Update Application Dependencies Due to Class Loading Changes” and Section 4.2.1, “Debug and Resolve Migration Issues”.
3.1.5. Application Packaging Changes
3.1.5.1. Modify Packaging of EARs and WARs
When you migrate your application, you might have to change the packaging structure of your EAR or WAR due to the change to modular class loading. Module dependencies are loaded in this specific order:
- System dependencies
- User dependencies
- Local resources
- Inter-deployment dependencies
Procedure 3.7. Modify archive packaging
- Package a WAR.A WAR is a single module and all classes in the WAR are loaded with the same class loader. This means classes packaged in the
WEB-INF/lib/directory are treated the same as classes in theWEB-INF/classesdirectory. - Package an EAR.An EAR consists of multiple modules. The
EAR/lib/directory is a single module and every WAR or EJB jar subdeployment within the EAR is a separate module. Classes do not have access to classes in other modules within the EAR unless explicit dependencies have been defined. Subdeployments always have an automatic dependency on the parent module which gives them access to classes in theEAR/lib/directory. However, subdeployments do not always have an automatic dependency to allow them to access each other. This behavior is controlled by setting the<ear-subdeployments-isolated>element in theeesubsystem configuration as follows.<subsystem xmlns="urn:jboss:domain:ee:1.0" > <ear-subdeployments-isolated>false</ear-subdeployments-isolated> </subsystem>
By default this is set to false which allows the subdeployments to see classes belonging to other subdeployments within the EAR.For more information on class loading, see the chapter entitled Class Loading and Modules in the Development Guide for JBoss EAP 6 on https://access.redhat.com/documentation/en-us/red_hat_jboss_enterprise_application_platform/?version=6.4.
3.1.5.2. Change in Precedence of Root Context
<context-root> element defined in the jboss-web.xml WAR file took precedence over a <context-root> element defined in the application.xml EAR file.
<context-root> element defined in the application.xml EAR file takes precedence over a <context-root> element defined in the jboss-web.xml WAR file. If a WAR file is deployed within an EAR archive, define the <context-root> element in the application.xml file.
3.1.6. Datasource and Resource Adapter Configuration Changes
3.1.6.1. Update the Application Due to Configuration Changes
- If your application uses a datasource, see: Section 3.1.6.2, “Update the DataSource Configuration”.
- If your application uses JPA and currently bundles the Hibernate JARs, see the following for your migration options: Section 3.1.6.4, “Configure the Datasource for Hibernate or JPA”.
- If your application uses a resource adapter, see: Section 3.1.6.5, “Update the Resource Adapter Configuration”.
- Review the following for information on how to configure changes for basic security: Section 3.1.7.1, “Configure Application Security Changes”.
3.1.6.2. Update the DataSource Configuration
In previous versions of JBoss EAP, the JCA DataSource configuration is defined in a file with a suffix of *-ds.xml. This file is then deployed in the server's deploy/ directory or packaged with the application. The JDBC driver is copied to the server/lib/ directory or packaged in the application's WEB-INF/lib/ directory. While this method of configuring a DataSource is still supported for development, it is not recommended for production because it is not supported by the JBoss administrative and management tools.
domain/configuration/domain.xml file. If the JBoss EAP 6 instance is running as a standalone server, the DataSource is configured in the standalone/configuration/standalone.xml file. DataSources configured this way can be managed and controlled using the JBoss management interfaces, including the Web Management Console and command line interface (CLI). These tools make it easy to manage deployments and configure multiple servers running in a managed domain.
A JDBC 4.0 compliant driver can be installed as a deployment or as a core module. A driver that is JDBC 4.0 compliant contains a META-INF/services/java.sql.Driver file that specifies the driver class name. A driver that is not JDBC 4.0 compliant requires additional steps. For details on how to make a driver JDBC 4.0 compliant and how update your current DataSource configuration to one that is manageable by the Web Management Console and CLI, see Section 3.1.6.3, “Install and Configure the JDBC Driver”.
You can use the IronJacamar tool to migrate DataSource and ResourceAdapter configurations. This tool converts the *-ds.xml style configuration files into the format expected by JBoss EAP 6. For more information, see: Section 4.1.6, “Use the IronJacamar Tool to Migrate Datasource and Resource Adapter Configurations”.
In previous versions of JBoss EAP, is possible to perform a JNDI remote lookup of DataSource objects, however it is never a recommended practice for the following reasons.
- Client control of a server resource is unreliable and can result in leaked connections if the client crashes or loses the connection to the server.
- Performance is very slow because all database operations are proxied through an
MBean. - Transaction propagation is not supported.
NotSerializableException when you migrate your application. The recommended approach is to create an EJB to access the DataSource and then call the EJB remotely. For more information, see the section in this book entitled Remote Invocation Changes. Additional information can be found in the Development Guide for JBoss EAP 6 on https://access.redhat.com/documentation/en-us/red_hat_jboss_enterprise_application_platform/?version=6.4.
3.1.6.3. Install and Configure the JDBC Driver
The JDBC driver can be installed into the container in one of the following two ways:
- As a deployment
- As a core module
domain/configuration/domain.xml file. If the JBoss EAP 6 instance is running as a standalone server, the datasource is configured in the standalone/configuration/standalone.xml file. Schema reference information, which is the same for both modes, can be found in the docs/schema/ directory of the JBoss EAP 6 install. For purposes of this discussion, assume the server is running as standalone server and the datasource is configured in the standalone.xml file.
Procedure 3.8. Install and Configure the JDBC Driver
- Install the JDBC Driver.
- Install the JDBC Driver as a deployment.This is the recommended way to install the driver. When the JDBC driver is installed as a deployment, it is deployed as a regular JAR. If the JBoss EAP 6 instance is running as a standalone server, copy the JDBC 4.0 compliant JAR into the
EAP_HOME/standalone/deployments/directory. For a managed domain, you must use the Management Console or Management CLI to deploy the JAR to the server groups.The following is an example of a MySQL JDBC driver installed as a deployment to a standalone server:$cp mysql-connector-java-5.1.15.jar
EAP_HOME/standalone/deployments/Any JDBC 4.0 compliant driver is automatically recognized and installed into the system by name and version. A JDBC 4.0 compliant JAR contains a text file namedMETA-INF/services/java.sql.Driverwhich specifies the driver class name(s). If the driver is not JDBC 4.0 compliant, it can be made deployable in one of the following ways:- Create and add a
java.sql.Driverfile to the JAR under theMETA-INF/services/path. This file should contain the driver class name, for example:com.mysql.jdbc.Driver - Create a
java.sql.Driverfile in the deployment directory. For a JBoss EAP 6 instance running as a standalone server, the file should be placed here:EAP_HOME/standalone/deployments/META-INF/services/java.sql.Driver. If the server is in a managed domain, you must use the Management Console or Management CLI to deploy the file.
The pros of this approach are:The cons of this approach are:- This is the easiest method because there is no need to define a module.
- When the server is running in a managed domain, deployments that use this approach are automatically propagated to all servers in the domain. This means the administrator does not need to distribute the driver JAR manually.
- If the JDBC driver consists of more than one JAR, for example the driver JAR plus a dependent license JAR or localization JAR, you can not install the driver as a deployment. You must install the JDBC driver as a core module.
- If the driver is not JDBC 4.0 compliant, a file must be created containing the driver class name(s) and must be imported into the JAR or overlayed in the
deployments/directory.
- Install the JDBC Driver as a core module.To install a JDBC driver as a core module, you must create a file path structure under the
EAP_HOME/modules/directory. This structure contains the JDBC driver JAR, any additional vendor license or localization JARs, and amodule.xmlfile to define the module.- Install the MySQL JDBC Driver as a core module
- Create the directory structure
EAP_HOME/modules/com/mysql/main/ - In the
main/subdirectory, create amodule.xmlfile containing the following module definition for the MySQL JDBC driver:<?xml version="1.0" encoding="UTF-8"?> <module xmlns="urn:jboss:module:1.0" name="com.mysql"> <resources> <resource-root path="mysql-connector-java-5.1.15.jar"/> </resources> <dependencies> <module name="javax.api"/> </dependencies> </module>The module name, "com.mysql", matches the directory structure for this module. The<dependencies>element is used to specify this module's dependencies on other modules. In this case, as is the case with all JDBC datasources, it is dependent on the Java JDBC APIs which are defined in another module namedjavax.api. That module is located under themodules/system/layers/base/javax/api/main/directory.Note
Make sure you do NOT have a space at the beginning ofmodule.xmlfile or you will get a "New missing/unsatisfied dependencies" error for this driver. - Copy the MySQL JDBC driver JAR into the
EAP_HOME/modules/com/mysql/main/directory:$ cp mysql-connector-java-5.1.15.jar
EAP_HOME/modules/com/mysql/main/
- Install the IBM DB2 JDBC driver and license JAR as a core module.This example is provided to only demonstrate how to deploy drivers that require JARs in addition to the JDBC Driver JAR.
- Create the directory structure
EAP_HOME/modules/com/ibm/db2/main/. - In the
main/subdirectory, create amodule.xmlfile containing the following module definition for the IBM DB2 JDBC driver and license:<?xml version="1.0" encoding="UTF-8"?> <module xmlns="urn:jboss:module:1.1" name="com.ibm.db2"> <resources> <resource-root path="db2jcc.jar"/> <resource-root path="db2jcc_license_cisuz.jar"/> </resources> <dependencies> <module name="javax.api"/> <module name="javax.transaction.api"/> </dependencies> </module>Note
Make sure you do NOT have a space at the beginning ofmodule.xmlfile or you will get a "New missing/unsatisfied dependencies" error for this driver. - Copy the JDBC driver and license JAR to the
EAP_HOME/modules/com/ibm/db2/main/directory.$ cp db2jcc.jar
EAP_HOME/modules/com/ibm/db2/main/$ cp db2jcc_license_cisuz.jarEAP_HOME/modules/com/ibm/db2/main/
The pros of this approach are:The cons of this approach are:- This is the only approach that works when the JDBC driver consists of more than one JAR.
- With this approach, drivers that are not JDBC 4.0 compliant can be installed without modifying the driver JAR or creating a file overlay.
- It is more difficult to set up a module.
- The module must be manually copied to every server running in a managed domain.
- Configure the datasource.
- Add the database driver.Add the
<driver>element to the<drivers>element of the same file. Again, this contains some of the same datasource information that was previously defined in the*-ds.xmlfile.First determine if the driver JAR is JDBC 4.0 compliant. A JAR that is JDBC 4.0 compliant contains aMETA-INF/services/java.sql.Driverfile that specifies the driver class name. The server uses this file to find the name of the driver class(es) in the JAR. A driver that is JDBC 4.0 compliant does not require a<driver-class>element since it is already specified in the JAR. This is an example of the driver element for a JDBC 4.0 compliant MySQL driver:<driver name="mysql-connector-java-5.1.15.jar" module="com.mysql"/>
A driver that is not JDBC 4.0 compliant requires a<driver-class>attribute to identify the driver class since there is noMETA-INF/services/java.sql.Driverfile that specifies the driver class name. This is an example of the driver element for driver that is not JDBC 4.0 compliant:<driver name="mysql-connector-java-5.1.15.jar" module="com.mysql"> <driver-class>com.mysql.jdbc.Driver</driver-class></driver>
- Create the datasource.Create a
<datasource>element in the<datasources>section of thestandalone.xmlfile. This file contains much of the same datasource information that was previously defined in the*-ds.xmlfile.Important
You must stop the server before editing the server configuration file for your change to be persisted on server restart.The following is an example of a MySQL datasource element in thestandalone.xmlfile:<datasource jndi-name="java:/YourDatasourceName" pool-name="YourDatasourceName"> <connection-url>jdbc:mysql://localhost:3306/YourApplicationURL</connection-url> <driver>mysql-connector-java-5.1.15.jar</driver> <transaction-isolation>TRANSACTION_READ_COMMITTED</transaction-isolation> <pool> <min-pool-size>100</min-pool-size> <max-pool-size>200</max-pool-size> </pool> <security> <user-name>USERID</user-name> <password>PASSWORD</password> </security> <statement> <prepared-statement-cache-size>100</prepared-statement-cache-size> <share-prepared-statements/> </statement> </datasource>
- Update JNDI references in the application code.You must replace outdated JNDI lookup names in the application source code to use the new JNDI standardized datasource names you have defined. For more information, see: Section 3.1.8.4, “Modify the Application to Follow the New JNDI Namespace Rules”.You must also replace any existing
@Resourceannotations that access the datasource to use the new JNDI name. For example:@Resource(name = "java:/YourDatasourceName").
3.1.6.4. Configure the Datasource for Hibernate or JPA
Procedure 3.9. Remove the Hibernate bundle
- Remove the Hibernate JARs from your application library folders.
- Remove or comment out the
<hibernate.transaction.manager_lookup_class>element in yourpersistence.xmlfile as this element is not needed.
3.1.6.5. Update the Resource Adapter Configuration
In previous versions of the application server, the resource adapter configuration was defined in a file with a suffix of *-ds.xml. In JBoss EAP 6, a resource adapter is configured in the server configuration file. If you are running in a managed domain, the configuration file is the EAP_HOME/domain/configuration/domain.xml file. If you are running as a standalone server, configure the resource adapter in the EAP_HOME/standalone/configuration/standalone.xml file. Schema reference information, which is the same for both modes, can be found under Schemas on the IronJacamar web site here: http://www.ironjacamar.org/documentation.html.
Important
The resource adapter descriptor information is defined under the following subsystem element in the server configuration file:
<subsystem xmlns="urn:jboss:domain:resource-adapters:1.1"/>You will use some of the same information that was previously defined in the resource adapter
*-ds.xml file.
<resource-adapters>
<resource-adapter>
<archive>multiple-full.rar</archive>
<config-property name="Name">ResourceAdapterValue</config-property>
<transaction-support>NoTransaction</transaction-support>
<connection-definitions>
<connection-definition
class-name="org.jboss.jca.test.deployers.spec.rars.multiple.MultipleManagedConnectionFactory1"
enabled="true" jndi-name="java:/eis/MultipleConnectionFactory1"
pool-name="MultipleConnectionFactory1">
<config-property name="Name">MultipleConnectionFactory1Value</config-property>
</connection-definition>
<connection-definition
class-name="org.jboss.jca.test.deployers.spec.rars.multiple.MultipleManagedConnectionFactory2"
enabled="true" jndi-name="java:/eis/MultipleConnectionFactory2"
pool-name="MultipleConnectionFactory2">
<config-property name="Name">MultipleConnectionFactory2Value</config-property>
</connection-definition>
</connection-definitions>
<admin-objects>
<admin-object
class-name="org.jboss.jca.test.deployers.spec.rars.multiple.MultipleAdminObject1Impl"
jndi-name="java:/eis/MultipleAdminObject1">
<config-property name="Name">MultipleAdminObject1Value</config-property>
</admin-object>
<admin-object class-name="org.jboss.jca.test.deployers.spec.rars.multiple.MultipleAdminObject2Impl"
jndi-name="java:/eis/MultipleAdminObject2">
<config-property name="Name">MultipleAdminObject2Value</config-property>
</admin-object>
</admin-objects>
</resource-adapter>
</resource-adapters>
3.1.6.6. Detect Leaked Datasource Connections
In JBoss EAP 6, you can detect leaked datasource connections using the Cached Connection Manager (CCM) debug utility. This topic describes how to enable and debug the CCM utility.
Procedure 3.10. Enable the Cached Connection Manager
- Enable CCM in the
datasourcessubsystem of the server configuration file by setting<use-ccm="true". This is the default value and does not need to be set explicitly.<subsystem xmlns="urn:jboss:domain:datasources:1.2"> <datasources> <datasource ... enabled="true" use-ccm="true"> ... </datasource> </datasources> </subsystem> - Verify that the
<cached-connection-manager>exists in thejcasubsystem of the server configuration file. Set thedebugattribute totrue.<subsystem xmlns="urn:jboss:domain:jca:1.1"> ... <cached-connection-manager debug="true" error="true"/> ... </subsystem>
Settingdebug="true"causes the following to happen.The additional property- An
INFOmessage is logged with the following message: "Closing a connection for you. Please close them yourself" - A stacktrace is generated for the code that opened the leaked connection.
- The leaked connection is closed.
error="true"can be used to raise aRuntimeExceptionand generate anERRORmessage in the log. - Activating debug will have some impact on performance and log file size, so it is only recommended for use during testing. After verifying that no leaks remain and before deploying applications to production, restore the configuration by removing the
debug="true"setting or using<cached-connection-manager debug="false"/>.
Procedure 3.11. Debug Leaks Not Reported by Cached Connection Manager
- Be sure the
datasourcesubsystem of the server configuration file is not configured withuse-ccm="false" - Be sure the
datasourcesubsystem of the server configuration file is not configured withjta="false" - Be sure the minimum logging level is set to
INFOfororg.jboss.jca.
3.1.7. Security Changes
3.1.7.1. Configure Application Security Changes
In previous versions of JBoss EAP, properties files placed in the EAP_HOME/server/SERVER_NAME/conf/ directory were on classpath and could be easily found by the UsersRolesLoginModule. In JBoss EAP 6, the directory structure has changed. Properties files must be packaged within the application to make them available in the classpath.
Important
security-domains to the standalone/configuration/standalone.xml or the domain/configuration/domain.xml server configuration file:
<security-domain name="example">
<authentication>
<login-module code="UsersRoles" flag="required">
<module-option name="usersProperties"
value="${jboss.server.config.dir}/example-users.properties"/>
<module-option name="rolesProperties"
value="${jboss.server.config.dir}/example-roles.properties"/>
</login-module>
</authentication>
</security-domain>
${jboss.server.config.dir} refers to the EAP_HOME/standalone/configuration/ directory. If the instance is running in a managed domain, ${jboss.server.config.dir} refers to the EAP_HOME/domain/configuration/ directory.
In JBoss EAP 6, security domains no longer use the prefix java:/jaas/ in their names.
- For Web applications, you must remove this prefix from the security domain configurations in the
jboss-web.xml. - For Enterprise applications, you must remove this prefix from the security domain configurations in the
jboss-ejb3.xmlfile. This file has replaced thejboss.xmlin JBoss EAP 6.
3.1.7.2. Update Applications That Use PicketLink STS and Web Services
If your JBoss EAP 6.1 application uses PicketLink STS and Web services, you might need to make changes when you migrate to JBoss EAP 6.2 or later. A fix applied to JBoss EAP to address CVE-2013-2133 enforces authorization checks by the container before running any JAXWS handlers attached to EJB3-based WS endpoints. As a consequence, some PicketLink STS functionality can be affected because the PicketLink SAML2Handler establishes a security principal that is intended to be used later in the process. You might see a NullPointerException in the server log because the principal is NULL when the HandlerAuthInterceptor accesses the SAML2Handler. You must disable this security check to fix this problem.
Procedure 3.12. Disable Additional Authorization Checks
- You can disable the additional authorization checks and keep using the existing PicketLink deployments by using one of the following methods.
- Set a system-wide property.You can disable additional authorization checks at the server level by setting the
org.jboss.ws.cxf.disableHandlerAuthCheckssystem property value totrue. This method affects any deployment made to the application server.For information on how to set a system property, see the topic entitled Configure System Properties Using the Management CLI in the Administration and Configuration Guide for JBoss EAP. - Create a property in the deployment's web services descriptor file.You can disable additional authorization checks at the deployment level by setting the
org.jboss.ws.cxf.disableHandlerAuthChecksproperty value totruein thejboss-webservices.xmlfile. This method impacts only the specific deployment.- Create a
jboss-webservices.xmlfile in theMETA-INF/directory of the deployment in which you want to disable additional authorization checks. - Add the following content.
<?xml version="1.1" encoding="UTF-8"?> <webservices xmlns="http://www.jboss.com/xml/ns/javaee" xmlns:xsi="http://www.w3.org/2001/XMLSchema-instance" version="1.2" xsi:schemaLocation="http://www.jboss.com/xml/ns/javaee"> <property> <name>org.jboss.ws.cxf.disableHandlerAuthChecks</name> <value>true</value> </property> </webservices>
Note
org.jboss.ws.cxf.disableHandlerAuthChecks property renders a system vulnerable to CVE-2013-2133. If the application expects security restrictions declared on EJB methods to be applied and does not apply them independent to the JAX-WS handler, then the property should not be enabled. The property should only be used for purposes of backwards compatibility when needed to avoid breaking the application.
3.1.8. JNDI Changes
3.1.8.1. Update Application JNDI Namespace Names
EJB 3.1 introduced a standardized global JNDI namespace and a series of related namespaces that map to the various scopes of a Java EE application. Portable EJB names only get bound to three of them: java:global, java:module, and java:app. Applications with EJBs that use JNDI must be changed to follow the new standardized JNDI namespace convention.
Procedure 3.13. Modify JNDI lookups
- Learn more about Section 3.1.8.2, “Portable EJB JNDI Names”
Examples of JNDI namespaces in previous releases and how they are specified in JBoss EAP 6 can be found here: Section 3.1.8.5, “Examples of JNDI Namespaces in Previous Releases and How They are Specified in JBoss EAP 6”
3.1.8.2. Portable EJB JNDI Names
The Java EE 6 specification defines four logical namespaces, each with its own scope, but portable EJB names only get bound to three of them. The following table details when and how to use each namespace.
Table 3.1. Portable JNDI Namespaces
| JNDI Namespace | Description |
|---|---|
| java:global |
Names in this namespace are shared by all applications deployed in an application server instance. Use names in this namespace to find EJBs external archives deployed to the same server.
The following is an example of a java:global namespace:
java:global/jboss-seam-booking/jboss-seam-booking-jar/HotelBookingAction
|
| java:module |
Names in this namespace are shared by all components in a module, for example, all enterprise beans in a single EJB module or all components in a web module.
The following is an example of a java:module namespace:
java:module/HotelBookingAction!org.jboss.seam.example.booking.HotelBooking
|
| java:app |
Names in this namespace are shared by all components in all modules in a single application. For example, a WAR and an EJB jar file in the same EAR file would have access to resources in the java:app namespace.
The following is an example of a java:app namespace:
java:app/jboss-seam-booking-jar/HotelBookingAction
|
3.1.8.3. Review the JNDI Namespace Rules
JBoss EAP 6 has improved upon JNDI namespace names, not only to provide predictable and consistent rules for every name bound in the application server, but also to prevent future compatibility issues. This means you might run into issues with the current namespaces in your application if they don't follow the new rules.
- Unqualified relative names like
DefaultDSorjdbc/DefaultDSshould be qualified relative tojava:comp/env,java:module/env, orjava:jboss/env, depending on the context. - Unqualified
absolutenames like/jdbc/DefaultDSshould be qualified relative to ajava:jboss/rootname. - Qualified
absolutenames likejava:/jdbc/DefaultDSshould be qualified the same way as Unqualifiedabsolutenames above. - The special
java:jbossnamespace is shared across the entire AS server instance. - Any
relativename with ajava:prefix must be in one of the five namespaces:comp,module,app,global, or the proprietaryjboss. Any name starting withjava:xxxwhere xxx does not match any of the above five would result in an invalid name error.
3.1.8.4. Modify the Application to Follow the New JNDI Namespace Rules
- Here is an example of a JNDI lookup in JBoss EAP 5.1. This code is usually found in an initialization method.
private ProductManager productManager; try { context = new InitialContext(); productManager = (ProductManager) context.lookup("OrderManagerApp/ProductManagerBean/local"); } catch(Exception lookupError) { throw new ServletException("Unable to find the ProductManager bean", lookupError); }Note the lookup name isOrderManagerApp/ProductManagerBean/local. - The following is an example of how the same lookup would be coded in JBoss EAP 6 using dependency injection.
@EJB(lookup="java:app/OrderManagerEJB/ProductManagerBean!services.ejb.ProductManager") private ProductManager productManager;
The lookup values are now defined as member variables and use the new portablejava:appJNDI namespace namejava:app/OrderManagerEJB/ProductManagerBean!services.ejb.ProductManager. - If you prefer not to use dependency injection, you can continue to create the new InitialContext as above and modify the lookup to use the new JNDI namespace name.
private ProductManager productManager; try { context = new InitialContext(); productManager = (ProductManager) context.lookup("java:app/OrderManagerEJB/ProductManagerBean!services.ejb.ProductManager"); } catch(Exception lookupError) { throw new ServletException("Unable to find the ProductManager bean", lookupError); }
3.1.8.5. Examples of JNDI Namespaces in Previous Releases and How They are Specified in JBoss EAP 6
Table 3.2. JNDI Namespace Mapping Table
| Namespace in JBoss EAP 5.x | Namespace in JBoss EAP 6 | Additional Comments |
|---|---|---|
| OrderManagerApp/ProductManagerBean/local | java:module/ProductManagerBean!services.ejb.ProductManager | Java EE 6 standard binding. Scoped to the current module and only accessible within the same module. |
| OrderManagerApp/ProductManagerBean/local | java:app/OrderManagerEJB/ProductManagerBean!services.ejb.ProductManager | Java EE 6 standard binding. Scoped to the current application and only accessible within the same application. |
| OrderManagerApp/ProductManagerBean/local | java:global/OrderManagerApp/OrderManagerEJB/ProductManagerBean!services.ejb.ProductManager | Java EE 6 standard binding. Scoped to the application server and globally accessible. |
| java:comp/UserTransaction | java:comp/UserTransaction | Namespace is scoped to the current component. Not accessible for threads that are not Java EE 6, for example, threads created directly by your application. |
| java:comp/UserTransaction | java:jboss/UserTransaction | Globally accessible. Use this if java:comp/UserTransaction is not available. |
| java:/TransactionManager | java:jboss/TransactionManager | |
| java:/TransactionSynchronizationRegistry | java:jboss/TransactionSynchronizationRegistry |
3.2. Changes Dependent on Your Application Architecture and Components
3.2.1. Review Changes Dependent on Your Application Architecture and Components
- Hibernate and JPA
- If your application uses Hibernate or JPA, your application may need some modifications. For more information, refer: Section 3.2.2.1, “Update Applications That Use Hibernate and/or JPA”.
- REST
- If your application uses JAX-RS, you should be aware that JBoss EAP 6 automatically sets up RESTEasy, so you no longer need to configure it yourself. For more information, refer: Section 3.2.7.1, “Configure JAX-RS and RESTEasy Changes”
- LDAP
- The LDAP security realm is configured differently in JBoss EAP 6. If your application uses LDAP, refer to the following topic for more information: Section 3.2.8.1, “Configure LDAP Security Realm Changes”.
- Messaging
- JBoss Messaging is no longer included in JBoss EAP 6. If your application uses JBoss Messaging as the messaging provider, you need to replace the JBoss Messaging code with HornetQ. The following topic describes what you need to do: Section 3.2.9.4, “Migrate Your Application to Use HornetQ as the JMS Provider”.
- Clustering
- The way you enable clustering has changed in JBoss EAP 6. For details, refer: Section 3.2.10.1, “Make Changes to Your Application for Clustering”.
- Service-style deployment
- Although JBoss EAP 6 no longer uses service-style descriptors, the container supports these service-style deployments without change where possible. For deployment information, refer: Section 3.2.11.1, “Update Applications That Use Service-style Deployments”
- Remote invocation
- If your application makes remote invocations, you can still use JNDI to lookup a proxy for your bean and invoke on that returned proxy. For more information about required syntax and namespaces changes, refer: Section 3.2.12.1, “Migrate JBoss EAP 5 Deployed Applications That Make Remote Invocations to JBoss EAP 6”.
- Seam 2.2
- If your application uses Seam 2.2, refer to the following topic for changes you need to make: Section 3.2.18.1, “Migrate Seam 2.2 Archives to JBoss EAP 6”.
- Spring
- If your application uses Spring, refer: Section 3.2.19.1, “Migrate Spring Applications”.
- Other changes that may impact your migration
- For additional changes in JBoss EAP 6 that may impact your application, refer: Section 3.2.20.1, “Become Familiar with Other Changes That May Affect Your Migration”.
3.2.2. Hibernate and JPA Changes
3.2.2.1. Update Applications That Use Hibernate and/or JPA
If your application uses Hibernate or JPA, read through the following sections and make any changes necessary to migrate to JBoss EAP 6.
3.2.2.2. Configure Changes for Applications That Use Hibernate and JPA
If your application contains a persistence.xml file or the code uses the annotations @PersistenceContext or @PersistenceUnit, JBoss EAP 6 detects this during deployment and assumes the application uses JPA. It implicitly adds Hibernate 4 plus a few other dependencies to your application classpath.
ClassNotFoundExceptions when you deploy your application, you can try to resolve them using one of the following approaches.
Important
Procedure 3.14. Configure the Application
- Copy the required Hibernate 3 JARs to your application library.You may be able to resolve the issue by copying the specific Hibernate 3 JARs that contain the missing classes into the application's
lib/directory or by adding them to the classpath using some other method. In some cases this may result inClassCastExceptionsor other class loading issues due to the mixed use of the Hibernate versions. If that happens, you need to use the next approach. - Instruct the server to use only the Hibernate 3 libraries.JBoss EAP 6 allows you to package Hibernate 3.5 (or greater) persistence provider jars with the application. To direct the server to use only the Hibernate 3 libraries and to exclude the Hibernate 4 libraries, you need to set the
jboss.as.jpa.providerModuletohibernate3-bundledin thepersistence.xmlas follows:<?xml version="1.0" encoding="UTF-8"?> <persistence xmlns="http://java.sun.com/xml/ns/persistence" version="1.0"> <persistence-unit name="plannerdatasource_pu"> <description>Hibernate 3 Persistence Unit.</description> <jta-data-source>java:jboss/datasources/PlannerDS</jta-data-source> <properties> <property name="hibernate.show_sql" value="false" /> <property name="jboss.as.jpa.providerModule" value="hibernate3-bundled" /> </properties> </persistence-unit> </persistence>The Java Persistence API (JPA) deployer will detect the presence of a persistence provider in the application and use the Hibernate 3 libraries. For more information on the JPA persistence properties, refer Section 3.2.2.3, “Persistence Unit Properties”. - Disable Hibernate second-level cache.Second-level cache for Hibernate 3 does not exhibit the same behavior with JBoss EAP 6 as it did in previous releases. If you are using Hibernate second-level cache with your application, you must disable it until you upgrade to Hibernate 4. To disable second-level cache, set the
<hibernate.cache.use_second_level_cache>tofalsein thepersistence.xmlfile. - Replace references to
org.jboss.ejb3.entity.ExtendedEntityManager.In JBoss EAP 5, theorg.jboss.ejb3.entity.ExtendedEntityManagerclass extendedjavax.persistence.EntityManagerfor extended persistence context management. In JBoss EAP 6, this class was replaced with theorg.jboss.as.jpa.container.ExtendedEntityManagerclass. However, it is recommended that you update the code to use the standard Java EE 6 JPA APIjavax.persistence.EntityManagerclass instead of the proprietary class.
3.2.2.3. Persistence Unit Properties
JBoss EAP 6 automatically sets the following Hibernate 4.x configuration properties:
Table 3.3. Hibernate Persistence Unit Properties
| Property Name | Default Value | Purpose |
|---|---|---|
hibernate.id.new_generator_mappings | true |
This setting is relevant if you use
@GeneratedValue(AUTO) to generate unique index key values for new entities. New applications should keep the default value of true. Existing applications that used Hibernate 3.3.x might need to change it to false to continue using a sequence object or table based generator and maintain backward compatibility. The application can override this value in the persistence.xml file.
More information on this behavior is provided below.
|
hibernate.transaction.jta.platform | Instance of org.hibernate.service.jta.platform.spi.JtaPlatform Interface |
This class passes the transaction manager, user transaction, and transaction synchronization registry into Hibernate.
|
hibernate.ejb.resource_scanner | Instance of org.hibernate.ejb.packaging.Scanner Interface |
This class knows how to use the JBoss EAP 6 annotation indexer to provide faster deployment.
|
hibernate.transaction.manager_lookup_class |
This property is removed if found in the persistence.xml because it could conflict with
hibernate.transaction.jta.platform
| |
hibernate.session_factory_name | QUALIFIED_PERSISTENCE_UNIT_NAME |
This is set to the application name + persistence unit name. The application can specify a different value, but it must be unique across all application deployments on the JBoss EAP 6 instance.
|
hibernate.session_factory_name_is_jndi | false |
This is set only if the application did not specify a value for the
hibernate.session_factory_name.
|
hibernate.ejb.entitymanager_factory_name | QUALIFIED_PERSISTENCE_UNIT_NAME |
This is set to the application name + persistence unit name. The application can specify a different value but it needs to be unique across all application deployments on the JBoss EAP 6 instance.
|
new_generator_mappings is set to true:
@GeneratedValue(AUTO)maps toorg.hibernate.id.enhanced.SequenceStyleGenerator.@GeneratedValue(TABLE)maps toorg.hibernate.id.enhanced.TableGenerator.@GeneratedValue(SEQUENCE)maps toorg.hibernate.id.enhanced.SequenceStyleGenerator.
new_generator_mappings is set to false:
@GeneratedValue(AUTO)maps to Hibernate "native".@GeneratedValue(TABLE)maps toorg.hibernate.id.MultipleHiLoPerTableGenerator.@GeneratedValue(SEQUENCE)maps to Hibernate "seqhilo".
The following JPA properties are supported in the persistence unit definition in the persistence.xml file:
Table 3.4. JPA Persistence Unit Properties
| Property Name | Default Value | Purpose |
|---|---|---|
jboss.as.jpa.providerModule | org.hibernate |
The name of the persistence provider module.
The value should be
hibernate3-bundled if Hibernate 3 JARs are in the application archive.
If a persistence provider is packaged with the application, this value should be
application.
|
jboss.as.jpa.adapterModule | org.jboss.as.jpa.hibernate:4 |
The name of the integration classes that help JBoss EAP 6 to work with the persistence provider.
Current valid values are:
|
3.2.2.4. Update Your Hibernate 3 Application to Use Hibernate 4
When you update your application to use Hibernate 4, some updates are general and apply regardless of version of Hibernate currently used by the application. For other updates, you must determine which version the application currently uses.
Procedure 3.15. Update the application to use Hibernate 4
- The default behavior of autoincrement sequence generator has changed in JBoss EAP 6. For more information, refer Section 3.2.2.5, “Preserve the Existing Behavior of the Hibernate Identity Auto Generated Value”.
- Determine the version of Hibernate currently used by the application and choose the correct update procedure below.
- Refer Section 3.2.2.8, “Modify Persistence Properties for Migrated Seam and Hibernate Applications that Run in a Clustered Environment” if you plan to run your application in a clustered environment.
3.2.2.5. Preserve the Existing Behavior of the Hibernate Identity Auto Generated Value
hibernate.id.new_generator_mappings that directs how identity or sequence columns are generated when using @GeneratedValue. In JBoss EAP 6, the default value for this property is set as follows:
- When you deploy a native Hibernate application, the default value is
false. - When you deploy a JPA application, the default value is
true.
New applications that use the @GeneratedValue annotation should set the value for the hibernate.id.new_generator_mappings property to true. This is the preferred setting because it is more portable across different databases. In most cases it is more efficient and, in some cases, it addresses compatibility with the JPA 2 specification.
- For new JPA applications, JBoss EAP 6 defaults the
hibernate.id.new_generator_mappingsproperty totrueand it should not be changed. - For new native Hibernate applications, JBoss EAP 6 defaults the
hibernate.id.new_generator_mappingsproperty tofalse. You should set this property totrue.
Existing applications that use the @GeneratedValue annotation should make sure that the same generator is used to create primary key values for new entities when the application is migrated to JBoss EAP 6.
- For existing JPA applications, JBoss EAP 6 defaults the
hibernate.id.new_generator_mappingsproperty totrue. You should set this property tofalsein thepersistence.xmlfile. - For existing native Hibernate applications, JBoss EAP 6 defaults the
hibernate.id.new_generator_mappingstofalseand it should not be changed.
3.2.2.6. Migrate Your Hibernate 3.3.x Application to Hibernate 4.x
- Hibernate
texttypes are now mapped toJDBC LONGVARCHARIn versions of Hibernate prior to 3.5,texttype was mapped toJDBC CLOB. A new Hibernate type,materialized_clob, was added in Hibernate 4 to map JavaStringproperties toJDBC CLOB. If your application has properties configured astype="text"that are intended to be mapped toJDBC CLOB, you must do one of the following:- If your application uses hbm mapping files, change the property to
type="materialized_clob". - If your application uses annotations, you should replace
@Type(type = "text")with@Lob.
- Review code to find changes in returned value typesNumeric aggregate criteria projections now return the same value type as their HQL counterparts. As a result, the return types from the following projections in
org.hibernate.criterionhave changed.- Due to changes in
CountProjection,Projections.rowCount(),Projections.count(propertyName), andProjections.countDistinct(propertyName), thecountandcount distinctprojections now return aLongvalue. - Due to changes in
Projections.sum(propertyName), thesumprojections now return a value type that depends on the property type.Note
Failure to modify your application code could result in ajava.lang.ClassCastException.- For properties mapped as Long, Short, Integer, or primitive integer types, a Long value is returned;
- For properties mapped as Float, Double, or primitive floating point types, a Double value is returned.
- Update the
UserTypesignatures for thenullSafeGet()andnullSafeSet()methods.The signatures for thenullSafeGet()andnullSafeSet()methods in theUserTypeclass changed in Hibernate 4. Any application code that uses these methods must be updated to use the new signatures.The following is an example of the method signatures in Hibernate 3.x.public Object nullSafeGet(ResultSet rs, String[] names, Object owner) throws HibernateException, SQLException; public void nullSafeSet(PreparedStatement st, Object value, int index) throws HibernateException, SQLException;The following is an example of the new method signatures in Hibernate 4.public Object nullSafeGet(ResultSet rs, String[] names, SessionImplementor session, Object owner) throws HibernateException, SQLException; public void nullSafeSet(PreparedStatement st, Object value, int index, SessionImplementor session) throws HibernateException, SQLException;
3.2.2.7. Migrate Your Hibernate 3.5.x Application to Hibernate 4.x
- AnnotationConfiguration was merged into ConfigurationAlthough
AnnotationConfigurationis now deprecated, it should not affect your migration.- If you are still using an
hbm.xmlfile, you should be aware that JBoss EAP 6 now uses theorg.hibernate.cfg.EJB3NamingStrategyinAnnotationConfigurationinstead of theorg.hibernate.cfg.DefaultNamingStrategythat was used in previous releases. This can result in naming mismatches. - If you rely on the naming strategy to default the name of an association (many-to-many and collections of elements) table, you may see this issue. To resolve it, you can tell Hibernate to use the legacy
org.hibernate.cfg.DefaultNamingStrategyby callingConfiguration#setNamingStrategyand passing itorg.hibernate.cfg.DefaultNamingStrategy#INSTANCE.
- Modify the namespaces to conform to the new Hibernate DTD file names as noted in the following table.
Table 3.5. DTD Namespace Mapping Table
Previous DTD Namespace New DTD Namespace http://hibernate.sourceforge.net/hibernate-configuration-3.0.dtd http://www.hibernate.org/dtd/hibernate-configuration-3.0.dtd http://hibernate.sourceforge.net/hibernate-mapping-3.0.dtd http://www.hibernate.org/dtd/hibernate-mapping-3.0.dtd - Modify environment variables.
- If you are using Oracle and using the
materialized_clobormaterialized_blobproperties, the global environment variablehibernate.jdbc.use_streams_for_binarymust be set to true. - If you are using PostgreSQL and using the
CLOBorBLOBproperties, the global environment variablehibernate.jdbc.use_streams_for_binarymust be set to false.
- Update the
UserTypesignatures for thenullSafeGet()andnullSafeSet()methods.The signatures for thenullSafeGet()andnullSafeSet()methods in theUserTypeclass changed in Hibernate 4. Any application code that uses these methods must be updated to use the new signatures. See Section 3.2.2.6, “Migrate Your Hibernate 3.3.x Application to Hibernate 4.x” for details.
3.2.2.8. Modify Persistence Properties for Migrated Seam and Hibernate Applications that Run in a Clustered Environment
javax.ejb.EJBTransactionRolledbackException: JBAS010361: Failed to deserialize .... Caused by: java.io.InvalidObjectException: could not resolve session factory during session deserialization [uuid=8aa29e74373ce3a301373ce3a44b0000, name=null]To resolve these errors, you need to modify properties in the configuration file. In most cases this is the
persistence.xml file. For native Hibernate API applications, this is the hibernate.cfg.xml file.
Procedure 3.16. Set persistence properties to run in a clustered environment
- Set the
hibernate.session_factory_namevalue to a unique name. This name must be unique across all application deployments on the JBoss EAP 6 instance. For example:<property name="hibernate.session_factory_name" value="jboss-seam-booking.ear_session_factory"/>
- Set the
hibernate.ejb.entitymanager_factory_namevalue to a unique name. This name must be unique across all application deployments on the JBoss EAP 6 instance. For example:<property name="hibernate.ejb.entitymanager_factory_name" value="seam-booking.ear_PersistenceUnitName"/>
3.2.2.9. Update Your Application to Conform to the JPA 2.0 Specification
The JPA 2.0 specification requires that a persistence context cannot be propagated outside of a JTA transaction. If your application uses only transaction-scoped persistence contexts, the behavior is the same in JBoss EAP 6 as it was in previous versions of the application server and no changes are required. However, if your application uses an extended persistence context (XPC) to allow queuing or batching of data modifications, you may need to make changes to your application.
If your application has a stateful session bean, Bean1, that uses an extended persistence context, and it calls a stateless session bean, Bean2, that uses a transaction-scoped persistence context, you can expect the following behavior to occur:
- If
Bean1starts a JTA transaction and makes theBean2method invocation with the JTA transaction active, the behavior in JBoss EAP 6 is the same as previous releases and no change is necessary. - If
Bean1does not start a JTA transaction and makes theBean2method invocation, JBoss EAP 6 does not propagate the extended persistence context intoBean2. This behavior is different than in previous releases which did propagate the extended persistence context intoBean2. If your application expects the extended persistence context to be propagated to the bean with the transactional entity manager, you need to change your application to do the invocation within an active JTA transaction.
3.2.2.10. Replace JPA/Hibernate Second Level Cache with Infinispan
JBoss Cache has been replaced by Infinispan for second-level cache (2LC). This requires a change to the persistence.xml file. The syntax is slightly different, depending on if you are using JPA or Hibernate second level cache. These examples assume you are using Hibernate.
persistence.xml file in JBoss EAP 5.x.
<property name="hibernate.cache.region.factory_class"
value="org.hibernate.cache.jbc2.JndiMultiplexedJBossCacheRegionFactory"/>
<property name="hibernate.cache.region.jbc2.cachefactory" value="java:CacheManager"/>
<property name="hibernate.cache.use_second_level_cache" value="true"/>
<property name="hibernate.cache.region.jbc2.cfg.entity" value="mvcc-entity"/>
<property name="hibernate.cache.region_prefix" value="services"/>
The following steps will use this example to configure Infinispan in JBoss EAP 6.
Procedure 3.17. Modify the persistence.xml file to use Infinispan
- Configure Infinispan for a JPA application in JBoss EAP 6This is an example of how properties to achieve the same configuration for a JPA application using Infinispan in JBoss EAP 6 can be specified:
<property name="hibernate.cache.use_second_level_cache" value="true"/>
In addition, you need to specify ashared-cache-modewith a value ofENABLE_SELECTIVEorALLas follows:ENABLE_SELECTIVEis the default and recommended value. It means entities are not cached unless you explicitly mark them as cacheable.<shared-cache-mode>ENABLE_SELECTIVE</shared-cache-mode>
ALLmeans entities are always cached even if you mark them as not cacheable.<shared-cache-mode>ALL</shared-cache-mode>
- Configure Infinispan for a native Hibernate application in JBoss EAP 6This is an example of how the same configuration for a native Hibernate application using Infinispan with JBoss EAP 6 can be specified:
<property name="hibernate.cache.region.factory_class" value="org.jboss.as.jpa.hibernate4.infinispan.InfinispanRegionFactory"/> <property name="hibernate.cache.infinispan.cachemanager" value="java:jboss/infinispan/container/hibernate"/> <property name="hibernate.transaction.jta.platform" value="org.hibernate.service.jta.platform.internal.JBossAppServerJtaPlatform"/> <property name="hibernate.cache.use_second_level_cache" value="true"/>You must also add the following dependencies to theMANIFEST.MFfile:Manifest-Version: 1.0 Dependencies: org.infinispan, org.hibernate
3.2.2.11. Hibernate Cache Properties
Table 3.6. Properties
| Property Name | Description |
|---|---|
hibernate.cache.region.factory_class |
The classname of a custom
CacheProvider.
|
hibernate.cache.use_minimal_puts |
Boolean. Optimizes second-level cache operation to minimize writes, at the cost of more frequent reads. This setting is most useful for clustered caches and, in Hibernate3, is enabled by default for clustered cache implementations.
|
hibernate.cache.use_query_cache |
Boolean. Enables the query cache. Individual queries still have to be set cacheable.
|
hibernate.cache.use_second_level_cache |
Boolean. Used to completely disable the second level cache, which is enabled by default for classes that specify a
<cache> mapping.
|
hibernate.cache.query_cache_factory |
The classname of a custom
QueryCache interface. The default value is the built-in StandardQueryCache.
|
hibernate.cache.region_prefix |
A prefix to use for second-level cache region names.
|
hibernate.cache.use_structured_entries |
Boolean. Forces Hibernate to store data in the second-level cache in a more human-friendly format.
|
hibernate.cache.default_cache_concurrency_strategy |
Setting used to give the name of the default
org.hibernate.annotations.CacheConcurrencyStrategy to use when either @Cacheable or @Cache is used. @Cache(strategy="..") is used to override this default.
|
3.2.2.12. Migrate to Hibernate Validator 4
Hibernate Validator 4.x is a completely new code base that implements JSR 303 - Bean Validation. The migration process from Validator 3.x to 4.x is fairly straightforward, but there are a few changes you must make when you migrate your application.
Procedure 3.18. You may need to perform one or more of the following tasks
- Access the default ValidatorFactoryJBoss EAP 6 binds a default ValidatorFactory to the JNDI context under the name
java:comp/ValidatorFactory. - Understand life cycle triggered validationWhen used in combination with Hibernate Core 4, life-cycle based validation is automatically enabled by Hibernate Core.
- Validation occurs on entity
INSERT,UPDATE, andDELETEoperations. - You can configure the groups to be validated by event type using the following properties:The values of these properties are the comma-separated, fully qualified class names of the groups to validate.
javax.persistence.validation.group.pre-persist,javax.persistence.validation.group.pre-update, andjavax.persistence.validation.group.pre-remove.
Validation groups are a new feature of the Bean Validation specification. If you do not want to take advantage of this new feature, no changes are required when you migrate to Hibernate Validator 4. - You can disable life-cycle based validation by setting the
javax.persistence.validation.modeproperty tonone. Other valid values for this property areauto(the default),callbackandddl.
- Configure your application to use manual validation
- To manually control validation, you can create a Validator in either of the following ways:
- Create a
Validatorinstance from theValidatorFactoryusing thegetValidator()method. - Inject Validator instances in your EJB, CDI bean or any other Java EE injectable resource.
- You can use the
ValidatorContextreturned by theValidatorFactory.usingContext()to customize your Validator instance. Using this API you can configure a customMessageInterpolator,TraverableResolverandConstraintValidatorFactory. These interfaces are specified in the Bean Validation specification and are new to Hibernate Validator 4.
- Modify code to use the new Bean Validation constraintsThe new Bean level validation constraints require code changes when you migrate to Hibernate Validator 4.
- To upgrade to Hibernate Validator 4, you must use the constraints in the following packages:
javax.validation.constraintsorg.hibernate.validator.constraints
- All constraints that existed in Hibernate Validator 3 are still available in Hibernate Validator 4. To use them, you need to import the specified class, and in some cases, change the name or type of the constraint parameter.
- Use custom constraintsIn Hibernate Validator 3, a custom constraint needed to implement the
org.hibernate.validator.Validatorinterface. In Hibernate Validator 4, you need to implement thejavax.validation.ConstraintValidatorinterface. This interface contains the sameinitialize()andisValid()methods as the previous interface, however, the method signature has changed. In addition,DDLalteration is no longer supported in Hibernate Validator 4. - The following Hibernate 3.x
Validatorclasses are obsolete.- Replace
org.hibernate.validator.NotNullwithjavax.validation.constraints.NotNull. - Replace
org.hibernate.validator.ClassValidatorwithjavax.validation.Validator.. - Replace
org.hibernate.validator.InvalidValuewithjavax.validation.Validator..
For more information, see the Hibernate Valitator Reference Guide. - The
jboss-ejb3-ext-api-VERSION.jarfile removed many of the annotation extension APIs because they are no longer needed in JBoss EAP 6. For example, theorg.jboss.ejb3.annotation.IgnoreDependencyclass is no longer available or needed because JBoss EAP 6 handles the interdependencies automatically.
3.2.3. JTS and JTA Changes
3.2.3.1. Migrate JBoss Transaction Service Configurations
In previous versions of JBoss EAP, the JBoss Transaction Service transaction manager was configured in one of the following XML files:
Table 3.7. JBossTS Configuration Files
| JBoss EAP Version | Configuration File Name |
|---|---|
|
4.2
|
jboss-eap-4.2.0/server/default/conf/jbossjta-properties.xml
|
|
4.3
|
jboss-eap-4.3.0/server/default/conf/jbossjta-properties.xml
|
|
5.2
|
jboss-eap-5.2.0/server/default/conf/jbossts-properties.xml
|
- JBoss EAP 6 includes a default value for the node identifier, which is fine when running a single instance of the JBoss EAP server, but must be modified when running multiple instances of the server.
- JBoss EAP 6 ships with JTA transactions enabled by default. Additional steps are needed to configure JTS transactions.
JBoss EAP 6 ships with a default value setting for the node identifier. This is fine when running a single instance of the JBoss EAP server, but because the node identifier must be unique across all JBoss EAP server instances, the value must be modified when running multiple instances of the server.
Note
jbossts-properties.xml file using the following property.
<property name="com.arjuna.ats.arjuna.xa.nodeIdentifier" value=UNIQUE_NODE_ID/>
transaction subsystem of the server configuration file using Management CLI commands. The commands you use depend on whether you are running a managed domain or a standalone server.
/system-property=jboss.tx.node.id:add(value=UNIQUE_NODE_ID)
/subsystem=transactions:write-attribute(name=node-identifier,value="${jboss.tx.node.id}")
reload
/host=master/server-config=server-one/system-property=jboss.tx.node.id:add(boot-time=true,value=UNIQUE_NODE_ID)
/profile=PROFILE_NAME/subsystem=transactions:write-attribute(name=node-identifier,value="${jboss.tx.node.id}")
reload
In JBoss EAP 5, you enabled JTS transactions by running an Ant script located in the EAP5_HOME/docs/examples/transactions directory and then performed some manual steps. The script updated the jbossts-properties.xml and jacorb.properties files for all JBoss EAP server configurations.
batch
# Create a system property for the unique node identifier
/system-property=jboss.tx.node.id:add(value=UNIQUE_NODE_ID)
/system-property=jacorb.node.id:add(value=UNIQUE_JACORB_ID)
# JacORB properties must be unique for each JBoss server instance
# JacORB name must appear in JacORB context root i.e. ${jacorb.name}/Naming/root
/subsystem=jacorb:write-attribute(name=transactions,value="on")
/subsystem=jacorb:write-attribute(name="name",value="${jacorb.node.id}")
/subsystem=jacorb:write-attribute(name="root-context",value="${jacorb.node.id}/Naming/root")
/subsystem=transactions:write-attribute(name=jts,value=true)
/subsystem=transactions:write-attribute(name=node-identifier,value="${jboss.tx.node.id}")
run-batch
reload
batch
#
# Define global system properties for the node identifier and JacORB implementation name.
#
/system-property=jboss.tx.node.id/:add(value="11",boot-time="true")
/system-property=jacorb.node.id:add(value="mars",boot-time="true")
/profile=PROFILE_NAME/subsystem=jacorb:write-attribute(name="security",value="on")
/profile=PROFILE_NAME/subsystem=jacorb:write-attribute(name="transactions",value="on")
/profile=PROFILE_NAME/subsystem=jacorb:write-attribute(name="name",value="${jacorb.node.id}")
/profile=PROFILE_NAME/subsystem=jacorb:write-attribute(name="root-context",value="${jacorb.node.id}/Naming/root")
/profile=PROFILE_NAME/subsystem=transactions:write-attribute(name="jts",value="true")
/profile=PROFILE_NAME/subsystem=transactions:write-attribute(name="node-identifier",value="${jboss.tx.node.id:1}")
run-batch
reload --host=master
3.2.4. JSF changes
3.2.4.1. Enable Applications To Use Older Versions of JSF
If your application uses an older version of JSF, you do not need to upgrade to JSF 2.0. Instead, you can create a jboss-deployment-structure.xml file to request that JBoss EAP 6 use JSF 1.2 rather than JSF 2.0 with your application deployment. This JBoss specific deployment descriptor is used to control class loading and is placed in the META-INF/ or WEB-INF/ directory of your WAR, or in the META-INF/ directory of your EAR.
jboss-deployment-structure.xml file that adds a dependency for the JSF 1.2 module and excludes or prevents the automatic loading of the JSF 2.0 module.
<jboss-deployment-structure xmlns="urn:jboss:deployment-structure:1.0">
  <deployment>
    <dependencies>
      <module name="javax.faces.api" slot="1.2" export="true"/>
      <module name="com.sun.jsf-impl" slot="1.2" export="true"/>
    </dependencies>
  </deployment>
  <sub-deployment name="jboss-seam-booking.war">
    <exclusions>
      <module name="javax.faces.api" slot="main"/>
      <module name="com.sun.jsf-impl" slot="main"/>
    </exclusions>
    <dependencies>
      <module name="javax.faces.api" slot="1.2"/>
      <module name="com.sun.jsf-impl" slot="1.2"/>
    </dependencies>
  </sub-deployment>
</jboss-deployment-structure>
3.2.5. Cache Changes
3.2.5.1. Replace JBoss Cache
infinispan subsystem of the server configuration file. They should not be used directly by any application and are not supported for this purpose.
- Remote Client-Server
- This mode provides a managed, distributed and clusterable data grid server. Applications can remotely access the data grid server using Hot Rod, memcached or REST client APIs.
- Library
- This mode allows the user to build and deploy a custom runtime environment. The Library usage mode hosts a single data grid node in the applications process, with remote access to nodes hosted in other JVMs.
3.2.6. Web Services Changes
3.2.6.1. Web Services Changes
- JBossWS API Changes
- SPI and Common components were refactored in JBossWS 4. The following table lists API and packaging changes may affect your application migration.
Table 3.8. JBossWS API Changes
Old JAR Old Package New JAR New Package JBossWS SPI org.jboss.wsf.spi.annotation.* JBossWS API org.jboss.ws.api.annotation.* JBossWS SPI org.jboss.wsf.spi.binding.* JBossWS API org.jboss.ws.api.binding.* JBossWS SPI org.jboss.wsf.spi.management.recording.* JBossWS API org.jboss.ws.api.monitoring.* JBossWS SPI org.jboss.wsf.spi.tools.* JBossWS API org.jboss.ws.api.tools.* JBossWS SPI org.jboss.wsf.spi.tools.ant.* JBossWS API org.jboss.ws.tools.ant.* JBossWS SPI org.jboss.wsf.spi.tools.cmd.* JBossWS API org.jboss.ws.tools.cmd.* JBossWS SPI org.jboss.wsf.spi.util.ServiceLoader JBossWS API org.jboss.ws.api.util.ServiceLoader JBossWS Common org.jboss.wsf.common.* JBossWS API org.jboss.ws.common.* JBossWS Common org.jboss.wsf.common.handler.* JBossWS API org.jboss.ws.api.handler.* JBossWS Common org.jboss.wsf.common.addressing.* JBossWS API org.jboss.ws.api.addressing.* JBossWS Common org.jboss.wsf.common.DOMUtils JBossWS API org.jboss.ws.api.util.DOMUtils JBossWS Native org.jboss.ws.annotation.EndpointConfig JBossWS API org.jboss.ws.api.annotation.EndpointConfig JBossWS Framework org.jboss.wsf.framework.invocation.RecordingServerHandler JBossWS Common org.jboss.ws.common.invocation.RecordingServerHandler - @WebContext Annotation
- In JBossWS 3.4.x, this annotation was packaged as
org.jboss.wsf.spi.annotation.WebContextin the JBossWS SPI JAR. In JBossWS 4.0, this annotation was moved toorg.jboss.ws.api.annotation.WebContextin the JBossWS API JAR. If your application includes the obsolete dependency, you must replace the imports and dependencies in your application source code and compile it against the new JBossWS API JAR.There is also a change to an attribute that is not backward compatible. TheString[] virtualHostsattribute has been changed toString virtualHost. In JBoss EAP 6, you can specify only one virtual host per deployment. If multiple webservices use the@WebContextannotation, the virtualHost value must be identical for all endpoints defined in the deployment archive. - Endpoint Configuration
- JBossWS 4.0 provides integration of the JBoss Web Services stack with most of the Apache CXF modules. The integration layer allows the use of standard webservices APIs, including JAX-WS. It also allows the use of Apache CFX advanced features on top of the JBoss EAP 6 container without requiring complex configuration or setup.The
webservicesubsystem in the domain configuration of JBoss EAP 6 includes predefined endpoint configurations. You can also define your own additional endpoint configurations. The@org.jboss.ws.api.annotation.EndpointConfigannotation is used to reference a given endpoint configuration.For more information on how to configure webservice endpoints in the JBoss server, see the chapter entitled JAX-WS Web Services in the Development Guide for JBoss EAP 6 on https://access.redhat.com/documentation/en-us/red_hat_jboss_enterprise_application_platform/?version=6.4. - jboss-webservices.xml Deployment Descriptor
- JBossWS 4.0 introduces a new deployment descriptor to configure web services. The
jboss-webservices.xmlfile provides additional information for the given deployment and partially replaces the obsoletejboss.xmlfile.For EJB webservice deployments, the expected location of thejboss-webservices.xmldescriptor file is in theMETA-INF/directory. For POJO and EJB webservice endpoints bundled in WAR file, the expected location of thejboss-webservices.xmlfile is in theWEB-INF/directory.The following is an example of ajboss-webservices.xmldescriptor file and a table describing the elements.<webservices> <context-root>foo<context-root> <config-name>Standard WSSecurity Endpoint</config-name> <config-file>META-INF/custom.xml</config-file> <property> <name>prop.name</name> <value>prop.value</value> </property> <port-component> <ejb-name>TestService</ejb-name> <port-component-name>TestServicePort</port-component-name> <port-component-uri>/*</port-component-uri> <auth-method>BASIC</auth-method> <transport-guarantee>NONE</transport-guarantee> <secure-wsdl-access>true</secure-wsdl-access> </port-component> <webservice-description> <webservice-description-name>TestService</webservice-description-name> <wsdl-publish-location>file:///bar/foo.wsdl</wsdl-publish-location> </webservice-description> </webservices>Table 3.9. jboss-webservice.xml File Element Description
Element Name Description context-rootUsed to customize the context root of the webservices deployment.config-nameconfig-fileUsed to associate an endpoint deployment with a given endpoint configuration. Endpoint configurations are specified in the referenced configuration file or in thewebservicessubsystem of the domain configuration.propertyUsed to set up simple property name value pairs to configure the webservice stack behavior.port-componentUsed to customize the EJB endpoint target URI or to configure security related properties.webservice-descriptionUsed to customize or override the webservice WSDL published location.
3.2.6.2. Use Apache Axis in JBoss EAP 6
It is recommended that you use JBossWS Apache CXF, which is bundled with JBoss EAP 6, for developing and deploying Web Service applications. The JBossWS Apache CXF that ships with JBoss EAP 6 is the supported configuration. If you prefer to use Axis, this topic describes how to use it in JBoss EAP 6. Be aware that this implementation is considered part of your application and is not a supported configuration.
Procedure 3.19. Configure JBoss EAP to Use Axis
- You must first disable the web services implementation that ships with JBoss EAP 6. For detailed instructions, see Section 3.2.6.3, “Disable JBossWS in JBoss EAP 6”.
- Rebuild and deploy the application. The Axis WS API implementation should now access the Java EE 6 API classes correctly.
3.2.6.3. Disable JBossWS in JBoss EAP 6
The Java Enterprise Edition Specification (Java EE) 6 requires that application servers provide an integrated JAX-WS implementation for developing and deploying Web Service applications. Applications that migrate from other containers, such as Servlet containers that do not provide support for JAX-WS, may be packaged with their own JAX-WS implementations. If you do not deploy anything that uses JBossWS CXF and plan to package your own JAX-WS implementation, you can disable the webservices subsystem in JBoss EAP 6. Be aware that the JBossWS Apache CXF that ships with JBoss EAP 6 is the supported configuration. Any other implementation is considered part of your application and is not a supported configuration.
Procedure 3.20. Disable JBossWS for a Single Deployment
- Create a
jboss-deployment-structure.xmlfile for your application.- If your application is packaged and deployed as a WAR, create the
jboss-deployment-structure.xmlfile in either theMETA-INF/or theWEB-INF/directory of the WAR with the following contents.<jboss-deployment-structure xmlns="urn:jboss:deployment-structure:1.2"> <deployment> <!-- Exclude webservices subsystem so the implicit dependencies will not be added --> <exclude-subsystems> <subsystem name="webservices"/> </exclude-subsystems> </deployment> </jboss-deployment-structure> - If your application is packaged and deployed in an EAR, create the
jboss-deployment-structure.xmlfile in theMETA-INF/directory of the EAR with contents similar to the following example.<jboss-deployment-structure xmlns="urn:jboss:deployment-structure:1.2"> ... <sub-deployment name="example.war"> <!-- Exclude webservices subsystem so the implicit dependencies will not be added --> <exclude-subsystems> <subsystem name="webservices"/> </exclude-subsystems> <dependencies> ... </dependencies> </sub-deployment> </jboss-deployment-structure>
- Deploy the application in the usual manner. JBossWS is now disabled for the application.
Procedure 3.21. Disable JBossWS for All Deployments to the Server
- Stop the JBoss EAP server.
- Open the server configuration file for editing. For a standalone server, this is the
EAP_HOME/standalone/configuration/standalone.xmlfile. For a managed domain, this is theEAP_HOME/domain/configuration/domain.xmlfile. - Find the
org.jboss.as.webservicesextension and either comment it out or remove it. - Find the
webservicessubsystem profile and either comment it out or remove it. - The following is an example of the changes maded to a
standalone.xmlfile.<?xml version='1.0' encoding='UTF-8'?> <server xmlns="urn:jboss:domain:1.7"> <extensions> ... <!-- <extension module="org.jboss.as.webservices"/> --> ... </extensions> ... <profile> <!-- <subsystem xmlns="urn:jboss:domain:webservices:1.2"> <modify-wsdl-address>true</modify-wsdl-address> <wsdl-host>${jboss.bind.address:127.0.0.1}</wsdl-host> <endpoint-config name="Standard-Endpoint-Config"/> <endpoint-config name="Recording-Endpoint-Config"> <pre-handler-chain name="recording-handlers" protocol-bindings="##SOAP11_HTTP ##SOAP11_HTTP_MTOM ##SOAP12_HTTP ##SOAP12_HTTP_MTOM"> <handler name="RecordingHandler" class="org.jboss.ws.common.invocation.RecordingServerHandler"/> </pre-handler-chain> </endpoint-config> <client-config name="Standard-Client-Config"/> </subsystem> --> ... </profile> ... </server>
3.2.7. JAX-RS and RESTEasy Changes
3.2.7.1. Configure JAX-RS and RESTEasy Changes
web.xml file and replace it with one of the following three options:
- Subclass
javax.ws.rs.core.Applicationand use the@ApplicationPathannotation.This is the easiest option and does not require any xml configuration. Simply subclassjavax.ws.rs.core.Applicationin your application and annotate it with the path where you want to make your JAX-RS classes available. For example:@ApplicationPath("/mypath") public class MyApplication extends Application { }In the above example, your JAX-RS resources are available in the path/MY_WEB_APP_CONTEXT/mypath/.Note
Note the path should be specified as/mypath, not/mypath/*. There should be no trailing forward-slash or asterisk. - Subclass
javax.ws.rs.core.Applicationand use theweb.xmlfile to set up the JAX-RS mapping.If you do not wish to use the@ApplicationPathannotation, you still need to subclassjavax.ws.rs.core.Application. You then set up the JAX-RS mapping in theweb.xmlfile. For example:public class MyApplication extends Application { }<servlet-mapping> <servlet-name>com.acme.MyApplication</servlet-name> <url-pattern>/hello/*</url-pattern> </servlet-mapping>
In the above example, your JAX-RS resources are available in the path/MY_WEB_APP_CONTEXT/hello.Note
You can also use this approach to override an application path that was set using the@ApplicationPathannotation. - Modify the
web.xmlfile.If you do not want to subclassApplication, you can set up the JAX-RS mapping in theweb.xmlfile as follows:<servlet-mapping> <servlet-name>javax.ws.rs.core.Application</servlet-name> <url-pattern>/hello/*</url-pattern> </servlet-mapping>
In the above example, your JAX-RS resources are available in the path/MY_WEB_APP_CONTEXT/hello.Note
When you choose this option, you only need to add the mapping. You do not need to add the corresponding servlet. The server is responsible for adding the corresponding servlet automatically.
3.2.8. LDAP Security Realm Changes
3.2.8.1. Configure LDAP Security Realm Changes
<application-policy> element in the login-config.xml file. In JBoss EAP 6, the LDAP security realm is configured in the <security-domain> element in the server configuration file. For a standalone server, this is the standalone/configuration/standalone.xml file. If you are running your server in a managed domain, this is the domain/configuration/domain.xml file.
login-config.xml file in JBoss EAP 5:
<application-policy name="mcp_ldap_domain">
  <authentication>
    <login-module code="org.jboss.security.auth.spi.LdapExtLoginModule" flag="required">
      <module-option name="java.naming.factory.initial">com.sun.jndi.ldap.LdapCtxFactory</module-option>
      <module-option name="java.naming.security.authentication">simple</module-option>
      ....
    </login-module>
  </authentication>
</application-policy>
<subsystem xmlns="urn:jboss:domain:security:1.2">
  <security-domains>
    <security-domain name="mcp_ldap_domain" cache-type="default">
      <authentication>
        <login-module code="org.jboss.security.auth.spi.LdapLoginModule" flag="required">
          <module-option name="java.naming.factory.initial" value="com.sun.jndi.ldap.LdapCtxFactory"/>
          <module-option name="java.naming.security.authentication" value="simple"/>
          ...
        </login-module>
      </authentication>
    </security-domain>
  </security-domains>
</subsystem>
Note
<module-option name="java.naming.factory.initial">com.sun.jndi.ldap.LdapCtxFactory</module-option>Now, the module options must be specified as element attributes with "value=" as follows:
<module-option name="java.naming.factory.initial" value="com.sun.jndi.ldap.LdapCtxFactory"/>
3.2.9. HornetQ Changes
3.2.9.1. About HornetQ and NFS
- The Red Hat Enterprise Linux NFS client cache must be disabled.
Important
Important
libaio is installed on the Red Hat Enterprise Linux system where JBoss EAP 6 is running.
3.2.9.2. Configure a JMS Bridge to Migrate Existing JMS Messages to JBoss EAP 6
3.2.9.3. Create a JMS Bridge
A JMS bridge consumes messages from a source JMS queue or topic and sends them to a target JMS queue or topic, which is typically on a different server. It can be used to bridge messages between any JMS servers, as long as they are JMS 1.1 compliant. The source and destination JMS resources are looked up using JNDI and the client classes for the JNDI lookup must be bundled in a module. The module name is then declared in the JMS bridge configuration.
Procedure 3.22. Create a JMS Bridge
- Configure the Bridge on the Source JBoss EAP 5.x ServerTo avoid conflicts in classes between releases, you must follow these steps to configure the JMS bridge on JBoss EAP 5.x. The names of the SAR directory and bridge are arbitrary and can be changed if you prefer.
- Create a subdirectory in the JBoss EAP 5 deployment directory to contain the SAR, for example:
EAP5_HOME/server/PROFILE_NAME/deploy/myBridge.sar/. - Create a subdirectory named
META-INFinEAP5_HOME/server/PROFILE_NAME/deploy/myBridge.sar/. - Create a
jboss-service.xmlfile in theEAP5_HOME/server/PROFILE_NAME/deploy/myBridge.sar/META-INF/directory. It should contain information similar to the following example.<server> <loader-repository> com.example:archive=unique-archive-name <loader-repository-config>java2ParentDelegation=false</loader-repository-config> </loader-repository> <!-- JBoss EAP 6 JMS Provider --> <mbean code="org.jboss.jms.jndi.JMSProviderLoader" name="jboss.messaging:service=JMSProviderLoader,name=EnterpriseApplicationPlatform6JMSProvider"> <attribute name="ProviderName">EnterpriseApplicationPlatform6JMSProvider</attribute> <attribute name="ProviderAdapterClass">org.jboss.jms.jndi.JNDIProviderAdapter</attribute> <attribute name="FactoryRef">jms/RemoteConnectionFactory</attribute> <attribute name="QueueFactoryRef">jms/RemoteConnectionFactory</attribute> <attribute name="TopicFactoryRef">jms/RemoteConnectionFactory</attribute> <attribute name="Properties"> java.naming.factory.initial=org.jboss.naming.remote.client.InitialContextFactory java.naming.provider.url=remote://EnterpriseApplicationPlatform6host:4447 java.naming.security.principal=jbossuser java.naming.security.credentials=jbosspass </attribute> </mbean> <mbean code="org.jboss.jms.server.bridge.BridgeService" name="jboss.jms:service=Bridge,name=MyBridgeName" xmbean-dd="xmdesc/Bridge-xmbean.xml"> <depends optional-attribute-name="SourceProviderLoader">jboss.messaging:service=JMSProviderLoader,name=JMSProvider</depends> <depends optional-attribute-name="TargetProviderLoader">jboss.messaging:service=JMSProviderLoader,name=EnterpriseApplicationPlatform6JMSProvider</depends> <attribute name="SourceDestinationLookup">/queue/A</attribute> <attribute name="TargetDestinationLookup">jms/queue/test</attribute> <attribute name="QualityOfServiceMode">1</attribute> <attribute name="MaxBatchSize">1</attribute> <attribute name="MaxBatchTime">-1</attribute> <attribute name="FailureRetryInterval">60000</attribute> <attribute name="MaxRetries">-1</attribute> <attribute name="AddMessageIDInHeader">false</attribute> <attribute name="TargetUsername">jbossuser</attribute> <attribute name="TargetPassword">jbosspass</attribute> </mbean> </server>Note
Theload-repositoryelement is present to ensure the SAR has an isolated class loader. Also note both the JNDI look-up and the bridge "target" include security credentials for user "jbossuser" with password "jbosspass". This is because JBoss EAP 6 is secured by default. The user named "jbossuser" with password "jbosspass" was created in theApplicationRealmwith theguestrole using theEAP_HOME/bin/add_user.shscript. - Copy the following JARs from the
EAP_HOME/modules/system/layers/base/directory into theEAP5_HOME/server/PROFILE_NAME/deploy/myBridge.sar/directory. Replace each VERSION_NUMBER with the actual version number in your JBoss EAP 6 distribution.org/hornetq/main/hornetq-core-VERSION_NUMBER.jarorg/hornetq/main/hornetq-jms-VERSION_NUMBER.jarorg/jboss/ejb-client/main/jboss-ejb-client-VERSION_NUMBER.jarorg/jboss/logging/main/jboss-logging-VERSION_NUMBER.jarorg/jboss/logmanager/main/jboss-logmanager-VERSION_NUMBER.jarorg/jboss/marshalling/main/jboss-marshalling-VERSION_NUMBER.jarorg/jboss/marshalling/river/main/jboss-marshalling-river-VERSION_NUMBER.jarorg/jboss/remote-naming/main/jboss-remote-naming-VERSION_NUMBER.jarorg/jboss/remoting3/main/jboss-remoting-VERSION_NUMBER.jarorg/jboss/sasl/main/jboss-sasl-VERSION_NUMBER.jarorg/jboss/netty/main/netty-VERSION_NUMBER.jarorg/jboss/remoting3/remote-jmx/main/remoting-jmx-VERSION_NUMBER.jarorg/jboss/xnio/main/xnio-api-VERSION_NUMBER.jarorg/jboss/xnio/nio/main.xnio-nio-VERSION_NUMBER.jar
Note
Do not simply copy theEAP_HOME/bin/client/jboss-client.jarbecause the javax API classes will conflict with those in JBoss EAP 5.x.
- Configure the Bridge on the Destination JBoss EAP 6 ServerIn JBoss EAP 6.1 and later, the JMS bridge can be used to bridge messages from any JMS 1.1 compliant server. Because the source and target JMS resources are looked up using JNDI, the JNDI lookup classes of the source messaging provider, or message broker, must be bundled in a JBoss Module. The following steps use the fictitious 'MyCustomMQ' message broker as an example.
- Create the JBoss module for the messaging provider.
- Create a directory structure under
EAP_HOME/modules/system/layers/base/for the new module. Themain/subdirectory will contain the client JARs andmodule.xmlfile. The following is an example of the directory structure created for the MyCustomMQ messaging provider:EAP_HOME/modules/system/layers/base/org/mycustommq/main/ - In the
main/subdirectory, create amodule.xmlfile containing the module definition for the messaging provider. The following is an example of themodule.xmlcreated for the MyCustomMQ messaging provider.<?xml version="1.0" encoding="UTF-8"?> <module xmlns="urn:jboss:module:1.1" name="org.mycustommq"> <properties> <property name="jboss.api" value="private"/> </properties> <resources> <!-- Insert resources required to connect to the source or target --> <resource-root path="mycustommq-1.2.3.jar" /> <resource-root path="mylogapi-0.0.1.jar" /> </resources> <dependencies> <!-- Add the dependencies required by JMS Bridge code --> <module name="javax.api" /> <module name="javax.jms.api" /> <module name="javax.transaction.api"/> <!-- Add a dependency on the org.hornetq module since we send --> <!-- messages tothe HornetQ server embedded in the local EAP instance --> <module name="org.hornetq" /> </dependencies> </module> - Copy the messaging provider JARs required for the JNDI lookup of the source resources to the module's
main/subdirectory. The directory structure for the MyCustomMQ module should now look like the following.modules/ `-- system `-- layers `-- base `-- org `-- mycustommq `-- main |-- mycustommq-1.2.3.jar |-- mylogapi-0.0.1.jar |-- module.xml
- Configure the JMS bridge in the
messagingsubsystem of the JBoss EAP 6 server.- Before you begin, stop the server and back up the current server configuration files. If you are running a standalone server, this is the
EAP_HOME/standalone/configuration/standalone-full-ha.xmlfile. If you are running a managed domain, back up both theEAP_HOME/domain/configuration/domain.xmland theEAP_HOME/domain/configuration/host.xmlfiles. - Add the
jms-bridgeelement to themessagingsubsystem in the server configuration file. Thesourceandtargetelements provide the names of the JMS resources used for JNDI lookups. Ifuserandpasswordcredentials are specified, they are passed as arguments when JMS connection is created.The following is an example of thejms-bridgeelement configured for the MyCustomMQ messaging provider:<subsystem xmlns="urn:jboss:domain:messaging:1.3"> ... <jms-bridge name="myBridge" module="org.mycustommq"> <source> <connection-factory name="ConnectionFactory"/> <destination name="sourceQ"/> <user>user1</user> <password>pwd1</password> <context> <property key="java.naming.factory.initial" value="org.mycustommq.jndi.MyCustomMQInitialContextFactory"/> <property key="java.naming.provider.url" value="tcp://127.0.0.1:9292"/> </context> </source> <target> <connection-factory name="java:/ConnectionFactory"/> <destination name="/jms/targetQ"/> </target> <quality-of-service>DUPLICATES_OK</quality-of-service> <failure-retry-interval>500</failure-retry-interval> <max-retries>1</max-retries> <max-batch-size>500</max-batch-size> <max-batch-time>500</max-batch-time> <add-messageID-in-header>true</add-messageID-in-header> </jms-bridge> </subsystem>In the above example, the JNDI properties are defined in thecontextelement for thesource. If thecontextelement is omitted, as in thetargetexample above, the JMS resources are looked up in the local instance.
3.2.9.4. Migrate Your Application to Use HornetQ as the JMS Provider
Prerequisites
- Shut down the client and server.
- Make a backup copy of any JBoss Messaging data. The message data is stored in a database in tables prefixed with
JBM_.
Procedure 3.23. Change Your Provider to HornetQ
- Transfer configurations.Transfer the existing JBoss Messaging configurations to the JBoss EAP 6 configuration. The following configurations can be found in deployment descriptors located on the JBoss Messaging server:
- Connection Factories Service ConfigurationThis configuration describes the JMS connection factories deployed with the JBoss Messaging server. JBoss Messaging configures connection factories in a file named
connection-factories-service.xmlwhich is located in the deployment directory of the application server. - Destination ConfigurationThis configuration describes JMS queues and topics deployed with JBoss Messaging server. By default, JBoss Messaging configures destinations in a file named
destinations-service.xmlwhich is located in the deployment directory of the application server. - Message Bridge Service ConfigurationThis configuration includes bridge services deployed with JBoss Messaging server. No bridges are deployed by default so the name of the deployment file varies depending on your JBoss Messaging installation.
- Modify your application code.If the application code uses standard JMS, no code changes are required. However, you must modify the application to use the new standardized JNDI namespaces as described in the section Section 3.1.8.2, “Portable EJB JNDI Names”. If the application uses features specific to JBoss Messaging, you must modify the code to use the equivalent features available in HornetQ.The following is an example of a JMS client that creates the
InitialContextand looks up a queue in JBoss EAP 6.Hashtable<String, String> env = new Hashtable<String, String>(); String providerUrl = "remote:" + host + ":" + port; env.put(Context.URL_PKG_PREFIXES, "org.jboss.ejb.client.naming"); env.put("java.naming.factory.initial", "org.jboss.naming.remote.client.InitialContextFactory"); env.put("java.naming.provider.url", providerUrl); env.put(Context.SECURITY_PRINCIPAL, user); env.put(Context.SECURITY_CREDENTIALS, pass); InitialContext context = new InitialContext(env); Queue myTestQueue = (Queue) context.lookup("jms/queue/myTestQueue");If the application will be connecting to a cluster, you must carefully review the HornetQ documentation on clustering semantics. Clustering is outside the scope of the JMS specification and HornetQ and JBoss Messaging have taken substantially different approaches in their respective implementations of clustering functionality.For more information on how to configure messaging with HornetQ, see: Section 3.2.9.5, “Configure Messaging with HornetQ” - Migrate existing messages.Move any messages in the JBoss Messaging database to the HornetQ journal using a JMS bridge. Instructions for configuring the JMS bridge can be found here: Section 3.2.9.2, “Configure a JMS Bridge to Migrate Existing JMS Messages to JBoss EAP 6”.
3.2.9.5. Configure Messaging with HornetQ
standalone.xml or domain.xml configuration files. It is useful however to familiarize yourself with the messaging components of the default configuration files, where documentation examples using management tools give configuration file snippets for reference.
3.2.9.6. Migrate JMS Destinations
<mbeans> element of the jbossmq-destinations-service.xml or destinations-service.xml file. Because HornetQ replaces JBoss Messaging in JBoss EAP 6, JMS destinations are now configured in the messaging subsystem of the server configuration file.
Example 3.3. JBoss EAP 4.2 Destination Configuration Example
jbossmq-destinations-service.xml file in JBoss EAP 4.2. Note that if the JNDIName attribute is not specified, the value defaults to the name shown in the example.
<mbean code="org.jboss.mq.server.jmx.Queue"
  name="jboss.mq.destination:service=Queue,name=DLQ">
  <!-- The following JNDIName attribute shows the default JNDI binding name  -->
  <attribute name="JNDIName">queue/DLQ</attribute>
  <depends optional-attribute-name="DestinationManager">
    jboss.mq:service=DestinationManager
  </depends>
</mbean>
<mbean code="org.jboss.mq.server.jmx.Queue"
  name="jboss.mq.destination:service=Queue,name=ExpiryQueue">
  <!-- The following JNDIName attribute shows the default JNDI binding name  -->
  <attribute name="JNDIName">queue/ExpiryQueue</attribute>
  <depends optional-attribute-name="DestinationManager">
    jboss.mq:service=DestinationManager
  </depends>
</mbean>
Example 3.4. JBoss EAP 5 Destination Configuration Example
destinations-service.xml file in JBoss EAP 5. Note that if the JNDIName attribute is not specified, the value defaults to the name shown in the example.
<mbean code="org.jboss.jms.server.destination.QueueService"
  name="jboss.messaging.destination:service=Queue,name=DLQ"
  xmbean-dd="xmdesc/Queue-xmbean.xml">
  <!-- The following JNDIName attribute shows the default JNDI binding name  -->
  <attribute name="JNDIName">queue/DLQ</attribute>
  <depends optional-attribute-name="ServerPeer">
    jboss.messaging:service=ServerPeer
  </depends>
  <depends>
    jboss.messaging:service=PostOffice
  </depends>
</mbean>
<mbean code="org.jboss.jms.server.destination.QueueService"
  name="jboss.messaging.destination:service=Queue,name=ExpiryQueue"
  xmbean-dd="xmdesc/Queue-xmbean.xml">
  <!-- The following JNDIName attribute shows the default JNDI binding name  -->
  <attribute name="JNDIName">queue/ExpiryQueue</attribute>
  <depends optional-attribute-name="ServerPeer">
    jboss.messaging:service=ServerPeer
  </depends>
  <depends>
    jboss.messaging:service=PostOffice
  </depends>
</mbean>
Example 3.5. JBoss EAP 6 Destination Configuration Example
messaging subsystem of the server configuration file in JBoss EAP 6. In JBoss EAP 6, the entry element configures the name that is used to bind the queue to JNDI.
<subsystem xmlns="urn:jboss:domain:messaging:1.4">
<hornetq-server>
  ...
    <jms-destinations>
      <jms-queue name="ExpiryQueue">
        <entry name="java:/jms/queue/ExpiryQueue"/>
      </jms-queue>
      <jms-queue name="DLQ">
        <entry name="java:/jms/queue/DLQ"/>
      </jms-queue>
    </jms-destinations>
  </hornetq-server>
</subsystem>
3.2.10. Clustering Changes
3.2.10.1. Make Changes to Your Application for Clustering
Start JBoss EAP 6 with clustering enabled
To enable clustering in JBoss EAP 5.x, you needed to start your server instances using theallprofile or some derivation of it, like this:$ EAP5_HOME/bin/run.sh -c allIn JBoss EAP 6, the method for enabling clustering depends on whether the servers are standalone or running in a managed domain.Enable clustering for servers running in a managed domain
To enable clustering for servers started using the domain controller, update yourdomain.xmland designate a server group to use thehaprofile andha-socketssocket binding group. For example:<server-groups> <server-group name="main-server-group" profile="ha"> <jvm name="default"> <heap size="64m" max-size="512m"/> </jvm> <socket-binding-group ref="ha-sockets"/> </server-group> </server-group>Enable clustering for standalone servers
To enable clustering for standalone servers, start the server using the appropriate configuration file as follows:$ EAP_HOME/bin/standalone.sh --server-config=standalone-ha.xml -Djboss.node.name=UNIQUE_NODE_NAME
Specify the bind address
In JBoss EAP 5.x, you would typically indicate the bind address used for clustering using the-bcommand line argument like this:$ EAP5_HOME/bin/run.sh -c all -b 192.168.0.2JBoss EAP 6 binds sockets to the IP addresses and interfaces contained in the<interfaces>elements instandalone.xml,domain.xmlandhost.xmlfiles. The standard configurations that ship with JBoss EAP include two interface configurations:<interfaces> <interface name="management"> <inet-address value="${jboss.bind.address.management:127.0.0.1}"/> </interface> <interface name="public"> <inet-address value="${jboss.bind.address:127.0.0.1}"/> </interface> </interfaces>These interface configurations use the values of the system propertiesjboss.bind.address.managementandjboss.bind.address. If these system properties are not set, the default127.0.0.1is used for each value.You can also specify the bind address as a command line argument when you start the server or you can explicitly define it within the JBoss EAP 6 server configuration file.- Specify the bind argument on the command line when you start the JBoss EAP standalone server.The following is an example of how to specify the bind address on the command line for a standalone server:
EAP_HOME/bin/standalone.sh -Djboss.bind.address=127.0.0.1Note
You can also use the-bargument, which is a shortcut for-Djboss.bind.address=127.0.0.1:EAP_HOME/bin/standalone.sh -b=127.0.0.1The JBoss EAP 5 syntax format is also still supported:
Note that theEAP_HOME/bin/standalone.sh -b 127.0.0.1-bargument only changes thepublicinterface. It does not affect themanagementinterface. - Specify the bind address in the server configuration file.For servers running in a managed domain, specify the bind addresses in the
domain/configuration/host.xmlfile. For standalone servers, specify the bind addresses in thestandalone-ha.xmlfile.In the following example, thepublicinterface is specified as the default interface for all sockets within theha-socketssocket binding group.<interfaces> <interface name="management"> <inet-address value="192.168.0.2"/> </interface> <interface name="public"> <inet-address value="192.168.0.2"/> </interface> </interfaces><socket-binding-groups> <socket-binding-group name="ha-sockets" default-interface="public"> <!-- ... --> </socket-binding-group> </socket-binding-groups>Note
If you specify the bind address as a hard-coded value rather than a system property in the configuration file, you can not override it with a command line argument.
Configure
jvmRouteto support mod_jk and mod_proxyIn JBoss EAP 5, the web serverjvmRoutewas configured using a property in theserver.xmlfile. In JBoss EAP 6, thejvmRouteattribute is configured in the web subsystem of the server configuration file using theinstance-idattribute as follows:<subsystem xmlns="urn:jboss:domain:web:1.1" default-virtual-server="default-host" native="false" instance-id="{JVM_ROUTE_SERVER}">The {JVM_ROUTE_SERVER} above should be replaced by the jvmRoute server ID.Theinstance-idcan also be set using the Management Console.Specify the multicast address and port
In JBoss EAP 5.x, you could specify the multicast address and port used for intra-cluster communication using the command line arguments-uand-m, respectively, like this:$ EAP5_HOME/bin/run.sh -c all -u 228.11.11.11 -m 45688In JBoss EAP 6, the multicast address and port used for intra-cluster communication are defined by the socket-binding referenced by the relevant JGroups protocol stack as follows:<subsystem xmlns="urn:jboss:domain:jgroups:1.0" default-stack="udp"> <stack name="udp"> <transport type="UDP" socket-binding="jgroups-udp"/> <!-- ... --> </stack> </subsystem><socket-binding-groups> <socket-binding-group name="ha-sockets" default-interface="public"> <!-- ... --> <socket-binding name="jgroups-udp" port="55200" multicast-address="228.11.11.11" multicast-port="45688"/> <!-- ... --> </socket-binding-group> </socket-binding-groups>If you prefer to specify the multicast address and port in the command line, you can define the multicast address and ports as system properties and then use those properties on the command line when you start the server. In the following example,jboss.mcast.addris the variable name for the multicast address andjboss.mcast.portis the variable name for the port.<socket-binding name="jgroups-udp" port="55200" multicast-address="${jboss.mcast.addr:230.0.0.4}" multicast-port="${jboss.mcast.port:45688}"/>You can then start your server using the following command line arguments:$ EAP_HOME/bin/domain.sh -Djboss.mcast.addr=228.11.11.11 -Djboss.mcast.port=45688Use an alternate protocol stack
In JBoss EAP 5.x, you could manipulate the default protocol stack used for all clustering services using thejboss.default.jgroups.stacksystem property.$ EAP5_HOME/bin/run.sh -c all -Djboss.default.jgroups.stack=tcpIn JBoss EAP 6, the default protocol stack is defined by the JGroups subsystem withindomain.xmlorstandalone-ha.xml:<subsystem xmlns="urn:jboss:domain:jgroups:1.0" default-stack="udp"> <stack name="udp"> <!-- ... --> </stack> </subsystem>Replace Buddy Replication
JBoss EAP 5.x used JBoss Cache Buddy Replication to suppress replication of data to all instances in a cluster.In JBoss EAP 6, Buddy Replication has been replaced by Infinispan's distributed cache, also known asDISTmode. Distribution is a powerful clustering mode which allows Infinispan to scale linearly as more servers are added to the cluster. The following is an example of how to configure the server to use the DIST caching mode.- Open a command line and start the server with either the HA or Full Profile, for example:
EAP_HOME/bin/standalone.sh -c standalone-ha.xml
- Open another command line and connect to the Management CLI.
- For Linux, enter the following at the command line:
$ EAP_HOME/bin/jboss-cli.sh --connect
- For Windows, enter the following at a command line:
C:\>EAP_HOME\bin\jboss-cli.bat --connect
You should see the following response:Connected to standalone controller at localhost:9999
- Issue the following commands to configure the cache tell the server to reload the new configuration:
/subsystem=infinispan/cache-container=web/:write-attribute(name=default-cache,value=dist)
/subsystem=infinispan/cache-container=web/distributed-cache=dist/:write-attribute(name=owners,value=3)
reload
You should see the following response after each command:"outcome" => "success"
These commands modify thedist<distributed-cache>element in theweb<cache-container>configuration in theinfinispansubsystem of thestandalone-ha.xmlfile as follows:<cache-container name="web" aliases="standard-session-cache" default-cache="dist" module="org.jboss.as.clustering.web.infinispan"> <transport lock-timeout="60000"/> <replicated-cache name="repl" mode="ASYNC" batching="true"> <file-store/> </replicated-cache> <replicated-cache name="sso" mode="SYNC" batching="true"/> <distributed-cache name="dist" owners="3" l1-lifespan="0" mode="ASYNC" batching="true"> <file-store/> </distributed-cache> </cache-container>For more information, see the chapter entitled Clustering in Web Applications in the Development Guide for JBoss EAP 6 located on the Customer Portal at https://access.redhat.com/documentation/en-us/red_hat_jboss_enterprise_application_platform/?version=6.4.
3.2.10.2. Implement an HA Singleton
The following procedure demonstrates how to deploy a service that is wrapped with the SingletonService decorator and used as a cluster-wide singleton service. The service activates a scheduled timer, which is started only once in the cluster.
Procedure 3.24. Implement an HA Singleton Service
- Write the HA singleton service application.The following is a simple example of a
Servicethat is wrapped with theSingletonServicedecorator to be deployed as a singleton service. A complete example can be found in thecluster-ha-singletonquickstart that ships with Red Hat JBoss Enterprise Application Platform 6. This quickstart contains all the instructions to build and deploy the application.- Create a service.The following listing is an example of a service:
package org.jboss.as.quickstarts.cluster.hasingleton.service.ejb; import java.util.Date; import java.util.concurrent.atomic.AtomicBoolean; import javax.naming.InitialContext; import javax.naming.NamingException; import org.jboss.logging.Logger; import org.jboss.msc.service.Service; import org.jboss.msc.service.ServiceName; import org.jboss.msc.service.StartContext; import org.jboss.msc.service.StartException; import org.jboss.msc.service.StopContext; /** * @author <a href="mailto:wfink@redhat.com">Wolf-Dieter Fink</a> */ public class HATimerService implements Service<String> { private static final Logger LOGGER = Logger.getLogger(HATimerService.class); public static final ServiceName SINGLETON_SERVICE_NAME = ServiceName.JBOSS.append("quickstart", "ha", "singleton", "timer"); /** * A flag whether the service is started. */ private final AtomicBoolean started = new AtomicBoolean(false); /** * @return the name of the server node */ public String getValue() throws IllegalStateException, IllegalArgumentException { LOGGER.infof("%s is %s at %s", HATimerService.class.getSimpleName(), (started.get() ? "started" : "not started"), System.getProperty("jboss.node.name")); return ""; } public void start(StartContext arg0) throws StartException { if (!started.compareAndSet(false, true)) { throw new StartException("The service is still started!"); } LOGGER.info("Start HASingleton timer service '" + this.getClass().getName() + "'"); final String node = System.getProperty("jboss.node.name"); try { InitialContext ic = new InitialContext(); ((Scheduler) ic.lookup("global/jboss-cluster-ha-singleton-service/SchedulerBean!org.jboss.as.quickstarts.cluster.hasingleton.service.ejb.Scheduler")).initialize("HASingleton timer @" + node + " " + new Date()); } catch (NamingException e) { throw new StartException("Could not initialize timer", e); } } public void stop(StopContext arg0) { if (!started.compareAndSet(true, false)) { LOGGER.warn("The service '" + this.getClass().getName() + "' is not active!"); } else { LOGGER.info("Stop HASingleton timer service '" + this.getClass().getName() + "'"); try { InitialContext ic = new InitialContext(); ((Scheduler) ic.lookup("global/jboss-cluster-ha-singleton-service/SchedulerBean!org.jboss.as.quickstarts.cluster.hasingleton.service.ejb.Scheduler")).stop(); } catch (NamingException e) { LOGGER.error("Could not stop timer", e); } } } } - Create an activator that installs the
Serviceas a clustered singleton.The following listing is an example of a Service activator that installs theHATimerServiceas a clustered singleton service:package org.jboss.as.quickstarts.cluster.hasingleton.service.ejb; import org.jboss.as.clustering.singleton.SingletonService; import org.jboss.logging.Logger; import org.jboss.msc.service.DelegatingServiceContainer; import org.jboss.msc.service.ServiceActivator; import org.jboss.msc.service.ServiceActivatorContext; import org.jboss.msc.service.ServiceController; /** * Service activator that installs the HATimerService as a clustered singleton service * during deployment. * * @author Paul Ferraro */ public class HATimerServiceActivator implements ServiceActivator { private final Logger log = Logger.getLogger(this.getClass()); @Override public void activate(ServiceActivatorContext context) { log.info("HATimerService will be installed!"); HATimerService service = new HATimerService(); SingletonService<String> singleton = new SingletonService<String>(service, HATimerService.SINGLETON_SERVICE_NAME); /* * To pass a chain of election policies to the singleton, for example, * to tell JGroups to prefer running the singleton on a node with a * particular name, uncomment the following line: */ // singleton.setElectionPolicy(new PreferredSingletonElectionPolicy(new SimpleSingletonElectionPolicy(), new NamePreference("node1/singleton"))); singleton.build(new DelegatingServiceContainer(context.getServiceTarget(), context.getServiceRegistry())) .setInitialMode(ServiceController.Mode.ACTIVE) .install() ; } }Note
The above code example uses a class,org.jboss.as.clustering.singleton.SingletonService, that is part of the JBoss EAP private API. A public API will become available in the JBoss EAP 7 release and the private class will be deprecated, but these classes will be maintained and available for the duration of the JBoss EAP 6.x release cycle. - Create a ServiceActivator FileCreate a file named
org.jboss.msc.service.ServiceActivatorin the application'sresources/META-INF/services/directory. Add a line containing the fully qualified name of the ServiceActivator class created in the previous step.org.jboss.as.quickstarts.cluster.hasingleton.service.ejb.HATimerServiceActivator - Create a Singleton bean that implements a timer to be used as a cluster-wide singleton timer.This Singleton bean must not have a remote interface and you must not reference its local interface from another EJB in any application. This prevents a lookup by a client or other component and ensures the SingletonService has total control of the Singleton.
- Create the Scheduler interface
package org.jboss.as.quickstarts.cluster.hasingleton.service.ejb; /** * @author <a href="mailto:wfink@redhat.com">Wolf-Dieter Fink</a> */ public interface Scheduler { void initialize(String info); void stop(); } - Create the Singleton bean that implements the cluster-wide singleton timer.
package org.jboss.as.quickstarts.cluster.hasingleton.service.ejb;

import javax.annotation.Resource;
import javax.ejb.ScheduleExpression;
import javax.ejb.Singleton;
import javax.ejb.Timeout;
import javax.ejb.Timer;
import javax.ejb.TimerConfig;
import javax.ejb.TimerService;

import org.jboss.logging.Logger;


/**
 * A simple example to demonstrate a implementation of a cluster-wide singleton timer.
 *
 * @author <a href="mailto:wfink@redhat.com">Wolf-Dieter Fink</a>
 */
@Singleton
public class SchedulerBean implements Scheduler {
    private static Logger LOGGER = Logger.getLogger(SchedulerBean.class);
    @Resource
    private TimerService timerService;

    @Timeout
    public void scheduler(Timer timer) {
        LOGGER.info("HASingletonTimer: Info=" + timer.getInfo());
    }

    @Override
    public void initialize(String info) {
        ScheduleExpression sexpr = new ScheduleExpression();
        // set schedule to every 10 seconds for demonstration
        sexpr.hour("*").minute("*").second("0/10");
        // persistent must be false because the timer is started by the HASingleton service
        timerService.createCalendarTimer(sexpr, new TimerConfig(info, false));
    }

    @Override
    public void stop() {
        LOGGER.info("Stop all existing HASingleton timers");
        for (Timer timer : timerService.getTimers()) {
            LOGGER.trace("Stop HASingleton timer: " + timer.getInfo());
            timer.cancel();
        }
    }
}
- Start each JBoss EAP 6 instance with clustering enabled.To enable clustering for standalone servers, you must start each server with the
HAprofile, using a unique node name and port offset for each instance.- For Linux, use the following command syntax to start the servers:
EAP_HOME/bin/standalone.sh --server-config=standalone-ha.xml -Djboss.node.name=UNIQUE_NODE_NAME -Djboss.socket.binding.port-offset=PORT_OFFSET
Example 3.6. Start multiple standalone servers on Linux
$ EAP_HOME/bin/standalone.sh --server-config=standalone-ha.xml -Djboss.node.name=node1$ EAP_HOME/bin/standalone.sh --server-config=standalone-ha.xml -Djboss.node.name=node2 -Djboss.socket.binding.port-offset=100 - For Microsoft Windows, use the following command syntax to start the servers:
EAP_HOME\bin\standalone.bat --server-config=standalone-ha.xml -Djboss.node.name=UNIQUE_NODE_NAME -Djboss.socket.binding.port-offset=PORT_OFFSET
Example 3.7. Start multiple standalone servers on Microsoft Windows
C:> EAP_HOME\bin\standalone.bat --server-config=standalone-ha.xml -Djboss.node.name=node1C:> EAP_HOME\bin\standalone.bat --server-config=standalone-ha.xml -Djboss.node.name=node2 -Djboss.socket.binding.port-offset=100
Note
If you prefer not to use command line arguments, you can configure thestandalone-ha.xmlfile for each server instance to bind on a separate interface. - Deploy the application to the serversThe following Maven command deploys the application to a standalone server running on the default ports.
mvn clean install jboss-as:deployTo deploy to additional servers, pass the server name. if it is on a different host, pass the host name and port number on the command line:mvn clean package jboss-as:deploy -Djboss-as.hostname=localhost -Djboss-as.port=10099See thecluster-ha-singletonquickstart that ships with JBoss EAP 6 for Maven configuration and deployment details.
3.2.11. Service-style Deployment Changes
3.2.11.1. Update Applications That Use Service-style Deployments
MBeans were part of the core architecture in previous versions of Red Hat JBoss Enterprise Application Platform. JBoss Service Archive (SAR) deployments using the JBoss specific jboss-service.xml and jboss-beans.xml service-style descriptors were used by the application server to create MBeans based on JBoss Beans. The internal architecture has changed in JBoss EAP 6 and is no longer based on an MBean JMX architecture. MBeans are no longer part of the core architecture. They are now a wrapper for the management API.
jboss-service.xml files.
The JBoss Service Archive (SAR) and service-style descriptors used in previous versions of JBoss EAP are not a part of the Java EE 6 specification and are not recommended for use in JBoss EAP 6. It is recommended that you modify your application to the Java EE 6 specification. For MBeans singletons, you should modify the code to use the more portable Java EE 6 @Singleton instead of the JBoss EAP proprietary *-beans.xml and *-service.xml files. For more information about creating and deploying MBean services, see the chapter entitled JBoss MBean Services in the Development Guide for JBoss EAP 6 located on the Customer Portal at https://access.redhat.com/documentation/en-us/red_hat_jboss_enterprise_application_platform/?version=6.4.
If choose not to modify the code to use the standard Java EE 6 EJB @Singleton, be aware that the jboss-beans.xml and jboss-service.xml files changed between JBoss EAP 5 and JBoss EAP 6.
- The XML declaration in
jboss-beans.xmlfile changed between JBoss EAP 5 and JBoss EAP 6. - The following is an example of a
jboss-beans.xmlfile in JBoss EAP 5.<?xml version="1.0" encoding="UTF-8"?> <deployment xmlns:xsi="http://www.w3.org/2001/XMLSchema-instance" xsi:schemaLocation="urn:jboss:bean-deployer:2.0 bean-deployer_2_0.xsd" xmlns="urn:jboss:bean-deployer:2.0"> <bean name="TestServantBean" class="org.jboss.test.iiop.jbpapp6462.servant.TestServantBean"/> </deployment>The following is an example of ajboss-beans.xmlfile in JBoss EAP 6.<deployment xmlns="urn:jboss:pojo:7.0" xmlns:xsi="http://www.w3.org/2001/XMLSchema-instance" xsi:schemaLocation="urn:jboss:pojo:7.0 jboss-mc_7_0.xsd"> ... <bean name="Bean"> <alias>Alias-Bean</alias> <constructor factory-class="org.jboss.as.test.integration.pojo.support.TFactory" factory-method="createBean"> <parameter><value>test</value></parameter> </constructor> <property name="injectee"><inject bean="Injectee"/></property> <start> <parameter><value>start</value></parameter> </start> <stop> <parameter><value>stop</value></parameter> </stop> <install method="install" state="CREATE"> <parameter><value>install</value></parameter> </install> <install bean="Alias-Injectee" method="sayHello"> <parameter><value>from-other-bean</value></parameter> </install> </bean> </deployment> - The DTD for the
jboss-service.xmlfile changed between JBoss EAP 5 and JBoss EAP 6. - The following is an example of a
jboss-service.xmlfile in JBoss EAP 5.<?xml version="1.0" encoding="UTF-8"?> <!DOCTYPE server PUBLIC "-//JBoss//DTD MBean Service 5.0//EN" "http://www.jboss.org/j2ee/dtd/jboss-service_5_0.dtd"> <server> ... </server>The following is an example of ajboss-service.xmlfile in JBoss EAP 6.<server xmlns="urn:jboss:service:7.0" xmlns:xsi="http://www.w3.org/2001/XMLSchema-instance" xsi:schemaLocation="urn:jboss:service:7.0 jboss-service_7_0.xsd"> <mbean name="jboss.test:service=testdeployments" code="org.jboss.as.test.integration.mgmt.access.deployment.sar.Simple"/> </server>
3.2.12. Remote Invocation Changes
3.2.12.1. Migrate JBoss EAP 5 Deployed Applications That Make Remote Invocations to JBoss EAP 6
In JBoss EAP 5, the EJB remote interface was bound in JNDI, by default, under the name EJB_NAME/local for local interfaces, and EJB_NAME/remote for remote interfaces. The client application then looked up the bean using EJB_NAME/remote.
ejb:BEAN_REFERENCE for remote access to EJBs using the following syntax.
ejb:BEAN_REFERENCE syntax is:
ejb:<app-name>/<module-name>/<distinct-name>/<bean-name>!<fully-qualified-classname-of-the-remote-interface>For stateful beans, the
ejb:BEAN_REFERENCE syntax is:
ejb:<app-name>/<module-name>/<distinct-name>/<bean-name>!<fully-qualified-classname-of-the-remote-interface>?stateful
<app-name>- the application name of the deployed EJBs. This is typically the ear name without the .ear suffix, however, the name can be overridden in the application.xml file. If the application is not deployed as a .ear, this value is an empty string. Assume this example was not deployed as an EAR.<module-name>- the module name of the deployed EJBs on the server. This is typically the jar name of the EJB deployment, without the .jar suffix, but can be overridden using the ejb-jar.xml. In this example, assume the EJBs were deployed in a jboss-ejb-remote-app.jar, so the module name is jboss-ejb-remote-app.<distinct-name>- an optional distinct name for the EJB. This example does not use a distinct name, so it uses an empty string.<bean-name>- by default, is the simple class name of the bean implementation class.<fully-qualified-classname-of-the-remote-interface>- the remote view fully qualified class name.
The client code examples below assume you deployed the following stateless EJB to a JBoss EAP 6 server. Note that it exposes a remote view for the bean using the @Remote annotation.
Example 3.8. Stateless Session Bean Code Example
@Stateless
@Remote(RemoteCalculator.class)
public class CalculatorBean implements RemoteCalculator {

    @Override
    public int add(int a, int b) {
        return a + b;
    }

    @Override
    public int subtract(int a, int b) {
        return a - b;
    }
}
InitialContext and looked up the EJB using its JNDI name.
Example 3.9. JBoss EAP 5 Client Example
InitialContext ctx = new InitialContext();
RemoteCalculator calculator = (RemoteCalculator) ctx.lookup("CalculatorBean/remote");
int a = 204;
int b = 340;
int sum = calculator.add(a, b);
Hashtable and set the properties for the bean reference as described above. The following is an example of the client lookup and invocation.
Example 3.10. JBoss EAP 6 Stateless Client Example
final Hashtable jndiProperties = new Hashtable();
jndiProperties.put(Context.URL_PKG_PREFIXES, "org.jboss.ejb.client.naming");
final Context context = new InitialContext(jndiProperties);
final String appName = "";
final String moduleName = "jboss-ejb-remote-app";
final String distinctName = "";
final String beanName = CalculatorBean.class.getSimpleName();
final String viewClassName = RemoteCalculator.class.getName();
final RemoteCalculator statelessRemoteCalculator =  (RemoteCalculator) context.lookup("ejb:" + appName + "/" + moduleName + "/" + distinctName + "/" + beanName + "!" + viewClassName);

int a = 204;
int b = 340;
int sum = statelessRemoteCalculator.add(a, b);
Example 3.11. JBoss EAP 6 Stateful Client Example
final RemoteCalculator statefulRemoteCalculator = (RemoteCalculator) context.lookup("ejb:" + appName + "/" + moduleName + "/" + distinctName + "/" + beanName + "!" + viewClassName + "?stateful")
3.2.12.2. Invoke a Session Bean Remotely using JNDI
ejb-remote quickstart contains working Maven projects that demonstrate this functionality. The quickstart contains projects for both the session beans to deploy and the remote client. The code samples below are taken from the remote client project.
Warning
Prerequisites
- You must already have a Maven project created ready to use.
- Configuration for the JBoss EAP 6 Maven repository has already been added.
- The session beans that you want to invoke are already deployed.
- The deployed session beans implement remote business interfaces.
- The remote business interfaces of the session beans are available as a Maven dependency. If the remote business interfaces are only available as a JAR file then it is recommended to add the JAR to your Maven repository as an artifact. Refer to the Maven documentation for the
install:install-filegoal for directions, http://maven.apache.org/plugins/maven-install-plugin/usage.html - You need to know the hostname and JNDI port of the server hosting the session beans.
Procedure 3.25. Add Maven Project Configuration for Remote Invocation of Session Beans
- Add the required project dependenciesThe
pom.xmlfor the project must be updated to include the necessary dependencies. - Add the
jboss-ejb-client.propertiesfileThe JBoss EJB client API expects to find a file in the root of the project namedjboss-ejb-client.propertiesthat contains the connection information for the JNDI service. Add this file to thesrc/main/resources/directory of your project with the following content.# In the following line, set SSL_ENABLED to true for SSL remote.connectionprovider.create.options.org.xnio.Options.SSL_ENABLED=false remote.connections=default # Uncomment the following line to set SSL_STARTTLS to true for SSL # remote.connection.default.connect.options.org.xnio.Options.SSL_STARTTLS=true remote.connection.default.host=localhost remote.connection.default.port = 4447 remote.connection.default.connect.options.org.xnio.Options.SASL_POLICY_NOANONYMOUS=false # Add any of the following SASL options if required # remote.connection.default.connect.options.org.xnio.Options.SASL_POLICY_NOANONYMOUS=false # remote.connection.default.connect.options.org.xnio.Options.SASL_POLICY_NOPLAINTEXT=false # remote.connection.default.connect.options.org.xnio.Options.SASL_DISALLOWED_MECHANISMS=JBOSS-LOCAL-USER
Change the host name and port to match your server.4447is the default port number. For a secure connection, set theSSL_ENABLEDline totrueand uncomment theSSL_STARTTLSline. The Remoting interface in the container supports secured and unsecured connections using the same port. - Add dependencies for the remote business interfacesAdd the Maven dependencies to the
pom.xmlfor the remote business interfaces of the session beans.<dependency> <groupId>org.jboss.as.quickstarts</groupId> <artifactId>jboss-ejb-remote-server-side</artifactId> <type>ejb-client</type> <version>${project.version}</version> </dependency>
Procedure 3.26. Obtain a Bean Proxy using JNDI and Invoke Methods of the Bean
- Handle checked exceptionsTwo of the methods used in the following code (
InitialContext()andlookup()) have a checked exception of typejavax.naming.NamingException. These method calls must either be enclosed in a try/catch block that catchesNamingExceptionor in a method that is declared to throwNamingException. Theejb-remotequickstart uses the second technique. - Create a JNDI ContextA JNDI Context object provides the mechanism for requesting resources from the server. Create a JNDI context using the following code:
final Hashtable jndiProperties = new Hashtable();
jndiProperties.put(Context.URL_PKG_PREFIXES, "org.jboss.ejb.client.naming");
final Context context = new InitialContext(jndiProperties);
The connection properties for the JNDI service are read from thejboss-ejb-client.propertiesfile. - Use the JNDI Context's lookup() method to obtain a bean proxyInvoke the
lookup()method of the bean proxy and pass it the JNDI name of the session bean you require. This will return an object that must be cast to the type of the remote business interface that contains the methods you want to invoke.final RemoteCalculator statelessRemoteCalculator = (RemoteCalculator) context.lookup( "ejb:/jboss-ejb-remote-server-side//CalculatorBean!" + RemoteCalculator.class.getName());Session bean JNDI names are defined using a special syntax. For more information, see Section 3.2.12.3, “EJB JNDI Naming Reference” . - Invoke methodsNow that you have a proxy bean object you can invoke any of the methods contained in the remote business interface.
int a = 204;
int b = 340;
System.out.println("Adding " + a + " and " + b + " via the remote stateless calculator deployed on the server");
int sum = statelessRemoteCalculator.add(a, b);
System.out.println("Remote calculator returned sum = " + sum);
The proxy bean passes the method invocation request to the session bean on the server, where it is executed. The result is returned to the proxy bean which then returns it to the caller. The communication between the proxy bean and the remote session bean is transparent to the caller.
3.2.12.3. EJB JNDI Naming Reference
ejb:<appName>/<moduleName>/<distinctName>/<beanName>!<viewClassName>?stateful
<appName>- If the session bean's JAR file has been deployed within an enterprise archive (EAR) then this is the name of that EAR. By default, the name of an EAR is its filename without the
.earsuffix. The application name can also be overridden in itsapplication.xmlfile. If the session bean is not deployed in an EAR then leave this blank. <moduleName>- The module name is the name of the JAR file that the session bean is deployed in. By the default, the name of the JAR file is its filename without the
.jarsuffix. The module name can also be overridden in the JAR'sejb-jar.xmlfile. <distinctName>- JBoss EAP 6 allows each deployment to specify an optional distinct name. If the deployment does not have a distinct name then leave this blank.
<beanName>- The bean name is the classname of the session bean to be invoked.
<viewClassName>- The view class name is the fully qualified classname of the remote interface. This includes the package name of the interface.
?stateful- The
?statefulsuffix is required when the JNDI name refers to a stateful session bean. It is not included for other bean types.
3.2.12.4. Migrate EJB Asynchronous Method Calls
The EJB 3.1 specification introduced the ability to make asynchronous methods calls. Prior to the introduction of this feature, some application servers provided proprietary asynchronous functionality. JBoss EAP 4.x provided classes in the org.jboss.ejb3.asynchronous package and JBoss EAP 5.x provided the org.jboss.ejb3.common.proxy.plugins.async.AsyncUtils class for this purpose. These classes are not supported in JBoss EAP 6 and must be replaced. The following is an example of how to make an asynchronous method call in JBoss EAP 6.
Procedure 3.27. Create the Asynchronous Session Bean and Client
- Create the Asynchronous session bean method.In the following example, the
sayHelloAsync()method is marked as asynchronous using the@Asynchronousannotation. It returns the requiredFutureclass implementation with a result of typeString.import javax.ejb.Remote; import javax.ejb.SessionContext; import javax.ejb.Stateless; import javax.ejb.TransactionAttribute; import javax.ejb.TransactionAttributeType; import javax.interceptor.Interceptors; import java.util.concurrent.Future; import javax.ejb.AsyncResult; import javax.ejb.Asynchronous; @Stateless(name="Hello") @Remote(Hello.class) public class HelloBean implements Hello { @Asynchronous public Future<String> sayHelloAsync() { return new AsyncResult<String>("Hello"); } } - Create the client code.Look up the EJB and call its asynchronous method using one of the available
Future.get()methods. The following example limits the wait time to the values specified by the timeout and unit arguments.Future<String> future = ejbObject.sayHelloAsync(); String response = future.get(timeout, unit);
3.2.13. EJB Changes
3.2.13.1. Migrate Stateful EJB Cache Configuration
container-cache-conf element in the jboss.xml file. The following is an example of stateful cache configuration in JBoss EAP 5.
<container-cache-conf>
	  <cache-policy>org.jboss.ejb.plugins.LRUStatefulContextCachePolicy</cache-policy>
	  <cache-policy-conf>
	    <min-capacity>50</min-capacity>
	    <max-capacity>200</max-capacity>
	    <remover-period>1800</remover-period>
	    <max-bean-life>1320</max-bean-life>
	    <overager-period>300</overager-period>
	    <max-bean-age>1260</max-bean-age>
	  </cache-policy-conf>
	</container-cache-conf>
ejb3 subsystem of the server configuration file. For detailed instructions, see Section 3.2.13.2, “Configure Stateful Session Bean Cache”. The instructions also describe how to configure stateful-timeout, which replaces the <max-bean-age> that was specified in JBoss EAP 5.
3.2.13.2. Configure Stateful Session Bean Cache
ejb3 subsystem of the server configuration file. The following procedure describes how to configure stateful EJB cache and stateful timeout.
Procedure 3.28. Configure Stateful EJB Cache
- Find the
<caches>element in theejb3subsystem of the server configuration file. Add a<cache>element. The following example creates a cache named "my=cache".<cache name="my-cache" passivation-store-ref="my-cache-file" aliases="my-custom-cache"/>
- Find the
<passivation-stores>element in theejb3subsystem of the server configuration file. Create a<file-passivation-store>for the cache defined in the previous step.<file-passivation-store name="my-cache-file" idle-timeout="1260" idle-timeout-unit="SECONDS" max-size="200"/>
- The
ejb3subsystem configuration should now look like the following example.<subsystem xmlns="urn:jboss:domain:ejb3:1.4"> ... <caches> <cache name="simple" aliases="NoPassivationCache"/> <cache name="passivating" passivation-store-ref="file" aliases="SimpleStatefulCache"/> <cache name="clustered" passivation-store-ref="infinispan" aliases="StatefulTreeCache"/> <cache name="my-cache" passivation-store-ref="my-cache-file" aliases="my-custom-cache"/> </caches> <passivation-stores> <file-passivation-store name="file" idle-timeout="120" idle-timeout-unit="SECONDS" max-size="500"/> <cluster-passivation-store name="infinispan" cache-container="ejb"/> <file-passivation-store name="my-cache-file" idle-timeout="1260" idle-timeout-unit="SECONDS" max-size="200"/> </passivation-stores> ... </subsystem>The passivating cache, "my-cache", passivates stateful session beans to the file system as configured in the "my-cache-file" passivation store, which has theidle-timeout,idle-timeout-unitandmax-sizeoptions. - Create a
jboss-ejb3.xmlfile in the EJB JARMETA-INF/directory. The following example configures the EJBs to use the cache defined in the previous steps.<jboss:ejb-jar xmlns:jboss="http://www.jboss.com/xml/ns/javaee" xmlns="http://java.sun.com/xml/ns/javaee" xmlns:xsi="http://www.w3.org/2001/XMLSchema-instance" xmlns:c="urn:ejb-cache:1.0" xsi:schemaLocation="http://www.jboss.com/xml/ns/javaee http://www.jboss.org/j2ee/schema/jboss-ejb3-2_0.xsd http://java.sun.com/xml/ns/javaee http://java.sun.com/xml/ns/javaee/ejb-jar_3_1.xsd" version="3.1" impl-version="2.0"> <assembly-descriptor> <c:cache> <ejb-name>*</ejb-name> <c:cache-ref>my-cache</c:cache-ref> </c:cache> </assembly-descriptor> </jboss:ejb-jar> - To method to configure a timeout value depends on whether you are implementing EJB 2 or EJB 3.
- EJB 3 introduced annotations, so you can specify the
javax.ejb.StatefulTimeoutannotation in the EJB code as follows.@StatefulTimeout(value = 1320, unit=java.util.concurrent.TimeUnit.SECONDS) @Stateful @Remote(MyStatefulEJBRemote.class) public class MyStatefulEJB implements MyStatefulEJBRemote { ... }The@StatefulTimeoutvalue can be set to one of the following.- A value of
0means the bean is immediately eligible for removal. - A value greater than
0indicates a timeout value in the units specified by theunitparameter. The default timeout unit isMINUTES. If you are using a passivating cache configuration and theidle-timeoutvalue is less than theStatefulTimeoutvalue, JBoss EAP will passivate the bean when it is idle for theidle-timeoutperiod specified. The bean is then eligible for removal after theStatefulTimeoutperiod specified. - A value of
-1means the bean will never be removed due to timeout. If you are using a passivating cache configuration and the bean is idle foridle-timeout, JBoss EAP will passivate the bean instance to thepassivation-store. - Values less than
-1are not valid.
- For both EJB 2 and EJB 3, you can configure the stateful timeout in the
ejb-jar.xmlfile.<?xml version="1.0" encoding="UTF-8"?> <ejb-jar xmlns="http://java.sun.com/xml/ns/javaee" xmlns:xsi="http://www.w3.org/2001/XMLSchema-instance" xsi:schemaLocation="http://java.sun.com/xml/ns/javaee http://java.sun.com/xml/ns/javaee/ejb-jar_3_1.xsd" version="3.1"> <enterprise-beans> <session> <ejb-name>HelloBean</ejb-name> <session-type>Stateful</session-type> <stateful-timeout> <timeout>1320</timeout> <unit>Seconds</unit> </stateful-timeout> </session> </enterprise-beans> </ejb-jar> - For both EJB 2 and EJB 3, you can configure the stateful timeout in the
jboss-ejb3.xmlfile.<jboss:ejb-jar xmlns:jboss="http://www.jboss.com/xml/ns/javaee" xmlns="http://java.sun.com/xml/ns/javaee" xmlns:xsi="http://www.w3.org/2001/XMLSchema-instance" xmlns:c="urn:ejb-cache:1.0" xsi:schemaLocation="http://www.jboss.com/xml/ns/javaee http://www.jboss.org/j2ee/schema/jboss-ejb3-2_0.xsd http://java.sun.com/xml/ns/javaee http://java.sun.com/xml/ns/javaee/ejb-jar_3_1.xsd" version="3.1" impl-version="2.0"> <enterprise-beans> <session> <ejb-name>HelloBean</ejb-name> <session-type>Stateful</session-type> <stateful-timeout> <timeout>1320</timeout> <unit>Seconds</unit> </stateful-timeout> </session> </enterprise-beans> <assembly-descriptor> <c:cache> <ejb-name>*</ejb-name> <c:cache-ref>my-cache</c:cache-ref> </c:cache> </assembly-descriptor> </jboss:ejb-jar>
- To disable passivation of stateful session beans, do one of the following:
- If you implement stateful session beans using EJB 3 annotations, you can disable the passivation of the stateful session bean the annotation
@org.jboss.ejb3.annotation.Cache("NoPassivationCache") - If the stateful session bean is configured in the
jboss-ejb3.xmlfile, set the<c:cache-ref>element value to "simple", which is the equivalent ofNoPassivationCache.<c:cache-ref>simple</c:cache-ref>
- EJB cache policy "LRUStatefulContextCachePolicy" has been changed in JBoss EAP 6 so it is impossible to have 1-to-1 configuration mapping in JBoss EAP 6.
- In JBoss EAP 6, you can set up the following cache properties:
- Bean life time is configured using the @StatefulTimeout in EJB 3.1.
- Configure passivation of a bean to disk in the
ejb3subsystem of the server configuration file using theidle-timeoutattribute of the<file-passivation-store>element. - Configure the maximum size of the passivation store in the
ejb3subsystem of the server configuration file using themax-sizeattribute of the<file-passivation-store>element.
- In JBoss EAP 6, you can not configure the following cache properties:
- The minimum and maximum numbers in memory cache.
- The minimum numbers in passivation store.
- The
*-periodconfigurations that control the frequency of cache operations.
3.2.13.3. Configure Stateless Session Bean Pool Size
In JBoss EAP 5, stateless EJB pool defaults were configured in EAP_HOME/server/PROFILE/deploy/ejb3-interceptors-aop.xml file. The following is an example of pool configuration in JBoss EAP 5.
<domain name="Stateless Bean" extends="Intercepted Bean" inheritBindings="true">
  ...
  <annotation expr="class(*) AND !class(@org.jboss.ejb3.annotation.Pool)">
	  @org.jboss.ejb3.annotation.Pool (value="ThreadlocalPool", maxSize=30, timeout=10000)
  </annotation>
</domain>
This topic describes how to configure EJB session bean stateless pools in JBoss EAP 6.
In JBoss EAP 6, stateless session bean pools are configured in the <bean-instance-pools> section of the ejb3 subsytem in the server configuration file. The default pool for stateless session beans is the "slsb-strict-max-pool". You can define additional configurations in the <bean-instance-pools>. The following example defines a new configuration named "my-stateless-bean-pool" in JBoss EAP 6.
<subsystem xmlns="urn:jboss:domain:ejb3:1.3">
  <session-bean>
    <stateless>
      <bean-instance-pool-ref pool-name="slsb-strict-max-pool"/>
    </stateless>
    <stateful default-access-timeout="5000" cache-ref="simple"/>
      <singleton default-access-timeout="5000"/>
    </session-bean>
    <pools>
      <bean-instance-pools>
        <strict-max-pool name="slsb-strict-max-pool" max-pool-size="20" instance-acquisition-timeout="5" instance-acquisition-timeout-unit="MINUTES"/>
        <strict-max-pool name="mdb-strict-max-pool" max-pool-size="20" instance-acquisition-timeout="5" instance-acquisition-timeout-unit="MINUTES"/>
        <strict-max-pool name="my-stateless-bean-pool" max-pool-size="50" instance-acquisition-timeout="20" instance-acquisition-timeout-unit="SECONDS"/>
      </bean-instance-pools>
    </pools>
  ...
</subsystem>
You can associate an EJB with a pool using one of the following approaches.
- Associate the EJB to the pool using annotations, where the value is the name of the pool defined in the server configuration file. The following is an example that associates the EJB to the "my-stateless-bean-pool" in JBoss EAP 6.
@Stateless
@org.jboss.ejb3.annotation.Pool(value="my-stateless-bean-pool")
public class MyBean....
- Associate the EJB to the pool by configuring the
jboss-ejb3.xmlfile in the EJB JARMETA-INF/directory. The following example associates the EJB to the pool using the jboss-ejb3.xml file in JBoss EAP 6.<jboss xmlns="http://java.sun.com/xml/ns/javaee" xmlns:p="urn:ejb-pool:1.0"> .... <assembly-descriptor> <p:pool> <ejb-name>MyBean</ejb-name> <p:bean-instance-pool-ref>my-stateless-bean-pool</p:bean-instance-pool-ref> </p:pool> </assembly-descriptor> </jboss>
If EJB instance memory is not an issue and the EJB instance is not doing costly initialization in its PostConstruct method, it can be useful to disable pooling by default. When the pool is not used, any thread that invokes a method on an EJB simply creates an instance of the EJB, invokes the method on it, and then destroys the EJB instance.
<bean-instance-pool-ref> element in the ejb3 subsystem of the server configuration file.
<subsystem xmlns="urn:jboss:domain:ejb3:1.3">
  <session-bean>
    <stateless>
      <!-- Remove the following line -->
      <bean-instance-pool-ref pool-name="slsb-strict-max-pool"/>
    </stateless>
    ...
3.2.13.4. Replace the jboss.xml File
The jboss-ejb3.xml deployment descriptor replaces the jboss.xml deployment descriptor file. This file is used to override and add to the features provided by the Java Enterprise Edition (EE) defined ejb-jar.xml deployment descriptor. The new file is incompatible with jboss.xml, and the jboss.xml is now ignored in deployments.
jboss.xml file with the jboss-ejb3.xml deployment descriptor file. If your application uses EJB 3.x, you can use the jboss-ejb3.xml file, or you might be able eliminate it entirely by using EJB3 annotations.
In previous releases of JBoss EAP, if you defined a <resource-ref> in the ejb-jar.xml file, you needed a corresponding resource definition for the JNDI name in the jboss.xml file. XDoclet automatically generated both of these deployment descriptor files. In JBoss EAP 6, the JNDI mapping information is now defined in the jboss-ejb3.xml file. Assume the datasource is defined in the Java source code as follows.
DataSource ds1 = (DataSource) new InitialContext().lookup("java:comp/env/jdbc/Resource1");
DataSource ds2 = (DataSource) new InitialContext().lookup("java:comp/env/jdbc/Resource2");
The ejb-jar.xml defines the following resource references.
<resource-ref >
    <res-ref-name>jdbc/Resource1</res-ref-name>
    <res-type>javax.sql.DataSource</res-type>
    <res-auth>Container</res-auth>
</resource-ref>
<resource-ref >
    <res-ref-name>java:comp/env/jdbc/Resource2</res-ref-name>
    <res-type>javax.sql.DataSource</res-type>
    <res-auth>Container</res-auth>
</resource-ref>
jboss-ejb3.jxml file maps the JNDI names to the references using the following XML syntax.
<resource-ref>
    <res-ref-name>jdbc/Resource1</res-ref-name>
    <jndi-name>java:jboss/datasources/ExampleDS</jndi-name>
</resource-ref>
<resource-ref>
    <res-ref-name>java:comp/env/jdbc/Resource2</res-ref-name>
    <jndi-name>java:jboss/datasources/ExampleDS</jndi-name>
</resource-ref>
Some of the configuration options that were available in the JBoss EAP 5.x jboss.xml file were not implemented in JBoss EAP 6. The following list describes some of the commonly used attributes in the jboss.xml file and whether there is an alternate way to achieve them in JBoss EAP 6.
- The
method-attributeelement was used to configure individual entity and session beans methods.- The
read-onlyandidempotentconfiguration options were not ported to JBoss EAP 6. - The
transaction-timeoutoption is now configured in thejboss-ejb3.xmlfile.
- The
missing-method-permission-exclude-modeattribute changed the behavior of methods without implementing explicit security metadata on a secured bean. In JBoss EAP 6, the absence of a@RolesAllowedannotation is currently treated in a similar manner to the@PermitAll
jboss-ejb3.xml file configuration are located in the topics entitled Specifying a Resource Adapter in jboss-ejb3.xml for an MDB, Configure a Container Interceptor, and jboss-ejb3.xml Deployment Descriptor Reference in the Enterprise JavaBeans chapter of the Development Guide for JBoss EAP.
3.2.14. EJB 2.x and Earlier Changes
3.2.14.1. EJB 1.x and EJB 2.x Deprecated Features
- EJB 2.1 and earlier CMP and BMP entity bean
- Client view of an EJB 2.1 entity bean
- EJB QL for CMP entity bean queries
- JAX-RPC-based web service endpoints and client view
3.2.14.2. Changes Required for Applications That Use EJB 1.x and EJB 2.x
3.2.14.2.1. Configuration Changes Required to Run EJB 2.x
EJB 2.x Container Managed Persistence (CMP) beans require the Java Enterprise Edition 6 Full Profile. This profile contains configuration elements that are needed to run CMP EJBs.
org.jboss.as.cmp extension module:
<extensions>
    ...
    <extension module="org.jboss.as.cmp"/>
    ...
</extensions>
It also contains the cmp subsystem:
<profiles>
    ...
    <subsystem xmlns="urn:jboss:domain:cmp:1.1"/>
    ...
</profiles>
.
-c standalone-full.xml or -c standalone-full-ha.xml argument on the command line when you start the server.
In previous versions of JBoss EAP, it was possible to configure a different container for CMP entity and other beans and use it by setting references inside the jboss.xml application deployment descriptor file. For example, there were different configurations for SLSB to session beans in general.
- Pessimistic locking is active by default. This can result in deadlocks.
- The deadlock detection code that was in the CMP layer in JBoss EAP 5.x is no longer in JBoss EAP 6.
commit-options, and the interceptor stack. In JBoss EAP 6, this is no longer possible. There is only one implementation, which is similar to the Instance Per Transaction policy with commit-option C. If you migrate an application that uses the cmp2.x jdbc2 pm entity bean container configuration, which uses CMP2.x compatible JDBC based persistence manager, there will be a performance impact. This container was optimized for performance. It is recommended that you migrate these entities to EJB 3 before migrating the application.
JBoss EAP 6 supports the standard Java EE Interceptor using the @Interceptors and @AroundInvoke annotations. However, this does not allow manipulation outside the Security or Transaction.
- Use the
InitialContextTransactionSynchronizationRegistry tsr = (TransactionSynchronizationRegistry) new InitialContext().lookup("java:jboss/TransactionSynchronizationRegistry"); tsr.registerInterposedSynchronization(new MyTxCallback()); - Use Injection
@Resource(mappedName = "java:comp/TransactionSynchronizationRegistry")
TransactionSynchronizationRegistry tsr;
...
tsr.registerInterposedSynchronization(new MyTxCallback());
javax.transaction.Synchronization Interface. Use the beforeCompletion{} method to perform any checks before the transaction is committed or rolled back. If a RuntimeException is thrown from this method, the transaction is rolled back and the client is informed with a EJBTransactionRolledbackException. In case of an XA-Transaction, all resources will be rolled back according to the XA contract. It is also possible for enable business logic to depend on the transaction state using the afterCompletion(int txStatus) method. If a RuntimeException is thrown from this method, the transaction remains in the former state, either committed or rolled-back, and the client is not informed. Only the transaction manager shows a warning within the server log files.
In previous versions of JBoss EAP, it was possible to configure the client interceptors within the server configuration and provide only the classes with the client API.
Entity bean pool configuration is not recommended in JBoss EAP 6. Because it is limited to configuration of the <strict-max-pool> element, deadlocks and other issues can occur if the pool is too small to load all entities in the result set. Entity beans do not have large lifecycle methods during initialization, so creating the instance and surrounding container is no slower than when using a pooled entity bean instance.
The jboss-ejb3.xml deployment descriptor replaces the jboss.xml deployment descriptor file. This file is used to override and add to the features provided by the Java Enterprise Edition (EE) defined ejb-jar.xml deployment descriptor. The new jboss-ejb3.xml file is incompatible with the jboss.xml file, which is now ignored in deployments. For more information, see Section 3.2.13.4, “Replace the jboss.xml File”.
In previous versions of JBoss EAP, it was possible to configure the datasource type-mapping within the *-ds.xml datasource deployment configuration file.
jbosscmp-jdbc.xml deployment descriptor file.
<defaults>
    <datasource-mapping>mySQL</datasource-mapping>
    <create-table>true</create-table>
    ....
</defaults>
standardjbosscmp-jdbc.xml file. This file is no longer available and mapping is now done in the jbosscmp-jdbc.xml deployment descriptor file.
3.2.14.2.2. Container-Managed Persistence and Container-Managed Relationship Changes Required for EJB 2.x
In previous releases of JBoss EAP, it was possible for some containers, for example the cmp2.x jdbc2 pm container, to iterate CMR collections and remove or add relations. Because container configuration is not supported, this is no longer possible in JBoss EAP 6. For information about how to achieve this same functionality in the application code, see EJB2.1 Finder for CMP entities with relations (CMR) returns duplicates in EAP6 in the Support Knowledgebase Solutions section of the Customer Portal .
In previous versions of JBoss EAP, it was possible to select different CMP containers which used different persistence strategies. The cmp2.x jdbc2 pm container in JBoss EAP 5.x used optimized SQL-92 to generate optimized LEFT OUTER JOIN syntax for finders. Because JBoss EAP 6.x only supports the standard container for CMP and CMR, the implementation does not contain these optimizations. The finder should include the keyword DISTINCT in the SELECT statement to avoid cartesian product in the result set. For more information , see EJB2.1 Finder for CMP entities with relations (CMR) returns duplicates in EAP6 in the Support Knowledgebase Solutions section of the Customer Portal.
The cascade delete default value has changed to false. This can result in delete failures in JBoss EAP 6. If entity relations are marked as cascade-delete, you must explicitly set the batch-cascade-delete to true in the jbosscmp-jdbc.xml file. For more information , see cascade delete fail for EJB2 CMP Entities after migration to EAP6 in the Support Knowledgebase Solutions section of the Customer Portal.
If you used customer mapper classes such as JDBCParameterSetter, JDBCResultSetReader and Mapper in your JBoss EAP 5.x application, you might see java.lang.ClassNotFoundException when you deploy your application to JBoss EAP 6. This is because the package names for the interfaces were changed from org.jboss.ejb.plugins.cmp.jdbc.Mapper to org.jboss.as.cmp.jdbc.Mapper. For more information , see How to use Field mapping for custom classes in an EJB2 CMP application in EAP6 in the Support Knowledgebase Solutions section of the Customer Portal.
If your JBoss EAP 5 application uses entity-commands to generate primary keys, for example Sequence or Auto-increment, you might see a ClassNotFoundException for the JDBCOracleSequenceCreateCommand class when you migrate your application to JBoss EAP 6. This is because the class package was changed from org.jboss.ejb.plugins.cmp.jdbc to org.jboss.as.cmp.jdbc.keygen. If you use this class in your JBoss EAP 6 application, you must also add a dependency on the EAP_HOME/modules/system/layers/base/org/jboss/as/cmp module.
3.2.14.2.3. Application Changes Required to Run EJB 2.x
As with EJB 3.0, you must use the full JNDI prefix with EJB 2.x. For more information on the new JNDI namespace rules and code examples, see Section 3.1.8.1, “Update Application JNDI Namespace Names”.
Modify the <jndi-name> for each <ejb-ref> to use the new JNDI fully qualified lookup format.
With EJB 2, it was very common to use the Locator pattern to look up Beans. If you used this pattern in your application, rather than modify application code, you can use XDoclet to generate a map for the new JNDI names.
@ejb.bean name="UserAttribute" display-name="UserAttribute" local-jndi-name="ejb21/UserAttributeEntity" view-type="local" type="CMP" cmp-version="2.x" primkey-field="id"The JNDI name
ejb21/UserAttributeEntity in the above example is no longer valid in JBoss EAP 6. You can map this name to a valid JNDI name using the naming subsystem in the server configuration and a patch for XDoclet.
Procedure 3.29. Change the XDoclet Generated Code and Use the Naming Subsystem
- Extract the XDoclet
lookup.xdttemplate located in theejb-module.jarand modify thelookup()in thelookupHomeas follows:private static Object lookupHome(java.util.Hashtable environment, String jndiName, Class narrowTo) throws javax.naming.NamingException { // Obtain initial context javax.naming.InitialContext initialContext = new javax.naming.InitialContext(environment); try { // Replace the existing lookup // Object objRef = initialContext.lookup(jndiName); // This is the new mapped lookup Object objRef; try { // try JBoss EAP mapping objRef = initialContext.lookup("global/"+jndiName); } catch(java.lang.Exception e) { objRef = initialContext.lookup(jndiName); } // only narrow if necessary if (java.rmi.Remote.class.isAssignableFrom(narrowTo)) return javax.rmi.PortableRemoteObject.narrow(objRef, narrowTo); else return objRef; } finally { initialContext.close(); } } - Run Ant, setting the template attribute to use the modified
lookup.xdtfor theejbdoclettask. - Modify the
namingsubsystem in the server configuration file to map the old JNDI name to the new valid JNDI name.<subsystem xmlns="urn:jboss:domain:naming:1.2"> <bindings> <lookup name="java:global/ejb21/UserAttributeEntity" lookup="java:global/ejb2CMP/ejb/UserAttribute!de.wfink.ejb21.cmp.cmr.UserAttributeLocalHome"/> </bindings> <remote-naming/> </subsystem>
3.2.14.2.4. Known Issues with EJB 2.x
ejb-jar.xml descriptor files that define Message Driven Beans (MDBs) in releases of JBoss EAP 6.3 and older. The server throws a parsing error at the time of deployment and you see the following output in the server log.
ERROR [org.jboss.msc.service.fail] (MSC service thread 1-7) MSC000001: Failed to start service jboss.deployment.unit."EJB_JAR_NAME.jar".PARSE: org.jboss.msc.service.StartException in service jboss.deployment.unit."EJB_JAR_NAMEjar".PARSE: JBAS018733: Failed to process phase PARSE of deployment "EJB_JAR_NAME.jar"This issue was fixed in JBoss EAP 6.4. See Bugzilla 1057835 for details.
3.2.14.2.5. Summary of Obsolete EJB 2.x Files
- jboss.xml
- The
jboss.xmlapplication deployment descriptor file is no longer supported and ignored if included in the deployed archive. This file has been replaced by thejboss-ejb3.xmldeployment descriptor file. - standardjbosscmp-jdbc.xml
- The
standardjbosscmp-jdbc.xmlserver configuration file is no longer supported. This configuration information is now included in theorg.jboss.as.cmpmodule and it is no longer customizable. - standardjboss.xml
- The
standardjboss.xmlserver configuration file is no longer supported. This configuration information is now included in thestandalone.xmlfile when running a standalone server or thedomain.xmlfile when running in a managed domain..
3.2.15. JBoss AOP Changes
3.2.15.1. Update Applications That Use JBoss AOP
- Standard EJB3 configurations that were previously made in the
ejb3-interceptors-aop.xmlfile are now configured in the server configuration file. For a standalone server, this is thestandalone/configuration/standalone-full.xmlfile. If you are running your server in a managed domain, this is thedomain/configuration/domain.xmlfile. - Server side AOP Interceptors should be modified to use the standard Java EE
Interceptor. For more information about container interceptors and how to use a client side interceptor in an application, see the chapter entitled Container Interceptors in the Development Guide for JBoss EAP 6 located on the Customer Portal at https://access.redhat.com/documentation/en-us/red_hat_jboss_enterprise_application_platform/?version=6.4.
- If you are not able to refactor the code, you can obtain a copy of the JBoss AOP libraries and bundle them with the application. The AOP libraries may work in JBoss EAP 6, but are not deployed. You can manually deploy them by using the following command line argument when you start your server:
-Djboss.aop.path=PATH_TO_AOP_CONFIGNote
Although the JBoss AOP libraries may work in JBoss EAP 6, this not a supported configuration.
3.2.16. JacORB Changes
3.2.16.1. JacORB Configuration Changes
EAP_HOME/server/production/conf/jacorb.properties file. The following is an example of JacORB properties configured in that file.
jacorb.connection.client.pending_reply_timeout=600000
jacorb.connection.client.idle_timeout=120000
jacorb.connection.server.timeout=300000
jacorb.native_char_codeset=UTF8
jacorb.native_wchar_codeset=UTF16
3.2.17. JBoss Web Component Changes
3.2.17.1. Map HTTP/HTTPS/AJP Connector Attributes
Table 3.10. Map Connector Attributes
| Attribute Name in Previous Release | Equivalent in JBoss EAP 6 | Details |
|---|---|---|
| maxThreads | max-connections | This attribute sizes the JBossWeb level thread/connection pool. It is set on the connectors in the web subsystem. The default is 512 per CPU core.
<connector name="http" protocol="HTTP/1.1" scheme="http" socket-binding="http" enabled="true" max-connections="200" /> |
|
minSpareThreads
maxSpareThreads
| N/A | There is no equivalent for minSpareThreads or maxSpareThreads since there is little incentive to reclaim threads. If you use an executor for the connector instead of the default worker thread pool, The closest thing to this would be the core-threads size and keepalive-time attributes. |
|
proxyName
proxyPort
|
proxy-name
proxy-port
| This attribute is set on the connector in the web subsystem.
<connector name="http" protocol="HTTP/1.1" scheme="http" socket-binding="http" enabled="true" proxy-name="proxy.com" proxy-port="80"/> |
|
redirectPort
|
redirect-port
|
This attribute is set on the
connector in the web subsystem.
connector name="http" protocol="HTTP/1.1" scheme="https" secure="true" socket-binding="http"
           redirect-port="8443" proxy-name="loadbalancer.hostname.com" proxy-port="443"
|
|
enableLookups
|
enable-lookups
|
This attribute is set on the
connector in the web subsystem.
<connector name="http" protocol="HTTP/1.1" scheme="http" socket-binding="http" enable-lookups="true"/>" |
|
MaxHttpHeaderSize
| System Property | This attribute is set using System Properties. The default value is 8 KB.
<system-properties>
    <property name="org.apache.coyote.http11.Http11Protocol.MAX_HEADER_SIZE" value="8192"/>
</system-properties>
|
|
maxKeepAliveRequests
| System Property | This attribute is set using System Properties.
<system-properties>
    <property name="org.apache.coyote.http11.Http11Protocol.MAX_KEEP_ALIVE_REQUESTS" value="1"/>
</system-properties>
|
|
connectionTimeout
| System Property | This attribute is set using System Properties. The following configurations set the AJP connectionTimeout to 600000 milliseconds (10 minutes) and the HTTP connectionTimeout to 120000 milliseconds (2 minutes).
<system-properties>
    <!-- connectionTimeout for AJP connector. Default value is "-1" (no timeout). -->
    <property name="org.apache.coyote.ajp.DEFAULT_CONNECTION_TIMEOUT" value="600000"/>
    <!-- connectionTimeout for HTTP connector. Default value is "60000". -->
    <property name="org.apache.coyote.http11.DEFAULT_CONNECTION_TIMEOUT" value="120000"/>
</system-properties>
|
|
compression
| System Property | This attribute enables compression. You can specify the content type, which defaults to text/html,text/xml,text/plain. You can also specify the minimum size of content that is to be compressed, which defaults to 2048 bytes. Compression is set using System Properties.
<system-properties>
    <property name="org.apache.coyote.http11.Http11Protocol.COMPRESSION" value="on"/>
    <property name="org.apache.coyote.http11.Http11Protocol.COMPRESSION_MIN_SIZE" value="4096"/>
    <property name="org.apache.coyote.http11.Http11Protocol.COMPRESSION_MIME_TYPES" value="text/javascript,text/css,text/html"/>
</system-properties>
|
|
URIEncoding
| System Property | This attribute is set using System Properties.
<system-properties>
    <property name="org.apache.catalina.connector.URI_ENCODING" value="UTF-8"/>
</system-properties>
|
|
useBodyEncodingForURI
| System Property | This attribute is set using System Properties.
<system-properties>
    <property name="org.apache.catalina.connector.USE_BODY_ENCODING_FOR_QUERY_STRING" value="true"/>
</system-properties>
|
|
server
| System Property | This attribute is set using System Properties.
<system-properties>
    <property name="org.apache.coyote.http11.Http11Protocol.SERVER" value="NewServerHeader"/>
 </system-properties>
|
|
allowTrace
| System Property | This attribute is set using System Properties.
<system-properties>
    <property name="org.apache.catalina.connector.ALLOW_TRACE " value="true"/>
 </system-properties>
|
|
xpoweredby
| System Property | This attribute is set using System Properties.
<system-properties>
    <property name="org.apache.catalina.connector.X_POWERED_BY " value="true"/>
 </system-properties>
|
|
keepAliveTimeout
| N/A |
Prior to JBoss EAP 6.4, there was no equivalent parameter in JBoss EAP 6. Internally, it defaulted to the
connectionTimeout value.
In JBoss EAP 6.4, a new system property,
org.apache.coyote.http11.DEFAULT_KEEP_ALIVE_TIMEOUT, was introduced to control keepAliveTimeout. The -Dorg.apache.coyote.http11.DEFAULT_KEEP_ALIVE_TIMEOUT argument takes affect when used with the -Dorg.apache.coyote.http11.DEFAULT_DISABLE_UPLOAD_TIMEOUT=true argument.
|
|
disableUploadTimeout
connectionUploadTimeout
| N/A |
There are currently no equivalent parameters in JBoss EAP 6. The
disableUploadTimeout is true by default and the connectionUploadTimeout internally uses the connectionTimeout value.
|
|
packetSize
| System Property | This attribute is set using System Properties. The following configurations set the AJP packetSize to 20000
<system-properties>
    <property name="org.apache.coyote.ajp.MAX_PACKET_SIZE" value="20000"/>
</system-properties>
|
|
maxPostSize
maxSavePostSize
|
max-post-size
max-save-post-size
| A value of 0 means unlimited. Note that this parameter can limit data size only when Content-Type is application/x-www-form-urlencoded. For more information, see this solution on the Customer Portal: How to limit data size of HTTP POST method from a client to JBoss |
|
tomcatAuthentication
| System Property |
Depending on the version of JBoss EAP 6, this attribute is set using the System Property
org.apache.coyote.ajp.AprProcessor.TOMCATAUTHENTICATION or org.apache.coyote.ajp.DEFAULT_TOMCAT_AUTHENTICATION. A patch or upgrade is required for all versions of the server.
In JBoss EAP 6.0.1, tomcatAuthentication is configured using the following property.
<system-properties>
    <property name="org.apache.coyote.ajp.AprProcessor.TOMCATAUTHENTICATION" value="false"/>
</system-properties>
In JBoss EAP 6.1 and later, tomcatAuthentication is configured as follows:
<system-properties>
    <property name="org.apache.coyote.ajp.DEFAULT_TOMCAT_AUTHENTICATION" value="false"/>
</system-properties>
For more information, see this solution on the Customer Portal: How to configure tomcatAuthentication in JBoss EAP 6
|
3.2.17.2. Configure 1-Way SSL
keystore.jks file created by that process was placed in the EAP_HOME/server/PROFILE/conf/ directory. You then configured the HTTP connector in the EAP_HOME/server/PROFILE/deploy/jbossweb.sar/server.xml file as follows.
<Connector protocol="HTTP/1.1" SSLEnabled="true"
  port="8443" address="${jboss.bind.address}"
  scheme="https" secure="true" clientAuth="false"
  keystoreFile="${jboss.server.home.dir}/conf/keystore.jks"
  keystorePass="password" SSLProtocol = "TLS" />
keystore.jks file created by that process is placed in the EAP_HOME/standalone/configuration/ or EAP_HOME/domain/configuration/ directory. The HTTP connector is then configured in the web subsystem of the server configuration file as follows.
<connector name="https" protocol="HTTP/1.1" scheme="https" socket-binding="https">
  <ssl name="ssl" key-alias="jboss" password="password"
    certificate-key-file="${jboss.server.config.dir}/keystore.jks"
    protocol="TLSv1" verify-client="false"/>
</connector>
web subsystem of the server configuration file, however, the connector protocol is set to "org.apache.coyote.http11.Http11AprProtocol".
3.2.17.3. Migrate Valve Configuration
EAP_HOME/server/PROFILE/lib directory and then configuring the one of the following files.
- For JBoss EAP 4.x, valves were configured in either the
EAP_HOME/server/PROFILEdeploy/jboss-web.deployer/server.xmlorEAP_HOME/server/PROFILEdeploy/jboss-web.deployer/context.xmlfile. - For JBoss EAP 5.x, valves were configured in the
EAP_HOME/server/PROFILEdeploy/jbossweb.sar/server.xmlfile.
web subsystem of the server configuration file. For detailed instructions on how to configure valves, see the chapter entitled Global Valves in the Administration and Configuration Guide for JBoss EAP located on the Customer Portal at https://access.redhat.com/documentation/en-us/red_hat_jboss_enterprise_application_platform/?version=6.4
Note
3.2.17.4. Configure the CertificatePrincipal Class
CertificatePrincipal class was configured on the JBossWeb container by setting the certificatePrincipal attribute for the Realm in the jbossweb-tomcat.sar/server.xml file as in the following example.
<Realm className="org.jboss.web.tomcat.security.JBossWebRealm"
  certificatePrincipal="org.jboss.security.auth.certs.SubjectDNMapping"
  allRolesMode="authOnly"/>
3.2.18. Migrate Seam 2.2 Applications
3.2.18.1. Migrate Seam 2.2 Archives to JBoss EAP 6
When you migrate a Seam 2.2 application, you need to configure the datasource and specify any module dependencies. You also need to determine if the application has any dependencies on archives that do not ship with JBoss EAP 6 and copy any dependent JARs into the application lib/ directory.
Important
Procedure 3.30. Migrate Seam 2.2 Archives
- Update the datasource configuration.Some Seam 2.2 examples use the default JDBC datasource named
java:/ExampleDS. This default datasource has changed in JBoss EAP 6 tojava:jboss/datasources/ExampleDS. If your application uses the example database, you can do one of the following.For more information on how to configure a datasource, see Section 3.1.6.2, “Update the DataSource Configuration”.- If you want to use the example database that ships with JBoss EAP 6, modify the
META-INF/persistence.xmlfile to replace the existingjta-data-sourceelement with the example database datasource JNDI name.<!-- <jta-data-source>java:/ExampleDS</jta-data-source> --> <jta-data-source>java:jboss/datasources/ExampleDS</jta-data-source>
- If you prefer to keep your existing database, you can add the datasource definition to the
EAP_HOME/standalone/configuration/standalone.xmlfile.Important
You must stop the server before editing the server configuration file for your change to be persisted on server restart.The following definition is a copy of the default HSQL datasource defined in JBoss EAP 6.<datasource name="ExampleDS" jndi-name="java:/ExampleDS" enabled="true" jta="true" use-java-context="true" use-ccm="true"> <connection-url>jdbc:h2:mem:test;DB_CLOSE_DELAY=-1</connection-url> <driver>h2</driver> <security> <user-name>sa</user-name> <password>sa</password> </security> </datasource> - You can also add the datasource definition using the Management CLI command line interface. The following is an example of the syntax you must use to add a datasource. The "\" at the end of line indicates the continuation of the command on the following line.
Example 3.12. Example of syntax to add the datasource definition
$ EAP_HOME/bin/jboss-cli --connect
[standalone@localhost:9999 /] data-source add --name=ExampleDS --jndi-name=java:/ExampleDS \
      --connection-url=jdbc:h2:mem:test;DB_CLOSE_DELAY=-1 --driver-name=h2 \
      --user-name=sa --password=sa
- Add any required dependencies.Because Seam 2.2 applications use JSF 1.2, you need to add dependencies for the JSF 1.2 modules and exclude the JSF 2.0 modules. To accomplish this, you need to create a
jboss-deployment-structure.xmlfile in the EAR'sMETA-INF/directory that contains the following data.<jboss-deployment-structure xmlns="urn:jboss:deployment-structure:1.0"> <deployment> <dependencies> <module name="javax.faces.api" slot="1.2" export="true"/> <module name="com.sun.jsf-impl" slot="1.2" export="true"/> </dependencies> </deployment> <sub-deployment name="jboss-seam-booking.war"> <exclusions> <module name="javax.faces.api" slot="main"/> <module name="com.sun.jsf-impl" slot="main"/> </exclusions> <dependencies> <module name="javax.faces.api" slot="1.2"/> <module name="com.sun.jsf-impl" slot="1.2"/> </dependencies> </sub-deployment> </jboss-deployment-structure>If your application uses any third-party logging frameworks you need to add those dependencies as described here: Section 3.1.4.1, “Modify Logging Dependencies”. - If your application uses Hibernate 3.x, first try to run the application using the Hibernate 4 libraries.If your application does not use the Seam Managed Persistence Context, Hibernate search, validation, or other features that have changed with Hibernate 4, you may be able to run with the Hibernate 4 libraries. However, if you see
ClassNotFoundExceptionsorClassCastExceptionsthat point to Hibernate classes, or see errors similar to the following, you may have to follow the instructions in the next step and modify the application to use Hibernate 3.3 libraries.Caused by: java.lang.LinkageError: loader constraint violation in interface itable initialization: when resolving method "org.jboss.seam.persistence.HibernateSessionProxy.getSession(Lorg/hibernate/EntityMode;)Lorg/hibernate/Session;" the class loader (instance of org/jboss/modules/ModuleClassLoader) of the current class, org/jboss/seam/persistence/HibernateSessionProxy, and the class loader (instance of org/jboss/modules/ModuleClassLoader) for interface org/hibernate/Session have different Class objects for the type org/hibernate/Session used in the signature - Copy dependent archives from outside frameworks or other locations.If your application uses Hibernate 3.x and you are not able to use Hibernate 4 successfully with your application, you will need to copy the Hibernate 3.x JARs into the
/libdirectory and exclude the Hibernate module in the deployments section of theMETA-INF/jboss-deployment-structure.xmlas follows.<jboss-deployment-structure xmlns="urn:jboss:deployment-structure:1.0"> <deployment> <exclusions> <module name="org.hibernate"/> </exclusions> <deployment> </jboss-deployment-structure>There are additional steps you must take when you bundle Hibernate 3.x with your application. For more information, see Section 3.2.2.2, “Configure Changes for Applications That Use Hibernate and JPA”. - Debug and resolve Seam 2.2 JNDI errors.When you migrate a Seam 2.2 application, you may see
javax.naming.NameNotFoundExceptionerrors in the log like the following.javax.naming.NameNotFoundException: Name 'jboss-seam-booking' not found in context ''
If you don't want to modify JNDI lookups throughout the code, you can modify the application'scomponents.xmlfile as follows.- Replace the existing core-init element.First, you need to replace the existing core-init element as follows:
<!-- <core:init jndi-pattern="jboss-seam-booking/#{ejbName}/local" debug="true" distributable="false"/> --> <core:init debug="true" distributable="false"/> - Find the JNDI binding INFO messages in the server logNext, find the JNDI binding INFO messages that are printed in the server log when the application is deployed. The JNDI binding messages should look similar to the following.
INFO org.jboss.as.ejb3.deployment.processors.EjbJndiBindingsDeploymentUnitProcessor (MSC service thread 1-1) JNDI bindings for session bean named AuthenticatorAction in deployment unit subdeployment "jboss-seam-booking.jar" of deployment "jboss-seam-booking.ear" are as follows. java:global/jboss-seam-booking/jboss-seam-booking.jar/AuthenticatorAction!org.jboss.seam.example.booking.Authenticator java:app/jboss-seam-booking.jar/AuthenticatorAction!org.jboss.seam.example.booking.Authenticator java:module/AuthenticatorAction!org.jboss.seam.example.booking.Authenticator java:global/jboss-seam-booking/jboss-seam-booking.jar/AuthenticatorAction java:app/jboss-seam-booking.jar/AuthenticatorAction java:module/AuthenticatorAction - Add component elements.For each JNDI binding INFO message in the log, add a matching
componentelement to thecomponents.xmlfile.<component class="org.jboss.seam.example.booking.AuthenticatorAction" jndi-name="java:app/jboss-seam-booking.jar/AuthenticatorAction" />
For more information on how to debug and resolve migration issues, see Section 4.2.1, “Debug and Resolve Migration Issues”.For a list of known migration issues with Seam 2 archives, see Section 3.2.18.2, “Seam 2.2 Archive Migration Issues”.
The Seam 2.2 archive deploys and runs successfully on JBoss EAP 6.
3.2.18.2. Seam 2.2 Archive Migration Issues
- Seam 2.2 Drools and Java 7 are not compatible
- Seam 2.2 Drools and Java 7 are incompatible and fail with an org.drools.RuntimeDroolsException: value '1.7' is not a valid language level error.
- Seam 2.2.5 signed
cglib.jarprevents the Spring example from working - When the Spring example is run using the signed
cglib.jarthat shipped with Seam 2.2.5 in JBoss EAP 5, it fails with the following root cause:java.lang.SecurityException: class "org.jboss.seam.example.spring.UserService$$EnhancerByCGLIB$$7d6c3d12"'s signer information does not match signer information of other classes in the same package
The work around for this issue is to unsign thecglib.jaras follows:zip -d $SEAM_DIR/lib/cglib.jar META-INF/JBOSSCOD\* - Seambay example fails with
NotLoggedInException - The cause of this issue is the SOAP message header being null when processing the message in the SOAPRequestHandler and consequently, the conversation ID not being set.The work around for this issue is to override
org.jboss.seam.webservice.SOAPRequestHandler.handleOutbound, as described in https://issues.jboss.org/browse/JBPAPP-8376. - Seambay example fails with
UnsupportedOperationException: no transaction - This bug is caused by changes in the JNDI name of UserTransaction in JBoss EAP 6.The work around for this issue is to override
org.jboss.seam.transaction.Transaction.getUserTransaction, as described in https://issues.jboss.org/browse/JBPAPP-8322. - Tasks example throws
org.jboss.resteasy.spi.UnhandledException: Unable to unmarshall request body - This bug is caused by the incompatibility between seam-resteasy-2.2.5 included in JBoss EAP 5.1.2) and RESTEasy 2.3.1.GA included in JBoss EAP 6.The work around for this issue is to use the
jboss-deployment-structure.xmlto exclude resteasy-jaxrs, resteasy-jettison-provider, and resteasy-jaxb-provider from the main deployment and resteasy-jaxrs, resteasy-jettison-provider, resteasy-jaxb-provider, and resteasy-yaml-provider from thejboss-seam-tasks.waras described in https://issues.jboss.org/browse/JBPAPP-8315. It is then necessary to include the RESTEasy libraries bundled with Seam 2.2 in the EAR. - Deadlock between
org.jboss.seam.core.SynchronizationInterceptorand stateful component instance EJB lock during an AJAX request - An error page with "Caused by javax.servlet.ServletException with message: "javax.el.ELException: /main.xhtml @36,71 value="#{hotelSearch.pageSize}": org.jboss.seam.core.LockTimeoutException: could not acquire lock on @Synchronized component: hotelSearch" or similar error message is displayed.The problem is that Seam 2 does its own locking outside the stateful session bean (SFSB) lock and with a different scope. This means that if a thread accesses an EJB twice in the same transaction, after the first invocation it will have the SFSB lock, but not the seam lock. A second thread can then acquire the seam lock, which will then hit the EJB lock and wait. When the first thread attempts its second invocation it will block on the seam 2 interceptor and deadlock. In Java EE 5, EJBs would throw an exception immediately on concurrent access. This behavior has changed in Java EE 6.The work around for this issue is to add @AccessTimeout(0) to the EJB. This will cause it to throw a
ConcurrentAccessExceptionimmediately when this situation occurs. - Dvdstore example create order fails with a
javax.ejb.EJBTransactionRolledbackException - The dvdstore example displays the following error:
JBAS011437: Found extended persistence context in SFSB invocation call stack but that cannot be used because the transaction already has a transactional context associated with it. This can be avoided by changing application code, either eliminate the extended persistence context or the transactional context. See JPA spec 2.0 section 7.6.3.1.
This problem is due to changes in the JPA specification.The fix for this issue is to change the persistence context totransactionalin theCheckoutActionandShowOrdersActionclasses and use the entity manager merge operation in thecancelOrderanddetailOrdermethods. - JBoss Cache Seam Cache provider cannot be used in JBoss EAP 6
- JBoss Cache is not supported in JBoss EAP 6. This causes JBoss Cache Seam Cache provider to fail in a Seam application on the application server with a
java.lang.NoClassDefFoundError: org/jboss/util/xml/JBossEntityResolver
. - Hibernate 3.3.x Auto scan for JPA entities issue with JBoss EAP 6
- The fix for this issue is to list all the entity classes in the persistence.xml file manually. For example:
<?xml version="1.0" encoding="UTF-8"?> <persistence xmlns="http://java.sun.com/xml/ns/persistence" version="1.0"> <persistence-unit name="example_pu"> <description>Hibernate 3 Persistence Unit.</description> <jta-data-source>java:jboss/datasources/ExampleDS</jta-data-source> <properties> <property name="jboss.as.jpa.providerModule" value="hibernate3-bundled" /> </properties> <class>com.acme.Foo</class> <class>com.acme.Bar</class> </persistence-unit> </persistence> - Calling EJB Seam components from non-EJB Threads results in a javax.naming.NameNotFoundException
- This issue is a result of changes in JBoss EAP 6 to implement the new modular class loading system and to adopt the new standardized JNDI namespace conventions. The
java:appnamespace is designated for names shared by all components in a single application. Non-EE threads, such as Quartz asynchronous threads, must use thejava:globalnamespace, which is shared by all applications deployed in an application server instance.If you receive ajavax.naming.NameNotFoundExceptionwhen you try to call EJB Seam components from Quartz asynchronous methods, you must modify thecomponents.xmlfile to use the global JNDI name, for example:<component class="org.jboss.seam.example.quartz.MyBean" jndi-name="java:global/seam-quartz/quartz-ejb/myBean"/>
For more information on JNDI changes, refer to the following topic: Section 3.1.8.1, “Update Application JNDI Namespace Names” . For more information on this specific issue, refer to BZ#948215 - Seam2.3 javax.naming.NameNotFoundException trying to call EJB Seam components from quartz asynchronous methods in the 2.2.0 Release Notes for Red Hat JBoss Web Framework Kit on the Red Hat Customer Portal.
3.2.19. Migrate Spring Applications
3.2.19.1. Migrate Spring Applications
3.2.20. Other Changes That Affect Migration
3.2.20.1. Become Familiar with Other Changes That May Affect Your Migration
3.2.20.2. Change the Maven Plug-in Name
jboss-maven-plugin has not been updated and does not work in JBoss EAP 6. You must now use org.jboss.as.plugins:jboss-as-maven-plugin to deploy to the correct directory.
3.2.20.3. Modify Client Applications
jboss-client.jar and is located in the EAP_HOME/bin/client/ directory. It replaces the EAP_HOME/client/jbossall-client.jar and contains all the dependencies required to connect to JBoss EAP 6 from a remote client.
Chapter 4. Tools and Tips
4.1. Resources to Assist With Migration
4.1.1. Resources to Assist in Your Migration
- Tools
- There are several tools that help automate some of the configuration changes. For more information, refer: Section 4.1.2, “Become Familiar with Tools That Can Assist with the Migration”.
- Debugging Tips
- For a list of the most common causes and resolutions of issues and errors you may see when you migrate your application, refer: Section 4.2.1, “Debug and Resolve Migration Issues”.
- Example migrations
- For examples of applications that have been migrated to JBoss EAP 6, refer: Section 4.3.1, “Review Migration of Example Applications”.
4.1.2. Become Familiar with Tools That Can Assist with the Migration
There are some tools that can assist you in your migration efforts. The following is a list of these tools along with a description of what they do.
- Tattletale
- With the change to modular class loading, you need to find and rectify application dependencies. Tattletale can help you identify dependent module names and generate the configuration XML for your application.
- IronJacamar Migration Tool
- In JBoss EAP 6, datasources and resource adapters are no longer configured in a separate file. They are now defined in the server configuration file and use new schemas. The IronJacamar Migration Tool can help convert the old configuration into the format expected by JBoss EAP 6.
4.1.3. Use Tattletale to Find Application Dependencies
Due to the modular class loading changes in JBoss EAP 6, you might see ClassNotFoundException or ClassCastException traces in the JBoss log when you migrate your application. To resolve these errors, you need to find the JARs that contain the classes specified by the exceptions.
jboss-deployment-structure.xml file.
Procedure 4.1. Install and run Tattletale to find application dependencies
Note
4.1.4. Download and Install Tattletale
Procedure 4.2. Download and Install Tattletale
- Download Tattletale version 1.2.0.Beta2 or newer from http://sourceforge.net/projects/jboss/files/JBoss%20Tattletale.
- Unzip the file into the directory of your choice.
- Modify the
TATTLETALE_HOME/jboss-tattletale.propertiesfile by doing the following:- Add
ee6andas7to theprofilesproperty.profiles=java5, java6, ee6, as7
- Uncomment the
scanandreportsproperties.
4.1.5. Create and Review the Tattletale Report
- Create the Tattletale report by issuing the command:
java -jarTATTLETALE_HOME/tattletale.jarAPPLICATION_ARCHIVEOUTPUT_DIRECTORYFor example:java -jar tattletale-1.2.0.Beta2/tattletale.jar ~/applications/jboss-seam-booking.ear ~/output-results/ - In a browser, open the
OUTPUT_DIRECTORY/index.htmlfile and click on "JBoss AS 7" under the "Reports" section.- The column on the left lists the archives used by the application. Click on the ARCHIVE_NAME link to view details about the archive, such as its location, manifest information, and classes it contains.
- The
jboss-deployment-structure.xmllink in the column on the right shows how to specify the module dependency for the archive named in the left column. Click on this link to see how to define the deployment dependency module information for this archive.
4.1.6. Use the IronJacamar Tool to Migrate Datasource and Resource Adapter Configurations
In previous versions of the application server, datasources and resource adapters were configured and deployed using a file with a suffix of *-ds.xml. The IronJacamar 1.1 distribution contains a migration tool that can be used to convert these configuration files into the format expected by JBoss EAP 6. The tool parses the source configuration file from the previous release, then creates and writes the XML configuration to an output file in the new format. This XML can then be copied and pasted under the correct subsystem in the JBoss EAP 6 server configuration file. This tool makes a best effort to convert old attributes and elements into the new format, however, it may be necessary to make additional modifications to the generated file.
Procedure 4.3. Install and run the IronJacamar Migration tool
Note
4.1.7. Download and Install the IronJacamar Migration Tool
Note
- Download the latest distribution of IronJacamar from here: http://www.ironjacamar.org/download.html
- Unzip the downloaded file into a directory of your choice.
- Find the converter script in the IronJacamar distribution.
- The Linux script is located here:
IRONJACAMAR_HOME/doc/as/converter.sh - The Windows batch file is located here:
IRONJACAMAR_HOME/doc/as/converter.bat
4.1.8. Use the IronJacamar Migration Tool to Convert a Datasource Configuration File
Note
Procedure 4.4. Convert a Datasource Configuration File
- Open a command line and navigate to the
IRONJACAMAR_HOME/doc/as/directory. - Run the converter script by typing the following command:
- For Linux:
./converter.sh -dsSOURCE_FILETARGET_FILE - For Microsoft Windows:
./converter.bat -dsSOURCE_FILETARGET_FILE
TheSOURCE_FILEis the datasource -ds.xml file from the previous release. TheTARGET_FILEcontains the new configuration.For example, to convert thejboss-seam-booking-ds.xmldatasource configuration file located in the current directory, you would type:- For Linux:
./converter.sh -dsjboss-seam-booking-ds.xmlnew-datasource-config.xml - For Microsoft Windows:
./converter.bat -dsjboss-seam-booking-ds.xmlnew-datasource-config.xml
Note that the parameter for datasource conversion is-ds. - Copy the
<datasource>element from the target file and paste it into the server configuration file under the<subsystem xmlns="urn:jboss:domain:datasources:1.1"><datasources>element.Important
You must stop the server before editing the server configuration file for your change to be persisted on server restart.- If you are running in a managed domain, copy the XML into the
EAP_HOME/domain/configuration/domain.xmlfile. - If you are running as a standalone server, copy the XML into the
EAP_HOME/standalone/configuration/standalone.xmlfile.
- Modify the generated XML in the new configuration file.Here is an example of the
jboss-seam-booking-ds.xmldatasource configuration file for the Seam 2.2 Booking example that shipped with JBoss EAP 5.x:<?xml version="1.0" encoding="UTF-8"?> <datasources> <local-tx-datasource> <jndi-name>bookingDatasource</jndi-name> <connection-url>jdbc:hsqldb:.</connection-url> <driver-class>org.hsqldb.jdbcDriver</driver-class> <user-name>sa</user-name> <password></password> </local-tx-datasource> </datasources>The following is the configuration file that was generated by running the converter script. The generated file contains a<driver-class>element. The preferred way to define the driver class in JBoss EAP 6 is to use a<driver>element. Here is the resulting XML in the JBoss EAP 6 configuration file with modifications to comment out the<driver-class>element and add the corresponding<driver>element:<subsystem xmlns="urn:jboss:domain:datasources:1.1"> <datasources> <datasource enabled="true" jndi-name="java:jboss/datasources/bookingDatasource" jta="true" pool-name="bookingDatasource" use-ccm="true" use-java-context="true"> <connection-url>jdbc:hsqldb:.</connection-url> <!-- Comment out the following driver-class element since it is not the preferred way to define this. <driver-class>org.hsqldb.jdbcDriver</driver-class> --> <!-- Specify the driver, which is defined later in the datasource --> <driver>h2<driver> <transaction-isolation>TRANSACTION_NONE</transaction-isolation> <pool> <prefill>false</prefill> <use-strict-min>false</use-strict-min> <flush-strategy>FailingConnectionOnly</flush-strategy> </pool> <security> <user-name>sa</user-name> <password/> </security> <validation> <validate-on-match>false</validate-on-match> <background-validation>false</background-validation> <use-fast-fail>false</use-fast-fail> </validation> <timeout/> <statement> <track-statements>false</track-statements> </statement> </datasource> <drivers> <!-- The following driver element was not in the XML target file. It was created manually. --> <driver name="h2" module="com.h2database.h2"> <xa-datasource-class>org.h2.jdbcx.JdbcDataSource</xa-datasource-class> </driver> </drivers> </datasources> </subsystem>
4.1.9. Use the IronJacamar Migration Tool to Convert a Resource Adapter Configuration File
Note
- Open a command line and navigate to the
IRONJACAMAR_HOME/docs/as/directory. - Run the converter script by typing the following command:
- For Linux:
./converter.sh -raSOURCE_FILETARGET_FILE - For Microsoft Windows:
./converter.bat -raSOURCE_FILETARGET_FILE
TheSOURCE_FILEis the resource adapter -ds.xml file from the previous release. TheTARGET_FILEcontains the new configuration.For example, to convert themttestadapter-ds.xmlresource adapter configuration file located in the current directory, you would type:- For Linux:
./converter.sh -ramttestadapter-ds.xmlnew-adapter-config.xml - For Microsoft Windows:
./converter.bat -ramttestadapter-ds.xmlnew-adapter-config.xml
Note that the parameter for resource adapter conversion is-ra. - Copy the entire
<resource-adapters>element from the target file and paste it into the server configuration file under the<subsystem xmlns="urn:jboss:domain:resource-adapters:1.1">element.Important
You must stop the server before editing the server configuration file for your change to be persisted on server restart.- If you are running in a managed domain, copy the XML into the
EAP_HOME/domain/configuration/domain.xmlfile. - If you are running as a standalone server,copy the XML into the
EAP_HOME/standalone/configuration/standalone.xmlfile.
- Modify the generated XML in the new configuration file.Here is an example of the
mttestadapter-ds.xmlresource adapter configuration file from the JBoss EAP 5.x TestSuite:<?xml version="1.0" encoding="UTF-8"?> <!-- ==================================================================== --> <!-- ConnectionManager setup for jboss test adapter --> <!-- Build jmx-api (build/build.sh all) and view for config documentation --> <!-- ==================================================================== --> <connection-factories> <tx-connection-factory> <jndi-name>JBossTestCF</jndi-name> <xa-transaction/> <rar-name>jbosstestadapter.rar</rar-name> <connection-definition>javax.resource.cci.ConnectionFactory</connection-definition> <config-property name="IntegerProperty" type="java.lang.Integer">2</config-property> <config-property name="BooleanProperty" type="java.lang.Boolean">false</config-property> <config-property name="DoubleProperty" type="java.lang.Double">5.5</config-property> <config-property name="UrlProperty" type="java.net.URL">http://www.jboss.org</config-property> <config-property name="sleepInStart" type="long">200</config-property> <config-property name="sleepInStop" type="long">200</config-property> </tx-connection-factory> <tx-connection-factory> <jndi-name>JBossTestCF2</jndi-name> <xa-transaction/> <rar-name>jbosstestadapter.rar</rar-name> <connection-definition>javax.resource.cci.ConnectionFactory</connection-definition> <config-property name="IntegerProperty" type="java.lang.Integer">2</config-property> <config-property name="BooleanProperty" type="java.lang.Boolean">false</config-property> <config-property name="DoubleProperty" type="java.lang.Double">5.5</config-property> <config-property name="UrlProperty" type="java.net.URL">http://www.jboss.org</config-property> <config-property name="sleepInStart" type="long">200</config-property> <config-property name="sleepInStop" type="long">200</config-property> </tx-connection-factory> <tx-connection-factory> <jndi-name>JBossTestCFByTx</jndi-name> <xa-transaction/> <track-connection-by-tx>true</track-connection-by-tx> <rar-name>jbosstestadapter.rar</rar-name> <connection-definition>javax.resource.cci.ConnectionFactory</connection-definition> <config-property name="IntegerProperty" type="java.lang.Integer">2</config-property> <config-property name="BooleanProperty" type="java.lang.Boolean">false</config-property> <config-property name="DoubleProperty" type="java.lang.Double">5.5</config-property> <config-property name="UrlProperty" type="java.net.URL">http://www.jboss.org</config-property> <config-property name="sleepInStart" type="long">200</config-property> <config-property name="sleepInStop" type="long">200</config-property> </tx-connection-factory> </connection-factories>The following is the configuration file that was generated by running the converter script. Replace the class-name attribute value "FIXME_MCF_CLASS_NAME" in the generated XML with the correct class name of the managed connection factory, in this case, "org.jboss.test.jca.adapter.TestManagedConnectionFactory". Here is the resulting XML in the JBoss EAP 6 configuration file with modifications to the<class-name>element value:<subsystem xmlns="urn:jboss:domain:resource-adapters:1.1"> <resource-adapters> <resource-adapter> <archive>jbosstestadapter.rar</archive> <transaction-support>XATransaction</transaction-support> <connection-definitions> <!-- Replace the "FIXME_MCF_CLASS_NAME" class-name value with the correct class name <connection-definition class-name="FIXME_MCF_CLASS_NAME" enabled="true" jndi-name="java:jboss/JBossTestCF" pool-name="JBossTestCF" use-ccm="true" use-java-context="true"> --> <connection-definition class-name="org.jboss.test.jca.adapter.TestManagedConnectionFactory" enabled="true" jndi-name="java:jboss/JBossTestCF" pool-name="JBossTestCF" use-ccm="true" use-java-context="true"> <config-property name="IntegerProperty">2</config-property> <config-property name="sleepInStart">200</config-property> <config-property name="sleepInStop">200</config-property> <config-property name="BooleanProperty">false</config-property> <config-property name="UrlProperty">http://www.jboss.org</config-property> <config-property name="DoubleProperty">5.5</config-property> <pool> <prefill>false</prefill> <use-strict-min>false</use-strict-min> <flush-strategy>FailingConnectionOnly</flush-strategy> </pool> <security> <application/> </security> <timeout/> <validation> <background-validation>false</background-validation> <use-fast-fail>false</use-fast-fail> </validation> </connection-definition> </connection-definitions> </resource-adapter> <resource-adapter> <archive>jbosstestadapter.rar</archive> <transaction-support>XATransaction</transaction-support> <connection-definitions> <!-- Replace the "FIXME_MCF_CLASS_NAME" class-name value with the correct class name <connection-definition class-name="FIXME_MCF_CLASS_NAME" enabled="true" jndi-name="java:jboss/JBossTestCF2" pool-name="JBossTestCF2" use-ccm="true" use-java-context="true"> --> <connection-definition class-name="org.jboss.test.jca.adapter.TestManagedConnectionFactory" enabled="true" jndi-name="java:jboss/JBossTestCF2" pool-name="JBossTestCF2" use-ccm="true" use-java-context="true"> <config-property name="IntegerProperty">2</config-property> <config-property name="sleepInStart">200</config-property> <config-property name="sleepInStop">200</config-property> <config-property name="BooleanProperty">false</config-property> <config-property name="UrlProperty">http://www.jboss.org</config-property> <config-property name="DoubleProperty">5.5</config-property> <pool> <prefill>false</prefill> <use-strict-min>false</use-strict-min> <flush-strategy>FailingConnectionOnly</flush-strategy> </pool> <security> <application/> </security> <timeout/> <validation> <background-validation>false</background-validation> <use-fast-fail>false</use-fast-fail> </validation> </connection-definition> </connection-definitions> </resource-adapter> <resource-adapter> <archive>jbosstestadapter.rar</archive> <transaction-support>XATransaction</transaction-support> <connection-definitions> <!-- Replace the "FIXME_MCF_CLASS_NAME" class-name value with the correct class name <connection-definition class-name="FIXME_MCF_CLASS_NAME" enabled="true" jndi-name="java:jboss/JBossTestCFByTx" pool-name="JBossTestCFByTx" use-ccm="true" use-java-context="true"> --> <connection-definition class-name="org.jboss.test.jca.adapter.TestManagedConnectionFactory" enabled="true" jndi-name="java:jboss/JBossTestCFByTx" pool-name="JBossTestCFByTx" use-ccm="true" use-java-context="true"> <config-property name="IntegerProperty">2</config-property> <config-property name="sleepInStart">200</config-property> <config-property name="sleepInStop">200</config-property> <config-property name="BooleanProperty">false</config-property> <config-property name="UrlProperty">http://www.jboss.org</config-property> <config-property name="DoubleProperty">5.5</config-property> <pool> <prefill>false</prefill> <use-strict-min>false</use-strict-min> <flush-strategy>FailingConnectionOnly</flush-strategy> </pool> <security> <application/> </security> <timeout/> <validation> <background-validation>false</background-validation> <use-fast-fail>false</use-fast-fail> </validation> </connection-definition> </connection-definitions> </resource-adapter> </resource-adapters> </subsystem>
4.2. Debug Migration Issues
4.2.1. Debug and Resolve Migration Issues
4.2.2. Debug and Resolve ClassNotFoundExceptions and NoClassDefFoundErrors
ClassNotFoundExceptions usually occur due to an unresolved dependency. This means you must explicitly define the dependencies on other modules or copy JARs from external sources.
- First, try to find the missing dependency. This is described in more detail here: Section 4.2.3, “Find the JBoss Module Dependency”
- If there is not a module for the missing class, find the JAR in the previous install. For more information, see Section 4.2.4, “Find the JAR in the Previous Install”
4.2.3. Find the JBoss Module Dependency
ClassNotFoundException by looking in the EAP_HOME/modules/system/layers/base/ directory. If you find a module for the class, you must add a dependency to the manifest entry.
Caused by: java.lang.ClassNotFoundException: org.apache.commons.logging.Log
    from [Module "deployment.TopicIndex.war:main" from Service Module Loader]
    at org.jboss.modules.ModuleClassLoader.findClass(ModuleClassLoader.java:188)
Find the JBoss module containing this class by doing the following:
Procedure 4.5. Find the Dependency
- First determine if there is an obvious module for the class.
- Navigate to the
EAP_HOME/modules/system/layers/base/directory and look for the module path matching class named in theClassNotFoundException.You find the module pathorg/apache/commons/logging/. - Open the
EAP_HOME/modules/system/layers/base/org/apache/commons/logging/main/module.xmlfile and find the module name. In this case, it is "org.apache.commons.logging". - Add the module name to the Dependencies in the
MANIFEST.MFfile:Manifest-Version: 1.0 Dependencies: org.apache.commons.logging
- If there is no obvious module path for the class, you may need to find the dependency in another location.
- Find the class named by the
ClassNotFoundExceptionin the Tattletale report. - Find the module containing the JAR in the
EAP_HOME/modulesdirectory and find the module name as in the previous step.
4.2.4. Find the JAR in the Previous Install
lib/ directory.
ClassNotFoundException trace in the log:
Caused by: java.lang.NoClassDefFoundError: org/hibernate/validator/ClassValidator at java.lang.Class.getDeclaredMethods0(Native Method)Find the JAR containing this class by doing the following:
- Open a terminal and navigate to the
EAP5_HOME/directory. - Issue the command:
grep 'org.hibernate.validator.ClassValidator' `find . \-name '*.jar'` - You might see more than one result. In this case, the following result is the JAR we need:
Binary file ./jboss-eap-5.1/seam/lib/hibernate-validator.jar matches
- Copy this JAR to the application's
lib/directory.If you find that you need a large number of JARs, it may be easier to define a module for the classes. For more information, see Modules in the chapter entitled Get Started Developing Applications in the Development Guide for JBoss EAP 6 on https://access.redhat.com/documentation/en-us/red_hat_jboss_enterprise_application_platform/?version=6.4. - Rebuild and redeploy the application.
4.2.5. Debug and Resolve ClassCastExceptions
- Search the application to find all JAR(s) that contain the class named by the
ClassCastException. If there is a module defined for the class, find and remove the duplicate JAR(s) from the application's WAR or EAR. - Find the JBoss module containing the class and explicitly define the dependency in the
MANIFEST.MFfile or in thejboss-deployment-structure.xmlfile. For more information, see Class Loading and Subdeployments in the chapter entitled Class Loading and Modules in the Development Guide for JBoss EAP 6 on https://access.redhat.com/documentation/en-us/red_hat_jboss_enterprise_application_platform/?version=6.4. - If you are not able to resolve it using the steps above, you can often determine the cause of the problem by printing the class loader information to the log. For example, you see the following
ClassCastExceptionin the log:java.lang.ClassCastException: com.example1.CustomClass1 cannot be cast to com.example2.CustomClass2
- In your code, print the class loader information for the classes named by the
ClassCastExceptionto the log, for example:logger.info("Class loader for CustomClass1: " + com.example1.CustomClass1.getClass().getClassLoader().toString()); logger.info("Class loader for CustomClass2: " + com.example2.CustomClass2.getClass().getClassLoader().toString()); - The information in the log shows which modules are loading the classes and, based on your application, you need to remove or move the conflicting JAR(s).
4.2.6. Debug and Resolve DuplicateServiceExceptions
- Rename the JAR file to a name that is different than the WAR so the generated web and WAR contexts is unique.
- Provide a
<context-root>element in thejboss-web.xmlfile. - Provide a
<context-root>element in thejboss-webservices.xmlfile. - Customize the
<context-root>element for the WAR in theapplication.xmlfile.
4.2.7. Debug and Resolve JBoss Seam Debug Page Errors
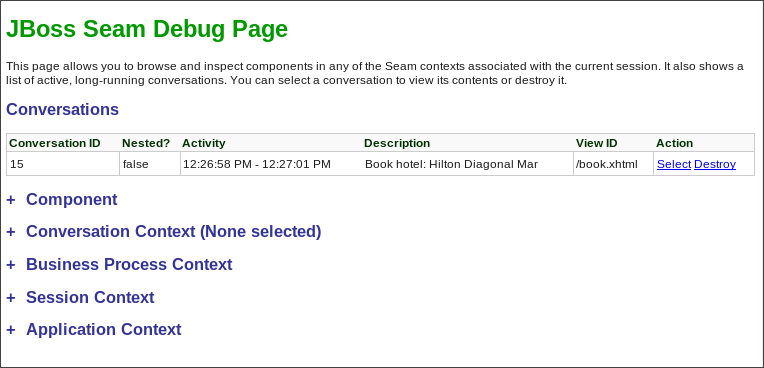
Figure 4.1. JBoss Seam Debug Page
- Expand the
Componentsection on the page and look for theorg.jboss.seam.caughtExceptioncomponent. - The cause and stack trace should point you to the missing dependencies.
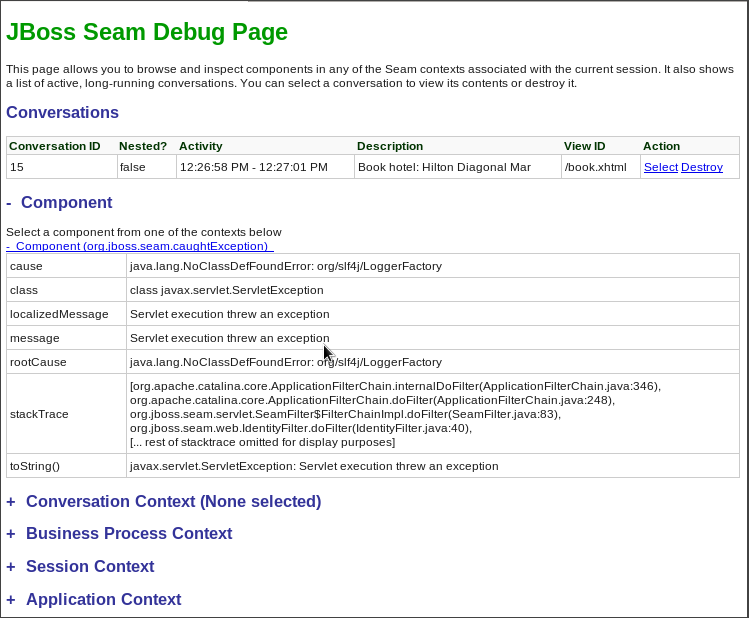
Figure 4.2. Component
org.jboss.seam.caughtExceptioninformation - Use the technique described in Section 4.2.2, “Debug and Resolve ClassNotFoundExceptions and NoClassDefFoundErrors” to resolve module dependencies.In the example above, the simplest solution is to add
org.slf4jto theMANIFEST.MFManifest-Version: 1.0 Dependencies: org.slf4j
Another option is to add a dependency for the module to thejboss-deployment-structure.xmlfile:<jboss-deployment-structure> <deployment> <dependencies> <module name="org.slf4j" /> </dependencies> </deployment> </jboss-deployment-structure>
4.3. Review Migration of Example Applications
4.3.1. Review Migration of Example Applications
The following is a list of JBoss EAP 5.x example applications that have been migrated to JBoss EAP 6. To view the details of what was changed in a particular application, click on the link below.
4.3.2. Migrate the Seam 2.2 JPA Example to JBoss EAP 6
The following task list summarizes the changes needed to successfully migrate the Seam 2.2 JPA example application to JBoss EAP 6. This example application can be found in the latest JBoss EAP 5 distribution under EAP5.x_HOME/jboss-eap-5.x/seam/examples/jpa/
Important
Procedure 4.6. Migrate the Seam 2.2 JPA Example
- Remove the
jboss-web.xmlfile.Remove thejboss-web.xmlfile from thejboss-seam-jpa.war/WEB-INF/directory. The class loading defined in thejboss-web.xmlis now the default behavior. - Modify the
jboss-seam-jpa.jar/META-INF/persistence.xmlfile as follows.- Remove or comment out the
hibernate.cache.provider_classproperty in thejboss-seam-jpa.war/WEB-INF/classes/META-INF/persistence.xmlfile.<!-- <property name="hibernate.cache.provider_class" value="org.hibernate.cache.HashtableCacheProvider"/> -->
- Add the provider module property to the
jboss-seam-booking.jar/META-INF/persistence.xmlfile.<property name="jboss.as.jpa.providerModule" value="hibernate3-bundled" />
- Change the
jta-data-sourceproperty to use the default JDBC datasource JNDI name:<jta-data-source>java:jboss/datasources/ExampleDS</jta-data-source>
- Add Seam 2.2 dependencies.Copy the following JARs from the Seam 2.2 distribution library,
SEAM_HOME/lib/, into thejboss-seam-jpa.war/WEB-INF/lib/directory.- antlr.jar
- slf4j-api.jar
- slf4j-log4j12.jar
- hibernate-entitymanager.jar
- hibernate-core.jar
- hibernate-annotations.jar
- hibernate-commons-annotations.jar
- hibernate-validator.jar
- Create a jboss-deployment-structure file to add remaining dependencies.Create a
jboss-deployment-structure.xmlfile in thejboss-seam-jpa.war/WEB-INF/folder containing the following data.<jboss-deployment-structure> <deployment> <exclusions> <module name="javax.faces.api" slot="main"/> <module name="com.sun.jsf-impl" slot="main"/> <module name="org.hibernate" slot="main"/> </exclusions> <dependencies> <module name="org.apache.log4j" /> <module name="org.dom4j" /> <module name="org.apache.commons.logging" /> <module name="org.apache.commons.collections" /> <module name="javax.faces.api" slot="1.2"/> <module name="com.sun.jsf-impl" slot="1.2"/> </dependencies> </deployment> </jboss-deployment-structure>
The Seam 2.2 JPA example application deploys and runs successfully on JBoss EAP 6.
4.3.3. Migrate the Seam 2.2 Booking Example to JBoss EAP 6
The Seam 2.2 Booking EAR migration is more complicated than the Seam 2.2 JPA WAR example. Documentation for the Seam 2.2 JPA WAR example migration can be found here: Section 4.3.2, “Migrate the Seam 2.2 JPA Example to JBoss EAP 6”. To migrate the application, you must do the following:
- Initialize JSF 1.2 instead of the default JSF 2.
- Bundle older versions of the Hibernate JARs rather than use those that ship with JBoss EAP 6.
- Change the JNDI bindings to use the new Java EE 6 JNDI portable syntax.
Important
Procedure 4.7. Migrate the Seam 2.2 Booking example
- Create the
jboss-deployment-structure.xmlfile.Create a new file namedjboss-deployment-structure.xmlin thejboss-seam-booking.ear/META-INF/and add the following content:<jboss-deployment-structure xmlns="urn:jboss:deployment-structure:1.0"> <deployment> <dependencies> <module name="javax.faces.api" slot="1.2" export="true"/> <module name="com.sun.jsf-impl" slot="1.2" export="true"/> <module name="org.apache.log4j" export="true"/> <module name="org.dom4j" export="true"/> <module name="org.apache.commons.logging" export="true"/> <module name="org.apache.commons.collections" export="true"/> </dependencies> <exclusions> <module name="org.hibernate" slot="main"/> </exclusions> </deployment> <sub-deployment name="jboss-seam-booking.war"> <exclusions> <module name="javax.faces.api" slot="main"/> <module name="com.sun.jsf-impl" slot="main"/> </exclusions> <dependencies> <module name="javax.faces.api" slot="1.2"/> <module name="com.sun.jsf-impl" slot="1.2"/> </dependencies> </sub-deployment> </jboss-deployment-structure> - Modify the
jboss-seam-booking.jar/META-INF/persistence.xmlfile as follows.- Remove or comment out the hibernate property for the cache provider class.
<!-- <property name="hibernate.cache.provider_class" value="org.hibernate.cache.HashtableCacheProvider"/> -->
- Add the provider module property to the
jboss-seam-booking.jar/META-INF/persistence.xmlfile.<property name="jboss.as.jpa.providerModule" value="hibernate3-bundled" />
- Change the
jta-data-sourceproperty to use the default JDBC datasource JNDI name.<jta-data-source>java:jboss/datasources/ExampleDS</jta-data-source>
- Copy JARs from the Seam 2.2 distribution.Copy the following JARs from the Seam 2.2 distribution
EAP5.x_HOME/jboss-eap5.x/seam/lib/into thejboss-seam-booking.ear/libdirectory.antlr.jar slf4j-api.jar slf4j-log4j12.jar hibernate-core.jar hibernate-entitymanager.jar hibernate-validator.jar hibernate-annotations.jar hibernate-commons-annotations.jar
- Change the JNDI lookup names.Change JNDI lookup strings in the
jboss-seam-booking.war/WEB-INF/components.xmlfile. Because of new JNDI portable rules, JBoss EAP 6 now binds EJBs using JNDI portable syntax rules and you cannot use the single jndiPattern that was used in JBoss EAP 5. This is what the application EJB JNDI lookup strings must be changed to JBoss EAP 6.java:global/jboss-seam-booking/jboss-seam-booking/HotelSearchingAction!org.jboss.seam.example.booking.HotelSearching java:app/jboss-seam-booking/HotelSearchingAction!org.jboss.seam.example.booking.HotelSearching java:module/HotelSearchingAction!org.jboss.seam.example.booking.HotelSearching java:global/jboss-seam-booking/jboss-seam-booking/HotelSearchingAction java:app/jboss-seam-booking/HotelSearchingAction java:module/HotelSearchingAction
The JNDI lookup strings for the Seam 2.2 framework EJBs must be changed as follows.java:global/jboss-seam-booking/jboss-seam/EjbSynchronizations!org.jboss.seam.transaction.LocalEjbSynchronizations java:app/jboss-seam/EjbSynchronizations!org.jboss.seam.transaction.LocalEjbSynchronizations java:module/EjbSynchronizations!org.jboss.seam.transaction.LocalEjbSynchronizations java:global/jboss-seam-booking/jboss-seam/EjbSynchronizations java:app/jboss-seam/EjbSynchronizations java:module/EjbSynchronizations
You can take either of the following approaches.- Add component elements.You can add a
jndi-namefor every EJB to theWEB-INF/components.xml.<component class="org.jboss.seam.transaction.EjbSynchronizations" jndi-name="java:app/jboss-seam/EjbSynchronizations"/> <component class="org.jboss.seam.async.TimerServiceDispatcher" jndi-name="java:app/jboss-seam/TimerServiceDispatcher"/> <component class="org.jboss.seam.example.booking.AuthenticatorAction" jndi-name="java:app/jboss-seam-booking/AuthenticatorAction" /> <component class="org.jboss.seam.example.booking.BookingListAction" jndi-name="java:app/jboss-seam-booking/BookingListAction" /> <component class="org.jboss.seam.example.booking.RegisterAction" jndi-name="java:app/jboss-seam-booking/RegisterAction" /> <component class="org.jboss.seam.example.booking.HotelSearchingAction" jndi-name="java:app/jboss-seam-booking/HotelSearchingAction" /> <component class="org.jboss.seam.example.booking.HotelBookingAction" jndi-name="java:app/jboss-seam-booking/HotelBookingAction" /> <component class="org.jboss.seam.example.booking.ChangePasswordAction" jndi-name="java:app/jboss-seam-booking/ChangePasswordAction" /> - You can modify the code by adding the
@JNDIName(value="")annotation specifying the JNDI path. An example of the changed stateless session bean code is below. A detailed description of this process can be found in the Seam 2.2 reference documentation.@Stateless @Name("authenticator") @JndiName(value="java:app/jboss-seam-booking/AuthenticatorAction") public class AuthenticatorAction implements Authenticator { ... }
The Seam 2.2 Booking application deploys and runs successfully on JBoss EAP 6.
4.3.4. Migrate the Seam 2.2 Booking Archive to JBoss EAP 6: Step-By-Step Instructions
EAP6_HOME/standalone/deployments directory with no changes other than extracting the archives. This allows you to easily modify the XML files contained within the archives as you encounter and resolve issues.
Important
Procedure 4.8. Migrate the application
4.3.5. Build and Deploy the JBoss EAP 5.X Version of the Seam 2.2 Booking Application
Procedure 4.9. Build and deploy the EAR
- Build the EAR:
$ cd /EAP5_HOME/jboss-eap5.x/seam/examples/booking
$ ANT_HOME/ant explode
Replace jboss-eap5.x with the version of JBoss EAP that you are migrating from - Copy the EAR to the EAP6_HOME deployments directory:
$ cp -r EAP5_HOME/seam/examples/booking/exploded-archives/jboss-seam-booking.ear EAP6_HOME/standalone/deployments/
$ cp -r EAP5_HOME/seam/examples/booking/exploded-archives/jboss-seam-booking.war EAP6_HOME/standalone/deployments/jboss-seam.ear
$ cp -r EAP5_HOME/seam/examples/booking/exploded-archives/jboss-seam-booking.jar EAP6_HOME/standalone/deployments/jboss-seam.ear
- Start the JBoss EAP 6 server and check the log. You see:
INFO [org.jboss.as.deployment] (DeploymentScanner-threads - 1) Found jboss-seam-booking.ear in deployment directory. To trigger deployment create a file called jboss-seam-booking.ear.dodeploy - Create an empty file with the name
jboss-seam-booking.ear.dodeployand copy it into theEAP6_HOME/standalone/deploymentsdirectory. You need to copy this file into the deployments directory many times while migrating this application, so keep it in a location where you can easily find it. In the log, you should now see the following messages, indicating that it is deploying:INFO [org.jboss.as.server.deployment] (MSC service thread 1-1) Starting deployment of "jboss-seam-booking.ear" INFO [org.jboss.as.server.deployment] (MSC service thread 1-3) Starting deployment of "jboss-seam-booking.jar" INFO [org.jboss.as.server.deployment] (MSC service thread 1-6) Starting deployment of "jboss-seam.jar" INFO [org.jboss.as.server.deployment] (MSC service thread 1-2) Starting deployment of "jboss-seam-booking.war"
At this point, you encounter your first deployment error. In the next step, you walk through each issue and learn how to debug and resolve it.To learn how to debug and resolve deployment issues, click here: Section 4.3.6, “Debug and Resolve Seam 2.2 Booking Archive Deployment Errors and Exceptions”To return to the previous topic, click here: Section 4.3.4, “Migrate the Seam 2.2 Booking Archive to JBoss EAP 6: Step-By-Step Instructions”
4.3.6. Debug and Resolve Seam 2.2 Booking Archive Deployment Errors and Exceptions
Important
Procedure 4.10. Debug and resolve deployment errors and exceptions
- Issue - java.lang.ClassNotFoundException: javax.faces.FacesExceptionWhen you deploy the application, the log contains the following error:
ERROR \[org.jboss.msc.service.fail\] (MSC service thread 1-1) MSC00001: Failed to start service jboss.deployment.subunit."jboss-seam-booking.ear"."jboss-seam-booking.war".POST_MODULE:
org.jboss.msc.service.StartException in service jboss.deployment.subunit."jboss-seam-booking.ear"."jboss-seam-booking.war".POST_MODULE:
Failed to process phase POST_MODULE of subdeployment "jboss-seam-booking.war" of deployment "jboss-seam-booking.ear"
    (.. additional logs removed ...)
Caused by: java.lang.ClassNotFoundException: javax.faces.FacesException from \[Module "deployment.jboss-seam-booking.ear:main" from Service Module Loader\]
    at org.jboss.modules.ModuleClassLoader.findClass(ModuleClassLoader.java:191)
What it means:The ClassNotFoundException indicates a missing dependency. In this case, it cannot find the class
javax.faces.FacesExceptionand you need to explicitly add the dependency.How to resolve it:Find the module name for that class in the
EAP6_HOME/modules/system/layers/base/directory by looking for a path that matches the missing class. In this case, you find 2 modules that match:javax/faces/api/main javax/faces/api/1.2
Both modules have the same module name:javax.faces.apibut one in the main directory is for JSF 2.0 and the one located in the 1.2 directory is for JSF 1.2. If there was only one module available, you could simply create aMANIFEST.MFfile and added the module dependency. But in this case, you want to use the JSF 1.2 version and not the 2.0 version in main, so you need to specify one and exclude the other. To do this, you create ajboss-deployment-structure.xmlfile in the EAR'sMETA-INF/directory that contains the following data:<jboss-deployment-structure xmlns="urn:jboss:deployment-structure:1.0"> <deployment> <dependencies> <module name="javax.faces.api" slot="1.2" export="true"/> </dependencies> </deployment> <sub-deployment name="jboss-seam-booking.war"> <exclusions> <module name="javax.faces.api" slot="main"/> </exclusions> <dependencies> <module name="javax.faces.api" slot="1.2"/> </dependencies> </sub-deployment> </jboss-deployment-structure>In thedeploymentsection, you add the dependency for thejavax.faces.apifor the JSF 1.2 module. You also add the dependency for the JSF 1.2 module in the subdeployment section for the WAR and exclude the module for JSF 2.0.Redeploy the application by deleting theEAP6_HOME/standalone/deployments/jboss-seam-booking.ear.failedfile and creating a blankjboss-seam-booking.ear.dodeployfile in the same directory. - Issue - java.lang.ClassNotFoundException: org.apache.commons.logging.LogWhen you deploy the application, the log contains the following error:
ERROR [org.jboss.msc.service.fail] (MSC service thread 1-8) MSC00001: Failed to start service jboss.deployment.unit."jboss-seam-booking.ear".INSTALL:
org.jboss.msc.service.StartException in service jboss.deployment.unit."jboss-seam-booking.ear".INSTALL:
Failed to process phase INSTALL of deployment "jboss-seam-booking.ear"
    (.. additional logs removed ...)
Caused by: java.lang.ClassNotFoundException: org.apache.commons.logging.Log from [Module "deployment.jboss-seam-booking.ear.jboss-seam-booking.war:main" from Service Module Loader]
What it means:The
ClassNotFoundExceptionindicates a missing dependency. In this case, it cannot find the classorg.apache.commons.logging.Logand you need to explicitly add the dependency.How to resolve it:Find the module name for that class in the
EAP6_HOME/modules/system/layers/base/directory by looking for a path that matches the missing class. In this case, you find one module that matches the pathorg/apache/commons/logging/. The module name is “org.apache.commons.logging”.Modify thejboss-deployment-structure.xmlfile to add the module dependency to the deployment section of the file.<module name="org.apache.commons.logging" export="true"/>
Thejboss-deployment-structure.xmlshould now look like this:<jboss-deployment-structure xmlns="urn:jboss:deployment-structure:1.0"> <deployment> <dependencies> <module name="javax.faces.api" slot="1.2" export="true"/> <module name="org.apache.commons.logging" export="true"/> </dependencies> </deployment> <sub-deployment name="jboss-seam-booking.war"> <exclusions> <module name="javax.faces.api" slot="main"/> </exclusions> <dependencies> <module name="javax.faces.api" slot="1.2"/> </dependencies> </sub-deployment> </jboss-deployment-structure>Redeploy the application by deleting theEAP6_HOME/standalone/deployments/jboss-seam-booking.ear.failedfile and creating a blankjboss-seam-booking.ear.dodeployfile in the same directory. - Issue - java.lang.ClassNotFoundException: org.dom4j.DocumentExceptionWhen you deploy the application, the log contains the following error:
ERROR [org.apache.catalina.core.ContainerBase.[jboss.web].[default-host].[/seam-booking]] (MSC service thread 1-3) Exception sending context initialized event to listener instance of class org.jboss.seam.servlet.SeamListener: java.lang.NoClassDefFoundError: org/dom4j/DocumentException
    (... additional logs removed ...)
Caused by: java.lang.ClassNotFoundException: org.dom4j.DocumentException from [Module "deployment.jboss-seam-booking.ear.jboss-seam.jar:main" from Service Module Loader]
What it means:The
ClassNotFoundExceptionindicates a missing dependency. In this case, it cannot find the classorg.dom4j.DocumentException.How to resolve it:Find the module name in the
EAP6_HOME/modules/system/layers/base/directory by looking for theorg/dom4j/DocumentException. The module name is “org.dom4j”. Modify thejboss-deployment-structure.xmlfile to add the module dependency to the deployment section of the file.<module name="org.dom4j" export="true"/>
Thejboss-deployment-structure.xmlfile should now look like this:<jboss-deployment-structure xmlns="urn:jboss:deployment-structure:1.0"> <deployment> <dependencies> <module name="javax.faces.api" slot="1.2" export="true"/> <module name="org.apache.commons.logging" export="true"/> <module name="org.dom4j" export="true"/> </dependencies> </deployment> <sub-deployment name="jboss-seam-booking.war"> <exclusions> <module name="javax.faces.api" slot="main"/> </exclusions> <dependencies> <module name="javax.faces.api" slot="1.2"/> </dependencies> </sub-deployment> </jboss-deployment-structure>Redeploy the application by deleting theEAP6_HOME/standalone/deployments/jboss-seam-booking.ear.failedfile and creating a blankjboss-seam-booking.ear.dodeployfile in the same directory. - Issue - java.lang.ClassNotFoundException: org.hibernate.validator.InvalidValueWhen you deploy the application, the log contains the following error:
ERROR [org.apache.catalina.core.ContainerBase.[jboss.web].[default-host].[/seam-booking]] (MSC service thread 1-6) Exception sending context initialized event to listener instance of class org.jboss.seam.servlet.SeamListener: java.lang.RuntimeException: Could not create Component: org.jboss.seam.international.statusMessages
    (... additional logs removed ...)
Caused by: java.lang.ClassNotFoundException: org.hibernate.validator.InvalidValue from [Module "deployment.jboss-seam-booking.ear.jboss-seam.jar:main" from Service Module Loader]
What it means:The
ClassNotFoundExceptionindicates a missing dependency. In this case, it cannot find the classorg.hibernate.validator.InvalidValue.How to resolve it:There is a module “org.hibernate.validator”, but the JAR does not contain the
org.hibernate.validator.InvalidValueclass, so adding the module dependency does not resolve this issue. In this case, the JAR containing the class was part of the JBoss EAP 5.X deployment. Look for the JAR that contains the missing class in theEAP5_HOME/seam/lib/directory. To do this, open a console and type the following:$ cd EAP5_HOME/seam/lib $ grep 'org.hibernate.validator.InvalidValue' `find . -name '*.jar'`
The result shows:$ Binary file ./hibernate-validator.jar matches $ Binary file ./test/hibernate-all.jar matches
In this case, copy thehibernate-validator.jarto thejboss-seam-booking.ear/lib/directory:$ cp EAP5_HOME/seam/lib/hibernate-validator.jar jboss-seam-booking.ear/lib
Redeploy the application by deleting theEAP6_HOME/standalone/deployments/jboss-seam-booking.ear.failedfile and creating a blankjboss-seam-booking.ear.dodeployfile in the same directory. - Issue - java.lang.InstantiationException: org.jboss.seam.jsf.SeamApplicationFactoryWhen you deploy the application, the log contains the following error:
INFO  [javax.enterprise.resource.webcontainer.jsf.config] (MSC service thread 1-7) Unsanitized stacktrace from failed start...: com.sun.faces.config.ConfigurationException: Factory 'javax.faces.application.ApplicationFactory' was not configured properly.
  at com.sun.faces.config.processor.FactoryConfigProcessor.verifyFactoriesExist(FactoryConfigProcessor.java:296) [jsf-impl-2.0.4-b09-jbossorg-4.jar:2.0.4-b09-jbossorg-4]
  (... additional logs removed ...)
Caused by: javax.faces.FacesException: org.jboss.seam.jsf.SeamApplicationFactory
  at javax.faces.FactoryFinder.getImplGivenPreviousImpl(FactoryFinder.java:606) [jsf-api-1.2_13.jar:1.2_13-b01-FCS]
  (... additional logs removed ...)
  at com.sun.faces.config.processor.FactoryConfigProcessor.verifyFactoriesExist(FactoryConfigProcessor.java:294) [jsf-impl-2.0.4-b09-jbossorg-4.jar:2.0.4-b09-jbossorg-4]
  ... 11 more
Caused by: java.lang.InstantiationException: org.jboss.seam.jsf.SeamApplicationFactory
  at java.lang.Class.newInstance0(Class.java:340) [:1.6.0_25]
  at java.lang.Class.newInstance(Class.java:308) [:1.6.0_25]
  at javax.faces.FactoryFinder.getImplGivenPreviousImpl(FactoryFinder.java:604) [jsf-api-1.2_13.jar:1.2_13-b01-FCS]
  ... 16 more
What it means:The
com.sun.faces.config.ConfigurationExceptionandjava.lang.InstantiationExceptionindicate a dependency issue. In this case, the cause is not as obvious.How to resolve it:You need to find the module that contains the
com.sun.facesclasses. While there is nocom.sun.facesmodule, there are twocom.sun.jsf-implmodules. A quick check of thejsf-impl-1.2_13.jarin the 1.2 directory shows it contains thecom.sun.facesclasses. As you did with thejavax.faces.FacesExceptionClassNotFoundException, you want to use the JSF 1.2 version and not the JSF 2.0 version in main, so you need to specify one and exclude the other. You need to modify thejboss-deployment-structure.xmlto add the module dependency to the deployment section of the file. You also need to add it to the WAR subdeployment and exclude the JSF 2.0 module. The file should now look like this:<jboss-deployment-structure xmlns="urn:jboss:deployment-structure:1.0"> <deployment> <dependencies> <module name="javax.faces.api" slot="1.2" export="true"/> <module name="com.sun.jsf-impl" slot="1.2" export="true"/> <module name="org.apache.commons.logging" export="true"/> <module name="org.dom4j" export="true"/> </dependencies> </deployment> <sub-deployment name="jboss-seam-booking.war"> <exclusions> <module name="javax.faces.api" slot="main"/> <module name="com.sun.jsf-impl" slot="main"/> </exclusions> <dependencies> <module name="javax.faces.api" slot="1.2"/> <module name="com.sun.jsf-impl" slot="1.2"/> </dependencies> </sub-deployment> </jboss-deployment-structure>Redeploy the application by deleting theEAP6_HOME/standalone/deployments/jboss-seam-booking.ear.failedfile and creating a blankjboss-seam-booking.ear.dodeployfile in the same directory. - Issue - java.lang.ClassNotFoundException: org.apache.commons.collections.ArrayStackWhen you deploy the application, the log contains the following error:
ERROR [org.apache.catalina.core.ContainerBase.[jboss.web].[default-host].[/seam-booking]] (MSC service thread 1-1) Exception sending context initialized event to listener instance of class com.sun.faces.config.ConfigureListener: java.lang.RuntimeException: com.sun.faces.config.ConfigurationException: CONFIGURATION FAILED! org.apache.commons.collections.ArrayStack from [Module "deployment.jboss-seam-booking.ear:main" from Service Module Loader]
    (... additional logs removed ...)
Caused by: java.lang.ClassNotFoundException: org.apache.commons.collections.ArrayStack from [Module "deployment.jboss-seam-booking.ear:main" from Service Module Loader]
What it means:The
ClassNotFoundExceptionindicates a missing dependency. In this case, it cannot find the classorg.apache.commons.collections.ArrayStack.How to resolve it:Find the module name in the
EAP6_HOME/modules/system/layers/base/directory by looking for theorg/apache/commons/collectionspath. The module name is “org.apache.commons.collections”. Modify thejboss-deployment-structure.xmlto add the module dependency to the deployment section of the file.<module name="org.apache.commons.collections" export="true"/>
Thejboss-deployment-structure.xmlfile should now look like this:<jboss-deployment-structure xmlns="urn:jboss:deployment-structure:1.0"> <deployment> <dependencies> <module name="javax.faces.api" slot="1.2" export="true"/> <module name="com.sun.jsf-impl" slot="1.2" export="true"/> <module name="org.apache.commons.logging" export="true"/> <module name="org.dom4j" export="true"/> <module name="org.apache.commons.collections" export="true"/> </dependencies> </deployment> <sub-deployment name="jboss-seam-booking.war"> <exclusions> <module name="javax.faces.api" slot="main"/> <module name="com.sun.jsf-impl" slot="main"/> </exclusions> <dependencies> <module name="javax.faces.api" slot="1.2"/> <module name="com.sun.jsf-impl" slot="1.2"/> </dependencies> </sub-deployment> </jboss-deployment-structure>Redeploy the application by deleting theEAP6_HOME/standalone/deployments/jboss-seam-booking.ear.failedfile and creating a blankjboss-seam-booking.ear.dodeployfile in the same directory. - Issue - Services with missing/unavailable dependenciesWhen you deploy the application, the log contains the following error:
ERROR [org.jboss.as.deployment] (DeploymentScanner-threads - 2) {"Composite operation failed and was rolled back. Steps that failed:" => {"Operation step-2" => {"Services with missing/unavailable dependencies" => ["jboss.deployment.subunit.\"jboss-seam-booking.ear\".\"jboss-seam-booking.jar\".component.AuthenticatorAction.START missing [ jboss.naming.context.java.comp.jboss-seam-booking.\"jboss-seam-booking.jar\".AuthenticatorAction.\"env/org.jboss.seam.example.booking.AuthenticatorAction/em\" ]","jboss.deployment.subunit.\"jboss-seam-booking.ear\".\"jboss-seam-booking.jar\".component.HotelSearchingAction.START missing [ jboss.naming.context.java.comp.jboss-seam-booking.\"jboss-seam-booking.jar\".HotelSearchingAction.\"env/org.jboss.seam.example.booking.HotelSearchingAction/em\" ]","
  (... additional logs removed ...)
"jboss.deployment.subunit.\"jboss-seam-booking.ear\".\"jboss-seam-booking.jar\".component.BookingListAction.START missing [ jboss.naming.context.java.comp.jboss-seam-booking.\"jboss-seam-booking.jar\".BookingListAction.\"env/org.jboss.seam.example.booking.BookingListAction/em\" ]","jboss.persistenceunit.\"jboss-seam-booking.ear/jboss-seam-booking.jar#bookingDatabase\" missing [ jboss.naming.context.java.bookingDatasource ]"]}}}
What it means:When you get a “Services with missing/unavailable dependencies” error, look at the text within the brackets after “missing”. In this case you see:
missing [ jboss.naming.context.java.comp.jboss-seam-booking.\"jboss-seam-booking.jar\".AuthenticatorAction.\"env/org.jboss.seam.example.booking.AuthenticatorAction/em\" ]
The “/em” indicates an Entity Manager and datasource issue.How to resolve it:In JBoss EAP 6, datasource configuration has changed and needs to be defined in the
EAP6_HOME/standalone/configuration/standalone.xmlfile. Because JBoss EAP 6 ships with an example database that is already defined in thestandalone.xmlfile, modify thepersistence.xmlfile to use that example database in this application. Looking in thestandalone.xmlfile, you can see that thejndi-namefor the example database isjava:jboss/datasources/ExampleDS. Modify thejboss-seam-booking.jar/META-INF/persistence.xmlfile to comment the existingjta-data-sourceelement and replace it as follows:<!-- <jta-data-source>java:/bookingDatasource</jta-data-source> --> <jta-data-source>java:jboss/datasources/ExampleDS</jta-data-source>
Redeploy the application by deleting theEAP6_HOME/standalone/deployments/jboss-seam-booking.ear.failedfile and creating a blankjboss-seam-booking.ear.dodeployfile in the same directory. - At this point, the application deploys without errors, but when you access the URL http://localhost:8080/seam-booking/ in a browser and attempt "Account Login", you get a runtime error “The page isn't redirecting properly”. In the next step, you learn how to debug and resolve runtime errors.To learn how to debug and resolve runtime issues, click here: Section 4.3.7, “Debug and Resolve Seam 2.2 Booking Archive Runtime Errors and Exceptions”To return to the previous topic, click here: Section 4.3.4, “Migrate the Seam 2.2 Booking Archive to JBoss EAP 6: Step-By-Step Instructions”
4.3.7. Debug and Resolve Seam 2.2 Booking Archive Runtime Errors and Exceptions
Important
Procedure 4.11. Debug and resolve runtime errors and exceptions
- Issue - javax.naming.NameNotFoundException: Name 'jboss-seam-booking' not found in context ''When you access the URL http://localhost:8080/seam-booking/ in a browser, you get "The page isn't redirecting properly" and the log contains the following error:
SEVERE [org.jboss.seam.jsf.SeamPhaseListener] (http--127.0.0.1-8080-1) swallowing exception: java.lang.IllegalStateException: Could not start transaction
  at org.jboss.seam.jsf.SeamPhaseListener.begin(SeamPhaseListener.java:598) [jboss-seam.jar:]
  (... log messages removed ...)
Caused by: org.jboss.seam.InstantiationException: Could not instantiate Seam component: org.jboss.seam.transaction.synchronizations
  at org.jboss.seam.Component.newInstance(Component.java:2170) [jboss-seam.jar:]
  (... log messages removed ...)
Caused by: javax.naming.NameNotFoundException: Name 'jboss-seam-booking' not found in context ''
  at org.jboss.as.naming.util.NamingUtils.nameNotFoundException(NamingUtils.java:109)
  (... log messages removed ...)
What it means:A
NameNotFoundExceptionindicates a JNDI naming issue. JNDI naming rules have changed in JBoss EAP 6, so you need to modify the lookup names to follow the new rules.How to resolve it:To debug this, look earlier in the server log trace to what JNDI binding were used. Looking at the server log you see this:
15:01:16,138 INFO  [org.jboss.as.ejb3.deployment.processors.EjbJndiBindingsDeploymentUnitProcessor] (MSC service thread 1-1) JNDI bindings for session bean named RegisterAction in deployment unit subdeployment "jboss-seam-booking.jar" of deployment "jboss-seam-booking.ear" are as follows:
  java:global/jboss-seam-booking/jboss-seam-booking.jar/RegisterAction!org.jboss.seam.example.booking.Register
  java:app/jboss-seam-booking.jar/RegisterAction!org.jboss.seam.example.booking.Register
  java:module/RegisterAction!org.jboss.seam.example.booking.Register
  java:global/jboss-seam-booking/jboss-seam-booking.jar/RegisterAction
  java:app/jboss-seam-booking.jar/RegisterAction
  java:module/RegisterAction
  [JNDI bindings continue ...]
There are a total of eight INFO JNDI bindings listed in the log, one for each session bean: RegisterAction, BookingListAction, HotelBookingAction, AuthenticatorAction, ChangePasswordAction, HotelSearchingAction, EjbSynchronizations, and TimerServiceDispatcher. You need to modify the WAR'slib/components.xmlfile to use the new JNDI bindings. In the log, note the EJB JNDI bindings all start with "java:app/jboss-seam-booking.jar" Replace thecore:initelement as follows:<!-- <core:init jndi-pattern="jboss-seam-booking/#{ejbName}/local" debug="true" distributable="false"/> --> <core:init jndi-pattern="java:app/jboss-seam-booking.jar/#{ejbName}" debug="true" distributable="false"/>Next, you need to add the EjbSynchronizations and TimerServiceDispatcher JNDI bindings. Add the following component elements to the file:<component class="org.jboss.seam.transaction.EjbSynchronizations" jndi-name="java:app/jboss-seam/EjbSynchronizations"/> <component class="org.jboss.seam.async.TimerServiceDispatcher" jndi-name="java:app/jboss-seam/TimerServiceDispatcher"/>
The components.xml file should now look like this:<?xml version="1.0" encoding="UTF-8"?> <components xmlns="http://jboss.com/products/seam/components" xmlns:core="http://jboss.com/products/seam/core" xmlns:security="http://jboss.com/products/seam/security" xmlns:transaction="http://jboss.com/products/seam/transaction" xmlns:xsi="http://www.w3.org/2001/XMLSchema-instance" xsi:schemaLocation= "http://jboss.com/products/seam/core http://jboss.com/products/seam/core-2.2.xsd http://jboss.com/products/seam/transaction http://jboss.com/products/seam/transaction-2.2.xsd http://jboss.com/products/seam/security http://jboss.com/products/seam/security-2.2.xsd http://jboss.com/products/seam/components http://jboss.com/products/seam/components-2.2.xsd"> <!-- <core:init jndi-pattern="jboss-seam-booking/#{ejbName}/local" debug="true" distributable="false"/> --> <core:init jndi-pattern="java:app/jboss-seam-booking.jar/#{ejbName}" debug="true" distributable="false"/> <core:manager conversation-timeout="120000" concurrent-request-timeout="500" conversation-id-parameter="cid"/> <transaction:ejb-transaction/> <security:identity authenticate-method="#{authenticator.authenticate}"/> <component class="org.jboss.seam.transaction.EjbSynchronizations" jndi-name="java:app/jboss-seam/EjbSynchronizations"/> <component class="org.jboss.seam.async.TimerServiceDispatcher" jndi-name="java:app/jboss-seam/TimerServiceDispatcher"/> </components>Redeploy the application by deleting thestandalone/deployments/jboss-seam-booking.ear.failedfile and creating a blankjboss-seam-booking.ear.dodeployfile in the same directory. - Issue - The application deploys and runs without error. When you access the URL http://localhost:8080/seam-booking/ in a browser and attempt to login, it fails with the message "Login failed. Transaction failed." You should see an exception trace in the server log:
13:36:04,631 WARN [org.jboss.modules] (http-/127.0.0.1:8080-1) Failed to define class org.jboss.seam.persistence.HibernateSessionProxy in Module "deployment.jboss-seam-booking.ear.jboss-seam.jar:main" from Service Module Loader: java.lang.LinkageError: Failed to link org/jboss/seam/persistence/HibernateSessionProxy (Module "deployment.jboss-seam-booking.ear.jboss-seam.jar:main" from Service Module Loader) .... Caused by: java.lang.LinkageError: Failed to link org/jboss/seam/persistence/HibernateSessionProxy (Module "deployment.jboss-seam-booking.ear.jboss-seam.jar:main" from Service Module Loader) ... Caused by: java.lang.NoClassDefFoundError: org/hibernate/engine/SessionImplementor at java.lang.ClassLoader.defineClass1(Native Method) [rt.jar:1.7.0_45] ... Caused by: java.lang.ClassNotFoundException: org.hibernate.engine.SessionImplementor from [Module "deployment.jboss-seam-booking.ear.jboss-seam.jar:main" from Service Module Loader] ...
What it means:The ClassNotFoundException indicates a missing Hibernate library. In this case it's the
hibernate-core.jar.How to resolve it:Copy the
hibernate-core.jarJAR from theEAP5_HOME/seam/lib/directory to thejboss-seam-booking.ear/libdirectory.Redeploy the application by deleting thestandalone/deployments/jboss-seam-booking.ear.failedfile and creating a blankjboss-seam-booking.ear.dodeployfile in the same directory. - Issue - The application deploys and runs without error. When you access the URL http://localhost:8080/seam-booking/ in a browser, you are able to login successfully. However, when you attempt to book a hotel, you will see an exception trace.To debug this, you must first remove the
jboss-seam-booking.ear/jboss-seam-booking.war/WEB-INF/lib/jboss-seam-debug.jaras it masks the true error. At this point, you should see the following error:java.lang.NoClassDefFoundError: org/hibernate/annotations/common/reflection/ReflectionManager
What it means:The NoClassDefFoundError indicates a missing Hibernate library.
How to resolve it:Copy the
hibernate-annotations.jarandhibernate-commons-annotations.jarJARs from theEAP5_HOME/seam/lib/directory to thejboss-seam-booking.ear/libdirectory.Redeploy the application by deleting thestandalone/deployments/jboss-seam-booking.ear.failedfile and creating a blankjboss-seam-booking.ear.dodeployfile in the same directory. - Runtime and application errors should be resolvedAt this point, the application deploys and runs without error.To return to the previous topic, click here: Section 4.3.4, “Migrate the Seam 2.2 Booking Archive to JBoss EAP 6: Step-By-Step Instructions”
4.3.8. Review a Summary of the Changes Made When Migrating the Seam 2.2 Booking Application
Important
- You created a
jboss-deployment-structure.xmlfile in the EAR'sMETA-INF/directory. You added<dependencies>and<exclusions>to resolveClassNotFoundExceptions. This file contains the following data:<jboss-deployment-structure xmlns="urn:jboss:deployment-structure:1.0"> <deployment> <dependencies> <module name="javax.faces.api" slot="1.2" export="true"/> <module name="com.sun.jsf-impl" slot="1.2" export="true"/> <module name="org.apache.commons.logging" export="true"/> <module name="org.dom4j" export="true"/> <module name="org.apache.commons.collections" export="true"/> </dependencies> </deployment> <sub-deployment name="jboss-seam-booking.war"> <exclusions> <module name="javax.faces.api" slot="main"/> <module name="com.sun.jsf-impl" slot="main"/> </exclusions> <dependencies> <module name="javax.faces.api" slot="1.2"/> <module name="com.sun.jsf-impl" slot="1.2"/> </dependencies> </sub-deployment> </jboss-deployment-structure> - You copied the following JARs from the
EAP5_HOME/jboss-eap-5.X/seam/lib/directory (replace 5.X with the version of EAP 5 that you are migrating from) to thejboss-seam-booking.ear/lib/directory to resolveClassNotFoundExceptions:- hibernate-core.jar
- hibernate-validator.jar
- You modified the
jboss-seam-booking.jar/META-INF/persistence.xmlfile as follows.- You changed the
jta-data-sourceelement to use the Example database that ships with JBoss EAP 6:<!-- <jta-data-source>java:/bookingDatasource</jta-data-source> --> <jta-data-source>java:jboss/datasources/ExampleDS</jta-data-source>
- You commented out the hibernate.cache.provider_class property:
<!-- <property name="hibernate.cache.provider_class" value="org.hibernate.cache.HashtableCacheProvider"/> -->
- You modified the WAR's
lib/components.xmlfile to use the new JNDI bindings- You replaced the
core:initexisting element as follows:<!-- <core:init jndi-pattern="jboss-seam-booking/#{ejbName}/local" debug="true" distributable="false"/> --> <core:init jndi-pattern="java:app/jboss-seam-booking.jar/#{ejbName}" debug="true" distributable="false"/> - You added component elements for the "EjbSynchronizations" and "TimerServiceDispatcher" JNDI bindings
<component class="org.jboss.seam.transaction.EjbSynchronizations" jndi-name="java:app/jboss-seam/EjbSynchronizations"/>
<component class="org.jboss.seam.async.TimerServiceDispatcher" jndi-name="java:app/jboss-seam/TimerServiceDispatcher"/>
Appendix A. Revision History
| Revision History | |||
|---|---|---|---|
| Revision 6.4.0-42 | Thursday November 16 2017 | ||
| |||