
HornetQ User Guide
for use with JBoss Enterprise Application Platform 5
Edition 5.2.0
Abstract
Chapter 1. Introduction
Chapter 2. Migrating to HornetQ
2.1. Before You Migrate
Important
Note
Warning
2.1.1. Back up relevant data
2.1.1.1. JBoss Messaging database tables
- JBM_MSG_REF, JBM_MSG
- These tables store persistent messages and their states.
- JBM_TX, JBM_TX_EX
- These tables store transaction states.
- JBM_USER, JBM_ROLE
- These tables store user and role information.
- JBM_POSTOFFICE
- This table holds bindings information.
2.1.1.2. JBoss Messaging configuration files
$JBOSS_HOME/server/$PROFILE/deploy/messaging, assuming your JBoss Messaging server profile is messaging. Applications can choose other locations in which to deploy some configuration files.
- Connection Factory service configuration files
- Contain JMS connection factories deployed with the JBoss Messaging server.
- Destination service configuration files
- Contain JMS queues and topics deployed with the JBoss Messaging server.
- Bridge service configuration files
- Contain bridge services deployed with the JBoss Messaging server.
messaging-service.xml and the database persistence configuration file, are JBoss Messaging MBeans configurations. The HornetQ implementation consists only of Plain Old Java Objects (POJOs), so these configuration files are not migration targets.
2.2. Application Code
Table 2.1. Implementation class mapping between JBoss Messaging and HornetQ
| org.jboss.jms.client. Classname | HornetQ Equivalent Classname |
|---|---|
JBossConnectionFactory | org.hornetq.jms.client.HornetQConnectionFactory |
JBossConnection | org.hornetq.jms.client.HornetQConnection |
JBossSession | org.hornetq.jms.client.HornetQSession |
JBossMessageProducer | org.hornetq.jms.client.HornetQMessageProducer |
JBossMessageConsumer | org.hornetq.jms.client.HornetQMessageConsumer |
Note
2.3. Client-side Failure Handling
producer.send(createMessage(session, i));
System.out.println("Message: " + i);try {
producer.send(createMessage(session, i));
System.out.println("Message: " + i);
} catch (Exception e) {
Thread.sleep(1000);
producer.send(createMessage(session, i));
}2.4. Installing HornetQ
2.5. Server Configuration Migration
<JBOSS_HOME>/jboss-as/server/<PROFILE>/deploy/hornetq/hornetq-configuration.xml. The full set of supported directives in this file are documented in Appendix A, Configuration Reference
Table 2.2. Server attribute mapping between JBoss Messaging and HornetQ
| JBoss Messaging Server Attributes (Server Peer MBean) | Equivalent HornetQ Server Attributes |
|---|---|
ServerPeerID | N/A - HornetQ does not require a specified server ID |
DefaultQueueJNDIContext, DefaultTopicJNDIContext | N/A |
PostOffice | N/A |
DefaultDLQ | N/A - HornetQ defines dead letter addresses at the core level. There is no default dead letter address for an address unless you specify one. |
DefaultMaxDeliveryAttempts | N/A - In HornetQ, the default is always 10. |
DefaultExpiryQueue | N/A - HornetQ defines expiry addresses at the core level. There is no default expiry address for an address unless you specify one. |
DefaultRedeliveryDelay | N/A - HornetQ's default redelivery delay is always 0 (no delay). |
MessageCounterSamplePeriod | message-counter-sample-period |
FailoverStartTimeout | N/A |
FailoverCompleteTimeout | N/A |
DefaultMessageCounterHistoryDayLimit | N/A |
ClusterPullConnectionFactory | N/A |
DefaultPreserveOrdering | N/A |
RecoverDeliveriesTimeout | N/A |
EnableMessageCounters | message-counter-enabled |
SuckerPassword | cluster-password |
SuckerConnectionRetryTimes | bridges.reconnect-attempts |
SuckerConnectionRetryInterval | bridges.reconnect-interval |
StrictTCK | N/A |
Destinations, MessageCounters, MessageStatistics | N/A - These are part of HornetQ's management functions. Refer to the appropriate chapter for details. |
SupportsFailover | N/A |
PersistenceManager | N/A - HornetQ uses its built-in high-performance journal as its persistence utility. |
JMSUserManager | N/A |
SecurityStore | N/A - The security manager is configured in hornetq-beans.xml or hornetq-jboss-beans.xml. |
2.6. Migrating JMS-administered Objects and Bridges
JBOSS_DIST/jboss-as/server/<PROFILE>/deploy/hornetq/hornetq-jms.xml. Appendix A, Configuration Reference contains all supported directives for hornetq-jms.xml.
Table 2.3. JMS Connection Factory Configuration Mappings
| JBoss Messaging ConnectionFactory Attributes | HornetQ JMS ConnectionFactory Attributes |
|---|---|
ClientID | connection-factory.client-id |
JNDIBindings | connection-factory.entries |
PrefetchSize | connection-factory.consumer-window-size |
SlowConsumers | N/A - equivalent to consumer-window-size=0 |
StrictTck | N/A |
SendAcksAsync | connection-factory.block-on-acknowledge |
DefaultTempQueueFullSize, DefaultTempQueuePageSize, DefaultTempQueueDownCacheSize | N/A |
DupsOKBatchSize | connection-factory.dups-ok-batch-size |
SupportsLoadBalancing | N/A |
SupportsFailover | N/A |
DisableRemotingChecks | N/A |
LoadBalancingFactory | connection-factory.connection-load-balancing-policy-class-name |
Connector | connection-factory.connectors |
EnableOrderingGroup, DefaultOrderingGroup | N/A |
<JBOSS_HOME>/jboss-as/server/<PROFILE>/deploy/hornetq/hornetq-configuration.xml. If not specified in hornetq-configuration.xml, they are specified in JBOSS_DIST/jboss-as/server/<PROFILE>/deploy/hornetq/hornetq-jms.xml.
Table 2.4. JMS Queue Configuration Mappings
| JBoss Messaging Queue Attributes | HornetQ JMS Queue Attributes |
|---|---|
Name | queue.name - defined in hornetq-jms.xml |
JNDIName | queue.entry - defined in hornetq-jms.xml |
DLQ | address-settings.dead-letter-address |
ExpiryQueue | address-settings.expiry-address |
RedeliveryDelay | address-settings.redelivery-delay |
MaxDeliveryAttempts | address-settings.max-delivery-attempts |
SecurityConfig | security-settings |
FullSize | address-settings.max-size-bytes - HornetQ paging attributes do not exactly match JBoss Messaging paging attributes. Refer to the appropriate chapter for details. |
PageSize | address-settings.page-size-bytes - HornetQ paging attributes do not exactly match JBoss Messaging paging attributes. Refer to the appropriate chapter for details. |
DownCacheSize | Not Supported |
CreatedProgrammatically | Refer to org.hornetq.api.jms.management.JMSQueueControl to retrieve this attribute. |
MessageCount | Refer to org.hornetq.api.jms.management.JMSQueueControl to retrieve this attribute. |
ScheduledMessageCount | Refer to org.hornetq.api.jms.management.JMSQueueControl to retrieve this attribute. |
MessageCounter | Refer to org.hornetq.api.jms.management.JMSQueueControl to retrieve this attribute. |
MessageCounterStatistics | Refer to org.hornetq.api.jms.management.JMSQueueControl to retrieve this attribute. |
ConsumerCount | Refer to org.hornetq.api.jms.management.JMSQueueControl to retrieve this attribute. |
DropOldMessageOnRedeploy | Not Supported |
MaxSize | Not Supported |
Clustered | Not Supported |
<JBOSS_HOME>/jboss-as/server/<PROFILE>/deploy/hornetq/hornetq-configuration.xml describes how JBoss Messaging Topic attributes map to HornetQ JMS Topic attributes. Unless otherwise specified, these attributes are defined in JBOSS_DIST/jboss-as/server/<PROFILE>/deploy/hornetq/hornetq-jms.xml.
Table 2.5. JMS Topic Configuration Mappings
| JBoss Messaging Topic Attributes | HornetQ JMS Topic Attributes |
|---|---|
Name | topic.name - defined in hornetq-jms.xml |
JNDIName | topic.entry - defined in hornetq-jms.xml |
DLQ | address-settings.dead-letter-address |
ExpiryQueue | address-settings.expiry-address |
RedeliveryDelay | address-settings.redelivery-delay |
MaxDeliveryAttempts | address-settings.max-delivery-attempts |
SecurityConfig | security-settings |
FullSize | address-settings.max-size-bytes - HornetQ paging attributes do not exactly match JBoss Messaging paging attributes. Refer to the appropriate chapter for details. |
PageSize | address-settings.page-size-bytes - HornetQ paging attributes do not exactly match JBoss Messaging paging attributes. Refer to the appropriate chapter for details. |
DownCacheSize | N/A |
CreatedProgrammatically | Refer to org.hornetq.api.jms.management.TopicControl to retrieve this attribute. |
MessageCounterHistoryDayLimit | Refer to org.hornetq.api.jms.management.TopicControl to retrieve this attribute. |
MessageCounters | Refer to org.hornetq.api.jms.management.TopicControl to retrieve this attribute. |
AllMessageCount | Refer to org.hornetq.api.jms.management.TopicControl to retrieve this attribute. |
DurableMessageCount | Refer to org.hornetq.api.jms.management.TopicControl to retrieve this attribute. |
NonDurableMessageCount | Refer to org.hornetq.api.jms.management.TopicControl to retrieve this attribute. |
AllSubscriptionsCount | Refer to org.hornetq.api.jms.management.TopicControl to retrieve this attribute. |
DurableSubscriptionsCount | Refer to org.hornetq.api.jms.management.TopicControl to retrieve this attribute. |
NonDurableSubscriptionsCount | Refer to org.hornetq.api.jms.management.TopicControl to retrieve this attribute. |
MaxSize | N/A |
Clustered | N/A |
DropOldMessageOnRedeploy | N/A |
Table 2.6. JMS Bridge Configuration Mappings
| JBoss Messaging Topic Attributes | HornetQ JMS Topic Attributes |
|---|---|
SourceProviderLoader | SourceCFF |
TargetProviderLoader | TargetCFF |
SourceDestinationLookup | SourceDestinationFactory |
TargetDestinationLookup | TargetDestinationFactory |
SourceUsername | Source user name parameter |
SourcePassword | Source user password parameter |
TargetUsername | Target user name parameter |
TargetPassword | Target password parameter |
QualityOfServiceMode | Quality of Service parameter |
Selector | Selector parameter |
MaxBatchSize | Max batch size parameter |
MaxBatchTime | Max batch time parameter |
SubName | Subscription name parameter |
ClientID | Client ID parameter |
FailureRetryInterval | Failure retry interval parameter |
MaxRetries | Max retry times parameter |
AddMessageIDInHeader | Add Message ID in Header parameter |
2.7. Other Configuration in JBoss Messaging
2.8. Migrating Existing Messages
2.9. Applications that use management APIs
- JMX
- JMX is the standard method of managing Java applications.
- Core API
- Management operations are sent to the HornetQ server using Core messages.
- JMS API
- Management operations are sent to the HornetQ server using JMS messages
Table 2.7. JBoss Messaging and HornetQ Management Object API Mappings
| org.jboss.jms.server. Class | org.hornetq.api.jms.management. Class |
|---|---|
ServerPeer | JMSServerControl |
connectionfactory.ConnectionFactory | ConnectionFactoryControl |
destination.QueueService | JMSQueueControl |
destination.TopicService | TopicControl |
Note
JDBCPersistenceManagerService because HornetQ does not require a datasource as JBoss Messaging does.
Chapter 3. Messaging Concepts
3.1. Messaging Concepts
3.2. Messaging styles
3.2.1. The Point-To-Point Pattern
3.2.2. The Publish-Subscribe Pattern
3.3. Delivery guarantees
3.4. Transactions
XA: JTA.
3.5. Durability
3.6. Messaging APIs and protocols
3.6.1. Java Message Service (JMS)
3.6.2. System specific APIs
3.7. High Availability
3.8. Clusters
3.9. Bridges and routing
Chapter 4. Core Architecture
netty.jar. This is because some of the netty buffer classes are used internally.
- Core Client API
- This is a simple intuitive Java API that allows the full set of messaging functionality without some of the complexities of JMS.
- JMS Client API
- The standard JMS API is available at the client side.
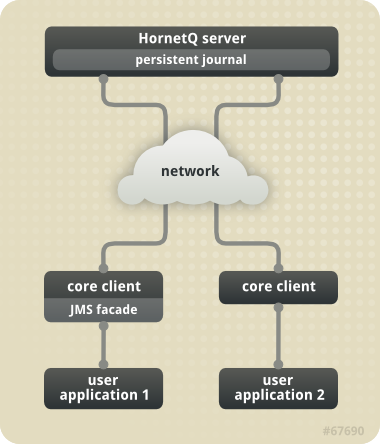
Figure 4.1. HornetQ Application Interaction Schematic
Chapter 5. Using the Server
5.1. Library Path
java.library.path as a property on your Java options. This is done automatically in the run.sh script.
java.library.path at your Java options then the JVM will use the environment variable LD_LIBRARY_PATH.
5.2. System properties
5.3. Configuration files
Files located in /deploy/hornetq/
- hornetq-configuration.xml
- This is the main HornetQ configuration file. All the parameters in this file are described in Appendix A, Configuration Reference. Refer to Section 5.4, “The Main Configuration File” for more information on this file.
Note
The propertyfile-deployment-enabledin thehornetq-configuration.xmlconfiguration when set to false means that the other configuration files are not loaded. By default, this is set to true. - hornetq-jboss-beans.xml
- This is the JBoss Microcontainer beans file which defines what beans the Microcontainer should create and what dependencies to enforce between them.
- hornetq-jms.xml
- The distribution configuration by default includes a server side JMS service which mainly deploys JMS Queues, Topics and Connection Factories from this file into JNDI. If you are not using JMS, or you do not need to deploy JMS objects on the server side, then you do not need this file. For more information on using JMS, refer to Chapter 6, Using JMS.
Files located in /conf/props/
- hornetq-users.properties
- HornetQ ships with a security manager implementation that obtains user credentials from the
hornetq-users.propertiesfile. This file contains user and password information. For more information on security, refer to Chapter 29, Security. - hornetq-roles.properties
- This file contains user names defined in
hornetq-users.propertieswith the roles they have permission to use. For more information on security, refer to Chapter 29, Security.
<connector name="netty">
   <factory-class>org.hornetq.core.remoting.impl.netty.NettyConnectorFactory
</factory-class>
   <param key="host" value="${hornetq.remoting.netty.host:localhost}" type="String"/>
   <param key="port"  value="${hornetq.remoting.netty.port:5445}" type="Integer"/>
</connector>hornetq.remoting.netty.host and hornetq.remoting.netty.port. These values will be replaced by the value found in the system property if there is one. If not, they default back to localhost or 5445 respectively. It is also possible to not supply a default. That is, ${hornetq.remoting.netty.host}, however the system property must be supplied in that case.
5.4. The Main Configuration File
<JBOSS_HOME>/jboss-as/server/<PROFILE>/deploy/hornetq/hornetq-configuration.xml. This is what the FileConfiguration bean uses to configure the messaging server.
Chapter 6. Using JMS
6.1. A Simple Ordering System - Configuration Example
OrderQueue, with a single MessageProducer sending an order messages to the queue. A single MessageConsumer consumes the order message from the queue.
durable, (it will survive a server restart or crash).
6.1.1. JMS Server Configuration
hornetq-jms.xml on the server classpath (in standard configurations, JBOSS_DIST/jboss-as/server/<PROFILE>/deploy/hornetq/hornetq-jms.xml) contains any JMS queue, topic and ConnectionFactory instances that we wish to create and make available to lookup via the JNDI.
<configuration xmlns="urn:hornetq" xmlns:xsi="http://www.w3.org/2001/XMLSchema-instance" xsi:schemaLocation="urn:hornetq ../schemas/hornetq-jms.xsd ">
   <connection-factory name="NettyConnectionFactory">
      <connectors>
         <connector-ref connector-name="netty"/>
      </connectors>
      <entries>
         <entry name="/ConnectionFactory"/>
      </entries>
   </connection-factory>
   <queue name="OrderQueue">
      <entry name="queues/OrderQueue"/>
   </queue>
</configuration>
ConnectionFactory is deployed and bound in just one place in JNDI as given by the entry element. ConnectionFactory instances can be bound in many places in JNDI if it is required.
Note
connector called netty. This is a reference to a connector object deployed in the main core configuration file <JBOSS_HOME>/jboss-as/server/<PROFILE>/deploy/hornetq/hornetq-configuration.xml, which defines the transport and parameters used to actually connect to the server.
6.1.2. Connection Factory Types
signature attribute and a xa parameter, the combination of which determines the type of the factory.
signature has three possible string values (generic, queue and topic).
xa is a boolean type parameter. The following table gives their configuration values for different connection factory interfaces.
Table 6.1. Configuration for Connection Factory Types
| signature | xa | Connection Factory Type |
|---|---|---|
| generic (default) | false (default) | javax.jms.ConnectionFactory |
| generic | true | javax.jms.XAConnectionFactory |
| queue | false | javax.jms.QueueConnectionFactory |
| queue | true | javax.jms.XAQueueConnectionFactory |
| topic | false | javax.jms.TopicConnectionFactory |
| topic | true | javax.jms.XATopicConnectionFactory |
<configuration xmlns="urn:hornetq"
    xmlns:xsi="http://www.w3.org/2001/XMLSchema-instance"
    xsi:schemaLocation="urn:hornetq ../schemas/hornetq-jms.xsd ">

    <connection-factory name="ConnectionFactory" signature="queue">
        <xa>true</xa>
        <connectors>
           <connector-ref connector-name="netty"/>
        </connectors>
        <entries>
            <entry name="/ConnectionFactory"/>
        </entries>
    </connection-factory>
</configuration>
6.1.3. The code
InitialContect ic = new InitialContext();
ConnectionFactory cf = (ConnectionFactory)ic.lookup("/ConnectionFactory");Queue orderQueue = (Queue)ic.lookup("/queues/OrderQueue");Connection connection = cf.createConnection();
Session session = connection.createSession(false, Session.AUTO_ACKNOWLEDGE);
MessageProducer producer = session.createProducer(orderQueue);
MessageConsumer consumer = session.createConsumer(orderQueue);
connection.start();
TextMessage message = session.createTextMessage("This is an order");
producer.send(message);TextMessage receivedMessage = (TextMessage)consumer.receive();
System.out.println("Got order: " + receivedMessage.getText());Warning
6.2. Directly Instantiating JMS Resources Without Using JNDI
TransportConfiguration transportConfiguration =
   new TransportConfiguration(NettyConnectorFactory.class.getName());
ConnectionFactory cf =
   HornetQJMSClient.createConnectionFactory(transportConfiguration);
Queue orderQueue = HornetQJMSClient.createQueue("OrderQueue");Connection connection = cf.createConnection();
Session session = connection.createSession(false, Session.AUTO_ACKNOWLEDGE);
MessageProducer producer = session.createProducer(orderQueue);
MessageConsumer consumer = session.createConsumer(orderQueue);
connection.start();
TextMessage message = session.createTextMessage("This is an order");
producer.send(message);TextMessage receivedMessage = (TextMessage)consumer.receive();
System.out.println("Got order: " + receivedMessage.getText());6.3. Setting The Client ID
JBOSS_DIST/jboss-as/server/<PROFILE>/deploy/hornetq/hornetq-jms.xml, and can be set via the <client-id> directive. Any connection created by this connection factory will have this set as its client ID.
6.4. Setting The Batch Size for DUPS_OK
DUPS_OK it is possible to configure the consumer so that it sends acknowledgments in batches rather that one at a time, saving valuable bandwidth. This can be configured via the connection factory via the dups-ok-batch-size element and is set in bytes. The default is 1024 * 1024 bytes = 1 MiB (Mebibyte).
6.5. Setting The Transaction Batch Size
transaction-batch-size element. The default is 1024 * 1024 (bytes).
Chapter 7. Using Core
7.1. Core Messaging Concepts
7.1.1. Message
- A message is the unit of data that is sent between clients and servers.
- A message has a body which is a buffer containing convenient methods for reading and writing data into it.
- A message has a set of properties which are key-value pairs. Each property key is a string and property values can be of type integer, long, short, byte, byte[], String, double, float or boolean.
- A message has an address it is being sent to. When the message arrives on the server it is routed to any queues that are bound to the address - if the queues are bound with any filter, the message will only be routed to that queue if the filter matches. An address may have many queues bound to it or none. There may also be entities other than queues, like diverts bound to addresses.
- Messages can be either durable or non durable. Durable messages in a durable queue will survive a server crash or restart. Non durable messages will not survive a server crash or restart.
- Messages can be specified with a priority value between 0 and 9. 0 represents the lowest priority and 9 represents the highest. HornetQ will attempt to deliver higher priority messages before lower priority ones.
- Messages can be specified with an optional expiry time. HornetQ will not deliver messages after its expiry time has been exceeded.
- Messages have an optional time stamp which represents the time the message was sent.
- HornetQ also supports the sending or consuming of very large messages - much larger than can fit in available RAM at any one time.
7.1.2. Address
Note
7.1.3. Queue
7.1.4. ClientSessionFactory
ClientSessionFactory instances to create ClientSession instances. ClientSessionFactory instances know how to connect to the server to create sessions, and are configurable with many settings.
ClientSessionFactory instances are created using the HornetQClient factory class.
7.1.5. ClientSession
XAResource interface so messaging operations can be performed as part of a JTA transaction.
SendAcknowledgementHandler. This allows your client code to be notified asynchronously when sent messages have successfully reached the server. This feature ensures sent messages have reached the server without having to block on each message sent until a response is received.
7.1.6. ClientConsumer
ClientConsumer instances to consume messages from a queue. Core Messaging supports both synchronous and asynchronous message consumption semantics. ClientConsumer instances can be configured with an optional filter expression and will only consume messages which match that expression.
7.1.7. ClientProducer
ClientProducer instances on ClientSession instances so they can send messages. ClientProducer instances can specify an address to which all sent messages are routed, or they can have no specified address, and the address is specified at send time for the message.
Warning
7.2. Simple Core Example
ClientSessionFactory factory =  HornetQClient.createClientSessionFactory(
                                        new TransportConfiguration(
                                           InVMConnectorFactory.class.getName()));

ClientSession session = factory.createSession();

session.createQueue("example", "example", true);

ClientProducer producer = session.createProducer("example");

ClientMessage message = session.createMessage(true);

message.getBodyBuffer().writeString("Hello");

producer.send(message);

session.start();

ClientConsumer consumer = session.createConsumer("example");

ClientMessage msgReceived = consumer.receive();

System.out.println("message = " + msgReceived.getBodyBuffer().readString());

session.close();
Chapter 8. Mapping JMS Concepts to the Core API
jms.queue. prepended to it. For example, the JMS Queue with the name "orders.europe" would map to the core queue with the name "jms.queue.orders.europe". The address at which the core queue is bound is also given by the core queue name.
<!-- expired messages in JMS Queue "orders.europe"
    will be sent to the JMS Queue "expiry.europe" -->
<address-setting match="jms.queue.orders.europe">
   <expiry-address>jms.queue.expiry.europe</expiry-address>
   ...
</address-setting>
Chapter 9. The Client Classpath
Warning
$JBOSS_HOME/client directory of the HornetQ distribution. Be sure you only use the jars from the correct version of the release, you must not mix and match versions of jars from different HornetQ versions. Mixing and matching different jar versions may cause subtle errors and failures to occur.
9.1. HornetQ Core Client
hornetq-core-client.jar and netty.jar on your client classpath.
9.2. JMS Client
hornetq-jms-client.jar and jboss-javaee.jar.
Note
jboss-javaee.jar only contains Java EE API interface classes needed for the javax.jms.* classes. If you already have a jar with these interface classes on your classpath, you will not need it.
9.3. JMS Client with JNDI
jnp-client.jar jar on your client classpath as well as any other jars mentioned previously.
Chapter 10. Routing Messages With Wild Cards
queue.news.#, for example, then it will receive any messages sent to addresses that match this. Take these, for example: queue.news.europe or queue.news.usa or queue.news.usa.sport. If you create a consumer on this queue, this allows a consumer to consume messages which are sent to a hierarchy of addresses.
Note
wild-card-routing-enabled in the <JBOSS_HOME>/jboss-as/server/<PROFILE>/deploy/hornetq/hornetq-configuration.xml file to true. This is true by default.
Chapter 11. Understanding the HornetQ Wildcard Syntax
.' (full stop).
#' and '*' also have special meaning and can take the place of a word.
#' means "match any sequence of zero or more words".
*' means "match a single word".
Chapter 12. Filter Expressions
- Predefined Queues. When pre-defining a queue, either in
<JBOSS_HOME>/jboss-as/server/<PROFILE>/deploy/hornetq/hornetq-configuration.xmlorJBOSS_DIST/jboss-as/server/<PROFILE>/deploy/hornetq/hornetq-jms.xmla filter expression can be defined for a queue. Only messages that match the filter expression will enter the queue. - Core bridges can be defined with an optional filter expression, only matching messages will be bridged (see Chapter 34, Core Bridges).
- Diverts can be defined with an optional filter expression. Only matching messages will be diverted (see Chapter 33, Diverting and Splitting Message Flows).
- Filters are also used programmatically when creating consumers, queues and in several places as described in Chapter 28, Management.
- HQPriority
- To refer to the priority of a message. Message priorities are integers with valid values from
0 - 9.0is the lowest priority and9is the highest. For example,HQPriority = 3 and department = 'payroll'. This refers to a message with a priority of three and a department of 'payroll'. - HQExpiration
- To refer to the expiration time of a message. The value is a long integer.
- HQDurable
- To refer to whether a message is durable or not. The value is a string with valid values:
DURABLEorNON_DURABLE. - HQTimestamp
- The time stamp of when the message was created. The value is a long integer.
- HQSize
- The size of a message in bytes. The value is an integer.
Chapter 13. Persistence
- Java Non-blocking IO (NIO)
- Uses standard Java NIO to interface with the file system. This provides extremely good performance and runs on any platform with a Java 6 or later runtime.
- Linux Asynchronous IO (AIO)
- Uses a native code wrapper to talk to the Linux asynchronous IO library (AIO). With AIO, HornetQ receives a message when data has been persisted. This removes the need for explicit syncs. AIO will typically provide better performance than Java NIO, but requires Linux kernel 2.6 or later and libaio.AIO also requires
ext2,ext3,ext4,jfsorxfstype file systems. On NFS, AIO falls back to slower, synchronous behavior.Note
On Red Hat Enterprise Linux, install libaio with the following command:yum install libaio
- bindings journal
- Stores bindings-related data, including the set of queues deployed on the server and their attributes. It also stores data such as ID sequence counters. The bindings journal is always a NIO journal, as it typically has low throughput in comparison to the message journal.The files on this journal are prefixed as
hornetq-bindings. Each file has abindingsextension. File size is1048576bytes, and it is located in the bindings folder. - JMS journal
- Stores all JMS-related data, for example, any JMS queues, topics or connection factories and any JNDI bindings for these resources. Any JMS resources created with the management API are persisted to this journal. Any resources configured with configuration files are not. This journal is created only if JMS is in use.
- message journal
- Stores all message-related data, including messages themselves and
duplicate-idcaches. By default, HornetQ uses AIO for this journal. If AIO is not available, it will automatically fall back to NIO.
13.1. Configuring the bindings journal
<JBOSS_HOME>/jboss-as/server/<PROFILE>/deploy/hornetq/hornetq-configuration.xml.
-
bindings-directory - The location of the bindings journal. The default value is
data/bindings. -
create-bindings-dir - If
true, and the bindings directory does not exist, the bindings directory is created automatically at the location specified inbindings-directory. The default value istrue.
13.2. Configuring the JMS journal
13.3. Configuring the message journal
<JBOSS_HOME>/jboss-as/server/<PROFILE>/deploy/hornetq/hornetq-configuration.xml.
-
journal-directory - The location of the message journal. The default value is
data/journal. For best performance, this journal should be located on its own physical volume to minimize disk head movement. If this journal is stored on a storage area network, each journal instance on the network should have its own logical unit. -
create-journal-dir - If
true, the journal directory is created at the location specified injournal-directory. The default value istrue. -
journal-type - Valid values are
NIOorASYNCIO. IfNIO, the Java NIO journal is used. IfASYNCIO, Linux asynchronous IO is used. IfASYNCIOis set on a non-Linux or non-libaio system, HornetQ detects this and falls back toNIO. -
journal-sync-transactional - If
true, HornetQ ensures all transaction data is flushed to disk on transaction boundaries (commit, prepare, and rollback). The default istrue. -
journal-sync-non-transactional - If
true, HornetQ ensures non-transactional message data (sends and acknowledgments) are flushed to disk. The default istrue. -
journal-file-size - The size of each journal file in bytes. The default value is
10485760bytes (10 megabytes). -
journal-min-files - The minimum number of files the journal maintains. When HornetQ starts and there is no initial data, HornetQ pre-creates this number of files. Creating and padding journal files is an expensive operation, so to be avoided at run-time as files are filled. Pre-creating files means that as one is filled the journal can immediately resume with the next file without pausing to create it.
-
journal-max-io - The maximum number of write requests to hold in the IO queue. Write requests are queued here before being submitted to the system for execution. If the queue fills, writes are blocked until space becomes available in the queue. For NIO, this must be
1. For AIO, this should be500. A different default value is maintained depending on whether NIO or AIO is used (1for NIO,500for AIO). The total max AIO must not be higher than what is configured at the operating system level (/proc/sys/fs/aio-max-nr), generally at 65536. -
journal-buffer-timeout - HornetQ maintains a buffer of flush requests, and flushes the entire buffer either when it is full or when this timeout expires - whichever is soonest. This is used for both NIO and AIO and allows improved scaling when many concurrent writes and flushes are required.
-
journal-buffer-size - The size of the timed buffer on AIO. The default value is
490kilobytes. -
journal-compact-min-files - The minimum number of files before the journal will be compacted. The default value is
10. -
journal-compact-percentage - When less than this percentage of a journal is considered live data compacting will occur. The default value is
30.journal-compact-min-filesmust also be fulfilled before compacting.
Warning
disabled. This can have negative effects on performance, but ensures data integrity.
13.4. Configuring HornetQ for Zero Persistence
persistence-enabled parameter in <JBOSS_HOME>/jboss-as/server/<PROFILE>/deploy/hornetq/hornetq-configuration.xml to false.
Important
false, no persistence will occur. No bindings data, message data, large message data, duplicate ID caches, or paging data will be persisted.
13.5. Import/Export the Journal Data
hornetq-core.jar, you can export the journal as a text file by using this command:
java -cp hornetq-core.jar org.hornetq.core.journal.impl.ExportJournal <JournalDirectory> <JournalPrefix> <FileExtension> <FileSize> <FileOutput>
netty.jar):
java -cp hornetq-core.jar:netty.jar org.hornetq.core.journal.impl.ImportJournal <JournalDirectory> <JournalPrefix> <FileExtension> <FileSize> <FileInput>
- JournalDirectory: Use the configured folder for your selected folder. Example: ./hornetq/data/journal
- JournalPrefix: Use the prefix for your selected journal, as discussed
- FileExtension: Use the extension for your selected journal, as discussed
- FileSize: Use the size for your selected journal, as discussed
- FileOutput: text file that will contain the exported data
Chapter 14. Configuring the Transport
14.1. Understanding Acceptors
<JBOSS_HOME>/jboss-as/server/<PROFILE>/deploy/hornetq/hornetq-configuration.xml using the following directives.
<acceptor name="netty">
   <factory-class>
org.hornetq.core.remoting.impl.netty.NettyAcceptorFactory</factory-class>
   <param key="host"  value="${jboss.bind.address:localhost}"/>
   <param key="port"  value="${hornetq.remoting.netty.port:5445}"/>
</acceptor>acceptors element. Multiple acceptors can be defined in one acceptors element. There is no upper limit to the number of acceptors per server.
acceptor that uses Netty to listen for connections on port 5445.
acceptor element contains a sub-element factory-class which defines the factory used to create acceptor instances. In this case Netty is used to listen for connections, so the Netty implementation of AcceptorFactory is being used. The factory-class element determines which pluggable transport listens.
acceptor element can also be configured with zero or more param sub-elements. Each param element defines a key-value pair. These key-value pairs are used to configure the specific transport, the set of valid key-value pairs depends on the specific transport be used and are passed straight through to the underlying transport.
14.2. Understanding Connectors
<JBOSS_HOME>/jboss-as/server/<PROFILE>/deploy/hornetq/hornetq-configuration.xml file:
<connector name="netty">
  <factory-class>org.hornetq.core.remoting.impl.netty.NettyConnectorFactory</factory-class>
  <param key="host" value="${jboss.bind.address:localhost}"/>
  <param key="port" value="${hornetq.remoting.netty.port:5445}"/>
</connector>- Sometimes the server acts as a client itself when it connects to another server, for example when one server is bridged to another, or when a server takes part in a cluster. In these cases the server needs to know how to connect to other servers. This is defined by connectors.
- If JMS and the server-side JMS service are used to instantiate JMS ConnectionFactory instances and bind them in JNDI, the JMS service needs to know which server the
HornetQConnectionFactorywill create connections to at the connection factory's creation.This is defined by the <connector-ref> element in theJBOSS_DIST/jboss-as/server/<PROFILE>/deploy/hornetq/hornetq-jms.xmlfile on the server side. The following snippet from ahornetq-jms.xmlfile shows a JMS connection factory that references the netty connector defined in the<JBOSS_HOME>/jboss-as/server/<PROFILE>/deploy/hornetq/hornetq-configuration.xmlfile:<connection-factory name="NettyConnectionFactory"> <connectors> <connector-ref connector-name="netty"/> </connectors> <entries> <entry name="/ConnectionFactory"/> <entry name="/XAConnectionFactory"/> </entries> </connection-factory>
14.3. Configuring the transport directly from the client side
ClientSessionFactory to connect with a server.
ClientSessionFactory to talk to a server. In this case, it is unnecessary to define a connector in the server-side configuration. Instead, create the parameters and configure the connector factory to be used by ClientSessionFactory.
ClientSessionFactory connects directly to the acceptor defined previously in this chapter. It uses the standard Netty TCP transport, and will attempt to connect on port 5446 to localhost (the default).
Map<String, Object> connectionParams =
  new HashMap<String, Object>();

  connectionParams.put(
    org.hornetq.core.remoting.impl.netty.TransportConstants.PORT_PROP_NAME,
    5446
  );

TransportConfiguration transportConfiguration =
  new TransportConfiguration(
    "org.hornetq.core.remoting.impl.netty.NettyConnectorFactory",
    connectionParams
  );

ClientSessionFactory sessionFactory =
  HornetQClient.createClientSessionFactory(transportConfiguration);

ClientSession session = sessionFactory.createSession(...);JBOSS_DIST/jboss-as/server/<PROFILE>/deploy/hornetq/hornetq-jms.xml:
Map<String, Object> connectionParams =
  new HashMap<String, Object>();

connectionParams.put(
  org.hornetq.core.remoting.impl.netty.TransportConstants.PORT_PROP_NAME,
  5446
);

TransportConfiguration transportConfiguration =
  new TransportConfiguration(
    "org.hornetq.core.remoting.impl.netty.NettyConnectorFactory",
    connectionParams
  );

ConnectionFactory connectionFactory =
  HornetQJMSClient.createConnectionFactory(transportConfiguration);

Connection jmsConnection = connectionFactory.createConnection();
14.4. Configuring the Netty transport
14.4.1. Configuring Netty TCP
Warning
Important
org.hornetq.core.remoting.impl.netty.TransportConstants. Most parameters can be used with acceptors and connectors. Some only work with acceptors. The following parameters can be used to configure Netty for simple TCP:
-
use-nio - If this is
truethen Java non-blocking NIO will be used. If set tofalsethe older, blocking Java IO will be used. If handling many concurrent connections to the server is a requirement, the non-blocking Java NIO method is highly recommended. Java NIO does not maintain a thread per connection so can scale to many more concurrent connections than the older blocking IO method. If handling many concurrent connections is not required, slightly better performance might be gained by using older blocking IO method. The default value for this property isfalseon the server side andfalseon the client side. -
host - The host name or IP address to connect to (for connectors) or listen on (for acceptors). The default value is
localhost.Important
The default for this variable islocalhost. This is not accessible from remote nodes and must be modified for the server to accept incoming connections.Acceptors can be configured with multiple comma-delimited hosts or IP addresses. Multiple addresses are not valid for connectors.0.0.0.0specifies that all network interfaces of a host should be accepted. -
port - Specifies the port to connect to (for connectors) or listen on (for acceptors). The default value is
5445. -
tcp-no-delay - If
true, Nagle's algorithm is enabled. The default value istrue. -
tcp-send-buffer-size - Defines the size of the TCP send buffer in bytes. The default value is
32768(32 kilobytes). TCP buffer size should be tuned according to the bandwidth and latency of your network. The buffer size in bytes should be equal to the bandwidth in bytes-per-second multiplied by the network round-trip-time (RTT) in seconds. RTT can be measured using the ping utility. For fast networks, you may wish to increase the buffer size from the default value. -
tcp-receive-buffer-size - Defines the size of the TCP receive buffer in bytes. The default value is
32768(32 kilobytes). -
batch-delay - HornetQ can be configured to place write operations into batches for up to
batch-delaymilliseconds. This can increase overall throughput for very small messages, but does so at the expense of an increase in average latency for message transfer. The default value is0milliseconds. -
direct-deliver - When a message arrives on the server and is delivered to consumers, by default the delivery occurs on a different thread to that in which the message arrived. This gives the best overall throughput and scalability, especially on multi-core machines. However, it also introduces additional latency due to the context switch required. For the lowest latency (and possible reduction of throughput), set
direct-delivertotrue(the default). For highest throughput, set tofalse. -
nio-remoting-threads - When configured to use NIO, by default HornetQ uses three times the number of threads as cores (or hyper-threads) reported by
Runtime.getRuntime().availableProcessors()to process incoming packets.nio-remoting-threadsoverrides this and defines the number of threads to use. The default is-1, which represents three times the value fromRuntime.getRuntime().availableProcessors().
14.4.2. Configuring Netty SSL
-
ssl-enabled - Set to
trueto enable SSL. -
key-store-path - Defines the path to the SSL key store on the client that holds the client certificates.
-
key-store-password - Defines the password for the client certificate key store on the client.
-
trust-store-path - Defines the path to the trusted client certificate store on the server.
-
trust-store-password - Defines the password to the trusted client certificate store on the server.
14.4.3. Configuring Netty HTTP
-
http-enabled - Set to
trueto enable HTTP. -
http-client-idle-time - The period of time (in milliseconds) a client can be idle before sending an empty HTTP request to keep the connection alive.
-
http-client-idle-scan-period - How often, in milliseconds, to scan for idle clients.
-
http-response-time - The period of time in milliseconds the server should wait before sending an empty HTTP response to keep the connection alive.
-
http-server-scan-period - How often, in milliseconds, to scan for clients requiring responses.
-
http-requires-session-id - When
true, the client waits to receive a session ID after the first call. This is used when the HTTP connector is connecting to the servlet acceptor (not recommended).
14.4.4. Configuring Netty Servlet
Configuring a servlet engine for the Netty Servlet transport
- Deploy the servlet. A web application using the servlet might have a
web.xmlfile similar to the following:<?xml version="1.0" encoding="UTF-8"?> <web-app xmlns="http://java.sun.com/xml/ns/j2ee" xmlns:xsi="http://www.w3.org/2001/XMLSchema-instance" xsi:schemaLocation="http://java.sun.com/xml/ns/j2ee http://java.sun.com/xml/ns/j2ee/web-app_2_4.xsd" version="2.4"> <servlet> <servlet-name>HornetQServlet</servlet-name> <servlet-class>org.jboss.netty.channel.socket.http.HttpTunnelingServlet</servlet-class> <init-param> <param-name>endpoint</param-name> <param-value>local:org.hornetq</param-value> </init-param> <load-on-startup>1</load-on-startup> </servlet> <servlet-mapping> <servlet-name>HornetQServlet</servlet-name> <url-pattern>/HornetQServlet</url-pattern> </servlet-mapping> </web-app> - Add the
netty-invmacceptor to the server-side configuration in<JBOSS_HOME>/jboss-as/server/<PROFILE>/deploy/hornetq/hornetq-configuration.xml:<acceptors> <acceptor name="netty-invm"> <factory-class> org.hornetq.core.remoting.impl.netty.NettyAcceptorFactory </factory-class> <param key="use-invm" value="true"/> <param key="host" value="org.hornetq"/> </acceptor> </acceptors> - Define a connector for the client in
<JBOSS_HOME>/jboss-as/server/<PROFILE>/deploy/hornetq/hornetq-configuration.xml:<connectors> <connector name="netty-servlet"> <factory-class> org.hornetq.core.remoting.impl.netty.NettyConnectorFactory </factory-class> <param key="host" value="localhost"/> <param key="port" value="8080"/> <param key="use-servlet" value="true"/> <param key="servlet-path" value="/messaging/HornetQServlet"/> </connector> </connectors>
Init Parameters
-
endpoint - Defines the netty acceptor to which the servlet forwards its packets. Matches the name of the
hostparameter.
web.xml is the path of the URL that is used. The connector parameter servlet-path on the connector configuration must match this using the application context of the web application if there is one.
<connector name="netty-servlet">
  <factory-class>
    org.hornetq.core.remoting.impl.netty.NettyConnectorFactory
  </factory-class>
  <param key="host" value="localhost"/>
  <param key="port" value="8443"/>
  <param key="use-servlet" value="true"/>
  <param key="servlet-path" value="/messaging/HornetQServlet"/>
  <param key="ssl-enabled" value="true"/>
  <param key="key-store-path" value="path to a keystore"/>
  <param key="key-store-password" value="keystore password"/>
</connector>server/default/deploy/jbossweb.sar/server.xml like so:
<Connector protocol="HTTP/1.1" SSLEnabled="true"
  port="8443" address="${jboss.bind.address}"
  scheme="https" secure="true" clientAuth="false"
  keystoreFile="path to a keystore"
keystorePass="keystore password" sslProtocol = "TLS" />Chapter 15. Detecting Dead Connections
15.1. Cleaning up Dead Connection Resources on the Server
finally block.
Example 15.1. Well Behaved Core Client Application
ClientSessionFactory sf = null;
ClientSession session = null;

try
{
   sf = HornetQClient.createClientSessionFactory(...);
   session = sf.createSession(...);
   ... do some stuff with the session...
}
finally
{
   if (session != null)
   {
      session.close();
   }

   if (sf != null)
   {
      sf.close();
   }
}
Example 15.2. Well Behaved JMS Client Application
Connection jmsConnection = null;

try
{
   ConnectionFactory jmsConnectionFactory = HornetQJMSClient.createConnectionFactory(...);

   jmsConnection = jmsConnectionFactory.createConnection();

   ... do some stuff with the connection...
}
finally
{
   if (connection != null)
   {
      connection.close();
   }
}
connection TTL is configurable. Each ClientSessionFactory has a defined connection TTL. The TTL determines how long the server will keep a connection alive in the absence of any data arriving from the client.
- On the client side, specify the
ConnectionTTLattribute on aHornetQConnectionFactoryinstance (<JBOSS_HOME>/jboss-as/server/<PROFILE>/deploy/jms-ra.rar/META-INF/ra.xml) - On the server side where connection factory instances are being deployed directly into JNDI, specify the
connection-ttlparameter for the<connection-factory>directive in theJBOSS_DIST/jboss-as/server/<PROFILE>/deploy/hornetq/hornetq-jms.xmlfile.
ConnectionTTL is 60000 (milliseconds). A value of -1 for the ConnectionTTL attribute means the server will never time out the connection on the server side.
connection-ttl-override attribute in JBOSS_DIST/jboss-as/server/<PROFILE>/deploy/hornetq/hornetq-jms.xml file. The default value for connection-ttl-override is -1, which allows clients to set their own values for connection TTL.
15.1.1. Closing core sessions or JMS connections that have failed to close
finally block when they are finished.
finally block, HornetQ will detect this at garbage collection time, and log a warning similar to the following in the logs (If you are using JMS the warning will involve a JMS connection not a client session):
[Finalizer] 20:14:43,244 WARNING [org.hornetq.core.client.impl.DelegatingSession]
  I'm closing a ClientSession you left open. Please make sure you close all ClientSessions
  explicitly before letting them go out of scope!
[Finalizer] 20:14:43,244 WARNING [org.hornetq.core.client.impl.DelegatingSession]
The session you did not close was created here:
java.lang.Exception
  at org.hornetq.core.client.impl.DelegatingSession.<init>(DelegatingSession.java:83)
  at org.acme.yourproject.YourClass (YourClass.java:666)
15.2. Detecting failure from the client side.
client-failure-check-period milliseconds then it will consider the connection failed and will either initiate fail-over, or call any SessionFailureListener instances (or ExceptionListener instances if you are using JMS) depending on how it has been configured.
ClientFailureCheckPeriod attribute on a HornetQConnectionFactory instance. If JMS connection factory instances are being deployed directly into JNDI on the server side, it can be specified in the JBOSS_DIST/jboss-as/server/<PROFILE>/deploy/hornetq/hornetq-jms.xml configuration file, using the parameter client-failure-check-period.
30000ms (30 seconds). A value of -1 means the client will never fail the connection on the client side if no data is received from the server. Typically this is much lower than the connection TTL value to allow clients to reconnect in case of transitory failure.
15.3. Configuring Asynchronous Connection Execution
Note
async-connection-execution-enabled in <JBOSS_HOME>/jboss-as/server/<PROFILE>/deploy/hornetq/hornetq-configuration.xml is set to true to enable asynchronous connection execution.
Chapter 16. Resource Manager Configuration
transaction-timeout property in <JBOSS_HOME>/jboss-as/server/<PROFILE>/deploy/hornetq/hornetq-configuration.xml (value must be in milliseconds). The property transaction-timeout-scan-period configures how often, in milliseconds, to scan for old transactions.
Chapter 17. Flow Control
17.1. Consumer Flow Control
receive() method or asynchronously via a message listener. Messages can build up if the consumer cannot process messages as fast as they are being delivered and installed on the internal buffer. This can potentially lead to a lack of memory on the client if they cannot be processed in time.
17.1.1. Window-Based Flow Control
consumer-window-size parameter.
consumer-window-size is set to 1 MiB (1024 * 1024 bytes).
-1for an unbound buffer0to not buffer any messages.>0for a buffer with the given maximum size in bytes.
- Fast consumers
- Fast consumers can process messages as fast as they consume them.To allow fast consumers, set the
consumer-window-sizeto -1. This will allow unbound message buffering on the client side.Use this setting with caution: it can overflow the client memory if the consumer is not able to process messages as fast as it receives them. - Slow consumers
- Slow consumers take significant time to process each message and it is desirable to prevent buffering messages on the client side so that they can be delivered to another consumer instead.Consider a situation where a queue has two consumers; one of which is very slow. Messages are delivered in a circular fashion to both consumers; the fast consumer processes all of its messages very quickly until its buffer is empty. At this point there are still messages waiting to be processed in the buffer of the slow consumer which prevents them being processed by the fast consumer. The fast consumer is therefore sitting idle when it could be processing the other messages.To allow slow consumers, set the
consumer-window-sizeto 0 (for no buffer at all). This will prevent the slow consumer from buffering any messages on the client side. Messages will remain on the server side ready to be consumed by other consumers.Setting this to 0 can give deterministic distribution between multiple consumers on a queue.
consumer-window-size to optimize performance depends on the messaging use case and requires benchmarks to find the optimal value, but a value of 1MiB is fine in most cases.
17.1.1.1. Using Core API
ClientSessionFactory.setConsumerWindowSize() method and some of the ClientSession.createConsumer() methods.
17.1.1.2. Using JMS
JBOSS_DIST/jboss-as/server/<PROFILE>/deploy/hornetq/hornetq-jms.xml:
<connection-factory name="ConnectionFactory">
   <connectors>
      <connector-ref connector-name="netty-connector"/>
   </connectors>
   <entries>
      <entry name="/ConnectionFactory"/>
   </entries>

   <!-- Set the consumer window size to 0 to have *no* buffer on the client side -->
   <consumer-window-size>0</consumer-window-size>
</connection-factory>HornetQConnectionFactory.setConsumerWindowSize() method.
17.1.2. Rate limited flow control
-1 disables rate limited flow control. The default value is -1.
17.1.2.1. Using Core API
ClientSessionFactory.setConsumerMaxRate(int consumerMaxRate) method or alternatively via some of the ClientSession.createConsumer() methods.
17.1.2.2. Using JMS
JBOSS_DIST/jboss-as/server/<PROFILE>/deploy/hornetq/hornetq-jms.xml:
<connection-factory name="NettyConnectionFactory">
   <connectors>
      <connector-ref connector-name="netty-connector"/>
   </connectors>
   <entries>
      <entry name="/ConnectionFactory"/>
   </entries>
<!-- We limit consumers created on this connection factory to consume messages at a maximum rate of 10 messages per sec -->
   <consumer-max-rate>10</consumer-max-rate>
</connection-factory>HornetQConnectionFactory.setConsumerMaxRate(int consumerMaxRate) method.
Note
17.2. Producer flow control
17.2.1. Window based flow control
17.2.1.1. Using Core API
ClientSessionFactory.setProducerWindowSize(int producerWindowSize) method.
17.2.1.2. Using JMS
JBOSS_DIST/jboss-as/server/<PROFILE>/deploy/hornetq/hornetq-jms.xml:
<connection-factory name="NettyConnectionFactory">
   <connectors>
     <connector-ref connector-name="netty-connector"/>
   </connectors>
   <entries>
      <entry name="/ConnectionFactory"/>
   </entries>
   <producer-window-size>10</producer-window-size>
</connection-factory>HornetQConnectionFactory.setProducerWindowSize(int producerWindowSize) method.
17.2.1.3. Blocking producer window based flow control
max-size-bytes and address-full-policy
max-size-bytes. In the case of JMS topics this means the total memory of all subscriptions in the topic will not exceed max-size-bytes.
<address-settings>
   <address-setting match="jms.queue.exampleQueue">
      <max-size-bytes>100000</max-size-bytes>
      <address-full-policy>PAGE</address-full-policy>
   </address-setting>
</address-settings>BLOCK to enable blocking producer flow control.
17.2.2. Rate limited flow control
-1 disables rate limited flow control. The default value is -1.
17.2.2.1. Using Core API
ClientSessionFactory.setProducerMaxRate(int consumerMaxRate) method or alternatively via some of the ClientSession.createProducer() methods.
17.2.2.2. Using JMS
JBOSS_DIST/jboss-as/server/<PROFILE>/deploy/hornetq/hornetq-jms.xml:
<connection-factory name="NettyConnectionFactory">
   <connectors>
      <connector-ref connector-name="netty-connector"/>
   </connectors>
   <entries>
      <entry name="ConnectionFactory"/>
   </entries>
<!-- We limit producers created on this connection factory to produce messages at a maximum rate of 10 messages per sec -->
   <producer-max-rate>10</producer-max-rate>
</connection-factory>HornetQConnectionFactory.setProducerMaxRate(int consumerMaxRate) method.
Chapter 18. Guarantees of sends and commits
18.1. Guarantees of Transaction Completion
journal-sync-transactional the server will ensure that the commit or rollback is durably persisted to storage before sending the response back to the client. If this parameter has the value false then commit or rollback may not actually get persisted to storage until some time after the response has been sent to the client. In the event of server failure this may mean the commit or rollback never gets persisted to storage. The default value of this parameter is true so the client can be sure all transaction commits or rollbacks have been persisted to storage by the time the call to commit or rollback returns.
false can improve performance at the expense of some loss of transaction durability.
<JBOSS_HOME>/jboss-as/server/<PROFILE>/deploy/hornetq/hornetq-configuration.xml.
18.2. Guarantees of Non Transactional Message Sends
-
BlockOnDurableSend - If this is set to
truethen all calls to send for durable messages on non transacted sessions will block until the message has reached the server, and a response has been sent back. The default value istrue. -
BlockOnNonDurableSend - If this is set to
truethen all calls to send for non-durable messages on non-transacted sessions will be blocked until the message has reached the server, and a response has been sent back. The default value isfalse.
true can reduce performance since each send requires a network round trip before the next send can be performed. This means the performance of sending messages will be limited by the network round trip time (RTT) of your network, rather than the bandwidth of your network. For better performance it is recommended that you either batch many message sends together in a transaction (since with a transactional session, only the commit/rollback does not block every send), or use the asynchronous send acknowledgments feature described in Section 18.4, “Asynchronous Send Acknowledgments”.
JBOSS_DIST/jboss-as/server/<PROFILE>/deploy/hornetq/hornetq-jms.xml using the elements block-on-durable-send and block-on-non-durable-send. If you are using JMS but not using JNDI then you can set these values directly on the HornetQConnectionFactory instance using the appropriate setter methods.
ClientSessionFactory instance using the appropriate setter methods.
journal-sync-non-transactional is set to true the server will not send a response back to the client until the message has been persisted and the server has a guarantee that the data has been persisted to disk. The default value for this parameter is true.
18.3. Guarantees of Non-Transactional Acknowledgments
BlockOnAcknowledge. If this is set to true then all calls to acknowledge on non-transacted sessions will block until the acknowledge has reached the server, and a response has been sent back. You might want to set this to true if you want to implement a strict at most once delivery policy. The default value is false
18.4. Asynchronous Send Acknowledgments
18.4.1. Asynchronous Send Acknowledgments
org.hornetq.api.core.client.SendAcknowledgementHandler and set a handler instance on your ClientSession.
ClientSession, and as messages reach the server, the server will send back an acknowledgment of the send asynchronously. HornetQ calls your handler's sendAcknowledged(ClientMessage message) method, passing in a reference to the message that was sent.
confirmation-window-size is set to a positive integer value (specified in bytes). For example, 10485760 (10 Mebibytes) .
Chapter 19. Message Redelivery and Undelivered Messages
- Delayed Redelivery
- Message delivery can be delayed to allow the client time to recover from transient failures and not overload its network or CPU resources.
- Dead Letter Address
- Configure a dead letter address, to which messages are sent after being determined undeliverable.
19.1. Delayed Redelivery
19.1.1. Configuring Delayed Redelivery
address-setting configuration:
<!-- delay redelivery of messages for 5s -->
<address-setting match="jms.queue.exampleQueue">
   <redelivery-delay>5000</redelivery-delay>
</address-setting>
redelivery-delay is specified, HornetQ will wait that many milliseconds before redelivering the messages. Redelivery delay is enabled by default and set to 60000 (1 minute).
19.2. Dead Letter Addresses
19.2.1. Configuring Dead Letter Addresses
address-setting configuration:
<!-- undelivered messages in exampleQueue will be sent to the dead
letter address deadLetterQueue after 3 unsuccessful delivery attempts-->
<address-setting match="jms.queue.exampleQueue">
   <dead-letter-address>jms.queue.deadLetterQueue</dead-letter-address>
   <max-delivery-attempts>3</max-delivery-attempts>
</address-setting>
dead-letter-address is not specified, messages will be removed after max-delivery-attempts unsuccessful attempts.
max-delivery-attempts to -1 for infinite redeliveries.
max-delivery-attempts set to -1 for a specific address setting to allow infinite redeliveries only for this address.
19.2.2. Dead Letter Properties
-
HQ_ORIG_ADDRESS - A String property containing the original address of the dead letter message.
19.3. Delivery Count Persistence
redelivered set to false when it should be true.
persist-delivery-count-before-delivery to true in <JBOSS_HOME>/jboss-as/server/<PROFILE>/deploy/hornetq/hornetq-configuration.xml:
<persist-delivery-count-before-delivery>
  true
</persist-delivery-count-before-delivery>
Chapter 20. Message Expiry
TimeToLive) when sending them.
20.1. Message Expiry
// message will expire in 5000ms from now
message.setExpiration(System.currentTimeMillis() + 5000);
TimeToLive for the messages it sent:
// messages sent by this producer will be retained for 5s (5000ms) before expiration
producer.setTimeToLive(5000);
-
HQ_ORIG_ADDRESS - a String property containing the original address of the expired message
-
HQ_ACTUAL_EXPIRY - a Long property containing the actual expiration time of the expired message
20.2. Configuring Expiry Addresses
<!-- expired messages in exampleQueue will be sent to the expiry address expiryQueue -->
<address-setting match="jms.queue.exampleQueue">
   <expiry-address>jms.queue.expiryQueue</expiry-address>
</address-setting>
20.3. Configuring The Expiry Reaper Thread
<JBOSS_HOME>/jboss-as/server/<PROFILE>/deploy/hornetq/hornetq-configuration.xml.
-
message-expiry-scan-period - How often the queues will be scanned to detect expired messages (in milliseconds, default is 30000ms, set to
-1to disable the reaper thread) -
message-expiry-thread-priority - The reaper thread priority (it must be between zero and nine; nine being the highest priority. The default is three).
Chapter 21. Large Messages
InputStream on a message body. When that message is sent, HornetQ will read the InputStream. For example, a FileInputStream could be used to send a large message from a large file on disk.
InputStream is read, the data is sent to the server as a stream of fragments. The server persists these fragments to disk as it receives them. When the time comes to deliver them to a consumer they are read back off the disk, also in fragments, and re-transmitted. When the consumer receives a large message it initially receives just the message with an empty body. It can then set an OutputStream on the message to stream the large message body to a file on disk or elsewhere. At no time is the entire message body stored fully in memory, either on the client or the server.
21.1. Configuring the server
<JBOSS_HOME>/jboss-as/server/<PROFILE>/deploy/hornetq/hornetq-configuration.xml.
large-messages-directory specifies where large messages are stored.
<configuration xmlns="urn:hornetq"
  xmlns:xsi="http://www.w3.org/2001/XMLSchema-instance"
  xsi:schemaLocation="urn:hornetq /schema/hornetq-configuration.xsd">

...

   <large-messages-directory>${jboss.server.data.dir}/${hornetq.data.dir:hornetq}/largemessages</large-messages-directory>

...

</configuration>data/large-messages.
21.2. Setting the limits
min-large-message-size.
21.2.1. Using Core API
ClientSessionFactory.setMinLargeMessageSize.
ClientSessionFactory factory =
  HornetQClient.createClientSessionFactory(new
  TransportConfiguration(NettyConnectorFactory.class.getName()), null);
factory.setMinLargeMessageSize(25 * 1024);
21.2.2. Using JMS
JBOSS_DIST/jboss-as/server/<PROFILE>/deploy/hornetq/hornetq-jms.xml.
...
<connection-factory name="NettyConnectionFactory">
   <connectors>
     <connector-ref connector-name="netty"/>
   </connectors>
   <entries>
      <entry name="/ConnectionFactory"/>
      <entry name="/XAConnectionFactory"/>
   </entries>
   <min-large-message-size>250000</min-large-message-size>
</connection-factory>
...HornetQConnectionFactory.setMinLargeMessageSize.
21.3. Streaming large messages
java.lang.io).
ClientMessage.saveOutputStream or alternatively using the method ClientMessage.setOutputstream which will asynchronously write the message to the stream. If you choose the latter the consumer must be kept alive until the message has been fully received.
- JDBC Blobs
SocketInputStream- Things recovered from
HTTPRequests, and so on.
java.io.InputStream for sending messages, or java.io.OutputStream for receiving them can be used.
21.3.1. Streaming over Core API
ClientMessage which are also available through JMS by the use of object properties.
Table 21.1. org.hornetq.api.core.client.ClientMessage API
| Name | Description | JMS Equivalent Property |
|---|---|---|
| setBodyInputStream (InputStream) | Set the InputStream used to read a message body when sending it. | JMS_HQ_InputStream |
| setOutputStream (OutputStream) | Set the OutputStream that will receive the body of a message. This method does not block. | JMS_HQ_OutputStream |
| saveToOutputStream (OutputStream) | Save the body of the message to the OutputStream. It will block until the entire content is transferred to the OutputStream. | JMS_HQ_SaveStream |
...
ClientMessage msg = consumer.receive(...);

// This will block here until the stream was transferred
msg.saveToOutputStream(someOutputStream);

ClientMessage msg2 = consumer.receive(...);

// This will not wait the transfer to finish
msg.setOutputStream(someOtherOutputStream);
...
...
ClientMessage msg = session.createMessage();
msg.setInputStream(dataInputStream);
...
21.3.2. Streaming over JMS
Message.setObjectProperty to set the input and output streams.
InputStream can be defined through the JMS Object Property JMS_HQ_InputStream on messages being sent:
BytesMessage message = session.createBytesMessage();

FileInputStream fileInputStream = new FileInputStream(fileInput);

BufferedInputStream bufferedInput = new BufferedInputStream(fileInputStream);

message.setObjectProperty("JMS_HQ_InputStream", bufferedInput);

someProducer.send(message);OutputStream can be set through the JMS Object Property JMS_HQ_SaveStream on messages being received in a blocking way.
BytesMessage messageReceived = (BytesMessage)messageConsumer.receive(120000);

File outputFile = new File("huge_message_received.dat");

FileOutputStream fileOutputStream = new FileOutputStream(outputFile);

BufferedOutputStream bufferedOutput = new BufferedOutputStream(fileOutputStream);

// This will block until the entire content is saved on disk
messageReceived.setObjectProperty("JMS_HQ_SaveStream", bufferedOutput);OutputStream could also be done in a non-blocking way using the property JMS_HQ_OutputStream.
// This will not wait the stream to finish. You need to keep the consumer active.
messageReceived.setObjectProperty("JMS_HQ_OutputStream", bufferedOutput);
Note
StreamMessage and BytesMessage.
21.4. Streaming Alternative
InputStream or OutputStream capability of HornetQ, the data can still be accessed directly in an alternative fashion.
ClientMessage msg = consumer.receive();

byte[] bytes = new byte[1024];
for (int i = 0 ;  i < msg.getBodySize(); i += bytes.length)
{
   msg.getBody().readBytes(bytes);
   // Whatever you want to do with the bytes
}BytesMessage and StreamMessage also supports it transparently.
BytesMessage rm = (BytesMessage)cons.receive(10000);

byte data[] = new byte[1024];

for (int i = 0; i < rm.getBodyLength(); i += 1024)
{
   int numberOfBytes = rm.readBytes(data);
   // Do whatever you want with the data
}
21.5. Cache Large Messages on client
cache-large-message-client in the connection factory. If you enable this property the client consumer will create a temporary file to hold the large message content, so it would be possible to resend large messages.
Note
Chapter 22. Paging
22.1. Page Files
page-size-bytes). When reading page-files all messages on the page-file are read, routed, and the file is deleted as soon as the messages are recovered.
22.2. Configuration
<JBOSS_HOME>/jboss-as/server/<PROFILE>/deploy/hornetq/hornetq-configuration.xml.
<configuration xmlns="urn:hornetq"
            xmlns:xsi="http://www.w3.org/2001/XMLSchema-instance"
            xsi:schemaLocation="urn:hornetq /schema/hornetq-configuration.xsd">

            ...

            <paging-directory>${jboss.server.data.dir}/hornetq/paging</paging-directory>
            <page-max-concurrent-io>5</page-max-concurrent-io>

...-
paging-directory - This is where page files are stored. HornetQ will create one folder for each address under this configured location. The default for this is data/paging.
-
page-max-concurrent-io - The maximum number of concurrent reads the system can make on the paging files. This may be increased depending on the expected number of paged destinations and the limits on the storage infrastructure.
22.3. Paging Mode
Note
22.3.1. Configuration
<JBOSS_HOME>/jboss-as/server/<PROFILE>/deploy/hornetq/hornetq-configuration.xml.
<address-settings>
   <address-setting match="jms.someaddress">
      <max-size-bytes>104857600</max-size-bytes>
      <page-size-bytes>10485760</page-size-bytes>
      <address-full-policy>PAGE</address-full-policy>
   </address-setting>
</address-settings>Table 22.1. Paging Address Settings
| Property Name | Description | Default |
|---|---|---|
max-size-bytes | The max memory the address could have before entering on page mode. | -1 (disabled) |
page-size-bytes | The size of each page file used on the paging system | 10MiB (10 * 1024 * 1024 bytes) |
address-full-policy | This must be set to PAGE for paging to enable.
| PAGE |
| page-max-cache-size | Specifies the number of page files kept in memory to optimize input/output cycles during paging navigation. | 5 |
22.4. Dropping messages
address-full-policy to DROP in the address settings
22.5. Blocking producers
address-full-policy to BLOCK in the address settings.
Important
22.6. Caution with Addresses with Multiple Queues
- An address has ten queues
- One of the queues does not deliver its messages (maybe because of a slow consumer).
- Messages continually arrive at the address and paging is started.
- The other nine queues are empty even though messages have been sent.
Important
Important
page-size-bytes (on the server) to a value lower than ack-batch-size (in the client) or your system may appear to hang.
Chapter 23. Queue Attributes
23.1. Predefined Queues
The following shows a queue predefined in the JBOSS_DIST/jboss-as/server/<PROFILE>/deploy/hornetq/hornetq-jms.xml configuration file.
<queue name="selectorQueue">
   <entry name="/queue/selectorQueue"/>
   <selector string="color='red'"/>
   <durable>true</durable>
</queue>
jms.queue.selectorQueue.
null.
true.
A queue can be predefined at a core level in the <JBOSS_HOME>/jboss-as/server/<PROFILE>/deploy/hornetq/hornetq-configuration.xml file.
<queues>
   <queue name="jms.queue.selectorQueue">
      <address>jms.queue.selectorQueue</address>
      <filter string="color='red'"/>
      <durable>true</durable>
</queues>- The name attribute of queue is the actual name used for the queue with no naming convention as in JMS.
- The address element defines what address is used for routing messages.
- There is no entry element.
- The filter uses the Core filter syntax (described in Chapter 12, Filter Expressions), not the JMS selector syntax.
23.2. Using the API
org.hornetq.api.core.client.ClientSession interface. There are multiple createQueue methods that support setting all of the previously mentioned attributes. There is one extra attribute that can be set via this API which is temporary. Setting this to true means the queue will be deleted once the session is disconnected.
23.3. Configuring Queues Through Address Settings
address-setting entry that would be found in the <JBOSS_HOME>/jboss-as/server/<PROFILE>/deploy/hornetq/hornetq-configuration.xml file.
<address-settings>
   <address-setting match="jms.queue.exampleQueue">
      <dead-letter-address>jms.queue.deadLetterQueue</dead-letter-address>
      <max-delivery-attempts>3</max-delivery-attempts>
      <redelivery-delay>5000</redelivery-delay>
      <expiry-address>jms.queue.expiryQueue</expiry-address>
      <last-value-queue>true</last-value-queue>
      <max-size-bytes>100000</max-size-bytes>
      <page-size-bytes>20000</page-size-bytes>
      <redistribution-delay>0</redistribution-delay>
      <send-to-dla-on-no-route>true</send-to-dla-on-no-route>
      <address-full-policy>PAGE</address-full-policy>
   </address-setting>
</address-settings>match attribute. In the above example the settings would only be applied to any addresses which exactly match the address jms.queue.exampleQueue, but you can also use wildcards to apply sets of configuration against many addresses. The wildcard syntax used is described in Chapter 11, Understanding the HornetQ Wildcard Syntax
match string jms.queue.# the settings would be applied to all addresses which start with jms.queue. which would be all JMS queues.
-
max-delivery-attempts - Defines how many times a canceled message can be redelivered before sending it to the
dead-letter-address. A full explanation can be found in Section 19.2.1, “Configuring Dead Letter Addresses”. -
redelivery-delay - Defines how long to wait before attempting redelivery of a canceled message. Refer to Section 19.1.1, “Configuring Delayed Redelivery”.
-
expiry-address - Defines where to send a message that has expired. Refer to Section 20.2, “Configuring Expiry Addresses”.
-
last-value-queue - Defines whether a queue only uses last values or not. Refer to Chapter 25, Last-Value Queues.
max-size-bytesandpage-size-bytes- Are used to set paging on an address. This is explained in Chapter 22, Paging.
-
redistribution-delay - Defines how long to wait when the last consumer is closed on a queue before redistributing any messages. See Section 36.6, “Message Redistribution”.
-
send-to-dla-on-no-route - If a message is sent to an address, but the server does not route it to any queues, (for example, there might be no queues bound to that address, or none of the queues have filters that match) then normally that message would be discarded. However if this parameter is set to true for that address, if the message is not routed to any queues it will instead be sent to the dead letter address (DLA) for that address, if it exists.
-
address-full-policy - This attribute can have one of the following values: PAGE, DROP or BLOCK and determines what happens when an address where
max-size-bytesis specified becomes full. The default value is PAGE. If the value is PAGE then further messages will be paged to disk.- If the value is DROP then further messages will be silently dropped.
- If the value is BLOCK then client message producers will block when they try and send further messages.
Chapter 24. Scheduled Messages
24.1. Scheduled Delivery Property
"_HQ_SCHED_DELIVERY" (or the constant Message.HDR_SCHEDULED_DELIVERY_TIME).
long corresponding to the time the message must be delivered (in milliseconds). An example of sending a scheduled message using the JMS API is as follows.
  TextMessage message =
   session.createTextMessage("This is a scheduled message which will be delivered
     in 5 sec.");
  message.setLongProperty("_HQ_SCHED_DELIVERY", System.currentTimeMillis() + 5000);
  producer.send(message);

  ...

  // message will not be received immediately but 5 seconds later
  TextMessage messageReceived = (TextMessage) consumer.receive();
Chapter 25. Last-Value Queues
25.1. Configuring Last-Value Queues
<address-setting match="jms.queue.lastValueQueue">
   <last-value-queue>true</last-value-queue>
</address-setting>
last-value-queue is false. Address wildcards can be used to configure Last-Value queues for a set of addresses (see Chapter 11, Understanding the HornetQ Wildcard Syntax).
25.2. Using Last-Value Property
"_HQ_LVQ_NAME" (or the constant Message.HDR_LAST_VALUE_NAME from the Core API).
// send 1st message with Last-Value property set to STOCK_NAME
TextMessage message =
  session.createTextMessage("1st message with Last-Value property set");
message.setStringProperty("_HQ_LVQ_NAME", "STOCK_NAME");
producer.send(message);

// send 2nd message with Last-Value property set to STOCK_NAME
message =
  session.createTextMessage("2nd message with Last-Value property set");
message.setStringProperty("_HQ_LVQ_NAME", "STOCK_NAME");
producer.send(message);

...

// only the 2nd message will be received: it is the latest with
// the Last-Value property set
TextMessage messageReceived = (TextMessage)messageConsumer.receive(5000);
System.out.format("Received message: %s\n", messageReceived.getText());
Chapter 26. Message Grouping
- Messages in a message group share the same group id; that is, they have the same group identifier property (
JMSXGroupIDfor JMS,_HQ_GROUP_IDfor HornetQ Core API). - Messages in a message group are always consumed by the same consumer, even if there are many consumers on a queue. They pin all messages with the same group id to the same consumer. If that consumer closes another consumer is chosen and will receive all messages with the same group id.
26.1. Using Core API
"_HQ_GROUP_ID" (or the constant MessageImpl.HDR_GROUP_ID). Alternatively, you can set autogroup to true on the SessionFactory which will pick a random unique id.
26.2. Using JMS
JMSXGroupID.
 // send 2 messages in the same group to ensure the same
 // consumer will receive both
 Message message = ...
 message.setStringProperty("JMSXGroupID", "Group-0");
 producer.send(message);

 message = ...
 message.setStringProperty("JMSXGroupID", "Group-0");
 producer.send(message);
autogroup to true on the HornetQConnectionFactory which will pick a random unique id. This can also be set in the JBOSS_DIST/jboss-as/server/<PROFILE>/deploy/hornetq/hornetq-jms.xml file like this:
<connection-factory name="NettyConnectionFactory">
   <connectors>
      <connector-ref connector-name="netty-connector"/>
   </connectors>
   <entries>
      <entry name="/ConnectionFactory"/>
   </entries>
   <autogroup>true</autogroup>
</connection-factory>
JMSXGroupID to the specified value on all messages sent. To configure the group id set it on the connection factory in the hornetq-jms.xml configuration file as follows:
<connection-factory name="NettyConnectionFactory">
   <connectors>
      <connector-ref connector-name="netty-connector"/>
   </connectors>
   <entries>
      <entry name="/ConnectionFactory"/>
   </entries>
   <group-id>Group-0</group-id>
</connection-factory>
26.3. Clustered Grouping
<JBOSS_HOME>/jboss-as/server/<PROFILE>/deploy/hornetq/hornetq-configuration.xml file.
<grouping-handler name="my-grouping-handler">
   <type>LOCAL</type>
   <address>jms</address>
   <timeout>5000</timeout>
</grouping-handler>
<grouping-handler name="my-grouping-handler">
   <type>REMOTE</type>
   <address>jms</address>
   <timeout>5000</timeout>
</grouping-handler>
Note
26.3.1. Clustered Grouping Best Practices
- Make sure your consumers are distributed evenly across the different nodes if possible. This is only an issue if you are creating and closing consumers regularly. Since messages are always routed to the same queue once pinned, removing a consumer from this queue may leave it with no consumers, meaning the queue will just keep receiving the messages. Avoid closing consumers or make sure that you always have plenty of consumers, that is, if you have three nodes, have three consumers.
- Use durable queues if possible. If queues are removed once a group is bound to it, then it is possible that other nodes may still try to route messages to it. This can be avoided by making sure that the queue is deleted by the session that is sending the messages. This means that when the next message is sent it is sent to the node where the queue was deleted meaning a new proposal can successfully take place. Alternatively you could just start using a different group id.
- Always make sure that the node that has the local grouping handler is replicated. This means that grouping can still occur on fail-over.
Chapter 27. Pre-Acknowledge Mode
AUTO_ACKNOWLEDGECLIENT_ACKNOWLEDGEDUPS_OK_ACKNOWLEDGE
Note
27.1. Using PRE_ACKNOWLEDGE
JBOSS_DIST/jboss-as/server/<PROFILE>/deploy/hornetq/hornetq-jms.xml file on the connection factory like this:
<connection-factory name="NettyConnectionFactory">
   <connectors>
      <connector-ref connector-name="netty-connector"/>
   </connectors>
   <entries>
      <entry name="/ConnectionFactory"/>
   </entries>
   <pre-acknowledge>true</pre-acknowledge>
</connection-factory>HornetQSession.PRE_ACKNOWLEDGE constant.
// messages will be acknowledge on the server *before* being delivered to the client
Session session = connection.createSession(false, HornetQSession.PRE_ACKNOWLEDGE);
HornetQConnectionFactory instance using the setter method.
ClientSessionFactory instance using the setter method.
Chapter 28. Management
- Modify a server configuration;
- Create new resources (for example, JMS queues and topics);
- Inspect these resources (for example, how many messages are currently held in a queue);
- Interact with it (that is, to remove messages from a queue).
- Using JMX; JMX is the standard way to manage Java applications.
- Using the core API; management operations are sent to HornetQ server using core messages.
- Using the JMS API; management operations are sent to HornetQ server using JMS messages.
28.1. The Management API
- Core resources are located in the org.hornetq.api.core.management package.
- JMS resources are located in the org.hornetq.api.jms.management package.
Note
null or an empty string means that the management operation will be performed on all messages.
28.1.1. Core Management API
28.1.1.1. Core Server Management
- Listing, creating, deploying and destroying queues
- A list of deployed core queues can be retrieved using the
getQueueNames()method.Core queues can be created or destroyed using the management operations:createQueue()deployQueue()destroyQueue()on theHornetQServerControl(with the ObjectNameorg.hornetq:module=Core,type=Serveror the resource namecore.server)
createQueuewill fail if the queue already exists whiledeployQueuewill do nothing. - Pausing and resuming Queues
- The
QueueControlcan pause and resume the underlying queue. When a queue is paused, it will receive messages but will not deliver them. When it is resumed, it will begin delivering the queued messages. - Listing and closing remote connections
- Client remote addresses can be retrieved using
listRemoteAddresses(). It is also possible to close the connections associated with a remote address using thecloseConnectionsForAddress()method.Alternatively, connection ids can be listed usinglistConnectionIDs()and all the sessions for a given connection id can be listed usinglistSessions(). - Transaction heuristic operations
- In the case of a server crash, some transactions may require manual intervention when the server restarts. The
listPreparedTransactions()method lists the transactions which are in the prepared states (the transactions are represented as opaque Base64 Strings.) To commit or rollback a given prepared transaction, thecommitPreparedTransaction()orrollbackPreparedTransaction()method can be used to resolve heuristic transactions. Heuristically completed transactions can be listed using thelistHeuristicCommittedTransactions()andlistHeuristicRolledBackTransactionsmethods. - Enabling and resetting Message counters
- Message counters can be enabled or disabled using the
enableMessageCounters()ordisableMessageCounters()method. To reset message counters, it is possible to invokeresetAllMessageCounters()andresetAllMessageCounterHistories()methods. - Retrieving the server configuration and attributes
- The
HornetQServerControlexposes HornetQ server configuration through all its attributes (for example,getVersion()method to retrieve the server's version, and so on.)
28.1.1.2. Core Address Management
AddressControl class (with the ObjectName org.hornetq:module=Core,type=Address,name="<the address name>" or the resource name core.address.<the address name>).
addRole() or removeRole() methods. You can list all the roles associated with the queue with the getRoles() method.
28.1.1.3. Core Queue Management
QueueControl class defines the core queue management operations (with the ObjectName org.hornetq:module=Core,type=Queue,address="<the bound address>",name="<the queue name>" or the resource name core.queue.<the queue name>).
- Expiring, sending to a dead letter address and moving messages
- Messages can be expired from a queue by using the
expireMessages()method. If an expiry address is defined, messages will be sent to it, otherwise they are discarded. The queue's expiry address can be set with thesetExpiryAddress()method.Messages can also be sent to a dead letter address with thesendMessagesToDeadLetterAddress()method. It returns the number of messages which are sent to the dead letter address. If a dead letter address is not defined, message are removed from the queue and discarded. The queue's dead letter address can be set with thesetDeadLetterAddress()method.Messages can also be moved from a queue to another queue by using themoveMessages()method. - Listing and removing messages
- Messages can be listed from a queue by using the
listMessages()method which returns an array of Map; one Map for each message.Messages can also be removed from the queue by using theremoveMessages()method which returns a boolean for the single message id variant or the number of removed messages for the filter variant. TheremoveMessages()method takes a filter argument to remove only filtered messages. Setting the filter to an empty string will remove all messages. - Counting messages
- The number of messages in a queue is returned by the
getMessageCount()method. Alternatively, thecountMessages()will return the number of messages in the queue which match a given filter - Changing message priority
- The message priority can be changed by using the
changeMessagesPriority()method which returns a boolean for the single message id variant or the number of updated messages for the filter variant. - Message counters
- Message counters can be listed for a queue with the
listMessageCounter()andlistMessageCounterHistory()methods (see Section 28.6, “Message Counters”). The message counters can also be reset for a single queue using theresetMessageCounter()method. - Retrieving the queue attributes
- The
QueueControlexposes core queue settings through its attributes (for example,getFilter()to retrieve the queue's filter if it was created with one,isDurable()to know whether the queue is durable or not, and so on). - Pausing and resuming Queues
- The
QueueControlcan pause and resume the underlying queue. When a queue is paused, it will receive messages but will not deliver them. When it is resumed, it will begin delivering the queued messages.
28.1.1.4. Other Core Resources Management
- Acceptors
- Acceptors can be started or stopped using the
start()or.stop()method on theAcceptorControlclass (with the ObjectNameorg.hornetq:module=Core,type=Acceptor,name="<the acceptor name>"or the resource namecore.acceptor.<the address name>). The parameters of the acceptors can be retrieved using theAcceptorControlattributes (see Section 14.1, “Understanding Acceptors”) - Diverts
- Diverts can be started or stopped using the
start()orstop()method on theDivertControlclass (with the ObjectNameorg.hornetq:module=Core,type=Divert,name=<the divert name>or the resource namecore.divert.<the divert name>). Diverts parameters can be retrieved using theDivertControlattributes (see Chapter 33, Diverting and Splitting Message Flows) - Bridges
- They can be started or stopped using the
start()(resp.stop()) method on theBridgeControlclass (with the ObjectNameorg.hornetq:module=Core,type=Bridge,name="<the bridge name>"or the resource namecore.bridge.<the bridge name>). Bridges parameters can be retrieved using theBridgeControlattributes (see Chapter 34, Core Bridges) - Broadcast groups
- Broadcast groups can be started or stopped using the
start()orstop()method on theBroadcastGroupControlclass (with the ObjectNameorg.hornetq:module=Core,type=BroadcastGroup,name="<the broadcast group name>"or the resource namecore.broadcastgroup.<the broadcast group name>). Broadcast groups parameters can be retrieved using theBroadcastGroupControlattributes (see Section 36.2.1, “Broadcast Groups”) - Discovery groups
- They can be started or stopped using the
start()orstop()method on theDiscoveryGroupControlclass (with the ObjectNameorg.hornetq:module=Core,type=DiscoveryGroup,name="<the discovery group name>"or the resource namecore.discovery.<the discovery group name>). Discovery groups parameters can be retrieved using theDiscoveryGroupControlattributes (see Section 36.2.2, “Discovery Groups”) - Cluster connections
- They can be started or stopped using the
start()orstop()method on theClusterConnectionControlclass (with the ObjectNameorg.hornetq:module=Core,type=ClusterConnection,name="<the cluster connection name>"or the resource namecore.clusterconnection.<the cluster connection name>). Cluster connections parameters can be retrieved using theClusterConnectionControlattributes (see Section 36.3.1, “Configuring Cluster Connections”)
28.1.2. JMS Management API
28.1.2.1. JMS Server Management
JMSServerControl class (with the ObjectName org.hornetq:module=JMS,type=Server or the resource name jms.server).
- Listing, creating, destroying connection factories
- Names of the deployed connection factories can be retrieved by the
getConnectionFactoryNames()method.JMS connection factories can be created or destroyed using thecreateConnectionFactory()methods ordestroyConnectionFactory()methods. These connection factories are bound to JNDI so that JMS clients can look them up. If a graphical console is used to create the connection factories, the transport parameters are specified in the text field input as a comma-separated list of key=value (that is,key1=10, key2="value", key3=false). If there are multiple transports defined, you need to enclose the key/value pairs between curly braces. For example{key=10}, {key=20}. In that case, the firstkeywill be associated to the first transport configuration and the secondkeywill be associated to the second transport configuration (see Chapter 14, Configuring the Transport for a list of the transport parameters) - Listing, creating, destroying queues
- Names of the deployed JMS queues can be retrieved by the
getQueueNames()method.JMS queues can be created or destroyed using thecreateQueue()methods ordestroyQueue()methods. These queues are bound to JNDI so that JMS clients can look them up - Listing, creating/destroying topics
- Names of the deployed topics can be retrieved by the
getTopicNames()method.JMS topics can be created or destroyed using thecreateTopic()ordestroyTopic()methods. These topics are bound to JNDI so that JMS clients can look them up. - Listing and closing remote connections
- JMS Clients remote addresses can be retrieved using
listRemoteAddresses(). It is also possible to close the connections associated with a remote address using thecloseConnectionsForAddress()method.Alternatively, connection ids can be listed usinglistConnectionIDs()and all the sessions for a given connection id can be listed usinglistSessions().
28.1.2.2. JMS ConnectionFactory Management
ConnectionFactoryControl class (with the ObjectName org.hornetq:module=JMS,type=ConnectionFactory,name="<the connection factory name>" or the resource name jms.connectionfactory.<the connection factory name>).
- Retrieving connection factory attributes
- The
ConnectionFactoryControlexposes JMS ConnectionFactory configuration through its attributes (that is,getConsumerWindowSize()to retrieve the consumer window size for flow control,isBlockOnNonDurableSend()to know whether the producers created from the connection factory will block when sending non-durable messages, and so on).
28.1.2.3. JMS Queue Management
JMSQueueControl class (with the ObjectName org.hornetq:module=JMS,type=Queue,name="<the queue name>" or the resource name jms.queue.<the queue name>).
- Expiring, sending to a dead letter address and moving messages
- Messages can be expired from a queue by using the
expireMessages()method. If an expiry address is defined, messages will be sent to it, otherwise they are discarded. The queue's expiry address can be set with thesetExpiryAddress()method.Messages can also be sent to a dead letter address with thesendMessagesToDeadLetterAddress()method. It returns the number of messages which are sent to the dead letter address. If a dead letter address is not defined, message are removed from the queue and discarded. The queue's dead letter address can be set with thesetDeadLetterAddress()method.Messages can also be moved from a queue to another queue by using themoveMessages()method. - Listing and removing messages
- Messages can be listed from a queue by using the
listMessages()method which returns an array of Map, one Map for each message.Messages can also be removed from the queue by using theremoveMessages()method which returns a boolean for the single message ID variant or the number of removed messages for the filter variant. TheremoveMessages()method takes afilterargument to remove only filtered messages. Setting the filter to an empty string will in effect remove all messages. - Counting messages
- The number of messages in a queue is returned by the
getMessageCount()method. Alternatively, thecountMessages()will return the number of messages in the queue which match a given filter - Changing message priority
- The message priority can be changed by using the
changeMessagesPriority()method which returns a boolean for the single message id variant or the number of updated messages for the filter variant. - Message counters
- Message counters can be listed for a queue with the
listMessageCounter()andlistMessageCounterHistory()methods (see Section 28.6, “Message Counters”) - Retrieving the queue attributes
- The
JMSQueueControlexposes JMS queue settings through its attributes (for example,isTemporary()to know whether the queue is temporary or not,isDurable()to know whether the queue is durable or not, and so on.) - Pausing and resuming queues
- The
JMSQueueControlcan pause and resume the underlying queue. When the queue is paused it will continue to receive messages but will not deliver them. When resumed again it will deliver the enqueued messages.
28.1.2.4. JMS Topic Management
TopicControl class (with the ObjectName org.hornetq:module=JMS,type=Topic,name="<the topic name>" or the resource name jms.topic.<the topic name>).
- Listing subscriptions and messages
- JMS topics subscriptions can be listed using the
listAllSubscriptions(),listDurableSubscriptions(),listNonDurableSubscriptions()methods. These methods return arrays of Object representing the subscriptions information (subscription name, client ID, durability, message count, and so on). It is also possible to list the JMS messages for a given subscription with thelistMessagesForSubscription()method. - Dropping subscriptions
- Durable subscriptions can be dropped from the topic using the
dropDurableSubscription()method. - Counting subscriptions messages
- The
countMessagesForSubscription()method can be used to determine the number of messages held for a given subscription (with an optional message selector to determine the number of messages matching the selector).
28.2. Using Management Via JMX
org.hornetq.
ObjectName to manage a JMS Queue exampleQueue is:
org.hornetq:module=JMS,type=Queue,name="exampleQueue"
org.hornetq.api.jms.management.JMSQueueControl
ObjectName is built using the helper class org.hornetq.api.core.management.ObjectNameBuilder. You can also use jconsole to find the ObjectName of the MBeans you want to manage.
28.2.1. Configuring JMX
jmx-management-enabled to false in <JBOSS_HOME>/jboss-as/server/<PROFILE>/deploy/hornetq/hornetq-configuration.xml.
<!-- false to disable JMX management for HornetQ -->
<jmx-management-enabled>false</jmx-management-enabled>
jconsole.
Note
run.sh or run.bat scripts.
jmx-domain in <JBOSS_HOME>/jboss-as/server/<PROFILE>/deploy/hornetq/hornetq-configuration.xml:
<!-- use a specific JMX domain for HornetQ MBeans -->
<jmx-domain>my.org.hornetq</jmx-domain>
28.3. Using Management Via Core API
- The name of the managed resource
- The name of the management operation
- The parameters of the management operation
- extracts the information
- invokes the operation on the managed resources
- sends a management reply to the management message's reply-to address.
org.hornetq.core.client.impl.ClientMessageImpl.REPLYTO_HEADER_NAME parameter.
ClientConsumer can be used to consume the management reply and retrieve the result of the operation (if any) stored in the body of the reply. For portability, results are returned as a JSON string rather than Java Serialization. The org.hornetq.api.core.management.ManagementHelper can be used to convert the JSON string to Java objects.
Procedure 28.1. Invoking Management Operations
Step One
Create aClientRequestorto send messages to the management address and receive repliesStep Two
Create aClientMessageStep Three
Use the helper classorg.hornetq.api.core.management.ManagementHelperto fill the message with the management properties.Step Four
Send the message using theClientRequestorStep Five
Use the helper classorg.hornetq.api.core.management.ManagementHelperto retrieve the operation result from the management reply.
exampleQueue:
   ClientSession session = ...
   ClientRequestor requestor = new ClientRequestor(session, "jms.queue.hornetq.management");
   ClientMessage message = session.createMessage(false);
   ManagementHelper.putAttribute(message, "core.queue.exampleQueue", "messageCount");
   ClientMessage reply = requestor.request(m);
   int count = (Integer) ManagementHelper.getResult(reply);
   System.out.println("There are " + count + " messages in exampleQueue");
management packages.
org.hornetq.api.core.management.ResourceNames and are straightforward (core.queue.exampleQueue for the Core Queue exampleQueue, jms.topic.exampleTopic for the JMS Topic exampleTopic, and so on).
28.3.1. Configuring Core Management
<JBOSS_HOME>/jboss-as/server/<PROFILE>/deploy/hornetq/hornetq-configuration.xml:
<management-address>jms.queue.hornetq.management</management-address>
jms.queue.hornetq.management (it is prepended by "jms.queue" so that JMS clients can also send management messages).
manage to be able to receive and handle management messages. This is also configured in <JBOSS_HOME>/jboss-as/server/<PROFILE>/deploy/hornetq/hornetq-configuration.xml:
<!-- users with the admin role will be allowed to manage -->
<!-- HornetQ using management messages        -->
<security-setting match="jms.queue.hornetq.management">
   <permission type="manage" roles="admin" />
</security-setting>
28.4. Using Management Via JMS
Queue managementQueue = HornetQJMSClient.createQueue("hornetq.management");
- Create a
QueueRequestorto send messages to the management address and receive replies. - Create a
Message. - Use the helper class
org.hornetq.api.jms.management.JMSManagementHelperto fill the message with the management properties. - Send the message using the
QueueRequestor. - Use the helper class
org.hornetq.api.jms.management.JMSManagementHelperto retrieve the operation result from the management reply.
exampleQueue:
   Queue managementQueue = HornetQJMSClient.createQueue("hornetq.management");

   QueueSession session = ...
   QueueRequestor requestor = new QueueRequestor(session, managementQueue);
   connection.start();
   Message message = session.createMessage();
   JMSManagementHelper.putAttribute(message, "jms.queue.exampleQueue", "messageCount");
   Message reply = requestor.request(message);
   int count = (Integer)JMSManagementHelper.getResult(reply);
   System.out.println("There are " + count + " messages in exampleQueue");
28.4.1. Configuring JMS Management
28.5. Management Notifications
- JMX notifications
- Core messages
- JMS messages
28.5.1. JMX Notifications
org.hornetq:module=Core,type=Serverfor notifications on core resourcesorg.hornetq:module=JMS,type=Serverfor notifications on JMS resources
28.5.2. Core Messages Notifications
28.5.2.1. Configuring The Core Management Notification Address
<JBOSS_HOME>/jboss-as/server/<PROFILE>/deploy/hornetq/hornetq-configuration.xml:
<management-notification-address>hornetq.notifications</management-notification-address>
hornetq.notifications.
28.5.3. JMS Messages Notifications
jms.queue (if it is a JMS queue) or jms.topic (if it is a JMS topic) to use a JMS Destination to receive management notifications.
<!-- notifications will be consumed from "notificationsTopic" JMS Topic -->
<management-notification-address>jms.topic.notificationsTopic</management-notification-address>
MessageListener:
   Topic notificationsTopic = HornetQJMSClient.createTopic("notificationsTopic");

   Session session = ...
   MessageConsumer notificationConsumer = session.createConsumer(notificationsTopic);
      notificationConsumer.setMessageListener(new MessageListener()
      {
         public void onMessage(Message notif)
         {
            System.out.println("------------------------");
            System.out.println("Received notification:");
            try
            {
               Enumeration propertyNames = notif.getPropertyNames();
               while (propertyNames.hasMoreElements())
               {
                  String propertyName = (String)propertyNames.nextElement();
                  System.out.format("  %s: %s\n", propertyName, notif.getObjectProperty(propertyName));
               }
            }
            catch (JMSException e)
            {
            }
            System.out.println("------------------------");
         }
      });
28.6. Message Counters
org.hornetq.api.core.management.MessageCounterInfo) to extract the information.
-
count - The total number of messages added to the queue since the server was started.
-
countDelta - The number of messages added to the queue since the last message counter update.
-
depth - The current number of messages in the queue.
-
depthDelta - The overall number of messages added or removed from the queue since the last message counter update. For example, if
depthDeltais equal to-10this means that overall 10 messages have been removed from the queue. -
lastAddTimestamp - The time stamp of the last time a message was added to the queue.
-
udpateTimestamp - The time stamp of the last message counter update.
28.6.1. Configuring Message Counters
true in <JBOSS_HOME>/jboss-as/server/<PROFILE>/deploy/hornetq/hornetq-configuration.xml:
<message-counter-enabled>true</message-counter-enabled>
<JBOSS_HOME>/jboss-as/server/<PROFILE>/deploy/hornetq/hornetq-configuration.xml:
<!-- keep history for a week -->
<message-counter-max-day-history>7</message-counter-max-day-history>
<!-- sample the queues every minute (60000ms) -->
<message-counter-sample-period>60000</message-counter-sample-period>
// retrieve a connection to HornetQ's MBeanServer
MBeanServerConnection mbsc = ...
JMSQueueControlMBean queueControl = (JMSQueueControl)MBeanServerInvocationHandler.newProxyInstance(mbsc,
   on,
   JMSQueueControl.class,
   false);
// message counters are retrieved as a JSON String
String counters = queueControl.listMessageCounter();
// use the MessageCounterInfo helper class to manipulate message counters more easily
MessageCounterInfo messageCounter = MessageCounterInfo.fromJSON(counters);
System.out.format("%s message(s) in the queue (since last sample: %s)\n",
   counter.getDepth(),
   counter.getDepthDelta());
28.7. Administering HornetQ Resources Using the Admin Console
28.7.1. JMS Queues
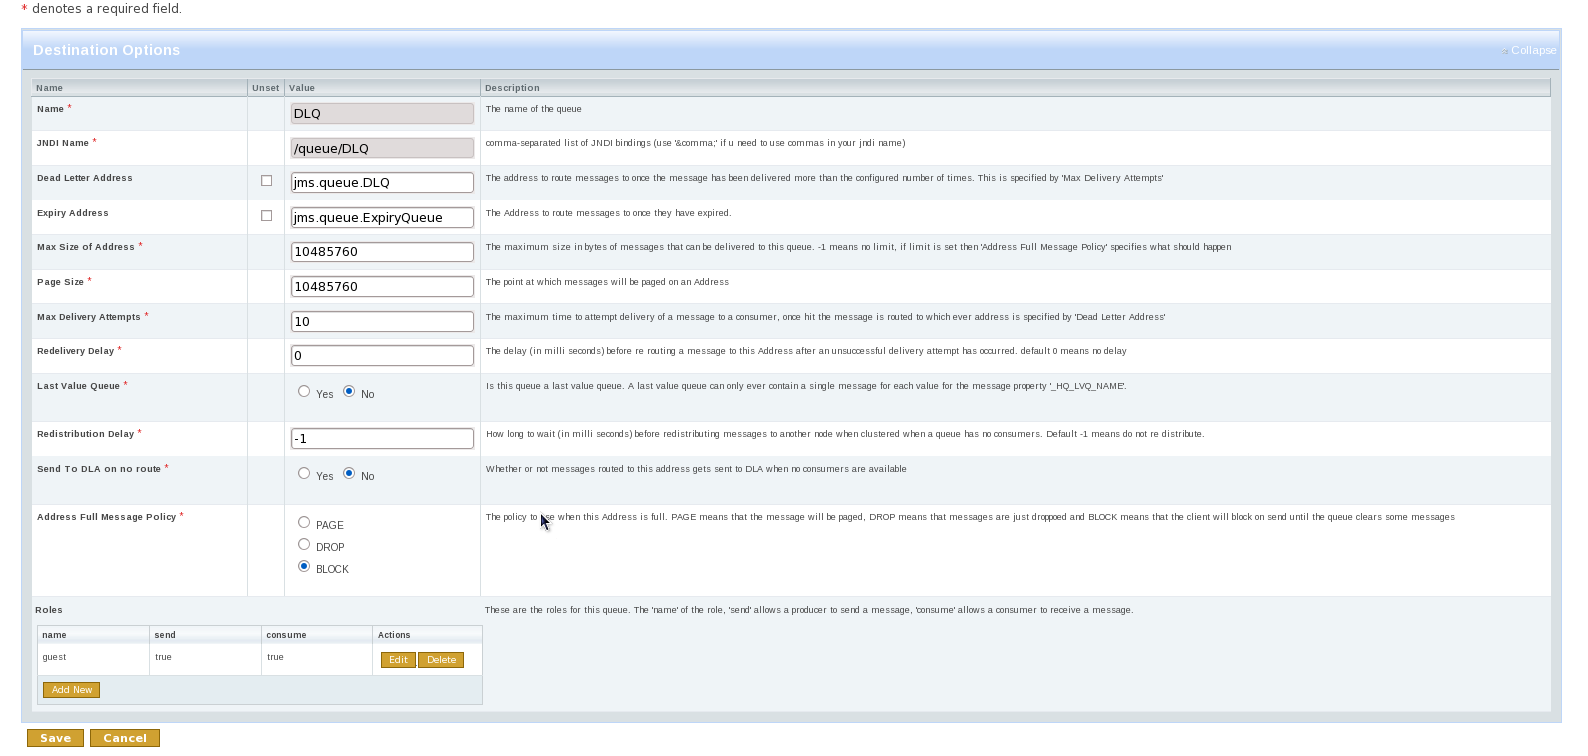
28.7.2. JMS Topics
28.7.3. JMS Connection Factories
Chapter 29. Security
security-invalidation-interval, which is in milliseconds. The default is 10000 ms.
Warning
security-enabled property to false in the <JBOSS_HOME>/jboss-as/server/<PROFILE>/deploy/hornetq/hornetq-configuration.xml file. This practice is strongly discouraged for production environments.
29.1. Role based security for addresses
#' and '*'.
-
createDurableQueue - This permission allows the user to create a durable queue under matching addresses.
-
deleteDurableQueue - This permission allows the user to delete a durable queue under matching addresses.
-
createNonDurableQueue - This permission allows the user to create a non-durable queue under matching addresses.
-
deleteNonDurableQueue - This permission allows the user to delete a non-durable queue under matching addresses.
-
send - This permission allows the user to send a message to matching addresses.
-
consume - This permission allows the user to consume a message from a queue bound to matching addresses.
-
manage - This permission allows the user to invoke management operations by sending management messages to the management address.
<JBOSS_HOME>/jboss-as/server/<PROFILE>/deploy/hornetq/hornetq-configuration.xml:
<security-setting match="globalqueues.europe.#">
   <permission type="createDurableQueue" roles="admin"/>
   <permission type="deleteDurableQueue" roles="admin"/>
   <permission type="createNonDurableQueue" roles="admin, guest, europe-users"/>
   <permission type="deleteNonDurableQueue" roles="admin, guest, europe-users"/>
   <permission type="send" roles="admin, europe-users"/>
   <permission type="consume" roles="admin, europe-users"/>
</security-setting>
#' character signifies "any sequence of words". Words are delimited by the '.' character. For a full description of the wildcard syntax refer to Chapter 11, Understanding the HornetQ Wildcard Syntax. The above security block applies to any address that starts with the string "globalqueues.europe.":
security-setting elements in each XML file. Where more than one match applies to a set of addresses the more specific match takes precedence.
<security-setting match="globalqueues.europe.orders.#">
   <permission type="send" roles="europe-users"/>
   <permission type="consume" roles="europe-users"/>
</security-setting>
security-setting block the match 'globalqueues.europe.orders.#' is more specific than the previous match 'globalqueues.europe.#'. So any addresses which match 'globalqueues.europe.orders.#' will take their security settings only from the latter security-setting block.
send and consume for the role europe-users. The permissions createDurableQueue, deleteDurableQueue, createNonDurableQueue, deleteNonDurableQueue are not inherited from the other security-setting block.
29.2. Secure Sockets Layer (SSL) Transport
29.3. Basic user credentials
hornetq-users.properties and hornetq-users.roles files. These files are both located in the /conf/props/ directory within the profile you wish to run.
Example 29.1. hornetq-users.properties example file
#
# user=password
#
guest=guest
tim=marmite
andy=doner_kebab
jeff=camembert
Example 29.2. hornetq-users.roles example file
#
# user=role1,role2,...
#
guest=guest
tim=admin
andy=admin,guest
jeff=europe-users,guest
29.4. Changing the security manager
hornetq-jboss-beans.xml and changing the class for the HornetQSecurityManager bean.
org.hornetq.spi.core.security.HornetQSecurityManager interface, and specifying the class name of your implementation in the file hornetq-jboss-beans.xml.
29.5. JAAS Security Manager
JAASSecurityManager in the beans file. Here is an example:
<bean name="HornetQSecurityManager"
      class="org.hornetq.integration.jboss.security.JAASSecurityManager">
    <start ignored="true"/>
    <stop ignored="true"/>

    <property name="ConfigurationName">org.hornetq.jms.example.ExampleLoginModule</property>
    <property name="Configuration">
       <inject bean="ExampleConfiguration"/>
    </property>
    <property name="CallbackHandler">
       <inject bean="ExampleCallbackHandler"/>
    </property>
</bean>
- ConfigurationName
- The name of the
LoginModuleimplementation that JAAS must use - Configuration
- The
Configurationimplementation used by JAAS - CallbackHandler
- The
CallbackHandlerimplementation to use if user interaction are required
29.6. HornetQ Security Manager
org.hornetq.integration.jboss.security.JBossASSecurityManager
JBossASSecurityManager is configured is described in <JBOSS_HOME>/jboss-as/server/<PROFILE>/deploy/hornetq/hornetq-jboss-beans.xml.
29.6.1. Configuring Client Login
true (default is false) in <JBOSS_HOME>/jboss-as/server/<PROFILE>/deploy/hornetq/hornetq-jboss-beans.xml file. This bypasses HornetQ authentication, and propagates the provided Security Context.
authoriseOnClientLogin to true in addition to allowClientLogin.
29.7. Changing the Security Domain
securityDomainName property to the HornetQSecurityManager bean in hornetq-jboss-beans.xml.
HornetQSecurityManager bean does not contain this property by default.
Example 29.3. HornetQSecurityManager bean
<!-- The security manager --> <bean name="HornetQSecurityManager" class="org.hornetq.integration.jboss.security.JBossASSecurityManager"> <start ignored="true"/> <stop ignored="true"/> <depends>JBossSecurityJNDIContextEstablishment</depends> <property name="allowClientLogin">false</property> <property name="authoriseOnClientLogin">false</property> <property name="securityDomainName">java:/jaas/hornetq</property></bean>
|
The example above shows the securityDomainName property as it should be formatted, if used.
Note that the security domain shown in this example is the system default and will be used unless the securityDomainName parameter has been added with a different value.
|
29.8. Changing the user name/password for clustering
Chapter 30. Application Server Integration and Java EE
30.1. Configuring Message-Driven Beans
<JBOSS_HOME>/jboss-as/server/<PROFILE>/deploy/jms-ra.rar/META-INF/ra.xml file. By default this is configured to consume messages using an InVM connector from the instance of HornetQ running within the application server. If you need to adjust the configuration parameters, parameter details can be found in Section 30.4, “Configuring the JCA Adaptor”.
<JBOSS_HOME>/jboss-as/server/<PROFILE>/deploy/hornetq/jms-ds.xml data source file links destination and destination type configuration information in the ra.xml file using the <rar-name> directive.
30.1.1. Using Container-Managed Transactions
@MessageDriven(name = "MDB_CMP_TxRequiredExample",
  activationConfig =
  {
    @ActivationConfigProperty
      (propertyName = "destinationType", propertyValue = "javax.jms.Queue"),
    @ActivationConfigProperty
      (propertyName = "destination", propertyValue = "queue/testQueue")
  })
@TransactionManagement(value= TransactionManagementType.CONTAINER)
@TransactionAttribute(value= TransactionAttributeType.REQUIRED)
public class MDB_CMP_TxRequiredExample implements MessageListener
{
   public void onMessage(Message message)...
}TransactionManagement annotation tells the container to manage the transaction. The TransactionAttribute annotation tells the container that a JTA transaction is required for this MDB. Note that the only other valid value for this is TransactionAttributeType.NOT_SUPPORTED which tells the container that this MDB does not support JTA transactions and one should not be created.
setRollbackOnly on the MessageDrivenContext. The code for this would look something like:
@Resource
   MessageDrivenContextContext ctx;

   public void onMessage(Message message)
   {
      try
      {
         //something here fails
      }
      catch (Exception e)
      {
         ctx.setRollbackOnly();
      }
}@MessageDriven(name = "MDB_CMP_TxLocalExample",
activationConfig =
{
@ActivationConfigProperty
(propertyName = "destinationType", propertyValue = "javax.jms.Queue"),
@ActivationConfigProperty
(propertyName = "destination", propertyValue = "queue/testQueue"),
@ActivationConfigProperty
(propertyName = "useLocalTx", propertyValue = "true")
})
@TransactionManagement(value = TransactionManagementType.CONTAINER)
@TransactionAttribute(value = TransactionAttributeType.NOT_SUPPORTED)
public class MDB_CMP_TxLocalExample implements MessageListener
{
public void onMessage(Message message)...
}30.1.2. Using Bean-Managed Transactions
@MessageDriven(name = "MDB_BMPExample",
  activationConfig =
    {
      @ActivationConfigProperty
        (propertyName = "destinationType", propertyValue = "javax.jms.Queue"),
      @ActivationConfigProperty
        (propertyName = "destination", propertyValue = "queue/testQueue"),
      @ActivationConfigProperty
        (propertyName = "acknowledgeMode", propertyValue = "Dups-ok-acknowledge")
    })
@TransactionManagement(value= TransactionManagementType.BEAN)
public class MDB_BMPExample implements MessageListener
{
   public void onMessage(Message message)
}acknowledgeMode property. There are only 2 acceptable values for this Auto-acknowledge and Dups-ok-acknowledge. Please note that because the message delivery is outside the scope of the transaction a failure within the MDB will not cause the message to be redelivered.
@Resource
  MessageDrivenContext ctx;

  public void onMessage(Message message)
  {
    UserTransaction tx;
    try
    {
      TextMessage textMessage = (TextMessage)message;
      String text = textMessage.getText();
      UserTransaction tx = ctx.getUserTransaction();
      tx.begin();
      //do some stuff within the transaction
      tx.commit();
    }
    catch (Exception e)
    {
       tx.rollback();
    }
  }
30.1.3. Using Message Selectors with Message-Driven Beans
@MessageDriven(name = "MDBMessageSelectorExample",
  activationConfig =
    {
      @ActivationConfigProperty
        (propertyName = "destinationType", propertyValue = "javax.jms.Queue"),
      @ActivationConfigProperty
        (propertyName = "destination", propertyValue = "queue/testQueue"),
      @ActivationConfigProperty
        (propertyName = "messageSelector", propertyValue = "color = 'RED'")
    })
@TransactionManagement(value= TransactionManagementType.CONTAINER)
@TransactionAttribute(value= TransactionAttributeType.REQUIRED)
public class MDBMessageSelectorExample implements MessageListener
{
   public void onMessage(Message message)....
}
30.1.4. High Availability in Message-driven Beans
Important
<JBOSS_HOME>/jboss-as/server/<PROFILE>/deploy/hornetq/hornetq-configuration.xml. The Activation Property will cause a HornetQException if the <clustered> directive is not correctly specified. For more information about Clustering, refer to Chapter 36, Clusters.
activationConfig block to make the MDB compatible with HA environments:
activationConfig =
    {
     @ActivationConfigProperty
        (propertyName = "hA", propertyValue = "true"),
}30.2. Sending Messages from within Java EE components
<JBOSS_HOME>/jboss-as/server/<PROFILE>/deploy/hornetq/jms-ds.xml file and is mapped to java:/JmsXA.
@MessageDriven(name = "MDBMessageSendTxExample",
  activationConfig =
    {
      @ActivationConfigProperty
        (propertyName = "destinationType", propertyValue = "javax.jms.Queue"),
      @ActivationConfigProperty
        (propertyName = "destination", propertyValue = "queue/testQueue")
    })
@TransactionManagement(value= TransactionManagementType.CONTAINER)
@TransactionAttribute(value= TransactionAttributeType.REQUIRED)
public class MDBMessageSendTxExample implements MessageListener
{
   @Resource(mappedName = "java:/JmsXA")
   ConnectionFactory connectionFactory;

   @Resource(mappedName = "queue/replyQueue")
   Queue replyQueue;

   public void onMessage(Message message)
   {
      Connection conn = null;
      try
      {
         //Step 9. We know the client is sending a text message so we cast
         TextMessage textMessage = (TextMessage)message;

         //Step 10. get the text from the message.
         String text = textMessage.getText();

         System.out.println("message " + text);

         conn = connectionFactory.createConnection();

         Session sess = conn.createSession(false, Session.AUTO_ACKNOWLEDGE);

         MessageProducer producer = sess.createProducer(replyQueue);

         producer.send(sess.createTextMessage("this is a reply"));

      }
      catch (Exception e)
      {
         e.printStackTrace();
      }
      finally
      {
         if(conn != null)
         {
            try
            {
               conn.close();
            }
            catch (JMSException e)
            {
            }
         }
      }
   }
}30.3. MDB and Consumer pool size
MaxPoolSize parameter in the ejb3-interceptors-aop.xml file will not have an effect on how many sessions or consumers are created because the Resource Adaptor implementation is not aware of the application server MDB implementation.
MaxPoolSize to 1, 15 sessions or consumers are created (15 is the default). To limit how many sessions or consumers are created, set the maxSession parameter on the resource adapter, or through an ActivationConfigProperty annotation on the MDB.
@MessageDriven(name = "MDBMessageSendTxExample",
  activationConfig =
    {
      @ActivationConfigProperty
        (propertyName = "destinationType", propertyValue = "javax.jms.Queue"),
      @ActivationConfigProperty
        (propertyName = "destination", propertyValue = "queue/testQueue"),
      @ActivationConfigProperty
        (propertyName = "maxSession", propertyValue = "1")
    })
@TransactionManagement(value= TransactionManagementType.CONTAINER)
@TransactionAttribute(value= TransactionAttributeType.REQUIRED)
public class MyMDB implements MessageListener
{ ....}
30.4. Configuring the JCA Adaptor
<JBOSS_HOME>/jboss-as/server/<PROFILE>/deploy/jms-ra.rar archive. The configuration of the adapter is found in this archive under META-INF/ra.xml.
30.4.1. JCA Global Properties
resourceadapter-class which should be left unchanged. This is the HornetQ resource adapter class.
Note
reconnectAttempts which will default to -1. This signifies that the connection should attempt to reconnect on connection failure indefinitely. This is only used when the adapter is configured to connect to a remote server as an InVM connector can never fail.
Table 30.1. Global Configuration Properties
| Property Name | Property Type | Property Description |
|---|---|---|
ConnectorClassName | String | The Connector class name (see Chapter 14, Configuring the Transport for more information) |
ConnectionParameters | String | The transport configuration. These parameters must be in the form of key1=val1;key2=val2; and will be specific to the connector used |
useLocalTx | boolean | True will enable local transaction optimization. |
UserName | String | The user name to use when making a connection |
Password | String | The password to use when making a connection |
BackupConnectorClassName | String | The backup transport to use in case of failure of the live node |
BackupConnectionParameters | String | The backup transport configuration parameters |
DiscoveryAddress | String | The discovery group address to use to auto-detect a server |
DiscoveryPort | Integer | The port to use for discovery |
DiscoveryRefreshTimeout | Long | The timeout, in milliseconds, to refresh. |
DiscoveryInitialWaitTimeout | Long | The initial time to wait for discovery. |
ConnectionLoadBalancingPolicyClassName | String | The load balancing policy class to use. |
ConnectionTTL | Long | The time to live (in milliseconds) for the connection. |
CallTimeout | Long | the call timeout (in milliseconds) for each packet sent. |
DupsOKBatchSize | Integer | the batch size (in bytes) between acknowledgments when using DUPS_OK_ACKNOWLEDGE mode |
TransactionBatchSize | Integer | the batch size (in bytes) between acknowledgments when using a transactional session |
ConsumerWindowSize | Integer | the window size (in bytes) for consumer flow control |
ConsumerMaxRate | Integer | the fastest rate a consumer may consume messages per second |
ConfirmationWindowSize | Integer | the window size (in bytes) for reattachment confirmations |
ProducerMaxRate | Integer | the maximum rate of messages per second that can be sent |
MinLargeMessageSize | Integer | the size (in bytes) before a message is treated as large |
BlockOnAcknowledge | Boolean | whether or not messages are acknowledged synchronously |
BlockOnNonDurableSend | Boolean | whether or not non-durable messages are sent synchronously |
BlockOnDurableSend | Boolean | whether or not durable messages are sent synchronously |
AutoGroup | Boolean | whether or not message grouping is automatically used |
PreAcknowledge | Boolean | whether messages are pre acknowledged by the server before sending |
ReconnectAttempts | Integer | maximum number of retry attempts, default for the resource adapter is -1 (infinite attempts) |
RetryInterval | Long | the time (in milliseconds) to retry a connection after failing |
RetryIntervalMultiplier | Double | multiplier to apply to successive retry intervals |
FailoverOnServerShutdown | Boolean | If true client will reconnect to another server if available |
ClientID | String | the pre-configured client ID for the connection factory |
ClientFailureCheckPeriod | Long | the period (in ms) after which the client will consider the connection failed after not receiving packets from the server |
UseGlobalPools | Boolean | whether or not to use a global thread pool for threads |
ScheduledThreadPoolMaxSize | Integer | the size of the scheduled thread pool |
ThreadPoolMaxSize | Integer | the size of the thread pool |
SetupAttempts | Integer | Number of attempts to setup a JMS connection (default is 10, -1 means to attempt infinitely). It is possible that the MDB is deployed before the JMS resources are available. In that case, the resource adapter will try to setup several times until the resources are available. This applies only for inbound connections |
SetupInterval | Long | Interval in milliseconds between consecutive attempts to setup a JMS connection (default is 2000m). This applies only for inbound connections |
30.4.2. JCA Outbound Configuration
*-ds.xml. A default jms-ds.xml configuration file is located in <JBOSS_HOME>/jboss-as/server/<PROFILE>/deploy/hornetq/jms-ds.xml. The connection factories defined in this file inherit their properties from the main ra.xml configuration but can also be overridden. The following example shows how to override them.
<tx-connection-factory>
      <jndi-name>RemoteJmsXA</jndi-name>
      <xa-transaction/>
      <rar-name>jms-ra.rar</rar-name>
      <connection-definition>
        org.hornetq.ra.HornetQRAConnectionFactory
      </connection-definition>
      <config-property name="SessionDefaultType" type="String">javax.jms.Topic
      </config-property>
      <config-property name="ConnectorClassName" type="String">
        org.hornetq.core.remoting.impl.netty.NettyConnectorFactory
      </config-property>
      <config-property name="ConnectionParameters" type="String">
        port=5445
      </config-property>
      <max-pool-size>20</max-pool-size>
</tx-connection-factory>RemoteJmsXA and can be looked up in the usual way using JNDI or defined within the EJB or MDB as such:
@Resource(mappedName="java:/RemoteJmsXA")
private ConnectionFactory connectionFactory;
config-property elements are what overrides those in the ra.xml configuration file. Any of the elements pertaining to the connection factory can be overridden here.
Table 30.2. Outbound Configuration Properties
| Property Name | Property Type | Property Description |
|---|---|---|
| SessionDefaultType | String | the default session type |
| UseTryLock | Integer | try to obtain a lock within specified number of seconds. less than or equal to 0 disable this functionality |
30.4.3. JCA Inbound Configuration
Table 30.3. Inbound Configuration Properties
| Property Name | Property Type | Property Description |
|---|---|---|
| Destination | String | JNDI name of the destination |
| DestinationType | String | type of the destination, either javax.jms.Queue or javax.jms.Topic (default is javax.jms.Queue) |
| AcknowledgeMode | String | The Acknowledgment mode, either Auto-acknowledge or Dups-ok-acknowledge (default is Auto-acknowledge). AUTO_ACKNOWLEDGE and DUPS_OK_ACKNOWLEDGE are acceptable values. |
| MaxSession | Integer | Maximum number of session created by this inbound configuration (default is 15) |
| MessageSelector | String | the message selector of the consumer |
| SubscriptionDurability | String | Type of the subscription, either Durable or NonDurable |
| SubscriptionName | String | Name of the subscription |
| TransactionTimeout | Long | The transaction timeout in milliseconds (default is 0, the transaction does not timeout) |
| UseJNDI | Boolean | Whether or not use JNDI to look up the destination (default is true) |
30.4.4. High Availability JNDI (HA-JNDI)
Hashtable<String, String>
  jndiParameters = new Hashtable<String, String>();
jndiParameters.put("java.naming.factory.initial",
    "org.jnp.interfaces.NamingContextFactory");
jndiParameters.put("java.naming.factory.url.pkgs=",
    "org.jboss.naming:org.jnp.interfaces");

initialContext = new InitialContext(jndiParameters);30.4.5. XA Recovery
XA recovery deals with system or application failures to ensure that resources of a transaction are applied consistently to all resources affected by the transaction, even if any of the application processes or the machine hosting them crash or lose network connectivity.
Chapter 31. The JMS Bridge
Important
jms-bridge-jboss-beans.xml), which is located in the JBOSS_DIST/jboss-as/server/PROFILE/deploy directory.
Example 31.1. jms-bridge-jboss-beans.xml Sample Config
<?xml version="1.0" encoding="UTF-8"?>

<deployment xmlns="urn:jboss:bean-deployer:2.0">

  <bean name="JMSBridge" class="org.hornetq.api.jms.bridge.impl.JMSBridgeImpl">
     <!-- HornetQ must be started before the bridge -->
     <depends>HornetQServer</depends>
     <constructor>
         <!-- Source ConnectionFactory Factory -->
         <parameter>
             <inject bean="SourceCFF"/>
         </parameter>
         <!-- Target ConnectionFactory Factory -->
         <parameter>
             <inject bean="TargetCFF"/>
         </parameter>
         <!-- Source DestinationFactory -->
         <parameter>
             <inject bean="SourceDestinationFactory"/>
         </parameter>
         <!-- Target DestinationFactory -->
         <parameter>
             <inject bean="TargetDestinationFactory"/>
         </parameter>
         <!-- Source User Name (no user name here) -->
         <parameter><null /></parameter>
         <!-- Source Password (no password here)-->
         <parameter><null /></parameter>
         <!-- Target User Name (no user name here)-->
         <parameter><null /></parameter>
         <!-- Target Password (no password here)-->
         <parameter><null /></parameter>
         <!-- Selector -->
         <parameter><null /></parameter>
         <!-- Failure Retry Interval (in ms) -->
         <parameter>5000</parameter>
         <!-- Max Retries -->
         <parameter>10</parameter>
         <!-- Quality Of Service -->
         <parameter>ONCE_AND_ONLY_ONCE</parameter>
         <!-- Max Batch Size -->
         <parameter>1</parameter>
         <!-- Max Batch Time (-1 means infinite) -->
         <parameter>-1</parameter>
         <!-- Subscription name (no subscription name here)-->
         <parameter><null /></parameter>
         <!-- Client ID  (no client ID here)-->
         <parameter><null /></parameter>
         <!-- Add MessageID In Header -->
         <parameter>true</parameter>
         <!-- register the JMS Bridge in the AS MBeanServer -->
         <parameter>
             <inject bean="MBeanServer"/>
         </parameter>
         <parameter>org.hornetq:service=JMSBridge</parameter>
       </constructor>
     <property name="transactionManager">
         <inject bean="RealTransactionManager"/>
     </property>
  </bean>

  <!-- SourceCFF describes the ConnectionFactory used to connect to the
      source destination -->
  <bean name="SourceCFF"
      class="org.hornetq.api.jms.bridge.impl.JNDIConnectionFactoryFactory">
     <constructor>
         <parameter>
             <inject bean="JNDI" />
         </parameter>
         <parameter>/ConnectionFactory</parameter>
     </constructor>
  </bean>

  <!-- TargetCFF describes the ConnectionFactory used to connect to the
  target destination -->
  <bean name="TargetCFF"
      class="org.hornetq.api.jms.bridge.impl.JNDIConnectionFactoryFactory">
     <constructor>
         <parameter>
             <inject bean="JNDI" />
         </parameter>
         <parameter>/ConnectionFactory</parameter>
     </constructor>
  </bean>

  <!-- SourceDestinationFactory describes the Destination used as the source -->
  <bean name="SourceDestinationFactory"
      class="org.hornetq.api.jms.bridge.impl.JNDIDestinationFactory">
     <constructor>
         <parameter>
             <inject bean="JNDI" />
         </parameter>
         <parameter>/queue/source</parameter>
     </constructor>
  </bean>

  <!-- TargetDestinationFactory describes the Destination used as the target -->
  <bean name="TargetDestinationFactory"
      class="org.hornetq.api.jms.bridge.impl.JNDIDestinationFactory">
     <constructor>
         <parameter>
             <inject bean="JNDI" />
         </parameter>
         <parameter>/queue/target</parameter>
     </constructor>
  </bean>

  <!-- JNDI is a Hashtable containing the JNDI properties required -->
  <!-- to connect to the sources and targets JMS resources         -->
  <bean name="JNDI" class="java.util.Hashtable">
   <constructor class="java.util.Map">
      <map class="java.util.Hashtable" keyClass="String"
                                       valueClass="String">
         <entry>
            <key>java.naming.factory.initial</key>
            <value>org.jnp.interfaces.NamingContextFactory</value>
         </entry>
         <entry>
            <key>java.naming.provider.url</key>
            <value>jnp://localhost:1099</value>
         </entry>
         <entry>
            <key>java.naming.factory.url.pkgs</key>
            <value>org.jboss.naming:org.jnp.interfaces"</value>
         </entry>
      </map>
   </constructor>
  </bean>

  <bean name="MBeanServer" class="javax.management.MBeanServer">
   <constructor factoryClass="org.jboss.mx.util.MBeanServerLocator"
                factoryMethod="locateJBoss"/>
  </bean>
</deployment>
31.1. JMS Bridge Parameters
JMSBridge bean, as shown in Example 31.1, “jms-bridge-jboss-beans.xml Sample Config”, is configured via parameters passed to its constructor in a particular order. This order, and a description of each parameter, is outlined in the list following.
Note
<null /> for the unspecified parameter value.
-
Source Connection Factory Factory - Injects the
SourceCFFbean defined in thejms-bridge-jboss-beans.xmlfile, which creates theConnectionFactory. -
Target Connection Factory Factory - Injects the
TargetCFFbean defined in thejms-bridge-jboss-beans.xmlfile, which creates the targetConnectionFactory. -
Source Destination Factory Factory - Injects the
SourceDestinationFactorybean defined in thejms-bridge-jboss-beans.xmlfile, which creates the sourceDestination. -
Target Destination Factory Factory - Injects the
TargetDestinationFactorybean defined in thejms-bridge-jboss-beans.xmlfile, which creates the targetDestination. -
Source User Name - Defines the username used to create the source connection.
-
Source Password - Defines the password for the user name used to create the source connection.
-
Target User Name - Defines the user name used to create the target connection.
-
Target Password - Defines the password of the user name used to create the target connection.
-
Selector - Specifies a JMS selector expression used when consuming messages from the source destination. Only messages that match the selector expression will be bridged from the source to the target destination. The selector expression must follow the JMS selector syntax.
-
Failure Retry Interval - Specifies the time in milliseconds to wait in between attempting to recreate connections to the source or target servers when the bridge detects a connection failure.
-
Max Retries - Specifies the number of times to attempt to recreate connections to the source or target servers when the bridge detects a connection failure. The bridge will stop trying to reconnect after this number of tries.
-1means 'try forever'. -
Quality of Service - Defines the quality of service mode. The possible values are:
AT_MOST_ONCEDUPLICATES_OKONCE_AND_ONLY_ONCE
See Section 31.4, “Quality Of Service Modes” for a explanation of these modes. -
Max Batch Size - Defines the maximum number of messages that should be consumed from the source connection before the messages are sent in a batch to the target destination. Its value must be
1or greater. -
Max Batch Time - Defines the number of milliseconds to wait before sending a batch to the target destination, even if the number of messages consumed has not reached
MaxBatchSize. Its value must be1or greater, or-1to specify 'wait forever'. -
Subscription Name - If the source destination is a topic, and you want to consume from the topic with a durable subscription, this parameter defines the durable subscription name.
-
Client ID - If the source destination is a topic, and you want to consume from the topic with a durable subscription, this parameter defines the JMS client ID to use when creating or looking up the durable subscription.
-
Add MessageID In Header - When
true, the original message's message ID is appended to the message sent to the destination in theHORNETQ_BRIDGE_MSG_ID_LISTheader. If the message is bridged multiple times, each message ID is appended. This lets you use a distributed response pattern.Note
When a message is received, a response can be sent using the correlation ID of the first message ID so that when the original sender receives the response it is able to correlate the message. -
MBean Server - Set this to the place where the JMS Bridge is registered (the application server MBeanServer) to manage the JMS Bridge with JMX.
-
ObjectName - If
MBeanServeris set, this parameter must be set to define the name used to register the JMS Bridge MBean. This name must be unique.
31.2. Source and Target Connection Factories
org.hornetq.jms.bridge.ConnectionFactoryFactory interface.
31.3. Source and Target Destination Factories
org.hornetq.jms.bridge.DestinationFactory interface.
31.4. Quality Of Service Modes
31.4.1. AT_MOST_ONCE
31.4.2. DUPLICATES_OK
31.4.3. ONCE_AND_ONLY_ONCE
XAConnectionFactory implementations.
Note
DUPLICATES_OK mode and then checking for and discarding duplicate messages on the destination. This approach is not as reliable as using ONCE_AND_ONLY_ONCE mode, but may be a useful alternative.
31.4.4. Time outs and the JMS bridge
Max Retries to reconnect every Failure Retry Interval milliseconds as specified in the JMS Bridge definition.
jnp.timeout and the jnp.sotimeout on the Initial Context definition. The first sets the connection timeout for the initial connection and the second the read timeout for the socket.
Note
Chapter 32. Client Reconnection and Session Reattachment
32.1. 100% Transparent session re-attachment
connection-ttl has not expired (see Chapter 15, Detecting Dead Connections for details about connection-ttl).
ConfirmationWindowSize parameter (typically set in the <JBOSS_HOME>/jboss-as/server/<PROFILE>/deploy/jms-ra.rar/META-INF/ra.xml file) defines the size of the buffer in bytes. When the server has received ConfirmationWindowSize bytes of commands and processed them it will send back a command confirmation to the client. The client can then remove confirmed commands from the buffer.
ConfirmationWindowSize to -1 (default) disables buffering and prevents re-attachment from occurring, forcing reconnect instead.
ConfirmationWindowSize parameter in the <JBOSS_HOME>/jboss-as/server/<PROFILE>/deploy/jms-ra.rar/META-INF/ra.xml file. If you are using JMS, but not JNDI, set these values directly on the HornetQConnectionFactory instance with the appropriate setter method. If you are using Core, you can set these values directly on the ClientSessionFactory instance with the appropriate setter method.
32.2. Session reconnection
32.3. Configuring reconnection/reattachment attributes
JBOSS_DIST/jboss-as/server/<PROFILE>/deploy/hornetq/hornetq-jms.xml like so:
<connection-factory name="NettyConnectionFactory">
   <xa>true</xa>
   <connectors>
      <connector-ref connector-name="netty"/>
   </connectors>
   <entries>
      <entry name="/ConnectionFactory"/>
      <entry name="/XAConnectionFactory"/>
   </entries>
</connection-factory>
HornetQConnectionFactory immediately after its creation.
ClientSessionFactory instance directly, you can also specify the parameters using the appropriate setter methods on the ClientSessionFactory immediately after its creation.
ExceptionListener or SessionFailureListener instances registered on the connection or session will be called.
Note
ExceptionListener or Core SessionFailureListener instances are called when a client reconnects or re-attaches.
Chapter 33. Diverting and Splitting Message Flows
Transformer. If specified, all diverted messages can be transformed by this Transformer.
<JBOSS_HOME>/jboss-as/server/<PROFILE>/deploy/hornetq/hornetq-configuration.xml file. There can be zero or more diverts in the file.
33.1. Exclusive Diverts
<JBOSS_HOME>/jboss-as/server/<PROFILE>/deploy/hornetq/hornetq-configuration.xml using the following directives:
<divert name="prices-divert">
   <address>jms.topic.priceUpdates</address>
   <forwarding-address>jms.queue.priceForwarding</forwarding-address>
   <filter string="office='New York'"/>
   <transformer-class-name>
    org.hornetq.jms.example.AddForwardingTimeTransformer
   </transformer-class-name>
   <exclusive>true</exclusive>
</divert>prices-divert divert specified above diverts any messages sent to the address jms.topic.priceUpdates (a local JMS Topic called priceUpdates) to another local address jms.queue.priceForwarding (a local JMS Queue called priceForwarding).
filter string is also specified so that only messages with the message property office='New York' are diverted. All other messages continue to be routed to their usual address. The filter string is optional; if it is not specified, all messages are diverted.
33.2. Non-exclusive Diverts
<divert name="order-divert">
   <address>jms.queue.orders</address>
   <forwarding-address>jms.topic.spyTopic</forwarding-address>
   <exclusive>false</exclusive>
</divert>
order-divert example copies every message sent to the jms.queue.orders address (a JMS Queue called orders) and forwards the copy to a local address jms.topic.SpyTopic (a JMS Topic called SpyTopic).
Chapter 34. Core Bridges
Note
34.1. Configuring Bridges
<JBOSS_HOME>/jboss-as/server/<PROFILE>/deploy/hornetq/hornetq-configuration.xml. An example follows (this is actually from the bridge example):
<bridge name="my-bridge">
   <queue-name>jms.queue.sausage-factory</queue-name>
   <forwarding-address>jms.queue.mincing-machine</forwarding-address>
   <filter string="name='aardvark'"/>
   <transformer-class-name>
        org.hornetq.jms.example.HatColourChangeTransformer
   </transformer-class-name>
   <retry-interval>1000</retry-interval>
   <retry-interval-multiplier>1.0</retry-interval-multiplier>
   <reconnect-attempts>-1</reconnect-attempts>
   <failover-on-server-shutdown>false</failover-on-server-shutdown>
   <use-duplicate-detection>true</use-duplicate-detection>
   <confirmation-window-size>10000000</confirmation-window-size>
   <connector-ref connector-name="remote-connector"
        backup-connector-name="backup-remote-connector"/>
   <user>foouser</user>
   <password>foopassword</password>
</bridge>
Core Bridge Parameters
-
name - All bridges must have a unique name in the server.
-
queue-name - This is the unique name of the local queue that the bridge consumes from, it is a mandatory parameter.The queue must already exist by the time the bridge is instantiated at start-up.
Note
JBOSS_DIST/jboss-as/server/<PROFILE>/deploy/hornetq/hornetq-jms.xml) is loaded after the core configuration file <JBOSS_HOME>/jboss-as/server/<PROFILE>/deploy/hornetq/hornetq-configuration.xml is loaded. If the bridge is consuming from a JMS queue then ensure that the JMS queue is also deployed as a core queue in the core configuration. Refer to the bridge example for an example of this.
-
forwarding-address - This is the address on the target server that the message will be forwarded to. If a forwarding address is not specified, then the original address of the message will be retained.
-
filter-string - An optional filter string can be supplied. If specified, only messages which match the filter expression specified in the filter string will be forwarded. The filter string follows the HornetQ filter expression syntax described in Chapter 12, Filter Expressions.
-
transformer-class-name - An optional transformer-class-name can be specified. This is the name of a user-defined class which implements the
org.hornetq.core.server.cluster.Transformerinterface.If this is specified then the transformer'stransform()method will be invoked with the message before it is forwarded. This allows the opportunity to transform the message header or body before forwarding -
retry-interval - This optional parameter determines the period in milliseconds between subsequent reconnection attempts, if the connection to the target server has failed. The default value is
2000milliseconds. -
retry-interval-multiplier - This optional parameter determines a multiplier to apply to the time since the last retry in order to compute the time to the next retry.This allows an exponential backoff between retry attempts to be implemented.For example:If
retry-intervalis set to1000ms andretry-interval-multiplieris set to2.0, then, if the first reconnect attempt fails, there will be a wait of1000ms, then2000ms and then4000ms between subsequent reconnection attempts.The default value is1.0meaning each reconnect attempt is spaced at equal intervals. -
reconnect-attempts - This optional parameter determines the total number of reconnect attempts the bridge will make before giving up and shutting down. A value of
-1signifies an unlimited number of attempts. The default value is-1. -
failover-on-server-shutdown - This optional parameter determines whether the bridge will attempt to fail-over onto a backup server (if specified) when the target server is cleanly shutdown rather than crashed.The bridge connector can specify both a live and a backup server. If it specifies a backup server and this parameter is set to
true, then if the target server is cleanly shutdown the bridge connection will attempt to fail-over onto its backup. If the bridge connector has no backup server configured, this parameter has no effect.This parameter is useful when occasionally a bridge configured with a live and a backup target server is required, but fail-over to the backup is not required if the live server is taken down temporarily for maintenance.The default value for this parameter isfalse. -
use-duplicate-detection - This optional parameter determines whether the bridge will automatically insert a duplicate id property into each message that it forwards.Doing so, allows the target server to perform duplicate detection on messages it receives from the source server. If the connection fails or the server crashes, when the bridge resumes it will resend unacknowledged messages. This might result in duplicate messages being sent to the target server. Enabling duplicate detection allows these duplicates to be screened out and ignored.This allows the bridge to provide a once and only once delivery guarantee without using heavyweight methods such as XA (Refer to Chapter 35, Duplicate Message Detection for more information).The default value for this parameter is
true. -
confirmation-window-size - This optional parameter determines the
confirmation-window-sizeto use for the connection used to forward messages to the target node. This attribute is described in section Chapter 32, Client Reconnection and Session Reattachment.
Warning
max-size-bytes to prevent the flow of messages from ceasing.
-
connector-ref - This mandatory parameter determines which connector pair the bridge will use to actually make the connection to the target server.A connector encapsulates knowledge of what transport to use (TCP, SSL, HTTP etc) as well as the server connection parameters (host, port etc). For more information on connectors and their configuration, refer to Chapter 14, Configuring the Transport.The
connector-refelement can be configured with two attributes:connector-name. This references the name of a connector defined in<JBOSS_HOME>/jboss-as/server/<PROFILE>/deploy/hornetq/hornetq-configuration.xml. The bridge will use this connector to make its connection to the target server. This attribute is mandatory.backup-connector-name. This optional parameter also references the name of a connector defined in<JBOSS_HOME>/jboss-as/server/<PROFILE>/deploy/hornetq/hornetq-configuration.xml. It represents the connector that the bridge will fail-over to if it detects that the live server connection has failed. If this is specified andfailover-on-server-shutdownis set totruethen it will also attempt fail-over onto this connector if the live target server is cleanly shut-down.
-
user - This optional parameter determines the user name to use when creating the bridge connection to the remote server. If it is not specified the default cluster user specified by
cluster-userin<JBOSS_HOME>/jboss-as/server/<PROFILE>/deploy/hornetq/hornetq-configuration.xmlis used. -
password - This optional parameter determines the password to use when creating the bridge connection to the remote server. If it is not specified, the default cluster password specified by
cluster-passwordin<JBOSS_HOME>/jboss-as/server/<PROFILE>/deploy/hornetq/hornetq-configuration.xmlis used.
Chapter 35. Duplicate Message Detection
35.1. Using Duplicate Detection for Message Sending
Note
org.hornetq.api.core.HDR_DUPLICATE_DETECTION_ID, which is _HQ_DUPL_ID.
byte[] or SimpleString if using the core API. If using JMS it must be a String, and its value should be unique. An easy way of generating a unique ID is by generating a UUID.
...

ClientMessage message = session.createMessage(true);

SimpleString myUniqueID = "This is my unique id";   // Could use a UUID for this

message.setStringProperty(HDR_DUPLICATE_DETECTION_ID, myUniqueID);

...
...

Message jmsMessage = session.createMessage();

String myUniqueID = "This is my unique id";   // Could use a UUID for this

message.setStringProperty(HDR_DUPLICATE_DETECTION_ID.toString(), myUniqueID);

...
35.2. Configuring the Duplicate ID Cache
org.hornetq.core.message.impl.HDR_DUPLICATE_DETECTION_ID property sent to each address. Each address has its own distinct cache.
n elements, then the n + 1th id stored will overwrite the 0th element in the cache.
id-cache-size in <JBOSS_HOME>/jboss-as/server/<PROFILE>/deploy/hornetq/hornetq-configuration.xml. The default value is 2000 (elements).
persist-id-cache, also in <JBOSS_HOME>/jboss-as/server/<PROFILE>/deploy/hornetq/hornetq-configuration.xml. If this is set to true then each id will be persisted to permanent storage as it is received. The default value for this parameter is true.
Note
35.3. Duplicate Detection and Bridges
use-duplicate-detection to true when configuring a bridge in <JBOSS_HOME>/jboss-as/server/<PROFILE>/deploy/hornetq/hornetq-configuration.xml.
true.
35.4. Duplicate Detection and Cluster Connections
use-duplicate-detection to true when configuring a cluster connection in <JBOSS_HOME>/jboss-as/server/<PROFILE>/deploy/hornetq/hornetq-configuration.xml.
true.
35.5. Duplicate Detection and Paging
Chapter 36. Clusters
36.1. Clusters Overview
clustered element in <JBOSS_HOME>/jboss-as/server/<PROFILE>/deploy/hornetq/hornetq-configuration.xml to true (false by default).
Important
/hornetq directory, which is all profiles excluding Minimal and Web. Those profiles not containing a /hornetq directory do not natively contain the correct components to support a cluster.
<JBOSS_HOME>/jboss-as/server/<PROFILE>/deploy/hornetq/hornetq-configuration.xml. When a node forms a cluster connection to another node, internally it creates a core bridge (as described in Chapter 34, Core Bridges) connection between it and the other node, this is done transparently behind the scenes - you do not need to declare an explicit bridge for each node. These cluster connections allow messages to flow between the nodes of the cluster to balance load.
Warning
36.2. Server discovery
- Messaging clients. A messaging client wants to be able to connect to the servers of the cluster without having specific knowledge of which servers in the cluster are up at any one time.
- Other servers. Servers in a cluster want to be able to create cluster connections to each other without having prior knowledge of all the other servers in the cluster.
36.2.1. Broadcast Groups
<JBOSS_HOME>/jboss-as/server/<PROFILE>/deploy/hornetq/hornetq-configuration.xml. There can be many broadcast groups per HornetQ server. All broadcast groups must be defined in a broadcast-groups element.
<JBOSS_HOME>/jboss-as/server/<PROFILE>/deploy/hornetq/hornetq-configuration.xml:
<broadcast-groups>
   <broadcast-group name="my-broadcast-group">
      <local-bind-address>172.16.9.3</local-bind-address>
      <local-bind-port>5432</local-bind-port>
      <group-address>231.7.7.7</group-address>
      <group-port>9876</group-port>
      <broadcast-period>2000</broadcast-period>
      <connector-ref>netty</connector-ref>
   </broadcast-group>
</broadcast-groups>Broadcast Group Parameters
-
name - Each broadcast group in the server must have a unique name in the server.
-
local-bind-address - This is the local bind address that the datagram socket is bound to. If you have multiple network interfaces on your server, you would specify which one you wish to use for broadcasts by setting this property. If this property is not specified then the socket will be bound to the wildcard address, an IP address chosen by the kernel.
-
local-bind-port - If you want to specify a local port to which the datagram socket is bound you can specify it here. Normally you would just use the default value of
-1which signifies that an anonymous port should be used. This parameter is always specified in conjunction withlocal-bind-address.If you are behind a firewall you can utilizelocal-bind-addressandlocal-bind-portto specify a static host and port. However, it is highly unlikely that a cluster would be configured with server instances outside a firewall which would need to communicate with the server which are behind the firewall. -
group-address - This is the multicast address to which the data will be broadcast. It is a class D IP address in the range
224.0.0.0to239.255.255.255, inclusive. The address224.0.0.0is reserved and is not available for use. This parameter is mandatory. -
group-port - This is the UDP port number used for broadcasting. This parameter is mandatory.
-
broadcast-period - This is the period in milliseconds between consecutive broadcasts. This parameter is optional, the default value is
2000milliseconds. -
connector-ref - This specifies the connector and optional backup connector that will be broadcast (see Chapter 14, Configuring the Transport for more information on connectors).
36.2.2. Discovery Groups
- By cluster connections so they know what other servers in the cluster they should make connections to.
- By messaging clients so they can discover what servers in the cluster they can connect to.
36.2.3. Defining Discovery Groups on the Server
<JBOSS_HOME>/jboss-as/server/<PROFILE>/deploy/hornetq/hornetq-configuration.xml. All discovery groups must be defined inside a discovery-groups element. There can be many discovery groups defined by HornetQ server. Let us look at an example:
<discovery-groups>
   <discovery-group name="my-discovery-group">
      <local-bind-address>172.16.9.7</local-bind-address>
      <group-address>231.7.7.7</group-address>
      <group-port>9876</group-port>
      <refresh-timeout>10000</refresh-timeout>
   </discovery-group>
</discovery-groups>Discovery Group Parameters
-
name - Each discovery group must have a unique name per server.
-
local-bind-address - If you are running with multiple network interfaces on the same machine, you may want to specify that the discovery group only listens on a specific interface. To do this you can specify the interface address with this parameter. This parameter is optional.
-
group-address - This is the multicast IP address of the group to listen on. It should match the
group-addressin the broadcast group that you wish to listen from. This parameter is mandatory. -
group-port - This is the UDP port of the multicast group. It should match the
group-portin the broadcast group that you wish to listen from. This parameter is mandatory. -
refresh-timeout - This is the period the discovery group waits after receiving the last broadcast from a particular server before removing that server's connector pair entry from its list. You would normally set this to a value significantly higher than the
broadcast-periodon the broadcast group otherwise servers might intermittently disappear from the list even though they are still broadcasting due to slight differences in timing. This parameter is optional, the default value is10000milliseconds (10 seconds).
36.2.4. Discovery Groups on the Client Side
36.2.4.1. Configuring client discovery using JMS
JBOSS_DIST/jboss-as/server/<PROFILE>/deploy/hornetq/hornetq-jms.xml. Let us take a look at an example:
<connection-factory name="ConnectionFactory">
   <discovery-group-ref discovery-group-name="my-discovery-group"/>
    <entries>
       <entry name="/ConnectionFactory"/>
    </entries>
</connection-factory>discovery-group-ref specifies the name of a discovery group defined in <JBOSS_HOME>/jboss-as/server/<PROFILE>/deploy/hornetq/hornetq-configuration.xml.
final String groupAddress = "231.7.7.7";

final int groupPort = 9876;

ConnectionFactory jmsConnectionFactory =
   HornetQJMSClient.createConnectionFactory(groupAddress, groupPort);

Connection jmsConnection1 = jmsConnectionFactory.createConnection();

Connection jmsConnection2 = jmsConnectionFactory.createConnection();
refresh-timeout can be set directly on the connection factory by using the setter method setDiscoveryRefreshTimeout() if you want to change the default value.
setDiscoveryInitialWaitTimeout(). If the connection factory is used immediately after creation then it may not have had enough time to receive broadcasts from all the nodes in the cluster. On first usage, the connection factory will make sure it waits this long since creation before creating the first connection. The default value for this parameter is 10000 milliseconds.
36.2.4.2. Configuring client discovery using Core
ClientSessionFactory instances, then you can specify the discovery group parameters directly when creating the session factory. Here is an example:
final String groupAddress = "231.7.7.7";
final int groupPort = 9876;
SessionFactory factory = HornetQClient.createClientSessionFactory
  (groupAddress, groupPort);
ClientSession session1 = factory.createClientSession(...);
ClientSession session2 = factory.createClientSession(...);
refresh-timeout can be set directly on the session factory by using the setter method setDiscoveryRefreshTimeout() if you want to change the default value.
setDiscoveryInitialWaitTimeout(). If the session factory is used immediately after creation then it may not have had enough time to receive broadcasts from all the nodes in the cluster. On first usage, the session factory will make sure it waits this long since creation before creating the first session. The default value for this parameter is 10000 milliseconds.
36.3. Server-Side Message Load Balancing
OrderQueue is deployed on each node of the cluster.
OrderQueue on node A, so they will get consumed by the order processor client attached to node A, Pa.
OrderQueue instance. The messages are forwarded from the receiving node to other nodes of the cluster. This is all done on the server side, the client maintains a single connection to node A.
36.3.1. Configuring Cluster Connections
<JBOSS_HOME>/jboss-as/server/<PROFILE>/deploy/hornetq/hornetq-configuration.xml inside a cluster-connection element. There can be zero or more cluster connections defined per HornetQ server.
<cluster-connections>
   <cluster-connection name="my-cluster">
      <address>jms</address>
      <retry-interval>500</retry-interval>
      <use-duplicate-detection>true</use-duplicate-detection>
      <forward-when-no-consumers>false</forward-when-no-consumers>
      <max-hops>1</max-hops>
      <discovery-group-ref discovery-group-name="my-discovery-group"/>
   </cluster-connection>
</cluster-connections>address. Each cluster connection only applies to messages sent to an address that starts with this value.In this case, this cluster connection will load balance messages sent to address that start withjms. This cluster connection, applies to all JMS queue and topic subscriptions since they map to core queues that start with the substring "jms".The address can be any value and you can have many cluster connections with different values ofaddress, simultaneously balancing messages for those addresses, potentially to different clusters of servers. By having multiple cluster connections on different addresses a single HornetQ Server can effectively take part in multiple clusters simultaneously.Be careful not to have multiple cluster connections with overlapping values ofaddress, (for example, "europe" and "europe.news") since this could result in the same messages being distributed between more than one cluster connection, possibly resulting in duplicate deliveries.This parameter is mandatory.discovery-group-ref. This parameter determines which discovery group is used to obtain the list of other servers in the cluster to which this cluster connection will make connections.forward-when-no-consumers. This parameter determines whether messages will be distributed round robin between other nodes of the cluster irrespective of whether there are matching or indeed any consumers on other nodes.If this is set totruethen each incoming message will be processed in a round robin style even though the same queues on the other nodes of the cluster may have no consumers at all, or they may have consumers that have non matching message filters (selectors). Note that HornetQ will not forward messages to other nodes if there are no queues of the same name on the other nodes, even if this parameter is set totrue.If this is set tofalsethen HornetQ will only forward messages to other nodes of the cluster if the address to which they are being forwarded has queues which have consumers, and if those consumers have message filters (selectors) at least one of those selectors must match the message.This parameter is optional and the default value isfalse.max-hops. When a cluster connection decides the set of nodes to which it might load balance a message, those nodes do not have to be directly connected to it via a cluster connection. HornetQ can be configured to also load balance messages to nodes which might be connected to it only indirectly with other HornetQ servers as intermediates in a chain.This allows HornetQ to be configured in more complex topologies and still provide message load balancing. This is covered later in this chapter.The default value for this parameter is1, which means messages are only load balanced to other HornetQ serves which are directly connected to this server. This parameter is optional.min-large-message-size. This parameter determines the size threshold above which a message will be split into multiple packages when sent over the cluster. This parameter is optional and the default is100 kB.reconnect-attempts. This parameter determines the number of times the system will try to connect a node on the cluster. If the max-retry is achieved this node will be considered permanently down and the system will stop routing messages to it. This parameter is optional and the default is-1(infinite retries).retry-interval. Internally, cluster connections cause bridges to be created between the nodes of the cluster. If the cluster connection is created and the target node has not been started, or say, is being rebooted, then the cluster connections from other nodes will retry connecting to the target until it comes back up, in the same way as a bridge does.This parameter determines the interval in milliseconds between retry attempts. It has the same meaning as theretry-intervalon a bridge (as described in Chapter 34, Core Bridges).This parameter is optional and its default value is500milliseconds.use-duplicate-detection. Internally cluster connections use bridges to link the nodes, and bridges can be configured to add a duplicate id property in each message that is forwarded. If the target node of the bridge crashes and then recovers, messages might be resent from the source node. By enabling duplicate detection any duplicate messages will be filtered out and ignored on receipt at the target node.This parameter has the same meaning asuse-duplicate-detectionon a bridge. For more information on duplicate detection, refer to Chapter 35, Duplicate Message Detection.This parameter is optional and has a default value oftrue.
36.3.2. Cluster User Credentials
<JBOSS_HOME>/jboss-as/server/<PROFILE>/deploy/hornetq/hornetq-configuration.xml:
                <cluster-user>HORNETQ.CLUSTER.ADMIN.USER</cluster-user>
                <cluster-password>CHANGE ME!!</cluster-password>
Warning
36.4. Client-Side Load balancing
- Round Robin. With this policy the first node is chosen randomly then each subsequent node is chosen sequentially in the same order.For example nodes might be chosen in the order B, C, D, A, B, C, D, A, B or D, A, B, C, A, B, C, D, A or C, D, A, B, C, D, A, B, C, D, A.
- Random. With this policy each node is chosen randomly.
org.hornetq.api.core.client.loadbalance.ConnectionLoadBalancingPolicy
org.hornetq.api.core.client.loadbalance.RoundRobinConnectionLoadBalancingPolicy.
JBOSS_DIST/jboss-as/server/<PROFILE>/deploy/hornetq/hornetq-jms.xml configuration file on the server as follows:
<connection-factory name="ConnectionFactory">
   <discovery-group-ref discovery-group-name="my-discovery-group"/>
   <entries>
      <entry name="/ConnectionFactory"/>
   </entries>
   <ha>true</ha>
   <connection-load-balancing-policy-class-name>
    org.hornetq.api.core.client.loadbalance.RandomConnectionLoadBalancingPolicy
   </connection-load-balancing-policy-class-name>
</connection-factory>
The above example would deploy a JMS connection factory that uses the random connection load balancing policy.
HornetQConnectionFactory before using it:
ConnectionFactory jmsConnectionFactory = HornetQJMSClient.createConnectionFactory(...);
jmsConnectionFactory.setLoadBalancingPolicyClassName("com.acme.MyLoadBalancingPolicy");
ClientSessionFactory instance you are using:
ClientSessionFactory factory = HornetQClient.createClientSessionFactory(...);
factory.setLoadBalancingPolicyClassName("com.acme.MyLoadBalancingPolicy");
- Specifying servers explicitly
- Using discovery.
36.5. Specifying Members of a Cluster Explicitly
36.5.1. Specify List of Servers on the Client Side
36.5.1.1. Specifying List of Servers using JMS
JBOSS_DIST/jboss-as/server/<PROFILE>/deploy/hornetq/hornetq-jms.xml. Let us take a look at an example:
<connection-factory name="ConnectionFactory">
   <connectors>
      <connector-ref connector-name="my-connector1"
       backup-connector-name="my-backup-connector1"/>
      <connector-ref connector-name="my-connector2"
       backup-connector-name="my-backup-connector2"/>
      <connector-ref connector-name="my-connector3"
       backup-connector-name="my-backup-connector3"/>
   </connectors>
   <entries>
      <entry name="/ConnectionFactory"/>
   </entries>
</connection-factory>connection-factory element can contain zero or more connector-ref elements, each one of which specifies a connector-name attribute and an optional backup-connector-name attribute. The connector-name attribute references a connector defined in <JBOSS_HOME>/jboss-as/server/<PROFILE>/deploy/hornetq/hornetq-configuration.xml which will be used as a live connector. The backup-connector-name is optional, and if specified it also references a connector defined in hornetq-configuration.xml. For more information on connectors refer to Chapter 14, Configuring the Transport.
HornetQConnectionFactory. Here is an example:
List<Pair<TransportConfiguration, TransportConfiguration>> serverList =
        new ArrayList<Pair<TransportConfiguration, TransportConfiguration>>();

serverList.add(new Pair<TransportConfiguration,
        TransportConfiguration>(liveTC0, backupTC0));
serverList.add(new Pair<TransportConfiguration,
        TransportConfiguration>(liveTC1, backupTC1));
serverList.add(new Pair<TransportConfiguration,
        TransportConfiguration>(liveTC2, backupTC2));

ConnectionFactory jmsConnectionFactory = HornetQJMSClient.createConnectionFactory(serverList);

Connection jmsConnection1 = jmsConnectionFactory.createConnection();

Connection jmsConnection2 = jmsConnectionFactory.createConnection();
TransportConfiguration objects. Each TransportConfiguration object contains knowledge of how to make a connection to a specific server.
HornetQConnectionFactory instance, passing the list of servers in the constructor. Any connections subsequently created by this factory will create connections according to the client connection load balancing policy applied to that list of servers.
36.5.1.2. Specifying List of Servers using the Core API
ClientSessionFactory instance as in the following example:
List<Pair<TransportConfiguration, TransportConfiguration>> serverList =
        new ArrayList<Pair<TransportConfiguration, TransportConfiguration>>();

serverList.add(new Pair<TransportConfiguration,
        TransportConfiguration>(liveTC0, backupTC0));
serverList.add(new Pair<TransportConfiguration,
        TransportConfiguration>(liveTC1, backupTC1));
serverList.add(new Pair<TransportConfiguration,
        TransportConfiguration>(liveTC2, backupTC2));

ClientSessionFactory factory = HornetQClient.createClientSessionFactory(serverList);

ClientSession session1 = factory.createClientSession(...);

ClientSession session2 = factory.createClientSession(...);TransportConfiguration objects. Each TransportConfiguration object contains knowledge of how to make a connection to a specific server. For more information on this, refer to Chapter 14, Configuring the Transport.
ClientSessionFactoryImpl instance is then created passing the list of servers in the constructor. Any sessions subsequently created by this factory will create sessions according to the client connection load balancing policy applied to that list of servers.
36.5.2. Specifying a Static Cluster Server List
Important
Task: Specify Cluster Server List without Auto Discovery
Prerequisites
- The
<JBOSS_HOME>/jboss-as/server/<PROFILE>/deploy/hornetq/hornetq-configuration.xmlfile open, ready to add directives. - Understand the
hornetq-configuration.xmlconfiguration directives, as detailed in Section A.1.1, “hornetq-configuration.xml”.
Define Connectors
In thehornetq-configuraton.xmlfile, insert a <connectors> directive block defining the remoting connector factory, the names of connectors, and the ports each connector will use.Each connector must use a unique port.<connectors> <connector name="netty-connector"> <factory-class> org.hornetq.core.remoting.impl.netty.NettyConnectorFactory </factory-class> <param key="port" value="5445"/> </connector> <!-- connector to the server1 --> <connector name="server1-connector"> <factory-class> org.hornetq.core.remoting.impl.netty.NettyConnectorFactory </factory-class> <param key="port" value="5446"/> </connector> <!-- connector to the server2 --> <connector name="server2-connector"> <factory-class> org.hornetq.core.remoting.impl.netty.NettyConnectorFactory </factory-class> <param key="port" value="5447"/> </connector> </connectors>Define Cluster Connection
Insert a <cluster-connection> directive block. The block must contain mandatory clustering directives, and the <connector-ref> directives set in the previous step. The <connector-ref> directives use the name attribute set in the <connector> directives.<cluster-connections> <cluster-connection name="my-cluster"> <address>jms</address> <connector-ref>netty-connector</connector-ref> <retry-interval>500</retry-interval> <use-duplicate-detection>true</use-duplicate-detection> <forward-when-no-consumers>true</forward-when-no-consumers> <max-hops>1</max-hops> <static-connectors> <connector-ref>server1-connector</connector-ref> <connector-ref>server2-connector</connector-ref> </static-connectors> </cluster-connection> </cluster-connections>Result
The cluster is now defined with the directives required for server discovery using explicit server names.
36.6. Message Redistribution
forward-when-no-consumers is false, messages will not be forwarded to nodes which do not have matching consumers. This ensures that messages do not arrive on a queue which has no consumers to consume them, however there is a situation it does not solve: What happens if the consumers on a queue close after the messages have been sent to the node? If there are no consumers on the queue the message will not get consumed and a starvation situation will be created.
<JBOSS_HOME>/jboss-as/server/<PROFILE>/deploy/hornetq/hornetq-configuration.xml showing how message redistribution is enabled for a set of queues follows:
<address-settings>
   <address-setting match="jms.#">
      <redistribution-delay>0</redistribution-delay>
   </address-setting>
</address-settings>address-settings block would set a redistribution-delay of 0 for any queue which is bound to an address that starts with "jms.". All JMS queues and topic subscriptions are bound to addresses that start with "jms.", so the above would enable instant (no delay) redistribution for all JMS queues and topic subscriptions.
match can be an exact match or it can be a string that conforms to the HornetQ wildcard syntax (described in Chapter 11, Understanding the HornetQ Wildcard Syntax).
redistribution-delay defines the delay in milliseconds after the last consumer is closed on a queue before redistributing messages from that queue to other nodes of the cluster which do have matching consumers. A delay of zero means the messages will be immediately redistributed. A value of -1 signifies that messages will never be redistributed.
36.7. Cluster topologies
36.7.1. Symmetric cluster
max-hops set to 1. Typically the cluster connection will use server discovery in order to know what other servers in the cluster it should connect to, although it is possible to explicitly define each target server too in the cluster connection if, for example, UDP is not available on your network.
36.7.2. Chain cluster
max-hops to 2. With a value of 2 the knowledge of what queues and consumers that exist on node C would be propagated from node C to node B to node A. Node A would then know to distribute messages to node B when they arrive, even though node B has no consumers itself, it would know that a further hop away is node C which does have consumers.
Chapter 37. High Availability and Fail-over
Warning
37.1. Live - Backup Pairs
37.1.1. HA modes
Note
37.2. Fail-over Modes
- Automatic client fail-over
- Application-level client fail-over
37.2.1. Automatic Client fail-over
client-failure-check-period as explained in section Chapter 15, Detecting Dead Connections. If the client does not receive data in good time, it will assume the connection has failed and attempt fail-over.
FailoverOnServerShutdown to true either on the HornetQConnectionFactory if using JMS or in the JBOSS_DIST/jboss-as/server/<PROFILE>/deploy/hornetq/hornetq-jms.xml file when defining the connection factory, or if using core by setting the property directly on the ClientSessionFactoryImpl instance after creation. The default value for this property is false, this means that by default HornetQ clients will not fail-over to a backup server if the live server is shutdown cleanly.
Note
FailoverOnServerShutdown to true.
FailoverOnInitialConnection, or failover-on-initial-connection in XML, on the ClientSessionFactoryImpl or HornetQConnectionFactory. The default value for this parameter is false.
Note
37.2.1.1. Handling Blocking Calls During fail-over
javax.jms.JMSException (if using JMS), or a HornetQException with error code HornetQException.UNBLOCKED. It is up to the client code to catch this exception and retry any operations if desired.
javax.jms.TransactionRolledBackException (if using JMS), or a HornetQException with error code HornetQException.TRANSACTION_ROLLED_BACK if using the core API.
37.2.1.2. Handling fail-over With Transactions
javax.jms.TransactionRolledBackException (if using JMS), or a HornetQException with error code HornetQException.TRANSACTION_ROLLED_BACK if using the core API.
Note
37.2.1.3. Handling fail-over With Non Transactional Sessions
37.2.2. Getting Notified of Connection Failure
java.jms.ExceptionListener. For more information about ExceptionListener, refer to the Oracle javax.jms Javadoc.
org.hornet.core.client.SessionFailureListener
ExceptionListener or Core SessionFailureListener instance will always be called by HornetQ in the event of connection failure, irrespective of whether the connection was successfully failed over, reconnected or reattached.
37.2.3. Application-Level fail-over
ExceptionListener class on the JMS connection. The ExceptionListener will be called by HornetQ in the event that connection failure is detected. In ExceptionListener, close the old JMS connections, potentially look up new connection factory instances from JNDI and creating new connections. In this case you may well be using HA-JNDI to ensure that the new connection factory is looked up from a different server.
SessionFailureListener on the core ClientSession instances.
37.3. Fencing
Chapter 38. Colocated and Dedicated Symmetrical Cluster Configuration
An instance of HornetQ running on JBoss Enterprise Application Platform that is configured to fail over to a specified group of HornetQ instances.
- Colocated
- Topology containing one live, and at least one back-up server running concurrently. Each backup node belongs to a live node on another JBoss Enterprise Application Platform instance.
- Dedicated
- Topology containing one live and at least one backup server. Only one server can run at any given time.
38.1. Colocated Symmetrical Live and Backup Cluster
Note
$JBOSS_HOME/extras/hornetq/resources/examples/symmetric-cluster-with-backups-colocated. The readme in this directory provides basic configuration required to run the example.
Example 38.1. Two Instance Configuration
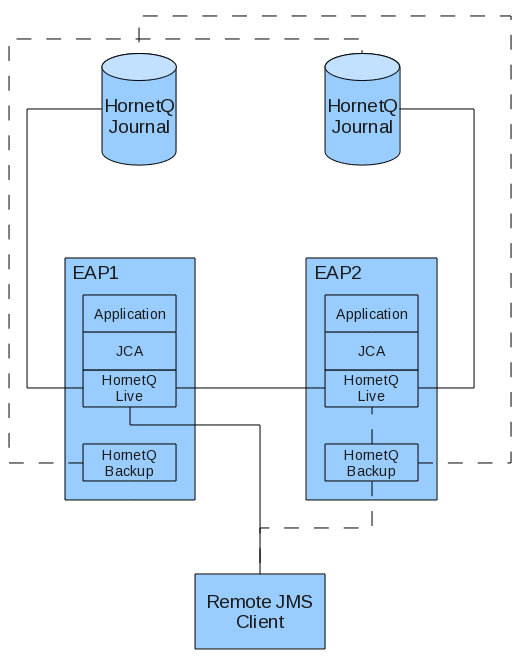
Note
Example 38.2. Three Instance Configuration
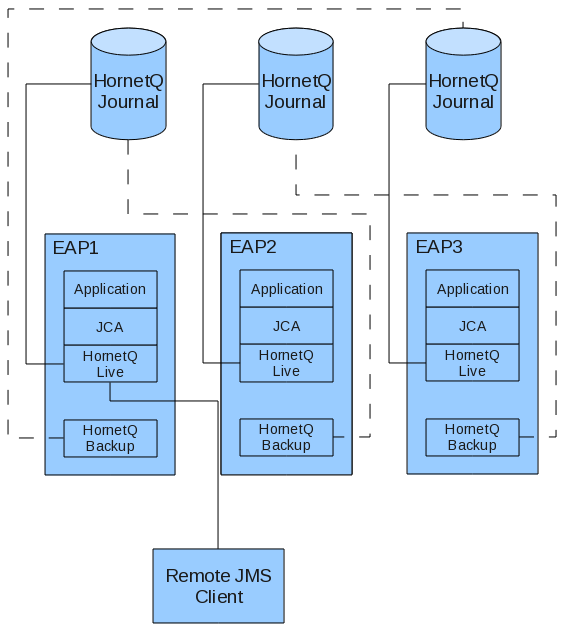
38.1.1. Colocated Live Server
Important
Procedure 38.1. Create Live Server Profile
production profile to customize the live server configuration.
Important
- Navigate to
$JBOSS_HOME/server/ - Copy the
productionprofile, and rename it toHornetQ_Colocated
Procedure 38.2. Configure Shared Store and Journaling
- Navigate to
$JBOSS_HOME/server/HornetQ_Colocated/deploy/hornetq/ - Open
- Add the <shared-store> element as a child of the <configuration> element.
<shared-store>true</shared-store>
- Ensure the bindings, journal, and large messages path locations are set to a location the live backup group can access.You can set absolute paths as the example describes, or use the JBoss parameters that exist in the configuration file.If you choose the parameter option, and you do not use the default paths that these parameters resolve to, you must specify the path your bindings, journal, and large messages reside in each time you start the server.
<large-messages-directory>/media/shared/data/serverA/large-messages</large-messages-directory>

<bindings-directory>/media/shared/data/serverA/bindings</bindings-directory>

<journal-directory>/media/shared/data/serverA/journal</journal-directory>

<paging-directory>/media/shared/data/ServerA/paging</paging-directory>
Note
Ensure you specify paths that are accessible to the live backup groups on your network.Note
Change ServerA to the name suitable to your server instance.
Procedure 38.3. Configure JMS Client Graceful Shutdown
- Navigate to
$JBOSS_HOME/server/HornetQ_Colocated/deploy/hornetq/ - Open
hornetq-configuration.xml - Specify the <fail-over-on-shutdown> element in the area near the journal directory configuration in Procedure 38.2, “Configure Shared Store and Journaling”.
<failover-on-shutdown>true</failover-on-shutdown>
Note
You are not constrained where you put the element in thehornetq-configuration.xmlfile, however it is easier to find the less detailed settings if they are all located at the top of the file. - Save and close the file.
Note
forceFailover through the JMX Console or the Admin Console on the core server object.
JBOSS_DIST/jboss-as/server/<PROFILE>/deploy/hornetq/hornetq-jms.xml.
Procedure 38.4. Configure HA Connection Factories
- Navigate to
$JBOSS_HOME/server/HornetQ_Colocated/deploy/hornetq/ - Open
hornetq-jms.xml. - Add the following attributes and values as specified below.
- <ha>true</ha>
- Specifies the client must support high availability, and must always be true for fail over to occur.
- <retry-interval>1000</retry-interval>
- Specifies how long the client must wait (in milliseconds) before it can reconnect to the server.
- <retry-interval-multiplier>1.0</retry-interval-multiplier>
- Specifies the multiplier <retry-interval> used for each subsequent reconnection pauses. By setting the value to
1.0, the retry interval is the same for each client reconnection request. - <reconnect-attempts>-1</reconnect-attempts>
- Specifies how many reconnect attempts a client should make before failing. Setting
-1means unlimited reconnection attempts.
<?xml version='1.0' encoding='UTF-8'?> <configuration xmlns="urn:hornetq" xmlns:xsi="http://www.w3.org/2001/XMLSchema-instance" xsi:schemaLocation="urn:hornetq /schema/hornetq-jms.xsd"> <connection-factory name="NettyConnectionFactory"> <xa>true</xa> <connectors> <connector-ref connector-name="netty"/> </connectors> <entries> <entry name="/ConnectionFactory"/> <entry name="/XAConnectionFactory"/> </entries> <ha>true</ha> <!-- Pause 1 second between connect attempts --> <retry-interval>1000</retry-interval> <!-- Multiply subsequent reconnect pauses by this multiplier. This can be used to implement an exponential back-off. For our purposes we just set to 1.0 so each reconnect pause is the same length --> <retry-interval-multiplier>1.0</retry-interval-multiplier> <!-- Try reconnecting an unlimited number of times (-1 means unlimited) --> <reconnect-attempts>-1</reconnect-attempts> </connection-factory> </configuration> - Define new queues in both master and backup nodes by adding one of the following configuration blocks to the specified file.For
production/deploy/hornetq/hornetq-jms.xml<queue name="testQueue"> <entry name="/queue/testQueue"/> <durable>true</durable> </queue>
Forproduction/deploy/customName-hornetq-jms.xmlNote
Ensure the file is well-formed from an XML validation perspective by ensuring the XML Namespace is present and correct in the file as specified.<configuration xmlns="urn:hornetq" xmlns:xsi="http://www.w3.org/2001/XMLSchema-instance" xsi:schemaLocation="urn:hornetq /schema/hornetq-jms.xsd"> <queue name="testQueue"> <entry name="/queue/testQueue"/> <durable>true</durable> </queue> </configuration>
38.1.2. Colocated Backup Server
hornetq-jboss-beans.xml and a hornetq-configuration.xml configuration file. Any JMS components are created from the shared journal when the backup server becomes live (configured in Procedure 38.2, “Configure Shared Store and Journaling”).
Procedure 38.5. Create Backup Server
Important
- Navigate to
$JBOSS_HOME/server/HornetQ_Colocated/deploy/ - Create a new directory called
hornetq-backup1. Move into that directory. - Open a text editor and create a new file called
hornetq-jboss-beans.xmlin thehornetq-backup1directory. - Copy the following configuration into
hornetq-jboss-beans.xml.<?xml version="1.0" encoding="UTF-8"?> <deployment xmlns="urn:jboss:bean-deployer:2.0"> <!-- The core configuration --> <bean name="BackupConfiguration" class="org.hornetq.core.config.impl.FileConfiguration"> <property name="configurationUrl">${jboss.server.home.url}/deploy/hornetq-backup1/hornetq-configuration.xml</property> </bean> <!-- The core server --> <bean name="BackupHornetQServer" class="org.hornetq.core.server.impl.HornetQServerImpl"> <constructor> <parameter> <inject bean="BackupConfiguration"/> </parameter> <parameter> <inject bean="MBeanServer"/> </parameter> <parameter> <inject bean="HornetQSecurityManager"/> </parameter> </constructor> <start ignored="true"/> <stop ignored="true"/> </bean> <!-- The JMS server --> <bean name="BackupJMSServerManager" class="org.hornetq.jms.server.impl.JMSServerManagerImpl"> <constructor> <parameter> <inject bean="BackupHornetQServer"/> </parameter> </constructor> </bean> </deployment> - Save and close the file.
hornetq-jboss-beans.xml file in Procedure 38.5, “Create Backup Server” contains configuration worth exploring in more detail. The BackupConfiguration bean is configured to pick up the configuration in hornetq-configuration.xml. This file is created in the next procedure: Procedure 38.6, “Create Backup Server Configuration File”.
Note
Procedure 38.6. Create Backup Server Configuration File
- Navigate to
$JBOSS_HOME/server/HornetQ_Colocated/deploy/hornetq-backup1 - Open a text editor and create a new file called
hornetq-configuration.xmlin thehornetq-backup1directory. - Copy the following configuration into
hornetq-configuration.xml<?xml version="1.0" encoding="UTF-8"?> <configuration xmlns="urn:hornetq" xmlns:xsi="http://www.w3.org/2001/XMLSchema-instance" xsi:schemaLocation="urn:hornetq /schema/hornetq-configuration.xsd"> <jmx-domain>org.hornetq.backup1</jmx-domain> <clustered>true</clustered> <backup>true</backup> <shared-store>true</shared-store> <allow-failback>true</allow-failback> <file-deployment-enabled>true</file-deployment-enabled> <log-delegate-factory-class-name> org.hornetq.integration.logging.Log4jLogDelegateFactory </log-delegate-factory-class-name> <bindings-directory> /media/shared/data/hornetq-backup/bindings </bindings-directory> <journal-directory>/media/shared/data/hornetq-backup/journal</journal-directory> <journal-min-files>10</journal-min-files> <large-messages-directory> /media/shared/data/hornetq-backup/largemessages </large-messages-directory> <paging-directory>/media/shared/data/hornetq-backup/paging</paging-directory> <connectors> <connector name="netty-connector"> <factory-class> org.hornetq.core.remoting.impl.netty.NettyConnectorFactory </factory-class> <param key="host" value="${jboss.bind.address:localhost}"/> <param key="port" value="${hornetq.remoting.netty.backup.port:5446}"/> </connector> <connector name="in-vm"> <factory-class> org.hornetq.core.remoting.impl.invm.InVMConnectorFactory </factory-class> <param key="server-id" value="${hornetq.server-id:0}"/> </connector> </connectors> <acceptors> <acceptor name="netty"> <factory-class> org.hornetq.core.remoting.impl.netty.NettyAcceptorFactory </factory-class> <param key="host" value="${jboss.bind.address:localhost}"/> <param key="port" value="${hornetq.remoting.netty.backup.port:5446}"/> </acceptor> </acceptors> <broadcast-groups> <broadcast-group name="bg-group1"> <group-address>231.7.7.7</group-address> <group-port>9876</group-port> <broadcast-period>1000</broadcast-period> <connector-ref>netty-connector</connector-ref> </broadcast-group> </broadcast-groups> <discovery-groups> <discovery-group name="dg-group1"> <group-address>231.7.7.7</group-address> <group-port>9876</group-port> <refresh-timeout>60000</refresh-timeout> </discovery-group> </discovery-groups> <cluster-connections> <cluster-connection name="my-cluster"> <address>jms</address> <connector-ref>netty-connector</connector-ref> <discovery-group-ref discovery-group-name="dg-group1"/> </cluster-connection> </cluster-connections> <security-settings> <security-setting match="#"> <permission type="createNonDurableQueue" roles="guest"/> <permission type="deleteNonDurableQueue" roles="guest"/> <permission type="consume" roles="guest"/> <permission type="send" roles="guest"/> </security-setting> </security-settings> <address-settings> <!--default for catch all--> <address-setting match="#"> <dead-letter-address>jms.queue.DLQ</dead-letter-address> <expiry-address>jms.queue.ExpiryQueue</expiry-address> <redelivery-delay>0</redelivery-delay> <max-size-bytes>10485760</max-size-bytes> <message-counter-history-day-limit>10</message-counter-history-day-limit> <address-full-policy>BLOCK</address-full-policy> </address-setting> </address-settings> </configuration> - Save and close the file.
hornetq-configuration.xml file in Procedure 38.6, “Create Backup Server Configuration File” contains specific configuration which is discussed in hornetq-configuration.xml Configuration Points.
hornetq-configuration.xml Configuration Points
- <jmx-domain>org.hornetq.backup1</jmx-domain>
- Specifies the object name (in this case the backup server) in the Java Management Extensions (JMX) service. The default value is
org.hornetq, however this name is already in use in other parts of HornetQ. You must change the name to a unique, system-wide name to avoid naming conflicts with the live server. - <clustered>true</clustered>
- Specifies whether the server should join a cluster. This configuration is the same as the live server.
- <backup>true</backup>
- Specifies whether the server starts as a backup server, and not a live server. Specifying true sets the server to start as a backup server.
- <shared-store>true</shared-store>
- Specifies whether the server should reference a shared store for journaling. This configuration is the same as the live server.
- <allow-failback>true</allow-failback>
- Specifies whether the backup server automatically stops and returns to standby mode when the live server becomes available again. If set to
false, the server must be stopped manually to trigger a return to standby mode. - <bindings-directory>, <journal-directory>, <large-messages-directory>, <paging-directory>
- The paths in these elements must all resolve to the same paths the live server references. This ensures the backup server uses the same journaling files as the live server.
- <connectors>
- Two connectors are defined that allow clients to connect to the backup server once live: one connector for the netty connector factory (to allow client and server connections across different Virtual Machines); and one connector to allow the server to accept connections within the VM.
- <acceptors>
- The NettyAcceptorFactory is chosen here for VM compatibility.
- <broadcast-groups>, <discovery-groups>, <cluster-connections>, <security-settings>, <address-settings>
- The settings in these configuration blocks are standard settings.
Task: Create Configuration for Second Server Instance
Prerequisites
- Navigate to
<JBOSS_HOME>/server/ - Copy the
HornetQ_Colocateddirectory, and rename it toHornetQ_Colocated_Second. - Rename
<JBOSS_HOME>/server/HornetQ_Colocated_Second/hornetq-backup1/to<JBOSS_HOME>/server/HornetQ_Colocated_Second/hornetq-backup-serverA/ - Open
<JBOSS_HOME>/server/HornetQ_Colocated_Second/hornetq/hornetq-configuration.xml - For all parameters with data directories specified in
hornetq-configuration.xml, change the data paths to/media/shared/data/hornetq-backup.For example change:<bindings-directory> /media/shared/data/serverA/bindings </bindings-directory>to <bindings-directory> /media/shared/data/hornetq-backup/bindings </bindings-directory> - Open
<JBOSS_HOME>/server/HornetQ_Colocated_Second/hornetq-backup-serverA/hornetq-configuration.xml - For all parameters with data directories specified in
hornetq-configuration.xml, change the data paths to/media/shared/data/serverA.For example change:<bindings-directory> /media/shared/data/hornetq-backup/bindings </bindings-directory>to <bindings-directory> /media/shared/data/serverA/bindings </bindings-directory>
38.2. Dedicated Symmetrical Live and Backup Clusters
Note
$JBOSS_HOME/extras/hornetq/resources/examples/cluster-with-dedicated-backup.
Example 38.3. Single Instance, Pure JMS, Dedicated Symmetrical Configuration

- Dedicated JCA Server, as described in Example 38.4, “Dedicated JCA Server”
- Remote JCA Server, as described in Example 38.5, “Remote JCA Server”.
38.2.1. Dedicated JCA Live Server
Example 38.4. Dedicated JCA Server

Procedure 38.7. Create Dedicated Live Server Profile
Important
production profile to customize the live server configuration.
Important
- Navigate to
$JBOSS_HOME/server/ - Copy the
productionprofile, and rename it toHornetQ_Dedicated
Procedure 38.8. Configure Shared Store and Journaling
- Navigate to
$JBOSS_HOME/server/HornetQ_Dedicated/deploy/hornetq/ - Open
hornetq-configuration.xml - Add the <shared-store> element as a child of the <configuration> element.
<shared-store>true</shared-store>
- Ensure the bindings, journal, and large messages path locations are set to a location the live backup group can access.You can set absolute paths as the example describes, or use the JBoss parameters that exist in the configuration file.If you choose the parameter option, and you do not use the default paths that these parameters resolve to, you must specify the path your bindings, journal, and large messages reside in each time you start the server.
<large-messages-directory>/media/shared/data/large-messages</large-messages-directory>

<bindings-directory>/media/shared/data/bindings</bindings-directory>

<journal-directory>/media/shared/data/journal</journal-directory>

<paging-directory>/media/shared/data/paging</paging-directory>
Note
Ensure you specify paths that are accessible to the live backup groups on your network.
Procedure 38.9. Configure JMS Client Graceful Shutdown
- Navigate to
$JBOSS_HOME/server/HornetQ_Dedicated/deploy/hornetq/ - Open
hornetq-configuration.xml - Specify the <fail over-on-shutdown> element in the area near the journal directory configuration in Procedure 38.2, “Configure Shared Store and Journaling”.
<failover-on-shutdown>true</failover-on-shutdown>
Note
You are not constrained where you put the element in thehornetq-configuration.xmlfile, however it is easier to find the less detailed settings if they are all located at the top of the file. - Save and close the file.
Procedure 38.10. Configure HA Connection Factories
- Navigate to
$JBOSS_HOME/server/HornetQ_Dedicated/deploy/hornetq/ - Open
hornetq-jms.xml. - Add the following attributes and values as specified below.
- <ha>true</ha>
- Specifies the client must support high availability, and must always be true for fail over to occur.
- <retry-interval>1000</retry-interval>
- Specifies how long the client must wait (in milliseconds) before it can reconnect to the server.
- <retry-interval-multiplier>1.0</retry-interval-multiplier>
- Specifies the multiplier <retry-interval> uses for each subsequent reconnection pauses. By setting the value to
1.0, the retry interval is the same for each client reconnection request. - <reconnect-attempts>-1</reconnect-attempts>
- Specifies how many reconnect attempts a client should make before failing. Setting
-1means unlimited reconnection attempts.
<?xml version='1.0' encoding='UTF-8'?> <configuration xmlns="urn:hornetq" xmlns:xsi="http://www.w3.org/2001/XMLSchema-instance" xsi:schemaLocation="urn:hornetq /schema/hornetq-jms.xsd"> <connection-factory name="NettyConnectionFactory"> <xa>true</xa> <connectors> <connector-ref connector-name="netty"/> </connectors> <entries> <entry name="/ConnectionFactory"/> <entry name="/XAConnectionFactory"/> </entries> <ha>true</ha> <!-- Pause 1 second between connect attempts --> <retry-interval>1000</retry-interval> <!-- Multiply subsequent reconnect pauses by this multiplier. This can be used to implement an exponential back-off. For our purposes we just set to 1.0 so each reconnect pause is the same length --> <retry-interval-multiplier>1.0</retry-interval-multiplier> <!-- Try reconnecting an unlimited number of times (-1 means unlimited) --> <reconnect-attempts>-1</reconnect-attempts> </connection-factory> </configuration> - Define new queues in both master and backup nodes by adding one of the following configuration blocks to the specified file.For
production/deploy/hornetq/hornetq-jms.xml<queue name="testQueue"> <entry name="/queue/testQueue"/> <durable>true</durable> </queue>
Forproduction/deploy/customName-hornetq-jms.xmlNote
Ensure the file is well-formed from an XML validation perspective by ensure the XML Namespace is present and correct in the file as specified.<configuration xmlns="urn:hornetq" xmlns:xsi="http://www.w3.org/2001/XMLSchema-instance" xsi:schemaLocation="urn:hornetq /schema/hornetq-jms.xsd"> <queue name="testQueue"> <entry name="/queue/testQueue"/> <durable>true</durable> </queue> </configuration>
38.2.2. Dedicated JCA Backup Server
hornetq-configuration.xml is unchanged. Because there is no live server, you must ensure the hornetq-jboss-beans.xml instantiates all the beans needed. You configure this using the same configuration as in the live server, with the exception of changing the location of the hornetq-configuration.xml parameter for the Configuration bean.
Procedure 38.11. Configure Dedicated Backup Server
- A HornetQ Live Server, configured according to the procedures contained within Section 38.2.1, “Dedicated JCA Live Server”
- A correctly configured JBoss Enterprise Application Platform instance, installed on a separate server instance to the live server.
- HornetQ installed on the platform instance.
- On the backup server, navigate using the command line to
/extras/hornetq/. - Execute
sh ./switch.sh -Dbackup=true.The script executes and creates aproduction-backupserver profile in$JBOSS_HOME/server/ - Copy the
production-backupserver profile, and rename it toHornetQ_Dedicated_Backup. - Open
$JBOSS_HOME/server/HornetQ_Dedicated_Backup/hornetq/hornetq-configuration.xml - Add the <shared-store>true</shared-store> element as a child element to the <configuration> element.
- Change the data directory locations to match the following values:
- <large-messages-directory>/media/shared/data/large-messages</large-messages-directory>
- <bindings-directory>/media/shared/data/bindings</bindings-directory>
- <journal-directory>/media/shared/data/journal</journal-directory>
- <paging-directory>/media/shared/data/paging</paging-directory>
- Save and close all updated files.
38.2.3. Dedicated Remote Server
Example 38.5. Remote JCA Server
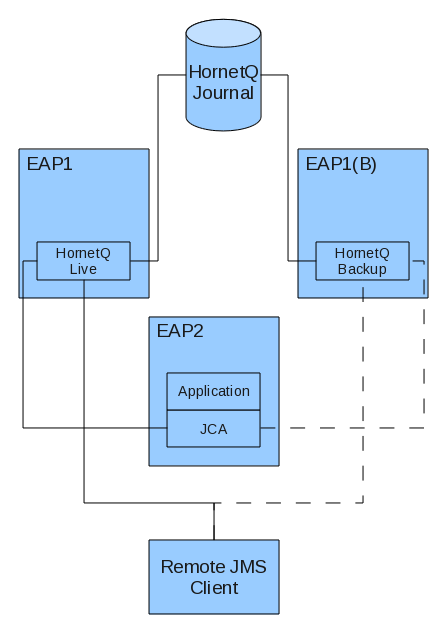
Procedure 38.12. Configure JCA Connection Factories
- Copy the
productionserver profile, and rename it toEAP2. - On the EAP2 instance, navigate to
$JBOSS_HOME/server/EAP2/deploy/hornetq/jms-ds.xml - The default
jms-ds.xmlhas the following <config-property> configuration present in the <tx-connection-factory>.<?xml version="1.0" encoding="UTF-8"?> <connection-factories> <!-- JMS Stuff --> <mbean code="org.jboss.jms.jndi.JMSProviderLoader" name="hornetq:service=JMSProviderLoader,name=JMSProvider"> <attribute name="ProviderName">DefaultJMSProvider</attribute> <attribute name="ProviderAdapterClass">org.jboss.jms.jndi.JNDIProviderAdapter</attribute> <attribute name="FactoryRef">java:/XAConnectionFactory</attribute> <attribute name="QueueFactoryRef">java:/XAConnectionFactory</attribute> <attribute name="TopicFactoryRef">java:/XAConnectionFactory</attribute> </mbean> <!-- JMS XA Resource adapter, use this to get transacted JMS in beans --> <tx-connection-factory> <jndi-name>JmsXA</jndi-name> <xa-transaction/> <rar-name>jms-ra.rar</rar-name> <connection-definition>org.hornetq.ra.HornetQRAConnectionFactory</connection-definition> <config-property name="SessionDefaultType" type="java.lang.String">javax.jms.Topic</config-property> <config-property name="JmsProviderAdapterJNDI" type="java.lang.String">java:/DefaultJMSProvider</config-property> <max-pool-size>20</max-pool-size> <security-domain-and-application>JmsXARealm</security-domain-and-application> </tx-connection-factory> </connection-factories> Configure Outbound JCA Connector
Add extra <config-property> elements as described in the following code sample.Important
Substitute the [live_server_IP_address] and [live_server_port_number] with the network address locations for your live server.If you are using Discovery to set IP address/port combinations, ensure you set the appropriate parameters for <DiscoveryAddress> and <DiscoveryPort> to match your configured broadcast groups.<?xml version="1.0" encoding="UTF-8"?> <connection-factories> <!-- JMS Stuff --> <mbean code="org.jboss.jms.jndi.JMSProviderLoader" name="hornetq:service=JMSProviderLoader,name=JMSProvider"> <attribute name="ProviderName">DefaultJMSProvider</attribute> <attribute name="ProviderAdapterClass">org.jboss.jms.jndi.JNDIProviderAdapter</attribute> <attribute name="FactoryRef">java:/XAConnectionFactory</attribute> <attribute name="QueueFactoryRef">java:/XAConnectionFactory</attribute> <attribute name="TopicFactoryRef">java:/XAConnectionFactory</attribute> </mbean> <!-- JMS XA Resource adapter, use this to get transacted JMS in beans --> <tx-connection-factory> <jndi-name>JmsXA</jndi-name> <xa-transaction/> <rar-name>jms-ra.rar</rar-name> <connection-definition>org.hornetq.ra.HornetQRAConnectionFactory</connection-definition> <config-property name="SessionDefaultType" type="java.lang.String">javax.jms.Topic</config-property> <config-property name="JmsProviderAdapterJNDI" type="java.lang.String">java:/DefaultJMSProvider</config-property> <config-property name="ConnectorClassName" type="java.lang.String">org.hornetq.core.remoting.impl.netty.NettyConnectorFactory</config-property> <config-property name="ConnectionParameters" type="java.lang.String">host=[live_server_IP_address];port=[live_server_port_number]</config-property> <max-pool-size>20</max-pool-size> <security-domain-and-application>JmsXARealm</security-domain-and-application> </tx-connection-factory> </connection-factories>- Open
$JBOSS_HOME/server/EAP2/deploy/jms-ra.rar/META-INF/ra.xmlin a text editor. - In
ra.xml, search for <resourceadapter>. Configure the Inbound Connector
Replace the "The transport type" and "The transport configuration..." <config-property> elements, and their child elements with the following configuration:Important
Substitute the [live_server_IP_address] and [live_server_port_number] with the network address locations for your live server.If you are using Discovery to set IP address/port combinations, ensure you set the appropriate parameters for <DiscoveryAddress> and <DiscoveryPort> to match your configured broadcast groups.If you are using Auto Discovery, ensure you comment out ConnectorClassName and ConnectionParameters directives.<?xml version="1.0" encoding="UTF-8"?> <!-- Preceeding parts of config file removed for readability --> <resourceadapter> <resourceadapter-class>org.hornetq.ra.HornetQResourceAdapter</resourceadapter-class> <config-property> <description>The transport type</description> <config-property-name>ConnectorClassName</config-property-name> <config-property-type>java.lang.String</config-property-type> <config-property-value>org.hornetq.core.remoting.impl.netty.NettyConnectorFactory</config-property-value> </config-property> <config-property> <description>The transport configuration. These values must be in the form of key=val;key=val;</description> <config-property-name>ConnectionParameters</config-property-name> <config-property-type>java.lang.String</config-property-type> <config-property-value>host=[live_server_IP_address];port=[live_server_port_number]</config-property-value> </config-property> <config-property> <description>Do we support HA</description> <config-property-name>HA</config-property-name> <config-property-type>java.lang.Boolean</config-property-type> <config-property-value>true</config-property-value> </config-property> <!-- Rest of config file removed for readability --> <resourceadapter>
Chapter 39. Libaio Native Libraries
libaio is a library, developed as part of the Linux kernel project. With libaio, writes are submitted to the operating system where they are processed asynchronously. When the writes have been processed, the operating system calls the code back.
- libHornetQAIO32.so - x86 32 bits
- libHornetQAIO64.so - x86 64 bits
Chapter 40. Thread management
40.1. Server-Side Thread Management
nio-remoting-threads in the transport configuration. Refer to Chapter 14, Configuring the Transport for more information on this.
40.1.1. Server Scheduled Thread Pool
java.util.concurrent.ScheduledThreadPoolExecutor instance.
<JBOSS_HOME>/jboss-as/server/<PROFILE>/deploy/hornetq/hornetq-configuration.xml with the scheduled-thread-pool-max-size parameter. The default value is 5 threads. A small number of threads is usually sufficient for this pool.
40.1.2. General Purpose Server Thread Pool
java.util.concurrent.ThreadPoolExecutor instance.
<JBOSS_HOME>/jboss-as/server/<PROFILE>/deploy/hornetq/hornetq-configuration.xml with the thread-pool-max-size parameter.
-1 is specified, the thread pool has no upper bound and new threads will be created on demand if there are not enough threads available to satisfy a request. If activity later subsides then threads are timed-out and closed.
n where n is a positive integer greater than zero is used this signifies that the thread pool is bounded. If more requests come in and there are no free threads in the pool and the pool is full then requests will block until a thread becomes available. It is recommended that a bounded thread pool is used with caution since it can lead to dead-lock situations if the upper bound is chosen to be too low.
thread-pool-max-size is 30.
40.1.3. Expiry Reaper Thread
40.1.4. Asynchronous IO
40.2. Client-Side Thread Management
5 threads, and the general purpose thread pool has an unbounded maximum size.
ClientSessionFactory instance does not use these static pools but instead maintains its own scheduled and general purpose pool. Any sessions created from that ClientSessionFactory will use those pools instead.
ClientSessionFactory instance to use its own pools, use the appropriate setter methods immediately after creation. For example:
ClientSessionFactory myFactory = HornetQClient.createClientSessionFactory(...);
myFactory.setUseGlobalPools(false);
myFactory.setScheduledThreadPoolMaxSize(10);
myFactory.setThreadPoolMaxSize(-1);
ConnectionFactory instance. For example:
ConnectionFactory myConnectionFactory = HornetQJMSClient.createConnectionFactory(myFactory);
HornetQConnectionFactory instances, you can also set these parameters in the JBOSS_DIST/jboss-as/server/<PROFILE>/deploy/hornetq/hornetq-jms.xml file where you describe your connection factory. For example:
<connection-factory name="NettyConnectionFactory">
   <connectors>
      <connector-ref connector-name="netty"/>
   </connectors>
   <entries>
      <entry name="/ConnectionFactory"/>
      <entry name="/XAConnectionFactory"/>
   </entries>
   <use-global-pools>false</use-global-pools>
   <scheduled-thread-pool-max-size>10</scheduled-thread-pool-max-size>
   <thread-pool-max-size>-1</thread-pool-max-size>
</connection-factory>
Chapter 41. Logging
Note
logging.properties file found in the config directories. This is configured to use the HornetQ logging formatter (HornetQLoggerFormatter.java) and will log to the console as well as a log file.
Log4jLogDelegateFactory is the implementation of org.hornetq.spi.core.logging.LogDelegateFactory that you would like to use:
org.hornetq.core.logging.Logger.setDelegateFactory(new Log4jLogDelegateFactory())
org.hornetq.logger-delegate-factory-class-name to the delegate factory being used. For example:
-Dorg.hornetq.logger-delegate-factory-class-name=org.hornetq.integration.logging.Log4jLogDelegateFactory
org.hornetq.core.logging.impl.JULLogDelegateFactory- the default that uses JUL.org.hornetq.integration.logging.Log4jLogDelegateFactory- which uses Log4J
logging.properties file is provided and set the java.util.logging.config.file property on client start up.
Chapter 42. Intercepting Operations
42.1. Implementing The Interceptors
Interceptor interface:
package org.hornetq.api.core.interceptor;

public interface Interceptor
{
   boolean intercept(Packet packet, RemotingConnection connection)
                throws HornetQException;
}
- if
trueis returned, the process continues normally - if
falseis returned, the process is aborted, no other interceptors will be called and the packet will not be handled by the server at all.
42.2. Configuring The Interceptors
<JBOSS_HOME>/jboss-as/server/<PROFILE>/deploy/hornetq/hornetq-configuration.xml:
<remoting-interceptors>
   <class-name>org.hornetq.jms.example.LoginInterceptor</class-name>
   <class-name>org.hornetq.jms.example.AdditionalPropertyInterceptor</class-name>
</remoting-interceptors>
42.3. Interceptors on the Client Side
ClientSessionFactory with the addInterceptor() method.
Chapter 43. Performance Tuning
43.1. Tuning Persistence
- Put the message journal on its own physical volume. For example, if the disk is shared with a transaction coordinator, database, or other journals which are also reading and writing from the disk, these may greatly reduce performance because the disk head may be skipping between the different files. One advantage of an append only journal is that disk head movement is minimized - this advantage is destroyed if the disk is shared. If using paging or large messages, ideally, ensure that they are put on separate volumes.
- Minimum number of journal files. Set
journal-min-filesto a number of files that would fit the average sustainable rate. For example, if new files are being created on the journal data directory too often and lots of data is being persisted, increase the minimum number of files, this way the journal would reuse more files instead of creating new data files. - Journal file size. The journal file size should be aligned to the capacity of a cylinder on the disk. The default value 10MiB should be enough on most systems.
- Use AIO journal. If using Linux, try to keep the journal type as AIO. AIO will scale better than Java NIO.
- Tune
journal-buffer-timeout. The timeout can be increased to increase throughput at the expense of latency. - If running AIO, it may be possible to increase performance by increasing
journal-max-io. DO NOT change this parameter if running NIO.
43.2. Tuning JMS
- Disable message id. Use the
setDisableMessageID()method on theMessageProducerclass to disable message ids if not needed. This decreases the size of the message and also avoids the overhead of creating a unique ID. - Disable message time stamp. Use the
setDisableMessageTimeStamp()method on theMessageProducerclass to disable message timestamps not required. - Avoid
ObjectMessage.ObjectMessageis convenient but it comes at a cost. The body of aObjectMessageuses Java serialization to serialize it to bytes. The Java serialized form of even small objects is verbose, resulting in increased server traffic, also Java serialization is slow in comparison to custom marshaling techniques. Only useObjectMessageif one of the other message types are unsuitable (for example, if the type of payload is unknown until run-time). - Avoid
AUTO_ACKNOWLEDGE.AUTO_ACKNOWLEDGEmode requires an acknowledgment to be sent from the server for each message received on the client, this means more traffic on the network. If possible, useDUPS_OK_ACKNOWLEDGE, or useCLIENT_ACKNOWLEDGEor a transacted session and batch up many acknowledgments with one acknowledge/commit. - Avoid durable messages. By default JMS messages are durable. If really durable messages are not required, set the messages to be non-durable. Durable messages incur much more overhead in persisting them to storage.
- Batch many sends or acknowledgments in a single transaction. HornetQ will only require a network round trip on the commit, not on every send or acknowledgment.
43.3. Other Tunings
- Use Asynchronous Send Acknowledgments. To send durable messages non transactionally and a guarantee is required that they have reached the server by the time the call to send() returns, do not set durable messages to be sent blocking, rather use asynchronous send acknowledgments to get the acknowledgments of send back in a separate stream. Refer to Chapter 18, Guarantees of sends and commits for more information on this.
- Use pre-acknowledge mode. With pre-acknowledge mode, messages are acknowledged
beforebeing sent to the client. This reduces the amount of acknowledgment traffic being transmitted. For more information on this, refer to Chapter 27, Pre-Acknowledge Mode. - Disable persistence. If message persistence is not required, turn it off altogether by setting
persistence-enabledto false in<JBOSS_HOME>/jboss-as/server/<PROFILE>/deploy/hornetq/hornetq-configuration.xml. - Sync transactions lazily. Setting
journal-sync-transactionaltofalseinhornetq-configuration.xmlgives better transactional persistent performance at the expense of some possibility of loss of transactions on failure. Refer to Chapter 18, Guarantees of sends and commits for more information. - Sync non transactional lazily. Setting
journal-sync-non-transactionaltofalseinhornetq-configuration.xmlcan provide better non-transactional persistent performance at the expense of some possibility of loss of durable messages on failure. Refer to Chapter 18, Guarantees of sends and commits for more information. - Send messages non blocking. Setting
block-on-durable-sendandblock-on-non-durable-sendtofalseinJBOSS_DIST/jboss-as/server/<PROFILE>/deploy/hornetq/hornetq-jms.xml(if using JMS and JNDI) or directly on the ClientSessionFactory. It is therefore not required to wait an entire network round trip for every message sent. Refer to Chapter 18, Guarantees of sends and commits for more information. - For very fast consumers, increase consumer-window-size. This effectively disables consumer flow control.
- Socket NIO vs Socket Old IO. By default HornetQ uses old (blocking) on the server and the client side (Refer to Chapter 14, Configuring the Transport for more information). NIO is much more scalable but can give some latency hit compared to old blocking IO. To be able to service many thousands of connections on the server, then ensure the use of NIO on the server. However, for fewer connections on the server, retaining the old IO for the server acceptors may gain a small performance advantage.
- Use the core API not JMS. Using the JMS API will have slightly lower performance than using the core API, since all JMS operations need to be translated into core operations before the server can handle them. If using the core API, try to use methods that take
SimpleStringas much as possible.SimpleString, unlikejava.lang.Stringdoes not require copying before it is transmitted, so if you re-useSimpleStringinstances between calls, some unnecessary copying can be avoided.
43.4. Tuning Transport Settings
- TCP buffer sizes. Fast networks and fast machines may get a performance boost by increasing the TCP send and receive buffer sizes. Refer to Chapter 14, Configuring the Transport for more information.
Note
Note that some operating systems like later versions of Linux include TCP auto-tuning and setting TCP buffer sizes manually can prevent auto-tune from working and actually give you worse performance! - Increase limit on file handles on the server. If a lot of concurrent connections on the servers is expected, or if clients are rapidly opening and closing connections, ensure that the user running the server has permission to create sufficient file handles.This varies from operating system to operating system. On Linux systems, increase the number of allowable open file handles in the file
/etc/security/limits.conf, for example. add the linesserveruser soft nofile 20000 serveruser hard nofile 20000
This would allow up to 20 000 file handles to be open by the userserveruser. - Use
batch-delayand setdirect-deliverto false for the best throughput for very small messages. HornetQ comes with a pre-configured connector/acceptor pair (netty-throughput) in<JBOSS_HOME>/jboss-as/server/<PROFILE>/deploy/hornetq/hornetq-configuration.xmland JMS connection factory (ThroughputConnectionFactory) inJBOSS_DIST/jboss-as/server/<PROFILE>/deploy/hornetq/hornetq-jms.xmlwhich can be used to give the very best throughput, especially for small messages. Refer to Chapter 14, Configuring the Transport for more information.
43.5. Avoiding Anti-Patterns
- Re-use connections, sessions, consumers, and producers. Probably the most common messaging anti-pattern observed, is users who create a new connection, session, or producer for every message sent, or every message consumed. This is a poor use of resources. Always reuse these objects as they take time to create and may involve several network round trips.
Note
Some popular libraries such as the Spring JMS Template are known to use these anti-patterns. If using Spring JMS Template, it is possibly a cause for poor performance and not HornetQ. The Spring JMS Template can only safely be used in an app server which caches JMS sessions (for example. using JCA), and only then for sending messages. It cannot be safely be used for synchronously consuming messages, even in an app server. - Avoid fat messages. Verbose formats such as XML result in increased server transmission load and performance will suffer as result. Avoid XML in message bodies if possible.
- Do not create temporary queues for each request. This common anti-pattern involves the temporary queue request-response pattern. With the temporary queue request-response pattern a message is sent to a target and a reply-to header is set with the address of a local temporary queue. When the recipient receives the message they process it then send back a response to the address specified in the reply-to. A common mistake made with this pattern is to create a new temporary queue on each message sent. This will drastically reduce performance. Instead the temporary queue should be re-used for many requests.
- Do not use Message-Driven Beans unnecessarily. MDB usage greatly increases the code path for each message received compared to a straightforward message consumer, as a lot of extra application server code is executed. Before using MDBs, investigate the use of a normal message consumer to complete the task.
Appendix A. Configuration Reference
A.1. Server Configuration
A.1.1. hornetq-configuration.xml
hornetq-configuration.xml file contains the core server configuration. The file is located in <JBOSS_HOME>/jboss-as/server/<PROFILE>/deploy/hornetq/hornetq-configuration.xml.
Table A.1. Server Configuration
| Element Name | Type | Description | Default |
|---|---|---|---|
| backup | Boolean | if true, this server is a backup to another node in the cluster. | false |
| allow-failback | Boolean | Specifies whether the backup server automatically stops and returns to standby mode when the live server becomes available again. If set to false, the server must be stopped manually to trigger a return to standby mode. | true |
| failover-on-shutdown | Boolean | Specifies how fail-over behaves when a live server is shutdown correctly. If set to true, the backup HornetQ instance takes over when the live server is shut down gracefully. | false |
| shared-store | Specifies whether the server should reference a shared store for journaling. | false | |
| grouping-handler | Parent element | Used to specify the LOCAL and REMOTE grouping handlers. | |
| remoting-interceptors | Parent element | Used to specify class names, using <class-name>. Refer to Chapter 42, Intercepting Operations for detailed information about this element. | |
| address-full-policy | String | Supports three values: PAGE, DROP, and BLOCK. Refer to Section 22.3, “Paging Mode” | PAGE |
| send-to-dla-on-no-route | Boolean | Specifies how messages are handled when a server does not routes the message to a queue. If set to true, the message is sent to the dead letter address (DLA) for the routed address, if a DLA exists. If a DLA does not exist, the message is dropped as a last resort. Refer to Section 23.3, “Configuring Queues Through Address Settings” for more information about Address Setting elements. | false |
| backup-connector-ref | String | the name of the remoting connector to connect to the backup node. | |
| bindings-directory | String | the directory in which to store the persisted bindings. | data/bindings |
| clustered | Boolean | if true, the server is clustered. | false |
| connection-ttl-override | Long | if set, overrides the time (in ms) to keep a connection alive without receiving a ping. | -1 |
| create-bindings-dir | Boolean | true means that the server will create the bindings directory on start up. | true |
| create-journal-dir | Boolean | if true, the journal directory will be created. | true |
| file-deployment-enabled | Boolean | if true, the server loads configuration from the configuration files. | true |
| id-cache-size | Integer | the size of the cache for pre-creating message IDs. | 2000 |
| journal-buffer-size | Long | The size of the internal buffer on the journal. | 128 kilobytes |
| journal-buffer-timeout | Long | the timeout (in nanoseconds) used to flush internal buffers on the journal. | 20000 |
| journal-compact-min-files | Integer | the minimum number of data files before compacting occurs. | 10 |
| journal-compact-percentage | Integer | the percentage of live data on which we consider compacting the journal. | 30 |
| journal-directory | String | the directory to store the journal files in. | data/journal |
| journal-file-size | Long | the size (in bytes) of each journal file. | 128 * 1024 |
| journal-max-io | Integer | the maximum number of write requests that can be in the AIO queue at any one time. | 500 |
| journal-min-files | Integer | the number of journal files to pre-create. | 2 |
| journal-sync-transactional | Boolean | if true, wait for transaction data to be synchronized to the journal before returning response to client. | true |
| journal-sync-non-transactional | Boolean | if true, wait for non-transaction data to be synced to the journal before returning response to client. | true |
| journal-type | String | the type of journal to use. | NIO |
| jmx-management-enabled | Boolean | if true, the management API is available via JMX. | true |
| jmx-domain | String | the JMX domain used to registered HornetQ MBeans in the MBeanServer. | org.hornetq |
| large-messages-directory | String | the directory in which to store large messages. The default location is data/largemessages | |
| management-address | String | the name of the management address to send management messages to. The default value is jms.queue.hornetq. management | |
| cluster-user | String | the user used by cluster connections to communicate between the clustered nodes. The default value is HORNETQ.CLUSTER.ADMIN. USER | See Description |
| cluster-password | String | the password used by cluster connections to communicate between the clustered nodes. | CHANGE ME!! |
| management-notification-address | String | the name of the address that consumers bind to receive management notifications. The default value is hornetq.notifications | See Description |
| message-counter-enabled | Boolean | if true, message counters are enabled. | false |
| message-counter-max-day-history | Integer | how many days to keep message counter history. | 10 |
| message-counter-sample-period | Long | the sample period (in ms) to use for message counters. | 10000 |
| message-expiry-scan-period | Long | how often (in ms) to scan for expired messages. | 30000 |
| message-expiry-thread-priority | Integer | the priority of the thread expiring messages. | 3 |
| paging-directory | String | the directory to store paged messages in. | data/paging |
| page-max-concurrent-io | Integer | The maximum number of concurrent reads the system can make on the paging files. | 5 |
| persist-delivery-count-before-delivery | Boolean | if true, delivery count is persisted before delivery; if false, this occurs only after a message has been canceled. | false |
| persistence-enabled | Boolean | true means that the server will use the file based journal for persistence. | true |
| persist-id-cache | Boolean | true means that id's are persisted to the journal. | true |
| scheduled-thread-pool-max-size | Integer | the number of threads that the main scheduled thread pool has. | 5 |
| security-enabled | Boolean | if true, security is enabled. | true |
| security-invalidation-interval | Long | how long (in ms) to wait before invalidating the security cache. | 10000 |
| thread-pool-max-size | Integer | the number of threads that the main thread pool has; -1 sets unlimited threads. | 30 |
| async-connection-execution-enabled | Boolean | should incoming packets on the server be handed off to a thread from the thread pool for processing or should they be handled on the remoting thread? | true |
| transaction-timeout | Long | how long (in ms) before a transaction can be removed from the resource manager after create time. | 60000 |
| transaction-timeout-scan-period | Long | how often (in ms) to scan for timeout transactions. | 1000 |
| wild-card-routing-enabled | Boolean | true means that the server supports wild card routing. | true |
| memory-measure-interval | Long | frequency to sample JVM memory in ms (or -1 to disable memory sampling). | -1 |
| memory-warning-threshold | Integer | Percentage of available memory which threshold a warning log. | 25 |
| connectors | String | a list of remoting connectors configurations to create. | |
| connector.name (attribute) | String | Name of the connector - mandatory. | |
| connector.factory-class | String | Name of the ConnectorFactory implementation - mandatory. | |
| connector.param | String | A key-value pair used to configure the connector. A connector can have many param. | |
| connector.param.key (attribute) | String | Key of a configuration parameter - mandatory. | |
| connector.param.value (attribute) | String | Value of a configuration parameter - mandatory. | |
| acceptors | String | a list of remoting acceptors to create. | |
| acceptor.name (attribute) | String | Name of the acceptor - optional. | |
| acceptor.factory-class | String | Name of the AcceptorFactory implementation - mandatory. | |
| acceptor.param | String | A key-value pair used to configure the acceptor. An acceptor can have many param. | |
| acceptor.param.key (attribute) | String | Key of a configuration parameter - mandatory. | |
| acceptor.param.value (attribute) | String | Value of a configuration parameter - mandatory. | |
| broadcast-groups | a list of broadcast groups to create. | ||
| broadcast-group.name (attribute) | String | a unique name for the broadcast group - mandatory. | |
| broadcast-group.local-bind-address | String | local bind address that the datagram socket is bound to. The default value is the wildcard IP address chosen by the kernel | See Description |
| broadcast-group.local-bind-port | Integer | local port to which the datagram socket is bound to. | -1 (anonymous port) |
| broadcast-group.group-address | String | multicast address to which the data will be broadcast - mandatory. | |
| broadcast-group.group-port | Integer | UDP port number used for broadcasting - mandatory. | |
| broadcast-group.broadcast-period | Long | period in milliseconds between consecutive broadcasts. | 2000 (ms) |
| broadcast-group.connector-ref | Integer | A pair connector and optional backup connector that will be broadcast. A broadcast-group can have multiple connector-ref. | |
| broadcast-group.connector-ref.connector-name (attribute) | String | Name of the live connector - mandatory. | |
| broadcast-group.connector-ref.backup-connector-name (attribute) | String | Name of the backup connector - optional. | |
| discovery-groups | String | a list of discovery groups to create. | |
| discovery-group.name (attribute) | String | A unique name for the discovery group - mandatory. | |
| discovery-group.local-bind-address | String | The discovery group will be bound only to this local address. | |
| discovery-group.group-address | String | Multicast IP address of the group to listen on - mandatory. | |
| discovery-group.group-port | Integer | UDP port of the multicast group - mandatory | |
| discovery-group.refresh-timeout | Integer | Period the discovery group waits after receiving the last broadcast from a particular server before removing that servers connector pair entry from its list. | 5000 (ms) |
| diverts | String | A list of diverts to use. | |
| divert.name (attribute) | String | A unique name for the divert - mandatory. | |
| divert.routing-name | String | The routing name for the divert - mandatory. | |
| divert.address | String | The address this divert will divert from - mandatory. | |
| divert.forwarding-address | String | The forwarding address for the divert - mandatory. | |
| divert.exclusive | Boolean | Is this divert exclusive? | false |
| divert.filter | String | An optional core filter expression. | null |
| divert.transformer-class-name | String | An optional class name of a transformer. | |
| queues | String | A list of pre configured queues to create. | |
| queues.name (attribute) | String | Unique name of this queue. | |
| queues.address | String | Address for this queue - mandatory. | |
| queues.filter | String | Optional core filter expression for this queue. | null |
| queues.durable | Boolean | Is this queue durable? | true |
| bridges | String | A list of bridges to create. | |
| bridges.name (attribute) | String | Unique name for this bridge. | |
| bridges.queue-name | String | Name of queue that this bridge consumes from - mandatory. | |
| bridges.forwarding-address | String | Address to forward to. If omitted original address is used. | null |
| bridges.filter | String | Optional core filter expression. | null |
| bridges.transformer-class-name | String | Optional name of transformer class. | null |
| bridges.retry-interval | Long | Period (in ms) between successive retries. | 2000 (ms) |
| bridges.retry-interval-multiplier | Double | Multiplier to apply to successive retry intervals. | 1.0 |
| bridges.reconnect-attempts | Integer | Maximum number of retry attempts, -1 signifies infinite. | -1 |
| bridges.fail-over-on-server-shutdown | Boolean | Should fail-over be prompted if target server is cleanly shutdown? | false |
| bridges.use-duplicate-detection | Boolean | Should duplicate detection headers be inserted in forwarded messages? | true |
| bridges.discovery-group-ref | String | Name of discovery group used by this bridge. | null |
| bridges.connector-ref.connector-name (attribute) | String | Name of connector to use for live connection. | |
| bridges.connector-ref.backup-connector-name (attribute) | String | Optional name of connector to use for backup connection. | null |
| cluster-connections | String | A list of cluster connections. | |
| cluster-connections.name (attribute) | String | Unique name for this cluster connection. | |
| cluster-connections.address | String | Name of address this cluster connection applies to. | |
| cluster-connections.forward-when-no-consumers | Boolean | Should messages be load balanced if there are no matching consumers on target? | false |
| cluster-connections.min-large-message-size | Integer | Message size threshold over which the message will be split into multiple packages when sent over the cluster. | 100 kB |
| cluster-connections.reconnect-attempts | Integer | Number of times the system will try to connect a node on the cluster, after which (if max-retry has been reached) the node will be considered permanently down and the system will stop routing messages to this node. | -1 (infinite retries) |
| cluster-connections.max-hops | Integer | Maximum number of hops cluster topology is propagated. | 1 |
| cluster-connections.retry-interval | Long | Period (in ms) between successive retries. | 2000 |
| cluster-connections.use-duplicate-detection | Boolean | Should duplicate detection headers be inserted in forwarded messages? | true |
| cluster-connections.discovery-group-ref | String | Name of discovery group used by this bridge. | null |
| cluster-connections.connector-ref.connector-name (attribute) | String | Name of connector to use for live connection. | |
| cluster-connections.connector-ref.backup-connector-name (attribute) | String | Optional name of connector to use for backup connection. | null |
| cluster-connections.min-large-message-size | Integer | Maximum threshold of message size, over which it will be split into multiple packages when sent over the cluster. | 100 kB |
| cluster-connections.reconnect-attempts | Integer | Maximum number of times the system will try to connect a node on the cluster. If the max-retry is achieved this node will be considered permanently down and the system will stop routing messages to this node. | -1 (infinite retries) |
| security-settings | String | A list of security settings. | |
| security-settings.match (attribute) | String | The string to use for matching security against an address. | |
| security-settings.permission | String | A permission to add to the address. | |
| security-settings.permission.type (attribute) | String | The type of permission. | |
| security-settings.permission.roles (attribute) | String | A comma-separated list of roles to apply the permission to. | |
| address-settings | String | A list of address settings. | |
| address-settings.dead-letter-address | String | The address to send dead messages to. | |
| address-settings.max-delivery-attempts | Integer | How many times to attempt to deliver a message before sending to dead letter address. | 10 |
| address-settings.expiry-address | String | The address to send expired messages to. | |
| address-settings.redelivery-delay | Long | The time (in ms) to wait before redelivering a canceled message. | 60000 (ms) |
| address-settings.last-value-queue | boolean | Whether to treat the queue as a last value queue. | false |
| address-settings.page-size-bytes | Long | The page size (in bytes) to use for an address. | 10 * 1024 * 1024 |
| address-settings.max-size-bytes | Long | The maximum size (in bytes) to use in paging for an address. | -1 |
| address-settings.redistribution-delay | Long | How long (in ms) to wait after the last consumer is closed on a queue before redistributing messages. | 60000 (1 minute) |
| initial-wait-timeout | String | ||
| server-dump-interval | Long | ||
| connector-services.connector-service | |||
| bridges.user | |||
| bridges.password | |||
| bridges.static-connectors | |||
| cluster-connections.static.connectors | |||
| message-counter-history-day-limit |
A.1.2. hornetq-configuration.xsd Reference
hornetq-configuration.xsd file that governs the validity of the hornetq-configuration.xml file.
<?xml version="1.0" encoding="UTF-8"?>
<xsd:schema xmlns="urn:hornetq" xmlns:xsd="http://www.w3.org/2001/XMLSchema" attributeFormDefault="unqualified" elementFormDefault="qualified" targetNamespace="urn:hornetq" version="1.0">
<xsd:element name="configuration">
<xsd:complexType>
<xsd:all>
<xsd:element maxOccurs="1" minOccurs="0" name="name" type="xsd:string">
</xsd:element>
<xsd:element maxOccurs="1" minOccurs="0" ref="clustered"/>
<xsd:element maxOccurs="1" minOccurs="0" ref="file-deployment-enabled"/>
<xsd:element maxOccurs="1" minOccurs="0" ref="persistence-enabled"/>
<xsd:element maxOccurs="1" minOccurs="0" name="scheduled-thread-pool-max-size" type="xsd:int">
<xsd:annotation>
<xsd:documentation>
Maximum number of threads to use for the scheduled thread pool
</xsd:documentation>
</xsd:annotation>
</xsd:element>
<xsd:element maxOccurs="1" minOccurs="0" name="thread-pool-max-size" type="xsd:int">
<xsd:annotation>
<xsd:documentation>
Maximum number of threads to use for the thread pool
</xsd:documentation>
</xsd:annotation>
</xsd:element>
<xsd:element maxOccurs="1" minOccurs="0" name="security-enabled" type="xsd:boolean">
</xsd:element>
<xsd:element maxOccurs="1" minOccurs="0" name="security-invalidation-interval" type="xsd:long">
</xsd:element>
<xsd:element maxOccurs="1" minOccurs="0" name="wild-card-routing-enabled" type="xsd:boolean">
</xsd:element>
<xsd:element maxOccurs="1" minOccurs="0" name="management-address" type="xsd:string">
</xsd:element>
<xsd:element maxOccurs="1" minOccurs="0" name="management-notification-address" type="xsd:string">
</xsd:element>
<xsd:element maxOccurs="1" minOccurs="0" name="cluster-user" type="xsd:string">
</xsd:element>
<xsd:element maxOccurs="1" minOccurs="0" name="cluster-password" type="xsd:string">
</xsd:element>
<xsd:element maxOccurs="1" minOccurs="0" name="log-delegate-factory-class-name" type="xsd:string">
</xsd:element>
<xsd:element maxOccurs="1" minOccurs="0" name="jmx-management-enabled" type="xsd:boolean">
</xsd:element>
<xsd:element maxOccurs="1" minOccurs="0" name="jmx-domain" type="xsd:string">
</xsd:element>
<xsd:element maxOccurs="1" minOccurs="0" name="message-counter-enabled" type="xsd:boolean">
</xsd:element>
<xsd:element maxOccurs="1" minOccurs="0" name="message-counter-sample-period" type="xsd:long">
</xsd:element>
<xsd:element maxOccurs="1" minOccurs="0" name="message-counter-max-day-history" type="xsd:int">
</xsd:element>
<xsd:element maxOccurs="1" minOccurs="0" name="connection-ttl-override" type="xsd:long">
</xsd:element>
<xsd:element maxOccurs="1" minOccurs="0" name="async-connection-execution-enabled" type="xsd:boolean">
</xsd:element>
<xsd:element maxOccurs="1" minOccurs="0" name="transaction-timeout" type="xsd:long">
</xsd:element>
<xsd:element maxOccurs="1" minOccurs="0" name="transaction-timeout-scan-period" type="xsd:long">
</xsd:element>
<xsd:element maxOccurs="1" minOccurs="0" name="message-expiry-scan-period" type="xsd:long">
</xsd:element>
<xsd:element maxOccurs="1" minOccurs="0" name="message-expiry-thread-priority" type="xsd:int">
</xsd:element>
<xsd:element maxOccurs="1" minOccurs="0" name="id-cache-size" type="xsd:int">
</xsd:element>
<xsd:element maxOccurs="1" minOccurs="0" name="persist-id-cache" type="xsd:boolean">
</xsd:element>
<xsd:element maxOccurs="1" minOccurs="0" ref="remoting-interceptors">
</xsd:element>
<xsd:element maxOccurs="1" minOccurs="0" name="backup" type="xsd:boolean">
</xsd:element>
<xsd:element maxOccurs="1" minOccurs="0" name="allow-failback" type="xsd:boolean">
</xsd:element>
<xsd:element maxOccurs="1" minOccurs="0" name="failback-delay" type="xsd:long">
</xsd:element>
<xsd:element maxOccurs="1" minOccurs="0" name="failover-on-shutdown" type="xsd:boolean">
</xsd:element>
<xsd:element maxOccurs="1" minOccurs="0" name="shared-store" type="xsd:boolean">
</xsd:element>
<xsd:element maxOccurs="1" minOccurs="0" name="persist-delivery-count-before-delivery" type="xsd:boolean">
</xsd:element>
<xsd:element maxOccurs="1" minOccurs="0" name="live-connector-ref" type="live-connectorType">
</xsd:element>
<xsd:element maxOccurs="1" minOccurs="0" name="connectors">
<xsd:complexType>
<xsd:sequence>
<xsd:element maxOccurs="unbounded" minOccurs="0" name="connector" type="connectorType"/>
</xsd:sequence>
</xsd:complexType>
</xsd:element>
<xsd:element maxOccurs="1" minOccurs="0" name="acceptors">
<xsd:complexType>
<xsd:sequence>
<xsd:element maxOccurs="unbounded" minOccurs="1" name="acceptor" type="acceptorType">
</xsd:element>
</xsd:sequence>
</xsd:complexType>
</xsd:element>
<xsd:element maxOccurs="1" minOccurs="0" name="broadcast-groups">
<xsd:complexType>
<xsd:sequence>
<xsd:element maxOccurs="unbounded" minOccurs="0" ref="broadcast-group">
</xsd:element>
</xsd:sequence>
</xsd:complexType>
</xsd:element>
<xsd:element maxOccurs="1" minOccurs="0" name="discovery-groups">
<xsd:complexType>
<xsd:sequence>
<xsd:element maxOccurs="unbounded" minOccurs="0" ref="discovery-group">
</xsd:element>
</xsd:sequence>
</xsd:complexType>
</xsd:element>
<xsd:element maxOccurs="1" minOccurs="0" name="diverts">
<xsd:complexType>
<xsd:sequence>
<xsd:element maxOccurs="unbounded" minOccurs="0" name="divert" type="divertType">
</xsd:element>
</xsd:sequence>
</xsd:complexType>
</xsd:element>
<xsd:element maxOccurs="1" minOccurs="0" name="queues">
</xsd:element>
<xsd:element maxOccurs="1" minOccurs="0" name="bridges">
<xsd:complexType>
<xsd:sequence>
<xsd:element maxOccurs="unbounded" minOccurs="0" name="bridge" type="bridgeType">
</xsd:element>
</xsd:sequence>
</xsd:complexType>
</xsd:element>
<xsd:element maxOccurs="1" minOccurs="0" name="cluster-connections">
<xsd:complexType>
<xsd:sequence>
<xsd:element maxOccurs="unbounded" minOccurs="0" name="cluster-connection" type="clusterConnectionType">
</xsd:element>
</xsd:sequence>
</xsd:complexType>
</xsd:element>
<xsd:element maxOccurs="1" minOccurs="0" name="grouping-handler" type="groupingHandlerType">
</xsd:element>
<xsd:element maxOccurs="1" minOccurs="0" name="paging-directory" type="xsd:string">
</xsd:element>
<xsd:element maxOccurs="1" minOccurs="0" name="bindings-directory" type="xsd:string">
</xsd:element>
<xsd:element maxOccurs="1" minOccurs="0" name="create-bindings-dir" type="xsd:boolean">
</xsd:element>
<xsd:element maxOccurs="1" minOccurs="0" name="journal-directory" type="xsd:string">
</xsd:element>
<xsd:element maxOccurs="1" minOccurs="0" name="create-journal-dir" type="xsd:boolean">
</xsd:element>
<xsd:element maxOccurs="1" minOccurs="0" name="journal-type" type="journalType">
</xsd:element>
<xsd:element maxOccurs="1" minOccurs="0" name="journal-buffer-timeout" type="xsd:long">
</xsd:element>
<xsd:element maxOccurs="1" minOccurs="0" name="journal-buffer-size" type="xsd:long">
</xsd:element>
<xsd:element maxOccurs="1" minOccurs="0" name="journal-sync-transactional" type="xsd:boolean">
</xsd:element>
<xsd:element maxOccurs="1" minOccurs="0" name="journal-sync-non-transactional" type="xsd:boolean">
</xsd:element>
<xsd:element maxOccurs="1" minOccurs="0" name="log-journal-write-rate" type="xsd:boolean">
</xsd:element>
<xsd:element maxOccurs="1" minOccurs="0" name="journal-file-size" type="xsd:long">
</xsd:element>
<xsd:element maxOccurs="1" minOccurs="0" name="journal-min-files" type="xsd:int">
</xsd:element>
<xsd:element maxOccurs="1" minOccurs="0" name="journal-compact-percentage" type="xsd:int">
</xsd:element>
<xsd:element maxOccurs="1" minOccurs="0" name="journal-compact-min-files" type="xsd:int">
</xsd:element>
<xsd:element maxOccurs="1" minOccurs="0" name="journal-max-io" type="xsd:int">
</xsd:element>
<xsd:element maxOccurs="1" minOccurs="0" name="perf-blast-pages" type="xsd:int">
</xsd:element>
<xsd:element maxOccurs="1" minOccurs="0" name="run-sync-speed-test" type="xsd:boolean">
</xsd:element>
<xsd:element maxOccurs="1" minOccurs="0" name="server-dump-interval" type="xsd:long">
</xsd:element>
<xsd:element maxOccurs="1" minOccurs="0" name="memory-warning-threshold" type="xsd:int">
</xsd:element>
<xsd:element maxOccurs="1" minOccurs="0" name="memory-measure-interval" type="xsd:long">
</xsd:element>
<xsd:element maxOccurs="1" minOccurs="0" name="large-messages-directory" type="xsd:string">
</xsd:element>
<xsd:element maxOccurs="1" minOccurs="0" name="security-settings">
</xsd:element>
<xsd:element maxOccurs="1" minOccurs="0" name="address-settings">
</xsd:element>
<xsd:element maxOccurs="1" minOccurs="0" name="connector-services">
<xsd:complexType>
<xsd:sequence>
<xsd:element maxOccurs="unbounded" minOccurs="0" name="connector-service" type="connectorServiceType"/>
</xsd:sequence>
</xsd:complexType>
</xsd:element>
</xsd:all>
</xsd:complexType>
</xsd:element>
<xsd:element name="clustered" type="xsd:boolean"/>
<xsd:element name="file-deployment-enabled" type="xsd:boolean"/>
<xsd:element name="persistence-enabled" type="xsd:boolean"/>
<xsd:element name="local-bind-address" type="xsd:string"/>
<xsd:element name="local-bind-port" type="xsd:int"/>
<xsd:element name="group-address" type="xsd:string"/>
<xsd:element name="group-port" type="xsd:int"/>
<xsd:element name="broadcast-period" type="xsd:long"/>
<xsd:element name="broadcast-group">
<xsd:complexType>
<xsd:sequence>
<xsd:element maxOccurs="1" minOccurs="0" ref="local-bind-address">
</xsd:element>
<xsd:element maxOccurs="1" minOccurs="0" ref="local-bind-port">
</xsd:element>
<xsd:element maxOccurs="1" minOccurs="1" ref="group-address">
</xsd:element>
<xsd:element maxOccurs="1" minOccurs="1" ref="group-port">
</xsd:element>
<xsd:element maxOccurs="1" minOccurs="0" ref="broadcast-period">
</xsd:element>
<xsd:element maxOccurs="unbounded" minOccurs="0" name="connector-ref" type="xsd:string">
</xsd:element>
</xsd:sequence>
<xsd:attribute name="name" type="xsd:ID" use="required"/>
</xsd:complexType>
</xsd:element>
<xsd:element name="refresh-timeout" type="xsd:int"/>
<xsd:element name="initial-wait-timeout" type="xsd:int"/>
<xsd:element name="discovery-group">
<xsd:complexType>
<xsd:sequence>
<xsd:element maxOccurs="1" minOccurs="0" ref="local-bind-address">
</xsd:element>
<xsd:element maxOccurs="1" minOccurs="1" ref="group-address">
</xsd:element>
<xsd:element maxOccurs="1" minOccurs="1" ref="group-port">
</xsd:element>
<xsd:element maxOccurs="1" minOccurs="0" ref="refresh-timeout">
</xsd:element>
<xsd:element maxOccurs="1" minOccurs="0" ref="initial-wait-timeout">
</xsd:element>
</xsd:sequence>
<xsd:attribute name="name" type="xsd:ID" use="required"/>
</xsd:complexType>
</xsd:element>
<xsd:element name="discovery-group-ref">
<xsd:complexType>
<xsd:attribute name="discovery-group-name" type="xsd:IDREF">
</xsd:attribute>
</xsd:complexType>
</xsd:element>
<xsd:element name="remoting-interceptors">
<xsd:complexType>
<xsd:sequence>
<xsd:element maxOccurs="unbounded" minOccurs="1" name="class-name" type="xsd:string">
</xsd:element>
</xsd:sequence>
</xsd:complexType>
</xsd:element>
<xsd:complexType name="paramType">
<xsd:attribute name="key" type="xsd:string" use="required"/>
<xsd:attribute name="value" type="xsd:string" use="required"/>
</xsd:complexType>
<xsd:complexType name="connectorType">
<xsd:sequence>
<xsd:element maxOccurs="1" minOccurs="1" name="factory-class" type="xsd:string">
</xsd:element>
<xsd:element maxOccurs="unbounded" minOccurs="0" name="param" type="paramType">
</xsd:element>
</xsd:sequence>
<xsd:attribute name="name" type="xsd:ID" use="required"/>
</xsd:complexType>
<xsd:complexType name="acceptorType">
<xsd:sequence>
<xsd:element maxOccurs="1" minOccurs="1" name="factory-class" type="xsd:string">
</xsd:element>
<xsd:element maxOccurs="unbounded" minOccurs="0" name="param" type="paramType">
</xsd:element>
</xsd:sequence>
<xsd:attribute name="name" type="xsd:string" use="optional"/>
</xsd:complexType>
<xsd:complexType name="bridgeType">
<xsd:sequence>
<xsd:element maxOccurs="1" minOccurs="1" name="queue-name" type="xsd:IDREF">
</xsd:element>
<xsd:element maxOccurs="1" minOccurs="0" name="forwarding-address" type="xsd:string">
</xsd:element>
<xsd:element maxOccurs="1" minOccurs="0" name="ha" type="xsd:boolean">
</xsd:element>
<xsd:element maxOccurs="1" minOccurs="0" name="filter">
<xsd:complexType>
<xsd:attribute name="string" type="xsd:string" use="required"/>
</xsd:complexType>
</xsd:element>
<xsd:element maxOccurs="1" minOccurs="0" name="transformer-class-name" type="xsd:string">
</xsd:element>
<xsd:element maxOccurs="1" minOccurs="0" name="retry-interval" type="xsd:long">
</xsd:element>
<xsd:element maxOccurs="1" minOccurs="0" name="retry-interval-multiplier" type="xsd:double">
</xsd:element>
<xsd:element maxOccurs="1" minOccurs="0" name="reconnect-attempts" type="xsd:int">
</xsd:element>
<xsd:element maxOccurs="1" minOccurs="0" name="failover-on-server-shutdown" type="xsd:boolean">
</xsd:element>
<xsd:element maxOccurs="1" minOccurs="0" name="use-duplicate-detection" type="xsd:boolean">
</xsd:element>
<xsd:element maxOccurs="1" minOccurs="0" name="confirmation-window-size" type="xsd:int">
</xsd:element>
<xsd:element maxOccurs="1" minOccurs="0" name="user" type="xsd:string">
</xsd:element>
<xsd:element maxOccurs="1" minOccurs="0" name="password" type="xsd:string">
</xsd:element>
<xsd:choice>
<xsd:element maxOccurs="1" minOccurs="1" name="static-connectors">
<xsd:complexType>
<xsd:sequence>
<xsd:element maxOccurs="unbounded" minOccurs="1" name="connector-ref" type="xsd:string"/>
</xsd:sequence>
</xsd:complexType>
</xsd:element>
<xsd:element maxOccurs="1" minOccurs="1" name="discovery-group-ref">
<xsd:complexType>
<xsd:attribute name="discovery-group-name" type="xsd:IDREF" use="required">
</xsd:attribute>
</xsd:complexType>
</xsd:element>
</xsd:choice>
</xsd:sequence>
<xsd:attribute name="name" type="xsd:string" use="required"/>
</xsd:complexType>
<xsd:complexType name="clusterConnectionType">
<xsd:sequence>
<xsd:element maxOccurs="1" minOccurs="1" name="address" type="xsd:string">
</xsd:element>
<xsd:element maxOccurs="1" minOccurs="1" name="connector-ref" type="xsd:string">
</xsd:element>
<xsd:element maxOccurs="1" minOccurs="0" name="retry-interval" type="xsd:long">
</xsd:element>
<xsd:element maxOccurs="1" minOccurs="0" name="use-duplicate-detection" type="xsd:boolean">
</xsd:element>
<xsd:element maxOccurs="1" minOccurs="0" name="forward-when-no-consumers" type="xsd:boolean">
</xsd:element>
<xsd:element maxOccurs="1" minOccurs="0" name="max-hops" type="xsd:int">
</xsd:element>
<xsd:element maxOccurs="1" minOccurs="0" name="confirmation-window-size" type="xsd:int">
</xsd:element>
<xsd:choice>
<xsd:element maxOccurs="1" minOccurs="0" name="static-connectors">
<xsd:complexType>
<xsd:sequence>
<xsd:element maxOccurs="unbounded" minOccurs="0" name="connector-ref" type="xsd:string"/>
</xsd:sequence>
<xsd:attribute name="allow-direct-connections-only" type="xsd:boolean" use="optional"/>
</xsd:complexType>
</xsd:element>
<xsd:element maxOccurs="1" minOccurs="0" name="discovery-group-ref">
<xsd:complexType>
<xsd:attribute name="discovery-group-name" type="xsd:IDREF" use="required">
</xsd:attribute>
</xsd:complexType>
</xsd:element>
</xsd:choice>
</xsd:sequence>
<xsd:attribute name="name" type="xsd:string" use="required"/>
</xsd:complexType>
<xsd:complexType name="divertType">
<xsd:sequence>
<xsd:element maxOccurs="1" minOccurs="0" name="routing-name" type="xsd:string">
</xsd:element>
<xsd:element maxOccurs="1" minOccurs="1" name="address" type="xsd:string">
</xsd:element>
<xsd:element maxOccurs="1" minOccurs="1" name="forwarding-address" type="xsd:string">
</xsd:element>
<xsd:element maxOccurs="1" minOccurs="0" name="filter">
<xsd:complexType>
<xsd:attribute name="string" type="xsd:string" use="required"/>
</xsd:complexType>
</xsd:element>
<xsd:element maxOccurs="1" minOccurs="0" name="transformer-class-name" type="xsd:string">
</xsd:element>
<xsd:element maxOccurs="1" minOccurs="0" name="exclusive" type="xsd:boolean">
</xsd:element>
</xsd:sequence>
<xsd:attribute name="name" type="xsd:string" use="required"/>
</xsd:complexType>
<xsd:simpleType name="journalType">
<xsd:restriction base="xsd:string">
<xsd:enumeration value="ASYNCIO"/>
<xsd:enumeration value="NIO"/>
</xsd:restriction>
</xsd:simpleType>
<xsd:complexType name="groupingHandlerType">
<xsd:sequence>
<xsd:element maxOccurs="1" minOccurs="1" name="type" type="groupingHandlerTypeType"/>
<xsd:element maxOccurs="1" minOccurs="1" name="address" type="xsd:string"/>
<xsd:element maxOccurs="1" minOccurs="0" name="timeout" type="xsd:int"/>
</xsd:sequence>
<xsd:attribute name="name" type="xsd:string" use="required"/>
</xsd:complexType>
<xsd:simpleType name="groupingHandlerTypeType">
<xsd:restriction base="xsd:string">
<xsd:enumeration value="LOCAL"/>
<xsd:enumeration value="REMOTE"/>
</xsd:restriction>
</xsd:simpleType>
<xsd:element name="security-settings">
<xsd:complexType>
<xsd:sequence>
<xsd:element maxOccurs="unbounded" minOccurs="0" name="security-setting">
</xsd:element>
</xsd:sequence>
</xsd:complexType>
</xsd:element>
<xsd:element name="security-setting">
<xsd:complexType>
<xsd:sequence>
<xsd:element maxOccurs="unbounded" minOccurs="0" name="permission">
<xsd:complexType>
<xsd:attribute name="type" type="xsd:string" use="required"/>
<xsd:attribute name="roles" type="xsd:string" use="required"/>
</xsd:complexType>
</xsd:element>
</xsd:sequence>
<xsd:attribute name="match" type="xsd:string" use="required"/>
</xsd:complexType>
</xsd:element>
<xsd:element name="address-settings">
<xsd:complexType>
<xsd:sequence>
<xsd:element maxOccurs="unbounded" minOccurs="0" name="address-setting">
</xsd:element>
</xsd:sequence>
</xsd:complexType>
</xsd:element>
<xsd:element name="address-setting">
<xsd:complexType>
<xsd:all>
<xsd:element maxOccurs="1" minOccurs="0" name="dead-letter-address" type="xsd:string">
</xsd:element>
<xsd:element maxOccurs="1" minOccurs="0" name="expiry-address" type="xsd:string">
</xsd:element>
<xsd:element maxOccurs="1" minOccurs="0" name="redelivery-delay" type="xsd:long">
</xsd:element>
<xsd:element maxOccurs="1" minOccurs="0" name="max-delivery-attempts" type="xsd:int">
</xsd:element>
<xsd:element maxOccurs="1" minOccurs="0" name="max-size-bytes" type="xsd:long">
</xsd:element>
<xsd:element maxOccurs="1" minOccurs="0" name="page-size-bytes" type="xsd:long">
</xsd:element>
<xsd:element maxOccurs="1" minOccurs="0" name="page-max-cache-size" type="xsd:int">
</xsd:element>
<xsd:element maxOccurs="1" minOccurs="0" name="address-full-policy" type="addressFullMessagePolicyType">
</xsd:element>
<xsd:element maxOccurs="1" minOccurs="0" name="message-counter-history-day-limit" type="xsd:int">
</xsd:element>
<xsd:element maxOccurs="1" minOccurs="0" name="last-value-queue" type="xsd:boolean">
</xsd:element>
<xsd:element maxOccurs="1" minOccurs="0" name="redistribution-delay" type="xsd:long">
</xsd:element>
<xsd:element maxOccurs="1" minOccurs="0" name="send-to-dla-on-no-route" type="xsd:boolean">
</xsd:element>
</xsd:all>
<xsd:attribute name="match" type="xsd:string" use="required"/>
</xsd:complexType>
</xsd:element>
<xsd:element name="queues">
<xsd:complexType>
<xsd:sequence>
<xsd:element maxOccurs="unbounded" minOccurs="0" name="queue">
</xsd:element>
</xsd:sequence>
</xsd:complexType>
</xsd:element>
<xsd:element name="queue">
<xsd:complexType>
<xsd:all>
<xsd:element maxOccurs="1" minOccurs="1" name="address" type="xsd:string">
</xsd:element>
<xsd:element maxOccurs="1" minOccurs="0" name="filter">
<xsd:complexType>
<xsd:attribute name="string" type="xsd:string" use="required"/>
</xsd:complexType>
</xsd:element>
<xsd:element maxOccurs="1" minOccurs="0" name="durable" type="xsd:boolean">
</xsd:element>
</xsd:all>
<xsd:attribute name="name" type="xsd:ID" use="required"/>
</xsd:complexType>
</xsd:element>
<xsd:complexType name="live-connectorType">
<xsd:attribute name="connector-name" type="xsd:IDREF" use="required">
</xsd:attribute>
</xsd:complexType>
<xsd:simpleType name="addressFullMessagePolicyType">
<xsd:restriction base="xsd:string">
<xsd:enumeration value="DROP"/>
<xsd:enumeration value="PAGE"/>
<xsd:enumeration value="BLOCK"/>
</xsd:restriction>
</xsd:simpleType>
<xsd:complexType name="connectorServiceType">
<xsd:sequence>
<xsd:element maxOccurs="1" minOccurs="1" name="factory-class" type="xsd:string">
</xsd:element>
<xsd:element maxOccurs="unbounded" minOccurs="0" name="param" type="paramType">
</xsd:element>
</xsd:sequence>
<xsd:attribute name="name" type="xsd:string" use="optional"/>
</xsd:complexType>
</xsd:schema>
A.1.3. An Example hornetq-configuration.xml
<configuration xmlns="urn:hornetq"
            xmlns:xsi="http://www.w3.org/2001/XMLSchema-instance"
            xsi:schemaLocation="urn:hornetq ../../../../src/schemas/hornetq-configuration.xsd ">

   <security-settings>
      <security-setting match="jms.queue.testQueue">
         <permission type="consume" roles="guest,publisher"/>
         <permission type="send" roles="guest,publisher"/>
      </security-setting>
   </security-settings>

   <address-settings>
      <!--default for catch all-->
      <address-setting match="#">
         <dead-letter-address>jms.queue.DLQ</dead-letter-address>
         <expiry-address>jms.queue.ExpiryQueue</expiry-address>
         <redelivery-delay>0</redelivery-delay>
         <max-size-bytes>-1</max-size-bytes>
         <page-size-bytes>10485760</page-size-bytes>
         <message-counter-history-day-limit>10</message-counter-history-day-limit>
      </address-setting>
   </address-settings>

</configuration>
A.1.4. hornetq-jms.xml
JBOSS_DIST/jboss-as/server/<PROFILE>/deploy/hornetq/hornetq-jms.xml.
Table A.2. JMS Server Configuration
| Element Name | Type | Description | Default |
|---|---|---|---|
| connection-factory | A list of connection factories to create and add to JNDI. | ||
| connection-factory.auto-group | Boolean | Whether or not message grouping is automatically used. | false |
| connection-factory.connectors | String | A list of connectors used by the connection factory. | |
| connection-factory.connectors.connector-ref.connector-name (attribute) | String | Name of the connector to connect to the live server. | |
| connection-factory.connectors.connector-ref. backup-connector-name (attribute) | String | Name of the connector to connect to the backup server. | |
| connection-factory.discovery-group-ref.discovery-group-name (attribute) | String | Name of discovery group used by this connection factory. | |
| connection-factory.discovery-initial-wait-timeout | Long | The initial time to wait (in ms) for discovery groups to wait for broadcasts. | 10000 |
| connection-factory.block-on-acknowledge | Boolean | Whether or not messages are acknowledged synchronously. | false |
| connection-factory.block-on-non-durable-send | Boolean | Whether or not non-durable messages are sent synchronously. | false |
| connection-factory.block-on-durable-send | Boolean | Whether or not durable messages are sent synchronously. | true |
| connection-factory.call-timeout | Long | The timeout (in ms) for remote calls. | 30000 |
| connection-factory.client-failure-check-period | Long | The period (in ms) after which the client will consider the connection failed after not receiving packets from the server. | 5000 |
| connection-factory.client-id | String | The pre-configured client ID for the connection factory. | null |
| connection-factory.connection-load-balancing-policy-class-name | String | The name of the load balancing class. The default is: org.hornetq.api.core. client.loadbalance. roundRobinConnection LoadBalancingPolicy | See description |
| connection-factory.connection-ttl | Long | the time to live (in ms) for connections | 1 * 60000 |
| connection-factory.consumer-max-rate | Integer | The fastest rate a consumer may consume messages per second. | -1 |
| connection-factory.consumer-window-size | Integer | The window size (in bytes) for consumer flow control. | 1024 * 1024 |
| connection-factory.dups-ok-batch-size | Integer | The batch size (in bytes) between acknowledgments when using DUPS_OK_ACKNOWLEDGE mode. | 1024 * 1024 |
| connection-factory.fail-over-on-initial-connection | Boolean | Whether or not to fail-over to backup on event that initial connection to live server fails. | false |
| connection-factory.fail-over-on-server-shutdown | Boolean | Whether or not to fail-over on server shutdown. | false |
| connection-factory.min-large-message-size | Integer | The size (in bytes) before a message is treated as large. | 100 * 1024 |
| connection-factory.cache-large-message-client | Boolean | If true clients using this connection factory will hold the large message body on temporary files. | false |
| connection-factory.pre-acknowledge | Boolean | Whether messages are pre acknowledged by the server before sending. | false |
| connection-factory.producer-max-rate | Integer | The maximum rate of messages per second that can be sent. | -1 |
| connection-factory.producer-window-size | Integer | The window size in bytes for producers sending messages. | 1024 * 1024 |
| connection-factory.confirmation-window-size | Integer | The window size (in bytes) for reattachment confirmations. | 1024 * 1024 |
| connection-factory.reconnect-attempts | Integer | Maximum number of retry attempts, -1 signifies infinite. | 0 |
| connection-factory.retry-interval | Long | The time (in ms) to retry a connection after failing. | 2000 |
| connection-factory.retry-interval-multiplier | Double | Multiplier to apply to successive retry intervals. | 1.0 |
| connection-factory.max-retry-interval | Integer | The maximum retry interval in the case a retry-interval-multiplier has been specified. | 2000 |
| connection-factory.scheduled-thread-pool-max-size | Integer | The size of the scheduled thread pool. | 5 |
| connection-factory.thread-pool-max-size | Integer | The size of the thread pool. | -1 |
| connection-factory.transaction-batch-size | Integer | The batch size (in bytes) between acknowledgments when using a transactional session. | 1024 * 1024 |
| connection-factory.use-global-pools | Boolean | Whether or not to use a global thread pool for threads. | true |
| queue | Queue | A queue to create and add to JNDI. | |
| queue.name (attribute) | String | Unique name of the queue. | |
| queue.entry | String | Context where the queue will be bound in JNDI (there can be many). | |
| queue.durable | Boolean | Is the queue durable? | true |
| queue.filter | String | Optional filter expression for the queue. | |
| topic | Topic | A topic to create and add to JNDI. | |
| topic.name (attribute) | String | Unique name of the topic. | |
| topic.entry | String | Context where the topic will be bound in JNDI (there can be many). |
Appendix B. ra.xml HornetQ Resource Adapter File
<?xml version="1.0" encoding="UTF-8"?>

<!-- $Id: ra.xml 76819 2008-08-08 11:04:20Z jesper.pedersen $ -->

<connector xmlns="http://java.sun.com/xml/ns/j2ee"
           xmlns:xsi="http://www.w3.org/2001/XMLSchema-instance"
           xsi:schemaLocation="http://java.sun.com/xml/ns/j2ee
           http://java.sun.com/xml/ns/j2ee/connector_1_5.xsd"
           version="1.5">

   <description>HornetQ 2.0 Resource Adapter</description>
   <display-name>HornetQ 2.0 Resource Adapter</display-name>

   <vendor-name>Red Hat Middleware LLC</vendor-name>
   <eis-type>JMS 1.1 Server</eis-type>
   <resourceadapter-version>1.0</resourceadapter-version>

   <license>
      <description>
Copyright 2009 Red Hat, Inc.
 Red Hat licenses this file to you under the Apache License, version
 2.0 (the "License"); you may not use this file except in compliance
 with the License.  You may obtain a copy of the License at
   http://www.apache.org/licenses/LICENSE-2.0
 Unless required by applicable law or agreed to in writing, software
 distributed under the License is distributed on an "AS IS" BASIS,
 WITHOUT WARRANTIES OR CONDITIONS OF ANY KIND, either express or
 implied.  See the License for the specific language governing
 permissions and limitations under the License.
      </description>
      <license-required>true</license-required>
   </license>

   <resourceadapter>
      <resourceadapter-class>org.hornetq.ra.HornetQResourceAdapter</resourceadapter-class>
      <config-property>
         <description>
            The transport type. Multiple connectors can be configured by using a comma separated list,
            i.e. org.hornetq.core.remoting.impl.invm.InVMConnectorFactory,org.hornetq.core.remoting.impl.invm.InVMConnectorFactory.
         </description>
         <config-property-name>ConnectorClassName</config-property-name>
         <config-property-type>java.lang.String</config-property-type>
         <config-property-value>org.hornetq.core.remoting.impl.invm.InVMConnectorFactory</config-property-value>
      </config-property>
      <config-property>
         <description>The transport configuration. These values must be in the form of key=val;key=val;,
            if multiple connectors are used then each set must be separated by a comma i.e. host=host1;port=5445,host=host2;port=5446.
            Each set of params maps to the connector classname specified.
         </description>
         <config-property-name>ConnectionParameters</config-property-name>
         <config-property-type>java.lang.String</config-property-type>
         <config-property-value>server-id=0</config-property-value>
      </config-property>
      <!--
      <config-property>
        <description>Does we support HA</description>
        <config-property-name>HA</config-property-name>
        <config-property-type>java.lang.Boolean</config-property-type>
        <config-property-value>false</config-property-value>
      </config-property>
      <config-property>
        <description>The method to use for locating the transactionmanager</description>
        <config-property-name>TransactionManagerLocatorMethod</config-property-name>
        <config-property-type>java.lang.String</config-property-type>
        <config-property-value>getTm</config-property-value>
      </config-property>
      <config-property>
        <description>Use A local Transaction instead of XA?</description>
        <config-property-name>UseLocalTx</config-property-name>
        <config-property-type>java.lang.Boolean</config-property-type>
        <config-property-value>false</config-property-value>
      </config-property>
      <config-property>
        <description>The user name used to login to the JMS server</description>
        <config-property-name>UserName</config-property-name>
        <config-property-type>java.lang.String</config-property-type>
        <config-property-value></config-property-value>
      </config-property>
      <config-property>
        <description>The password used to login to the JMS server</description>
        <config-property-name>Password</config-property-name>
        <config-property-type>java.lang.String</config-property-type>
        <config-property-value></config-property-value>
      </config-property>
      <config-property>
        <description>The jndi params to use to look up the jms resources if local jndi is not to be used</description>
        <config-property-name>JndiParams</config-property-name>
        <config-property-type>java.lang.String</config-property-type>
        <config-property-value>java.naming.factory.initial=org.jnp.interfaces.NamingContextFactory;java.naming.provider.url=jnp://localhost:1199;java.naming.factory.url.pkgs=org.jboss.naming:org.jnp.interfaces</config-property-value>
      </config-property>
      <config-property>
        <description>The discovery group address</description>
        <config-property-name>DiscoveryAddress</config-property-name>
        <config-property-type>java.lang.String</config-property-type>
        <config-property-value></config-property-value>
      </config-property>
      <config-property>
        <description>The discovery group port</description>
        <config-property-name>DiscoveryPort</config-property-name>
        <config-property-type>java.lang.Integer</config-property-type>
        <config-property-value></config-property-value>
      </config-property>
      <config-property>
        <description>The discovery refresh timeout</description>
        <config-property-name>DiscoveryRefreshTimeout</config-property-name>
        <config-property-type>java.lang.Long</config-property-type>
        <config-property-value></config-property-value>
      </config-property>
      <config-property>
        <description>The discovery initial wait timeout</description>
        <config-property-name>DiscoveryInitialWaitTimeout</config-property-name>
        <config-property-type>java.lang.Long</config-property-type>
        <config-property-value></config-property-value>
      </config-property>
      <config-property>
        <description>The load balancing policy class name</description>
        <config-property-name>LoadBalancingPolicyClassName</config-property-name>
        <config-property-type>java.lang.String</config-property-type>
        <config-property-value></config-property-value>
      </config-property>
      <config-property>
        <description>The client failure check period</description>
        <config-property-name>ClientFailureCheckPeriod</config-property-name>
        <config-property-type>java.lang.Long</config-property-type>
        <config-property-value></config-property-value>
      </config-property>
      <config-property>
        <description>The connection TTL</description>
        <config-property-name>ConnectionTTL</config-property-name>
        <config-property-type>java.lang.Long</config-property-type>
        <config-property-value></config-property-value>
      </config-property>
      <config-property>
        <description>The call timeout</description>
        <config-property-name>CallTimeout</config-property-name>
        <config-property-type>java.lang.Long</config-property-type>
        <config-property-value></config-property-value>
      </config-property>
      <config-property>
        <description>The dups ok batch size</description>
        <config-property-name>DupsOKBatchSize</config-property-name>
        <config-property-type>java.lang.Integer</config-property-type>
        <config-property-value></config-property-value>
      </config-property>
      <config-property>
        <description>The transaction batch size</description>
        <config-property-name>TransactionBatchSize</config-property-name>
        <config-property-type>java.lang.Integer</config-property-type>
        <config-property-value></config-property-value>
      </config-property>
      <config-property>
        <description>The consumer window size</description>
        <config-property-name>ConsumerWindowSize</config-property-name>
        <config-property-type>java.lang.Integer</config-property-type>
        <config-property-value></config-property-value>
      </config-property>
      <config-property>
        <description>The consumer max rate</description>
        <config-property-name>ConsumerMaxRate</config-property-name>
        <config-property-type>java.lang.Integer</config-property-type>
        <config-property-value></config-property-value>
      </config-property>
      <config-property>
        <description>The confirmation window size</description>
        <config-property-name>ConfirmationWindowSize</config-property-name>
        <config-property-type>java.lang.Integer</config-property-type>
        <config-property-value></config-property-value>
      </config-property>
      <config-property>
        <description>The producer max rate</description>
        <config-property-name>ProducerMaxRate</config-property-name>
        <config-property-type>java.lang.Integer</config-property-type>
        <config-property-value></config-property-value>
      </config-property>
      <config-property>
        <description>The min large message size</description>
        <config-property-name>MinLargeMessageSize</config-property-name>
        <config-property-type>java.lang.Integer</config-property-type>
        <config-property-value></config-property-value>
      </config-property>
      <config-property>
        <description>The block on acknowledge</description>
        <config-property-name>BlockOnAcknowledge</config-property-name>
        <config-property-type>java.lang.Boolean</config-property-type>
        <config-property-value></config-property-value>
      </config-property>
      <config-property>
        <description>The block on non durable send</description>
        <config-property-name>BlockOnNonDurableSend</config-property-name>
        <config-property-type>java.lang.Boolean</config-property-type>
        <config-property-value></config-property-value>
      </config-property>
      <config-property>
        <description>The block on durable send</description>
        <config-property-name>BlockOnDurableSend</config-property-name>
        <config-property-type>java.lang.Boolean</config-property-type>
        <config-property-value></config-property-value>
      </config-property>
      <config-property>
        <description>The auto group</description>
        <config-property-name>AutoGroup</config-property-name>
        <config-property-type>java.lang.Boolean</config-property-type>
        <config-property-value></config-property-value>
      </config-property>
      <config-property>
        <description>The max connections</description>
        <config-property-type>java.lang.Integer</config-property-type>
        <config-property-value></config-property-value>
      </config-property>
      <config-property>
        <description>The pre acknowledge</description>
        <config-property-name>PreAcknowledge</config-property-name>
        <config-property-type>java.lang.Boolean</config-property-type>
        <config-property-value></config-property-value>
      </config-property>
      <config-property>
        <description>The retry interval</description>
        <config-property-name>RetryInterval</config-property-name>
        <config-property-type>java.lang.Long</config-property-type>
        <config-property-value></config-property-value>
      </config-property>
      <config-property>
        <description>The retry interval multiplier</description>
        <config-property-name>RetryIntervalMultiplier</config-property-name>
        <config-property-type>java.lang.Double</config-property-type>
        <config-property-value></config-property-value>
      </config-property>
      <config-property>
        <description>The client id</description>
        <config-property-name>ClientID</config-property-name>
        <config-property-type>java.lang.String</config-property-type>
        <config-property-value></config-property-value>
      </config-property>-->

      <outbound-resourceadapter>
         <connection-definition>
            <managedconnectionfactory-class>org.hornetq.ra.HornetQRAManagedConnectionFactory</managedconnectionfactory-class>

            <config-property>
               <description>The default session type</description>
               <config-property-name>SessionDefaultType</config-property-name>
               <config-property-type>java.lang.String</config-property-type>
               <config-property-value>javax.jms.Queue</config-property-value>
            </config-property>
            <config-property>
               <description>Try to obtain a lock within specified number of seconds; less than or equal to 0 disable this functionality</description>
               <config-property-name>UseTryLock</config-property-name>
               <config-property-type>java.lang.Integer</config-property-type>
               <config-property-value>0</config-property-value>
            </config-property>

            <connectionfactory-interface>org.hornetq.ra.HornetQRAConnectionFactory</connectionfactory-interface>
            <connectionfactory-impl-class>org.hornetq.ra.HornetQRAConnectionFactoryImpl</connectionfactory-impl-class>
            <connection-interface>javax.jms.Session</connection-interface>
            <connection-impl-class>org.hornetq.ra.HornetQRASession</connection-impl-class>
         </connection-definition>
         <transaction-support>XATransaction</transaction-support>
         <authentication-mechanism>
            <authentication-mechanism-type>BasicPassword</authentication-mechanism-type>
            <credential-interface>javax.resource.spi.security.PasswordCredential</credential-interface>
         </authentication-mechanism>
         <reauthentication-support>false</reauthentication-support>
      </outbound-resourceadapter>

      <inbound-resourceadapter>
         <messageadapter>
            <messagelistener>
               <messagelistener-type>javax.jms.MessageListener</messagelistener-type>
               <activationspec>
                  <activationspec-class>org.hornetq.ra.inflow.HornetQActivationSpec</activationspec-class>
                  <required-config-property>
                      <config-property-name>destination</config-property-name>
                  </required-config-property>
               </activationspec>
            </messagelistener>
         </messageadapter>
      </inbound-resourceadapter>

   </resourceadapter>
</connector>


		<resourceadapter>
  <resourceadapter-class>
    org.hornetq.ra.HornetQResourceAdapter
  </resourceadapter-class>
  <config-property>
     <description>The transport type</description>
     <config-property-name>ConnectorClassName</config-property-name>
     <config-property-type>java.lang.String</config-property-type>
     <config-property-value>
       org.hornetq.core.remoting.impl.invm.InVMConnectorFactory
     </config-property-value>
  </config-property>
  <config-property>
     <description>
       The transport configuration. These values must be in the form of key=val;key=val;
     </description>
     <config-property-name>ConnectionParameters</config-property-name>
     <config-property-type>java.lang.String</config-property-type>
     <config-property-value>server-id=0</config-property-value>
  </config-property>

  <outbound-resourceadapter>
     <connection-definition>
        <managedconnectionfactory-class>org.hornetq.ra.HornetQRAManagedConnection
        Factory</managedconnectionfactory-class>

        <config-property>
           <description>The default session type</description>
           <config-property-name>SessionDefaultType</config-property-name>
           <config-property-type>java.lang.String</config-property-type>
           <config-property-value>javax.jms.Queue</config-property-value>
        </config-property>
        <config-property>
           <description>Try to obtain a lock within specified number of seconds; less
           than or equal to 0 disable this functionality</description>
           <config-property-name>UseTryLock</config-property-name>
           <config-property-type>java.lang.Integer</config-property-type>
           <config-property-value>0</config-property-value>
        </config-property>

        <connectionfactory-interface>org.hornetq.ra.HornetQRAConnectionFactory
        </connectionfactory-interface>
        <connectionfactory-impl-class>
		org.hornetq.ra.HornetQConnectionFactoryImplonFactoryImpl
        </connectionfactory-impl-class>
        <connection-interface>javax.jms.Session</connection-interface>
        <connection-impl-class>org.hornetq.ra.HornetQRASession
        </connection-impl-class>
     </connection-definition>
     <transaction-support>XATransaction</transaction-support>
     <authentication-mechanism>
        <authentication-mechanism-type>BasicPassword
        </authentication-mechanism-type>
        <credential-interface>javax.resource.spi.security.PasswordCredential
        </credential-interface>
     </authentication-mechanism>
     <reauthentication-support>false</reauthentication-support>
  </outbound-resourceadapter>

  <inbound-resourceadapter>
     <messageadapter>
        <messagelistener>
           <messagelistener-type>javax.jms.MessageListener</messagelistener-type>
           <activationspec>
              <activationspec-class>org.hornetq.ra.inflow.HornetQActivationSpec
              </activationspec-class>
              <required-config-property>
                  <config-property-name>destination</config-property-name>
              </required-config-property>
           </activationspec>
        </messagelistener>
     </messageadapter>
  </inbound-resourceadapter>

  </resourceadapter>
Appendix C. Revision History
| Revision History | |||
|---|---|---|---|
| Revision 5.2.0-100.400 | 2013-10-30 | ||
| |||
| Revision 5.2.0-100 | Wed 23 Jan 2013 | ||
| |||
| Revision 5.1.2-109 | Wed 18 Jul 2012 | ||
| |||
| Revision 5.1.2-100 | Thu 8 Dec 2011 | ||
| |||